David Holman
-
Posts
4,359 -
Joined
-
Last visited
-
Days Won
117
Content Type
Profiles
Forums
Events
Gallery
Blogs
Community Map
Everything posted by David Holman
-
Arigna Town - this week's scenery
David Holman replied to David Holman's topic in Irish Model Layouts
Not 'over the water' any time soon, I'm afraid. Cultural last November was my only excursion that way thus far. A four day trip for a one day show! Would not have missed it for the world, but with a 300 mile drive just to a ferry port it is quite an undertaking... Coming up at Farnham in October, Brighton in November, Lincoln in February and Derby in May. Guildex (Telford) in September, plus Warley next year are other trips north. -
Arigna Town - this week's scenery
David Holman replied to David Holman's topic in Irish Model Layouts
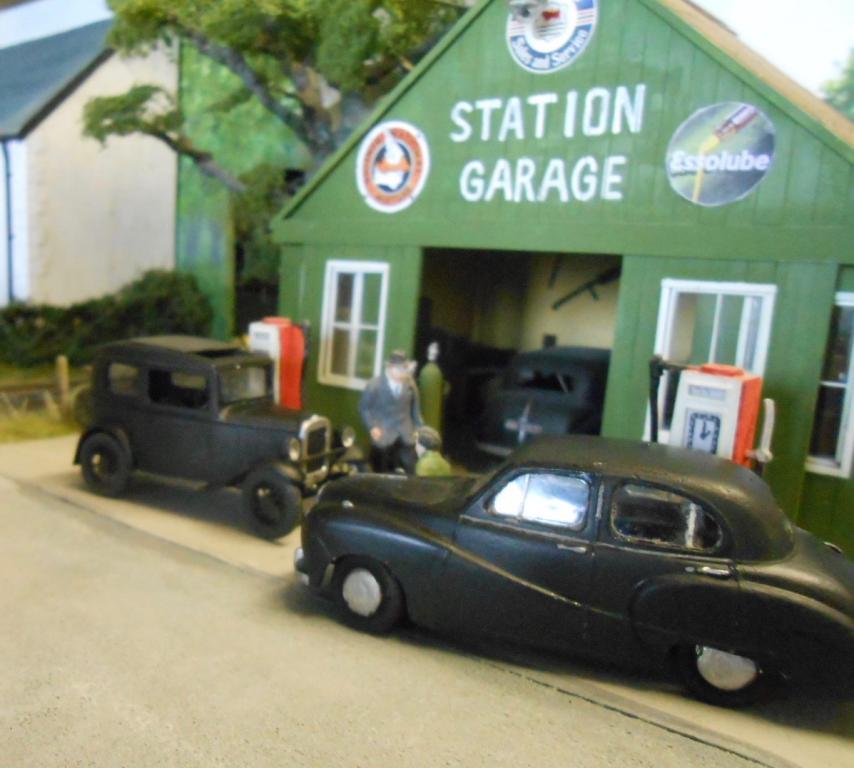
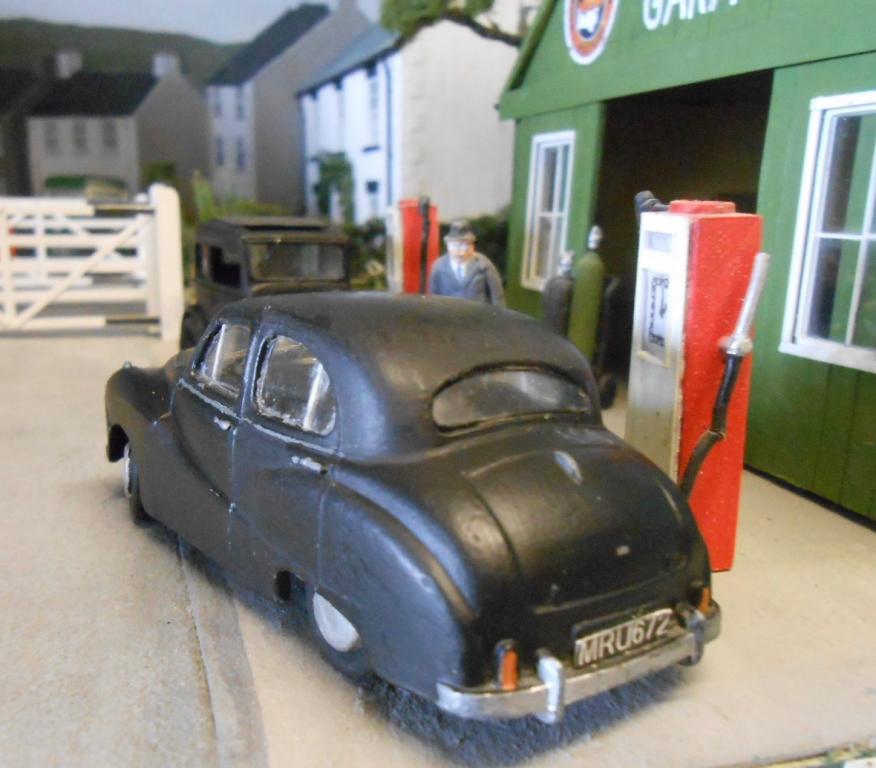
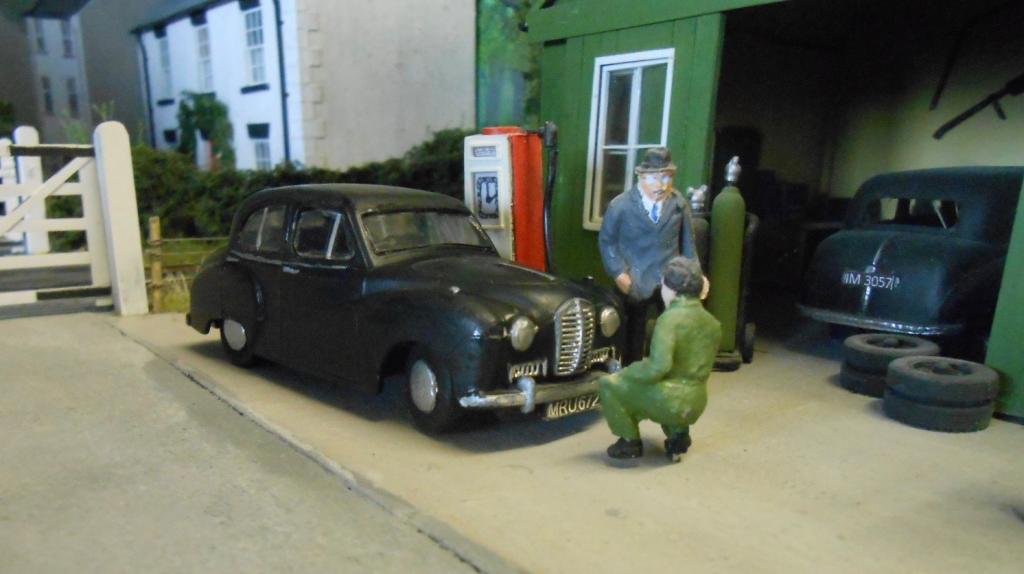
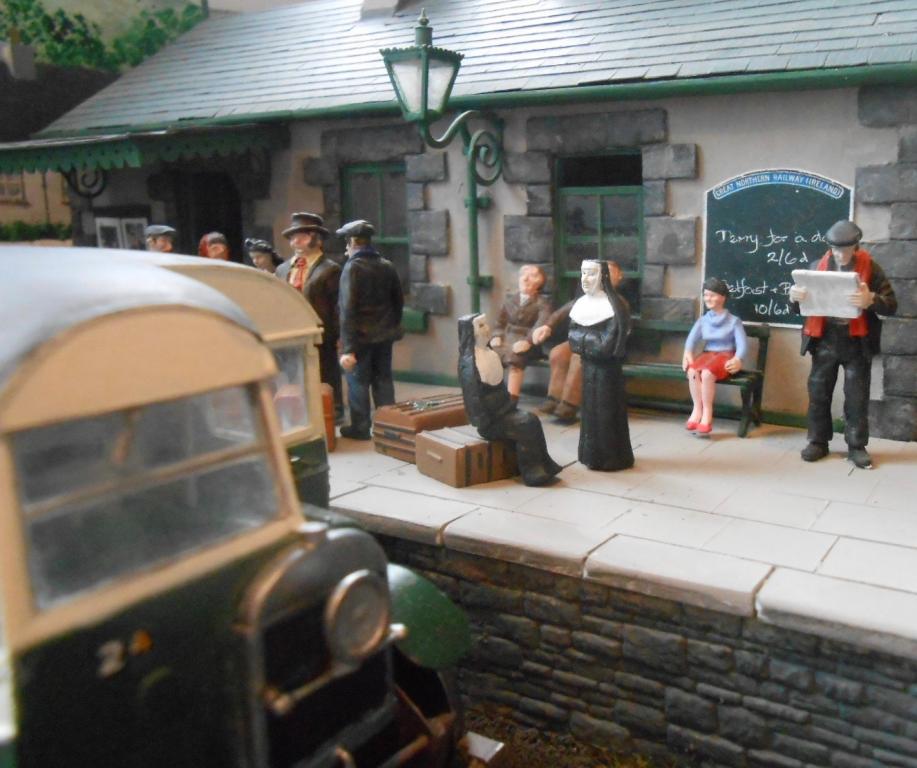
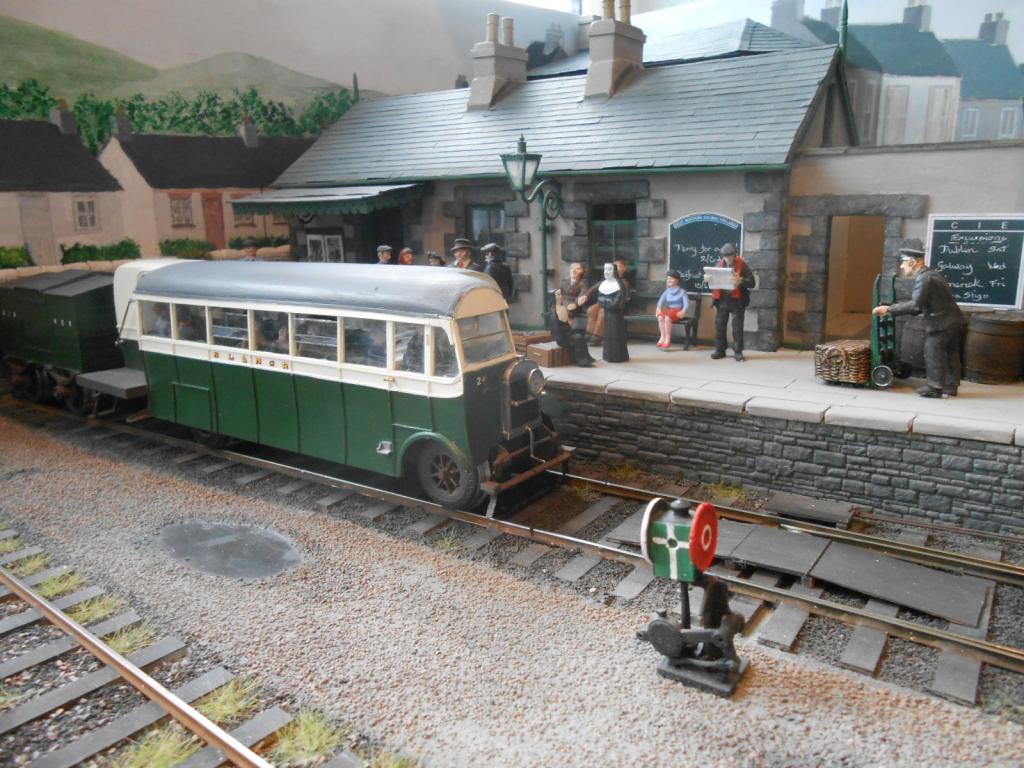
An aspect missing from the layout thus far has been the presence of members of the religious community & it is a little surprising to find that 7mm scale nuns and priests are hard to come by. However, at the Woking show a couple of weeks ago, was delighted to find a pair of nuns from the Master Piece stand. Cast white metal, they are a tad small, with the standing figure barely 5' tall. However, am guessing nuns in the 1950s were not prone to wearing high heels - apart from ne'er do wells at fancy dress parties perhaps??? Anyway, a quick Google on nun's habits in the 1950s [& ignoring the direction certain threads wanted to take me], gave all the info required for painting - essentially black, white & [pale] skin tone. The ladies join what is now quite a throng on the platform, though unlike the other figures, they will not be glued in place, so expect to see them also turn up at Fintonagh some time. Still looking for a priest though. Also not fixed down are my road vehicles & repeated removal for transport meant that, by the end of the Woking show, all were in need of repair - mainly replacing wheels that had come off. Quickly done, but the Austin A35/Somerset has been missing for a while because I made a mess of touching up paintwork. Matt black brush painted on does not sit well with the same colour from an automotive spray can. However, eventually got round to remedying things by the old trick of using T-Cut. Applied with a cotton bud and subsequently polished off with a soft cloth, it does a really good job on paintwork. Unfortunately, like the nuns, the A35 is too small, being an old Dinky model. These were probably either 1:48 or 1:50. Not especially noticeable on their own, the A35 does not pass muster against my Vanguard Models A35 van, which IS to 1:43 scale. Corgi Classic buses pose the same problem, but don't get me started on that one! Real officianados of railway photographers will note that the A35's number plate is none than that of Dr Ian Allen, better known for his photos in East Anglia. Not sure he ever went to Ireland, but these photos may prove otherwise & isn't that H.C. Casserley's Austin 7 in the background? Now he certainly DID visit & on more than one occasion...
-
Called 'The demise of the railways of NW Ireland', it is a welcome return to print from ace historian Neil Sprinks (forever my hero for his work on the SLNCR). Six pages, liberally sprinkled with photos. Also, for me anyway, interesting articles on excursions to Skegness and train performances on the Far North line to Wick and Thurso.
-
Don't know if this has featured elsewhere, but current Railway Modeller has a rather nice picture of the forthcoming J15 on p896 Rather nice price too, at £295, but this looks a high quality model. Shame it will be 16.5mm gauge, or I could be (very) tempted... By the by, two new locos from Hattons also look interesting - an SECR P class and. Barclay 0-4-0T. Info about the new Peco points too.
-
Oh my... Oozes class, very well done.
-
At the risk of muddying the waters even further Tony, have you got as far as thinking about couplings? A prime issue with them is track radius, for if 3 links are used, then buffer locking with be a real issue on radii below 36". Likewise for Jackson's and probably a range of others. In 7mm scale, Dinghams are pretty reliable, but being 'handed' are not so good if a turntable is involved. Believe they are ok in 4mm too. Any auto coupling involves compromise of course, not least because, apart from Kaydees, they don't look prototypical. Whatever you use though, be sure to factor them into your track plans, especially where uncoupling magnets might be sited, or where tight curves could affect reliability of running.
-
First outing planned to be Uckfield next year, Paul. Need to be careful after that as Arigna is currently averaging 9-10 shows a year so not much space for a second layout in the calendar...
-
Almost certainly, is the answer to that. Track was often recycled/downgraded from mainlines to sidings. Ballast was often different too, with ash more common on sidings and granite on mainlines, though minor lines often used ash ballast throughout. Re Peco track, it has always been 'universal', with sleeper spacings more suited to continental practice and HO scale, while with code 100 rail, it can look a bit clumpy if not carefully painted and ballasted. Modern RTR with finer wheels makes it unnecessary unless you have older stock with less fine wheels. Peco's move to producing code 75 track with correct 4mm scale sleeper spacings is certainly welcome, but remains of course narrow gauge - even for 4'8.5... For anyone contemplating doing 21mm track, C&L point kits are one way forward. The blades and crossings come ready made and the points are assembled with plastic solvent, once the chairs are slid on. Sleepers are the same length as in Britain. What will be needed is a 21mm roller gauge, but apart from that, it really isn't as difficult as might be thought. Cost is competitive too. The main problem for 21mm is axles, especially loco driving wheels, which need quartering. Until Romford can be persuaded to do an extended square ended axle, the problem will persist. Hence why I still think 7mm scale is the easiest way into 5'3. Slater's do a loco axle, C&L point kits are easily adapted, or Marcway will do custom made points at reasonable prices.
-
Splendid.
-
The Joy Of (Train) Sets -BBC FOUR shortly!
David Holman replied to fishplate7's topic in General Chat
Have it recorded. Many times better than Trainspotting Live, it really does show the hobby in a positive way. -
Has the makings of a very cosy man cave, Tony.
-
Not at all,, Eoin. As I said to Mick, it is a real bit of treasure.
-
John is right about the radii, Tony and a 10x6 shed is unlikely to work for a continuous run in 21mm gauge. However a 10x6 L would make a very nice terminus fiddle yard and leave you the other side for the work bench. In terms of operation, a terminus fiddle yard can be far more authentic than a tail chaser in some ways. It all depends on what you want. Remember, there is much to be said for starting with a fairly modest scheme which will see tangible results in a reasonable time. If you like making stuff, then I would say doing correct gauge makes it that more interesting, challenging and ultimately satisfying. Equally, just because that is what I like does not mean it is the same for everyone else. A hobby is meant to be enjoyed after all.
-
Very easy to spend a lot of money! Also, if shopping is your forte the 0 Gauge Trade Show at Reading is a great way to sort out your Christmas list. First Saturday December. By the by, Arigna Town is booked to attend at both Telford and Warley next year.
-
Couldn't agree more, Tony. However, for those more interested in operation than visual aesthetics, I also appreciate why many folk stick to 00. All depends on what the person wants from the hobby. I mainly like building stuff, so having the gauge right is important to me and is a key 'signature' element of modeling the Irish scene. Am sure others have different priorities and good luck to them, it is this diversity which mades our hobby so appealing to so many different people. What I will say is that it would be good to see more folk exploring 21mm gauge (and indeed broad gauge in other scales). Fine scale standards do not require P4/S7 wheels and track...
-
Not a million miles from my own thoughts JB and would love to build a 7mm scale C class one day. Trouble is, would also like to do the Swilly, Courtmacsherry, the Lartigue, etc, etc. Space, time... If only...
-
Was thinking along those lines, Eoin. The alternative would be to just use 3mm steel for new axles and keep the Ixion wheels, doing a bit of cosmetic work to make them more like 299s. What I need to do first is have a close look at an Ixion and decide what is best. If I do have a go, will certainly write it up.
-
A bit more research led me to the S7 website, where Dave Nicholson describes how to convert it using Slater's Manning Wardle wheels. Key bit of info though is the Ixion wheels have 3mm diameter axles, so presumably suitable steel rod could be used to get the model to broad gauge. Would be interested to know if anyone out there has had a good, though I'm not holding my breath...
-
Interesting, thanks Eoin.
-
Looking at my copy of Bylines this morning, noticed there are many similarities between this loco and the Ixion ready to run Hudswell Clarke 0-6-0T. Main differences would appear to be an internal bunker on 299, plus external sandboxes and Manning Wardke style wheels. For 36.75mm geeks like me am wondering what diameter the axles are, as this could make changing the wheels a challenge. Otherwise, for those less fussy, it could be an almost RTR Irish 7mm scale loco. Thoughts anyone?
-
Latest Railway Bylines has a photo feature of Cork Albert Quay. Nice pics, so Bantry boys should find them useful.
-
Coming on well. Am sure the interior detail is more than enough - once the roof is on, even with lighting, not much will be seen through the windows, so an impression is all that is required.
-
My Dremel packed up after two years, but I replaced it with a similar one from Wilkinsons for half the price. Have a Proxon mini-drill as well, which has limited torque but is good for light work. I also still have an even lighter, cheaper version [!], which I use for drilling fine holes [below 1mm], with a slitting disk usually in the Proxon and the 'Dremel' kept for heavy work. As use can see, I find changing chucks, colletts etc a pain...
-
Happy to oblige, JB. Will see what I can do over the next few days. However, the process does require a certain amount of investment, not least some form of static grass applicator and a wide range of fibres and scatter materials. Gordon Gravett's book: Modelling Grassland and Landscape Detailing (Wild Swan, ISBN 978 1 908763 06 8) is very much the 'bible' for such work, covering the key aspects of weeds, wild flowers, hedges, roads and pavements, mud, puddles and rivers. Very easy to follow too. It must be, because if I can...
-
Thanks Andy (and for the drawings). Had the same problem with Sir Henry on Arigna. I suppose S7 should be the way to go, but a small adjustment to the chassis makes more sense to me!