David Holman
-
Posts
4,359 -
Joined
-
Last visited
-
Days Won
117
Content Type
Profiles
Forums
Events
Gallery
Blogs
Everything posted by David Holman
-
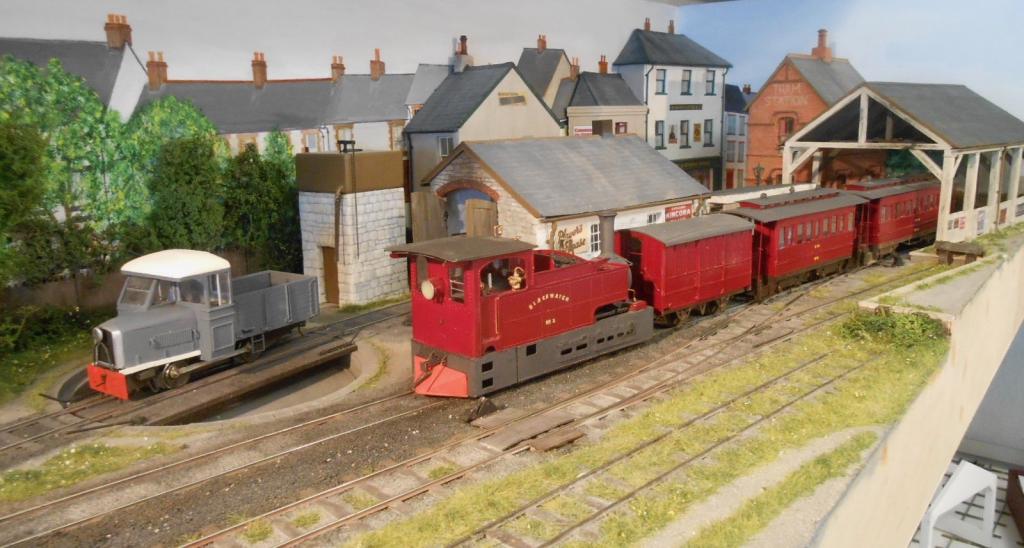
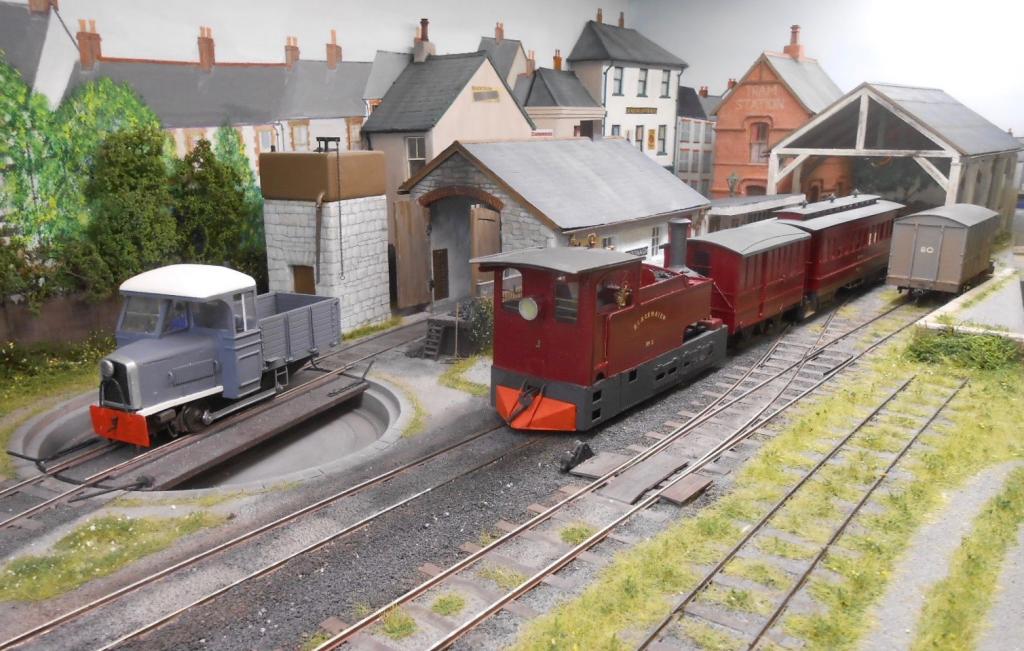
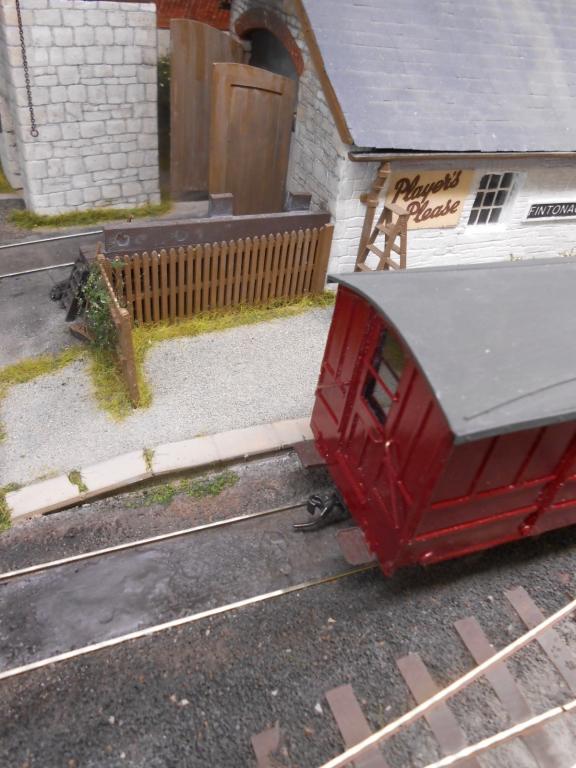
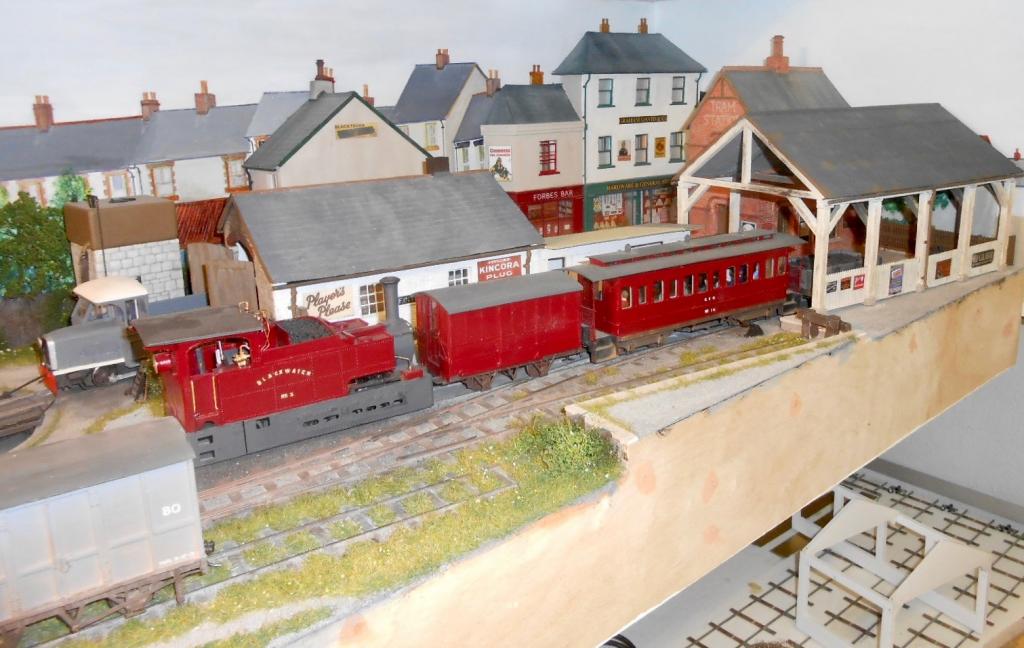
The passenger train is now is a bit more substantial now with the addition of a first class coach. Shorter than the 3rd/composites, I'd originally hoped that one would either make a short mixed train of at least two wagons & a van, or indeed the combo in the photo below. However, seems I did not get my measurements right & though the above will fit in the loop, they will foul the road to the turntable. So, either some additional shunting will be needed, or I have an excuse for an extra loco, so one will always be on shed and engines are swapped each time a train arrives. Anybody know where I can find drawings of the ex Castlederg loco which was bought by the CVR? The coach is of course the Branchlines kit, still going strong at around 30 years of age now.

-
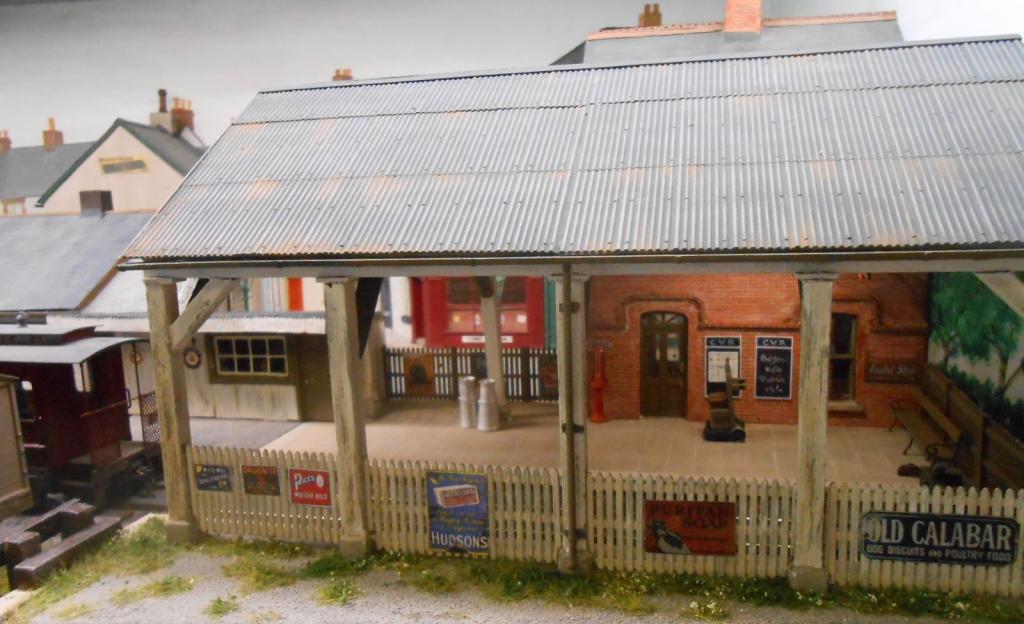
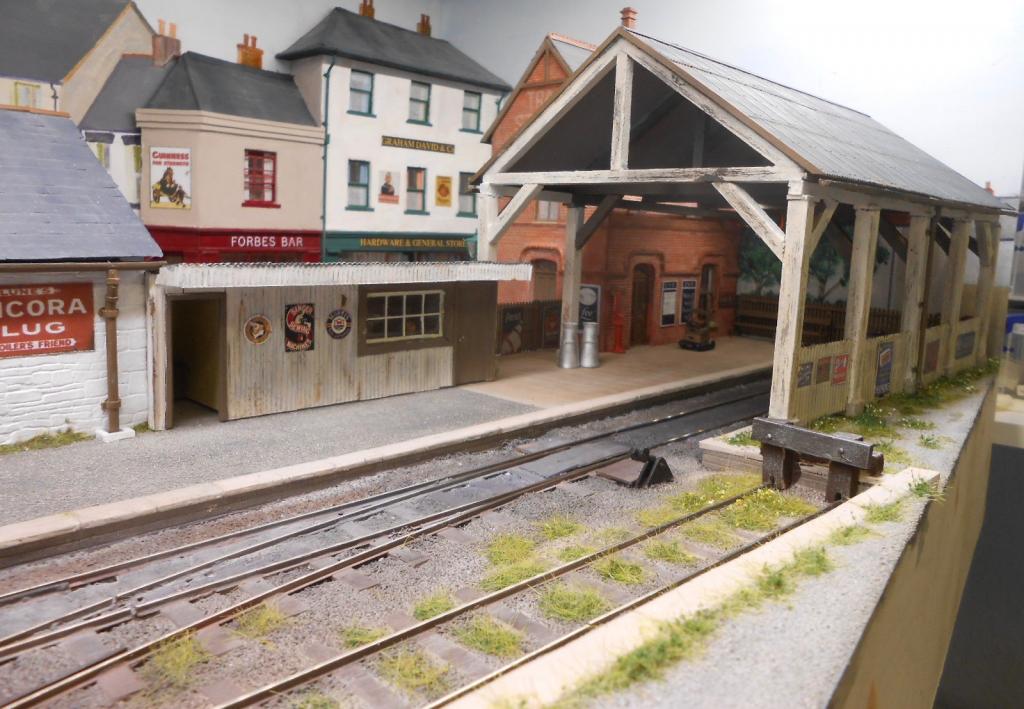
Thanks for the comments everyone. The paint job on the train shed is not difficult and could be replicated on any building, though smaller scales would require finer abrasives of course. For peeling paint on wood, first out on a coat of worn wood colour. I use a blend of humbrol 110 (natural wood), 64 (grey), plus a touch of Matt black. Allow to dry then add a couple of topcoats. Once this has dried, brush on humbrol liquid poly or similar, which will make the paint craze. Let this dry, then attack with abrasives, scrapers etc and the topcoats will come away leaving the worn wood colour underneath. Finally, dry brush the flaking paint with top coat to highlight. Slow, but simple.
-
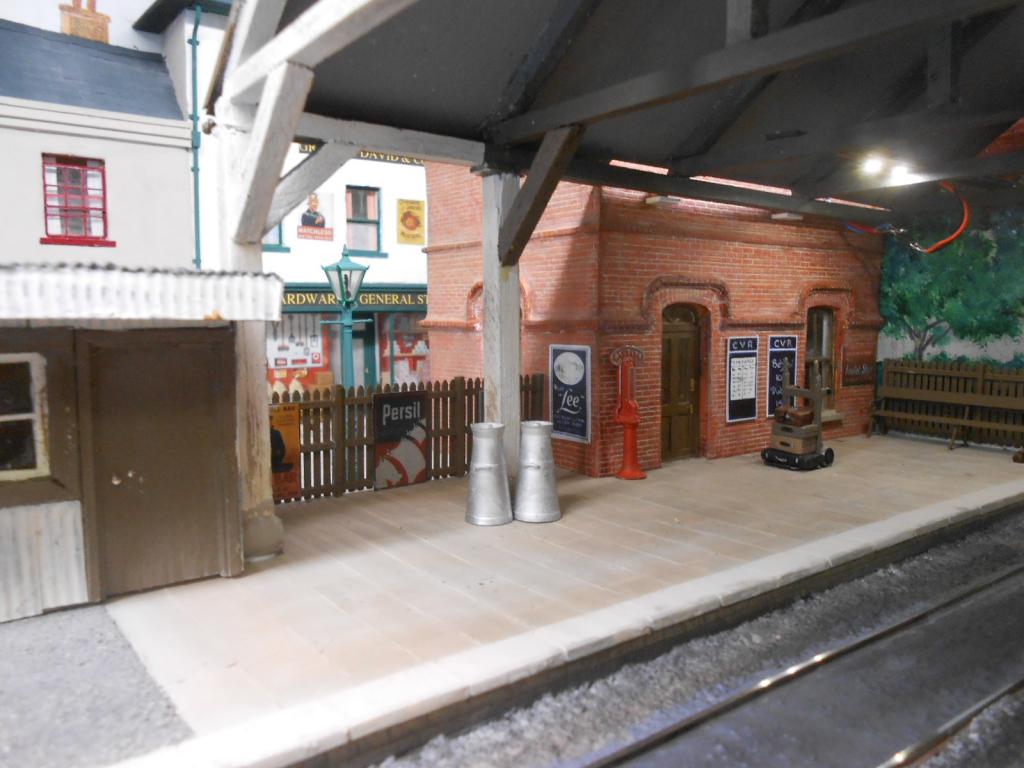
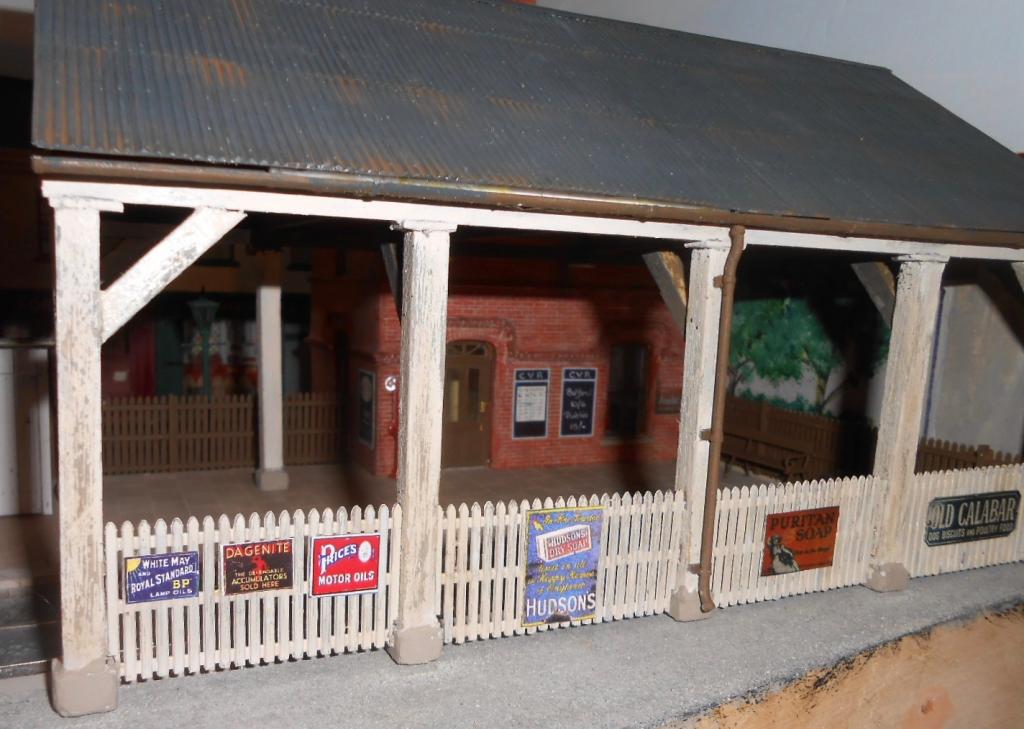
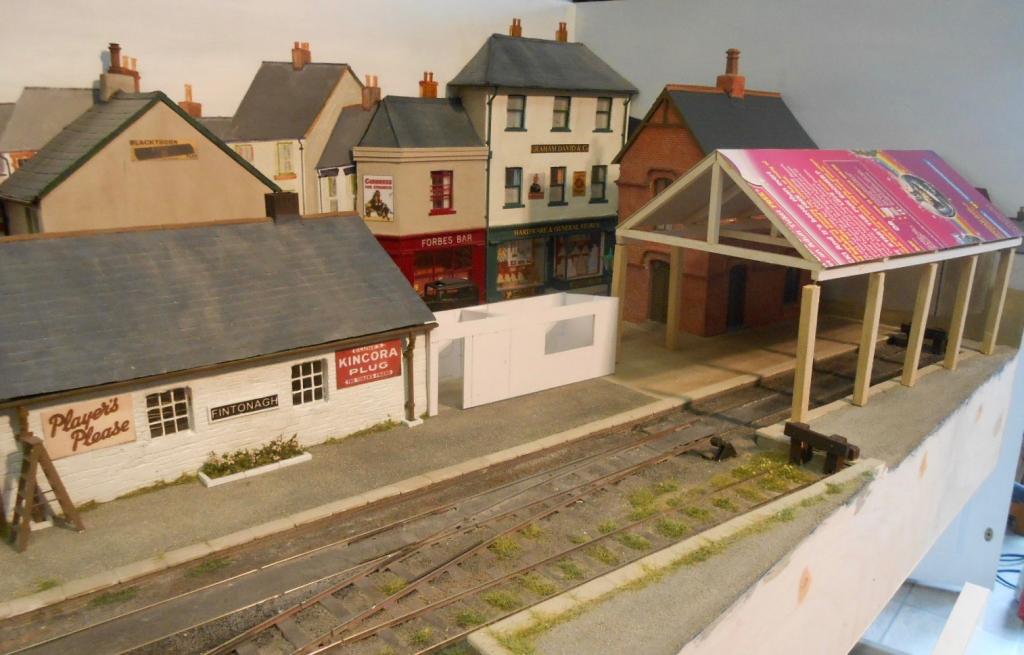
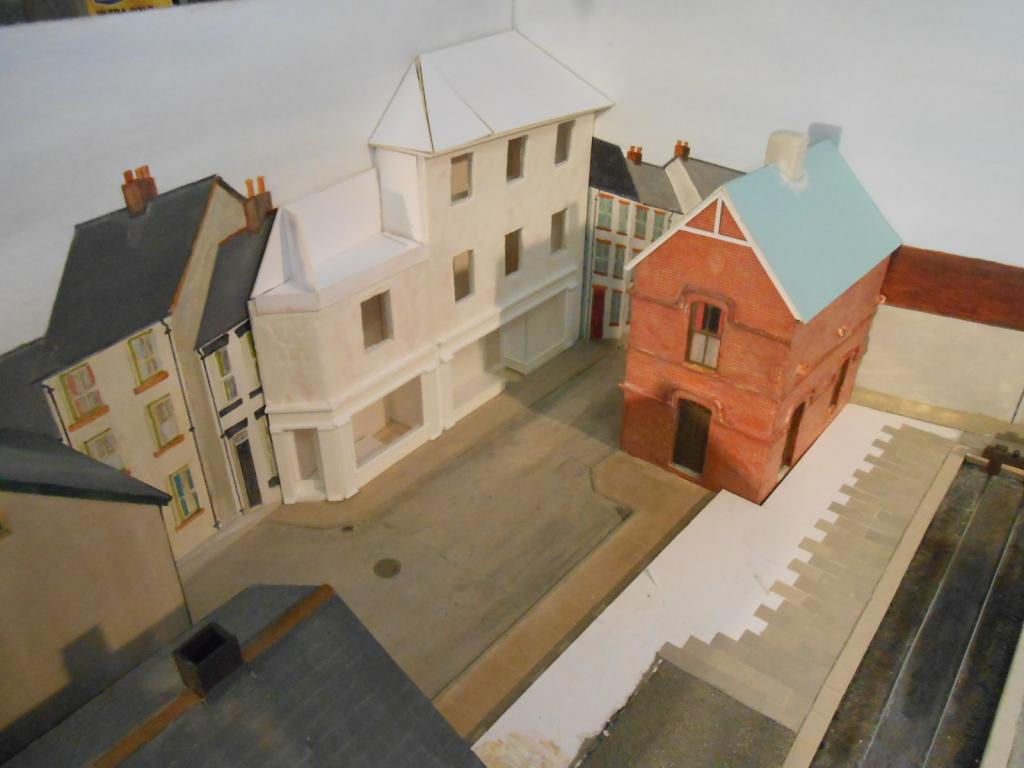
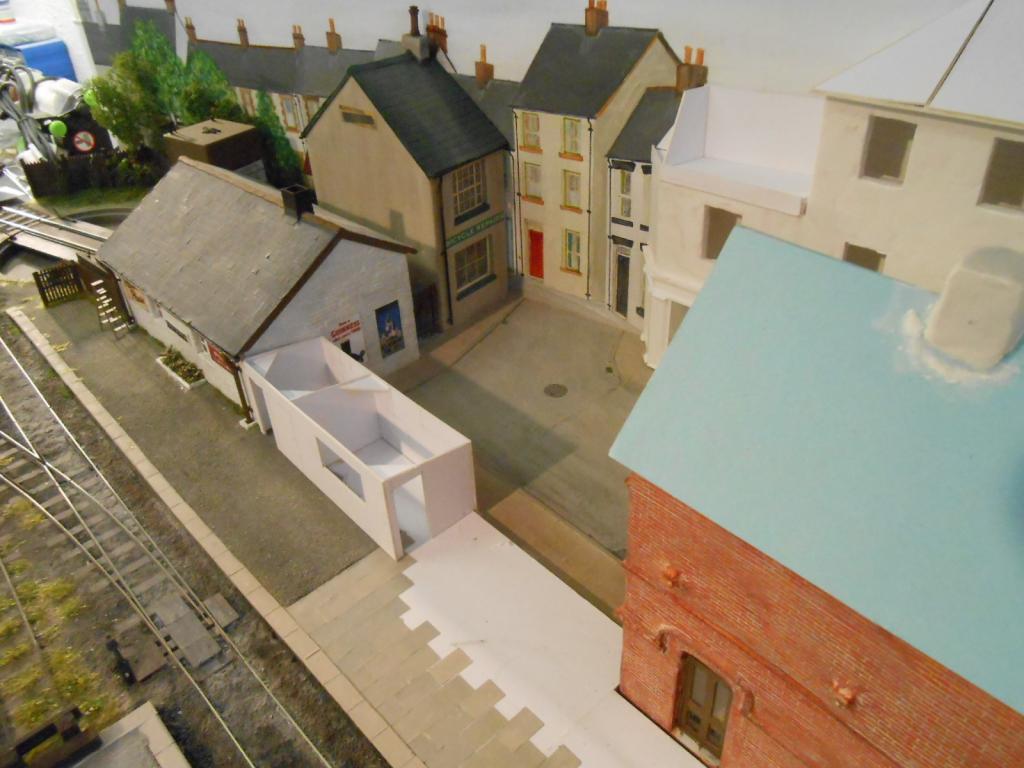
While there is still some final detailing required [in particular figures, clutter, etc], Baseboard 1 of my Clogher Valley project, ‘Fintonagh’ is now complete. Recent work has centred around the train shed, ladies’ waiting room/toilet block and platform details, in particular trying to present them in a well weathered appearance with peeling paint, rust & so on. When the figures eventually appear, it is planned to include a couple of workmen engaged in repainting – the locoshed is fairly pristine, but the other buildings are awaiting their attention. With my surname, it seemed appropriate to add a touch of ‘Colonel Stephens’ [Holman Fred] to the scene, so this is the inspiration behind the ladies waiting room/gents toilet. Corrugated iron was a favourite with the Colonel and popular in Ireland too, of course. My fiction for the station is that, apart from the overall roof, no facilities were available when it first opened, but the locals soon petitioned for something better. The ladies’ waiting room has a toilet reached by an inside door, while the gents’ is accessed from outside, hence the full length awning. Under the train shed itself is a bench seat and also a chocolate machine, otherwise, passengers are perhaps better off waiting in Forbes Bar across the road! Construction was fairly conventional, using a mixture of Slaters [walls] and Wills [roof] corrugated sheet on a thick card frame. Like the train shed, painting and weathering was ‘inside out’, in this case starting with a coat of gunmetal, then two coats of white, let down with a hint of brown. Once this had dried hard, Liquid Poly was brushed on, causing the paint to blister. After letting this harden, the surface was attacked with various abrasives [wire brush, scrapers etc] to expose the gun metal beneath. Dry brushing with gunmetal, white and rust then help to highlight the raised & peeling paint surface. Before I go on to Baseboard 2, I’m thinking it will be good to ring the changes and do some rolling stock. At the moment, I have one loco, plus the ‘Unit’, as motive power, but only one coach, two wagons and a guard’s van. I really ought to do some test running before any more scenic work, so a bit more stock will not go amiss. In preparation for this, I’ve starting installing uncoupling magnets. I’m using Kadees, but don’t much like their ‘plank’ magnets which unless posing as a barrow crossing are a bit obtrusive. On RMWeb there are several entries on using ‘rare earth/neodynimium’ magnets, which are both smaller and stronger. Despite the exotic name, they are available quite cheaply and in a wide variety of sizes. I ordered some 3mm diameter, 3mm thick, rod type, on line & was pleasantly surprised to have them arrive in the post the next day. To uncouple Kaydees, their magnet polarity is perpendicular to the track. Using rare earth magnets, all I had to do was place one each side of the track centre in 3mm holes drilled in the ballast. I fixed them in place with Lazer glue, though on reflection, I would have been better off buying longer magnets [say up to 15mm], so they could have been let into the baseboard surface, but so far, my 3mm ones work fine and are almost invisible from normal viewing distances you should just be able to see them in the last photo. As far as I can tell, I will need six pairs of magnets to cover all the shunting moves, so I may well use some of the other magnets to do things like hold loco cab roofs in place. Having half the scenic boards completed is certainly nowhere near half the project as a whole, for as well as needing to build the Railcar, another steam loco & the Atkinson Walker tractor, I also need two more coaches and a dozen or more wagons. Then there is the fiddle yard to build, plus fascia, pelmets, lighting & so on – so plenty to keep me occupied…
-
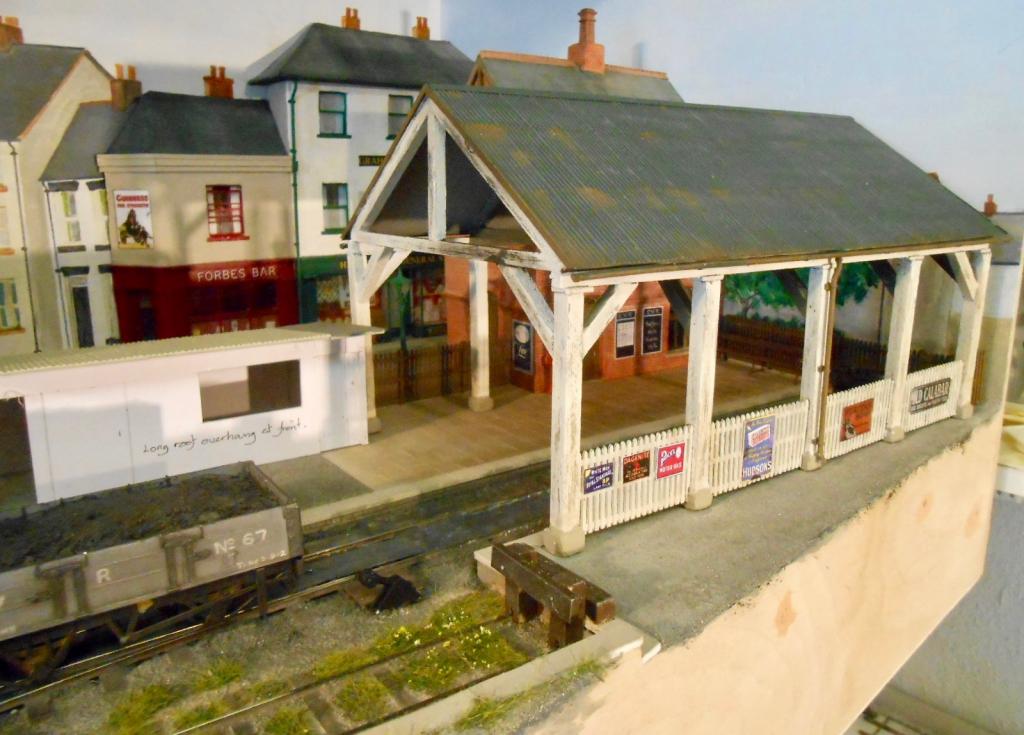
What will be the right hand end of the layout [baseboard 1 to me] is nearing some sort of completion. Shop, pub, [see workshop pages] and now the station & trainshed are almost finished, so here are three pictures which hopefully illustrate the composition of this end of the layout. Nothing is fixed down yet, because I have a fear of finding I've missed something obvious that I won't be able to get to later. Inside the trainshed is pretty gloomy, so have fitted a small LED strip, while there is also a light in the station office - the latter adorned with some 'Wargame' furniture [resin castings], which includes a gun rack[!]. More details in a few days, once I've finished the ladies waiting room & toilets, though passengers will be absent for a while until I'm at a show where they are on sale. What I am quite pleased with is the weathered wood. Straight out of Martin Welch's 'Art of Weathering', it is a simple, if somewhat extended task of painting from the inside out. You start with weathered wood [grey, natural wood & a touch of black], put on the top coat [white, let down with some brown] and then once hardened, paint on some liquid poly. This causes the paint to craze and once this has hardened, you can attack the surface with a wire brush, scraper, sandpaper etc to heighten the flaking and expose the weathered wood underneath. Note: the colours are not quite as they appear, as I used flash to fill in some of the shadows. A longer exposure will give a more realistic impression of the colours used.
-
Inchicore Class J10 Conversion From LNER J72
David Holman replied to murrayec's topic in Irish Models
Another gem in the making, Eoin -
That is good to hear, John. I must have seen Killarney at Chatham, but don't remember it. Shame... Loughrea looks good too, so nice to know there are more that I thought who are flying the flag!
-
7mm scale, of course! But then I would say that... The station building is a nice start and as already has been said, space should not be a problem. You can use OO track (21mm would be nicer) and Pecorama stuff is quick and easy to lay. The great joy of 7mmng is that you can use commercial chassis and have a lot of fun free lancing before doing something specific. Loco, coach and wagon bodies can all be made in plastic sheet, with 22mm plastic water pipe for boilers, plus there are white metal kits you can glue together. 4mm scale chassis will run better than 009 ones and by scaling up slow running is better too. Join the 7mmNG Association for masses of info and a great magazine too.
-
The mutt's nuts and poodle's privates. Just fab.
-
Only just seen this and can't believe I'm the first to reply. The colours and textures of the pier and mud are superb. Beautifully understated, but also - to my eyes at least - just right.
-
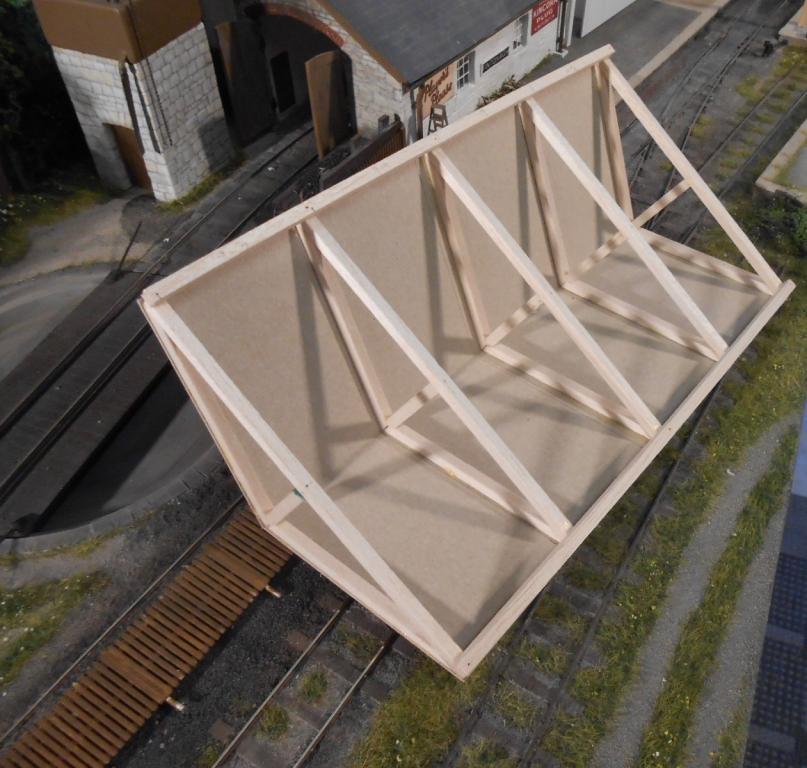
Many thanks for all the positive comments folks. As ever, such things are great for going on to the next thing, which in this case is the 'train shed'. This is the 'Fintona' aspect of the fantasy, though in fact owes more to Wantage. Some major doodling eventually helped with the design, for which I'd got some quarter inch square balsa strip quite a while ago. A simple jig enabled me to make the five roof trusses. These were glued with Resin W wood glue and once dry I made a false roof from cereal packet card and glued the trusses inside with contact adhesive. Fitting the roof to the support posts is going to be interesting, not least because it requires the station building to be fixed down as well, so I have a list of things to do so beforehand, one of which is installing uncoupling magnets for the Kaydees. It will be somewhat difficult once the roof is in place - as will back scene detailing in that area & so on... The roof will eventually be covered in 'wiggly tin', aka Wills 4mm scale corrugated asbestos sheet. The fact that the scale 38' length of the roof is exactly that of two Wills sheets is no co-incidence!
-
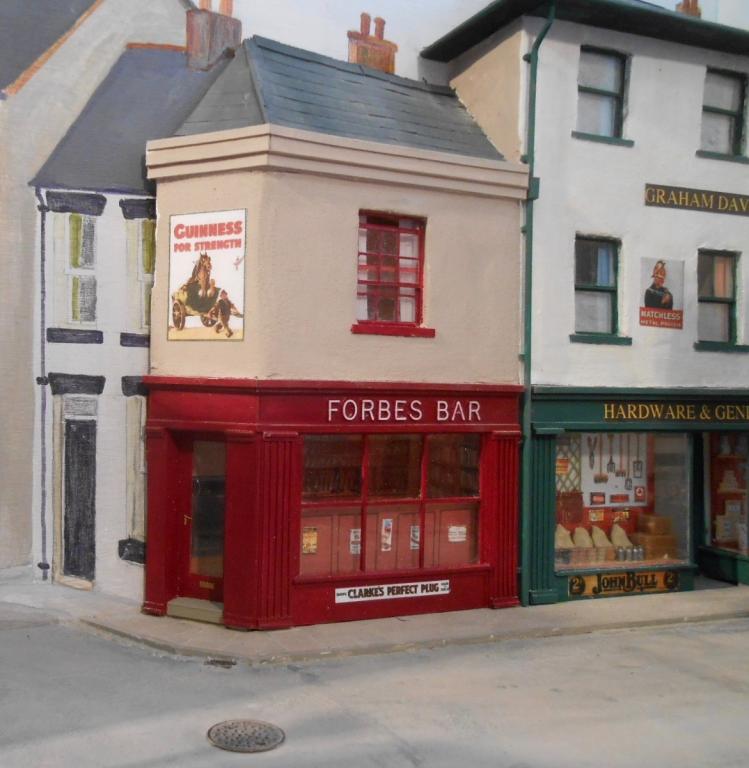
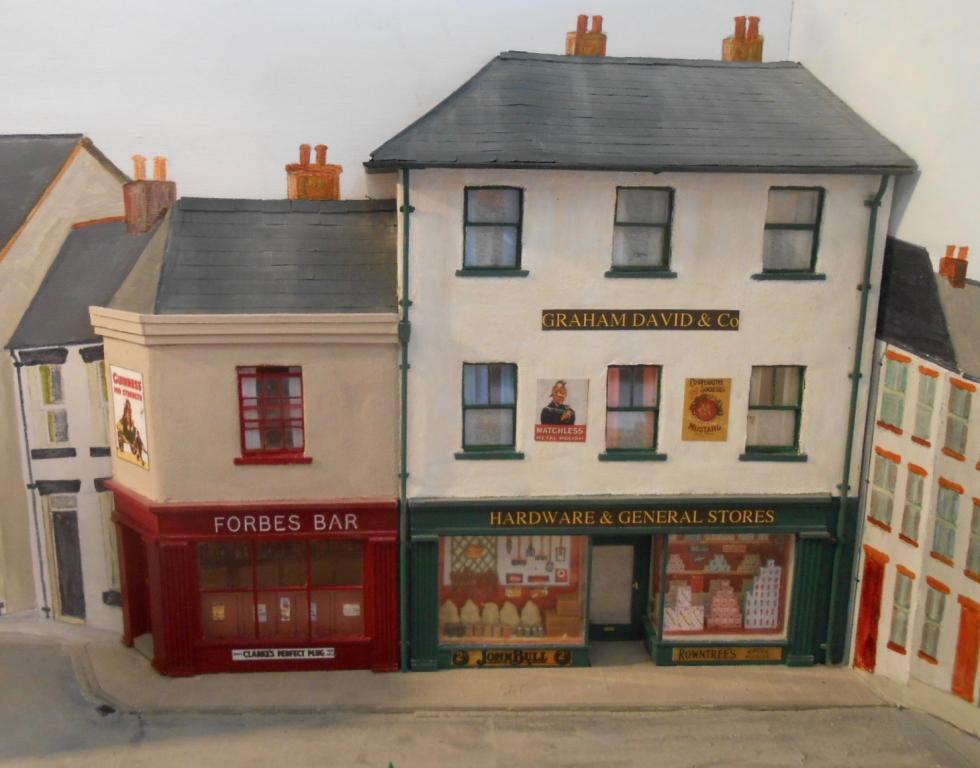
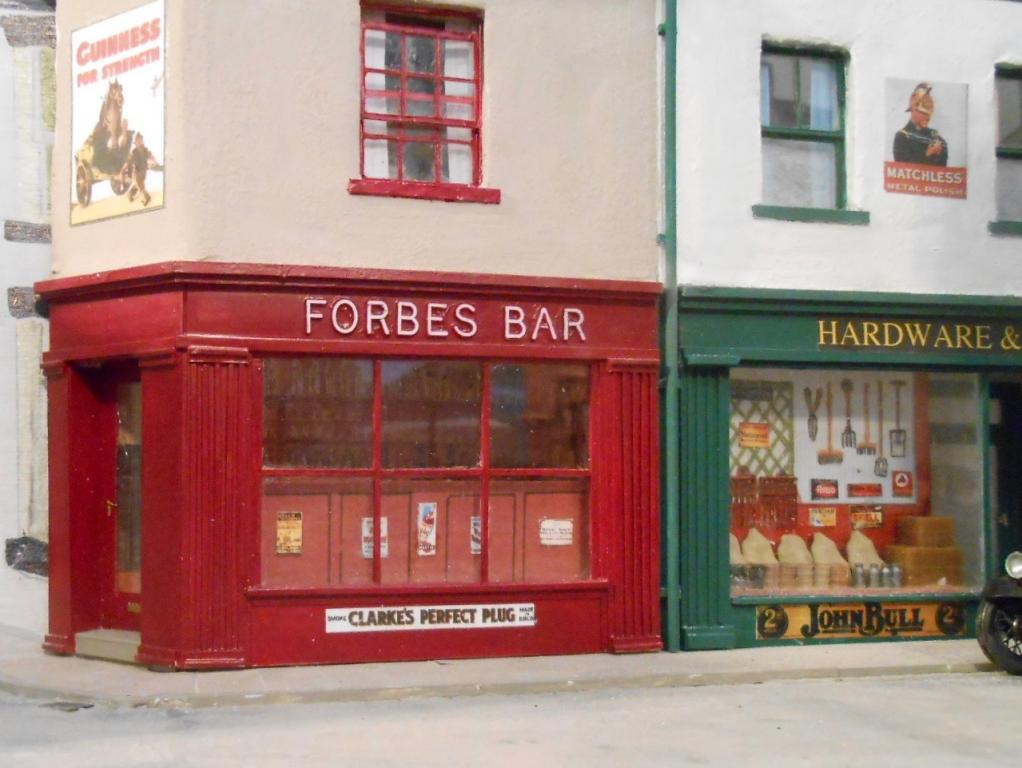
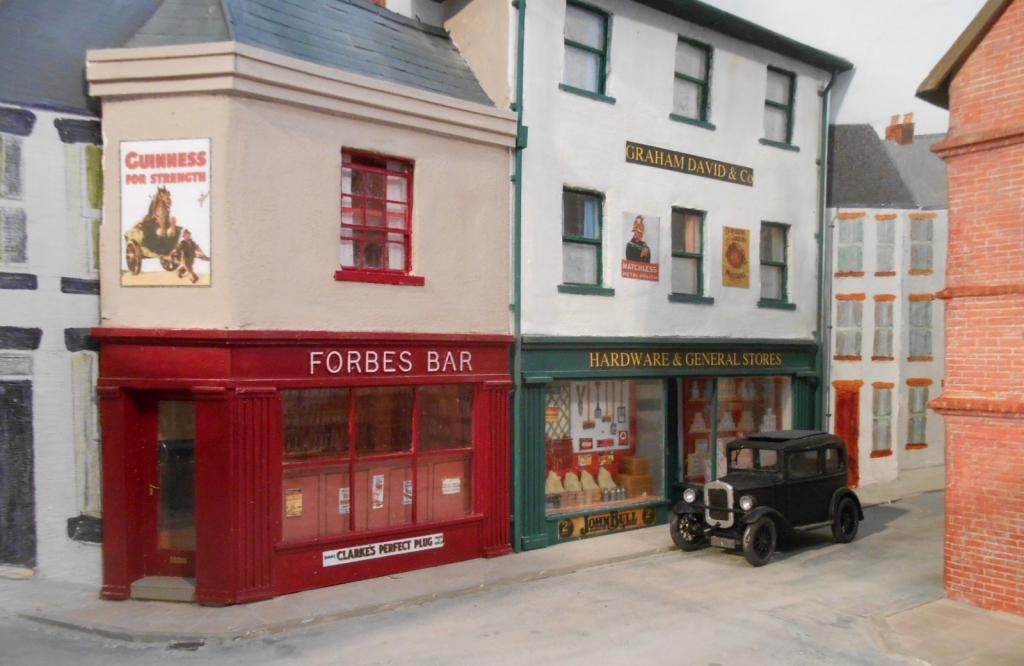
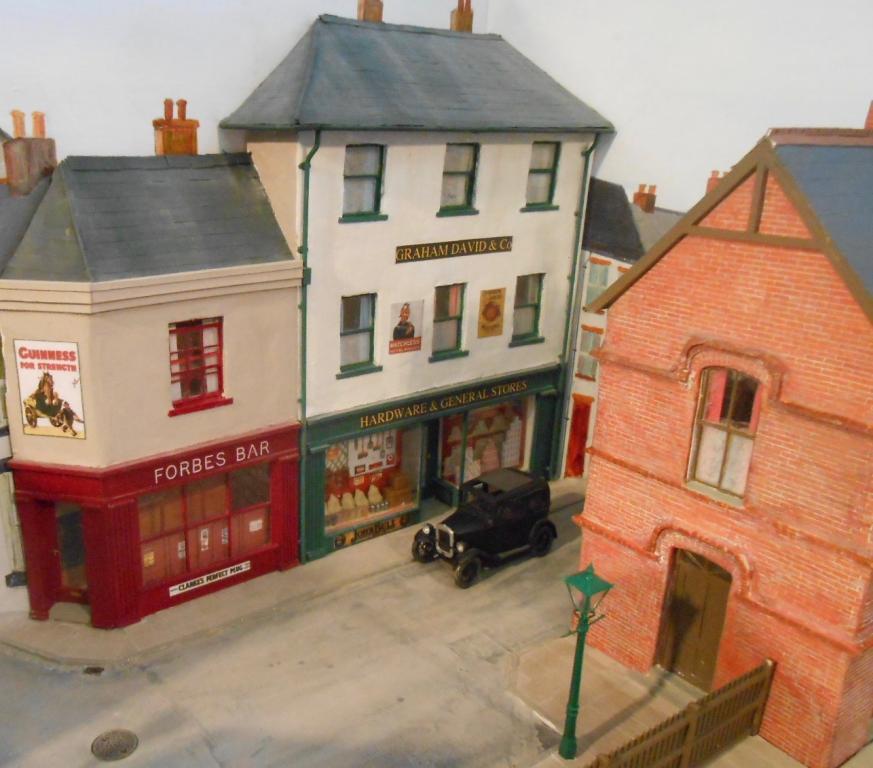
It seems to have been a very long time since I started this pair of buildings and probably is. A combination of weather [far too hot in the workshop] and holidays, plus the fact that buildings like these, despite being low profile, demand a high amount of work & detail. Anyway, just about done now, so worth sharing. Initially, I made the shells for the pub and shop separately [from foam board], but once the DAS clay rendering began, I fixed them together, so they have been treated as a single unit since. The pub and shop windows/surrounds are all plastic strip, building up the profiles in layers, before eventually painting in enamels. The upper walls are just DAS clay, sanded smooth, then given a coat of cement colour [for the pub] and white for the shop. In fact, pure white looks too stark, so I toned it down a bit with a touch of ochre. Upper floor windows use a technique described by Gordon Gravett, where self adhesive address labels are stuck onto clear perspex, the glazing bars drawn on in pencil & then the window apertures cut out with a craft knife. It is then easier to paint the glazing bars with acrylics, as any paint on the glazing itself is easier to remove. I pondered long & hard about what I was going to do for the interiors of the buildings. The pub was fairly easy - a piece of card across the window to represent the back of a wooden settle; then everything else [bar, fireplace, clock etc] just drawn on another pieces of card which is actually the back wall. A few items printed from the CG Textures website completed the scene. The shop was more of a pain until I remembered good old John Ahern. His book on Model Buildings first came out in 1950 & my version goes back to 1970, but in terms of the basics, it really is the Bible. Sure enough, there is a chapter on shop windows, so once that was read, it was pretty straight forward. Both windows are simply layers of 'flats', cut from card & coloured with felt pens, crayons etc. The upper storey windows have simple curtains from coloured paper and nets from tissue. The pub name [Forbes] refers to Henry of course, though also down to the fact that this was the only name I could make from the raised letters I had available. Clogher Valley pictures show a general store run by David Graham, so a bit of work on the laptop soon produced my version. The two street lamps are Peco. Plastic mouldings, they are very delicate & for me, every bit as good as the white metal versions from other sources. Easier to make too. As yet they are unpainted, but will probably still end up green - unless JHB suggests otherwise! Some angles do not favour the painted back scene, but overall, 3D & 2D seem to blend in ok & I'm pleased that the road & pavements seem to be fairly seamless. With the back part of the scene done, hopefully I can now turn my attentions to the station again, in particular the overall roof.
-
Starting to look better, thank goodness! Would be nice to see pictures of some of these. No mention of any other 36.75mm gauge though. Surely I can't be in a group of one?
-
The sad news about Richard Chown has again raised a concern in my mind that there are previous few folk doing broad gauge and possibly even fewer layouts. Hence would be interested in establishing a list. To the best of my knowledge, we have: Ballyconnel Road in 3mm scale Valencia Harbour in 4mm Paul Greene's S gauge Arigna Town in 7mm Is that really it??? If there are others working to broad gauge, please consider sharing.
-
The idea of doing Blacksod Bay is something I've always fancied JB, or at least ever since I got Rails to Achill... A blend of Courtmacsherry and Burton port maybe. One day!
-
Only 42 years JB, the March 75 Railway Modeller in fact. I cut out the article and still have it. 16 feet long, it still looks the business, even by today's standards. WLW 2-4-0 Galtee Moor was one engine and 0-6-0 Shannon the other. Fully lined, as you'd expect. So glad I was able to meet him.
-
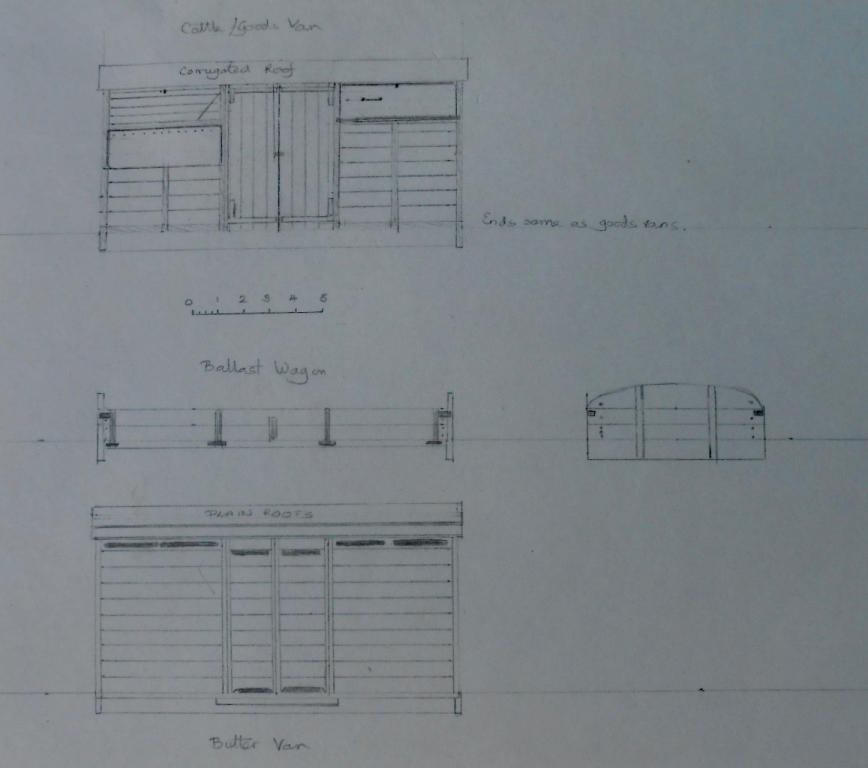
A couple of folk have asked me about these, so have attached photos of ones I made using dimensions & photos in the Patterson book. High tech they ain't, but hopefully of some use. To 7mm scale, I've included a 'rule' to help with re-sizing if you want 4mm. At least by going smaller, any errors are reduced accordingly!
-
Eight, I think, JB - check out the obituaries section of RMWeb. There are lots of photos, plus links to other sites, including Richard's own.
-
Just back from a short holiday in the West Country, which included a visit to Pecorama in Beer, Devon. Have met Andrew Burnham, editor of Continental Modeller, several times at exhibitions & he came along to the Chatham show in June. When I mentioned my wife & I would be staying near Beer, he immediately offered to give us a tour - something I was not going to miss out on! We arrived at 10am and Andrew kindly give up the next three hours to show us round - not just Pecorama itself, but a tour of the editorial offices, the Beer Heights Railway and the factory itself. Never again will I look at a humble piece of flexitrack in the same way. As the home of two major national magazines, the offices are relatively small, but pretty high tech, while on the stairs leading up there are several original Cuneo paintings. RM Editor Steve Flint was there & studying the latest edition of BRM as we arrived & I'm sure the other editors do the same. The new RM was just in [not published until Thursday], so I was able to see my own article in 'Talking Points', reviewing 30 years of exhibitions with my own layouts & the Chatham club. A tour of the exhibition layouts followed, all beautifully presented in 'home settings', to show that everyone can find space for a railway. Next we went into the gardens [fabulous] and across to the Beer Heights railway sheds. Lots of 7.25" locos present, including some actually built on site. The tracks wind their way around the gardens, with superb views of the local countryside, in a route totalling over a mile. The line is fully signalled too and up to three trains can run at once. The highlight though was the tour of the factory. Nestled into the hillside, it is a significant local employer of over 100 people. Andrew showed us the new moulding machines [installed at a cost of over £3 million]. Though they are of a 'standard' design, all the masters are machined on site. Lots of high tech stuff involved here too, but also good old fashioned, very skilled, workshop practice - no wonder they can build miniature steam locos on site... We saw track and points being assembled on the production lines, along with N gauge wagons, while in the paint shop was a fascinating new printer which can do things like private owner wagon sides in N gauge upwards. We finished off with a ride on the railway & indulged ourselves with tea in the Pullman car before we left. We felt extremely privileged to have been behind the scenes of one of our household names in modelling. Next time you pick up a bit of Peco track, reflect on the amount of skill and engineering that goes into it and marvel that it costs so little. Pecorama is well worth a visit at any time and is a super day out for all the family. You are unlikely to get a tour like I did, but the rest is still fantastic on its own.
-
Just noted on RM Web that the great Richard Chown has passed away. Obituaries are accumulating for the pioneer of Irish broad gauge in 7mm scale. Castle Rackrent was very much the inspiration for my Arigna Town layout, but Richard started his back in the early 1970s when there was less than nothing available & everything was built from scratch. The system eventually grew to over 200' in length with eight stations and was very much operated to prototype practice. It was a delight to meet him at Manchester back in December and a complete honour to run his model of Lissadel [in early SLNCR livery] on my layout. Innovative in all sorts of ways, his obituaries will be well worth reading, not least because he was by all accounts a lovely man and a real character.
-
Only just noticed this thread, but I've done a few GNRI vans in 7mm scale for my Arigna Town layout. At first I batch built in plastic card, but needing multiple copies, I just made masters of sides and ends to make moulds for resin casting. Easy enough to do and you can put every effort into making the masters as detailed as possible. Should work in 4mm too. I wrote it up for the latest version of New Irish Lines. Another source of wagon drawings might be the Alphagraphix card kits. In effect, they are a colour, 7mm scale drawing and at £3 each do not break the bank. However, undertake detail is lacking....
-
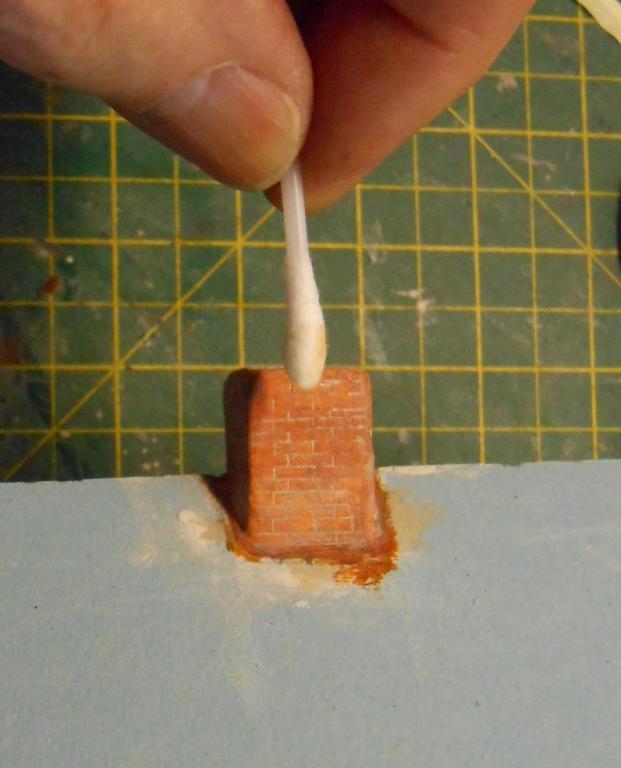
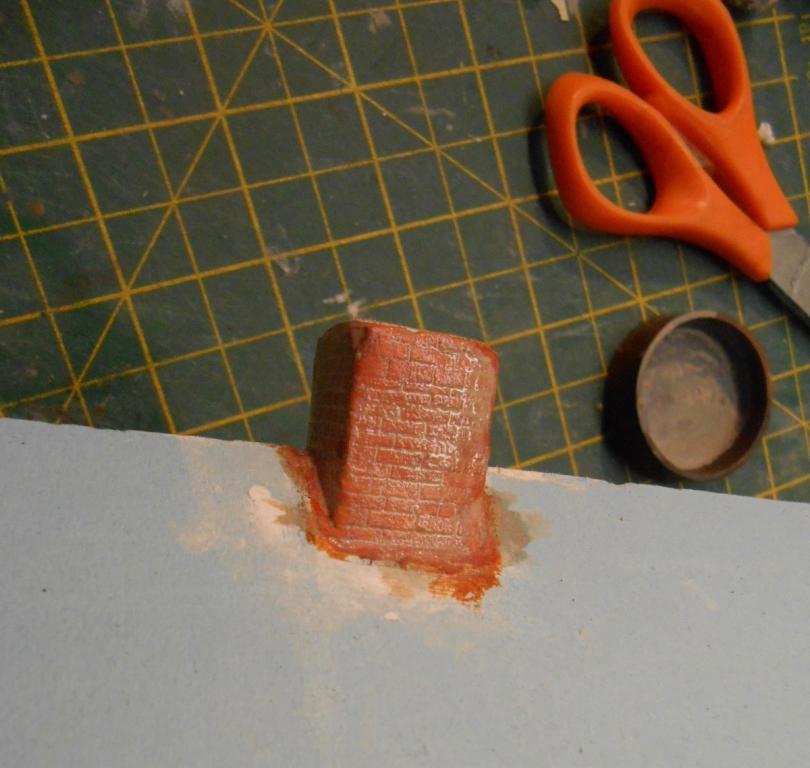
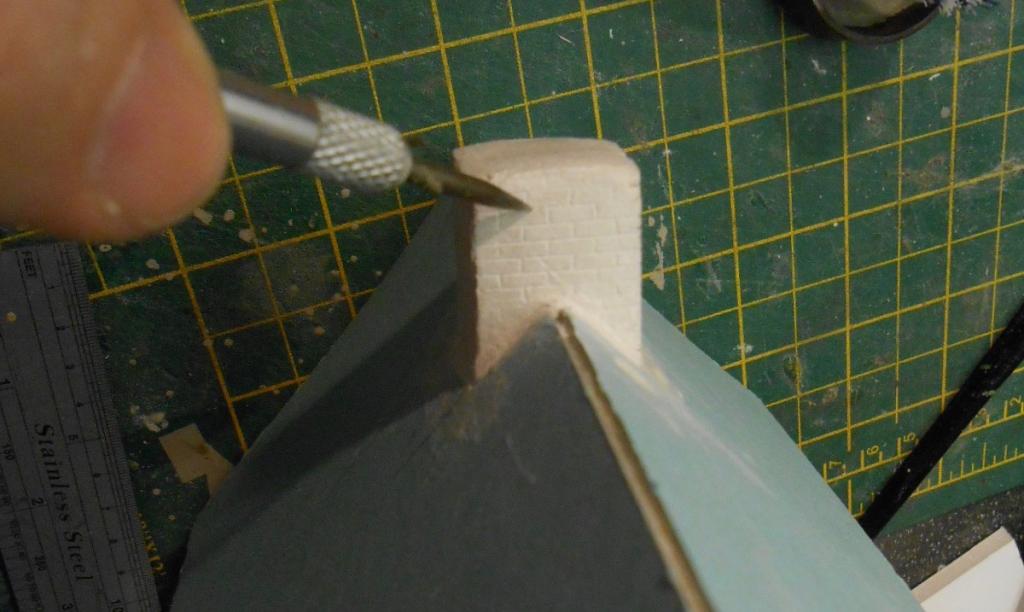
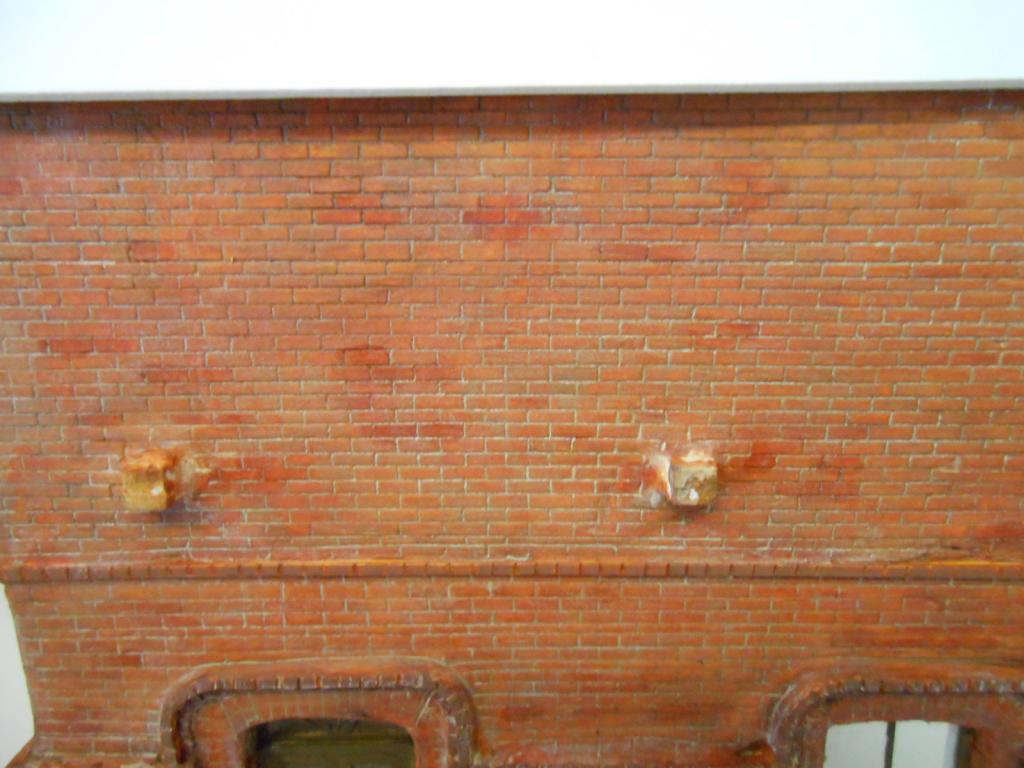
The photos show things in reverse order. The first is the final bit, using a damp cotton bud to remove excess mortar colour from the surface of the bricks. This is water colour, which is washed on top of the acrylic brick colour [burnt sienna in this case], once the latter is dry. Before that, the chimney stack had been built up using pieces of foam board, fitted into the ridge of the roof. A thin coat of PVA goes on, then the DAS is smeared all over, including the top. The latter will give the impression of cement rendering around the bases of the chimney pots. Once the DAS had dried [leaving overnight is best], the surface can be scored with a scriber of choice to give the brick [or stone] courses. I find it helps to have an old toothbrush handy to scrub away the dust made by the scribing. It is also useful to arrange to have a light source coming in from one side, that way, the scribed lines show up better. For brick courses, I scribe horizontal lines a scale 3" apart, with vertical line 9" apart for brick faces. The final picture is a close up of the upper storey of the station building, scribed and painted as above. Tedious, though not as bad as might first appear. Indeed, the hardest part was actually getting started. One big advantage of this method is you can accurately make brick courses go round the corners of buildings. Not recommended below 7mm scale though...
-
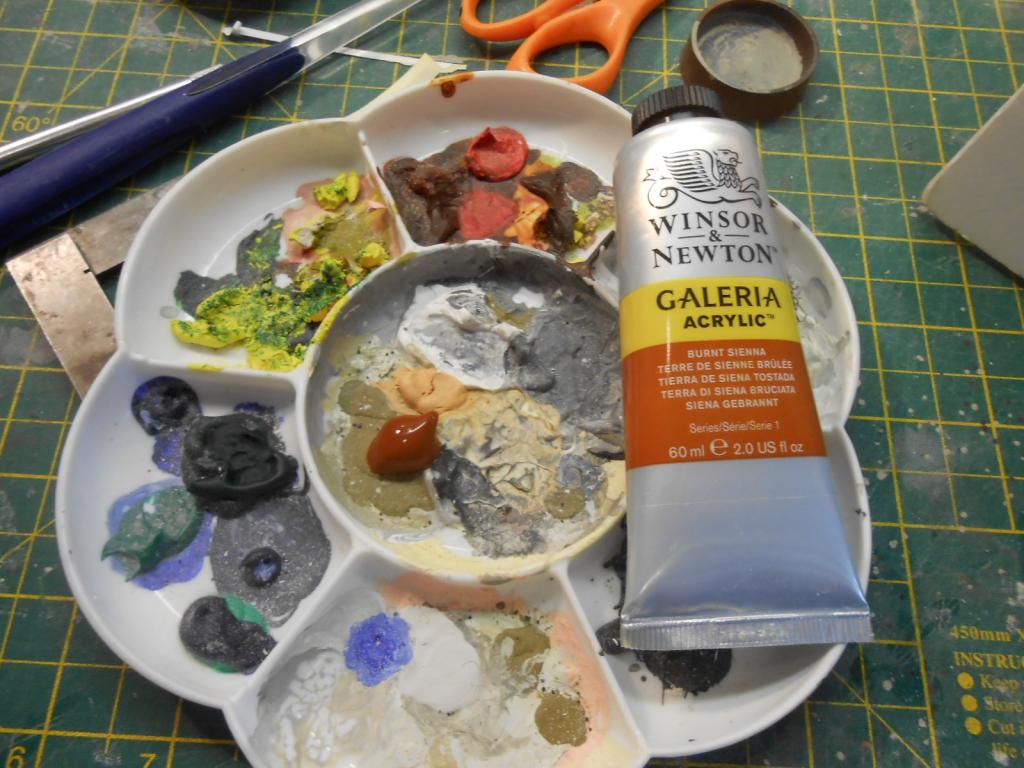
Several people have asked me about using DAS clay, so here are a couple of posts on what I do. However, I must point out that this is all taken from Gordon Gravett's books, particularly 'Building a Layout in 7mm Scale' [Wild Swan]. For those of you who have not come across DAS before, the first picture shows a pack. It comes in both grey and terra cotta colours and is an air drying clay which also contains a proportion of shredded paper. Once opened, keep the pack well sealed and it will last for months. I smear the DAS in pea sized balls on to a frame made of foam board. Use PVA/Resin W to stick the foam board together, but use dress making pins to hold while it dries. Coat both sides of the area to be covered in DAS with PVA, or walls might warp. The DAS should be spread to around 1mm thick and will dry overnight. If you get any cracks, they can easily be covered over with further additions. The next post will show how I did the chimney.
-
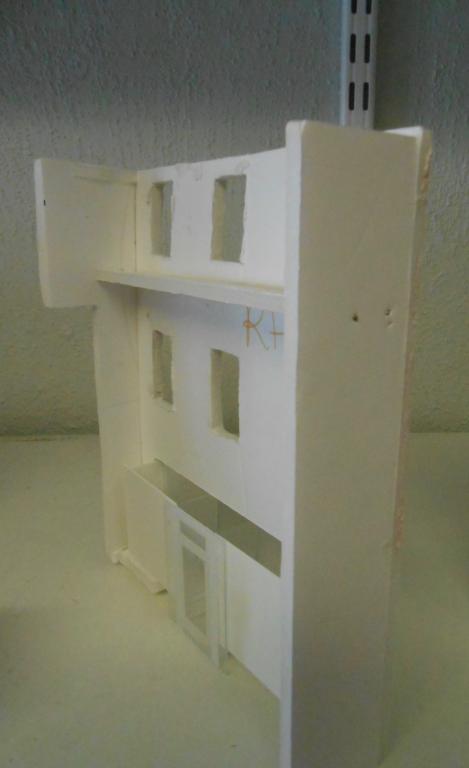
Not even making haste slowly at the moment, but bits and pieces are getting done. The station building is one of those projects that absorbs time for little apparent effect, though as you can see, it does now have a roof and some decorative bargeboards, plus a chimney stack. Doors and windows have been made too [plastic sheet and strip], with a basic interior on the upper floor. The other work has been on the road and pavement around the station & shops. These have been done as per Arigna - so a card base [on formers to create a bit of camber], then painted with gloss grey and talc sifted on. Vacuum off & repeat as necessary to get a smooth tarmac surface. Curbstones are plastic strip, while paving slabs are self adhesive address labels, pre-painted, laid and then treated with weathering powders. The end terrace has become a bicycle repair shop, as suggested by others, while you may also be able to spot drain and manhole covers in the road surface. These are on an etch sold by Langley Models and have been treated with 'Birchwood Casey Gun Blue', which blackens them without needing to use paint. Will put something in the workbench thread shortly about using DAS clay.
-
A little gem!
-
Looks pretty darned good to me. Very sharp.