David Holman
-
Posts
4,359 -
Joined
-
Last visited
-
Days Won
117
Content Type
Profiles
Forums
Events
Gallery
Blogs
Everything posted by David Holman
-
Two little gems. Love the weathering.
-
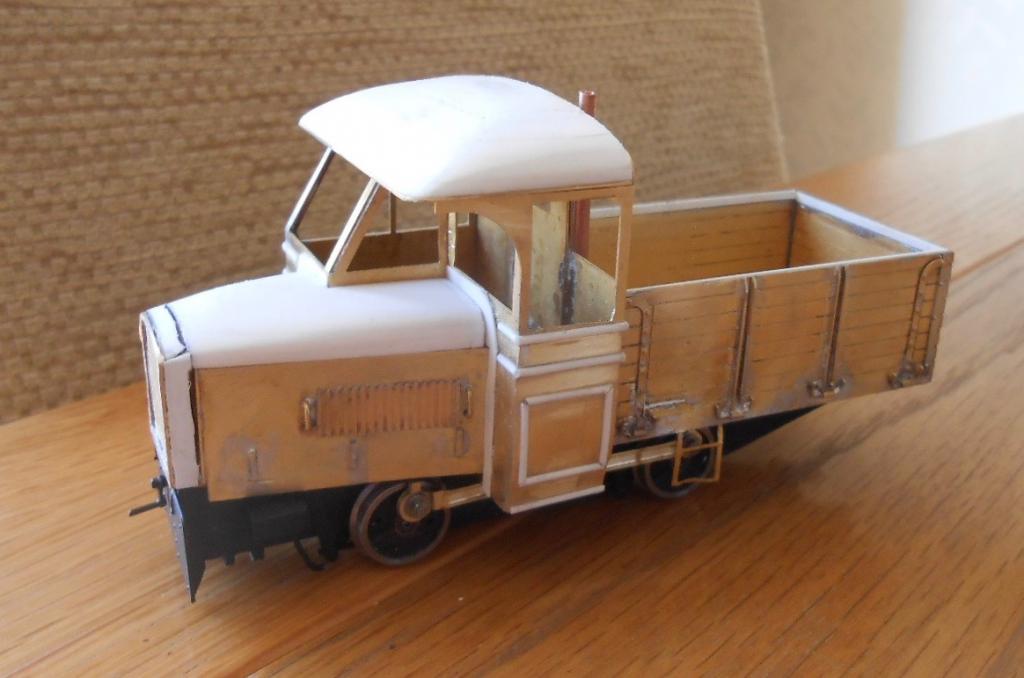
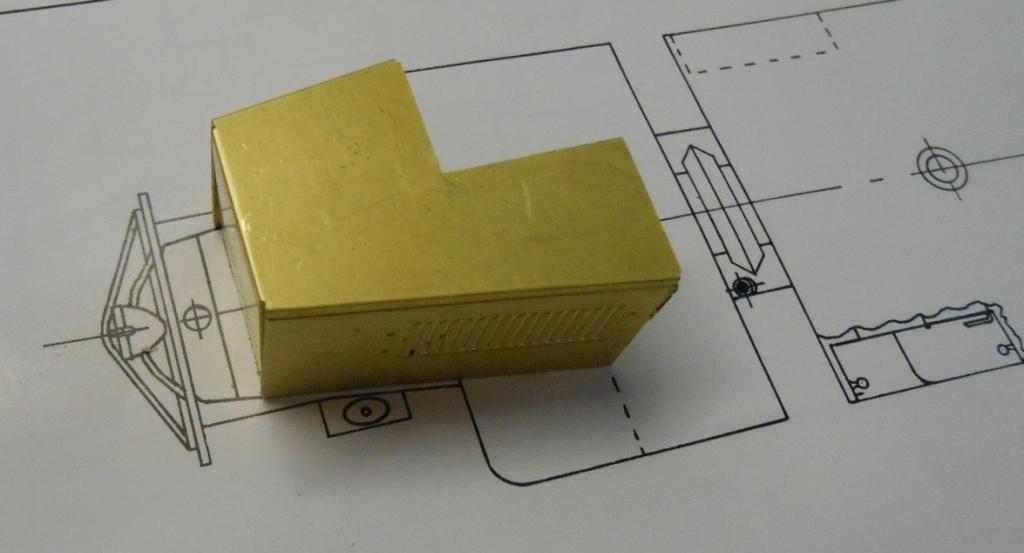
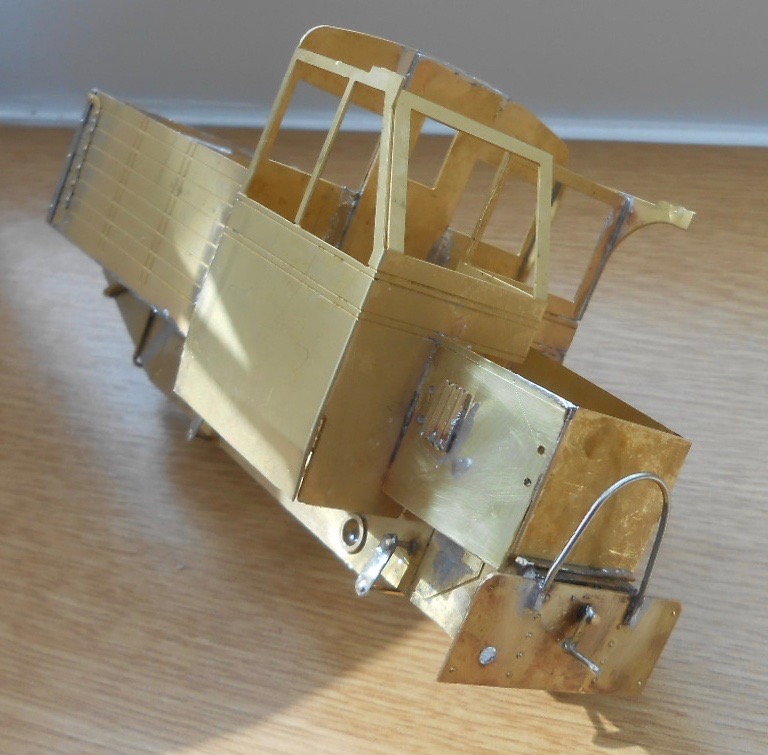
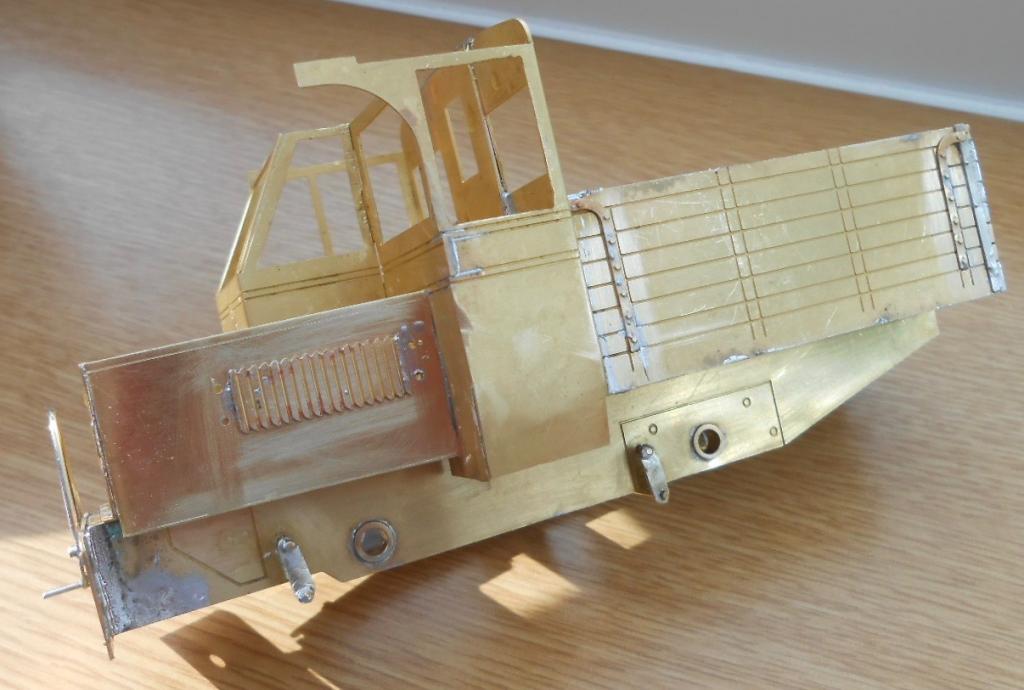
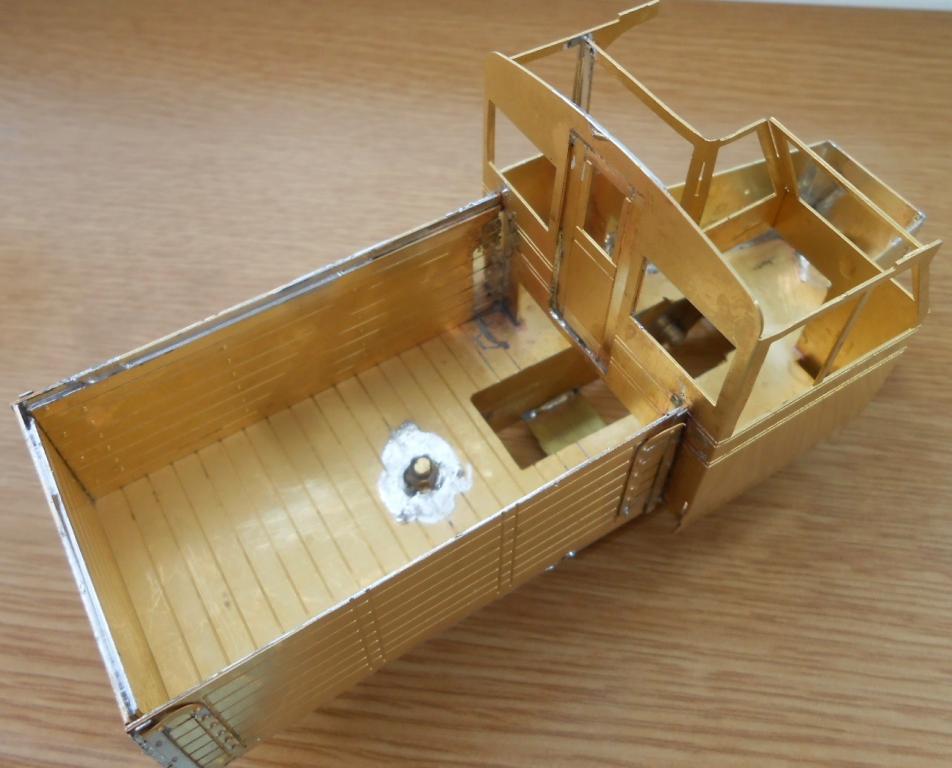
The Unit is now taking shape - this last word being the key as I've been working on the very awkward bonnet and roof. After my SLNCR railcar and railbus, I ought not be daunted by such things, but the fact is, these shapes are [for me] difficult things to get right and where the Unit is concerned involves all sorts of rounded corners and angles. A drawing doesn't help much either - it is simply a case of filing away and hoping to eventually get it right. The photos are therefore as much an exercise is proof reading and I'd value comments on how they look, having spent rather too long staring at the things myself! Construction was simply a case of laminating layers of plastic sheet and then getting busy with files, emery boards etc. Once again, inaccuracies in the etchings are shown up, with the cab rear sheet being lower than on my drawing, while I can't help thinking the metal work above the windows should be deeper too. On a model as small as this, a millimetre or two can really make a difference to overall proportions. Note that, both roof and bonnet are deliberately slightly oversize, because I'm actually going to use them as masters for resin castings. First reason for this is I want to build the railcar, so have no wish do repeat several hours of filing & sanding if I can help it; the other reason is that the laminations can be seen, but once I've got a casting, these can be sanded away. I'm conscious that the cab beading is a bit on the heavy side, but will be rubbed down to a finer profile before painting. You can also see where I've used plastic strip to make the inner and outer sides of the wagon body match. At least the chassis is largely complete & painted. The main omissions are linkage to the sandboxes, a couple of inserts on the driving wheels, plus the pick ups, about which I'm still brooding...

-
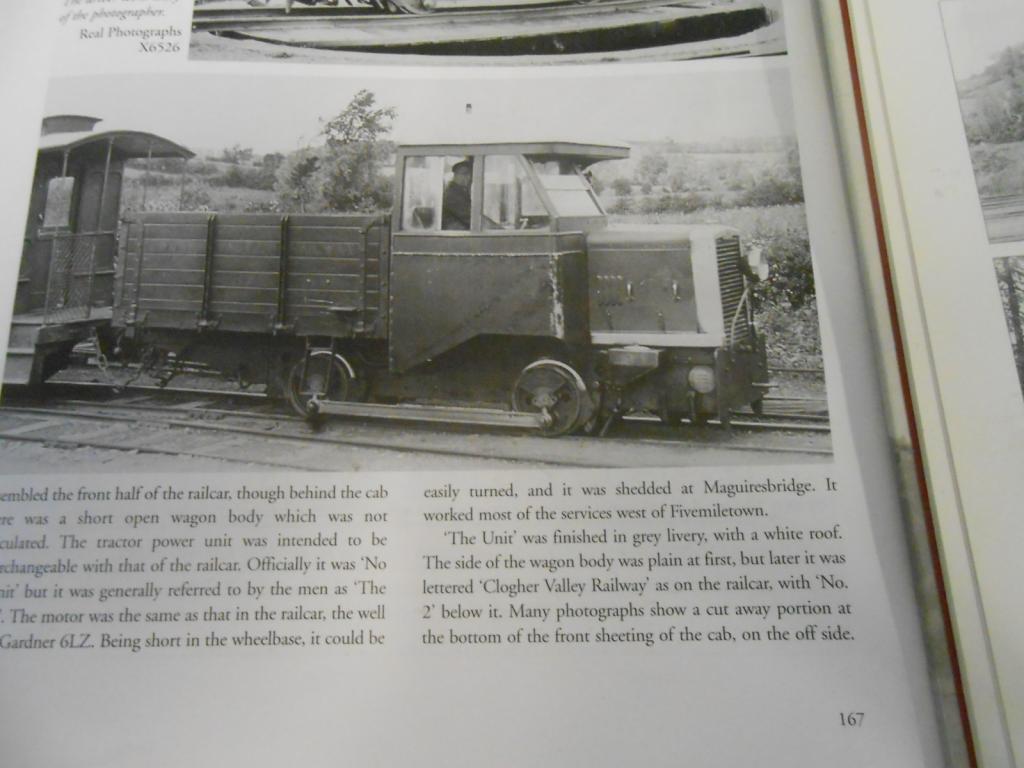
Thanks for the info JB. Would I be right in thinking the front 'buffer beam' was red and would the underframe have been black under the grime? Currently have no info on what the rear end of the wagon bit looked like. Strapping, hinges etc. Also, the etches give a cab door a scant 4'6" high, with an empty space below to the wagon floor. This actually suits me as the motor gear box intrudes somewhat, so will need to have a load in there to cover it up anyway. Equally, if there was a box covering say the gear box, that would do too. Finally, for now anyway, am guessing two rivet/bolt heads on the wagon side suggest a step on the inside face. Must have been quite an effort getting to the cab!
-
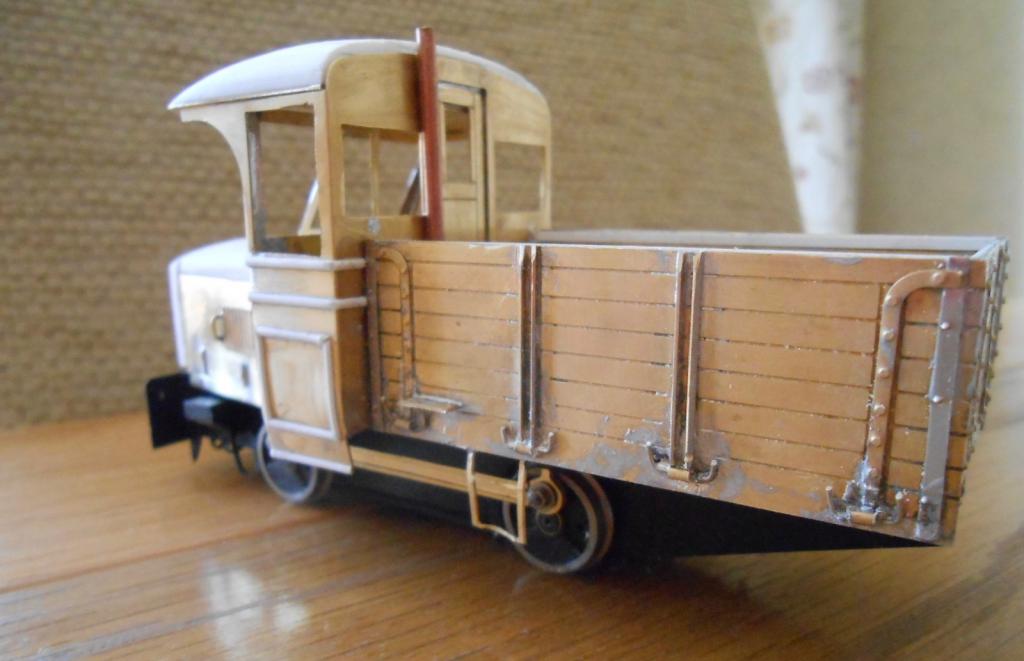
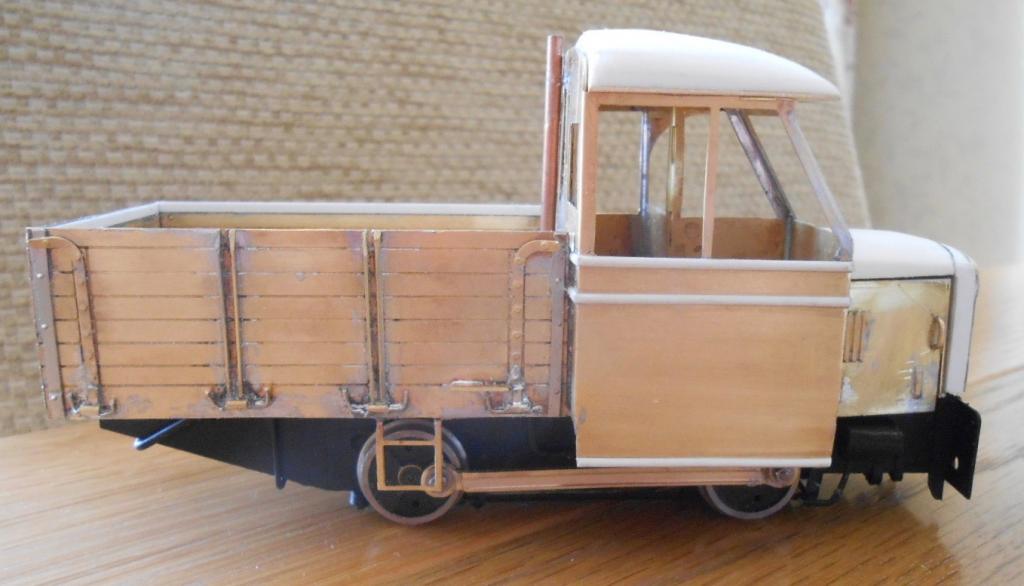
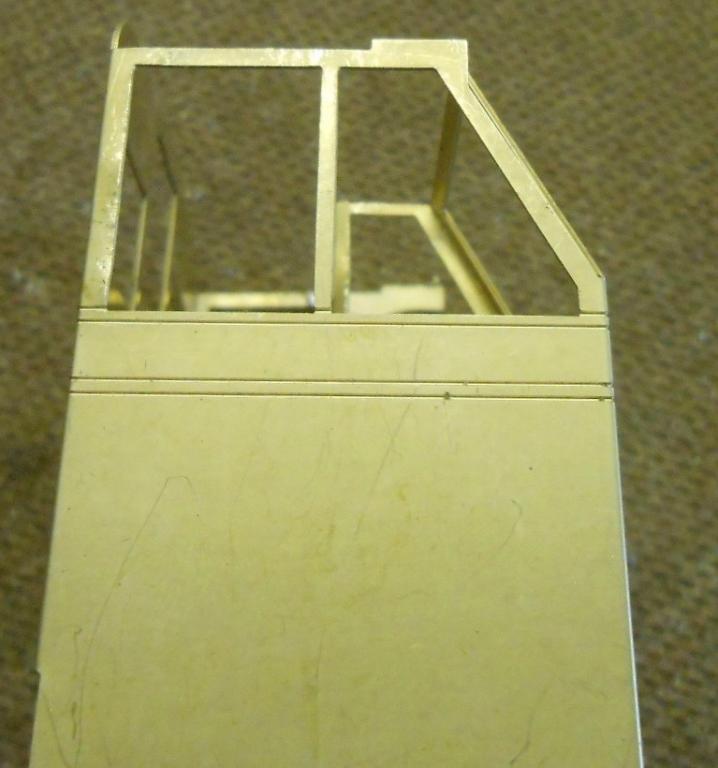
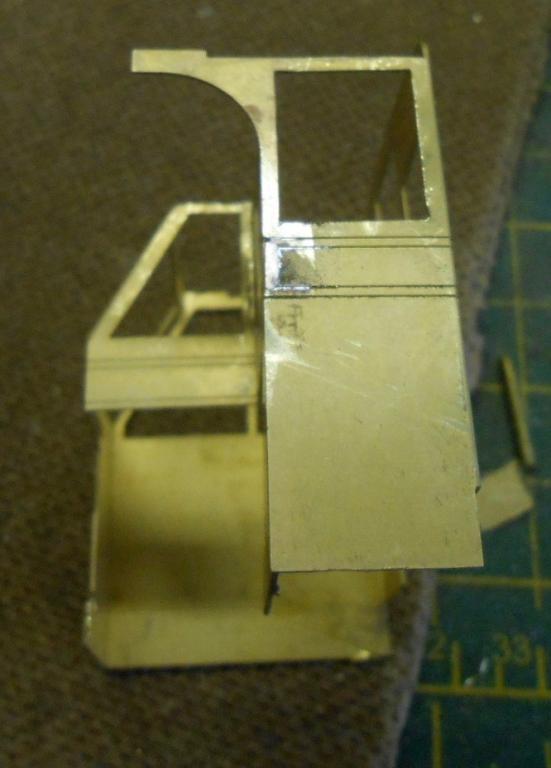
... though a tad more reflective. Am afraid the Worsley etchings are still causing problems, but am coming round to the fact that maybe my expectations were a bit too high. Having not worked on an engine for a while, I'd thought doing a kit would be a good way to get back into it. However, this is certainly not a kit and I really ought to have done some more research and preparation before I started - not least comparing the etches with existing plans and photos. As the photos show, there is a deal more than the chassis being to long that is wrong, though am wondering if much of this is down to original drawings for a smaller scale being blown up to a larger one. That said, there are some things that are hard to explain, like the nearside cab window, the bottom edge of which should come level with the beading. At least this is easier to fix than the opening being too big and only requires a few minutes with a file. The bonnet is likewise too short [by a good six inches], but in this case the only option was to make two new sides from brass sheet. Not a disaster and again, only a few minutes work to cut out two new rectangles. Perhaps the most odd thing is that the outer sides of the 'wagon' body are bigger than the inner ones. The former are correct, but this means a section of inner planking will be needed to bring the inners level with the outers. The etches include various bits of strapping for the wagon side, but while these might be ok in a smaller scale, they are not chunky enough for 7mm, the representation of hinges being far too flat. The other problem is that the cab sides should have a small, but noticeable amount of tumblehome on the lower edges. The etches make no provision for this and I didn't notice until after the cab unit had been soldered in place. After a bit of head scratching, realised I could address it by using a slitting disc to carve a slot part way up each side, then bend them inwards and re-solder. Overall, I think I have been a bit spoiled by recent kit builds, where everything has gone together well. These etches are rather more 'old school', but once I got my head round the fact that a bit more work was required, then they represent an interesting challenge and are still a worthwhile timesaver over a total scratch build. The etches are now pretty much used up [apart from the radiator grill], so the rest is down to me. The top of the bonnet and the cab roof will need to be shaped [probably from solid blocks of plasticard], plus there are a fair number of minor details and the cab interior to add.
-
Air brushes need patience and practice - I still have to psyche myself up to get my one out and most of the time stick to automotive rattle spray cans. Seems to me that preparation and cleaning up time for an airbrush far exceed the actual time spent painting! However, there are things [like weathering] where nothing else works as well. I have an old loco body that I use for practising before I do any proper work. A couple of good books on the subject are the definitive 'Art of Weathering' by Martin Welch and the more recent 'Handbook of Painting & Lining' by Ian Rathbone - both Wild Swann. Just keep at it Noel - you already show a good sense of subtlety and that is half the battle.
-
Simple, but very effective. A fine lesson in how not to overdo things. A layout that always seems to photograph well because it has real atmosphere - and that is not a 'gimme' either.
-
If you are testing actual running of stock, then the main issue will be how tight your curves are and whether there are any sharp changes of gradient. Really tight curves will limit the wheelbase of any locos you use and make longer vehicles look unsightly. Uneven track could cause pick up problems, particularly with short locos and/or ones that don not have pick ups on all wheels. The other issue with sharp curves might be buffer locking, but not if you are using tension lock [or similar] couplings. As others have mentioned, the other point of track testing is for electrical continuity. Using live frog points should help reduce problems, while DCC with 'stay alive' capacity seems to overcome dead frog points these days. Bottom lines are probably down to using the largest radius curves and points you have room for. Visual effect will be better as will running. However, if you have to use sharp curves, then keep loco/wagon/coach lengths short and you should still be alright.
-
Arigna Town - this week's scenery
David Holman replied to David Holman's topic in Irish Model Layouts
A few changes have been made to the layout recently, essentially to make exhibiting a bit easier, as per entry 295. Crating the boards together has not only cut two journeys to/from the car, it also means the layout is protected if loading takes place when it is raining. This worked well for Tonbridge & since then, have gone on to replace the beams and trestles with integral, folding legs. Have used these in the past, but Ulysses worked well. So, another couple of journeys avoided. At the moment, have just put Dinghams on the two passenger trains and fitted a single electro-magnet. This seems to work well, so will test under exhibition conditions at the end of April at the Hitchin 0 Gauge show. Fingers crossed, should be able to fit Dinghams to the ends of freight stock rakes too, though likely this will not be as reliable as everything gets turned in the fiddle yard. -
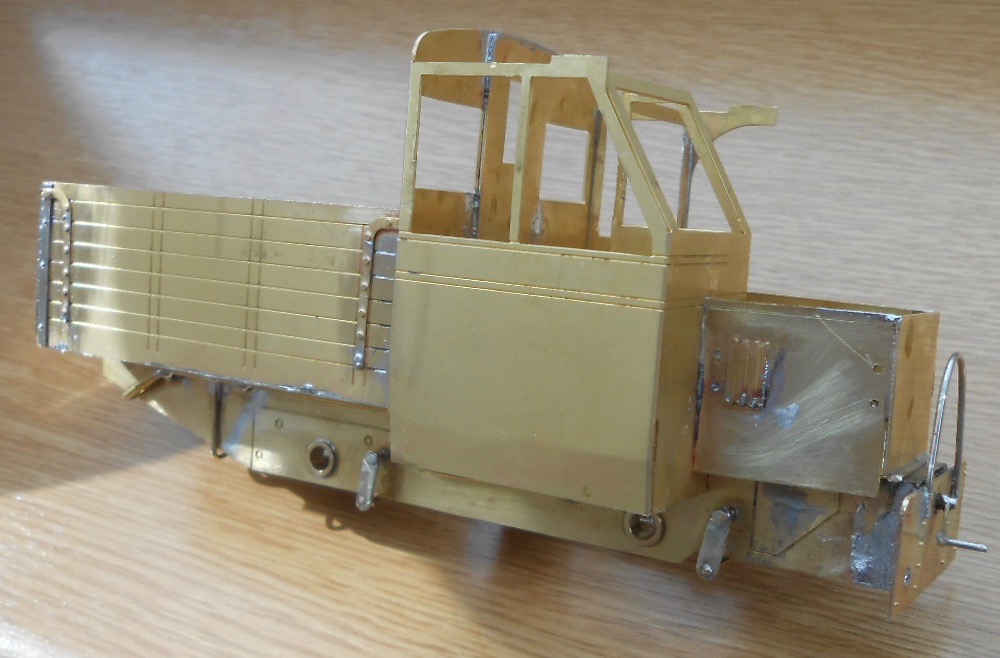
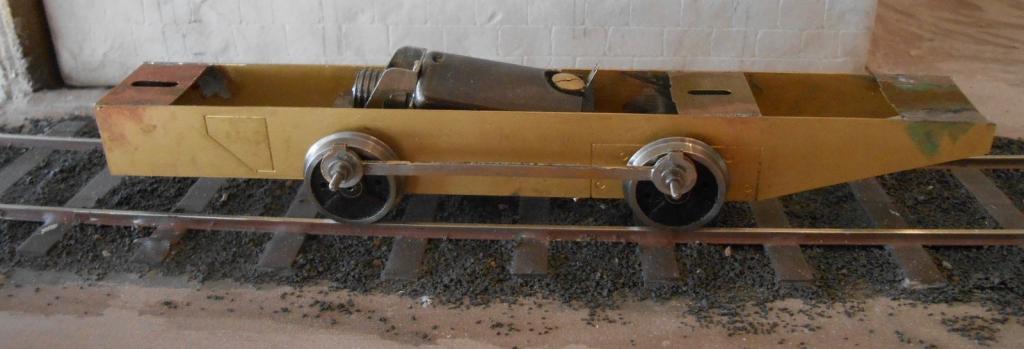
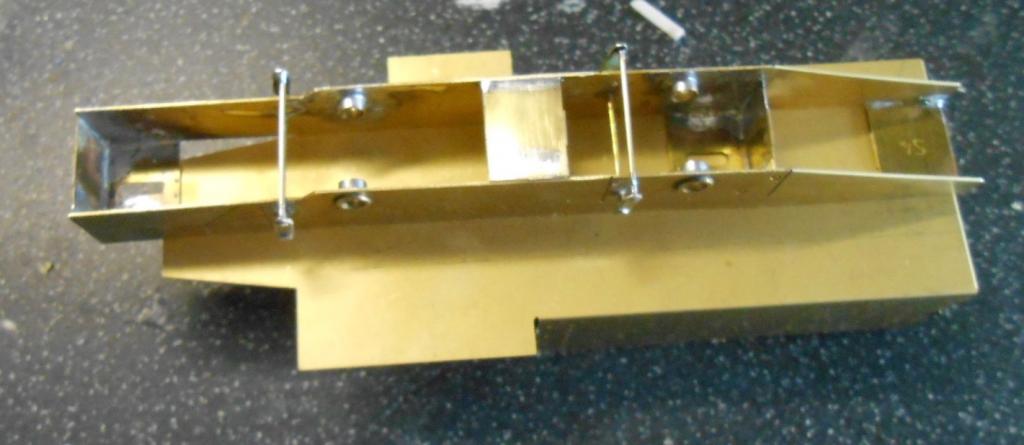
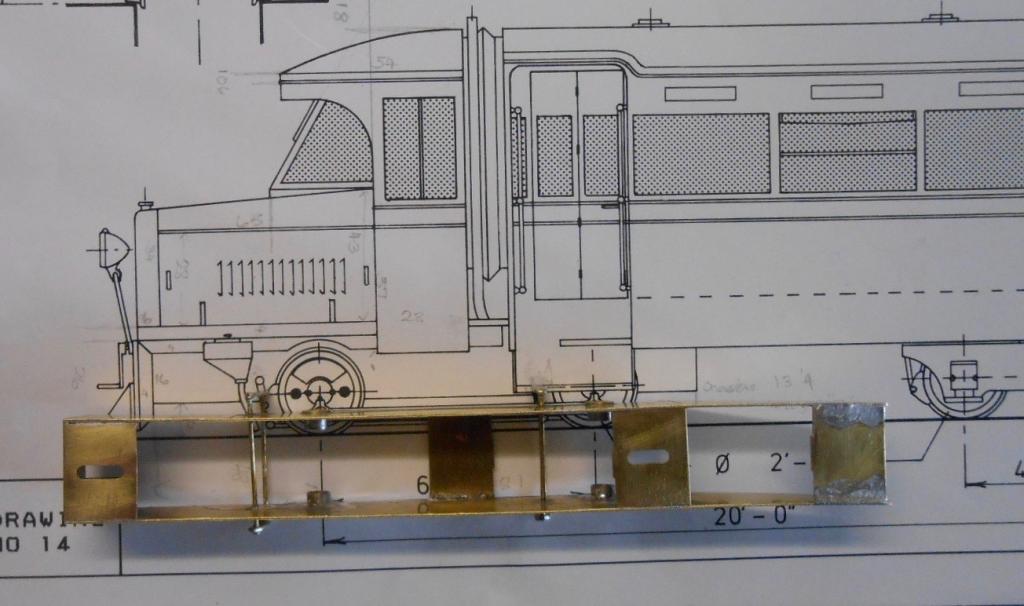
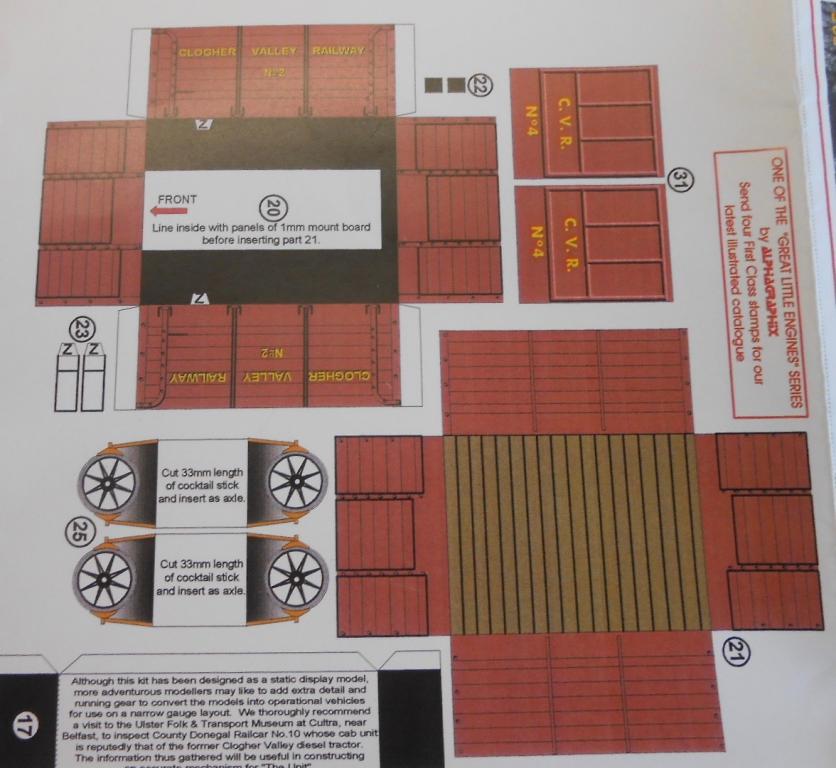
It's been a while, but have recently moved back to building rolling stock for my Clogher project. One of the joys of railway modelling being that, if you've had your fill of scenics or model buildings, there is always something else to have a go at. I've had a set of Worsley Works etchings for the CVR 'Unit' for around six months, unusual for me as I tend to get on and build what I buy straightaway. Worsley etches are meant as an aid to scratch building, so there are many bits to make and/or source yourself, but it is a start and I doubt whether Heljan are planning to do a RTR version [in 7mm scale/21mm gauge] anytime soon. However... There are issues, even with such basic etches. For one, the coupling rods are not the right profile, and they should be fluted, not plain. Indeed, looking at photos in the Patterson book, a piece of bullhead rail would probably suffice! That said, the rods line up nicely with the axle holes. Frame spacers provided are for 16.5mm gauge, but I was fortunate to find something suitable in my scrap box, so a basic chassis wasn't long in completion - or so I thought. I'd gone on to add hand made brake hangers, got the motor/gearbox installed and added an extra layer to the coupling rods to make them look more appropriate and was starting to think how the bodywork would be added. At this point, I discovered that the chassis did not match the 7mm Narrow Gauge Society drawing, nor the Alphagraphix card kit I'd bought. Indeed, the latter is printed in red-brown, when Patterson says the livery was grey. Cue the mutterings. In the end, by careful study of photographs, I took a scale 2 feet of the front of the frames, so am now hoping that the other bits will fit! At least it seems to run well, though hiding the pick ups will not be easy with wheels this small.
-
Great stuff. Well done Mick - told you everyone would like it! The signature loco for Bantry. Indeed am thinking you probably ought to have more than one... Will now be wondering if I can justify one on Arigna. Alphagraphix have one in their 7mm catalogue, but then they can also equip a Timoleague and Courtmacsherry layout. All very tempting!
-
Well done folks. Heard about this from Mike at Doncaster show and had a feeling it would be good. Having visited Bantry last summer (rather too much liquid sunshine that day) can see the setting is splendid. Can also see already that you have the skills to do it justice! As we all know, sourcing appropriate stock for Irish projects can be a problem, but stuff is out there and as long as you can make stuff run nicely then all the other skills (bodywork, detailing) are eminently transferable. A fantastic project that deserves to do well and will be looking forward to seeing it progress
-
Just keeps getting better and better.
-
Lovely job and a cunning bit of work with the under frames. Fine paintwork too.
-
Arigna Town - this week's scenery
David Holman replied to David Holman's topic in Irish Model Layouts
Thanks for the pictures, Paul - it was great meeting everyone at Doncaster. A very good show & we were extremely well looked after. Most welcome too, given the weather on the way up and the traffic on the way back. About to do it all again at Tonbridge this weekend, then a few weeks off until Luton/Hitchin at the end of April. Between now & then, am hoping to make some changes to the way the layout is exhibited - again! First up, the Iain Rice 'Ulysses' type supports of separate trestles & beams will be replaced with integral folding legs - two on the fiddle yard and one pair each on the scenic boards. Having paired the four boards for transport, this has worked well this year, so though adding the legs will increase overall weight, I move the boards by sack barrow now. Hence can cut down the number of trip required to/from the car from 9 to 5 - significant when I paced it at 130 metres each way at Doncaster! Am also going to fit auto-couplings to at least some of the trains. Having previously thought Dinghams would not work [because they are 'handed' and all trains on Arigna are reversed], realised that I can easily use Dinghams on both passenger trains, while even the goods trains will only need both hook and loop on the brake vans. More of this in a few weeks. Reason behind all this is Iain Rice's new book 'Cameo Layouts'. Am absolute must read if you build exhibition layouts and just as inspiring if you don't. Iain has an entertaining style of writing and has pretty much been there & done it where exhibiting is concerned over the last 40 years. Well worth a look. -
Beg, borrow or steal because static grass is a huge improvement over scatter in 4mm scale or larger. The Flock it is the top of the range machine and superb. However, smaller, cheaper versions are not to be sniffed at while the Noch puffer bottles are extremely good for tight corners.
-
modelling MGWR flat bottom track
David Holman replied to Junctionmad's question in Questions & Answers
Arigna Town uses code 100fb rail in 7mm scale. The usual bullhead stuff is code 124 I think. It was solder construction on PCB sleepers. Guess I could have tried to replicate chairs or spikes, but even in the larger scale, on a 12 foot scenic section the lack of them is not really noticeable, so unless a very small, highly detailed diorama, would think the same applies in 4mm and following Mayner's suggestion seems the best idea. -
I am sure you will be fine, Keith. I just used the card kit as a drawing for all the dimensions, then photos to get the details, plus a bit of guesswork on the interior. What scale are you planning? Even in 7mm scale it is still a very small model, so am sure anything bigger will not only make like a bit easier, but allow a fine model too. Keeps us posted!
-
Super work, as ever Nelson. The late, great David Jenkinson used all sorts of dodges where stuff wasn't easily seen. Eg his coaches rarely had brakes, underframes were only what you could see and many had little in the way of interior detail - but the looked fabulous and ran well. You are in good company methinks.
-
When I did my 7mm scale version, I used the Alphagraphix card kit as the starting point, Keith. Cost the princely sum of three quid, so just used it as a drawing to build mine from nickel silver and plastic sheet. Made the Howden Meredith patent wheels by adding a slice from a Corgi Classic road bus wheel. Alphagraphix advertise in Railway Modeller, but do not have a website. You have to send postage stamps in return for a catalogue.
-
Arigna Town - this week's scenery
David Holman replied to David Holman's topic in Irish Model Layouts
If you go to RM Web's exhibition pages, on the Canterbury show pages there is some video footage of Arigna, after some views of Sanford & Bamwell. The sounds are not mine, they were dubbed on after. By the by, well worth getting hold of the latest Model Railway Journal. Martyn Welch has at last been persuaded to share his latest developments in the art of weathering. Lovely stuff! -
Arigna Town - this week's scenery
David Holman replied to David Holman's topic in Irish Model Layouts
Somehow managed to book myself into four shows in five weeks, with Canterbury last week and Southampton this weekend. The former is a nicely run local show, where there was a good selection of layouts, the latter very much more ambitious. Twenty odd layouts in a collection where you wouldn't mind getting 'worst layout' award, such was the standard. As it was Pempoul got the nod from the judges, just ahead of St Merryn [P4 gem, based on Padstow] with Arigna not far behind I was told - which will certainly do me! However, one of the best bits was being next door to Andy Cundick's proper Arigna - and very good it is too. Even had the 4 wheel bicycle based track inspection trolley, as seen in Portillo's Railway Journeys a couple of week's back - though he did get a bit of gentle teasing for it not being motorised. Quite how you'd do that in 4mm scale is anyone's guess... The Southampton Club also lay on a fine array of demonstrators, including Tony Wright [locos] and Jeremy Clifford [2mm timescale]. Took very little persuading to join them, their wives & the Gravetts for a curry on Saturday night & very fine company they were too, with conversation ranging far & wide. As usual, met several people who knew Leitrim well so it was lovely talking to them. However, am thinking that there is a bit of an omission on my figures, with no priest or nuns, so must look out for at least one of each. Re the latter, remember on one of the early appraisal courses run for school staff, found myself with two secondary school headteachers, one of whom was indeed a nun. We had to go off and practice what we had been taught. The room we were sent to was a bedroom, complete with a video camera on a tripod. We had to record our discussions and review after. As we were packing up, we heard a noise outside and on opening the curtains found the window cleaner outside. He however, was looking in a a room with a kingsized bed, two men, a nun and a video camera. How he didn't fall off the ladder I'll never know, but his face was a picture. Our nun thought it was hilarious too. Packing up after the show was a nightmare as it was chucking it down with rain - probably the worst conditions I've ever done this in. However, back home, everything seems ok, but some checking needed before Doncaster in two weeks time -
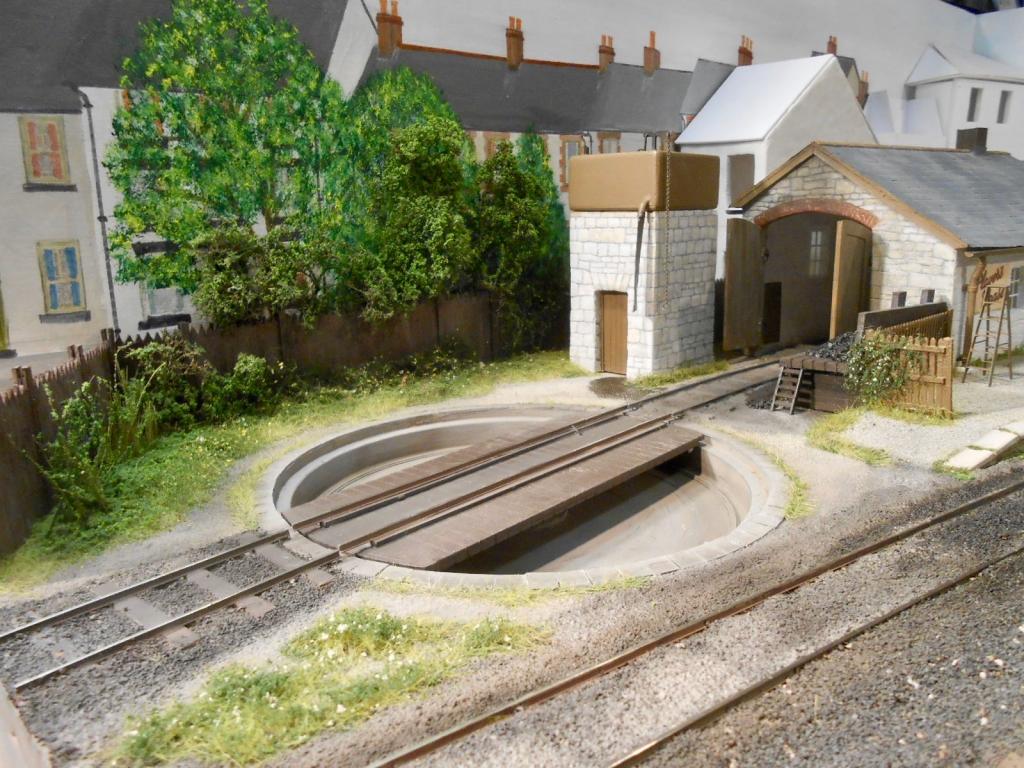
Looks pretty damn good to me - the flow of the track work is splendid and am sure must contribute to good running. Re platform surfaces, in 4mm scale or smaller, a painted surface may well be all the texture required. If a little more is wanted, try talc sifted on to GLOSS paint - either grey or black, depending on the colour you want to represent. Chinchilla dust [fine sand, not freeze dried rodents] on gloss paint works well in 7mm scale - did Fintonagh's platforms that way.
-
Hey, not bad at all! Only the track gauge stops it being utterly Irish and that is more than forgiveable because it reeks the right atmosphere. Nice one.
-
It is also possible to buy 'transfer rivet strips' , Tony. Not sure who makes them, but guess someone else will be able to post that soon and I'd quite like some too! From what I have seen, the kits are very good, but well done you for wanting to scratch build too.
-
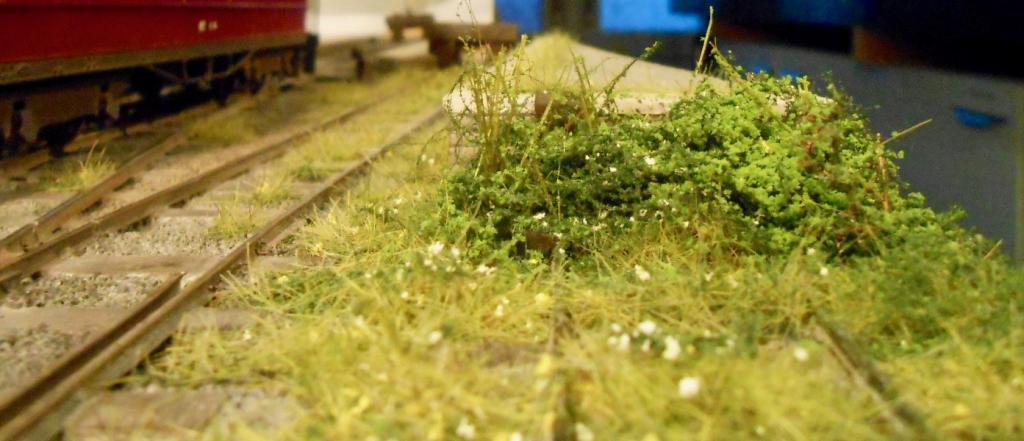
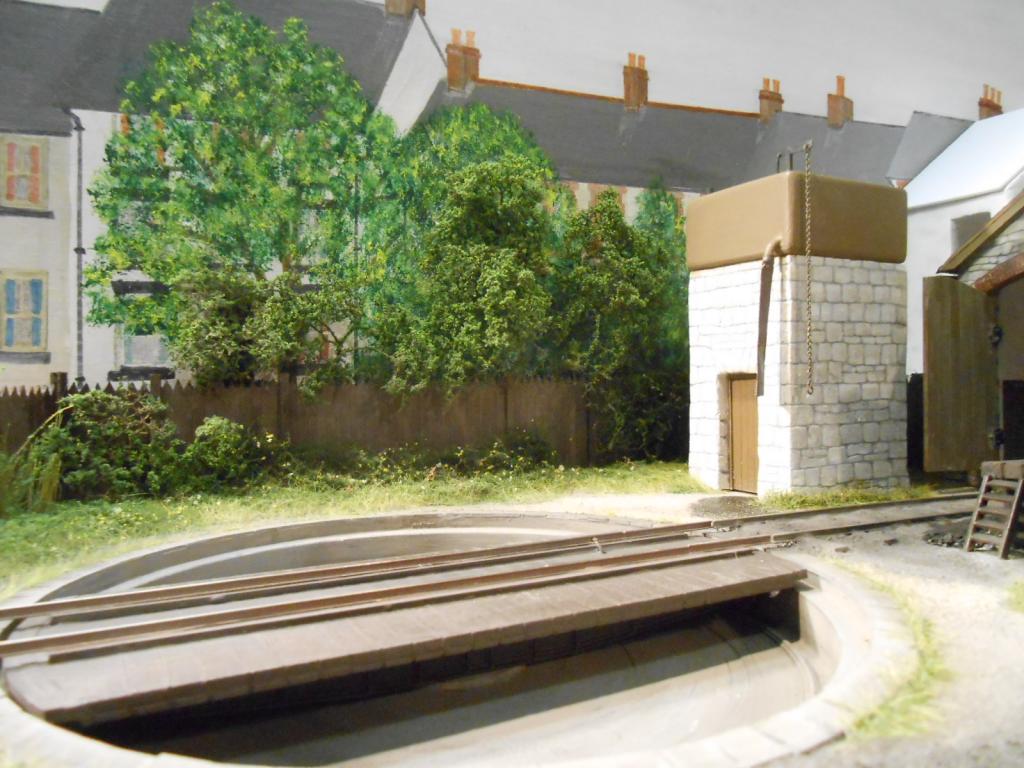
A good dozen or so anyway! To which can be added a bit of sea foam, some postiche, a static grass machine, a Noch puffer bottle and some PVA glue. Been busy today with the above, starting with the sea foam to try and bridge the gap between a 2D back scene and the 3D background. Sea foam tends to be a bit fragile, but it does produce low relief [indeed full relief] small trees in quick order. Working forwards, had a go at a patch of nettles, a few much scraps of sea foam for low growing shrubs & then moved forwards to start adding grass & weeds to the two sidings at the front of the layout. Various types of scatter were added to give some extra texture & depth to the grasses, though this left the platform looking rather clean and stark. Have so far added a flower bed and some weeds, though it still lacks details like figures. Coming on nicely though.