David Holman
-
Posts
4,359 -
Joined
-
Last visited
-
Days Won
117
Content Type
Profiles
Forums
Events
Gallery
Blogs
Everything posted by David Holman
-
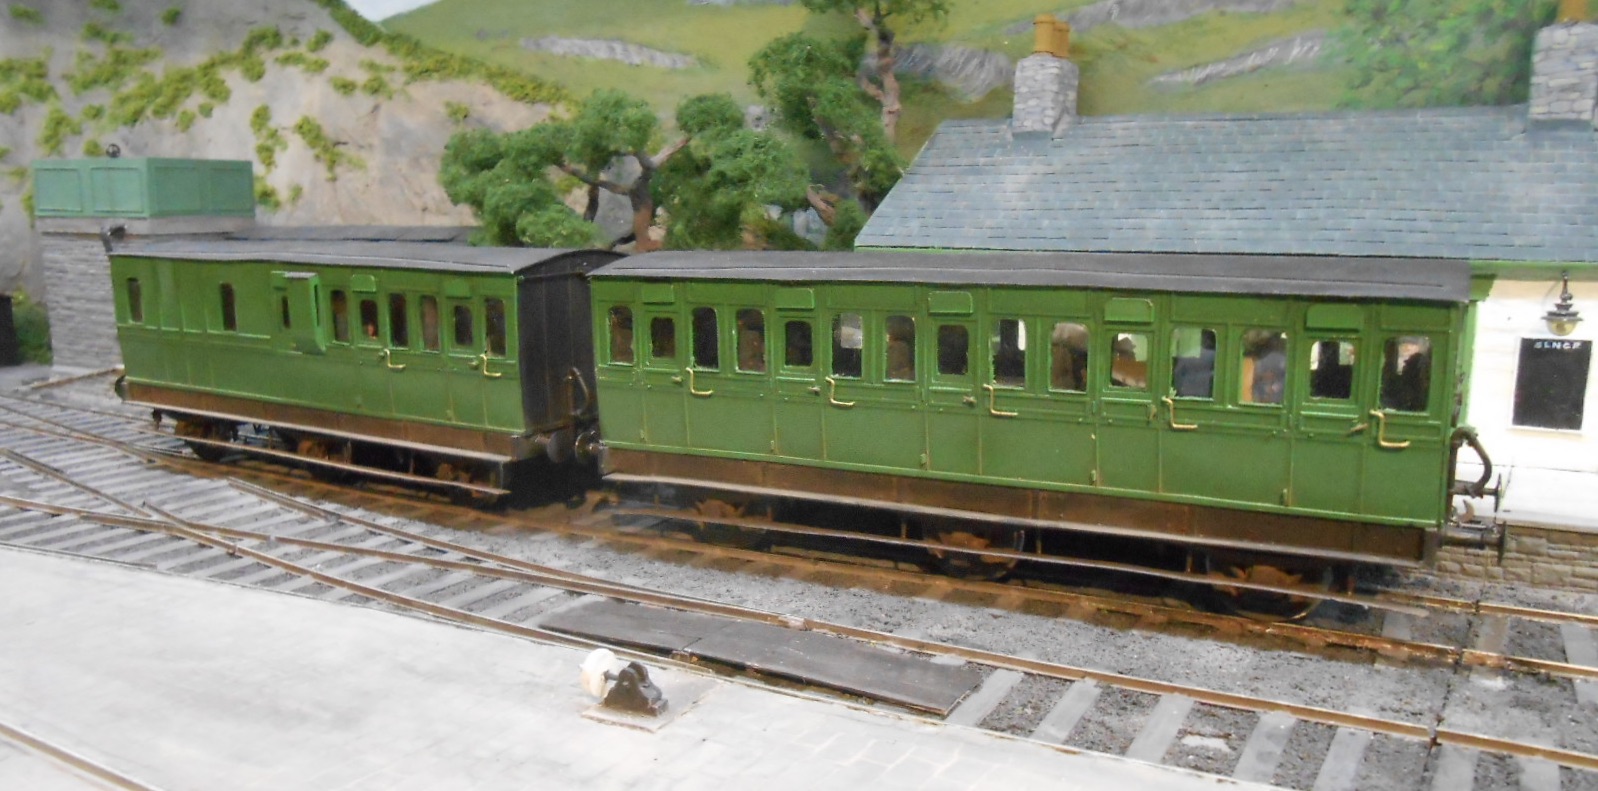
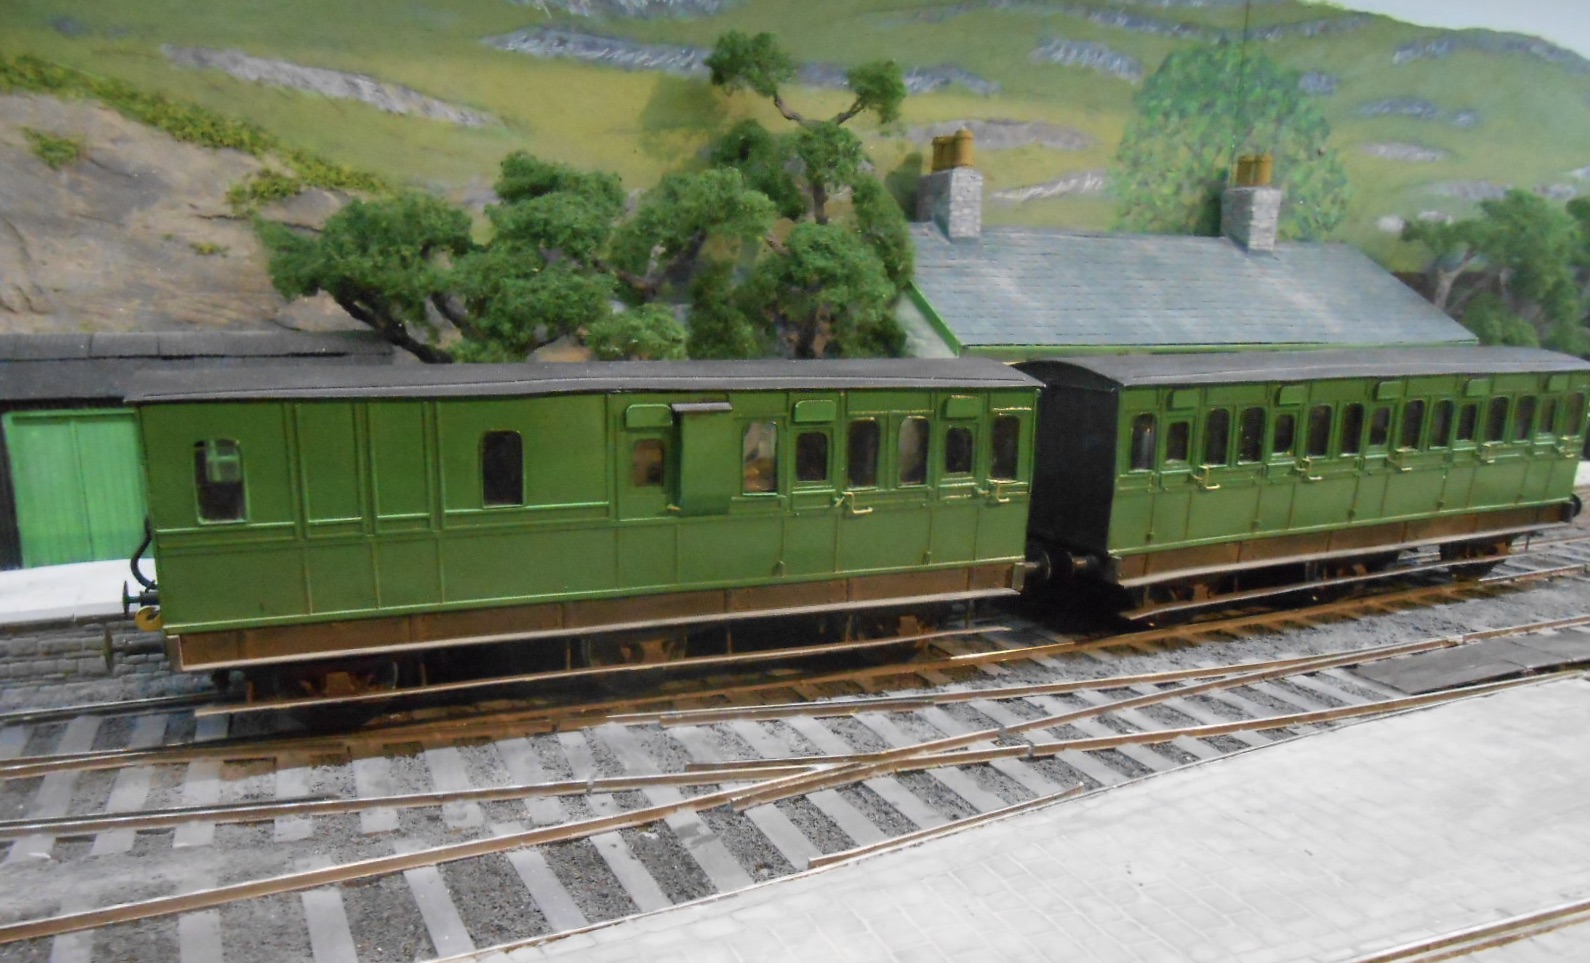
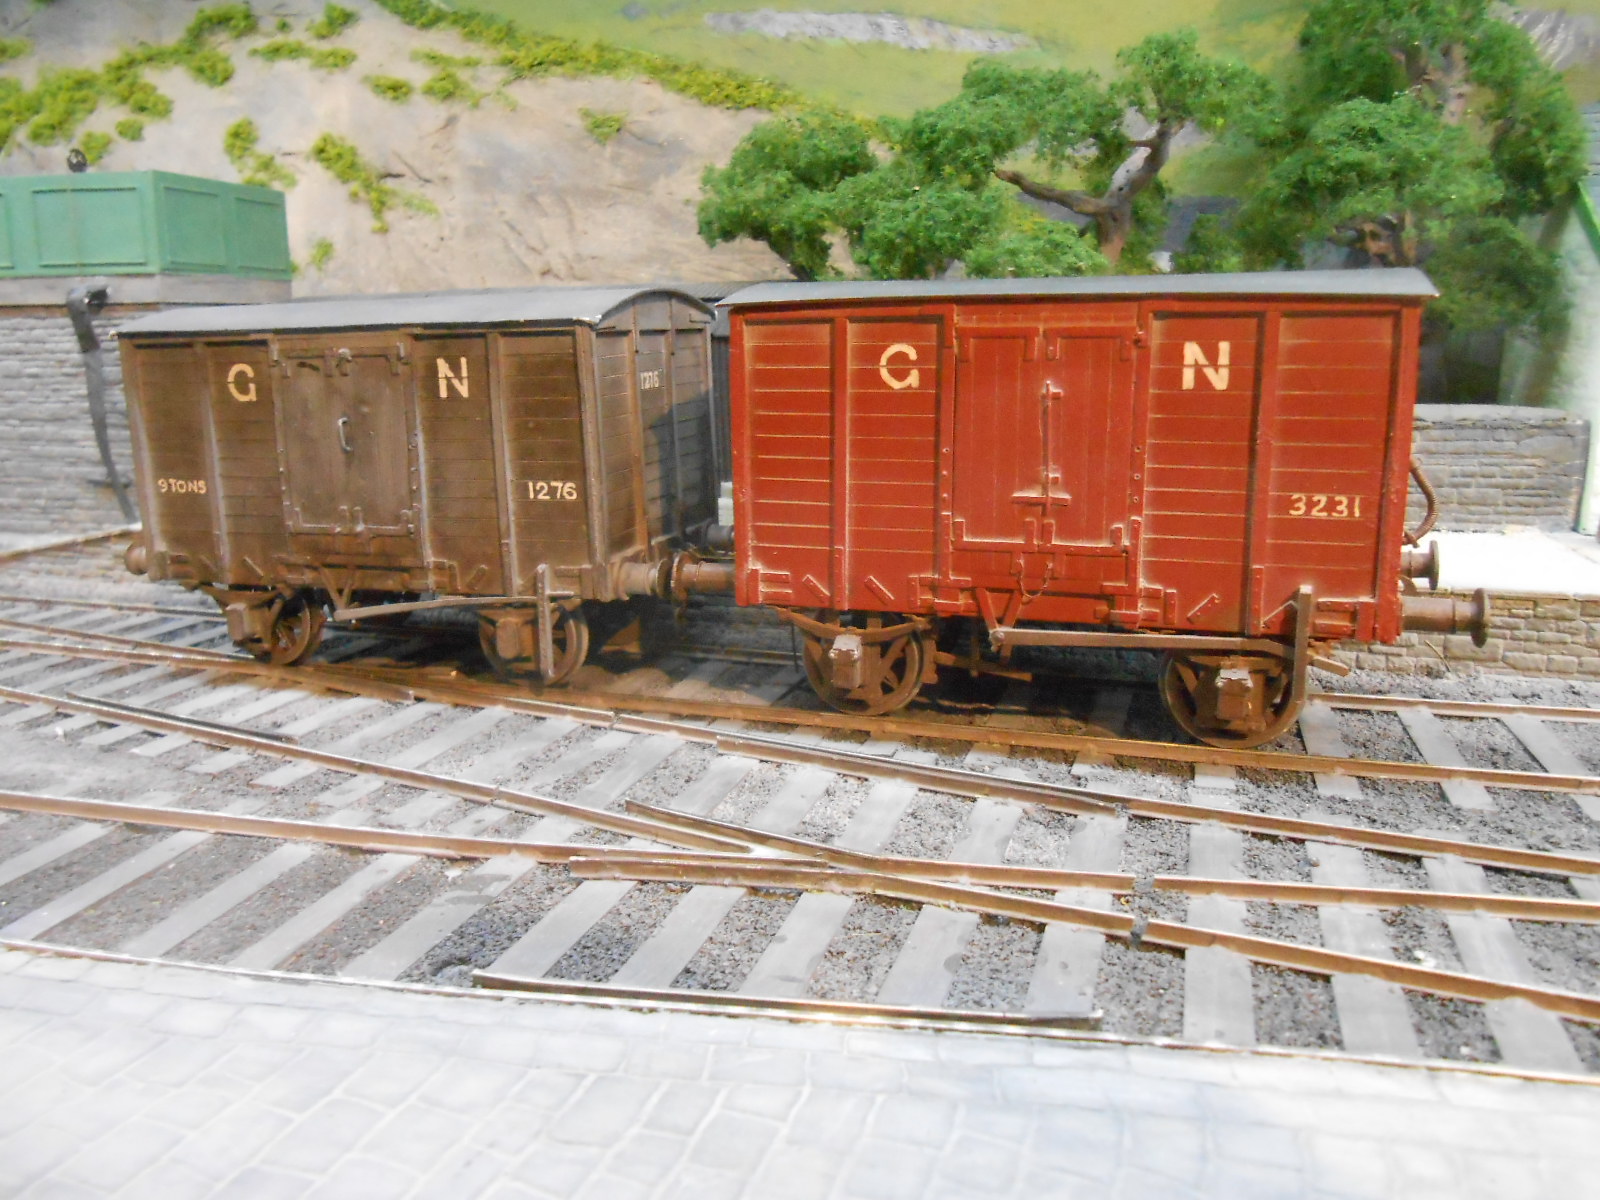
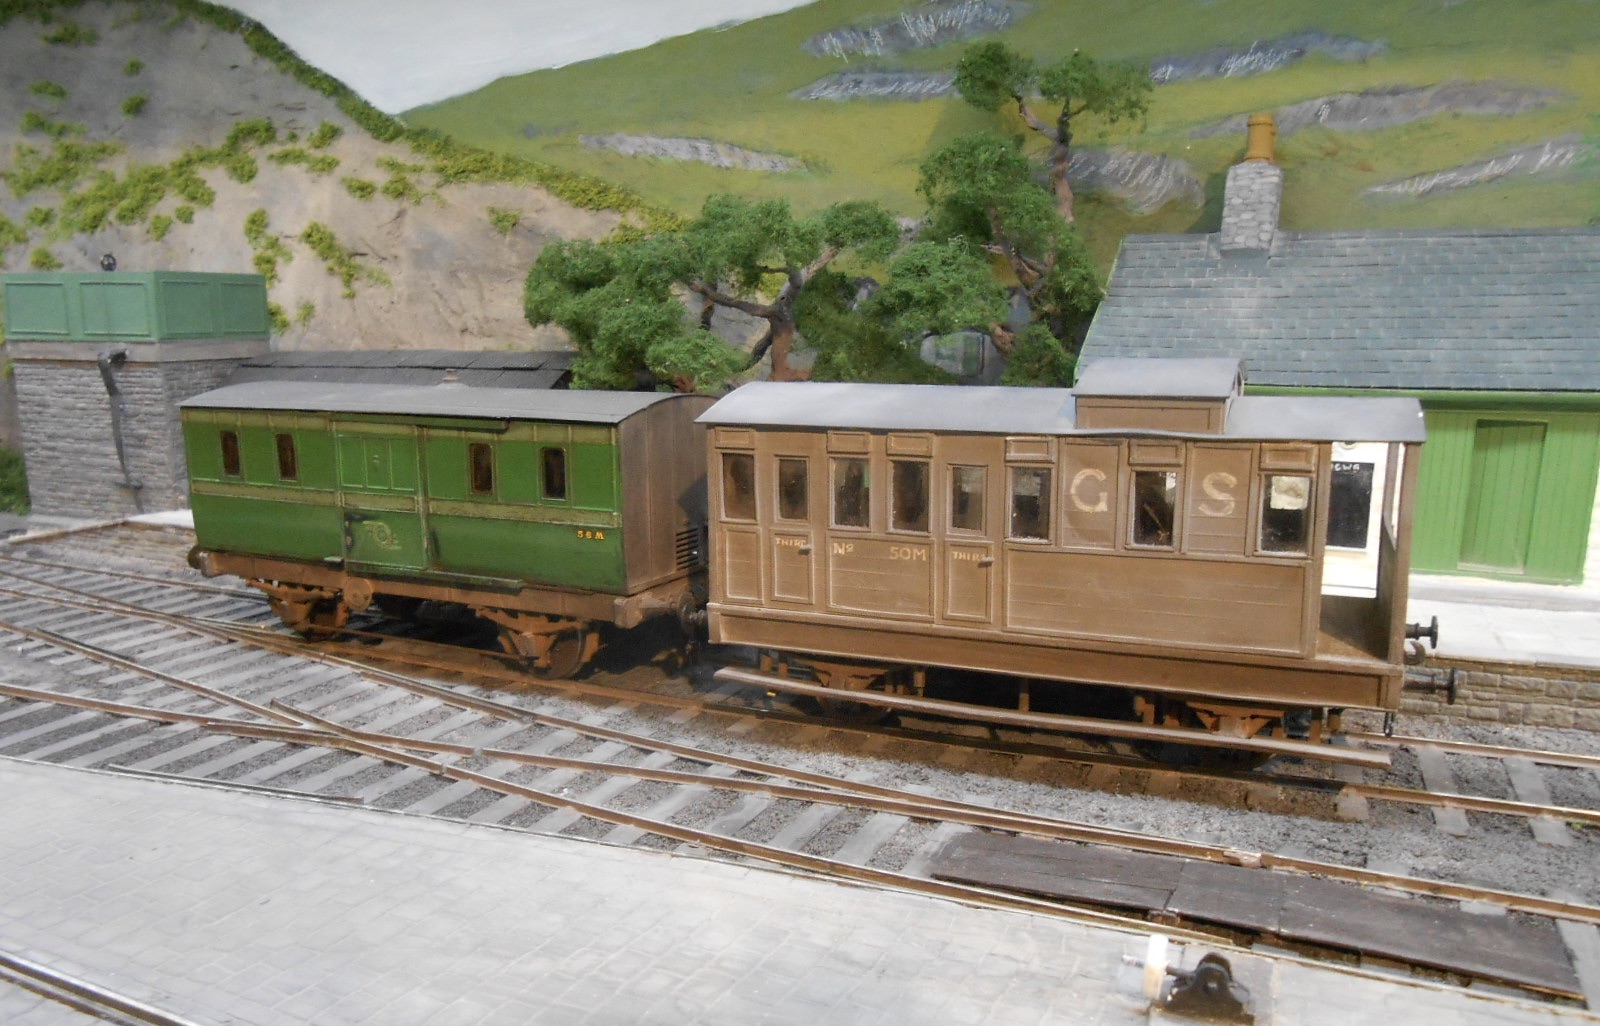
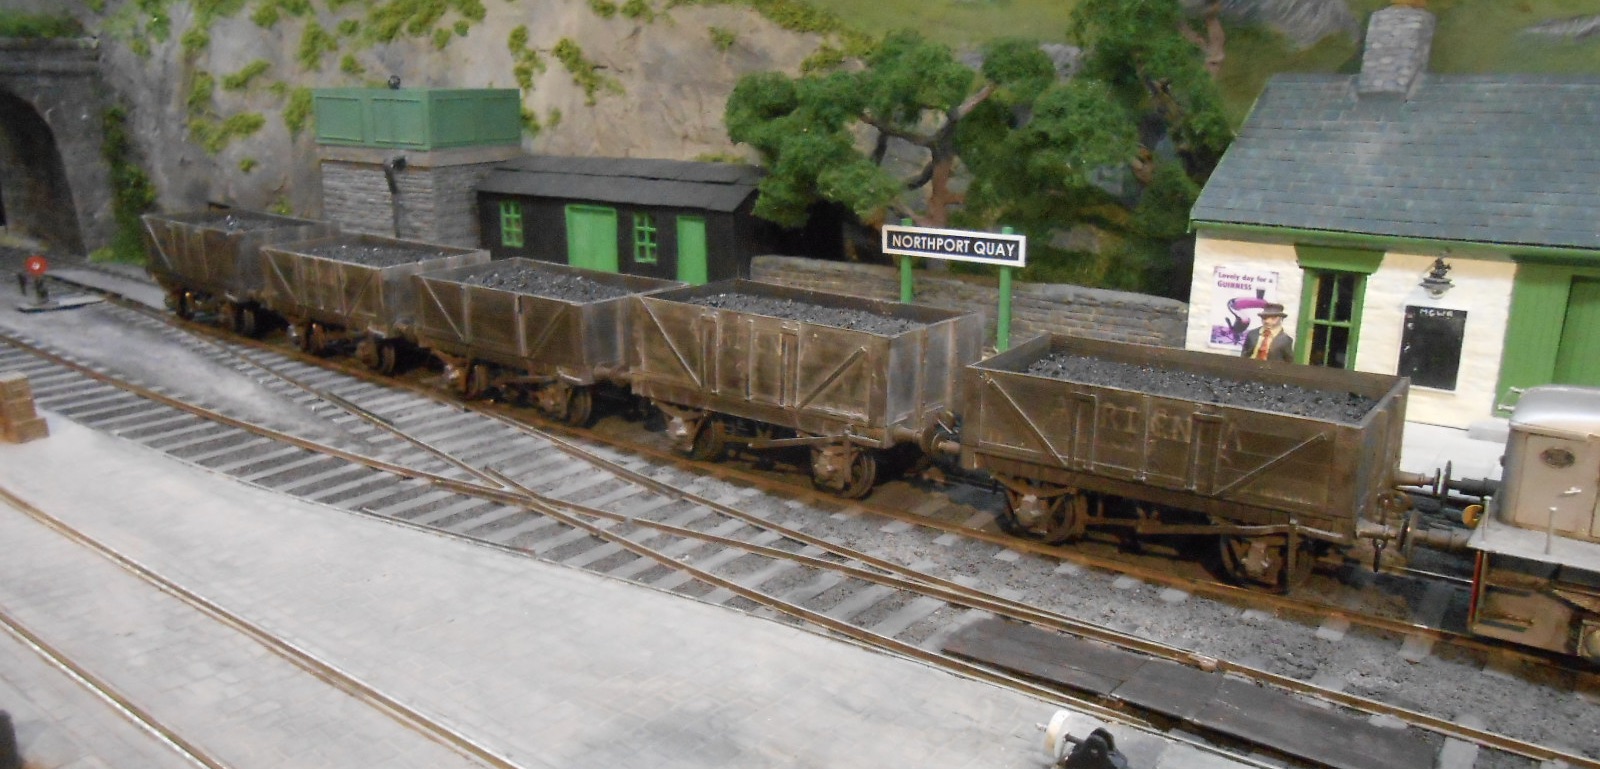
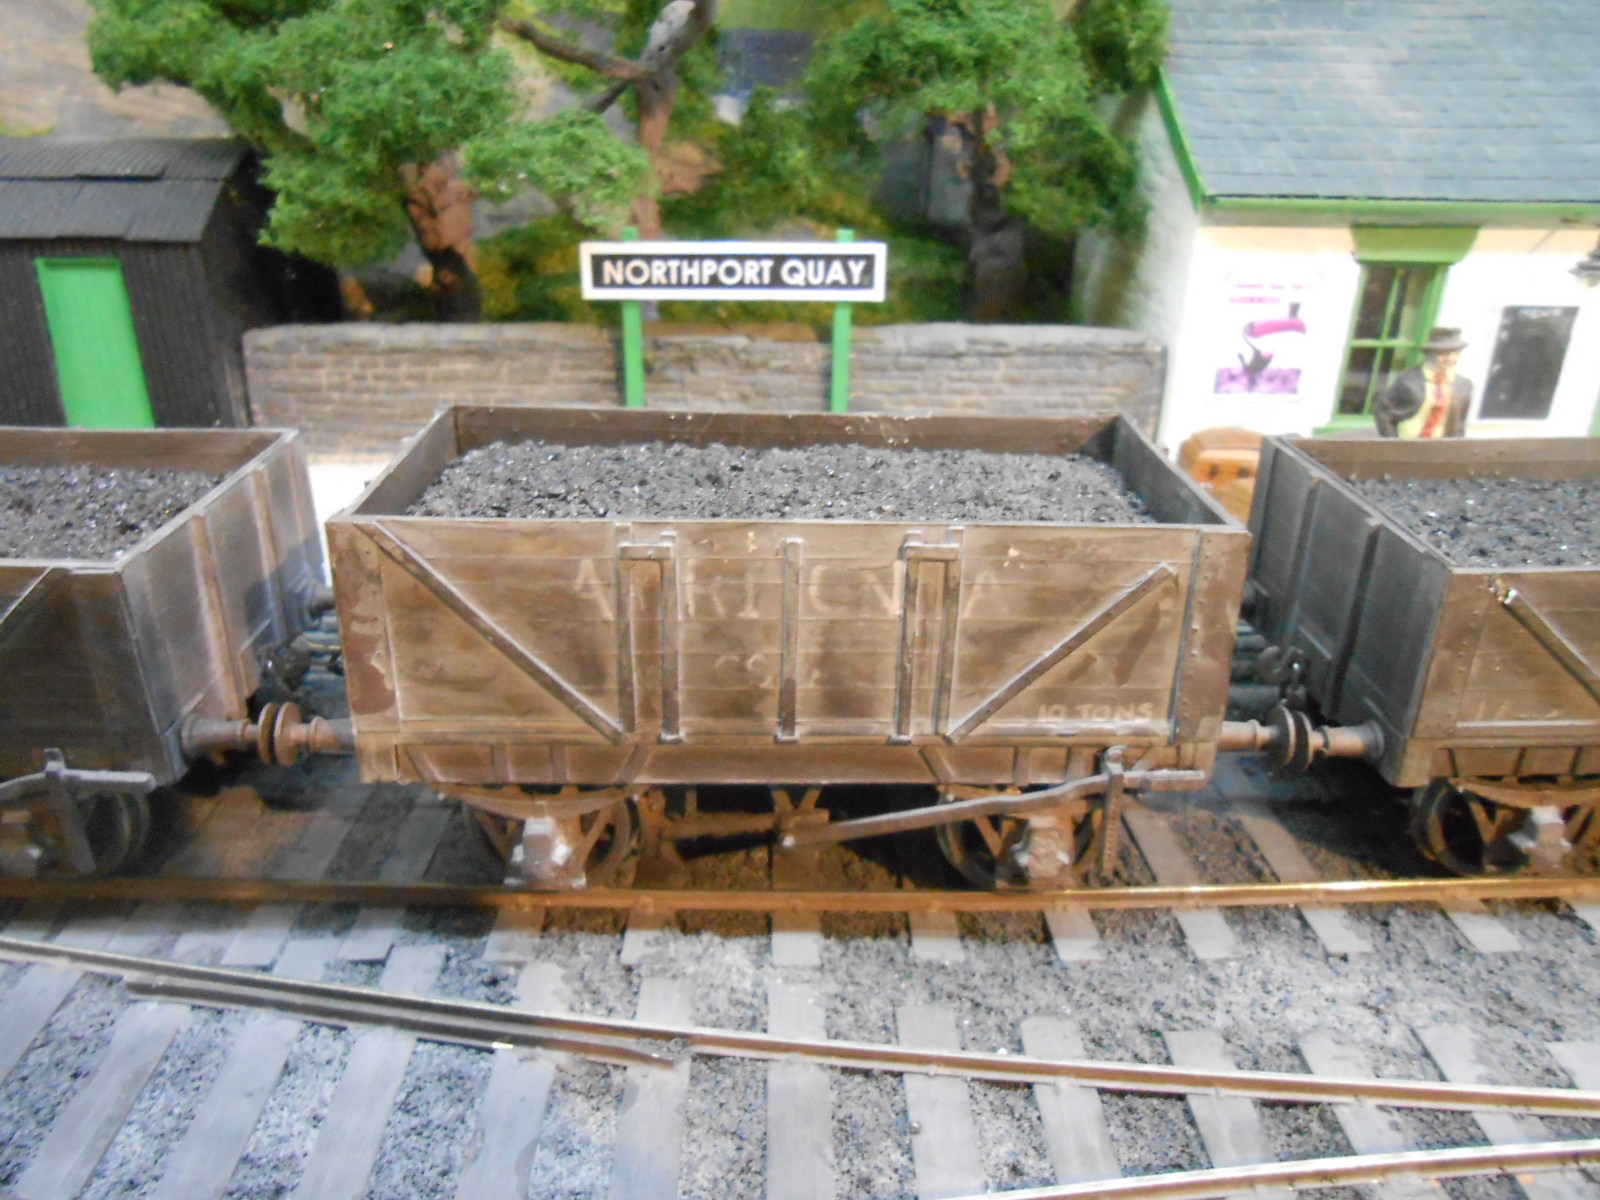
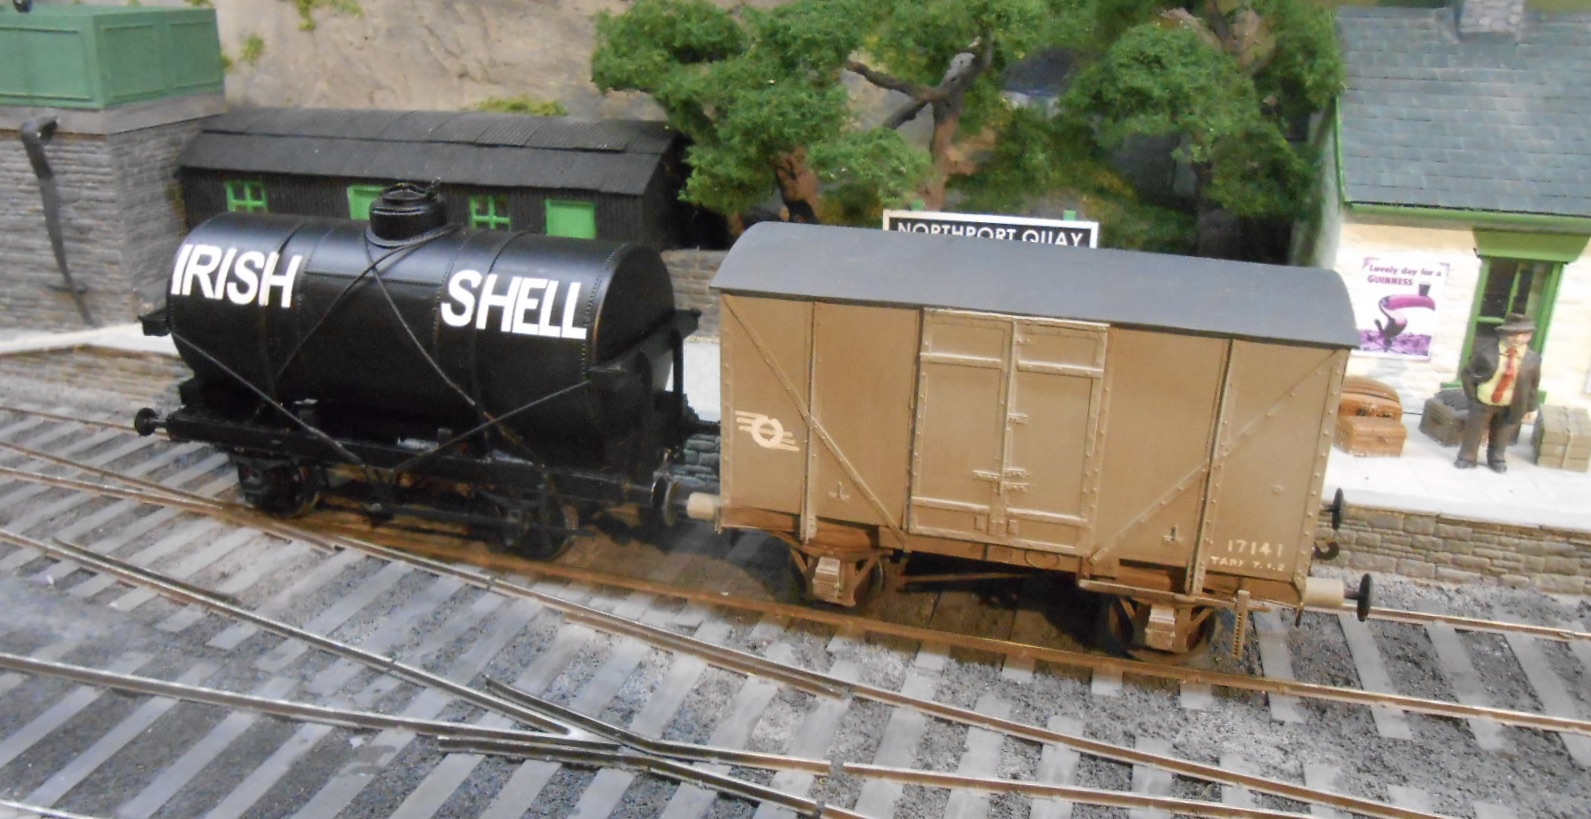
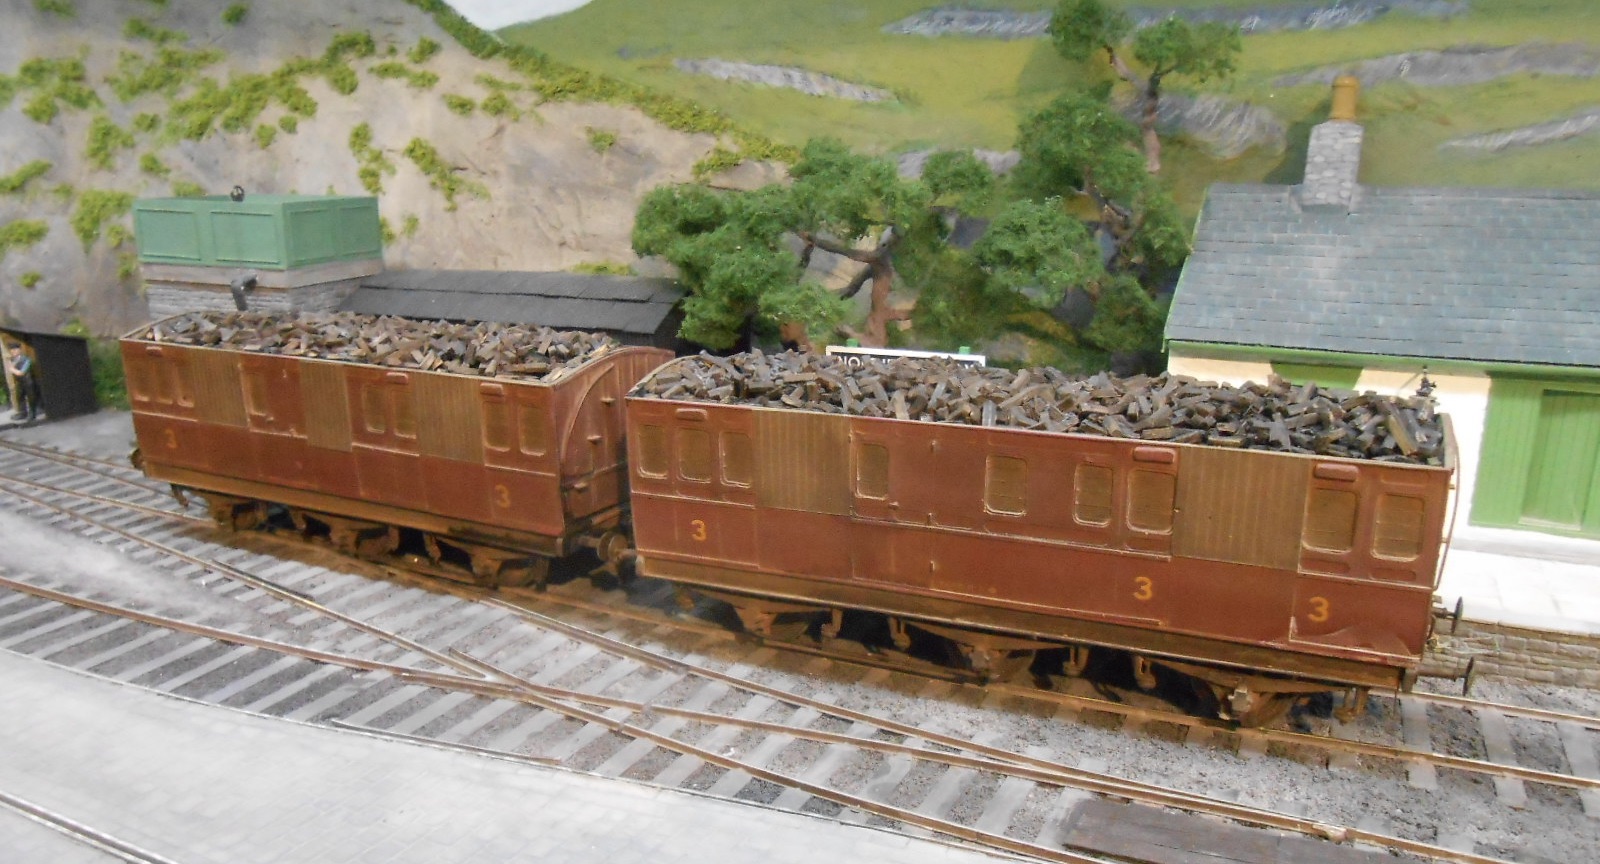
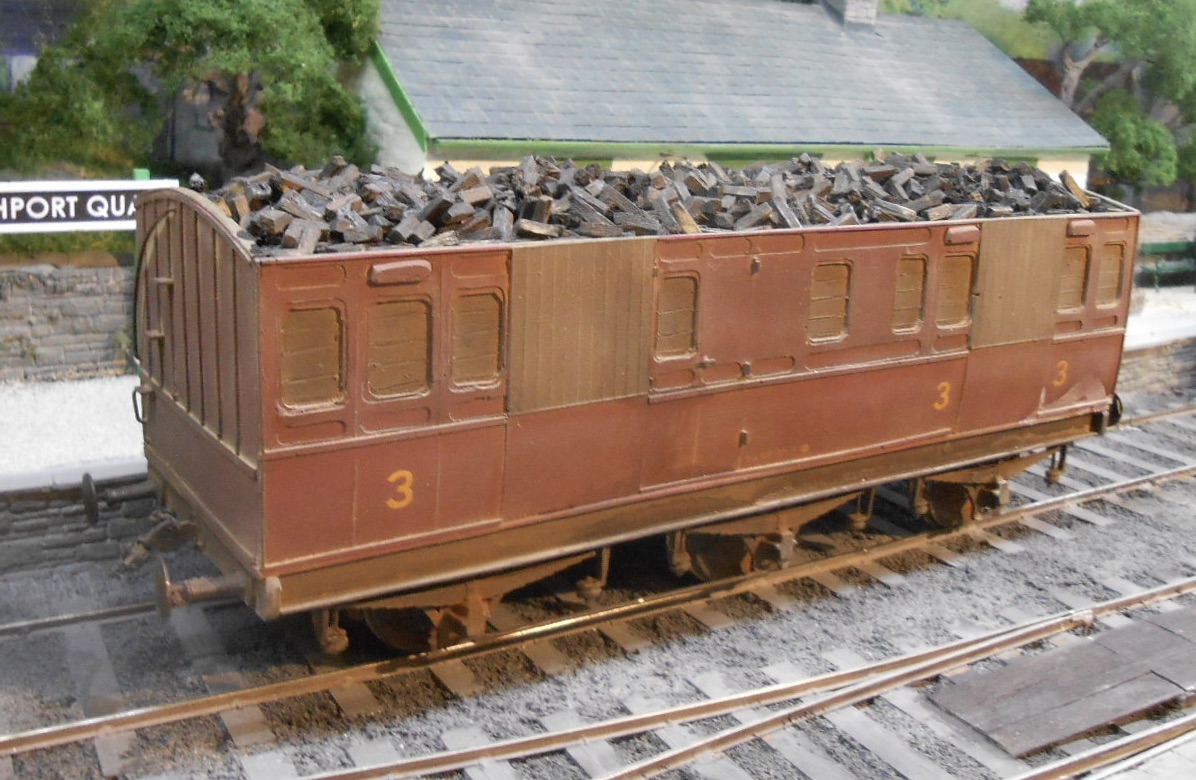
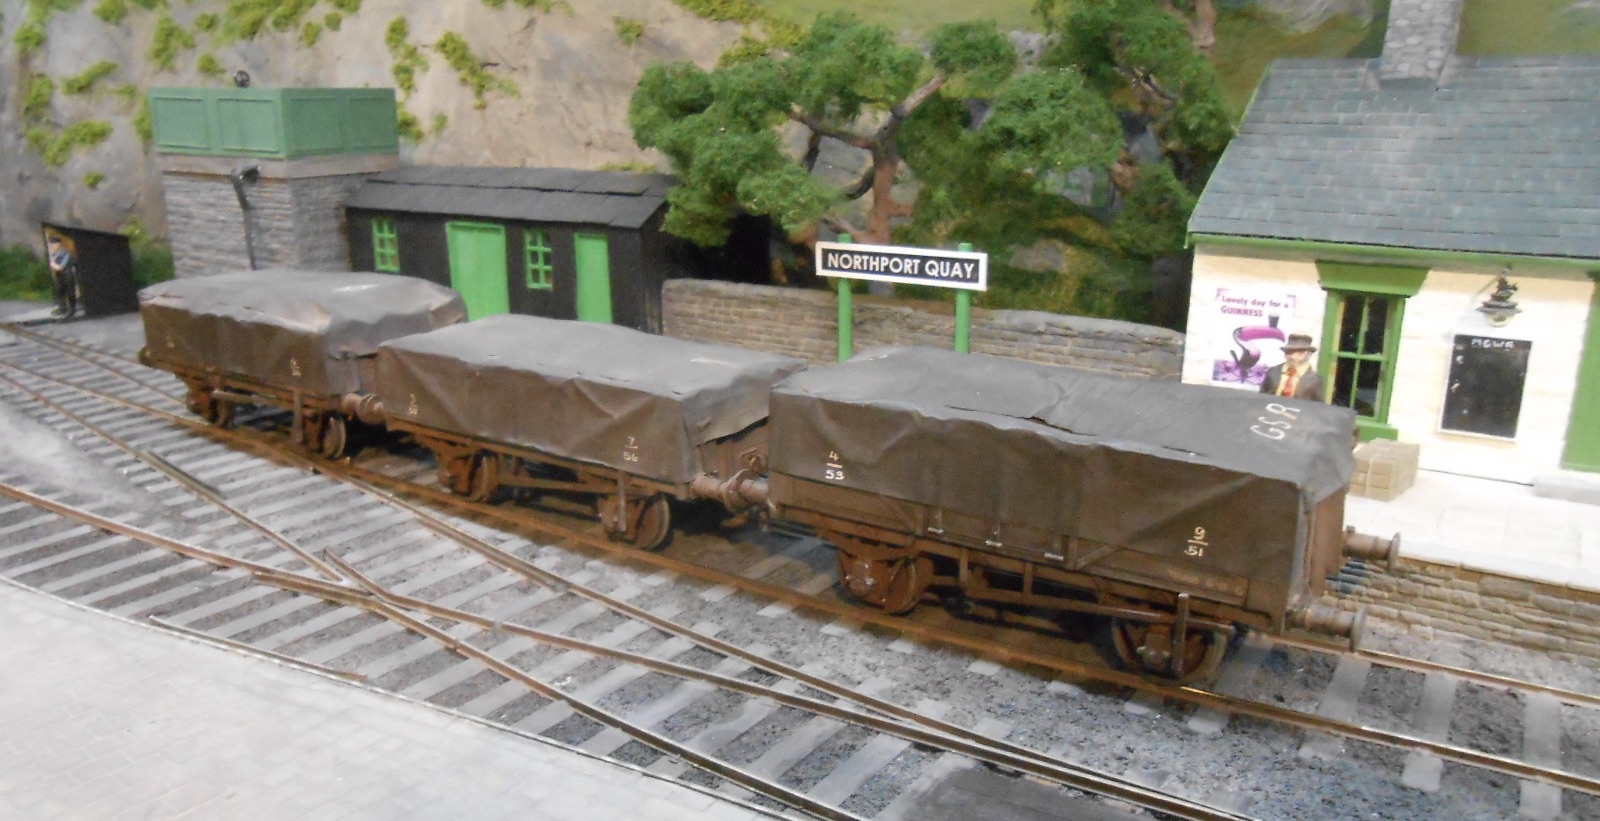
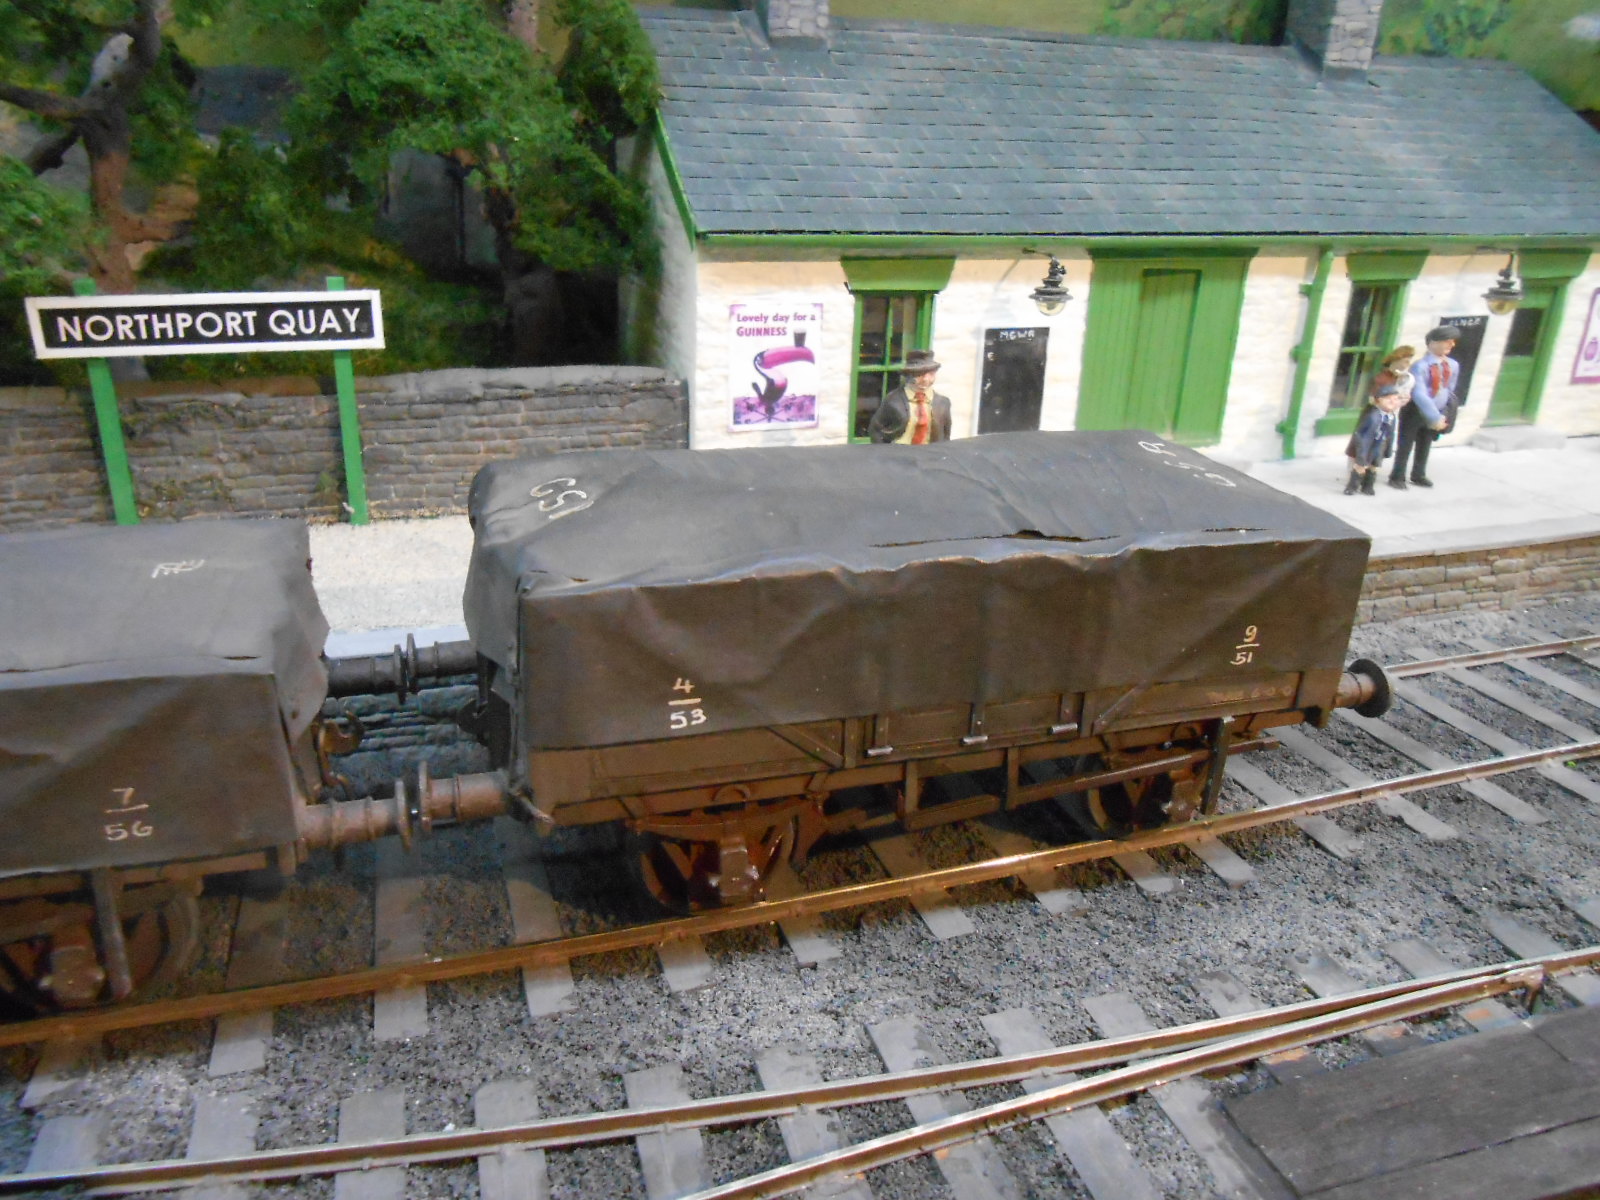
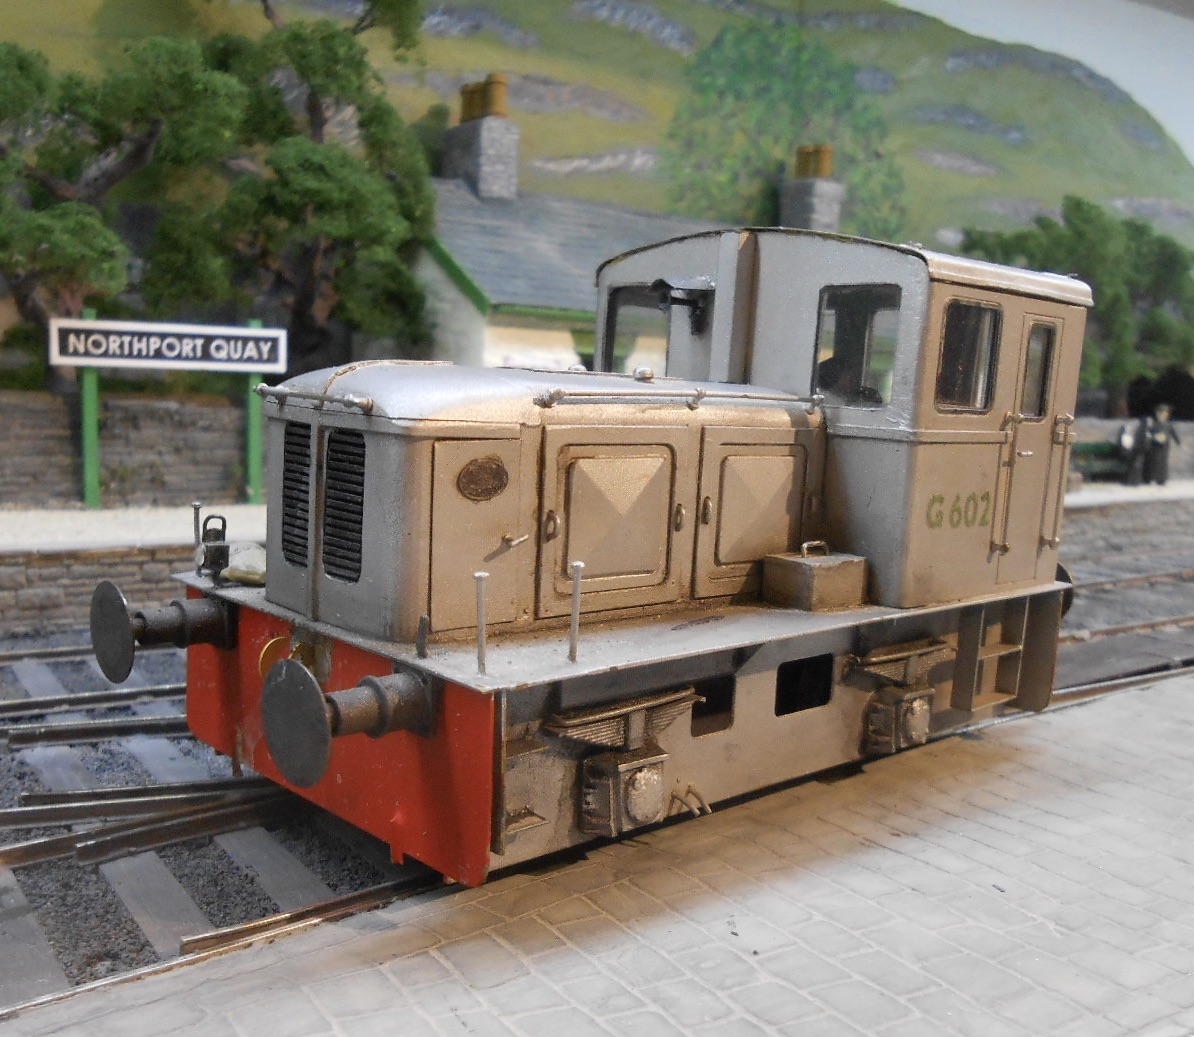
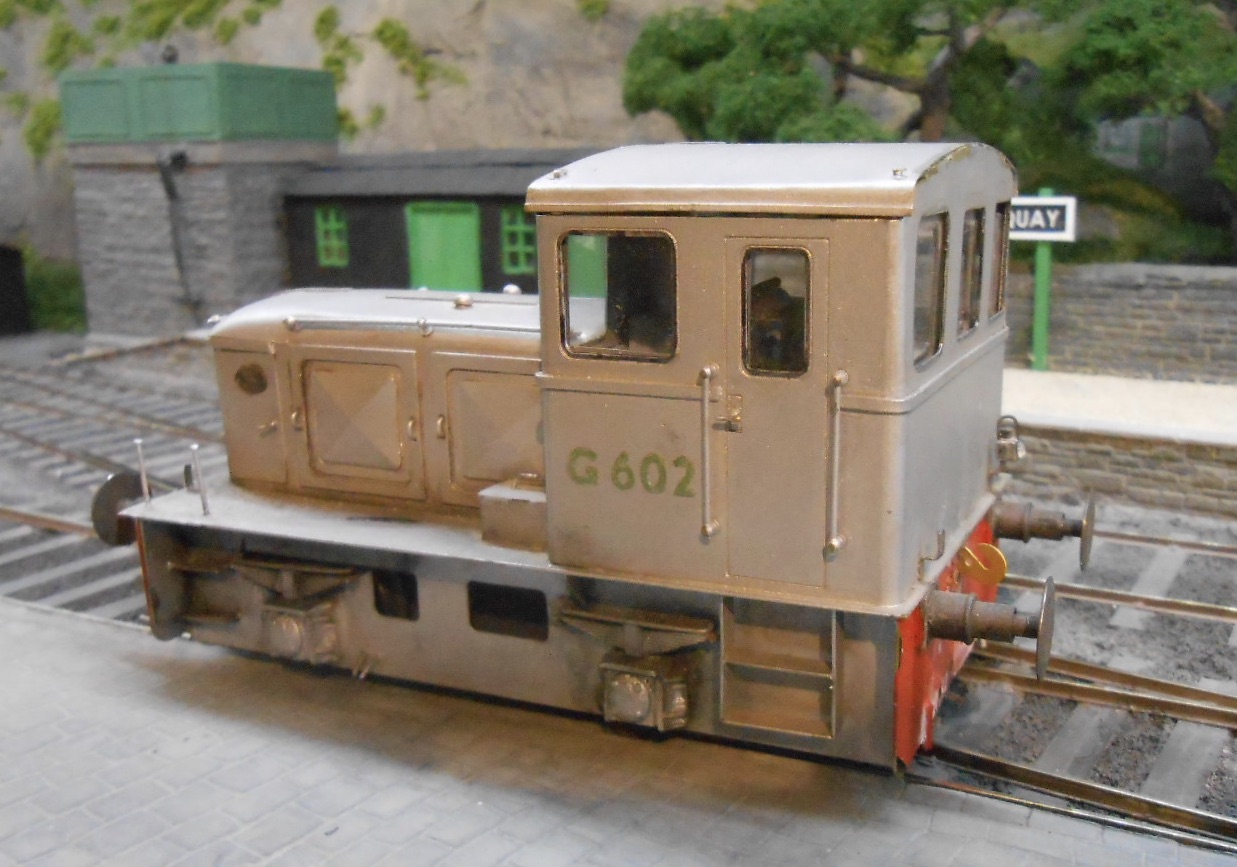
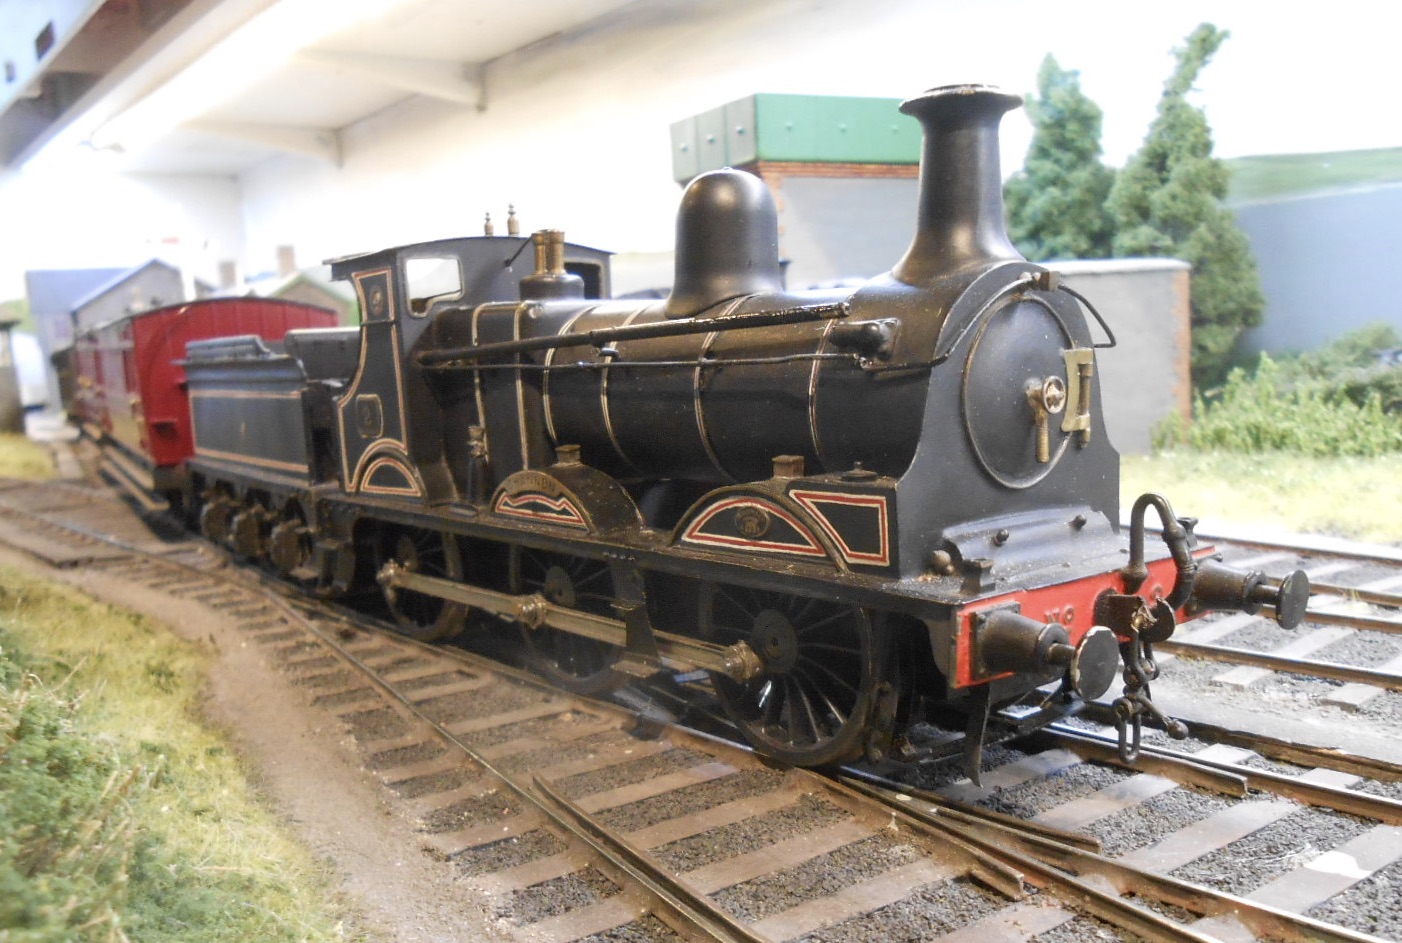
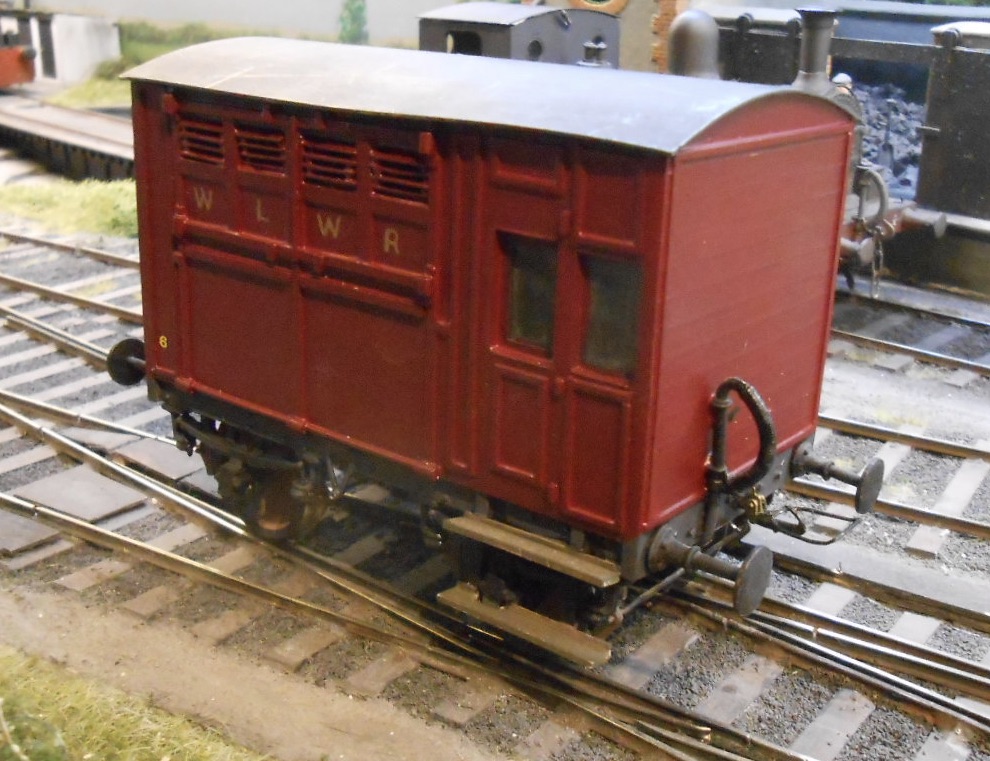
This hodge lodge of stock covers the rest of the stuff I've built for my 1950s period in Arigna Town/Belmullet/Northport Quay. First up is a couple of exMGWR six wheel coaches. One is an Alphagraphix etch brass kit, the other is a scratch built plastic body on an AlphaG chassis. They run with the G2 2-4-0 an a couple of fitted vans. I'll leave you to guess which is which. I built several Great Northern vans, using the AlphaG card kits as templates to make a side and an end that I then made moulds to resin cast multiple copies, which were assembled with cyano. Whitemetal castings were used for the chassis & two were finished as vacuum fitted [in bauxite], with the rest as weathered grey. The next two are ex MGWR - one of the 'glasshouse' brake vans [scratchbuilt in plastic sheet and strip], plus the Alphagraphix etched kit of a 'hearse' van, later converted for fish traffic. I batch built five open wagons [two different types] as freelance private owner types for the Arigna mines. Fairly conventional, but heavily weathered following techniques by Martin Welch in his book on the subject. Rather more conventional are two more recent additions. The RCH tank wagon is one of the very few British outline wagons that made it across the water. The model is the Slater's kit and certainly not the easiest model to build, being a mixture of plastic, etched brass and lost wax castings. It follows the prototype pretty closely and includes a lot of detail. The other wagon is a standard H van, made from plastic strip and sheet on an AlphaG etched chassis. Now a couple of real oddities - repurposed WL&WR six wheel coaches running as turf wagons. When I first read about these, I was convinced it must be a wind up, but no, they brought turf from the west to Dublin during various shortages & I soon decided I had to make some. The sides are resin castings I made from my own masters & mouldings. They ride on the AlphaG six wheel coach chassis, while the loads of turf are made from chopped up matchsticks. The last of my 1950s wagons are three CIE opens with tarpaulin covers. The advantage here is that the interior details don't need modelling, while the tarpaulins are made from masking tape as outlined by Martin Welch again. Conventional plastic bodies with white metal fittings for the chassis. Finally, we have my most modern [!] loco, a G class Deutz four wheel diesel shunter. The model was built using Worsley Works etches. These are very basic and actually cover the later versions, so a few adaptations were needed, particularly around the cab, while you need to source castings for things like axle boxes, springs, buffers etc. No instructions either, but a great aid to scratch building. The model is four wheel drive via Delrin chain. If you are still with me, this covers all my 1950s stock, so future posts will aim to look at the 1900s period I also now model.

-
Haven't used DCC for several years, Alan but when I did, the fact that most of my models were made of brass created issues, especially regarding insulating the chips. With the space you have available, could be challenging! As for DCC overall, I'm with you. It has its uses, but is certainly not the answer to everything and personally, I am much happier with analogue.
-
Not a Scooby...
-
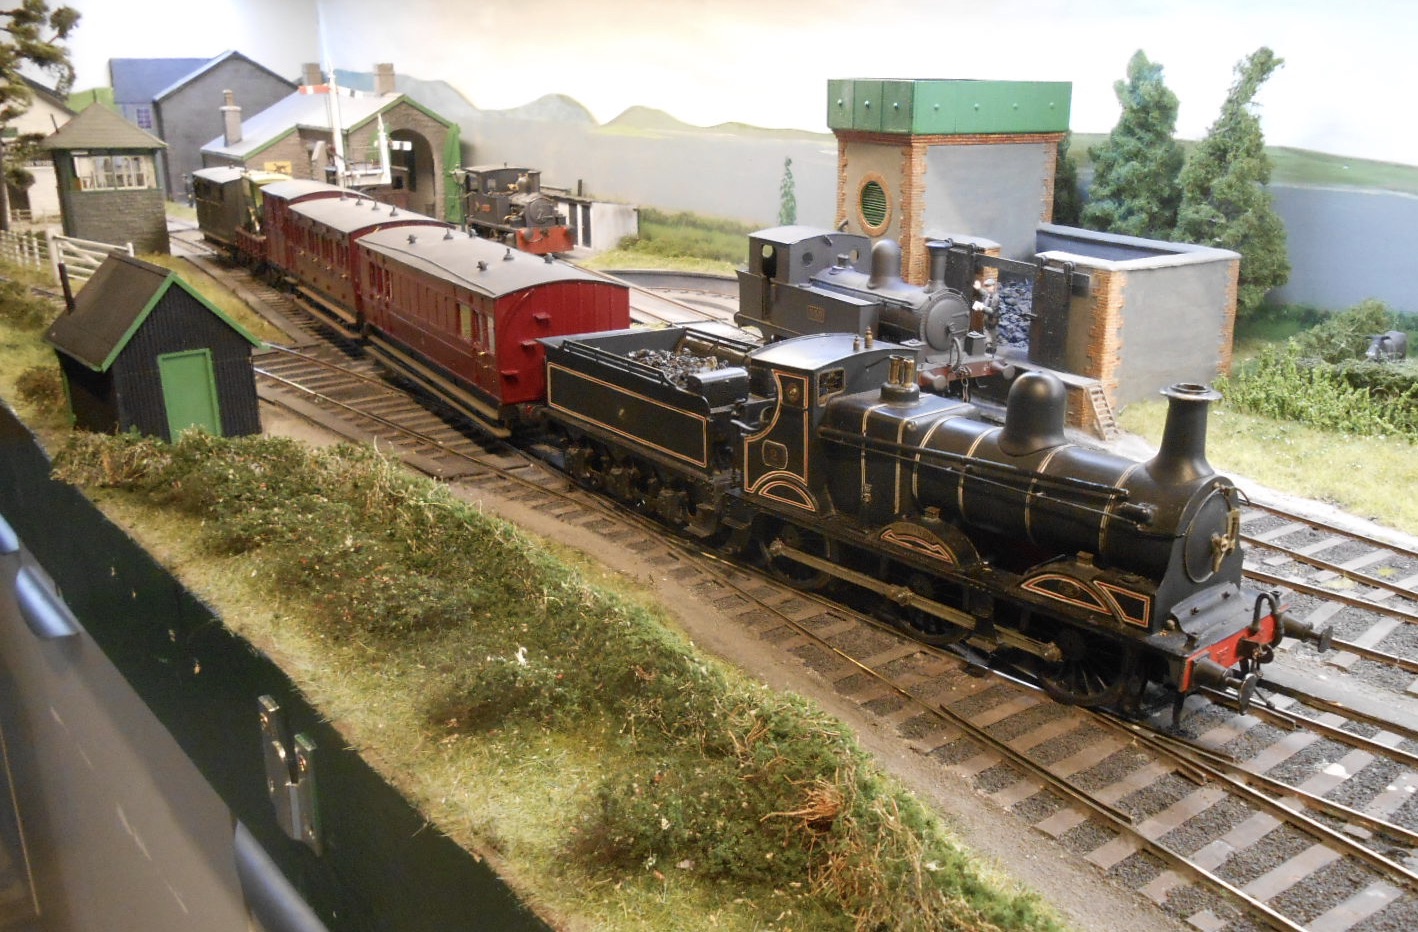
A couple more WLW pictures: Shannon, with the boiler pipework back in place, plus Richard's Dublin & Meath brake vans.
- 56 replies
-
- 12
-

-
Lovely stuff, as ever, Ernie
-
Buffer are holding a closing down sale, with everything at £1, plus p&p. Sadly, the Irish section is already empty, but there are plenty of other transport and railway sections
-
- 1
-
-
An absolute delight and bet the real thing had all sorts of mechanical grumblings too. Runs a treat.
-
Alphagraphix do a kit, though it is 7mm scale...
-
Yep, an absolute gem.
-
Mark Clarke's Locosnstuff has developed into a wonderful resource over the last few years. Mostly aimed at narrow gauge, he covers a range of scales with a combination of etching and 3D printing. Mark has done several talks at the Chatham Club on the latter and is constantly updating the printers and materials he uses. He is also one of life's genuinely clever people, creating simple, innovative solutions for a range of problems. If nothing else, his website is well worth a look and all his stuff is high quality and good value too.
-
Really good to know - thank you!
-
If it is a rolling chassis without that motor gearbox, then I'd say it is worth saving because the hard work has been done. A new motor gearbox is not hard to fit. Would then be tempted to do something with the body, even if it is mainly freelance because there is a lot to learn that will then benefit any future projects, even if the model only ends up being used to practice painting and lining or lettering.
-
Rumour has it that photographer Colin Garrett would offer loco crews a small bribe to put a couple of car tyres in the firebox to improve the smoke effect, though this was in Eastern Europe and Turkey.
-
This side of the water, The Range stocks Hycote. No idea if it is any cheaper, but will certainly be checking!
-
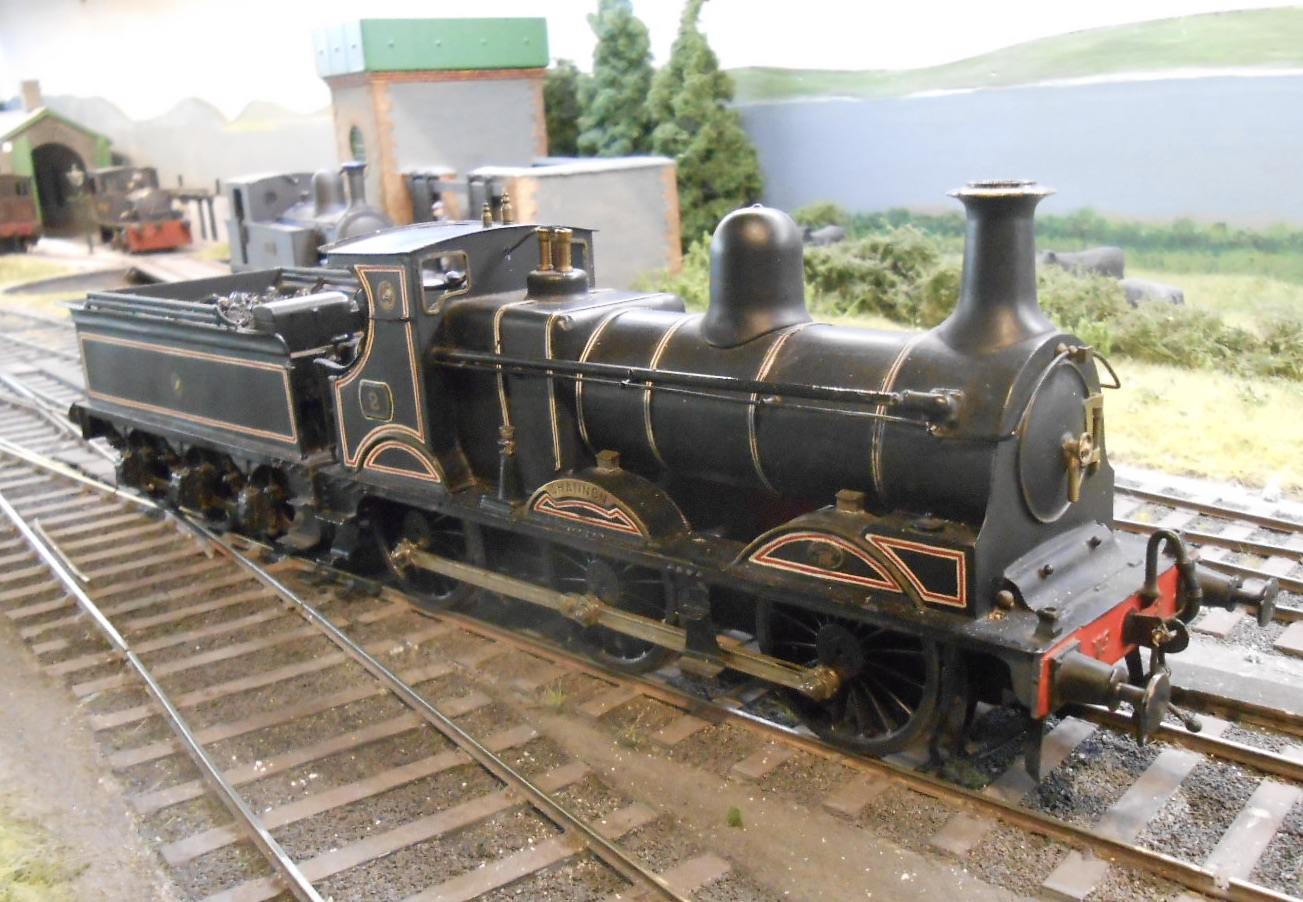
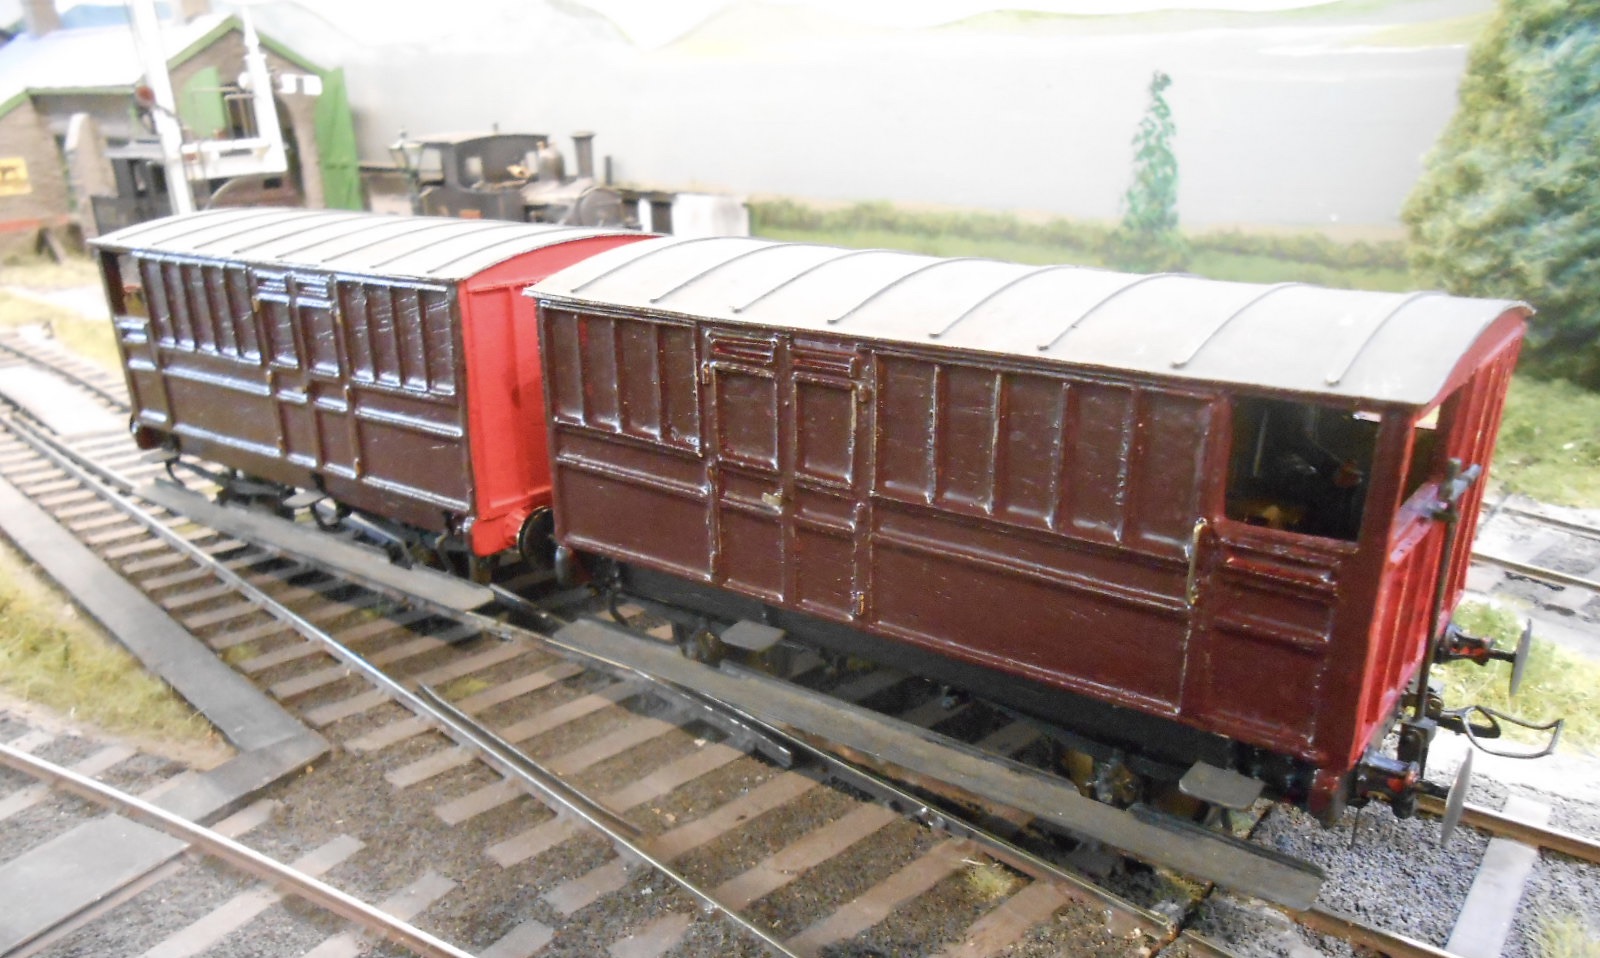
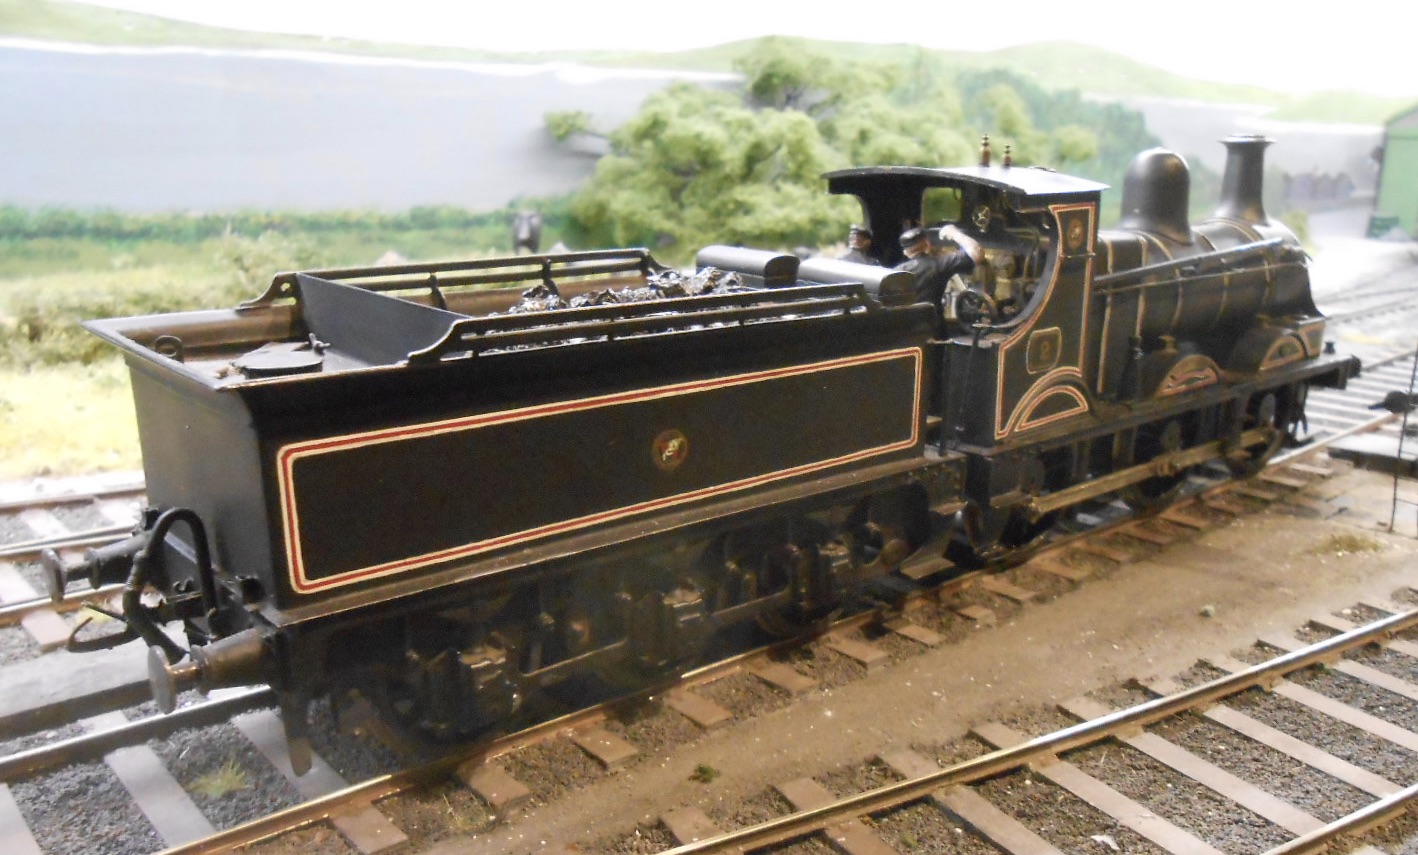
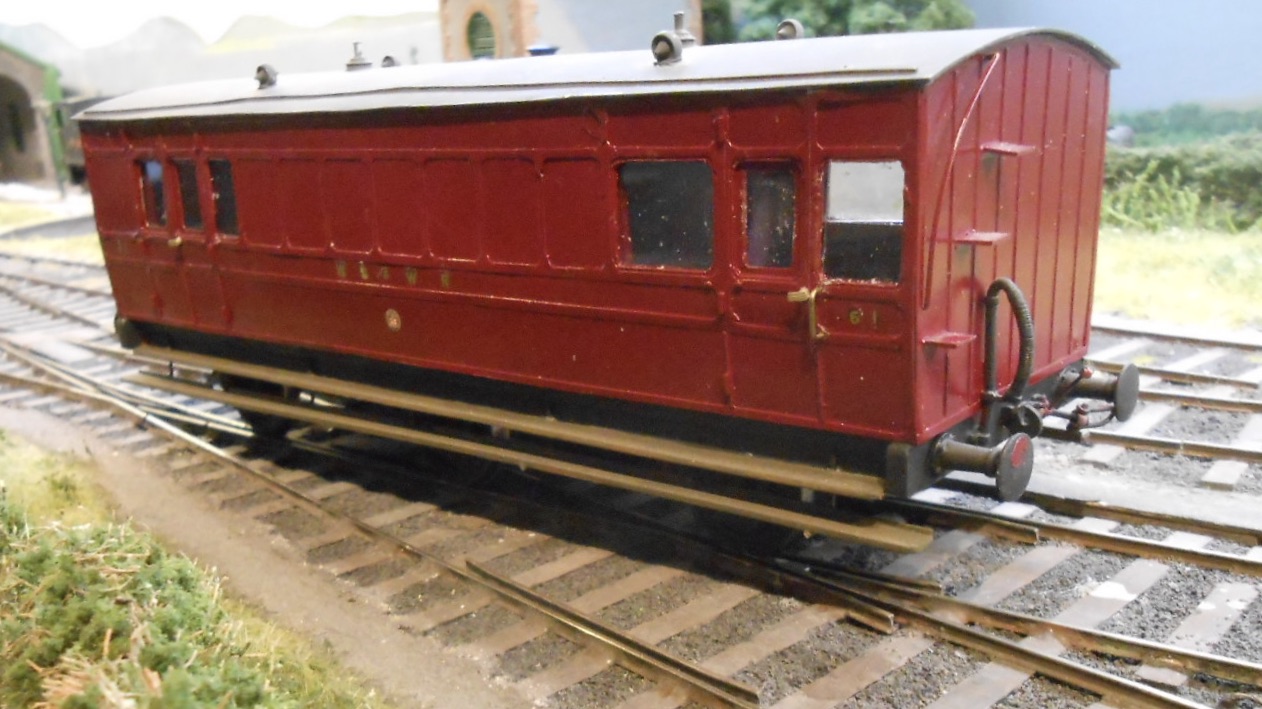
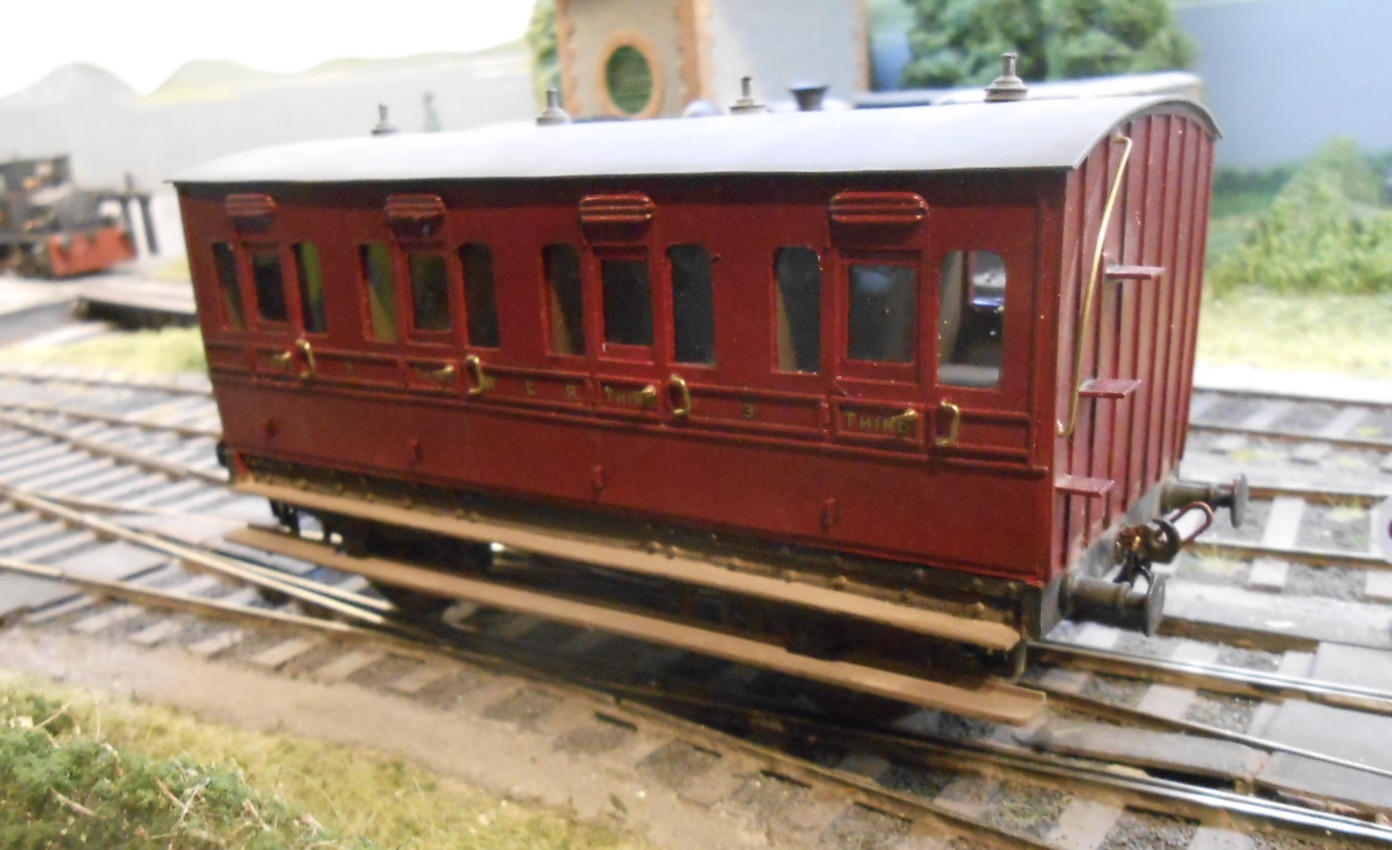
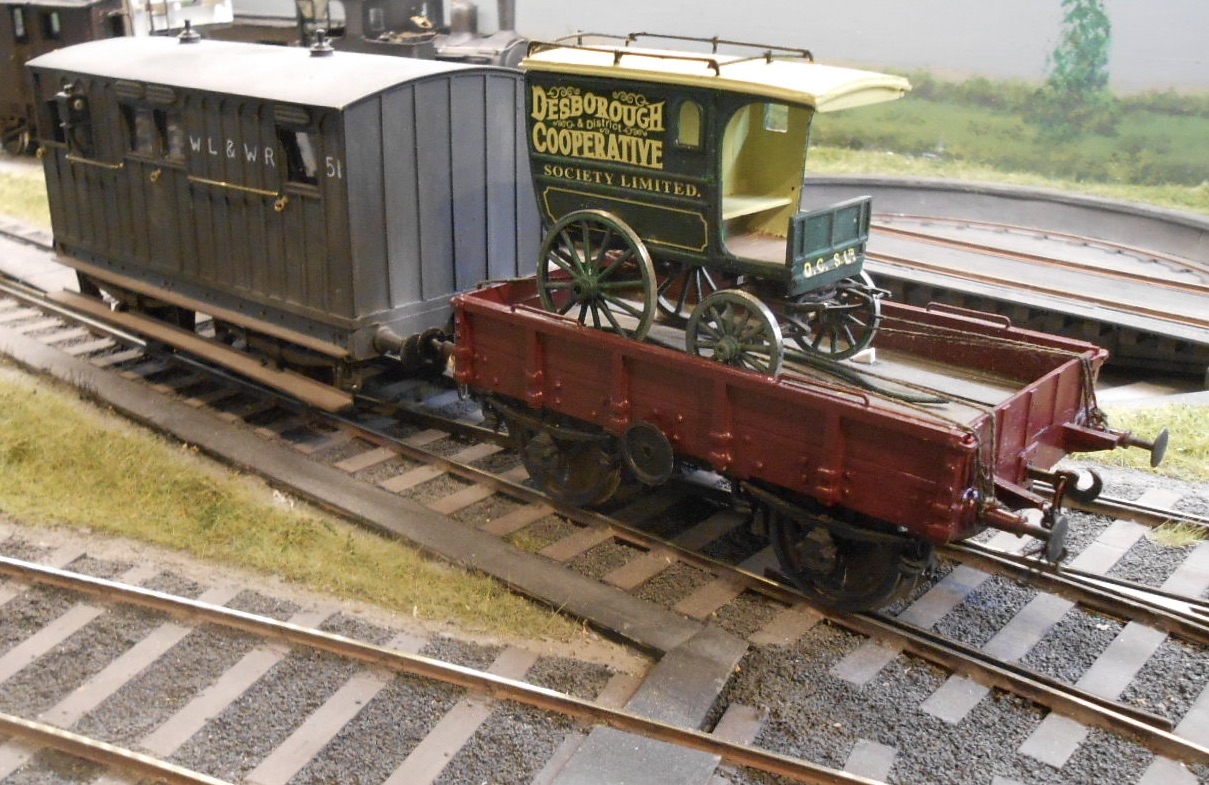
A WL&WR interlude Recent interest in Richard Chown's work made me dig out my Waterford, Limerick & Western models. The company was very much Richard's main interest in Ireland & when he started Castle Rackrent, back in the 1970s, there was very little for him to go on. However, he certainly found ways and 0-6-0 Shannon was one of his earliest models. I got it via a sealed bid after he died and it was duly delivered, by hand in a slightly clandestine liaison under the John Betjemin statue at St Pancras! This was chosen as his executor, Ian, was on his way from Scotland to Italy & preferred to travel by train. I also picked up the two Dublin & Meath brake vans at the same time. When I got Shannon home, it was clear the model had barely been cleaned since built nearly 50 years ago, but despite a wobbly centre driver and [very] worn wheels all round, still ran well, with its Portescap motor. A sympathetic tidy up followed, mainly using T-cut, though eventually I decided to replace all the wheels and remove the Pacific Fast Mail sound system in the tender. However, all in all the model continues to look as splendid as when Richard finished it all those years ago and still runs well too. Too late - have just notice the pipe running along the boiler has come adrift! Eventually, Shannon needed a train to pull, so I set about building a sort of 'mail goods', as per Castle Rackrent. There still isn't a great deal of material on the WL&W, but Ernie Shepherd's book contains enough photos for me to do a 6w full brake, 4w coach and a brake van, to which I've also added my backdated [SLNCR] horse box and a carriage truck, as per photos of Castle Rackrent itself. All are built from plastic sheet and strip, with white metal castings, though the 6wFB is on an Alphagraphix etched chassis.
- 56 replies
-
- 13
-
-

-
Given we can now have ourselves scanned, so that miniature versions go on the layout, the options are endless, it would appear!
-
Hope the crew had some clean underpants with them!
-
Forgot about that railcar, Ken! With improved printing technology, you'd think Shapeways could do better by now - or maybe they are? The lesson still seems to be that, unless you have your own, quality printer (or know someone who does), these models are best avoided. That said, the price of 3D printers is getting ever cheaper, so maybe one day, we will all have one on our workbench, just like our printer-copier next to the computer. Could be very useful for some things, but nobody is going to produce a 3D printed working loco chassis any time soon, methinks. In the meantime, I'll be sticking to tried and tested methods - occasionally literally! Thanks for the advice folks.
-
Came across this as one of the small ads in this month's Railway Modeller. Designed by Simon Dawson, the website links directly to Shapeways, so am guessing folk here may know of it. My interest is mainly 7mm scale 5'3, but this site covers other scales, while the Shapeways catalogue is pretty large too. These are of course 3D prints, so are body only and therefore producing a working model is definitely no gimme. The catalogue includes: Guinness Hudswell Clarke steam and diesel locos GSWR class 90 & 99 0-6-0T, also with the carriage section 101/J15 0-6-0, both boiler types SLNCR Railcar B Ford railcar - Donegal version, converted to 3' gauge Dublin and Blessington Drewery tramcar GNRI railcar B GSR Clayton steam railcar GSR Sentinel steam railcar GSR Drunk battery two car set MGWR 4 w coach MGWR 6w brake third, third and first coaches MGWR horsebox DSER Ashbury van For me, the Ford railcar looks the most interesting, as in Donegal guide it has a brief trial on the Clogher Valley and comes in at just under £40. A chassis wouldn't be too difficult. The 0-6-0 and coach is £80, but will need a lot of work, methinks...
-
Well done, Andy!
-
Needed a couple of goes then! Ain't taking off without a bridge over the M11 though...
-
An almost daily feature of my childhood as I lived close to several of their bases. Hunters, Provosts and Lightnings too. To stand next to a Vulcan is quite an experience! Duxford is perhaps THE place to go - how they squeezed the B52 into the American hall, let alone land it there is the first place was a real feat.
-
As an antidote to the woes of the world, I urge everyone to check out the link in Mayner's post above and then just wonder at the vision and sheer output of this remarkable man. Check the links within the post too - there are yet more photos, though sadly the website no longer functions.
-
Brilliant! Thanks for this link, John.
-
Wow, what an occasion that must have been! Nice to see Shannon on Castle Rackrent.