Angus
-
Posts
301 -
Joined
-
Last visited
-
Days Won
3
Content Type
Profiles
Forums
Events
Gallery
Blogs
Community Map
Everything posted by Angus
-
There is a scaled down version of the etch TMD/SSM etch in circulation from a few years back, commissioned, I think, by Patrick O'Sullivan author of the Farranfore to Valencia Harbour books. I've been kindly gifted three of the etches by other 2mm Association members one of which I've partially built ( I seem to have become the custodian of Irish railway etches for 2mm finescale). Although it doesn't appear to be in their catalogue? I have contemplated approaching them to see if these could be reduced to 2mm but 7-2mm might be a stretch to far to result in anything buildable. I've always viewed any scaled down etch (or print) as an aid to scratch building rather than a full blown kit, the basic structure should be usable (although might require a few tweaks) anything else is a bonus. That said Mayner's MGWR horse box and meat vans went together well.
-
Hi Bob, Presumably the underframes are etched, but what about the bodies, are these 3d printed? thanks Angus
-
Coming a little bit late to this thread, another vote for a J5, so that just leaves four more to find. The only snag is I need mine in 2mm scale so not sure that counts? I'd be happy to order a couple of etches if it helps make up the numbers. I feel the real missing engine is the more utilitarian MGWR 0-6-0s the L class (J18/J19). I'd also love one of Mayner's Z boiler etches in 2mm scale but having asked him to reduce some of his kits these have lain in the gloat pile gathering dust whilst my Irish modelling takes a back seat for a while. I really need to get on with what I've got 4!
-
Love the brass rod idea to hold the boiler level. I've not seen that before. Simple and effective I shall be using that!
-
I've always thought the G2 2-4-0s were the quintessential MGWR engine, long lived and rebuilt multiple times so you can have a few of them each looking totally different. That said a J18 would be more practical.
-
Hi Colin, The Sligo project was always something for the future. It would need a large amount of stock to be built to effectively represent the station. I've a build underway of a fictional terminus in the Sligo area which will allow the gradual accumulation of stock without appearing ridiculous. That build is on hold for a couple of reasons but I hope to recommence later in the year. I do plan a visit to Sligo at some point in the next year or so to do some detailed photography to assist.
-
Sad news indeed. I never met Ken but followed his inspirational work through this forum and had exchanged messages with him. I have half a dozen of his wagons that he kindly scaled down to 2mm scale for me, these will be a nice memento of his craftsmanship. My thoughts go out to his family and friends.
-
Would you model in 21mm if RTR track and models were readily available?
Angus replied to BosKonay's topic in Irish Models
I've used templot for all my 2mm finescale track including the Irish 10.5mm guage. It needs a little bit of dedication to learn but is a very powerful tool. As has been noted above loads of presets that cover some quite esoteric scales and guage and the possibility to set your own. You can also make up track panels that match the prototypes practice. I don't do this in 2mm but do with my 7mm scale Modelling as its much more noticeable. -
Ah! Sorry misunderstood.
-
Hi David, I am trying to figure out in my head why the quartering would work at 45 degrees but not 90. Something feels wrong there, but not sure what? Are the axles themselves straight and true? Or one driver mounting hole not straight and true? It suggests a lack of concentricity somewhere.
-
There was a great talk on the SLNCR at the IRRS Manchester meet last week. Lots of photos of Enniskillen and the line I hadn't seen. Although there was some IT issues the event was record so the slides should be available.
-
As with Galteemore, the "gauge" description doesn't fit my Irish modelling which is in 2mm finescale. So 1:152 on 10.5mm gauge track, which, at the risk of sounding elitist, is a long way from N Gauge. I've also got a passing interest in 3mm scale on 9mm track to represent the narrow gauge, this interest is latent at the moment though as I've enough to be going on with!
-
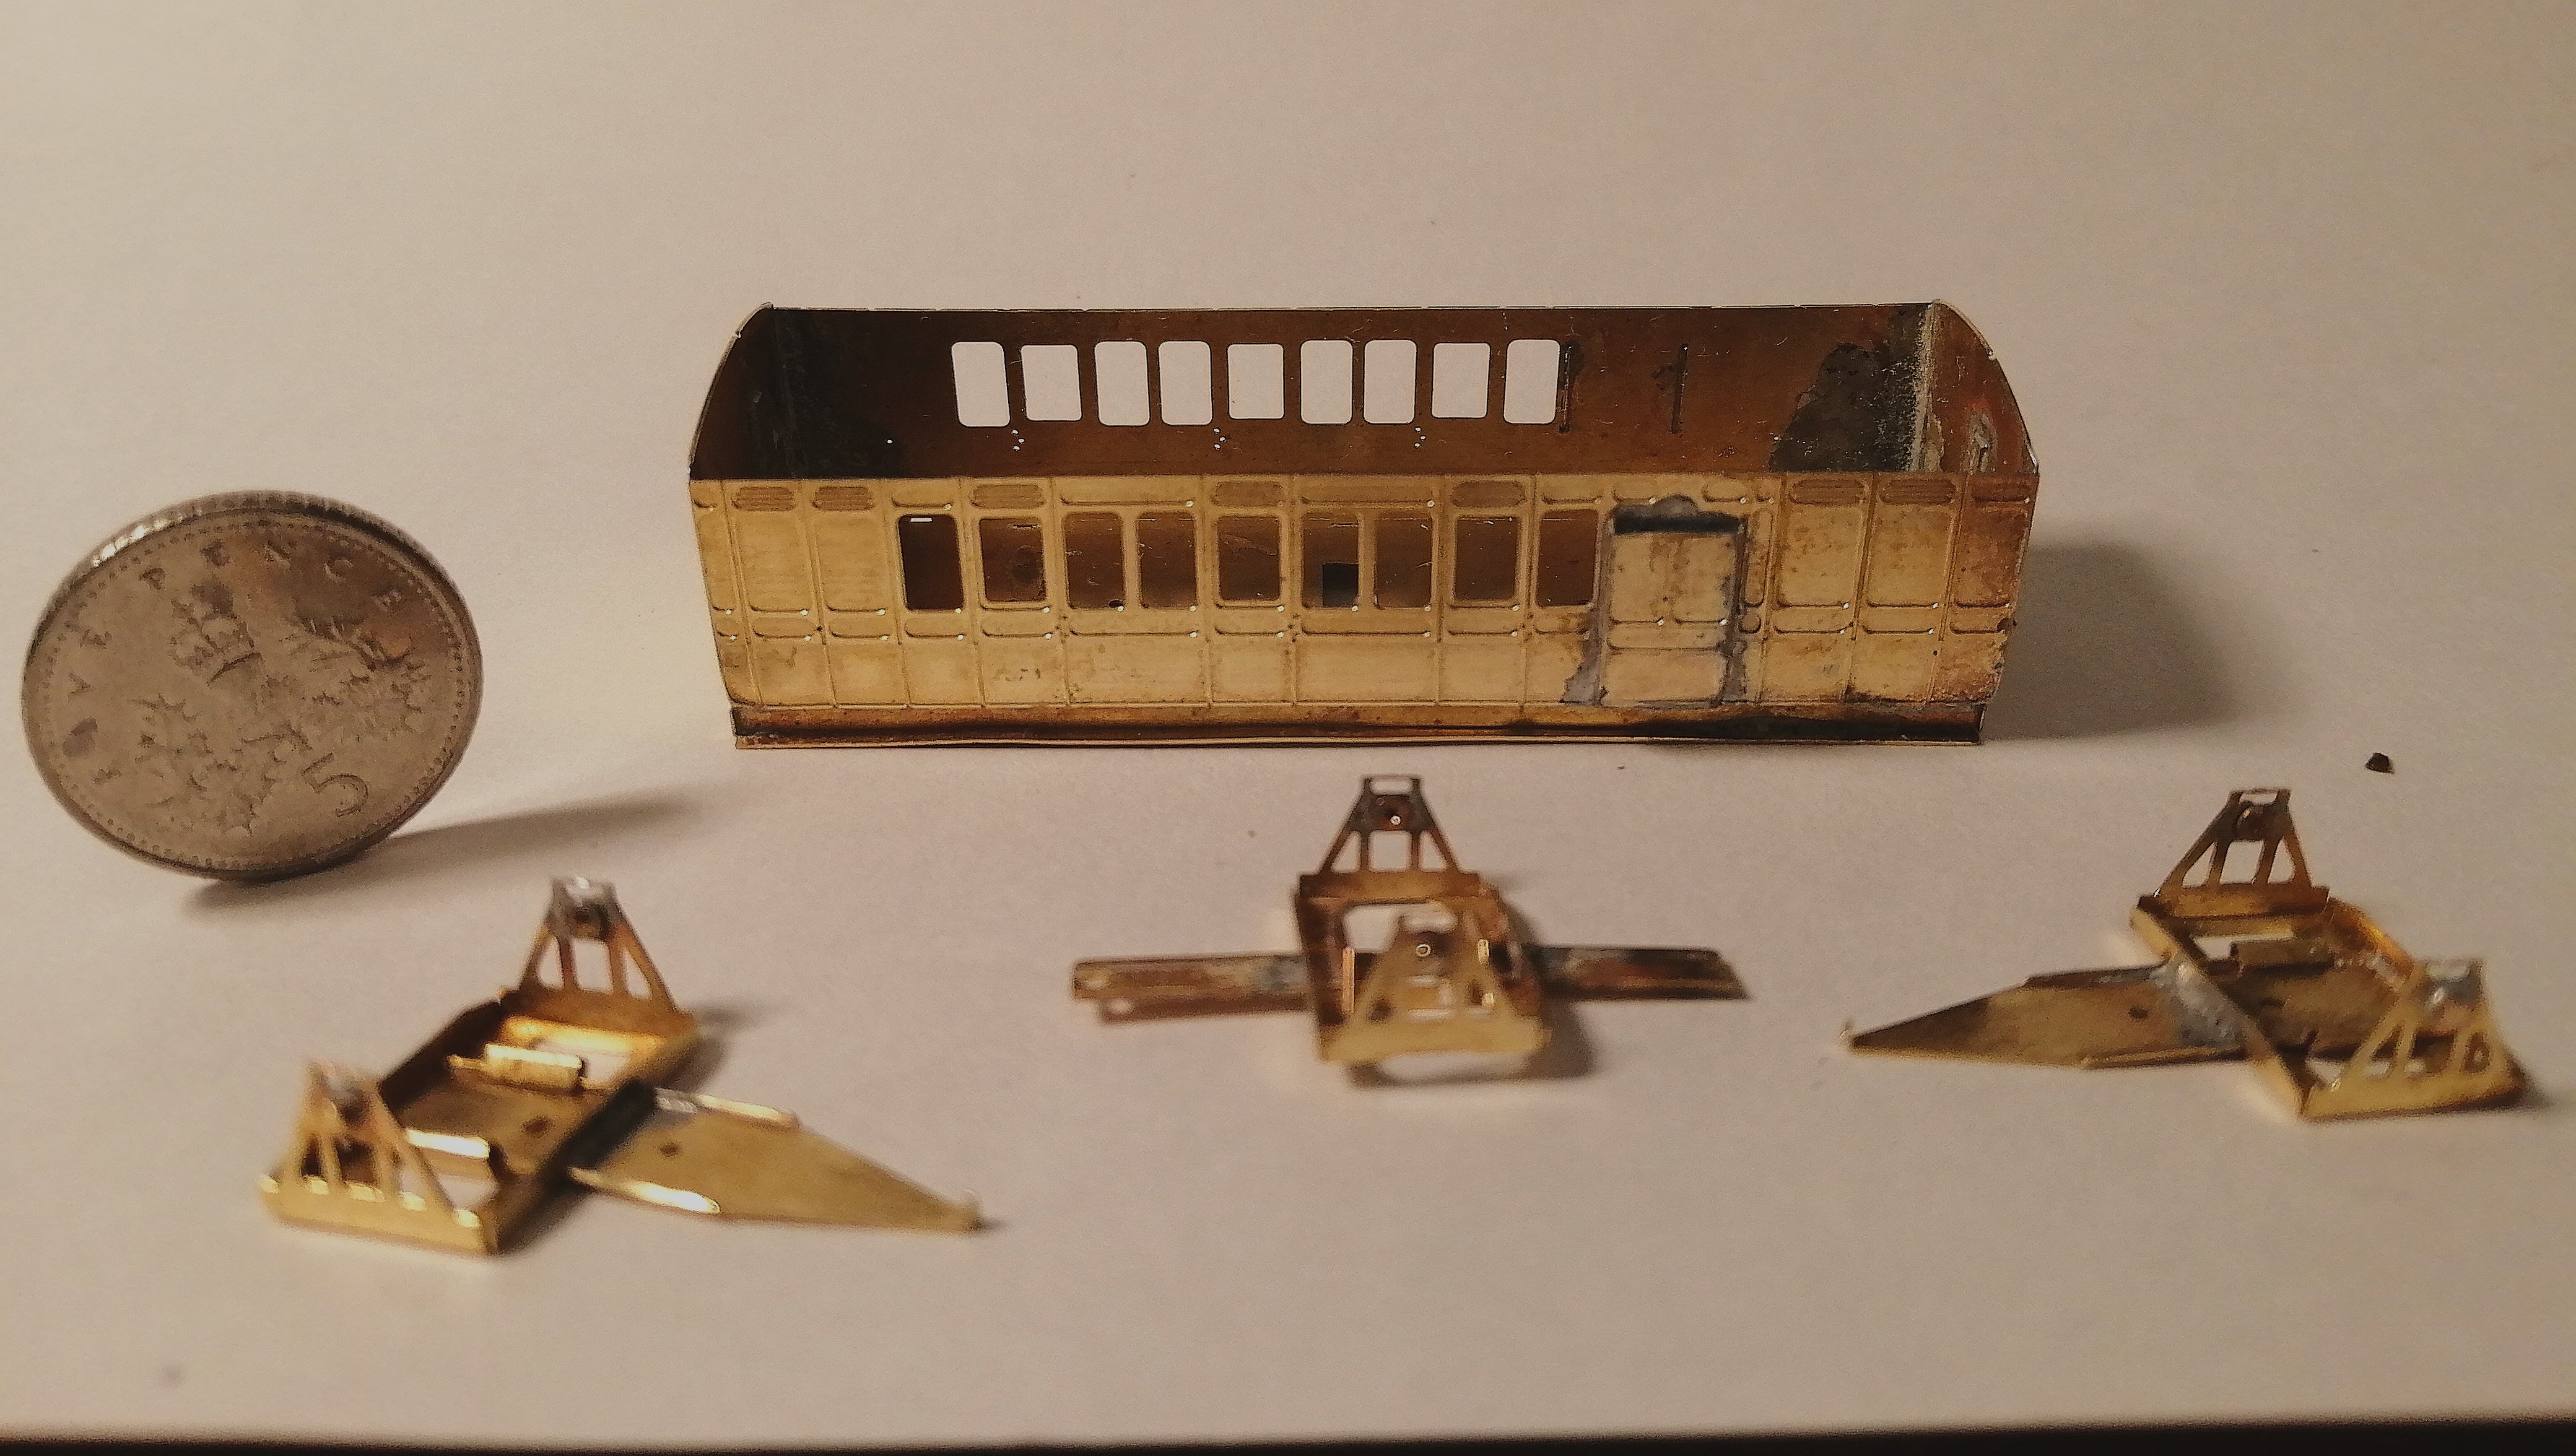
A week away with some modelling tools reinvigorated my modelling. As we were staying near Oban on the West Coast of Scotland I built up some Caledonian Railway stock. An Irish item did fall into the bag in the form of a Worsley Works etch for a GSWR brake third 6 wheeler. I only had a soldering iron and some basic tools so all the detailing is still to add.

-
Hi Alan, In some early third class carriages the compartment partitions were not full height. This enabled lighting and ventilation to be shared across compartments. The vent would therefore fall on the partition. That said, if they are torpedo vents on an 1880 carriage I would be fairly certain they were later additions.
-
Ernies Massive Irish 1930's to 2005 Photo Archive
Angus replied to Glenderg's topic in Photos & Videos of the Prototype
Hi JHB, I exchanged emails with him earlier in the year as I was aware he had started building a model of Caharcieveen in 2mm scale many moons ago. I'll contact him and check he is happy for me pass on his details. Cheers Angus Edit: I should have read further, I see Leslie has already sent you his details. -
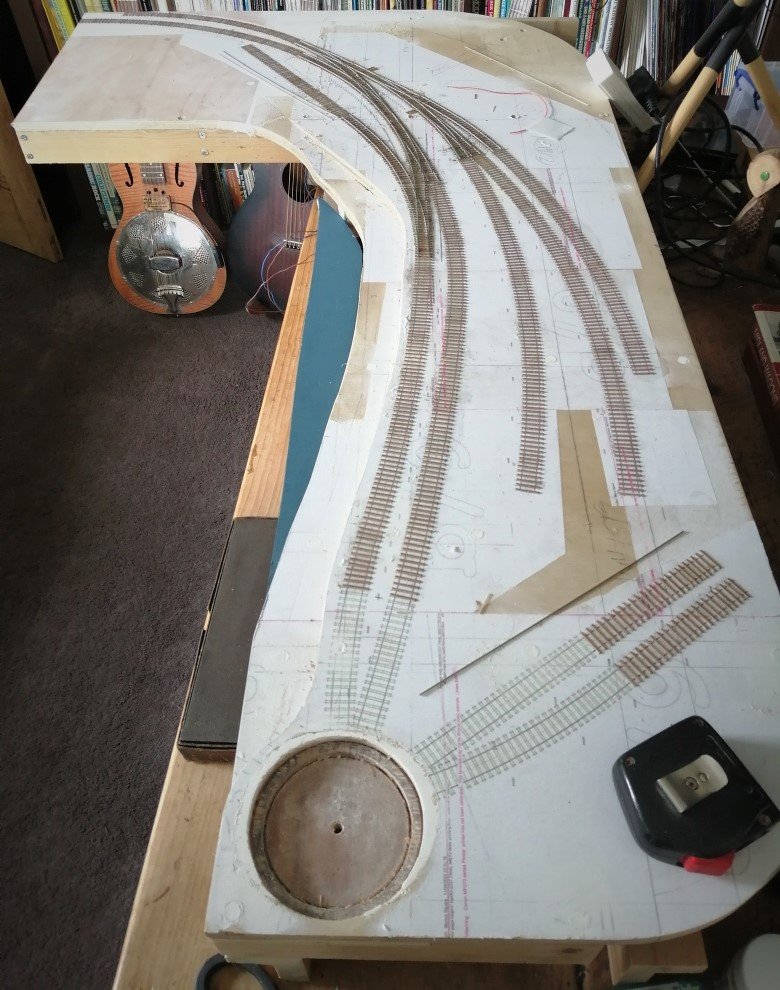
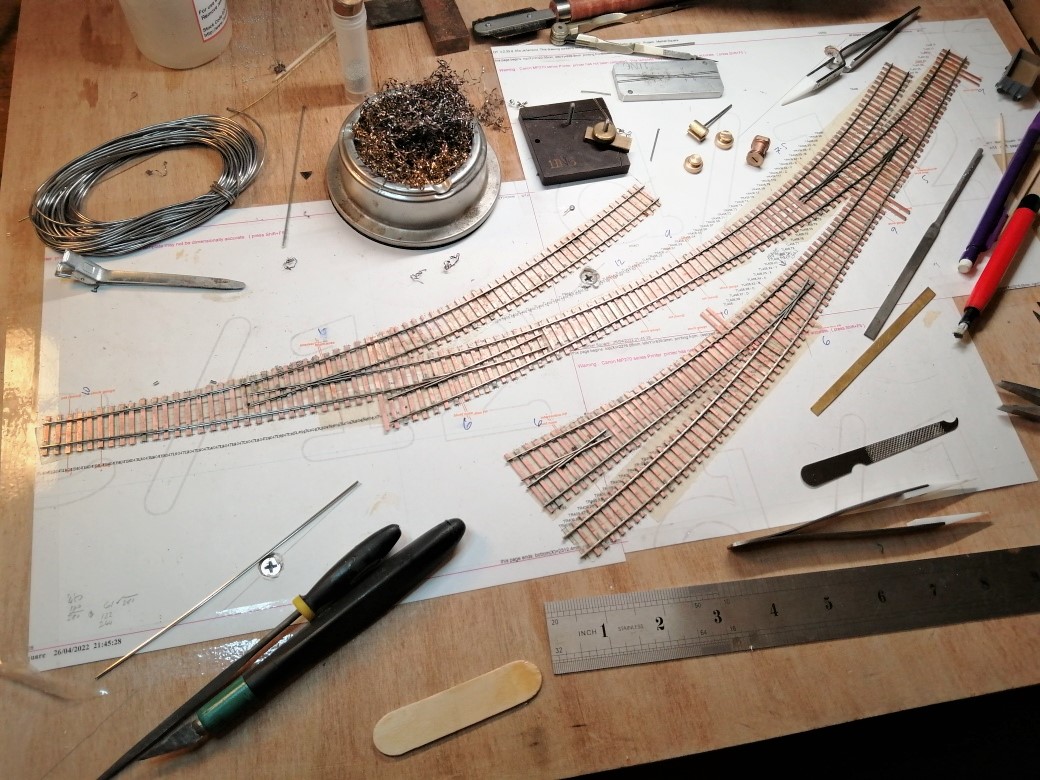
Plodding ever onwards..... the pointwork is now glued down with all electrical droppers in place. I've also been progressing laying the PCB sleepers in readiness for the plain track. I've left the tracks approaching the turntable out until I have the deck in position as I noticed the well is drilled very slightly off the centre point on the track template. This will enable some local adjustment to the track to accommodate the error. Another error I've discovered is that, despite measuring several times, I've manage to create the track plan 30mm longer than the boards. I really don't know how I've managed that! The issue being that the boards are the correct size for the alcove the layout will be sited in so cannot be lengthened. This has meant the goods yard headshunt has been sharpened from 500mm radius to 400mm to fit onto the board. It means the whole alignment isn't as pleasing and a wee bit crammed in but needs must. Some careful gauge widening should enable successful running. It is not as if any long wheelbase 0-8-0s will be shunting the yard! A spot of Ebay bidding secured a Farish Maunsell Mogul for a reasonable price and conversion parts have been ordered form the 2mm Scale Association shop which will hopefully make for a relatively straight forward conversion to 10.5mm finescale. The loco is the British N Gauge so is to 1:148 scale so will slightly dominate the remaining stock at 1:152 but hopefully not too noticeable. Some number plates are on order to create no 378, built in 1926 and shedded at Broadstone for all of its life so a likely as any of the class to appear on the Sligo line. In the period that will be modelled (the early '30s) the Sligo turntable was too small to accommodate the class so they wouldn't have appeared there. However, in my altered historical narrative a larger turntable has been installed at Larass to enable engines working excursion trains to be turned. This should lead to some odd engine movements, arriving tender first from Sligo to be turned and sent back tender first. It also occurs to me that I need to finish some of my other loco projects first as I've still not got any motive power!
- 200 replies
-
- 12
-

-
I'm currently contemplating buying a Farish N Class for conversion to 10.5mm gauge 2mm finescale (coz I've not enough started and half finished projects.....). The 2mm scale association have just released a set of etched valve gear for the conversion and the Farish model utilises bearings which can swapped for a replacements that accepts 2mm finescale stub axles (another association product) to allow drop in re-wheeling. Apart from the book mentioned in Maitland's post above (which I've just bought) does anyone know of a comprehensive list of difference between the English and Irish variants? Some differences can be easily picked out from photos (cut outs on the tender sides, front footsteps, age dependent smokebox doors, wheel diameters dependent upon batch, etc), others such the width are more subtle but can be seen (the widening of the tender frames but the tender tank width staying the same leading to a step between the two). Just being lazy really and looking to avoid work that may already have been done!
-
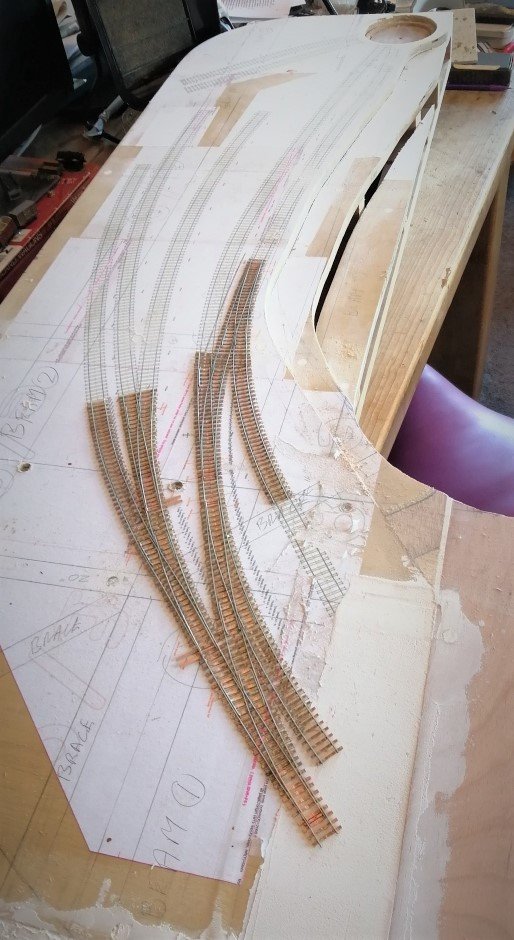
With the help of some not so great bank holiday weather the pointwork is completed, all check rails added and the PCBs gapped, although I bet I missed a section. Shorts always seem to turn up no matter how careful you are. It was quite satisfying to remove the pointwork from the board it has lived on for nearly year and then peal off the template. With some free time left I prepped the baseboard, holes for the wiring have been drilled, along with slots for the point motors. Despite my careful planning I've managed to get one of the tie bars partially in conflict with a cross beam which will need some head scratching to resolve. Hopefully next weekend should see the pointwork glued down.
-
It must have been fun playing with a train set of that quality Galteemore. Not Jealous at all, not one bit, not even a little bit....honest.....
-
That's two of us then!
-
Thanks both, I start using some cheap magnifying lens with a built in LED mounted on a head band a few years ago. That helps with eyesight, I doubt I could do anything without them now.
-
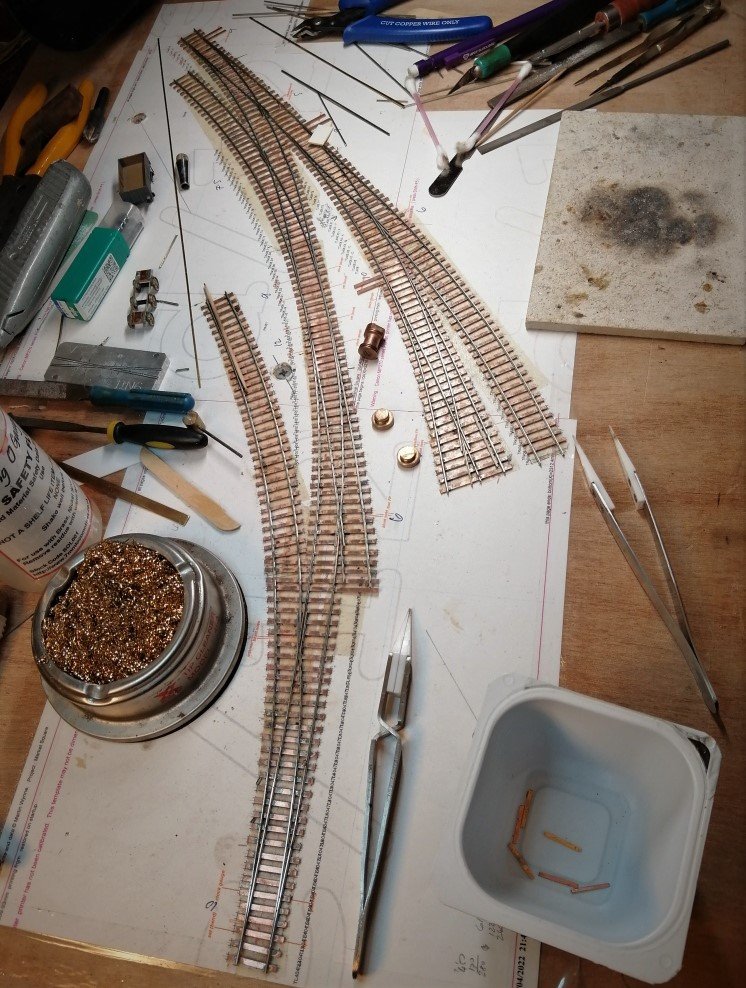
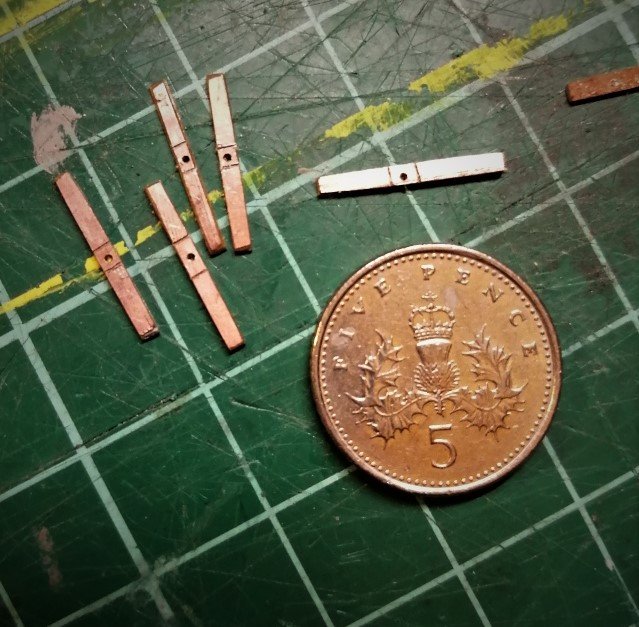
A bit more progress to report, the switch blades have all been filed and fitted using my home made jig: And the tie bars have been made up With the obligatory 5p for scale. The tie bars are a bit of a faff to make but have worked well for me in the past. Some of my 2mm finescale compatriots opt for a below base board turnout unit with the blades connected by wires through the board. I've never been convinced by this approach and prefer the tried and test moving sleeper method. The problem is in 2mm scale the PCB moving sleeper is narrow so significantly weakened by the hole for the point motor level. The result is that I had several tie bars break. The solution came following conversations with another 2mm modeller who used to build pointwork on commission. His solution was to use a piece of thin double sided PCB (0.25mm) laminated to a piece of thin strip brass. The PCB can still be gapped to provide electrical isolation and the brass strip adds strength for the point motor level. These are now ready for installation, albeit I have to remake one as I've managed to de-laminate one of the PCBs, probably by using too much heat. All that is left then will be to cut and fit the check rails.... the bank holiday weekend beckons!
- 200 replies
-
- 10
-

-
-
Hi Claire, You've got a few choices, however having the items boxed is an advantage. Due to Covid and manufacturing issues in China there is a dearth of N Gauge items in the shops so the second hand market is buoyant. Were you to sell on Ebay you could expect the get close to new price, £30-40 per carriage, £100 - £120 for locos, higher if the item is particularly wanted, less for some smaller locos. I'm not sure what postage you would incur as most of the interest will probably be in mainland UK. As you have the boxes you should be able provide detailed descriptions. You could sell to a dealer but they will need their cut so expect a fair slug less, alternately a local enthusiast may be interested in a bulk buy. Hope that helps?
-
Would you model in 21mm if RTR track and models were readily available?
Angus replied to BosKonay's topic in Irish Models
Speaking personally it is the gauge that helps create the charm and challenge of modelling Irish railways. I accept the total scale approach isn't for everyone and there is some very effective modelling out there that proves you don't need an accurate gauge to produce some evocative scenes, however from my perspective the extra effort is worth it. If I want to run trains on someone else layout, surely that's a good excuse for more trains...... never a bad thing! -
A quick progress update to prove to myself that the progress isn't fleeting: All plain rail and crossings are now complete with a wagon freewheeling happily through the crossings in both directions. Next is the moment of truth, once the switch rails are added any flaws become glaringly obvious.
- 200 replies
-
- 11
-