David Holman
-
Posts
4,359 -
Joined
-
Last visited
-
Days Won
117
Content Type
Profiles
Forums
Events
Gallery
Blogs
Community Map
Everything posted by David Holman
-
Splendid stuff. Many thanks - some alterations to brake gear and roof vents required, I see
-
The prototype isn't exactly picturesque, but it is becoming a very nice model that is full of character.
-
Neat job on the inset tracks - not an easy task in my experience. Painting the rail side rust colour will help disguise the slightly over wide gaps even better. The latest IRRS journal has some fantastic pictures of inset tracks on private sidings
-
Milliput or DAS clay pressed around the windows and then scribed to suit might work well.
-
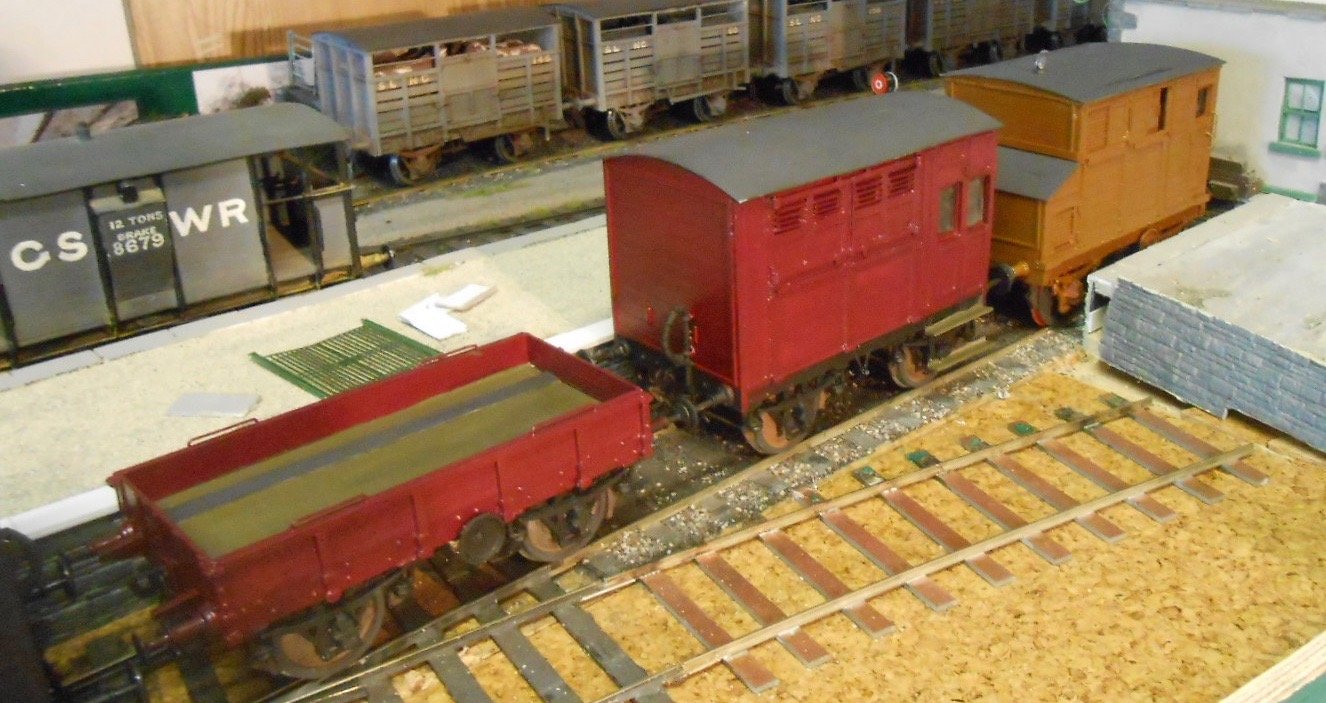
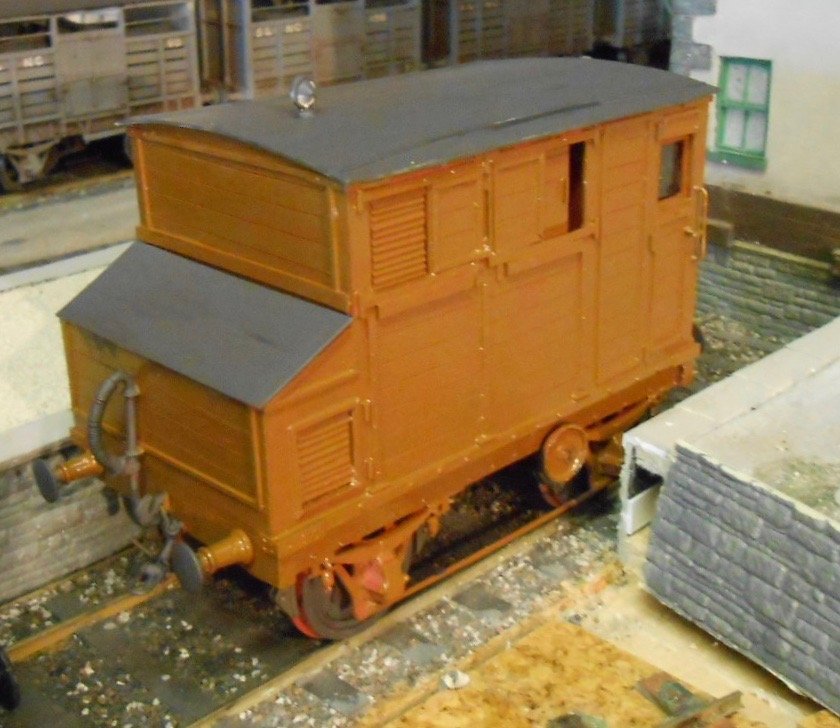
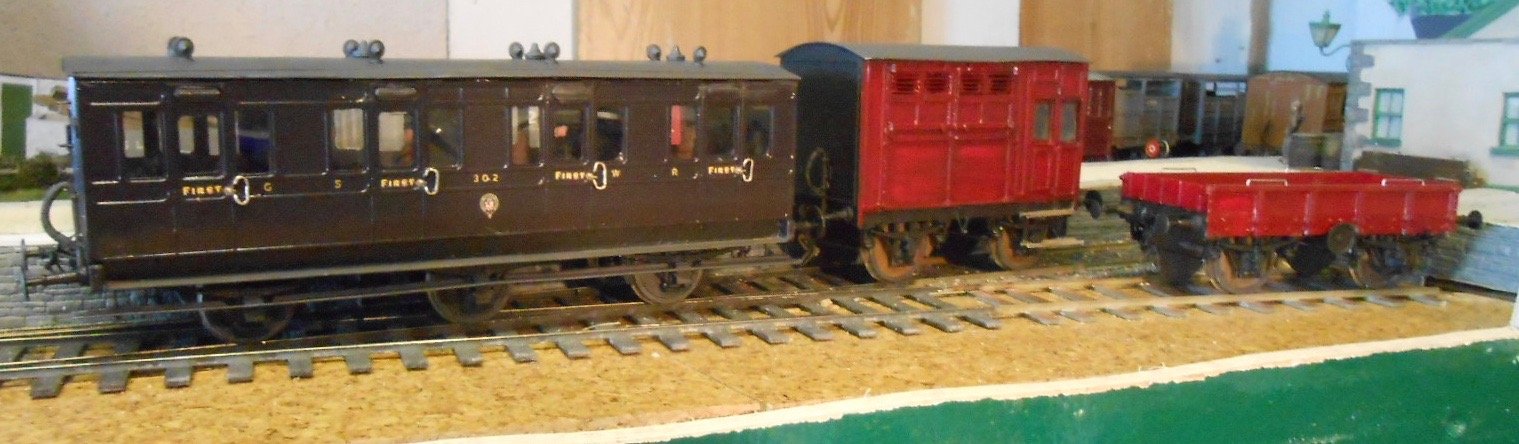
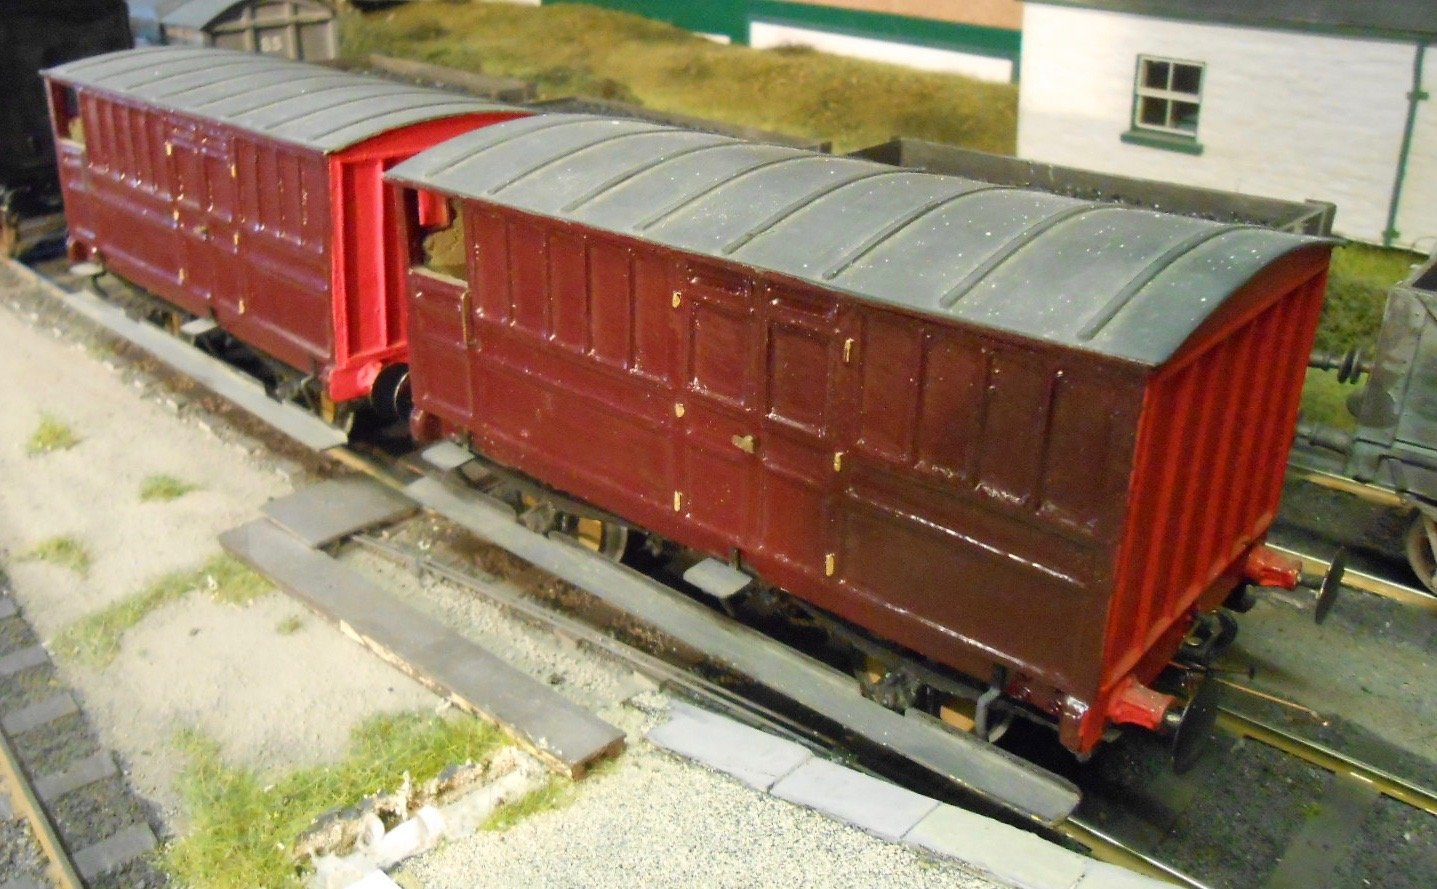
Non-passenger carriage stock and some more questions Not sure why the bolections answer came up again, but it was on my laptop when I opened up again... Anyway, have managed to build a MGWR horse box over the last few days and put another coat of paint on the WLW carriage truck & horse box. The questions are: Is the colour of the MGW horse box right? I've used Precision teak, which is supposedly the correct colour, but I'm not sure. It only has a single coat, over red primer, at the moment. When it comes to lettering, my research suggests gold lettering, similar to LSWR type, is good for the WLW stock - but where does it [and the stock numbers] go? Likewise the MGW van - what colour lettering was used? Looking at period photos, it seems that lettering often depended on the shape & panelling of the vehicles concerned. Eg MGW open wagons often have MGW on the left hand panel, with the wagon number on the right. Contributions appreciated as ever! The MGW horse box is plasticard, based on an Alphagraphix card kit. 60 thou sheet was used for the floor and 40thou for the bodywork, with microstrip for the bracing. The latter was also used to create the louvres in the horse and dog box compartments. I've built up a reasonable stock of whitemetal castings for W-irons, axle boxes etc, while the wheels are Slater's 3'6 Mansells. Compared to the low roofed six wheel coaches, horse boxes are quite tall, so it is nice for the WLW version to have a companion so it doesn't stand out quite so much now.

-
Bolections - now there's a word! Jenkinson does it the way you do window beading on a locomotive. First cut a blank of suitable size [slightly larger all round than the window opening], then glue/weld this in place over the window opening. Once dry/set, cut the opening to size again and then, for the final finish, scrape the edges to a bevel with a knife blade. It is in his book on p27-28, with the note that bolections are not something you normal get in etched brass coach kits & therefore a reason to scratch built if you like that extra bit of detail. My Sligo coaches do not have them, I'll admit!
-
Phew! That will do me nicely.
-
Little gems, all of them.
-
Looks almost like a medieval castle!
-
Love it when the little details are added. It brings the scene to life.
-
Oh yes, an A3 with those smoke deflectors definitely counts.
-
36.75mm gauge! What's not to like? These modern, laser cut baseboards have a lot going for them too. By the by, a question posed by Richard Chown back in MRJ several years ago was ' how many locos were called Galtee More?' I can think of two - the WLW 2-4-0 and an S class 4-4-0. Am guessing folk here will know of others...
-
Splendid stuff, thanks JB! It is these snippets of information which always develop the bigger picture and my thoughts are very much along what you suggest. The station building is based on Florence court and will stay. I'm using the excuse that government grants and building on the cheap meant they stuck with what they already knew. Sounds like a repaint might be appropriate though? Likewise the signal box, as off the shelf equipment seems common in Ireland. The Sligo used Saxby and Farmer, so this is again continued. Have just gone back to Sprink's history of the Sligo and it seems Fermanagh was reboilered in 1912, though others from 1906, when presumably the brass dome was replaced and Ross pop safety valves fitted? Livery becoming black at this point as well? If so, I will need to extend my artistic licence a bit, or move the clock to 1906, as I don't want to do a major rebuild. Was saving the 1950s scenario for another day, but essentially, it will make use of the rest of my current Arigna stock, so the railcar, railbus, Deutz G, Hazlewood and G2 continue to get used, along with the Sligo bogies, newer wagons and ex MGW six wheelers. More of that later, including plans for new stuff too. As for the Alphagraphix range, it is quite remarkable that we have such a resource at all, though, like Worsley Works, both provide a starting point, rather than a definitive answer. Hence I use the card kits as drawings, to scratchbuild one offs in plasticard or make masters for resin cast multiple copies, while the wagon and coach chassis are ideal for supporting the bodywork. I've found the etched brass stuff to be really well drawn (in other words, it fits) and the loco chassis have always run with little, if any fettling. If I'd started serious modelling ten years earlier, am fairly sure I'd have a lathe and be working in S (1/64) scale. If I'd started 10-15 years later, I'd probably be going along the RTR route. For me, that is where the Irish scene is so interesting. There is just enough available to get you started, but you nevertheless have to work at it. It's why I'm a builder, not an operator or collector, but that is the joy of our hobby, there is something in it for everyone. Keep the information coming folks! It really is appreciated
-
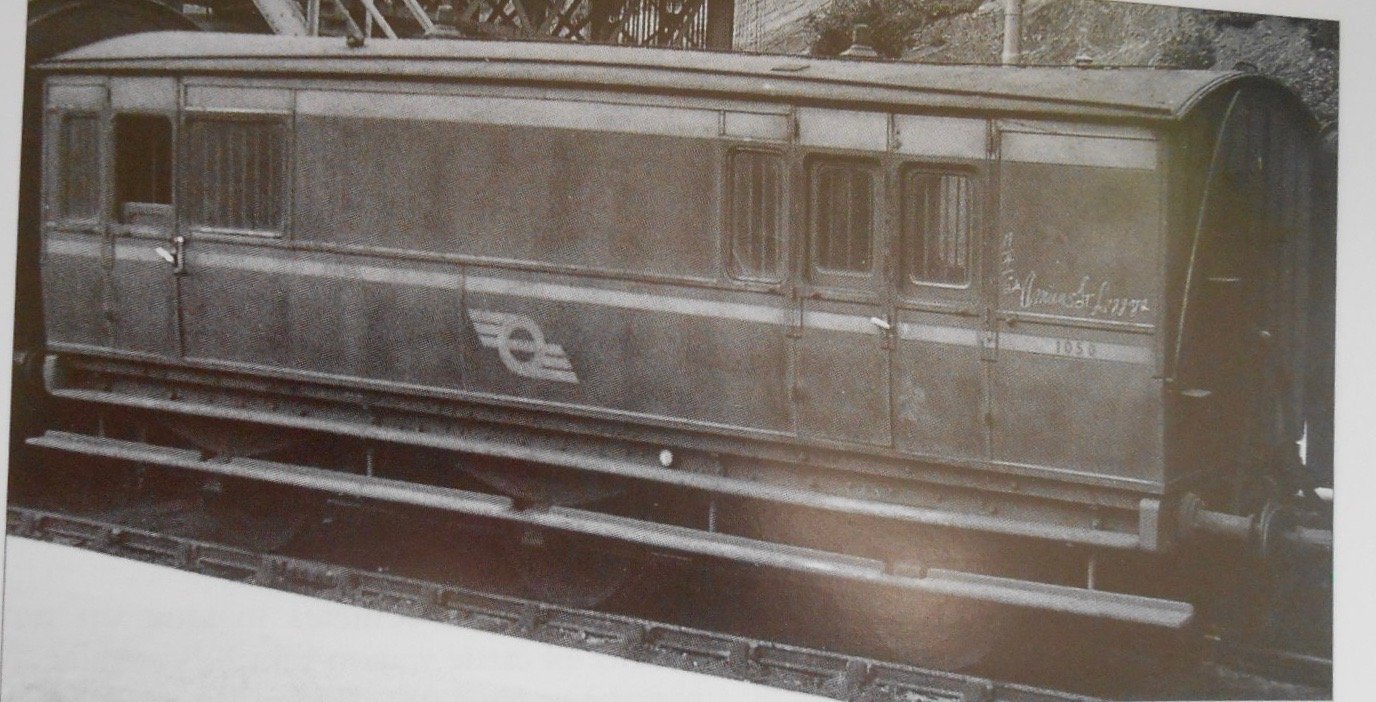
A bit more of the Rationale When modelling the real thing, there is always a lot of research involved. When doing a 'might have been/imaginary' project, for me it is important to come up with a plausible rationale, so that from there, trains and traffic can be devised, which then leads to a list of things you want and need to model. Belmullet, as said earlier is to be served by the WL&WR/GSWR, MGWR & SLNCR. I'm setting the date as 1904, with the GSWR take over of the WLWR put back by a couple of year to 1903. Hence the GSWR is starting to invade Mayo, but WLW liveries currently remain as they are. This particular idea stems from the need to incorporate the Castle Rackrent/Richard Chown models I now own - in addition to some of my SLNCR and MGW stock from Arigna Town. Eventually, I plan to be able to model both the 1904 and the 1950s: by building a second seven track train table, I'll like as not take one or the other to one day shows and both to two days. As you've no doubt realised by now, I enjoy writing about such things, but I also greatly appreciate the 'proof reading' that many of you offer on my ideas and work, so feel free to offer suggestions to what follows. 1904 Trains SLNCR passenger: Small Tank 0-6-4 'Fermanagh' and three six wheel coaches. The latter are in the Alphagraphix catalogue as card kits and I've already built number 4, though its rebuild to current outline will need backdating from the 1920s. I'm sure I can invent a reason! While it would be nice to redo Fermanagh in early SLNCR green, with a polished dome, it will probably stay in black, but with red coupling rods. The train is envisaged as a service from Belmullet to Collooney via Ballina, Foxford, & Swinford, with connections on to Enniskillen, Derry, Omagh & Belfast. SLNCR freight: Large Tank 'Sir Henry', with coal inward to Belmullet [from Arigna, of course] and cattle outwards [to Belfast as per SLNCR]. All aspects of these trains are already built and shouldn't need any more work, other than adding auto couplings. The idea is that after the train has arrived and Sir Henry gone to the turntable, the harbour loco [T&C 0-4-2T] will collect the coal wagons and return with the cattle for Sir Henry to take back. WLW/GSW passenger: 101 0-6-0, plus GSW six wheel first and WLW centre van six wheel third [see photo below]. This train will go south to Claremorris and on to Limerick. The GSW are trying out one of their newest [Coey] 101s, while the 6w 1st is an experiment to bring the well heeled up to Mayo from Cork. A couple of horse boxes will be included and there might be room for a carriage truck too. The servants will travel in the brake third, of course... WLW 'mail-goods': 0-6-0 'Shannon', WLW 6 w parcels [see photo], plus carriage truck, D&M goods brake and GSWR brake. Straight out of Castle Rackrent this one and likewise headed down to Limerick and maybe onwards to Waterford. Only the 6w parcels is needed to complete this train. MGW local freight: E class 0-6-0T, MGW 4w parcels van, D&M goods brake and various wagons from all the main companies. These will be worked to Westport, for onward journeys as required. Some of my Sligo wagons may find a use, otherwise I'll be building some new ones, plus I've already bought the Tyrconnel kit of the 4w parcels van. MGW passenger/mails: Achill Bogie 'Wolf Dog', plus three six wheelers - a post office van, birdcage brake third and a composite. This train will go to Westport and be added to a train from there to Dublin. This is the biggest project, as all the train will need to be scratch built, with maybe one coach kit. So, my plan is evolving. I'm hoping to finish the'Mail-Goods' and GSW/WLW passenger trains first, as they are partly available already, then move on the other as the whim/muse takes me. Watch this space and my workshop thread!
-
Yup, count me in on that too!
-
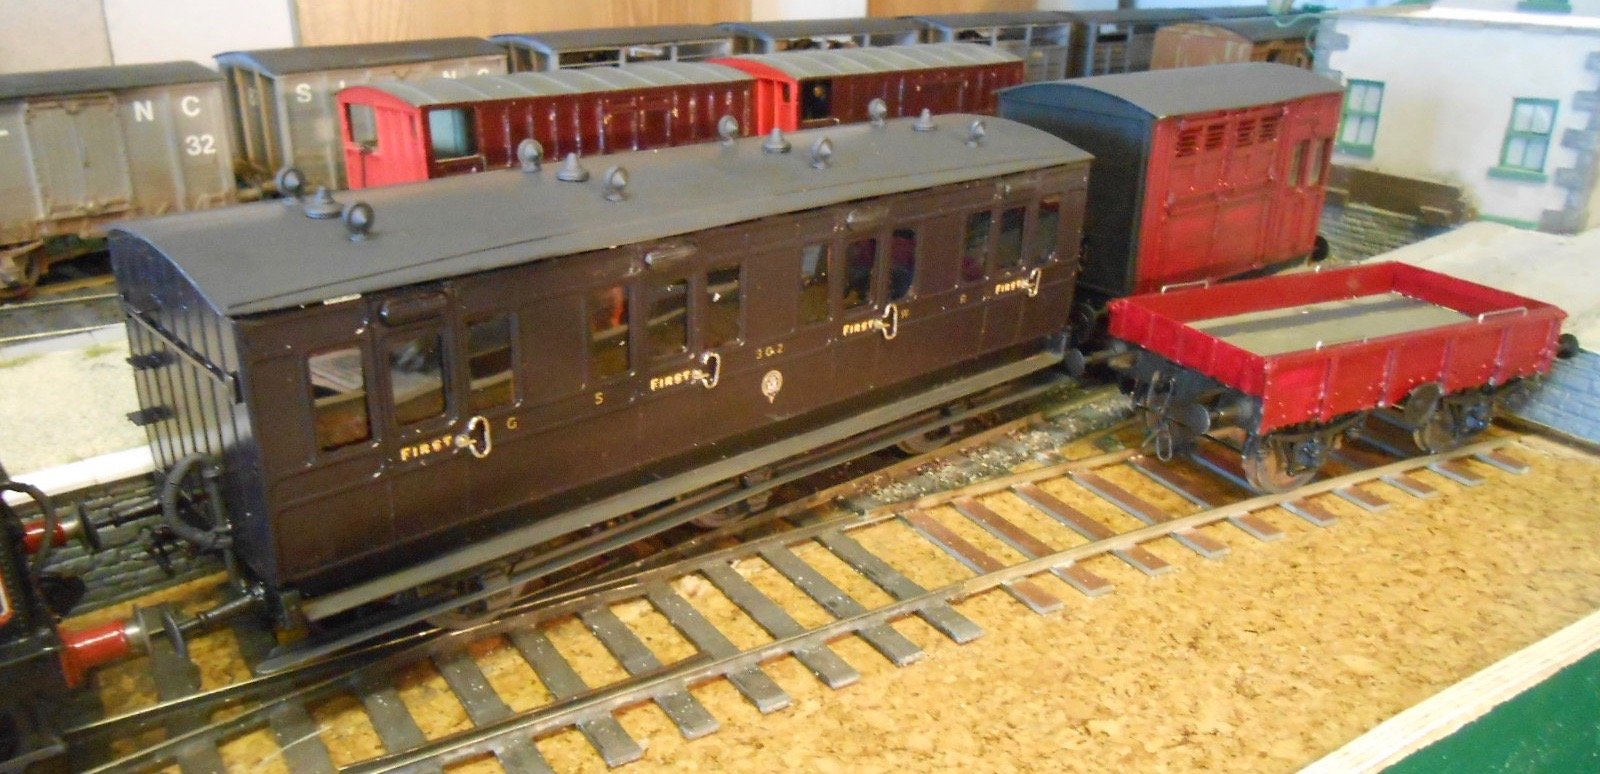
Bolections - now there's a word! Jenkinson does it the way you do window beading on a locomotive. First cut a blank of suitable size [slightly larger all round than the window opening], then glue/weld this in place over the window opening. Once dry/set, cut the opening to size again and then, for the final finish, scrape the edges to a bevel with a knife blade. It is in his book on p27-28, with the note that bolections are not something you normally get in etched brass coach kits & therefore a reason to scratch built if you like that extra bit of detail. My Sligo coaches do not have them, I'll admit! Now, back to my GSWR six wheeler. This was the kit I got from the Richard Chown estate, which he's made a start on the body. I've removed the clerestory roof and done it as a 300 series four compartment First. Anyway, before adding seats [wooden mouldings], I got out the airbrush for a main coat of 'purple lake'. Andy Cundick kindly gave me an article from IRRS in which the colour was analysed as roughly equal parts of Humbrol purple, crimson lake and brown - so that is what I mixed up for the airbrush. As usual, I ended up wearing some of it, but after two coats, on a red primer, it looks ok. Seats, glazing and roof [with gas lighting and torpedo ventilators] could then be added, before the body was joined to an Alphagraphix six wheel flexible chassis kit. Lettering is a mixture of HMRS prefix transfers for the numbers and GSWR letters [Southern/LSWR sheet], with the 'First' on each door from a Fox transfer [waterslide] sheet I had in hand for SECR coaches. The GSWR logo is also from that sheet and is a reasonable representation, I think. Also in the pictures are two 'quickies' - a horse box and a carriage truck. Both are repaints of two of my SLNCR wagons. The Sligo horse box was ex WLWR anyway, while the carriage truck has had a couple of end boards added & its brake gear remodelled from the Sligo version. They still need lettering. The WLWR book states there were quite a few of these, but the only pictures I can find are of the six wheel version, which is too big for my dock. So, mine is really just a bit of guesswork and given that there is not much room for variety in such wagons, it will do nicely for now. Hopefully the crimson lake colour is correct [Let me know JHB!] and, interestingly, looking a Castle Rackrent pictures, the end of the horseboxes are black - so can only hope I'm not making the mistake of modelling a model! The rationale behind this stock will be appearing on the Belmullet/Blacksod Bay thread in the layouts section shortly.
-
I originally used Ford Laurel Green from Halfords, but it is a bit dark, when compared to colour photos of the 1950s. My MGW six wheelers are on pages 2and 3 of my workbench thread if that helps.
-
Following this one with more than usual interest, as I have one to build too! That said, the chances of me making similar mistakes and more will still be high... I've used 1/8" I/d brass tube for bearings in the past, which has worked well. An issue with Tyrconnel coach kits is they are designed for 32mm gauge, so brake gear is a bit of a faff Turning into a nice model though. Will it be green or brown?
-
Doing Research First of all, many thanks to those who have been helping recently as I ponder the mysteries of early 20th century rolling stock. However many books and articles one has, it seems, there are still annoying gaps! Google can help at times, but when you start coming across stuff you have posted yourself, especially that which you made up, then the feeling of being up a certain creek without a paddle starts to loom. However, one thing Google led me too was Model Railway Journal, which featured several articles by Richard Chown & the legendary Castle Rackrent system. Indeed, his work has influenced my ideas a lot over the years, though I only have space for one station, while he had lots. MRJ 202 contains a very useful article with colour photos - handy in terms of liveries. One picture shows his WLW loco 'Shannon' working a very interesting train that he called the 'Mail Goods'. This includes a GSW 6w postal sorting van [built by Don Rowlands], plus the two brake vans I bought along with Shannon, after Richard died in 2017. Thus far, I'd been unable to identify these, but the caption solves it by naming them as 'brake/stowage' vans from the Dublin & Meath Railway. This was the line that ran to Athboy, but was taken over by the MGW. Not sure about the livery though - presumably the Midland would have painted them brown?Having long had a penchant for non-passenger coaching stock, the idea of a mail goods is very appealing and given that a carriage truck is also in the picture, I already have a good start for one of my own. In fact, just need a postal van! MRJ 127 meanwhile has a four page general description of the system in 1997 - though at this time the magazine old had black and white pictures. There are also hints of what an interesting character Richard was. For example he notes among his achievements as 'owning a Land Rover, designing & building my own house, & sailing around the world alone'. Remarkably, if someone else hadn't done it first, he was going to model the Cambrian Railway. Thank goodness he went along the Irish path - though he also somehow fitted in several French layouts, a Brecon & Merthyr, plus narrow gauge Norwegian as well. What a man.
-
Classy. Very classy. Well done sir!
-
The loco is way too clean and would benefit from a bit of weathering. Unless the owners are intent on keeping it in out of the box condition of course!
-
Oh my. Give us more, please!
-
More treasures and very much appreciated! So, top hat oil lamps for any MGW stock I build for my 1900s stock, but looks like I can put gas lamp tops on any GSW/WLW stock. Fingers crossed.
-
Splendid! The track looks SO right. Enjoy - I for one am really looking forward to seeing progress.
-
Gold dust. Maybe I ought to do at least one coach this way. Many thanks!