David Holman
-
Posts
4,359 -
Joined
-
Last visited
-
Days Won
117
Content Type
Profiles
Forums
Events
Gallery
Blogs
Everything posted by David Holman
-
For what it's worth, I bought a copy of Michael Bunch's Donegal Railway Diary, Part one, at the weekend. Must admit that, initially, I was very disappointed, because the quality of the photos is poor. Overall, I would say close to 50% are grainy, or simply out of focus, while another 25% are poorly composed. However, I'm now warming a little to the book, because if nothing else, it is a unique archive of hard to find views of the more obscure elements of the CDR. It also contains a wealth of generic details, such as platform clutter, piles of parcels, line side and track details, close ups of wagons and coaches, etc. It is just a shame that so many of the pictures are poorly composed/exposed/focussed. Sift through though and there are some real gems, while the price at 15 euros is pretty cheap for an A4 album of 148 pages.
-
Many thanks, these are a lot clearer than anything I have and should make sense of the instructions
-
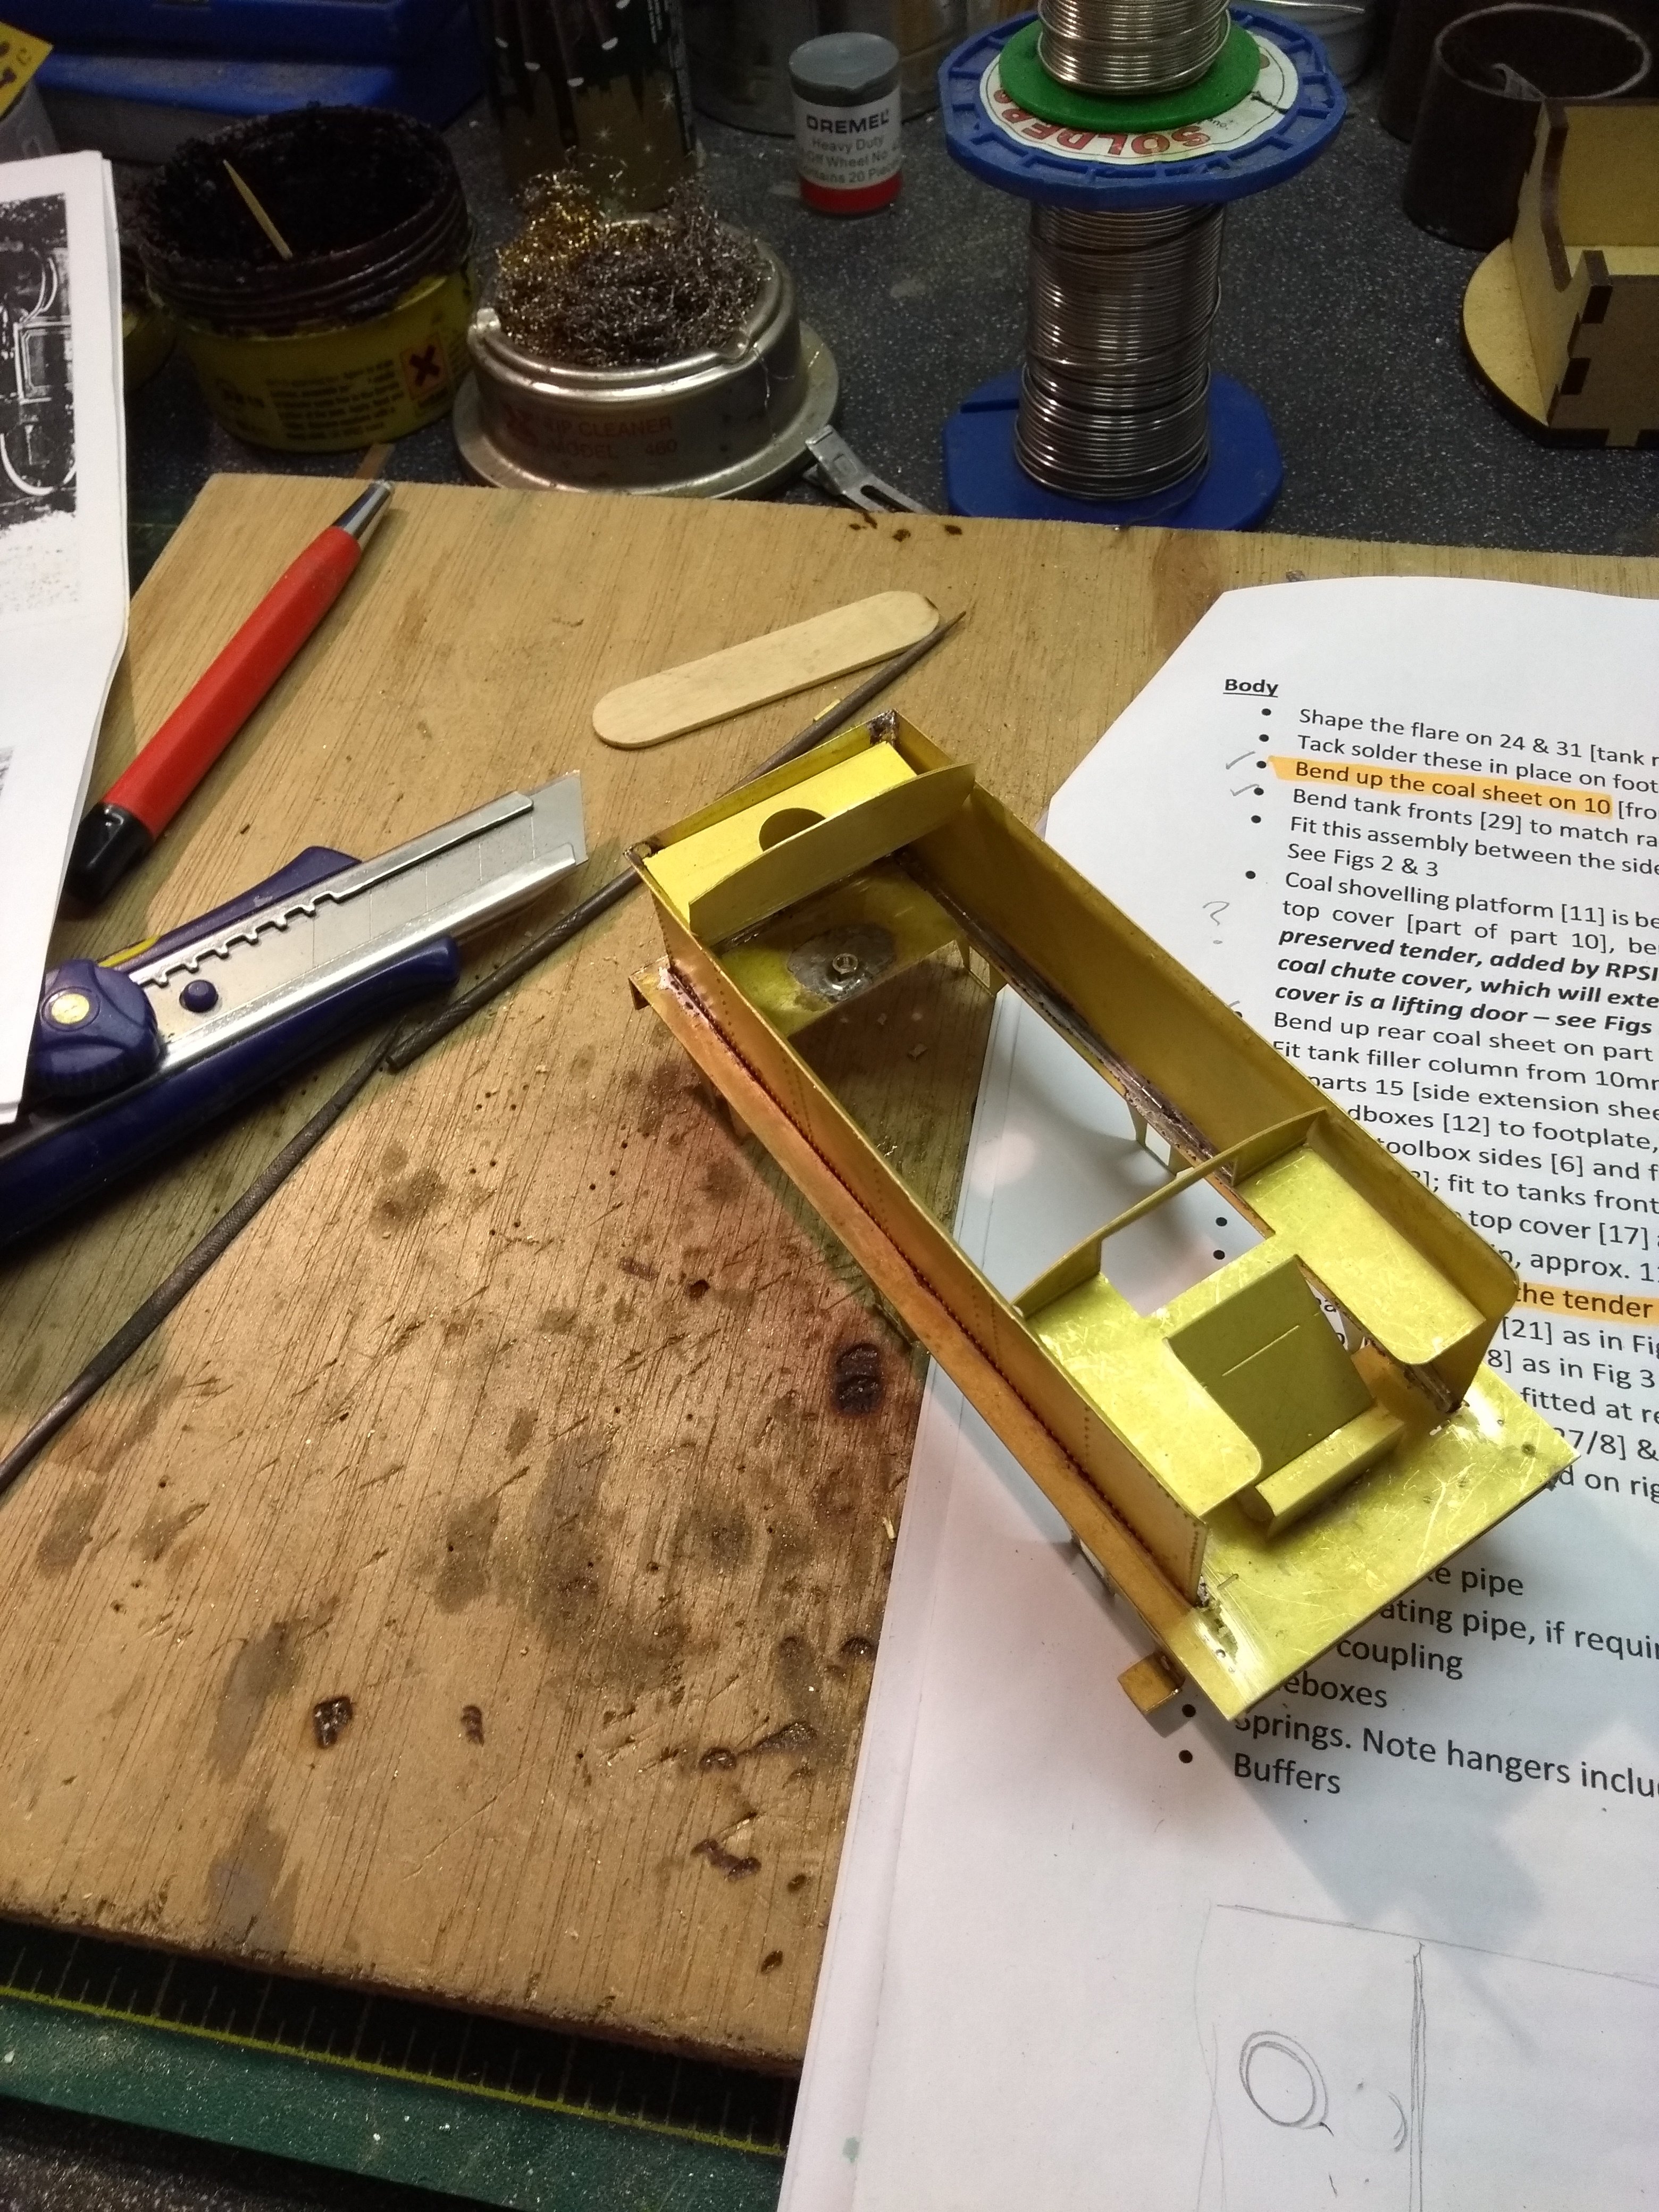
Instructions on my TMD kit seem a little vague, while those for the front end, particularly the coal shovelling platform refer to the preserved example. Meanwhile, photos in Steaming Through Three Centuries show a fair bit of variety! Am hoping to built the tender as first made in 1902 (Coey loco). So... 1. Would it have had the raves, or would it have been low sided? 2. Presumably, there would have been a front coal sheet, at right angles to the sides, but was there a rear sheet as well? Photos seem to show coal piled full length of the tender top, including round the tank filler. So, a simple flat top to the tender, but with the usual chute down to the front of the tender? 3. Just how is the front coal chute arranged? Instructions suggest a 'coal chute cover ( that you have to make yourself), which will extend down to footplate level and the bottom of this cover is a lifting door.' Any idea what this looks like? As ever, any help much appreciated. Photo shows what is supplied on the etches, but nothing fixed in place yet.

-
Sows' ears being turned into silk purses. we
-
Sounds great, Phil. Keep us posted!
-
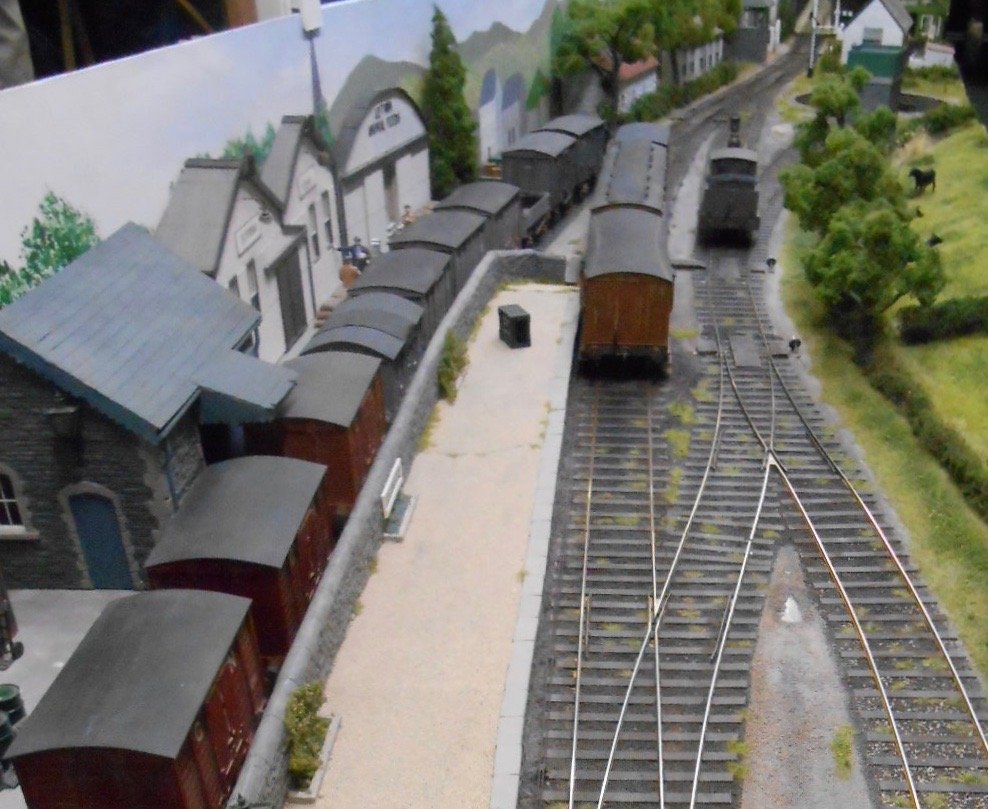
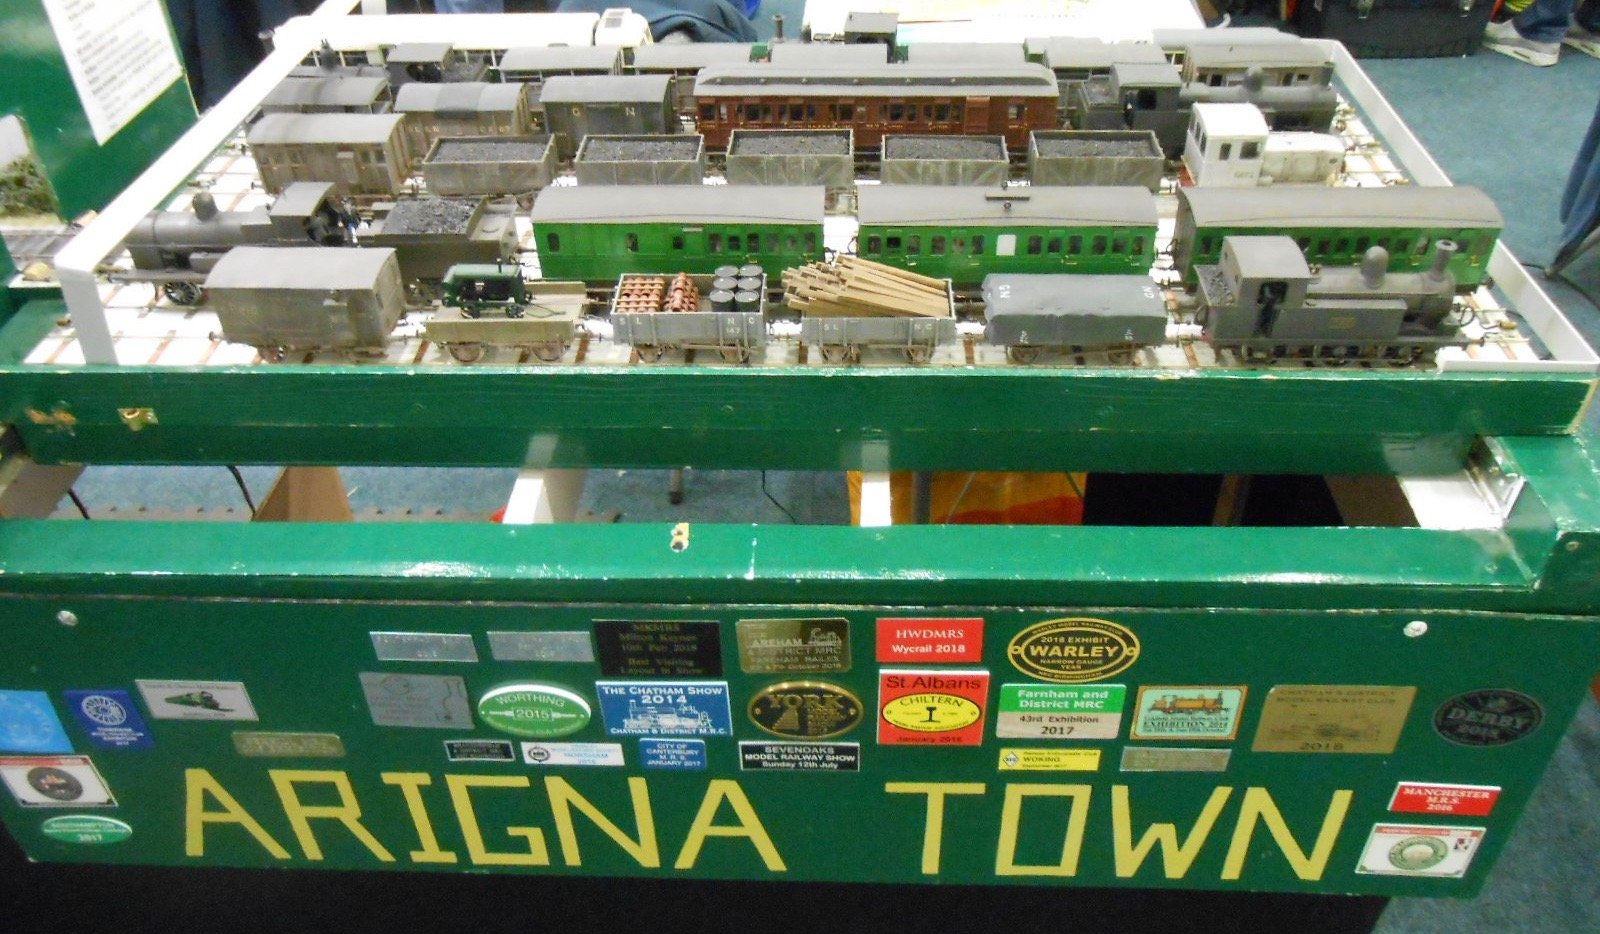
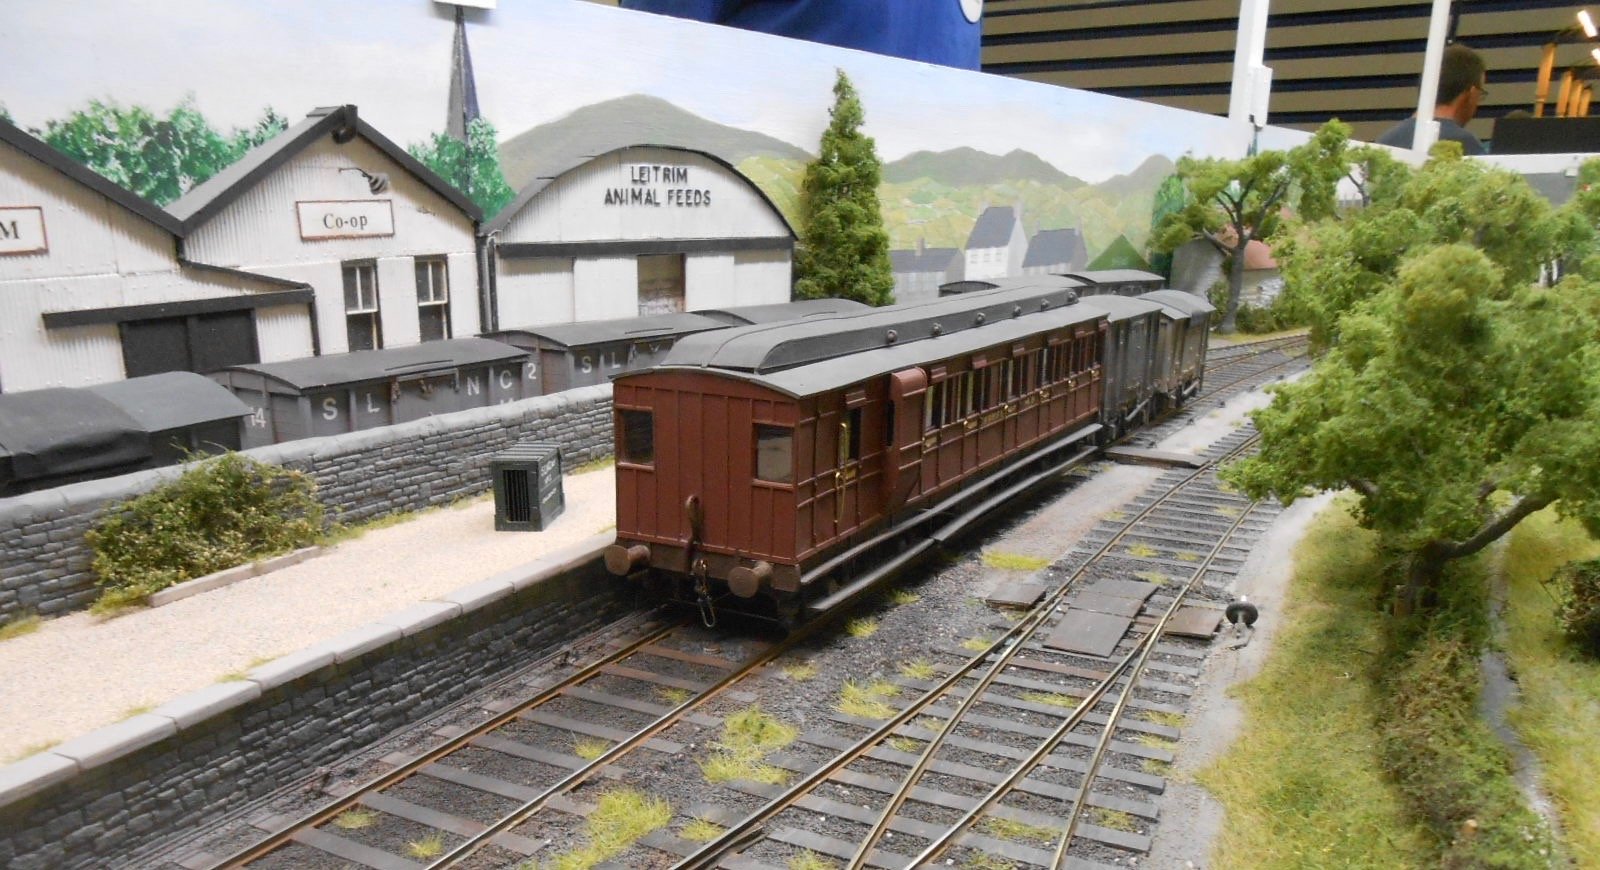
Arigna Town - this week's scenery
David Holman replied to David Holman's topic in Irish Model Layouts
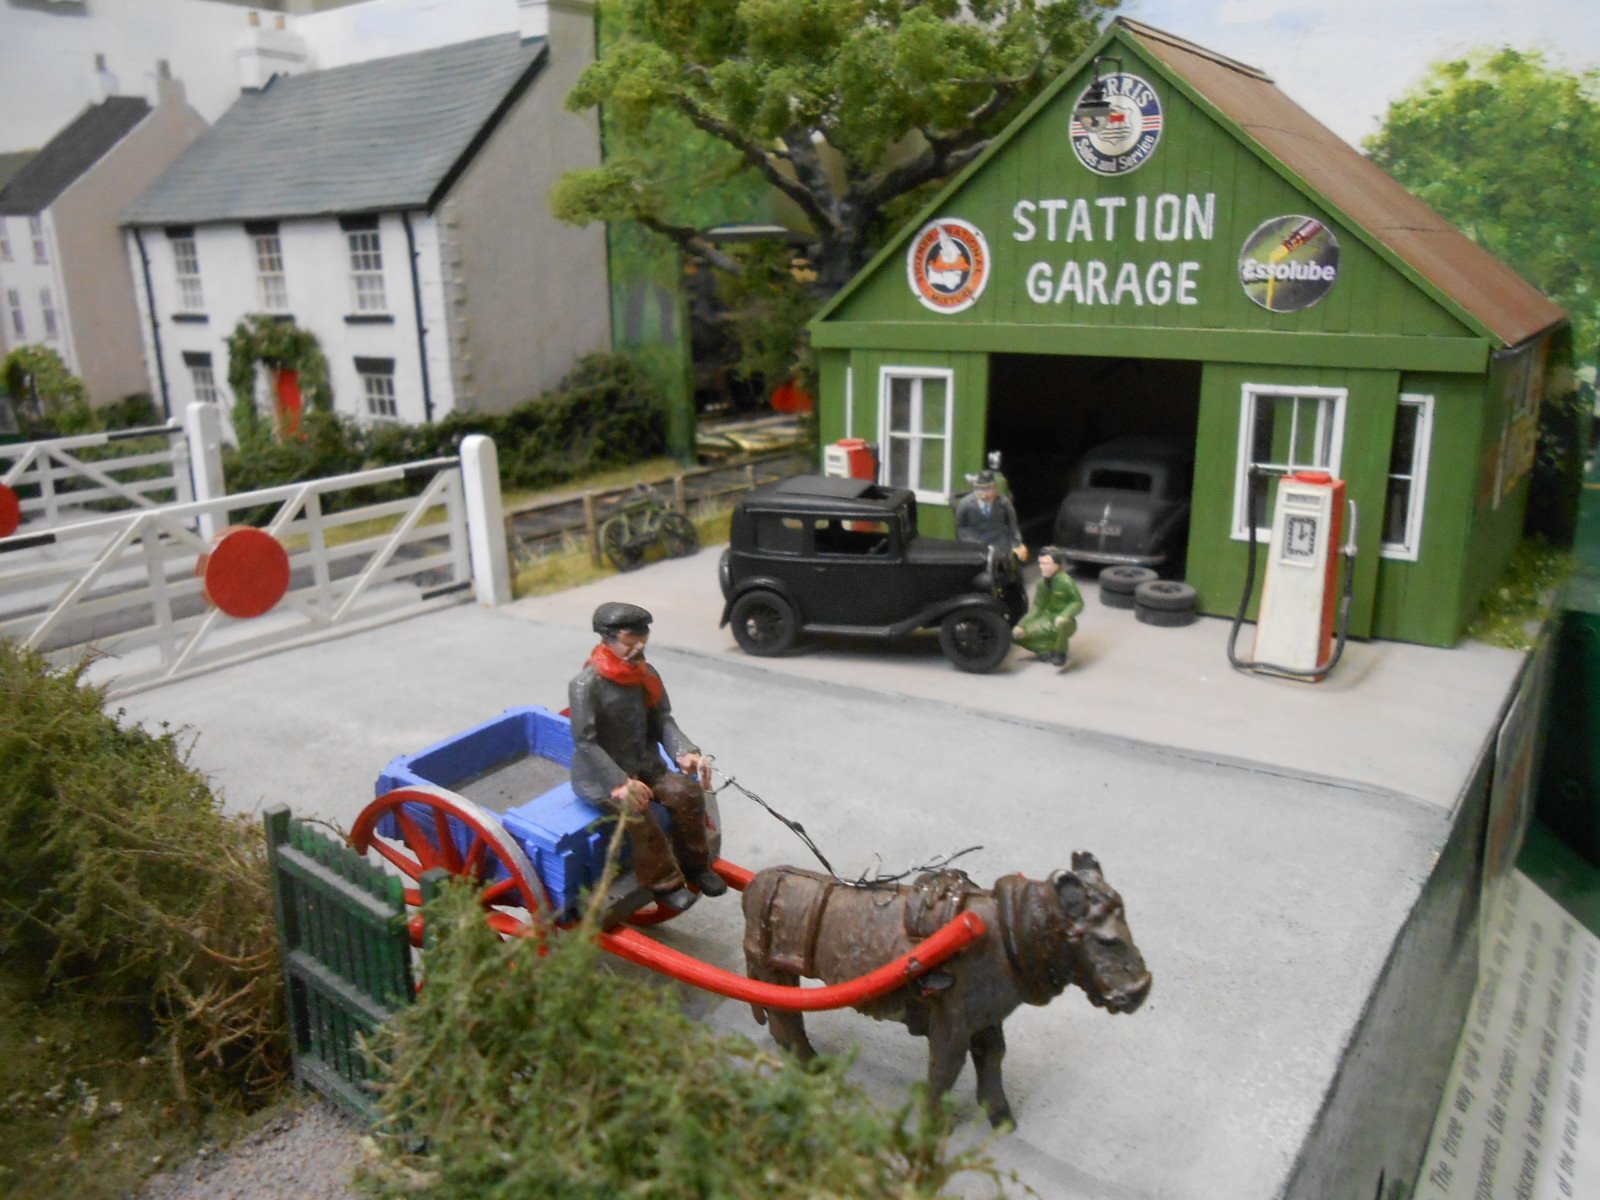
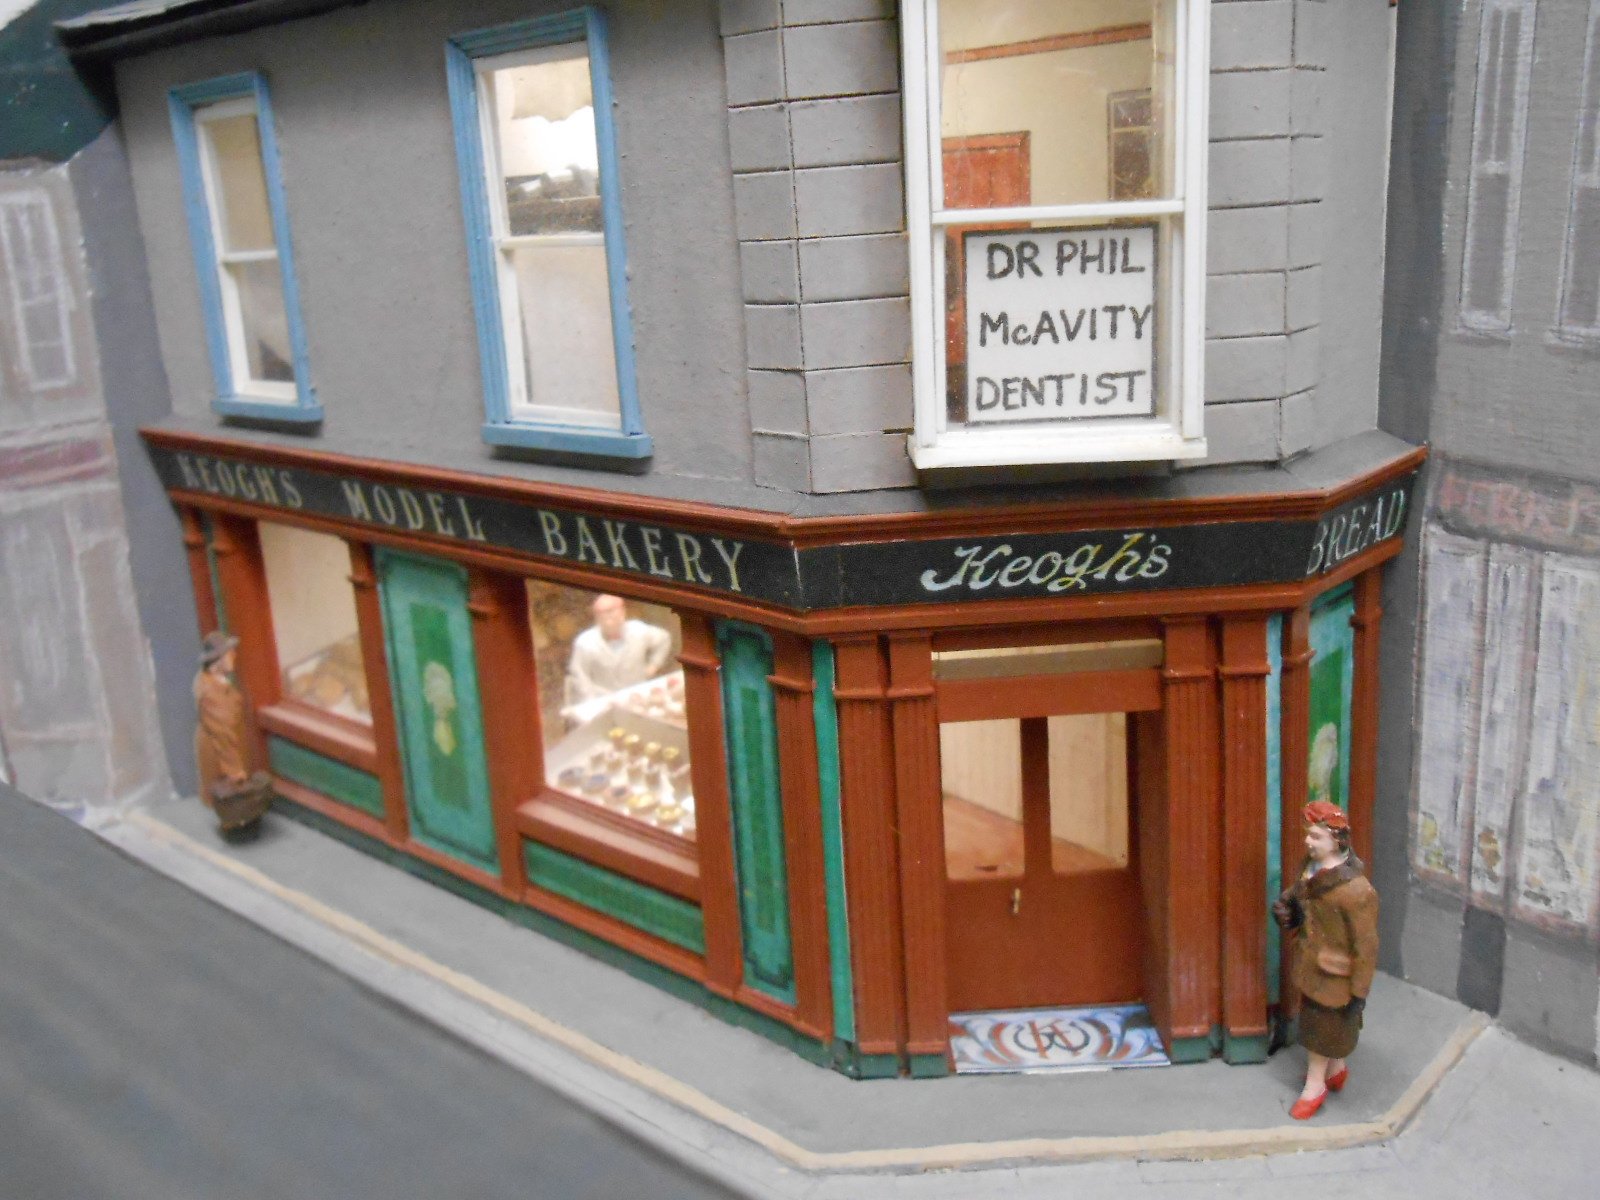
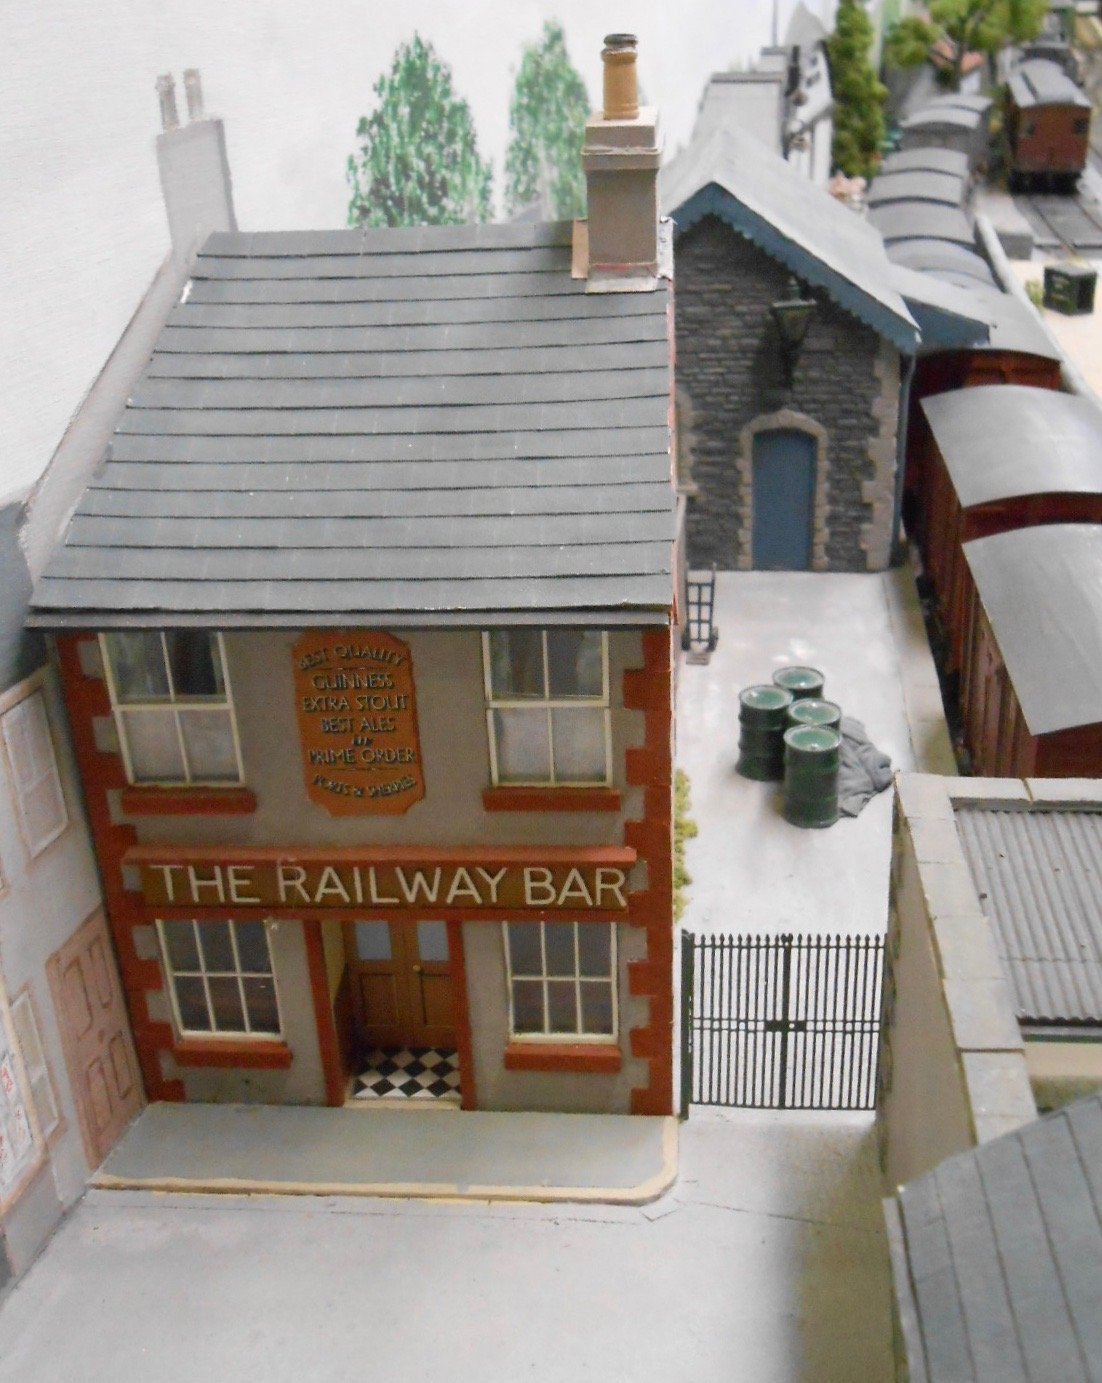
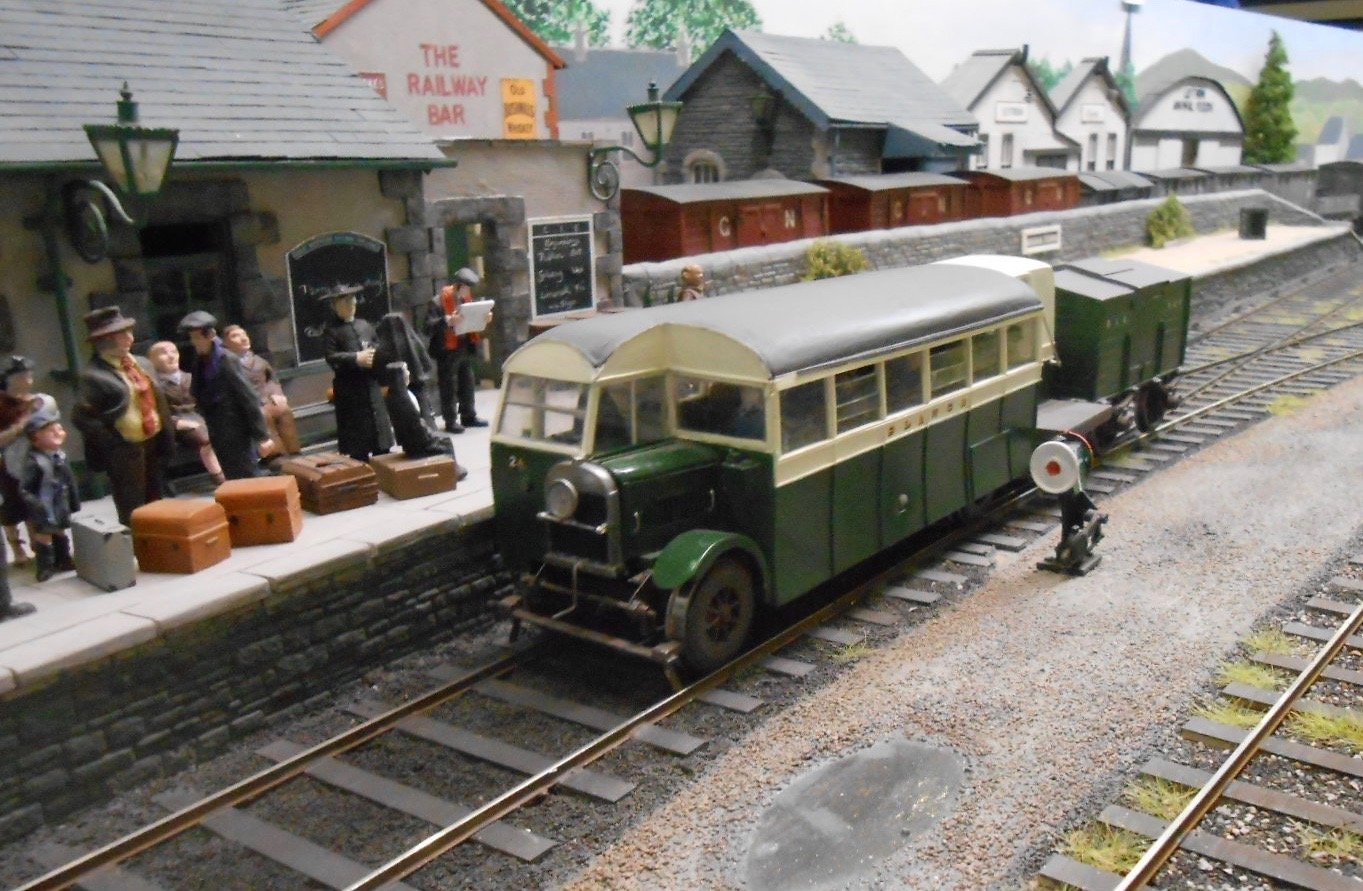
Not writing its obituary yet, Andy! That said, the layout almost met a sticky end yesterday afternoon. A little boy, being held up by his grandma, suddenly started coughing, then wailing loudly. Two seconds later, he was spectacularly sick all over her. Poor granny! However, had he turned his head the other way... Anyway, the final day went well enough & everything is back home. As for the future, their are two plans: Plan A To refurbish the layout, to the extent that it may not be instantly recognisable. This is because, I want to turn it around so that the back scene is the other side, thereby changing the view entirely. Apart from the station, all the buildings along the back will be removed, with some, along with the trees, being donated to the Chatham club 0 gauge layout. This is because the layout will be reborn as Belmullet, or more probably 'Black Sod Bay' in the far north west of County Mayo. Jonathan Beaumont, of this parish, covers all the proposals in his book on the Achill Island railway - such things being very must grist to the mill for me in terms of layout ideas. Further changes will involve replacing the turnout to the goods siding with a single slip, enabling an on scene junction to a harbour branch - off scene, of course. In addition, I'm planning a loco shed, beyond the turntable and a back scene which includes a view across Black Sod Bay to the peninsula beyond. All pretty barren and treeless, but shades of Burtonport, which has long been a favourite location too. For an extra twist, I want to turn the clock back to the early 1900s. I have Richard Chown's WLW 'Shannon' and his kit of the 101 class will be in GSW livery of the same period. Add in the MGW's 4-4-0 'Wolf Dog', one of the Sligo small tanks and some new, period stock and there is the makings of a colourful and interesting scene, in addition to the 1950s currently portrayed. I know, all rather unlikely, but I already have a bit of made up history to mind, while all four companies actually met up in Sligo, of course. Plan B I have considered selling Arigna Town as a going concern, with some, but by no means all of the locos and rolling stock. No point in offering the layout on its own, as, apart from Richard Chown's stuff, nobody else appears to do Irish broad gauge in 7mm scale. Was thinking in terms of one of the small tanks, the G class diesel & maybe the J26 and railcar, plus a selection of SLNCR wagons and coaches. However, clearly it wouldn't be cheap - though not as expensive as you might think, but it has been robustly built and is still in very good condition. However, note that this is not a ready to run train set. Everything is hand built and requires a degree of skill to maintain it. Loco servicing, soldering skills should a point tie bar break, etc. In addition, the controls are all at the rear, so to run it at home, a perspective buyer would be looking at adding point and signal motors - which is what I will be doing when/if I refurbish it. Alternatively, while the layout has been widely exhibited in the south of England, it hasn't been seen much at all in the north. If it was sold, then I have another idea for something brand new, but am not thinking about that at the moment. Anyone interested needs to send me a personal message, by the end of February at the latest, so we can discuss what might be available. As a guide, think at least £3-5000, depending on the amount of stock. For now though, here are a selection of photos taken on its final outing.
-
Arigna Town - this week's scenery
David Holman replied to David Holman's topic in Irish Model Layouts
One more day. Managed to take some more photos, which will upload tomorrow. Offer new angles that I couldn't do with the layout in the workshop. This evening, have looked back through my journals to create a few statistics on the layout: It is been on the exhibition circuit for four and a half years, racking up 39 shows in all. This equates to over 70 days, or at least 500 hours on display. I reckon that means at least 600 sequences, so each train has travelled about 3000 metres in that time, while the layout itself has done over 10 000 km in the back of my car, plus one return trip from Holyhead to Dublin. Not bad, though am sure there are plenty of layouts that have done far more. Certainly puts exhibiting in perspective though. -
Arigna Town - this week's scenery
David Holman replied to David Holman's topic in Irish Model Layouts
One last outing for Arigna Town this weekend at the Longfield show in Kent. My new layout, Fintonagh, already has five shows booked this year, so the broad gauge will be taking a back seat for a while. Various plans in mind as to what I'm going to do next, so will update you after Longfield. -
CIE Laminate Coaches - Worsley Works - ECMbuild in 4mm
David Holman replied to murrayec's topic in Irish Models
Beautiful. Reminder to self to visit this section more often! -
A fine piece of work, Ken. Highlights too the issues with 3D printing. At a meeting last night, was looking at a 7mm scale open wagon, done complete. From three feet away, it looked impressive, but any closer and the layered effect soon became apparent. Likewise a printed coach, where not sure any amount of sanding and polishing would give a smooth surface and retain the panelling. Apparently, the wagon took six hours to print and many days to get the CAD right. Fine if you enjoy that sort of thing, but not for me just yet, not least because I can produce masters for resin castings in a few hours and once the moulds are set, churn out sides and ends every half hour or so. While I'm here, total respect for the outside cylinder work. I've done St Mologa in 7mm scale, using the Tyrconnel kit. Small engines and outside cylinders make for fag paper clearances around the cross heads. Add in broad gauge and it gets tighter still. Like you, had to move the cylinders out slightly, plus bore the piston rod holes slightly off centre to make it fit. Pretty engine though, so worth the effort.
-
As well as the signature pieces such as the Google building, what makes this layout stand out is the way ordinary, mundane buildings come together so well. Chocolate box cover it ain't, but that's what makes it so special.
-
Try Google search for Lisduff Quarry. Some useful info and pics
-
Am sure you can fit low wattage, 'background' heaters to improve the temperature on an overall basis, Tony. Alternatively, something a bit stronger, but on a timer switch, to come on an hour before you visit, maybe?
-
Interesting to see what the rest of the layout looks like. If it ends up as good as the coastal section, then it will be quite something.
-
Another one to follow!
-
... excellent! Now all you have to do is tidy the garden! Can't do gardening in the dark though, so still plenty of modelling time.
-
Wouldn't give up on Omagh just yet, Tony. The shed may not be perfect in the winter, but it makes a fine escape for the rest of the year, while the layout is coming on nicely. However, nothing wrong with an indoor layout either, so enjoy having both. Presumably, trains would be common to both? For what it is worth, if you do get permission for you indoor layout (make it a good bottle of red!), aim to keep it simple. Something you can get running and sceniced inside six months, leaving Omagh as your long term project, to be dipped into as the muse takes you. I've got two layouts at home, but fellow Chatham club members have been known to have four on the go at once, often in different scales and gauges. Now there's a thought!
-
Excellent work and love the interiors. Can only agree that scratch, or even kit building coaches is a lot of work and not just because you usually want several of them. It is easy to think it is just sides roof and bogies, but all the details add up, especially stuff like handles, hinges and so on. Well worth it though and your paintwork provides a lovely finish.
-
7mm scale 101 - a tribute to Richard Chown
David Holman replied to David Holman's topic in Workbench
Thought you'd have some solutions, thanks John! The 4mm scale models are certainly impressive and it is really good to have a fleet of them in the various modifications. I have lost count of the number of times my own approach is the opposite of the practical one, while I can almost guarantee to assemble anything 'handed' back to front and have to redo it afterwards. Took two goes to work out the cab steps. Maybe it is because I'm mostly left handed, but do knife and fork conventionally, batted right handed in cricket (left hand bowler) and right footed too. That or just a bit mixed up... Ken, the frame spacers are simply 4mm brass rod. This works really well with my new Poppy's Woodtech frame jig. Guess you could do the same, or maybe go for smaller diameter? Clever idea to narrow the frames on the middle axle, by the way. The TDM kit is really just a set of etches, I assume Terry just enlarged the photo. Hence there are no frame spacers because the 4mm scale kits relied on square section brass spacers, with turned ends, drilled for the fixing bolts. At least that is what the drawings supplied with the instructions suggest. I'm sure there must be an official distance for frame spacers in 7mm finescale and there's bound to be in S7, of course. My first broad gauge loco was the Tyrconnel J26/E class. Here the foldup frames were for 32mm gauge. Roger Cromblehome suggests fitting the top hat bearings in back to front for broad gauge and this works well. On my own scratch building, I've used the same distance as the North Star kit of the SLNCR tanks, which is 29.5mm. This gives enough side play on the centre axles to go through 6' radius curves, with washers packing the outer axles. -
7mm scale 101 - a tribute to Richard Chown
David Holman replied to David Holman's topic in Workbench
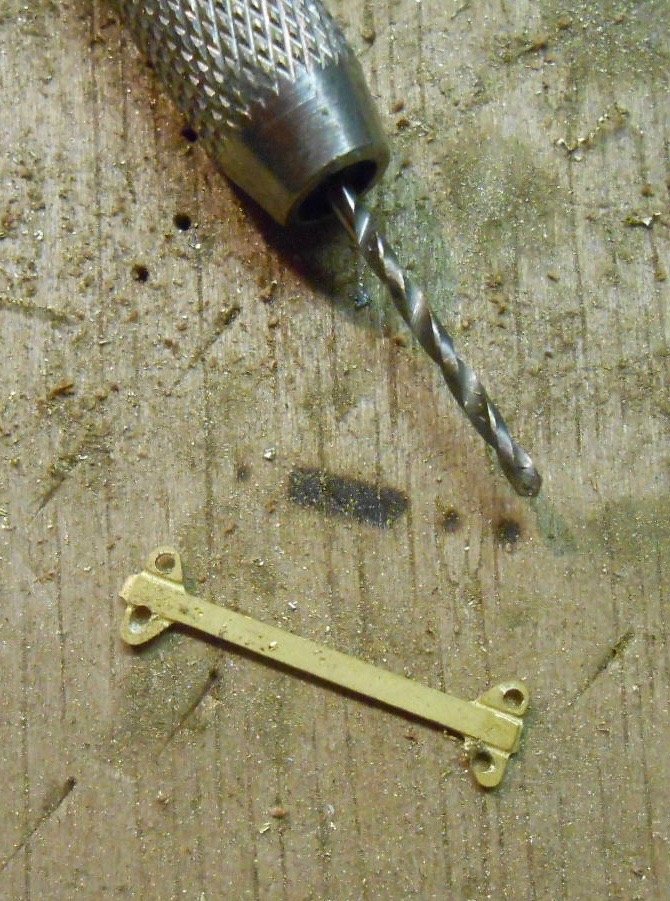
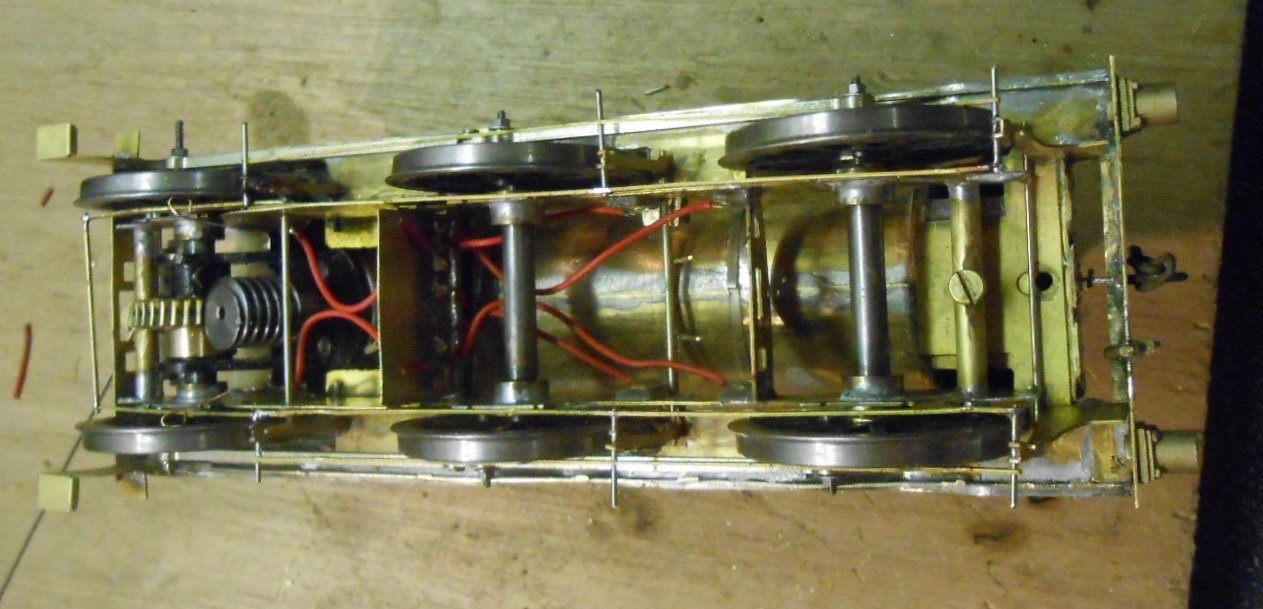
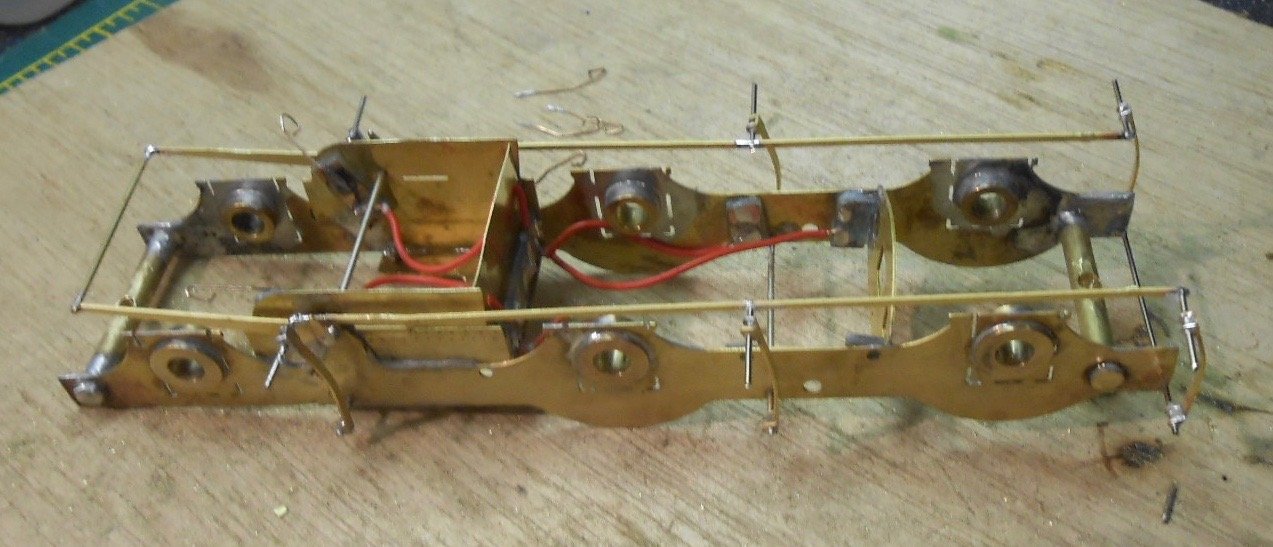
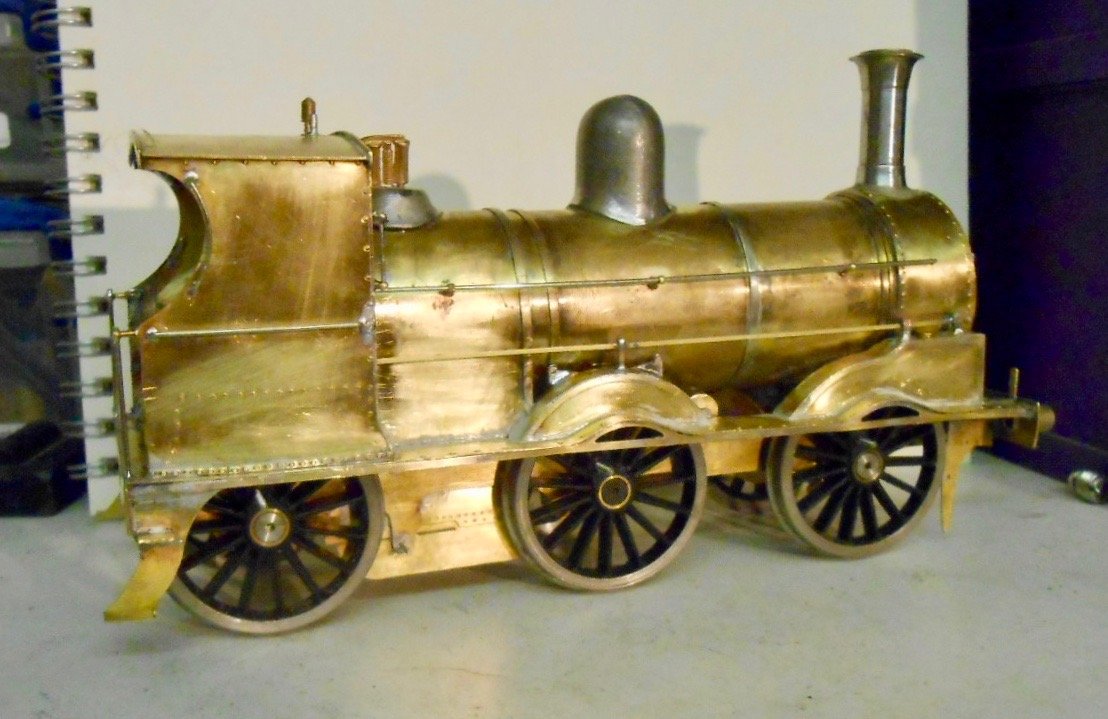
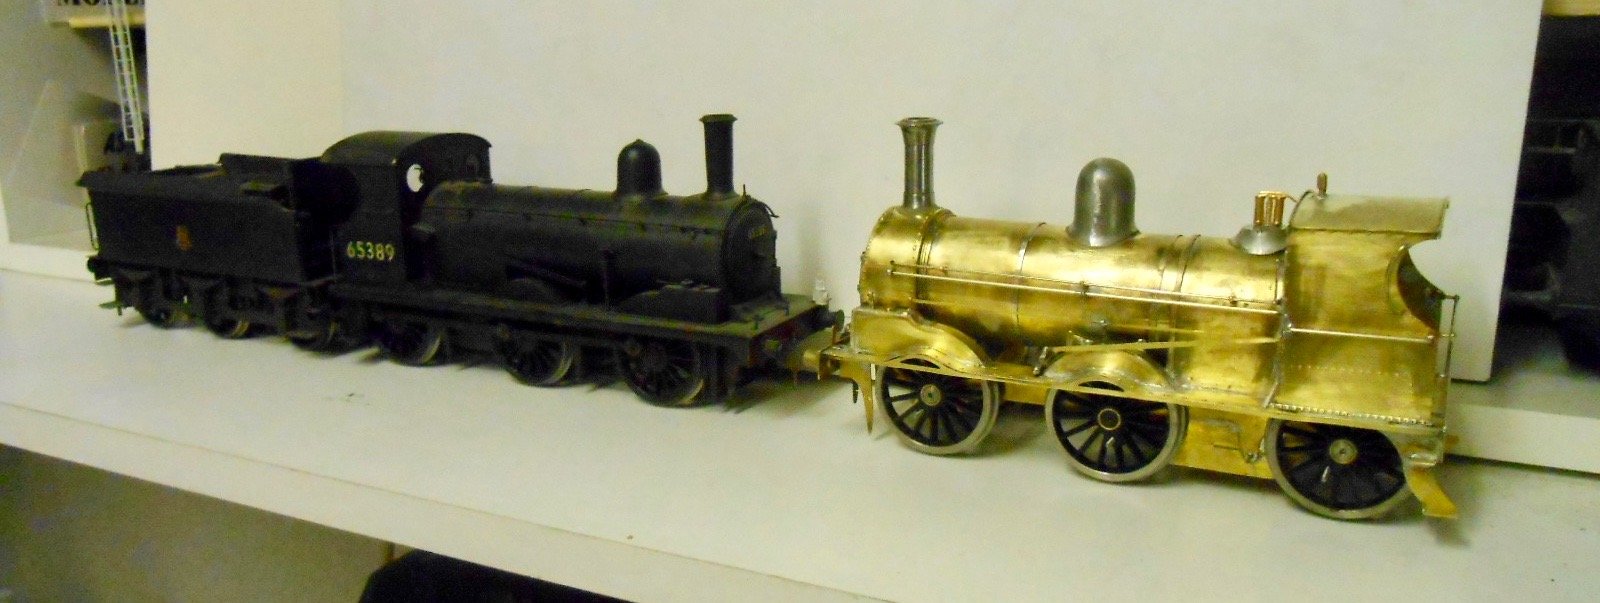
As you can see, have managed to get on a bit of a roll with the 101 kit. Following on from getting the bodywork finished yesterday, focussed on the chassis next. I'd got as far as making sure it rolled nicely, with the rods attached, but moved to the bodywork to ensure everything would fit before going any further. Hence it has been a case of adding pickups and wiring back to the motor. Pieces of copperclad were epoxied to the frames for the pick up wires, then phosphor bronze wires were soldered in place and bent to connect with the wheels. Much to my delight, the chassis still runs nicely, so next step was fixing it to the body [to check there were no shorts - always a possible problem with metal kits - and then run it on Arigna Town. Again, all was well, with the loco negotiating the points and curves without problems. Buoyed up by this success, this afternoon, I tackled the brake gear. Be it locos, coaches or wagons, brake gear is definitely not one of my favourite jobs and the 101's looked pretty complex. So it proved, though it has actually gone together quite well. However, I certainly take my hat off to John Mayner and others who have built this kit in smaller scales, because 7mm is more than fiddly enough for me! The kit comes with six etched brake brackets, which need drilling out to go on the cross rods. There are also 12 brake blocks, which are meant to be soldered in pairs to give the necessary thickness. However, there are pull rods on both sides of the wheels, so have decided to use some Slaters plastic blocks instead, in an effort to minimise the risk of shorts if any metal work touches the wheels. The brackets are hung on the top cross rods and were soldered in place. Nickel silver wire is then pushed through the lower holes and the pull rods then go on each side. I only fitted the inner pull rods, as the wheels need to come off again for painting. It was at this point that I discovered that the inner pull rods foul my newly installed pick ups, so they need re-positioning. The outer pull rods are just a push fit at the moment, so I'll need to think of a way to make them removable for maintenance. Fingers crossed, the chassis is now ready for the paint shop and it will be good to get this done so I can at last leave it assembled. No matter how many locos I build, it always seems I end up taking off and replacing the wheels more times than necessary! Pictures show the various stages, starting with a better shot of the cab interior and finishing with the disassembled chassis.
-
7mm scale 101 - a tribute to Richard Chown
David Holman replied to David Holman's topic in Workbench
More faffing around today. Have been unhappy with the cab, as especially on one side, it didn't look straight, even though a square suggested otherwise. Took a gamble and unsoldered the roof, so I could make some adjustments to the side sheet - managing to do it all without any details coming loose. The cab roof will stay off for now, as it makes painting far easier. Has enabled me to add some more piping, plus the cab floor (thin ply). This is slightly higher than it should be, in order to clear the gear wheel. Two plasticard seats have gone in too.d
-
Always good to place/run locos and stock on a new layout. Gives an idea of how things will look later on
-
7mm scale 101 - a tribute to Richard Chown
David Holman replied to David Holman's topic in Workbench
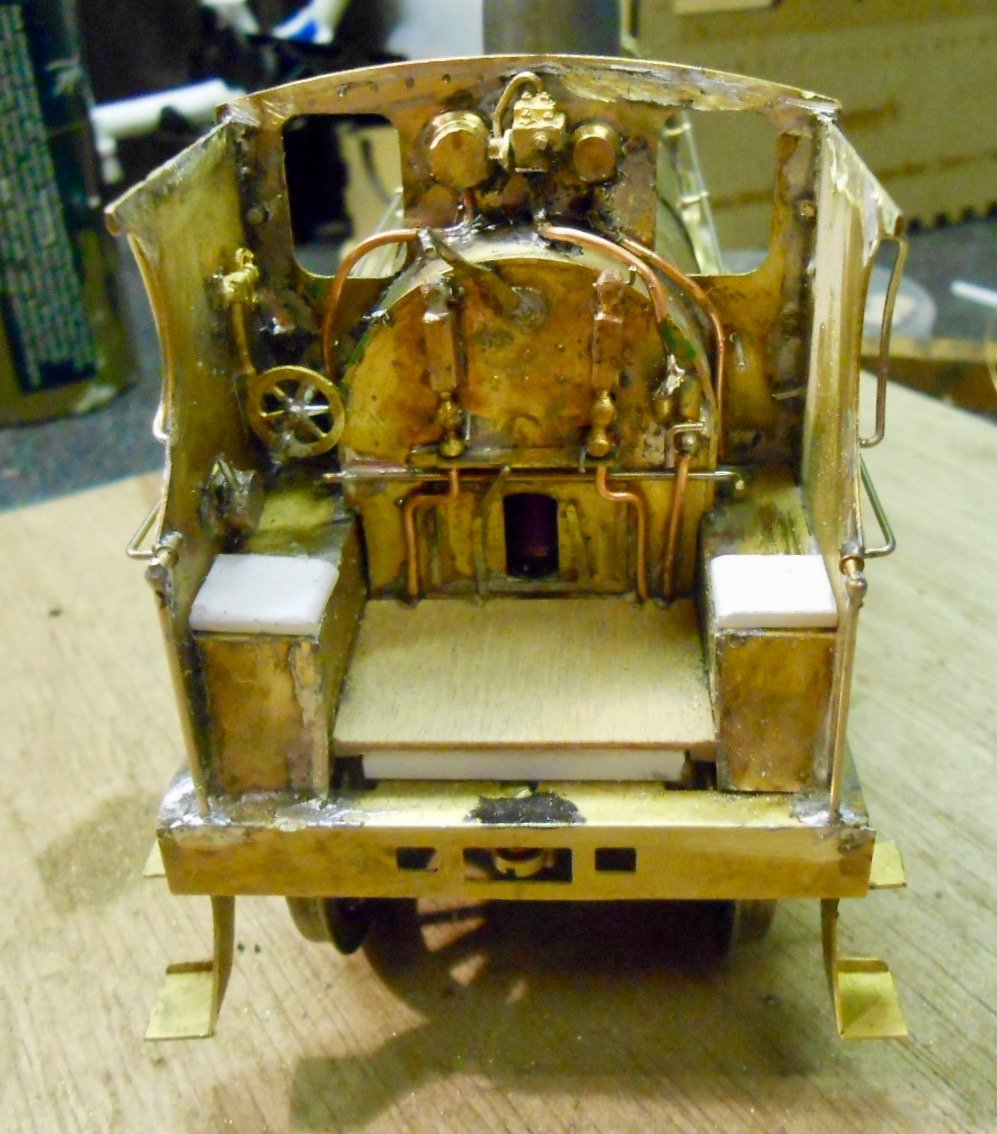
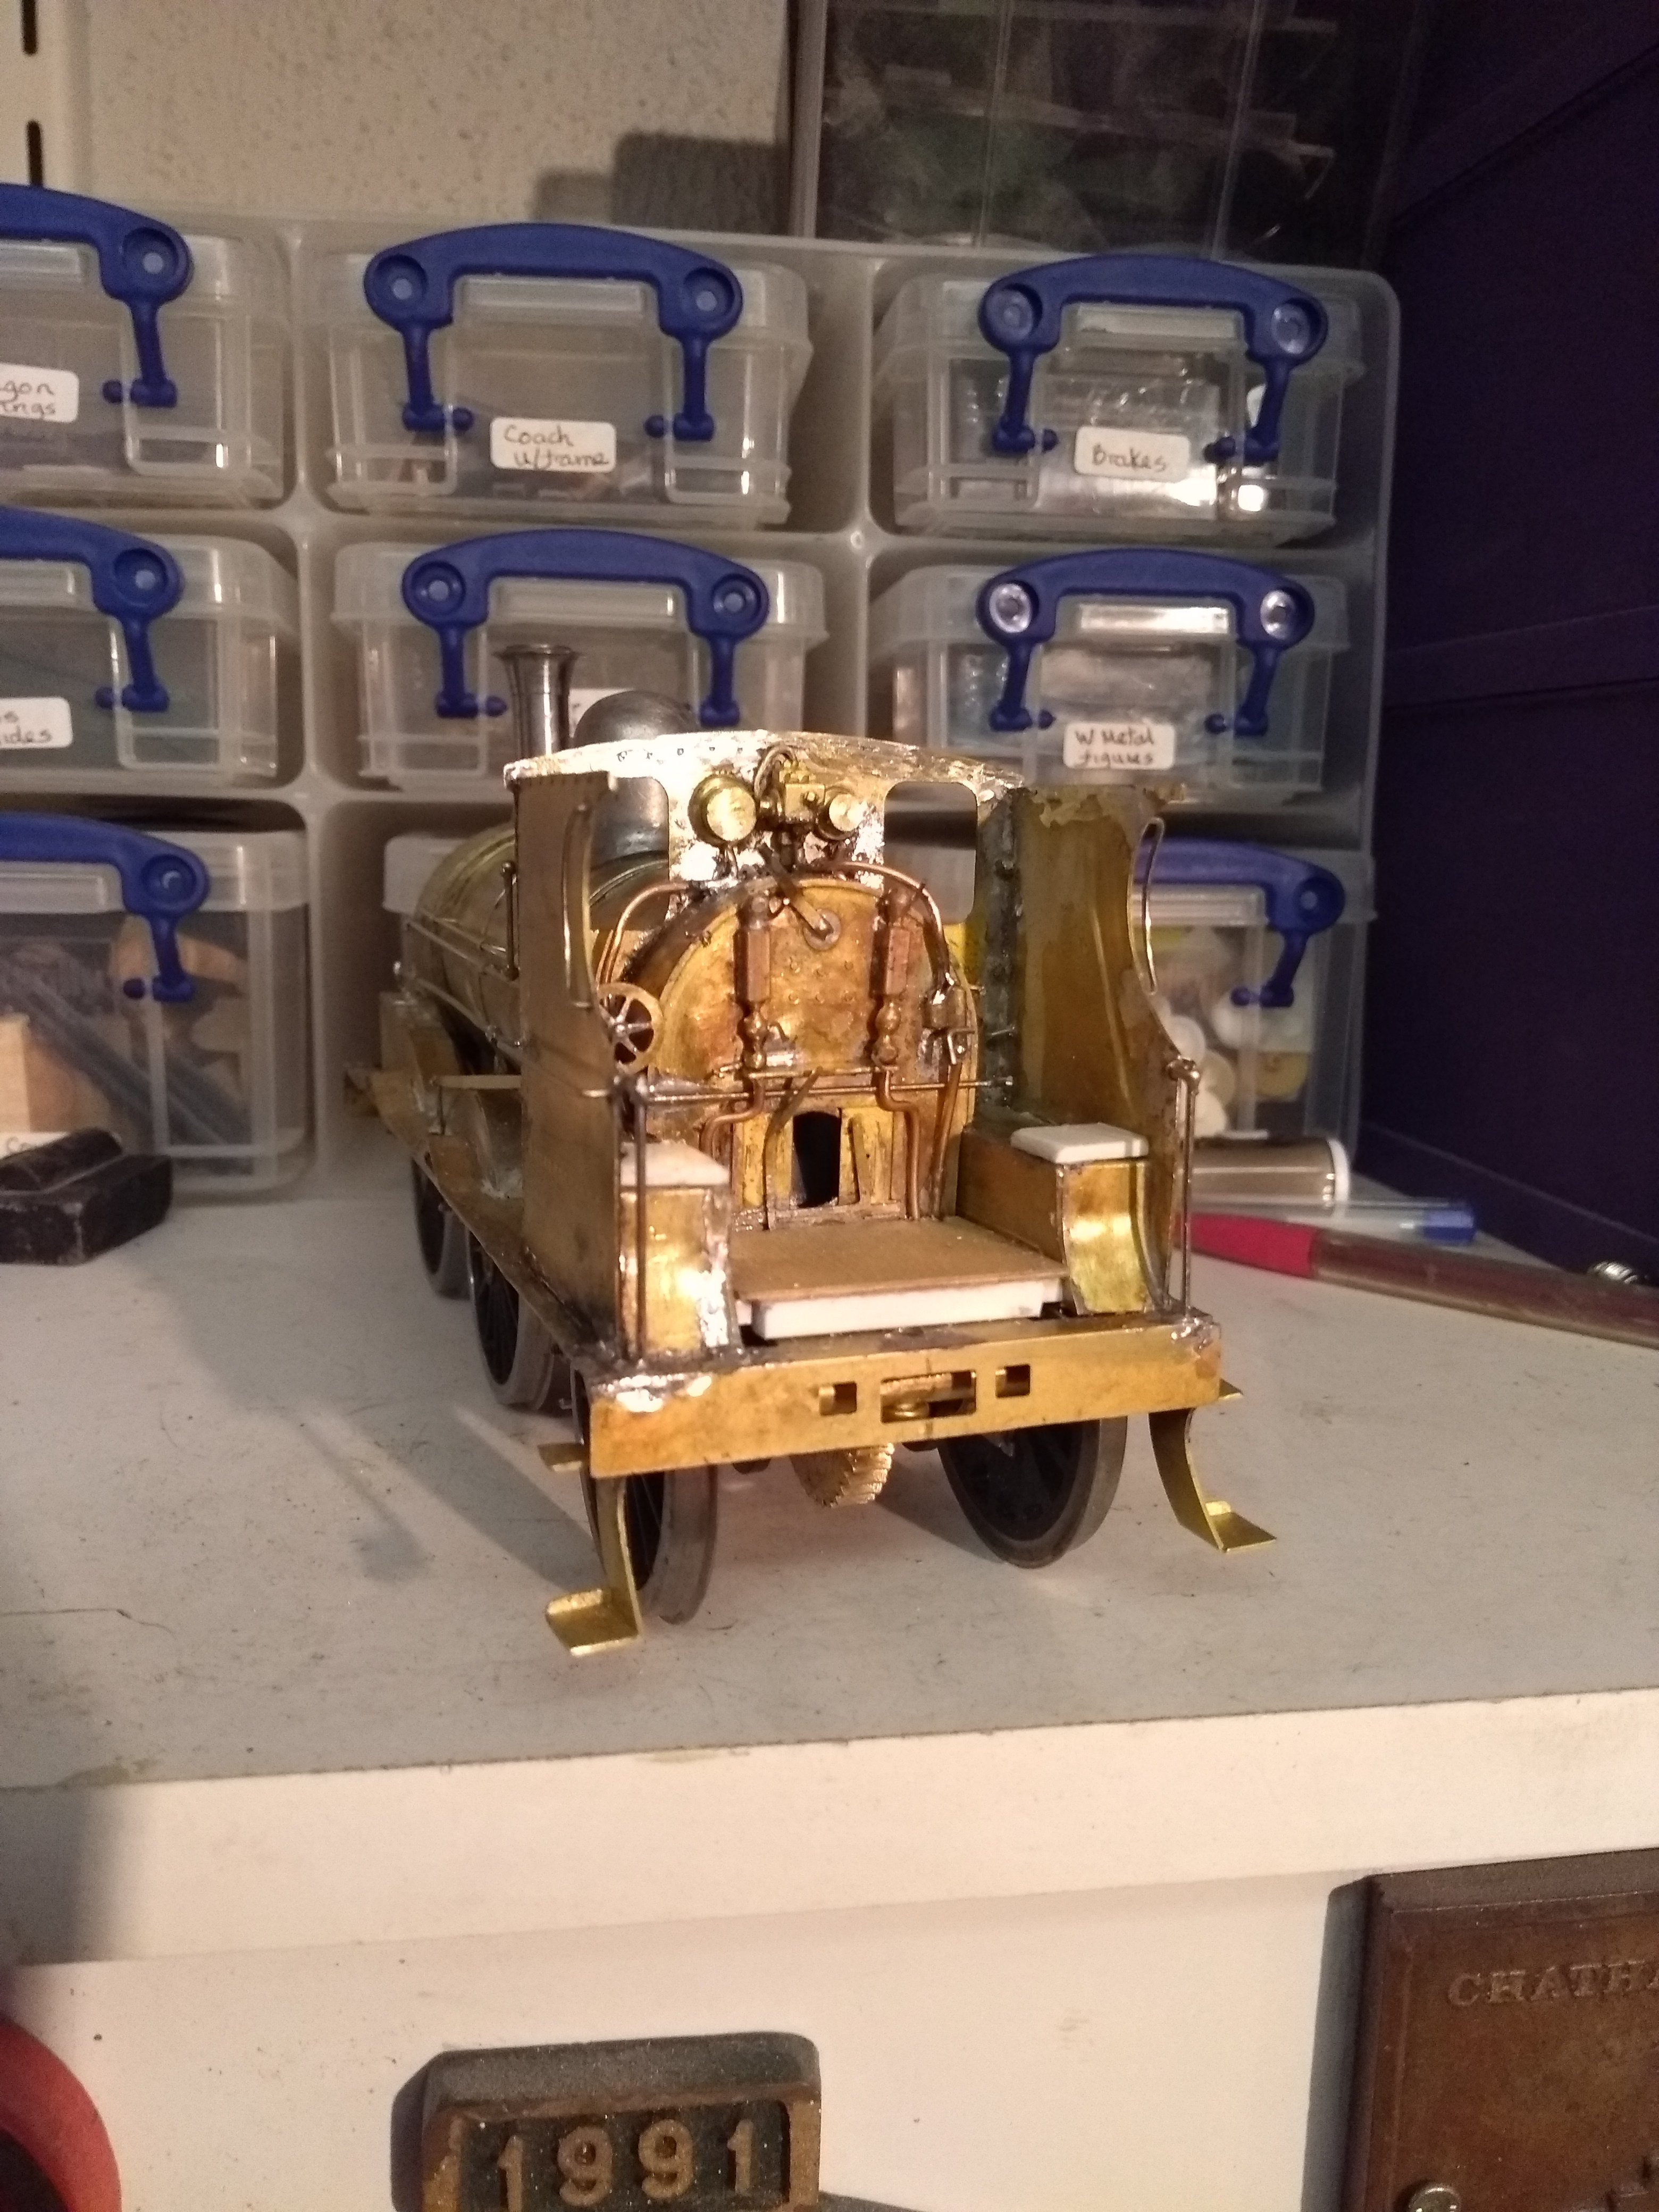
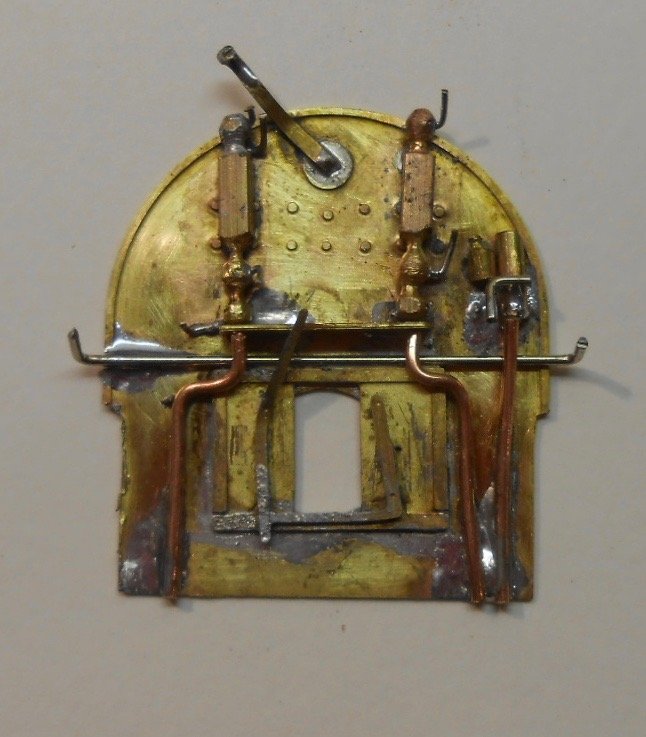
Normally, Christmas and New Year is a productive modelling time for me - a more than useful distraction from what's on TV. However, we were away from home a fair bit, so it's taken until this week to properly get started again. I'm developing a bit of a love/hate relationship with this kit, for it is certainly challenging my skills and there have been several 'one step forward, two back' stages. The latest was the Horlicks I made with filling some of the gaps - somehow putting on far too much, which then led to way more filing, sanding and scraping than I needed. Adding the fine details has been 'interesting', shall we say. For example, I can't remember building a loco kit with so many handrails! The are four on each side of the cab, plus the two along the boiler, plus another on the smokebox [the latter pending as I don't have any short knobs], so eleven in all. Add in another pipe down the left side of the boiler, plus sanding rods either side and it all adds up to quite a collection. My RSU has been very useful for much of this detailing work. I tin each component & then can hold it in place with the probe while operating the RSU with its foot switch. Another area where the RSU has helped is the cab 'backhead'. This is an area where a few castings would have been helpful, though at least the etches included things like firebox door, shelf and regulator handle. The 'Steaming Through Three Centuries' book has a nice colour picture on the top half of the cab, taken when the roof was removed for the film 'The Great Train Robbery'. Hence could work out a few pipe runs [copper wire], gauges and the like. The water gauges were made from square section brass rod, turned & filed in a drill, while the two main pressure gauges are sliced from some solid brass lamp tops I found in the spares box. A couple of other controls were made in the same way. I tend to go for a general impression rather than absolute accuracy. Even in 7mm scale, a cab interior is still a pretty small space and once the crew are in place, you can't actually see very much. You can see I've also added most of the other main fittings. Chimney dome and safety valve casings are all glued in place with 5 minute epoxy, which I find ideal to make small adjustments while it is setting. More work needed on the base of the chimney though. You might also be able to see the coupling hook and vacuum pipe - the latter interesting in the it goes behind the buffer beam, where there is an open space in front of the cylinder chest. The loco body is not too far off the paint shop. Indeed, there is always a bit of a dilemma as to when to put on the first primer/witness coat. However, I'll probably wait until the chassis is also ready & probably the tender too, so I can spray everything at once. Finishing the chassis may well be interesting too - the brake rodding actually sandwiches the wheels, so care will be needed to avoid short circuits. Finally [for now], there a couple of pictures with my other J15 - a standard [narrow?] gauge Great Eastern Railway 0-6-0, I built several years ago, from a Connoisseur Kit. One of the nicest I've done in terms of ease of building & it even included some dummy inside motion. Though very different, the two classes of loco were similar in size & power and likewise in overall usefulness as the proverbial 'maids of all work'.
-
Nice, very nice indeed!
-
Sorry to disturb the slumbers Tony, but such things are easily fixed. Looking at the photo, the slope appears to be 45 degrees or so. I'm certainly no engineer, but have a feeling that anything steeper would be in danger of collapsing on itself, which is why retaining walls are used. There's some nice thick foliage on that embankment, so longer static fibres, topped with scenic matting and scatter will replicate nicely.