David Holman
-
Posts
4,359 -
Joined
-
Last visited
-
Days Won
117
Content Type
Profiles
Forums
Events
Gallery
Blogs
Everything posted by David Holman
-
Add in Vic Reeves, Jools Holland, plus the inevitable B and C list nobodies and the natural successor will be Celebrity Model Railway Challenge! Soooooo not going to happen, one very much hopes.
-
Sorry, thought the final programme was appalling. Those that went before were ok, if cringeworthy at times, but fitting five layouts into an hour was an abject failure. The focus was almost completely on the people, rather than their work, so I have no idea if the winning layout was actually the best one, as it was impossible to know from what little we saw of them. Shame, as it could have been so much better. If the producers took a leaf out of the BBC's delightful Repair Shop, they might be able to learn how to portray actual modelling, instead of a railway edition of Bake Off.
-
Arigna Town and Andy Cundick's new layout, Courtmacsherry, will be next to one another at Warley in two week's time. Both are proper broad gauge [36.75 & 21mm], so those with an interest in all things Irish, do come and say hello. I'm really looking forward to seeing Courtmacsherry. Andy is doing it to scale, but the track plan must be the closest you'll get to the perfect branch terminus and why nobody has done it before is a real mystery. If it is as good as Castlederg, then it will be well worth seeing. Lots of other layout too, of course. At least another 88 in fact...
-
My three most used modelling books are The Art of Weathering, Gordon Gravett's book on Grassland and Landscape Detailing, plus John Ahern's book on Model Building Construction, the latter still extremely valid, even though first published 70 years ago. Mine isn't that old, in case you ask! Other books fill in the gaps, but with these three you can make a very realistic layout.
-
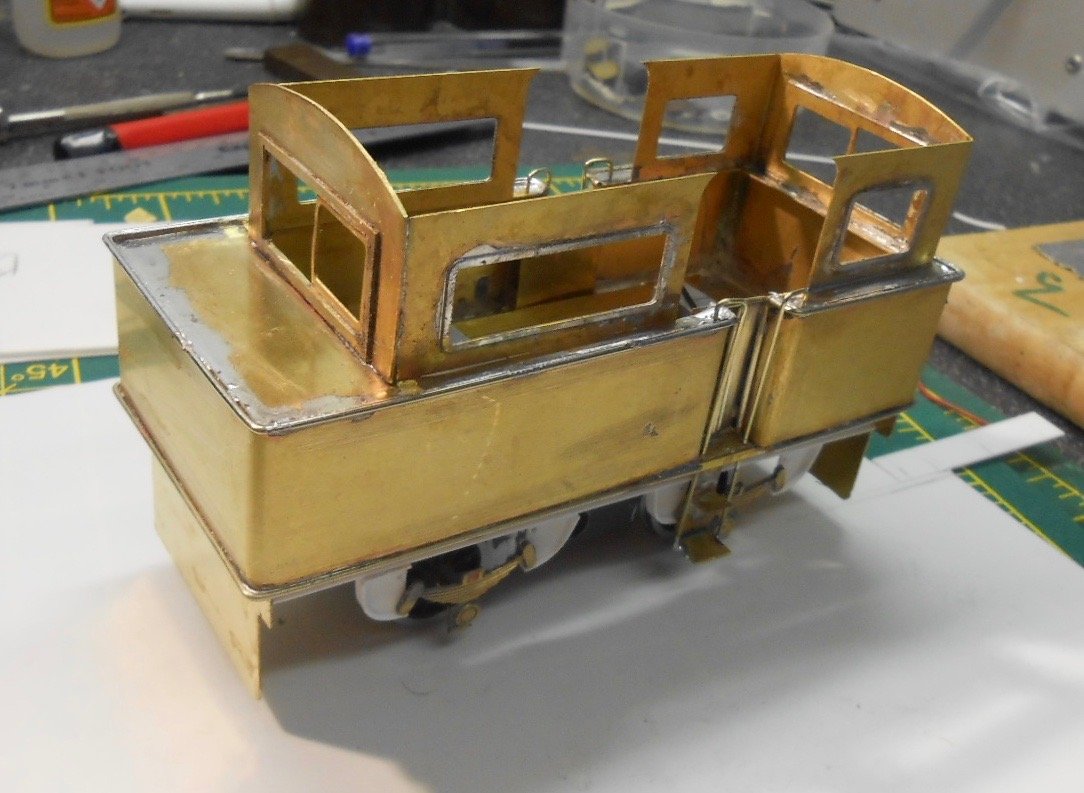
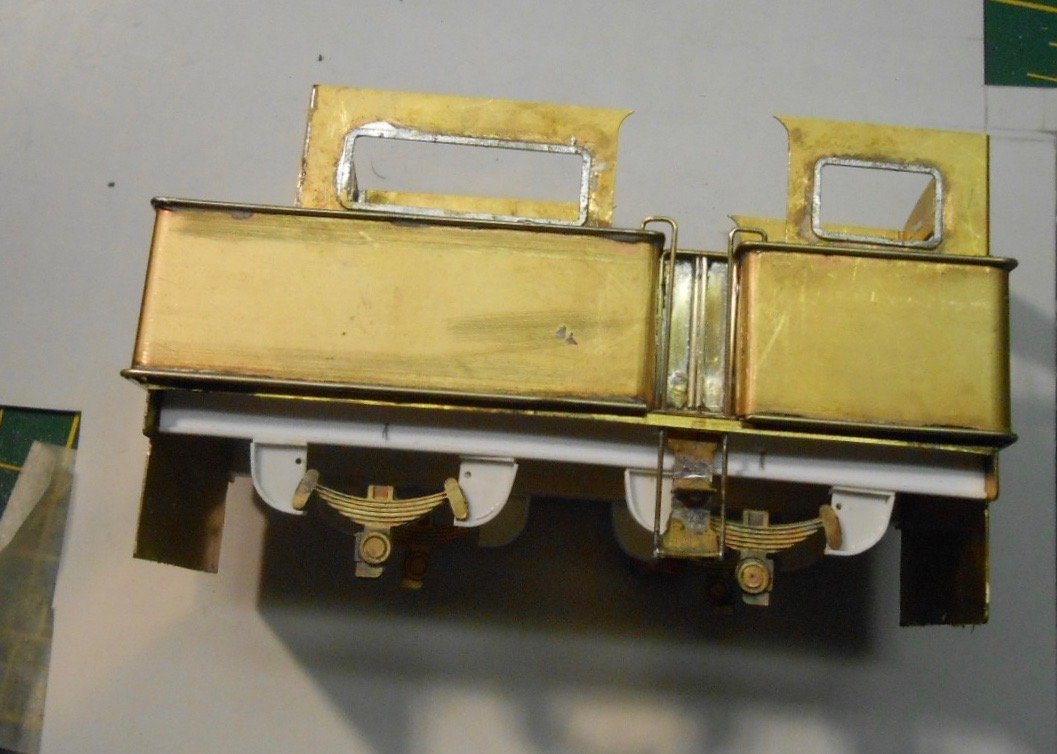
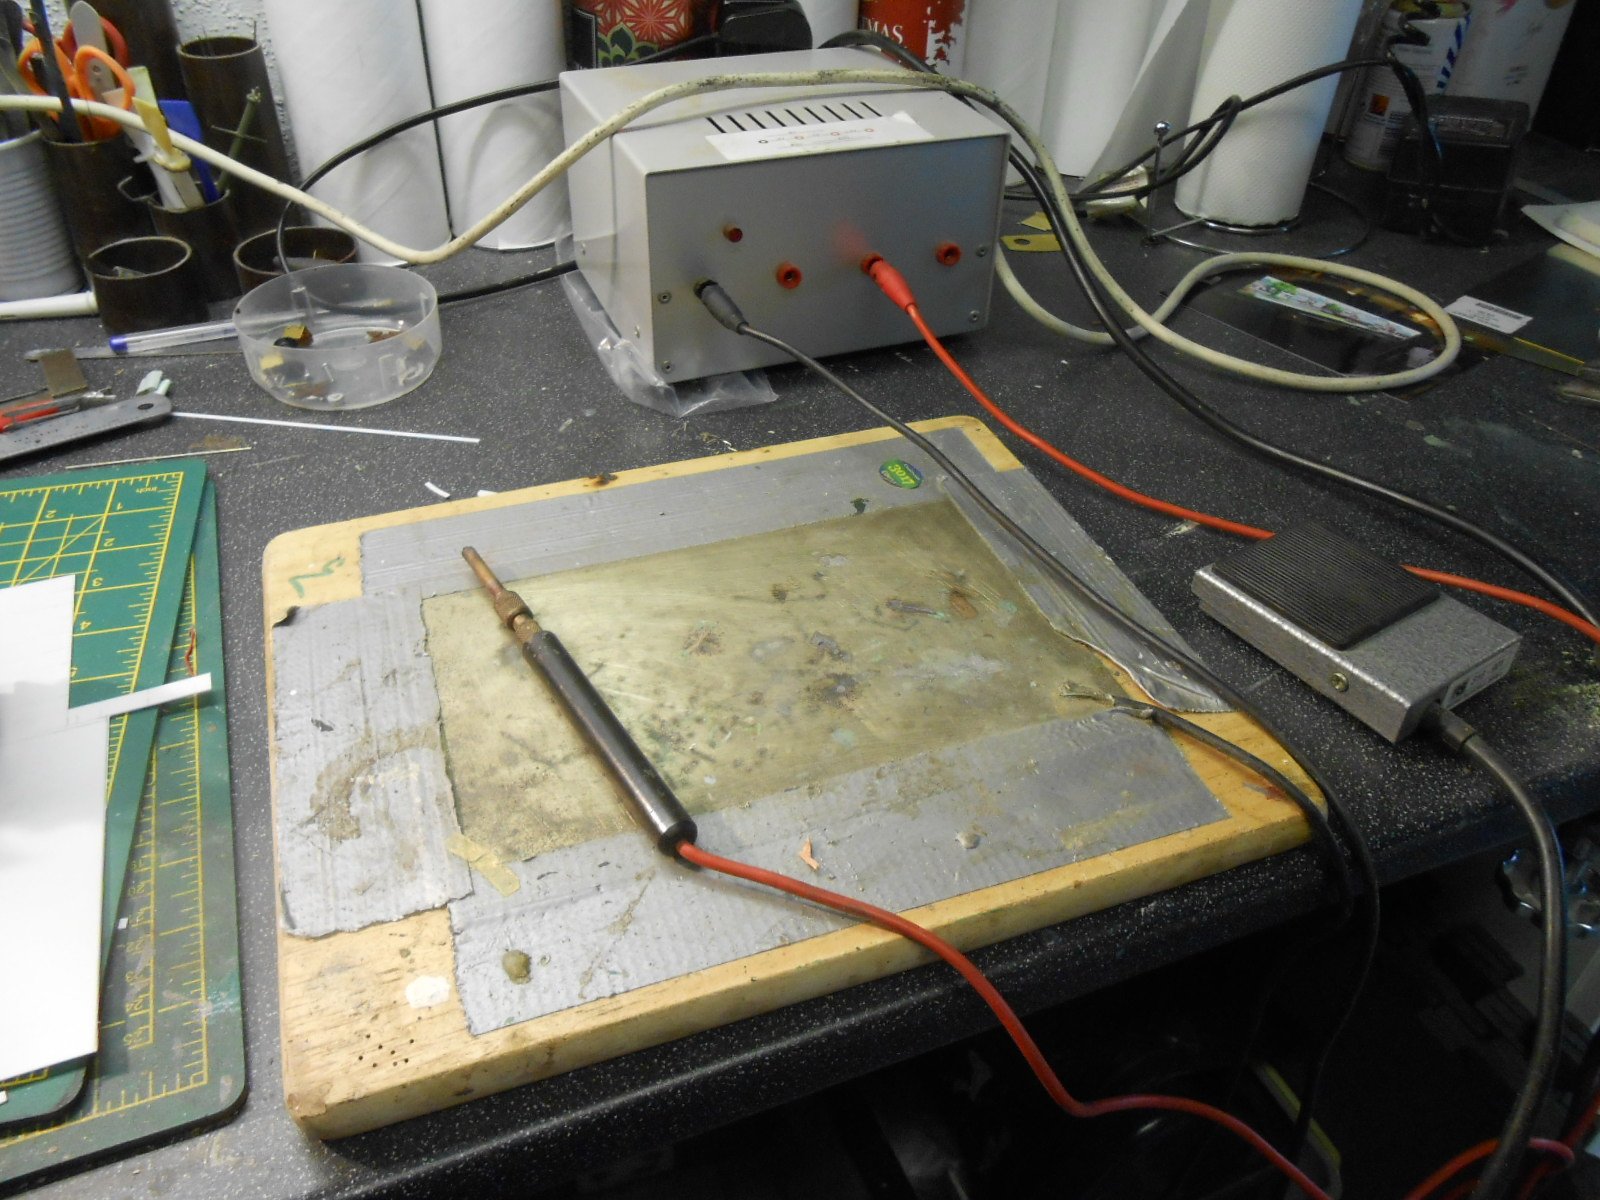
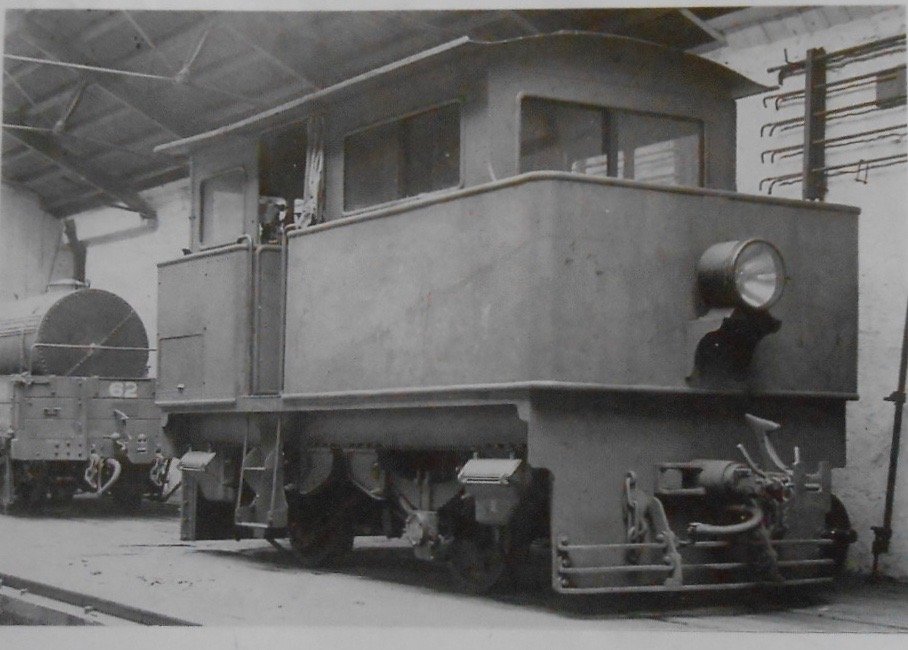
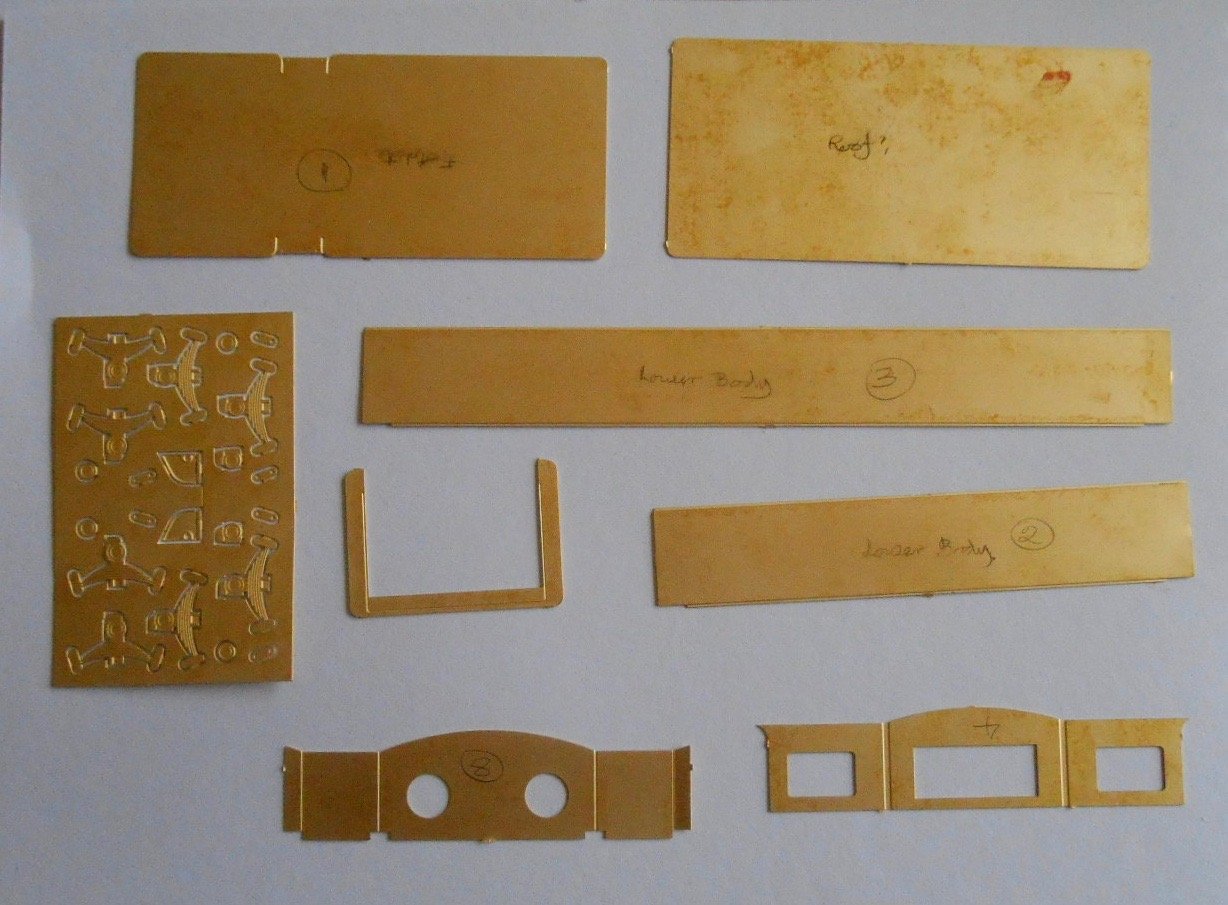
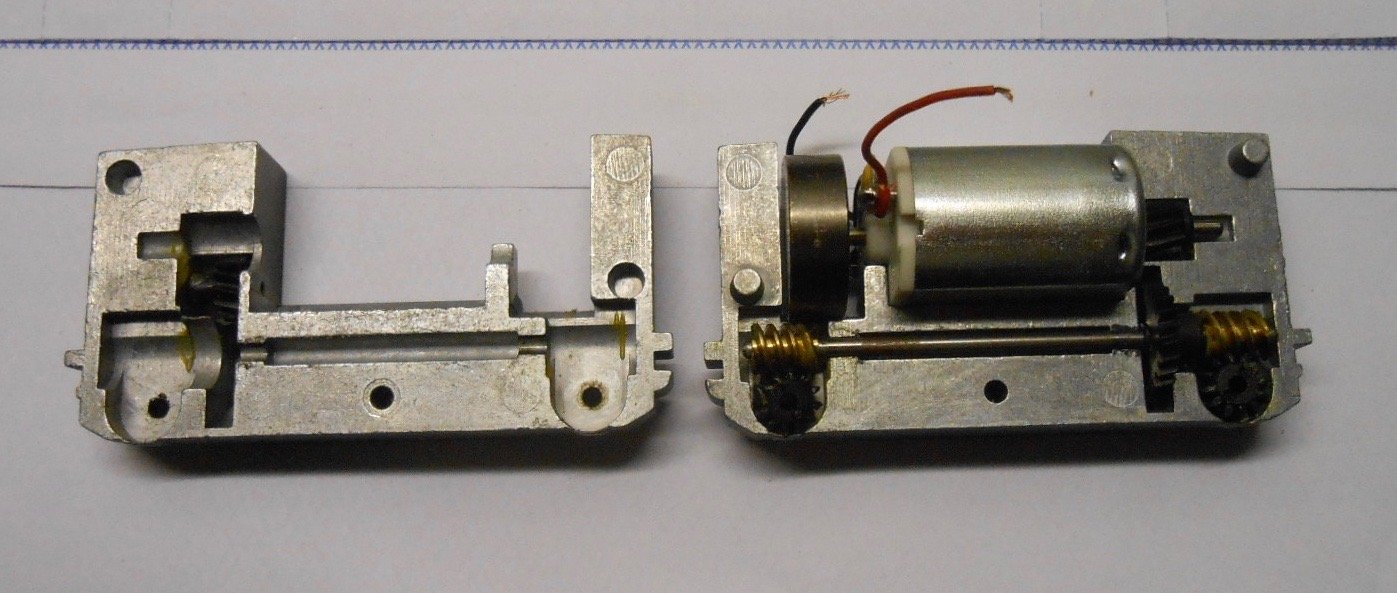
AW Steam Tractor Progress thus far on the model. Not that many etches to play with, so the loco body went together in fairly quick time. The main issues were working out what went where, as Worsley Works does not provide any instructions, or even a drawing. Hence found myself working to the photo in Patterson's book and a drawing, courtesy of Roger Cromblehome in his book on the County Donegal. The latter of course is its later incarnation, Phoenix, so a bit of guesswork required for the AW. Happily, there is a spare window frame included in the Worsley etches, so this enabled me to fabricate a different cab end from brass sheet. Being a bit of a bodger, I cut this with strong scissors - so not as troublesome as might first seem. Also cut out another piece to form the bonnet [actually a water tank] top, while the AW has much deeper buffer beams from than Phoenix, so these were cut out again from brass sheet. So, on to the fiddly bits! First were the steps, not included in the etches, which I made up from scrap etches, next the beading, which is 0.9mm nickel silver wire. Worsley helpful again here with etched rebates in the sides to ensure alignment. At this point, suddenly found my modelling wings severely clipped when my 100 watt iron packed up. A Weller, it has stood me in good stead for years, but has now gone in the bin. So, all I had now was a 25 watt and a 15 watt, neither of which are powerful enough to solder anything to an already made up brass body. Redemption came in the form of my RSU, which I am guilty of not using nearly enough. RSU means resistance soldering unit and can be seen in the pictures. It comprises a metal box with the electrical gubbins inside, a foot operated switch and two leads, one of which is soldered to a sheet of nickel silver, the other is a carbon probe. You might just be able to see in the picture, that depending on which sockets you put the leads in, will vary the power of the unit - from one volt to 4.5 volts. The latter might not seem much, but this represents enough power to actually vaporise small etchings [been there, got the T-shirt], so I normally use it on 3 volts. To operate the RSU, you either need to pre-tin one or both pieces to be joined, or used solder paint. This is more like a thin paste, which [I think] is mix of flux and solder in suspension. Once applied to one of the items which are to be joined, you bring the two together, apply the carbon probe and press the foot switch. Very quickly, heat is generated and you can see the solder flowing. Taking your foot off the switch, you can leave the probe in contact with the work until the solder joint sets, which is very useful - almost like having a third hand. Anyway, used the RSU to sweat together etches for the for axlebox/spring units, then changed tack and went over to adhesives. First were the two I section plastic beams for the under frames, then I had to make 8 plastic brackets to fixed the axle box units to with Gorilla glue. This morning, the wheels arrived in the post from Alan Gibson [very prompt], so after grinding off some of the chassis block, these went on the axles, though I'll need to add overlays to make them look like discs instead of spokes. So, there we are so far. Still a lot of detail to add, including some very awkwardly shaped sandboxes, plus the interior [cylinders and boiler], so will report again when I get a bit further.

-
Straight out of Martyn Welch's book, The Art of Weathering, methinks. And none the worse for it. Still takes skill and application, so another fine job. There's a free grounded van kit in this month's Modeller if you need another!
-
A beast. And stunning.
-
Sort of cow pat then... Fascinating!
-
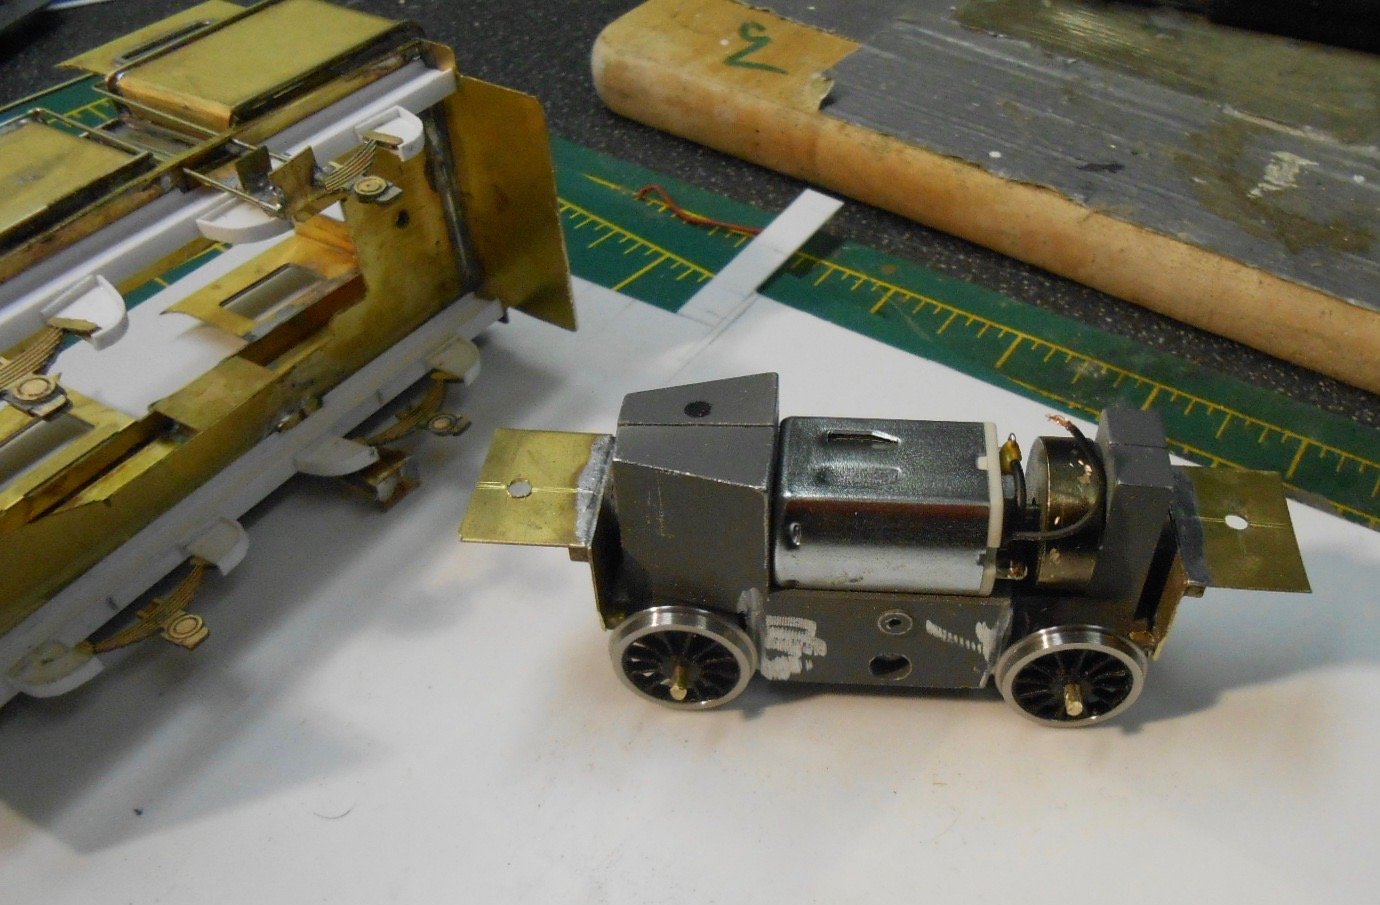
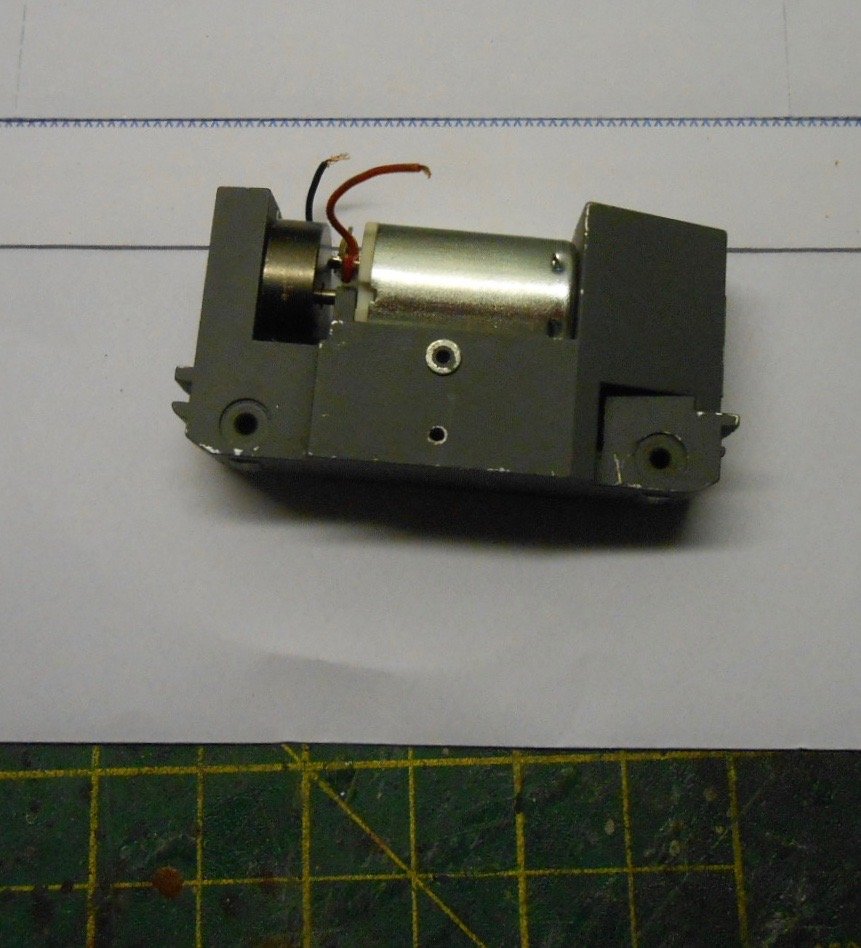
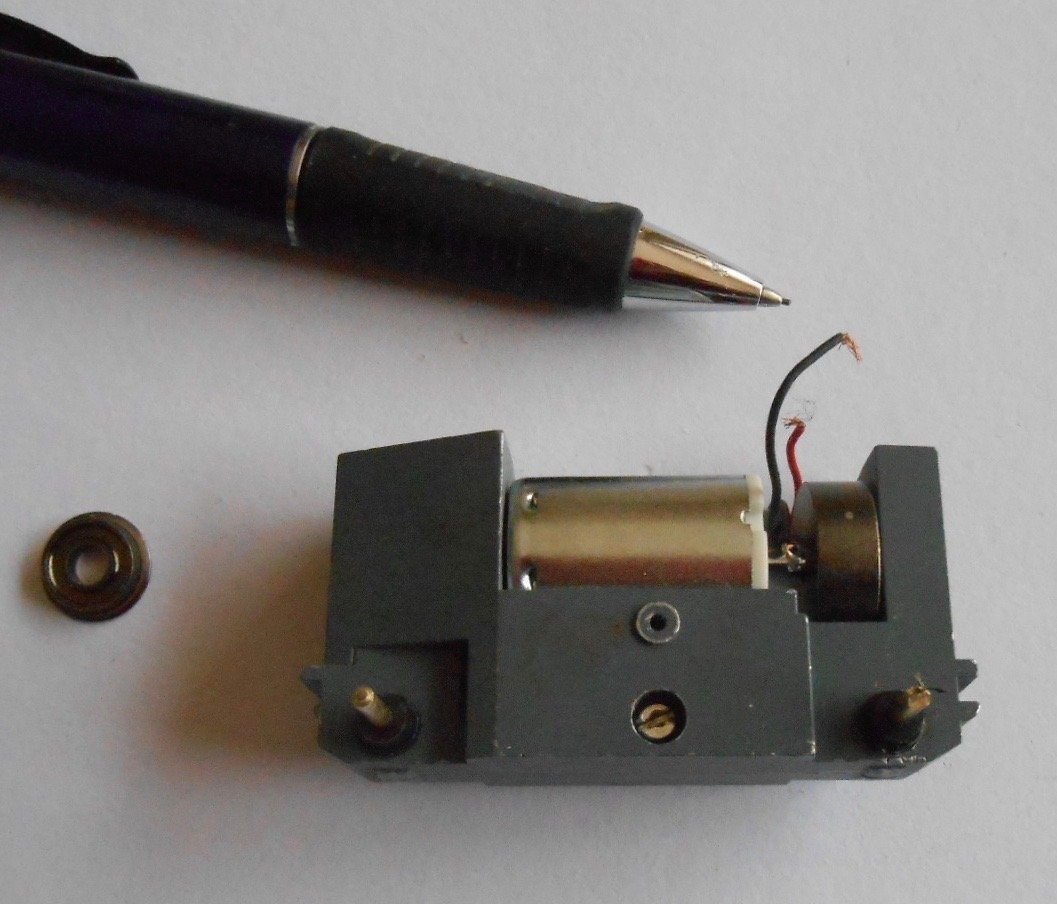
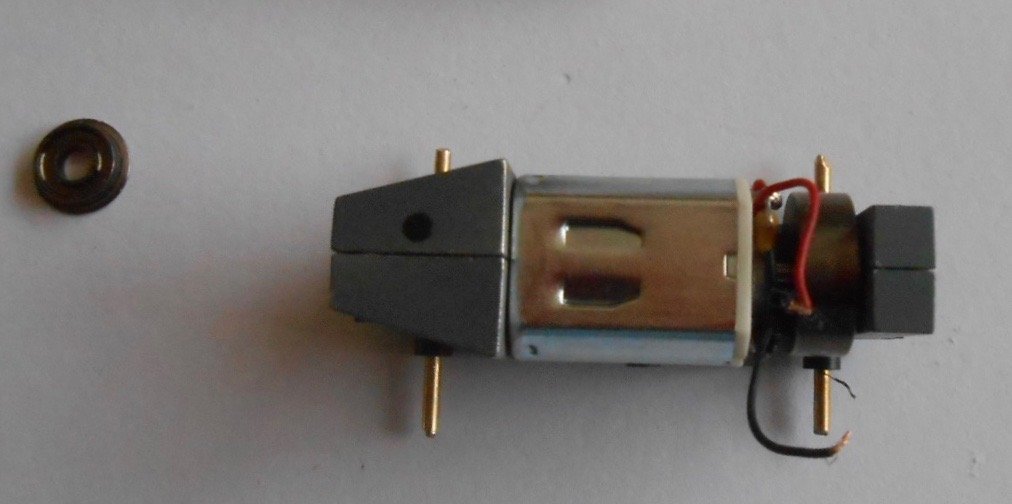
CVR Atkinson - Walker Tractor Spent Saturday exhibiting Arigna Town at High Wycombe [photos on RM Web]. The new sound system proved ok, with background lowing of cattle, but the whistle/horn needs the volume turning up a bit. Now have a three week window before Warley, so decided to make a start on the new loco for Fintonagh. Ok, loco is exaggerating things a bit, as the AW tractor never actually turned a wheel in traffic for the CVR, eventually being turned into the Donegal's diesel tractor, 'Phoenix'. As noted in my previous post, ExpoNG yielded a working chassis, plus a set of Worsley etches, though I've decided to model the original steam tractor, so changes are required. Why, you ask? Well, originally I thought I might be the first one to have a go at the said engine, but turns out its already been done in 15mm scale and live steam, no less. Whether there are any 21mm gauge, 7mm scale versions remains to be seen. Anyway, I happen to think the original was much better looking than Phoenix [though this isn't saying much], plus the tractor is probably ideal for duties on Fintonagh. So, what have I got? Photos of the etches show that what you get is far from complete. There are no frames, though there is are etches which might work for the axle boxes and springs. Likewise, no interior detail, though the motor bogie will get in the way a bit anyway, while choosing not to do Phoenix means I need to make a new end and tank top. A roof is provided, but will need shortening to match the original version, then there are various things like beading, handrails, water tank filler, chimney and so on to add - plus much deeper buffer beams and fenders. However, Worsley Works stuff is very much at the scratch building end of the spectrum, so these etches take some of the cutting out, filing etc from the project, especially as they include difficult things like window frames. The AW tractor [no name or number ever applied] had 2'6" diameter wheels, which have proved a bit of a challenge. Eventually found some 4mm scale tender wheels of approximately the right size in both the Alan Gibson and Ultrascale catalogues. The latter are the correct disc pattern, but as the site quotes a 10 month delivery time, it will be AG wheels, even though they are spoked - I should be able to make some covers from plastic sheet. Have already made some new axles, from 2mm brass rod and fixed these to the gears with Loctite 638 jointing compound. As can be seen from the photos, the working chassis is quite a neat little thing, with flywheel and driving both axles. The cast block it sits in should mean it will haul exponentially more wagons than the prototype, though I will have to grind bits off it to ensure clearance for the wheels. Next job will be to adapt the chassis so it can be bolted to the footplate.
-
Scarey Mary! Now I know why I only model might have beens.
-
Handrails, along with brake gear, have long been pet hates. A necessary evil, unfortunately, but overall worth the effort. Doesn't mean I have to like doing them though! They set off the 121 very nicely.
-
Not difficult to see why Barrow Street is turning out so well.
-
An attempt at sound and other stuff Went to ExpoNG [the national narrow gauge convention] at Swanley on Saturday. Always a good show and especially so for me as it is rare to have a national event close to home, as most seem to be around Birmingham. The range of layouts was impressive, with a preponderance of small, 009 stuff, beautifully created, which really sets you thinking - there were working layouts in a footprint of less than 100cm x 50cm. There is a host of trade and RTR stuff available too, so nobody can say they haven't room for a model railway! However, as usual, it was traders I was looking forward to see most, with a shopping list that ranged from figures for Fintonagh and materials to start my next project, a model of the Clogher Valley's Atkinson-Walker steam tractor. Yes, I know the prototype was an abject failure, but on my Fintonagh branch, it might just have had enough power to bring a couple of wagons from the off scene goods yard, plus also to shunt a van or two from the back of the railcar. Much as the latter is more than capable of doing this itself, it can't because trailing wagons block the turntable. Good planning that... Initial disappointment at finding Branchlines were not present [prime source of wheels, motors and gears], were eventually tempered by the fact that I found a 16.5mm gauge motor-bogie with a wheelbase of 46mm and 2mm axles, for the princely sum of 29 euros too [it was a Belgian stall holder]. Boasts a flywheel as well. The AW tractor has a 6'6 wheelbase, so this is pretty much prefect for 7mm scale]. I was going to scratch build the model, but then perusing Alan Docherty's Worsley Works stand, I found he had some 7mm scale etchings for the Donegal's 'Phoenix' - which of course is what the tractor was turned into. So, I suddenly had the means for what I hope will be a fairly quick project, so watch this space. I also had at the back of my mind that there might just be something I could buy to add a bit of sound to both Fintonagh and Arigna Town. As I've posted elsewhere, I don't want to do full DCC [even though I have a Bachmann Prodigy setup], because to me there is little point on a one engine in steam branchline. However, I have long wanted to sound a pop whistle to alert the signalman that a loco is ready to run round, depart etc. Therefore was very interested to see that the EDF stand included a new [to me, anyway] Soundtraxx Tsunami 'Sound Car'. For those who can never have enough chips, the idea is to add these to various vehicles along a train, thereby expanding the amount of brake/flange squeal and so on. The chip also has a range of horn, whistle and bell sounds, which would be used on a driving trailer in various forms of push-pull train. At £48.00, the chip is less than half the price of a loco one, but includes a speaker and some other gimmicks like lights. After a bit of thought, I decided to risk it, on the basis that what I want is a fixed speaker, under the baseboard and this chip would enable me to do it. So, this morning, I set about seeing what I had spent my hard earned on. First of all, this entailed soldering the chip to the speaker [two purple wires], then the red and black [track] leads were connected to the Prodigy master unit by crocodile clips to try it out. All seemed fine, though the sounds are [very] American, so next I had to learn again how to change the CVs to get something more suitable. Eventually satisfied with this [simple enough once you get your head round the instructions], I then made a 'sound box' that can be Velcroed to the underside of either layout. It contains the 28mm speaker and the chip, with two prongs to connect the wires from the command unit. Yes, I will have to take an extra box with me for all the Prodigy stuff and the operators will have to learn how to operate the sound features, but overall [at the moment anyway], it seems worth it: I've left the chip address at the default number 3 F1 operates a bell, configured to a slow, hand rung, cast bronze version would you believe F2 and F3 do the horn/whistle. Here, there is a degree of faffing about, as there are three options, none of which are perfect. Two are caboose whistles - one that sounds reasonably steam like for this side of the pond, the other higher pitched, but passes for both steam and an air whistle used on some railcars. The third is a diesel horn that should pass muster over here - in short form at least. A bit of programming on the hoof is required to switch between them, but nothing too onerous. F9 is a generator, which gives a decent impression of an idling diesel engine. Turning the speed up a fraction gives flange sequel too. F4 is a bit of a hoot - or should I say moo and baa. Called 'Beastbanter', it simulates a boxcar of sheep or cattle. Turning the speed up on DCC gets them excited [their word, not mine], so the amount of noise increases proportionately. This is not really my scene, but I do have a cattle train on Arigna Town [as well as a few cows in the dock], so it is tempting to use this from time to time, if only to amuse the kids. Arigna goes to High Wycombe next Saturday, so I'm keen to give the new system a whirl. The aim is to keep volumes at a sensible level, though anyone with multiple sound fitted locos on neighbouring layouts should now beware. My layouts can also make interesting noises as well! Just be grateful I haven't gone for smoke effects - though as far as I'm aware, there isn't steaming cowsh*t available as yet - is there??? Will post some pictures when I get started on the AW tractor.
-
One of the things is like about this forum is how supportive everyone is, as exemplified above and in the way regardless of standards, folk always find words of encouragement. Compared to my local football team's fan site, it makes a refreshing change - though that does not alter the fact that they were diabolical yesterday!
-
A fascinating project that deserves every success. The variety of computer controlled hardware and it's lowering cost has vast potential for modellers, although the main stumbling block is learning CAD, I think. Master that and the ability to create your own kit is eminently possible. The difference between hand drawn, photo-etched brass kits and computer drawn ones is noticeable in the greater accuracy of the latter. It seems to me that things fit together so much better these days and I'm sure it is not just down to my own skills evolving. I like the idea of being able to create a one off 'kit', where all the flat/non cast parts are drawn and etched, rather than having to go through the tedious process of cutting individual pieces from sheet metal. I know a couple of modellers who now do this. Having learnt CAD, they draw out their chosen items and send the computer file to a professional etcher. The cost of the latter is relatively cheap; design costs however run into four figures if you want somebody to do it for you. Maybe one day, we will be able to 'ask Alexa' (other smart speaker devices also exist) to 'make me a drawing of an Achilles Bogie'. However, guess by then, Alexa could probably rustle up a 3D printed version, though that would take away all the fun of building it.
-
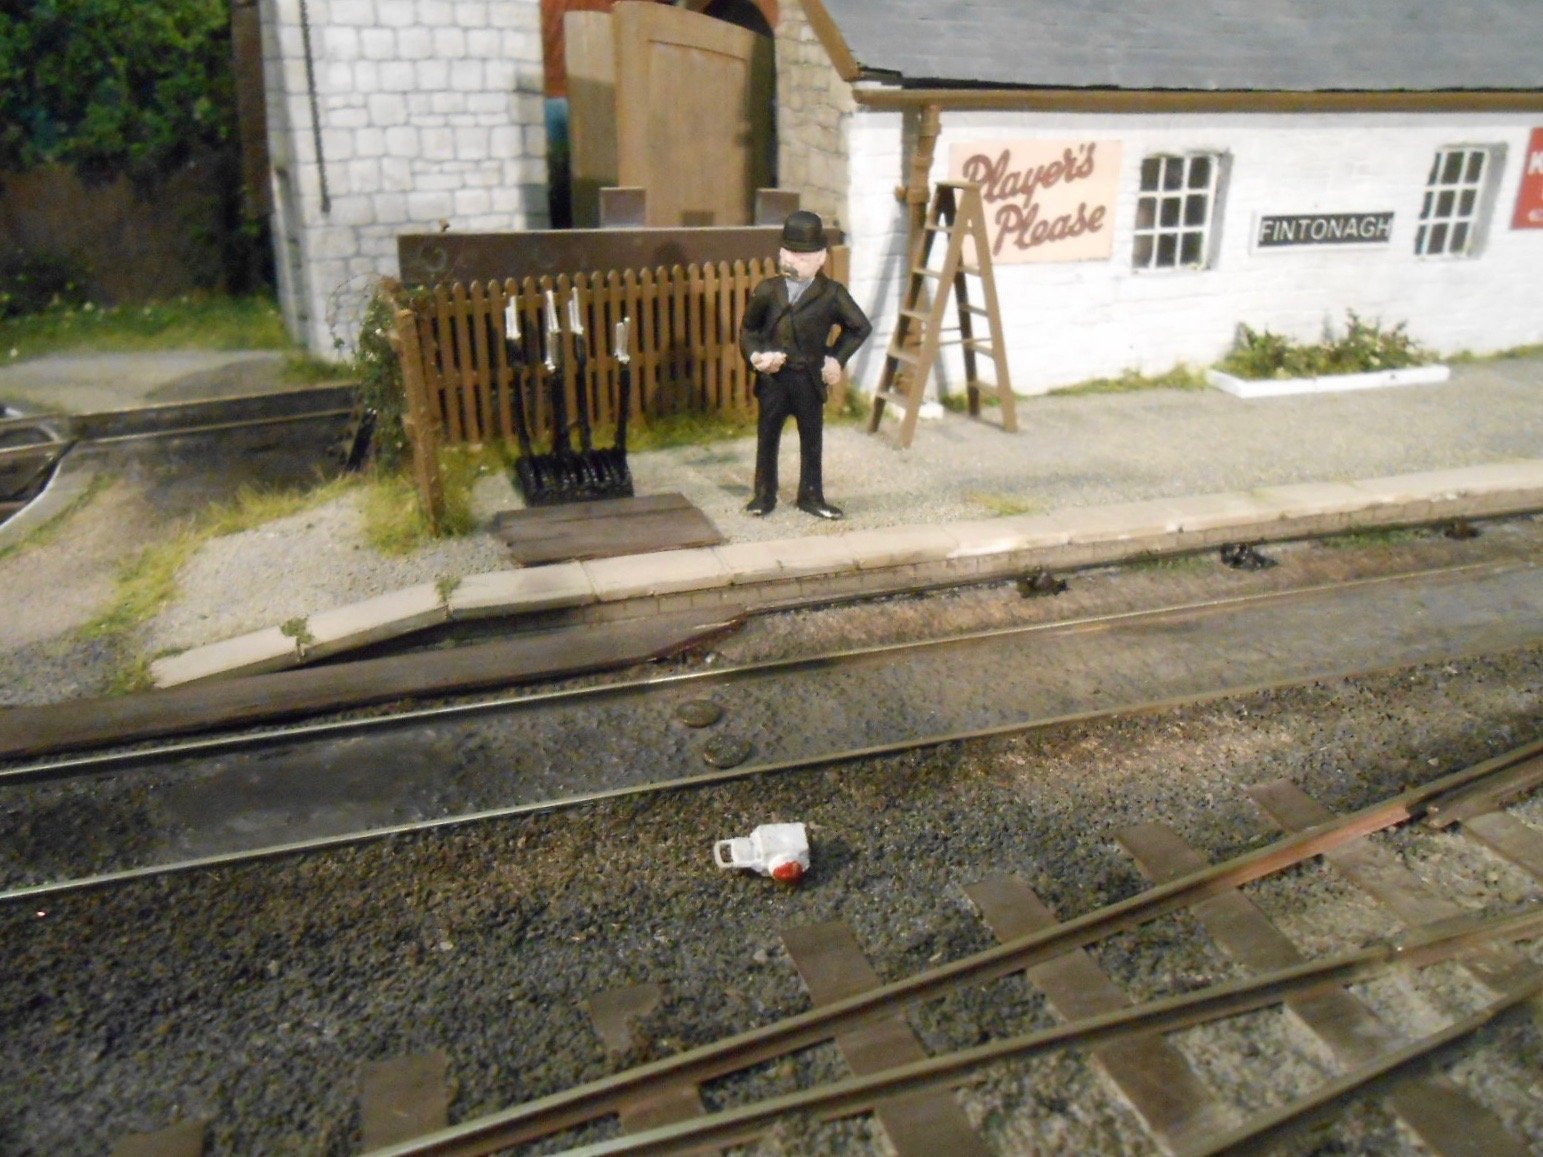
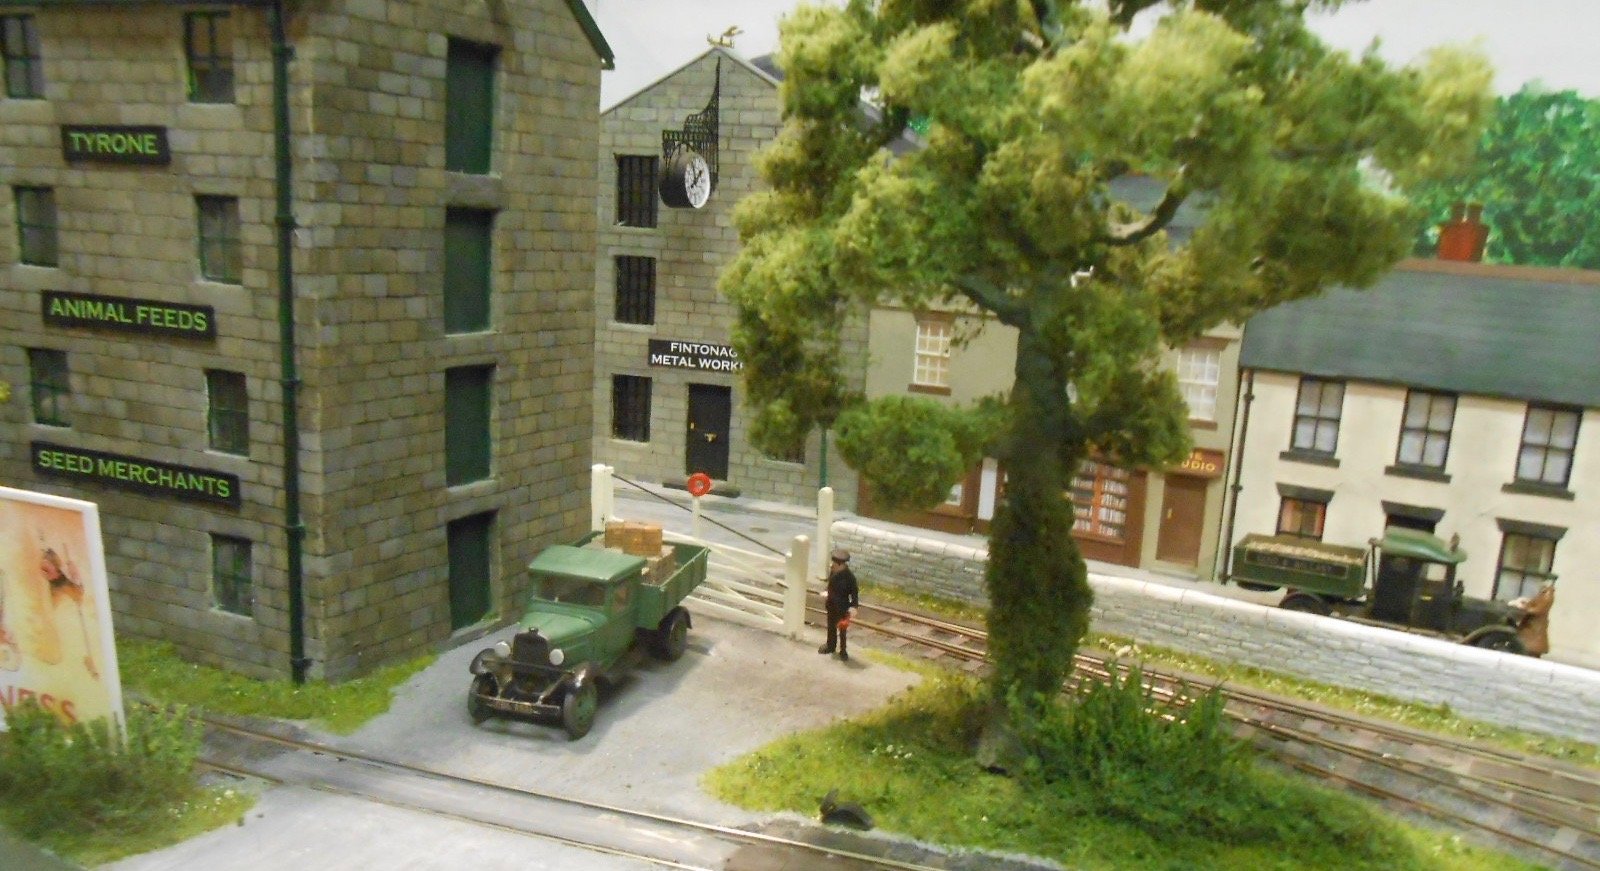
Uckfield By and large, Fintonagh's debut went well, though not without a couple of early problems. Setting up was quick and easy, but trying to run trains was a different matter, with a short as soon as power was applied. Not good when there is less than an hour before Joe Public arrives... Happily, the problem was soon traced to two tags behind the controller socket touching each other. A quick tweak and all was well; am guessing I must have pushed them together when carrying the layout to/from the car. However, no sooner that problem solved than the turntable stopped working! Lots of noise, but no movement. Fortunately the gearbox is easy to dismantle and just putting it back together again cured the problem. So, third time lucky and we were away. The only problems after that were down to the couplings. The rare earth magnets largely work well with the Kadee No5s, but are not perfect. The main issue is sighting the uncoupling points obliquely from either end of the the layout, which is front operated. The 'window' is probably less than 5mm, so it is as well that all the locos run nicely, though there was a bit to much to-ing and fro-ing to begin with until we got our eye in. One or two wagons were reluctant to couple up, so I guess things were about 80-90% efficient. Equally, as a first experience of operating from the front [with 90+ shows under my belt], it turned out not bad at all. Sitting on high stools certainly saves aching feet at the end of the show. The LED lighting strips, one towards the rear and one just under the front pelmet, seem to give just the right amount of illumination, with the 'cool white tones' giving a good colour balance too. Meanwhile, as a small layout, just eight trips are needed to/from the car and much to our surprise, we were driving away just 15 minutes after the show ended. There are only four trains at the moment, but the plan is to add a couple more locos, to provide a bit more variety and a degree of insurance in the event of any failures. Lots of people took details, so looks light Fintonagh will be out and about over the next few years.
-
Looks plenty neat enough and as long as you are enjoying yourself, that is all that matters. Have fun!
- 1 reply
-
- 1
-

-
Have several from the '60s and very informative they are too.
-
4mm scale, I presume. Don't suppose there are any in 7mm scale?
-
First day of layouts debut largely ok, though a short caused a bit of consternation first thing. A few issues with the Kadees, but motive power acquitted itself well. Here's hoping Sunday is at least as good.
-
Any chance of this little gem appearing in 7mm scale?
-
Bit like a London bus, recently - nothing for ages then several at once. Worth the wait though! Scenic wizardry.
-
Saturday 10th November.
-
Those of you on the other side of the water need to get to Cultra this year, where Andy is showing Castlederg. Super layout, accurately portraying a delightful prototype.
-
Fettling and finishing touches It is now less than a week to Fintonagh's exhibition debut at Uckfield next weekend. Not the largest show in the country, but definitely one of the finest in terms of layout quality. Manager Adrian Colenutt has become a past-master at fitting a lot in the space available, while the hospitality is very good too. However, this means the layout has to not just look right, but it must run well too, hence the last few weeks being spent in trying to iron out all the faults! I've written elsewhere that this is very much a problem with hand built stuff - or at least it is for me, for I am no expert, but I do work at things in the hope of getting them right, while experience helps too and I have approaching 100 shows under my belt now. Fettling essentially involves running the operating sequence over and over again, making notes of where things go wrong, then investigating the cause in the hope of putting things right. Faults manifest themselves in various ways: Derailments - mostly these are down to back to backs on the wheels. I use 4mm fine scale standards, which means 19.3mm b2b and not much leeway either. Less than 0.5mm out and wagons in particular derail on either the point blades or the crossing vee. Easily solved with a vernier gauge, thankfully Hesitant running - mostly cured by compensated/rocking axles on locos, plus pick ups on all wheels. Couplings - I'm using Kadee No 5s and though they are fairly reliable, they do need careful setting up, especially as I'm also using small 'rare earth' magnets for uncoupling. Practice also important too, stopping trains within a 5mm space requires a degree of concentration. On top of the above, one also has to create a sequence that works simply and effectively, for as well as running the layout, it is always enjoyable talking to visitors and they have paid to come in, so you owe it to them to put on a decent show. In addition to the above, there is of course Sod's Law, which can strike at any time - usually when there is a video camera operating! When [not if, note], this happens, then you just have to grin and bear it, though it is just as well visitors can't hear what I'm thinking! At them moment, the layout is running at about 95% efficiency. Derailments are now only operator error and the locos [as long as track and wheels are clean] are running nicely - even Blackwater, which has had large amounts of lead added to enable it to pull a short coach and two wagons [!]. The problem is it has 30:1 gears as opposed to the 40:1 in sister Erne and it makes quite a difference. Blackwater has caused further headaches, by repeatedly suffering from a loose wheel nut [hopefully now cured with some gloss varnish in the threads] and a broken lead on the motor. The first class bogie coach has caused much head scratching and many rude words, because in one direction, it was derailing on the point entering the station. No amount of wheel checks could sort it, but eventually cured it, by reversing the bogie, so the troublesome wheels were in the inside, not the outside. Fingers crossed now ok. The photos show some of the small details that I've been adding: A small [dummy] ground frame on the platform to operate the points A small section of point rodding [along the platform] and boarding elsewhere to cover the rest, which I really don't want to do! Figures, including a rakish fellow outside Forbes Bar, a flagman guarding the exit from the station and a lady promoting the Temperance Movement outside the tea rooms. Road vehicles are mainly from Arigna, including donkey cart, small lorry and Austin 7 saloon, plus the Model T Ford truck seen earlier. In addition, there has been organising packing and transport, with new stock boxes and trial fitting in the car. Talking to Christopher Payne [also at Uckfield with Pyn Valley Railway [in latest RM], he opined that a layout probably shouldn't be exhibited until it has done at least three shows, to iron out the faults that only ever occur away from home. Difficult, but I know what he means! Wish me luck, or better still, come along and say hello. Uckfield really is a great show.