David Holman
-
Posts
4,359 -
Joined
-
Last visited
-
Days Won
117
Content Type
Profiles
Forums
Events
Gallery
Blogs
Community Map
Everything posted by David Holman
-
Just did a Google search, Noel.Magnets4U, I think, who do a next day delivery. A pack of ten was less than a fiver.
-
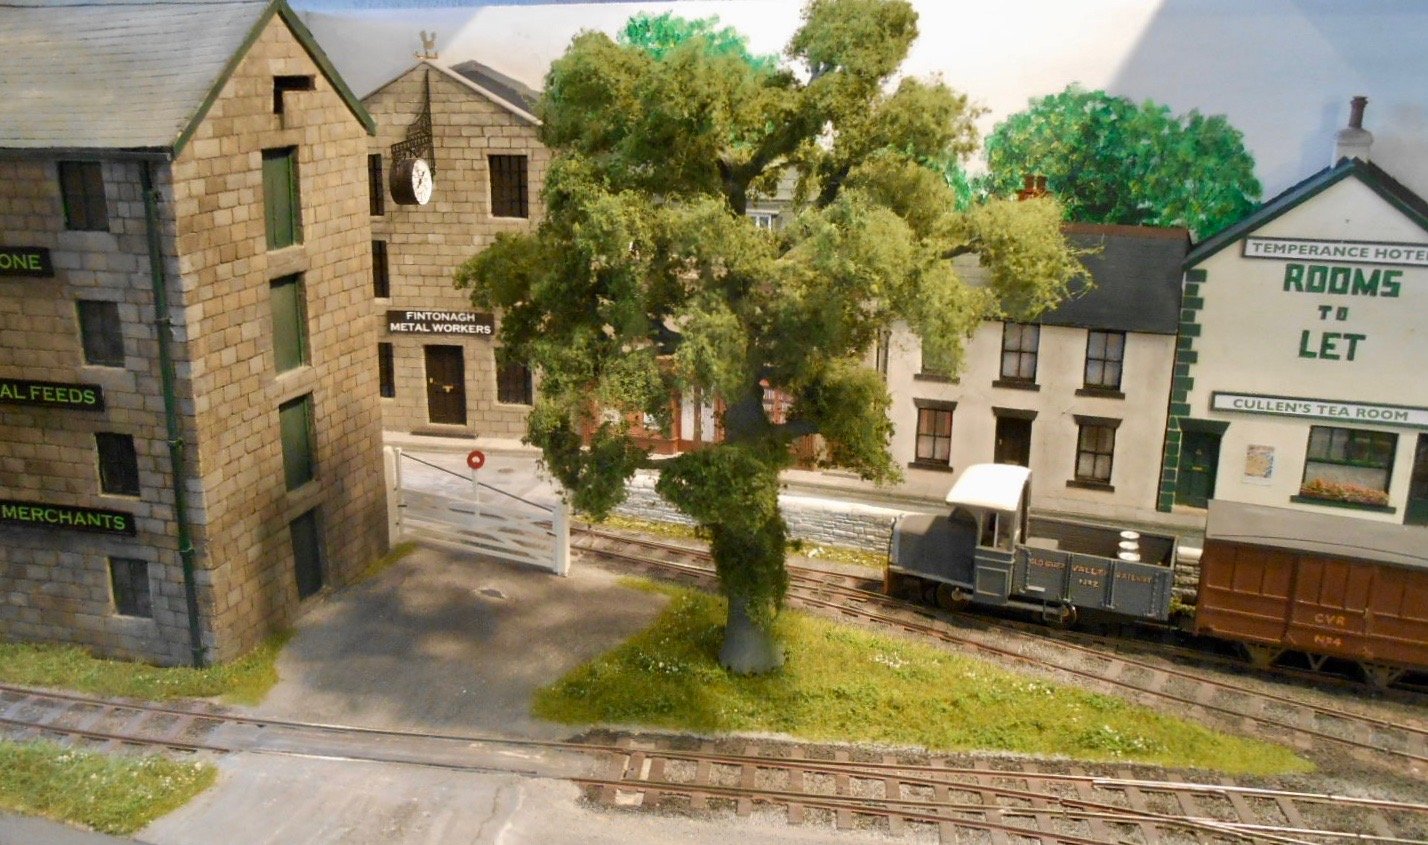
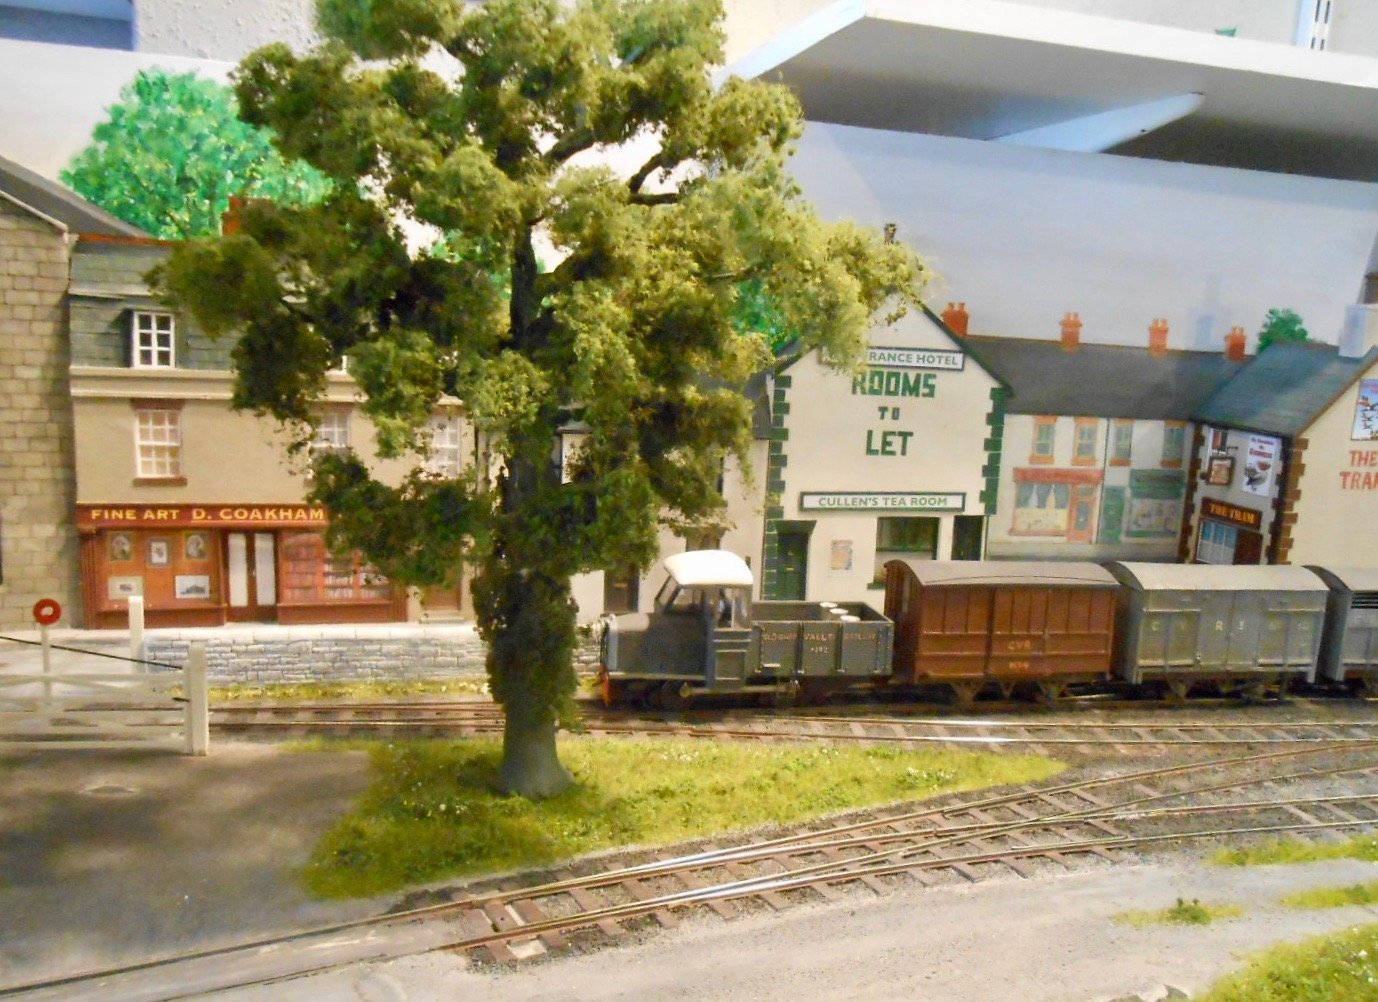
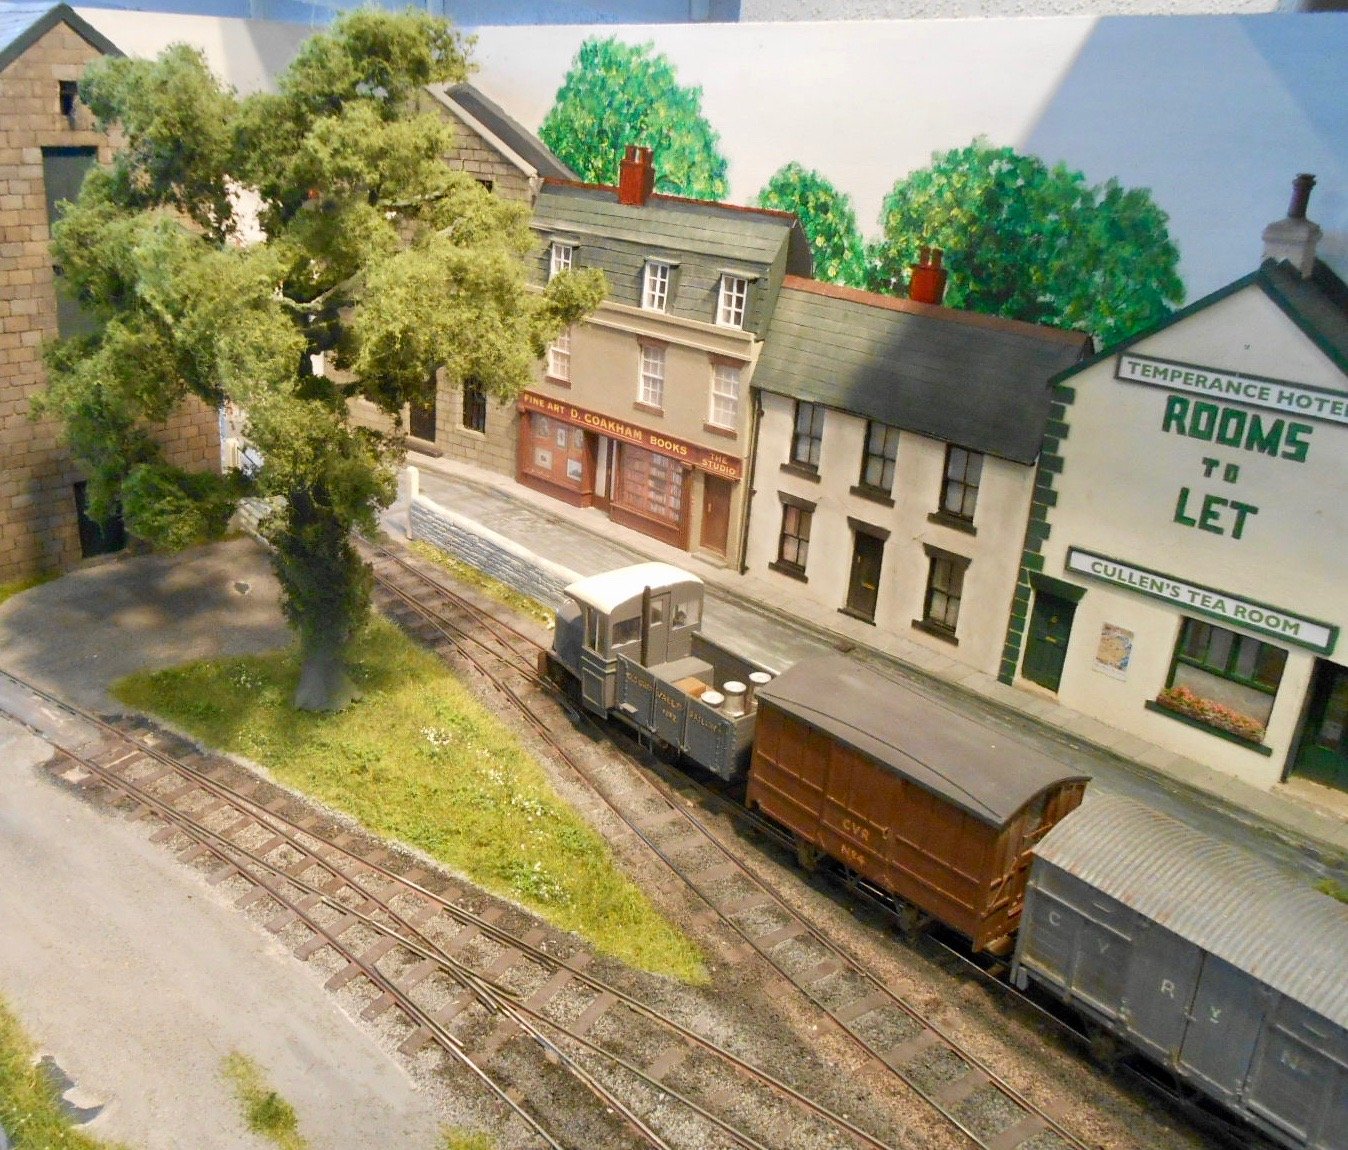
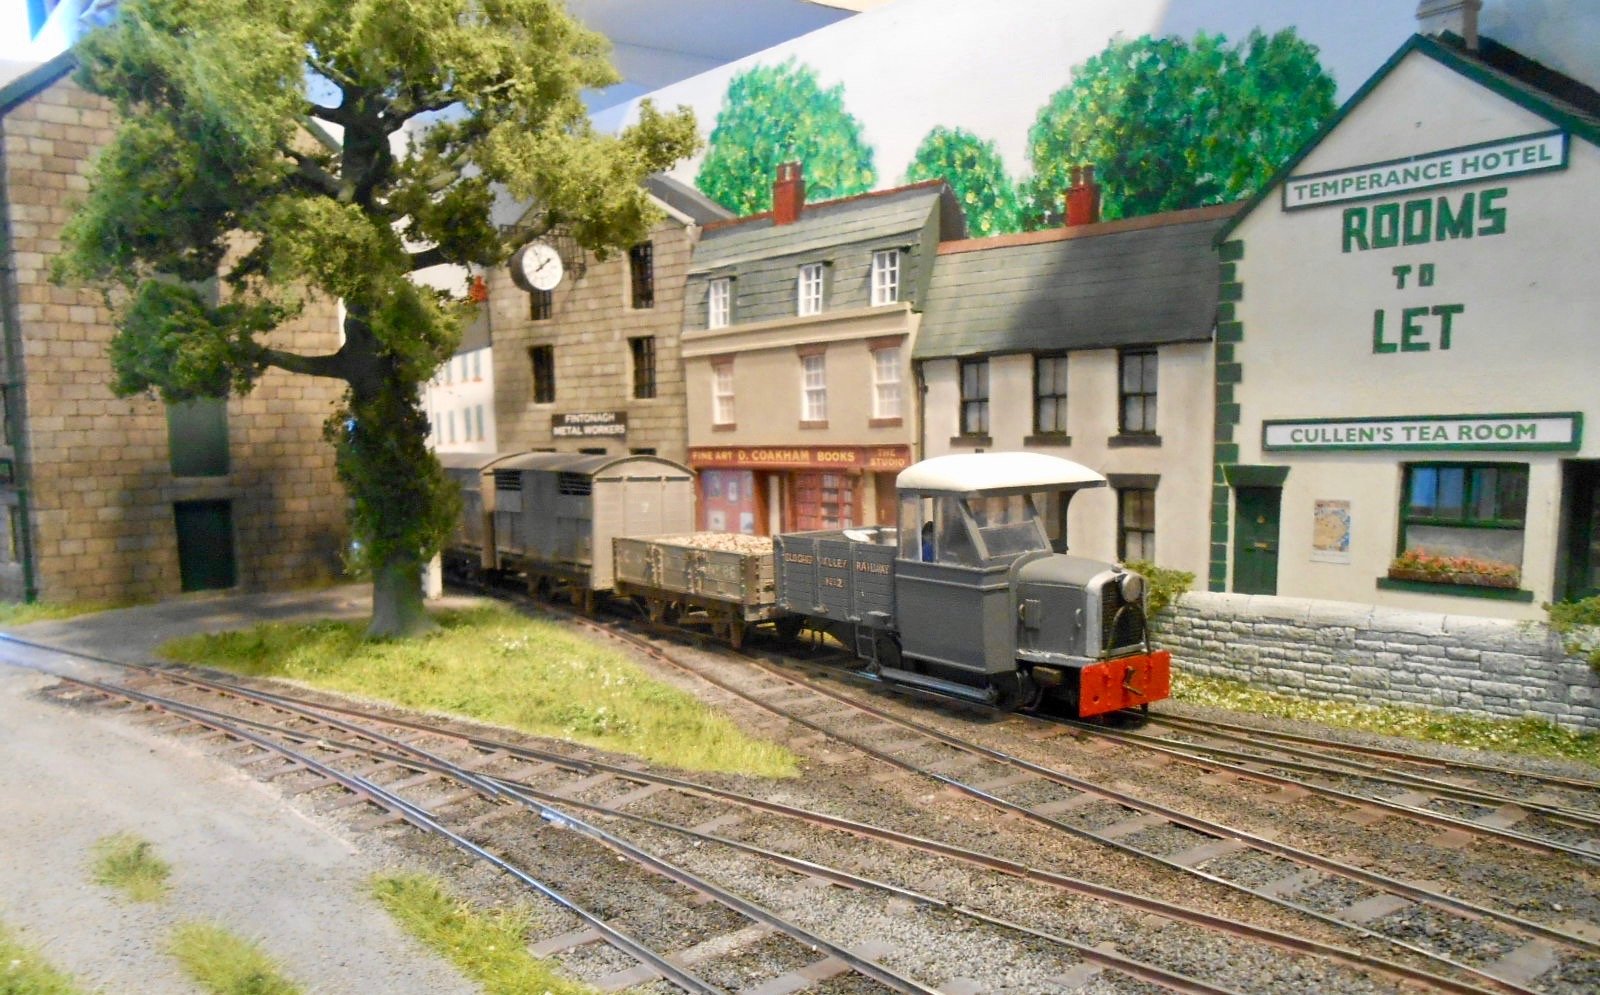
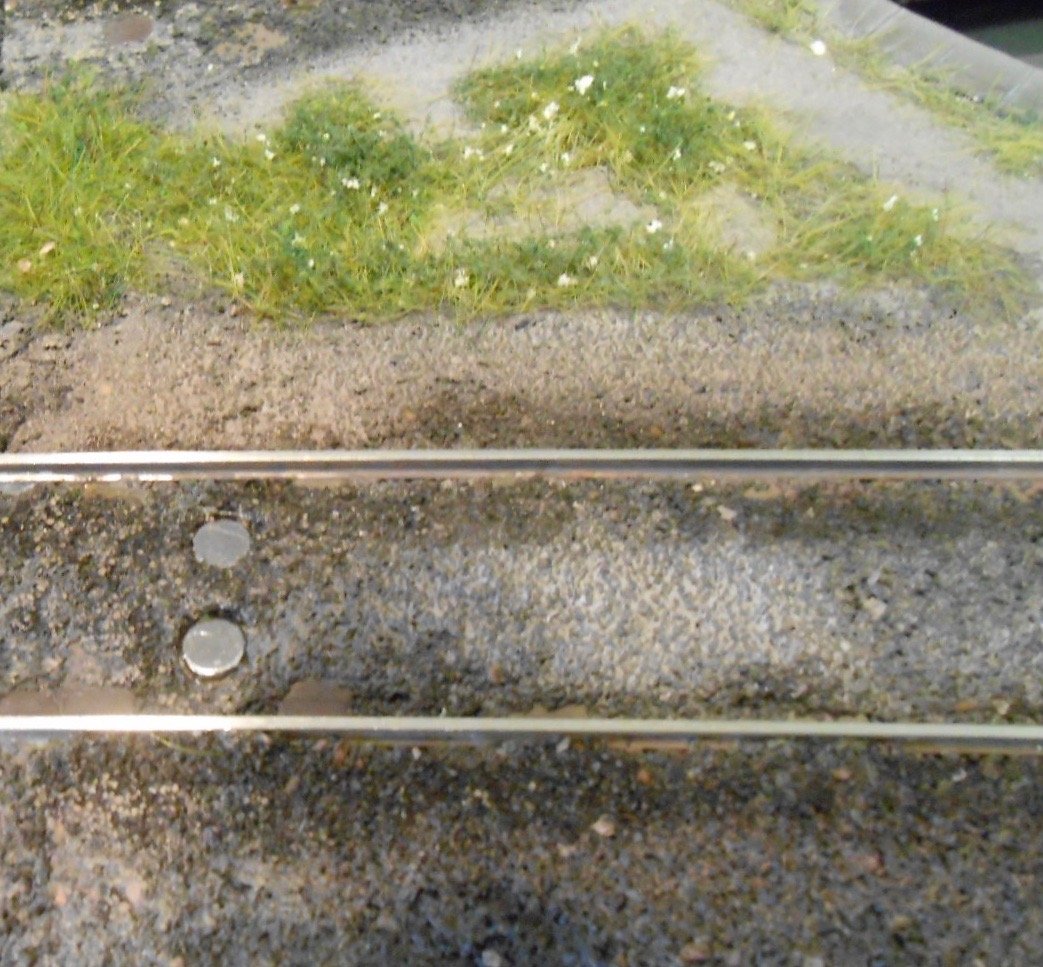
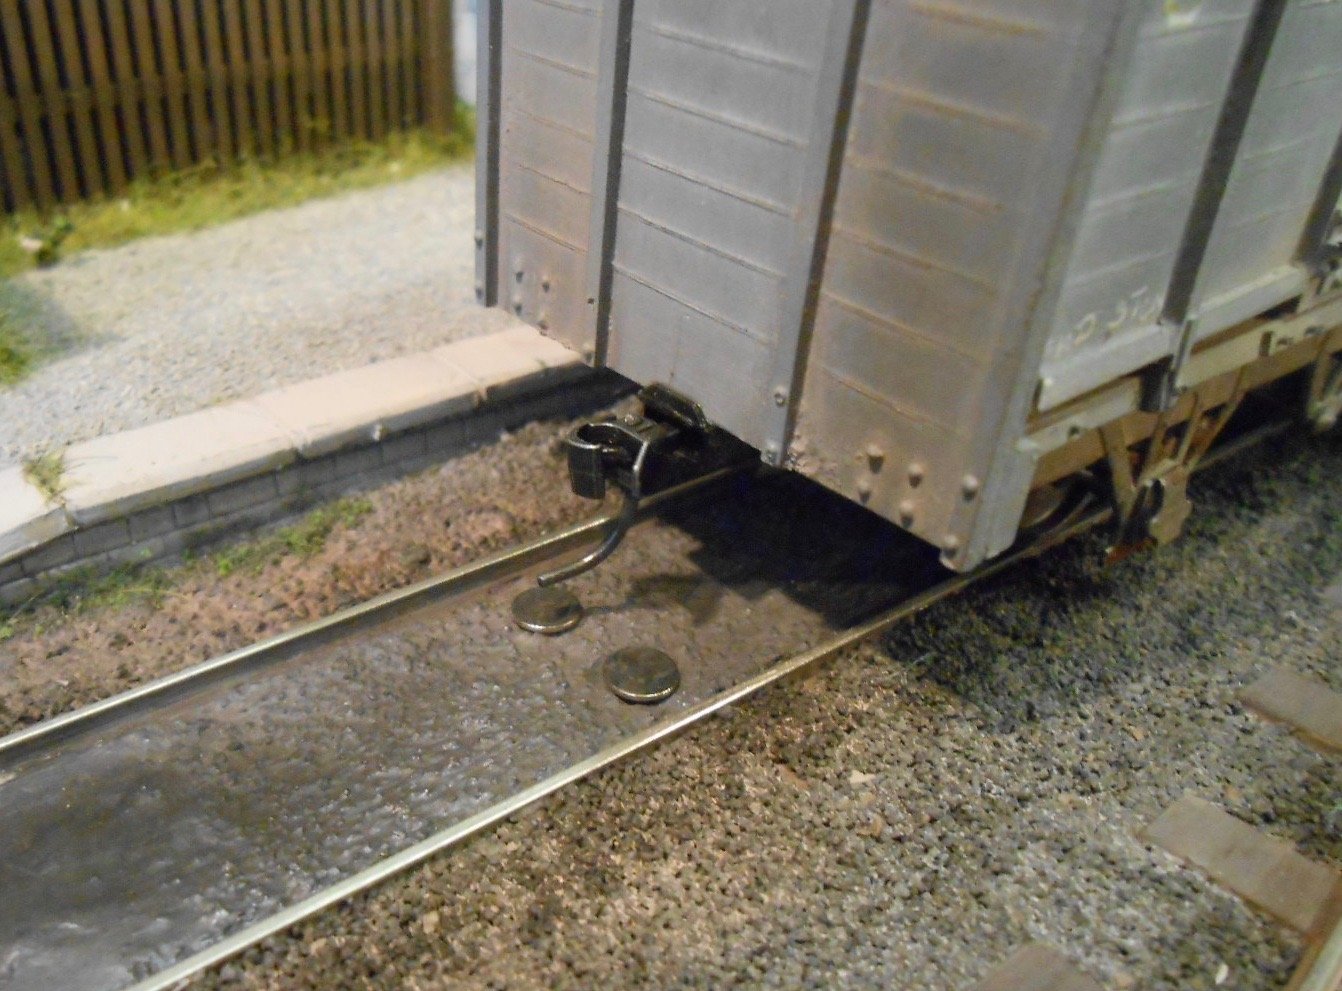
Things arboreal Managed to buy some Woodlands scenic matting at the Derby show, so spent this afternoon 'dressing' the tree. Took a packet and a half - around a square metre in total. A [fairly] simple case of tearing off a few square cms, then teasing the piece out nice and thin, before glueing to the tree frame with PVA. Start at the bottom and work up, of course... The model is based on an elm, using Gordon Gravett's book, with little else extra needing to be said. The tree marks the end of all the structures on the layout now, with just things like nettles, weeds and some figures/vehicles to add. The other pictures are of the rare earth [neodynimium] magnets I am using with the Kadee couplers. Mine are 5mm diameter and 10mm long. Drilled two holes in the track, either side of centre line & the magnets are then a push fit. Seem to work ok, though will have to work on a few ideas to mark where they are, as the layout is front operated from either end.

-
That looks a nice job. Proper track gauge too - every little helps!
-
Splendid - and love the signs!
-
Arigna Town - this week's scenery
David Holman replied to David Holman's topic in Irish Model Layouts
Often tease kids that it is nice squeaking in the treadmill under the baseboard... -
Arigna Town - this week's scenery
David Holman replied to David Holman's topic in Irish Model Layouts
Great to meet so many people at Derby, including the group of Ulster modellers over for the weekend. Took Shannon with me and she ran well throughout.
-
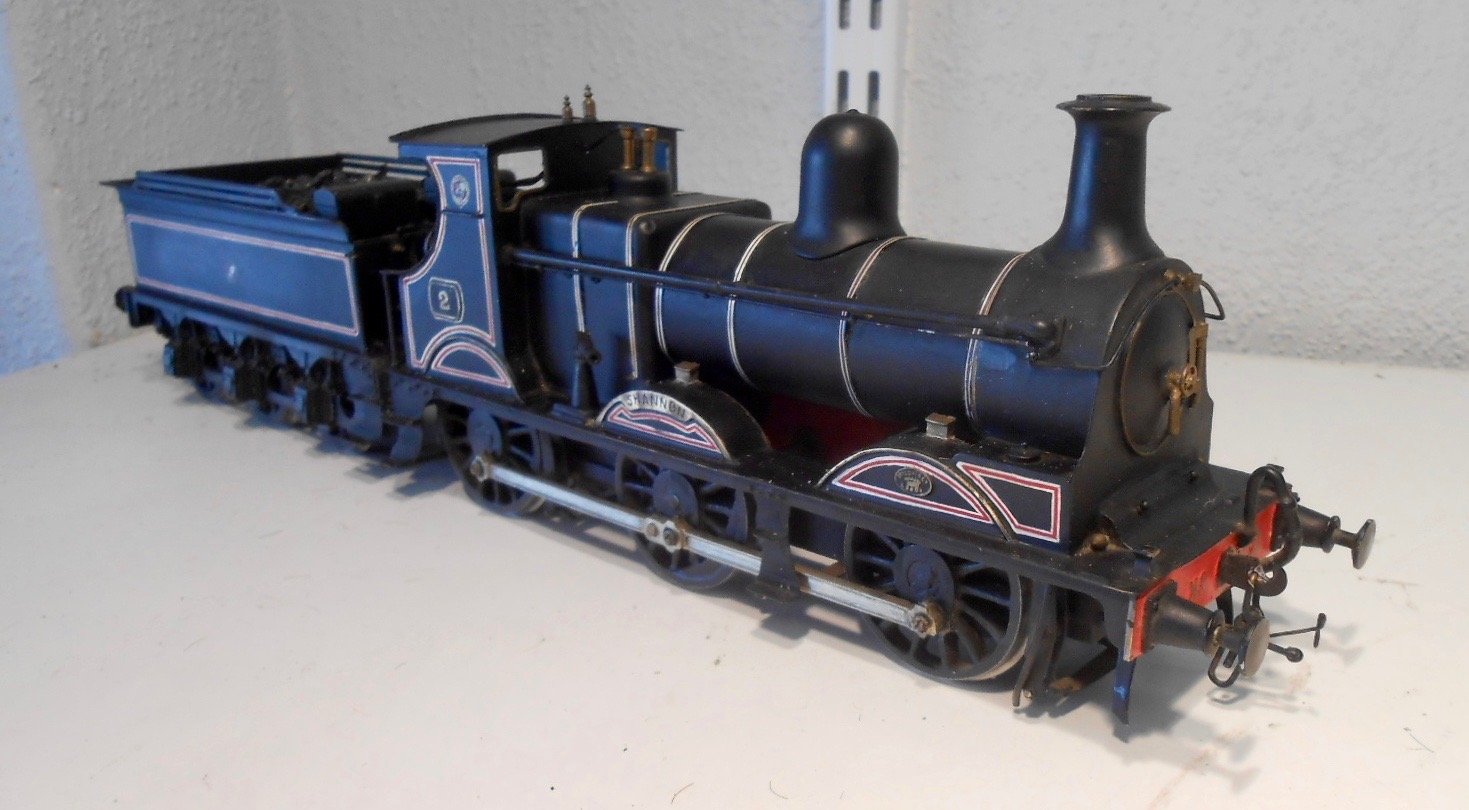
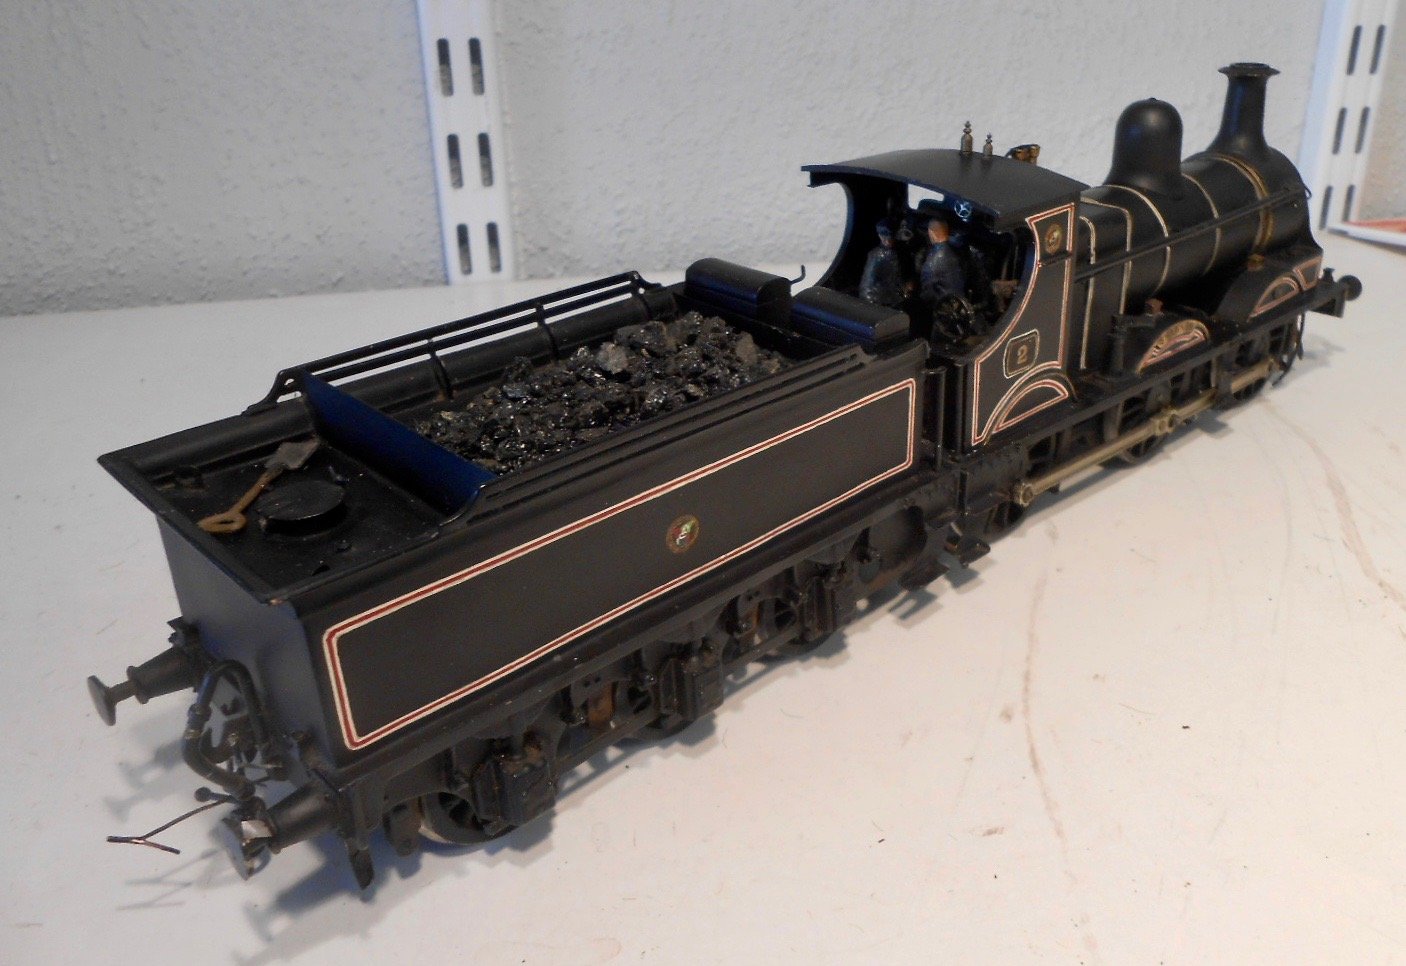
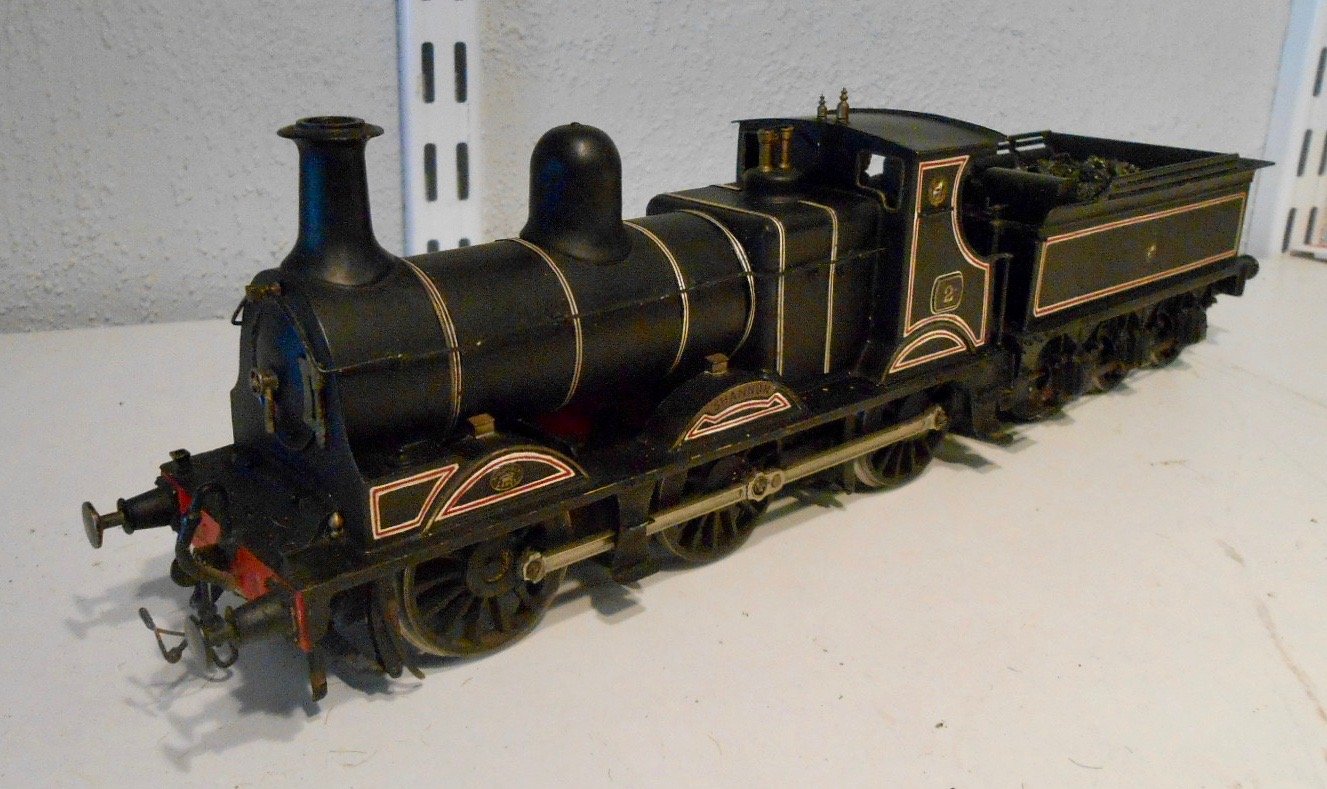
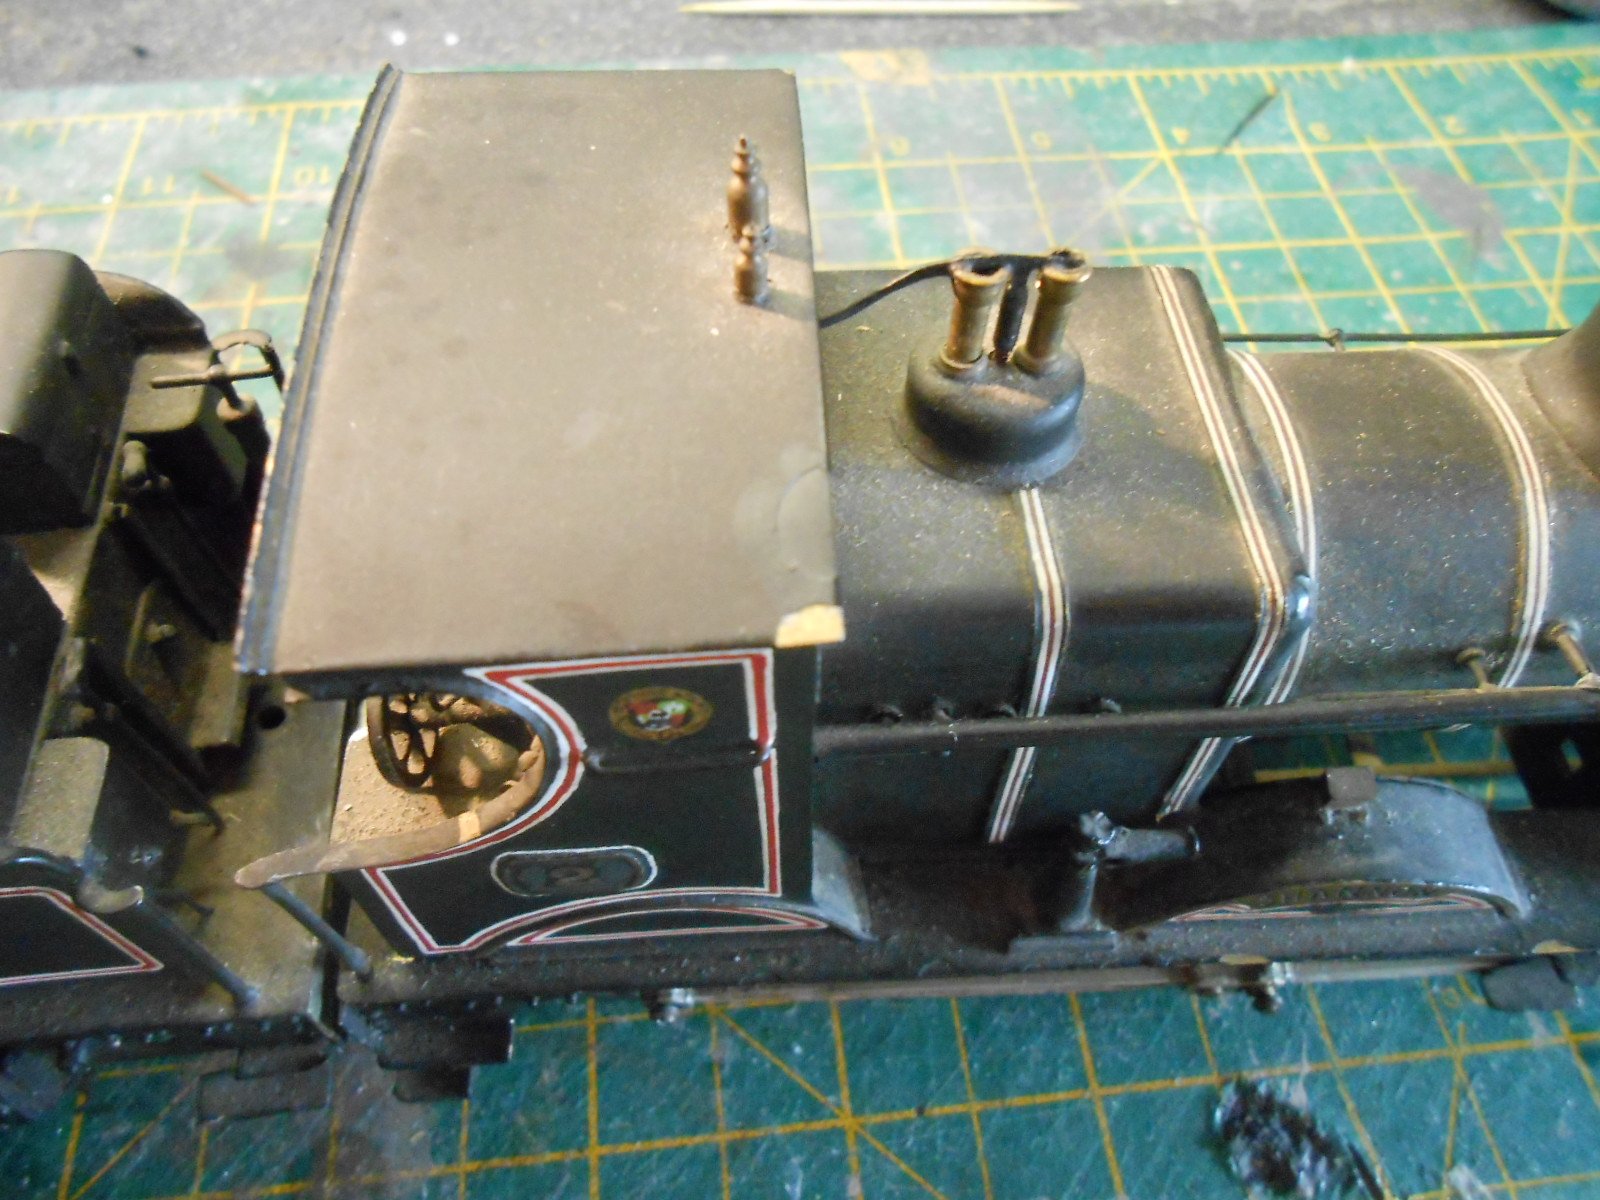
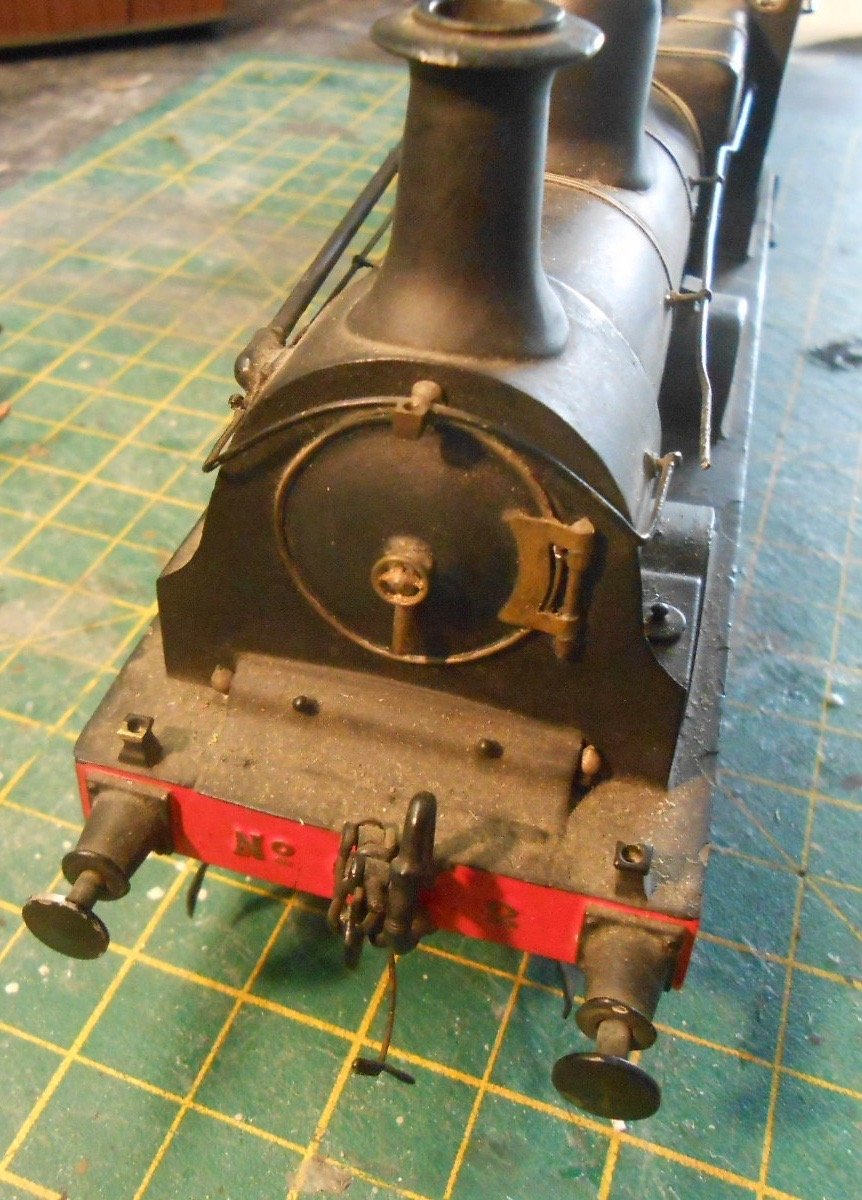
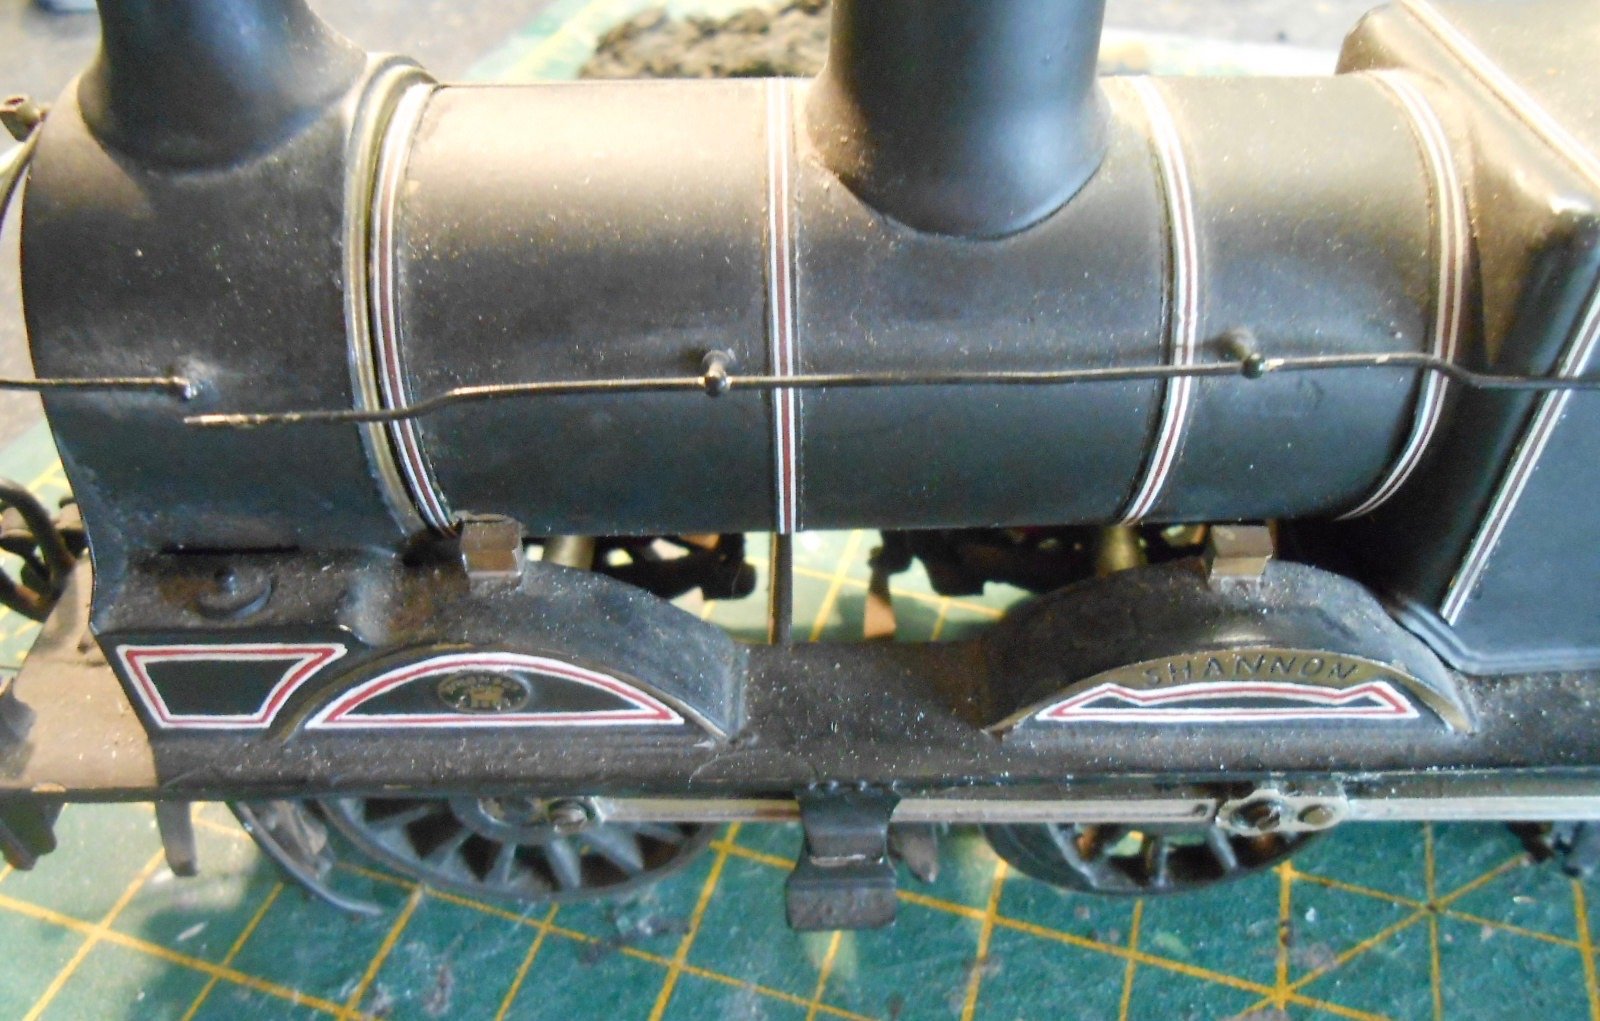
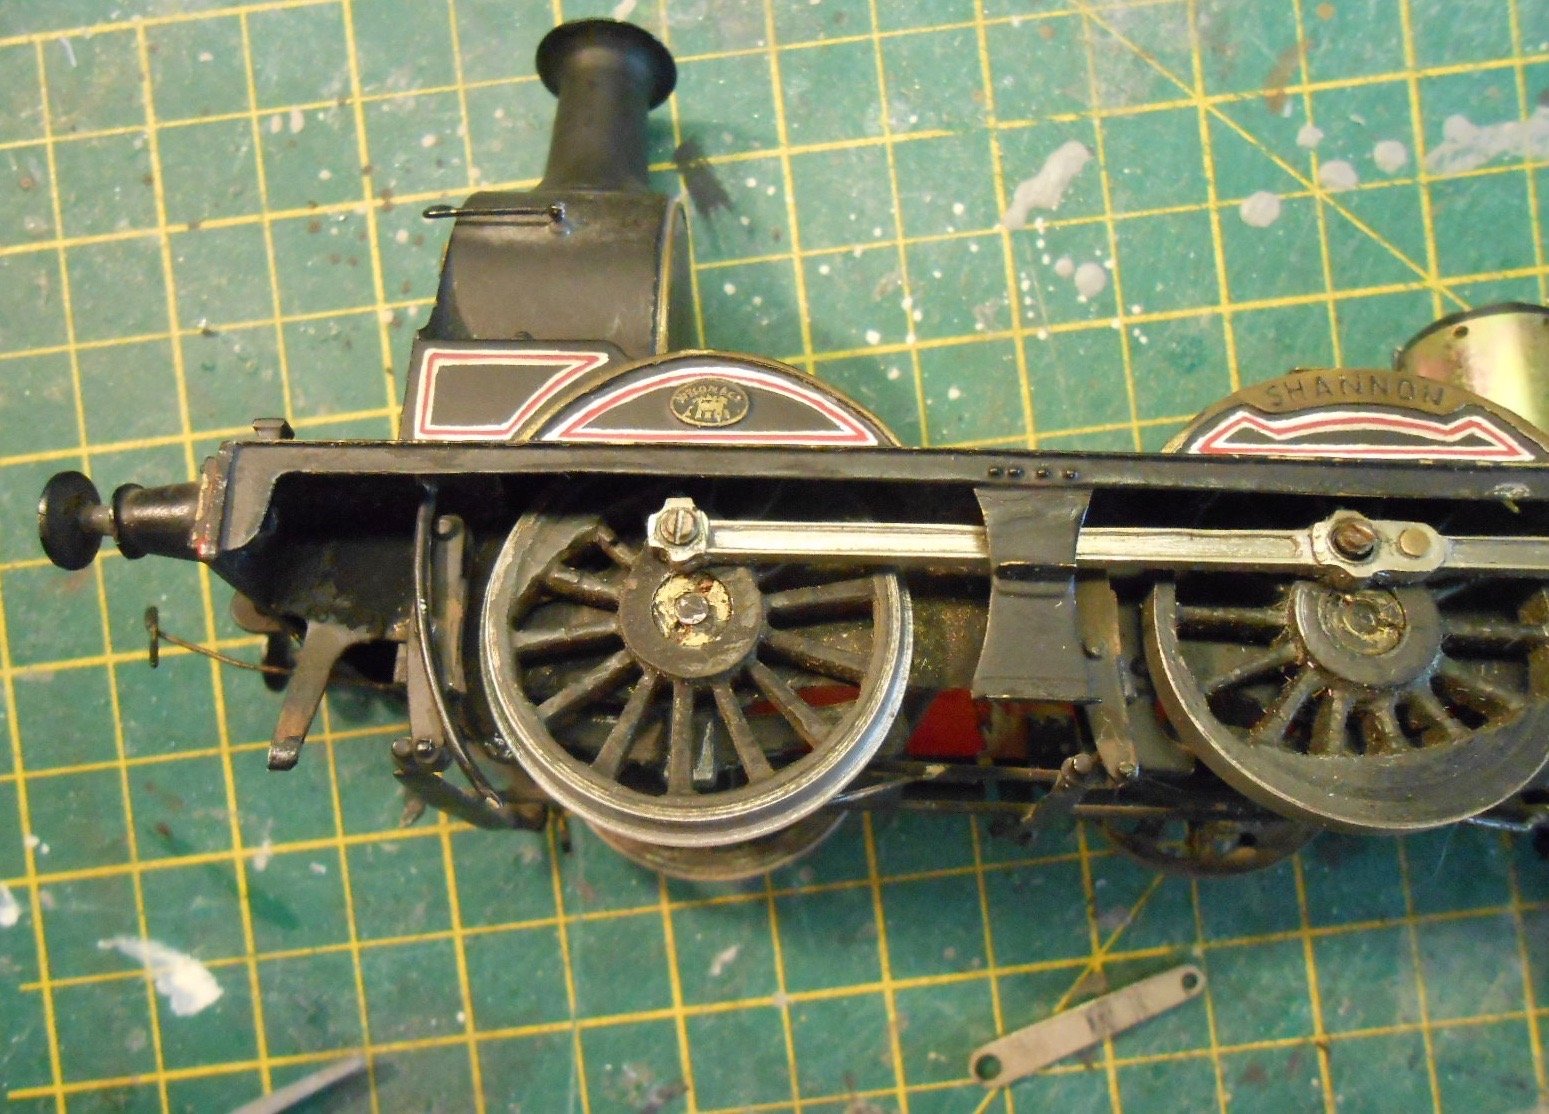
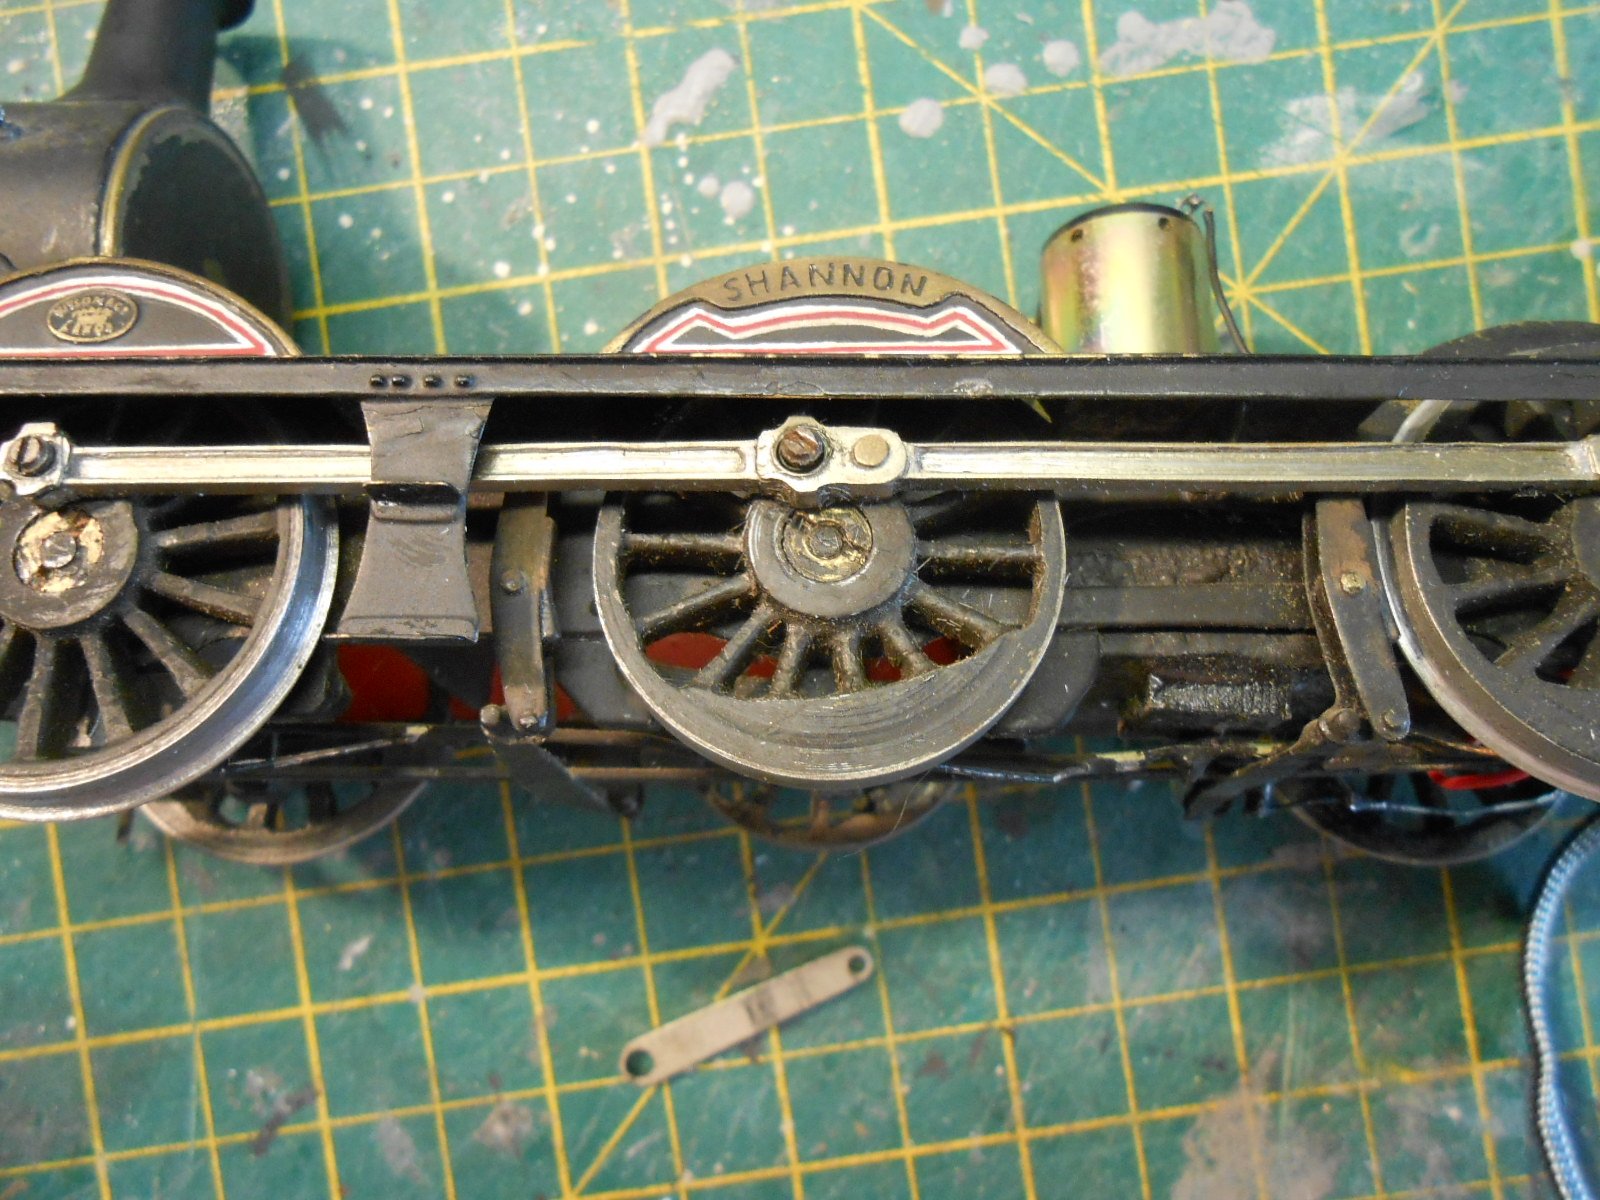
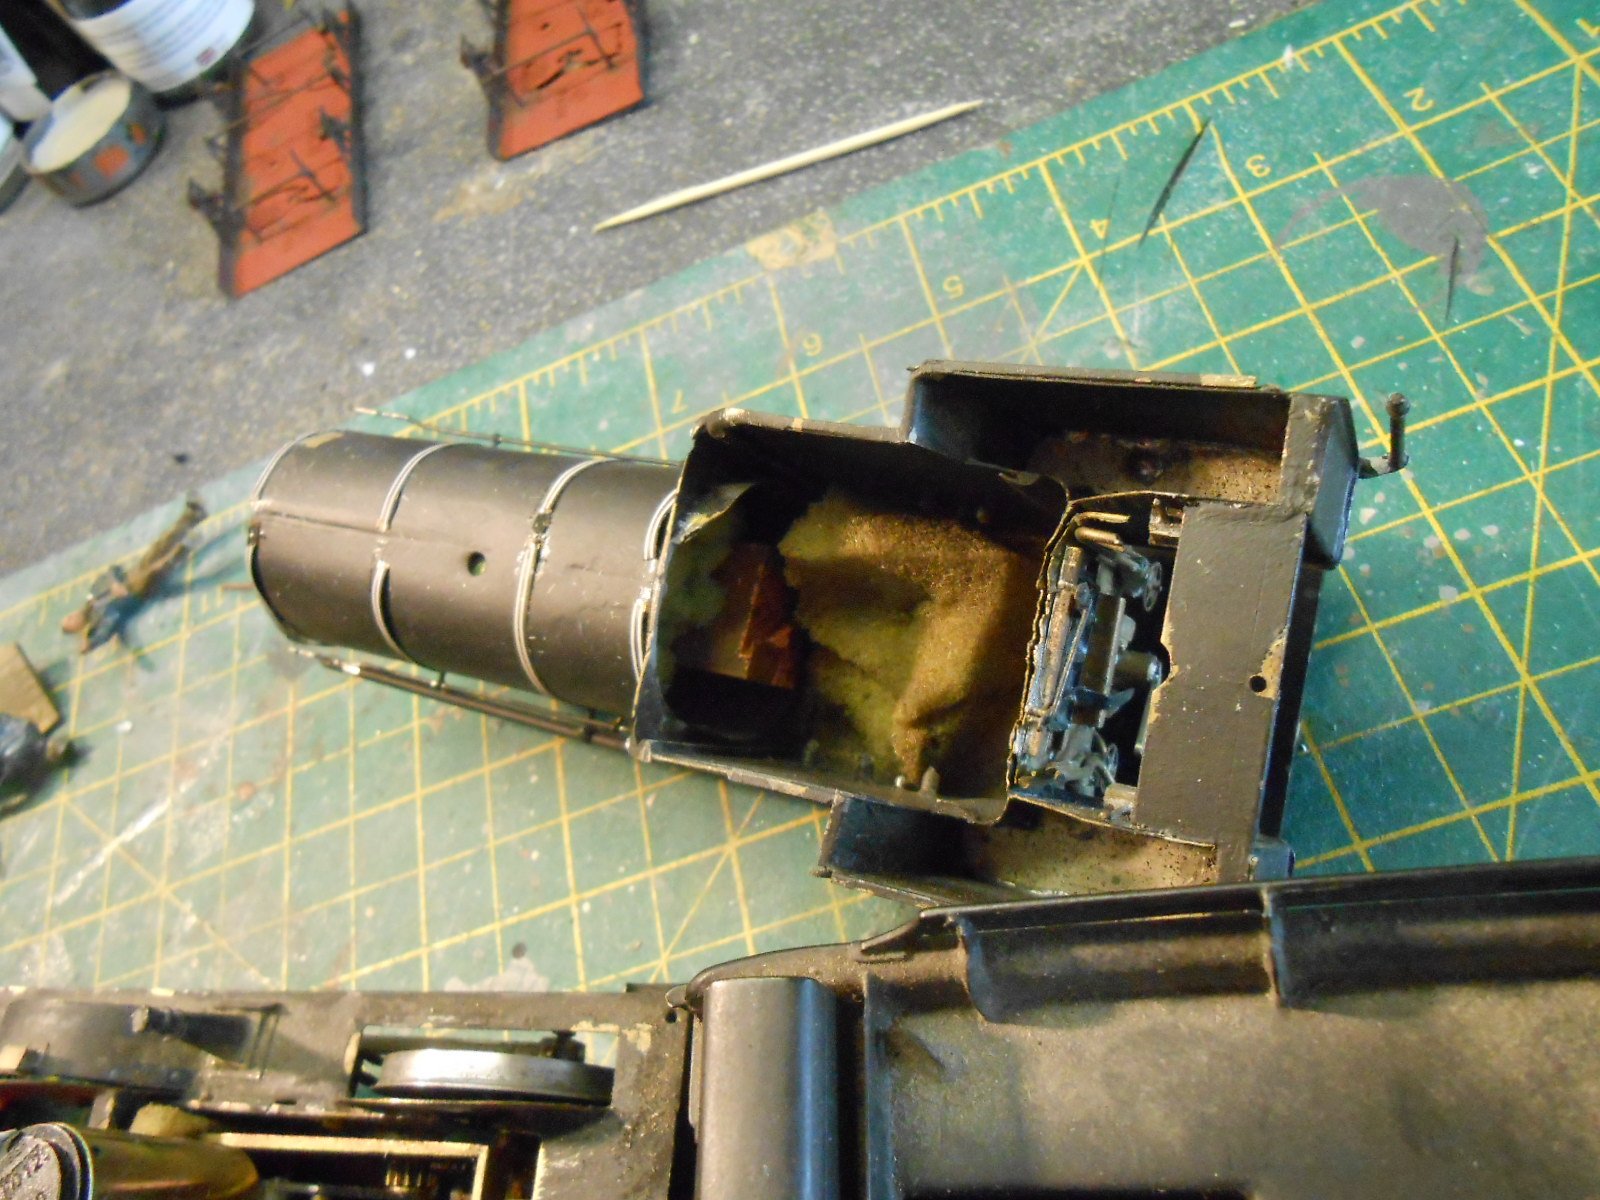
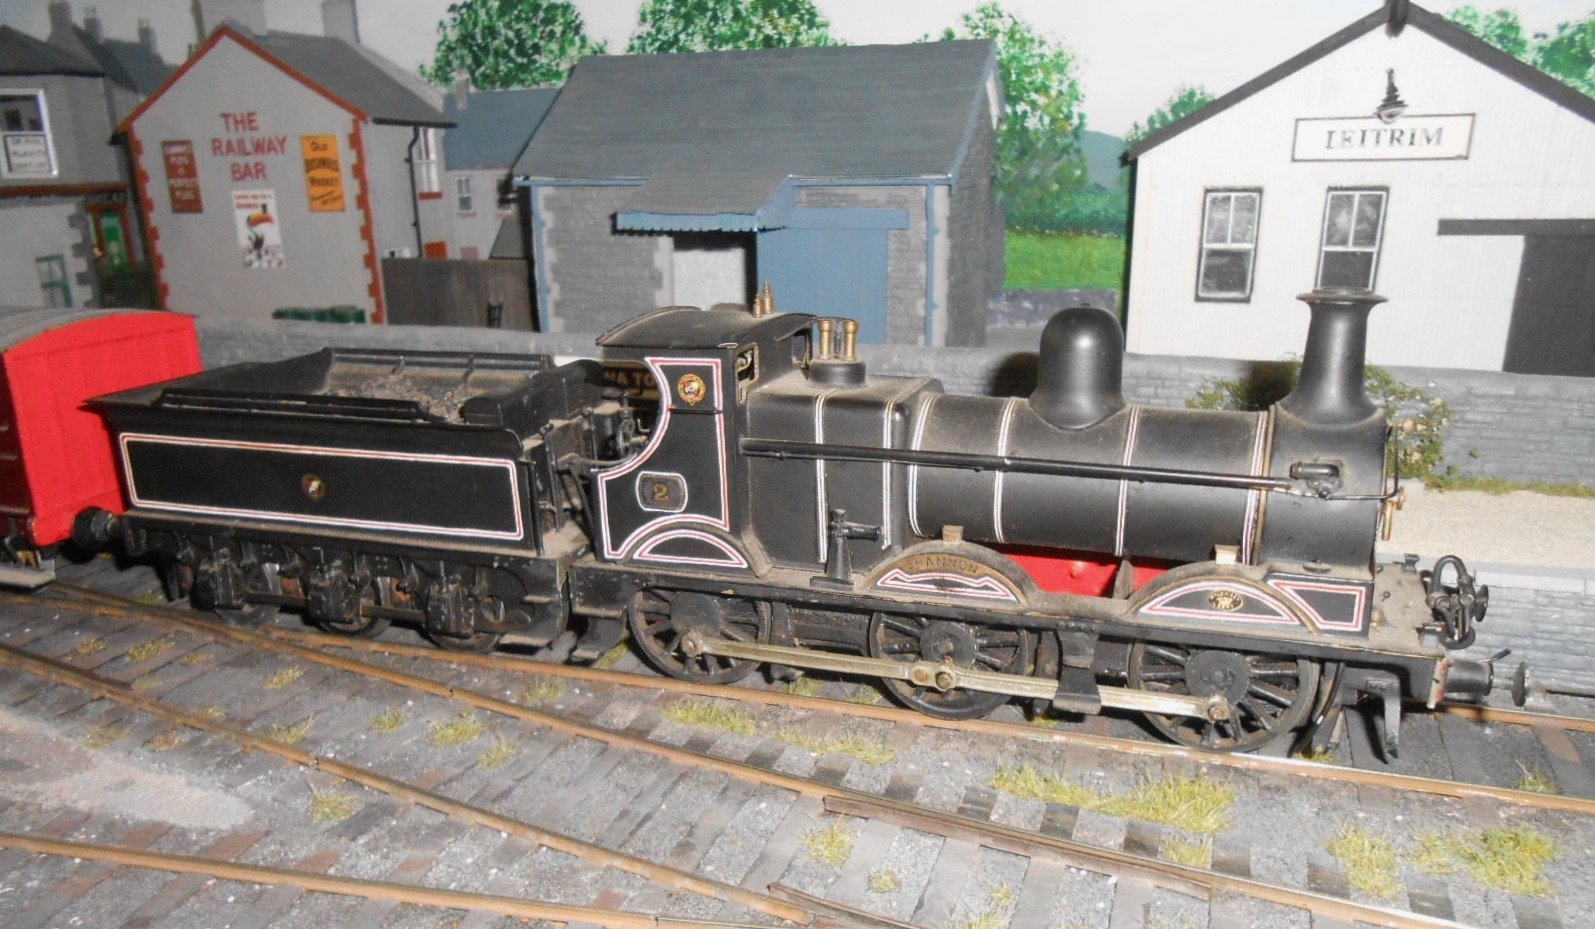
Shannon revitalised As the initial photos showed, Shannon was one very dirty engine when I took possession, but it was soon apparent that there was a very nice model underneath. A good dusting using a paintbrush was the first step, then I tried damp cotton buds to shift some of the grime. However, this only succeeded in moving the muck around, so out came the T-Cut. An automotive product for restoring paint, it works as a very gentle abrasive. Wipe on with a cotton bud, leave a short while and then polish off with a cloth or another cotton bud. I started with an area on the tender that would be covered with colour if the worst happened, but whatever paint Shannon was originally covered with was not affected - just the dirt came away. And it didn't actually take very long: within a couple of hours Shannon was looking a whole lot better. Left overnight, I then had a second look next morning to redo a couple areas and also polish off bits I'd missed earlier. However, polishing the T-Cut showed that the boiler bands were loose in places, so these were re-fixed using satin varnish. The other most noticeable thing wrong was all the chipped paint, with two areas on the cab roof and another on the boiler needing serious attention. It is one thing to touch up a bit of bare metal, but the covering needs to come level with the rest of the paint, or it still looks wrong. Then there is the problem of 'black'. Whatever shade Shannon was originally painted, it is neither matt, nor really satin black, more a very dark grey, with a tiny touch of blue. First I gave the bare metal a wipe with 'Birchwood Casey Gun Blue' - which is as per its name. Comes in a plastic bottle from Eileen's Emporium if [like me] you don't have a local gunsmith handy. Essentially selenium dioxide, thirty seconds is enough to blacken most metals, then you neutralise it with tap water: cotton buds again. After went over all the bare areas with a black spirit pen/marker, then it was time to get out the acrylics. An exact colour match wasn't important initially, more a case of building up layers to bring the bare areas level with the rest of the paintwork, while using acrylics meant there was only a few minutes drying time needed between coats. Eventually got the levels about right, then smoothed everything off with some 1200 grit wet and dry before finally trying to blend the paint in with the old top coat. The latter was slightly satin though, but rather than use varnish, I got the T-Cut out again and used this blend & polish the two areas together and [fingers crossed] it seems to have worked quite well. There were still a few other areas to attend to. The old coal load in the tender was scrapped in favour of a larger piece of plastic sheet [black this time], covered with real crushed coal glued in place the same way as ballasting track. Exposed brasswork, including name and number plates got a gentle polish with the 1200 wet & dry, while the crew got a fresh coat of acrylic [same colours as before] & were then glued back on the footplate. The last job for now was making a better join between the boiler and smokebox. The frames, footplate and smokebox are all one unit, with the boiler and cab the other. The only fixing is a 12BA screw in the cab floor, with the boiler being a push fit in the smokebox. However, there is only 1mm overlap here, so I introduced a brass peg - 1.2mm wire, soldered into the end of the boiler, which engages in an existing hole in the back of the smoke box. This stops the boiler moving when you pick the engine up and [hopefully] reduces the strain on that tiny screw. Shannon is quite heavy - the boiler has a copper bar inside for weight, while the tender has the PFM sound system. All this is moved along by a very small Escap motor, but, it seems to work fine. What I haven't done yet is have a go at the wobbly centre driver. Being flangeless, it doesn't seem to affect running, but when the Gravetts visit in a few week's time, I'll see what Gordon thinks might be done. So, there you are, a fine model, now looking smart again. It has been a pleasure to work with, not least because it has helped me appreciate how Shannon was built and discover some [though by no means all] of the fine details that have gone into her. Compare these new photos with the first ones from last week and hopefully, you will see quite a difference.
-
From what I have read recently, a kilo of resin might seem expensive, but tiny models weighing only a few grammes each means it should go a long way. Mastering CAD remains the biggest challenge, I think. Fine if you already know how, but could take a while to learn. Maybe local adult education classes might help?
-
Irish wagons V English wagons price wise.
David Holman replied to Northman's question in Questions & Answers
Can only agree with the explanations above, while the kit making side of the hobby has the same problems too, of course. For example, an etched brass kit is likely to cost around £800 - £1000 to get into production. The actual etches may come in at around £100 or more each, so selling them at between £50-£100 profit, you need to shift at least 10-20 to break even and goodness knows how many to make a living - which is why most kit producers do not do it as their main job. There is an interesting article in the latest Gauge 0 Gazette about 3D printing, which shows that a decent machine can be had from £300 upwards [£600 seems to be a more realistic figure], but to take advantage of one of these, you need to become an expert at a CAD program. Not a 5 minute learning process. Overall, it remains the case that you pays your money and/or makes your choice. Having seen the IRM wagons, can certainly vouch for their quality and value. For me, one thing that seems to be changing across the hobby is that the standard [and cost] of rolling stock has grown rapidly in the last few years. Coaches and wagons are no longer cheap compared to locomotives. In my preferred scale of 7mm, you can now get a Dapol Jinty for under £200 and Hattons are bringing out LNER A4 and A3 pacifics for £750, which is pretty remarkable. However, to stick a reasonable train behind one of the latter will cost considerably more - around £200 per coach or more, so even a six coach train will cost twice as much as the engine. Likewise, a 20 wagon freight train [rtr] could come to not much less. Anyone wanting a quick fix model railway these days is going to need deep pockets, so it is a good for the rest of us, that our hobby is very much a long term theme, where it is as much about the journey as the destination. It also shows that, where you can, building your own models, from scratch, or using kits, can help justify a few more expensive purchases to cover those items you really can't see getting any other way. IRM have been clever in choosing their first two wagons that way, methinks, as both represent considerable challenges in doing it yourself. -
Maisonettes! When has anyone done those? The mutt's nuts, the poodle's wotsits, the... Superb composition.
-
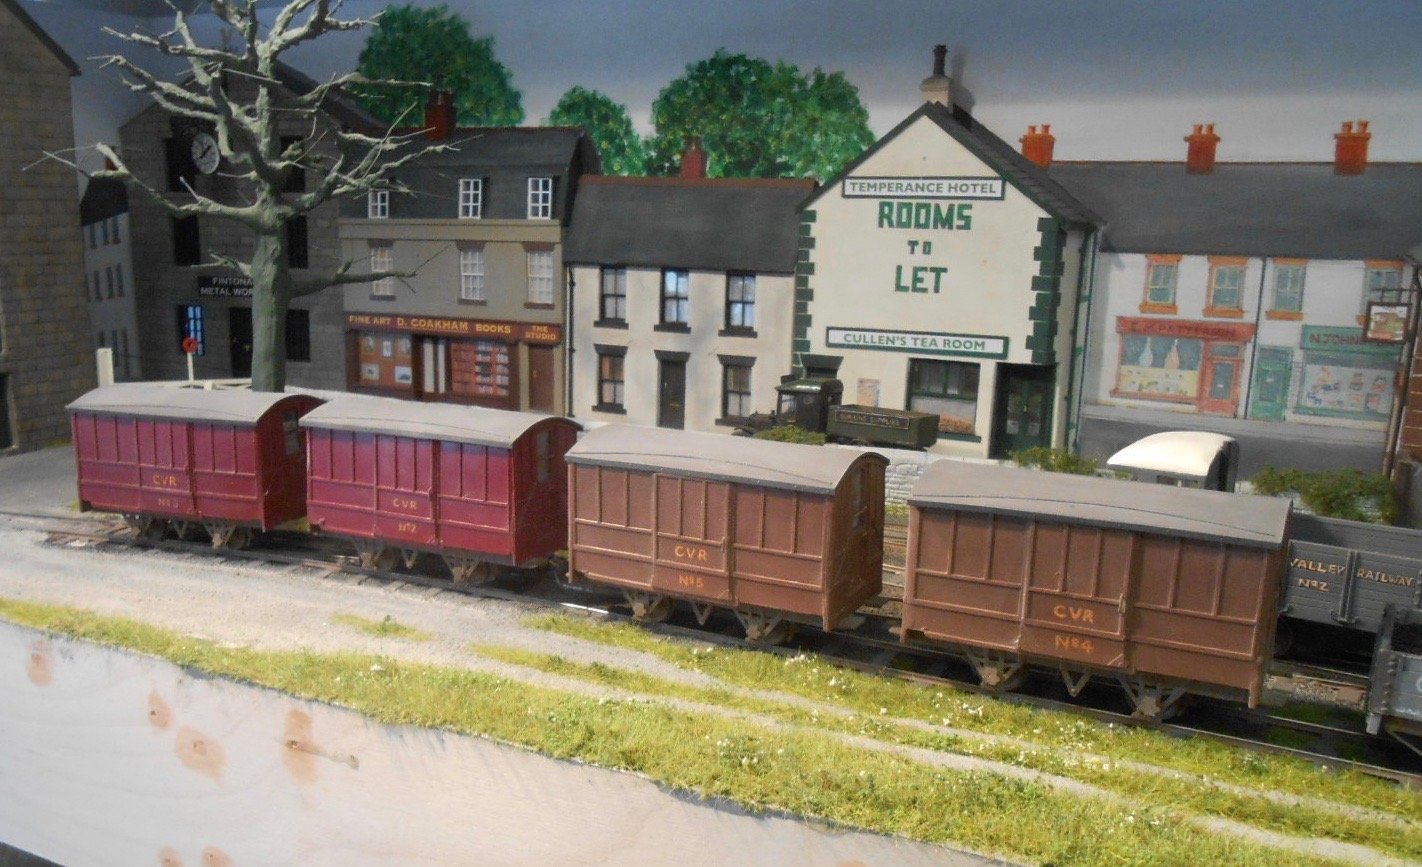
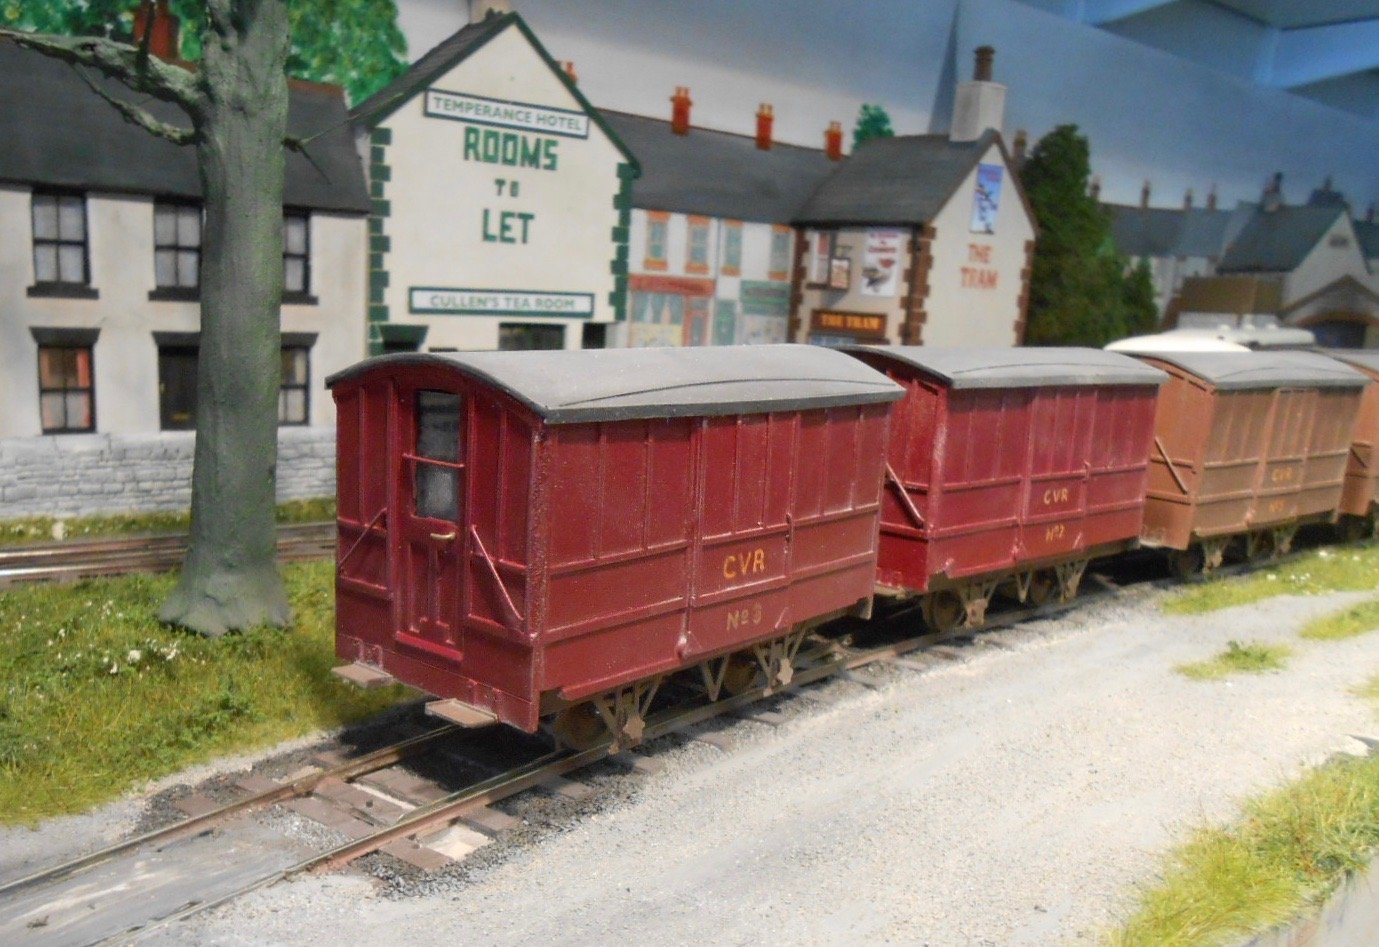
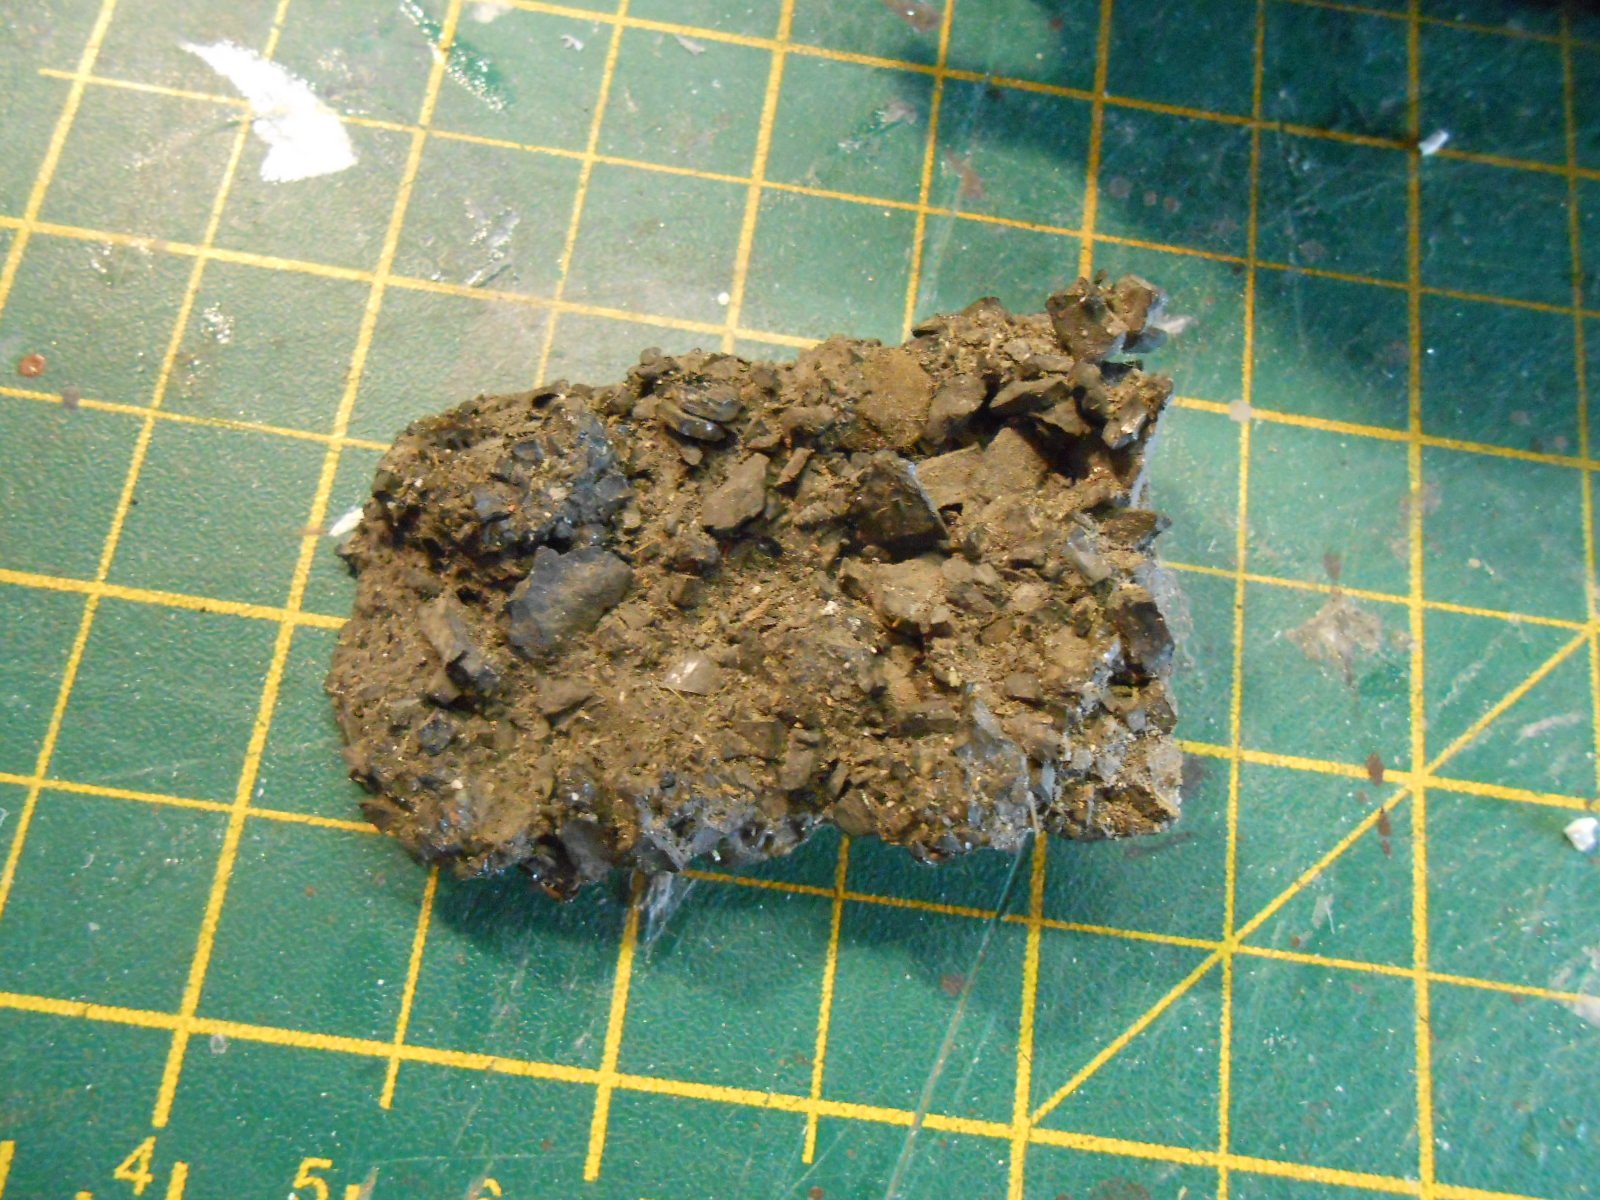
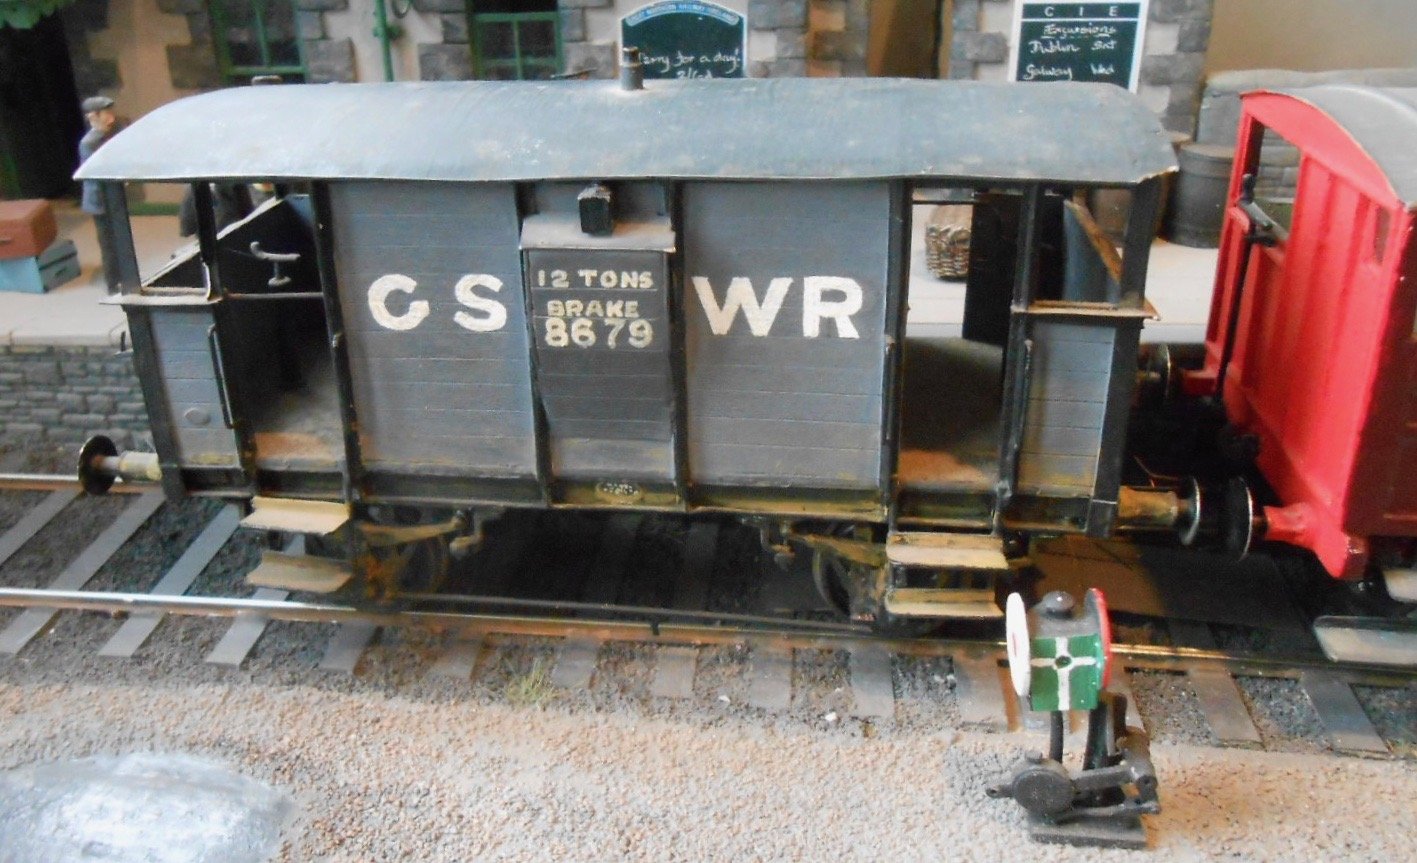
Report from the wagon works It may seem as though Ricard Chown's 'Shannon' has taken over my life recently, but the last month or so has mainly been around wagon building. As recorded in the workshop thread, four new open wagons have proved a trial of endurance, with over 300 separate pieces in each one [ok, most of these bits just rivets]. Add in hand lettering, weathering etc and it is easy to see why they have taken so much time. Still, nearly finished now - just waiting for the arrival of some more Kadee couplings in the post. One wagon has a load of ballast, while the others are a pair of loaded coal and complimentary empties. The idea is that there is an off stage coal yard, so swapping wagons will be one of the moves on exhibition. Three new brake vans have joined the fleet too. A bit simpler than the opens, they are resin castings I did from my own masters. Just two sides and ends though, so floor, roof, glazing and a fair few handrails and handles needed adding too. I've done one van in crimson lake, to match the one I'd done earlier, but photos indicate that the vans, like the coaches, weathered to a red/brown over time, so have done the other two in this colour. Eventually, I hope to add a third coach in the same colour - as I've said before, the Clogher was a real paint palette of a railway. Like the opens, they are hand lettered, using a dipping pen and white acrylic ink, though that on the vans has been gone over with Staedler fine tipped pen to give a more golden colour. The under frames use the standard Branchlines chassis as before. Also painted in the body colour, the chassis have been weathered to an overall dusty hue, with added weathering powders. Behind the new wagons, you can see example of the other type built so far. I probably have enough for the time being, so the next stage [once the new couplings arrive], will be to fit the other magnets and do some test running before finishing the scenery.
-
Thanks everyone for your thoughts. Mr Gravett concurs too and that is where I am leaning. Tried a but of T-cut on the cab roof this afternoon and the paint cleaned up nicely, so that may be the way to go. As Gordon said on the phone earlier this week, it could be an idea to build a replacement chassis, but with Shannon's also including the footplate and smokebox, that is a non-starter! The Gravett are staying with us for the Chatham exhibition in four weeks time, so we'll combine forces to see if anything can be done about the wobbly wheel. I could also invest in a complete new/alternative set of wheels/motor/gears, just for exhibition use, preserving the existing set for posterity at the same time, but that is probably another £120 and if it ain't broke, why fix it? As Eoin says, a gentle clean and a better coal load for the tender is really all she needs.
-
That is one seriously neat bit of work. Lovely job.
-
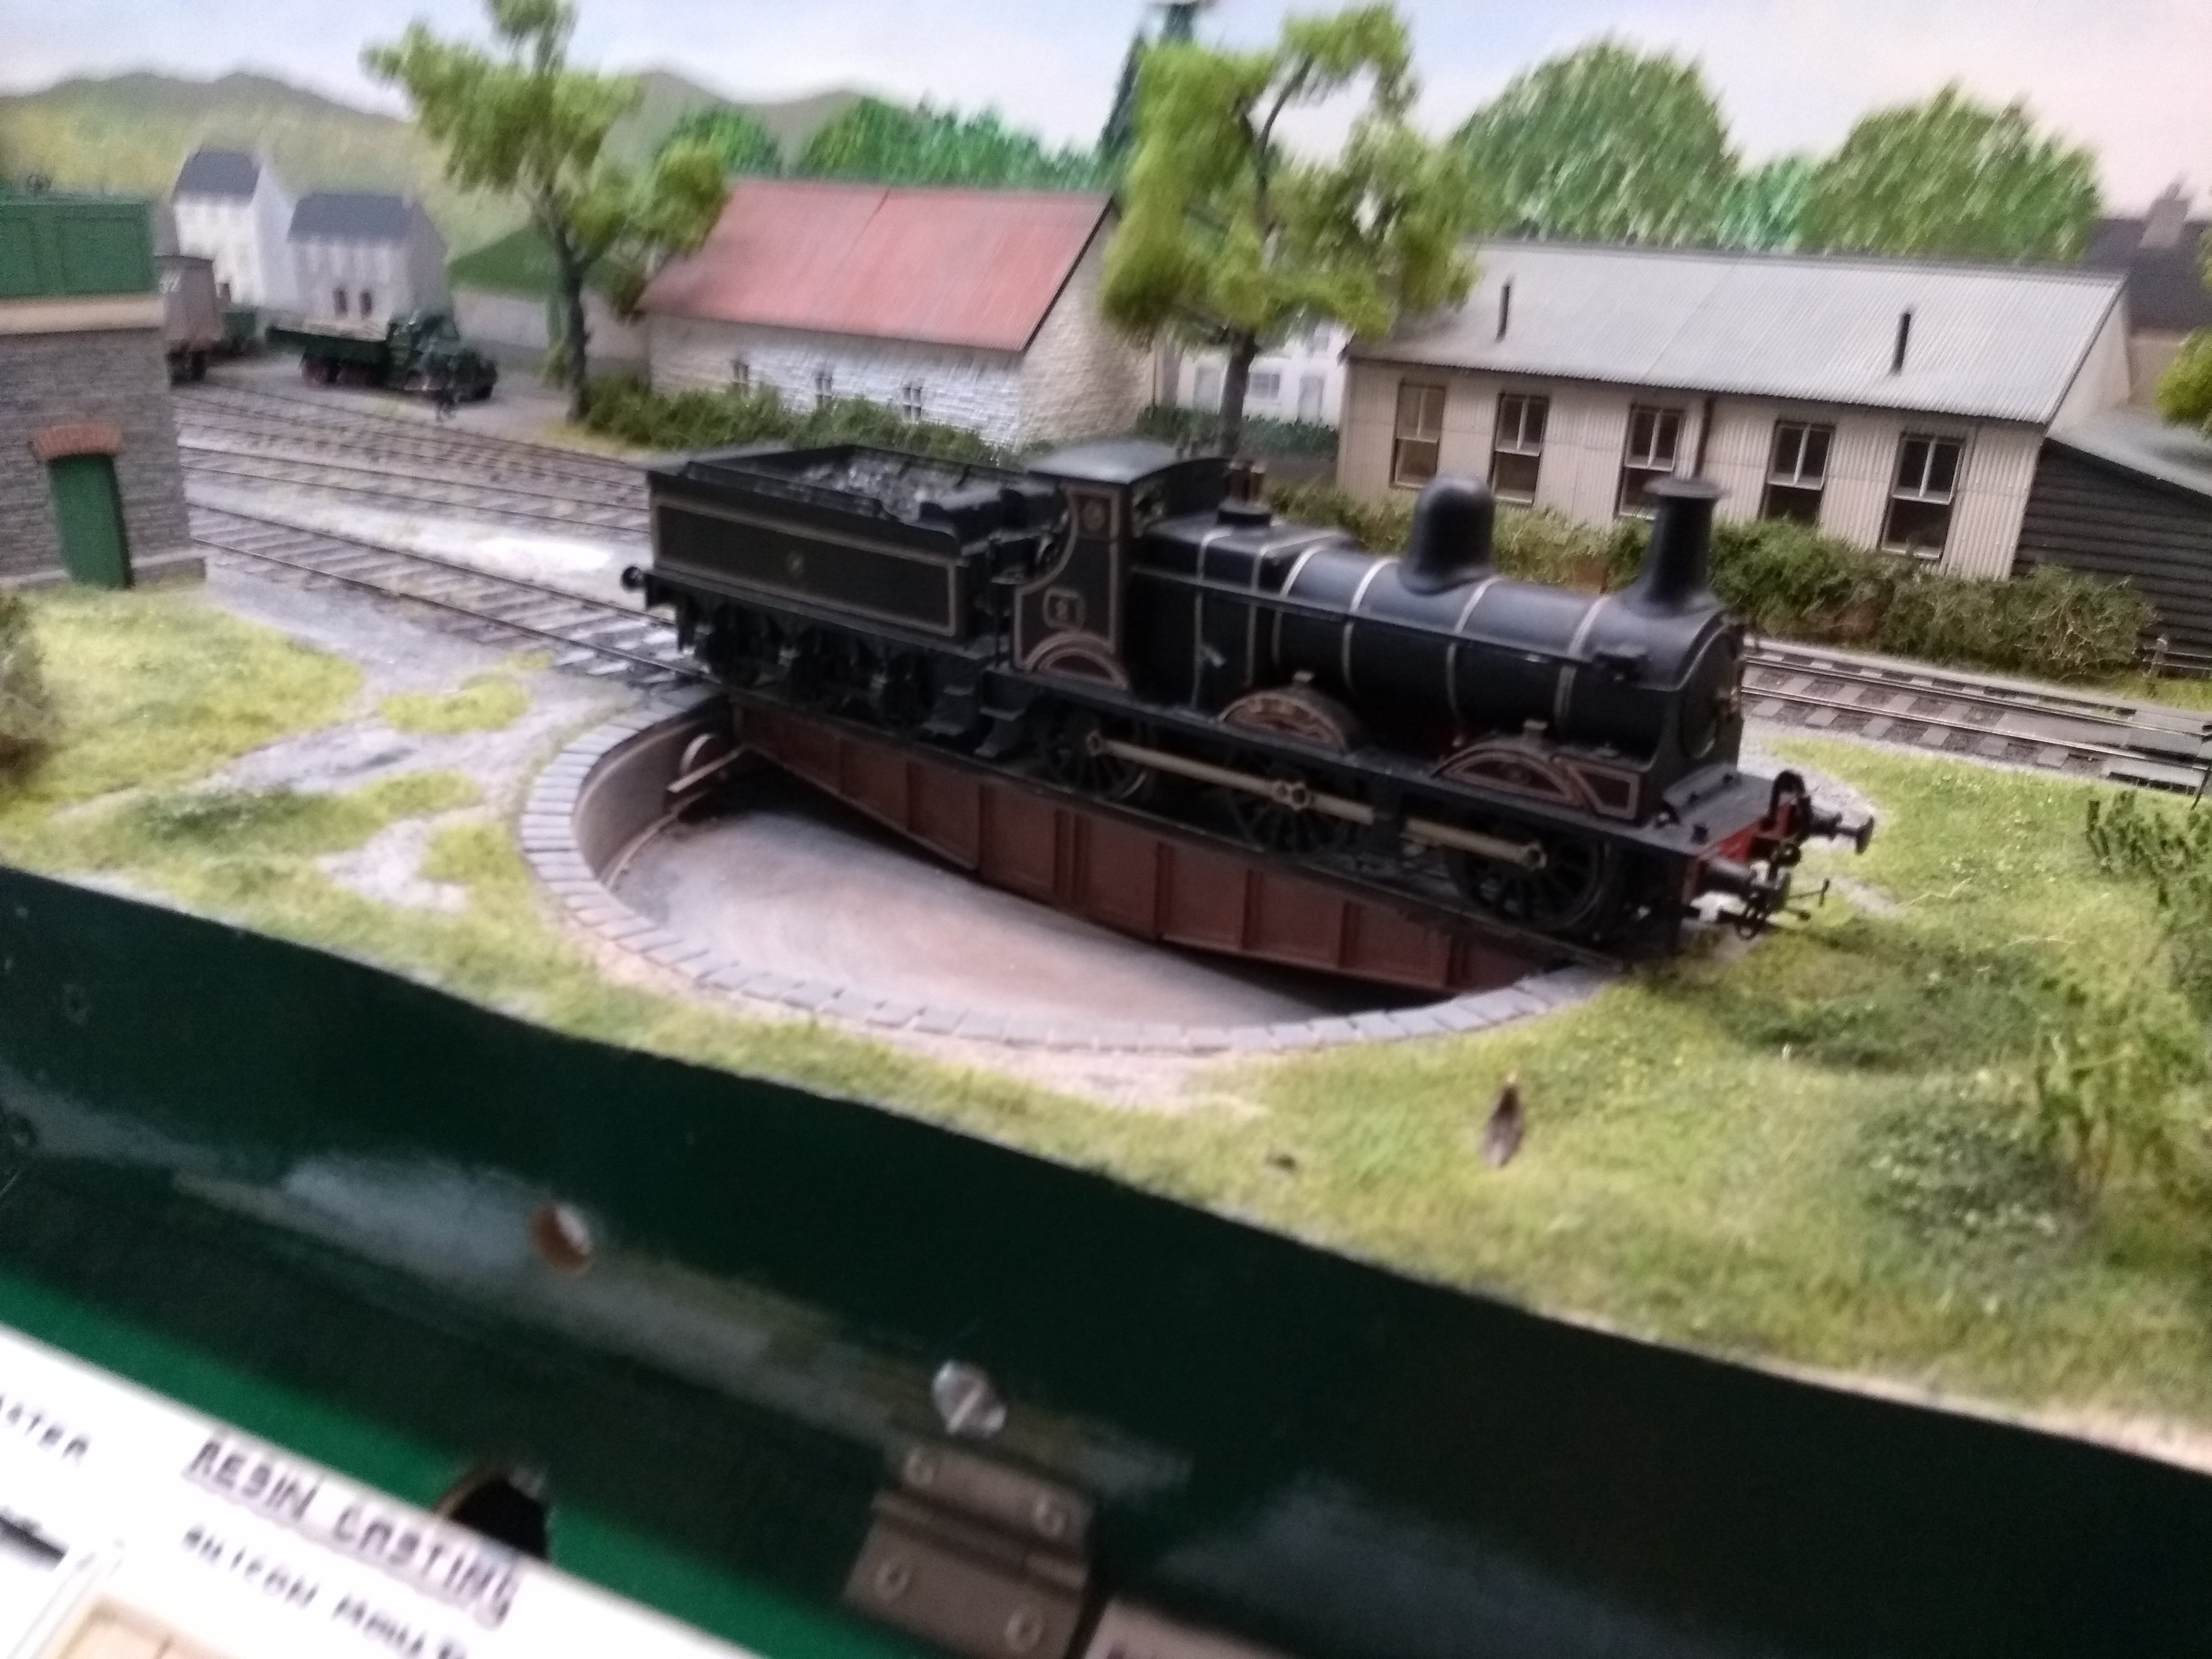
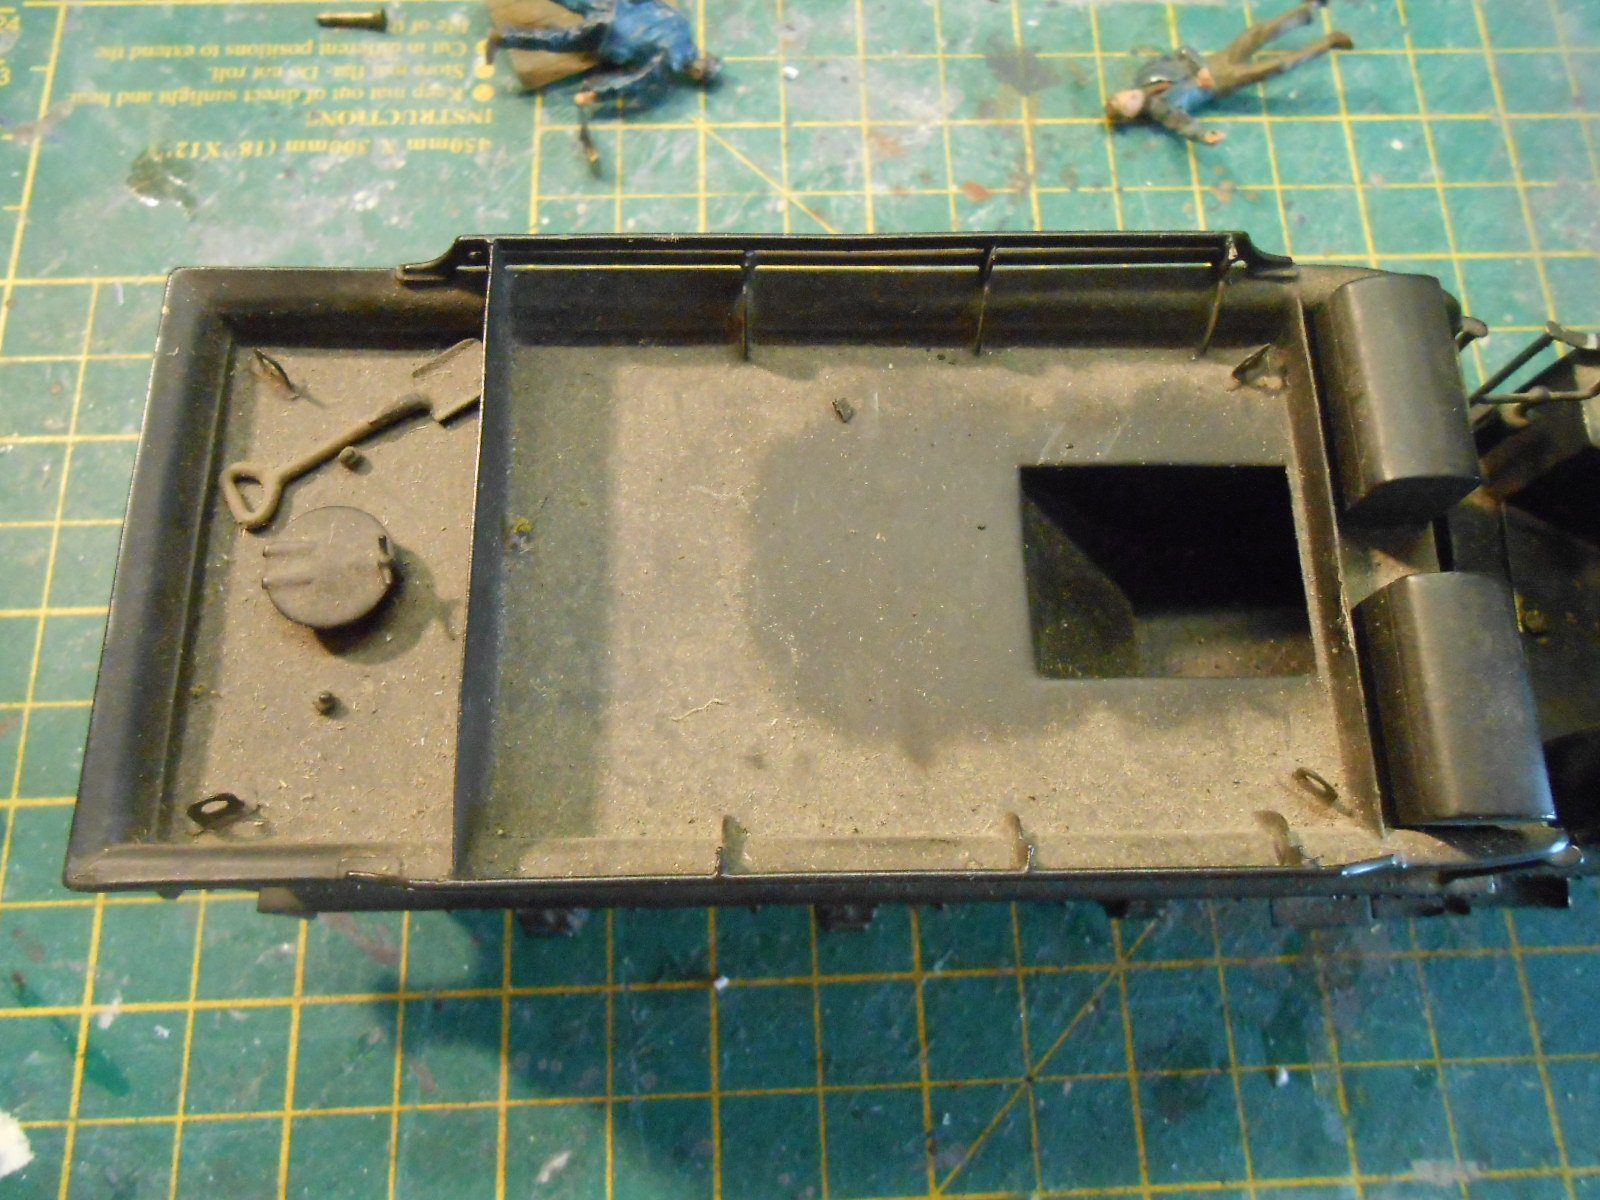
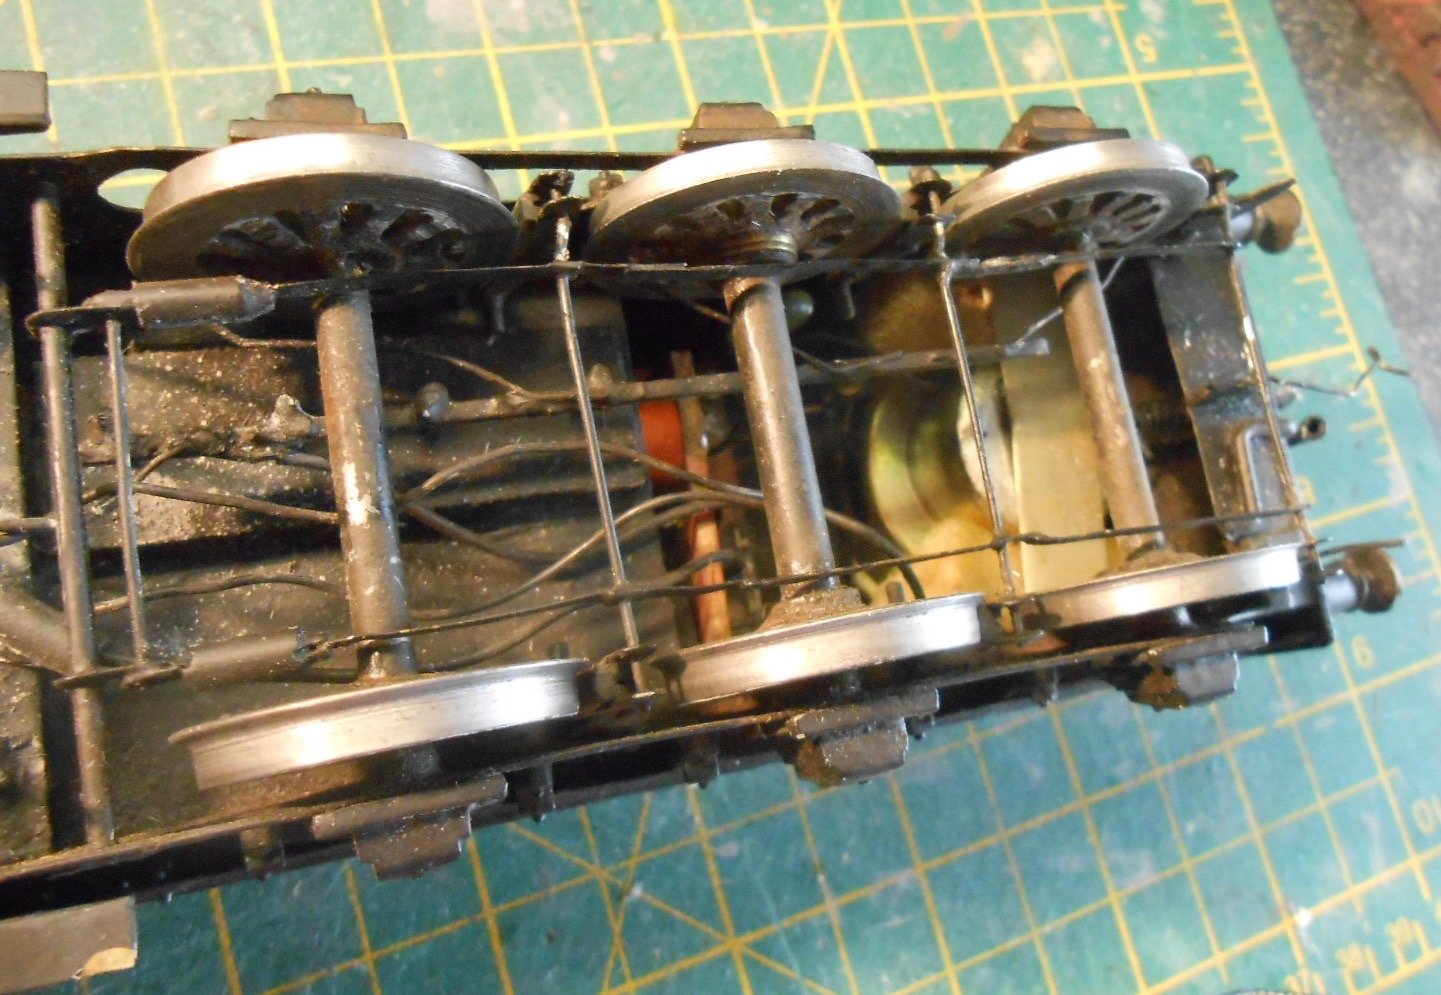
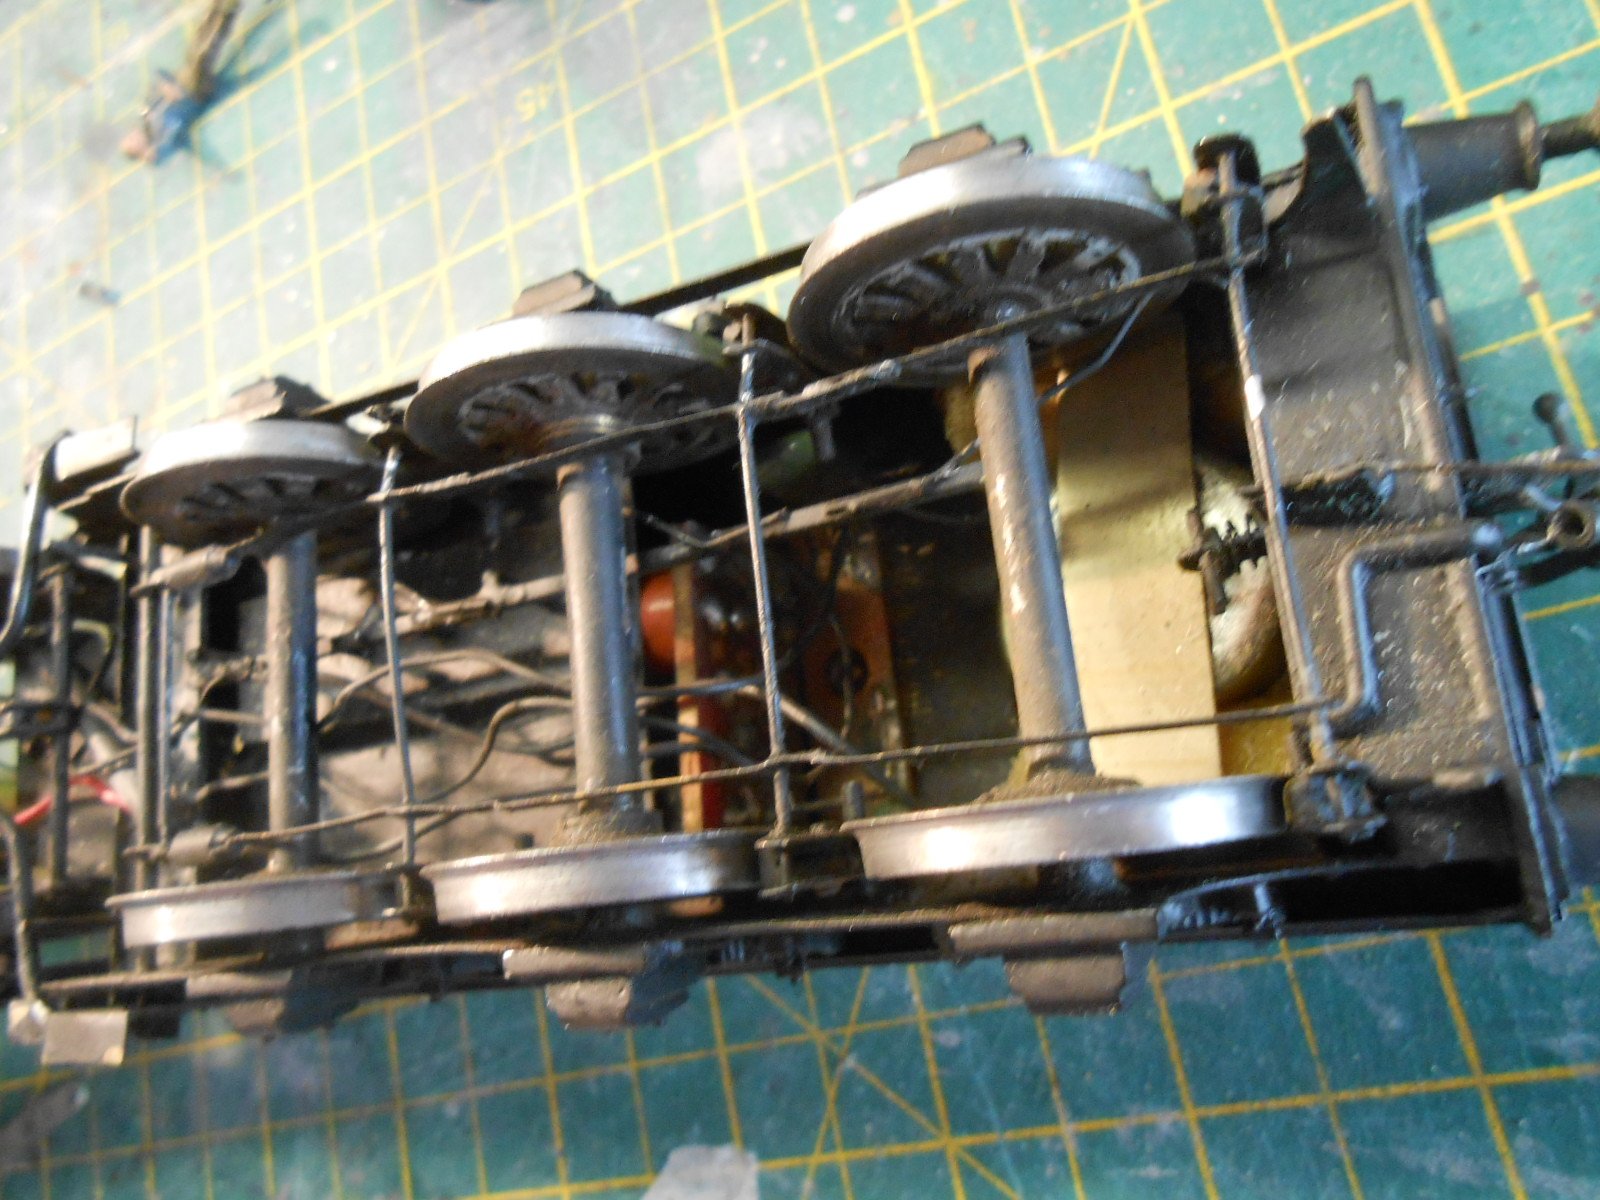
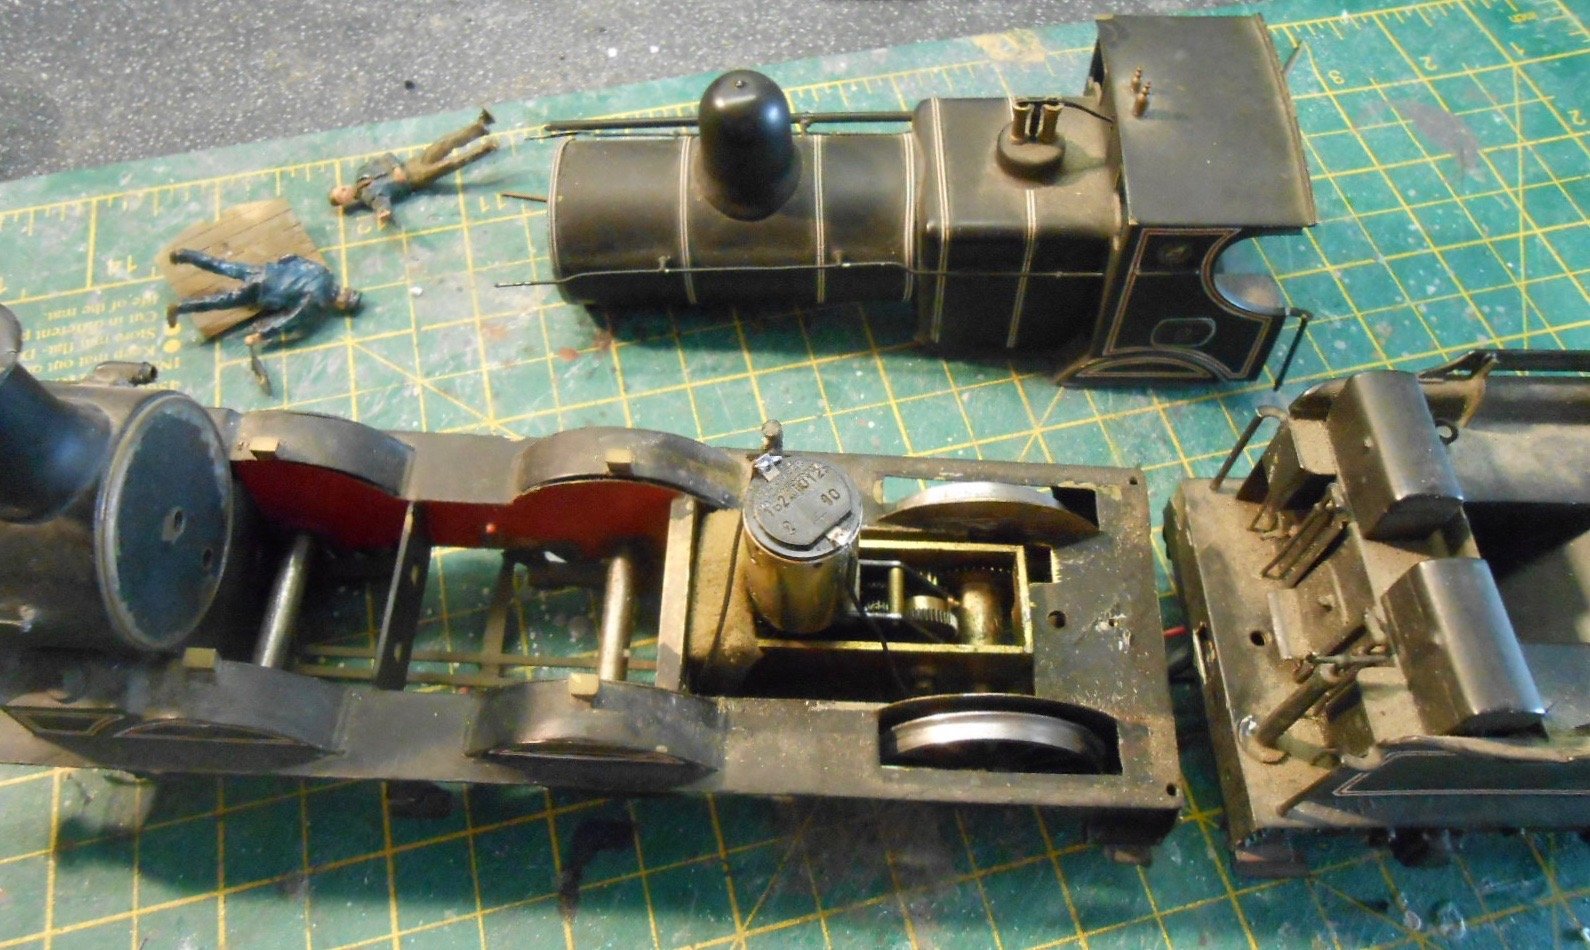
Shannon - modelling archeology! Got Shannon on the workbench this morning, to give her a bit of a once over. Fascinating - to paraphrase Star Trek, 'It's modelling Jim, but not as we know it' and any slight doubts I might have had that this was not the original [but a later rebuild], we instantly dispelled. The wheels for a start. Slaters they ain't & I suspect they might be Wallsall cast iron jobbies. The fixing nuts are like large versions on the Romford 4mm ones, while the centre drivers are flangeless. Just as well in the case of the latter, as one side has a horrible wobble on it [2-3mm at the rim] because the wheel centre no longer fits snugly on the axle. Happily, this does not seem to affect the running, as the loco goes through all Arigna's pointwork without any problems. Hopefully, the photos give some idea of how dusty Shannon had become - probably in no small amount to being unused since June last year. There are a fair few chips and scuffs on the paintwork, so will eventually have to decide whether or not to treat that, though I suspect it might be Floquill paint - much favoured in the 70s, it brushed on superbly, but not easily available now. All I've done thus far is give it a good dust with paint brushes and a gentle clean with moistened cotton buds. I wanted to have a closer look at the mechanism, but separating body from chassis was a surprise. Normally it is one or two bolts screwed into captive nuts, but Richard seems to have made the footplate, chassis and smokebox as one unit, with the boiler and cab as another. The front of the boiler plugs into the back of the smokebox, along with various handrails and piping, while a tiny 12BA screw is all that holds the cab end to the footplate. Different, but it works! The mechanism itself seems to be a Portescap RG4, doctored to fit on a 3/16" axle, by using an additional set of gears. The final drive is a very thin gear wheel, probably only 20thou thick and there is a fair degree of lateral slack, but again, it works. Coupling rods look to be a single piece of machined steel [nicely profiled] and at around 3mm thick, were clearly designed for hard work. Indeed, when you think Castle Rackrent grew to over 200' long and was operated pretty intensively, then Richard's locos were obviously built to cope with that and Shannon has survived the hard work very well. The gears do make her a bit noisy though and it is a good job I have a Gaugemaster W hand held controller, as my usual HH has feedback, which the motor clearly doesn't like. Speaking of noises, the tender holds a Pacific Fast Mail sound system, but there is no easy way to get to it as the tender seems to have been made as a complete unit. There seems no way to get the wheels out either, but [as you might expect], these are all wired for current collection. The tender body is a nice piece of modelling, complete with the coal chute, lifting rings and so on, so it was a bit surprising to find a very crude load of coal, stuck on a bit of plastic sheet and simply lying on top of the tender. The loco bodywork is also very nicely done, with lots of detail, though the boiler bands are perhaps a bit crude by today's standards. The smoke box and smokebox door is especially nicely made and really captures the look of the Kitson original, while there is some lovely detail in the cab too. So, very much something to treasure - but whether or not I leave it as it is, or try to restore some of it, I'm not sure. It won't get intensive use on Arigna, but it will be good to run Shannon at shows, so whether I need to do anything about the wheels remains to be seen. What do others think? Any comments welcome, especially re those wheels.
-
Arigna Town - this week's scenery
David Holman replied to David Holman's topic in Irish Model Layouts
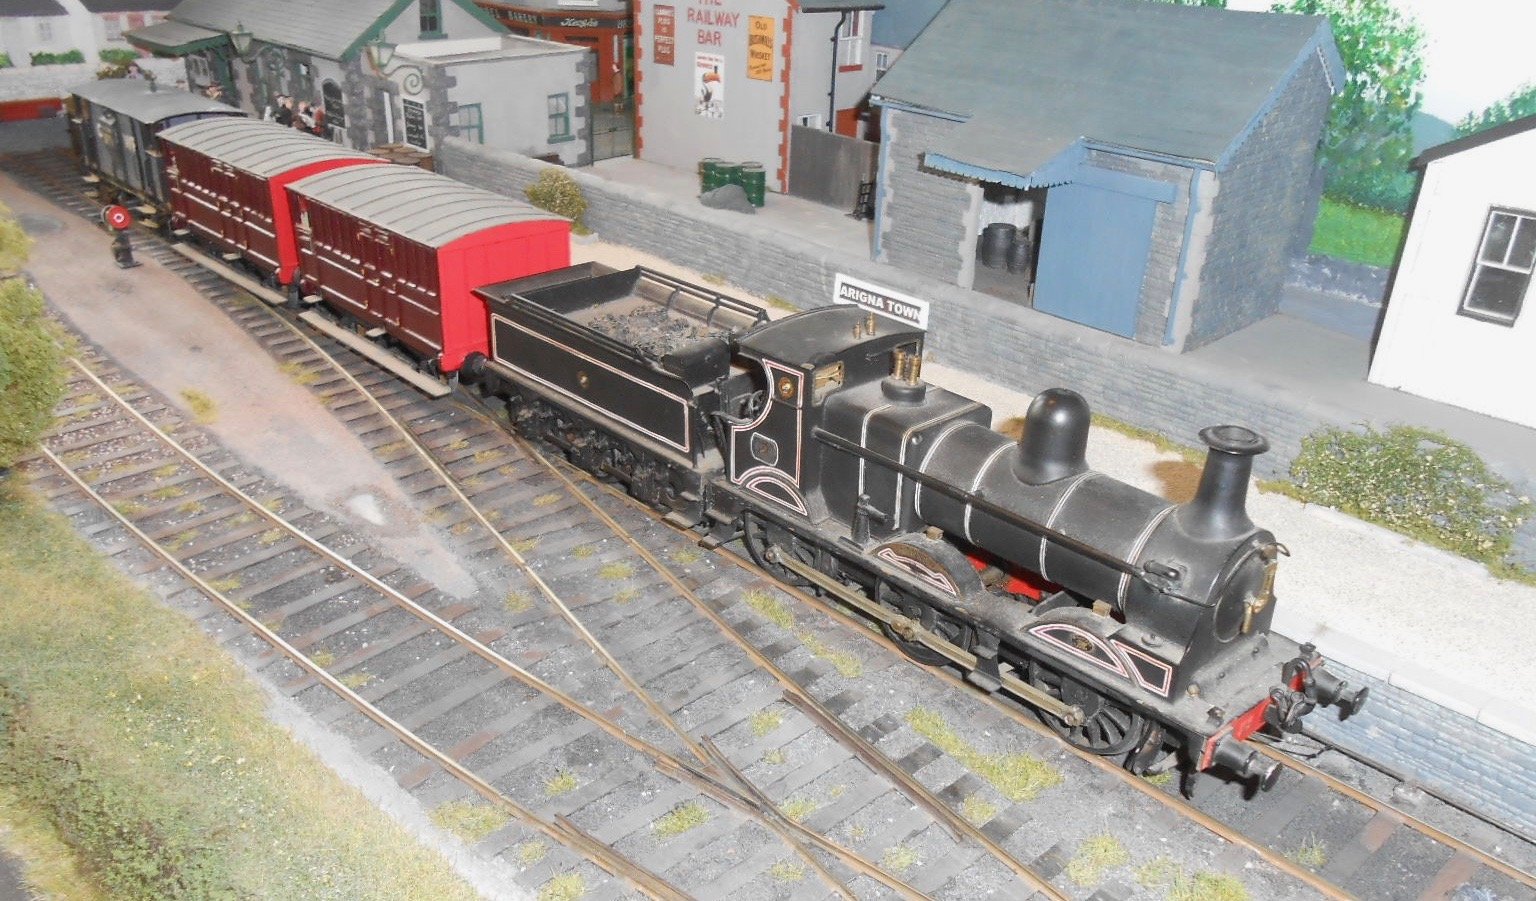
Indeed, Stephen - and while not cheap, not exorbitant either. I guess the small niche in which I model helped. Going back to Mayner's comments about Dave Walker's Killaney, turns out I actually had dinner with him a few years ago! I was talking to Gordon Gravett on the phone this afternoon and mentioned the layout & he reminded me that, at the St Alban's show, we'd had dinner one night at the hotel, with Dave, Andrew Burnham [editor of Continental Modeller] and Tony Wright and his wife. As you might assume, this was a very entertaining and convivial evening - one of the plus sides of exhibiting when you meet such knowledgable [and lovely] people. Given I was at St Albans with Arigna Town, am surprised Dave didn't mention his layout, though the conversation ranged far and wide, by no means limited to modelling either. More stuff on Shannon will be appearing in the Workbench section, though have included a picture of a likely train for exhibitions - Richard's wagons, plus my own SLNCR cattle wagon. This was actually second hand from the WL&W, so seems appropriate to include it in the consist.
-
Arigna Town - this week's scenery
David Holman replied to David Holman's topic in Irish Model Layouts
I must have just missed Killaney, as I joined the Chatham and District Model Railway club in 1986, taking part in the first Dockyard exhibition in 87 and only missing two shows since then. Certainly have no recollection of seeing the layout and clearly missed the chance to meet our Mayner before he headed off to the other side of the world! Shame on both counts. For my sins, I am now club chairman and very much involved in organising this year's exhibition on 2nd and 3rd of June. Having spent much of the morning going over Shannon and test running on Arigna Town, fingers crossed, she will be appearing at the show and hopefully also next weekend, 12/13 at Derby Roundhouse. More about Shannon soon, but she is certainly a tour de force - built in a very different way to how we tackle things today. -
Arigna Town - this week's scenery
David Holman replied to David Holman's topic in Irish Model Layouts
Royalty takes up residence at Arigna Following Richard Chown's death last year, his vast collection of models and layouts were made available for purchase. For those of you who don't know about Richard, he built Castle Rackrent in his bedsit in the early 1970s. It is 16' long and eventually was developed into a vast system around 200' long. Various stations have been sold off, including one which will be at Cultra this year and, I believe, then take up residence in the former barber's shop in Enniskillen. Given that I have often said in these pages that, apart from Richard, I seemed to be the only person around doing proper [36.75mm] broad gauge in 7mm scale, it was only right to put in a few bids for locos and stock. It was tempting to go for his model of Lissadell, which ran on Arigna Town at Manchester in December 2016 [when I was privileged to meet the great man], but already having two SLNCR 'Small Tanks', I didn't really need a third - even if it did come in early Sligo livery with a polished brass dome. Instead, I cast my lot for one of the original Castle Rackrent locos: Waterford, Limerick & Western 0-6-0, Shannon - and much to my delight my bid secured this historic model locomotive. Shannon is quite an old lady, appearing in Richard's article in the March 1975 Railway Modeller & have included one of Cyril Freezer's photos from this. She is therefore well over 40 years old and, according to the short article, was Richard's first ever scratch built engine. Given her age, she is in pretty good condition and seems to run well. Indeed, she was part of the regular Castle Rackrent running sessions up to June last year. The photos show her in 'as received' condition - more than a bit dusty and with paintwork a bit scuffed, but not bad for her age! It is going to be interesting to examine how the loco was built. First impressions are there seems to be a high quality motor [maybe and RG7?], plus what appears to be a speaker in the tender. Not sure if the loco is DCC though, it may be something like a Pacific Fast Mail analogue unit. If anyone out there knows, please tell me. Am hoping to include Shannon on the Arigna Town operating sequence. She fits on the turntable [just!] and came with three brake vans. All have Alex Jackson couplings, so it will be interesting to see if I can work these with the magnets I have for my Dingham auto couplings. Any info on the brake vans will also be welcome too, please. Will aim to report on my findings over the next few weeks, but what I would also be interested in is what folk think about possibly updating Shannon? I don't intend anything major to the bodywork, just a general clean up and maybe touch up the paintwork here & there, but there is a gaping space between the frames that is begging for working inside valve gear, as per my Sir Henry 0-6-4T. Is that something I should be doing, or should I respect this historic model's heritage and keep it as it is?
-
Never seen buildings made with drawers before, but hugely effective. Am now going through all the things one might keep in there!
-
Great stuff, JB. Always exciting starting a new project - may the force be with you.
-
Don't know if anyone out there is interested, but am taking Arigna Town to the Gauge 0 Guild Convention at Telford this year on 1st-2nd September. My usual operator is not available, so if you think you might like to help, send me a personal message. The Guild is not exactly generous with expenses, so you'll need to be fairly local [or intending to go anyway]. However you'll certainly get in free and lunch is also included. One or two people for each day. The layout is simple to operate [wire in tube points and signals], analogue control, but does use three link couplings. As I really only need spelling for lunch, plus a chance to look round, there will be every opportunity to enjoy the show. Here's hoping!
-
- 1
-

-
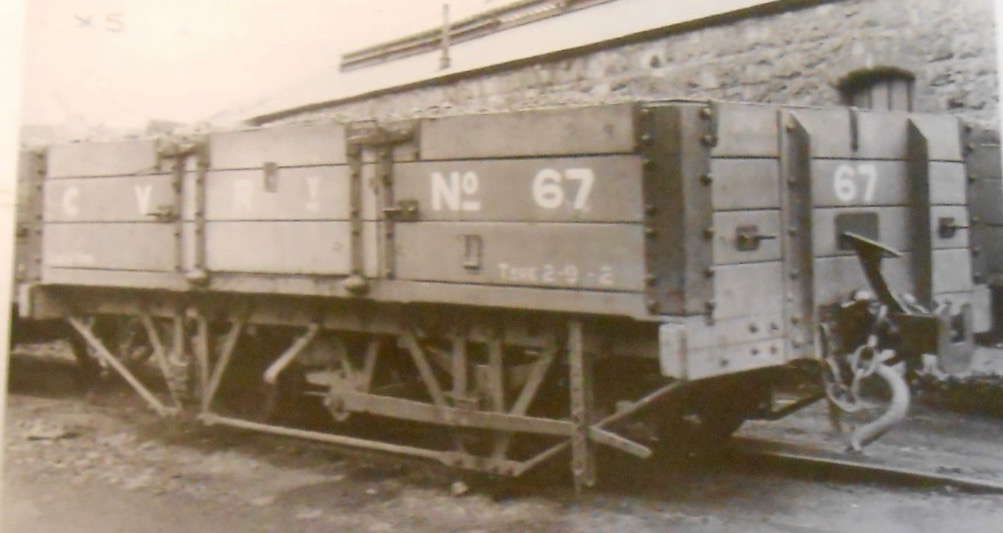
Interesting! The monochrome pictures certainly appear to show that the corner plates, side and top ironworks are something much darker, with the anglework on each end the same colour as the body. One would assume the ironwork would rust fairly consistently, so is it indeed dark rust, or black paint? The covered vans show darker colouring on the door hinges, but not so the convertible cattle vans. Vic Welch's painting on the cover of the original Patterson history shows dark grey underframes on the coaches, but the paintings on the later version suggest coaches were the same all over, as per much of the rest of Ireland. Artistic licence? As there appears to be no colour photos anywhere of the CVR, it seems we are reduced to conjecture. Maybe it is the dark rust that Martyn Welch describes? Gunmetal 53, Bauxite 133 and oily black (2000 series)? Either way, that nearest corner plate in the photo shows clear signs of texture, but is it peeling paint or rust? If it was a 16mm scale wagon, I might be more concerned, but as the model is only 10cm long and normal viewing distance is at least 60cm, perhaps I shouldn't worry. It would be nice to know though!
-
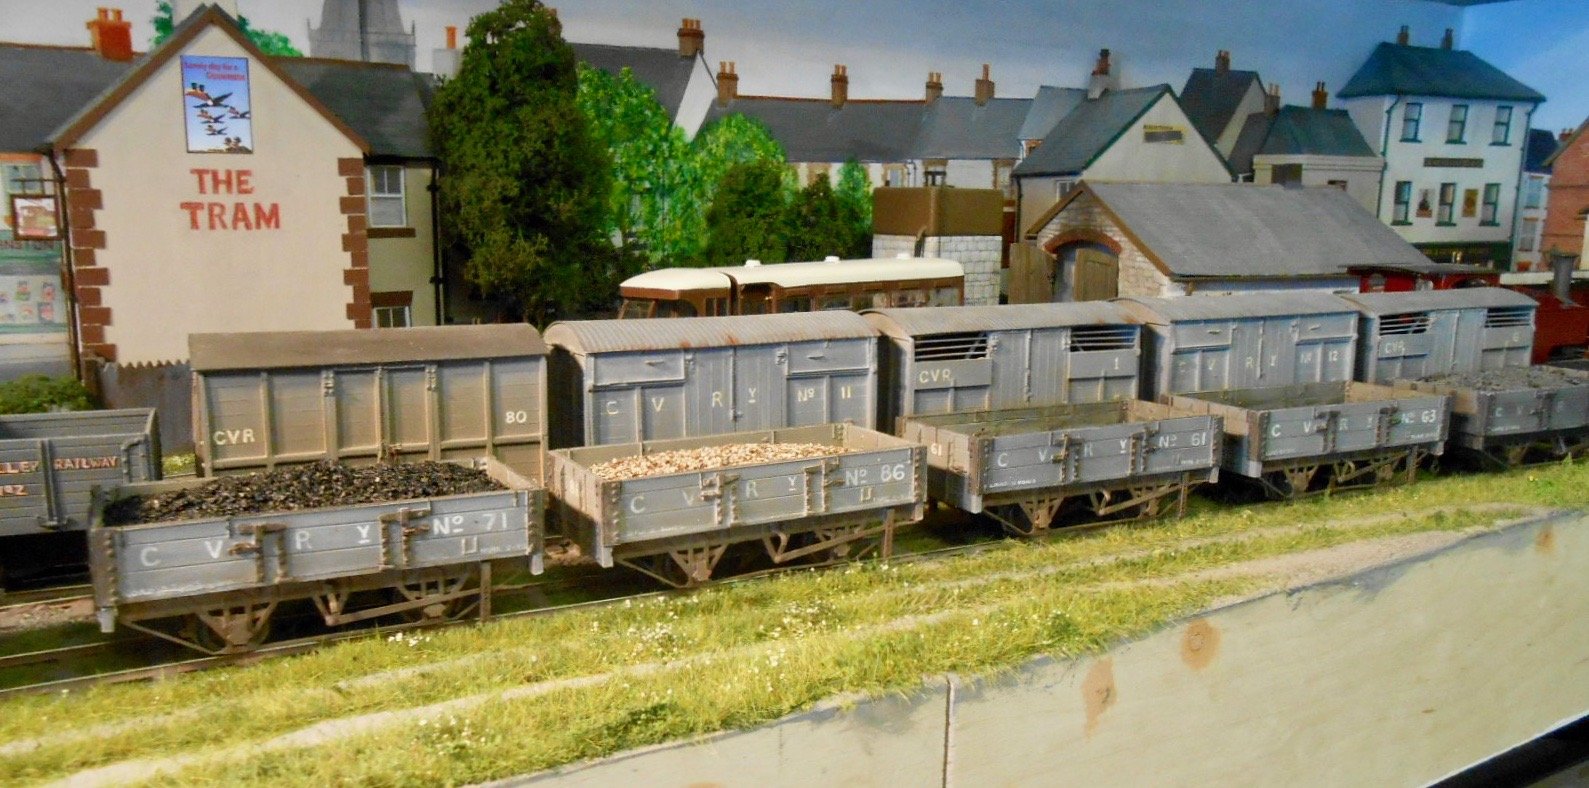
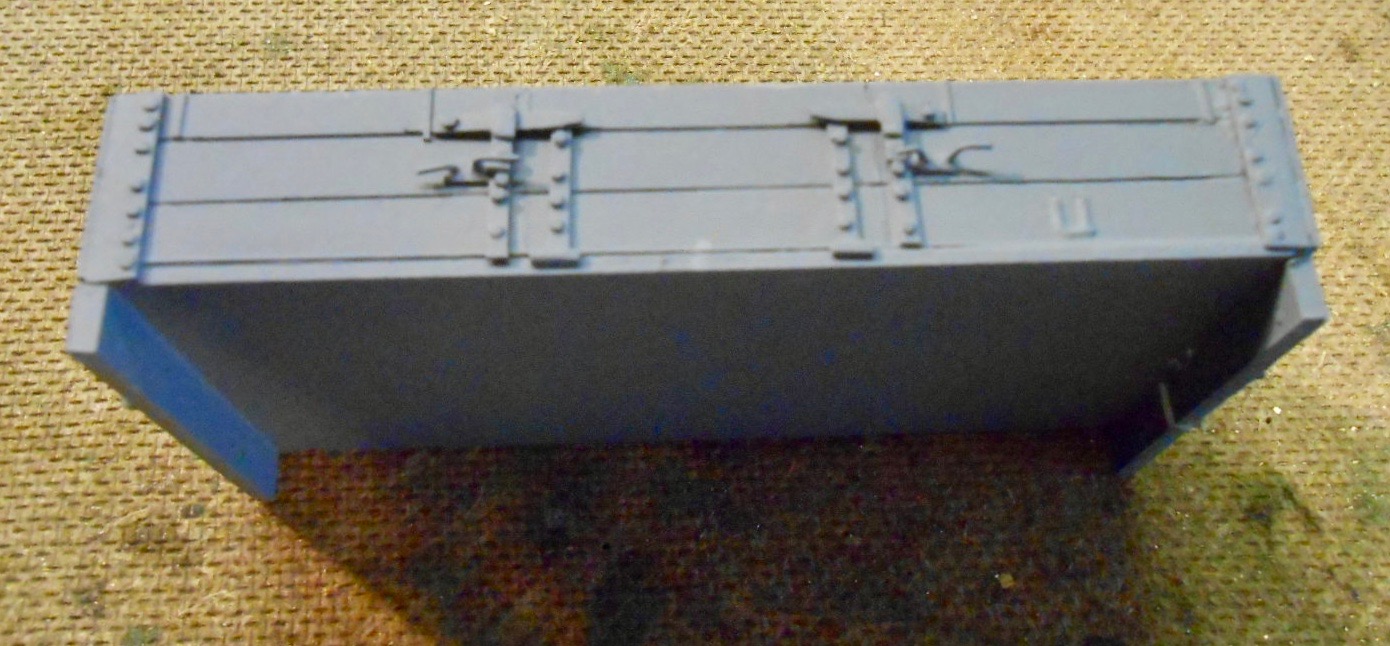
Back to the wagon works The next stage for Fintonagh will be to make sure everything runs as it should, so before that, there is a need to complete sufficient wagon stock. I've probably got enough vans for now, but the Clogher had a fair few open wagons, so these have become the focus of my attention. If I'm honest, it has not been much fun either - a trial of endurance, rather than a labour of love... At first thought, there's not much to making an open wagon - two ends, two sides and a floor - plus an etched chassis kit from Branchlines. Quick and easy, right? Wrong. Norman Johnston's revised version of E M Patterson's history of the CVR has some lovely photos of rolling stock, including a three quarter view of an open wagon which shows all manner of fine detail. Not just things like the strapping, but all sorts of rivet and bolt head detail, plus cleats for tarpaulin ropes, strapping along the tops of the sides and brackets to hold these in place. I considered doing a master for one side and end, to cast copies as per the vans. However, as I want several empty or lightly loaded opens, this meant interior detailing was required and I've yet to master that technique. I guess I could have cast sides and ends, then added an inner layer from plastic sheet, but that would have required an absolutely flat rear, plus the planks and bolt detail would have needed embossing on too. So, instead, I decided to apply the rivets and bolts individually and there are over 200 of the damned things on each wagon! No doubt anyone reading this is starting to question my sanity and I'm not sure I will disagree. I could have floated on squares of plastic strip, I could have riveted inner and our sides, then laminated them together, but in the end, I drilled a hole for each rivet and pushed a piece of 30 thou plastic rod into the hole, before trimming to size. I think it took about two hours to drill nearly 1000 0.75mm holes, then each wagon took an hour and a half to fit and trim the rivets. All in all, each wagon is made up of over 300 individual parts. Was it worth it? I'll tell you when they are finished. At the moment, the bodies have been sprayed with grey primer & the interiors painted as per Martyn Welch's book with a mixture of Humbrol 110 [natural wood], 64 [grey] and matt black. Ironwork looks to have been black on the prototype, with white lettering. The chassis is fairly regulation etched brass, though I've used Slater's 7mm scale wagon bearings instead of the 4mm versions suggested. I drill a 1mm hole in the bottom of each top hat bearing & the 'pinpoint' end of the axles goes in here. Because I'm using Kadee couplings and permanent magnet uncouplers, I've replaced the steel axles with ones made from 2mm brass rod. I cut it to approximate length, then put a pinpoint on each end by simply twirling it between my finger and thumb whilst pressing against a slitting disk in a Dremel. Crude, but effective. So, next time you pick up a simple wooden bodied open wagon, examine the fine detail that has been moulded in place and marvel at how cheap all that work is to buy.
-
Splendid! Love the way the railway sits firmly in the urban landscape. Such scenes are rare in British models and rarer still in the Irish scene, I'm guessing. Raised tracks, large, complex buildings are not easy, while the artistic skills involved in pulling them all together are considerable. Deserves a wider audience, so very much hope we will eventually see articles in one or more of the major magazines. Definitely one to watch.
-
Not my scene, but always good to see quality like this. Very classy.
-
Sounds good to me. Another key factor is to paint with the same sort of lighting you intend displaying under. Flourescent tubes are terrible at leaching out colour if you painted under incandescent bulbs. I have both in my workshop and with just the overhead flourescent on, colours are flat and lifeless. These days, I exhibit with LED lighting, but again, there are various tones. I use a combination of warm and cool white, which seems to work well as a bright cloudy day.