David Holman
-
Posts
4,359 -
Joined
-
Last visited
-
Days Won
117
Content Type
Profiles
Forums
Events
Gallery
Blogs
Everything posted by David Holman
-
May not be my thing, but the more you look, the more the details emerge. Nice one.
-
Would be the first to say it is not the answer to everything. Has its uses though. My own experiences improved exponentially when I got a 35 watt iron, 145 solder and flux! Now use a 100 watt iron for almost everything, so maybe worth another go? the other rule has to be cleanliness well before godliness. Too many rude words anyway, especially if you pick up the wrong end of the iron...
-
Looks good to me. Sure it wasn't your first attempt?
-
Martyn Welch waxes lyrical in the latest Model Railway Journal - weathering a RTR steel mineral using some of the latest powders and other techniques. Worth a read if you can get a copy.
-
Weaving cardboard strips would work well, especially as you only need things like cereal packets and a hot glue gun. Glue in verticals and then weave in horizontals. A covering of plaster, with some PVA [for flexibility] and poster paint [grey brown] means any chips do not show up white plaster.
-
Lovely stuff! Always really interesting to see how others make things.
-
7mm scale 101 - a tribute to Richard Chown
David Holman replied to David Holman's topic in Workbench
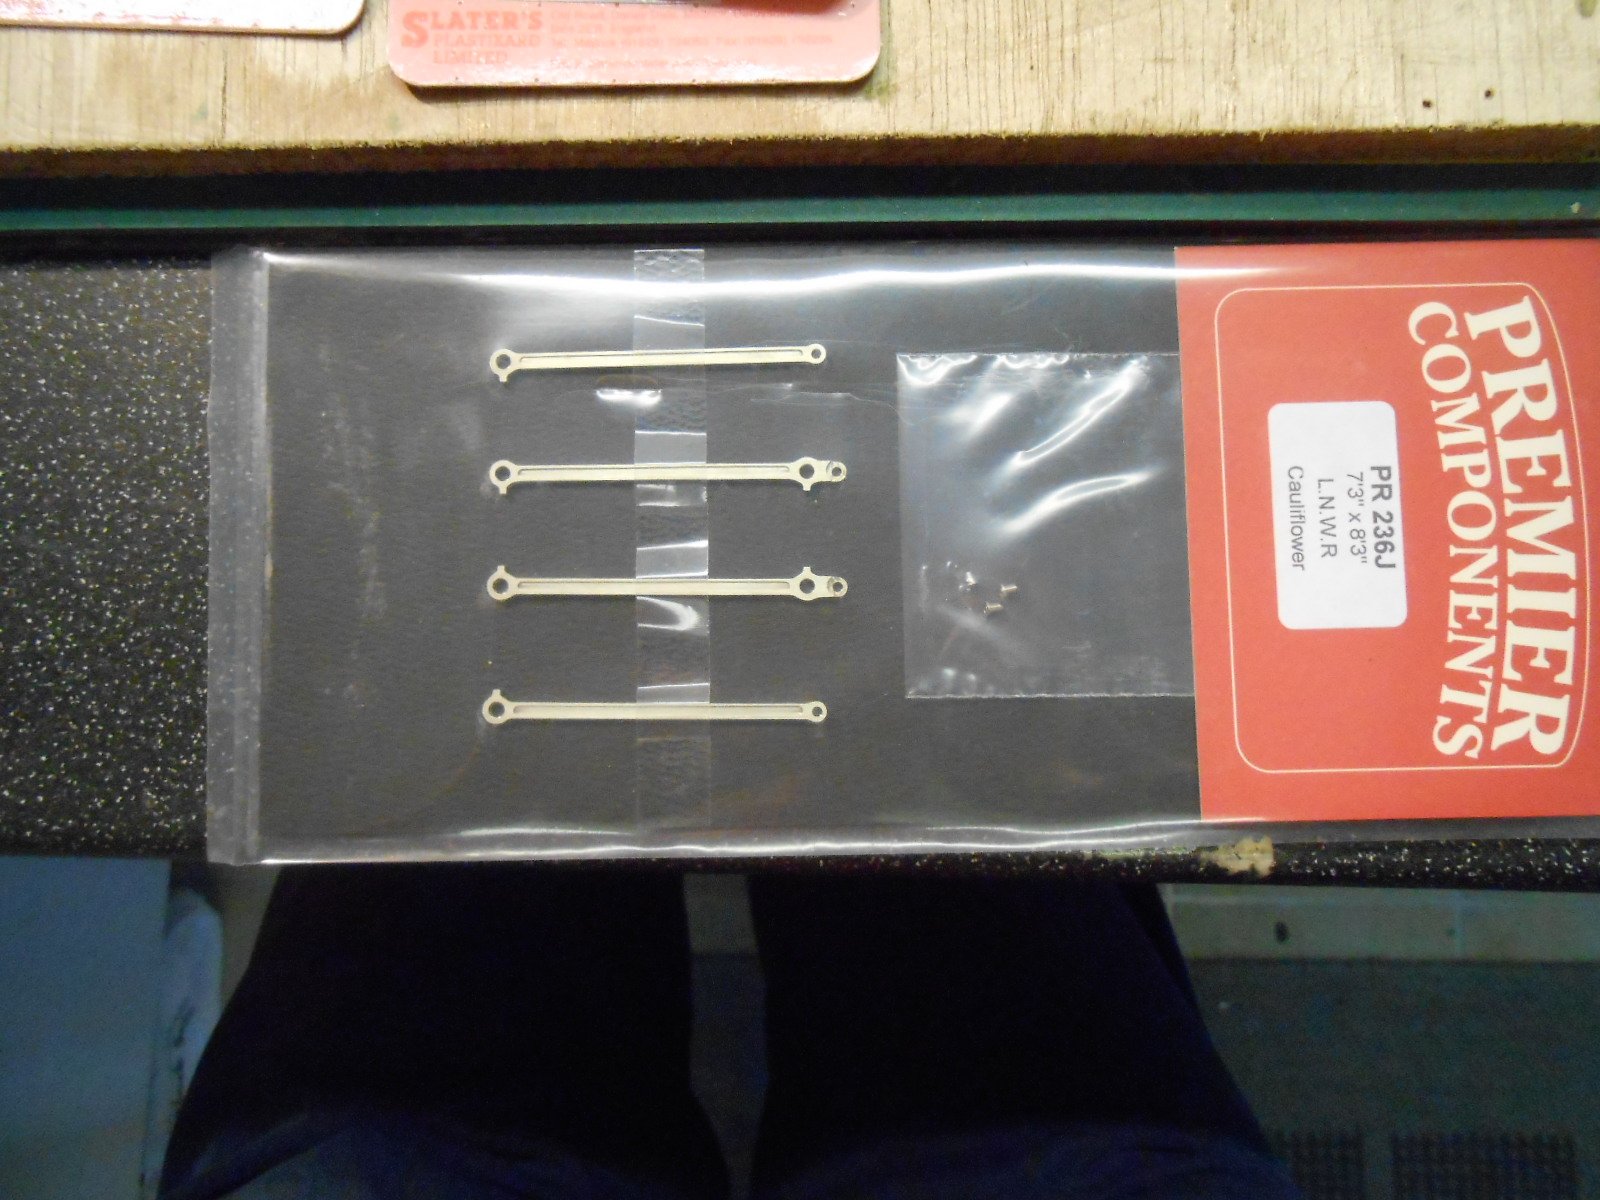
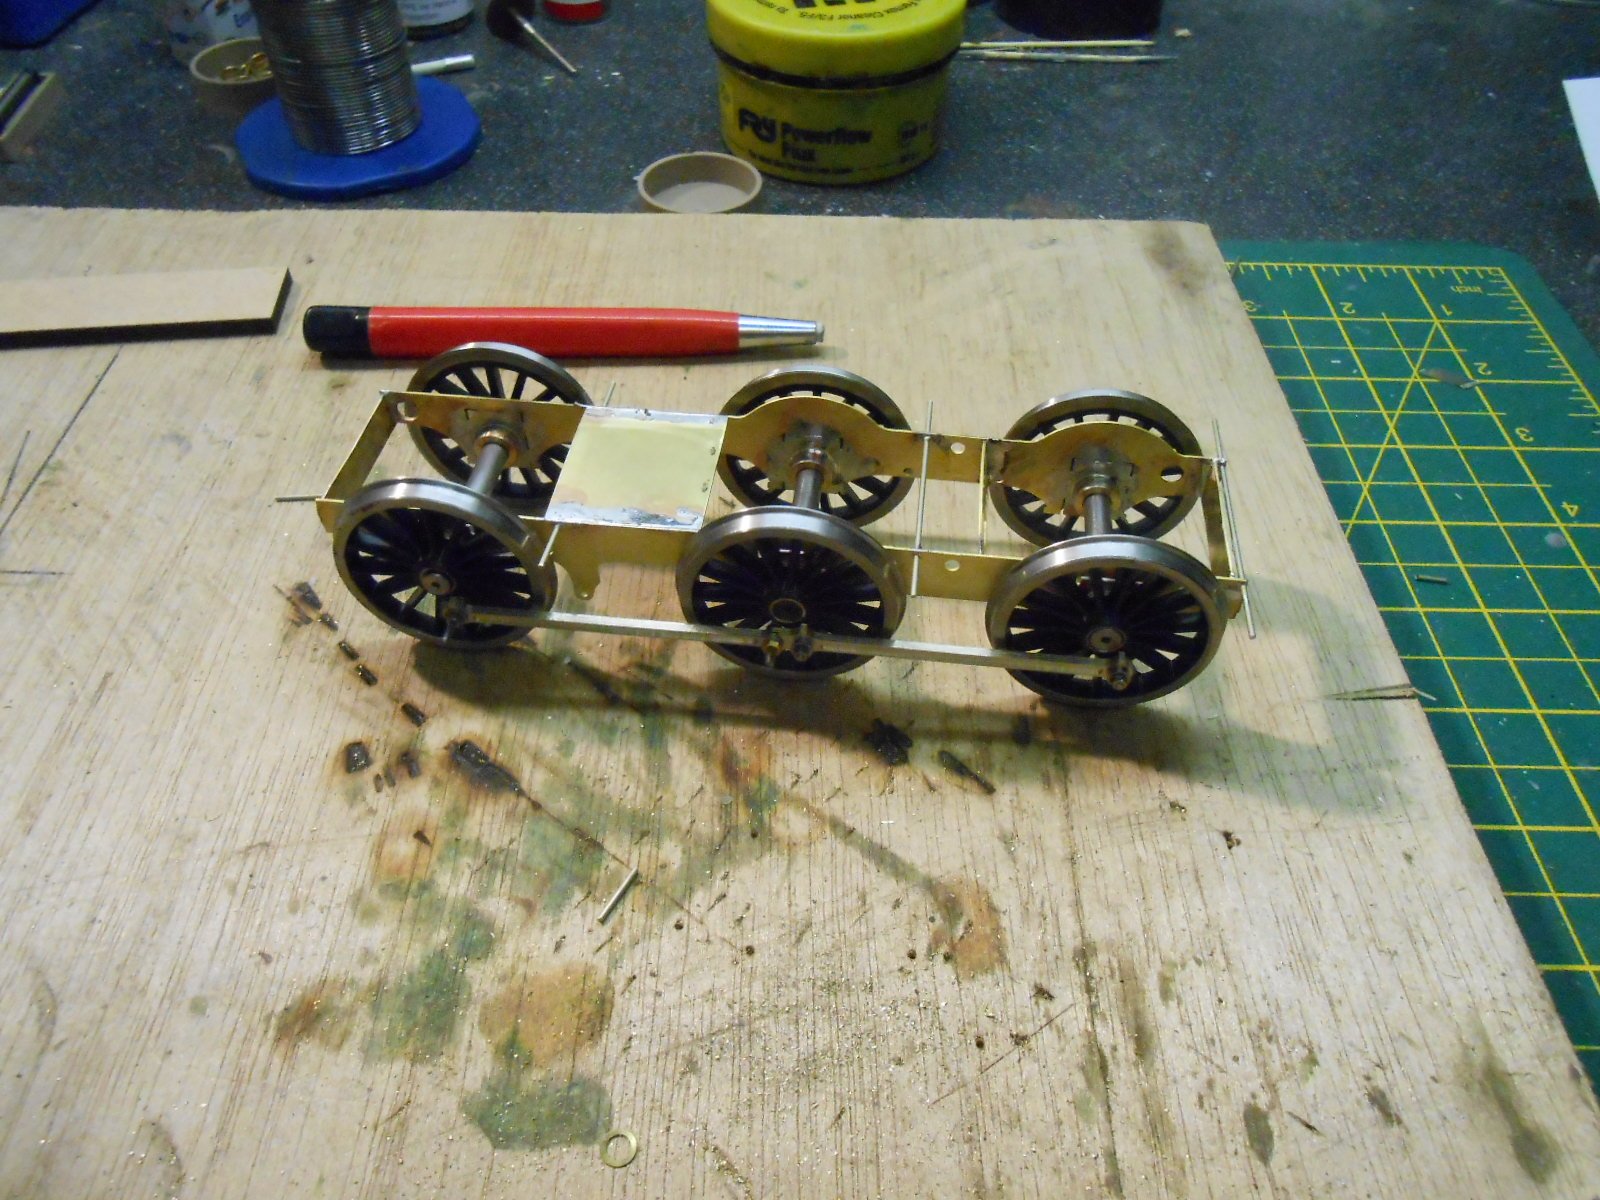
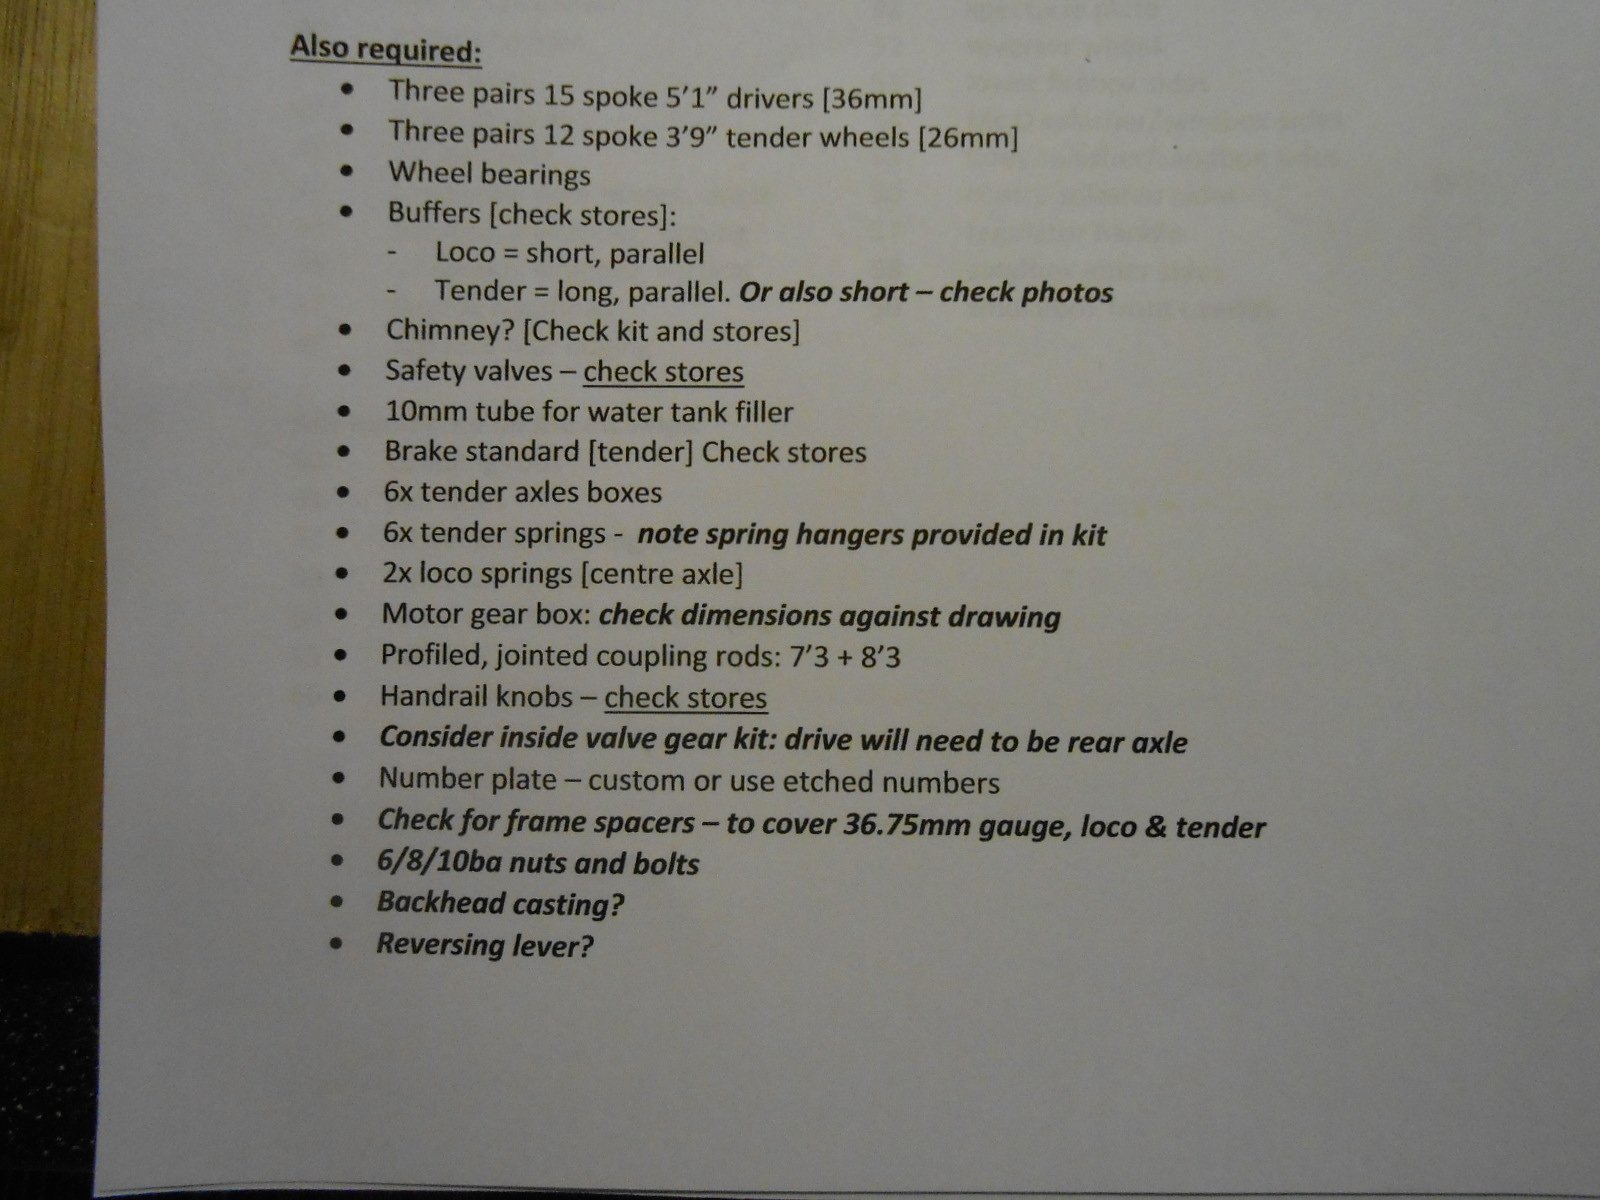
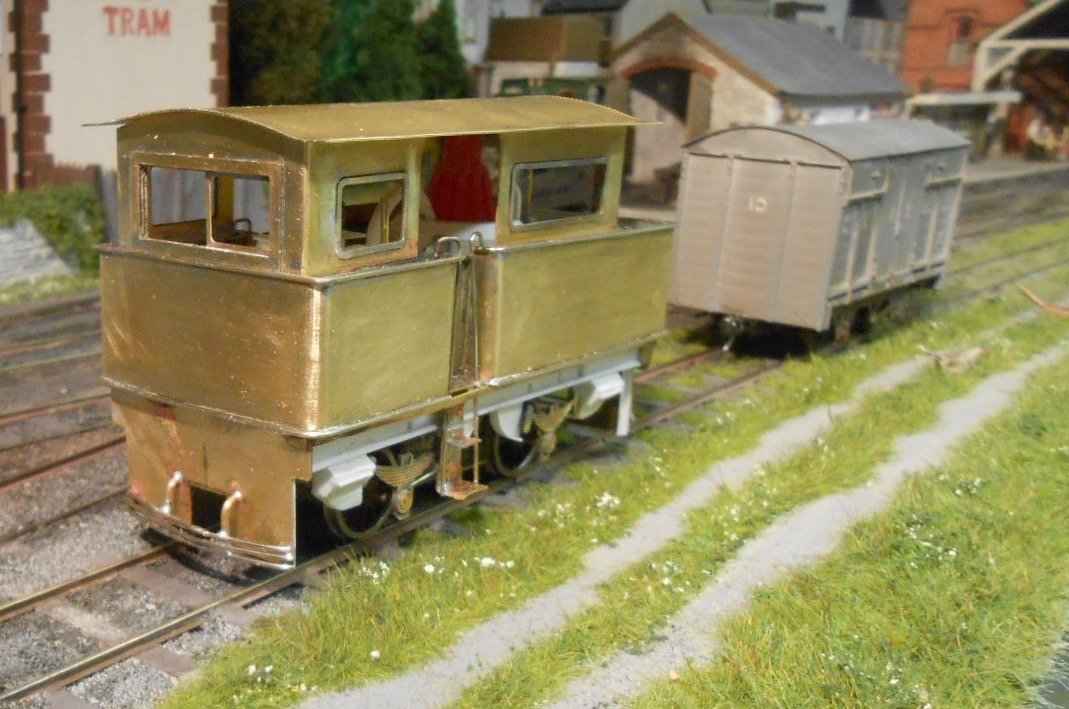
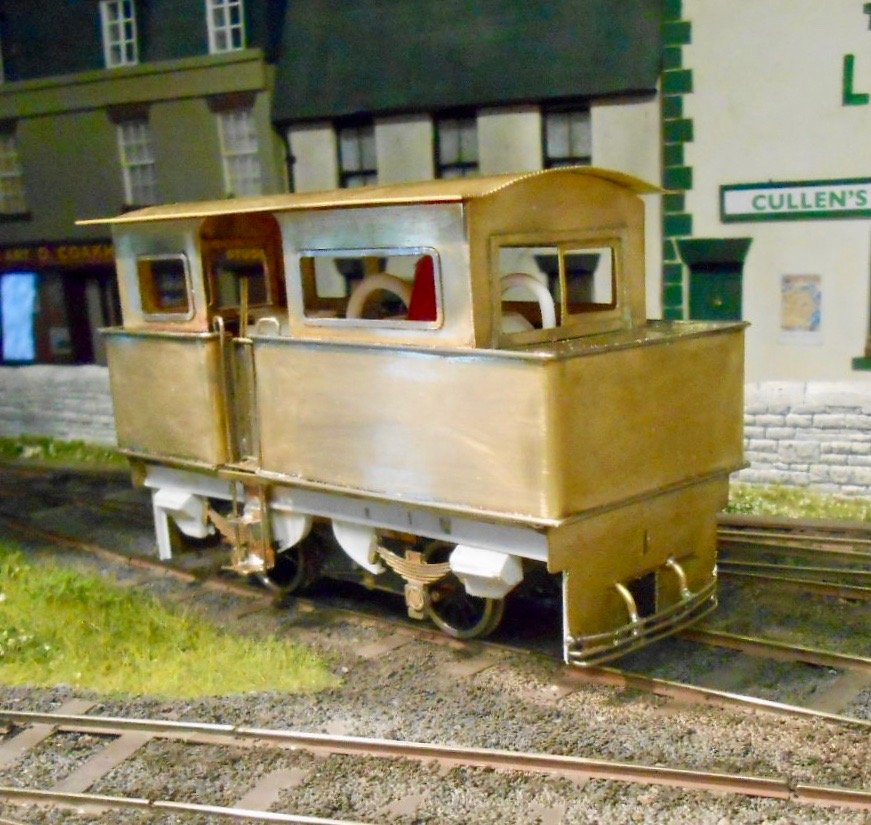
Shopping! So, I got my kit for £40, which is great, but as many of you will know, there is still a lot required to build the model. So, Reading 0 Gauge Trade Show yesterday, an event where it would be possible to spend well into five figures without even trying. A Lee Marsh loco, a rake of coaches, no problem... Well out of my league, but nevertheless, it gets quite expensive. First a visit to Premier Components, for a nice set of profile milled, jointed coupling rods, plus a Mashima motor and 40:1 gearbox. Seventy quid, just like that! A few stalls down and you come to Slaters. A pair of driving wheels is now £22 an axle, so with tender wheels and bearings as well, another £110 gone. Just as well I found a set of Slater's buffers on Roxy's stand, because at £12, they are a good £10 cheaper than the Markits versions. Yes, you read that right... Thankfully a bag of other castings [whitemetal] weren't so bad, but my £40 kit is now running well over £250, but still not bad in this scale. When you think that a Dapol Jinty costs less than £200 and wheels/motor/gears alone could easily make up more than half of that, recent RTR 7mm scale models look a bit of a bargain. You don't get the fun of building them though! Speaking of construction, I also bought a Poppy's Woodtech loco cradle. In laser cut MDF, the kit glues together in 5 minutes and has already proved its worth in holding the frames together while I soldered in home made [29mm] spacers. A photo shows that I already have a rolling chassis, though there is a small problem with the milled rods. In the past, I'm sure the joint was a rivet, but what's been supplied is a steel pin, that is actually too short to solder a washer on. Any thoughts out there?
-
Splendid - thanks John, helps make the instructions [same as in 4mm] come to life. This is really helpful.
-
7mm scale 101 - a tribute to Richard Chown
David Holman replied to David Holman's topic in Workbench
Love the overall/apron, especially the pouch for catching small items that get dropped. Must get myself one! What's the tap for though - recycling any spilled Guinness? -
7mm scale 101 - a tribute to Richard Chown
David Holman replied to David Holman's topic in Workbench
One would hope so, the compound interest over the last 20 years would be considerable. Nice little anecdote though! -
Over 2' X 1' in old money and bigger than anything on my 7mm scale layouts... One option is to make it low relief. You could even extend track through the building to a fiddle yard off scene, which would help improve capacity.
-
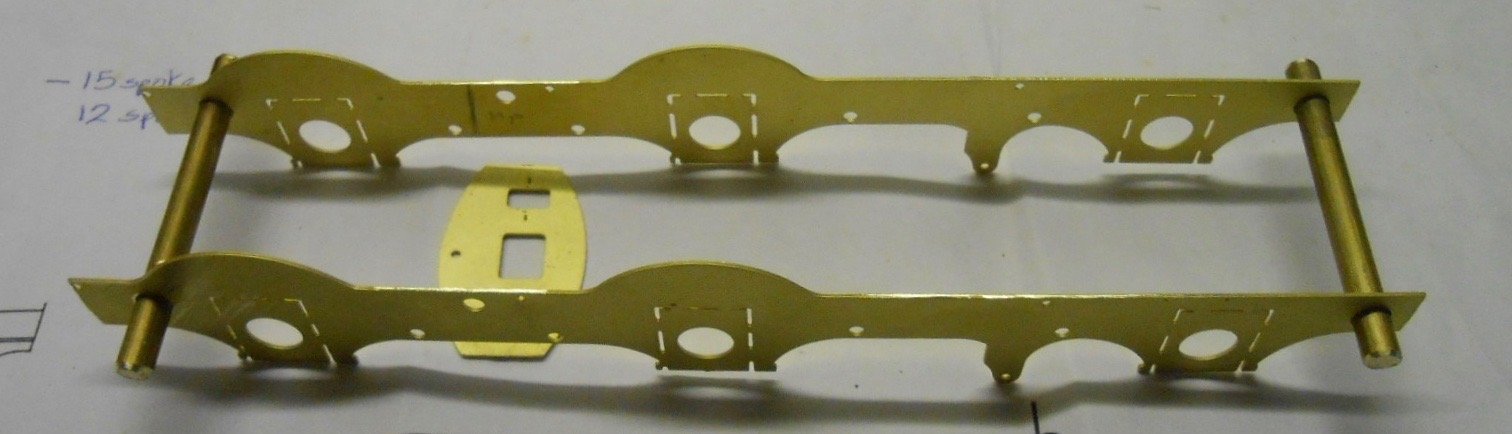
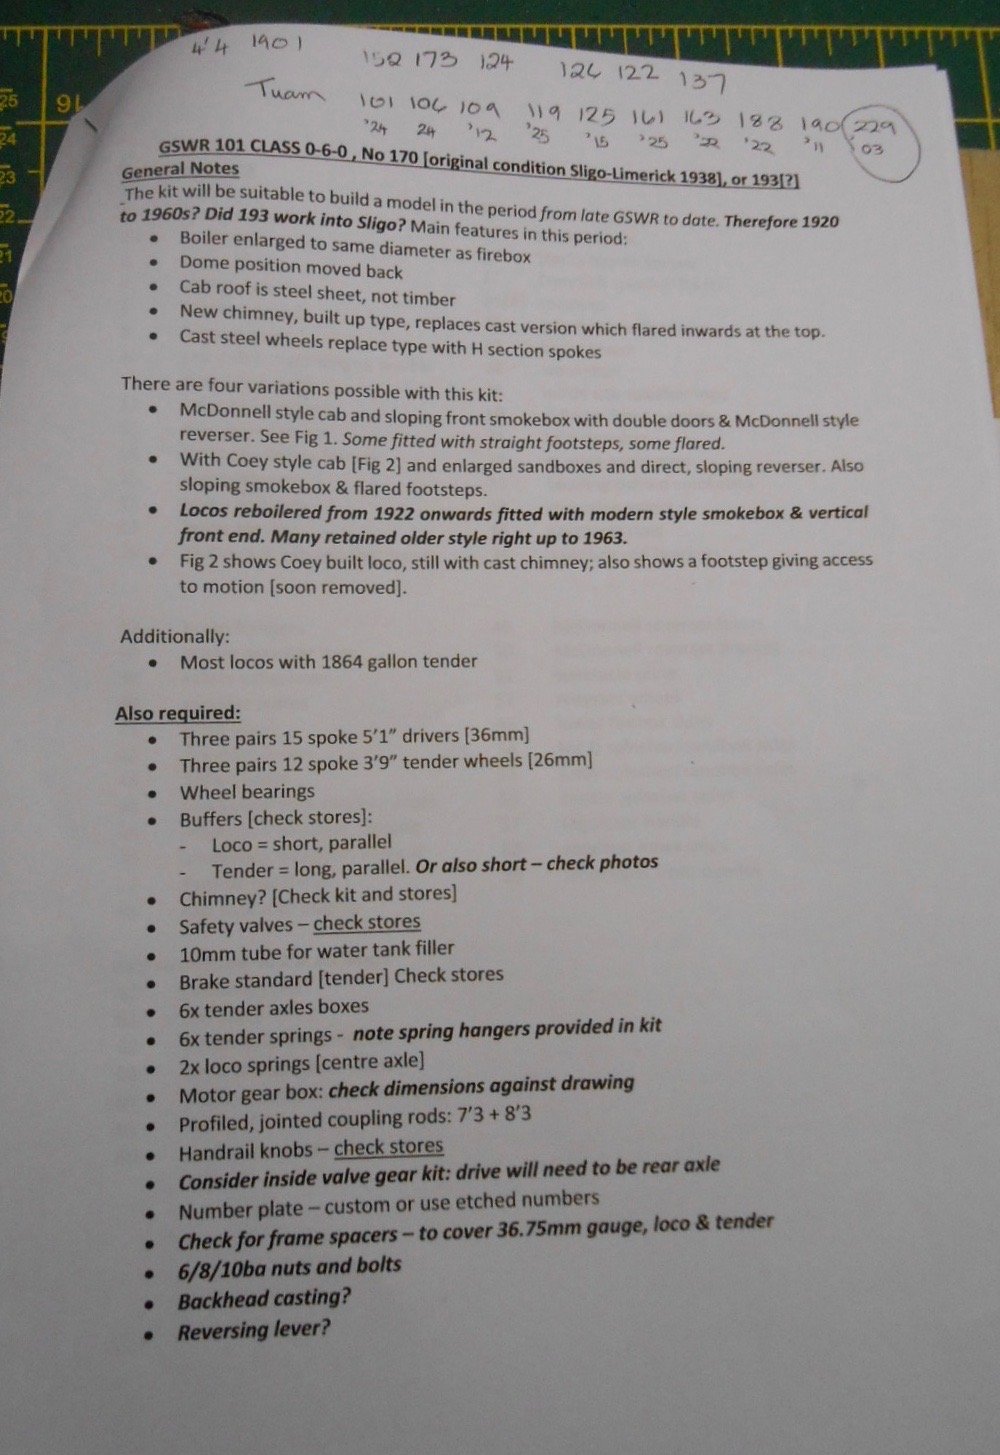
What, another J15? Well, yes - so sorry about that. A bit like buses, none for ages, then several come along at once. I must admit that a 101/J15 was not on my radar, as they never appeared on the SLNCR and my proposed branch to Arigna Town has been, thus far, a joint line with the MGW. However, acquiring Richard's 0-6-0 Shannon set me thinking. Arigna's fiddle yard is full, but what about back dating things, to do two distinct periods? At home, I can run what I like of course, but it is not unusual at shows to see layouts that will change, say, from steam to diesel - either half way through a day, or on separate days for a weekend show. Hence, when the chance came at Telford, back in September, to buy an unmade TDM kit of a 101/J15, it was an opportunity I wasn't going to refuse. The plan is to model trains around the turn of the century. Shannon was built in 1900/01 as is resplendent in WL&WR lined black. The GSWR took over the WLW in 1901, so my 101 will be in lined black livery and with the MGW also working into Sligo, the opportunity for all three companies' locos to appear alongside each other is far from impossible, though how that will eventually come about, you'll have to wait and see! Given that I've had the kit for a couple of months, why wait until now to start it - after all I'm not one to leave such things on the shelf? It all revolves around what was in the box, which included a letter from Terry McDermott [of TDM Models/Studio Scale] apologising to Richard for the delay in supplying the kit. The letter [see below] was dated 29th November 1998, so it seemed appropriate to make a start on the 20th anniversary of it being posted. I presume the kit was photo-etched and therefore is a blown up version of the ones currently being shared elsewhere on the Forum. Good news for me, because I have all that expertise to lean on - including the history of these locos, so many thanks to all concerned. It is interesting to ponder just why Richard never got round to building the kit and why it stayed unopened for 18 years, until his death in July 2016? Was he busy with one of his many other projects? I can't imagine a modeller as resourceful as him would have been put off by the need for extra components, so perhaps we will never know. Anyway, today I have made what is more of a token gesture in starting the kit, by cutting out the frames and using some 4mm brass rod as temporary spacers. Hopefully, after Saturday, I will have most of the key components I need to get started properly. Saturday is the Reading 0 Gauge Trade Show, a splendid gathering of major and minor traders, where I should get what I need. The kit doesn't actually contain any frame spacers. In the 4mm version, brass rod is used. I am planning to make my own from brass sheet and along with various brake rods, this should ensure a rather flimsy pair of frames become properly solid. I haven't decided yet whether to add springing - partly because none of my other locos have it, but also because I'm not yet sure about working inside valve gear. It would be nice [if expensive] to fit it, but I don't know if it can work on a set of sprung centre drivers. Am sure Lawrie Griffin will put me right on Saturday. You can see all the additional stuff I need in one of the photos. The kit is more at the Worsley end of things in that it is only etchings, but at least there is a good set of instructions and a 7mm scale drawing. That said, I have re-typed the instructions [8 pages!] in bullet point form. This can be a useful exercise anyway, as it gives you an insight into any extra required and gives an idea of how the model is intended to be built. Apart from things like chimney, dome, buffers, axle boxes etc, I'm hoping to treat myself to a set of profile milled coupling rods from Premier Components. These are a big improvement on sweating two or more layers of thin brass together, plus they also do a nice line in machined motor gearbox combinations. Just a matter of making sure one will fit! So, there we are. I'll report progress from time to time, so please feel free to comment, especially on anything which is not correct. This won't be one of Eoin's specials, but as long as I can create a good looking model, which reflects the prototype and also runs well, I'll be happy and hopefully if he is looking down on me, Richard will approve too!
-
Going back to Leslie's book, it appears that 229 may fit the bill - just! A Coey loco, built in 1903, it potentially fits the parameters of early lined black, 4'4 boiler etc. The kit contains the bits for the Coey cab etc, so fingers crossed. Have decided on the early livery, because, with Arigna's fiddle yard already full, I'm looking at backdating the project eventually. Now that I have Richard Chown's Shannon, something in the very early 20th century fits the bill. The GSWR took over the WLW in 1901, so with the SLNCR also working into Sligo, there is room for variety. Yes, I know other companies didn't work along the SLN line itself, but my Arigna branch was imagineered to be a joint line with the MGW and there are plans afoot to play around with itfurther still. So watch out for another J15 thread shortly!
-
Fantastic stuff! Many thanks, everyone. Ideas are forming now, of which more later.
-
Thanks chaps. Much appreciated. Seems I am either building something from the early 20th century, in black, clean and maybe lined, or something else old and dirty in the 50s. The former could run alongside my WLW 0-6-0, Shannon. The latter with my 1950s SLNCR and MGW stock. The list in the 101 book shows the earliest with 4'4 boilers were 152 (1901, survived in this form to 1959); 173 (1902-1933); 124 (1901 to Z in 1938); 126 (1901 to Z in 1938); 122 (1901 to Z in 1942); 137 (1902 to Z in 1931). Hence seems like 152 is the only loco that could have run alongside Shannon in its WLW livery and also survived in 4'4 form to the 50s. IF it retained the sloping smokebox, AND ran to Sligo occasionally, it would be almost perfect! However, clean black (no lining) v dirty grey black might be a problem, methinks...
-
Here's a challenge for you. Am due to start the 7mm scale TDM J15 kit, I bought from the Richard Chown estate. Trouble is, which one and what period? Realise the answer may be difficult, but the parameters are as follows: 1. I rather like the sloping front/double smokebox doors. 2. The 4'4" boiler is my preferred type, certainly not the Z, Belpair, extended smokebox types 3. In livery terms, battleship grey is a complete no! Therefore, plain black, or could be persuaded to do lining at a push. Dirt, weathering not a problem. 4. Period therefore seems either pre 1919, or much later, with a covering of grime. 5. A view of the cab, especially the blackhead, would be very useful. 6. Ideally, a loco known to work the Burmah Road to Sligo, fitting all the above, would be perfect!!! So, not much then and am prepared to face up to the fact that not all the above can be met. So far, I have the Steaming in Three Centuries book, plus the GSR locos tome. My WL&W history shows a picture of 170 in 1938 entering Limerick, with a train from Sligo and it has the right smokebox. The table in the 101 book shows it got a Z boiler in 1941 though. Meanwhile in that book is a picture of 121 at Sligo in 1955, which covers most aspects, but has the later smokebox door... So, you can see my problems! Any thought welcome. Thanking you all, in anticipation...
-
Didn't seem too bad. The aisles were mostly fairly wide, though there were obviously pinch points at the most popular layouts and traders. Forgot to say that the most heard comment at Arigna was how did I make my washing line work? A sheet and two pillow cases were blowing nicely because the was a continuous draft, both from the ventilation system and because the outside doors nearby were regularly opened to let in disabled visitors. Managed to convince one or two that the washing was DCC controlled... Another nice moment was when I looked up to see a young man running his hands over my stock in the fiddle yard. After a moment's panic, realised he was blind, or very nearly, so normal services suspended so we could have a chat and let him explore further.
-
Confessions of a Warley Virgin It was quite an adventure and, it must be said, pretty arduous. Andy's company most welcome and Courtmacsherry, already impressive, is going to be quite something. For the exhibitor, each day at Warley starts early. Paying customers can arrive at 9.15, so layouts have to be ready for 9am and Saturday goes on until 6pm. Nine hours exhibiting and talking! Plus another eight on Sunday... Warley club looks after us well though - big breakfast and proper cooked lunch, with helpful stewards too. The NEC staff are mostly good, though the same cannot be said for parking and traffic management, where Sunday after the show was complete and unnecessary chaos. Barrowing and carrying the layout and stock across a busy main road is just not acceptable and could easily be avoided. The perils of attending the largest show in the country, I suppose - especially as there were other big events going on at the same time. Equally, our little Irish corner was kept entertained by Leslie and Richard Aka the syndicate from IRRS. Two excellent books too, one from the man himself on the 101s ( hopefully meaning I will get my kit build correctly) and a splendid big tome of GSR locos, that has been put aside for Christmas. Elsewhere (not that there was a huge amount of time to look round), Liverpool Lime Street was certainly impressive, though that sort of modelling is not for me. The full size locos were splendid and the big, large scale layouts especially so. The Model Railway Challenge Layouts? Alright, I suppose, though they did indeed look like they had been hastily thrown together over a weekend. The Accuscale stand showed rather more finness, as you might image. They really do deserve to do well. Overall then, a memorable experience. It is all the lovely people you meet that made it worthwhile. However, the days are VERY long and I was very grateful that Warley let me stay an extra night, so I didn't have to do a four hour drive on Sunday evening. Still knackered when I got home this lunchtime though!
-
Same here, Leslie. To my shame had not at first realised IRRS had a stand there until I read you post and realised you were just behind. Seriously good planning, or what? If you find the time, you are more than welcome to come and play. Will be adding to the already long wish list - and this is on top of the Reading O Gauge trade show the week after - so am definitely looking forward to seeing what is on offer.
-
A lot of complex shapes in there!
-
Fascinating, not least because I am currently researching it's big sibling in 7mm scale - an unmade TDM kit from the Richard Chown estate. The instructions appear to be the same for the 4mm version and my first job will be to type them out in bullet point format, so they are easier to read. No castings, so just as well the Reading 0 gauge trade show is coming up soon. Even in 7mm scale the frame cut outs for compensated/sprung bearings leave previous little metal left over, so the advice here seems very good. Certainly hope that my model turns out as well as these beauties! Am hoping 193 has the sloping smokebox? One less casting to buy, while presume it was also a loco that worked up to Sligo.?
-
Splendid, as ever!
-
More work, and some rebuilding, for the tractor. If nothing else, the previous photos have showed that I was not born with a silver soldering iron in my hands! Ok, so the photos on a laptop screen make the model at least twice as big as it is, but some of that work looked decidedly scruffy. Some elements were plain wrong too. Not entirely my fault, although as ever, the old adage of measure twice, cut once, applies. However, photos do help with 'proof reading' and highlighted a couple of problems with the model, apart from the scruffy soldering. Firstly, one of the upper sides, with a longer window, wasn't level, so some tweaking [using the RSU to melt the solder joint] was required. Not too bad as it turned out, but more of a problem was how wrong the under frame looked. The problem boiled down to using Worsley etches for the spring/axlebox mounts. Checking with photo's and Roger's drawing showed they are too deep and too short. So, off they came, with new ones made up plasticard as before. This closed the gap between the mounts and made the whole under frame look/sit better. The awkwardly shaped sand boxes came next [plasticard], after which some basic brake gear was added. Unfortunately, the cast chassis is rather obvious but, along with the missing chain drive, I am going to have to live with that - at least for now. The fenders had been causing many a furrowed brow, so what I've added is more of an impression that anything accurate. It would be a major micro engineering job to fabricate them as per prototype. Look at the B&W photo to see what I mean. I've also had to make cut outs for the Kadee couplings. This morning, had a go at the interior. The windows are big enough for there to require an impression of the boiler, cylinders, controls and piping. These have been cobbled together from odds and ends. Lacking any precise detail, I've simply gone with a general impression and once the roof is on, hopefully this will be ok. Other work has included adding pick ups [phosphor bronze wire] and connecting up the motor. Test running shows that with my Gaugemaster hand held controller, running is slow and smooth enough for the shunting duties the model will be required to do. A bit more cleaning up, then apart from the lights, it will be off to the paint shop, about which not much to say, as it was grey. Am thinking of naming it 'Fintonagh'. The original never had name or number, so if it had survived to work my station, then that makes the name appropriate. The roof is not fixed yet, plus there is the chimney and water tank filler to add too.
-
Flier accompanying New Irish Lines suggests it is going to be rather good.
-
Now there's a thought. However, it would have to be perspective modelling as we are both wedded to different scales.