David Holman
-
Posts
4,359 -
Joined
-
Last visited
-
Days Won
117
Content Type
Profiles
Forums
Events
Gallery
Blogs
Everything posted by David Holman
-
What an extraordinary edifice that is. Must be one of the larger/est 4mm scale buildings made in recent times. And the ideal view blocker at the end of a scenic section too
-
Nice work, Ernie. Reminds me of stuff I did in much the same way and nicely illustrates what can be so enjoyable about doing 7mm NG.
-
EM/OO Fine standards applied to Irish 5'3" gauge track.
David Holman replied to Mayner's topic in Irish Models
Andy Cundick has been doing this on Valencia Harbour and latterly Courtmacsherry for years. Have had the pleasure of operating Valencia and the system works perfectly well. A pleasure to operate. Meanwhile, my own Fintonagh does exactly the same, albeit 7mm scale, but to 21mm gauge for 3' gauge. I've used 1mm flangeways on 900mm radius points, with 19- 19.5mm back to backs. What I have found is that, using 4mm finescale wagon wheels on code 83 flat bottomed rail is that there is a lot less margin for error than on Arigna Town, where Slater's 7mm scale wheels work really well on code 100 FB track. Derailments are virtually unknown, even though the gauge varies by up to +/- .5mm. This with a back to back on loco axles that Slater's quote as 33.98mm! On Fintonagh, tolerances are much tighter (using EM standards, as outlined by Mayner), so back to backs cannot be out more than 0.5mm max, or derailments occur on point crossings (frogs). However, apart from a degree of fettling to ensure tolerances are kept within these limits, all works well. The moral of the story, as Andy will tell you, is that 21mm gauge does NOT require P4 standards. EM/4mm finescale is fine! You still need to lay track carefully, but otherwise, it is no harder that doing 00. Whether your models are capable of running with wheels at 19mm back to backs is another matter, but 21mm gauge (or indeed 36.75mm in 7mm scale) looks so much better and if that appeals, this is so worth pursuing. -
Very good advice above! The world is full of half made kits started by enthusiastic but inexperienced modellers and Worsley Works stuff are not an easy job. In fact, they are really just an aid to scratch building, saving you having to cut out the major body parts from sheet metal and in that respect they work well. However, Eoin's list shows just how much more you need to source, while the fact that there are no instructions means you need to know a lot about the prototype to put the model together. A decent outline drawing and lots of photos essential here. As the others have said, try something simpler and build up from there. Wagon kits always good as in many ways, coach kits can be harder than locos, because of all the fine detail.
-
While knowing nothing of the models in question, there are a number of basic factors which can help improve the running of any loco. 1. Cleaning and oiling. Shouldn't be a problem on a new model, but stray paint might have got on the wheel treads. Arigna Town locos are cleaned before and during every show. 2. Pick ups. Are they in contact with the wheels? If not, a bit of gentle tweaking should help. Test by inverting the loco and putting fly leads (I use crocodile clips from my ancient H&M controller) on different pairs of wheels to find the culprit. Pick ups can also be too tight and limit running. Check to see if the motor is getting warm. 3. Add more pick ups! Spread the load over as many wheels and as much length as possible 4. Weight and balance. 4-4-0s can be a problem. Certainly need weight over the driven wheels, but front bogie probably needs springing too. Weight in the tender bearing down on the drawbar to the loco (and hence the drivers) can help. 5. Wheels. Check the back to backs, should be the same. Is there any sign of wobble? Are crank pins ok? If the loco stops, at low speed, at the same point (eg 3 o'clock), quartering may be the problem, or the crank pin holes may need opening out a little. The above are the common ones when kit building, but take nothing for granted. Having run ok for several days of testing, one of Fintonaghs's locos became rough. Turned out a wheel nut had worked loose. On another occasion, a lump of foam from the scenery had somehow got into the mechanism! Sod's Law applies at all times!
-
Not just a maker of fine buildings then. Not surprised! Evergreen strip has got very expensive of late - about 50p per piece/£5.00 a pack. Potentially cheaper to buy laser cut windows than make them yourself in 7mm scale. Trouble is, you can't always get what you want, as Sir Michael once sang.
-
Arigna Town - this week's scenery
David Holman replied to David Holman's topic in Irish Model Layouts
Thanks chaps! Next outing in a couple of weeks at Fareham, then High Wycombe and Warley in November. Warley probably it's last show for a while as new layout, Fintonagh, makes its debut at Uckfield in October. Can I'll afford to have two layouts doing the rounds and Mrs H would not be pleased either! -
Most of my stuff is with enamels, but if you have one, the airbrush method is best. Quicker and doesn't ruin your brushes
-
As above, but with Humbrol 53, gunmetal as well. Study photos, as rails vary according to location: oily where locos stop (and on fishplates), more rusty (because of brake dust) where trains slow and stop, darker in sidings etc. I do much of the above with weathering powders. If you can get it, a spray can of track colour (Humbrol or Precision), makes painting sleepers easier. Weathering powders and/or airbrush good for local colour as for rails. Colourpoint books great for fine track details.
-
That chimney was a bit of a give away! Glad I'm not the only one... Great to see things running.
-
All looks good to me. One piece of advice I was given in my early days of modelling was to always buy the best tools I could afford - something I'm afraid I haven't always kept to! Where I have been lucky is in acquiring old tools from modellers who have given up the hobby. My current favourite is a gauge for measuring thickness of wire, metal sheet etc. Dimensions are read from a clock like dial and it measures down to 0.1mm. Not sure how I ever managed without it.
-
Interesting. Many thanks chaps.
-
On both Fintonagh and Arigna Town, I've long fancied having a push button diesel horn & steam whistle, just to add the extra dimension of calling the signalman to change the points for running round. Seems nobody does one, unless it involves DCC sound chips and I do not want to go along that route. Mylocosound used to do something, but were expensive and seem no longer available. Maplins once did a rather cheap and nasty sound kit, but they have gone to the wall too. Any ideas?
-
Only the sixth floor?! Thank goodness I only have room for three! Splendid, as ever.
-
Been there, got a drawer full of T-shirts! A pain, but necessary for future enjoyment. Sounds like it's going well though.
-
Fairly sure there is no 21mm rtr out there DC. Be good if it was! Worth giving Marcway a call (advert in Railway Modeller). They do custom track in all gauges and at reasonable prices. Points will be 30-50% more than Peco, but if you made plain track yourself, it could balance out. I've been very impressed with their service.
-
Presume the point motors have their own internal switches for directing track current? Peco points have always been poor at directing current, even O gauge ones, so the extra shove from the motor will no doubt help keep blades in contact with the stock rails. Always good to have a couple of spare motors, as they will go wrong - they can lead a hard life! Nice story in the Gauge 0 Guild manuals. They made test machines to check the capacity of various motors. Most were pretty good, even the cheap ones, but the Tortoise motor actually wore out the test rig! That is not to say they are perfect though, internal contacts can get dirty and fail, while they are expensive too and need about 10cm vertical space below the baseboards. Stick with what you have, then when you start your next layout in a few years, you will know from experience if any changes are needed. Who know, everything could be holographic by then!
-
Enjoy some running to check, check and check again that all is ok and have some enjoyment after all the hard work. Suggest painting the sleepers and rails before ballasting, though it will all need going over after ballasting as well. On Fintonagh, have spent the last week fettling and still not completely right. Wheel back to backs v point clearances always a potential problem with handbuilt stock and track. Then just when you think everything is sorted, a loose wheel nut causes problems. Another problem can be when stock gets turned round and doesn't always run as well in the other direction! So extensive testing before ballasting always a good idea, but don't expect it to work perfectly afterwards, there are always a few stray grains around to gum up points and details stock! Life is complicated, which is why it's fun. Allegedly!
-
So, when and where can we hope to see this opus?
-
Scenic modelling at its very best.
-
Stunning locomotives and stock on the layout.
-
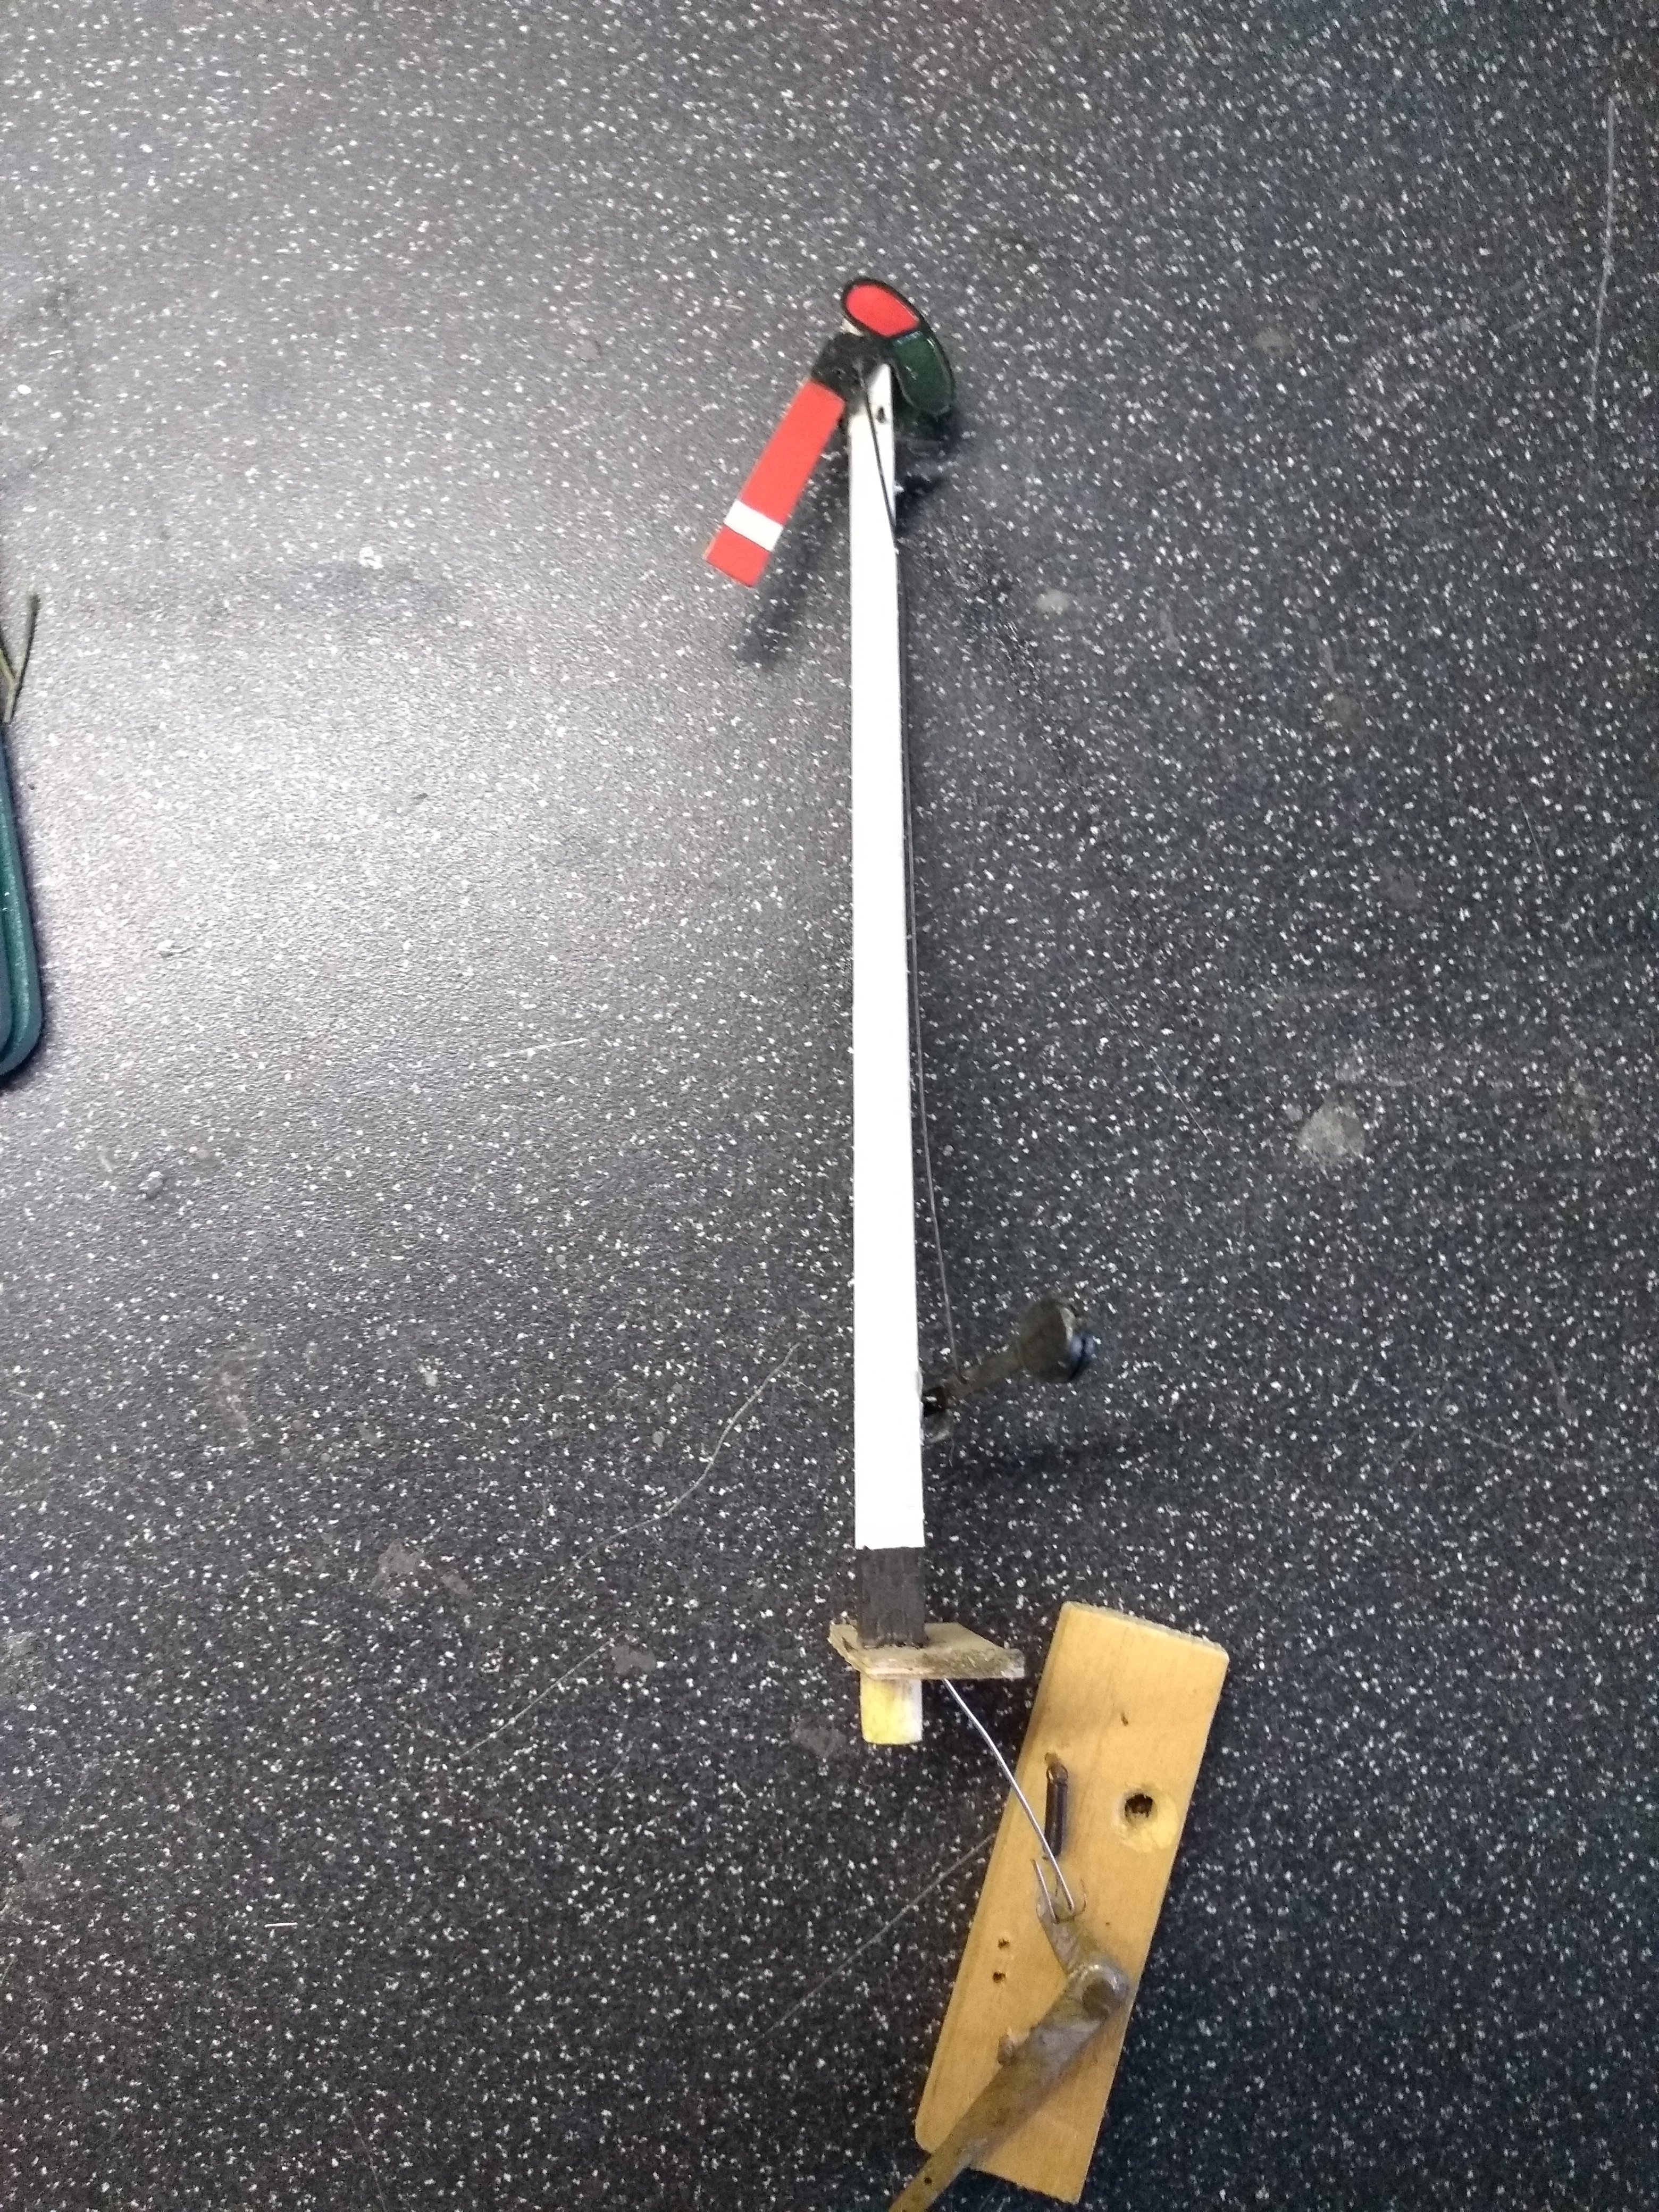
At Guildex last weekend, had the opportunity to browse the remaining items from Richard Chown's estate. Was surprised to see a J15 etched brass kit from TDM Models. Learned that the letters stand for Terry McDermott, the originator (?) of Studio Scale Models. Am told it should make a more than decent model, but any information about the kit is welcome. Seems to be 4mm scale blown up to 7mm and clearly dated 29th November 1998. Know this because in the box is a letter from Terry to Richard, apologising for the delay in producing the kit and also a gentle reminder that he still owed £2.50 postage and packing! Given what a prolific builder Richard was, am a little surprised the kit remained unbuilt for nearly 20 years. Needless to say, I intend doing something about that - though maybe I might wait until 29/11 and it's 20th anniversary. Also bought one of Richard's signals and a pack of coach wheels and broad gauge loco axles.

-
Arigna Town - this week's scenery
David Holman replied to David Holman's topic in Irish Model Layouts
Fantastic weekend at Guildex. There is something about specialist shows where the conversations with visitors are that bit more understanding and you are not just explaining the basics. Numerous highlights. Many of the Castle Rackrent crew were present so it was an absolute pleasure to run Shannon for them. Richard's Manning Wardle 0-4-0T made a guest appearance, courtesy of new custodian, Paul Green, while it was a real privilege to have Roger Cromblehome (Alphagraphix) come and operate for a while, especially as some much of the layout is down to his products. Thanks everyone for their kind comments and also Guest operators Chris and Frank. Also managed to pick up a few remaining items from Richard's estate, including a TDM kit of a J15. One for the winter! -
Wiring something to be endured for me, but so essential! Sounds like you are doing all the right things and at least the testing stage means you can enjoy running trains. Minor (major?) panic with Arigna at Guildex yesterday, when had no power to track after setting up. Traced it to a failed transformer. Probably my own fault as have long used cast offs from old printers and the like. Thankfully, Guildex not exactly short of traders, so soon managed to buy a 'proper' one. However, warning from the trader that most plug in transformers these days are DC and Gaugemasters need 16v AC.
-
For those of you this side of the water, Guildex [Telford], features two Irish themed layouts - my own Arigna Town, plus Tony Ragg's Standfording [NCC]. Alphagraphix will be there too - a goldmine of Irish kits, plus loads of other bits and pieces. Also, the 7mm scale showcase, with masses of trade support, demos & so on. Beware - can get very addictive!