David Holman
-
Posts
4,359 -
Joined
-
Last visited
-
Days Won
117
Content Type
Profiles
Forums
Events
Gallery
Blogs
Everything posted by David Holman
-
Only just found this and its very useful indeed. However, before anyone gets hung up on colours, remember, not only is everything very much in the eyes of the beholder, males of the species need to be aware that our perception of 'green' changes as we grow older. Unlike females, whose colour perception remains strong throughout like - which enables them to delight in telling us the faults in our dress sense! So, if you want to know if colours look right - ask a lady, especially if the colour is green.
-
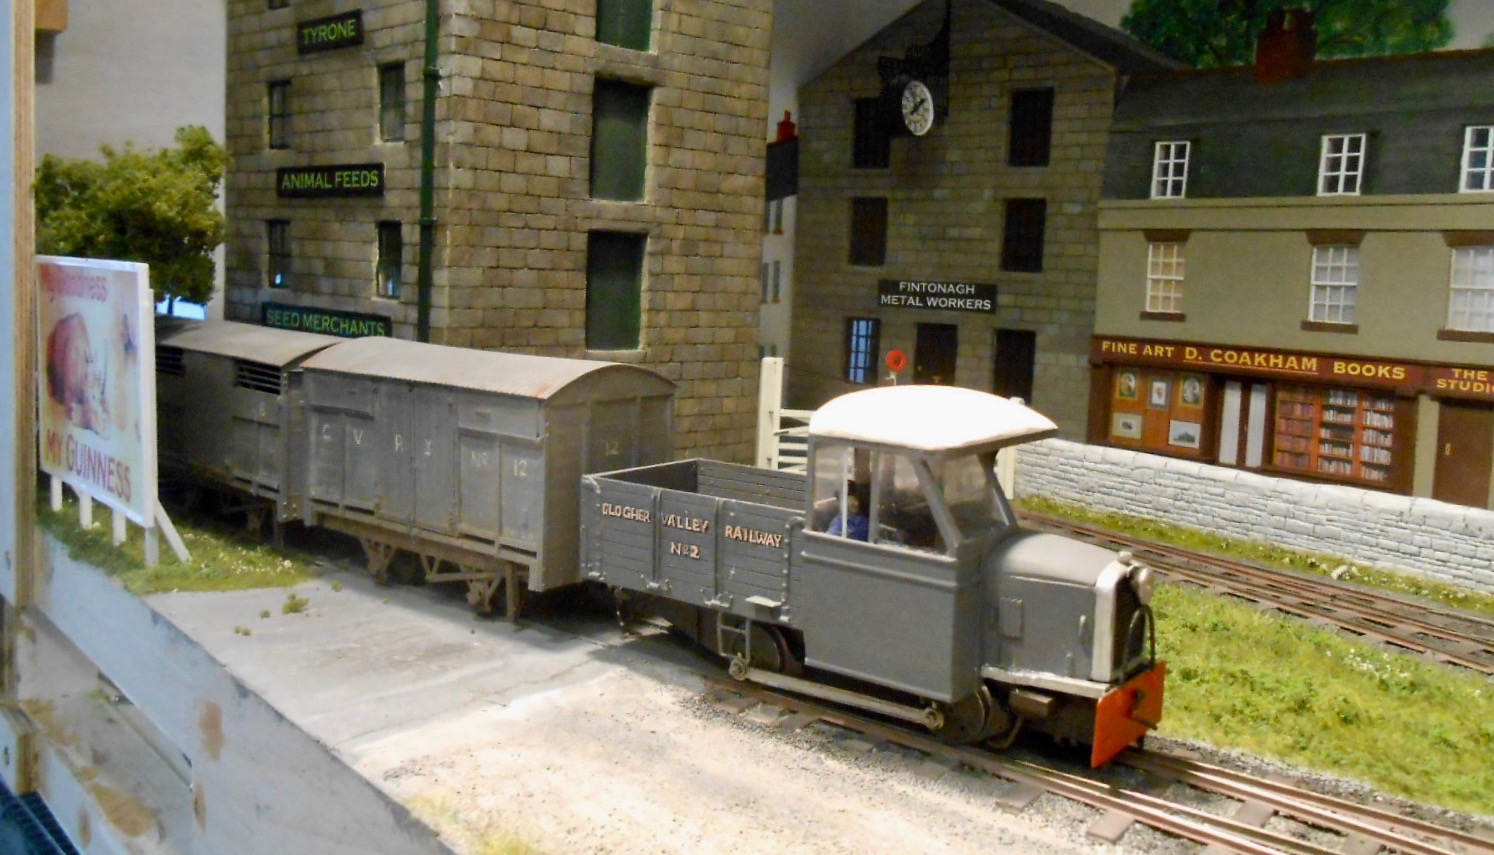
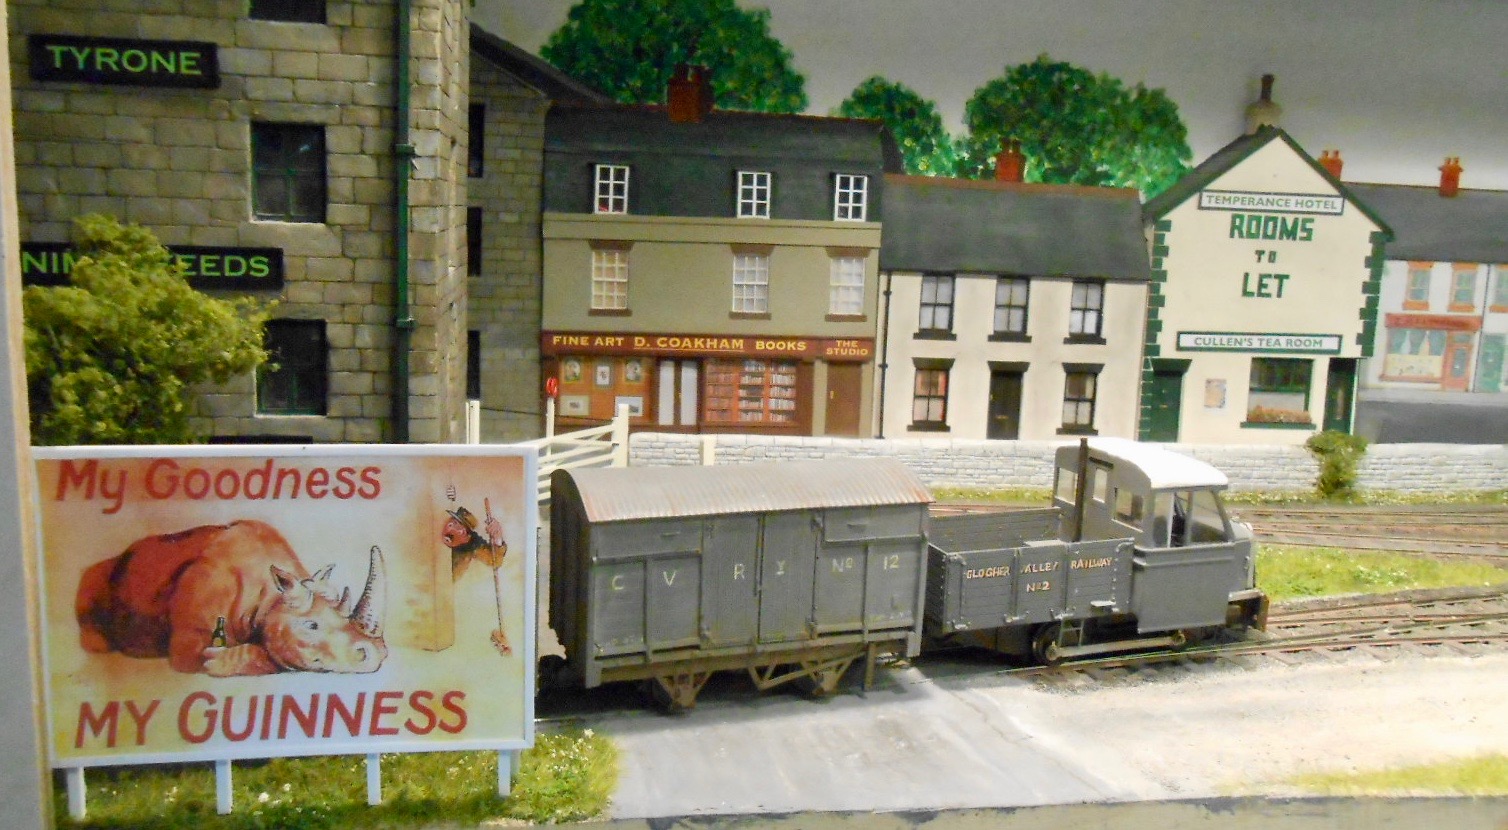
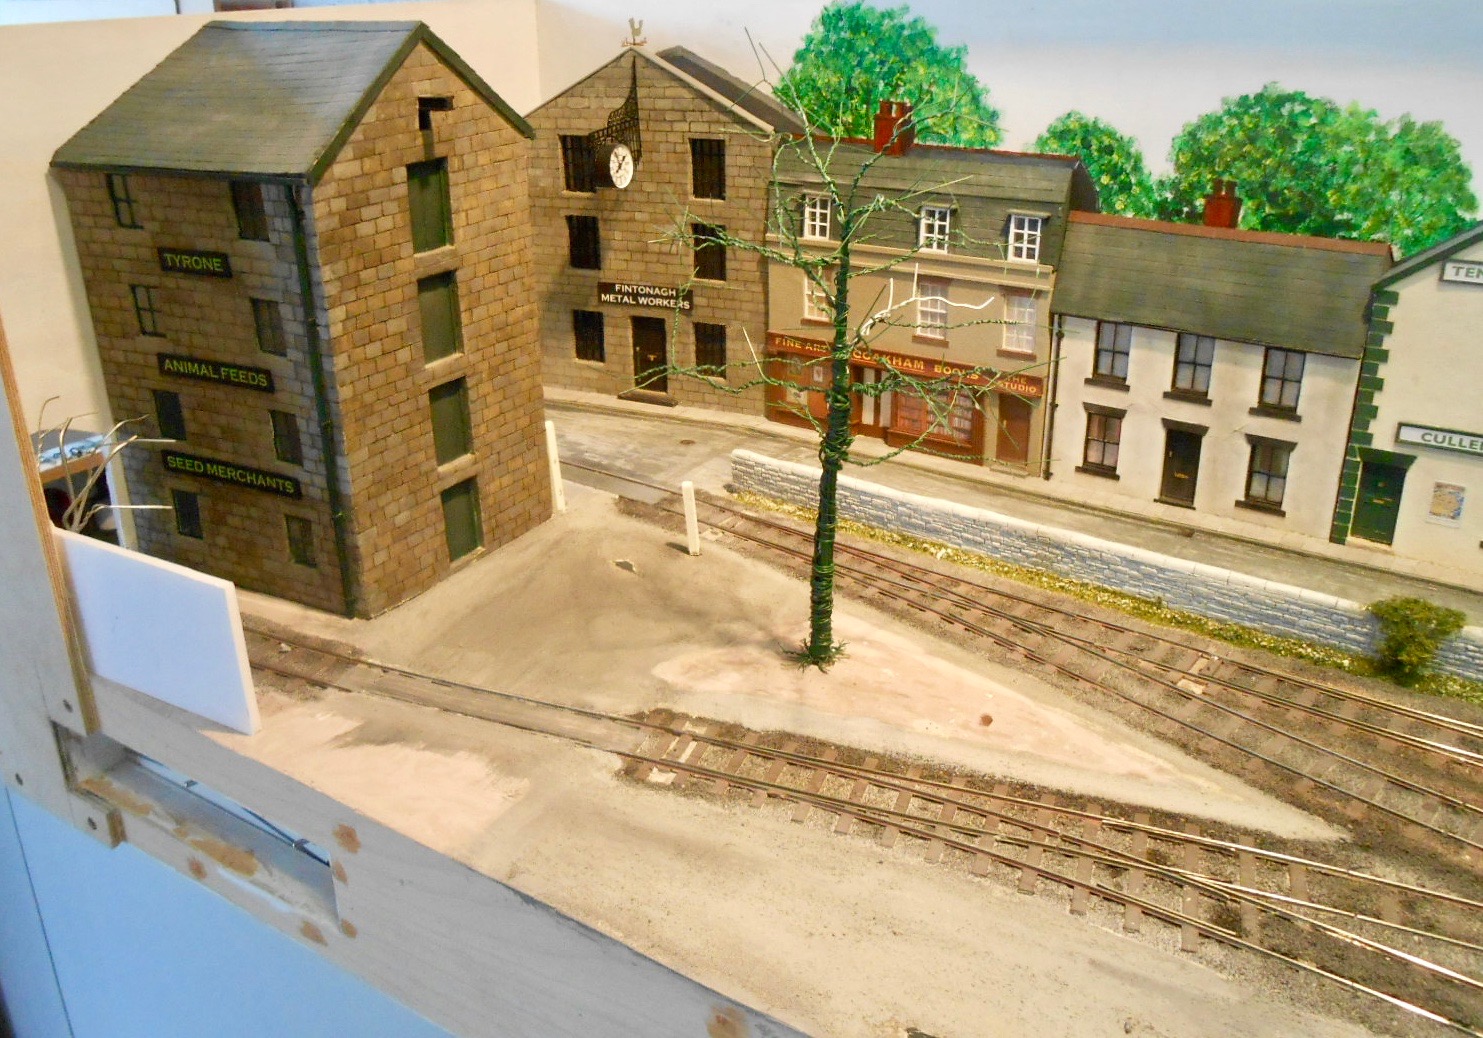
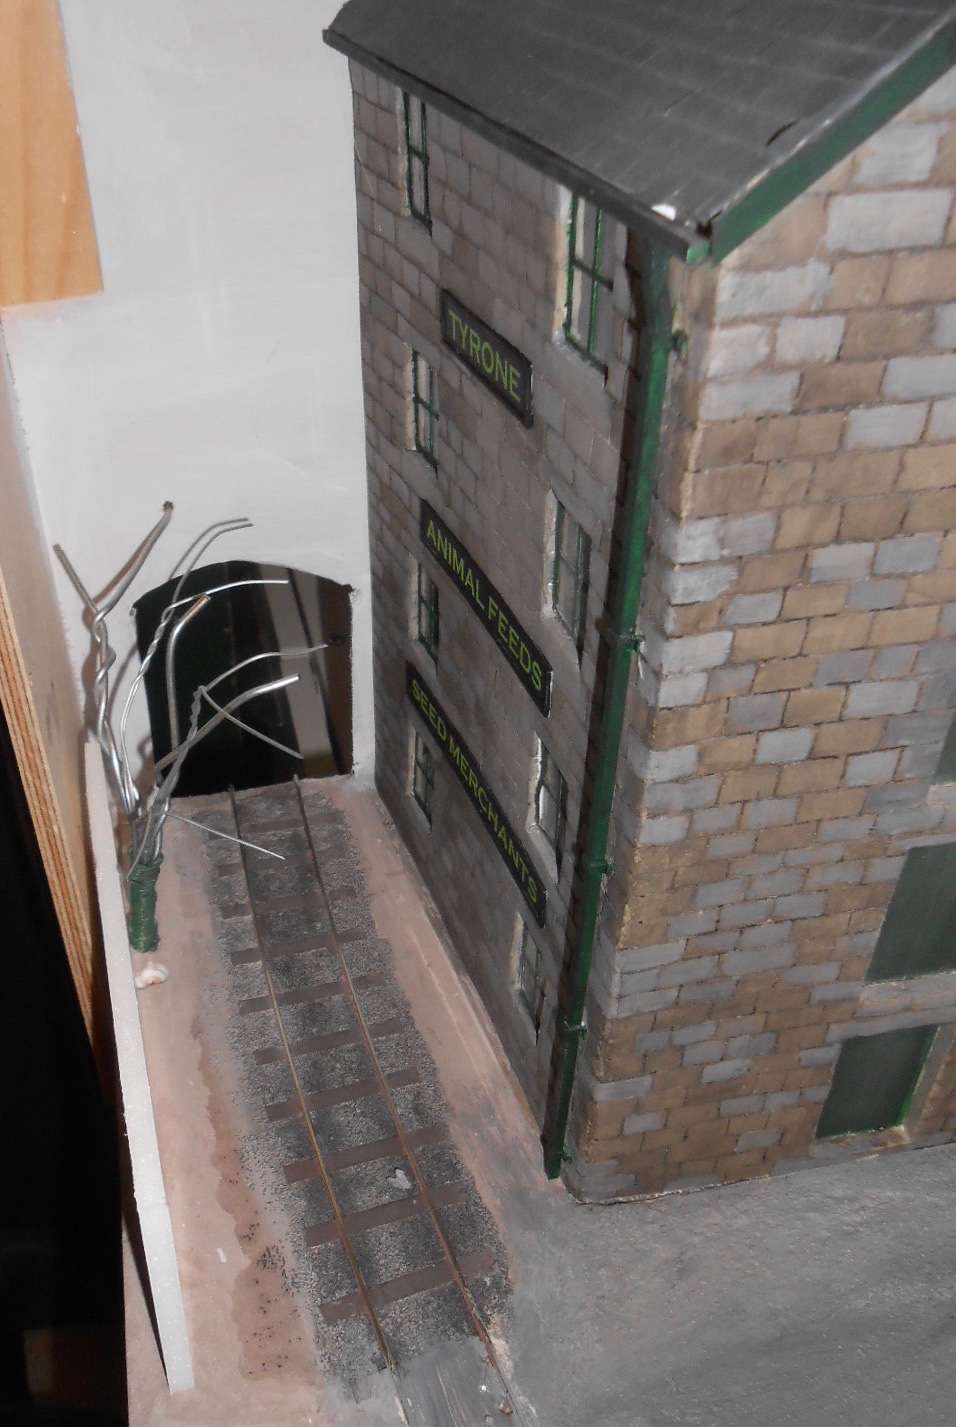
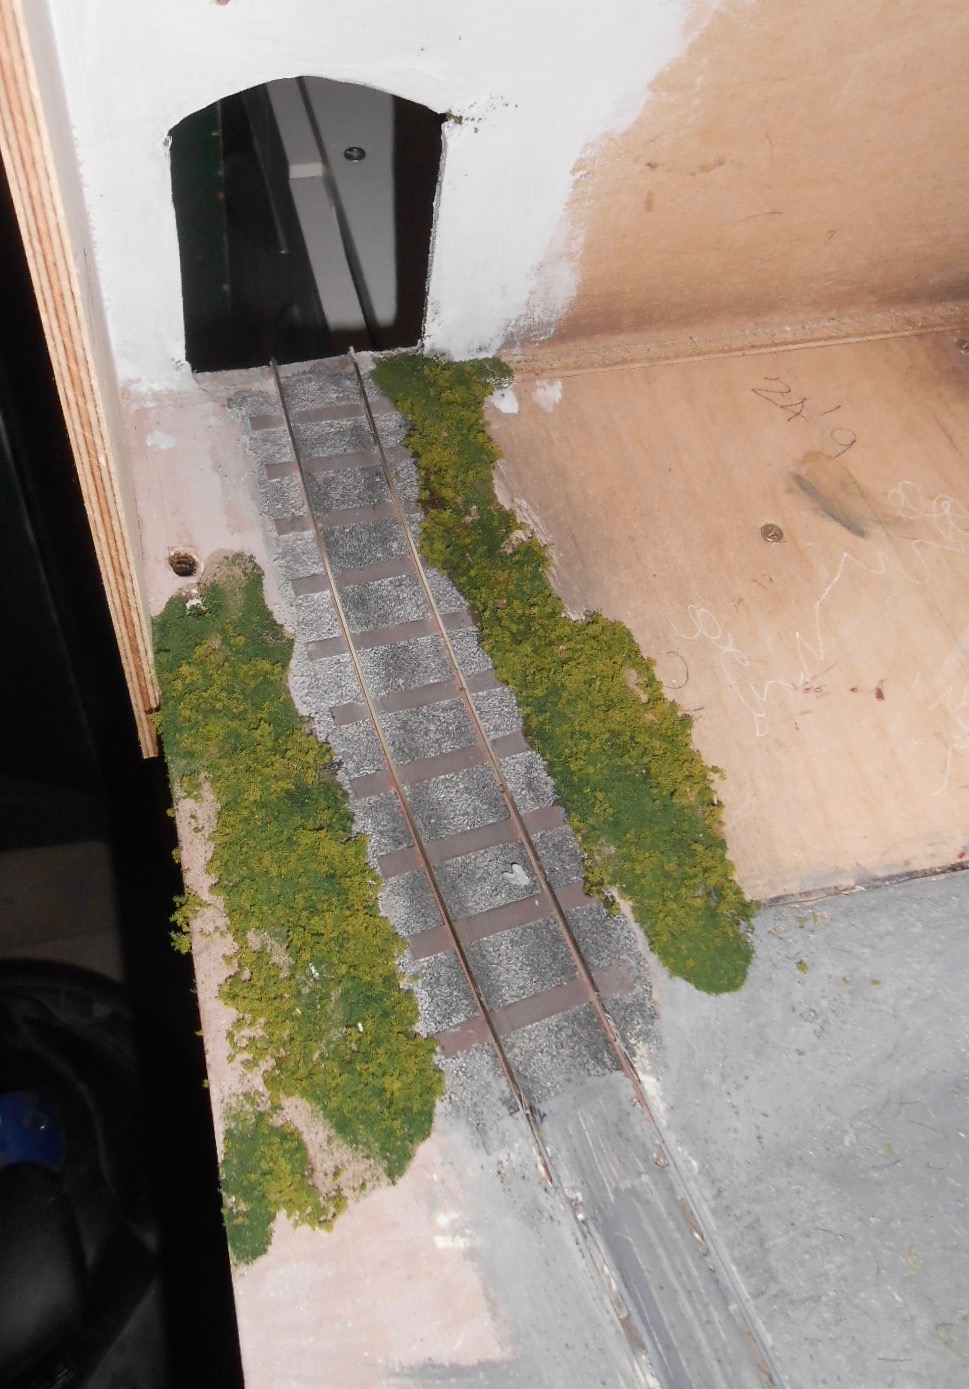
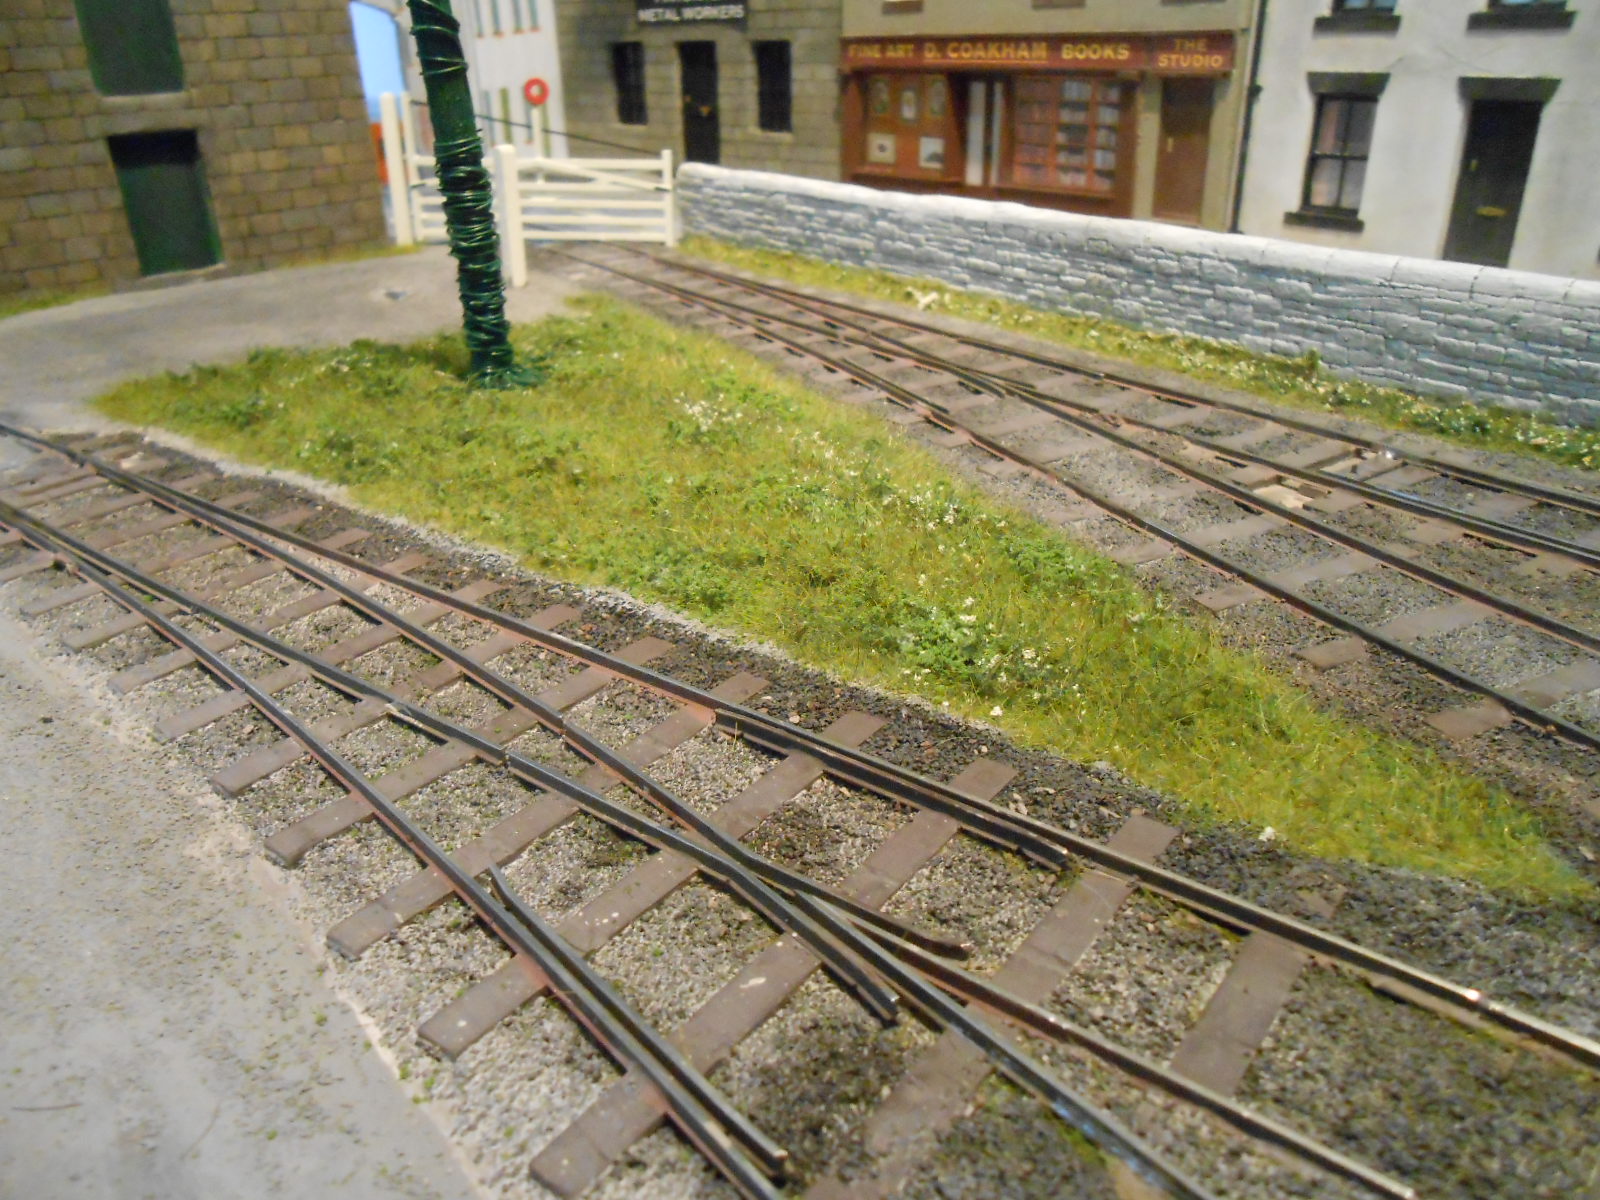
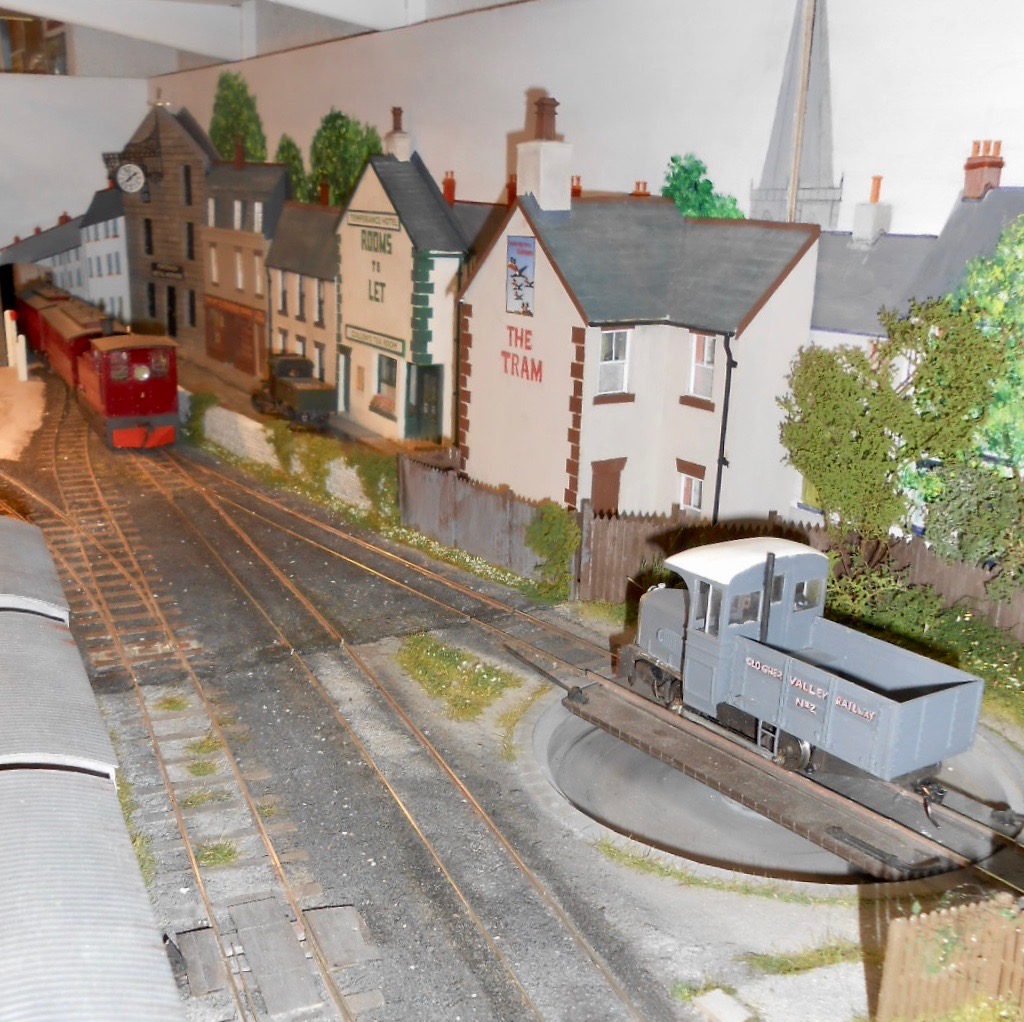
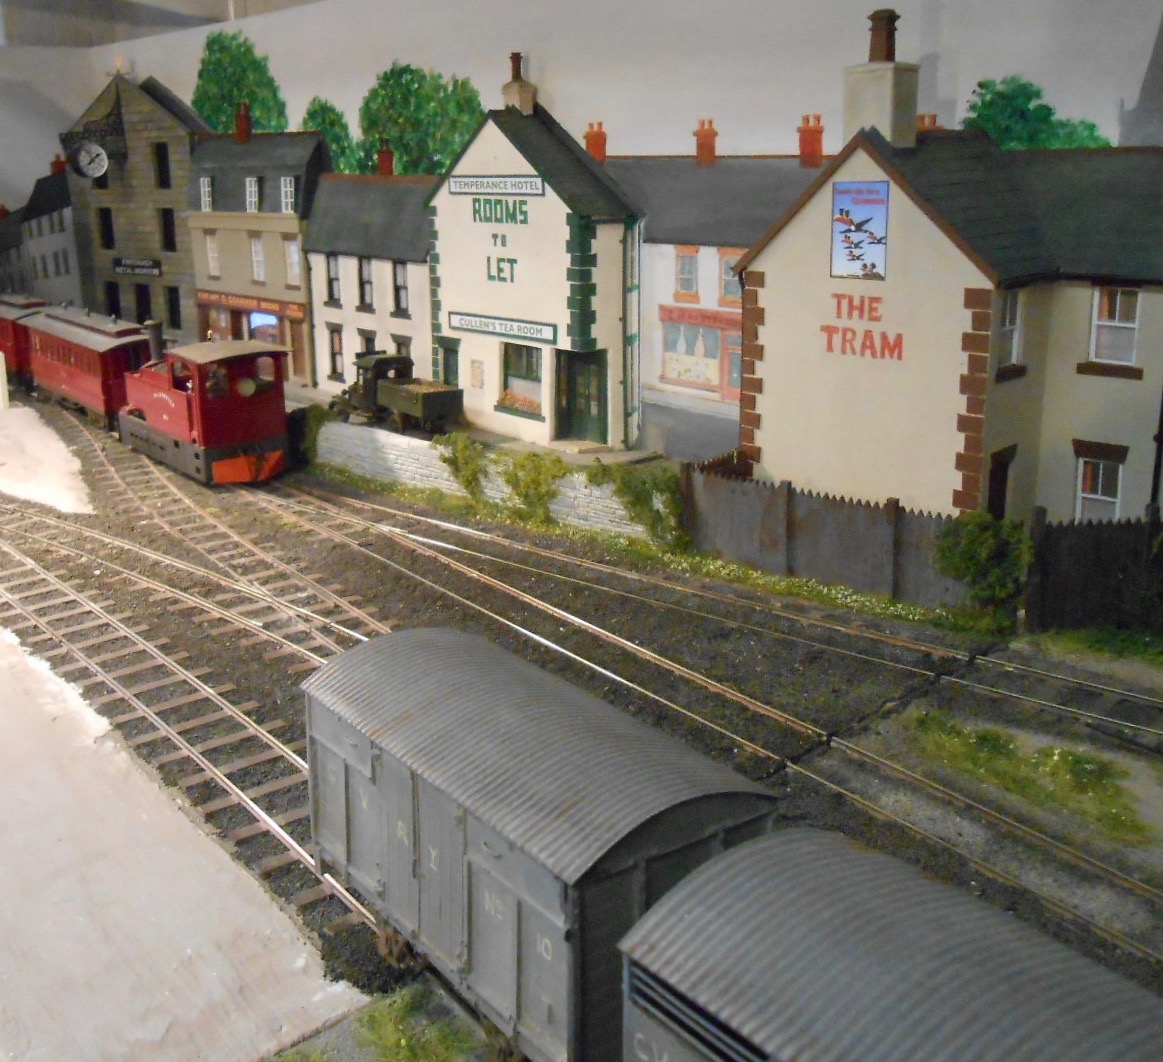
Hiding a hole in the sky A tricky one this, one which I have pondered long and hard over. Fintonagh has two exits to the fiddle yard - the main line, which exits behind the warehouse [so easy to hide] and the track which exits at the front edge of the layout, to the goods yard and exchange sidings. The latter poses problems because it is right on the front edge and though there is 10cm of fascia to provide a bit of screening, the hole in the backscene was all too visible the further to the right any observer will be standing. The solution I've used is in two parts: firstly a large advertising hoarding, and behind that a half relief tree, I'm saying hawthorn. Will now wait for someone to say that the Guinness poster isn't correct - though my defence is that it was cut & pasted from a Google search of 1930s adverts. No worries - it is easily changed, just point me in the right direction - getting such details right is all part of the fun.And, by and large, the two items do a fair job of hiding the hole in the sky. The 'Unit' is bringing a short rake of vans from the exchange sidings, which will then be added to the next departing train.

-
I have a GW Models rivetting tool that is similar and that certainly works well on plastics up to 20 thou (0.5mm) thick. The MDF table takes it to a new level though. Must remember to make one before I start my next brass kit. So much to enjoy and learn on this thread. Thanks Eoin!
-
Madder Valley is definitely going to be operated one day this year. Check out the Pendon website for details. Well worth seeing static anyway. As one of the granddaddies of scenic modelling, there as many artistic tricks that still have value today.
-
Gorgeous!
-
That may be so, but sinuous curves are naturally very attractive to the eye(!) and straight lines are often best avoided on layouts. Likewise anything parallel to the baseboard edge. On the real thing, track tended to follow contours and natural features, so flowing curves are actually more common than you might think. Hence anything that softens edges, draws the eye into the scene, makes you peer around some feature in the front and so on, all help to make a layout look bigger and more interesting. On a narrow baseboard, it can be difficult to avoid tracks that are parallel to the edge, so going slightly diagonally is an option. Alternatively, small, non structural additions to the baseboard front can do the same thing.
-
Alternatively, take one Chinchilla, put in a freezer for two days and then put through the coffee grinder - preferably twice. Needless to say, Broithe is correct. Comes in one kilo bags. Fine sand works just as well.
-
Indeed, JB - I can easily start salivating at the thought! Not enough space to do it justice though.
-
A couple of pictures for you showing how the scenery has been progressing this week. See the Workbench section for details of how it was done.
-
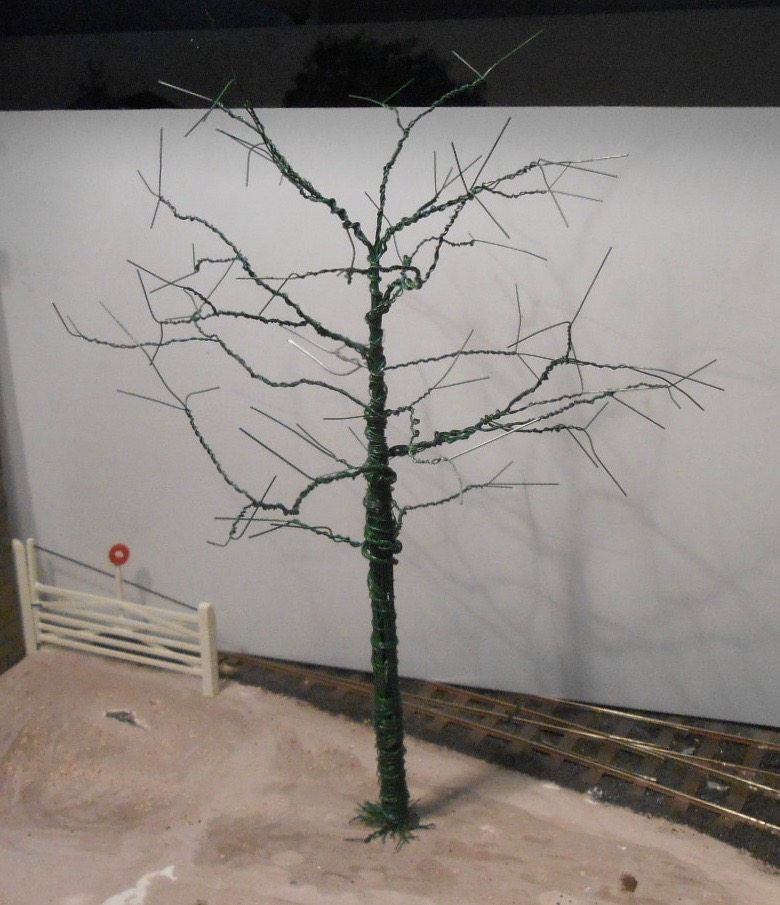
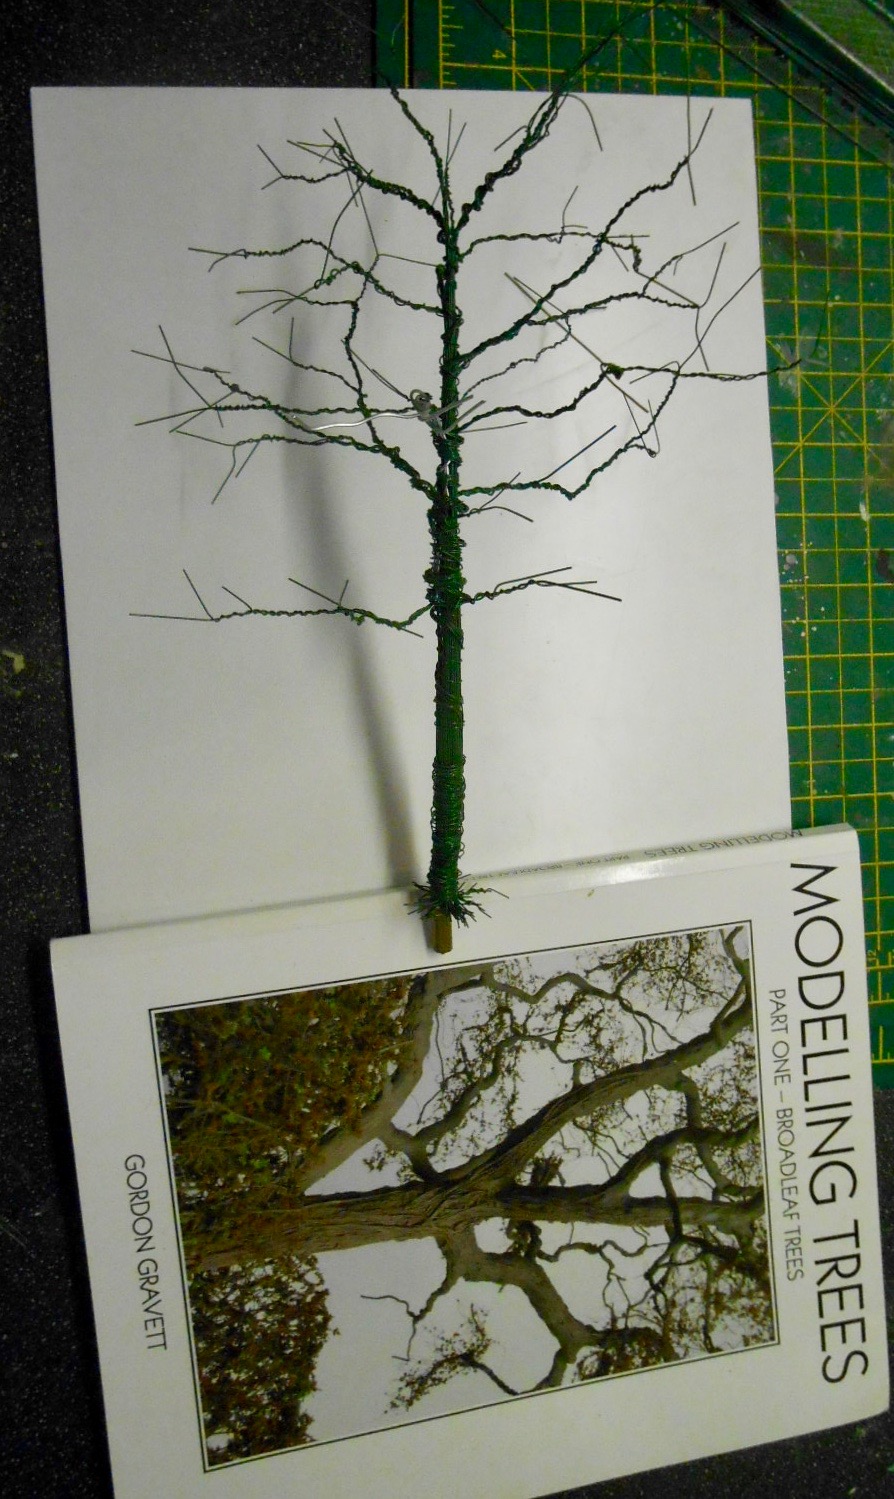
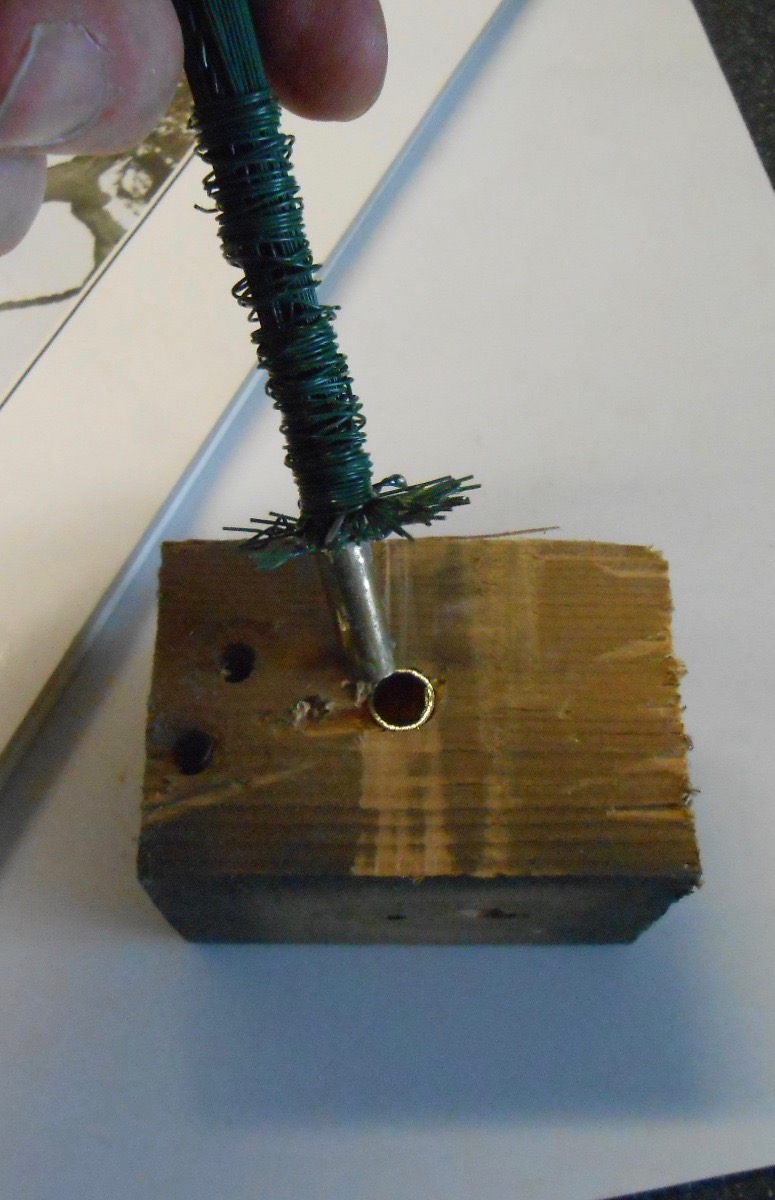
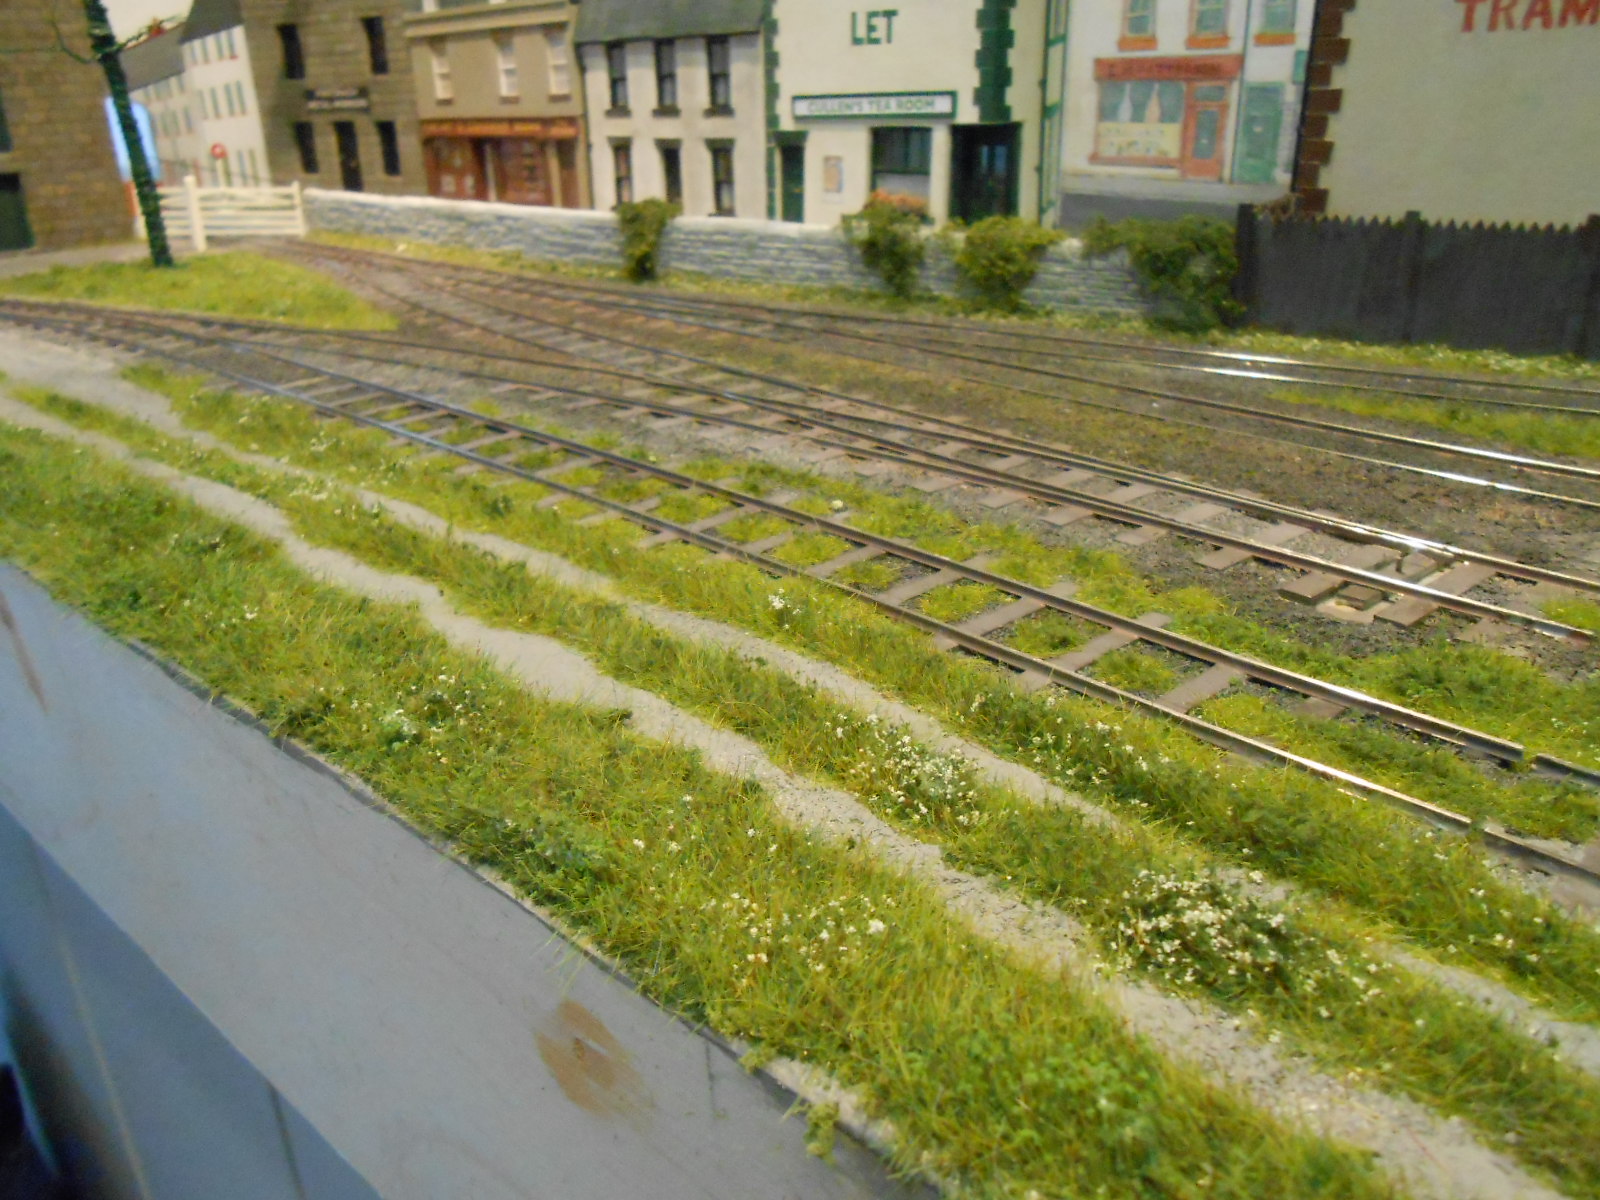
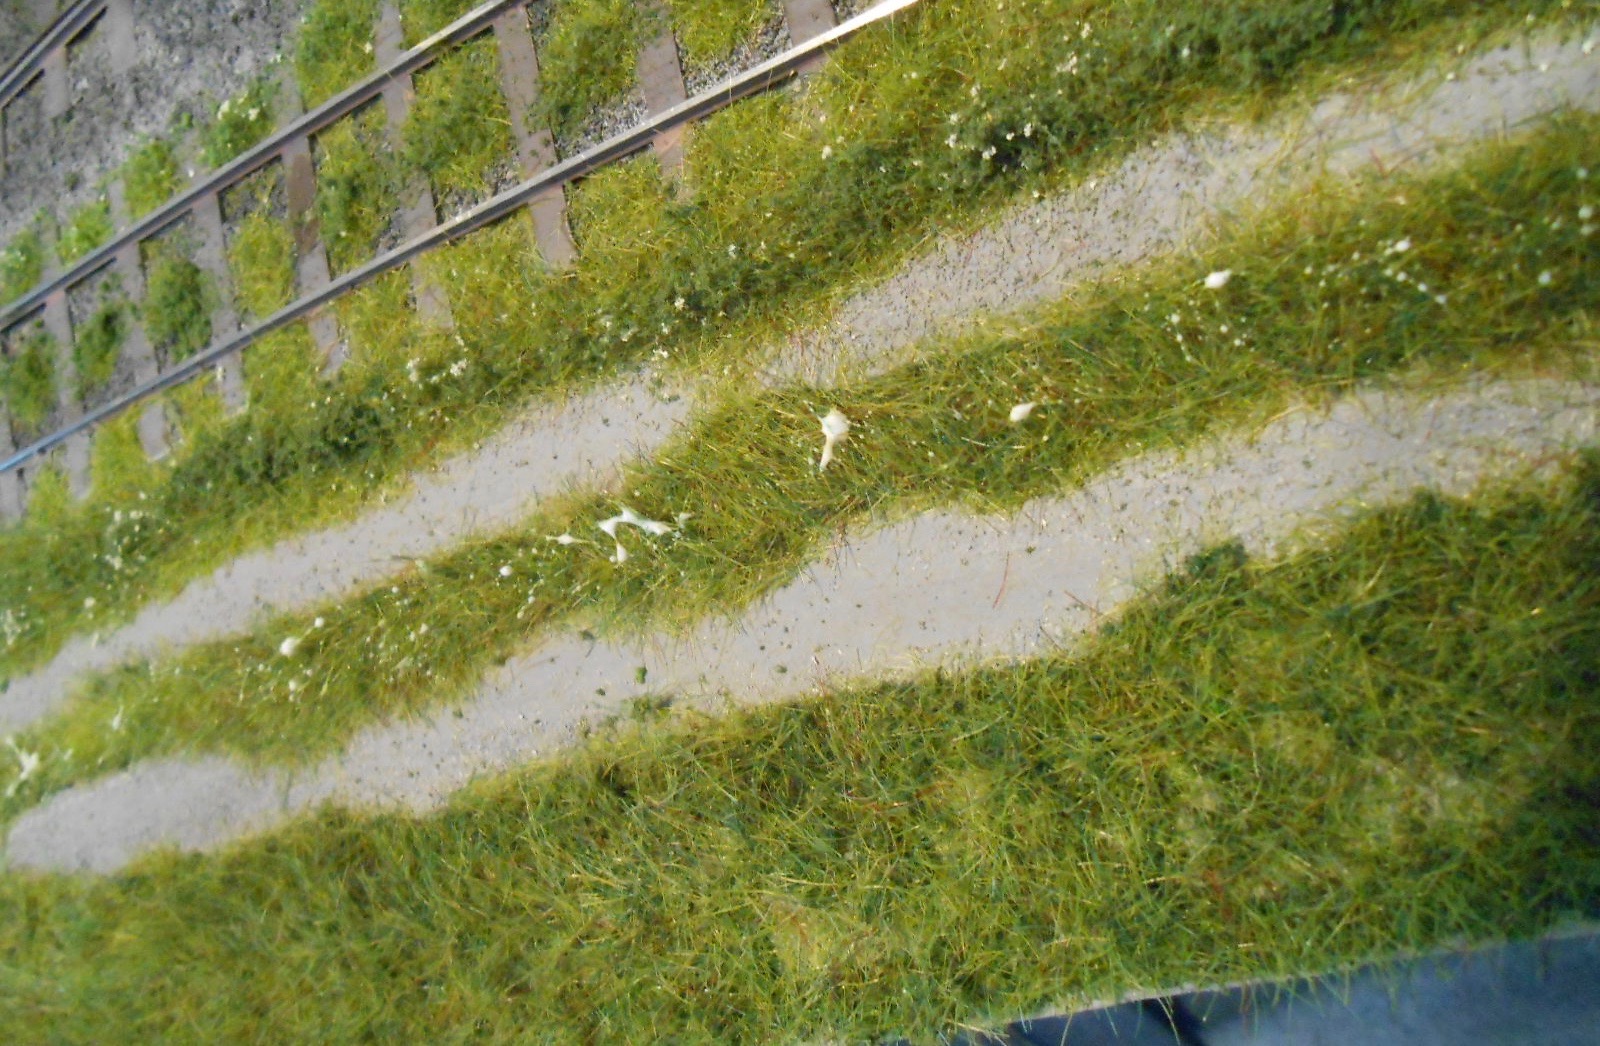
Trees and scenics It seemed to take a long time to complete the buildings and back scene, so it is pleasant to report that the basic scenics on board two have been much quicker. I want to produce a 'signature' tree, to hide the liberties I've taken with the back scene's perspective, so out came Gordon Gravett's book on the subject. His take on the twisted wire method for trees is interesting, because instead of unravelling a large hank of cable or wire, he starts with single strands & therefore builds up the model in reverse. It works well too. Using florists wire, you twist two or three strands together for an inch or two below the end of the branch, leaving the rest of the strands straight. You make enough of these to complete the thickness of trunk you want and bind them together with more wire from the base upwards, [creating the branches as you go] leaving a projecting section to go in the ground. On mine, I glued this in a length of brass tube, which then sits in a slightly larger piece of tube set in the baseboard. That is as far as I've got, because, while this only took an evening, the next stage - coating the wire with a PVA/artex mix takes ages, not least because a couple of coats or more are required. I don't have enough foliage material at the moment either! A second, half relief, tree has been made to help hide the front exit to the fiddle yard, past the warehouse. This has a more basic framework, again as described by Gordon in his book. A large advertising hoarding, shown by a sheet of foam board in the photo, will also hide the exit and hopefully suggest there is a road running in front of the layout [but off scene]. Am actually contemplating a front extension that might show this and create more depth - but not yet! So, could then turn my attention to the scenics. My preferred method is to first 'block in' the main areas [a bit like doing a painting], to get a feel for the work, then gradually work up the details. A static grass machine and puffer bottles make short work of tasks that would take many hours not that many years ago. Going a la Gravett again, the first stage is to prepare the ground surface. For me, this included improving the baseboard joint [bit of an earthquake crack up to now], then soften the track and ballast colours with weathering powders. Chinchilla dust was used for the yard surfaces [sprinkled on to gloss paint] and once all was dry, I could start the greenery. Hard to believe that this has only taken about three hours. I put down a layer of ground foam first [so the grassed areas don't look like a lawn], then after wetting with dilute PVA, got to work with the static grass machine. There are 3-4 different shades and two different lengths of fibres to give variety. I hoover up the excess fairly quickly, as it encourages the fibres to stand up better. Then, after this layer has dried, there is further fun to be had adding weeds and flowers. I dip a finger in PVA and wipe it lightly across the tops of the grass. Fine ground foam is then sprinkled on top. I've used Greenscene 'crumb' [light green and slightly larger], Woodlands fine medium green, plus their dark green with some white flower crumb mixed in. This is what really brings the scene to life and provides the all important variety of colour and texture you find in the real thing. So, coming on well, I think, though I want to do a lot more detailing, including a few larger shrubs and [lots of] nettles.
-
One of those projects that might have been quicker and easier to scratch build, but if it is enjoyable, then why not? Looking good too!
-
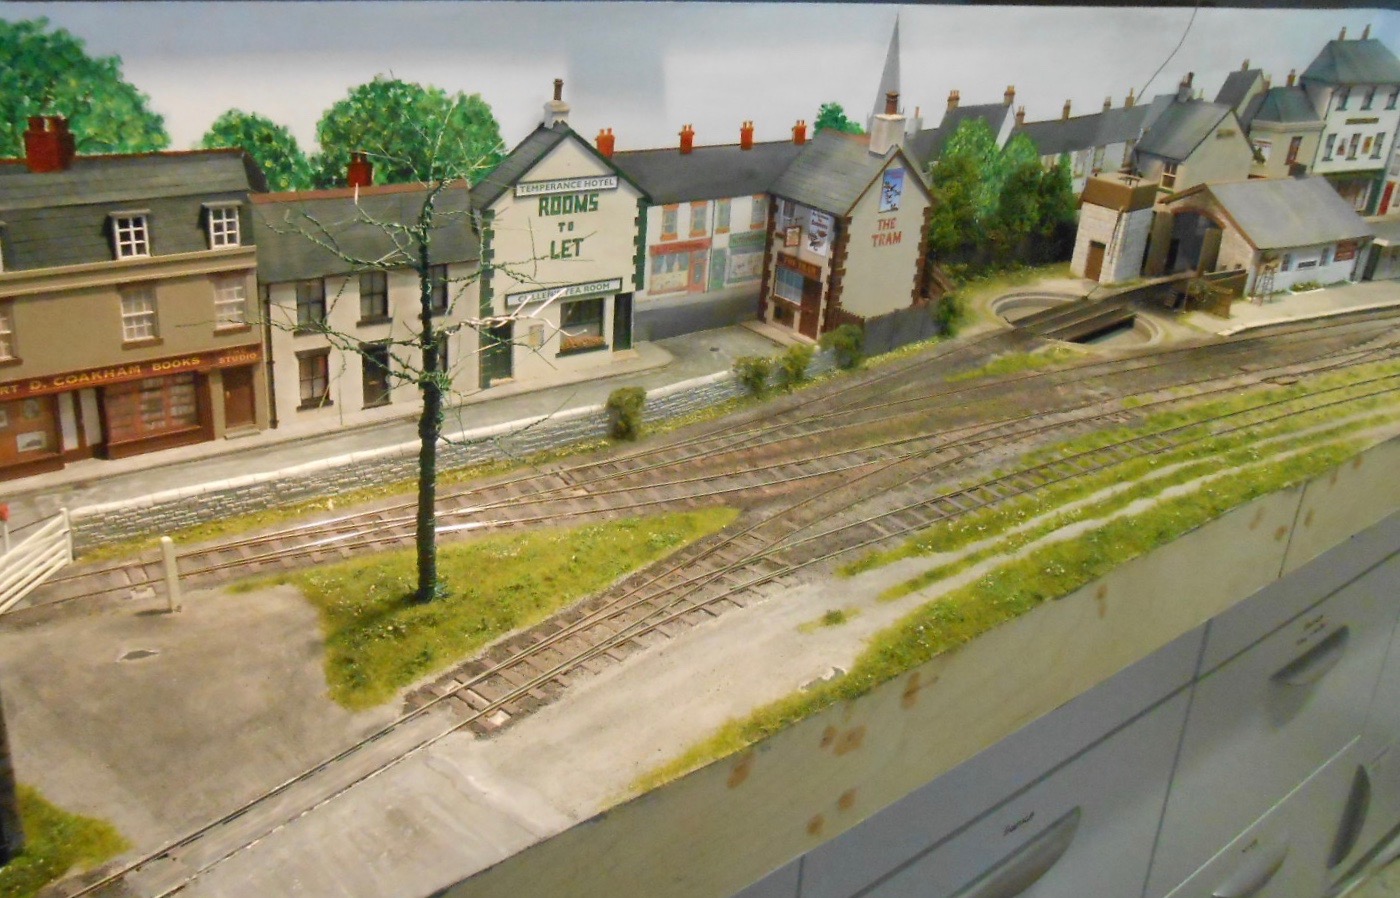
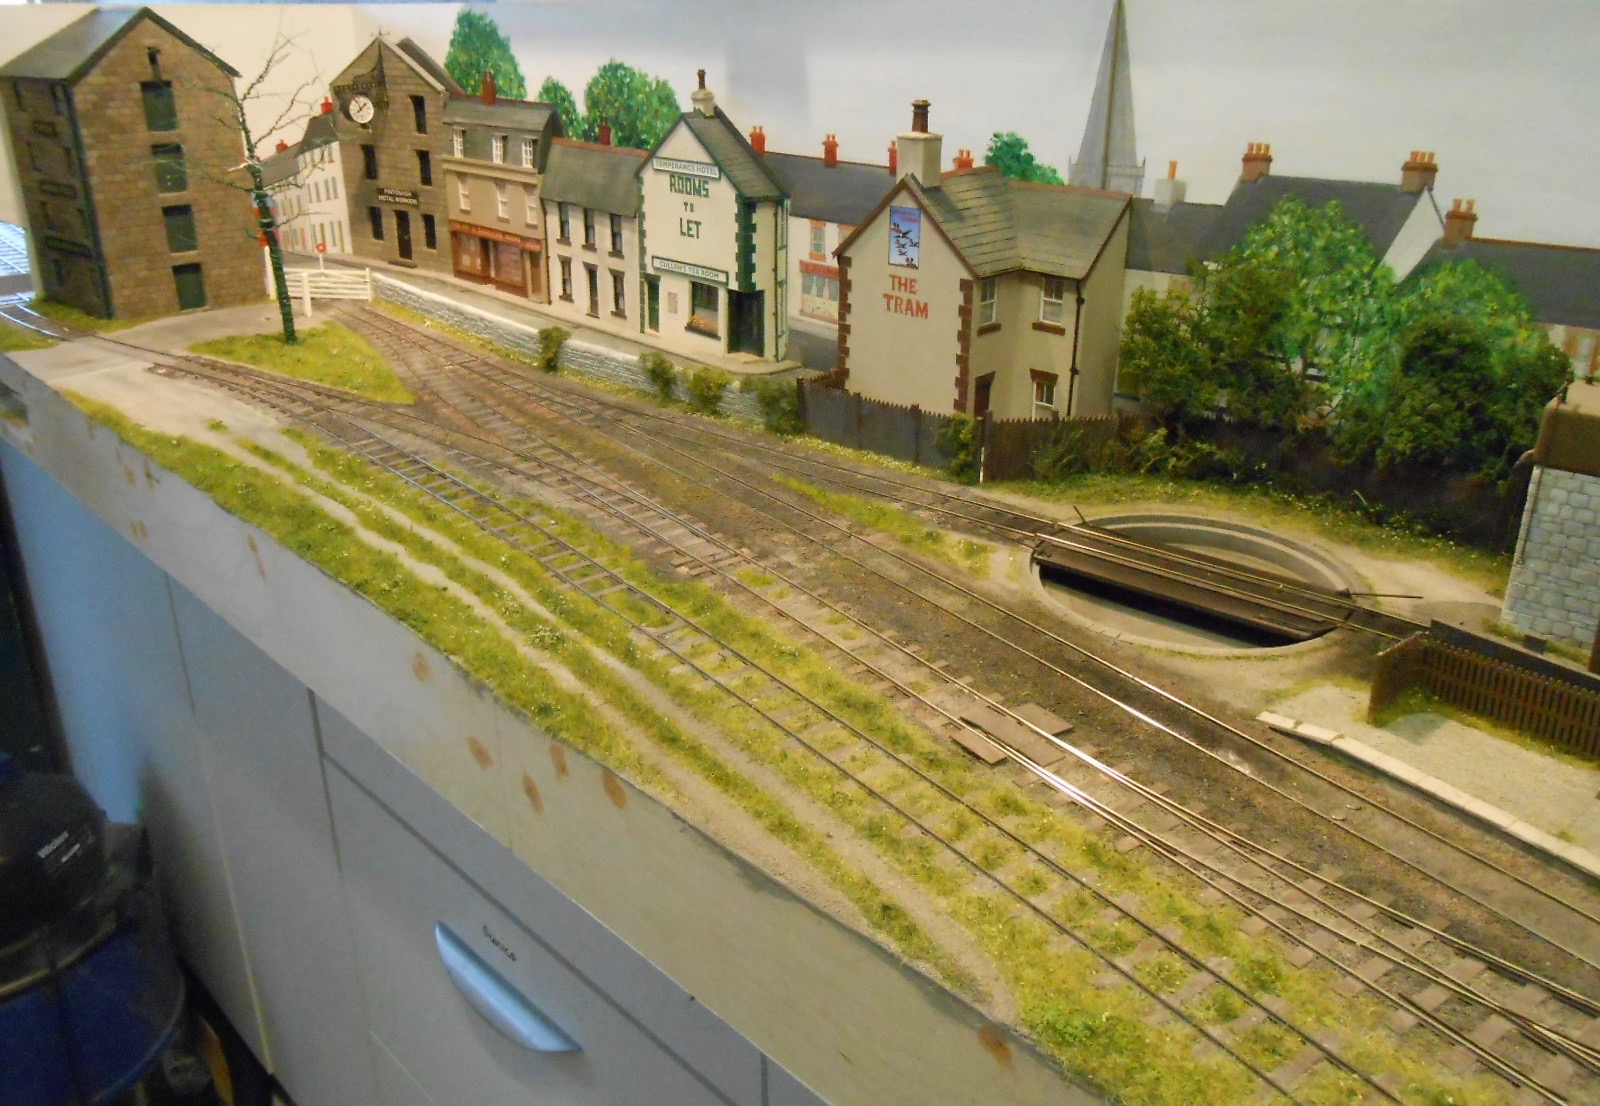
Thanks everyone, as ever - I always value your 'proof reading' of my posts. The main line snaking off stage, as Mayner nicely puts it, is exactly what I want to portray. Would love to have included a full on Clogher scene with a stretch of line running down the middle of the street, with buildings closing in on either side. Sadly, not enough space within the two metres available to me and viewing would be difficult too, hence the suggestion of the line heading for the middle of the road as it goes off scene. I suppose one option could have been the town, forget which one, where the line descends down the street at 1 in 30, followed by a right angle turn at 1.5 chains. That equals 100 feet, so 700 mm in my scale, where 900mm is getting tight! That would produce an interesting set of viewing angles. Could make a neat idea for the 00n3 project on another recent thread.
-
The Ulster and Connaught has always been an idea worth considering. Never happened of course, but a trans Ireland narrow gauge link from Newry to Clifden offers you a wealth of 'might have beens.' The U&C would have used the C&L as part of its route, so setting your layout somewhere nearby, or just inventing a name would be a decent option. As for track plans, there are plenty to choose from, though Iain Rice has done lots with his latest Cameo Layouts book a good start. A personal favourite is having a 'terminus junction' with the fork just off scene, or a second line trailing in from the fiddle yard that can serve anything from a harbour branch to a standard gauge exchange siding.
-
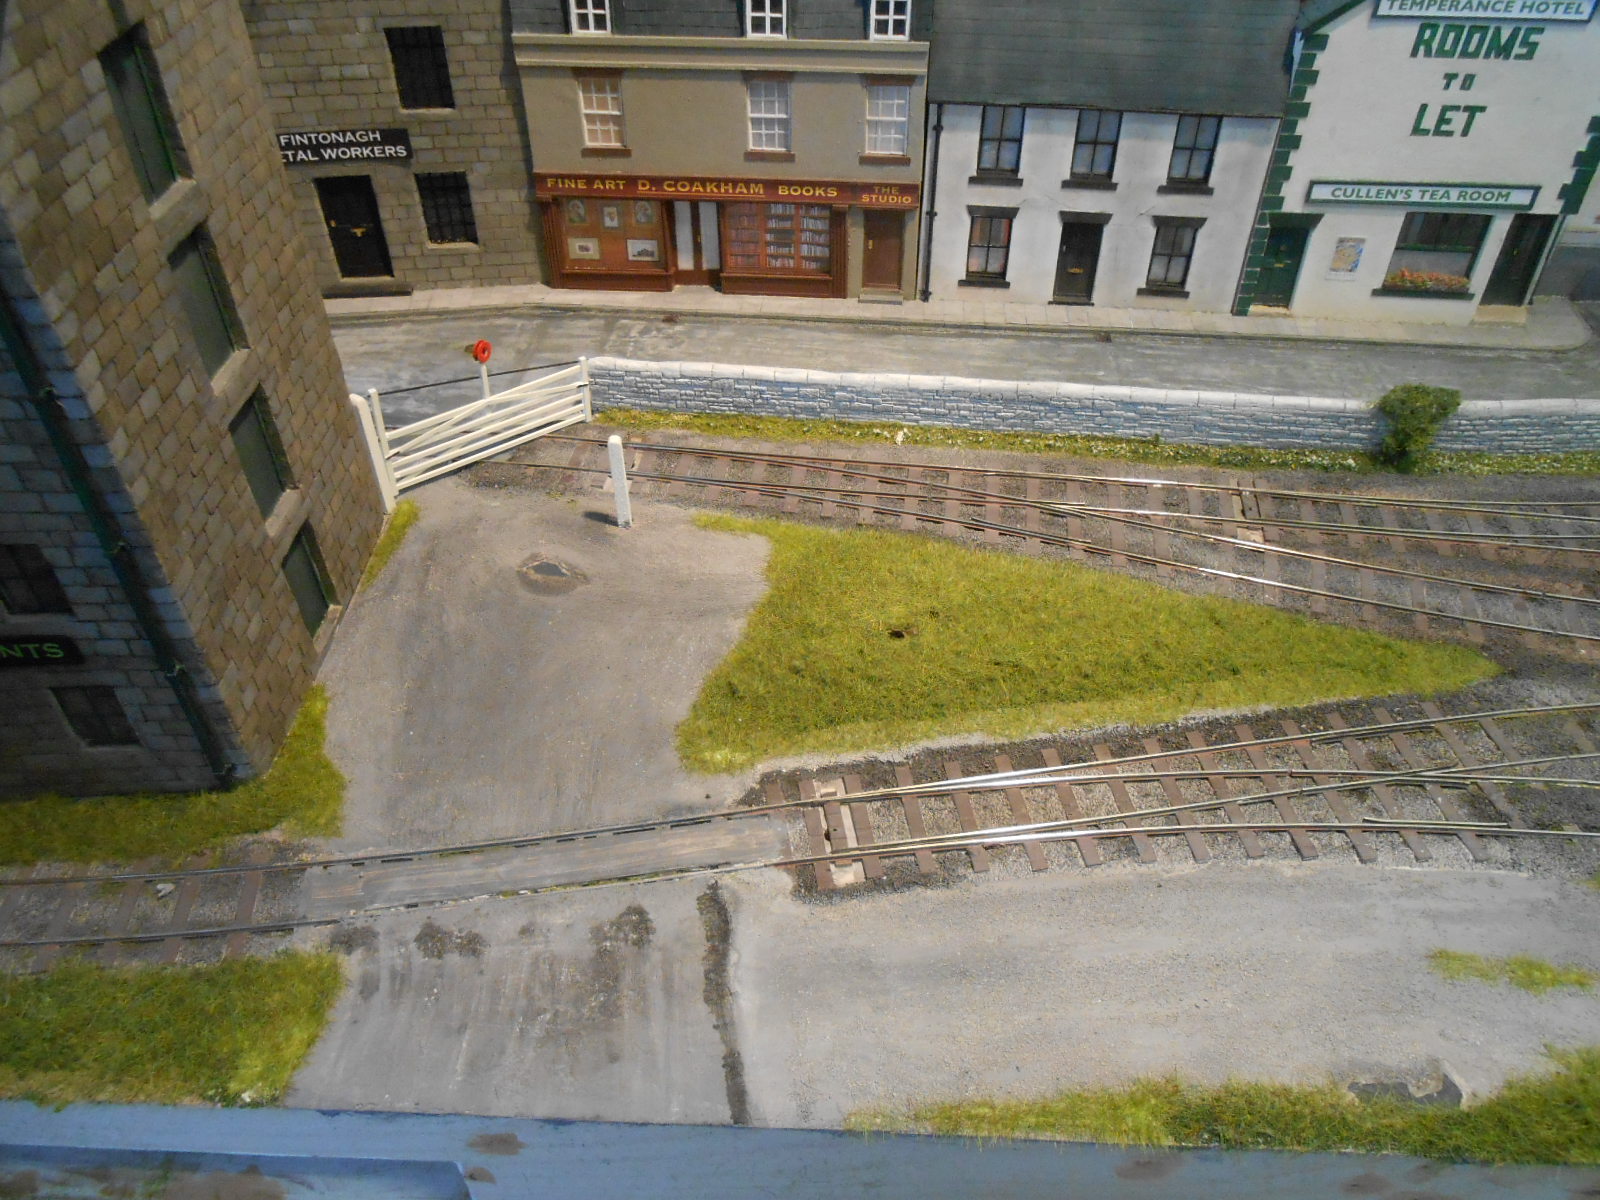
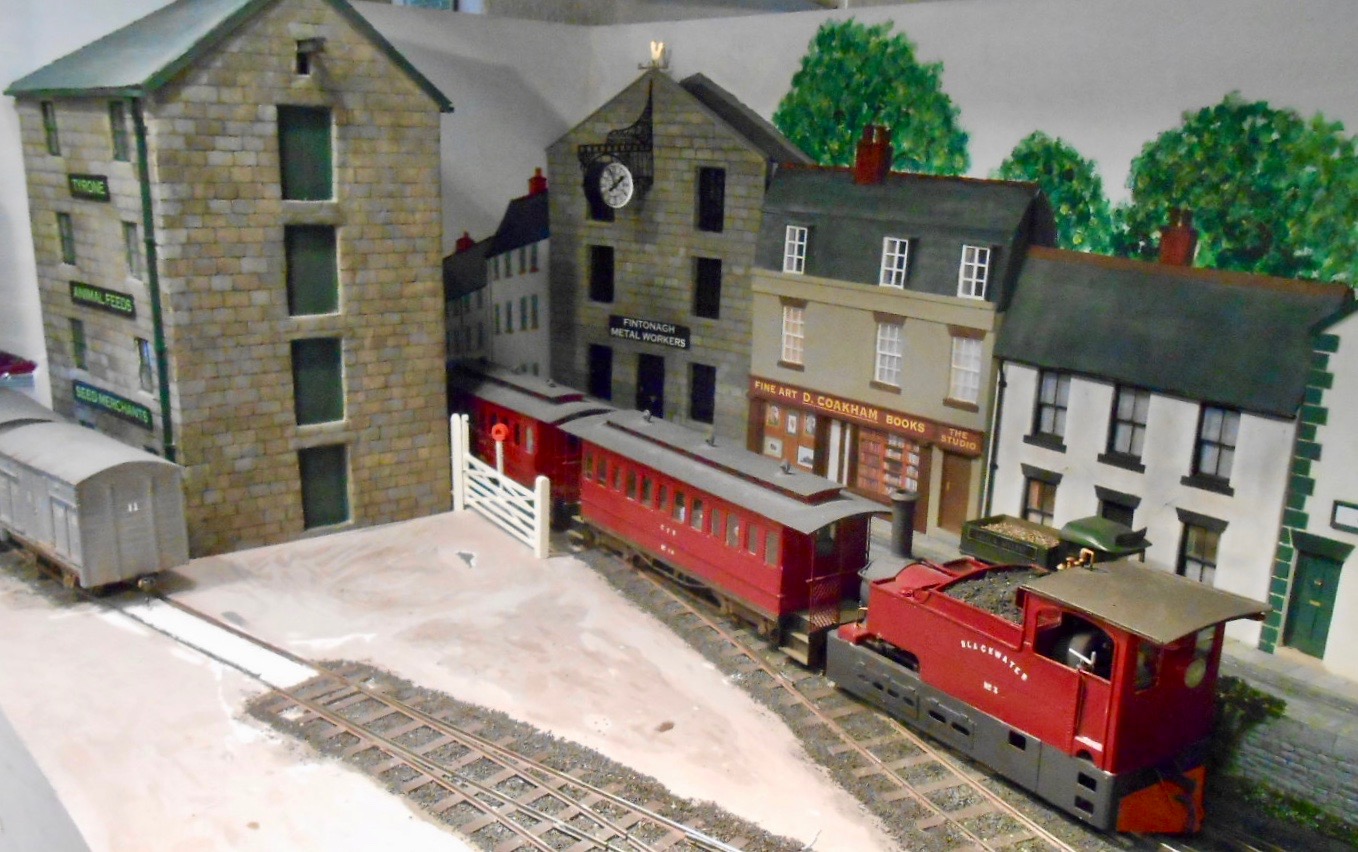
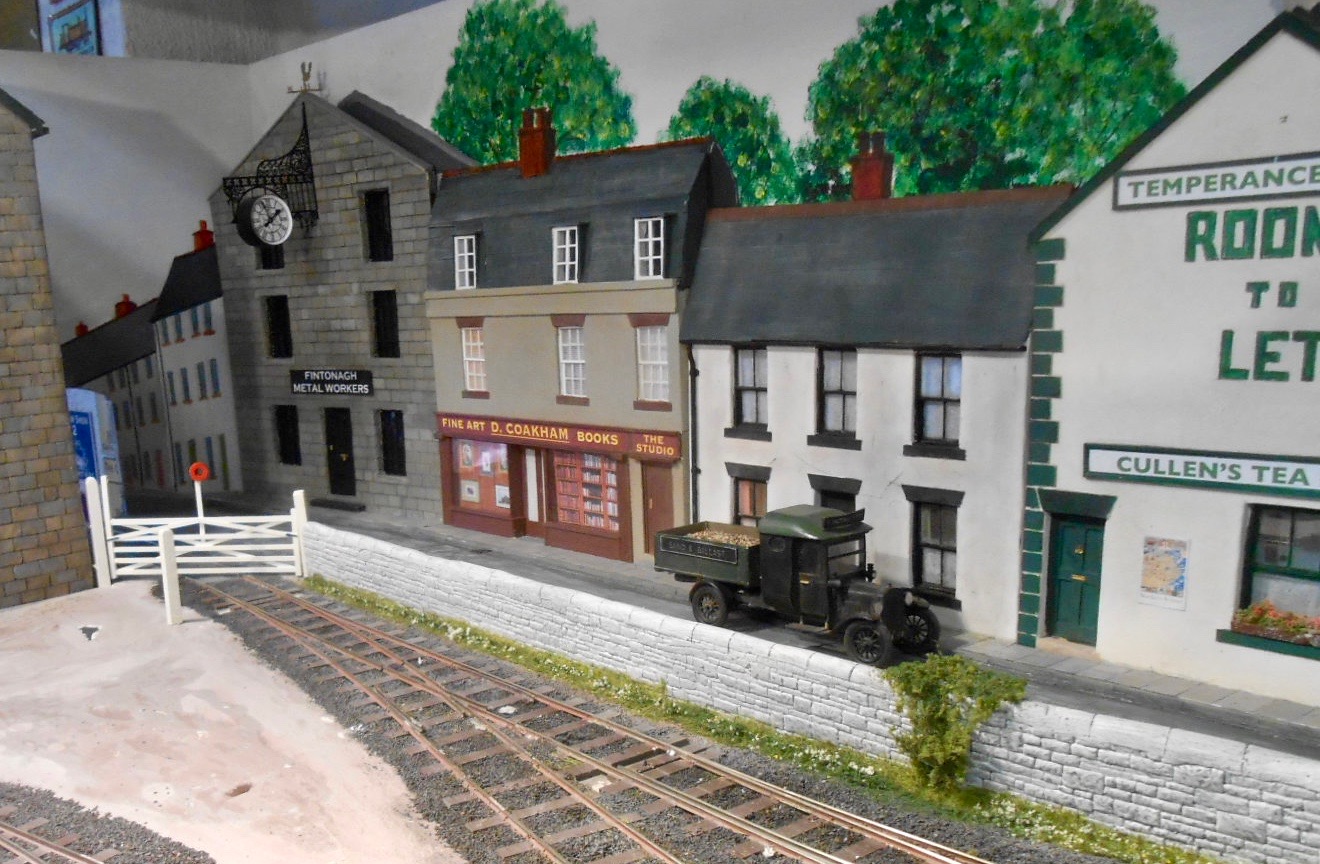
Buildings nearly finished! The photos may not at first sight appear to show a big difference from last time, but this has been one of those periods when a lot of work doesn't always translate into great effect. The most noticeable feature is the warehouse. It has been there for a long time, but in 'raw' form - just scribed DAS clay on a foam board core. Work has involved making the doors and windows, adding the hoist girder, guttering and down pipes, then internal floors and the roof tiling of course. After much deliberation, decided it would be a seed merchant & animal feed warehouse. At the moment, the hoist/lucam has little about it, but may well open up one of the doors and add a figure inside, along with a dummy hoist/chain/load. We'll see. Along the low relief back scene, some tidying up has been done to chimneys, trees and the like, then attention transferred to the road and pavements. Found some etched brass drain and manhole covers [Langley Models] and after blackening with gun blue, these were fixed in place. Pavements are cut from sticky address labels [pre-painted with enamels] & then weathered with washes & powders. The road surface was initially talcum powder on gloss paint. Once dry, I sanded it smooth with fine wet & dry paper & this had the interesting effect of making a range of shades, not unlike a road drying out after rain. Hence went over it with Humbrol 'satin cote' varnish to develop the effect. It was always intended to have a low wall separating the main street from the tramway station/yard, so that came next. As on Arigna Town it is made from Wills random stone glued to foam board & topped with capping stones made from DAS clay. A few creepers & grass/weeds complete the effect. Finally comes the yard gate. This is based on the design of the crossing gates at Brookeborough on the CVR main line. The gate is plastic strip and the posts are balsa. Eventually, I hope to make the gates swing open & closed. On a small layout like this, such little cameos help to expand interest - or I hope so! Next steps will involve completing the ground cover on the second baseboard. Two more structures are required - the large tree mentioned previously [to hide some of the liberties i've taken with perspective on the painted back scene, plus a large advertising hoarding to help hide the hole in the sky at the front edge of the layout.
-
removal of worm and wheel gears
David Holman replied to controller's question in Questions & Answers
Just to add to what John says, you may find the worm and gear come with grub screws to hold them to the motor/axle. However, wheel quartering is not for the faint hearted and get it wrong will only make for even worse running. -
Coupling/Uncoupling in a shunting yard
David Holman replied to GNRi1959's question in Questions & Answers
Or you could go for three links, Tony! Depends on you eyesight I guess. When I modelled in 4mm, found the Smiths three links were usable. Slightly bigger than prototype, but certainly not as ugly as tension locks. Completely prototypical too. Dinghams work well in 7mm, but your problem will be the turntable, as they are 'handed' and only work one way round. On Fintonagh, am experimenting with rare earth magnets and Kadees. There is a thread on RMWeb which explains how to use them. -
In the larger scales, if it is there, you are duty bound to model it, especially if it can be seen from a foot away. Hence bigger stuff not really a bonus for the eyes - you can include so much more and it is what gives bigger models more character. Nice trick with the home made split pins, Eoin. Another one to remember! As for the loco, it is really coming together and each fresh bit of gingerbread makes it that bit better. Am also drooling again
-
Unbelievably retractive prototype and why it doesn't appear to have been modelled before is beyond me. Visited in 2016 and the setting seems perfect. Quayside at the front, village street forms the backscene and even the engine shed to hide the hole in the sky to the fiddle yard! Not sure Andy is one for posting pictures, but do know the layout is booked for Warley this year.
-
And no sign of any track yet. Just like the real thing!
-
Great to see there are more!
-
And just to add, that means we now have a new addition to correct gauge layouts: 3mm - Ballyconnel Road 4mm - Valencia Harbour, Courtmacsherry and new P4. Adavoyle too. S - Paul Green's layout 7mm - Castle Rackrent, Arigna Town Not many, so great to have a new addition!
-
Star! Am guessing that, trackwise, P4 21mm is no harder than finescale 21mm and flangeways will undoubtedly look better. From what other people have said here, it seems that loco and rolling stock conversion is the main barrier to going 21mm, though Andy Cundick gets on well enough. So, all power to your elbows, good sir. It has the look of a very good layout and can only be enhanced by being correct gauge. Am really looking forward to seeing how you get on.
-
Part of me thinks that if it was that simple, why haven't we all been doing it for years? Then again, maybe you have hit on something really interesting.
-
A real beauty - full of character.
-
Good for you and hope you get lots of satisfaction from this project. It deserves to do well.