David Holman
-
Posts
4,359 -
Joined
-
Last visited
-
Days Won
117
Content Type
Profiles
Forums
Events
Gallery
Blogs
Everything posted by David Holman
-
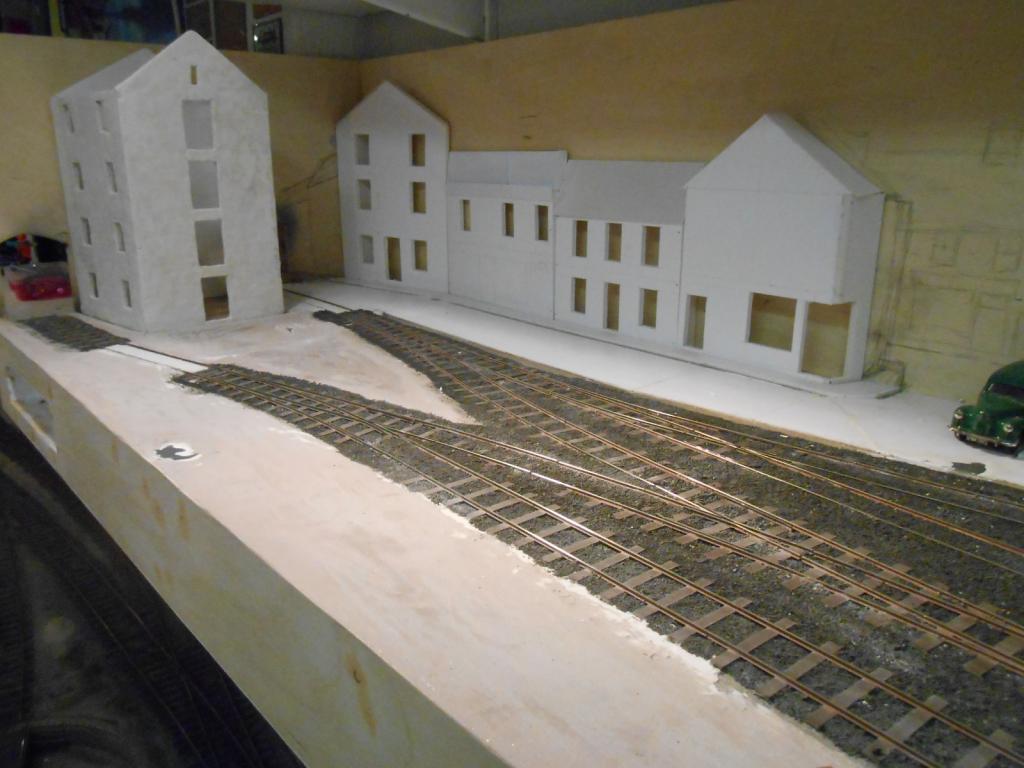
Have said before that in a small layout in a larger scale, a back scene is pretty much essential, both to frame the scene and to make up for the lack of actual depth. Given Fintonagh is only 50cm deep, I'm sure you can see what I mean... Started with a coat of emulsion for the sky, then sketched in the buildings. For me, the difficulty has always been getting colours muted enough, particularly for anything in the distance. However, in this case I want the buildings to crowd in on the scene & make it appear that the tram station is right in the town centre. Used acrylics for the larger areas and artists spirit 'brush pens' for the details, along with pencil crayons & pencil. Once done, then painted the foreground tress on top, using acrylics and my 'stippling' method to build up an impression of foliage. Then couldn't resist adding a little 3D foliage in front, though more needed here. Am thinking that some 'sea foam' pieces, suitably foliated and fixed behind the fence will help link the 3D ground cover with the 2D back scene. Need to buy some first though!

-
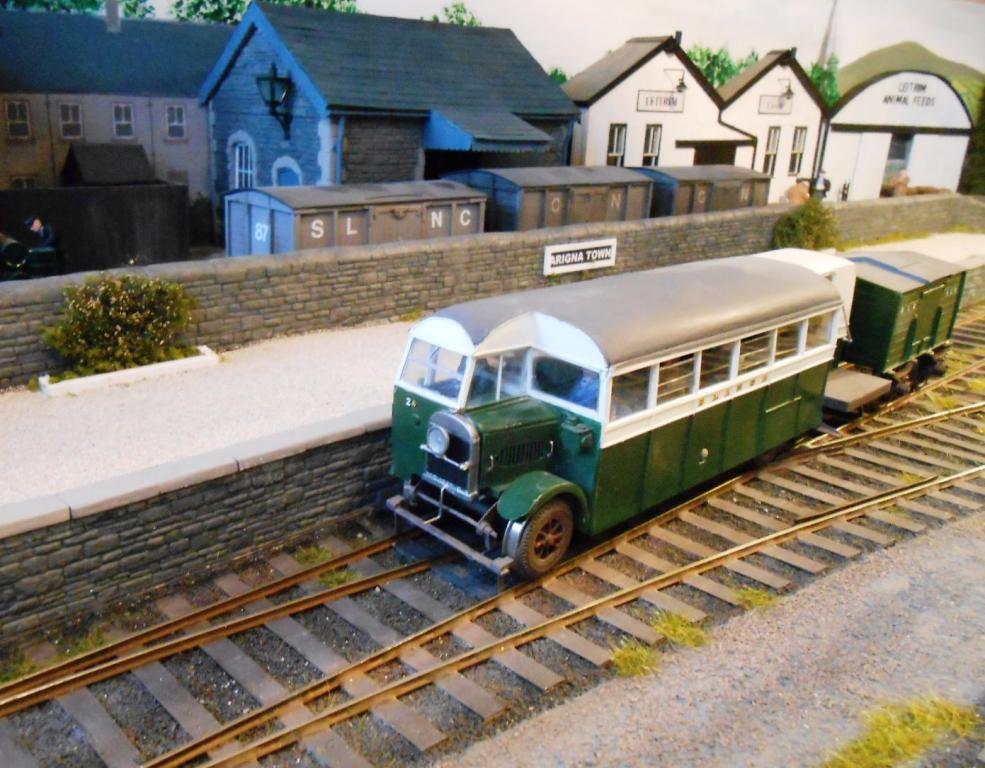
Couple of pictures for you DB, showing how I incorporated an addition of Glenfarne goods shed on my Arigna Town layout. Did the stonework using Wills 'Random' embossed sheets. Intended for 4mm scale, they work just as well in 7mm. The rails also began life via the Alphagraphix kit, though only as a 'drawing'. It is scratch built - plasticard body on a simple nickel silver chassis. The Howden-Meredith wheels are just slices of Corgi Classic lorry tyre stuck on to Slater's disk wagon wheels
-
If you are continuing the Sligo theme, what about Glenfarne goods shed? Ralph a graph x do a kit and even if you don't use it as intended, it certainly provides a starting point.
-
I always keep my eyes shut at the dentist - even though my current one is a rather pretty young lady! Given many of the tools they use are the same ones as in my own tool box, I'd rather not know what they are doing...
-
This 'new' adhesive was mentioned in the December Railway Modeller, but it took me a while to track it down. The glue is a gel, which only sets under ultra violet light. Hence we have a tube of gel with a 1mm via dispenser at one end and an ultra violet LED at the other. Use the applicator to put the gel where you want it, bring together whatever it is you are joining and then shine the UV light on the join for 3-5 seconds. While the join isn't as strong as say 5 min epoxy, it is certainly good enough for all sorts of things and I am finding it very useful. Sold by 'JML' in Britain, the likes of Wilkinsons & The Range are stocking it. About ten quid, but a worth addition to the modellers toolbox I would say Apparently, it is used by dentists too...
-
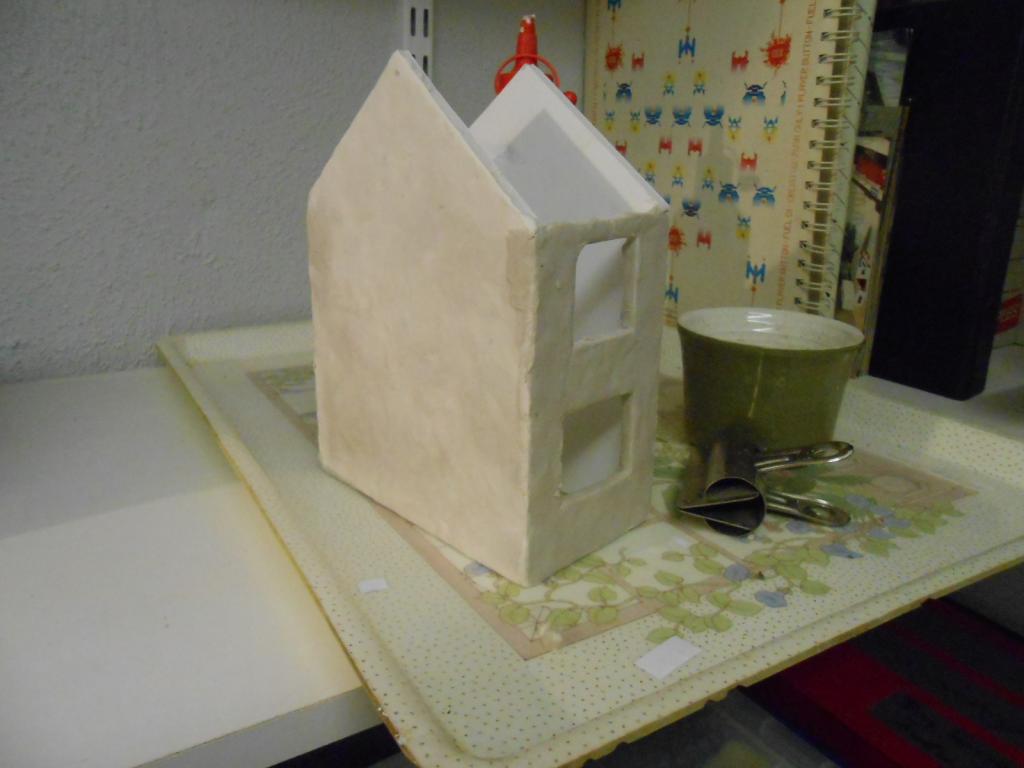
So far, have not found cracking to be a problem, Paul. The DAS is smeared on really thin [no more than 1mm thick], on a base of PVA, which helps it to stick and may well stop cracking too. However, as it dries overnight, it is easy to make any adjustments next day with the odd extra patch here and there. For random stone, I find leaving an uneven surface works well. For dressed stone, block and brickwork, I sand the surface smooth before starting scribing. Have just put DAS on the building that will go behind the loco shed. The three sides took less than two hours, including the window rebates. They need to be filed flat/square once the clay has dried.
-
Over a dozen or more exhibition layouts, rail soldered to screw heads works best, but ALWAYS lay the track over the join first, fix in place and cut after. Should ensure perfect alignment no matter how often the boards have to come apart.
-
Will look forward to seeing you there, Andy!
-
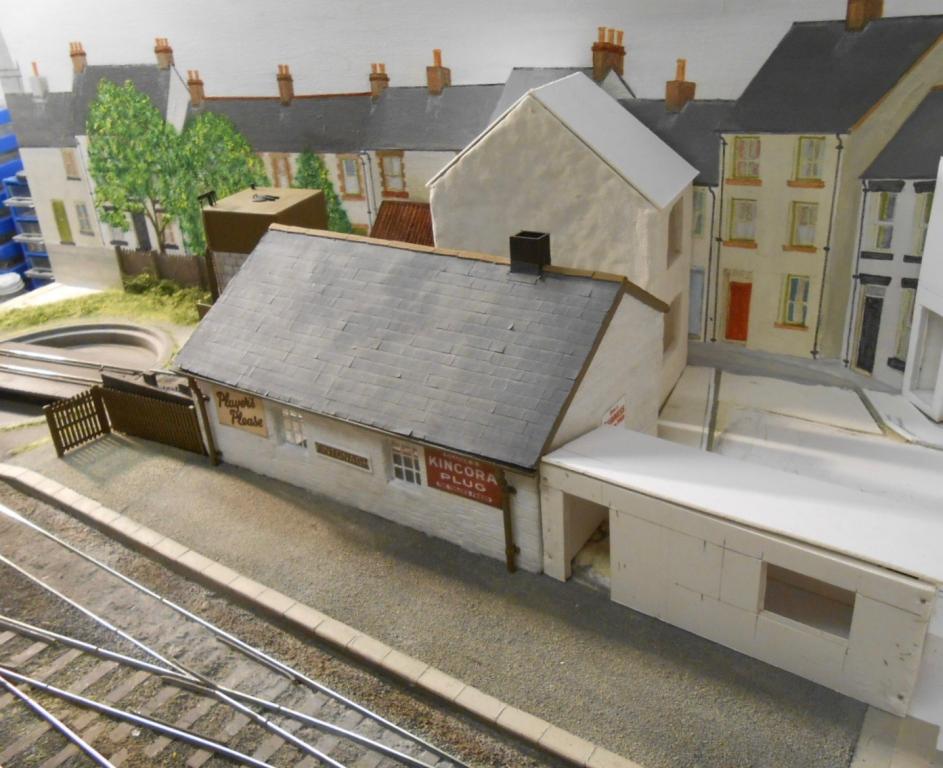
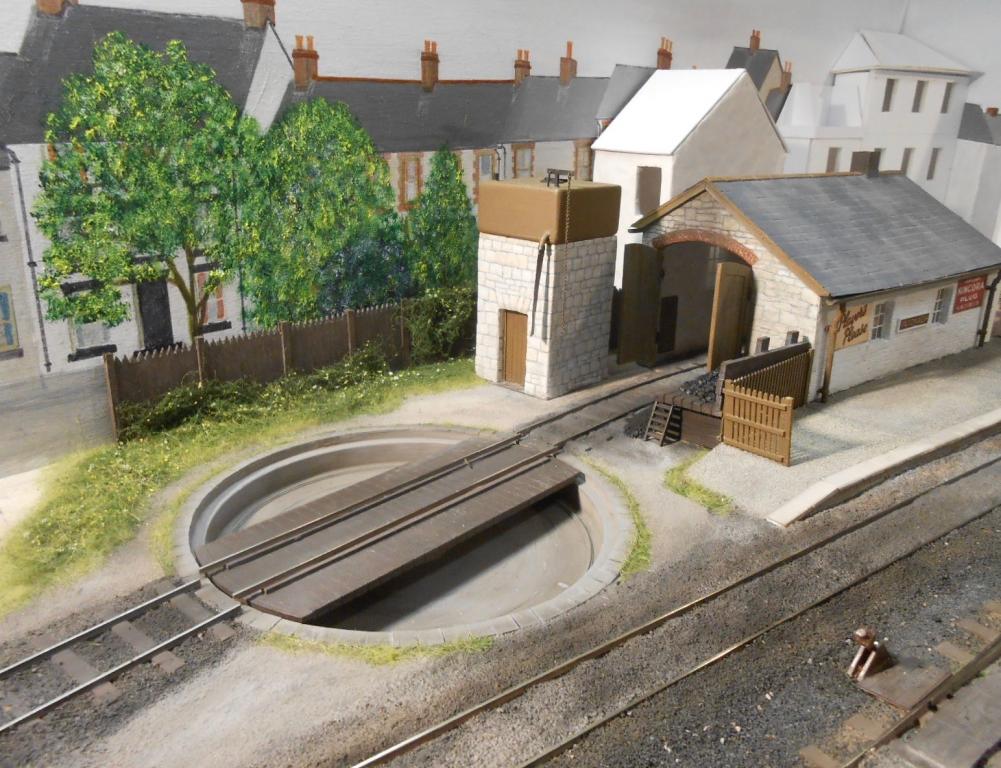
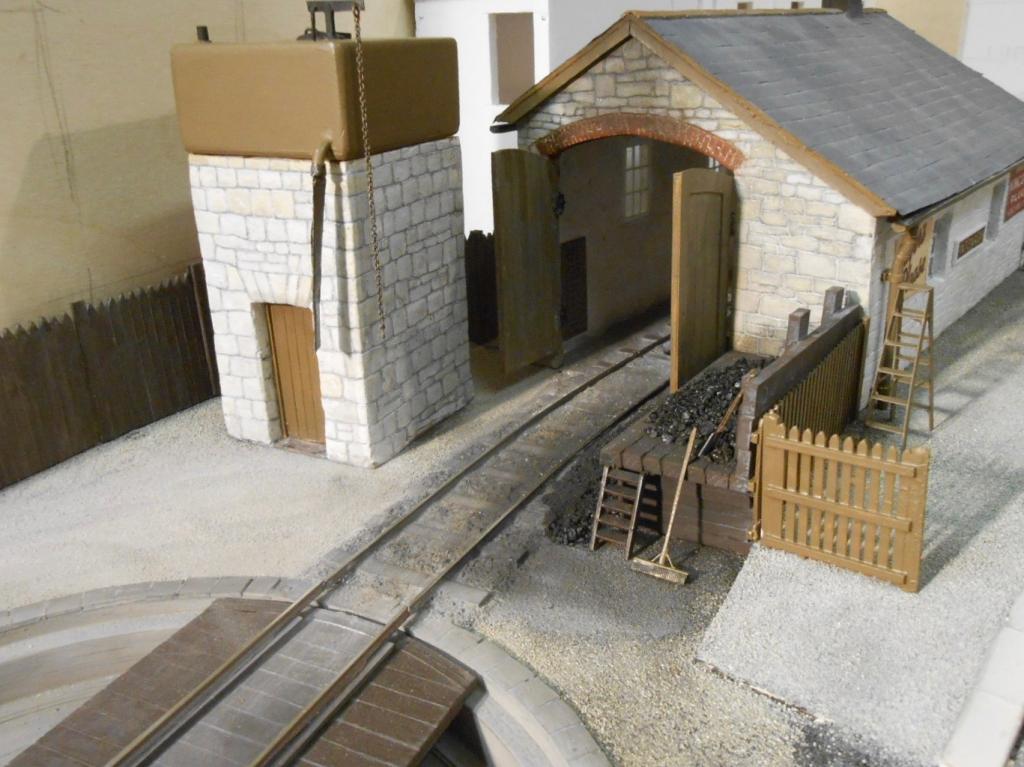
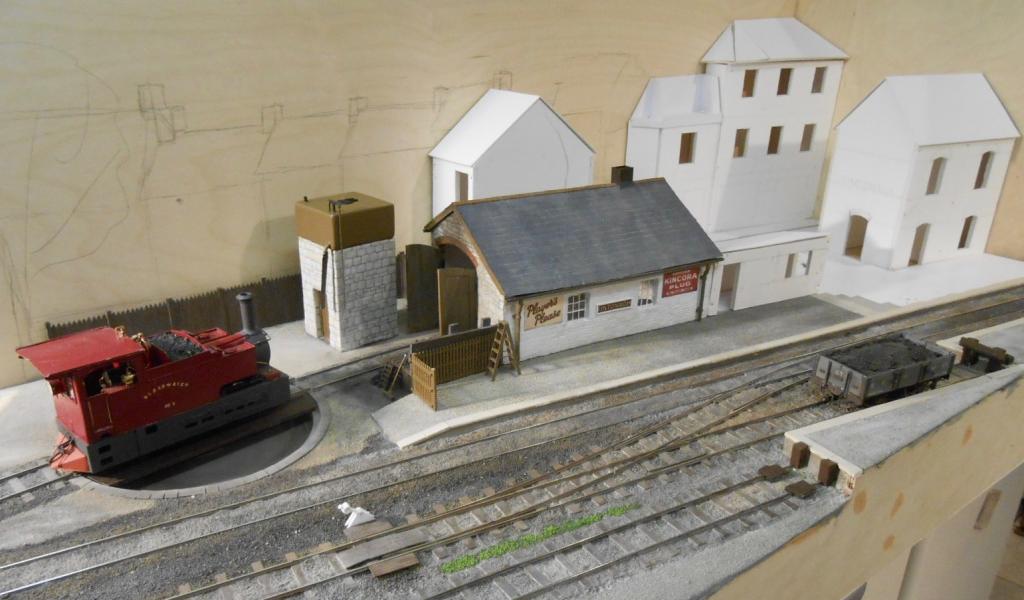
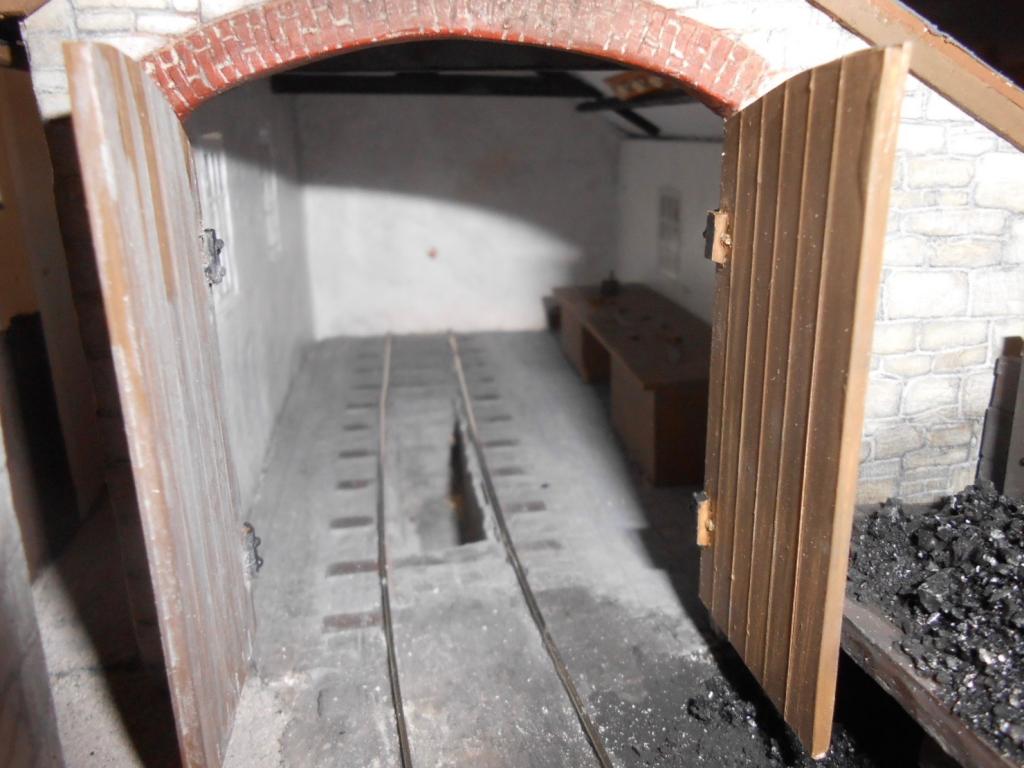
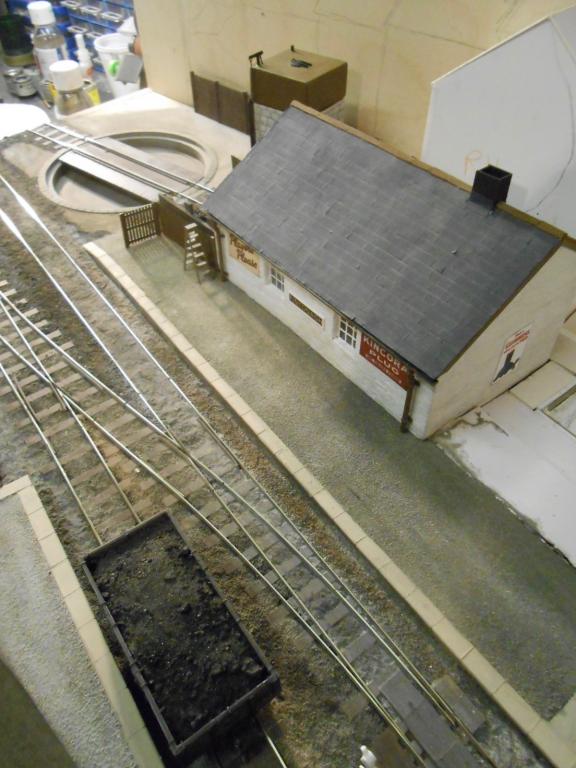
The end of January is always the Chatham Club's model competition & I tend to use this as an excuse to get something finished. However, it this case, in order to have anything for the buildings and scenic sections, I actually needed to get something started! Decided that the loco shed and water tower would make a good project and have been working on these over the last two weeks. DAS clay was pressed onto a foam board shell to give a thin overall covering and then, once dry, stonework was scribed in with a pointy thing. I'm fairly sure it was part of one of those screwdriver sets you get in the better quality sets of Christmas crackers. I'd tried DAS before & couldn't really get on with it, but it went better this time & has the advantage that you can scribe the mortar lines round corners, rather than try to match up embossed sheets. I left the [hidden] rear wall blank as a rendered surface & did the same with the interior walls, which I've just painted white. Indeed, only the entrance wall of the shed has been done in natural stone. However, the water tank is stone all round. The floor of the shed is also DAS, scribed to represent stone setts, though there is a cut out between the rails for an inspection pit. Windows are acrylic sheet, with glazing bars added by putting a self adhesive address label on top and cutting out the glazed sections with a scalpel. Inside is a work bench [plasticard] detailed with the only ready made items on the scene. This is a set of workshop etchings made by Severn Models, which comprise a set of tiny tools, tool box, a set of spanners on a wall rack and a set of steps. Fiddly and not especially much fun, but absolute jewels once completed and well worth the effort. The water tank is plastic sheet and is awaiting both some of those rivet transfer sheets and an etched ladder. Other work has focussed on the track, with much time spent on the ballast and rail colours. There are also two home made point levers awaiting painting. Apart from Woodlands Scenics fine ash, the ballast is a mixture of weathering powders, talc and chinchilla dust - the latter forms the platform surfaces too. The whole process was getting a bit stressful for a while as it was becoming well over 50 shades of grey. However, it is interesting to see how even simple things like brown paintwork and brightly coloured advertising posters lift the scene & am hoping that weeds etc in the sidings will do the same thing. Nothing is fixed down yet by the way, as I still need to pain the back scene. [/ATTACH]
-
In pre DCC days, Pacific Fast Mail did an analogue sound system, with synchronisation of the 'chuffs' coming from a cam on one of the loco axles. You had a small treble speaker in the loco and a fixed bass speaker [much bigger] under the layout. As I understand it, the principle is that the human ear can only attach direction to higher frequency sounds. Hence a mobile tweeter and a fixed woofer. Saw the absolute ultimate in this at Utrecht back in the '90s. There was a 7mm scale American outline layout run by a German guy which comprised a station [or depot], about 30' long, which included a 13 storey tower block above the platforms. Nicely modelled too. There were just two locos - a three unit early diesel and a 4-6-6-4 'Challenger' Mallet. It only operated for 15 minutes, on the hour, so a crowd tended to gather as per these animated clocks on churches etc. The guy appeared, magician like, from behind a curtain and the country and western music which had been playing for the previous 45 mins was replaced with the most humungous sound show & certainly one I've never seen bettered. The two locos were simply shuffled up and down the line, BUT, the 'woofers' were two 6 foot tall stacks of [very] hifi speakers, while the locos were big enough to hold decent tweeter cones. The earth did indeed move and the diesel in particular was utterly mind blowing. After 15 mins of this, everything stopped, the C&W music came back on & the German went back behind the curtain, to do whatever it was he'd been up to with his girlfriend...
-
Just got my copy and very interesting too. Burtonport has long been a favourite and managed to visit a couple of years ago. An amazingly bleak area & only government subsidies got the line built. But what a railway! Hubert Casserley's photos inspirational & I could just about fit the same track plan as in RM in my workshop... Not going to happen though. However, something derivative one day maybe. Temptation has always been to do it to 1:48 on EM track, to take advantage of 4mm scale extended axles for the outside framed locos. Also further info on the vast Carlisle Citadel project. Many of the buildings produced to commission in Ukraine of all places.
-
Coming on nicely!
-
On Arigna Town, all the points are operated by wire in tube, Tony and thus far have done 20+ shows without any problems. Mine is narrow bore copper tubing and steel 'piano' wire. As I'd used cork tiles on the baseboard surface, it was easy to cut a channel for the copper tube, which I soldered to countersunk screws set in the baseboard top. The piano wire is bent upwards at the baseboard edge & another short piece of copper tube soldered on to this as a small 'handle'. However, the other methods described about all work just as well. The only minor problems I've had with this method is [very rarely] the wire can become stiff/tight in the tube. Should this occur, it is a simple matter to replace it with new wire. The only disturbance to the layout is where the wire joins the tie-bar - in my case a piece of copper clad strip, which just needs re-soldering. Cheap and simple, especially if your points are already self isolating, as no other wiring is needed. Alternatively you can drill a hole in the head of a sliding microswitch and [with suitable bits of small tube either side, use this to both move the points and change polarity at the same time - particularly useful if you use Peco points, where the contacts have never been particularly robust or reliable, in any scale.
-
Am sure you will get good value from your birch ply. I only use 6mm, but it is quality stuff and has survived numerous exhibitions without problems. Not sure if cork tiles are worth it, though certainly better than sheet as nice and flat to begin with. As for painting, find that a coat of primer on the underside of baseboards helps with wiring etc as gives a clear white background to any work. Top surface less important, especially as scenery, glue, filler are going on anyway.
-
Clogher Valley buildings. What colour paintwork
David Holman replied to David Holman's question in Questions & Answers
Star! Thanks JB, always happy to trust your knowledge on colour. -
Clogher Valley buildings. What colour paintwork
David Holman posted a question in Questions & Answers
Serious brownie points to anyone able to answer this one. Am starting on some of my station buildings and find I have no idea what colour the woodwork was! Colour pics not exactly profligate, indeed only clue I can find is the paintings on the cover of Patterson's history. This suggests brown bargeboards and white window frames. Am sure the latter cannot be right, more likely the frames would be cream methinks. Cavan and Leitrim buildings had green and cream, but before I start any painting it would be nice to know! Please! -
Quality and quantity in equal amounts.
-
There look to be some rather nice buildings lurking in the background too. Any chance of seeing more of these?
-
Both models look the business to me. Am hoping to get my hands on a set of Worsley Works etchings in 7mm scale for Arigna at some point, so will follow this thread with more than the usual interest.
-
Irish freight yards and sidings. Prototypical operation and detailing.
David Holman replied to dave182's question in Questions & Answers
I am certainly no expert on Irish signalling, though am guessing the rules will be the same as in Britain because the origins are the same and firms like Saxby & Farmer supplied equipment on both sides of the water. Individual levers for yard points would almost certainly be the case and, for me at least, a good way of doing things. You would be following in esteemed company too. The wonderful East Lynn (S scale by Trevor Nunn) is fully signalled, with a proper lever frame hidden in one of the buildings. However, on the quay side, points are operated by local levers 'because that was what the prototype did' to quote Trevor. Had the immense privilege of operating this master piece on a couple of occasions. It is both clever yet simple and a joy to work. East Lynn makes are rare outing at Doncaster next month. Well worth a visit if you are anywhere near. -
Nicely put, Rich, both in the P4/EM compromise and compromises generally. Nobody should feel they have to do things a certain way, but if anyone wants to change to new/different standards, there will be plenty of folk out there willing to help
-
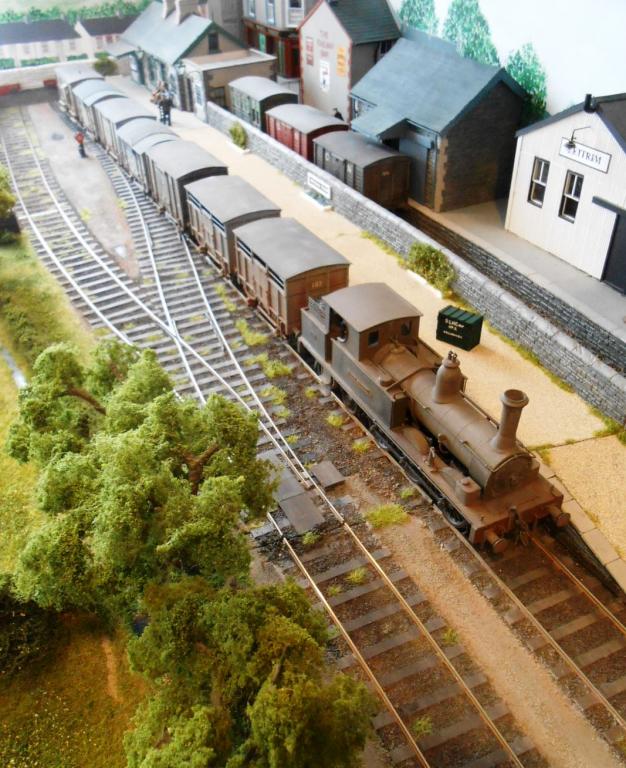
Hear what you say re train sheds, but am afraid I rather like them and Fintona lends itself nicely to my needs. This is as much a working diorama as a full blown layout, so artistic licence is as important as prototype fidelity. Three storey buildings very much provide a balanced scene, while reference to books on the CVR do indeed show quite a number this high in the msin town centres. All criticism welcome though. A bit like proof reading your own writing, you only see what you think you see, which is why I once wrote of my experience of working with children who had leaning difficulties on a job application form. Spell checker did not pick it up, but wife did and I got the job.
-
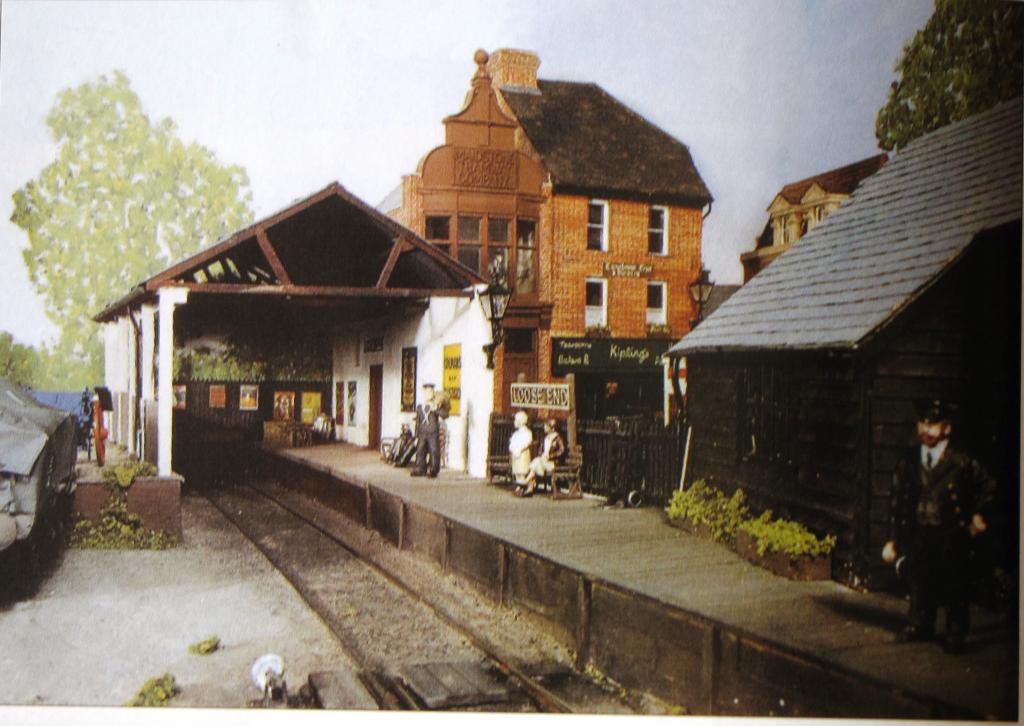
This was what I had in mind - based on Wantage Town, I built this for my Loose End layout. Given the vagaries of the Irish weather, a fully enclosed one would be better, but it is a case of using artistic licence here, so that the trashed does not hide the trains. It is the same with some of the low relief buildings, photographic evidence shows pretty much all roofs as gable ended, but to hide the fact that most of buildings on Fintonagh are little more than 2cm deep [sometimes less], then needs must, I'm afraid.
-
Very nice indeed. Keep it coming.
-
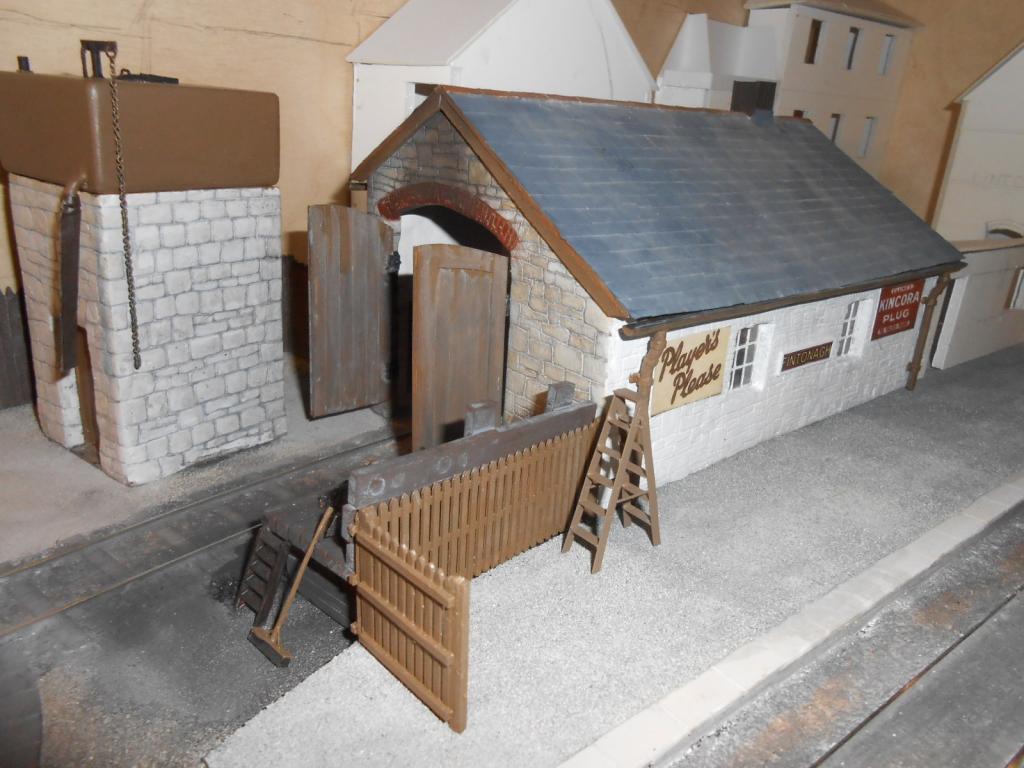
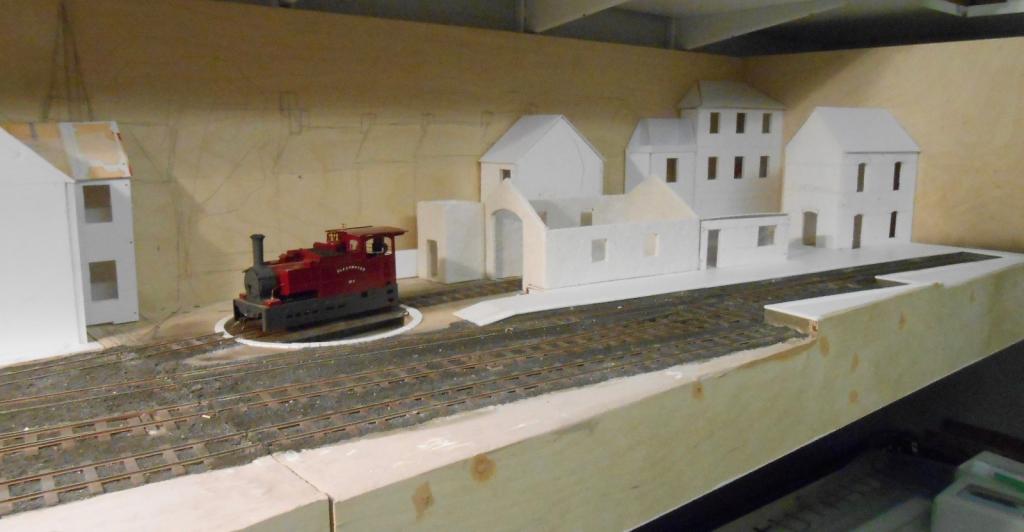
Spent spare time over Christmas doing more to the building shells & trying to create a better overall impression of the scene. Hence, the water tower has been moved behind the loco shed track, the shed itself has been enlarged slightly and several of the low relief buildings altered in an attempt to get the scene better balanced. Among my Christmas presents was a block of DAS clay [i know how to live!], which will feature a lot in the buildings as I want to try scribed stone and brickwork, a la Gravett. See if you can spot the changes from the two pics. The overall roof is yet to be finalised.