David Holman
-
Posts
4,359 -
Joined
-
Last visited
-
Days Won
117
Content Type
Profiles
Forums
Events
Gallery
Blogs
Everything posted by David Holman
-
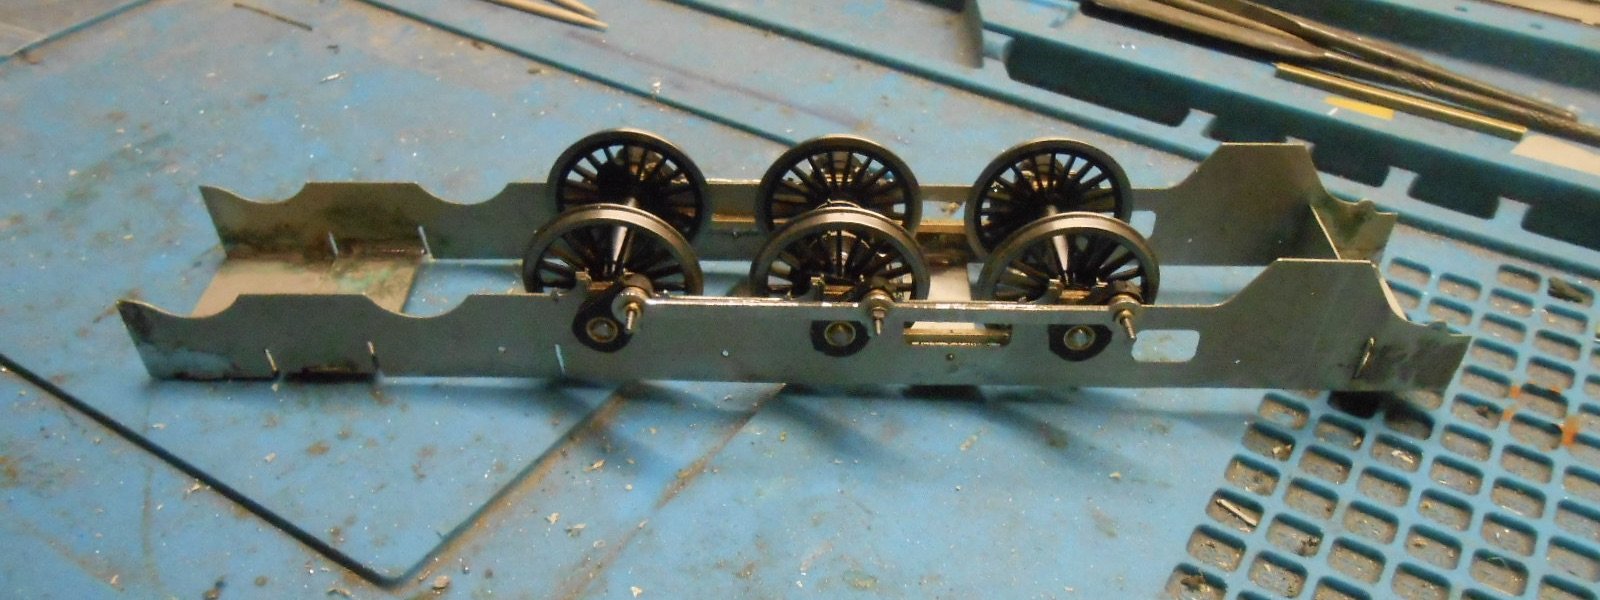
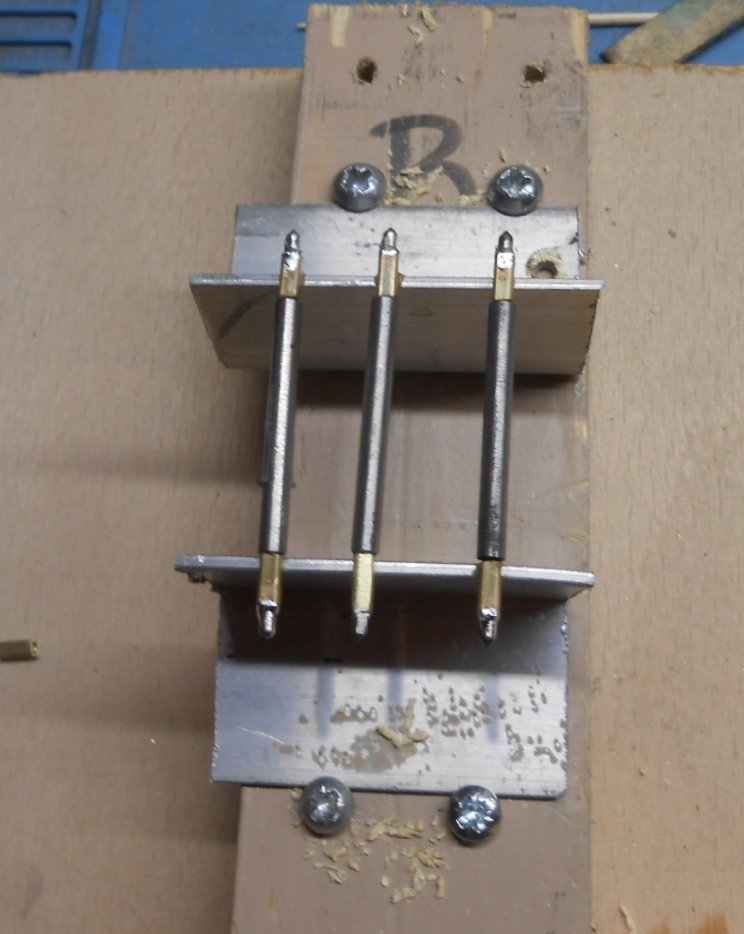
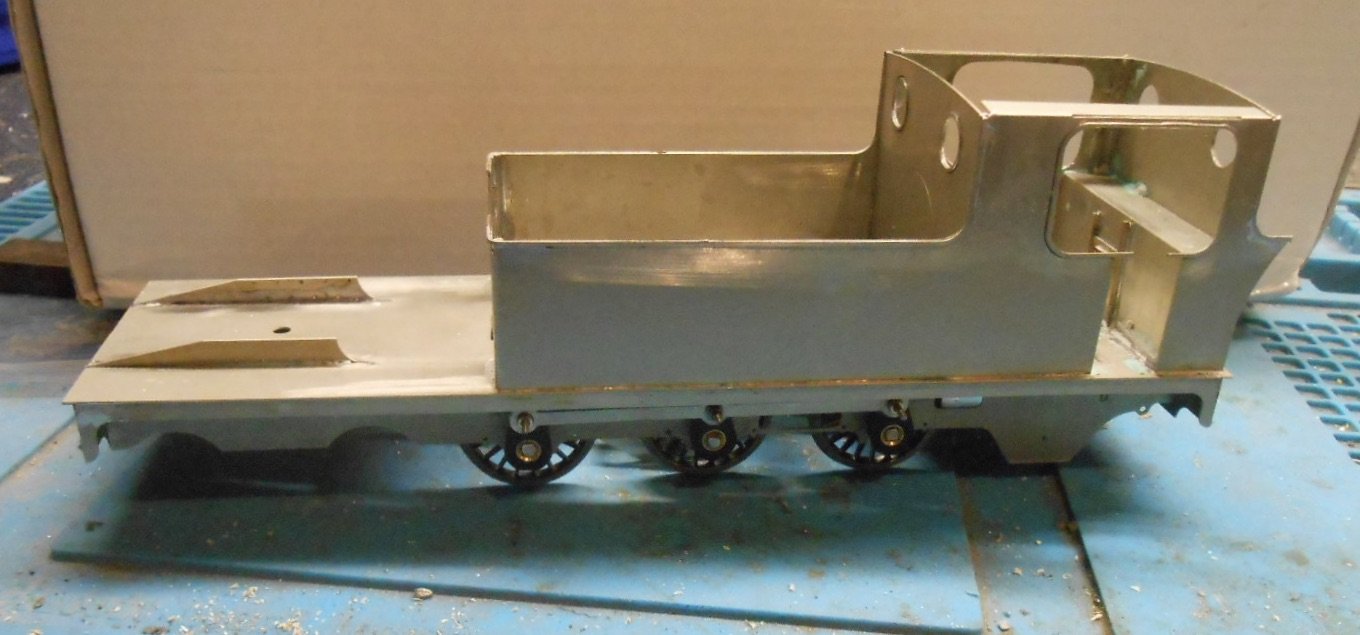
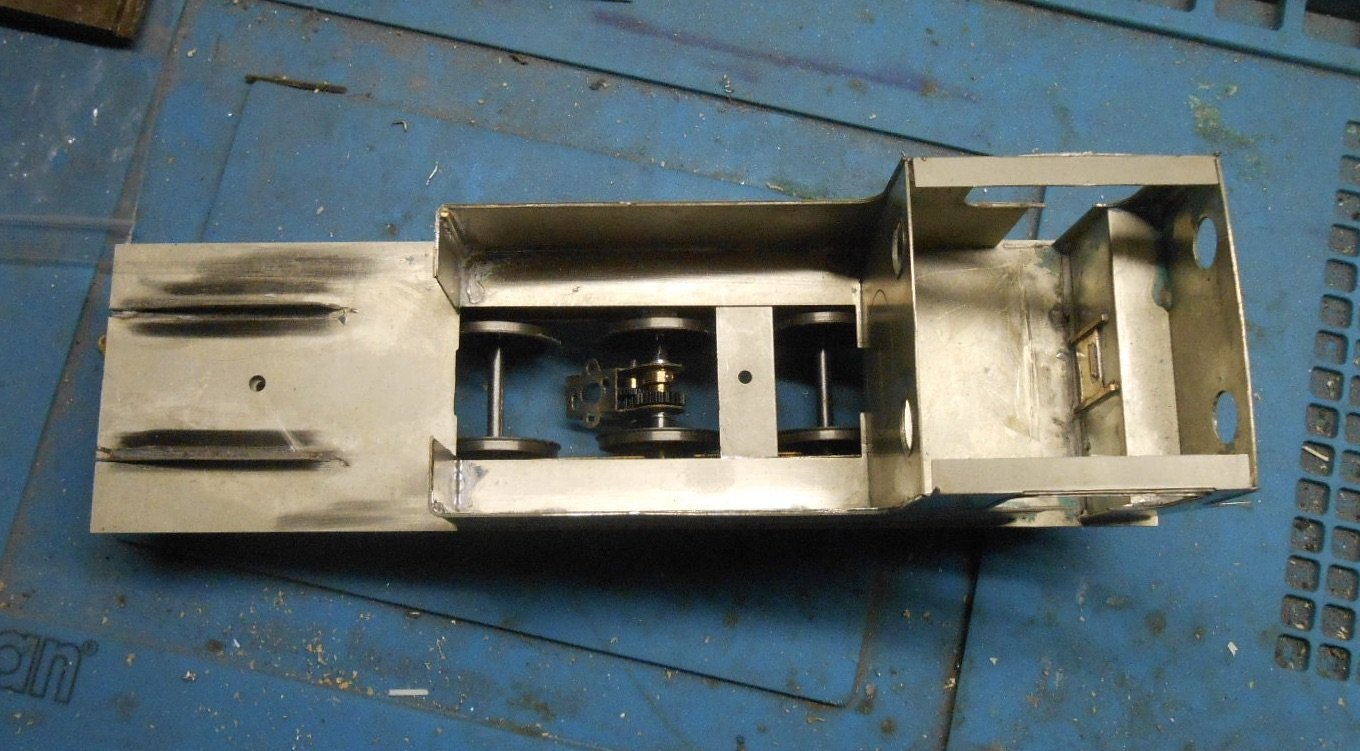
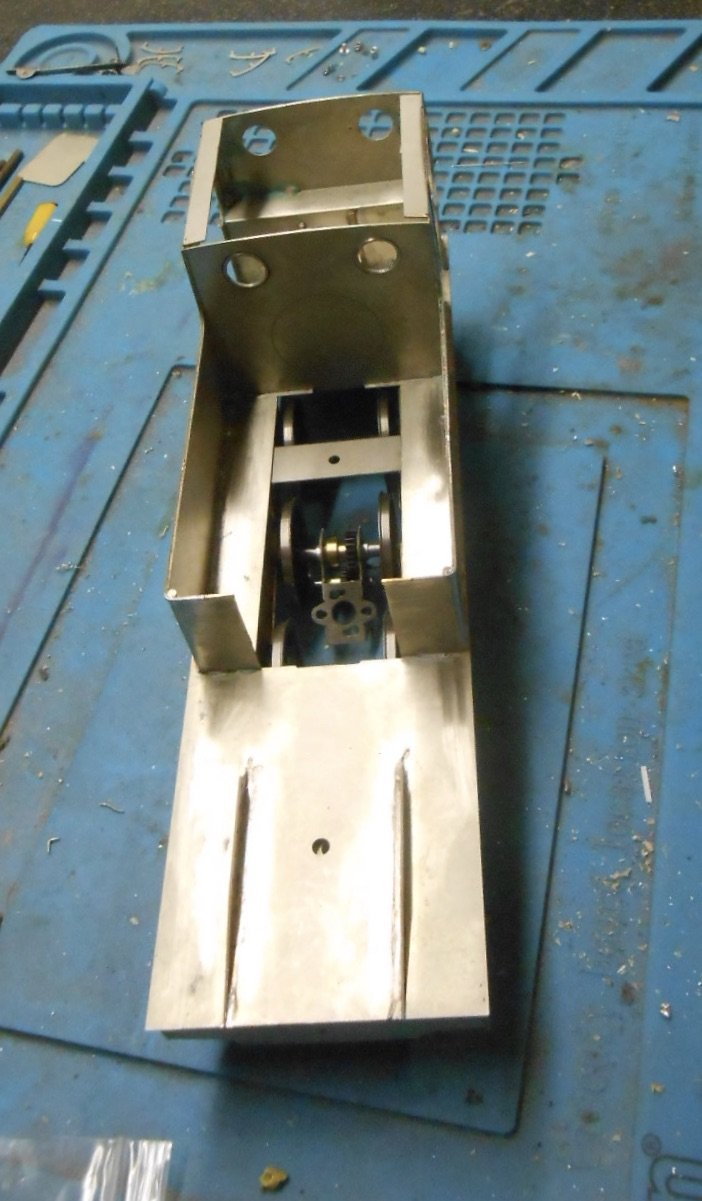
Thanks Alan, should have remembered about them, though right now suffering from serious brain ache after grappling with the basics of the chassis. As I've already said, many times, there are numerous issues when building an outside framed chassis, the main one being able to remove the wheels and motor/gearbox, both as part of ongoing construction and future maintenance. With the Barclay 4-6-0T, these are locked in and were a right pain too, especially trying to fit the wheels inside the frames. Therefore, resolved to dot better this time. The obvious way seemed to be to make cut outs in the frames, to take High Level horn blocks. The brain ache came from investigating whether I could incorporate suspension/compensation as well - given that is what these things are made for. The High Level beam springs are very clever, but would make removing the wheels very difficult. Sharman style compensation would probably have worked except for the fact that I needed to put the motor on the middle axle because mounting it on the rear one gets in the way on the pony truck. Geoff Kent's books offered other options, while in the course of my investigations I came across the CLAG papers. These cover the whole science of springing and compensation, but as I don't have A Level physics, most of it went straight over my head! So, in the end, the chassis is unsprung, with the horn blocks there simply to allow easy removal of the wheels. After deciding which of the half dozen frame spacers to use, I first tack soldered the frames together, so I could cut out rectangles for the horn blocks. These are 6mm wide and extend 4mm above the centre line of the axles. Once the frames were separated and cleaned up, I assembled them with spacers at each end with another in the centre, though this may need moving as other bits are added. The axles came next, Slater's coach/wagon ones, to which I added square section brass tube, which was then filed down to fit in the outside cranks. This nicely takes care of the all important quartering. High Level horn blocks are neat, if rather fiddly for a 7mm scale modeller like me, while fitting them needed much thought too. Rightly or wrongly, I used my Poppies Woodtech jig to set up the middle axle, then used two springs to hold the outer horn blocks in place, while I fitted the coupling rods. These were held with hair clips and [after checking multiple times to everything was square] soldered the remaining four horn blocks in place. I could then take out the square, brass bearings and fit the wheels, which go inside them. With the wheels back in the chassis, I then held my breath as I put the chassis on the track to find that all the wheels were turning - meaning everything was level. Phew! Crank pins and their bearings could now be added, along with the coupling rods, followed by another test on the track with happily, no signs of any binding. Double phew!! There's still lots more challenges, with the cylinder/crosshead/conrod unit to add, plus the bogie and pony wheels, all of which have the potential to cause me pain. However, it has been good to get this part done and while waiting for the horn blocks to arrive, I got the basics of the bodywork started, so I have a reasonable idea of how this will fit with the chassis.

-
Making an ‘E’ – the Maybach Diesel Model Assembly thread
David Holman replied to Mol_PMB's topic in Irish Models
Agreed. It is one thing to make a drawing, because that only involves thinking in two dimensions. Kit design means thinking in three, which is a whole extra level of visualisation and ramps up the number of variables considerably! -
I've got one in 7mm scale that went together well enough. It uses Delrin chain and gears to give four wheel drive. Must be on my Workshop thread, but you'll have to go back a bit to find it.
-
Little and often works well for me, as does the maxim of stop while you are winning, though still don't always remember that.
-
Looks good to me Leslie! An article in the latest MRJ shows that there were significant scaffolding type structures inside water tanks - all to do with the enormous weight pressing on the sides of the tanks. Fairly sure not many of us, me included, put such things in our models. Probably boils down to not seeing into the tanks from ground level, though where our models are concerned, the view is reversed as we are mostly looking down on them.
-
Making an ‘E’ – the Maybach Diesel Model Assembly thread
David Holman replied to Mol_PMB's topic in Irish Models
Impressive stuff! -
That works well! As for that poster, am sure we all know how many ears Mr Spok has. It's three of course : left ear, right ear and final frontier.
-
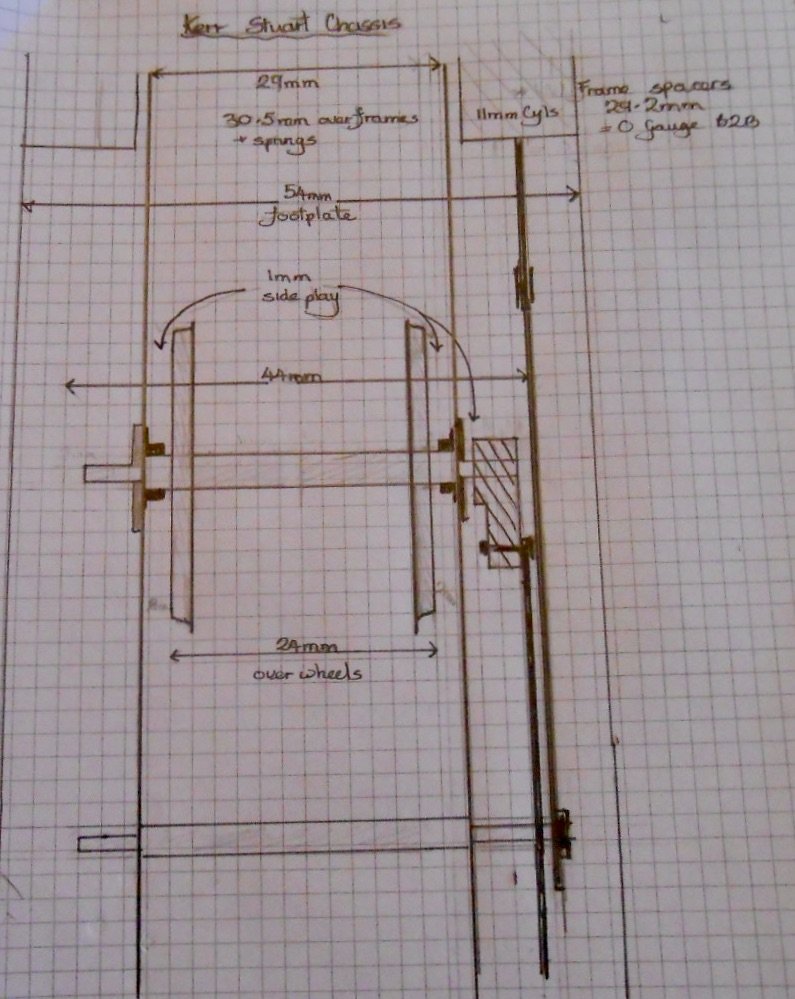
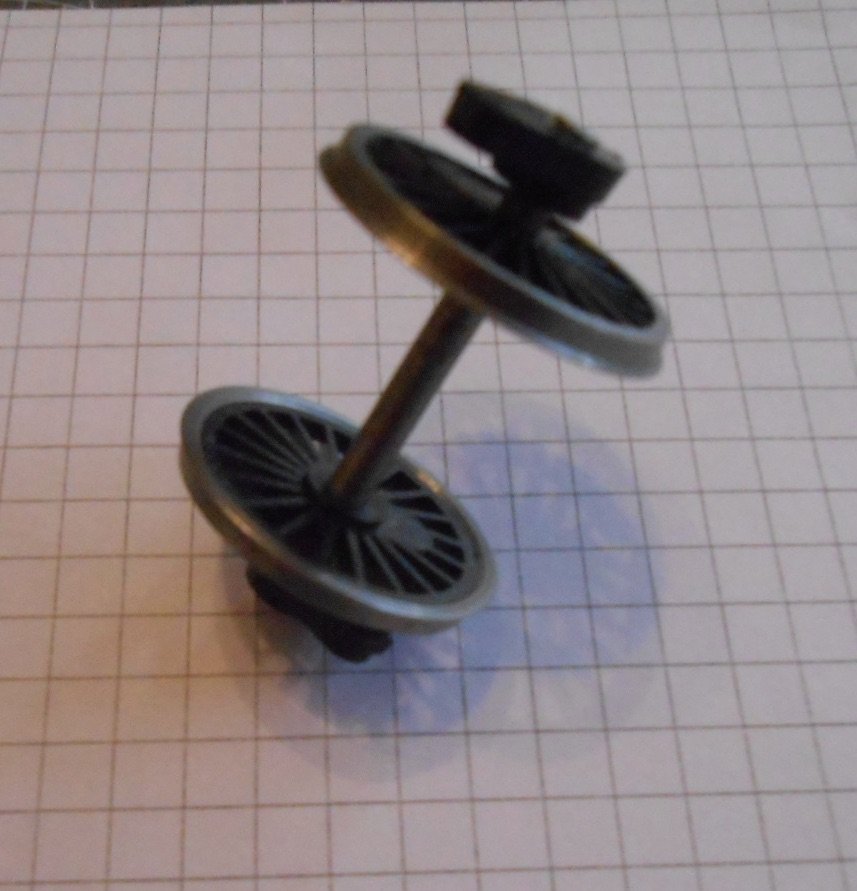
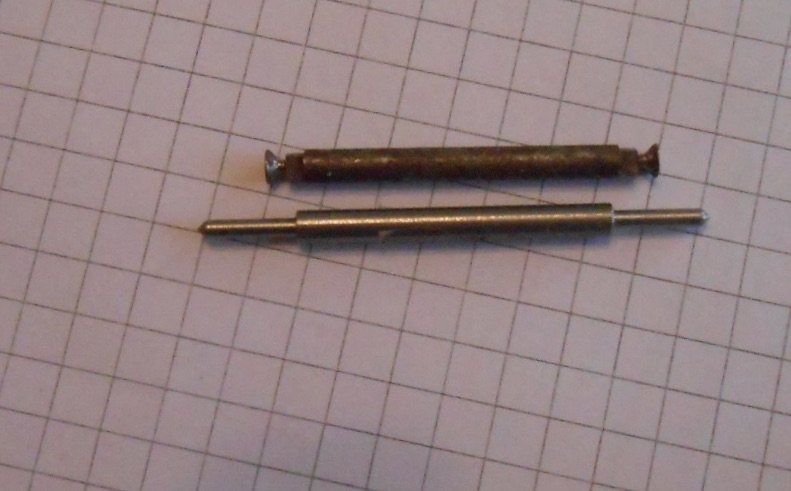
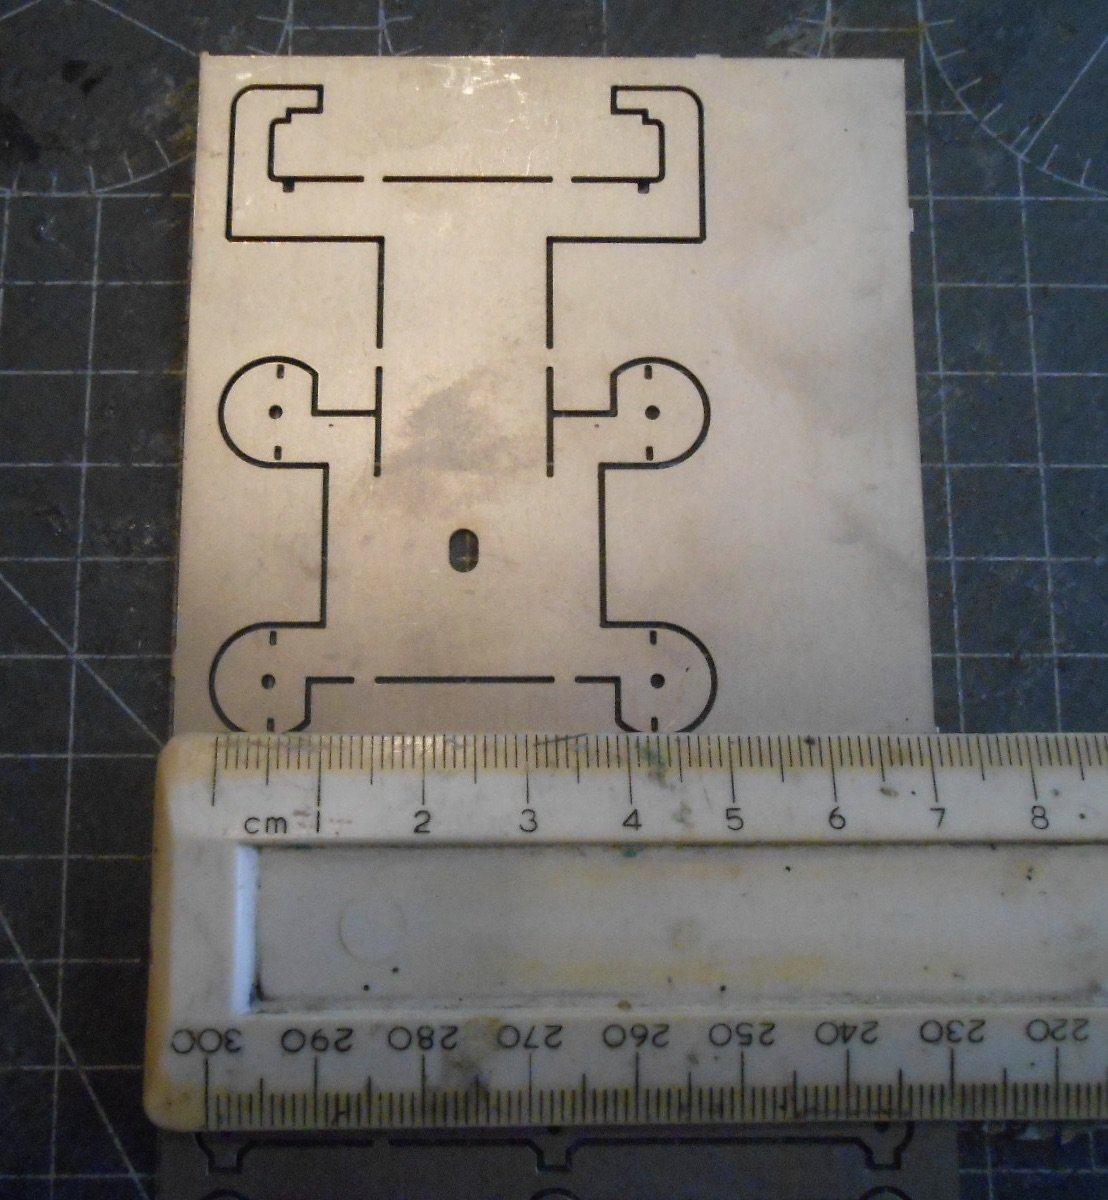
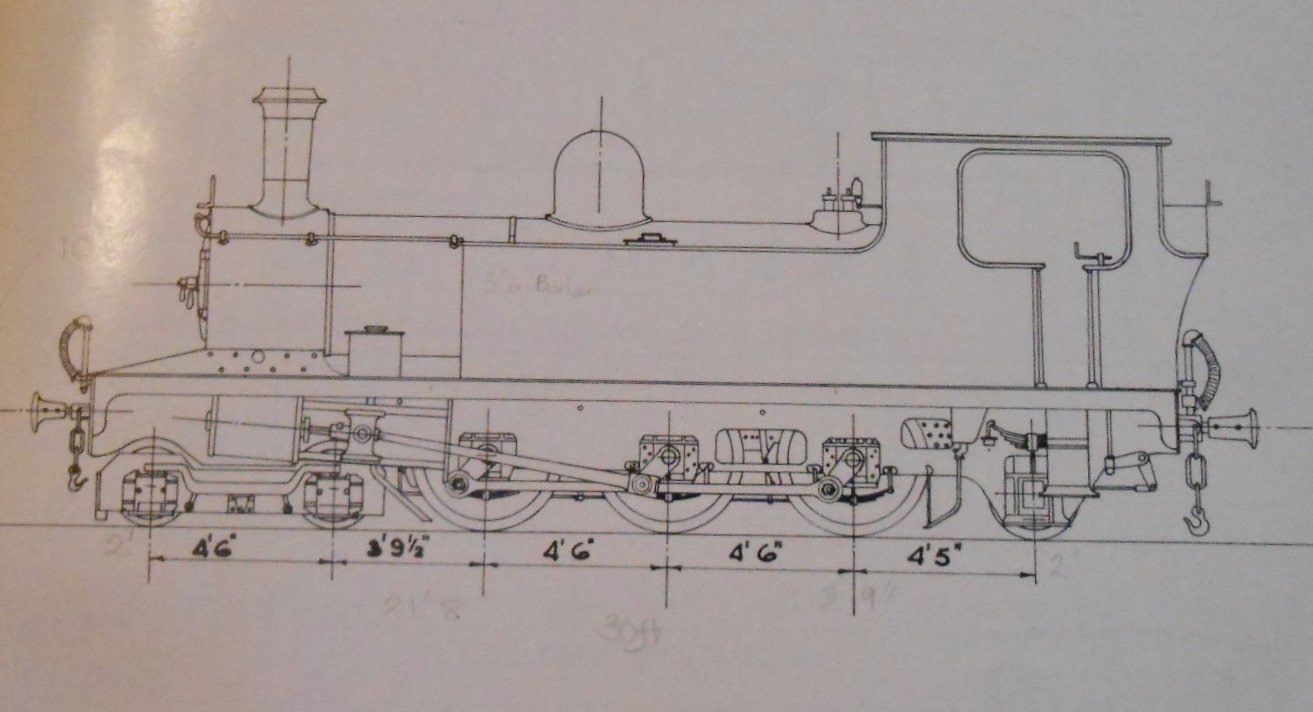
Kerr Stuart 4-6-2T Couldn't resist the thought of a new project any longer, so this morning sat down to evaluate what I need to do to get started. Having a set of parts is nice, but without any instructions, in effect you need to devise your own and as already mentioned in a previous post, work out what else you need. Found a scale drawing from the 7mm Narrow Gauge Society, though unfortunately not all the dimensions agree with the etchings. Nothing too drastic though, so guess I'll stick with what arrived. Those of you familiar with my Barclay Tank adventure will know the chassis caused me a LOT of grief, so decided I really needed a better plan of attack this time, starting with an oversized drawing to check clearances and so on: A good two hours was spent with ruler and vernier gauge checking parts and materials, from which I discovered, among other things that: The frame spacers at 29.2mm wide exactly match standard 0 gauge wheel back to backs. This is interesting, because the 0 gauge wagon axles I use with the Gibson driving wheels have nice extensions on them that will take square section brass tube to fit in the Slater's outside cranks, which helps with quartering the wheels. It is also a bit of a shame, because I discovered some Slater's 1/8" 0 gauge axles which fit nicely in the cranks and would have given perfect quartering with zero effort. Unfortunately, they are shorter than the wagon axles and would have made clearances far too tight. I really can't go through the hassle of trying to fit the Gibson drivers inside the frames as per the Barclay. Hence have sent off to High Level Kits for a set of horn blocks, so wheels and axles can be dropped out of the frames for painting etc. This does mean though that I need to find a way to make those dratted underslung dummy springs removable. A further point here is that talking to Dart Castings at the Tonbridge Show yesterday, it seems High Level could be the only supplier left for 4mm scale horn blocks. Dart can't get the square brass bearings, while Markits future is very much in doubt following the recent death of the proprietor... I fear the cylinder etching is too narrow. As the photo shows, it comes out as about 45mm, whereas the footplate is 54mm wide and the cylinders go right to the edge. They need to as well, to give space for the slide bars and con rods as can be seen from my drawing above. Without doing all this preparation, building the chassis would be fraught to say the least - been there and got the T shirts [plural] after all. However, it has helped me get my head round things and while I'm waiting for the horn blocks to arrive, I can get on with some of the bodywork, not least the footplate where it is important to find out where some of the spacers on the etch might fit and how they relate to where the motor/gearbox, body fixing points, bogie and pony wheels etc fit. As ever, life is complicated - which is why it is fun. Allegedly...
-
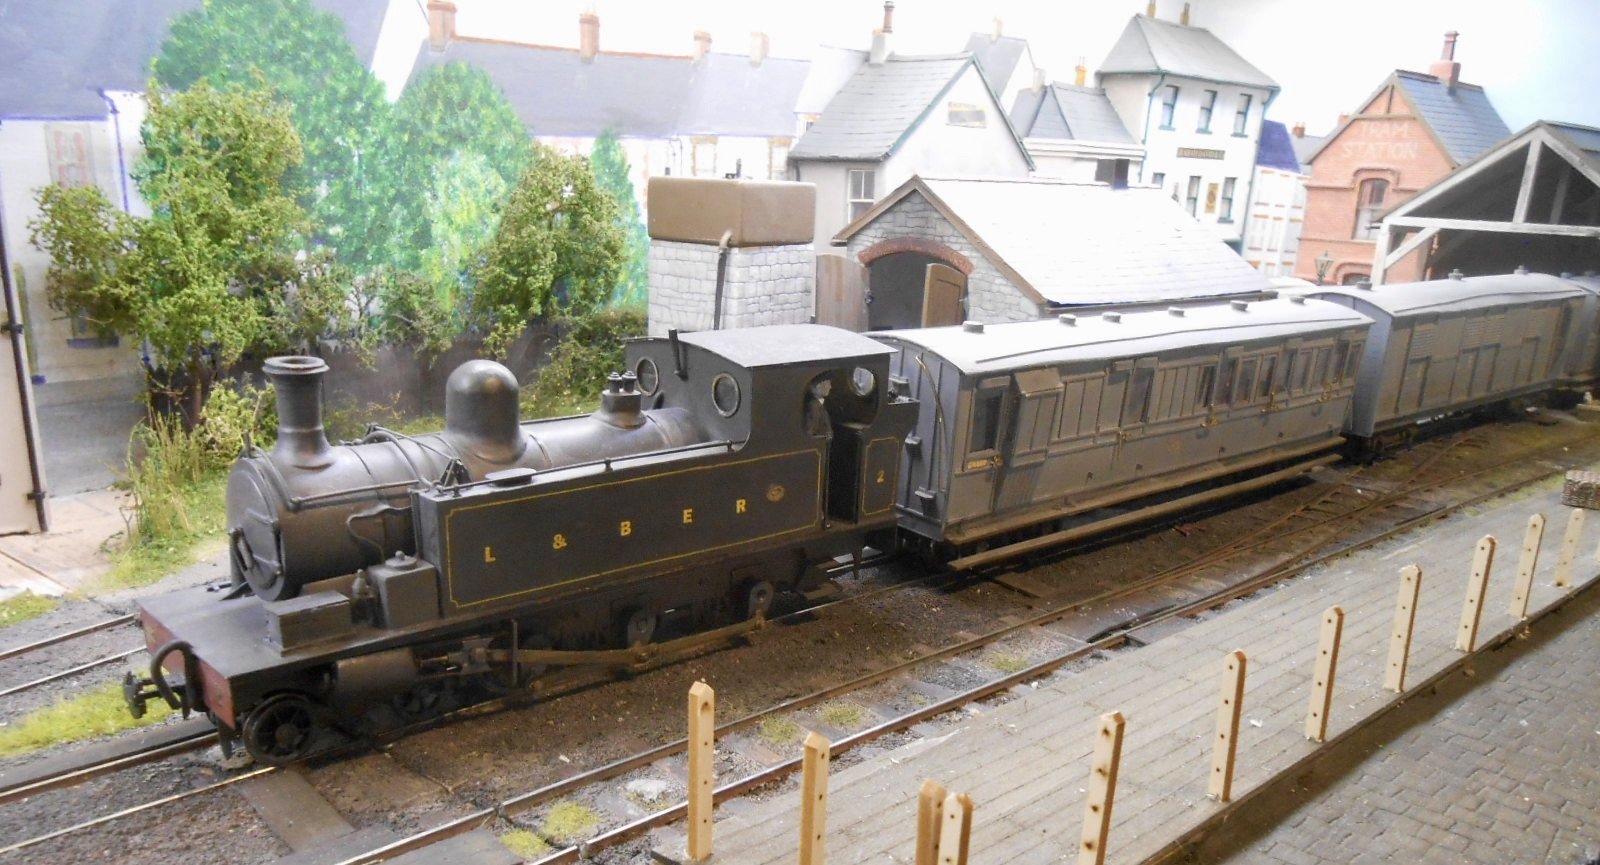
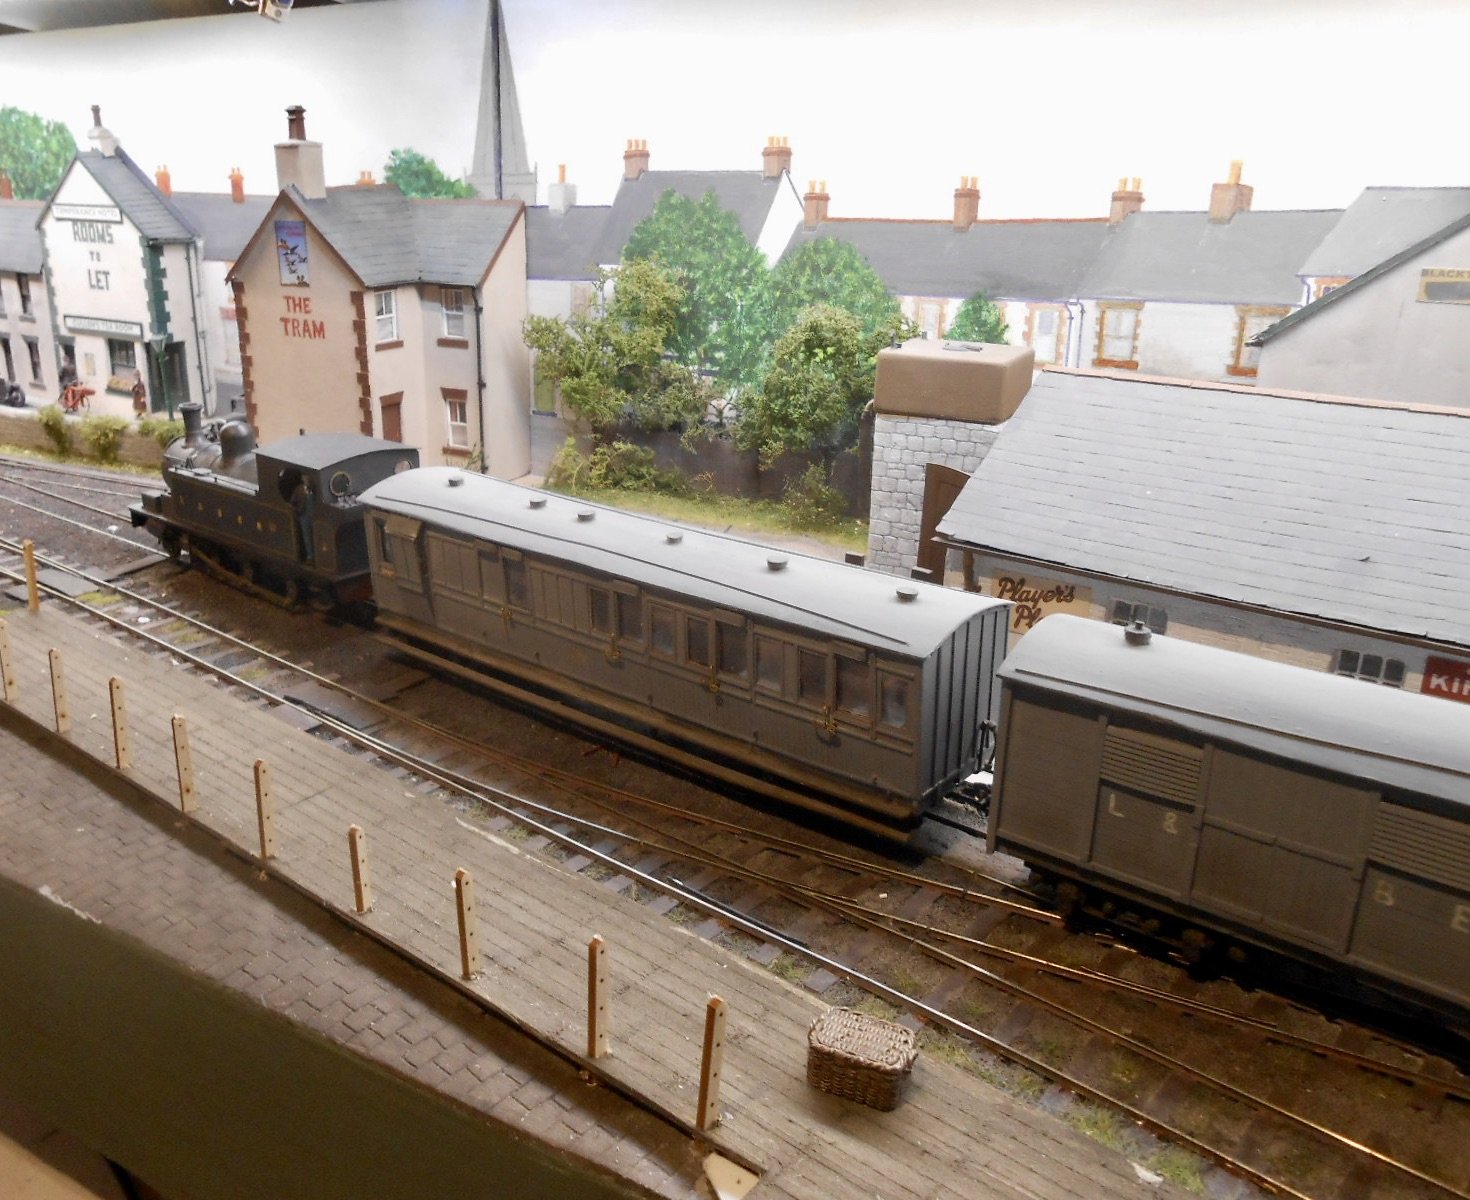
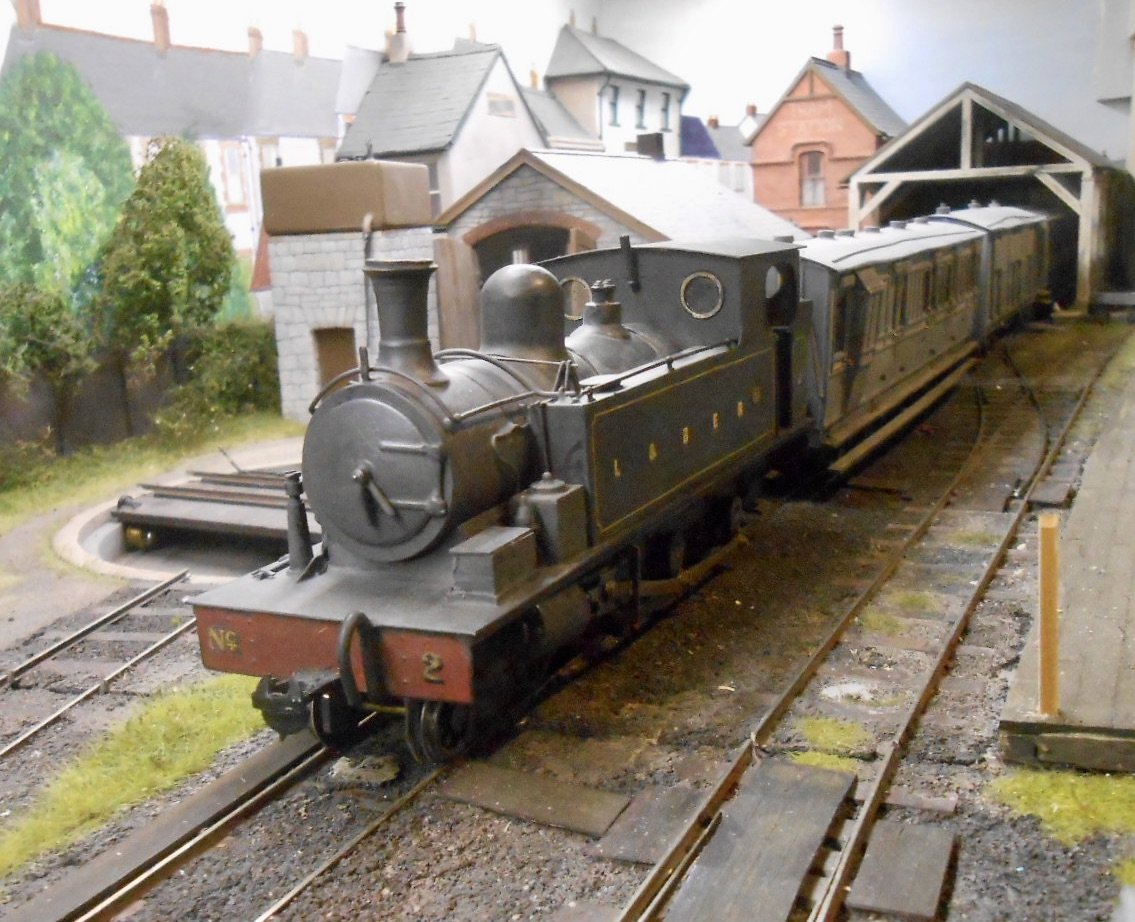
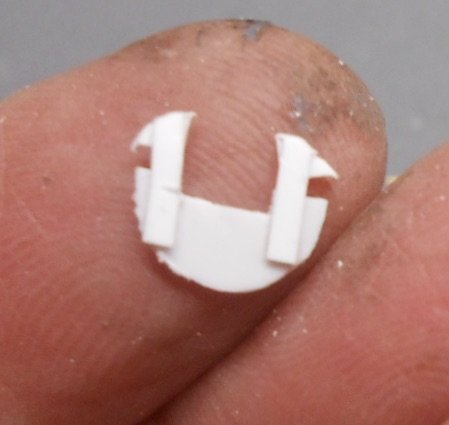
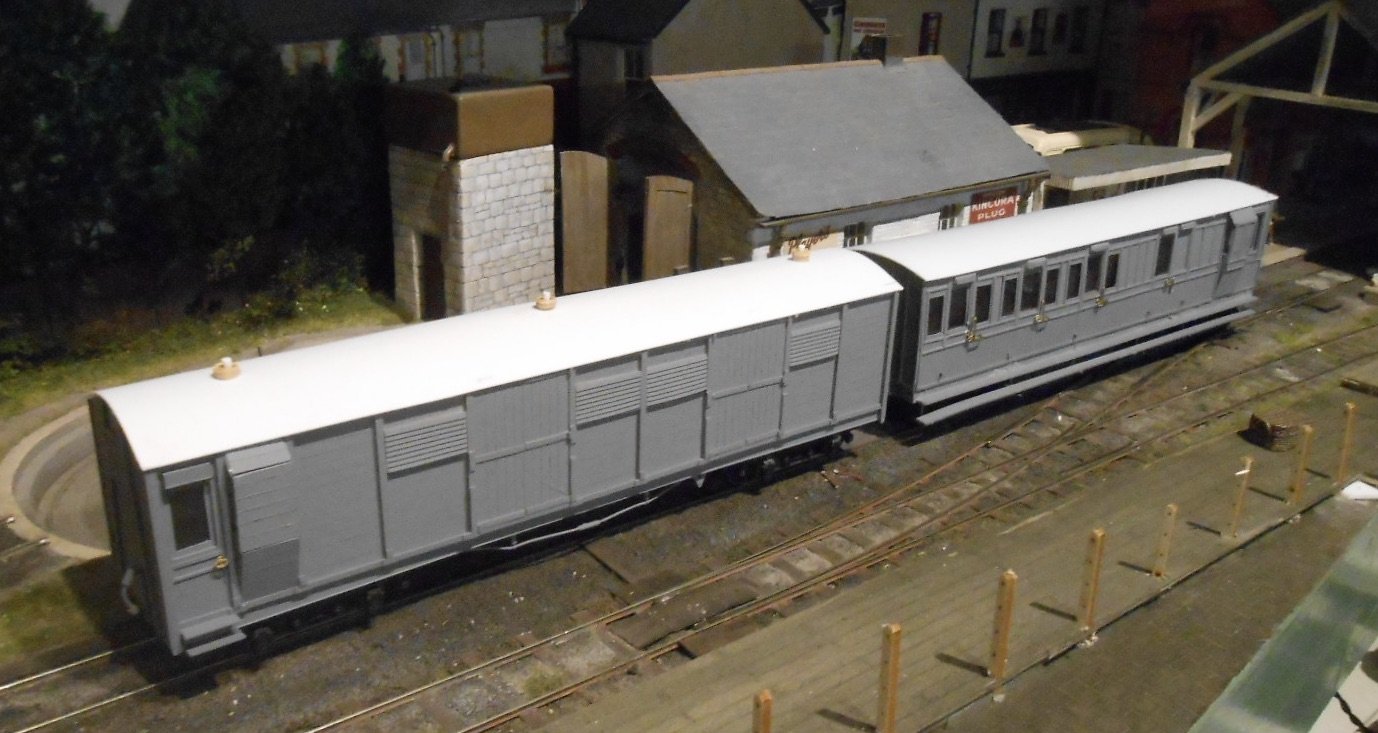
Still a bit more titivating needed, but the two Swilly bogies have made good progress. Hand lettering [white gel pen] and a few transfers, plus some weathering [enamels and powders], completes the scene, so have paired them up with the Barclay, below: Have also decided to have another go at trying to fabricate a cosmetic addition to the tension lock couplings to make them look a bit more like narrow gauge choppers. Just bits and pieces of plasticard, arranged to go on the inside of the buffing plate. A bit crude, but once stuck in place, with a bit of judicious filing and painted black, they are a reasonable upgrade. That said, in the latest Gauge 0 Guild Gazette, EDM Models have announced they are taking on production of the Zamzoodle Chopper couplings, which are much more accurate and can be made to work automatically too. If they are not too expensive, I could be tempted.
-
Making an ‘E’ – the Maybach Diesel Model Assembly thread
David Holman replied to Mol_PMB's topic in Irish Models
Don't forget that perceived colour depends on all sorts of things - weather, light/shadow, age, cleaning (or not), even the size of a model. For sure we want to get things as close as possible, but suspect that absolute fidelity is unlikely. Don't forget too that gentlemen's perception of colour, especially greens, deteriorates with age and we should defer to the fair sex on such matters. Scares the bejaysus out of me when my wife asks for my opinion on colour matching! She really ought to know by now... -
The latest, March, edition of RM has a Scottish theme and there is a really interesting article on small space layout ideas, including the loco shed at Kyle of Localsh. It would make quite a nice small Irish model too, complete with a turntable, of course!
-
Worsley Works Cork Blackrock & Passage tanks
David Holman replied to Pete00018's topic in Irish Models
When Clogher Valley wagons became Donegal 'red', they fitted larger wheels as the 2' ones, while fine for CVR speeds, weren't up to the higher ones on the Donegal. -
Worsley Works Cork Blackrock & Passage tanks
David Holman replied to Pete00018's topic in Irish Models
See my latest Workshop thread for an appraisal of a new set of Worsley etches. -
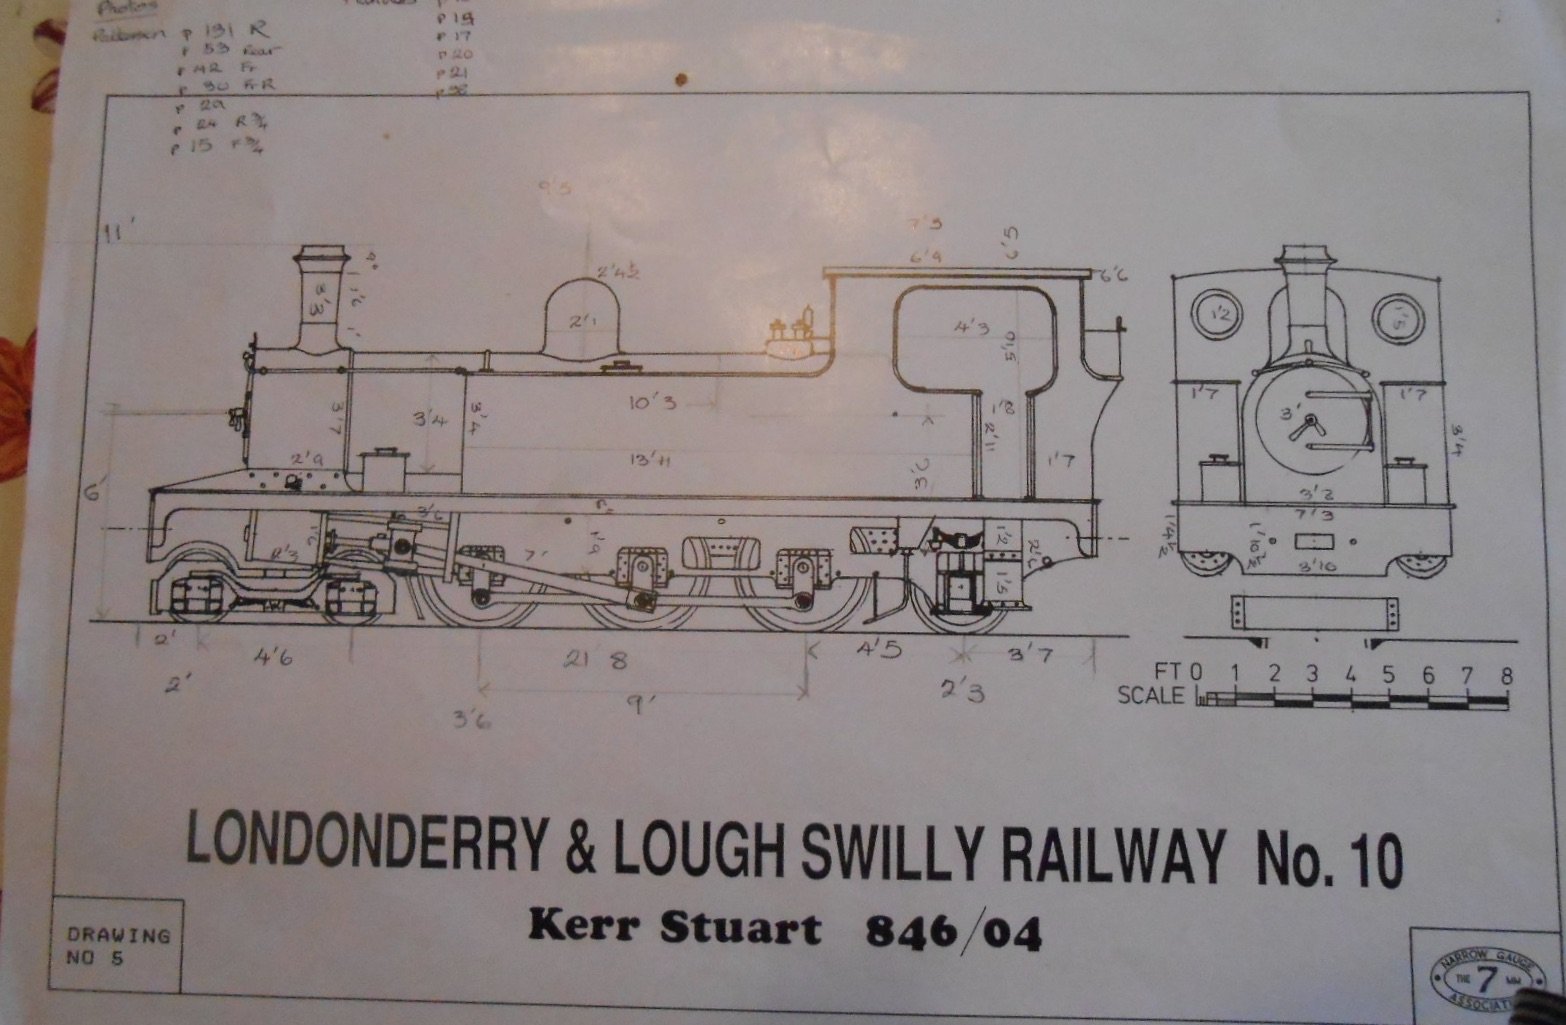
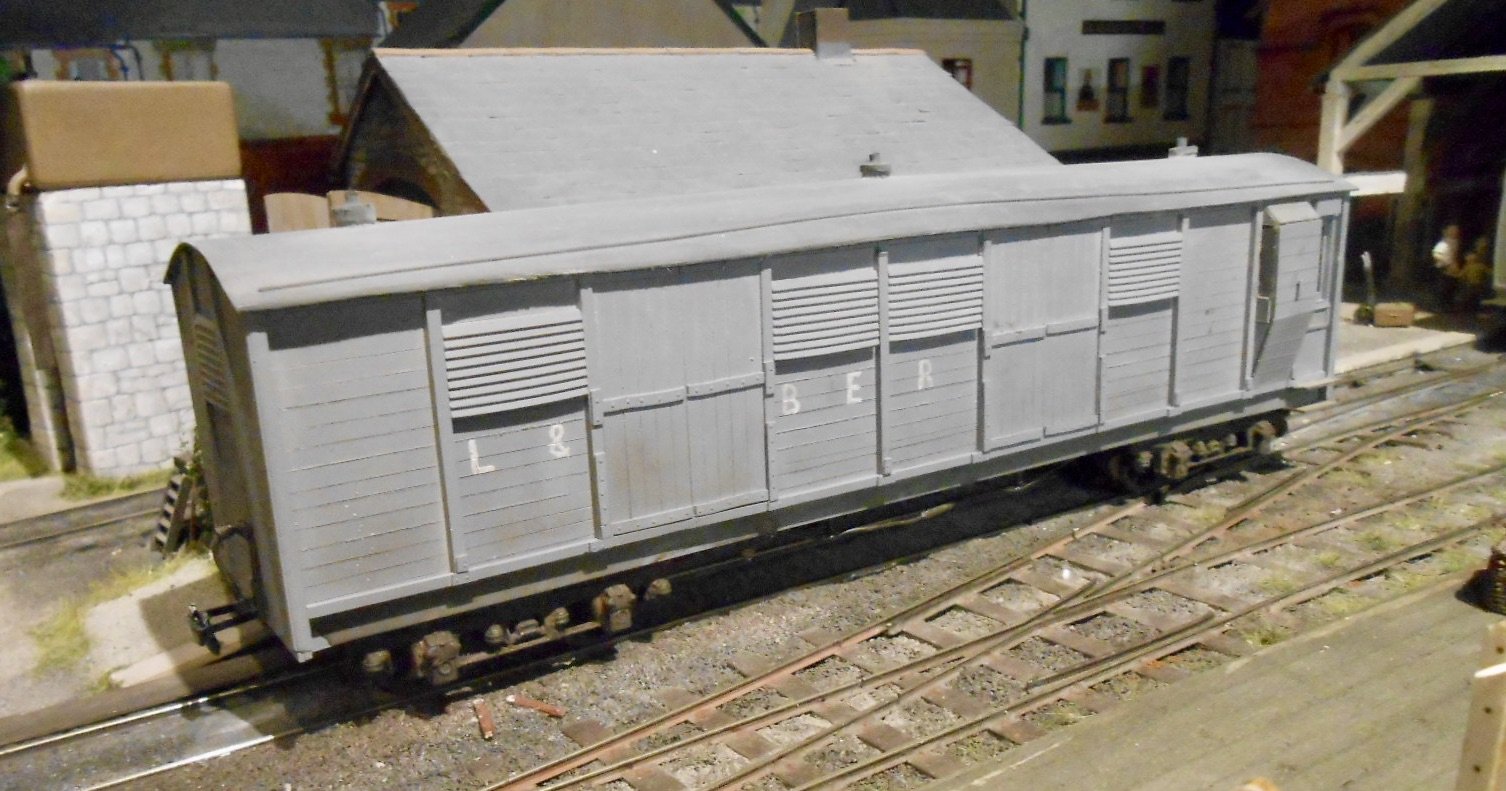
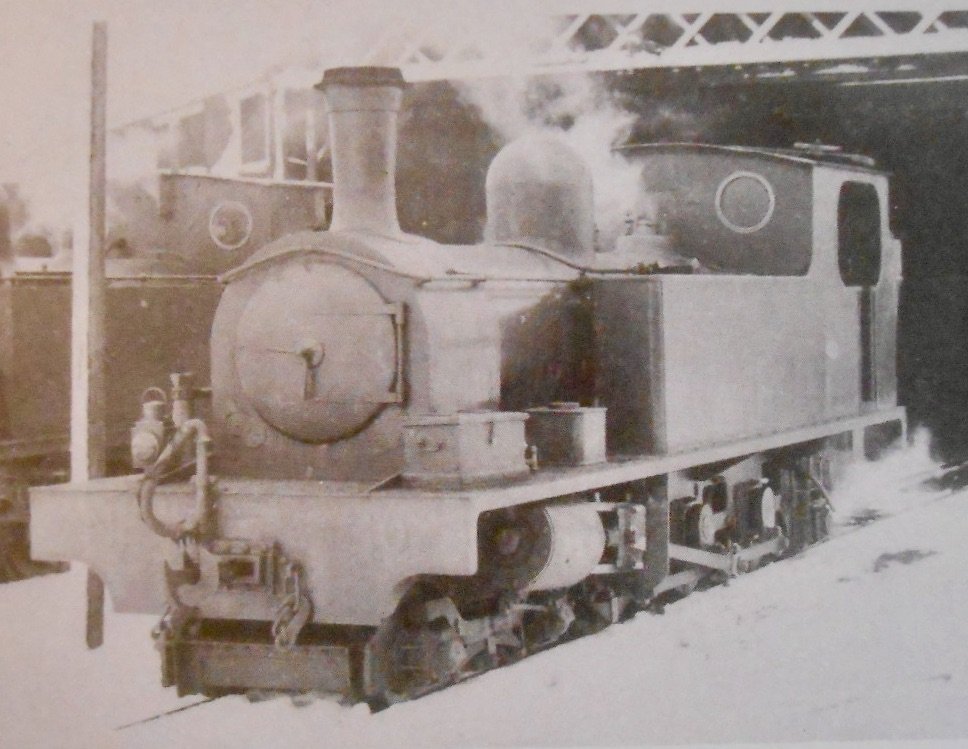
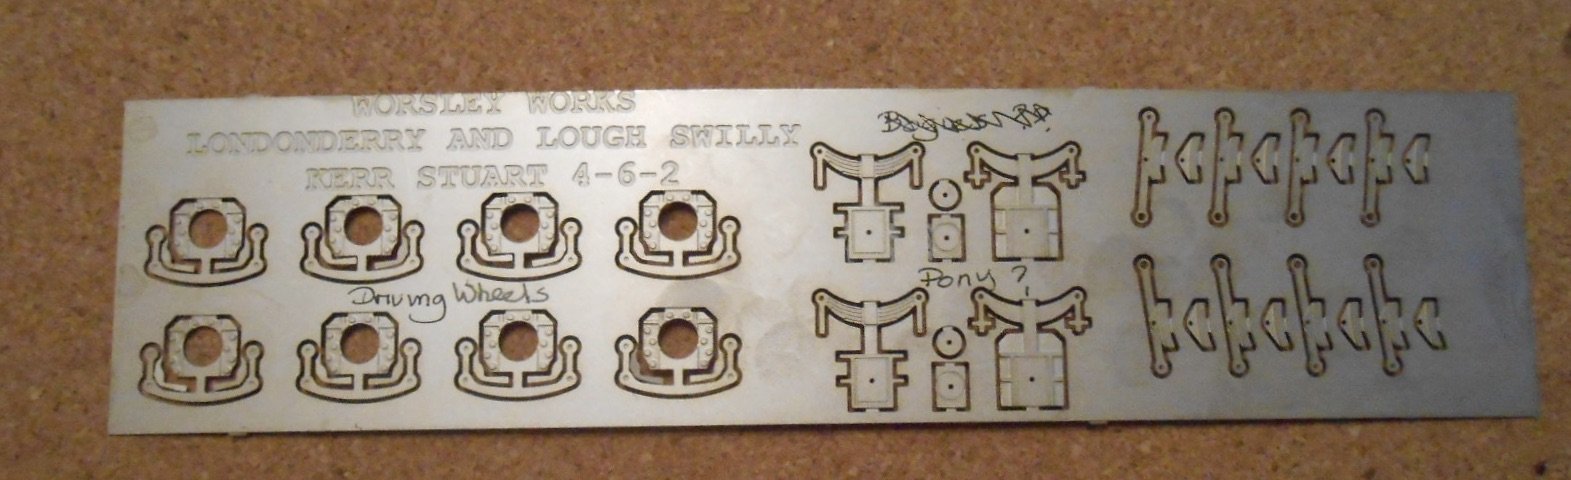
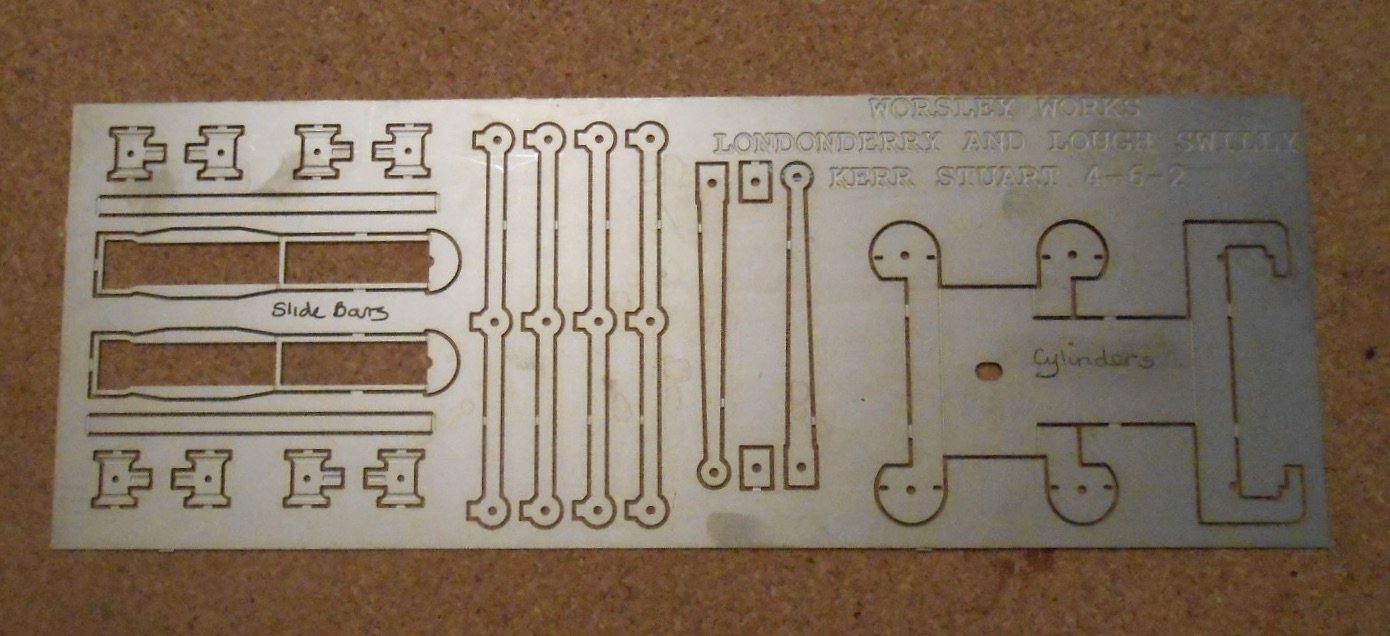
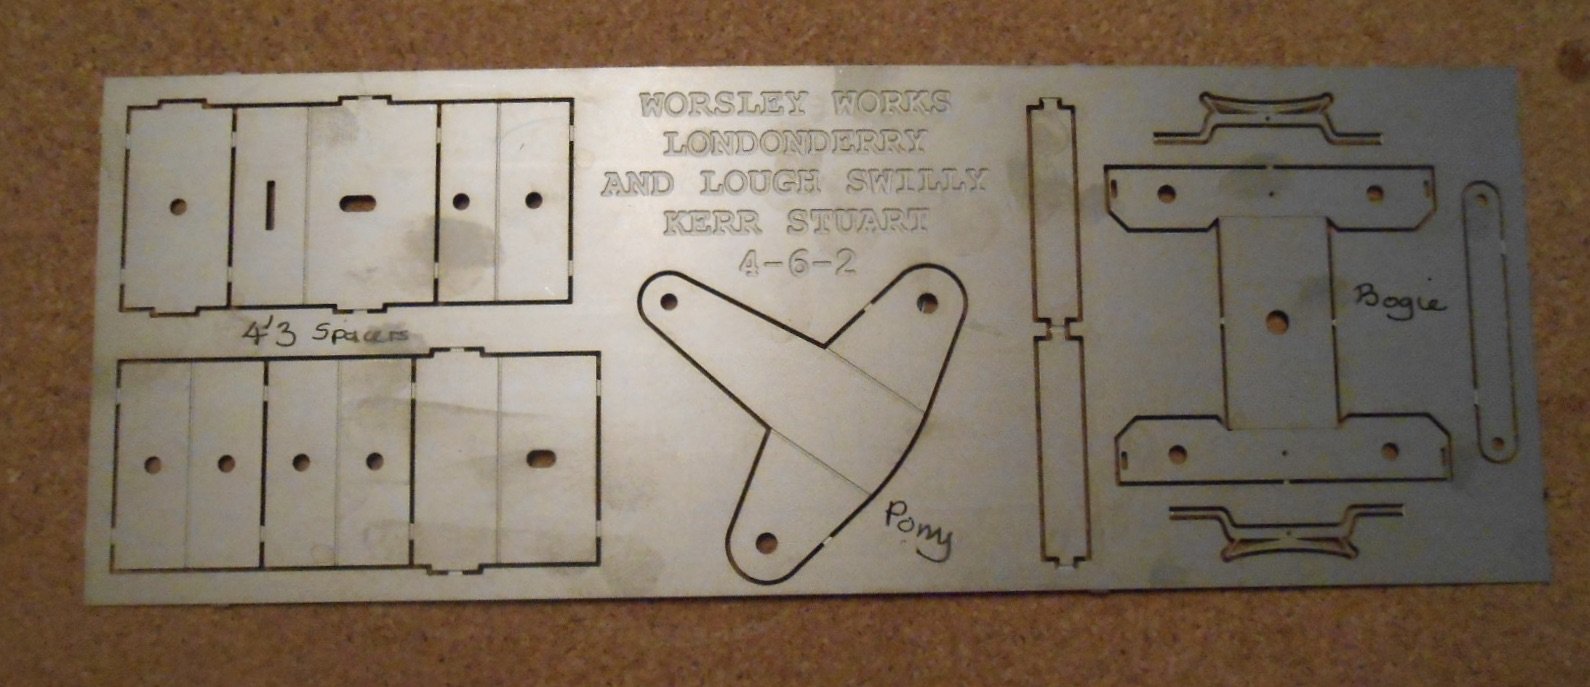
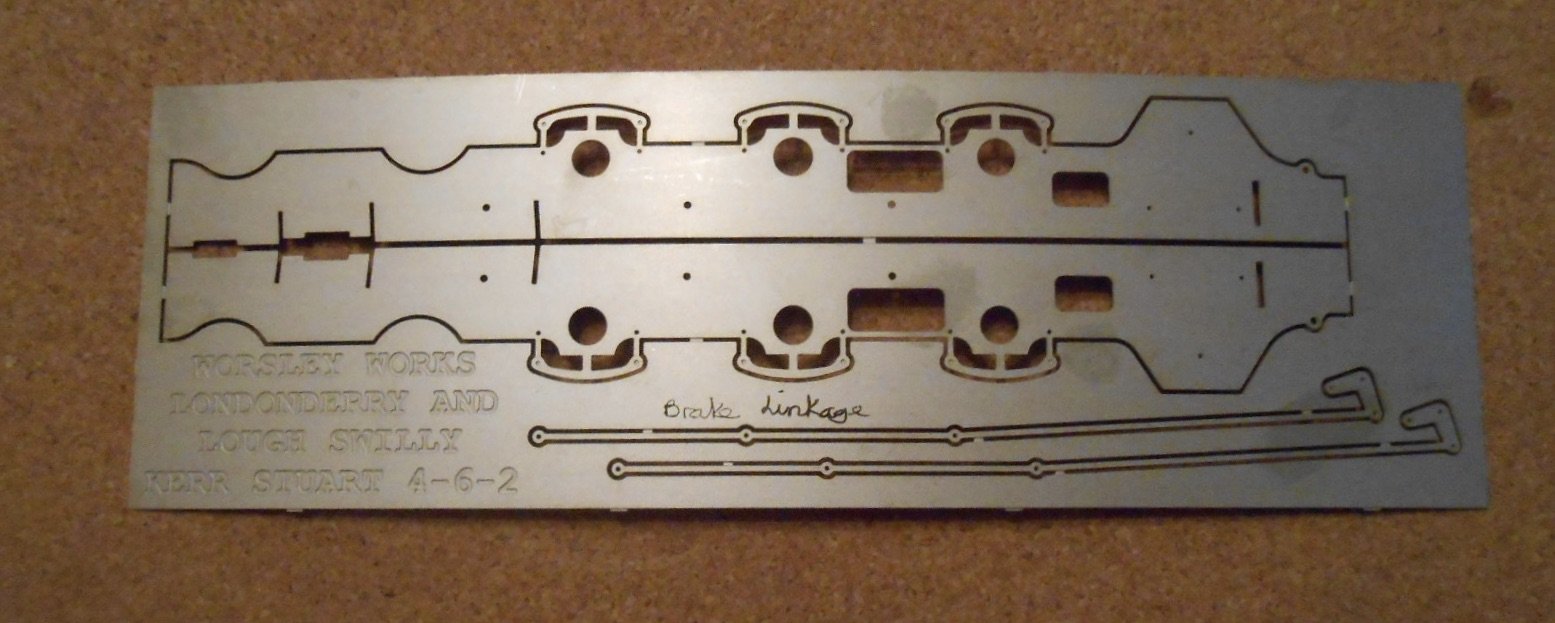
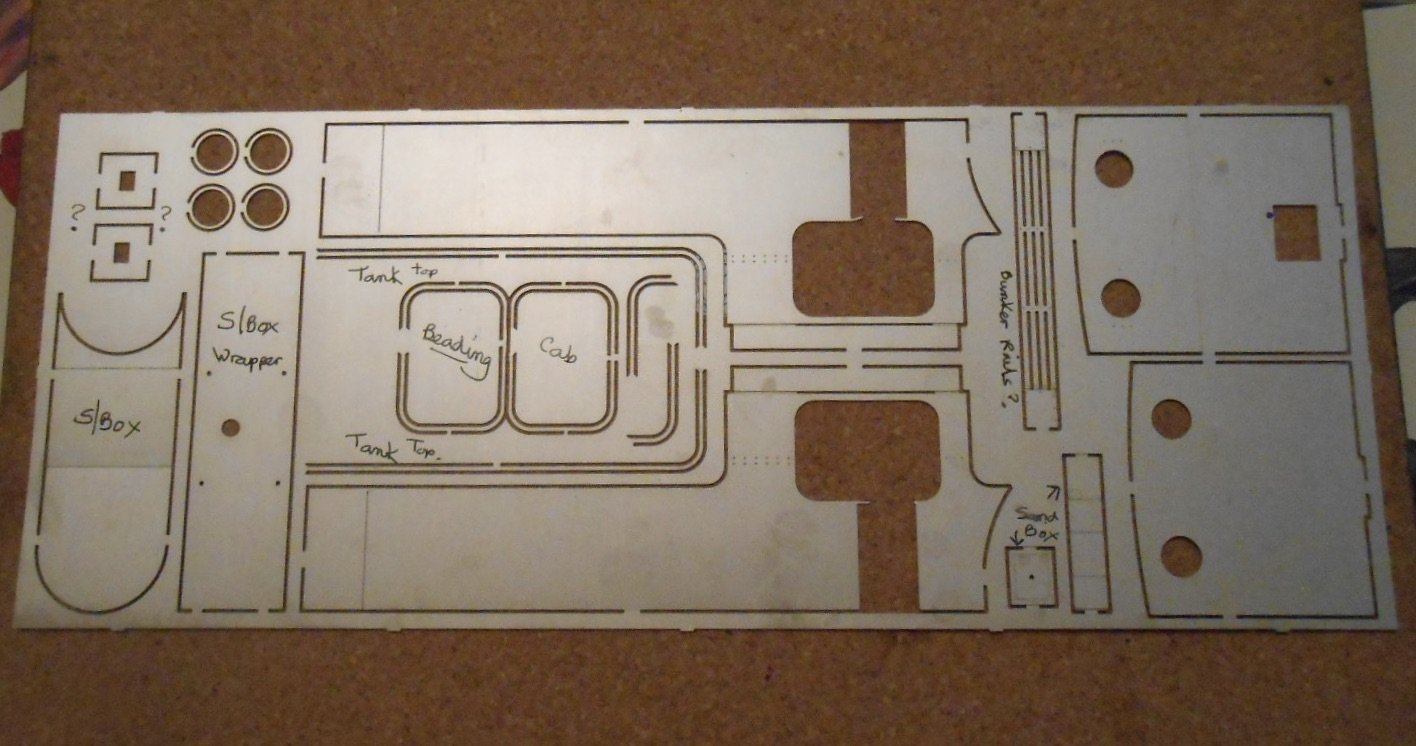
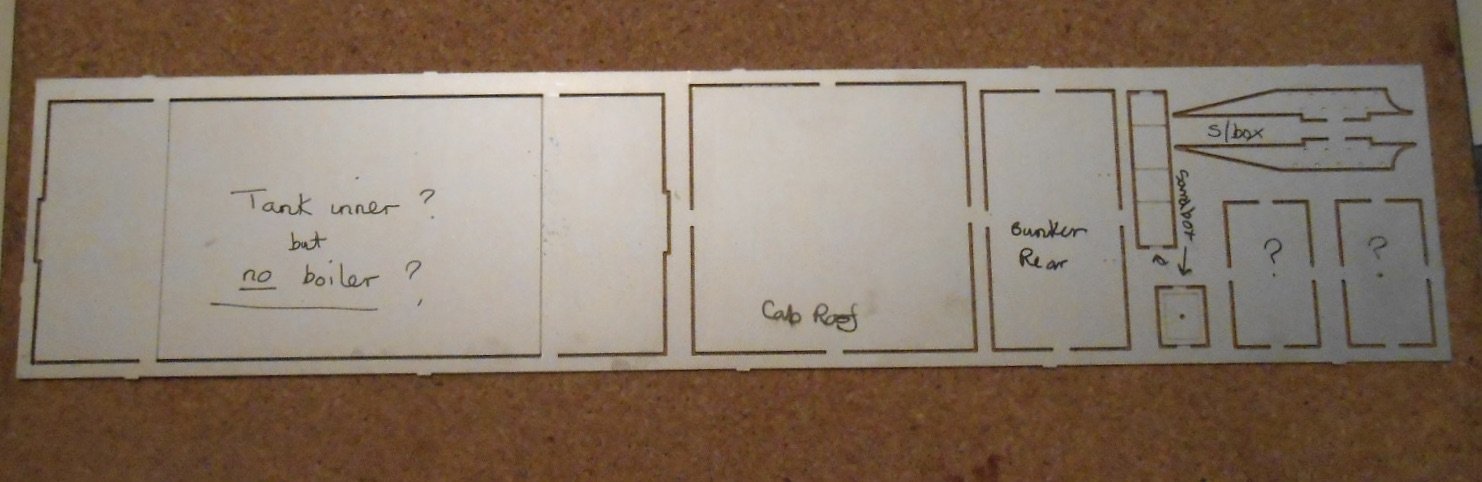
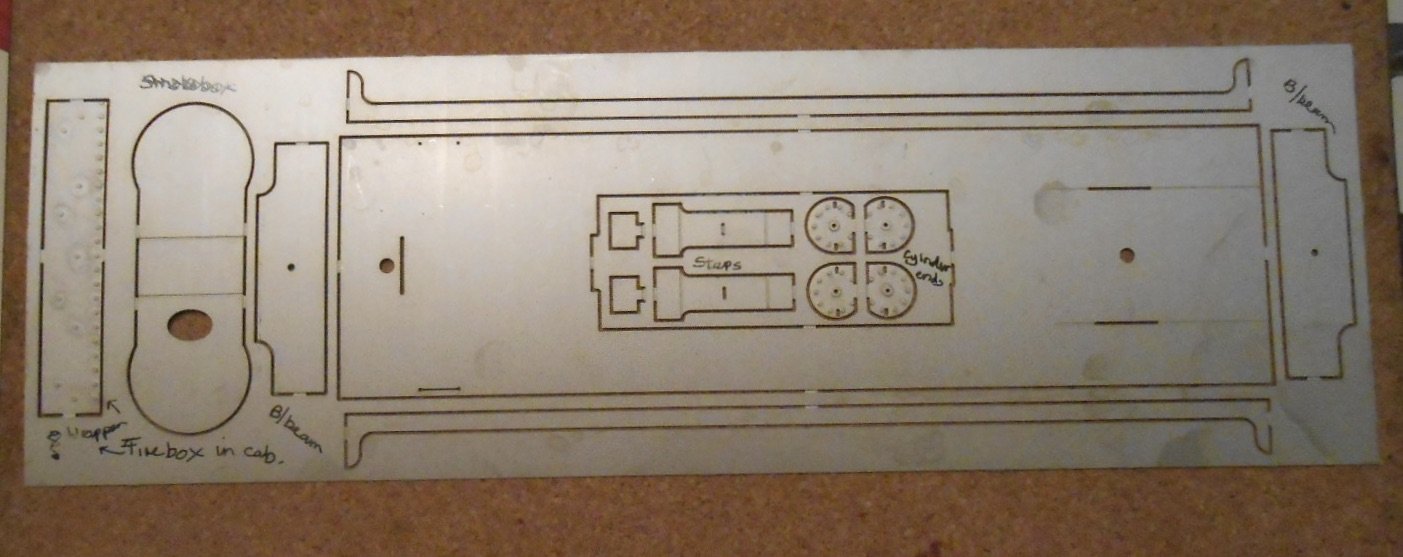
A short pause on the Swilly bogies, because the Worsley Works etches for my next loco arrived today. Much as I would like to dive in and get started, the first thing you always need to do with Worsley stuff is to work out what all the etches represent and then make a list of all the other things you need, so for anyone interested in Worsley products, hopefully the following might help. First, the loco itself. This will be a Lough Swilly 4-6-2T, built by Kerr Stuart, as shown below. Unlike my previous Barclay 4-6-0T, this set of etches includes the chassis - or most of it anyway. First lets look at the frames: Nickel silver - nice - for all the etches, although unfortunately the holes for the axle bearings are 3/16" [0 gauge] and I'm using Gibson wheels on 1/8" axles, because, as far as I can tell the correct 3'6 wheels are not available to go with the extended axles needed for outside frames. Hence, am thinking I will need to plate over & fill the current holes somehow so I can fit 1/8 bearings. Next we have the frame spacers and etches for the rear pony truck and front bogie. Mostly ok, though the spacers are 4'3 wide and [after several rebuilds] those on my Barclay are now 3'9, so looks like things will need cutting down a bit here. Always nice to have the coupling and connecting rods. Also on this fret is a one piece etch for the cylinder/motion bracket, plus the slide bars too. Real timer savers here, compared to making things from scratch. The fourth chassis etch has overlays for the outside frames [driving wheels] and what I think is the pony truck, along with the brakes. So far, so good. What you don't get are: Wheels - the aforementioned Gibsons, including bogie and pony Motor & gear box, from High Level Outside cranks from Slaters Slater's 0 gauge wagon axles for the driving wheels - see the section on the Barclay as to why. Axles box castings for the bogie. Ideas welcome here! Now for the bodywork: First is the footplate etch, which also contains the buffer beams, a couple of etches for the firebox inside the cab, along with cylinder ends and a pair of steps. The main body etches are the cab/tank sides, cab front/rear, smoke box frame & wrapper, bunker rails and a sand box. We also have some useful beading for the cab and tank tops, plus rings for the spectacle plates - though quite what the two square etches, top left, are I'm not sure. Suggestions welcome! Finally we have a bit of a mystery etch. Cab roof and bunker rear, plus the other sandbox are fairly obvious, as are the two front frame extensions, top right. No idea what the two rectangles below these are for, while I fear the large rectangle on the left is a bit of a bodge, posing as a filler between the tanks, as per the Barclay. You may have noticed there is no sign of a boiler! This will probably be rolled from a piece of flat sheet, though it may be possible to use a piece of tube. Also needed is the following: Smoke box door & 'dart' Chimney, dome, safety valves & whistle Tank filler caps Lamp irons Vacuum pipes Tool box Jack Brake cylinder Cab detail, including brake standard, reversing lever, gauges etc Builders plates No doubt I'll find more! However, while it may look like a lot, these etches take away an awful lot of measuring and cutting, though I must get those two bogie vehicles finished first!
-
As well as being very sad news, that is a real blow, leaving just Gibson and Ultrascale as the only option for kit builders. Mayner's comments nicely clarify the 21mm gauge issues: works with metal bodied, steam locos, but not with plastic or resin. That said, if a loco has no splashers, there are no clearance problems - though not many of these on the Irish scene. EM gauge may not be perfect for 4mms scale, but has been a practical option for about 70 years now - though also the time it has taken to get limited commercial support for track! I think modern image has a chance with 21mm while Andy Cundick clearly knows how to make it work with steam and diesel on Valencia Harbour. I suspect that what we are looking at here though is a workable option to convert rtr to 21mms and, for now at least, it remains more in the realm of kit and scratch building.
-
Utterly bonkers and comp!early wonderful. Love it.
-
Handsome engine and a very handsome model. Got to be pleased with that! Nice to complete a project that was otherwise languishing in a shelf somewhere.
-
Love all the fine detail on these big models. Simple things like the bolt heads, while the caboose interior is fantastic.
-
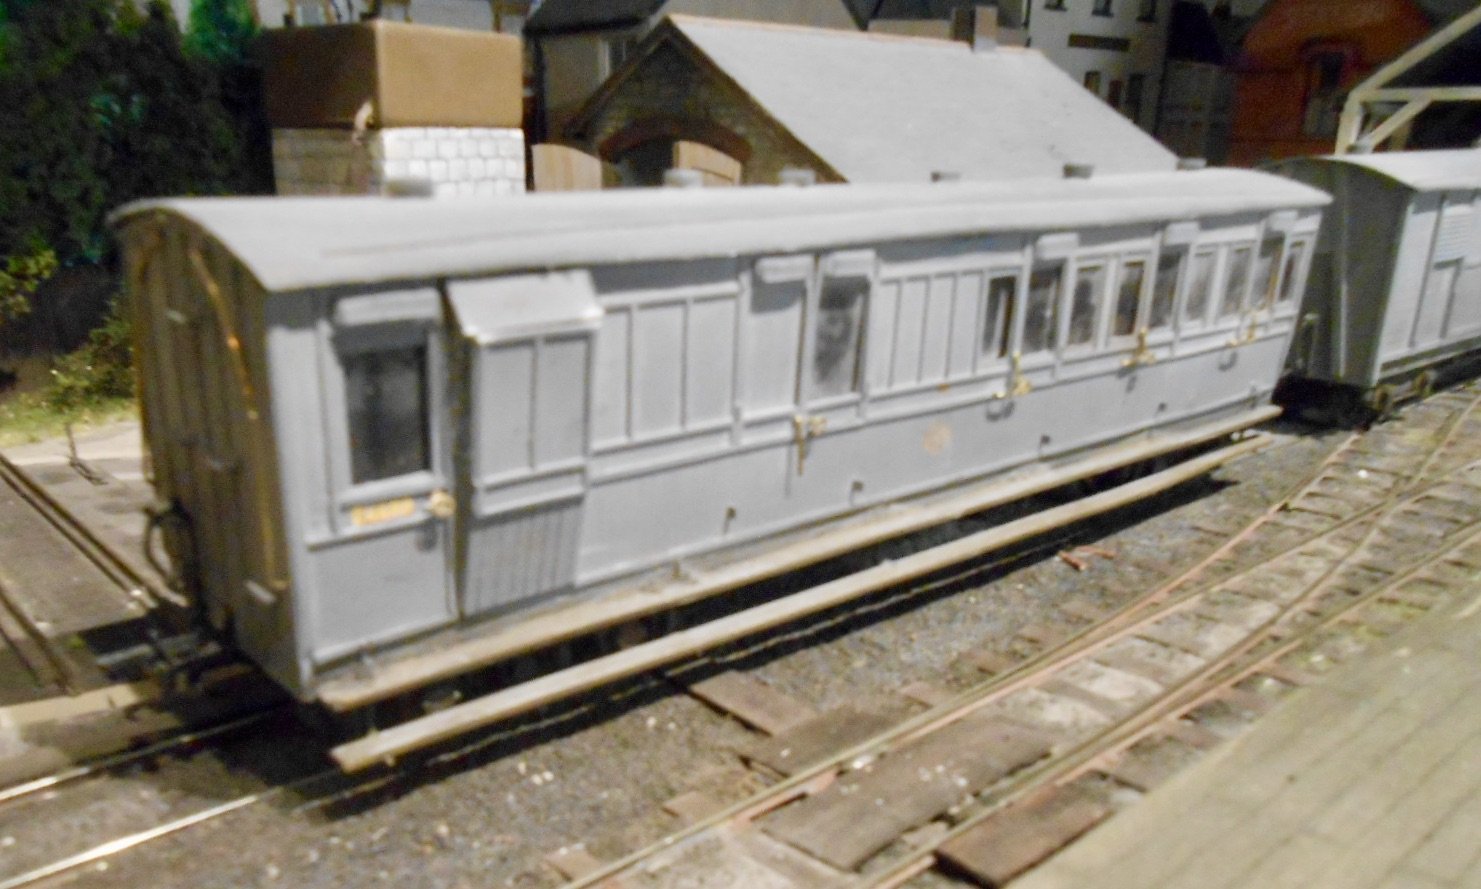
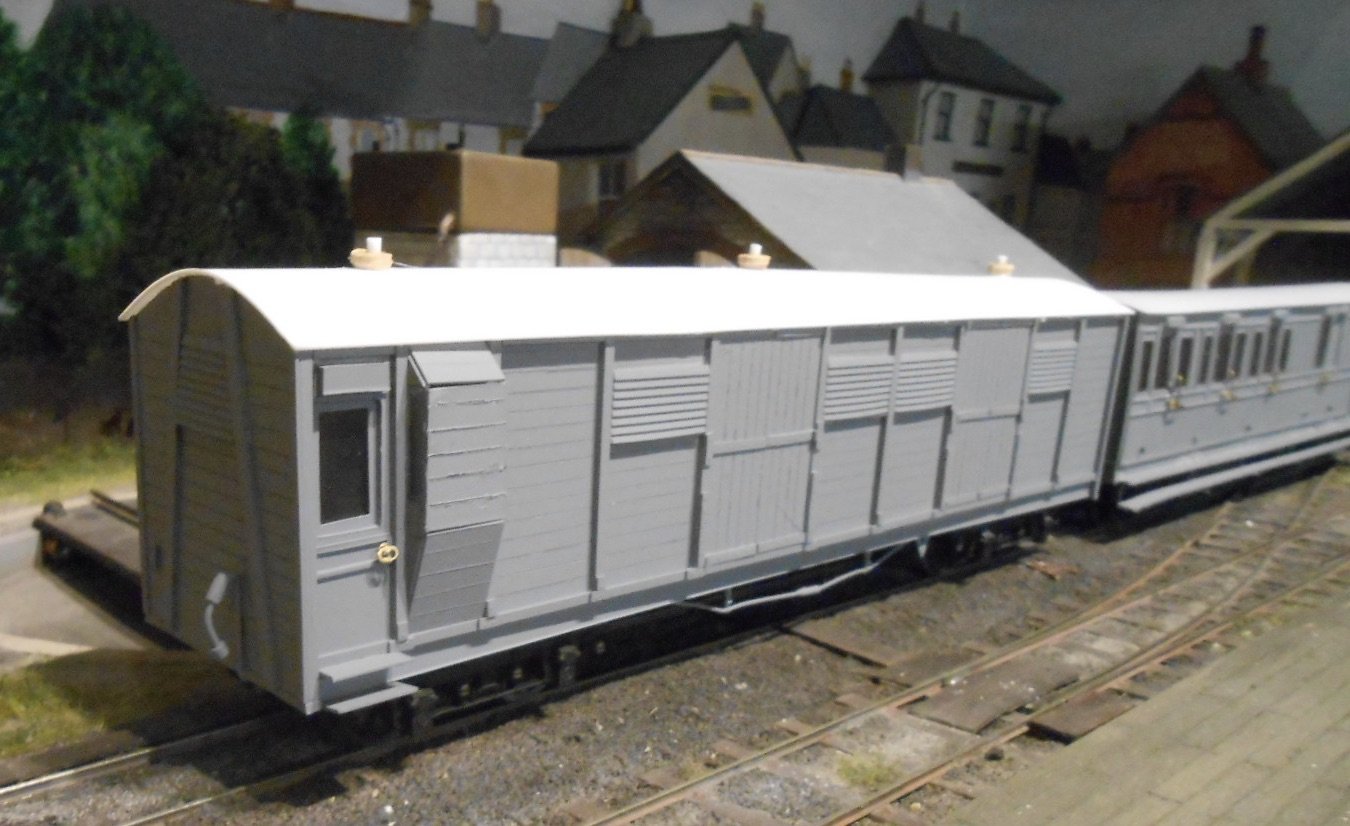
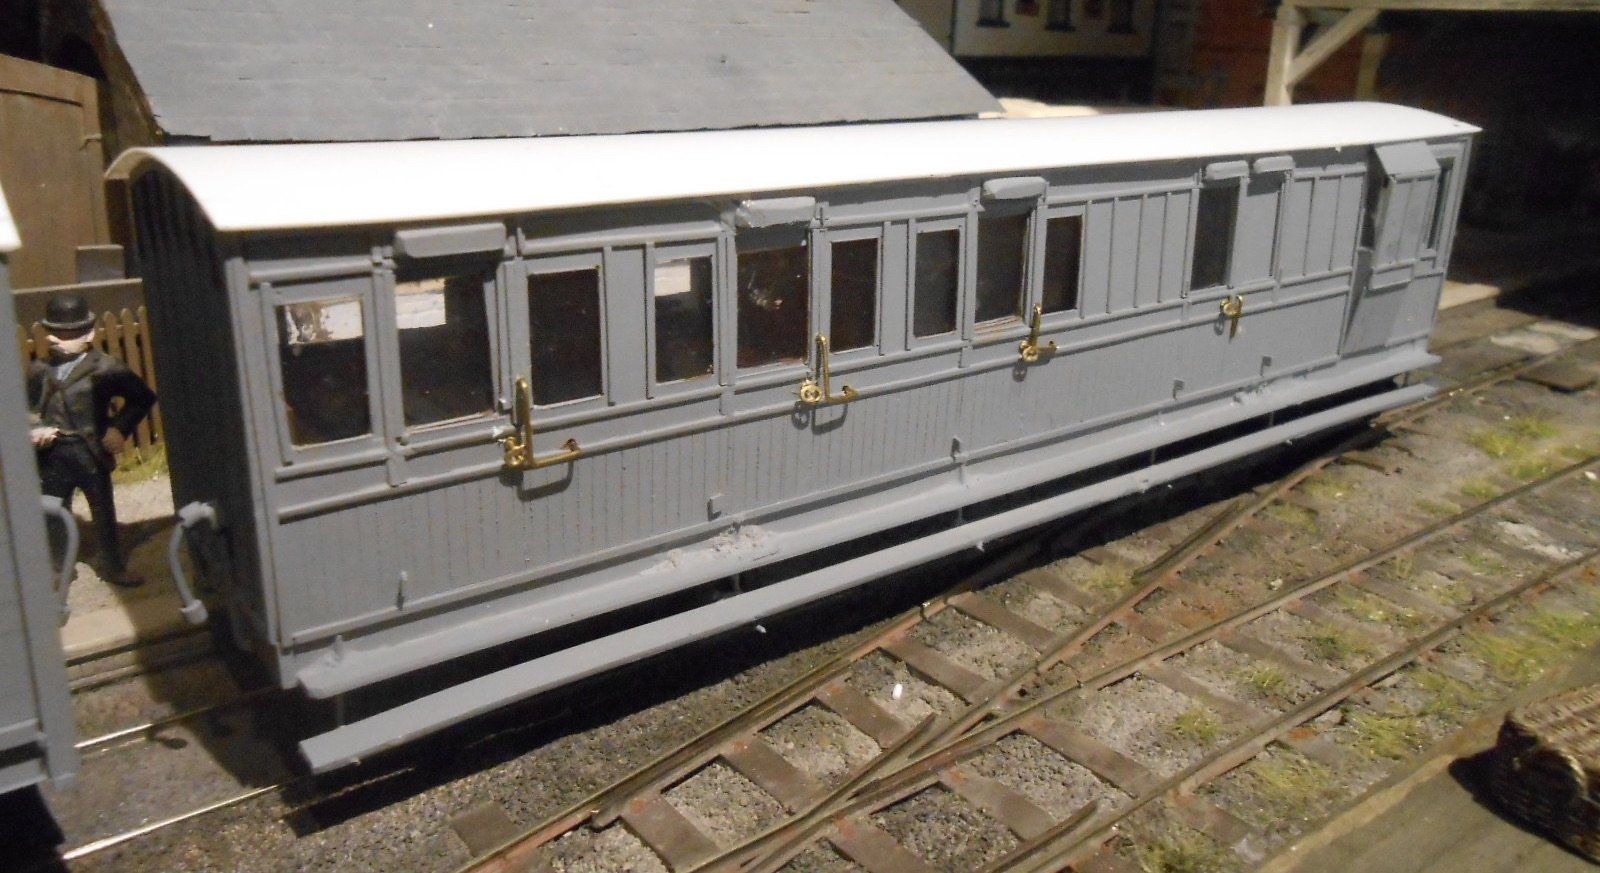
After a bit of a pause, while I had some louvres 3D printed, the Swilly bogie brake now nears completion. My first experience of such things, they look the part, though I soon found out they needed filing to shape, rather than cutting with a craft knife - far too brittle. While waiting for the prints to arrive, I made a start on another Swilly brake third, which will go with the bogie brake for the train for a Kerr Stuart 4-6-2T. Progress has been pretty good - enough to pose the two vehicles together, albeit with final details still needed. The brake third is pretty convention - a 40 thou plasticard shell, overlaid with micro strip for the outside strapping and frames. Bogies are from Alphagraphix, while took an idea from Tullygrainy for the roof vents, which are wooden dowel, shaped with files in an electric drill. As for that 4-6-2T, heard from Allen Doherty [Worsley Works], that the etches are done and should be with me next week, which is nice as I was wondering what I might do next!
-
7 1/4 INCH GAUGE GSR 800 CLASS MAÉDB REPLICA
David Holman replied to M.G.W.R_CLASS_50_1939's topic in General Chat
Wow! A phenomenal project for anyone to contemplate, but brilliant to see it coming from the next generation of engineers. -
7mm scale can be more like engineering, Alan, but certainly doesn't need to be and I should know! Indeed, am sure your own practical, methodical approach would be very well suited to the larger scale. Size makes some things easier, but it can also demand finer detail. Having started in EM and then gone through 7mmNG and standard gauge before being bitten by the Irish scene, would say 1:43 is very well suited to 5'3. Therefore always surprised there seem to be so few of us doing it, though can also appreciate why too.
-
Worsley Works Cork Blackrock & Passage tanks
David Holman replied to Pete00018's topic in Irish Models
Doubt if it is a kit, as all Worsley stuff is just a set of etches. So no castings and no instructions either. On the other hand, they make a good start for any scratchbuilding project because they remove the need for a lot of marking and cutting out. Generally pretty accurate in my experience, but that lack of instructions can make identification of parts difficult. Have a look at my workshop thread for the Swilly Barclay 4-6-0T I build last year -
Interesting to hear of the problems with larger scale stuff, but that Rio Grande stock is fabulous. I could easily be smitten, had I the space...
-
One (fairly) straightforward Alphagraphix kit v a total scratchbuild. Fine work by Tony, but no contest in the difficulty stakes, methinks. As for colour, one is clean and ex works, the other has been cleaned with the proverbial oily rag, but both look stunning.
-
Mmmm...., been there and got that t-shirt during my own dcc phase. Surprised in a way that the chip makers don't fully insulate the things in the first place - especially the sound equipped ones which are well into three figures.