Mol_PMB
-
Posts
2,165 -
Joined
-
Last visited
-
Days Won
112
Content Type
Profiles
Forums
Events
Gallery
Blogs
Store
Community Map
Everything posted by Mol_PMB
-
Making an ‘E’ – the Maybach Diesel Model Assembly thread
Mol_PMB replied to Mol_PMB's topic in Irish Models
I had hoped to use Railtec transfers for the loco, and had created artwork not just for E410 but for the whole class in silver livery. Sadly my repeated emails to Steve at Railtec have gone unanswered. So I've reverted to my other option of John at Precision Decals. He has older print technology and there are some limitations, but responds to emails within hours rather than weeks, and is very helpful. Hopefully the decals will arrive tomorrow and I can get them applied and then finish the weathering this weekend. So there's a fair chance I'll have a complete loco by the time I board the flight to Cork on Friday morning. Shall I bring it? Who's on the railtour that would like a closer look? -
Good news. Hopefully this will restore the AS team’s faith in multiple unit models. I suspect a lot of the features developed for this and the ICRs will find uses in other future models. I look forward to the day when we have to through-wire our Park Royals to act as AEC intermediates
-
Vac Attack - Production Sample Class 50s Are Here!
Mol_PMB replied to Warbonnet's topic in British Outline Modelling
It got me thinking about the forthcoming * AS Class 40's! Except they still haven't been announced. Maybe the pairs of 20s will be coming first? (*unfounded speculation warning) -
Super - that really looks the part!
-
Vac Attack - Production Sample Class 50s Are Here!
Mol_PMB replied to Warbonnet's topic in British Outline Modelling
I couldn't help noticing this over on RMweb: https://www.rmweb.co.uk/forums/topic/172809-the-class-89-by-accurascale-with-rails-of-sheffield/?do=findComment&comment=5792988 The Class 50 shipment fills multiple 40' containers. Even with generously sized AS boxes, that's a seriously large number of locos! A rough estimate based on box volume suggests there might be about 15000-20000 locos (sale price about 5 million quid) per container. I can see why the business crossed the water, and very pleased that it's helping to cover overheads to keep the Irish models coming too. -
I've also now had a satisfactory result - my missing points have now been restored and I'm building up a nice balance to spend on the next Irish release. Many thanks to the IRM / AS team for getting this sorted.
-
I was going to suggest extending your period by 20 years so you could justify a Hunslet and a rake of Mk2's, but then you would need to demolish your lovely station and replace it with an inhospitable concrete bunker with windswept platforms... At least there was still some freight traffic in the mid-1970s!

-
That's looking very nice indeed!
-
Making an ‘E’ – the Maybach Diesel Model Assembly thread
Mol_PMB replied to Mol_PMB's topic in Irish Models
It's possible. It would be nice to photograph it on the causeway at Fenit. But I'm a wary of taking it on the railtour where there is a high risk of damage if it gets handled by trainload of people who all want a close look. And I'm flying Ryanair so I should have built it in Z gauge to fit the baggage allowance. I'll have a think about it. -
Superb and inspirational work - so good to see it all come together.
-
Making an ‘E’ – the Maybach Diesel Model Assembly thread
Mol_PMB replied to Mol_PMB's topic in Irish Models
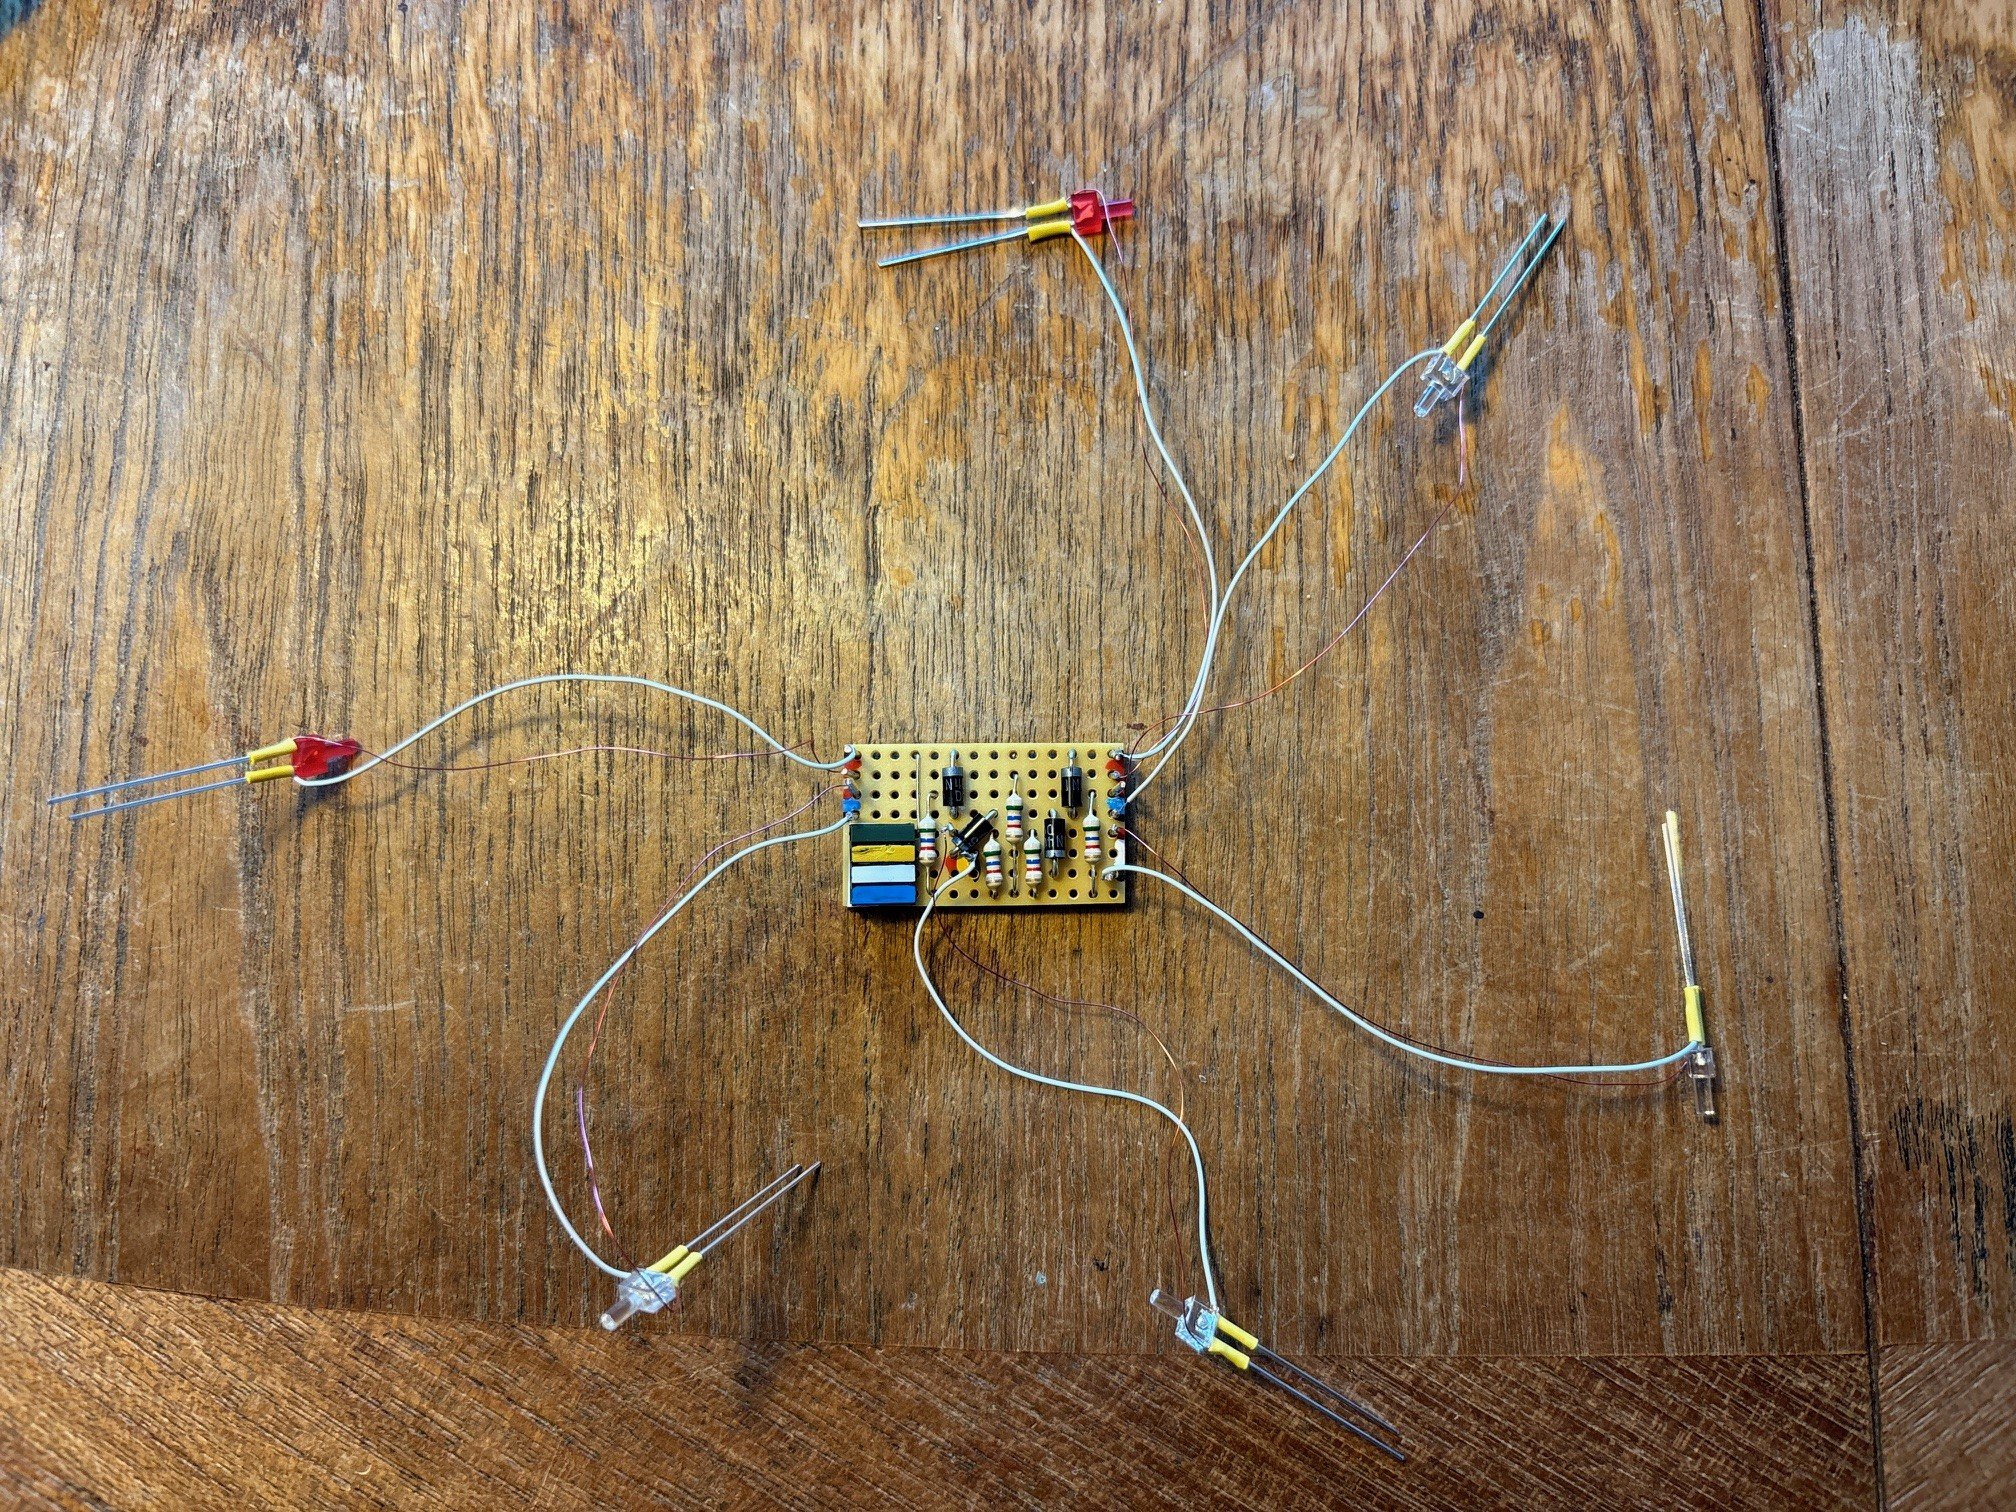
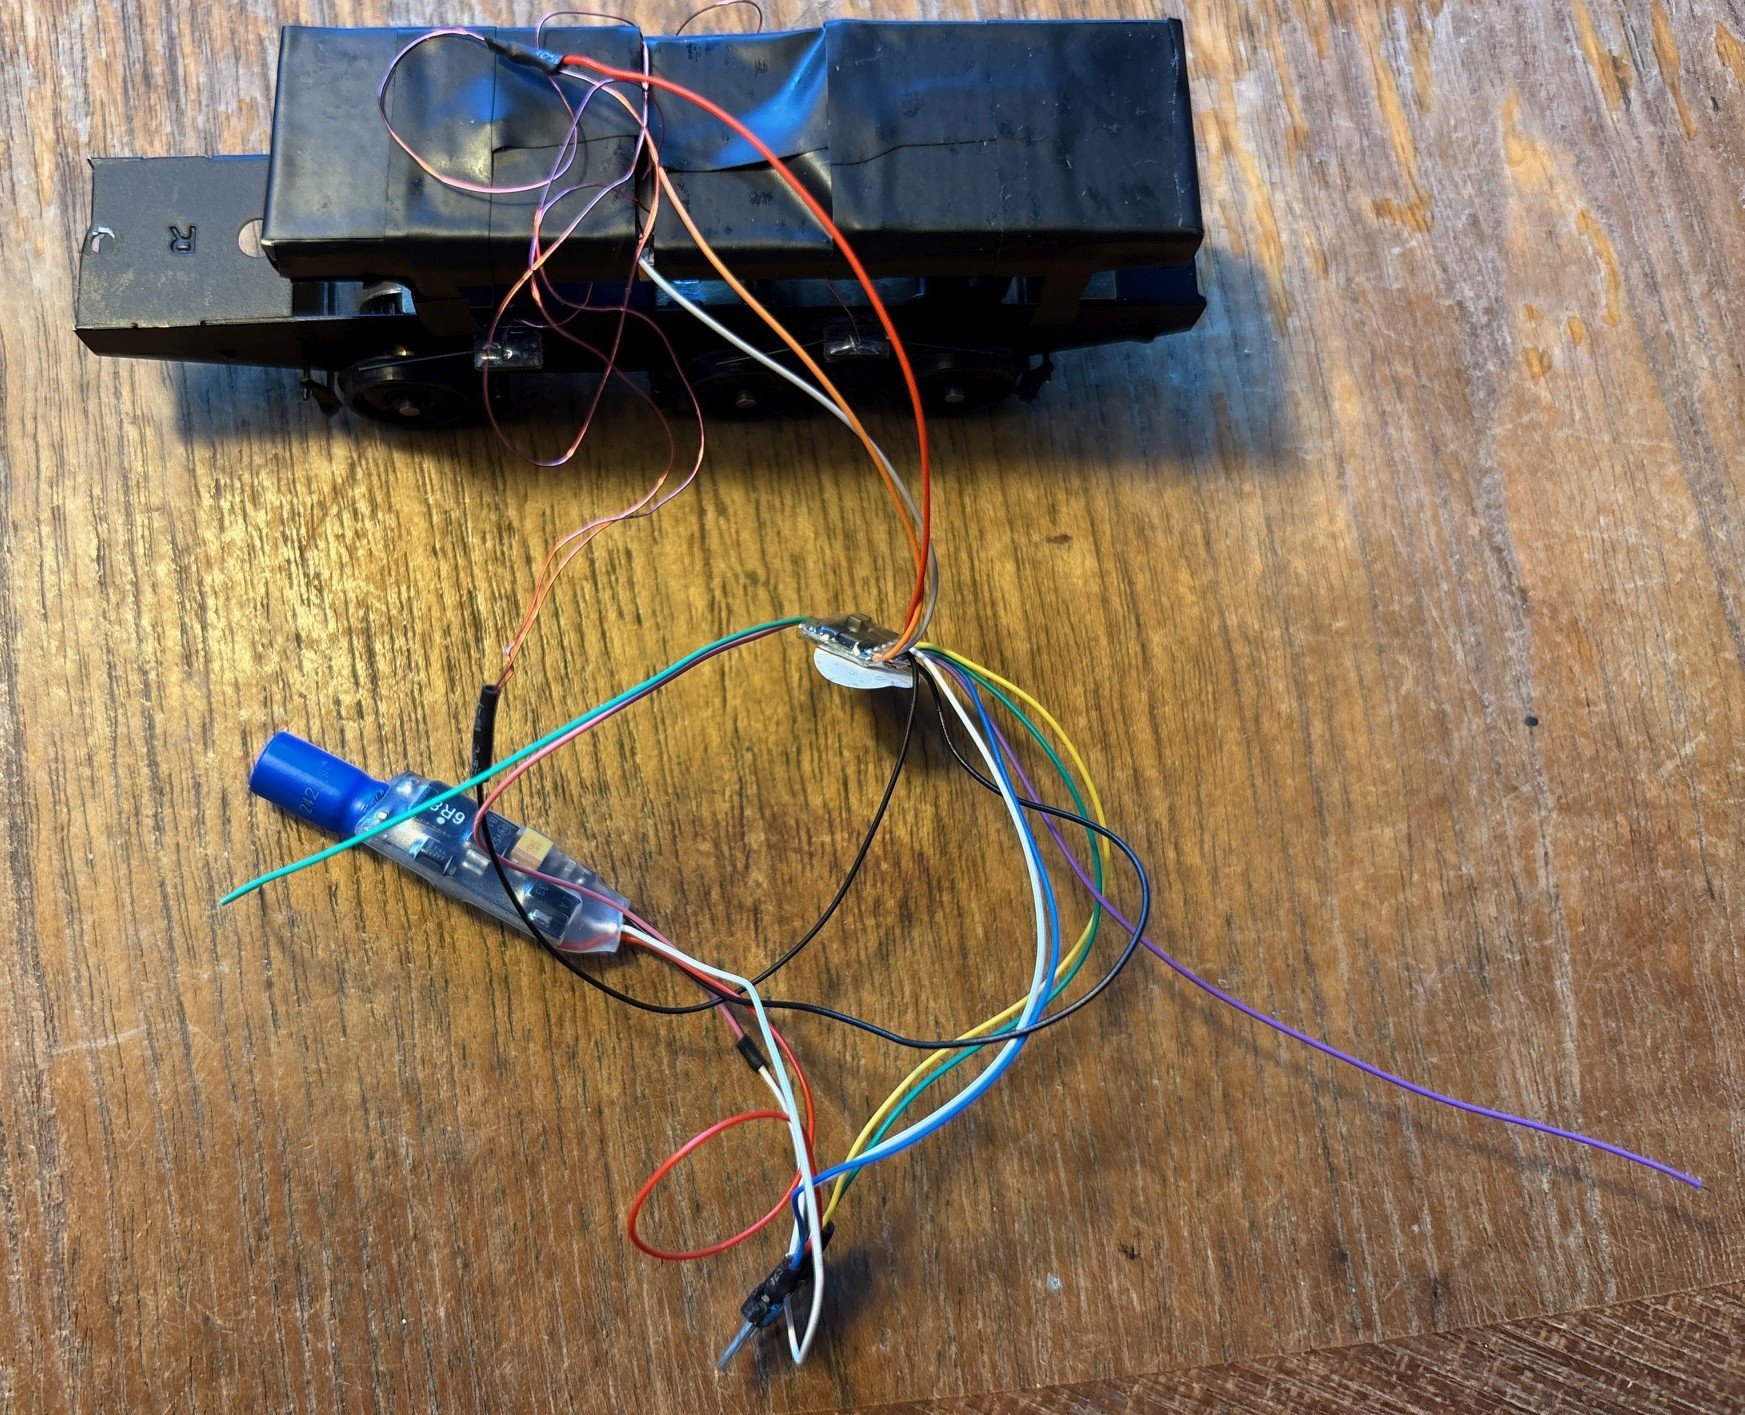
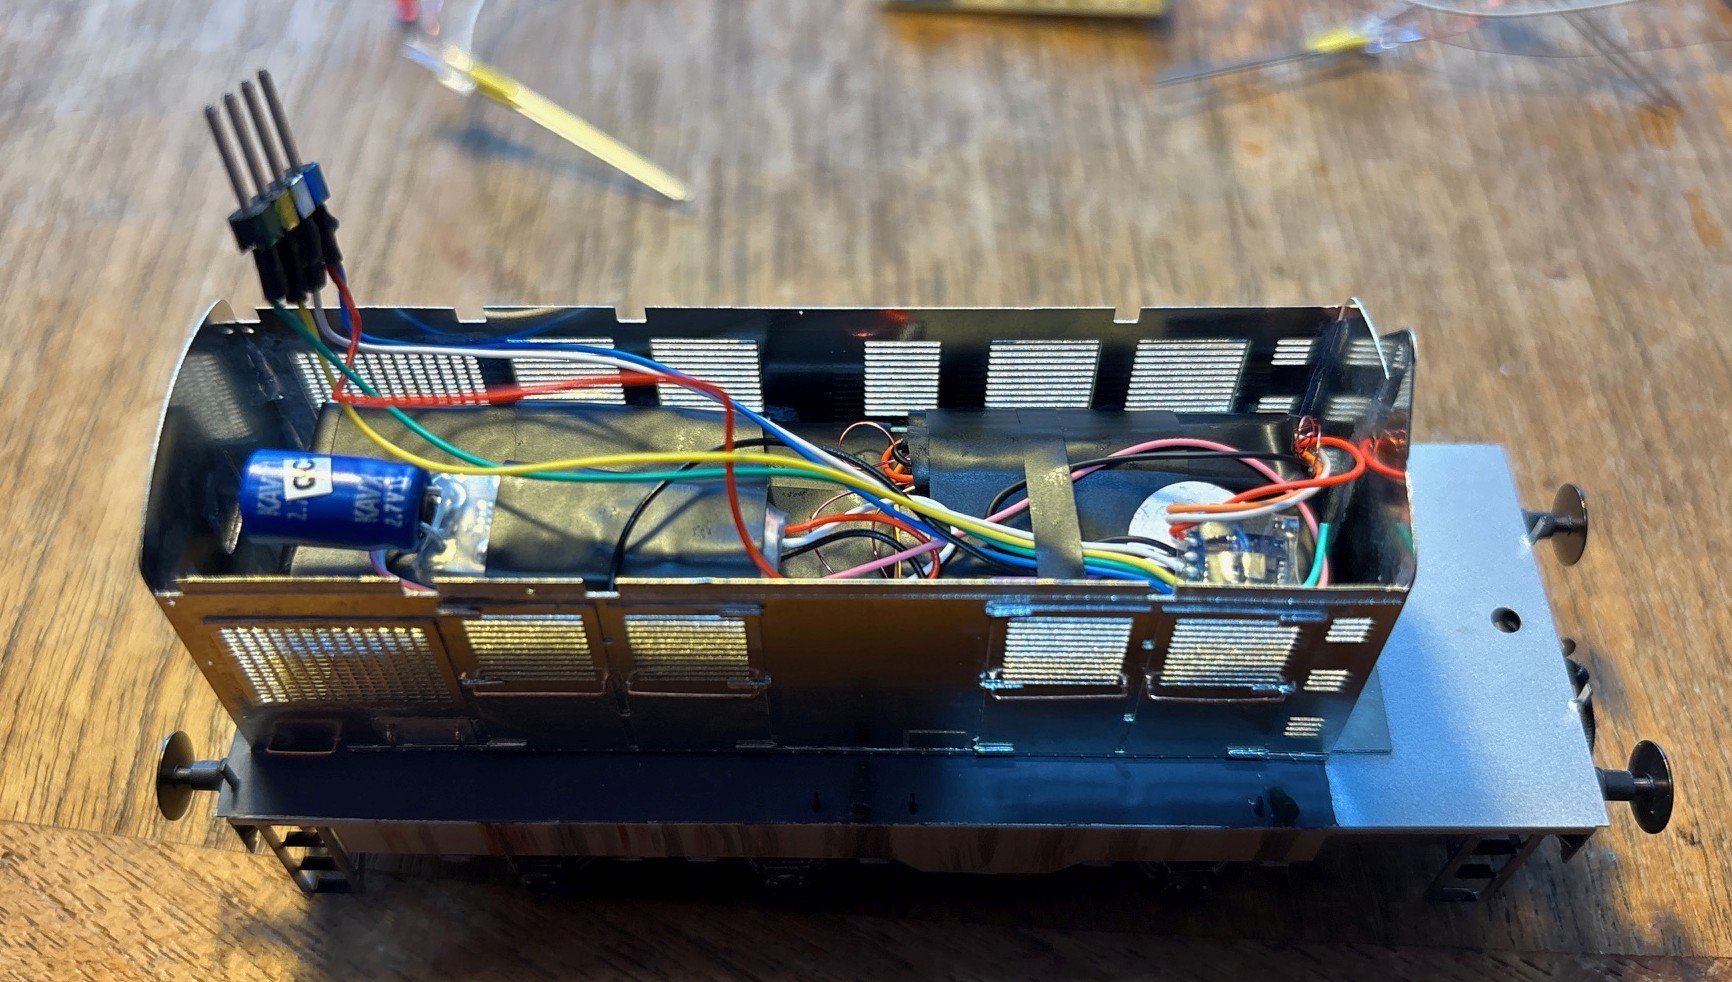
Some progress on the electronics. After seeking advice on RMweb I built a lighting board to allow me to have the required lighting functions. A connector from the decoder plugs into the multicoloured socket. Blue is the common positive while white, yellow and green are the 3 function outputs. White or Yellow give directional headlights (2 whites) at whichever end is the front. Green gives shunting markers (1 white and 1 red) at both ends simultaneously. The diodes enable one white at each end to be used twice. The board will be mounted in the top of the bonnet with the LEDs hard-wired. The other side of the equation is the decoder and stay-alive, which are wired to the chassis in the conventional manner. Thanks are due to my friend Matt who is better at very fine soldering and also has a lokprogrammer, for wiring these up and programming the chip: This shows how they fit within the bonnet. This is the incomplete second bonnet which is proving quite useful for positioning and fitting the internals. Note the plug top left, which connects to the lighting board. The functions and operation have been tested and the loco given its DCC address 410. The next thing to do on the electronics is to fit the LEDs into the cab and bonnet ends and route the wiring to the lighting board. The 2mm 'lighthouse' LEDs will need a bit of trimming to fit. But before that I need to finish any weathering tasks that need the cab and bonnet separated, because once the headlight wiring goes in they'll be joined.
- 200 replies
-
- 13
-

-

-
The "Eyre Lee Bird" railtour Cork-Galway-Return 5th April 2025
Mol_PMB replied to Niles's topic in What's On?
Sounds like JHB has his outfit planned for the railtour? Is that a warning about the availability of toilets on board More seriously, will there be any refreshments available on the train, and if not are we allowed to bring our own -
Absolutely - it was MGWR tank 560 that took on the Fenit job instead of 299.
-
Lovely job. You'll need to be careful with the clearance between those two lines - I can foresee a sideswipe when shunting one line if there's any stock in the other.
-
I agree with the above but there are plenty of areas where items are made a little over-scale thickness to ensure that they are robust, so I wouldn't worry too much about a small percentage increase. Something to think about is the typical viewing angles, especially for static scenery items. You probably wouldn't be looking down on the gate, it's more likely to be in the distance and looking across at it. So an increase in thickness in one direction is more noticeable than in the other, and I think you have done the right thing in this case - the gates at the top of your image look great. On the tubular gate the thickness can also be made less obvious with a bit of weathering or toning down the colour. For the sunburst gate, I agree that etching is the way to go because the wrought iron is so thin. It's something that would fit nicely in Weshty's scenic range.
-
With no splashers or outside cylinders, ‘Shamrock’ might be an easier conversion to 21mm than most kettles. It survived until 1957 latterly at Rocksavage but I don’t think it worked much (at all?) in the last few years. The Manchester Ship Canal (one of my other modelling interests) also had some very similar Hunslets in the early years. However, there were a host of detail differences among these locos which would make them challenging to produce accurately in RTR.
-
Not an oval boiler! But does the cab get wider, and if it does then the cab front sheet would need replacing so it still meets the sides of the firebox which are the same width as the standard gauge version. So it’s a little more complex as you indicate.
-
Oval boiler and all
-
The issue is of course that the largest market segment is 16.5mm gauge and therefore the engine and tender frames would need to be be 6" narrower, not wider! The ground has been covered by Bachmann already, admittedly some years ago. If IRM / AS chose to do an up-to-date model I expect they would cover both the GB and Irish variants but given the respective market sizes would there be a realistic prospect of the Irish one actually being wider?
-
Yes, that was my point!
-
Question: have IRM / AS ever produced a model of a loco class that no longer exists? I’m thinking in relation to which steam prototypes might be tackled in future. My impression, maybe wrong, is that scanning locos and close inspection of small details is part of their process, along with studying drawings and photos. I suppose there are some variants (e.g. some Buckjumpers, and the Class 30s) that don’t survive and must have been based on other sources.
-
My previous model railway was/is based on the Manchester Ship Canal and I looked at the Manchester Liners containers in great detail. In the late 1960s they leased containers from CFC, and I wrote a little document to collate my information on CFC. Why is this relevant to your question? Because CFC also leased containers to Ronagency, as well as some of the Irish Sea operators like Greenore Ferry Services. So the attached pdf may be of interest, although it's a bit tangential. Ronagency served Castletown and this shows one of their ships there, with containers in the background: https://www.shipsnostalgia.com/media/m-v-tower-duchess.134401/ CFC_Commercial Finance.pdf
-
A very fine selection of CIE container images have recently been uploaded to the IRRS Archive on Flickr - many thanks Ciaran! These are all from around 1975: CIE 40' with side doors CIEU 060138: https://www.flickr.com/photos/irishrailwayarchive/54403834639 CIE 20' bitumen tank CIEU 060442, a very nice set of detail views: https://www.flickr.com/photos/irishrailwayarchive/54403662801 https://www.flickr.com/photos/irishrailwayarchive/54403834634 https://www.flickr.com/photos/irishrailwayarchive/54403662786 https://www.flickr.com/photos/irishrailwayarchive/54404027845 CIE 20' half-height open top CIEU 060018: https://www.flickr.com/photos/irishrailwayarchive/54402779127 CIE 20' double side door container CIEU 060750: https://www.flickr.com/photos/irishrailwayarchive/54403893218 CIE 20' side door container CIEU 060510 (?): https://www.flickr.com/photos/irishrailwayarchive/54403834674 CIE 20' tiltainer CIEU 060234: https://www.flickr.com/photos/irishrailwayarchive/54403893223 CIE barley hopper container CIE 480: https://www.flickr.com/photos/irishrailwayarchive/54403893248 CIE 20' insulated container CIE IRL 2071: https://www.flickr.com/photos/irishrailwayarchive/54402779217 Small non-standard tank container, informal number only: https://www.flickr.com/photos/irishrailwayarchive/54403893098 CIE 10' bulk glucose containers, one of each type (the cylindrical tank and the cuboidal version CIEU 060144) https://www.flickr.com/photos/irishrailwayarchive/54402779167 This shows the opposite side and end of CIEU 060144, and beyond is the end of a cylindrical one: https://www.flickr.com/photos/irishrailwayarchive/54403834694 There are also a selection of CIE swapbodies, some of which may come under the 'Lancashire Flat' designation: https://www.flickr.com/photos/irishrailwayarchive/54403834579 https://www.flickr.com/photos/irishrailwayarchive/54404027740 https://www.flickr.com/photos/irishrailwayarchive/54403893238 https://www.flickr.com/photos/irishrailwayarchive/54403662761 It's also worth looking in the background of these photos for other container and wagon types. Excellent inspiration for some intermodal modelling!
-
Some newly uploaded photos from the IRRS Archive on Flickr, relevant to this thread and dating from the mid-1970s. 25201 series 20' flats, empty, loaded with a swapbody and loaded with a car: https://www.flickr.com/photos/irishrailwayarchive/54403662746 https://www.flickr.com/photos/irishrailwayarchive/54403893238 https://www.flickr.com/photos/irishrailwayarchive/54403893143 https://www.flickr.com/photos/irishrailwayarchive/54404027815 25436 series 20' flats loaded with CIE swapbody, a barley hopper container, and an insulated container: https://www.flickr.com/photos/irishrailwayarchive/54403834579 https://www.flickr.com/photos/irishrailwayarchive/54403893248 https://www.flickr.com/photos/irishrailwayarchive/54402779217 27101 series 20' flats loaded with CIE swapbodies: https://www.flickr.com/photos/irishrailwayarchive/54404027740 https://www.flickr.com/photos/irishrailwayarchive/54403662761 27301 series 22' flats empty, and loaded with a wide variety of CIE containers: https://www.flickr.com/photos/irishrailwayarchive/54403893148 https://www.flickr.com/photos/irishrailwayarchive/54404027745 https://www.flickr.com/photos/irishrailwayarchive/54403662801 https://www.flickr.com/photos/irishrailwayarchive/54403893218 https://www.flickr.com/photos/irishrailwayarchive/54403834674 https://www.flickr.com/photos/irishrailwayarchive/54403893223 https://www.flickr.com/photos/irishrailwayarchive/54402779167