Mayner
-
Posts
5,086 -
Joined
-
Last visited
-
Days Won
126
Content Type
Profiles
Forums
Events
Gallery
Blogs
Everything posted by Mayner
-
South African Railways operated 90 Class 25 4-8-4 condensing locomotives for use in arid regions such as the Karo the condensing apparatus and condensing tender was designed by Henschel and is likely to have been based on war time experience with the condensing Kreigslocks. The South Africans rebuilt the majority of the class as conventional locomotives (mainly to reduce maintenance costs) during the 1970s, the rebuilt tenders lost their condensing gear and were nicknamed Worshond Afrikaans for Daschund or literally sausage dog. Some steam can be seen escaping from the tender at 4:54.
-
Incorporating 21mm compatibility into the design would add considerably to the cost of an already very expensive model with little or no added value to the majority of prospective customers. The main object of the survey is to assess the potential level of demand for a rtr OO gauge brass steam loco to see if OEM manufacture is worth pursuing.
-
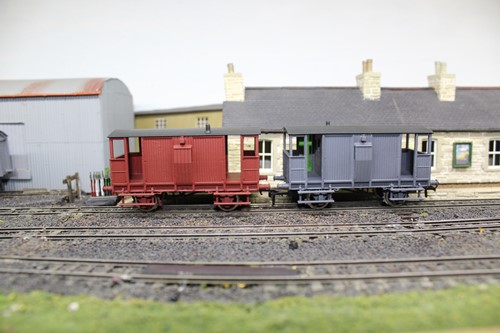
There are a number of photos of SLNCR trains with CIE & GNR coaching stock in Neil Spink's SLNCR Irish photo album. In one of the photos large tank "Enniskillen" is hauling the 12:00 Enniskillen-Sligo train on 6th July 1957 made up of 3ex-MGWR 6 wheelers, a pair of H Vans and an SLNCR goods brake. The caption states that the steam train was a substitution for Railcar B because of the anticipated number of passengers. Presumably the CIE coaches would have been worked to Enniskillen on an earlier goods train. There are a couple of photos of Lough Erne working a "Garland Sunday" excursion on 29th July 1956. The train is made up of the three SLNCR bogie coaches and a GNR non corridor clerestory coach, possibly the nearest thing to a long passenger train on the SLNCR in its final years. The train appears to have been re-marshalled at Sligo with the GNR coach coupled next to the loco in both directions.
-
In steam days usually an 0-6-0 and an A Class following dieselisation. The actual Class or type of steam loco depended pretty much on the part of the country or "Section" as steam classes kept pretty much to their pre-1925 amalgamation boundaries the Woolwich Moguls were the main exception as they worked passenger and goods trains on both the "Southern" ex-GSWR and "Midland" MGWR lines. In the 19th Century both the GSWR & MGWR built fairly large classes of "Standard" 0-6-0 goods locos which became CIE J15 (ex-GSWR), J18 & J19 (ex-MGWR) Classes, both companies built smaller numbers of larger goods locos during the early years of the 20th Century which became the CIE J4 & J9 (ex GSWR) and J5 (ex-MGWR) The DESR "Standard" goods the J8 was an early 20th Century design similar in size to a J9 and the inside cylinder K2 Class 2-6-0s 461 & 462 worked the overnight main line goods and heavier cattle specials. The GNR followed a similar pattern with smaller locos like the PG & AL followed by the various SG Classes in the 20th Century. The West Cosk is likely to have used its Beyer Peacock 0-6-0ST on the goods trains until replaced by the B4 4-6-0 Bandon tanks. The Murphy Models/Bachmann Woolwich Mogul, the OO Works J15, GNR UG and possibly West Cork 0-6-0ST are the only rtr options for an Irish goods loco, otherwise its either scratch, kit or modified rtr. The coupled wheelbase of the Bachmann LMS/BR 3F & 4F 0-6-0s are not far out for the K2 J4, J8, J9 but the Bachmann body would require heavy modification replacement. SSM produce kits for the CIE J15, B4 and GNR AL & SG/SG2 Classes and Worsley Works a set of scratchbuilders parts for the UG.
-
Locos were single manned, but a "snatcher man" travelled on the loco to exchange the electric train staff (ETS) on single track lines equipped with mechanical staff apparatus when the trains ran through crossing places without stopping mainly passenger and goods trains Dublin Galway line west of Clonsilla, the Rosslare Express both Rosslare-Mallow and Rosslare-Limerick and for a short lived express on the Dublin-Waterford line in the early 70s. CIE would not allow a fireman to travel on the loco when diesels were initially introduced, which may be on of the reasons for using heating vans rather than a boiler on the loco. Though you might have a travelling inspector, an enthusiast or a railway worker going home at the end of their shift. There is a story of a p.w. worker climbing on to the gangway of a B121 intending to hitch a lift home with the driver as he had no doubt done on a B141 only to come up against the back of the cab rather than a doorway. Apparently he was smoking a cigarette and the driver saw the reflection of the embers in the windscreen and stopped in time to save a very scared colleague who was hanging to the walkway handrail for his life.
-
You would need to run them 'elephant fashion" (nose to tail) with a driver in each loco if you have travelled back in time to the early 1960s as the B121s were not fitted to run in multiple until the late 60s. The B121s had a weak brake and were considered unsuitable for working heavy loose coupled goods trains & seem to have mainly worked passenger or light goods trains, it might be possible to simulate a run-away like the Roscommon de-railment by retarding the decoder brake setting. A single B121 was unable to hold a Westport-Athlone goods on the long grade from Donamon to Roscommon and ended up buried under the wagons when it ran off the rails at the end of the headshunt at the Dublin end of the station. The driver survived and there appears to have been relatively little damage to the loco.
-
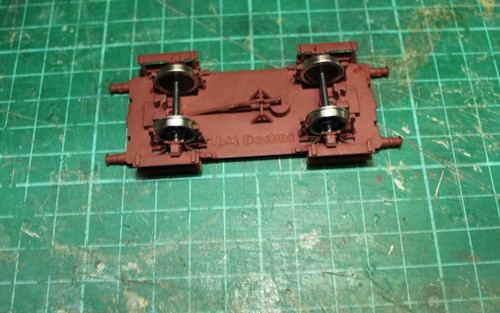
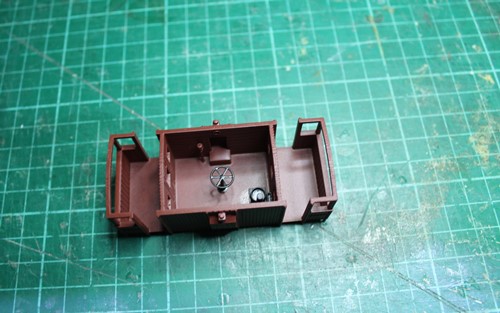
Not a lot to report at this stage, it will probably be mid-late November before the review samples are ready and will be in a position to make an announcement on pricing and availability. The photos are of 3D prints of the current version of the model with wheels and brake shoes set to OO gauge. The graphics are preliminary, I haven't got the correct running number font.

- 45 replies
-
- 11
-

-
It probably worth joining the IRRS to access their Flickr collection of photos, they have recently added a number of collections which include a lot of West Cork photos from the 1950s
-
To clear a few points. The tradition of commissioning highly detailed brass models of locos and rolling stock arose in the Far East during the late 1940s early 50s with American service men commissioning models from Japanese and Korean craftsmen, with some of the business shifting to Hong Kong & China. These models sell at a premium above plastic or die cast ready to run https://www.brasstrains.com/Classic/Trains/Builders/7/Ajin?showsold=True There are a number of European manufacturers like Fulgurex Precision Models http://www.fulgurex.ch/en/index.html like some shops its not polite to ask about the price if you are buying a model from Fulgurex or Aster. I am considering brass as the likely level of demand even for an 800 or a GNR Compound is unlikely to support a plastic injection (1000+) or die cast model (5000+). The big question is whether there is sufficient demand to sell the minimum order quantity of 500 locos. The survey price range is inclusive of UK vat but is based on preliminary costings, an 800 or even a Compound is likely to be considerably more expensive than a large inside cylinder 0-6-0 due to the greater number of individual parts requiring assembly and the complex liveries. The results of the survey so far have been interesting with 35 respondents so far with just over 60% prepared to consider paying £4-500 for a brass rtr steam loco with over 50% prepared to consider buying a Cattle Engine. Recent results has shown a shift in preference form an express passenger to a mixed traffic loco with just under 60% showing a preference for a mixed traffic loco while there was a slightly higher level of interest in an express passenger loco earlier in the survey. Respondents have shown a consistently higher level of interest in a Compound than in a Vs or S like 171. I selected the 3 GNR express locos both because both 85 and 171 are preserved and in active operation and their similarity in size to a Cattle Engine and because traditionally the GNR was considered to be a progressive and enterprising company which traditionally had a larger enthusiast base than CIE, I also convinced myself that I saw a big blue steam loco with smoke deflectors crossing Gormanstown Viaduct at speed when I was about 5 or 6 something which would be very hard to resist although my first loyalty lies with the Midland my Grandfathers railway.
-
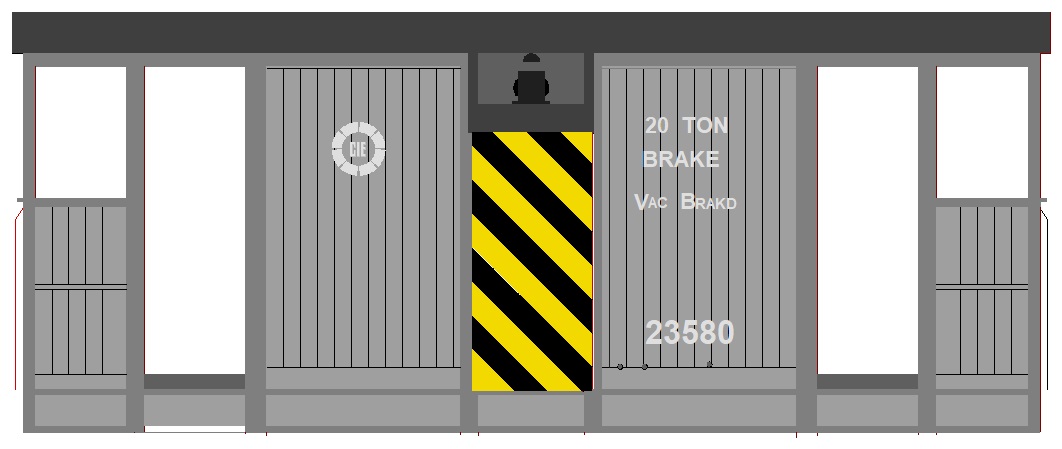
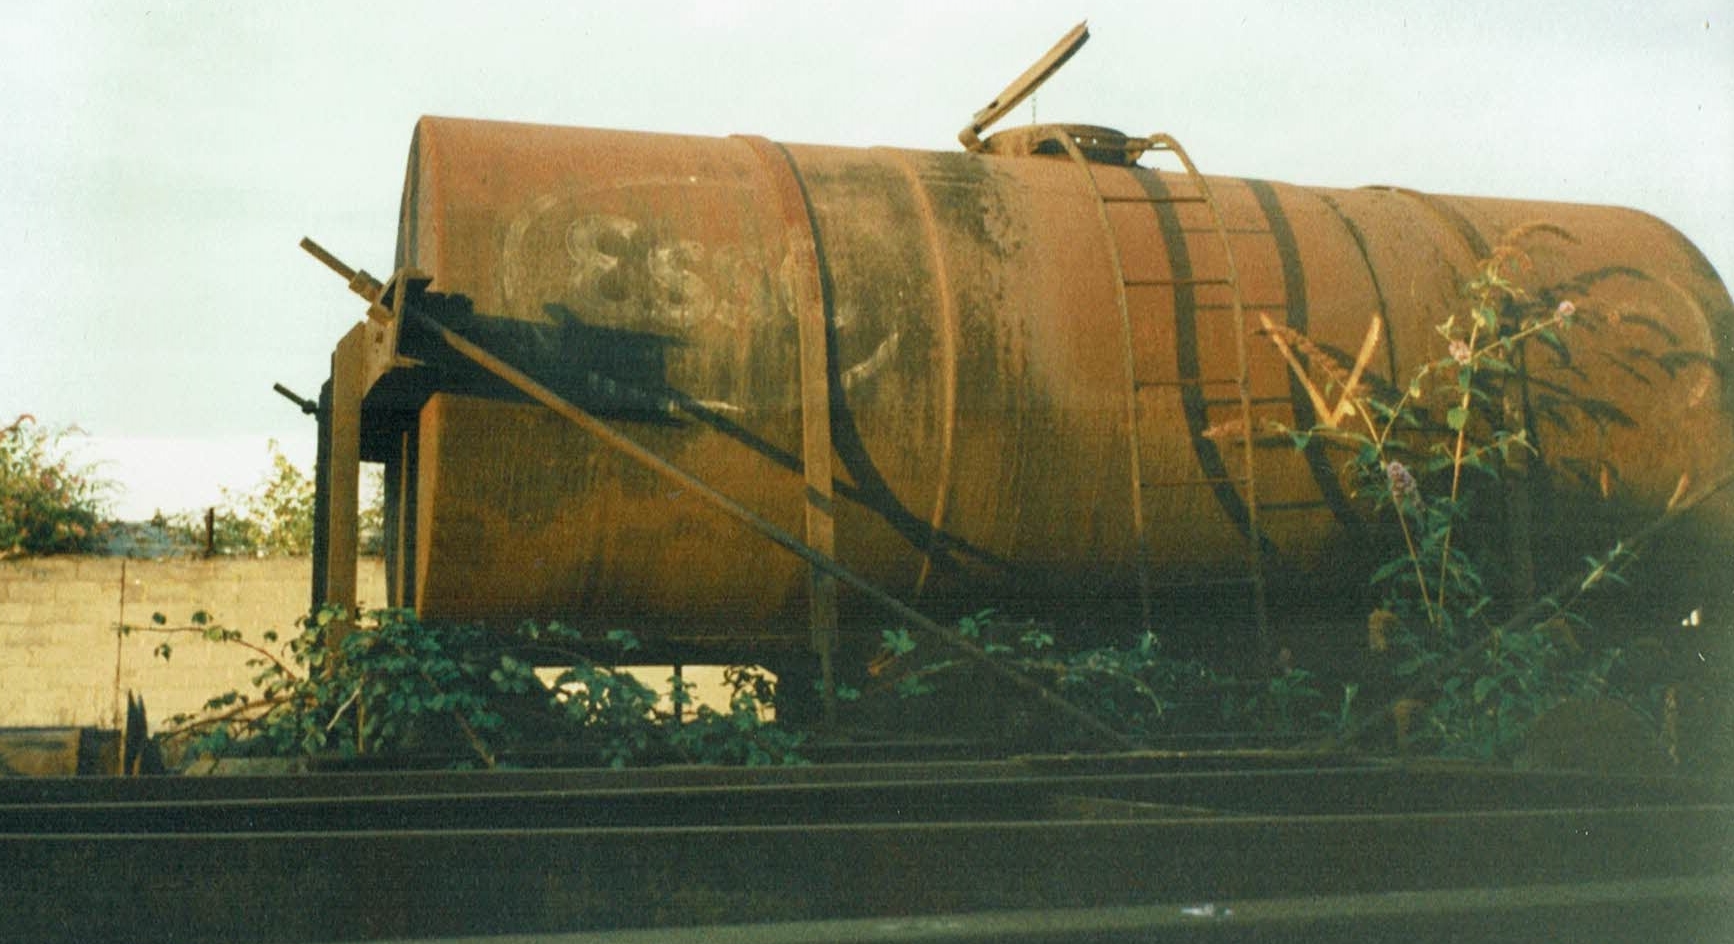
Several of the older private owner tank wagons were stored for many years at the Sheriff Street end of the Dardanelles Sidings and East Wall Yard until the yards were cleared out and re-modelled in the early 2000s. I took some photos but they did not come out too well in the low evening light. The majority of private owner tank wagons were built to slightly modified RCH designs by UK builders rather than Irish railway companies, CIE also bought Bitumen tank wagons from Charles Roberts of Horbury Yorkshire, the Bitumen tank wagons are similar to the Bachmann 20T anchor mounted tank wagon with an insulated barrel which would be a challenging conversion https://www.bachmann.co.uk/product/20t-class-b-anchor-mounted-tank-wagon-'shell-bp'-black-[w]/38-776a Most of the older Irish tank wagons appeared to be based on an RCH 1927 or later design similar to the Bachmann 14T Tank wagon https://www.bachmann.co.uk/product/category/155/14t-tank-wagon-'fina'-silver/37-680b some had diagonal cable stays around the dome like the "Fina" tank wagon others a horizontal tie bar like the "National Mobile" wagon. ESSO had some tank wagons with a smaller diameter barrel similar to the Oxford model but the Sherriff St example had a welded barrel steel rather than timber end transoms, possibly a re-build of an older wagon. I could not get close enough to get a photo of the underframe the tank car was between a wall and a cut of wagons
-
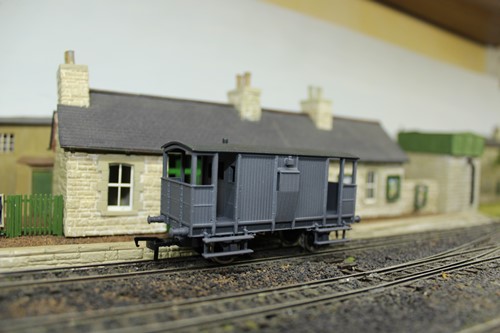
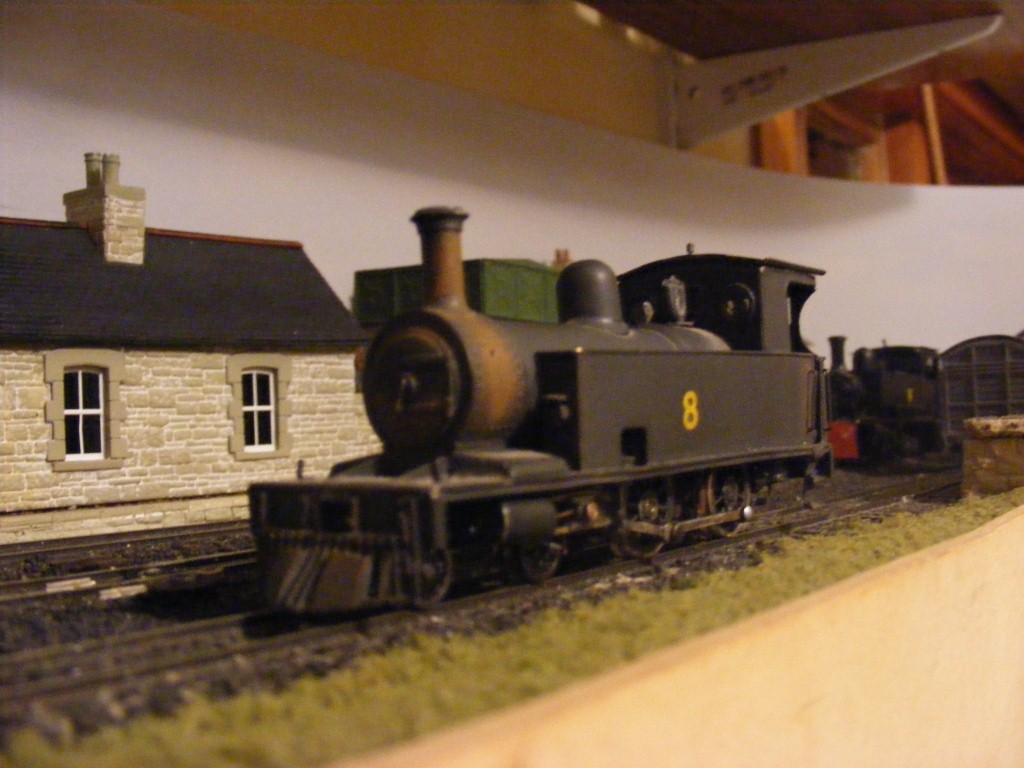
She is certainly looking the part a working loco that's still reasonably well maintained. There are a number of colour photos of 10l on pages 110 & 111 in Irish Railways in Colour a Second Glance there is a striking deterioration in her appearance between in July 1957 photos of her at Ballyconnell and Belturbet and later photos of her at Bawnboy Road and Ballinamore with the paint burnt off her smoke box door and funnel. 8L hasn't got a lot worse since I weathered her 20 odd years ago. I tried to capture the same effect with 3T but could not quiet match the rust effect on the chimney and smokebox!
-
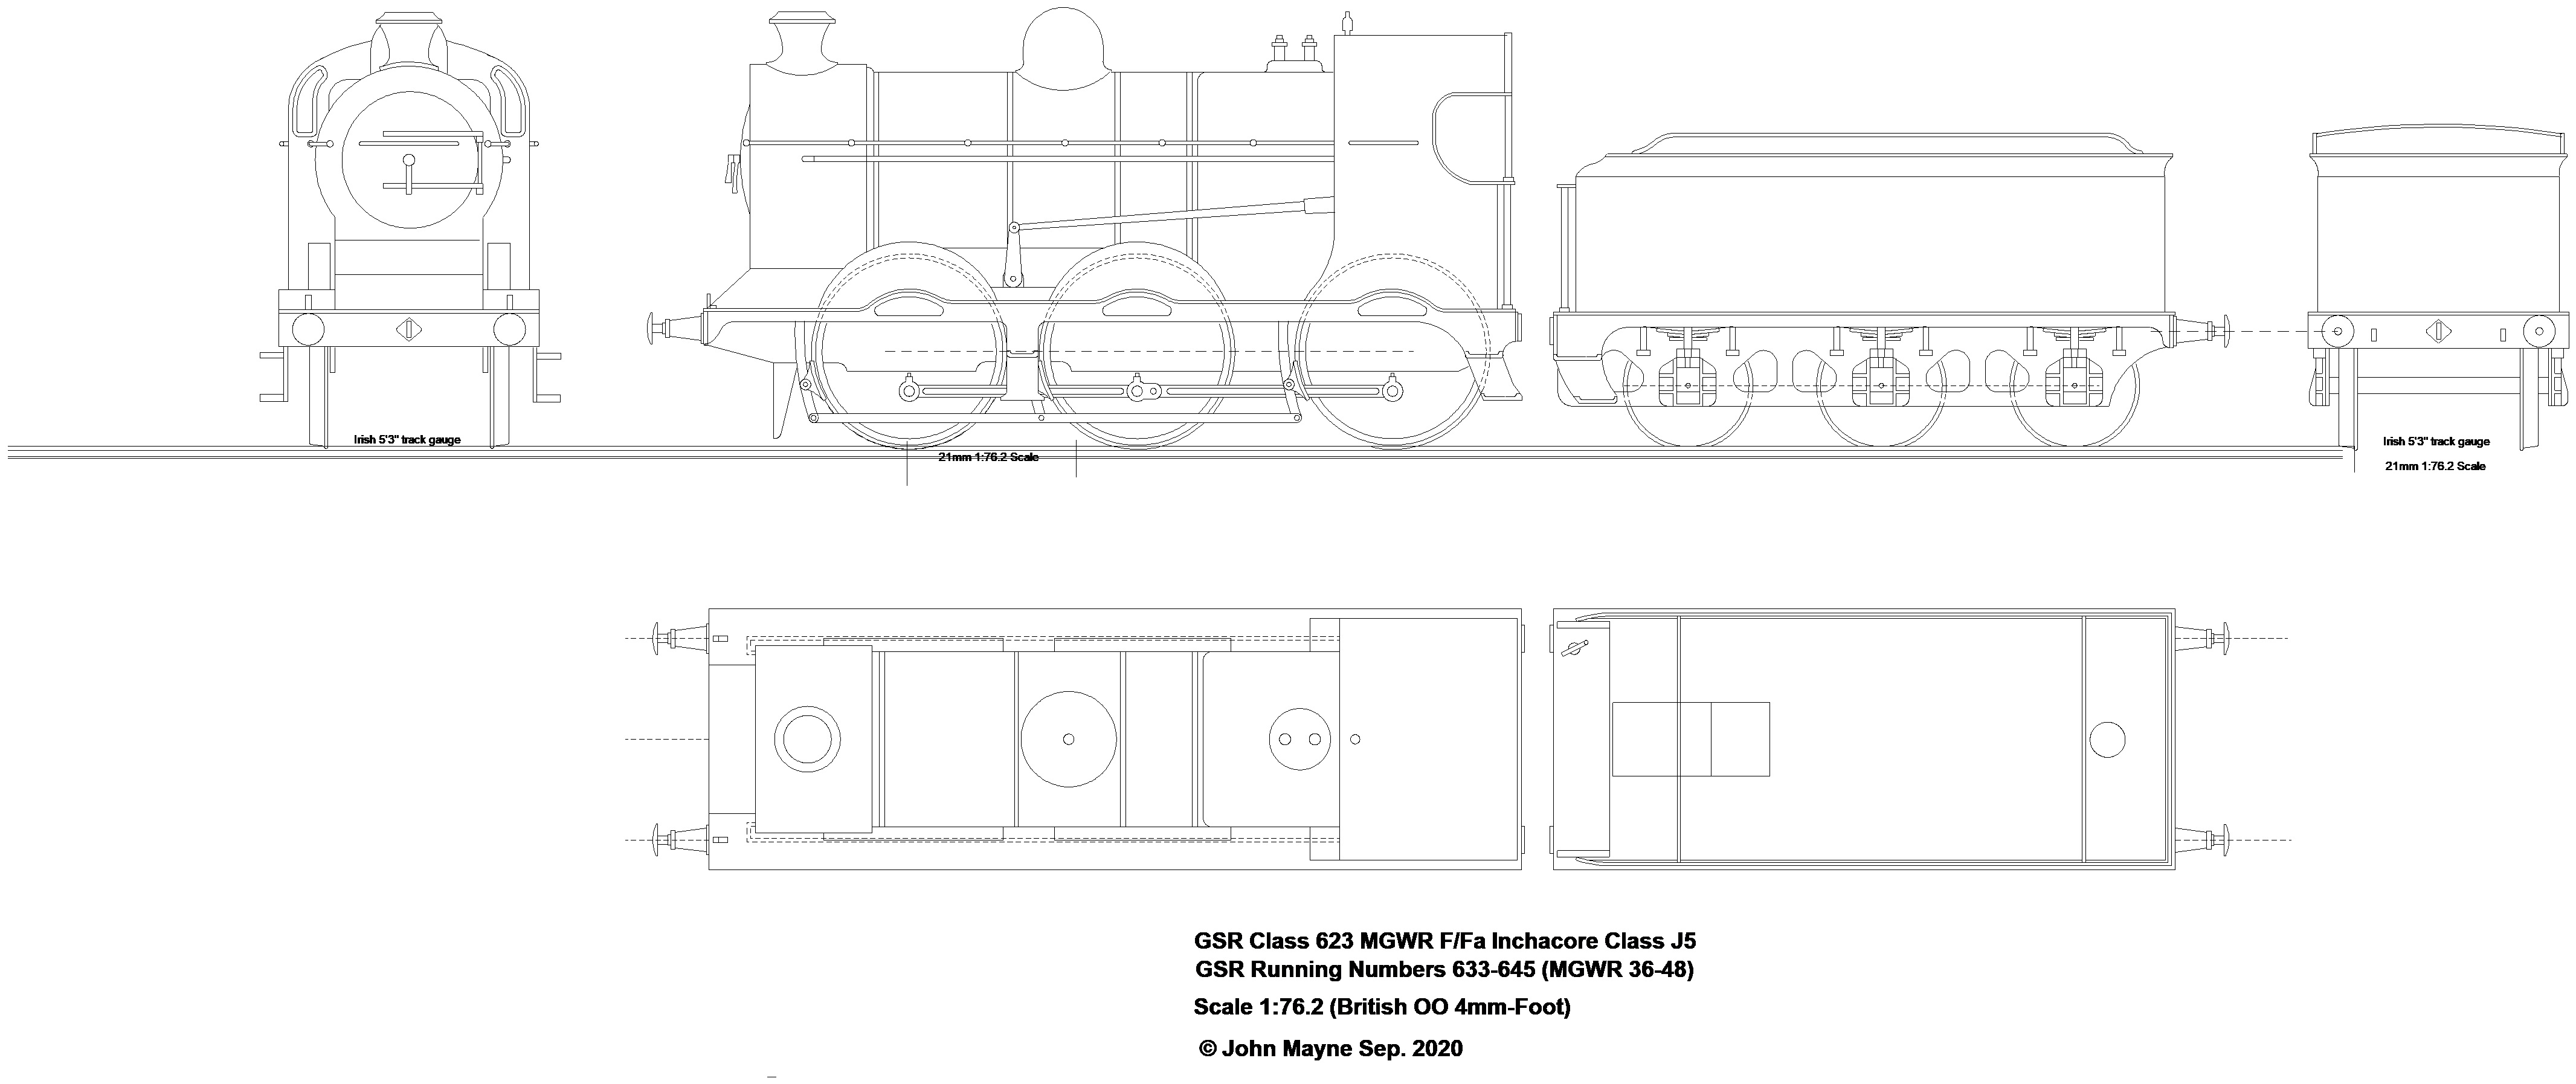
I am currently looking at the viability at producing a ready to run OO gauge brass steam loco in conjunction with a Far Eastern OEM manufacturer of high quality brass locos and rolling stock for the American, European and British markets. I am considering the Midland "Cattle Engine" as a first batched produced model of an Irish steam locomotive as it fits in with my own personal interests and its a good example of a large modern (1920s) mixed traffic design in contrast to the smaller Midland and GSWR "standard" goods types. The model would be produced as a limited edition with each model individually certified and are likely to be a sound investment. I am open to considering some of the larger GNR express passenger classes if there is insufficient interest in a Cattle Engine https://www.surveymonkey.com/r/HD3TB6Z
-
Spot on! A North Wall-Cork Liner ran away on the approaches to Cork was diverted into the goods yard, the 001 Class loco demolished the buffer stop and came to rest in an (empty) diesel storage tank. Rumor had it that the train ran away because there was no effective brake on the train as a result of an improvised brake tail piece on the last wagon despite both the Guard and an Inspector travelling on the loco that night.
-
The West Cork was a very interesting and distinctive system, ideal for a 'system' layout with a number of stations if you have the space. I once thought of building an N gauge West Cork layout with a number of stations and one of the branch line terminals in a 17X8 attic, though these days I would be more inclined towards a building a O gauge model based on the Timoleague and Courtmacsharry as brass kits are available for several of the locos from Alphagraphix and it a lot easier to assemble kits/scratchbuild in O gauge than OO Traditionally 2' was the minimum recommended radius for reliable running with flexible track in OO gauge, but you will achieve reliable running with medium and large radius set track curves in OO. I would recommend Peco track and points in preference to Hornby to achieve reliable running, you can achieve a more realistic effect and will be less constricted in you planning if you use flexible rather than the rigid geometry of set track straights and curves, though set track can be good if you want to experiment with different track layouts or get something up and running quickly.
-
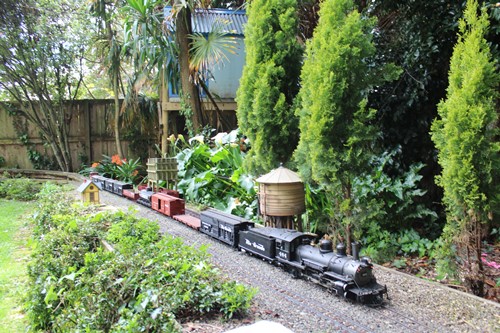
 We also have a Large Scale version GSR Grey who looks after things on the garden railway.
-
Ernies Massive Irish 1930's to 2005 Photo Archive
Mayner replied to Glenderg's topic in Photos & Videos of the Prototype
It depends on the era modelled. The daily Limerick-Sligo passenger services was re-routed to Ballina and the Manulla Junction-Ballina passenger services ceased when the station and signal box closed in 1963. The junction points were operated remotely from Balla. The Limerick-Ballina service does not appear to have connected with Dublin-Westport services at Claremorris. In the early 1970s CIE introduced a daily Dublin-Ballina & return through coach which was attached to Dublin-Westport and return trains between Dublin and Claremorris. The coach most likely a Brake Standard was worked by the Claremorris pilot loco to and from Ballina. This arrangement operated for a short period possibly less than a year before the branch train was re-instated. The branch passenger service was re-introduced with 3 trains in each way daily in 72 or 73 the train ran ahead of Westport-Heuston services and followed Heuston-Westport services between Manulla and Claremorris. The sequence would have been reversed when the connection was changed to Manulla in the 1990s. -
Possibly built by George Hannan who modelled the Irish 3' in OOn3 during the 1960s, his Killybegs layout along with scratchbuilt Donegal locos and stock was featured in the Railway Modeller during the early 60s. He ran a model railway/art shop in Malahide during the 1970s before retiring to Donegal. The Backwoods kit for the Swilly 4-8-0 was first introduced by Pete McParlin of Backwoods Miniatures in the early 1990s
-
To all GNR(I) fans with a few minutes to spare ...
Mayner replied to Galteemore's topic in General Chat
I love the plasticine models! There is a good photographic account of operations at Bundoran Junction shortly before closure in September 57 in Anthony's Burges "Railways in Ulster's Lakeland. Interestingly the junction between the Bundoran & Omagh lines had been revised to a facing turnout off the up? running loop at the Enniskillen end of the station eliminating the diamond crossing off the down? loop. I am not sure whether this section or line was considered as up or down as the Omagh-Enniskillen line was originally built by the Londonderry & Enniskillen and later worked by the Dundalk & Ennisklllen later Irish North Western before being absorbed by the Great Northern. Interestingly 2:05 Enniskilled-Omagh/Bundoran ran double headed to Bundoran Junction on 7th September before dividing and working as separate trains to their destination. Some of the photos feature PP No50 with the 10:30 from Bundoran and U No 205 with the 12:00 Enniskillen-Omagh. The 10:30 appears to have picked up "van traffic" at a number of stations en-route to the junction and attaches a bread container wagon to the rear of the 12:00 at the junction. Interestingly No50 shunts her entire train including coaches on to the waiting 12:00 on the up? main line platform. Both the Bundoran & Enniskillen trains had the normal consist for stopping trains on the Irish North two passenger coaches, a passenger rated van and a string of fitted vans and bread container wagons. No 50 appears to have re-marshalled her train before attaching traffic to the 12:00 from Enniskillen, the vans and wagons are marshaled between the loco and coaches in photos at Beleek and Kesh. -
Narrow Gauge in the Rockies not quite
Mayner replied to Mayner's topic in US / Canadian Railway Modelling
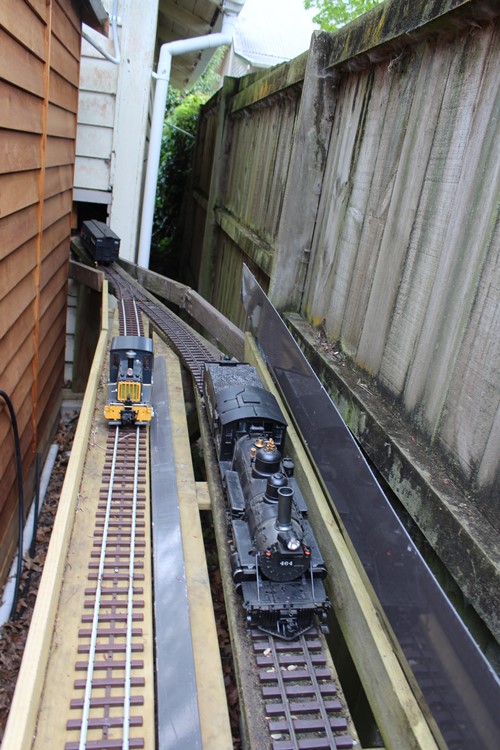
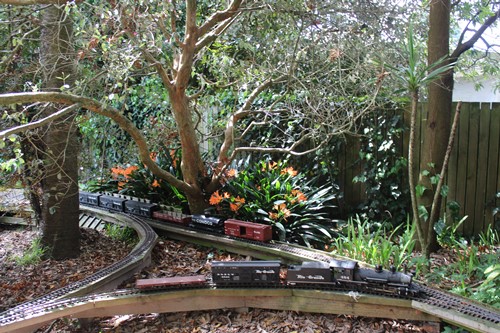
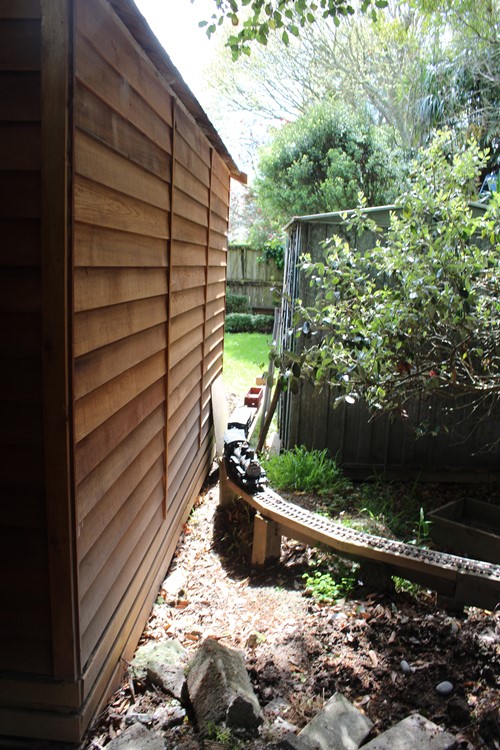
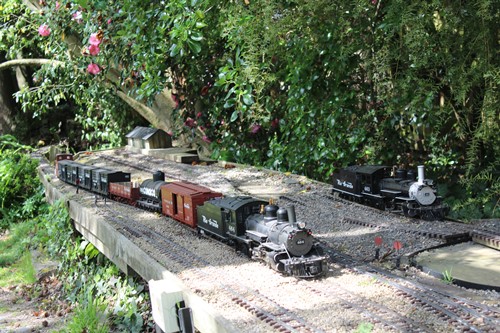
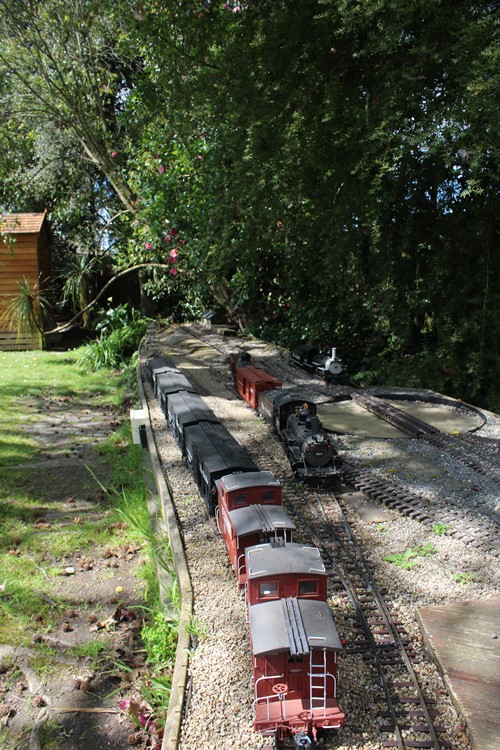
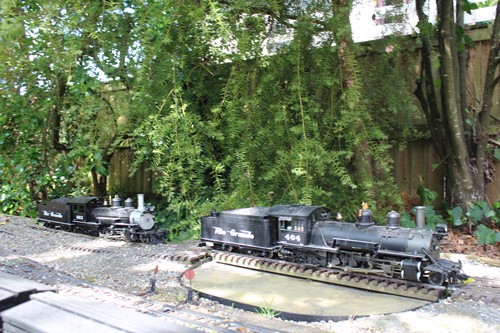
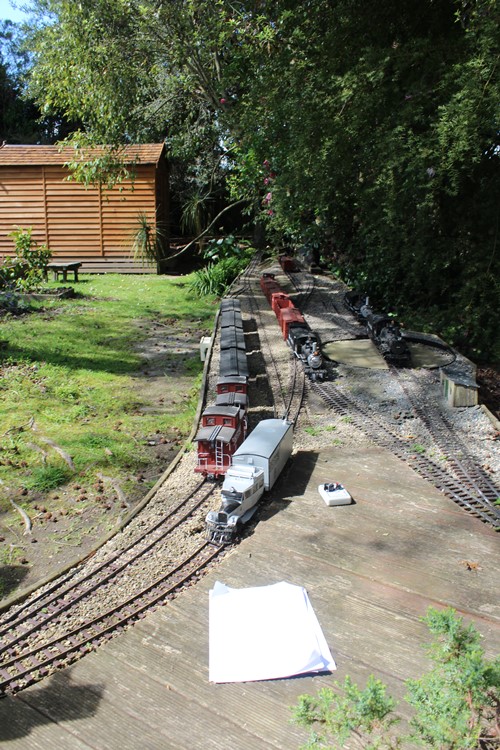
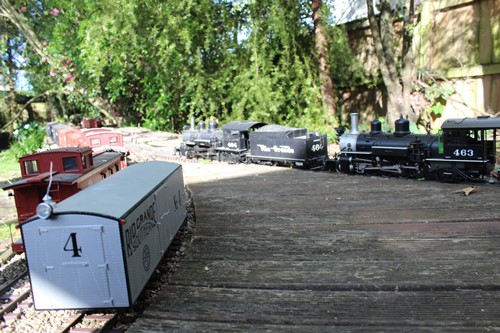
Not sure whether it was the Spring weather or frame of mind I ran the first operating session since March rather than watching a train run round while working in the garden or sitting on the deck. I used JMRI Operations to generate a Train Manifest which also conveniently marshals wagons/cars in station order for their destination. The LGB switcher No 50 waits on the yard lead/headshunt after making up the train as K27 "Mudhen" 464 backs on to the train to couple up. The yard lead is a recent addition and is useful both for making up trains and releasing locos off incoming trains especially when the train is longer than the storage yard. 464 arrives at the Junction before making its first set out for the "Utah Extension" 464 pushes two cars around the Wye onto the Utah Extension. Like a lot of Western Railroads the Extension is a short branch that ends in the middle of no-where! American model railroaders often treat a simple spur track as a branch or an interchange with another railroad as an operating ploy. The Wye and tail track is useful for turning locos and complete trains particularly at the end of an operating session, we will probably extend the extension as time and money permits during the next year or so. Back on her train 464 arrives at Jackson City the main Town/Division Point on the railroad. 461 arrived earlier on a caboose hop. 464 has positioned the stock cars and a pair of cabooses on track 3 and is propelling the remainder of her cars onto track 2 in the Yard. Bachmann K27 464 is showing the effects of age and wear & tear (planned obsolescense?) compared with the older Accuracraft (Brass & Stainless steel) 461. 461 was bought as a replacement when 464 was showing signs of wearing out, though I was lucky to find a replacement gearbox and tender trucks for 464 when the originals failed, but had to fabricate a new leading truck. The plastic body, leading and tender trucks became increasingly brittle with age, the trucks eventually failed, luckily there has been no sign (so far!) of metal fatigue in the cast mainframes and coupling rods and valve gear. Not quiet a "Jackpot" (all tracks occupied unable to move) at Jackson City as RGS Motor 4 arrives at the Depot platform, 348 waits on the siding to switch cars to Track 3. Motor 4 has set back along the Main Line allowing 348 to switch her cars to the Yard and Track 3 Large Scale operation is pretty hands on with hand operated switch stands and coupling cut-levers and takes almost as long as the real thing. American Caboose's are a bit more luxurious than Goods Brake vans.! Nearly ready for evening departures? RGS Motor 4 , 463 & 464 have turned and are awaiting their next duties. Tomorrows another Day!
-
The 60 --------47'6" wagons were introduced in 1978 and were used exclusively for keg traffic until Irish Rail lost the Guinness/Diagio contract in 2006. The 47'6" wagons appear to have been first used for export container traffic when the IWT liner Trains began running in 2008. There is a thread on 3D printed CIE 42' and 47" flats on Niles RM Web Thread https://www.rmweb.co.uk/community/index.php?/topic/130341-42ft-47ft-container-flat-wagons/ It might be worth contacting Niles to see if he is agreeable to producing the wagons to order using SLA or SLS to achieve a better surface finish than achievable with the Shapeways material.
-
Bachmann were likely to have designed and manufactured their motors in-house. Micromark sell 12V can motors but you would need to check shaft diameter. https://www.micromark.com/Flat-Can-Motor-Style-2025-12v
-
That's a long train by Wexford Liner standards! By 83-4 the Liner was down to 4-5 flats attached to the rear of a bagged fertiliser train between North Wall and Shelton Abbey.
-
Should not be a problem Kevin. I am planning to assemble the test etches for the revised versions of the heating & luggage and luggage vans (and the 52 Class) at some stage this month, all going well I hope to place an order for the production etches after Christmas for delivery during the 1st quarter of 2021 fingers crossed!
-
Replacement parts for larger scale (On30-to G Scale) has been a significant issue for several years once the original stock of spares sell out. I have use SLA printing for producing prototypes and replacement parts for models, such as gears, handrail brackets and handbrake wheels. While its feasible to achieve a similar finish to plastic injection moulding, considerable skill and experience is required in setting up the 3D (CAD) model for printing and the clean up process cleaning the model and removing the support structure is hazardous and requires a high level of care to avoid damaging the finished model. The brass castings were produced by a local jewellery industry supplier and metal caster, in some cases I have used the original part as a pattern or fabricated a pattern in metal or plasticard. More recently I engaged a freelance 3D modeller to produce the CAD work eliminating the physical pattern making phase and use a locally owned 3D printing house rather to produce the prints. A 3D printing house should be able to provide a 3D modelling service to produce the CAD work or recommend a freelancer.