Mayner
-
Posts
5,134 -
Joined
-
Last visited
-
Days Won
128
Content Type
Profiles
Forums
Events
Gallery
Blogs
Everything posted by Mayner
-
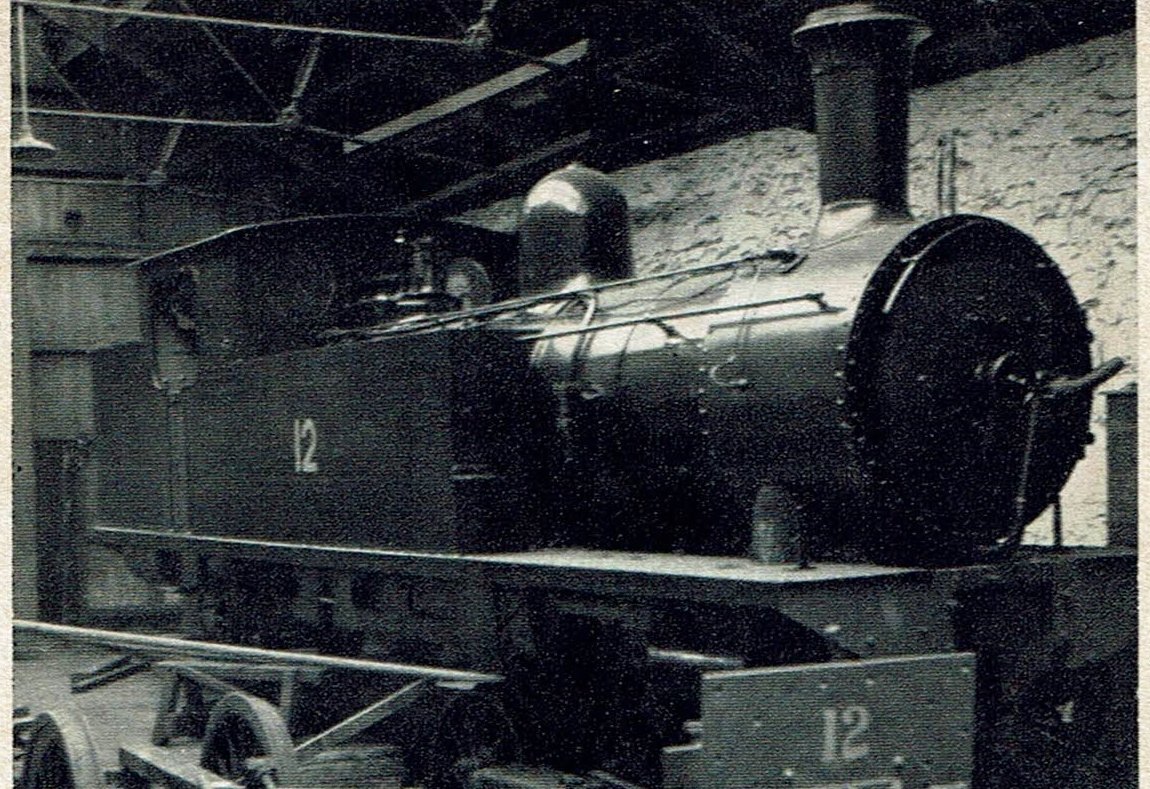
An un-credited photo of 12L under repair in Ballinamore Works in 1956 from the Pan Paperback edition of P J Flannigans book. It looks like the loco was recently repainted and is being re-assembled following repair, the colour is anyone guess. Ballinamore had lost most of its machine shop facilities when overhauls were concentrated at Inchacore in the 1930s, 12L last visited Inchacore in 1947 so it looks like Ballinamore retained capability to carry out all but major overhauls. There are some excellent colour photos of C&L locos in their final years of operation in Midland Publishing "Irish Railways in Colour" series, the most noticeable thing is that the locos were kept very clean despite burnt chimneys and smokebox doors and badly worn paintwork. Goods stock appeared to be well maintained and in good external condition in order to handle the relatively healthy goods traffic, passenger stock was a different story with one or two reasonable coaches on the Dromad-Belturbet main line and a a couple of decrepit former C&L coaches retained for the daily Arigna mixed train. The model looks fantastic, I am tempted to build a Passage Tank but its likely to stick on the curves on my layout just like 13L did with a coal special on the Tramway in 1934, nothing like prototypical accuracy even on a fictious extension of the Tramway to Boyle or Sligo

-
The Kitmaster/Airfix cattle wagon and oil tank wagons were one of my staples for Irish wagons when I was started modelling. I used to do odd sorts of things with the tank wagons shortening the tanks and mounting them on Trix wagon chassis and converting the chassis to carry Triang-Hornby 20' containers by chopping the chassis in two, shortening the length and re-joining. More recently I re-built Dapol tank wagons to resemble the ESSO Sligo oil train wagons by extending the tank barrel at each end with sections cut from a spare barrel, the joints are barely noticable once sanded down with wet and dray paper. The Dapol versions come with the added bonus of decent wheels and tension, the kits are a relatively cheap and quick way of churning out rakes of wagons, until fairly recently the Dapol kit was the best option for modelling the British Railways 16t mineral wagon, I still have a rake of about 20 Airfix/Dapol mineral wagons somewhere.
-
Railway workers often develop a gallows humor to keep their sanity like police or emergency services. One of the more gory jobs is removing human remains from under a train, a mate of mine was a maintenance manager at a South London Depot one of the tricks played on new recruits was to plaster the underside of a unit with sausages or mince meat and wait to see the reaction.
-
It varies some modelers turn their own either with a lathe or using a drill and file, Ultrascale will supply high quality 21mm wheel sets to order with a 9-12 month lead time, 28mm axles may be available through the Scalefour Society, North Yard in New Zealand produce a 28mmX 2.03 pinpoint coated brass axle for Sn3.5. There is also the alternative of cutting and extending a standard 26mm axle using 2mm bore brass tube as a sleeve.
-
New Zealand has a Government run an insurance based accident compensation (ACC) system which precludes claims for personal injuries, the no-blame state system basically covers medical and rehabilitation costs and up to 80% of loss of income. Courts also award reparations to victims in health and safety prosecutions. The system is intended to help people recover and get back to work/move on with their lives more quickly than by pursuing a claim through the court system. The downside is the system reduces the incentive for businesses to pro-actively manage health and safety risks in the absence of higher insurance premiums arising from personal injury claims, the no fault system with its industry based rather than individual levies or premiums. The legal requirement to securely fence railways in the UK and Ireland goes back to the dawn of the railway age while the rest of the World took a more pragmatic approach you enter the rail corridor at your own risk, the UK adapted a risk based approach to occupational health and safety following the publication of the Robbins Report in the late 1960s this approach was later adapted by Ireland and a number of Commonwealth Countries. What ever people think of "elf and safety" the UK consistently has one of the lowest occupational death and injury rates in the developed World with Ireland and most EU countries trailing behind.
-
The Chatham Show brings back memories, I had recently moved to the UK and for the 1st couple of years spent most weekends visiting exhibitions and preserved railways in the South and East Midlands. Taking the train from Victoria to Chatham in an early Southern Region EMU (4EPB?) was quite an adventure compared to the more modern stock used North of The Thames. At one stage I was a member of the Milton Keynes Model Railway club who kindly stored my layouts in Bletchley Park as I went gallivanting around Scotland and Ireland until Denis Lovett (MKMRS Treasurer) asked Kevin Thornbury (MRSI President) to remind me to collect my layouts while Kevin was visiting Bletchley Park. I eventually collected and almost completed one of the layouts (EM min space mineral railway), it appeared at a number of Irish Exhibitions about 20 years ago and was exhibited at Warley in 2004/5 connected to Frank Davis's Western Region layout though I was 12,000 miles away at the time. I got involved in the exhibition scene following my return to Ireland in the Mid 1990s acting as Roadie for the late Frank Davis helping to set up an operate his EM gauge Wentworth layout at exhibitions throughout Ireland, the Bangor Model Railway Club was notable for its hospitality to exhibitors with its excellent Saturday Night dinners. New Zealand tends to follow American influence with a greater focus on conventions rather than exhibitions with convention delegates visiting layouts on layout tours, though there is an exhibition circuit based on a small number of regional shows. My garden railway was included in layout tours at two conventions and my 3' gauge Irish layout Keadue was included at the last minute in the 2014 National Convention. Heavy rail was forecast during the weekend of the convention with Sunday a wash out, we quickly moved the layout from the house to the workshop where it provided a useful diversion for visitors sheltering from the rain. The Association of American Modelers of Australasia (AMRA) is considering a mini-convention in Hamilton in October but all bets are off in the current uncertain situation, though Keadue has had a dust off just in case the weather turns bad.
-
I had a pleasant surprise this afternoon with the arrival of a weed spray pack just over a week since I placed the order, international mail service between the UK and Australasia seems to be getting back to normal.
-
CIE initially attempted to operate "a no-shunt railway" with fixed formation trains when freight services were modernised under Railplan 80, with scheduled Liner Trains for container traffic and fixed formation trains for specific traffic flows, train length was effectively limited to 15 (42') bogie or 204 wheel wagon with the available motive power. Following it establishment IE adapted a more pragmatic approach with less of a focus on running point to point fixed formation trains and an increased level of shunting. Train lengths increased to 18 (42') or 35? wheel wagons following the introduction of the 201s and following union agreement to operate the 071s on freight traffic During the 1970s and 80s the Limerick Cement factory was served by a three times weekly block train direct from Kingscourt, in later years (c2000) the gypsum wagons were usually attached to the rear of a Platin-Cork bulk cement train and detached at the Junction, the wagons would have been worked to and from the factory by a trip working from Limerick. Its possible that the Limerick gypsum wagons were attached to scheduled liner trains between Drogheda and Limerick if the Platin-Cork was not operating. The 12:00 North Wall-North Esk Liner conveyed keg and container traffic to Limerick Junction in the late 1990s, the Limerick wagons were usually marshalled immediately behind the locomotive to speed up the shunt.
-
Politically the ILDA dispute occurred at a very convenient time when the future of the railways was under review and CIE was instructed by the Minister of Transport to dispose of surplus land (freight yards?) to fund investment in public transport. Steel traffic from Haulbowline would have been loaded onto scheduled Liner trains at North Esk, there was never enough traffic to warrant a dedicated steel liner. Limerick Ennis was not affected by the temporary closure of the Ennis-Claremorris section a daily Heuston-Ennis & return passenger operated during the 1990s, Ennis-Athenry re-opened with a Limerick-Gort bagged cement special, bulk cement to Athenry was a regular traffic on this section before regular operation ceased around 2002-3. I seem to have forgotten the trice weekly Kingscourt-Castle Munget Gypsum Train! In later years the Gypsum was attached to the rear of the Platin-Cork Bulk Cement train detached at the Junction and worked to Limerick on a local trip working.
-
Steel traffic was mainly shipments of reinforcing rod from the Irish Steel Haulbowline plant to Dublin carried on scheduled Liner trains, traffic was not particularly heavy as CIE only had 8 bogie flats suitable suitable for carrying the traffic. Molasses for Mullingar and Longford was attached to Limerick-Dublin and Dublin-Sligo Liner trains The Ennis-Claremorris line was only in intermittent service during the 1990s and the Mullingar-Athlone Line closed to regular traffic. Apart from a short lived Limerick Claremorris Liner (95-96) Traffic north of Ennis was largely restricted to the Ashai Coal and Oil train, fertiliser and cement specials. The line was closed to regular traffic for approx 2 years (94-95?) and the coal and oil train diverted to run via Roscrea and Portarlington when track from the line was salvaged for use on the Ballina Branch and other lines which were in poor condition. Despite the new liveries and new traffic flows the Irish railway system was effectively being run into the ground during the early 90s with de-railments, train breakdowns and speed restrictions as a result of minimal infrastructure investment and deferred track maintenance on the majority of main line and secondary routes.
-
The Hornby, Lima and possibly Mainline BSK coaches were basically stretched versions of the BR 57' Full Brake to fit a standard BR MK1 63 or was it 64' coach chassis. The Hornby, Lima and Mainline BR Full Brakes are a reasonable starting point for a modeler planning to scratchbuild new sides or use Bill Bedford (Mousa Models) etched overlays. A Bachmann Brake Composite (BCK) or Brake 2nd (BSK) would be a better option for a modeler who intends to build a BR Van or the Weedspray coach by modifying a rtr model. Personally I am tempted to build a van using a combination of Comet parts and Mousa Models sides.
-
The signalling of manned level crossings was largely dependent on local conditions in particular whether the driver of a train could see a signal or gate in time to safely stop short of the crossing! On passenger running lines crossings were normally protected by a working distant signal, the crossing barrier or gate was normally classed as a home or stop signal although separate home signals were usually provided where there was poor sighting as a result of a curving approach or a crest between the distant signal and crossing gates. In some cases signals were operated without a lever frame by physically opening or closing the crossing gate, a lever frame interlocked with the gates was usually required on crossings with working home and distant signals such as those between Liffey Junction and Maynooth on the Midland main line Crossing signals were normally fixed at danger at un-manned crossings on goods only or lines with no regular passenger service like Drogheda-Kingscourt. A lot of crossing signals were based on steam stopping distances and had to be moved out with increasing train weight and freer running rolling stock, there was an incident in recent years where a Liner ran through a set of gates on the Mayo Line despite the driver applying the brakes as he passed a distant signal at danger. Signals where the arm slotted vertically within the post to display a clear aspect were phased out following the Abbots Ripton disaster where a signal arm in the 19th Century, but continued in use in the North East of England into the British Railways Era, the SLNCR no doubt continued with it antique signalling because it worked and did not have the money or see the need to modernise.
-
The IRM 42' flats are models of the 42'9" wagons, the overall length of the bogie and some CIE flat wagons was longer than the bed or load length in order to carry 8'6" or 9' containers within the loading gauge. 27301-27767 22'6" 14' wb 4w flats 1973. During the 1990s these wagons were used on the Foynes-Ballina Coal and Oil trains, Foynes-Portlaoise Grain Traffic, 27658-27767 were used for Guinness traffic. Post 1996 approx. 40 of these wagons were converted to carry timber traffic including logs from Ennis to Waterford or Clonmel. 30001-98----42'9" bogie flats 1971 BR Ridemaster Bogies ----91-98 steel floors for Irish Steel traffic from Cork 30099-30218---42'9" bogie skeletal flats 1978 IRM model some were fitted with spark proof brake blocks for use on Dublin-Ballina Ashahi liner & Shelton Abbey-Marino Point Anhydrous Ammonia Trains. 30219-30278---47'6" bogie skeletal flats. introduced for keg traffic 1978 Currently used to carry 45' containers-------------------3D printed model available https://www.rmweb.co.uk/community/index.php?/topic/130341-42ft-47ft-container-flat-wagons/&ct=1598912053 30501-30540---62'9" air braked skeletal flat wagons. Initially used on 12:00 North Wall-Cork Liner and Dublin-Galway Night Mail-Liner converted to carry timber post 1994. Possible Hornby Tiphook container wagon https://www.hornby.com/uk-en/tiphook-kfa-container-wagon-93367-with-20-and-40-one-containers-era-11.html Molasses was imported through Foynes tripped to Limerick as a block train, the molasses tank wagons were attached to the rear of scheduled liner trains to be forwarded to their destination. There is a YouTube video of an UP Sligo liner attaching empty bagged cement and empty Molasses tank wagons at Mullingar during the mid 1990s. Initially apart from re-gauging to 5'3" there was little visual difference between the Irish and UK versions of the ESSO tank wagons when originally introduced. The Esso Teoranta wagons lost their ESSO shields and logo during the 1970s, CIE fitted reinforcing fillets between the tank and underframe similar to tank wagons built by CIE during the same era. SSM produce a detailing kit for the Irish tank wagons. http://www.studio-scale-models.com/img/K31.jpg
-
Irish Rail was much more freight orientated before 2000 modelling Limerick or the Junction would require a hell of a lot of freight rolling stock. The best option would be to obtain an Irish Rail Working Timetable (WTT) for the era, the WTT included paths for bagged cement and fertiliser specials in addition to the scheduled liner trains. There were significant changes in rolling operations and rolling stock use after the railway ceased operating mail trains and carrying Sundries Traffic in 1993/1994, there was a greater focus on bulk and trainload traffic post 94 with new traffic flows including logs to the new mills at Clonmel and Waterford, grain traffic for Avonmore Co-Op Portlaoise and molasses traffic (cattle feed) to a number of destinations in the Midlands. The 62'9" airbraked wagons used to carry Liner & Mail Traffic on the Cork and Galway Lines were converted to carry timber traffic, grain was transported in open containers on 4w & later bogie flats, molasses in redundant oil tank wagons. Excluding the ore and shale trains Bell Liner Trains: Operated until the company was liquidated in 1997 with daily Cork-Waterford & Limerick-Waterford Bell Liner Trains 42'9" wagons. CIE Liner Trains: Two Cork-Dublin Liners, One Dublin-Limerick Liner, Limerick later served by a connection into the 12:00 Dublin Cork Liner, Keg and Container traffic. Keg liners may also have worked from Dublin to Cork and limerick Limerick-Waterford Liner Mail one each way daily. Limerick-Ennis Liner daily trip working from Limerick container and keg traffic Limerick-Roscrea Liner daily trip working from Limerick (pre-1993/4) container and keg traffic. Bagged Cement traffic (usually weekly cycle) Castle Munget to Ballina/Westport/Galway/Tralee/Cork/Roscrea/Clonmel I am not sure if Waterford and New Ross received bagged cement form Limerick or Drogheda Bulk Cement Castle Munget Athenry, Cork, Waterford (also served from Drogheda) Fertiliser: Originating points. Arklow (NET/IFI) New Ross (Albatros), Foynes, Galway to destination points in midlands south and west. Deport. Athenry, Ballina, Castlebar, Claremorris, Clonmel, Cork, Ennis, Faranfore Mallow, Nenagh, Thurles, Rathluric, Rathmore, Tralee, Waterford, Westport. The majority of fertiliser depots were capable of handling a train load. Fertiliser traffic from New Ross or Foynes was likely to have been routed via Limerick and Athenry to destinations in the west
-
The Newry, Warrenpoint and Rostrevor and the Newry & Armagh certainly fitted into the disreputable minor railway category until absorbed by the GNR in the 1870s. GR Mahon wrote a series in the IRRS Journal ( late 1960s-early 1970s) on Irish Railways during the 1860s & 1870s the sections on the two Newry companies read like a soap opera as the companies struggled to operate their lines. One possible scenario would be to presume that the NW&R was built as a pioneering narrow gauge line with similar stock to the Ravenglass & Eskdale sharing a cramped joint terminal with the Newry & Armagh. Dublin Bridge anyone?
-
There was an interesting series of articles on the GNR dieselization proposals from the mid 1950s in New Irish Lines several years ago, both GM and Metrovick tendered to supply locos to the GNR in 1955, including the EMD standard G8 export model and Metrovick 1200hp A Class interestingly the A Class was more expensive than the G8 and one of the more expensive of the British diesels. Its possible the deal to buy the Metrovicks may have been tied up with improving trade relations with the UK in preparation for the Anglo Irish Free Trade agreement. Its possible that CIE accepted the Metrovick tender as the A Class was the only British design that met CIEs specification for a 6 axle locomotive in terms of power and axleload. The choice of the two stroke Crossley engine may have been an attempt by AEI to design a relatively high powered light axle load diesel to compete with GM in export markets, contemporary 4 cycle diesel electrics were heavier considerably heavier and likely to exceed axleload limits within a BoBo or Co Co format. CIEs choice of Sulzer engine and Metrovick electrical equipment for the pioneering diesel electrics 1100 & 1101 was nearly ideal in terms of choice of reliability of equipment, but effectively restricted to the Cork line in terms of axle load for a Bo Bo, the B101 A1A A1A BRCW version was the near ideal in terms of a British built diesel electric but underpowered for a main line diesel electric locomotive. The English Electrics attempts to produce a 1600hp 15ton axle load diesel electric for New Zealand based on the LMS twins resulted in 60' long 2-Co Co-2 behemoth NZR Df Class, which had a short life their V12 engines were plagued by engine problems, NZR selecting the GM G12 & G8 export model 5 years later to complete the North Island main line dieselization programme, though EE locos in the 600-900 Hp power class were more successful than the Df. The Brush Type A1A A1A design may have been suitable for use in Ireland, Brush built similar locos for Sri Lanka (then Ceylon) in the early 1950s, BR modernization Plan Brush locos would have been too heavy for use on CIE, the Brush diesel locos and components supplied to BR gave considerable problems in service, the Mirrless engines originally used in the Brush Type 2/Class 31 developed signs of stress when they were uprated beyond the manufacturers original specification and were replaced with EE engines, the twin Bank Sulzers used in the Class 47 locos gave trouble for similar reasons and some were later replaced with re-conditioned GM engines for heavy freight use. The Brush electrical system was considered problematic the final batch of BR Type 4 "Peak" Class 46 locomotives were fitted with AEI electrical equipment which proved even more problematic. Part of the problem with British manufacturers seems to have arisen from a sense of entitlement than develops in a protected market essentially closed to outside competition, it would have been politically unacceptable up to the mid 1980s for British Rail or other nationalized industry to award a large contract to a foreign company. Another problem was manufacturers failing to understand the long asset life of railway locos and rolling stock. British Leyland literally itself in the foot by failing to understand the market and shutting off part supply for locomotive/railcar/dmu engines and transmissions for CIE/UTA/BR and NZR when it upgraded engine and transmission design in the 60s and 70s. In Ireland and the UK first generation railcars and DMUs basically were made obsolete within 20 years of their introduction when Leyland ceased to supply spare parts, NZR had to re-engine its fleet of DSC shunting locos when Leyland ceased to supply replacement engines/parts within 10 years of the classes introduction.
-
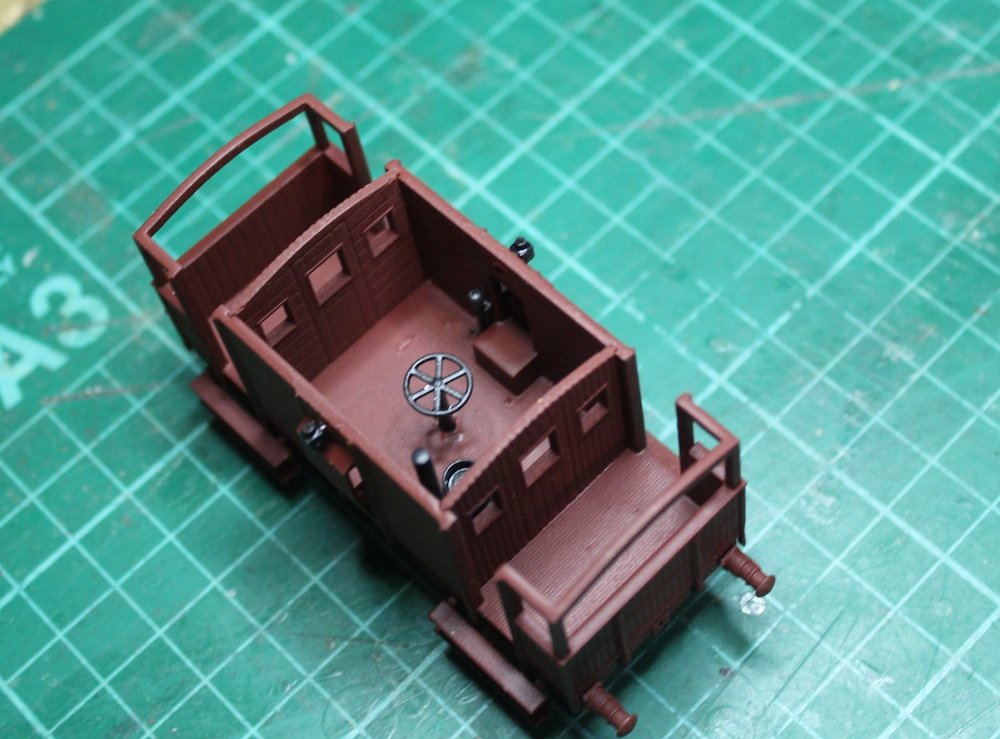
Personally I will probably get more enjoyment out of re-building at least one of the tanks back into its original state as a wagon, than waiting in the expectation of IRM producing a rtr model, I also need to design a 21mm gauge w iron assembly suitable for other wagons with triangulated underframes. One of the attractions of the conversion is that IRM have completed the really difficult work in modelling the tank anchors and triangulated underframe. The wagons were originally built on a standard 16'11" 10' wb triangulated underframe similar to the corrugated opens and later H vans. The wagons were converted into de-mountable tanks during the late 70s for use with the new weedspray train. These wagons were smaller in capacity and quite different in design to the tank wagons built by CIE from the mid 1960s onwards and the Class A & B Charles Robetrs tank wagons imported for ESSO oil traffic during the late 1960s
-
I am planning to use the tanks as a basis for the tank wagons built by CIE in the late 50s early 60, looks like a matter of cutting off the ISO twistlock frame extensions, designing and installing suitable running gear
-
Kader (Bachmann) dropped the ball about 10 years ago when the decided to concentrate on high volume production for their own brands and ceased OEM work for companies like Hornby and smaller commissioners like Murphy Models. Although this lead to some short term disruption it opened up an opportunity for a new generation of Chinese OEM manufacturers that supply large companies like Hornby and a multitude of smaller commissioners like Accurascale, IRM, MM, Hattons, Kernew, Rails, Revolutions Trains etc who have lifted expectations in terms of quality and detail while long established businesses Bachmann & Hornby struggle to respond. Rails and Hattons appear to have similar purchasing power to the big supermarket & retail chains being price setters rather than takers will treat suppliers like Bachmann & Hornby in a similar manner even establishing their own brand models like the Hattons SECR P & 14XX and Rails collaboration with Dapol on the A1/Ax and Accucrascale on the Class 89. I would not discount Irish business initiative or enterprise; low volume Chinese manufacture and significant gaps in the market opened up an opportunity for IRM & Accurascale to enter the Irish & UK rtr market in much the same way as Irish owned businesses like Kerry and Glanbia (Avonmore co-op) have become Global food businesses, CRH (Cement Roadstone Holdings) an international building materials business.
-

Early Dieselisation - Continuous run "micro" layout
Mayner replied to Sean's topic in Irish Model Layouts
The DC Kits G Class may not fit a Hornby 0-4-0 chassis, the loco was designed to fit a Black Beetle http://www.steameramodels.com/bbeetle.htm . The Black Beetle motor bogies were very good, the power bogies may no longer be available Mashima the company that manufactured the motors have gone out of buisness If you are using the Hornby chassis it might be better to see if you can pick up a used Hornby diesel shunter body at an auction. -
The Turf Trains appear to have run to Dublin and possibly other cities when imported coal was unavailable for domestic and industrial use as a result of WW2 during "The Emergency" possibly late 1940 until coal supplies returned to near normal after the ending of hostilities. Turf was transported from bogs in the West and Midlands to Liffey Junction with the Phoenix Park converted to a vast fuel depot. The unemployed were enlisted to cut turf one of my Uncle's a dapper city gentleman successfully avoided the draft possibly by finding a job or medical reasons. A Ballina- Belmullet Line would have been a good candidate for turf traffic from bogs in the Bangor Erris and Bellacorrick area to Dublin during the Emergency or possibly between Bangor Erris-Bellacorick if the power station came on line in the late 1940s. Bogs in the Bangor Erris area were used to supply turf to the Bellacorrick Power Station from the mid-1960s on-wards https://www.mayo-ireland.ie/en/towns-villages/bangor/bangor-activities-bellacorrick-station.html with development work commencing on the bogs in the early 1950s. The late Jack O'Neill wrote about his first experience of fast main line running as a passed fireman on a double headed turf train behind 656 and 660 from Mullingar to Liffey Junction in a "Decade of Stream". The Turf Trains were given the best available coal and ran at high speeds given priority over all trains except passenger and mails. Jack O'Neill described the trip as one of the most enjoyable of his career marred only by a fire breaking out on the train as they passed Clonsilla with 4 wagons ablaze when the reached Liffey Junction where the firebrigade dealt with the problem. Turf trains were unloaded on two long sidings served by a wide concrete roadway at Liffey Junction on the site of the current Broombridge LUAS light rail terminus and Depot. The sidings were disconnected and removed following the closure of Liffey Junction as a blockpost and re-alignment of the main running lines during the 1990s
-
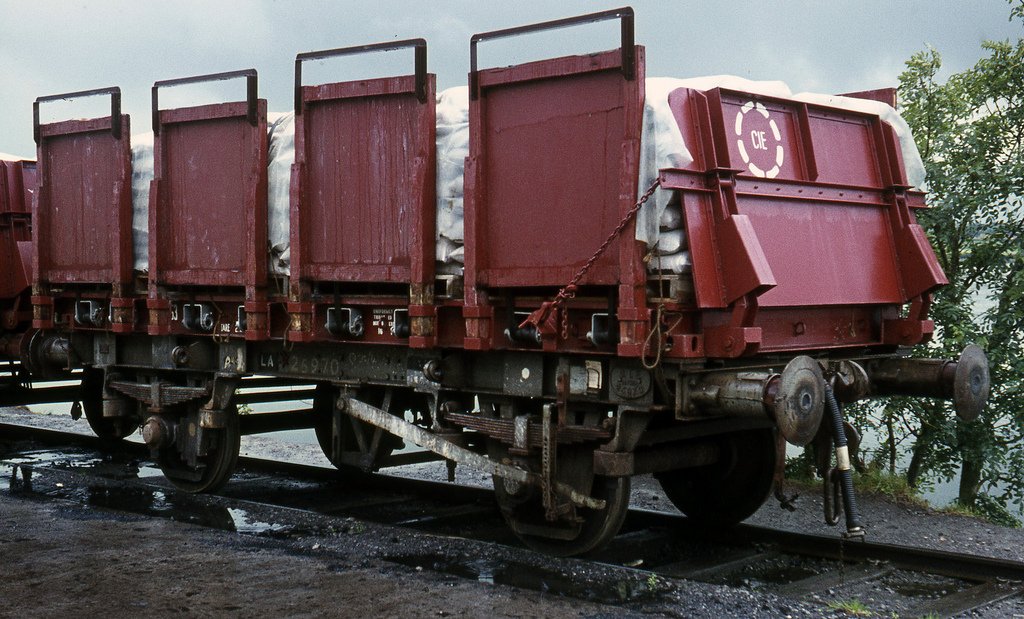
The Back to Back fertiliser swap bodies appear to have been carried by the 25436-25982 steel floored flats. The Back to Backs appear to have been in service between the late 60s and mid 70s when they were replaced by the bogie wagons. According to an IRRS Journal a couple of laden Back to Back specials ran to Newcastle West before central section of the North Kerry line closed in November 1975. Some time mixed rakes of bogie and back to back fertiliser wagons ran to and from Shelton Abbey with the 4w wagons marshaled at the rear of the train. I remember watching a southbound empty fertiliser train passing Dunlaoire in the mid-70s, the last wagon looked like it was lifting off the rails and about to derail as it ran through the facing point that leads to the bay platform/original Dunlaoire Station. The bodies of the swap bodies got very scruffy looking after a while in service with not quite horizontal battens nailed to the sides at crazy angles. 4:55. The battens may have been a replacement for the angle iron lifting brackets in the photo of 25970 may not have been up to handling by forklift.
-
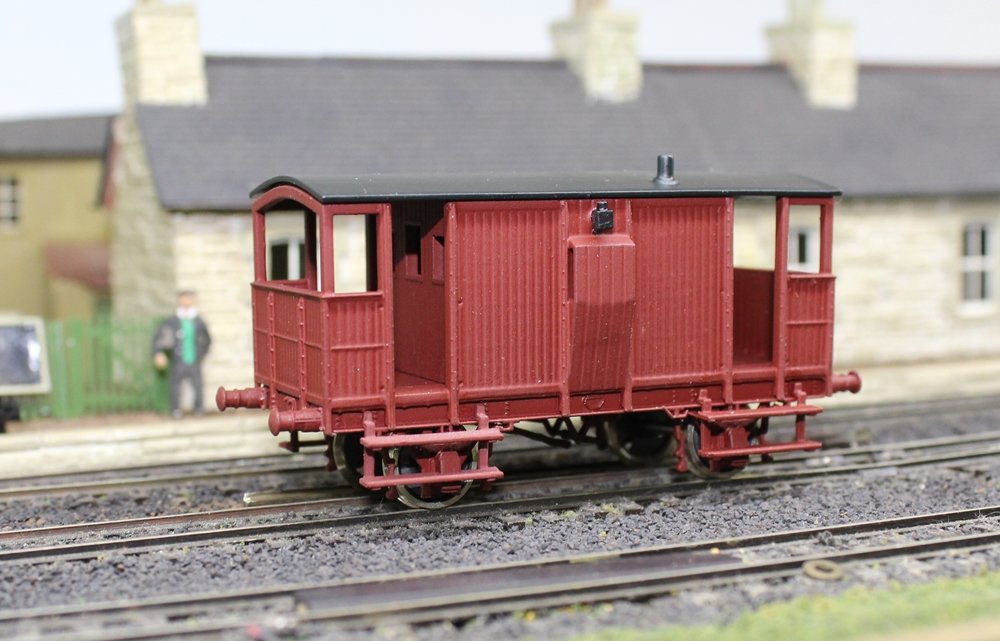
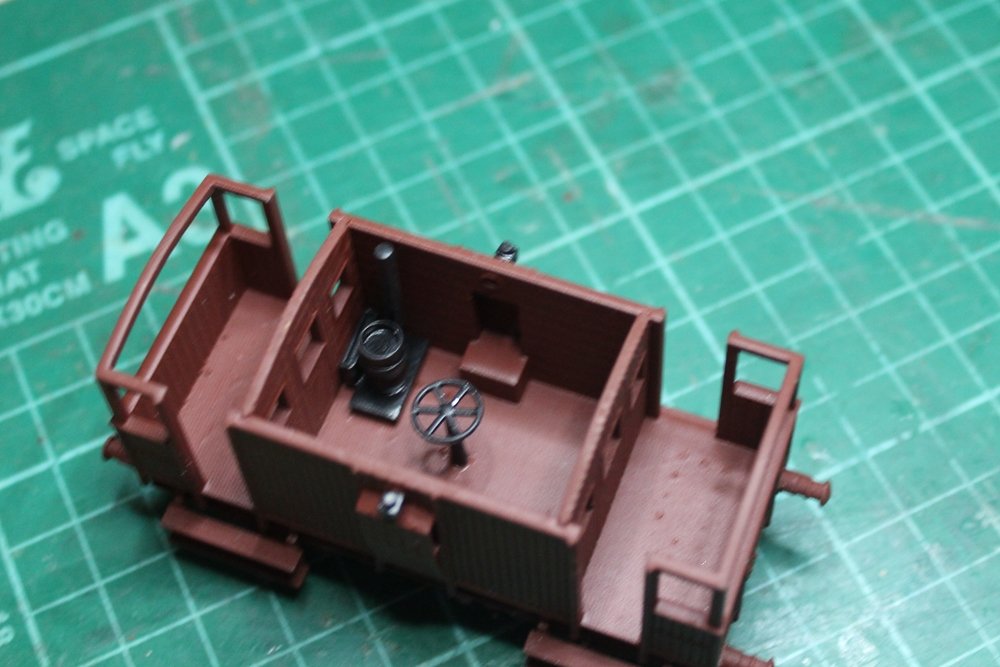
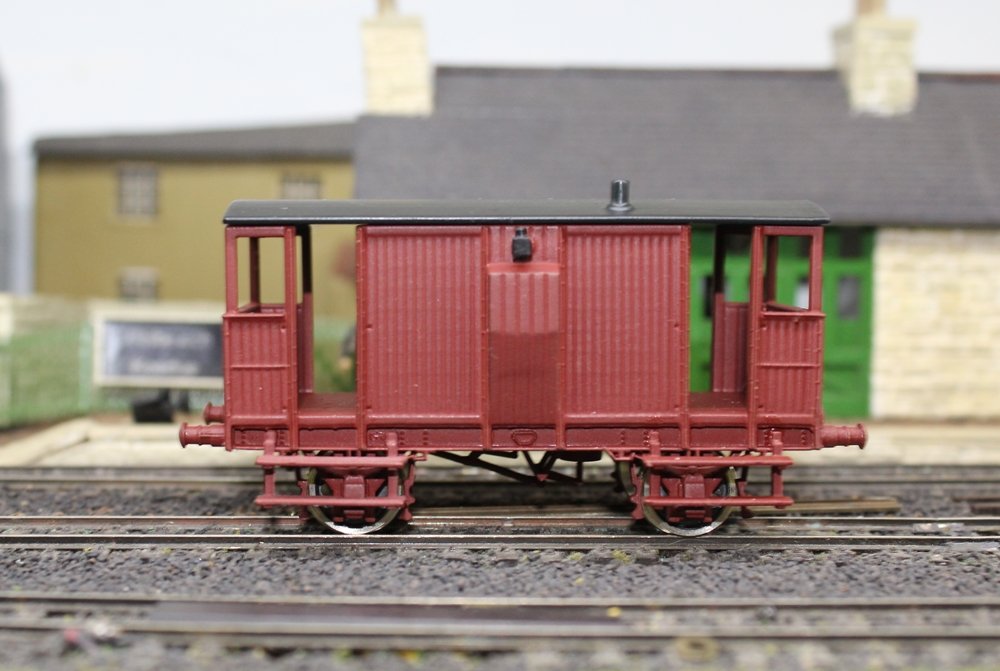
I just completed the assembly of the prototype build and everything fitted together thanks to the good work of our designer Ben on his first model railway project. The assembly was a bit of a rush job to make sure that everything fits, I haven't fitted grab irons or couplings (Bachmann tension lock in NEM pocket mount). Chassis is designed for OO or 21mm gauge It was touch and go on whether our printers Clone 3D https://www.clone3d.co.nz/ could get the prototype SLA prints for the model out this week under the Covid restrictions, but did a very good job considering the number of small parts in the design. I am planning to make a decision on the manufacturing phase of the project during the next 4-6 weeks and expect to be able to make an announcement in connection with whether the brake van will be produced as a rtr model or a kit, price and expected availability before Mid-October. We expect to have samples for review/inspection in Ireland from late September onwards. The lamps and the brakes are non working but we might consider it if we blow the model up to O or Gauge 1.
- 45 replies
-
- 11
-

-
The photo may have been taken in the early 1970s, I remember seeing a photo on a train with BR containers in wooden open wagons (possibly the same) on the Ballina Branch during the early 1970s. Lyons Tea also had similar containers which were also transported in open wagons https://peco-uk.com/products/lyons-tea-container I bought a set of Bachmann BD containers as a load for open wagons, but end detail needs to be trimmed back slightly tom fit in an SSM IRCH open, I don't know about the Bachmann or Dapol Opens https://www.bachmann.co.uk/category/model-railway%2Fbranchline/accessories. Cable drums would be another good load for an open, CIE transported cable drums for P&T and ESB and parked P&T vehicles and cable drums seem to have been a common feature in CIE goods yards during the 60s and early 70s
-
Our choice of prototype and era like our choice of friends and life partner(s) is probably a deep seated psychological thing. Growing up in Dublin in the 60s my first serious modelling interest was British Railways western region mainly because of good coverage in the model railway magazines, and the generally poor public perception of CIEs rail services, both my mother and father had bad experiences with breakdowns and dirty trains in the 50s & 60s and did not travel by rail for many years. I did not become interested in Irish Railways until the mid late 70s when I explored the CIE system using Railrover Tickets in my late teens/early 20s, although I was mainly interested in steam my first successful layout was based on then contemporary CIE practice in N Gauge having become frustrated trying to build a OO Gauge layout in a box bed room and the poor running quality of Lima locos. I found that I could build a more spacious realistic looking layout, and run longer trains on a shelf layout in a slightly larger space, running was more reliable than OO with the high quality Arnold, Atlas and Minitrix mechanisms. Despite its success and plans for a much larger loft layout I dismantled the N gauge layout and disposed of the locos and stock after a house move, concentrating instead on building British and Irish outline standard and narrow gauge locos and rolling stock in 21mm, OON3, EM and OO9 gauges with the very odd 1:20.3 kitbash thrown in. Since than I have had brief dalliances with British Railway Western Region in OO & EM & American On30 Narrow Gauge, and had more long term affairs with American and British industrial railways including building a large scale 1:20.3 American narrow gauge layout, an N gauge mainline loft layout and a minimum space EM industrial/mineral railway layout. The American layouts provided a distraction from Irish modelling a chance to get something up and running reasonably quickly (1-2years) compared with the longer timeframes involved in kit and scratchbuilding models. Interestingly my Irish modelling is slipping backwards from CIE in the 1950s to the GSR era as a Golden Age with well maintained locos stock and infrastructure and reasonable train services compared with the more run down state of the railways during the CIE era.