David Holman
-
Posts
4,359 -
Joined
-
Last visited
-
Days Won
117
Content Type
Profiles
Forums
Events
Gallery
Everything posted by David Holman
-
There is so much satisfaction to be gained from these kind of projects. Ok, it may not be absolute dead scale, but if it captures the look and feel of the prototype, fits it with the rest of the fleet etc, then all is well. As in many of these things, the final finish and coat of paint makes all the difference. Most of all it is yours, by your own hand and not just taken from the box. Long may you prosper!
-
There we are, if Eoin likes it, it must be good - he knows more about such things than most.
-
You might need to open up the bearings a little on the non powered axles, so they spin freely. If a bit more weight doesn't solve the stickiness, consider opening the bearings even more on one axle, so they are oval, in the vertical plane. A millimetre or so will be enough. What you can do then is to have a price of wire, say 1mm nickel silver or brass, soldered to a chassis spacer and bent to bear down lightly on the centre of that axle. This will add a small amount of compensation, which should improve both running and pickup. Not sure the other axle needs this treatment, as it might over complicate things. Also, even if it goes wrong, the worst thing you'll need to do is fit new bearings, but use this type of compensation on my Clogher Valley 0-4-2Ts and it makes a real difference.
-
Great fun. Seems to run well and that is half the battle.
-
Track looks right - because it is! Have just been experimenting with representing the fixing clips used in Ireland on FB rail. None on Arigna, so uprating on Belmullet would need about 3000 of them. The idea of drilling and fitting that number of Peco track pins doesn't bear thinking about. Hence am trying the following alternatives - 2mm lengths of 40x20 microstrip, blobs of canopy glue and blobs of acrylic paint. A combination of the last two is looking promising, so will report in a couple of days. As for the loco, no coupling rods, no valve gear - simples. As if! A fine job, especially as a first effort and really looks the part, sitting nicely on the track My own experience with single wheel drive is that it will need a fair bit of extra weight to pull anything, though am guessing the prototype didn't pull the cover off many rice puddings either...
-
There is a nice article in the October edition entitled Steamy times on the Emerald Isle. By Ron Herbert, it includes some nice photos by him too in its six pages.
-
- 1
-

-
Have always liked the bread wagons and like pretty much everything else, wagons got very dirty, very quickly, so weathering will mean they blend in well with the overall scene. One thing I have noticed - and photos are very good for this sort of proof reading, is there are a couple of places where the ground doesn't meet the bottom of the buildings, though am guessing that is already on the to do list! As for perspex edging, it is a personal thing, but over 30 years of exhibiting, is not something I've ever found necessary. Parents are pretty good at minding their children at shows and if inquisitive fingers do start exploring, a quiet word is all that is needed. If perspex is used, I think it is better to be full height, or most adults will find their view disturbed by the top edge. Mind you, I did once come very close to having a child vomit over the layout. Fortunately (?), he turned his head at the last moment and poor granny copped the whole lot instead. Not nice...
-
Fine work. Now, having weathered the building and scenics, presumably the wagons come next?!?
-
Only just found this thread, but so glad I have.
-
Nice. Very nice.
-
Live steam Cavan & Leitrim 4-4-0T
David Holman replied to minister_for_hardship's topic in Irish Models
Looks very good to me. -
Now that certainly gilds the lily and the extra external detail justs adds to the character and finish. Definitely one to be proud of!
-
Wow, that is good company. Many thanks.
-
Nice show, not the biggest, but very much along society lines, so a fair bit of specialist stuff. Particularly liked a G scale/15mm inglenook sidings layout which represented a WW1 trenches depot. Highly detailed figures and wagon loads. More off the shelf, but still good fun was a Faller (?) lady cyclist pedalling round and some animated chickens too (same source?), both on an HO layout.
-
Nice one! Always a prototype somewhere, it seems.
-
If anyone is in the Birmingham area on Saturday, Fintonagh is at the above exhibition in the H Suite, Edgebaston. 10 30 to 16.00 makes for civilised hours, or would do if it hadn't taken me six hours to do the 160 miles from home... As the title infers, most layouts are mainland Europe in origin. Still interesting though, as always feel we can learn a lot from looking at other genre, even if it's a case of wouldn't do that in a hurry! Anyway, if you are going, do come and say hello.
-
Interesting, am at Euroex in Birmingham this weekend (interesting concept for Fintonagh given the current political situation!), so will look out for that paint. Have a few Vallejo paints already and find them really good. As for the corner stones, a rub down with a file/sandpaper soon cures any rough surfaces, while a trim with a scalpel should sort out the corners. It is a lovely building and a small bit of tidying up really will ice the cake.
-
Nice one, not least because it has character - an indefinable quality that can sometimes be lacking in model buildings (kits especially), because they are almost too sharp or too square. I rather like the upper storey rendering, as it looks very much like that on buildings on the Cavan and Leitrim extension to Arigna, while the shot through the door is just sublime. Are the corner stones a bit rough though? Pictures I have seem to show them 'well dressed', especially compared to the random stones in the rest of the walls. Equally, vernacular buildings nearly always used what was local (such materials are heavy and you don't want to move them far if you can help it), so if that finish fits the area, then it is right! Fine work, because there is artistry there, as well as modelling and the two, for my eyes at least, make a great combination.
-
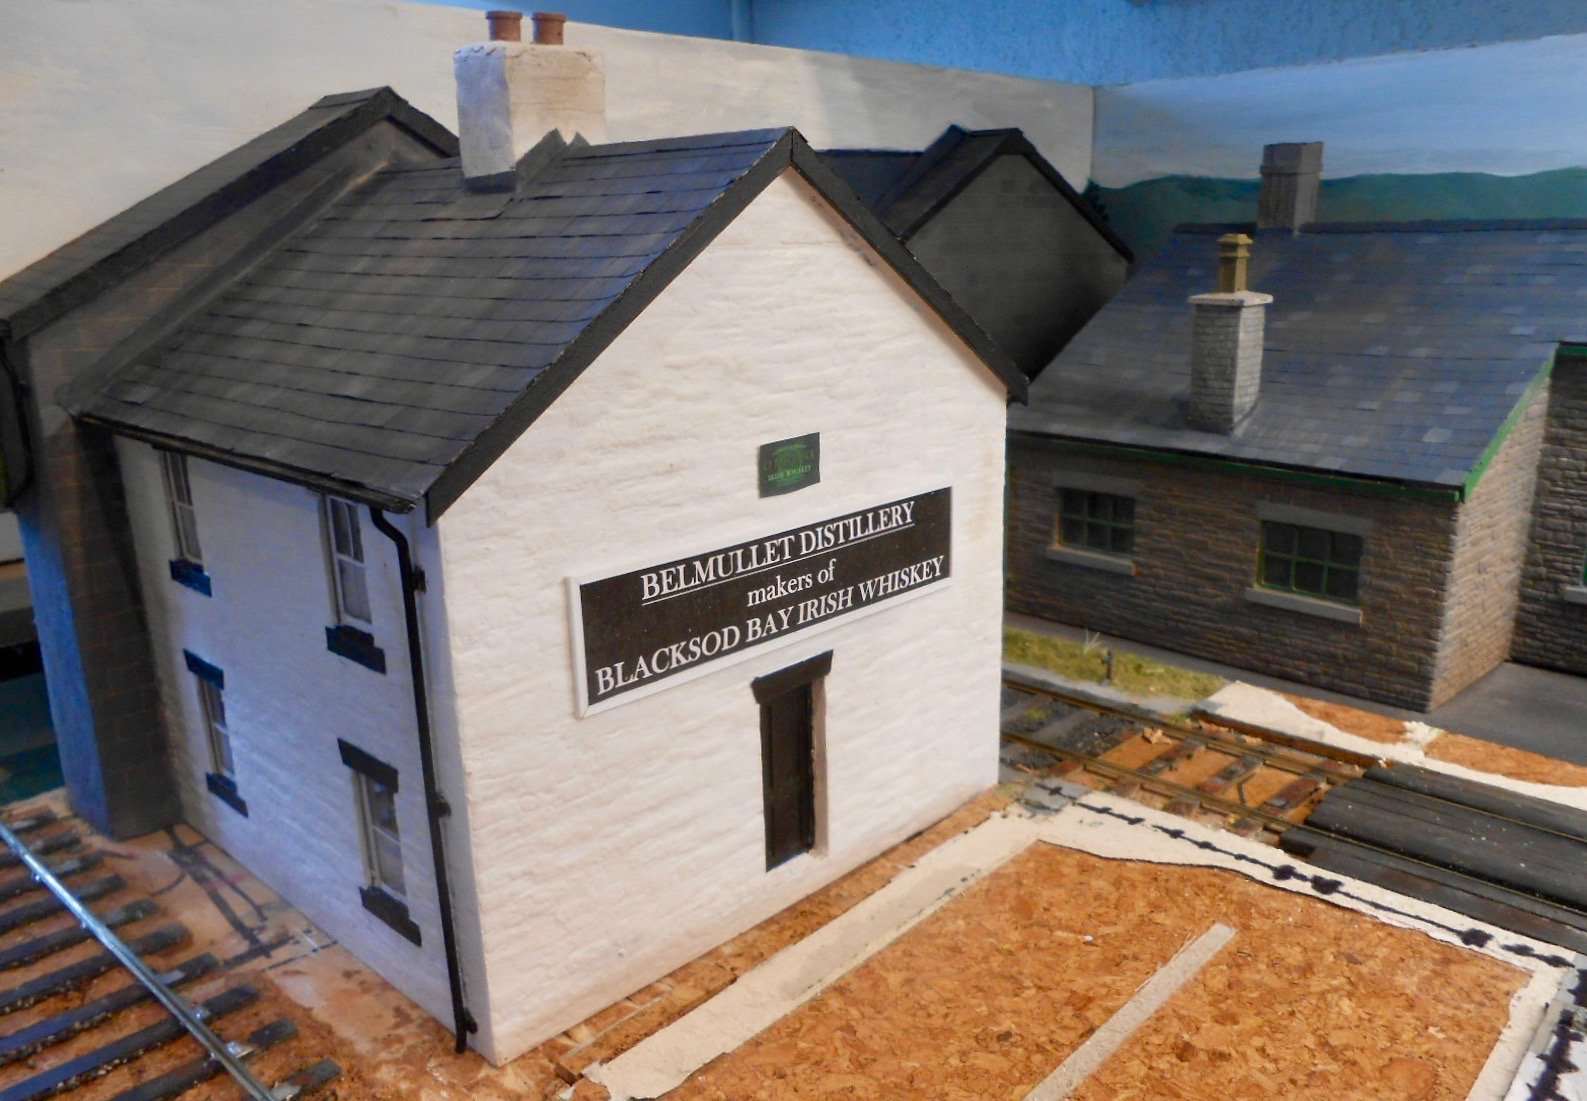
The left hand end of the layout is starting to come together, with the addition of part of a distillery and some weathering to both this and the loco shed. Not sure whether those of you in the Republic have access to BBC 1, but a lovely programme over the last couple of years has been 'The Repair Shop', where highly skilled individuals are challenged to bring interesting objects back to life. Needless to say that Steve, the clockmaker, is a bit of a hero, but I love them all and frequently take inspiration from the patient, gentle approach they all take to their work. Kirsten, the ceramics expert is another favourite, particularly for the delicate way she overpaints repairs made to broken pottery. Frequent, light washes of colour are the norm, rather than go in with just one or two coats. Would love to say this is my method, but am afraid I tend use to one or two fairly solid coats of the base colours and then start altering tones from there, using a variety of media. Hence for the stonework on all the buildings, light washes of acrylic in lighter tones than the base colours go on first, then a few individual stones are picked out in darker or lighter tones with a fine brush. Once this is dry, I get out the weathering powders and again using fairly light tones, give all the walls a good dusting over, working the powders into the mortar lines as I go. Most of it ends up on the workbench [or better and old tray, when I remember], but the main thing about the powders is they completely flatten the paintwork, so you have an absolute matt finish. The powders also make the window glazing nice and dusty too. The slate roofs are done much the same way, with individual slates picked out in lighter tones [essentially blue, black and a lot of white, very watered down] and again once dry attacked with weathering powders. I find pale browns and beiges soften the roof quite well, but pay particular attention to the direction of the dusting. On the walls, a general scrub usually works, but on the roofs, the powders need brushing downwards from the ridge tiles, to simulate the action of rainwater running off. Worth comparing the photos below with earlier ones to see the difference. Hopefully, they are subtle! The distillery has been labelled as 'The Belmullet' and it produces 'Blacksod Bay Irish Whiskey' [note the e], the lettering being done on the computer and the the print off stuck to some thin plastic sheet with a micro strip border.

- 179 replies
-
- 11
-
-

-
The current edition of Railway Modeller has an article on N gauge T-trak. They made a module for a big convention in Japan, where the format is really popular.
-
Mmmmm, lovely stuff. There are so many facets to the layout, so many cameos, while the overall views hang together so well too.
-
Always look forward to seeing progress, Tony.
-
Not sure you need many figures, in fact I can't see any people at all in that photo, but maybe it is Sunday. What I can see is a lot of litter, which ought to be easy enough to make, though in 4mm scale, the pieces will be very small. Also noticeable is how smooth the ground surfaces are - no doubt a mix of crushed ash, oil and mud. As for puddles and wet patches, the former ideally go in first as pieces of clear acrylic, while the for the latter, I find Humbrol Gloss and Satin Cote work well, rather than ordinary varnish. Am sure you'll have loads of fun with a static grass machine, while Gordon Gravett's book 'Modelling Grassland and Landscape Detailing' covers all the aspects you are likely to need, including weeds, flowers, roads, pavement, yards hedges, puddles and mud. It is the Bible of scenic work for me, anyway. Goods Yard is a superb model that can only get better with more detailing. Enjoy!
-
A lovely piece of work. Will it have a backscene/fascia to frame it? Not sure anyone has ever done rain effectively, though Gordon Gravett shows how to do puddles and wet patches in his book on grass, weeds and mud. Years ago, remember a layout where everything had been given a coat of gloss varnish. Set in Dorset, I'm not sure how effective it was, but have always remembered the name - Piddling Down!
-
Good luck with the show and hope it all runs well.