David Holman
-
Posts
4,359 -
Joined
-
Last visited
-
Days Won
117
Content Type
Profiles
Forums
Events
Gallery
Blogs
Everything posted by David Holman
-
Unusual project, but also some lovely modelling.
-
Try Magnets4U, or an internet search for rare earth magnets will give you lots of options. For electro magnets, Dingham couplings ones are good.
-
Rachelstown and St Stephens Green
David Holman replied to The Derry Road's topic in Irish Model Layouts
Classy. -
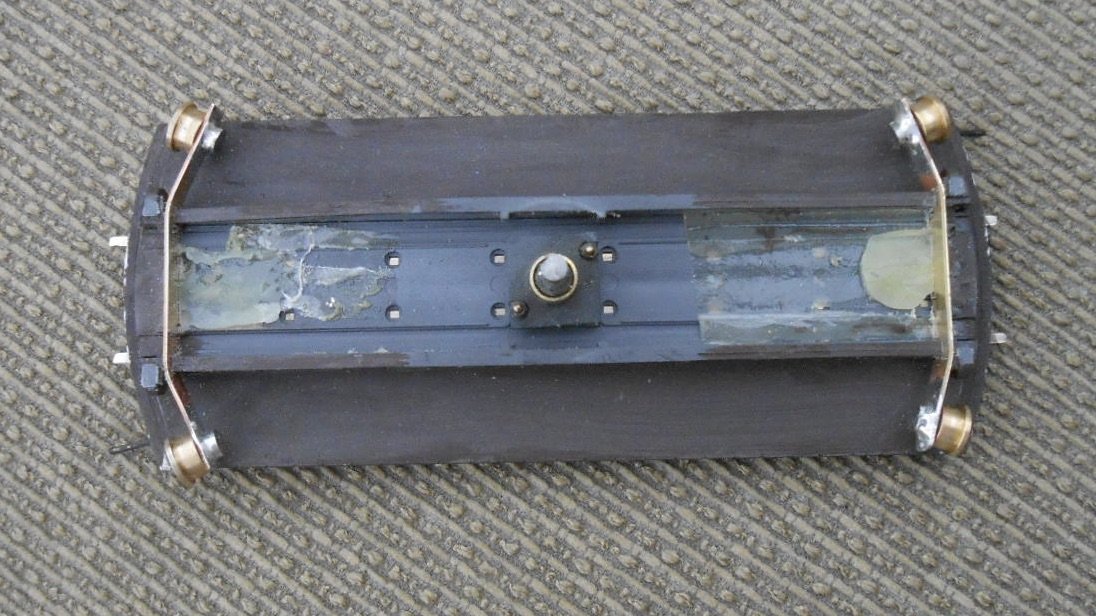
Sorting Fintonagh As some of you will have read, Fintonagh was misbehaving at the weekend, with four main culprits: The turnout to the turntable The turnout at the entrance to the yard The turntable Uncoupling magnets The first two were covered in the Layouts thread, but the turntable has needed a complete rebuild, while the magnets remain work in progress. The turntable is a Peco N gauge one, with a wider deck to take 21mm track. Its 15cm diameter is just right for the Clogher Valley locos, while to many visitors' surprise, the railcar fits on too. Just. However, its operation is far from prototypical in that all the weight of the loco is born by the centre 'boss'. As this is where the sprung, plunger pick ups are located as well, what happens is that my heavy CVR tanks make the deck drop down about 2mm as they drive on to it and also tend to skew it sideways as they drive off too. Not good then... I've lived with this for a few shows, but wear and tear has started to cause problems, mainly a very stuttering rotation, especially when it is cold for some reason. The weight of the loco should be born by the single 'rail' in the well. This is simply a raised, moulded line on the model, with four, moulded, none rotating 'wheels' under the deck which rub on the rail and therefore simply hinder progress. A solution came to me from building the new South East Finecast table for Belmullet. Here, four ball bearings act as carrying wheels for the deck, so the weight of the loco is taken on the outside of the well and everything is thus better supported. You can see what I've done from the two photos, which show the underside of the deck. First, I cut two pieces of 8mm brass strip, to act as carrying arms for the four new outer wheels. At the outer ends of these, I drilled four holes and reamed them out to take Slater's loco axles. Working in 36.75mm gauge, I have plenty of spares of these. What I did, was grind off the squared ends, still leaving enough of the tapped hole for the wheel nut. A section of each axle was then soldered into the holes in the brass strip, leaving about 4mm sticking out, to make stub axles. On to these have been put a Slater's brass wheel bearing, to act as rollers on the deck bearing, with these being held in place with wheel nuts. All that was then needed was to use a junior hacksaw to cut a slot in the underside of each end of the deck, just inside the former dummy wheels. Finally, I bent the brass strips to match the curve of the rail in the well. Hence the deck is now supported where it should be, at its outer edge and there is no drop when a loco drives on or off. Happily, the plunger pick ups in the centre boss still transmit current to the deck rails! The real test will be at the weekend, when Fintonagh is operating at the Canterbury show, so cross everything, as they say. However, thus far, I'm rather pleased with the result, which owes a little to good engineering practices than my usual bodging techniques, with special thanks to SE Finecast forgiving me the idea in the first place. The magnets are a different story though. I use [mainly] 5mm diameter, 10mm long rare earth rods, in holes drilled either side of the track centre line. These attract [most of the time] the dropped wires on the Kaydee No 5 couplings I use. However uncoupling can be erratic at times, with in the worst scenario wagons failing to uncouple when place over the magnet, but actually coming undone when pulled across one. Very annoying, and more difficult to solve on Fintonagh, where wagons get turned around after each sequence because I have a turntable fiddle yard. Hence, no matter how much you practice/test, there are a great many combinations of wagons pairings, some of which, for whatever reason, do not work reliably. Talking to one of the Burnisland crew at Stevenage, it seems there are a few issues I hadn't considered: Apparently, it can help to have the rare earth magnets slightly staggered, rather than opposite each other, as this helps stop the dropper wires being pulled in the same direction It is important to make sure that all the magnets are pointing the same way. Not sure which is best [all north or all south], but one way gives a wider magnetic field for some reason. Perhaps somebody out there can enlighten? It helps if the magnets are as far apart as possible, though even if your track gauge is 21mm, using 5mm diameter magnets doesn't allow that much space. Interestingly, I put 3mm dia magnets in the train shed and these work fine, as do the 5mm ones in two places further along the platform. The 5mm ones in the end loading dock have thus far foiled all attempts to get them working properly, so am going to replace them with two of the 3mm ones, to see what happens. Otherwise, it has been a case of sticking rigidly to the same wagons on each train and with each train shunting a single siding [exchanging just a single wagon each time], hopefully I can eventually rule out the 'rogues' and put them aside for future fettling. If it sounds like Fintonagh is not running well, fear not - generally derailments only occur through operator error and the couplings are around 80-90% efficient. However, when stuff is working well, it is a real pain when it doesn't as the whole illusion is spoiled. On these occasions, all I can say is that it is a good job any children present don't know what I'm thinking!

-
Great to see you at Stevenage!
-
Many thanks folks. For those of you who like the green I've used for the water tank, it is Humbrol 131.
-
Stevenage Weekend Having exhibited several times at the CMRS show, St Albans, I was more than a little interested to see how their new venue in Stevenage compared. St Albans was always a fine show, but in a challenging venue, Stevenage occupies a large sports hall and indoor bowls green, so from both access and moving around, it was immediately no contest - so much better. However, the show itself remains its previous highly enjoyable self. Fine layouts, excellent trade support and knowledgeable, friendly visitors. Add in the fact that on Saturday night I had dinner with Gordon and Maggie Gravett, Tony Wright (Stoke Summit, Little Bytham, loco builder extraordinaire, etc), Barry Norman and Adrian Colenutt (Uckfield show manager), then it had to be a fine weekend? Well, almost. Fintonagh's previous outing in November was almost problem free, plus there was the award for best layout too. At first, all went well at Stevenage, with all trains operating faultlessly, until the first visitors appeared at 10am, that is! We had derailments, poor uncoupling and the turntable was juddering round like it needed a dose of Ritalin. We put it down to the hall being cold early on and things did improve as it warmed up and certainly through the afternoon, but Sunday followed the same pattern, plus we managed to knock one of the point motors off its mounting while going back to the car. Oh yes, and we are at the Canterbury show next weekend!I Back home and with the boards accessible on the workbench, it didn't take long to fix the point motor, while another half hour saw the cause of the derailments hopefully fixed. This was the turnout to the turntable, which wasn't closing properly. At the show, it seemed like the operating wire had almost gone soft, but it is the same gauge as the others. In the end, I resoldered the tie bar a couple of mm over and this seems to have done the trick. While on the bench, I checked everything else underneath, not least because a different Tortoise point motor had suddenly dropped its operating wire halfway through Sunday afternoon. Am now trying to decide what to do about the turntable. It is a Peco N gauge version, with a plastic centre hole which really needs bushing. A basic fault is it rotates on the centre boss, so the outer rail track does no work and the deck rocks up and down on its centre pickups when a loco goes on and off. Have a plan to emulate the SE Finecast turntable I've put on Belmullet by adding some home made rollers that will actually run on the pit rail. Do I do it before Canterbury, or risk another show, knowing the next outing isn't until Allypally in March? At the moment, methinks the former, but will sleep on it and report back in a day or so. I also need to check the including magnets as I learned from one of the Burntisland free that not having them all the same way up can cause problems, along with some other advice I want to test too. Looks like it could be a busy week!
-
That is just stunning! Almost seems a shame to paint it. Lovely work.
-
Lovely thing. Suggest testing it with a couple of wires to the wheels, to see how many it picks up from. Rule number one though, make sure the gears and axles are lightly oiled and the wheels and pick ups clean!
-
Certainly doesn't look like a resin casting!
-
Modeller.
-
Thanks for the comments folks, though seems I may need a bit of artistic licence to portray pre grouping days. That, or citing red/green colour blindness!
-
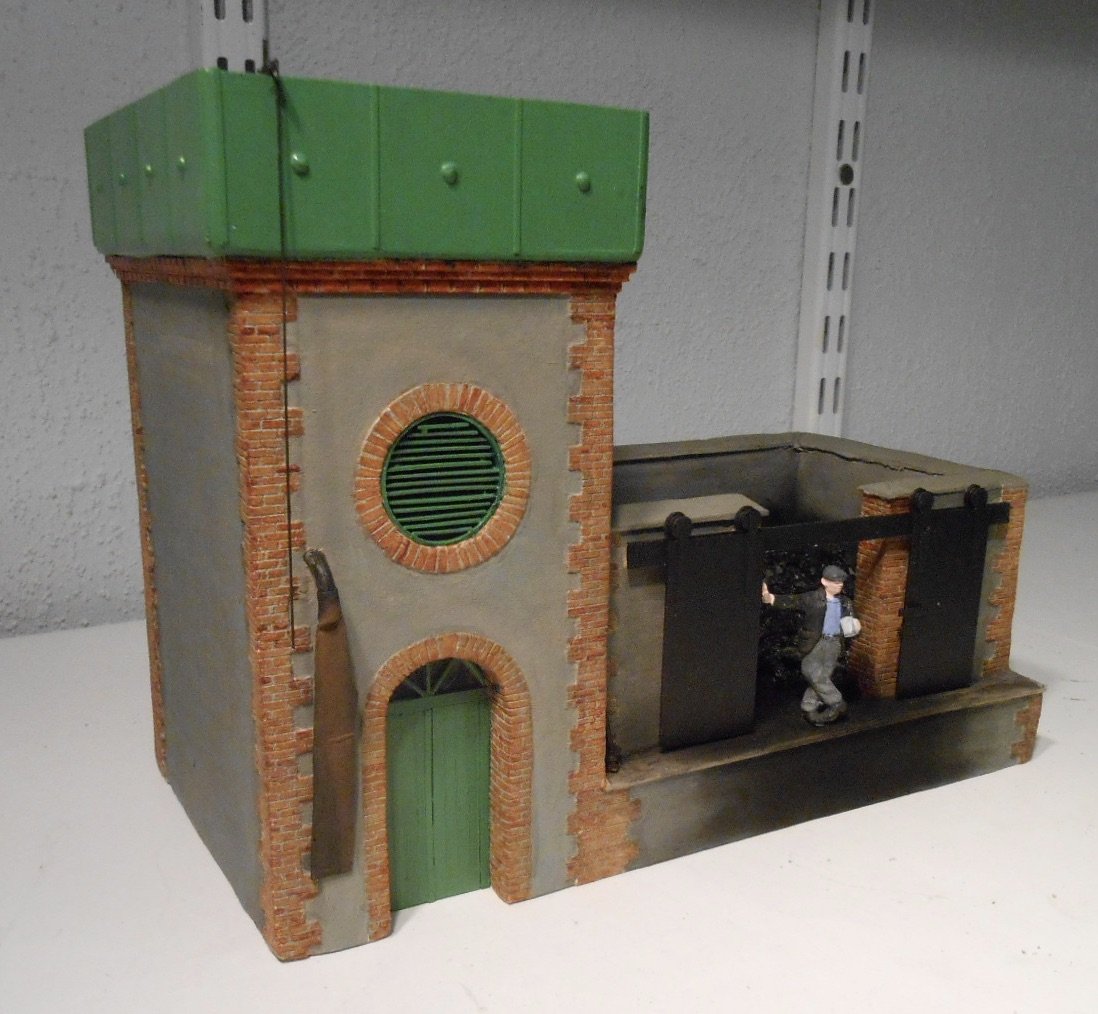
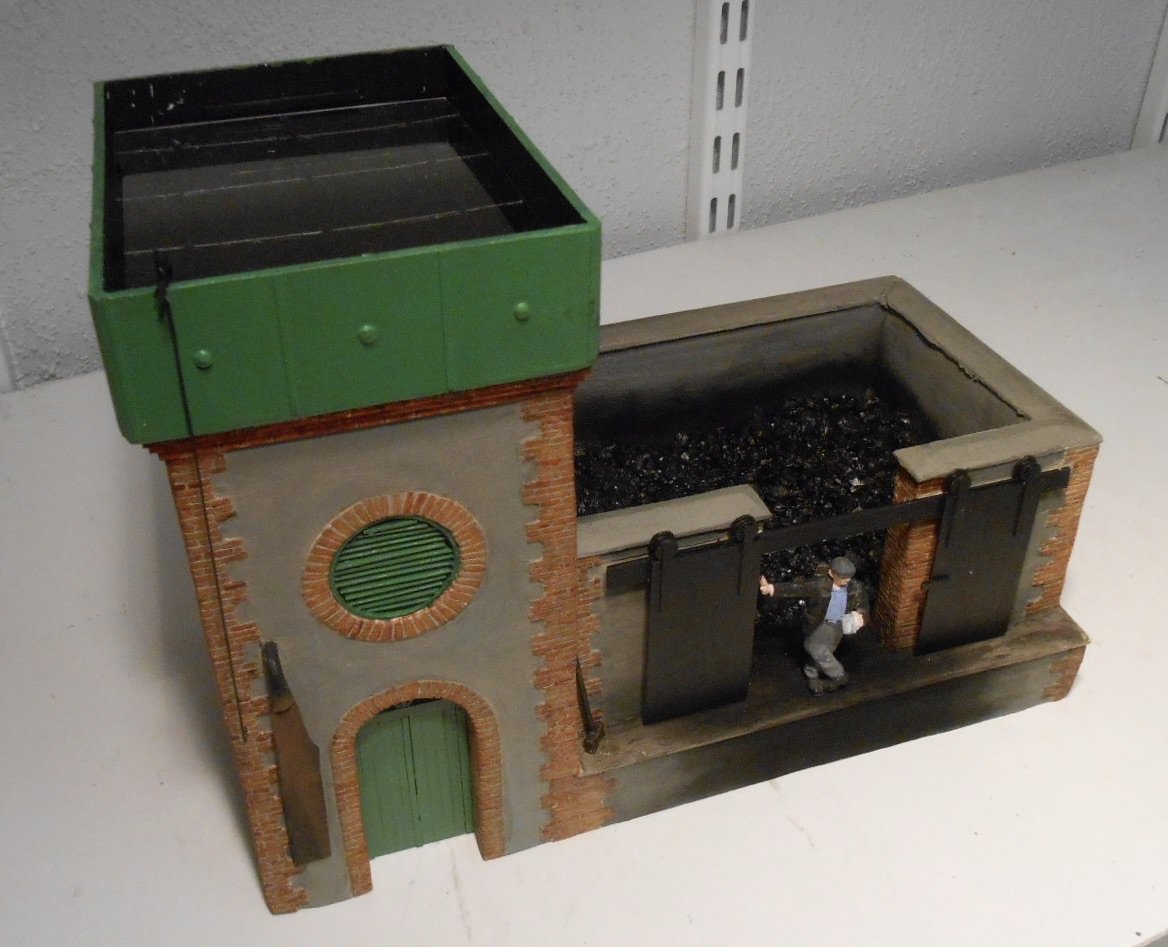
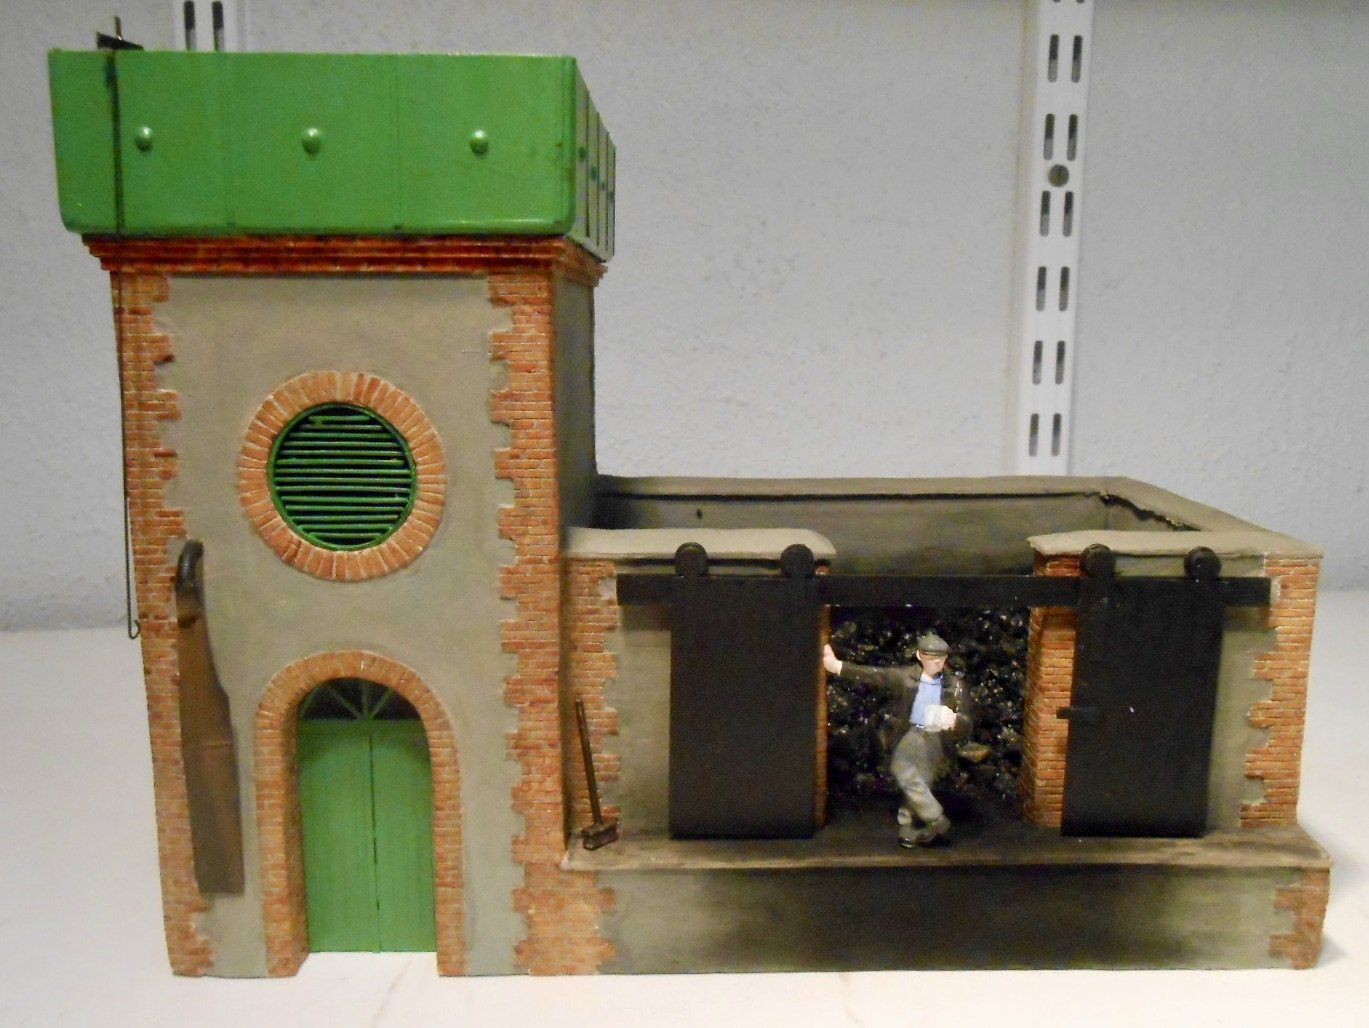
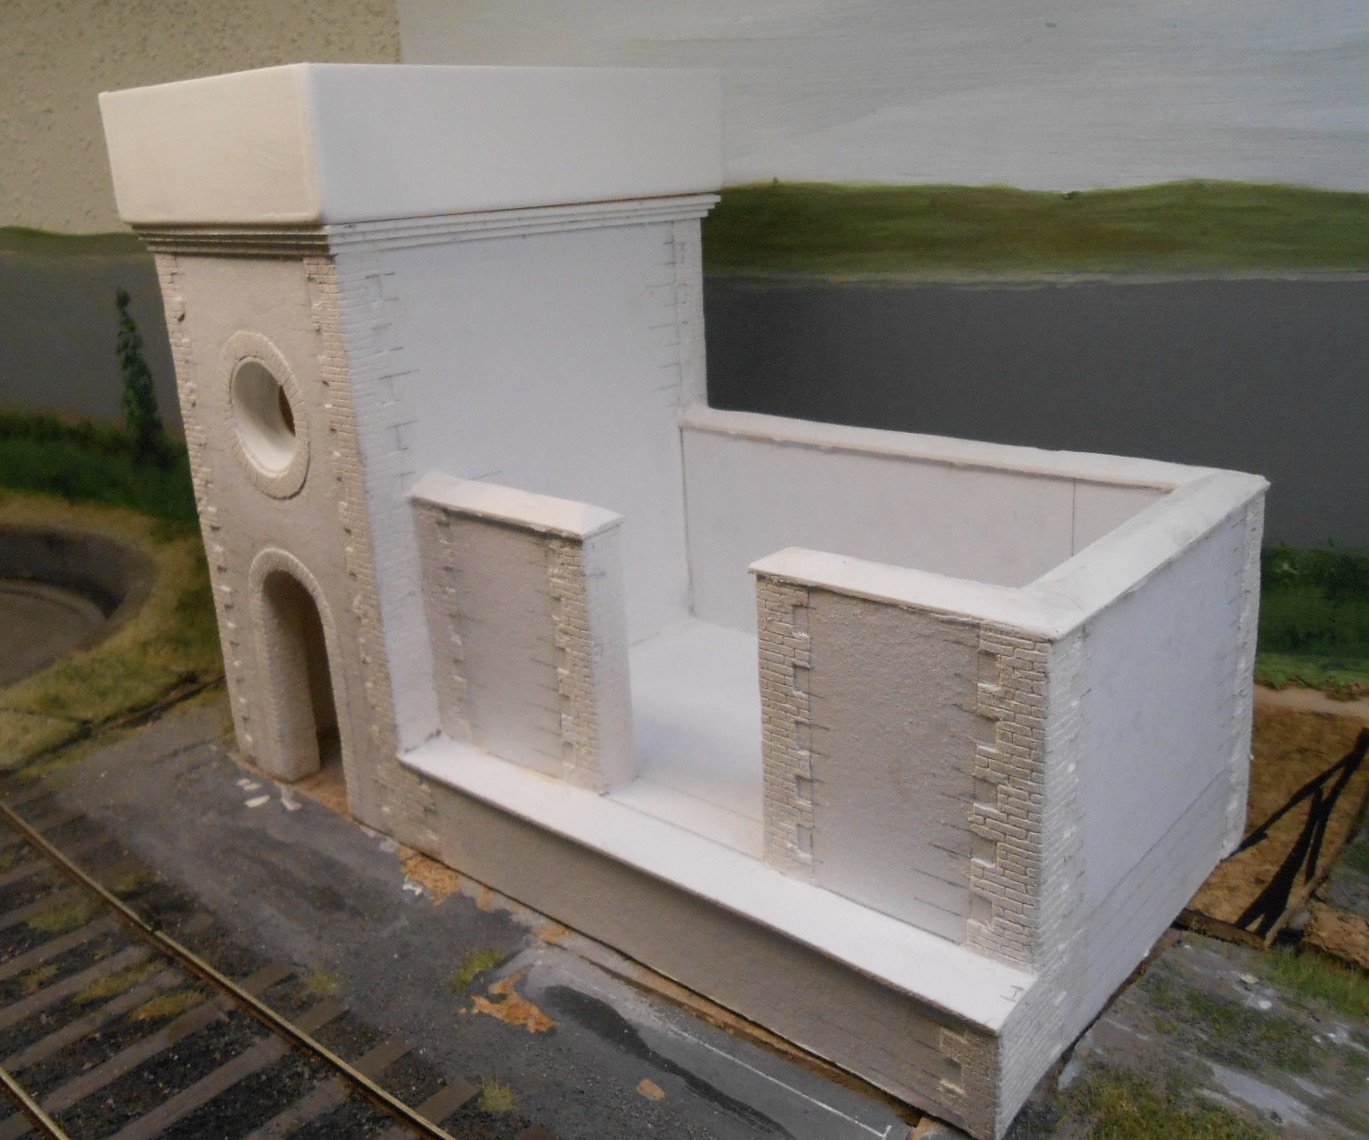
The water tower and fortress coal stage is now largely complete. As the photos hopefully show, the additional work since last time comprises the doors and louvred window - the latter, as predicted being a real pain to make. What you see is the mark 3 version. I used a piece of UPVC pipe and then cut 7mm wide strips for each louvre, separating them with micro strip. The coal doors are simple enough & I used some leftovers from the SE Finecast turntable kit for the top rollers. Most of the time though was spent on painting. It took quite a while to match the render to colour photos I have of the real thing, while the green of the water tank pretty much defies analysis - it all seems to depend on how long it has been since the last repaint. Colour albums range from almost carriage green to totally washed out turquoise: at one stage I was seriously tempted to paint it black, as per Sligo in the 1950s. Part of the problem is that Belmullet will be depicted in two periods, early 1900s and the 1950s. My impression is that building colours didn't change much over the years, but if they did in this case, I may have to make a second model. Hopefully JHB will provide the answer! Brickwork is painted individually, not as hard as you might think in 7mm scale, with a limited amount of weathering thus far - back to the twin period problem again... Coal is the real thing, proper Welsh stuff that I found lying around years ago at a traction engine rally and much better quality than the stuff I found at the Arigna concentration depot back in 2013. Fintonagh, meanwhile is at Stevenage this weekend, so as ever, come and say hello if you are attending.
-
Full page ad in Feb RM and it looks stunning.
-
Model Railways Magazine Irish Miscellany
David Holman replied to Angus's question in Questions & Answers
Tried a Google search, but all it did was bring me back to your question Angus! I'd certainly be interested in finding out more, especially anything on the Achill Bogies. Jonathan Beaumont's 'Rails to Achill' contains some info on these locos, including photos and a basic outline drawing. Maybe he will be able to help. A 7mm model of Wolf Dog is very much something I'd like to do for Belmullet. -
The track weathering and gentle curves create the realism for me. Add in the low viewing angle and you don't notice the narrow gauge either. Really effective.
-
That looks rather good! Great photography too, as we have to remember this is a small area, especially for 7mm scale. Most of all, it hangs together so well. Just goes to show the importance of researching and recreating mundane things like weeds and ground cover. More than a bit of artistry too. Top job.
-
May have said this before, but even so worth repeating. Fine details and big layouts don't always go together, but they do here!
-
Model buildings in Irish Outline
David Holman replied to DiveController's question in Questions & Answers
Have used Alphagraphix kits many times as a basis for buildings. Rarely make them up as intended - the card is fairly thin - but all the printed details are great time savers. Personally not sure about ready to plant buildings. Firstly they are expensive, especially when home made card buildings effectively cost pennies. Second, while clearly very attractive, they do not give your layout any originality. Third and the key one for me, is that making your own buildings is the easiest way into scratch building. Tools needed are minimal - steel rule, pencil and craft knife. Assemble with PVA or uhu. Cereal packets are a free source of card, but an A1 sheet of mounting board is not expensive either. Start with something simple, that just has four sides and a roof. Nothing wrong with downloading brick paper, slate roof sheets etc to get something completed quickly, plus there are plenty of good books out there to get you started. Most of all you end up with a model that is uniquely yours and unlike locos and rolling stock, only has to sit there and look pretty. A few hours work is all that is needed for a simple building and you can spend what you've saved on something more difficult to make. Have fun. -
Nice. VERY nice!
-
Same problem with Hattons A3 and A4. £750 is a decent price for RTR Pacific in 0 gauge, but eight coaches for it to haul will cost a couple of grand. That said, if you have ever made a coach, either kit or scratch, then you know how much work is involved, so £200 for a brass coach is actually good value.
-
The Really Useful Box Company have various sized offerings which are pretty robust and stack nicely too. I've also used A4 box files to good effect. A bit of work with card spacers, fixed with a hot glue gun is ok even for 7mm scale wagons. Plus you can get five of them in a large supermarket heavy duty carrier bag.
-
Subtle, understated, quality.
-
Looks like it will be a very fine model indeed.
-
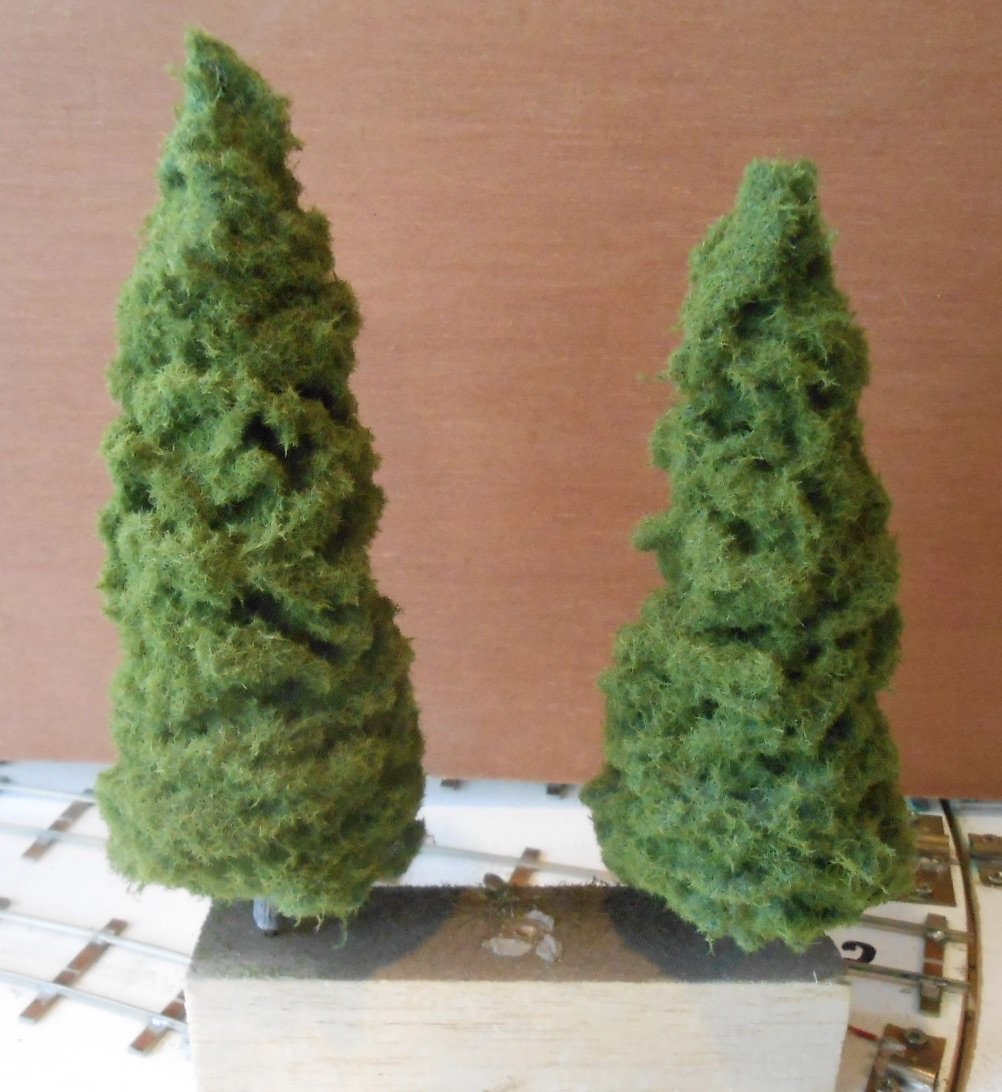
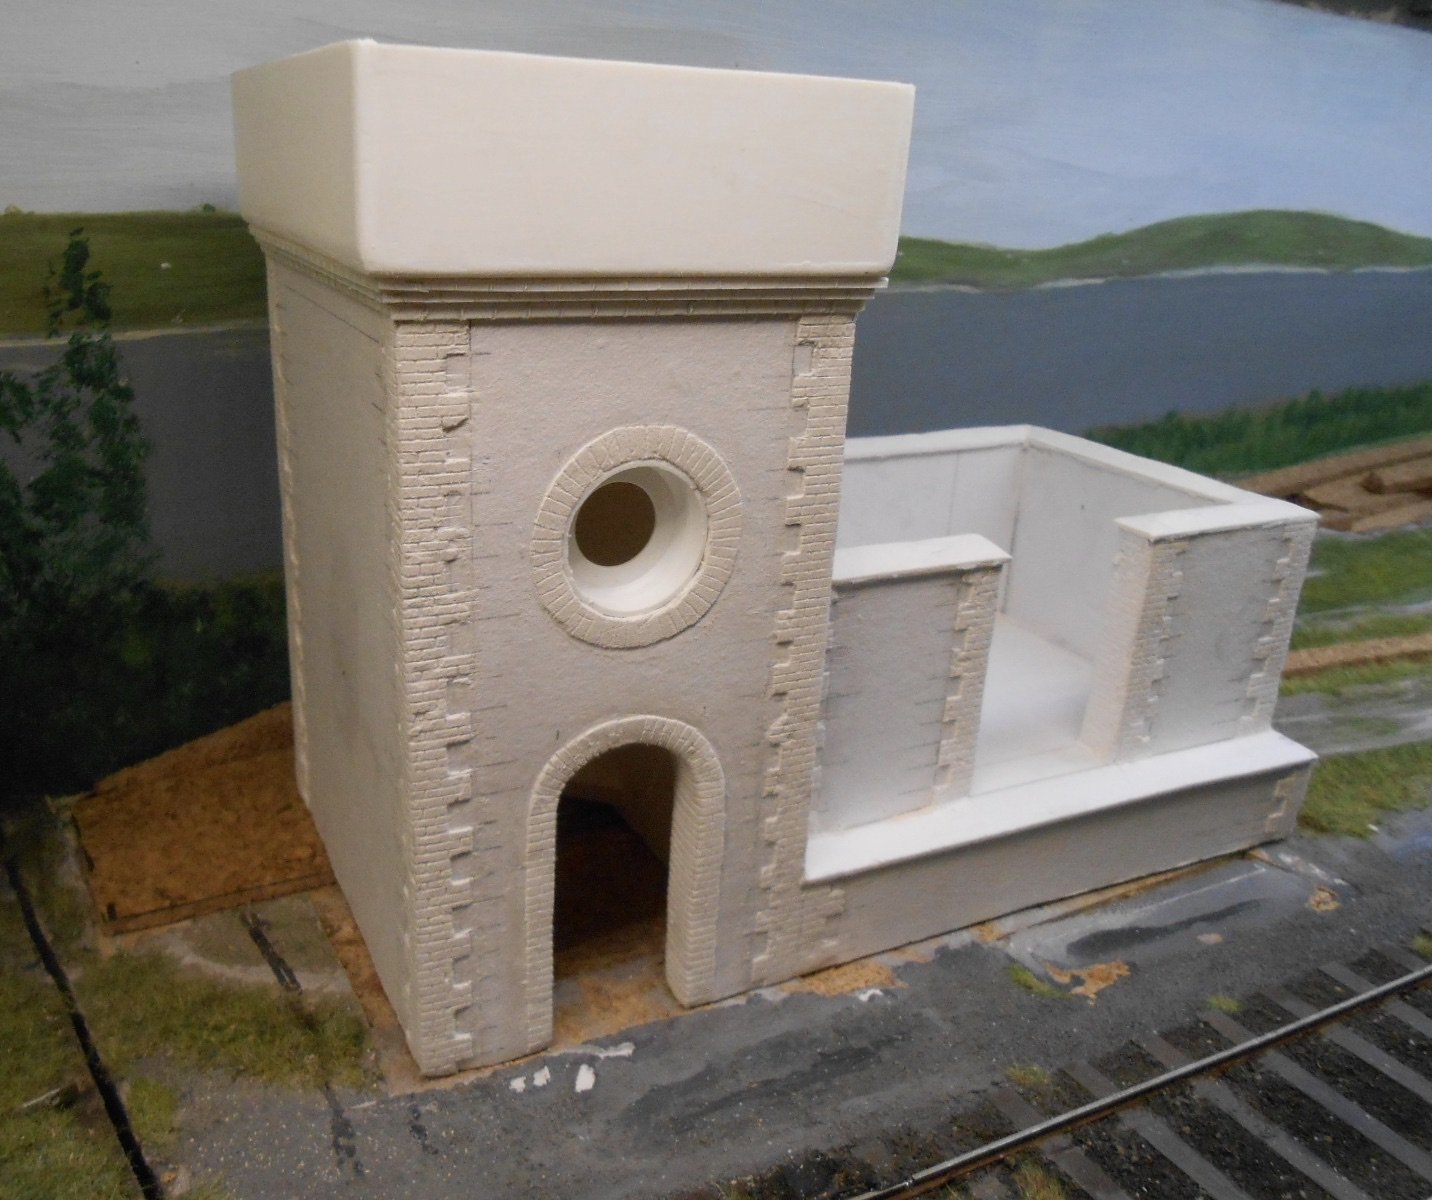
Christmas Projects As mentioned previously, I like to have some modelling to do over Christmas, because [unless you lie Soaps or Reality TV] there ain't a lot going on the gogglebox. The first couple of pictures show some experiments with conifers. My thinking is Belmullet needs a few to act as wind breaks, not least around the turntable. The area looks pretty treeless on Google Earth, so a few planted trees won't come amiss. The ideas are straight out of Gordon's second book on trees and the models are built around some tapered dowel, with the structures made from either industrial floor cleaning pad or kitchen scouring pads. The latter, being thinner, are easier to work with, but unless you are a part time flamenco guitarist, your fingers will be sore afterwards! Basically you cut a series of circles, tease the material out, make a hole in the centre and then mount them on the dowel, fixing with PVA. The final touch is to use a puffer bottle to squirt on dark green, short, static fibres. Not entirely convinced and want to have a go with rubberised horse hair, which should give a less dense appearance, enabling the earlier versions to go at the back. The other two pictures show work so far on a Midland Great Western combined water tower and coal stage - the fortress type. It is based on a photo in Jonathan Beaumont's excellent book 'Rails to Achill Island' [p130]. There is also a nice engineer's drawing of a water tank earlier in the book. At first, I didn't realise how big it was going to be, but so far, it seems to fit the space I've allocated alright. The shell is foam board, covered with watercolour paper to eventually represent a rendered finish, as per Achill. However, it also needed a lot of brick reinforcing on the corners and around the door and window. This has been made using scribed DAS clay. The trick is to first put on a thin layer of PVA and then 'thumb' the DAS onto that to about 1mm thick. Leave to dry, then sand smooth before starting the scribing. Fiddly? you bet, but very satisfying and it means the mortar lines are easily carried around any corners. The tank is 80thou/2mm plastic sheet, though there is still a fair bit to add here, plus the sliding doors of course. Likewise the louvres on the round window are a pain to make in my experience, but it has come together nicely so far.