David Holman
-
Posts
4,359 -
Joined
-
Last visited
-
Days Won
117
Content Type
Profiles
Forums
Events
Gallery
Blogs
Community Map
Everything posted by David Holman
-
Arigna Town Exhibition Blog
David Holman commented on David Holman's blog entry in David Holman's Blog
Getting ready for a weekend at the Epsom show now. Always a good range of layouts here and the venue is exhibitor friendly, being all on one level. The to do list has been worked through, so hopefully all will be well for Saturday morning. Was tempted to set up Friday pm till I realised that would be two trips round the M25 in the rush hour. So, an early alarm for Saturday instead. -
Arigna Town - this week's scenery
David Holman replied to David Holman's topic in Irish Model Layouts
The Ulster and Connaught! One of my fantasies too JB. Probably completely bonkers, but manna from heaven for the modeller. Many times have contemplated doing a scene/section, for [as you say] a great excuse to run the larger Swilly locos alongside smaller stuff such as the Clogher. Yet to make my mind whether it would be better to do in 21mm gauge/7mm scale, 18mm gauge/6mm scale or 32mm gauge/1:29 [Gauge One-ish]. The latter especially appealing because of the size. One day... -
Classy
-
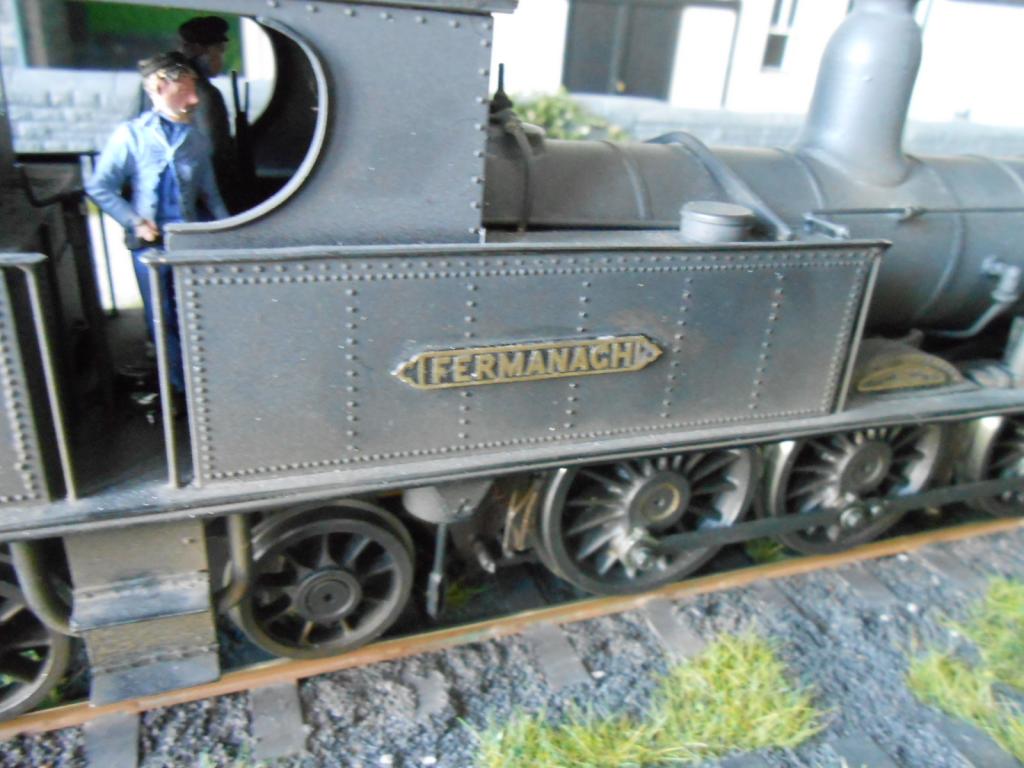
At long lat got round to altering the name plates on Fermanagh and Hazlewood, so they just have a black, rather than red background. While giving all the locos a good clean, decide to replace the fall plate on the G2, as the hinged version I'd made kept coming loose. The new version has two pins, which locate in holes in the cab floor. The loco has a new fireman too. The previous figure was very nice, but has an action pose. Looks alright in a photo, but less so in real time. Sorry about the G2 pic - my laptop seems to have hidden the edited photo, so this one is straight off the camera...

-
Would that I could bring the figures to life HF - thinks I could make a fortune! The nearest I've ever seen was on a load of American S scale stuff the Club inherited a few years ago. When figures were placed on a metal plate, vibration, presumably from an electric razor type motor [though it could have come from something else!] made them move. Hence you can herd cattle on to a wagon, or people along a platform. A real hoot to watch & guaranteed to make people smile.
-
Arigna Town Exhibition Blog
David Holman commented on David Holman's blog entry in David Holman's Blog
Been working my way through the 'to do' list from York, with the aforementioned rail bus getting its loose wheel fixed and at the same time the motor being fixed to the gearbox. No idea how long it had been working like that, but it did at least run. Track and wheel cleaning also done, but need to seek out some stuff called Track Magic. Seems as well as clean, it puts down an electro-conductive layer which minimises future applications. It was very hot and humid at times at York, so this would certain help, though even so, we only did a wheel clean at the start of each day. -
Arigna Town - this week's scenery
David Holman replied to David Holman's topic in Irish Model Layouts
Thanks Paul, the general impression I got was that folk like the fact that the layout is just that bit different from the norm & other shows so far confirm that. Reinforces the idea that the Irish scene has much to offer & it is a shame that the broad gauge seems to put a lot of people off. Still think 7mm is much easier to do than almost any other [because of the axles/wheels & Alphagraphix], though your S and Mick's 3mm make better use of space available and indeed, require much more effort and skill. Am still yet to come across any other 'correct gauge' layouts on the exhibition circuit, apart from the legendary Castle Rackrent, though would love to be proved wrong! Spoke to David White [slaters] on Sunday & he says they have sold quite a few 7mm broad gauge axles to folk in Ireland, so maybe there are some models out there we haven't seen yet. York's 'après show' was very good - dinner with the Gravetts always good fun & we were joined by Mike & Julie Edge, plus Bob Alderman [Guild] too. Then there was the Normanton & Pontefract, crew. These guys are legends at the Chatham Show. At the club dinner, they all turned up wearing dickiebows and sporting ferrets, flat caps, racing pigeons etc. Next job to get ready for Epsom. -
Arigna Town - this week's scenery
David Holman replied to David Holman's topic in Irish Model Layouts
Fascinating stuff - thanks chaps. Must go back to my Sprinks history of the line though as I don't remember reading about the Garrett. By the by, at the York show, noticed that one wheel on the rear axle of the rail bus was working loose. As it is only a Slater's wagon wheel [with a slice of a Corgi road bus wheel to give the Howden-Meredith effect], it was a simple case of removing the body to get at the wheel and add a drop of cyano. However, with the body removed, then noticed that there was nothing holding the motor to the gearbox! Both grub screws were absent and I have no idea how or when they disappeared. Only the downward pressure of the bus body on the chassis was keeping the gears meshed. May well have run the whole three days at York like this and for all I know the previous two outings as well. Anyway, found two new grub screws and [unsurprisingly] the model now runs somewhat more quietly... -
Arigna Town - this week's scenery
David Holman replied to David Holman's topic in Irish Model Layouts
Spoke to many people while at the York show over Easter, however, the highlight was undoubtedly the gentleman who shared with me some fascinating items from the effects of the late, great Desmond Coakham. Seems that, in 1924 Beyer Peacock made a sales pitch to the SLNCR for a new Garrett locomotive. A basic outline drawing shows the beast to be a 2-6-2-2-6-2, 62 feet long and weighing in at 112 tons. Maximum axle load was just 12 tons. Other details on the drawing suggest it would be superheated with a tractive effort of nearly 33 000lbs on driving wheels of 4'6" diameter. Needless to say, there is no record of the Sligo showing any interest in this loco and as far as Arigna Town is concerned, its scale length of almost 18" [435mm] is longer than the available head shunt, while in the fiddle yard, its train length would be limited to just 4 wagons! One must assume that Beyer Peacock were trying to sell one of their existing standard designs, so it would be interesting to know which one. It would have certainly created a stir across the borders. -
Arigna Town Exhibition Blog
David Holman commented on David Holman's blog entry in David Holman's Blog
With a day to recover after returning from York - how did it go? The trip up was a bit of a nightmare: Satnav suggested 3 hours 50 mins without stops, but total travel time was a full seven hours, with two stops, because of Good Friday traffic, rain etc. However, setting up went well & there was a good night out with the Gravetts & others including Mike & Judith Edge [finescale 4mm kit makers]. York seems to be very much the place for the great & good, while everyone seems keen to talk. Voice pretty much worn out by the end of each day! The layout ran pretty well, the only issues being the worm on the turntable drive, which started to slip [cured by a squirt of thin cyano], plus a failed solder joint in one of the baseboard connectors. Lots of interest for future shows, including Manchester and Warley. However, also just got a formal invite to Cultra in November next year so, fingers crossed, my ambition to take Arigna Town over the water will be realised - and what a venue too! Am already looking forward to seeing some of you guys. The show finished at 4.30 on Monday and by 5.30 the layout was packed back in the car & I was on my way south again. Home by 10pm - a big improvement on the outward journey. Took out the stock and went to bed, leaving the rest of the unloading till the next day. The layout packs into my car well, while motorways are much better than A roads for driving - fewer bumps and less 'white noise' from constant vibrations over poor surfaces. A small list of things to attend to over the next two weeks, before the process starts again with the Epsom show on the last weekend of April. -
The knees of the bee and the nuts of the mutts.
-
Arigna Town - this week's scenery
David Holman replied to David Holman's topic in Irish Model Layouts
Genius, as is Guinness! -
Just curious - How do you view layout?
David Holman replied to Chevron's question in Questions & Answers
Whatever works for you is my thought. It is your layout so do what works for you. However, always remember what my art teacher said, which is " draw/paint what you see, not what you think". Didn't like Picasso then! Any takers for a cubist layout??? -
With enamels, the rule is usually thin 50/50 when spraying. Not sure with acrylics though presumably the same applies. Guess you use water or I think special acrylic thinners can be bought.
-
Sad indeed. Can only hope folk come in with offers to give the stock a new home.
-
Arigna Town - this week's scenery
David Holman replied to David Holman's topic in Irish Model Layouts
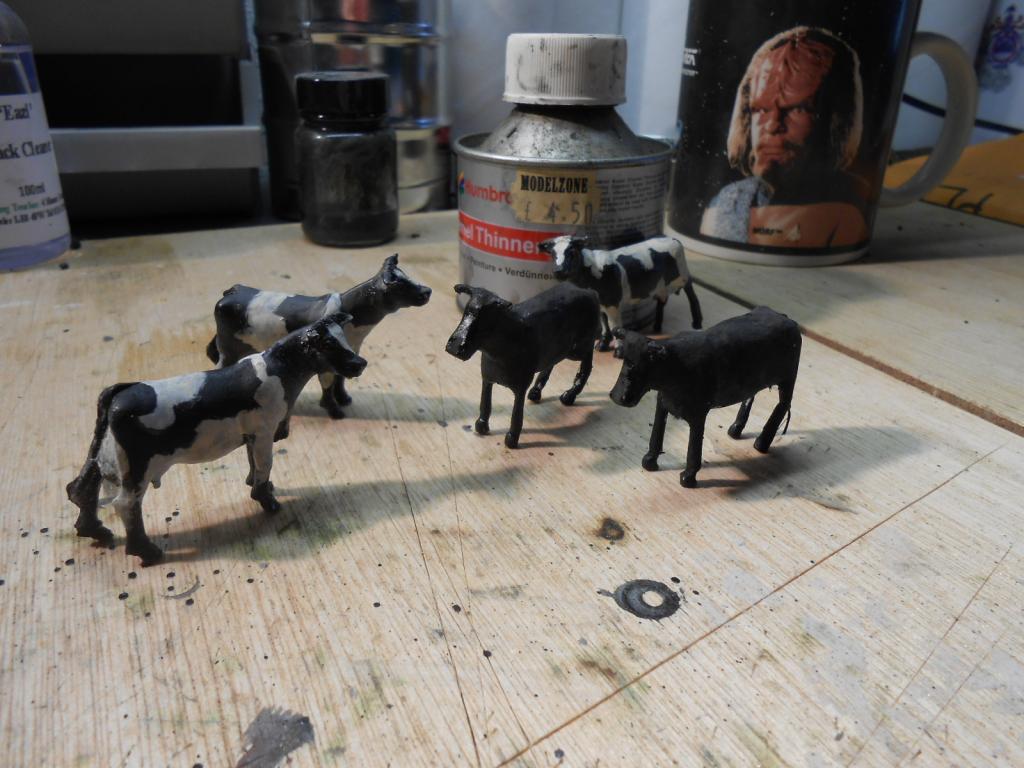
Thanks Minister - at least this one is easily cured with an all over coat of black. Hopefully a few Irish Moyles will come along later. -
Arigna Town - this week's scenery
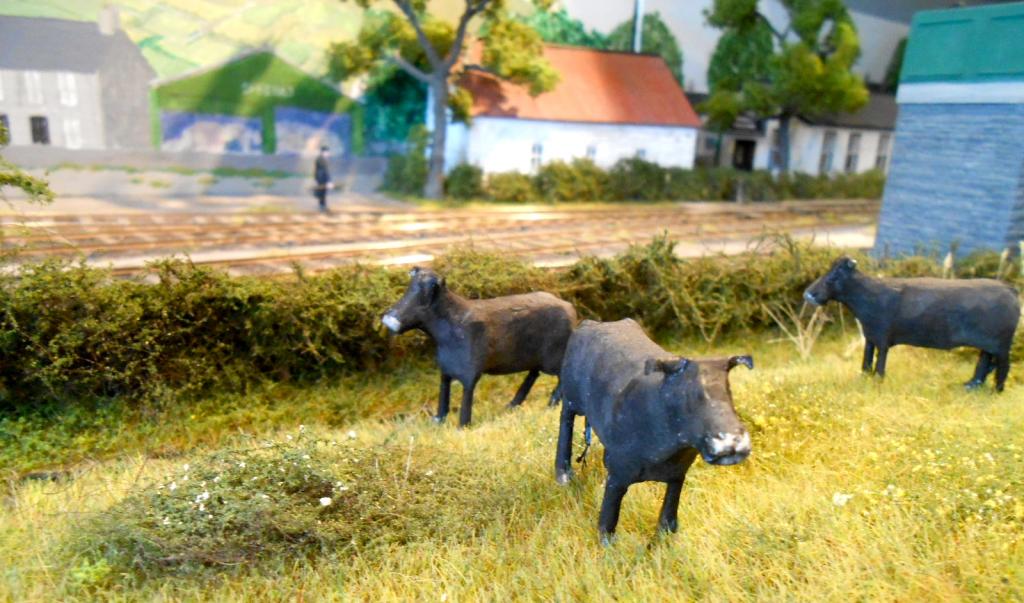
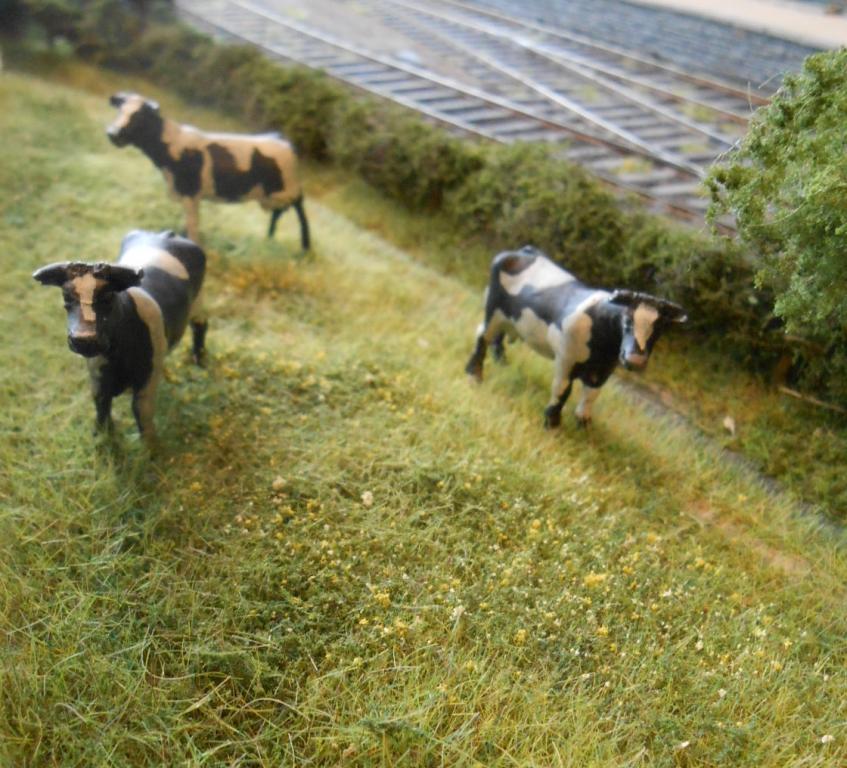
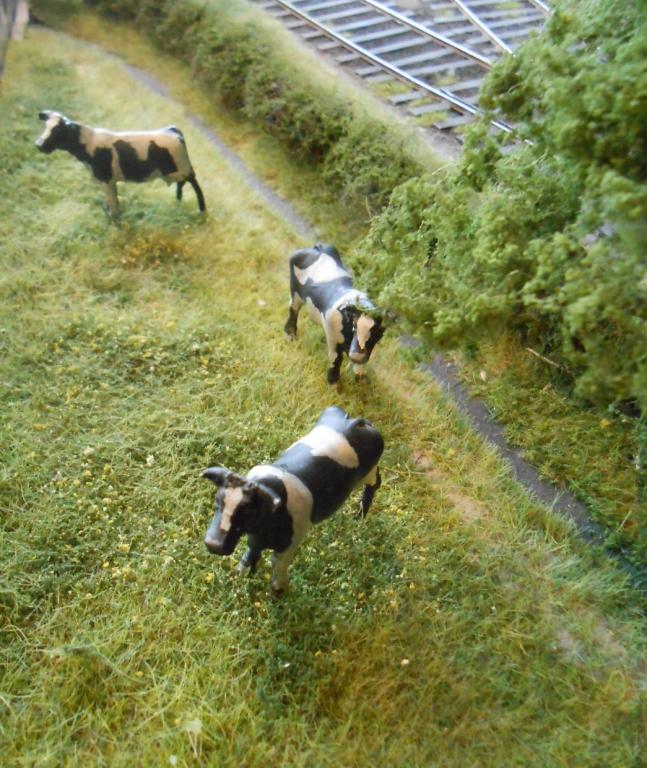
David Holman replied to David Holman's topic in Irish Model Layouts
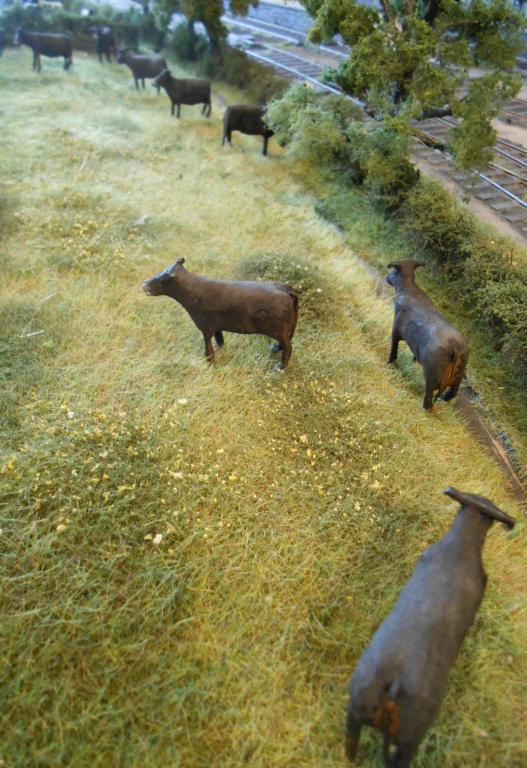
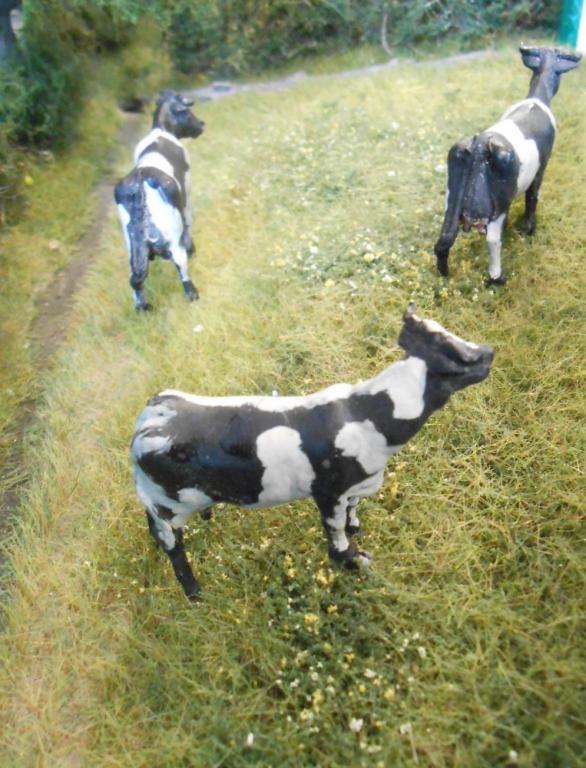
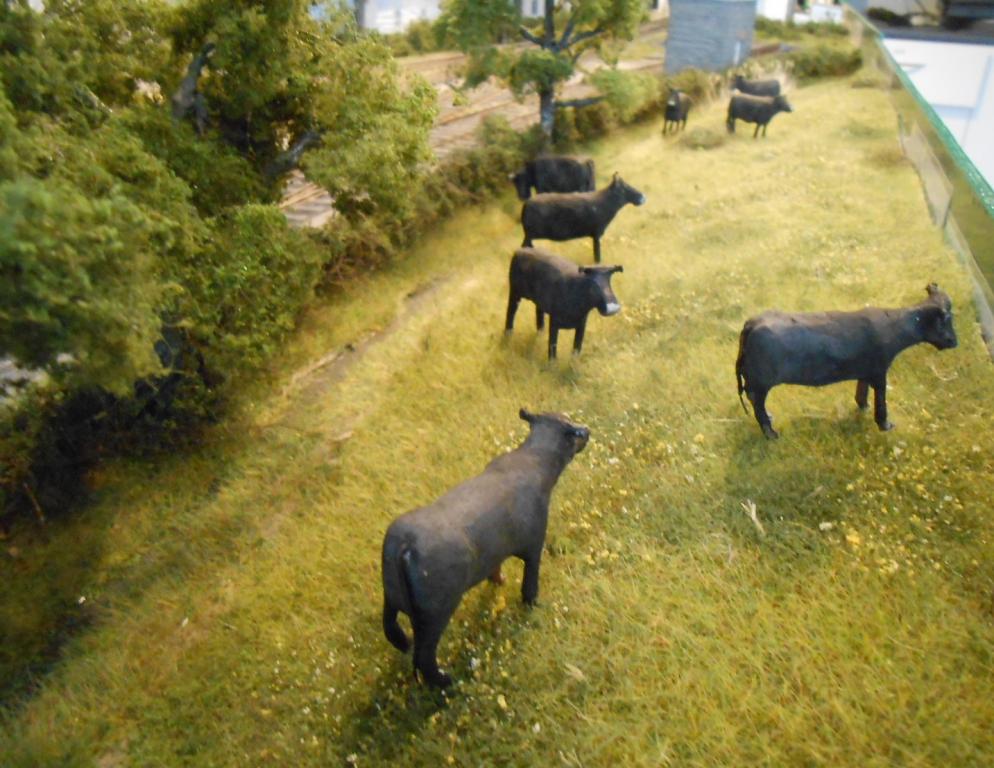
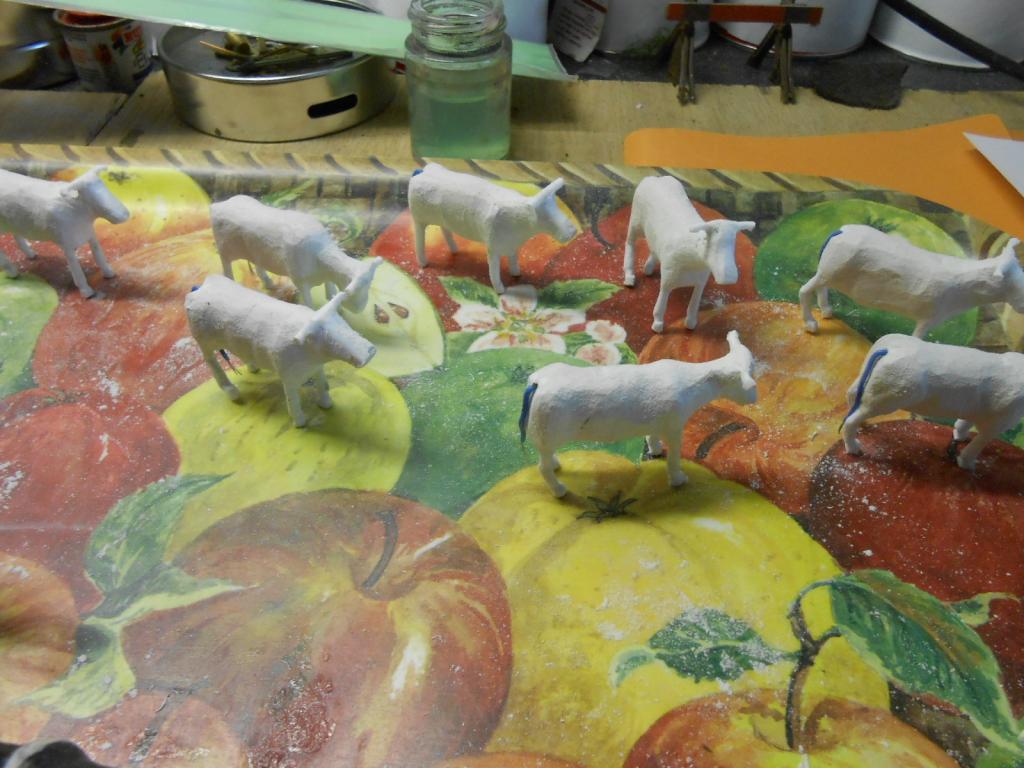
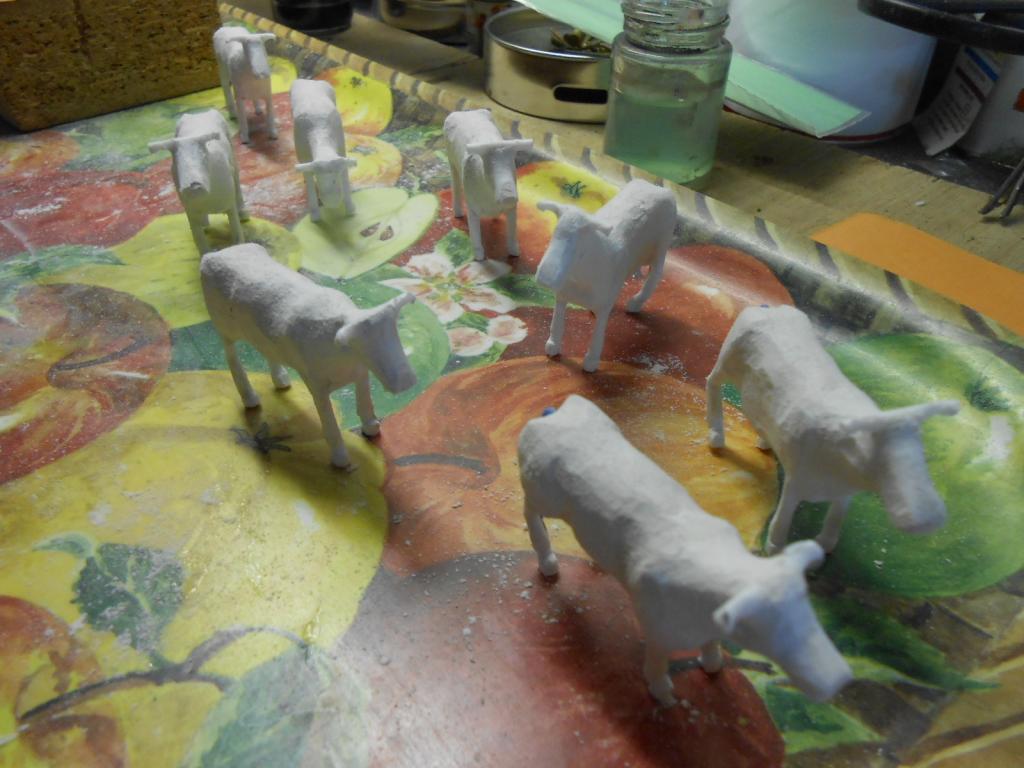
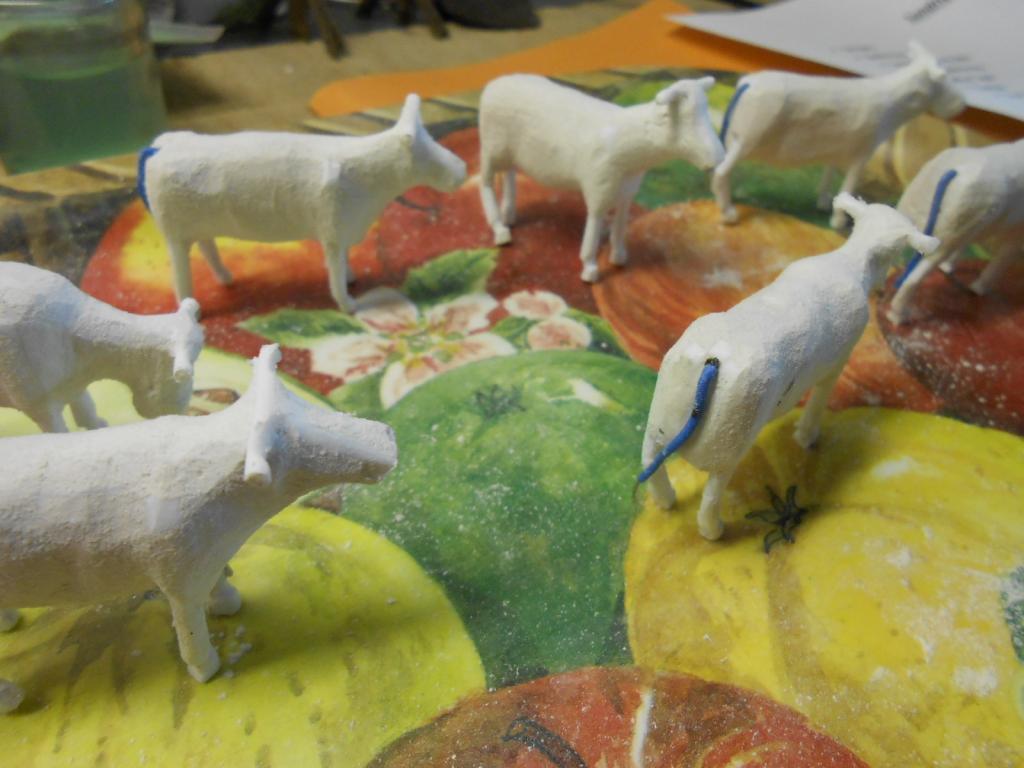
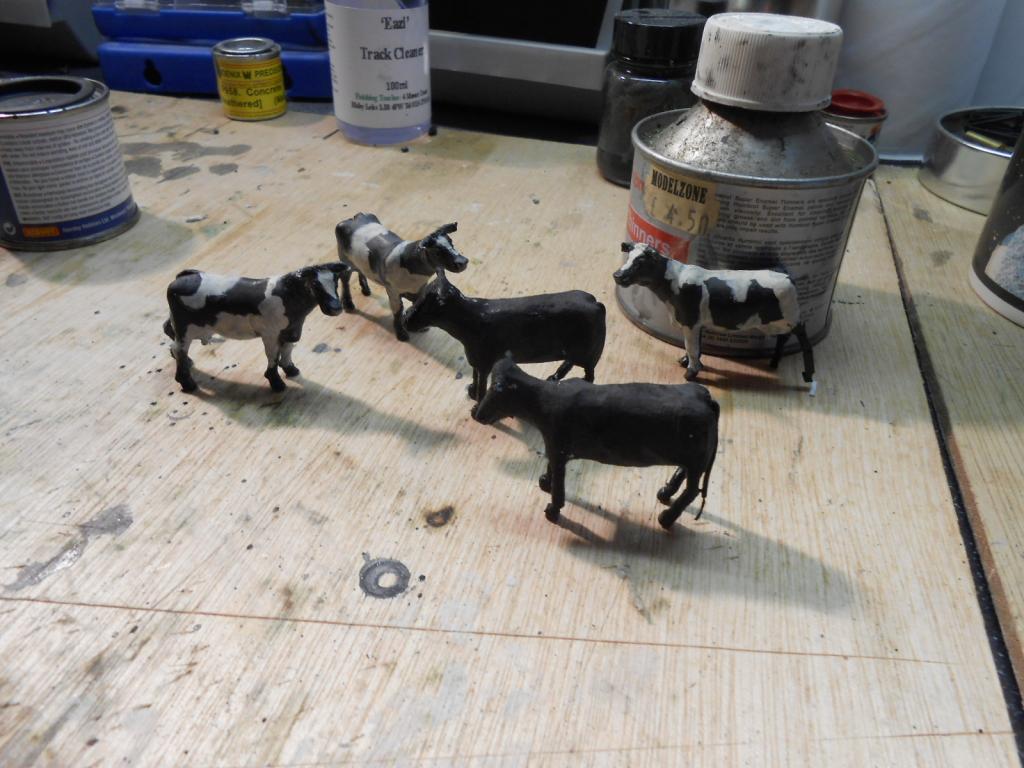
Did bit more detailing on the cattle and thought it might be interesting to show them on the layout. As they are not fixed at the moment, there is a choice between having them in the meadow or on the cattle dock. They are vaguely modelled on black Dexters - a breed that seems fairly common in Ireland. Having them black all over also hides the current lack of detail. Maybe after York, I'll do a bit more on them. If any of the IRM.com fellowship is at the show, please come and say hello this weekend. The Friesians are Slater's white metal models.
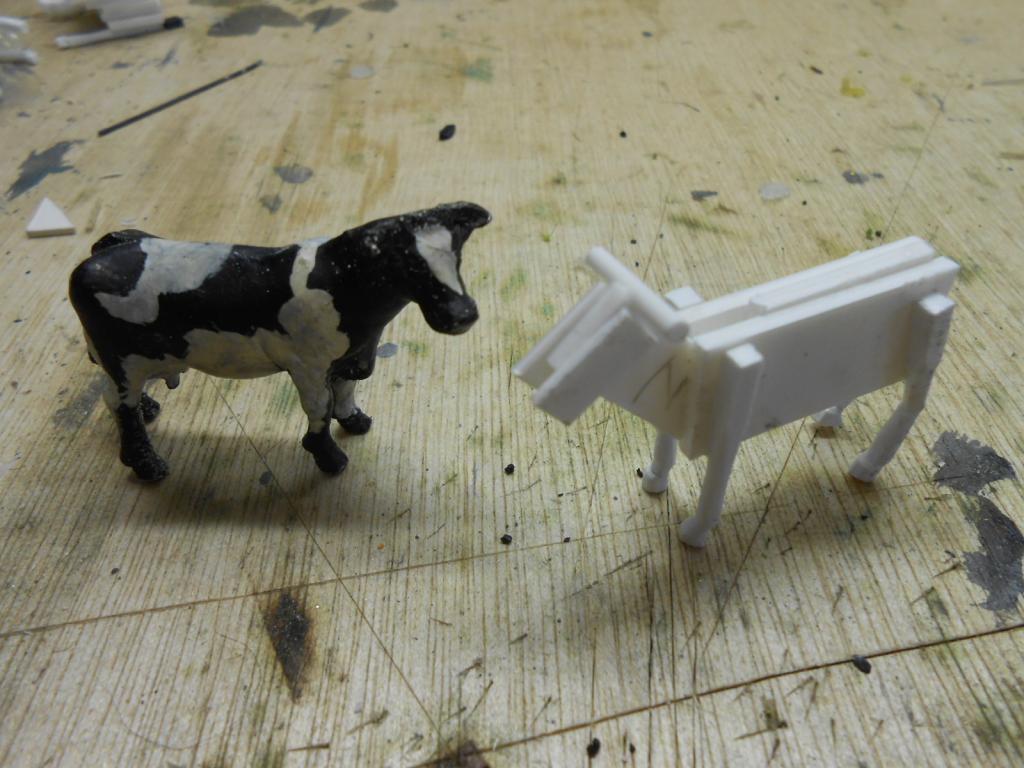
-
I don't think I'm particularly tight fisted, but somehow the idea of paying quite a lot of money for some model cows for my cattle dock rankled a bit. Slaters ones are at least two quid each and with a loaded cattle train and eventually a populated cattle dock, I could easily use £60-£80 worth. A lot of beer tokens in any currency. So, set about hand crafting some. Started with a frame of plasticard, then painted this with dilute PVA and then covered the frame with DAS modelling clay to give a basic body shape. Tried to give slightly different poses too. Once the DAS had gone off, set about fettling each model to try & match it to a Slaters white metal one. Scribed in mouth, eyes & nostrils, then added a tail from 1 amp multi strand wire. Thus far have just painted them black, but will go back to them & try to give a bit more detail/colour. Which probably means some brown around the outlet end of the primary orifice - if you get my drift. Not a quick job, which explains why ready made models are not cheap, but it has been an interesting little challenge & a change from more conventional modelling.
-
Arigna Town Exhibition Blog
David Holman commented on David Holman's blog entry in David Holman's Blog
Working my way through the 'to do' list for York. Fingers crossed, the turntable is working well now, with the centre spindle sleeved and an additional bracket to support the drive rod underneath the baseboard. The platform ramp has had a visit from a large file & since been repainted, while buffer locking on the cattle train was traced to wagons being in the wrong order, plus a stiff coupling chain. The cattle wagons are now numbered on the underside, so the rake should now work without problems. Servicing the locos means a thorough wheel clean, plus checks [like the stock], for back to backs, wheel nut tightness etc. On the latter, discovered two wheels were loose, but the countersunk screws which hold them in place could not be tightened because the hexagonal holes [for an Allen key] had worn. Only way to replace them was to drill out a suitable slot to get a jeweller's screwdriver in. Not too difficult as it turned out & the new wheel screws seem to be of a much harder metal - so will hopefully keep their allen key holes intact. Most layout preparation now done, so will turn my attention to the fascias pelmets, etc, plus the all important tools & sundries boxes. one job still to be done is to put some livestock in the cattle dock. The ones in the wagons are hand crafted & have been making some more detailed versions to go on full show. Hopefully will be some pictures in the workbench thread by the end of the weekend. -
Arigna Town Exhibition Blog
David Holman commented on David Holman's blog entry in David Holman's Blog
If any organisers of shows are reading this & interested, I would be very pleased to take Arigna Town 'over the water'. However, am only too aware it would be expensive. For shows within about an hour of where I live, my costs are simply fuel to get me there, plus a second car for operators - hence £30-£50. Further than that calls for overnight accommodation, though in the case of York, this is eased by the fact that Gordon Gravett is helping me operate and a fellow club member is travelling up with me in the car. So, fuel cost is a tank of diesel [£50], plus 6 nights hotel in two rooms. No idea what rates York have negotiated, but even at say £40, that takes the expenses up to nearly £300... To visit Ireland [North or Republic], I am looking at a full day's drive to the relevant ferry port, the ferry cost itself [no doubt much more than the £40 or so it takes to cross the Channel on a booze run]. For a Saturday & Sunday show, I'd probably need Fri/Sat/Sun night accommodation, as the idea of driving back straight after a show doesn't exactly appeal over long distances. Hence could be upwards of £500. Because of this I'd be willing to cover any expenses in Britain, but also appreciate that it might just be too costly to justify. At least it would only be me & the missus to put up - I'd be more than happy to have guest operators, so set against the cost of a large layout [van hire comes into the equation, along with multiple operators], maybe it might be ok for a bigger show? -
If you can get Humbrol paints, my advice is to get hold of a copy of Martyn Welch's The Art of Weathering ( Wild Swan). Gives a painting by numbers approach to the subject, using standard colours. Eg: for chassis weathering use 53 (gunmetal) and 133(bauxite) with matt black and leather or orange. By some distance my most well used book and I refer to it for every new paint job.
-
Very interesting to see what you are doing with that old 33, Rob. Has got me thinking because this sow's ear also exists in 7mm scale. Same issues re pancake motor, 'orrible wheels, chassis etc, but can be got hold off fairly cheap on the second hand stalls. The thing is - is it worth a punt in the larger scale? I'd be reasonably confident in a major fettling job, but would a scratchbuild be ultimately a simpler option? What is it about early diesels that attracts...? Comments welcome folks!
-
Arigna Town is about to embark on a series of exhibition dates, starting with the three day show at York over Easter. Hence thought it might be of interest to record my experiences in the coming weeks & months as, after York, there is Epsom [25/6 April], Gravesend [May], Bexhill [Aug], Worthing [sept], Beckenham [Oct] and Tolworth [Nov]. York will be the layout’s 4th outing &, as usual, following the previous one at Orpington in January, there is a list of things to attend to. However, before having a look at this, I would like to share a few thoughts about exhibition layouts generally. Have attended a couple of shows recently as a paying customer & it seems to me that some layout owners are missing the point of why they are there – ie to entertain the paying public. To me, that doesn’t just mean keeping the trains running [realistically too if possible], it also means ensuring there is a decent standard of presentation on the layout as a whole. Things that bugged included one layout where the backscene seemed to have footprints on it, while others had baseboards joints so obvious they were more like earthquake cracks. Then there was the diesel motive power depot where every loco was fitted with sound and ALL of them were running on tick over – there were over 20 of them & the resultant white noise made me feel sorry for the layouts either side. However, would any self-respecting shedmaster waste fuel in that way? One loco on tick over would have been enough, and undoubtedly the effect would have been so much better, also enabling the full start routines to be used too. Anyway, enough of the soapbox, because I’m only too aware that things do not always go as planned at exhibitions, as the list from my last outing shows: • Wiring between baseboards two and three needs replacing, due to a serious short • Loco turntable spindle requires a brass sleeve to improve operation. Likewise, pickups to turntable deck need adjusting • Austin 7 car – three of the wheels need re-fixing [just one still on then…] • Bakers/dentist shop had come adrift • Several items of stock are fouling the platform ramp • Suddenly, some items of stock were buffer locking, esp cattle wagons going into the cattle dock [turns out what order they are marshalled can cause problems] • Extra foliage needed behind the Miner’s Welfare building, as found it was possible to see the point lever supposedly hidden behind • One buffer & set of steps to repair on Brake van 2 • New ‘excursion train’ requires fresh info label for the fascia. Sadly, none of this is particularly unusual where exhibition layouts are concerned. Compared to home based [fixed] layouts, they lead a hard life. Every show means the baseboards are split up, crated & loaded into a car/van/trailer, then bounced & vibrated over often quite long distances [York is a 400 mile round trip for me], only to be set up again, operated intensively for 8 hours a day over 1-3 days, before being split up once more to be returned home. Owners & operators also go through it. The long journey to York means I am given Friday night accommodation [could have the Monday too if I’d wanted], but one day shows often mean you have to be there early in the morning to set up. Arigna Town needs about two hours, so a 10am start means being at the venue before eight, which can mean a 5am alarm call, or earlier. Packing up is usually quicker, because stock starts being put away in the last hour, but it is usually up to an hour after the show before I am driving home. Indeed, I often leave the layout in the car overnight [i do bring the stock in], because experience has taught me that tiredness causes all sorts of unwanted bumps and scrapes, to the layout and me, for that matter. So, one thing I always take with me to shows is a notebook, into which every fault/problem is recorded. It is therefore an unbreakable rule that these things get fixed before I go out next time. Because exhibitions give you an extended amount of [quite intimate] time with your layout, you often notice things that you might not see at home. Any electrical or track faults that might get ignored at home have to be sorted at a show, or you face the embarrassment of being seen with a duff layout – though there are a few who seem quite blasé about this. From time to time, I like to join the punters at the front of the layout, to see how things look to them, while seemingly simple things like a sticking three link coupling can be extremely frustrating when you have 20 people watching you struggle. Hence, it is better to get it all sorted before the layout goes out again. As well as working my way through the Orpington ‘list’ recently, a few changes have been made. These include painting the gates on the Georgian house & signalman’s cottage [they’d previously been left bare white plastic], removing the buffer stops beyond the turntable, touching up the backscene [mainly to cover up dirty marks made in transit], plus making new stock boxes for the excursion train. The last couple of weeks leading up to the York show will see all locos and stock serviced and repaired/repainted where necessary. Track, wheels and pickups all get a thorough clean, while all the ‘support items’ are also checked. Lights, toolbox, soldering iron, drapes, fascias, pelmets , controllers etc. There is a list of these in the back of my notebook & I shudder to think what I’d do if I forgot a key piece of equipment. Hence, watch this space, as I intend to add to this blog after each show, so you can get a feel for how things have gone and [with a bit of luck] an insight into some of the other layouts that catch my eye.
-
Thanks for the info folks. Have often wondered about the relationships between mines & tramway. History books have always seemed a bit vague, while Arigna C&L station is miles from the village itself - hence my liberties with local geog & hist. The Irish Times piece was especially interesting. My grandfather was a Yorkshire miner, though methinks there was likely a bit more headroom than the Arigna miners had. Even the modern 'mine experiences' [all that Thatcher has left us in Britain] barely scratch the surface of the conditions these guys faced. Remember supporting a miners strike demonstration while at college in the 1970s. All the bands and pit banners were out - it was a rousing experience, especially when they stormed parliament to 'lobby' MPs. A different age...
-
It is indeed Broithe. Mine is from Greenscene & was bought as a short plait. You tease a small piece out, spray with fixative of choice and sprinkle with scatter material. Very effective and quick. Am fairly sure it is a synthetic material, though mine is very curly/springy, so you never know!