David Holman
-
Posts
4,359 -
Joined
-
Last visited
-
Days Won
117
Content Type
Profiles
Forums
Events
Gallery
Blogs
Everything posted by David Holman
-
Clogherhead - A GNR(I) Seaside Terminus
David Holman replied to Patrick Davey's topic in Irish Model Layouts
Now that interior really is rather splendid. -
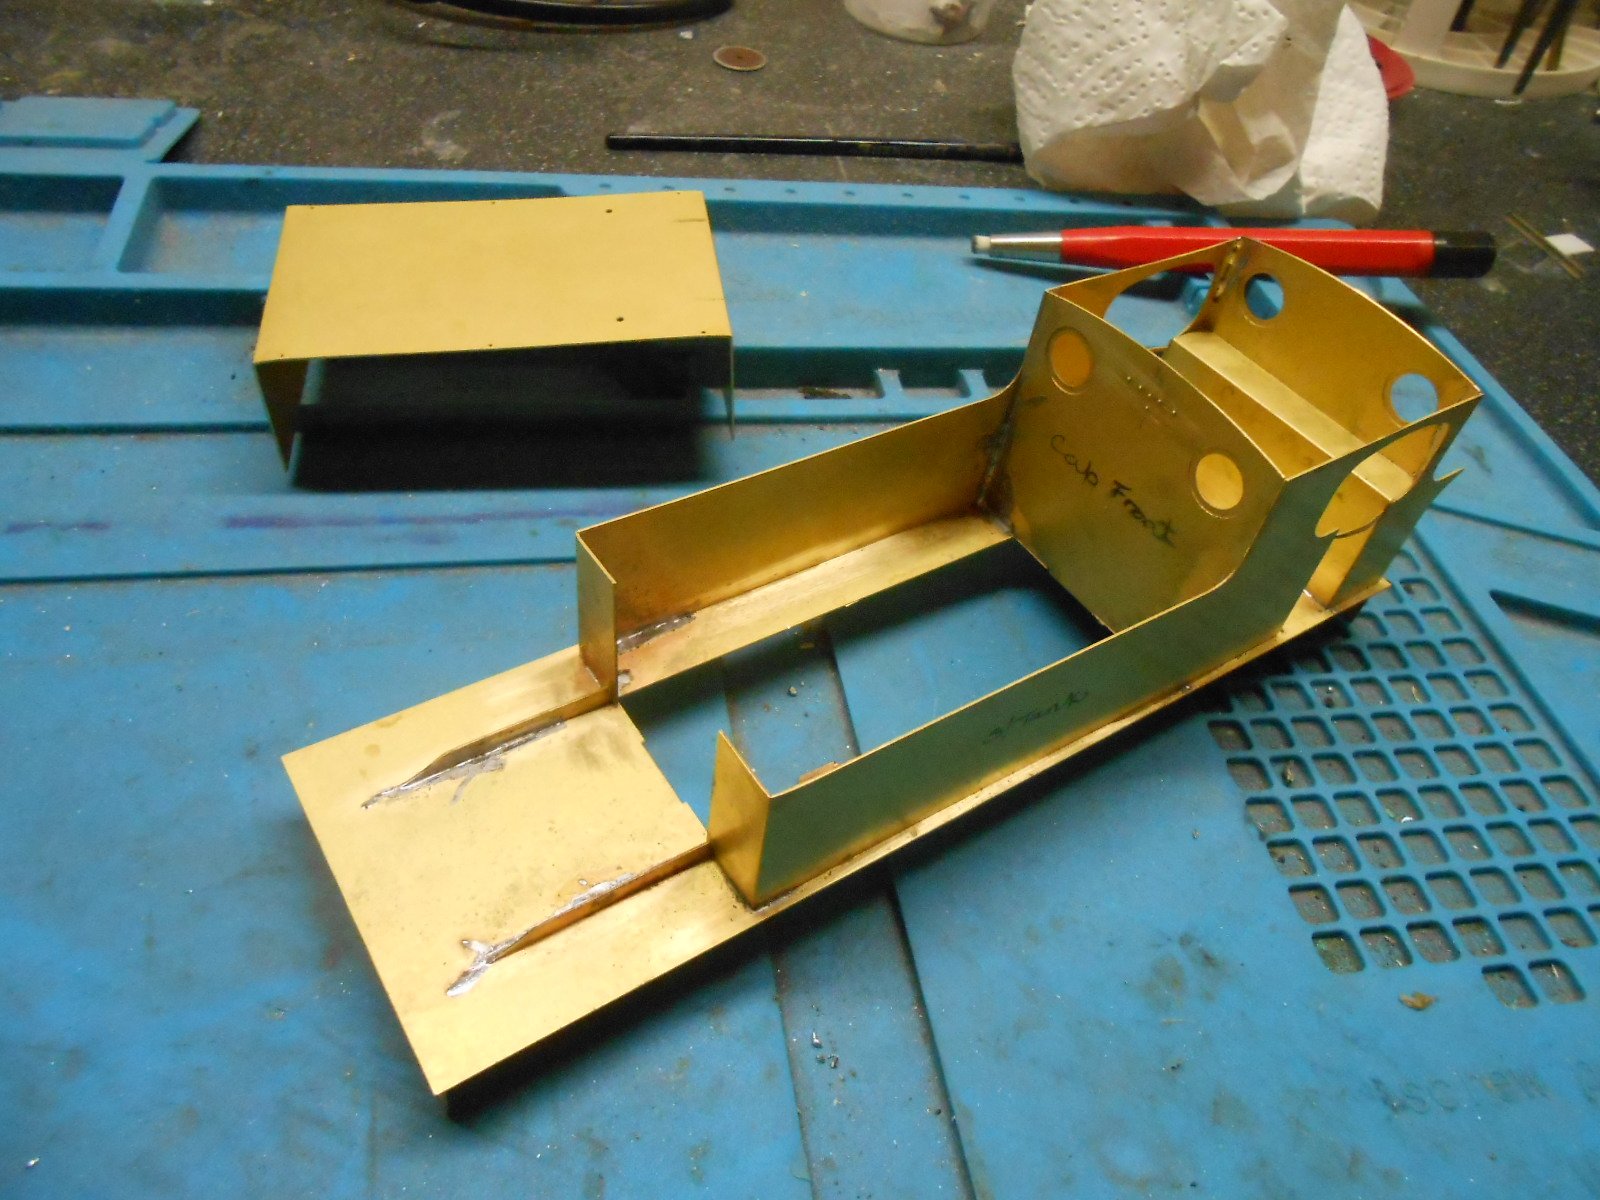
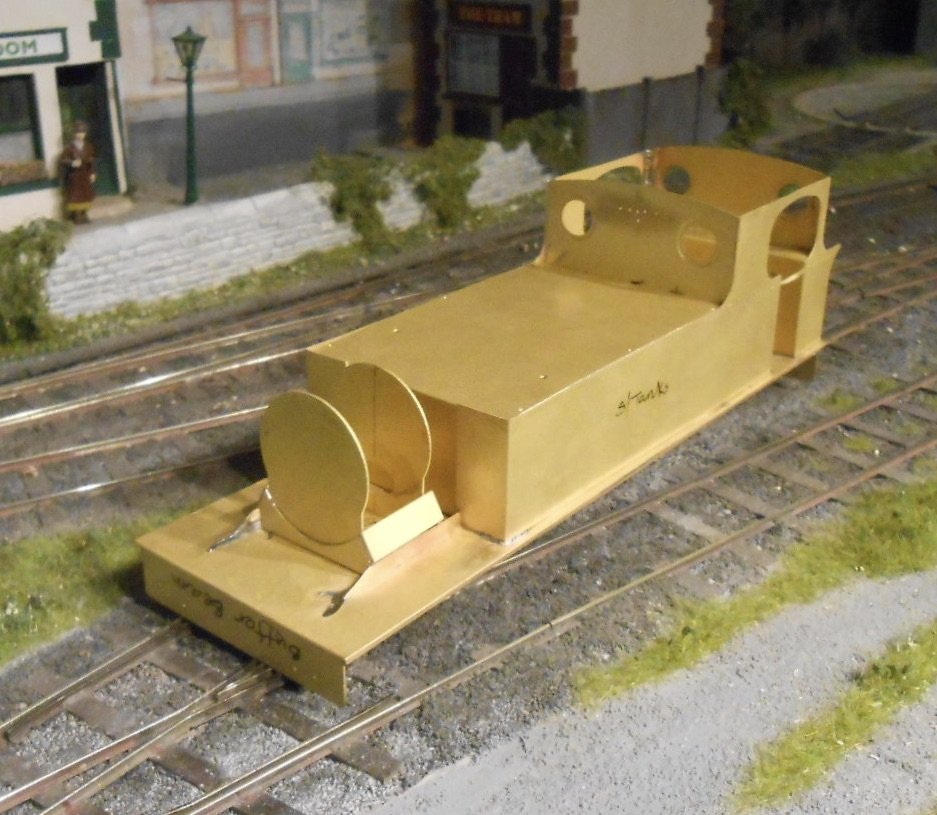
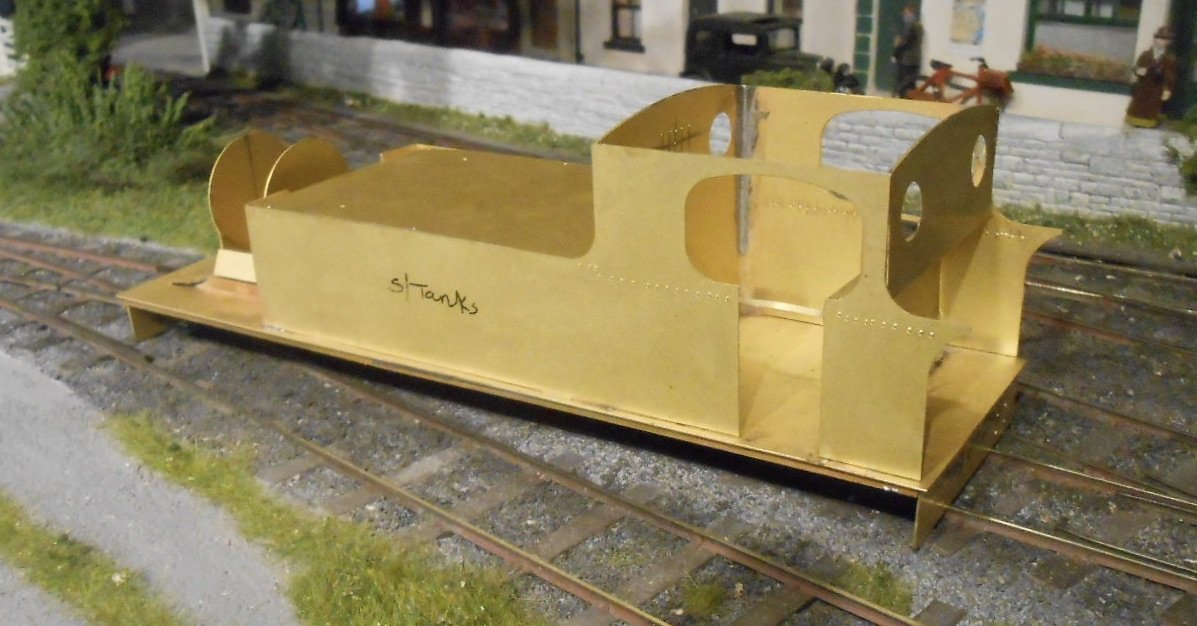
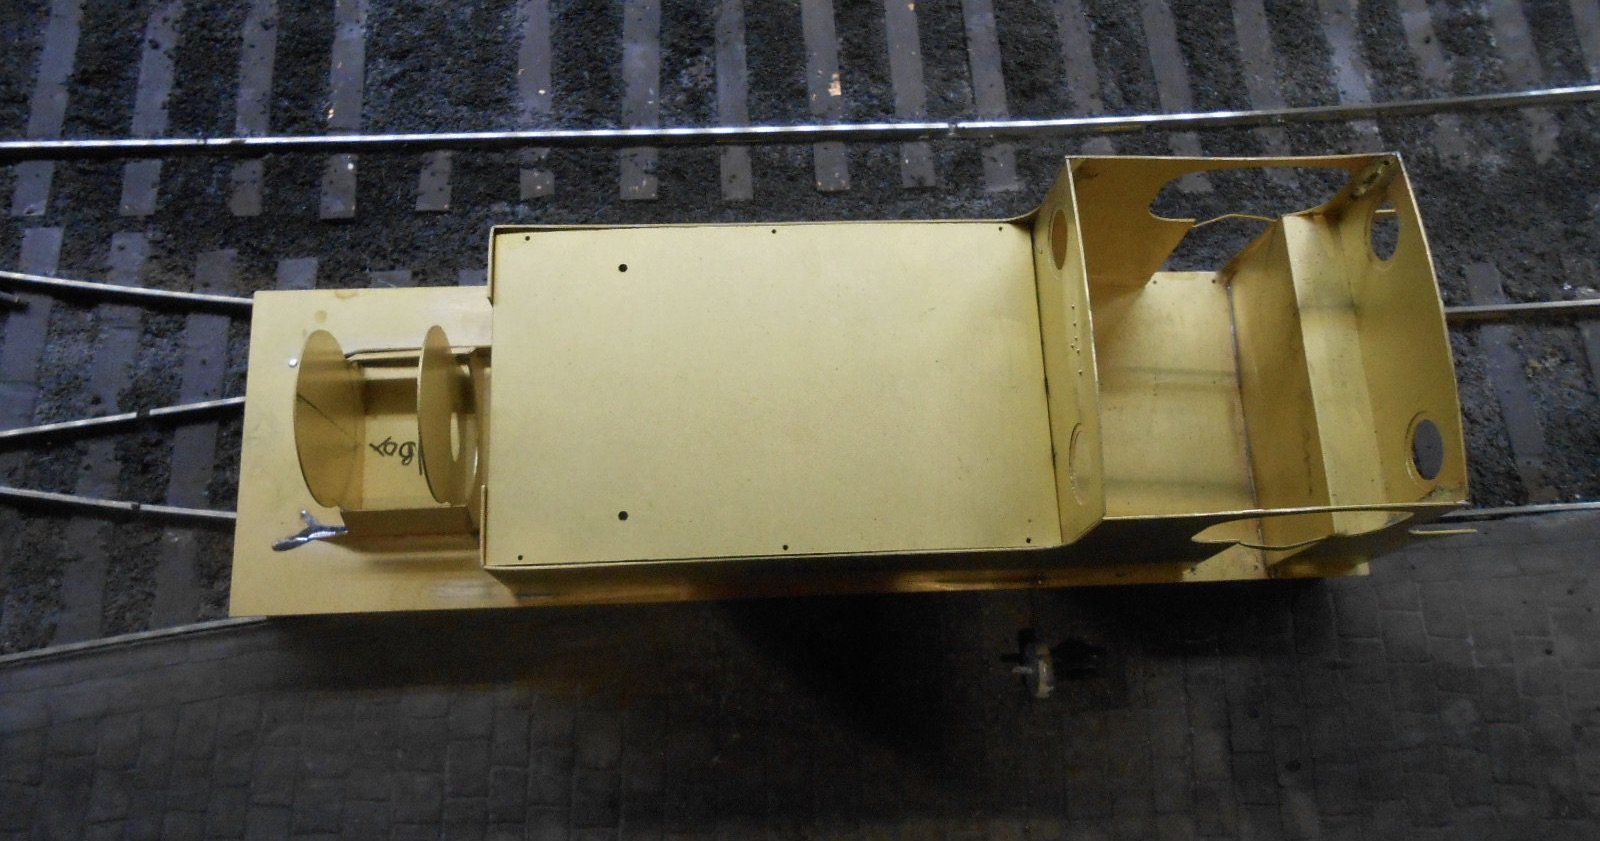
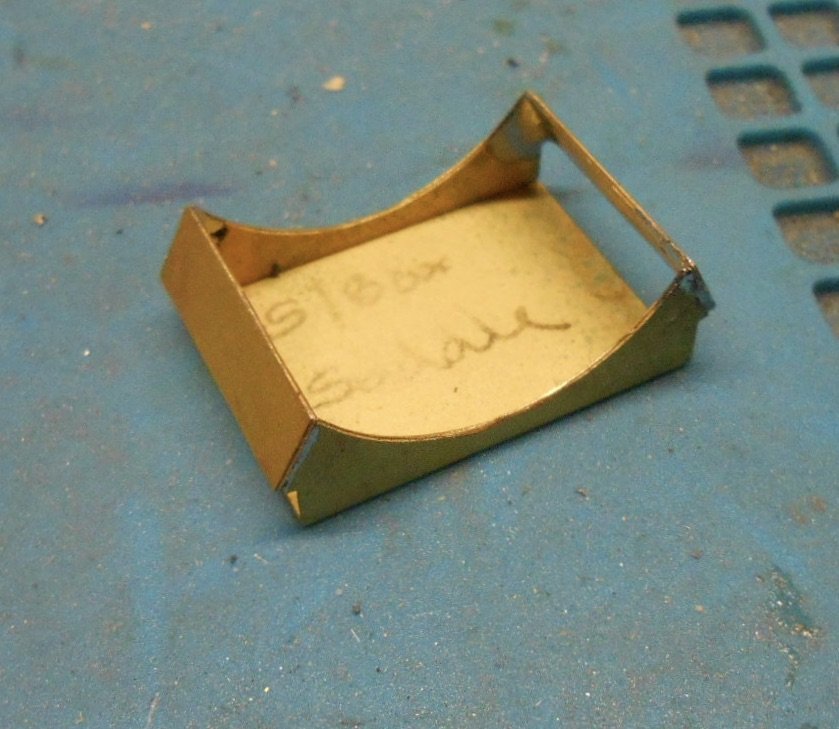
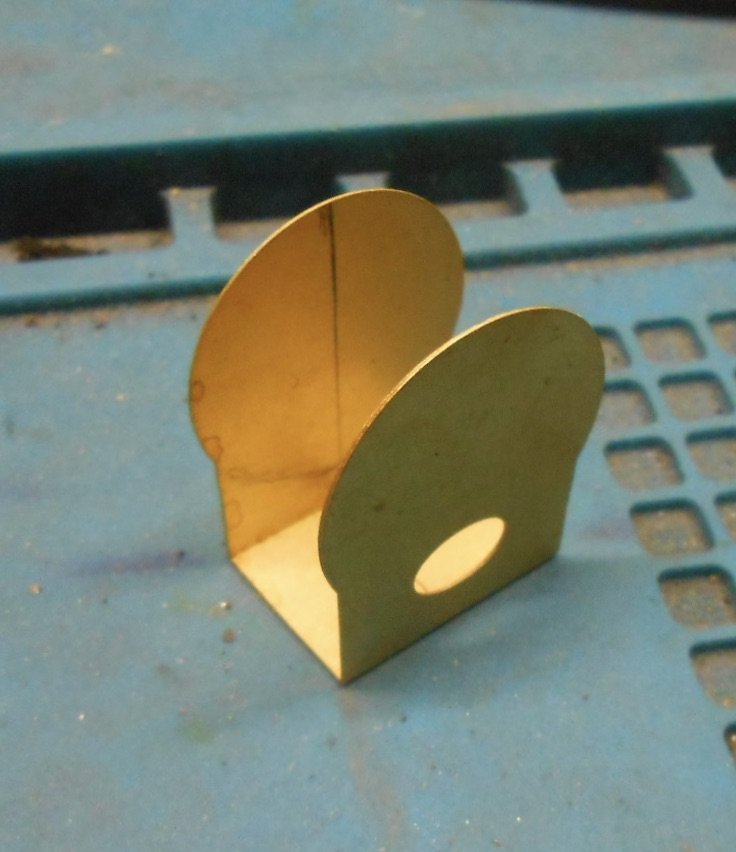
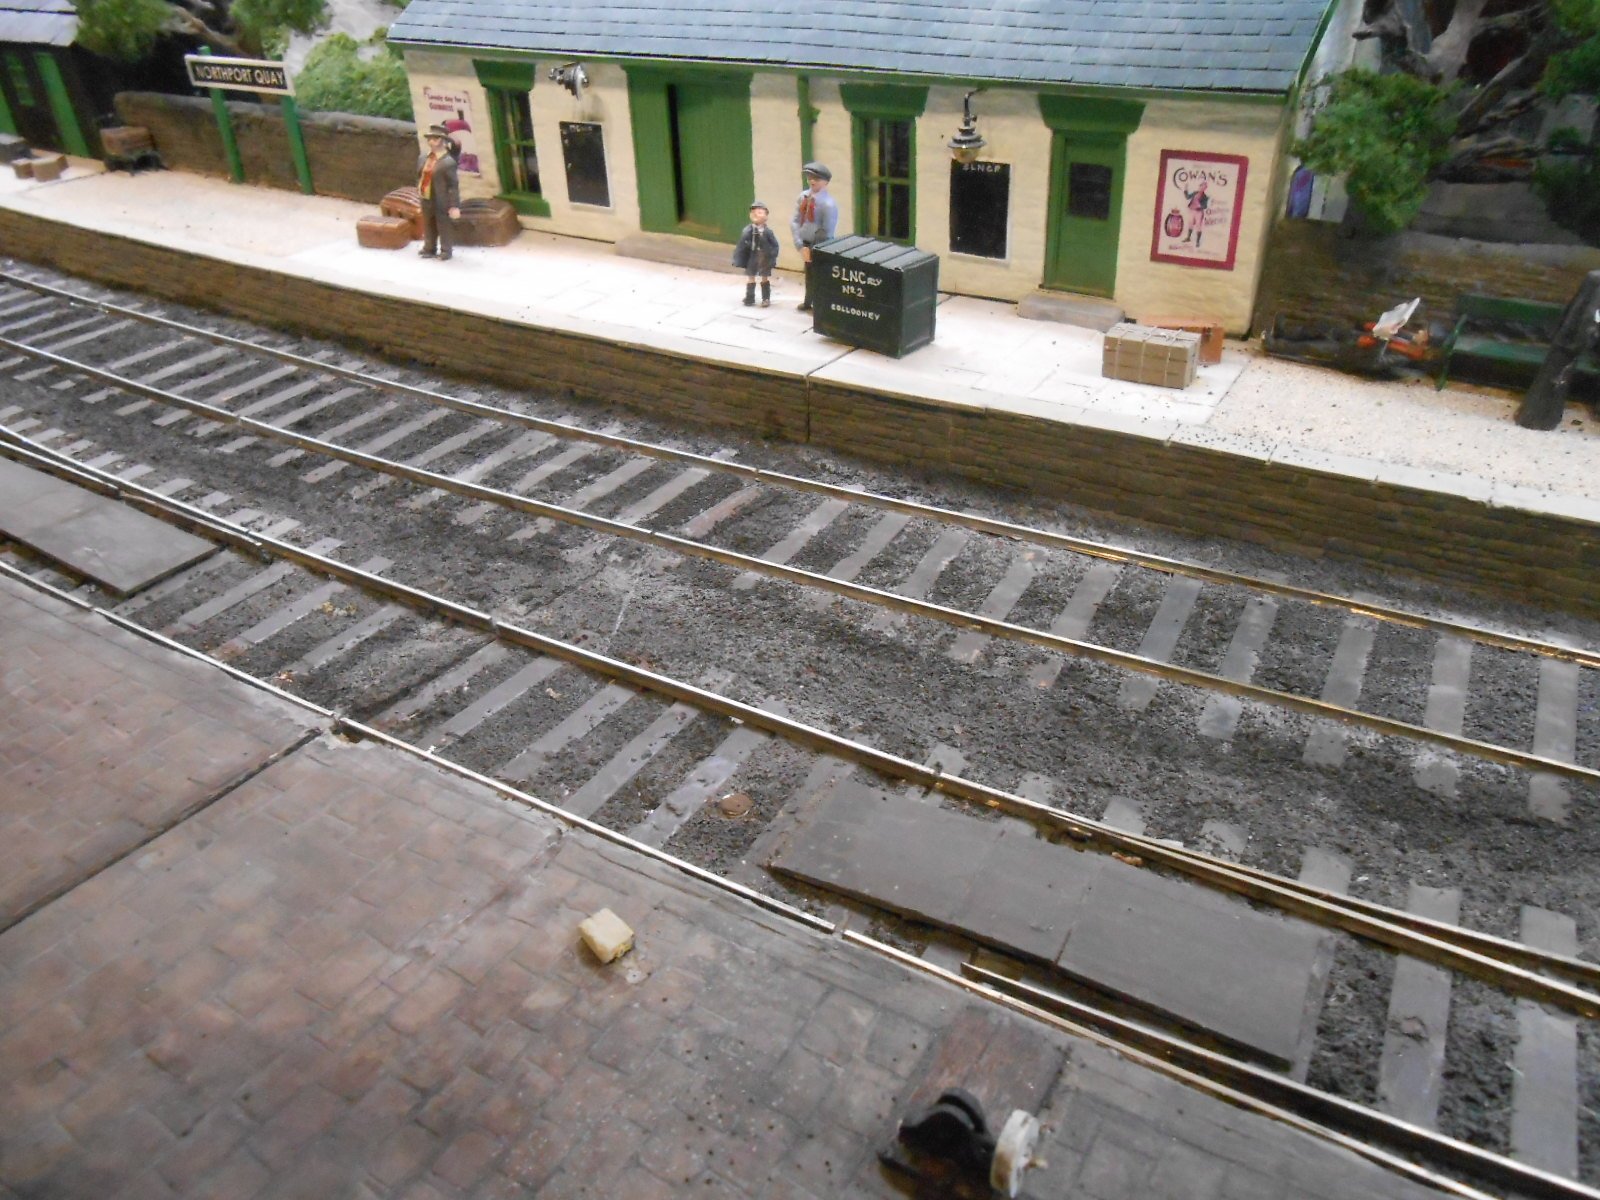
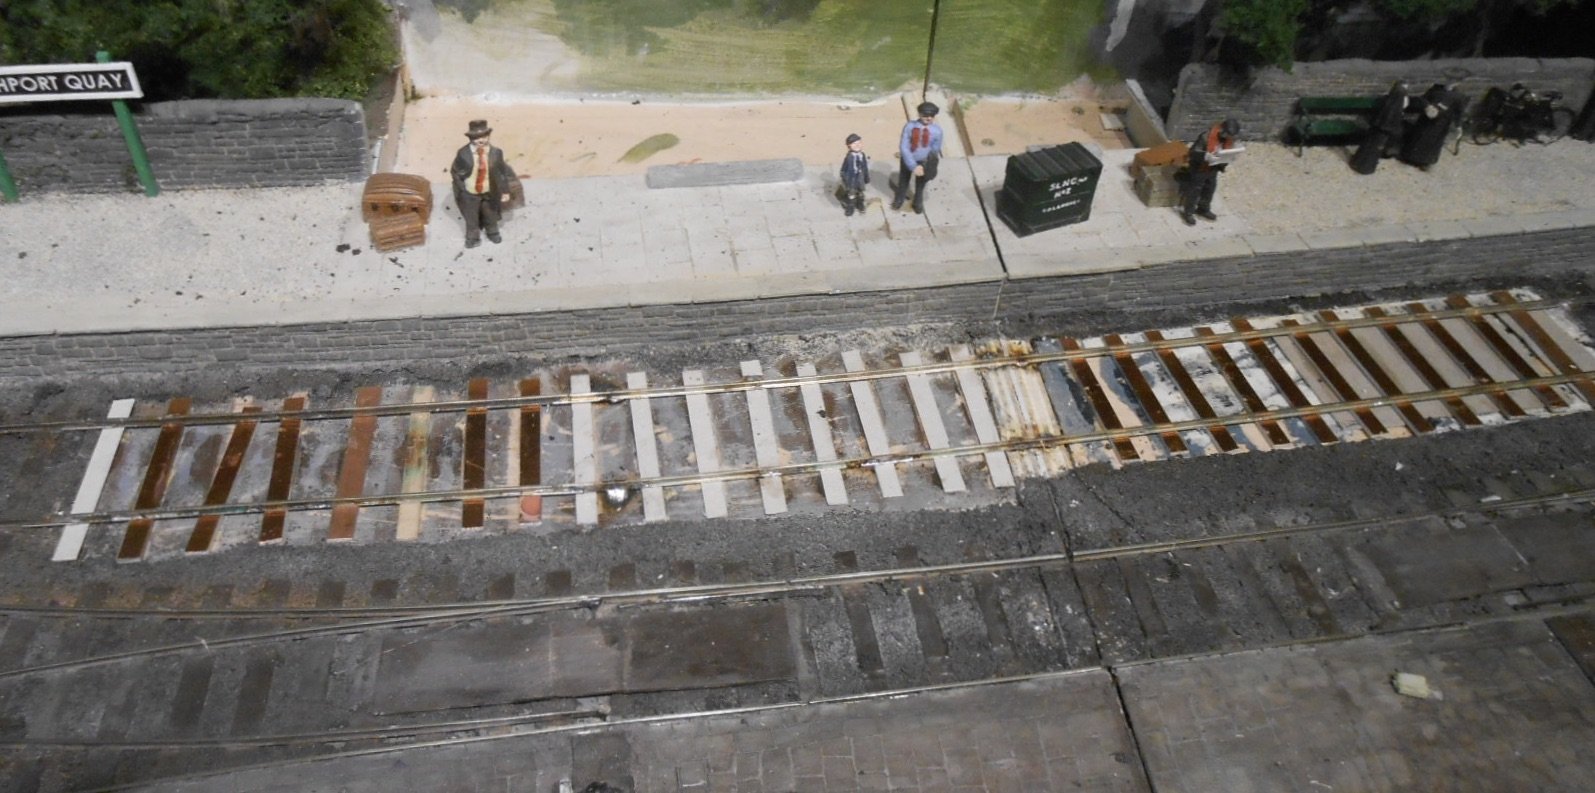
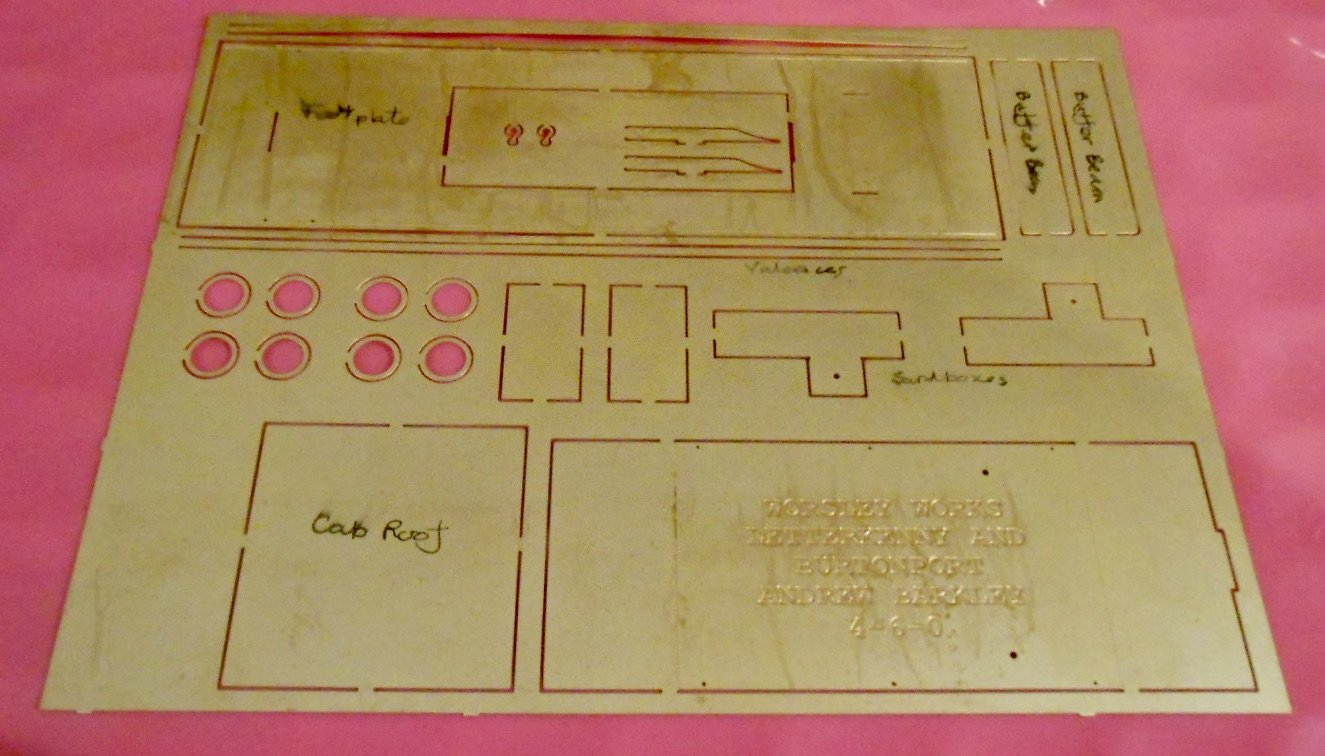
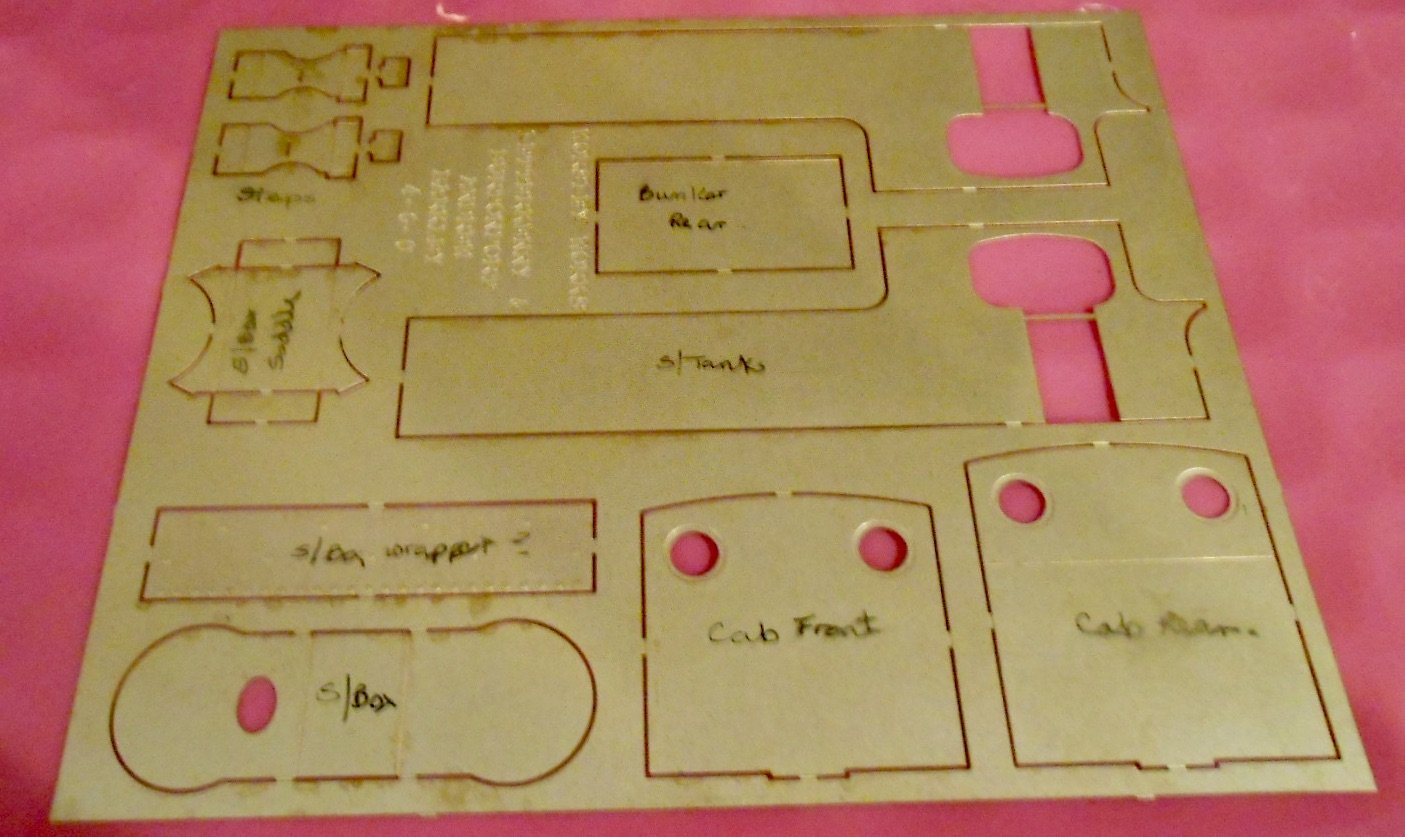
Barclay 4-6-0T Made a start today with the Worsley Works etches and as Galteemore intimated a couple of weeks ago, they don't take long to put together. However, because there are no instructions, there is a bit of detective work involved. Began with the footplate, adding the valances first, then the cab front, where a slot and tab help alignment. The cab rear has two half etched lines to help fold it to shape. Next came the combined cab, tank and bunker sides. There is a half etched line here too to bend the tank fronts. So far, so good, but there was one etch that caused a lot of head scratching. A curious large rectangle, which I initially though might be for the boiler, but two more etched lines for folds shown that it wasn't. Eventually noted that as well as two large holes, there were also six smaller ones, three each side along the edges. Curiously this etch is meant to fold up and fit the space between the tank sides, with the two large holes being for the tank fillers and the six smaller ones for hand rail knobs. Well, that ain't going to happen! Really not sure about why the etch was designed this way - unless these Barclays had completely flush tops to their tanks. This seems unlikely & in any case there would then be the awkward task of making up a section of boiler top. Instead, I plan to cut the big etch to just include the tank tops and then make new inner tank sides. At least this way I can take advantage of the etched holes for the hand rail knobs and tank fillers. Do let me know if the tanks were actually like this, please! The photos also show the smokebox saddle and what looks like a former for the smokebox itself. However, this is too short, so when I roll the boiler tube, some careful surgery looks likely to make sure it all fits. So, the basic shape only took a couple of hours, which certainly shows the value of Worsley etches, because they have saved me several hours of marking and cutting from sheet brass. However, don't think this is a quick build - far from it. These Barclay tanks had a lot of small details to be added, while there is the small matter of an outside framed chassis which needs scratch building. One final picture for now is of Northport Quay, where you can see the track that has been replaced is now reballasted, though still awaiting a bit more detailing. At least I can run trains again.

-
Clogherhead - A GNR(I) Seaside Terminus
David Holman replied to Patrick Davey's topic in Irish Model Layouts
Great fun, but also brings the layout to life. And before you remove thereof foliage entirely, Broithe's photos of Ballybrophy are food for thought! -
Clogherhead - A GNR(I) Seaside Terminus
David Holman replied to Patrick Davey's topic in Irish Model Layouts
Lovely work, though sometimes 'less is more'. Really like the simulation of moss on the roof and ivy growing up the walls, but not sure about what is in the gutters or growing around the chimney pot and stack. Few plants of any size would grow in such positions: buddleia seems happy to grow out of brick walls, but most other things would need their roots to be in the ground. -
Irish Railway Models A Class Re-wheeled to 21mm
David Holman replied to JohnMcGahern's topic in Irish Models
Impressive though this is, remember, you don't have to use P4 standards if you want to go 21mm gauge. You can use existing 00 finescale wheels and clearances - the latter being one millimetre flangeways between the vee and the check rails on the point crossing or frog. Andy Cundick has been doing this successfully for years with his Valentia Harbour and Courtmacsherry layouts and I copied this in my 7mm scale, 3' gauge Fintonagh. Compensation or suspension on stock isn't needed because of the deeper flanges compared to P4, but the track looks just as good. I built my points on Fintonagh using Templot templates. They actually produce an Irish EM version at 20.2mm gauge. Never heard of anyone doing this, but a simple matter to enlarge to 21mm on the home printer/copier. Anyone with diesel outline stock, assuming it is not a vast collection, could therefore convert to 21mm fairly easily. Yes, you have to make your own track, but C&L provide ready made parts for both plain track and points, so only a track gauge needs to be sourced and everything after that is welding plastic chairs to sleepers. With current rtr stock being so good, it almost seems a shame not to! -
Might be worth checking the Alphagraphix catalogue for card kits to use as the backdrop, though your artistic and photographic skills are more than up to the task.
-
Fascinating! Looks like an interesting, but hopefully stress free build and will form a great picture frame for current and future projects. In one of his 7mm layout building books, Gordon Gravett did a plan of a light railway junction, with the bay platform to the front and the mainline behind - just like Enniskillen. Hence either a full coach, if room, or a half relief, or even a painting or photo of a GN coach could set the scene nicely.
-
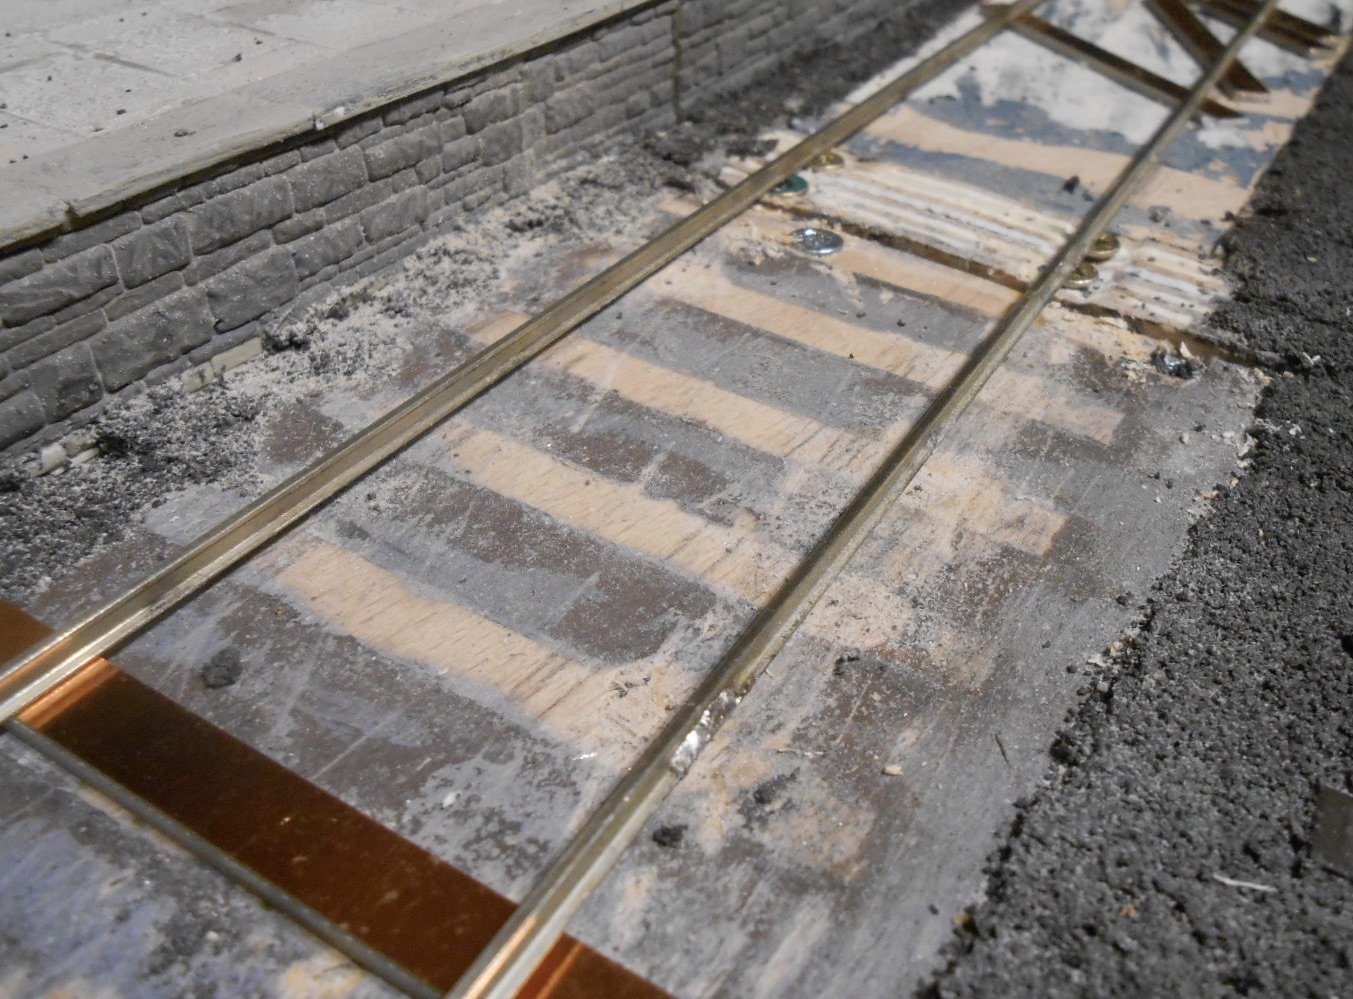
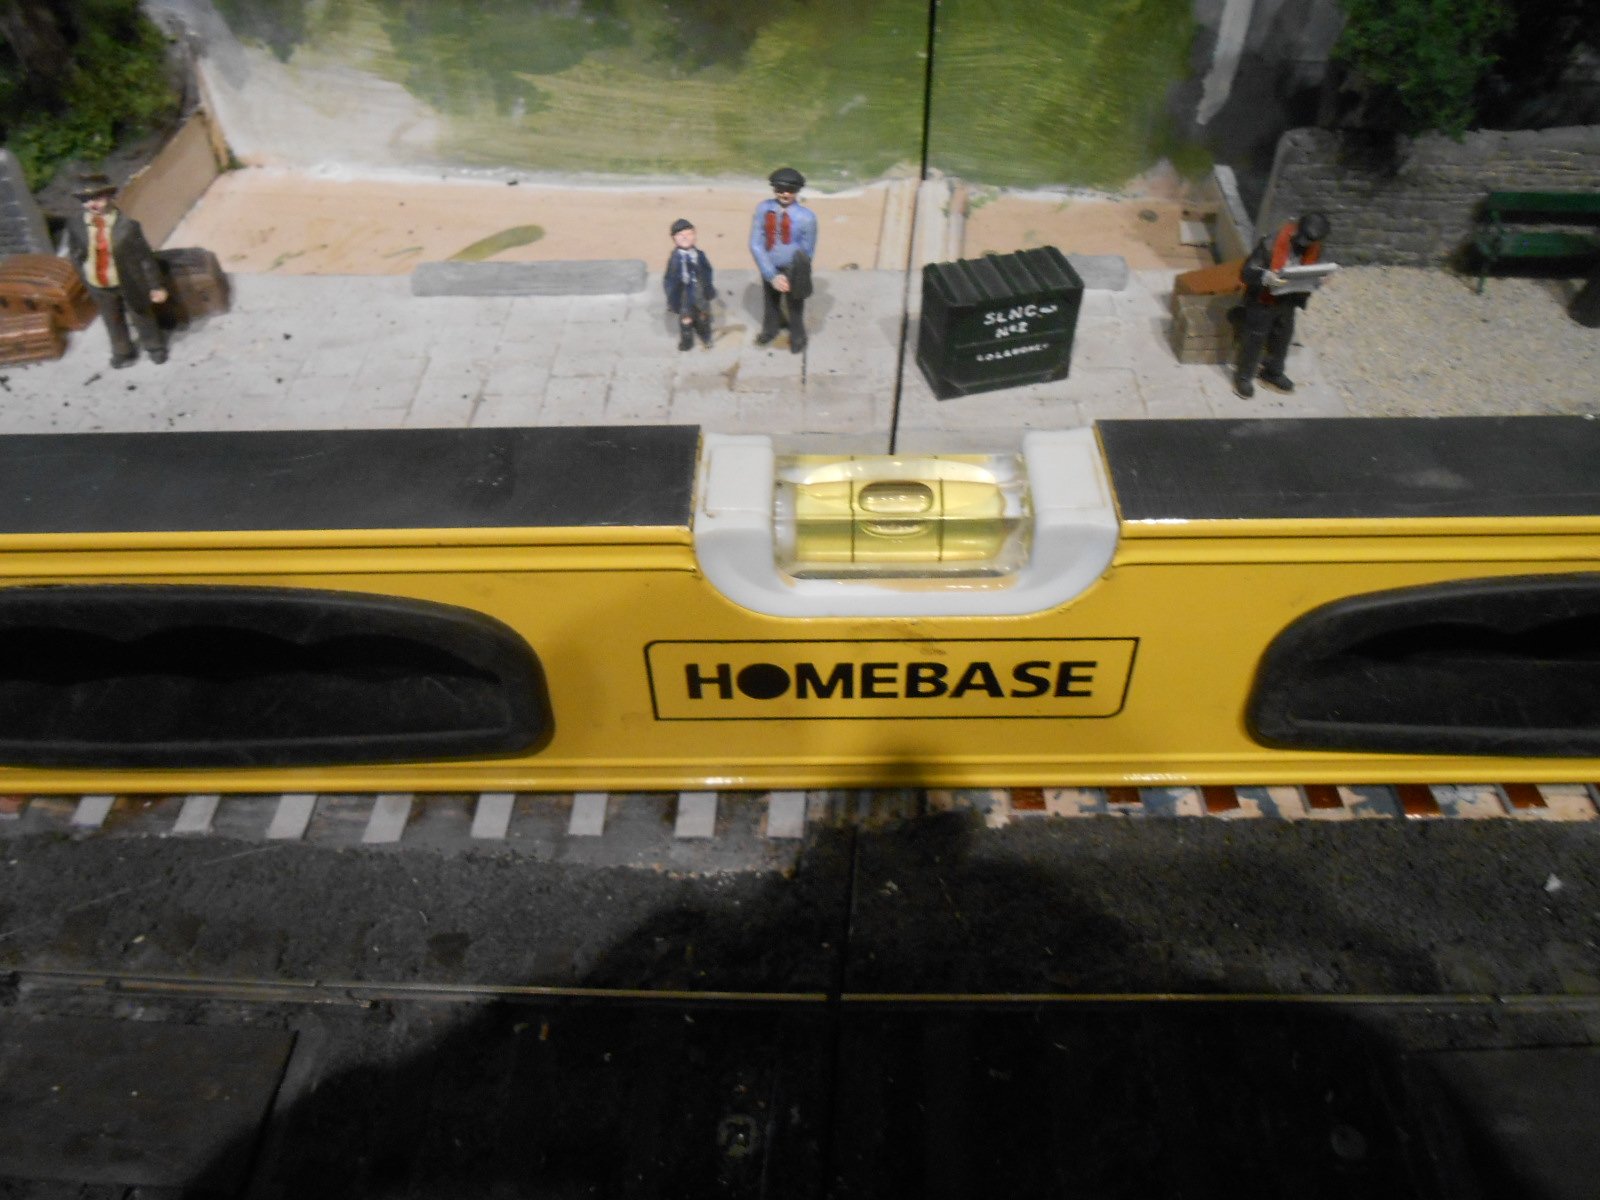
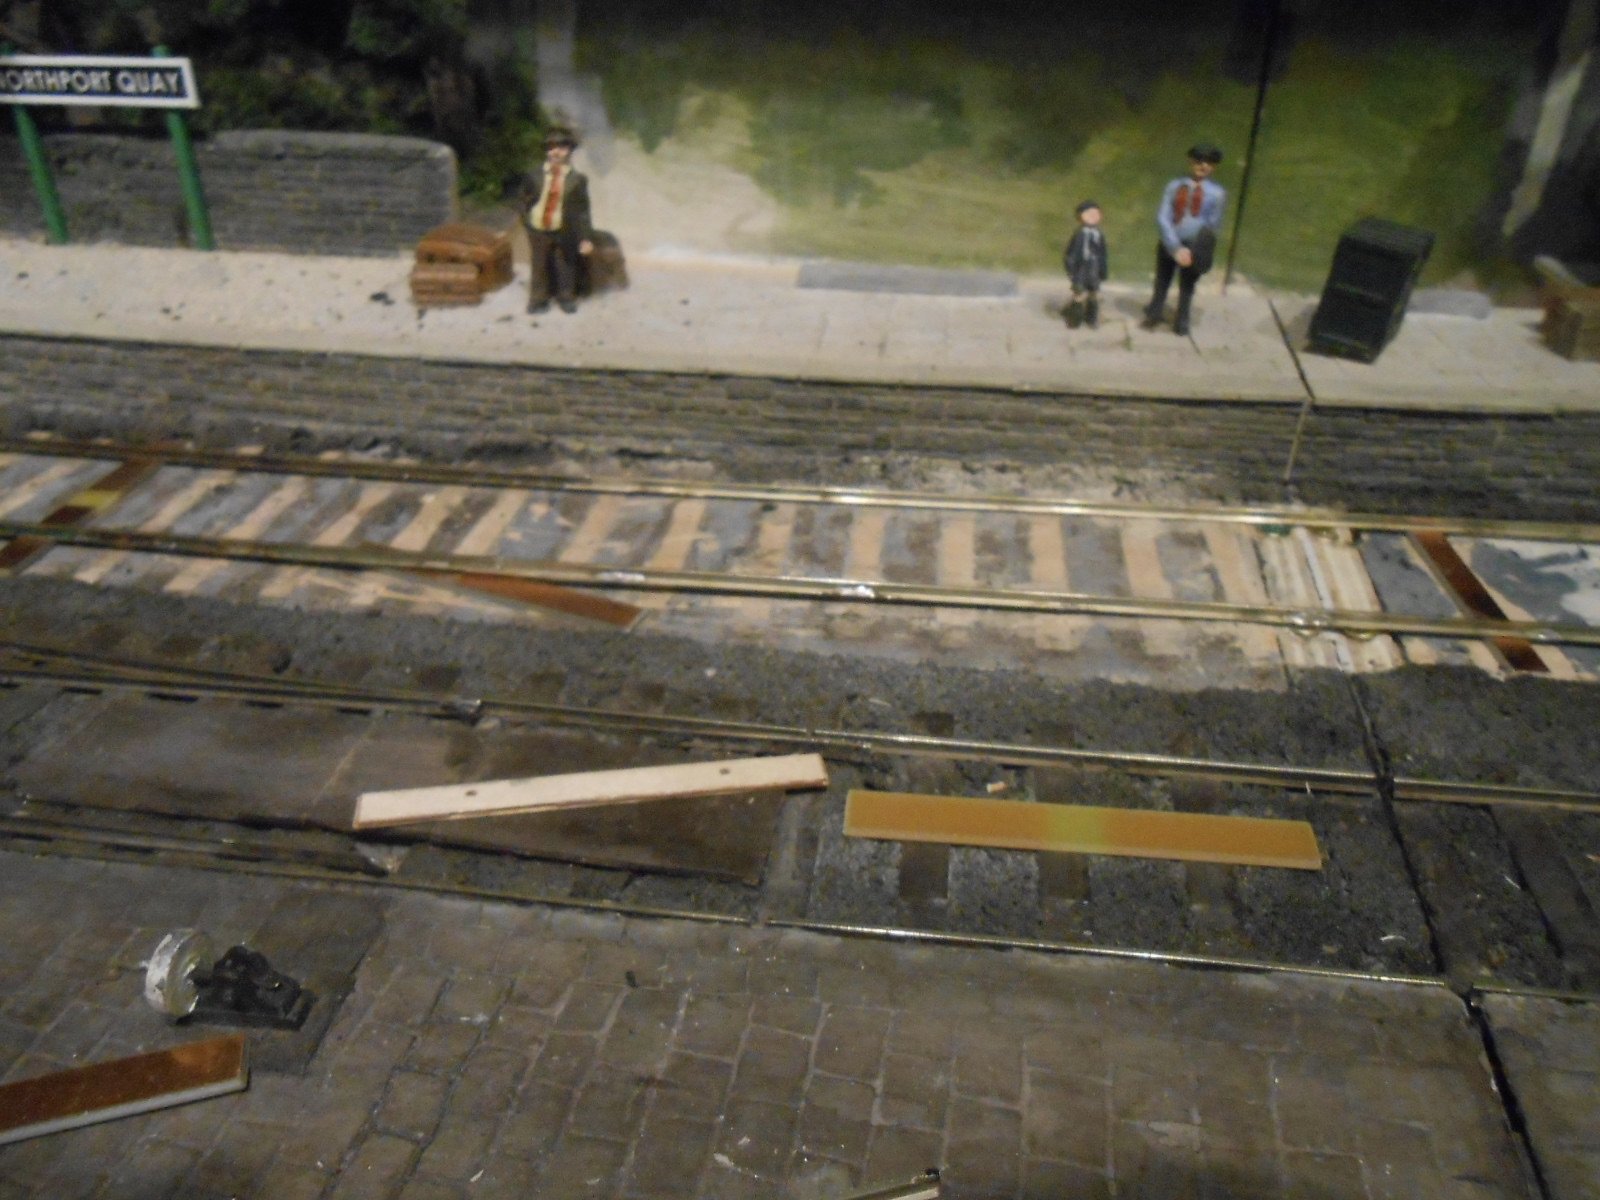
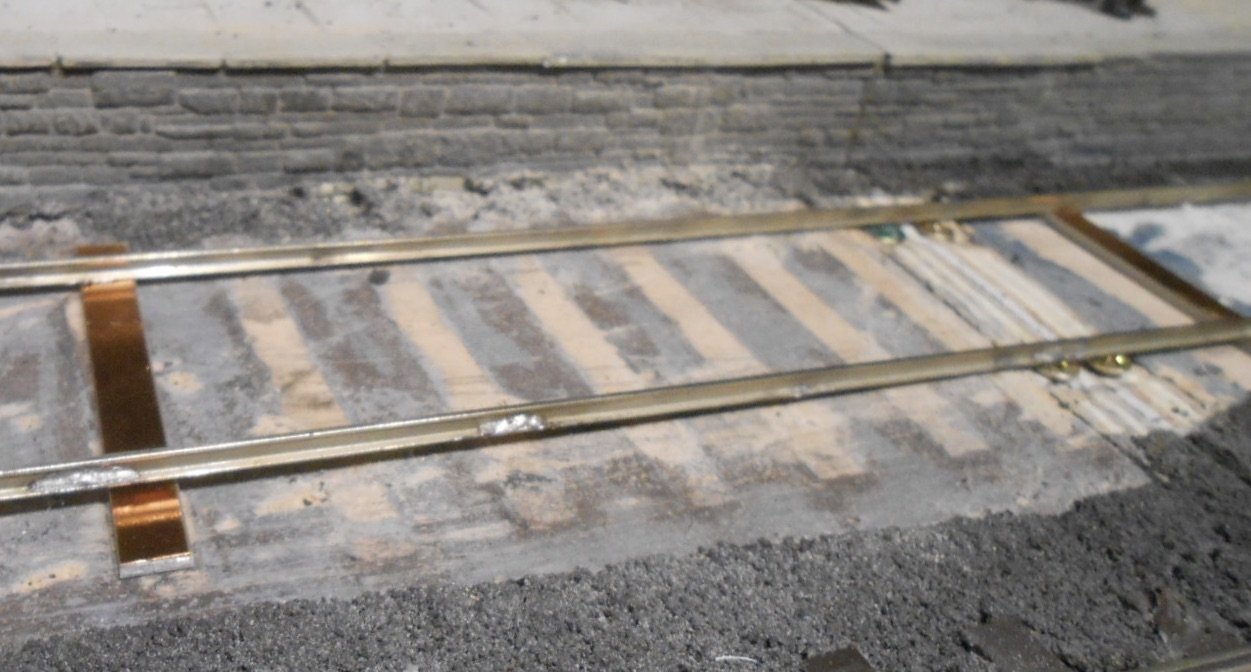
Investigations this morning revealed the cause of the ridge in the track. Turns out to be a case of not enough screws/glue/both to fix the baseboard to top the frame and the former had risen about 2mm in the centre. More than enough to derail a 7mm scale engine... A couple of screws was all that was needed to push the baseboard top down on to the frame beneath. This has enabled some of the copper clad sleepers to be replaced, but as can be seen from the photo above, clearance gets tighter near the baseboard join on the left hand side. The righthand side seems ok. So, I put in several small screws and then soldered the rails to these, before using sleepers made from thin card to fill in the gaps. As can be seen above, the track is now ready for ballasting, so am hoping it will be a case of third time lucky - though if I'd done a proper job in the first place, luck would not have anything to do with it. I've since sprayed primer over the new track, to prevent water getting into the surface [and card sleepers] when I do the ballasting. The final picture shows that everything is pretty much nice and level, while the longer spirit level also reassures me that there is no rocking over the baseboard joint. A bit of levelling up was also needed on the loop track, but nothing so drastic and hopefully I'll be able to run trains again soon.
- 257 replies
-
- 14
-

-
A serious amount of work in that model!
-
Not sure about smoke effects, they rarely seen to scale down for me, though the late John Dorman did some very impressive stuff on his 7mm scale GWR loco shed diorama. I think he used disco equipment. DVD control on vaping puffers maybe? The clouds that the gaspers produce are pretty substantial as is the range of 'flavours'. Not sure if wood smoke or steam coal is available though!
-
The Portsmouth Show proved to have a lot of very high quality layouts. Indeed, I would not have been disappointed to get 'worst layout', were such an award given! Lots of interested and knowledgeable folk came to look and talk, so it was in many ways a nice day. However, NPQ is still not all it should be, not least because the 'ridge' in the main baseboard joint reappeared and was severe enough to derail Shannon in either direction. Wolf Dog and the 101 were decidedly unhappy, but managed to get through with care. Part of the problem almost certainly came from the the varied heat and humidity of the weekend. The layout spent the night in my car & then Saturday morning was really wet, though luckily there was a brief window which let me get the boards into the hall unscathed. Normally, school sports halls are ideal, with high ceilings and flat floors, but as the venue warmed up, the humidity started to play havoc, so much so that in the middle of the day, the fiddle yard stiffened up considerably. Thankfully, things eased later, but it only goes to show the things that can affect exhibitors. Back home and with time to think on the two hour drive home yesterday evening, did a thorough check on my overall set up which revealed several issues I hadn't been aware of: One of my trestles is actually half an inch higher than the other [!] The beam extensions sag at the far end, by another half inch [!!] Therefore one end of the layout is a full inch lower than the other, which equals a minimum gradient of 1 in 90... Clearly, this doesn't help, but that ridge at the baseboard joint has meant I've had to strip out about half a metre of track and start relaying it. Again. Discovered that the fixing screws which the rails are soldered to at the join were sitting too high, but also the baseboard surface on the left hand board seems to have lifted slightly. Laying some new rail across the joint, shows there is minimal clearance between the bottom of the rail and the baseboard surface, so am going to have to find a way of sorting that out. At the moment, it may be I'll have to solder the rail to a few countersunk screws and the use thin card to represent the sleepers on a short stretch. I'll also be seeing if a bit of extra bracing is needed underneath the board. All in all, a bit of a bummer, but at least I don't have another show until July at the moment.
- 257 replies
-
- 16
-
-

-

-
Only angles you need to worry about are the horizontal and verticals. Suggest you extend the buildings down to the baseboard level, then add the actual ground levels in front. If it is a terrance, remember to make sure the front steps are level. If extending into a backscene, perspective demands that verticals are just that, with horizontal lines actually sloping up/down to the vanishing point.
-
Am depicting the 1940s, Andy so nothing fancy -apart from the locos, which always seemed to be well looked after. Shame none were saved...
-
Sounds interesting, especially if available in 7mm scale.
-
Ouch!
-
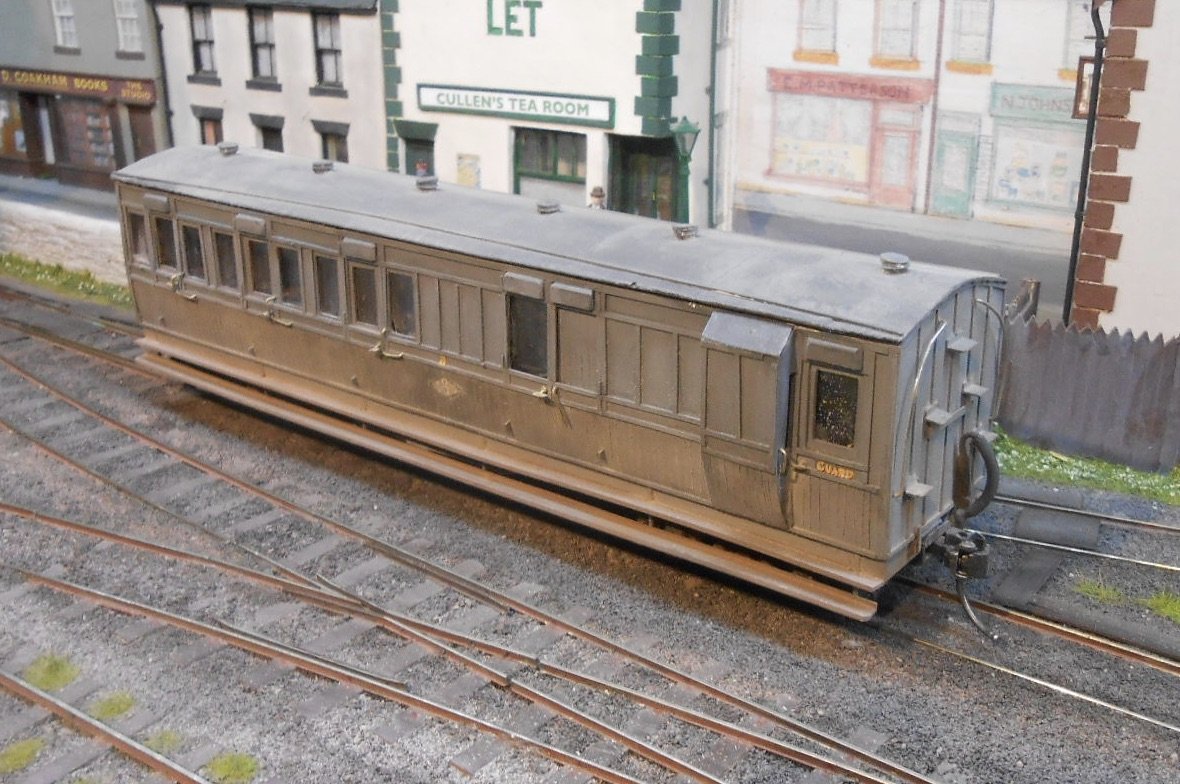
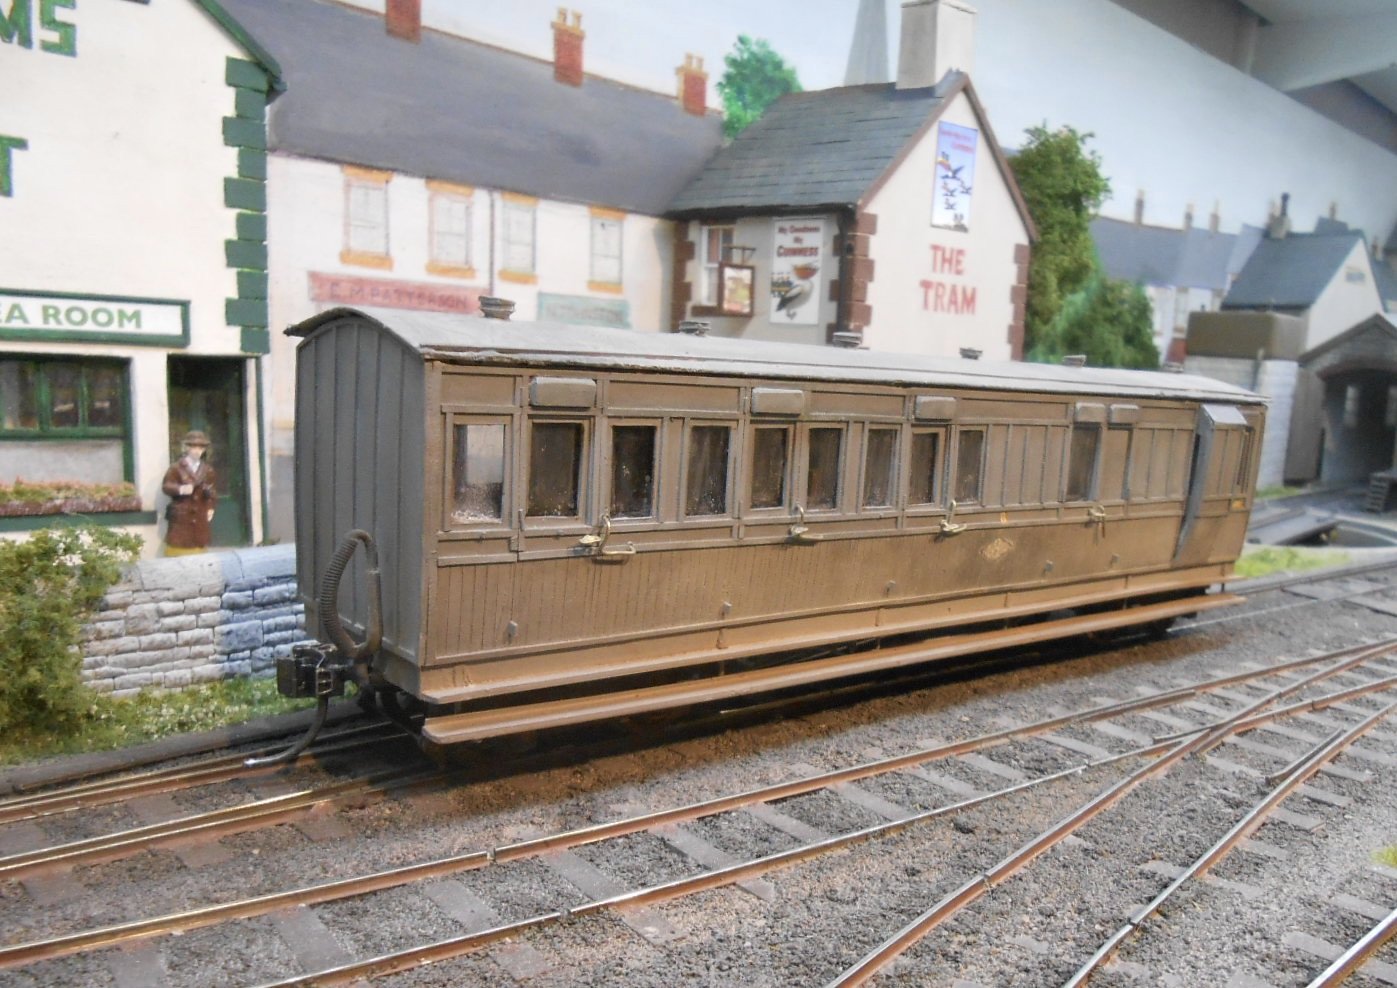
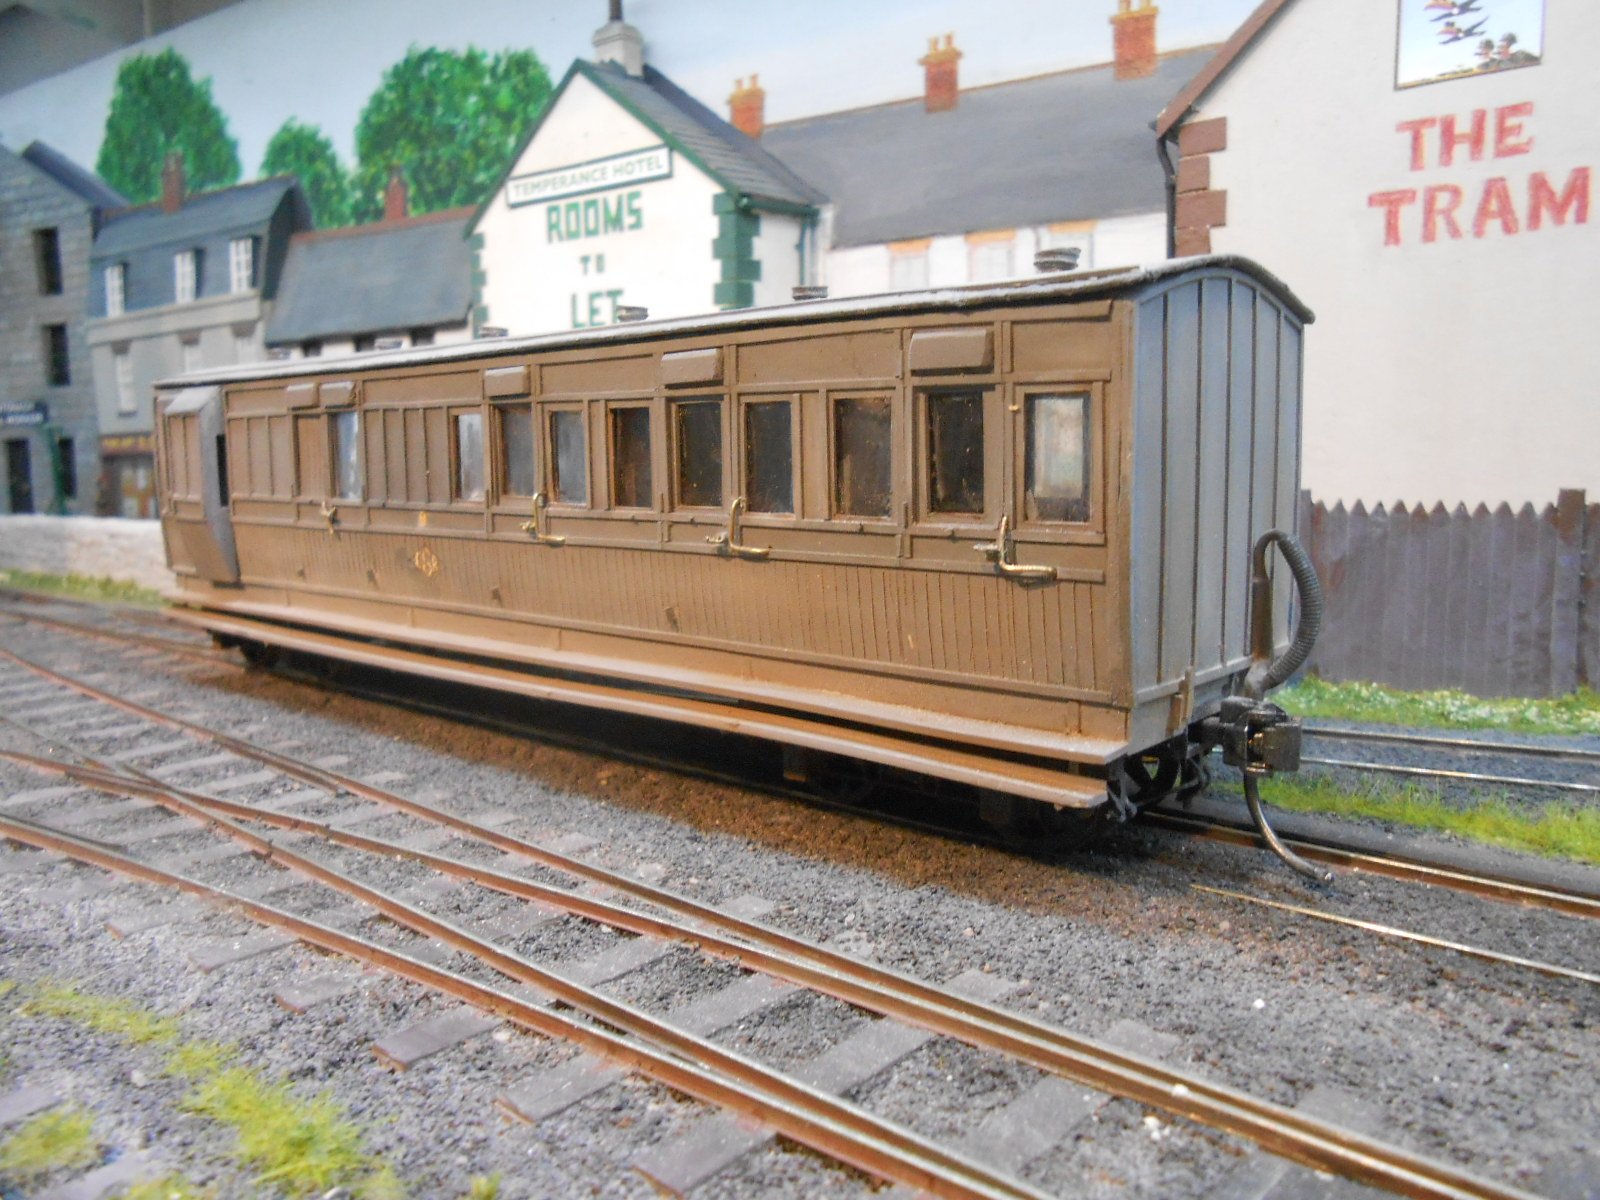
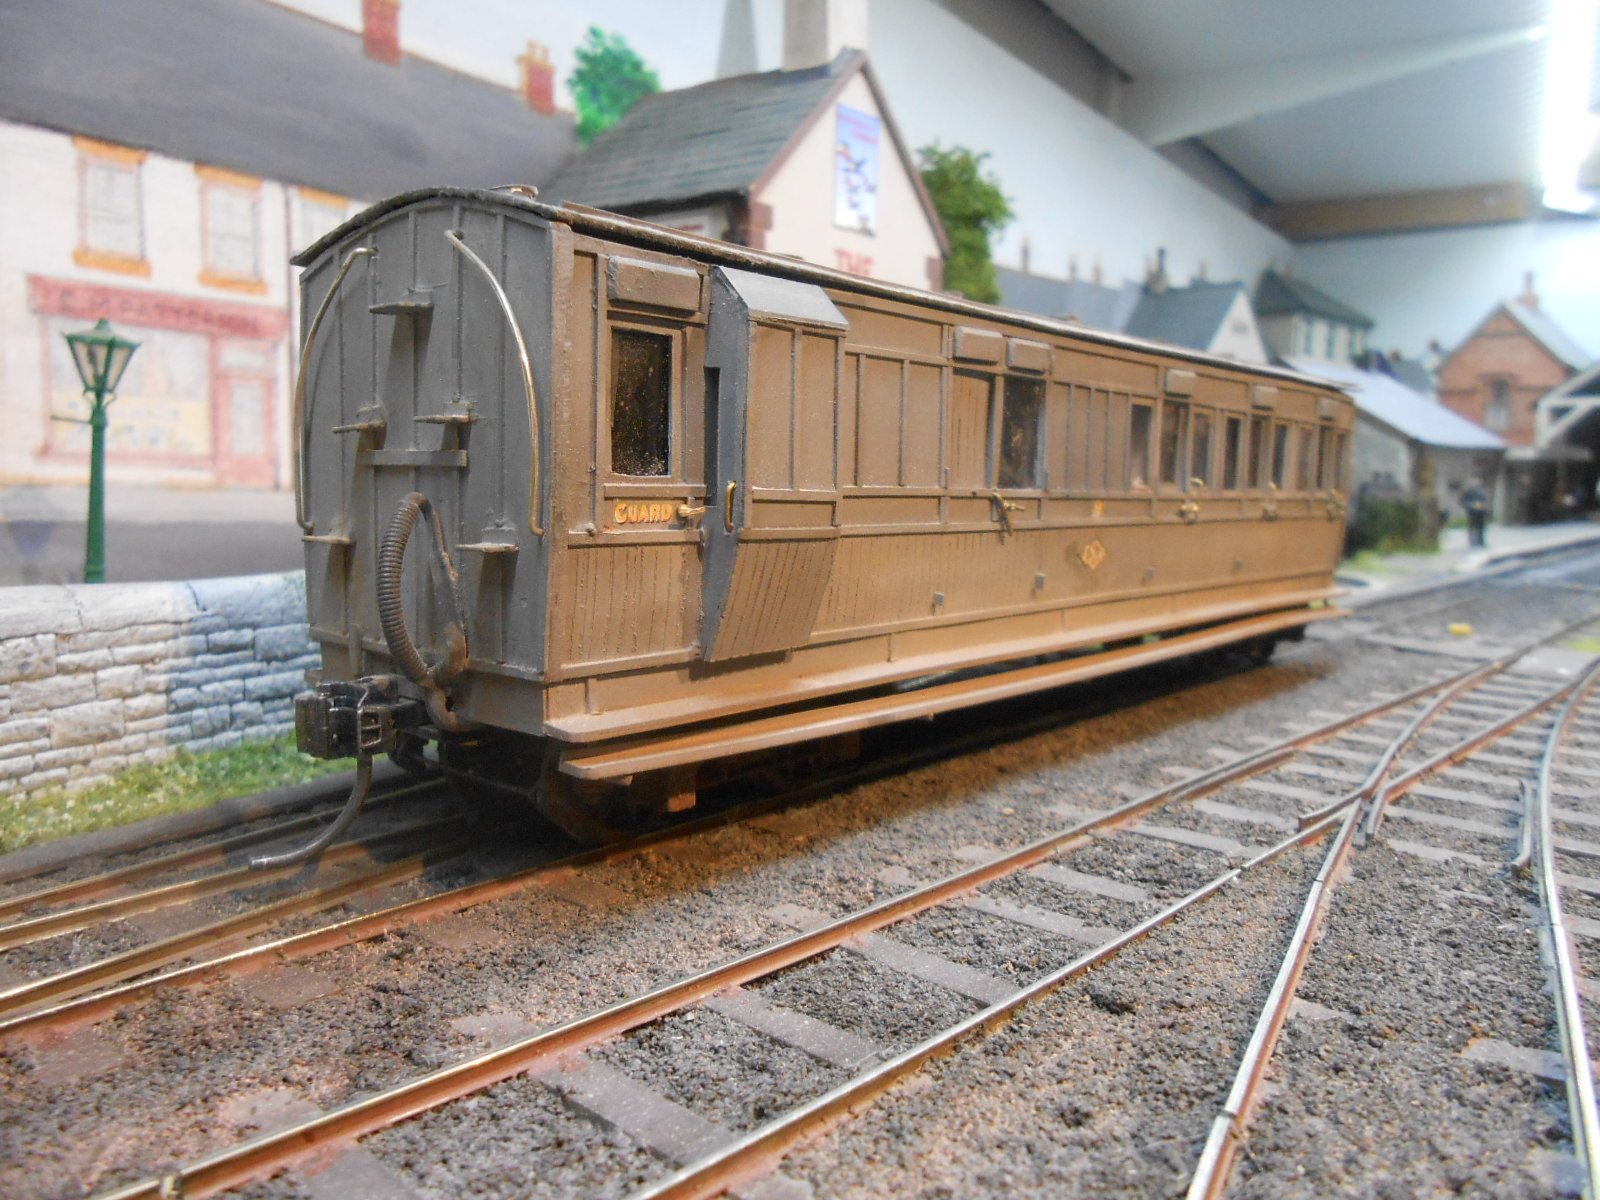
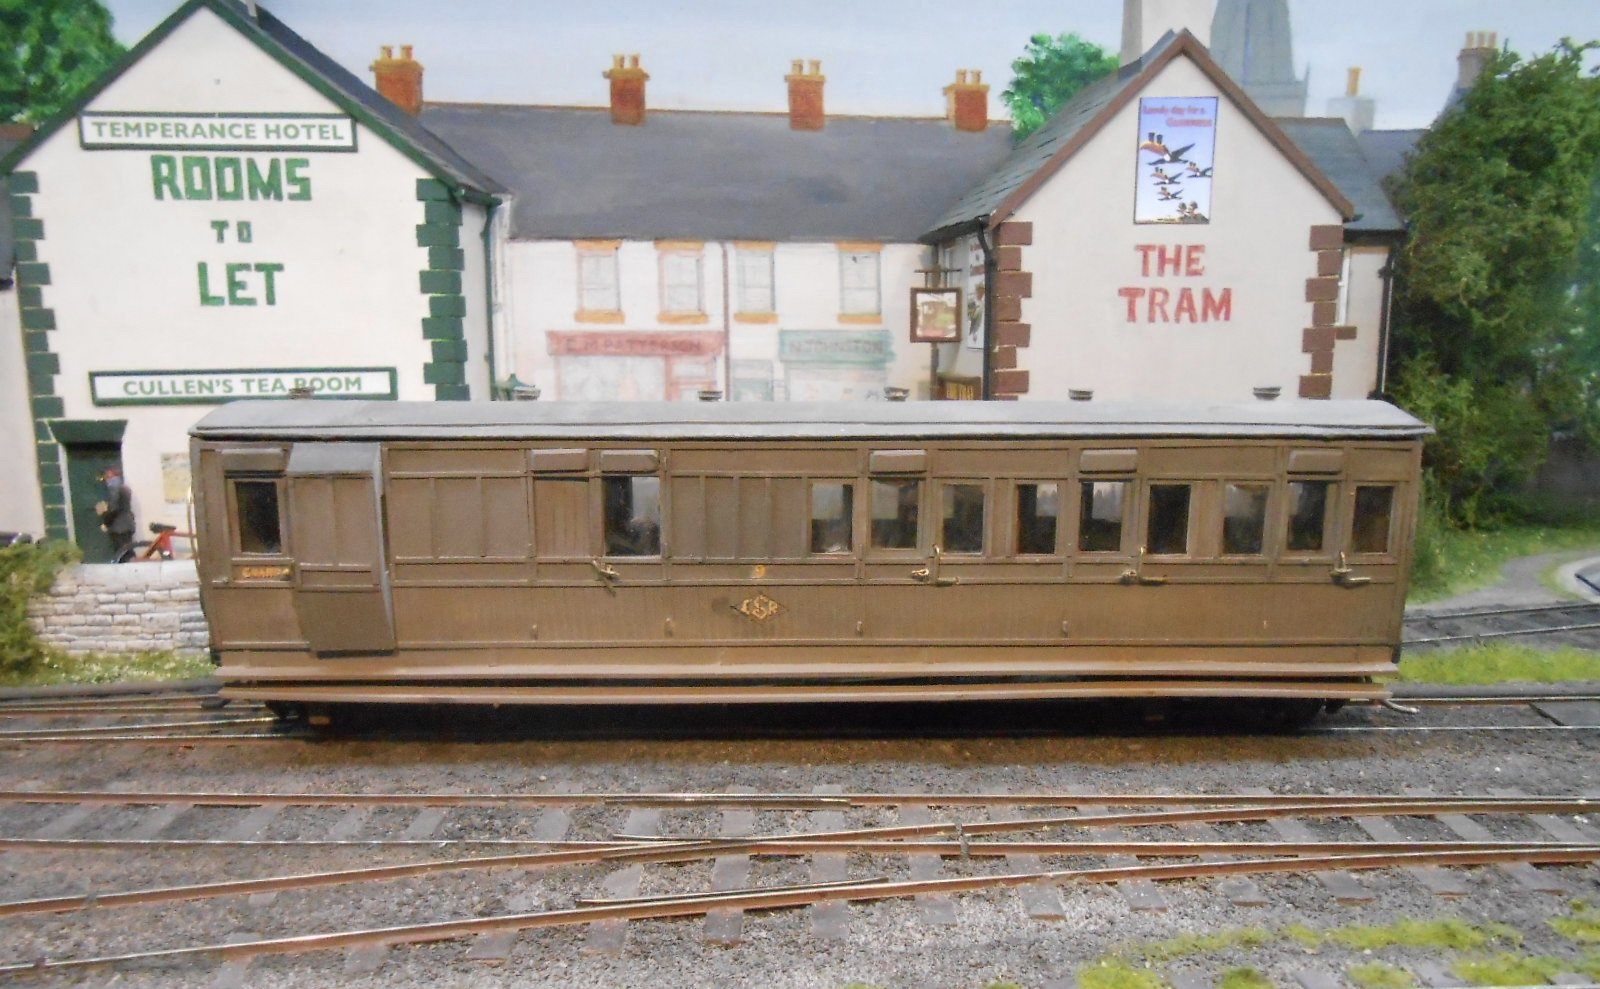
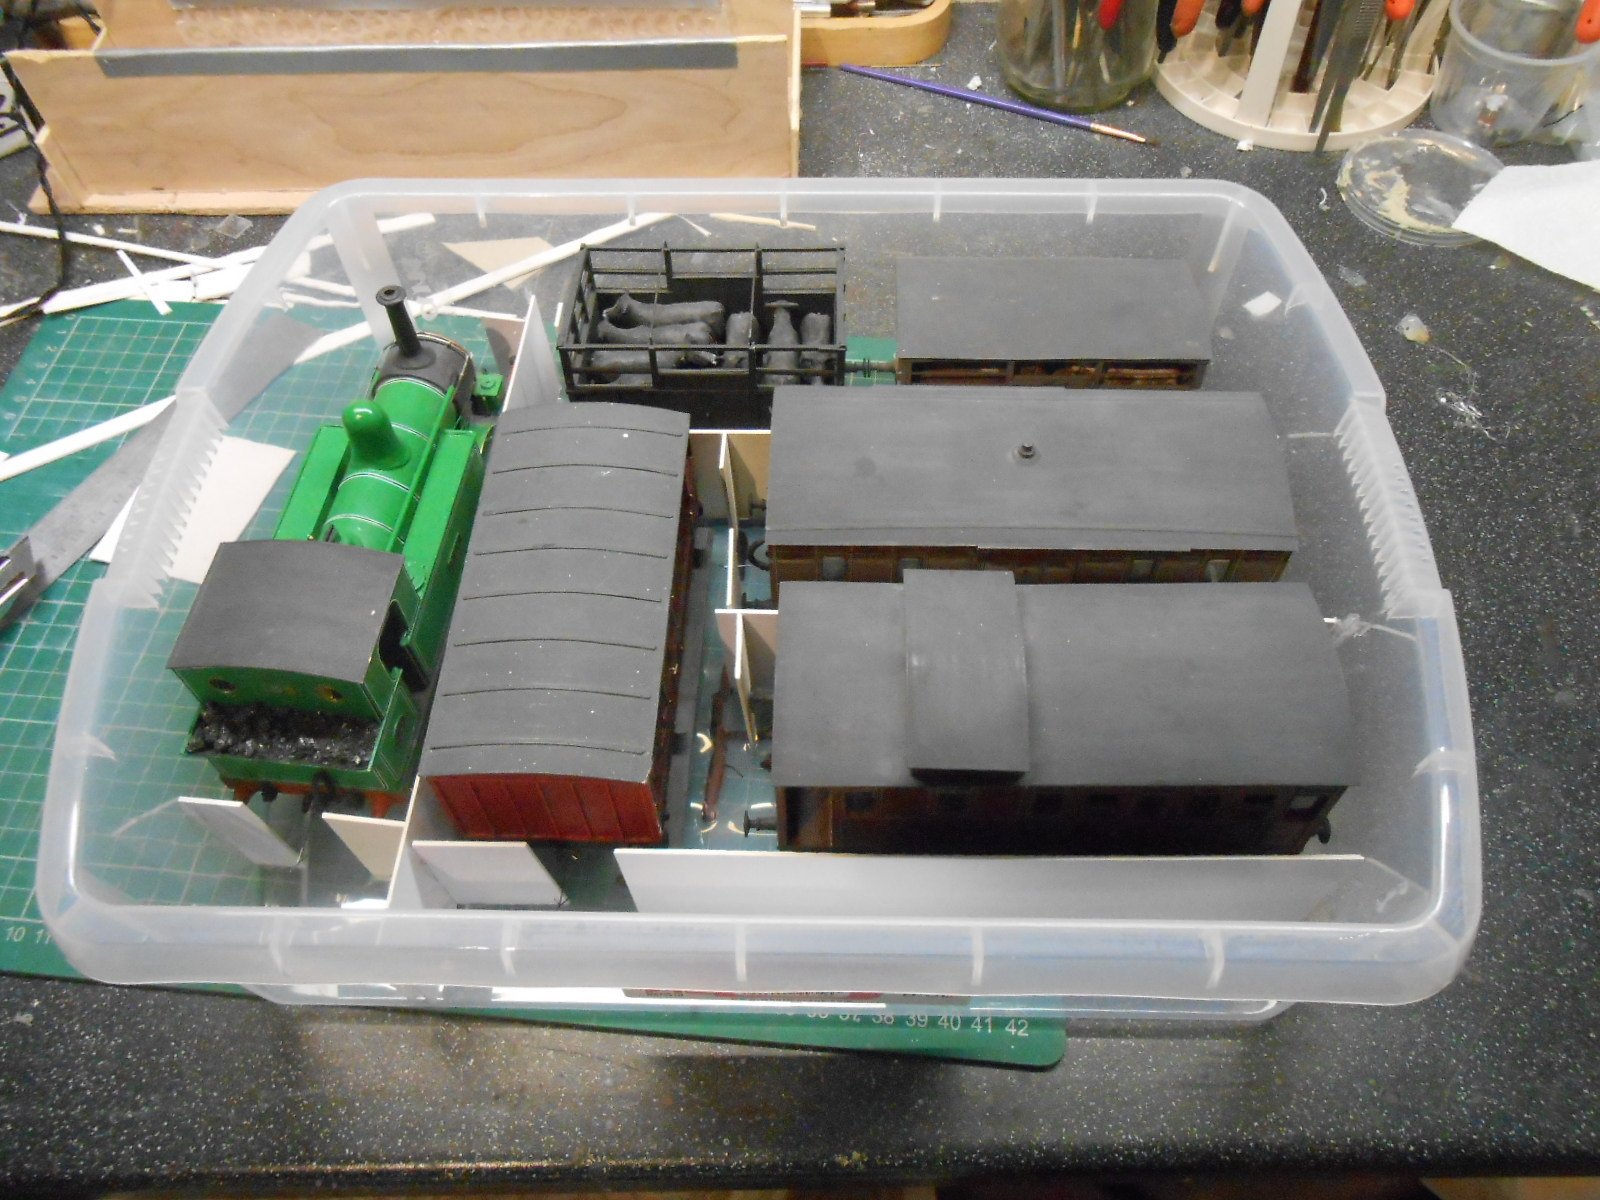
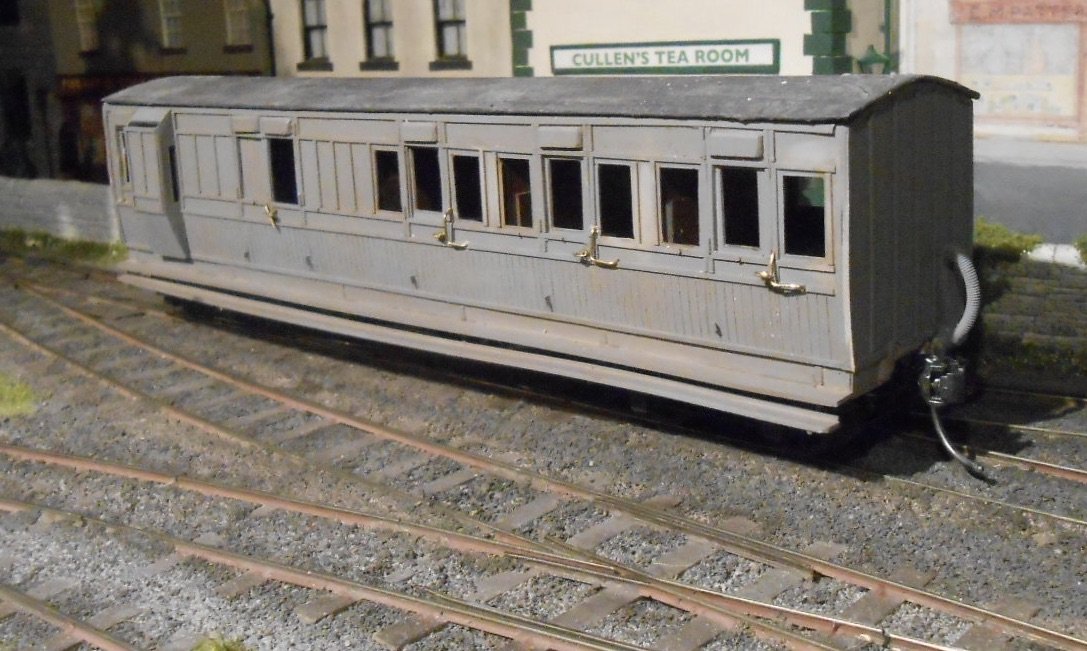
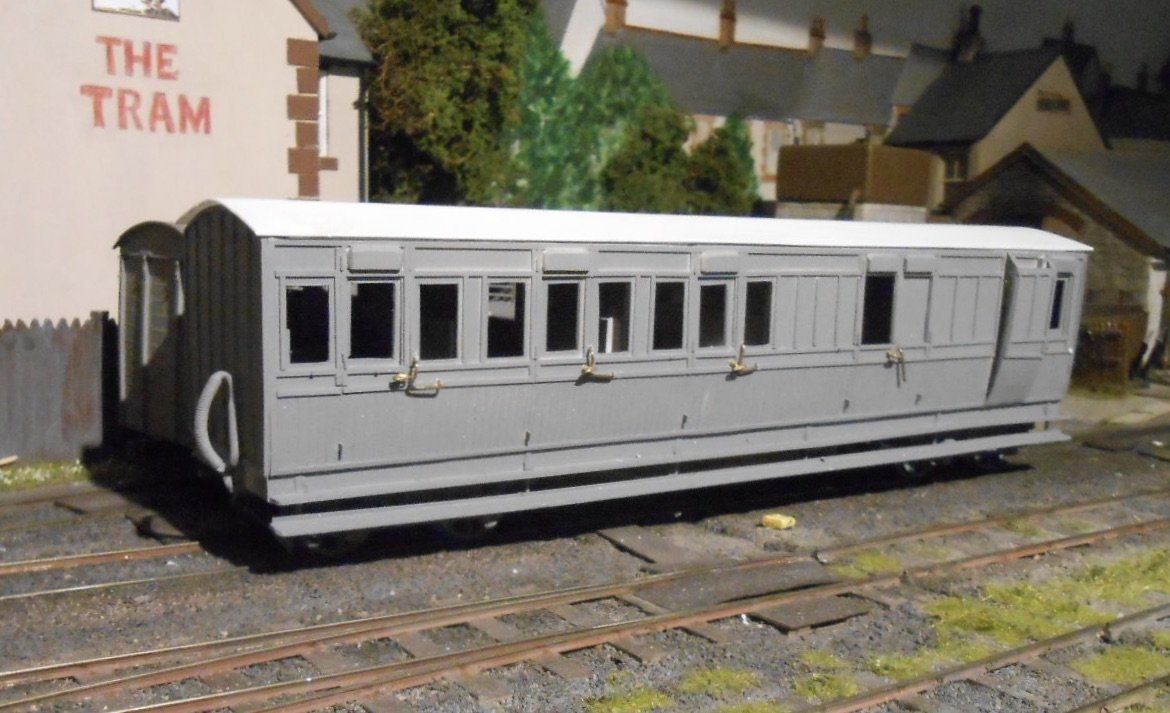
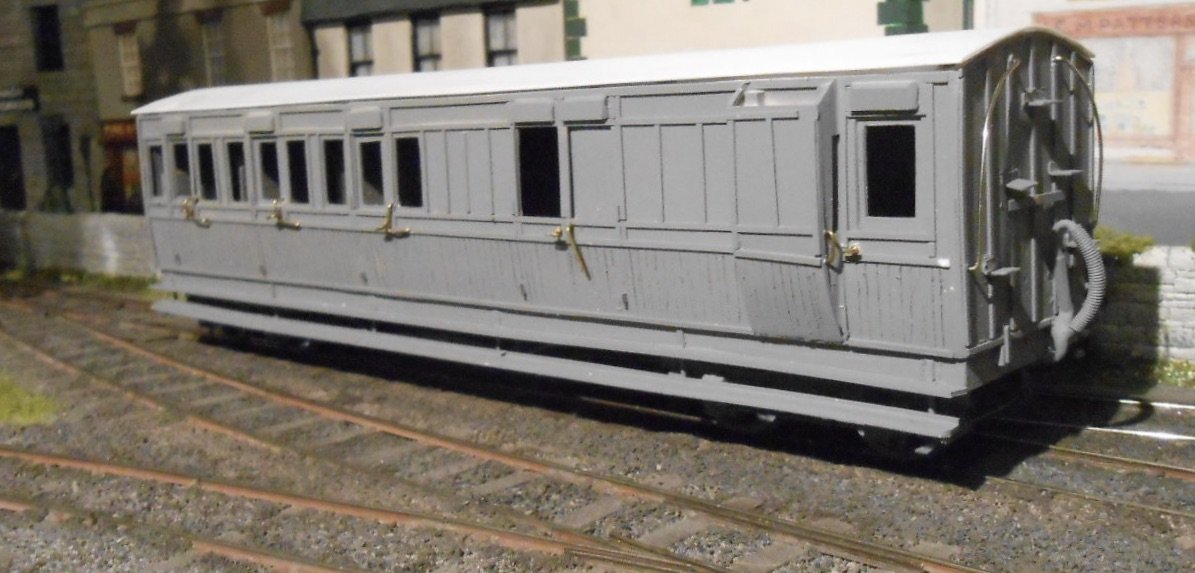
The Swilly coach is now pretty much finished. Final jobs included fitting roofs to the duckets, glazing, plus lettering, numbering and a bit more weathering. At least the Swilly didn't go much on complex liveries for its coaching stock - the diamond logo [hand drawn with various fine marker pens], plus 'guard' at the van end and a number [both transfers] and that's it. I also made some covers for where the lamp tops went after electric lighting was installed. Hopefully it looks suitably care worn. Eventually, it will form the mixed train with a couple of wagons and the Barclay 4-6-0T With another show coming up for NP Quay, decided I ought to improve my stock storage, so invested in some new plastic ones from The Range. Not sure about the Barbie Pink lids, but they mean my stock now stands on its wheels and I can [hopefully] protect the AJ coupling hooks better. I can also fit a complete train in each box, which makes for easier setting up and packing away. The three deeper cardboard boxes contain the station building, the crane and some spare stock if/when required.
-
Northport Quay gets its second outing at the South Hants show next Saturday. Venue is the Admiral Lord Nelson School, 10.30 - 4.30 and will be running the 1900s stock. Nothing after that until second half of next year at the moment, though should be a few coming up, post Uckfield.
-
What Scale Do You Model Irish Railways In?
David Holman replied to DJ Dangerous's topic in General Chat
7mm scale but 36.75mm gauge and 21mm for 3'ng. I sometimes wonder how many folk actually model 5'3 in each scale. Take 7mm scale: Slater's do a broad gauge loco axle and Donegal wheels, but the evidence of this forum suggests that, apart from myself and Galteemore, they don't have many customers! We seem to have Angus doing 2mm and Broadstone in S, while 4mm scale is probably still in single figures - I can think of four. Then there is Ballyconnell Road in 3mmfs. Not that it matters, there are great things being done in the more commercial scale/gauge combinations, but it would be nice to know who else is out there. -
Mail order parcels have been arriving this week, albeit not quite in the order I expected, but welcome nevertheless. First in was a pack of Kadee 0 gauge couplings. Fintonagh stock uses No5s, but these are too small for the 2'7" Donegal and Swilly rolling stock wheels, so have had to go for the larger ones. Had been thinking about using Alex Jacksons, but these need standard side buffers, whereas narrow gauge favours centre 'chopper' couplings, so Kadees seemed the only option. They are quite chunky, but certainly work in terms of height, though being American, key dimensions are in fractions of an inch. The gap between the the bottom of the dropper wire and the rails is 1/16th of an inch, but the top of the drag box has to be 25/32", so making a simple gauge or three seems the best option, the simplest of which is a piece of 60 thou plastic sheet, which is as near as dammit to 1/16th" A bit of weathering and painting has been done - in the case of the roof, after receiving a couple of layers of tissue paper to simulate the canvas covering. Another parcel was from Worsley Works. I hadn't been expecting the Barclay 4-6-0T etchings for several weeks, so it was a nice surprise. Worsley etches are very much an aid to scratch building and certainly NOT kits, because there are no castings, or indeed instructions, so working out what some of the parts are often requires a bit of thought, while you also need to compile a list of all the additional items required, such as chimney, dome, safety valves, handrail wire and other details, plus of course the chassis too. Speaking of which, am still waiting for the wheels from Alan Gibson, ordered at the same time as the Worsley etches... Anyway, I think I've identified the parts - side tanks, cab, footplate [& valances], smokebox saddle and sand boxes being fairly obvious. Less sure about how the boiler works, or indeed the smokebox wrapper, while the inner sides of the tanks are just one of the things I'll need to make, but overall, the etches represent a very helpful start.
-
Remains my favourite scene - something to do with the lighting and the wet looking ground.
-
Exquisite. Shouldn't be allowed, really...
-
Simple, inside cylinders, straight (ish) footplate - ought to be easy! Until you look more closely that is... Not hard to see the challenges, but certainly looking good and well worth the effort.
-
Indeed! Just been reading it. Interesting that he used just the outside frames.
-
A varied and eclectic library too, by the look of it!
-
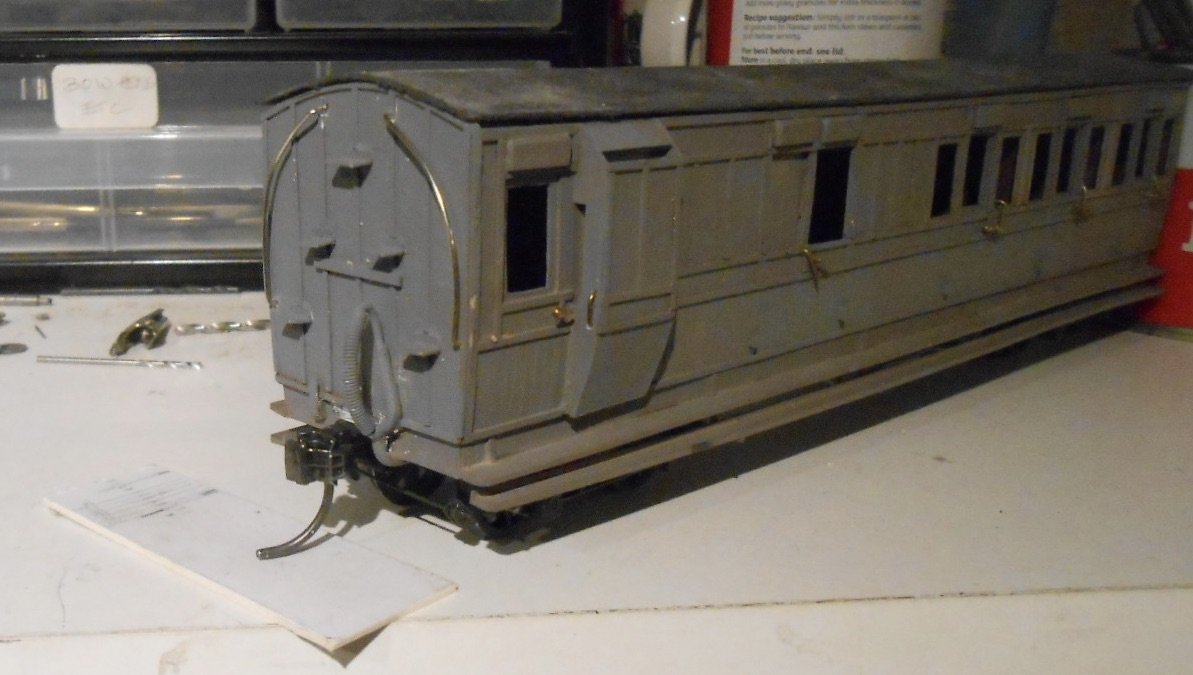
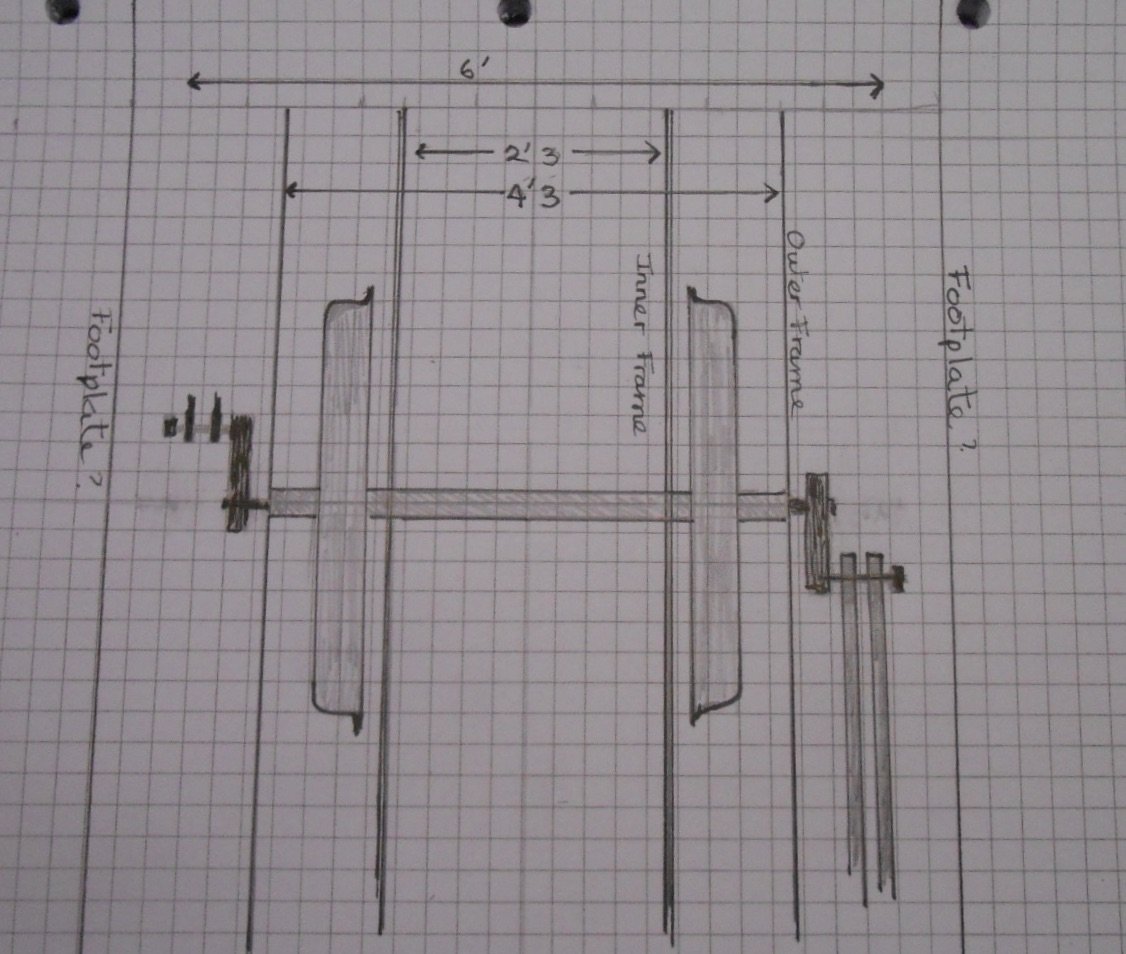
Narrow gauge continues on two fronts, albeit one more theory than practice at the moment. In the practical world, the Swilly brake third is making progress, though as is the way with coach building, it is as well not to get ahead of yourself too much. The coach had reached the stage where I could give it a coat of primer. I'd made a removable roof assembly & added basic interior seating detail [not sure the Swilly went much further!], so after a bit of a wash and brush up, out came the Halford's rattle can primer. This first witness coat showed a few areas needing attention, but as you can see from the second picture, a piece of beading on the guard's ducket is still slightly askew. After a few hours drying time, decided it was worth having a go at a bit more detailing. I'd already added representation of the door hinges [20thou plastic rod for the top two, 40x40 square of 20thou for the lower hinge], so next up were the varied door and grab handles. The former are ok, but the various grab handles are certainly not my favourite task - fiddly to say the least, with other, less polite, adjectives applicable too - especially the multiple bends for the door commode handles. Speaking of fiddly, I'd also added some [very] basic brake gear to the outer ends of each bogie. Not worth doing any more because the footboards hide much of what is below sole bar level. The upper footboards are just strips of 40thou plasticard, welded straight on to the sole bar, but the lower ones needed brackets made from 0.7mm brass wire, bent into an L shape. I flattened the top end using a hammer & small anvil, before glueing in place with cyano. It could be that the primer may end up being the top coat as well. In its latter days, Swilly coaches were grey, which it seems often weathered to an even lighter shade - along with a fair amount of dirt too, so once final detailing has been applied, it may be straight to the weathering bit. As far the Barclay 4-6-0T project is concerned, this remains in the planning stage at the moment. It certainly seems important to have a set of inside frames, with the outside ones being dummy. Swilly stock was about 7 feet wide, so I've been trying to work out all the clearances for the chassis. Therefore have been making some actual and large sized drawings to help visualise things. At the moment, using Slater's wagon axles seems about right. 3' gauge wheels work out as a scale 3' 6 wide overall. Therefore setting the frame spacers at 2'3 should give a scale one foot of space between the inner and outer frames. The latter, if set at 4'3 apart is also the distance between the ends of the Slater's 1/8th inch wagon axles. The actual wagon wheels are pushed on to smaller diameter extensions & these will hopefully take the crank axles. By the time coupling and connecting rods, plus the fixing nuts are added, the overall width stretches to about a scale 6'6, which seems about right under a 7' wide footplate., as shown below. Much as I'm keen to make a start, it probably makes sense to finish the coach first.