David Holman
-
Posts
4,359 -
Joined
-
Last visited
-
Days Won
117
Content Type
Profiles
Forums
Events
Gallery
Blogs
Everything posted by David Holman
-
Likewise! These days, when I go into Currys, I find that that not only do I not understand what I'm looking at, I actually don't care much either. Equally, I certainly applaud the 3D printers, because am always impressed with anything I cannot currently do. However, this bit of old school modelling shows what can be done and is all about breaking a component down into basic shapes and going from there. Love it!
-
Yep, good fun. Creating that world where our modelling resides definitely enriches satisfaction and helps bring the model to life.
-
Thanks folks - much of what I do is inspired by everyone else on this forum.
-
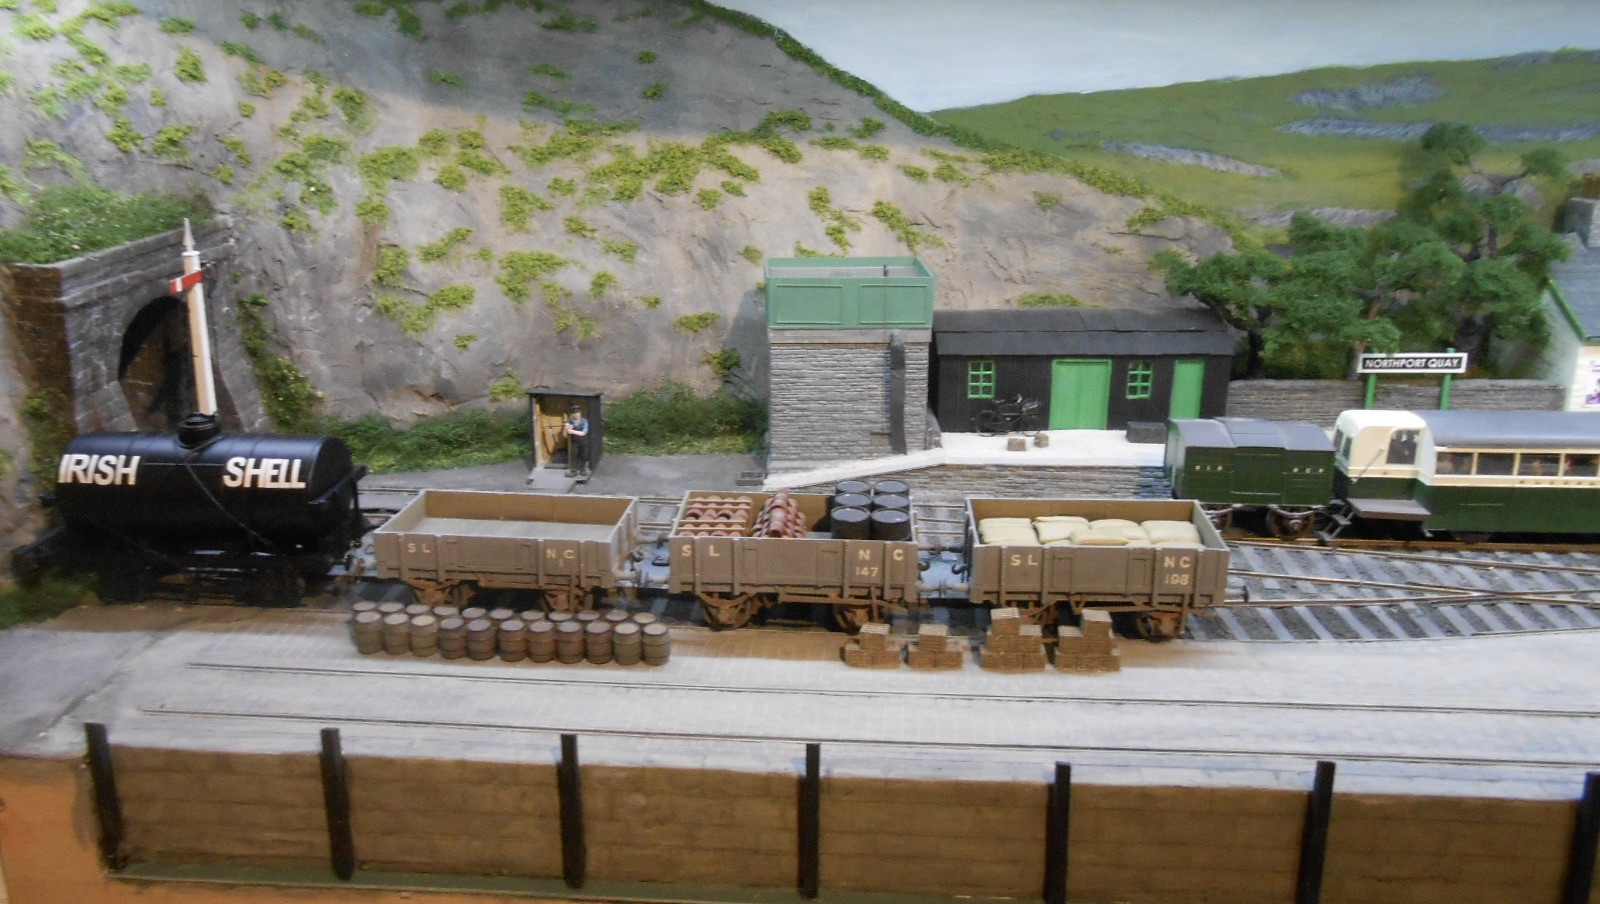
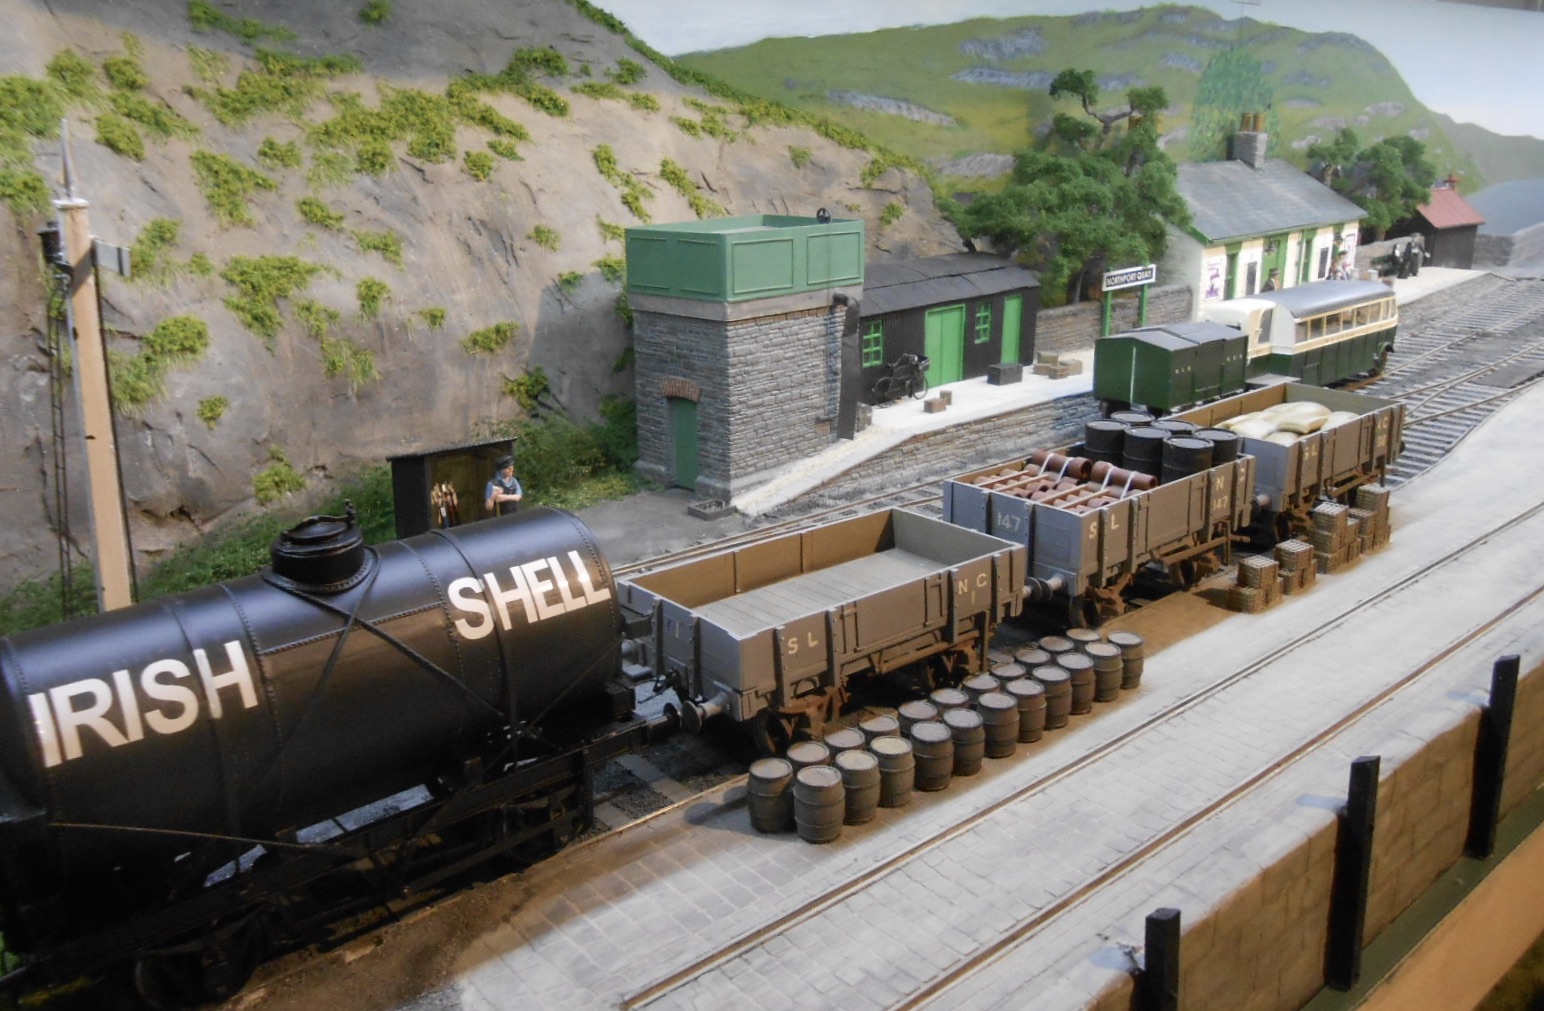
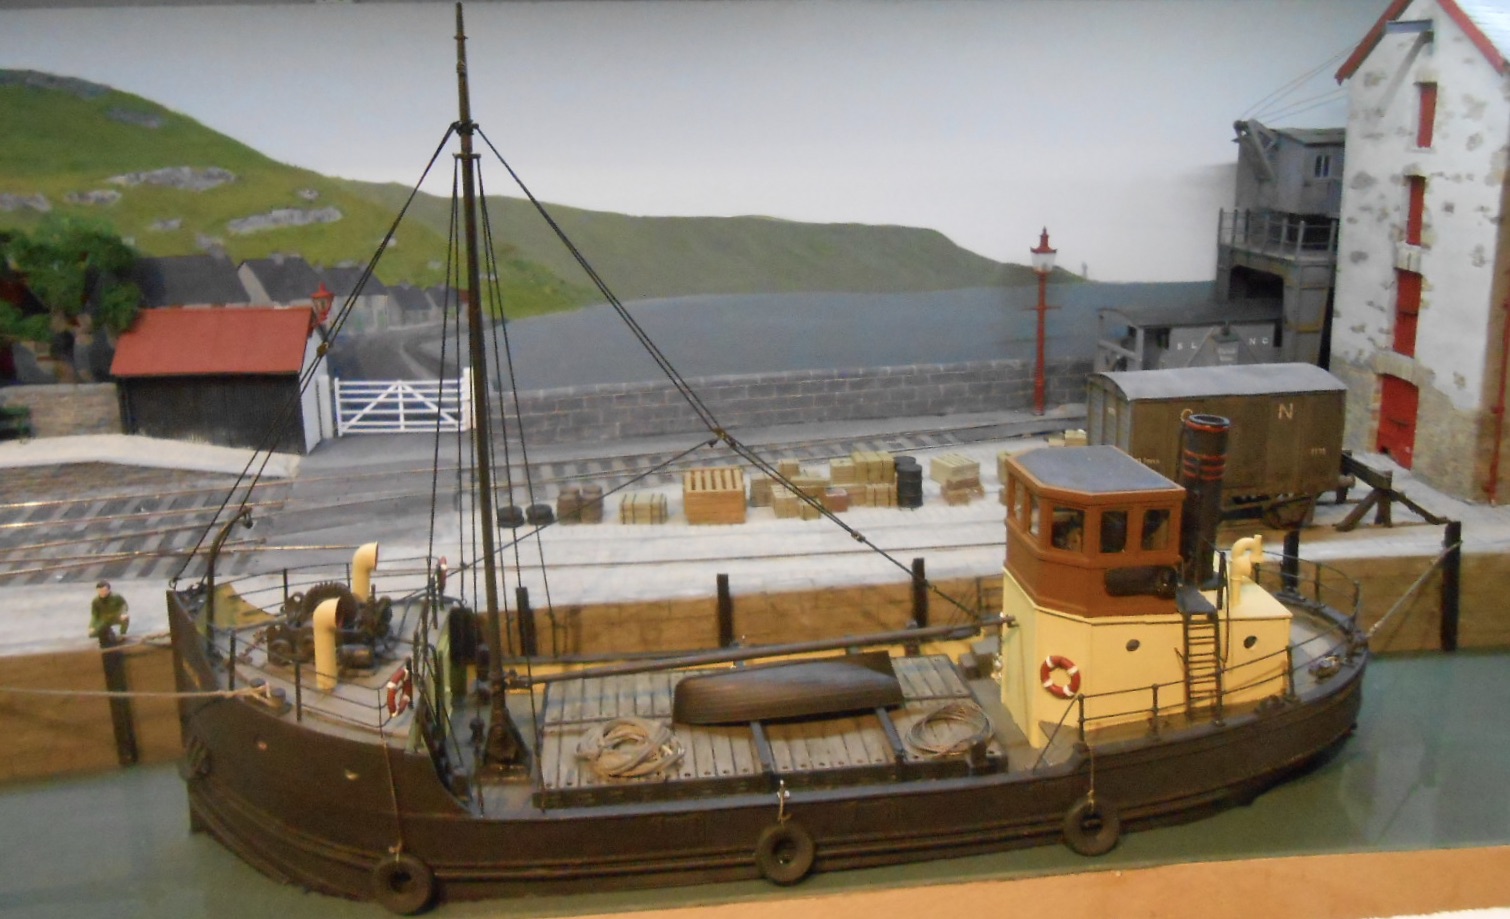
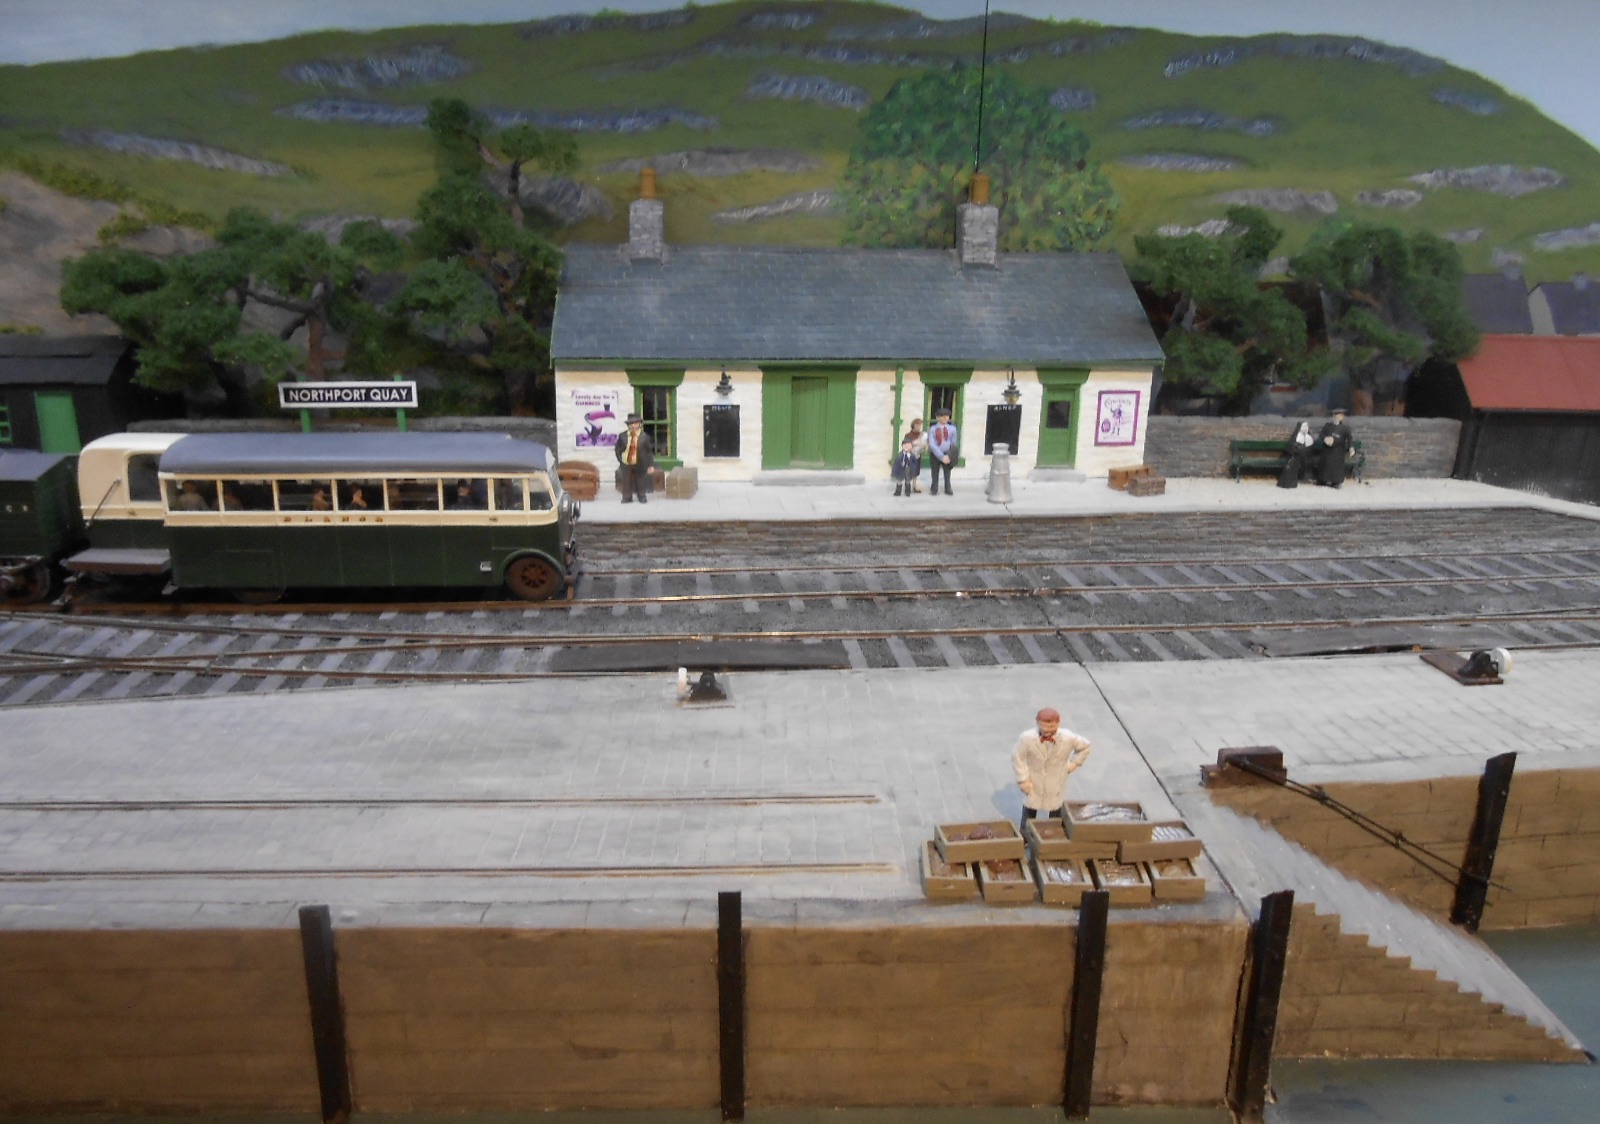
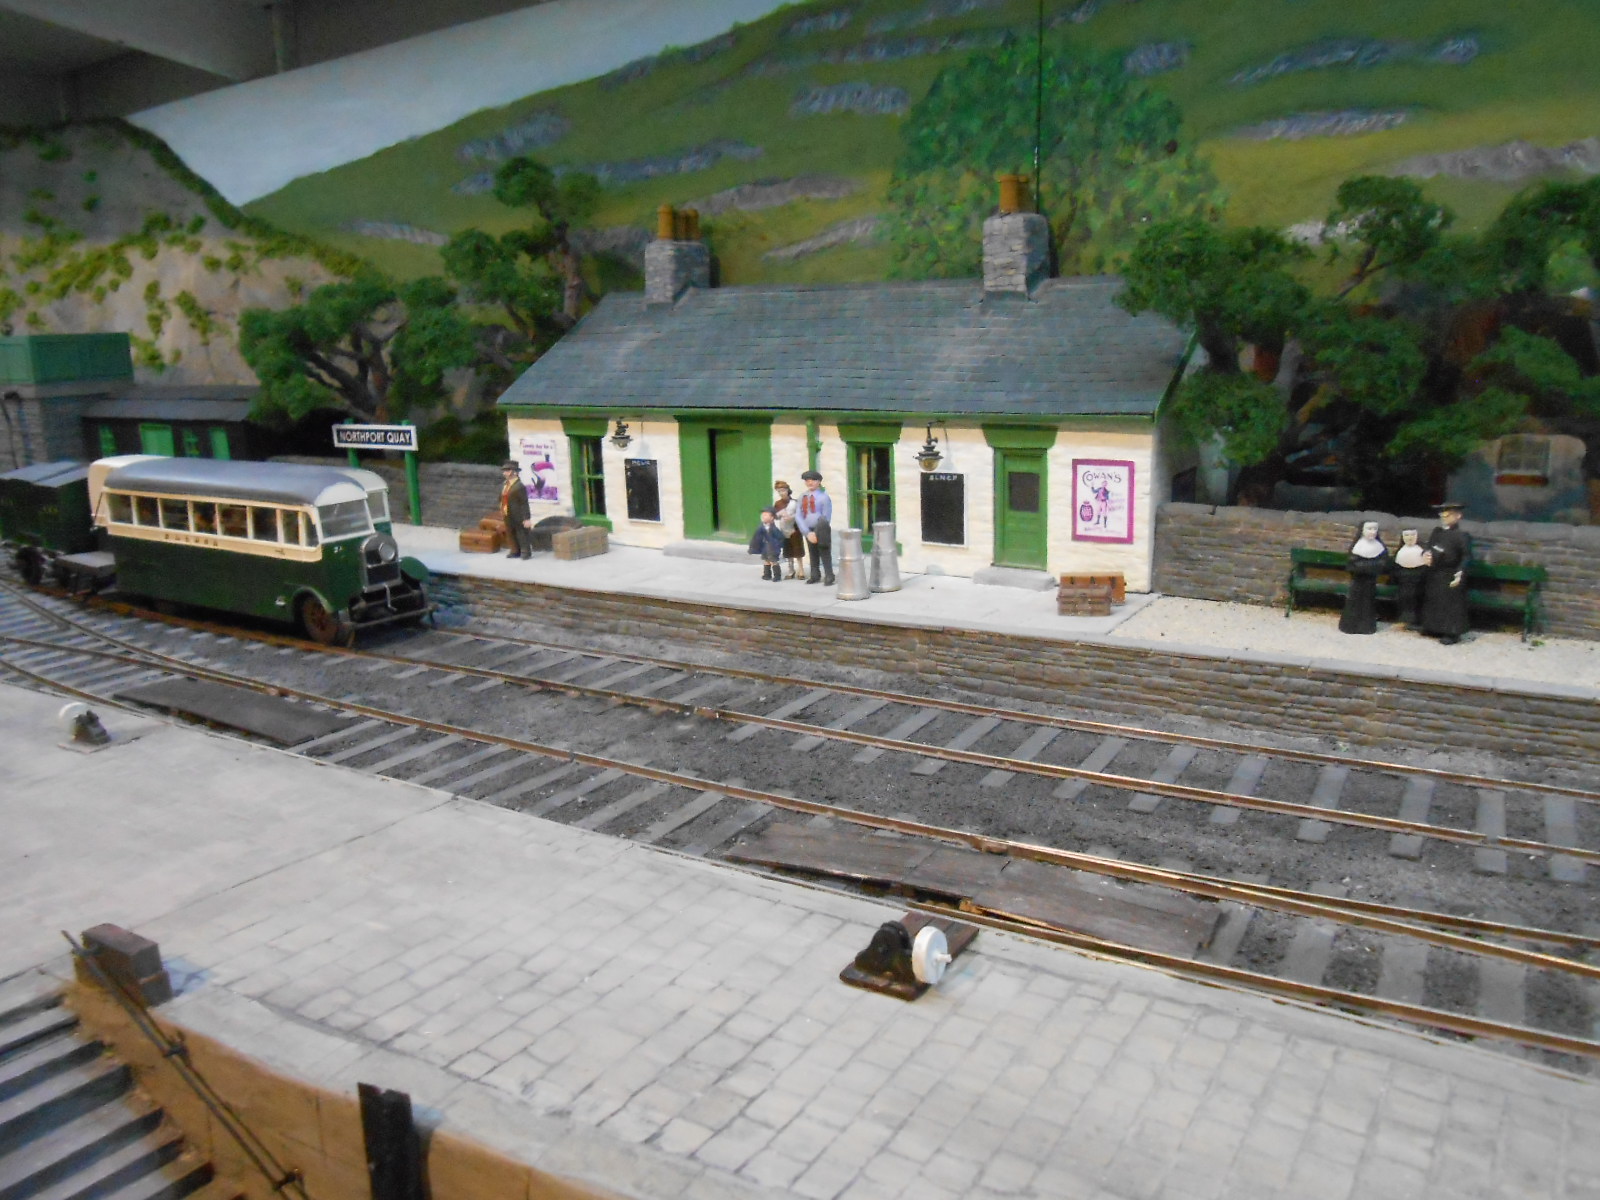
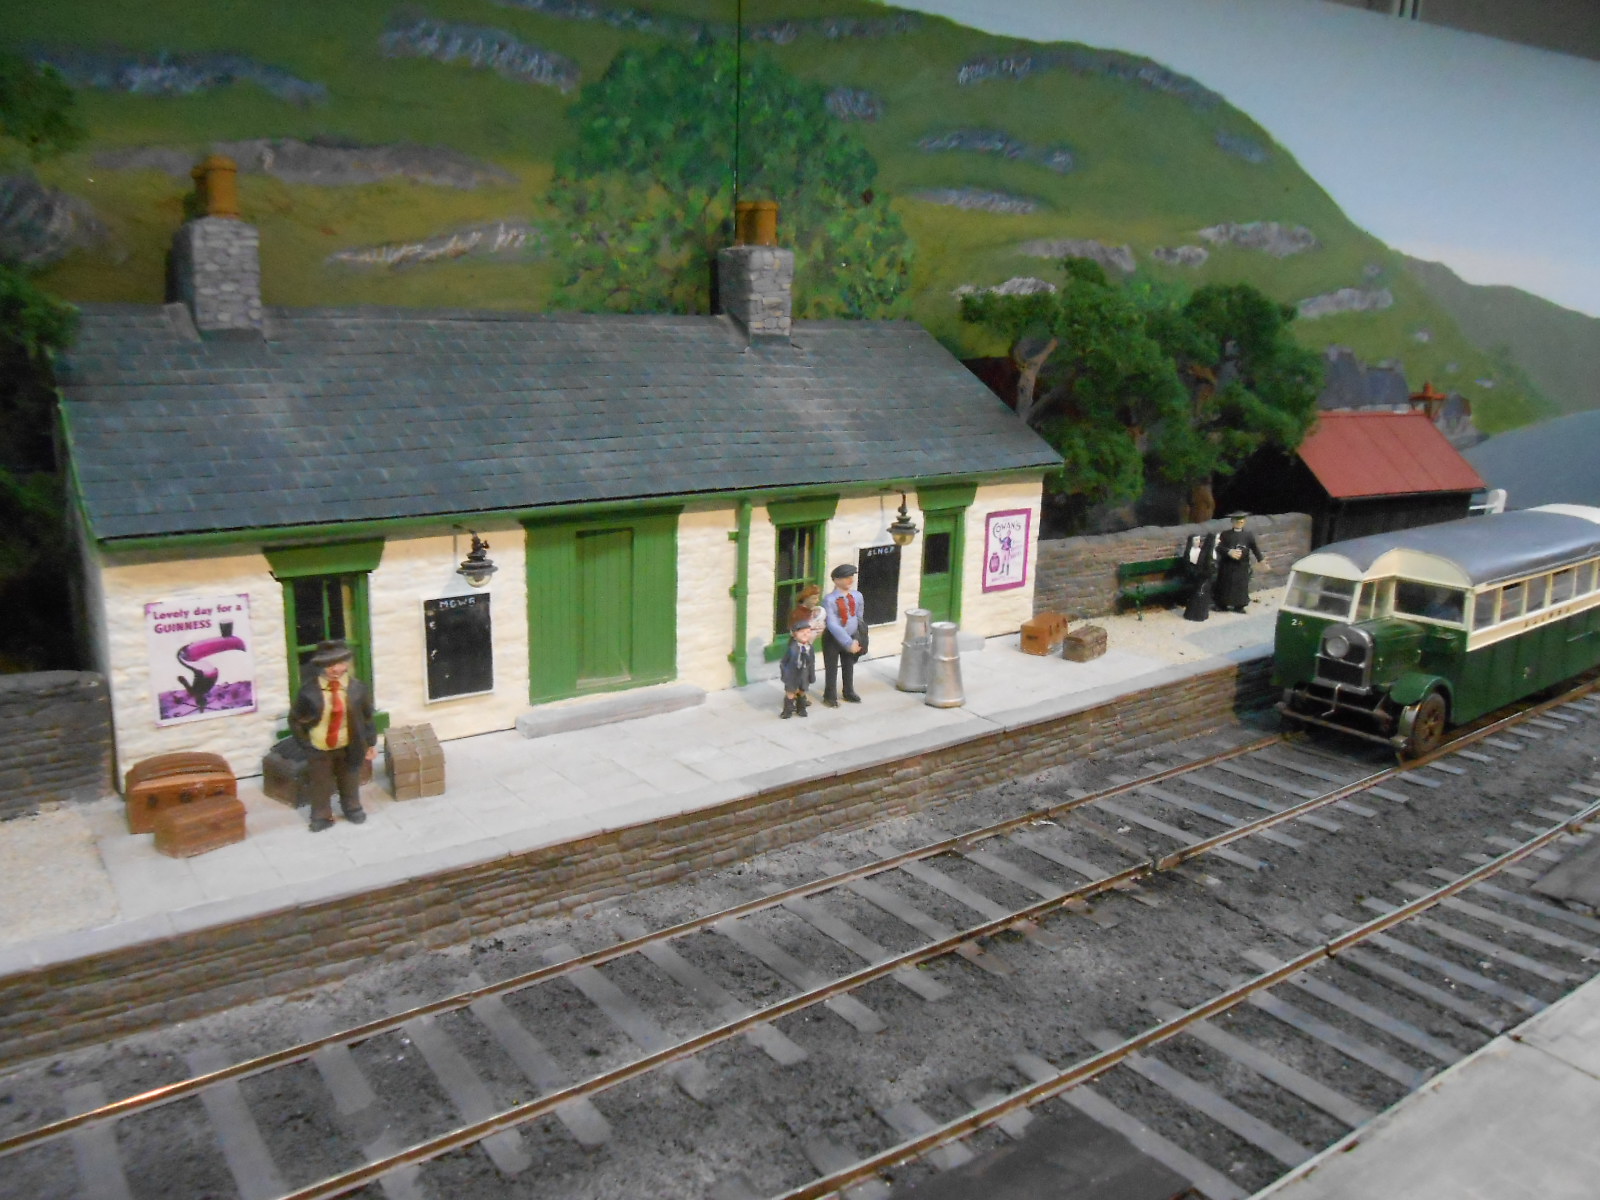
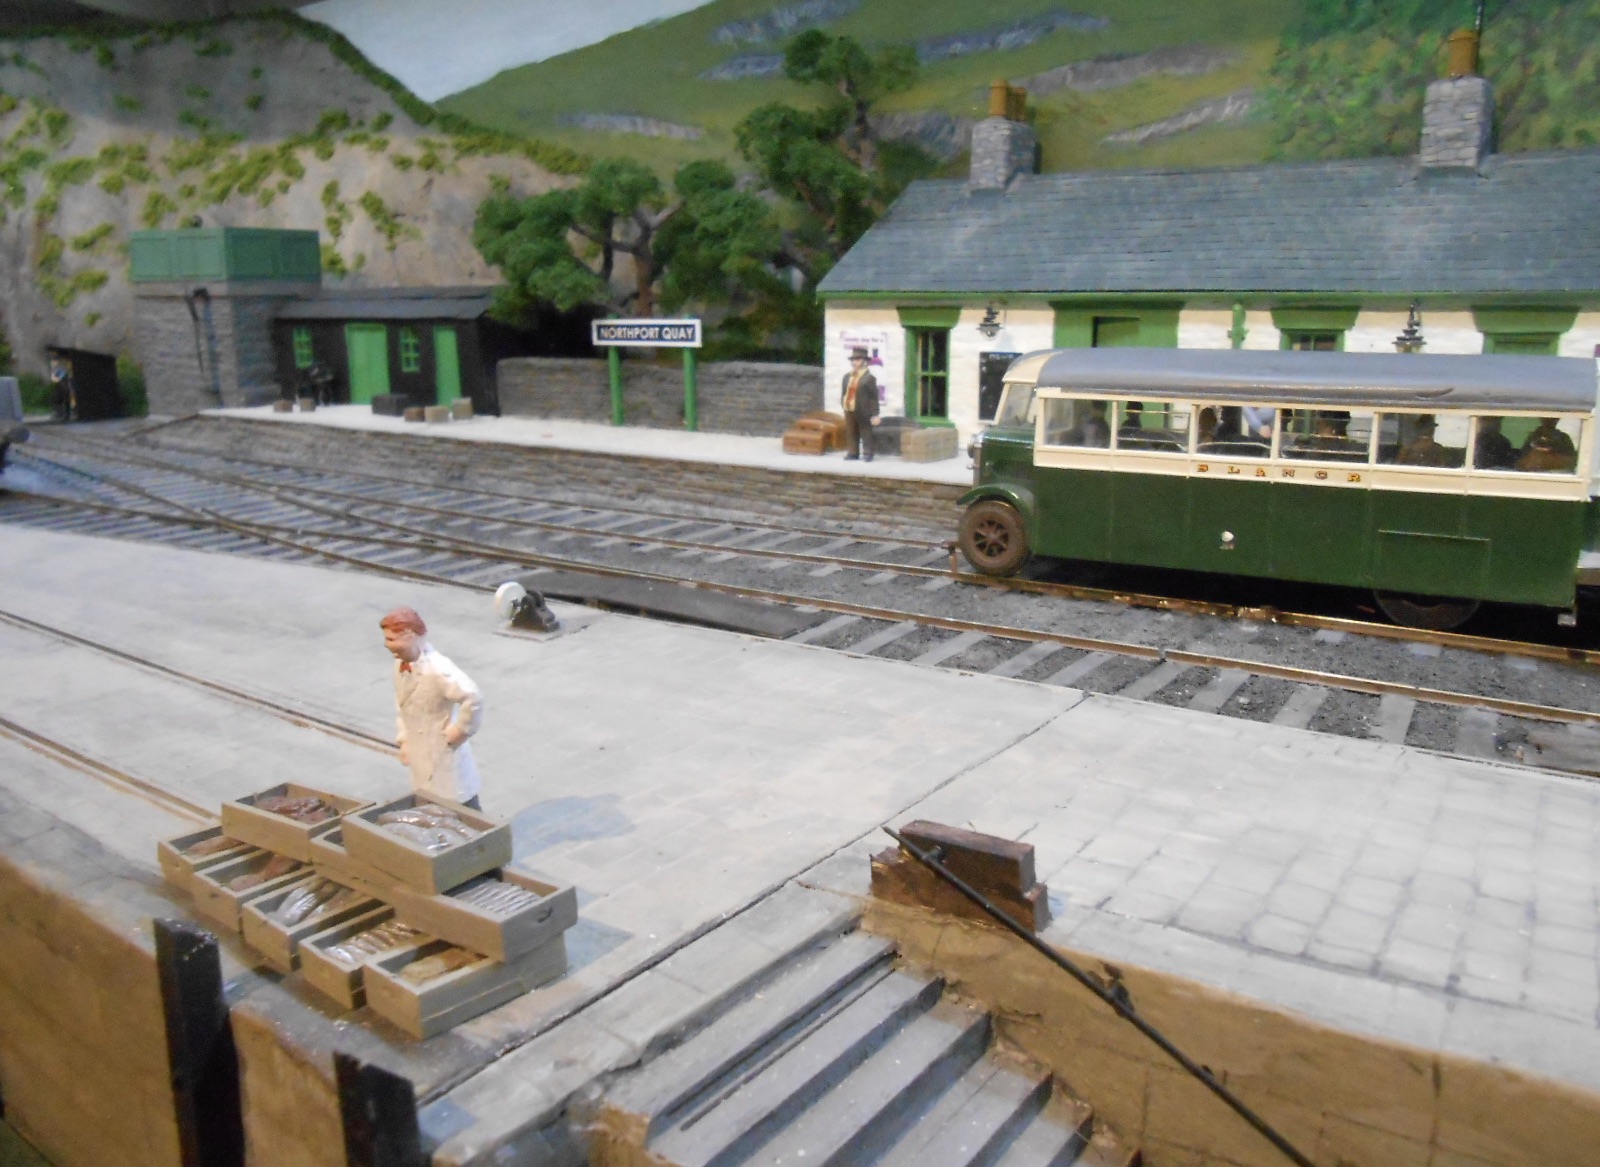
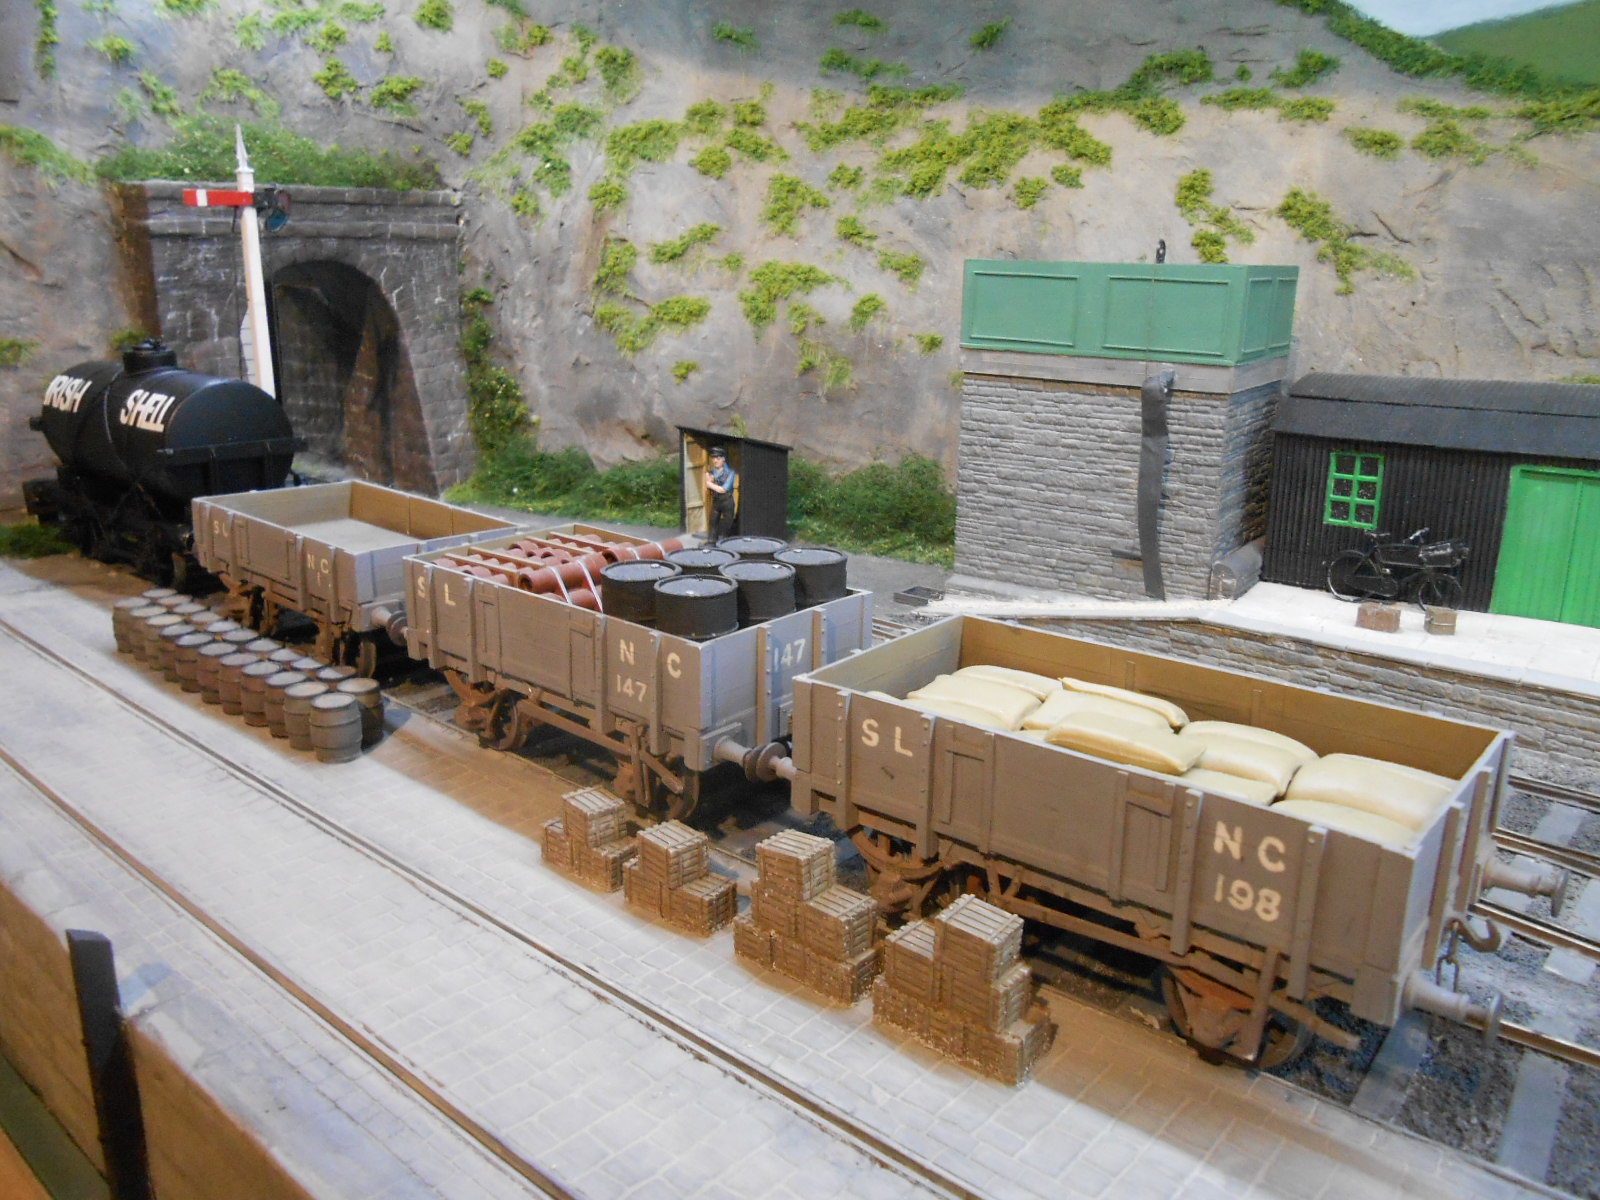
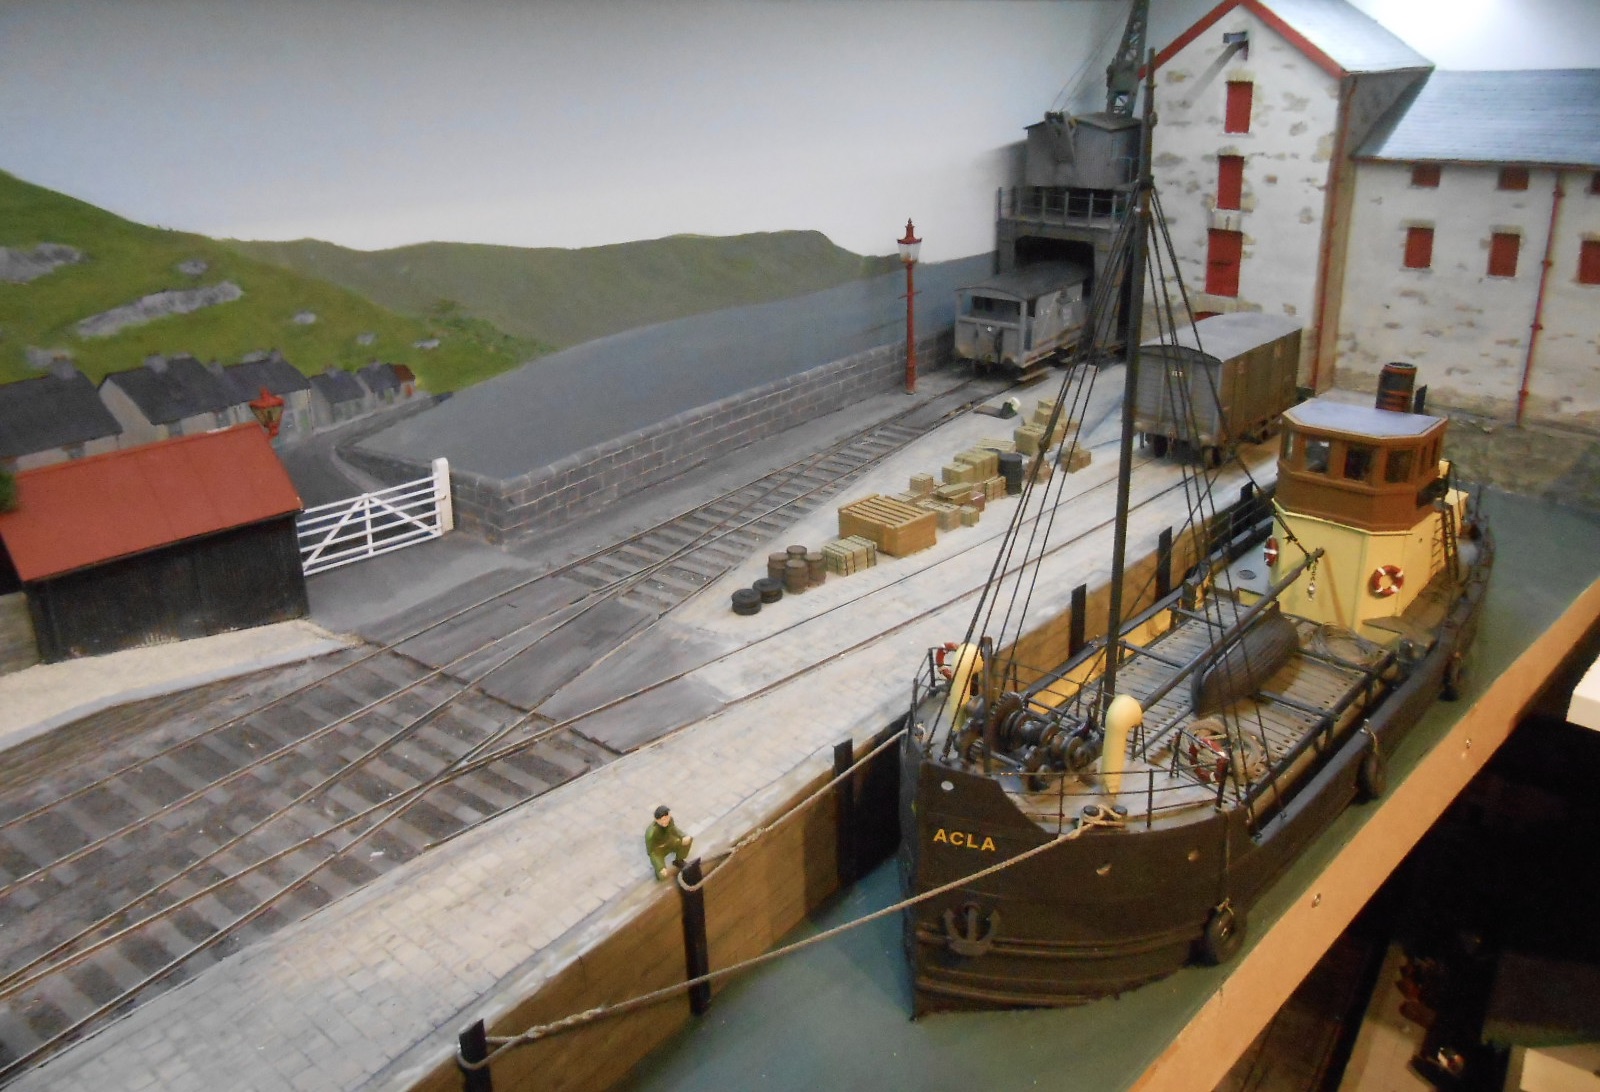
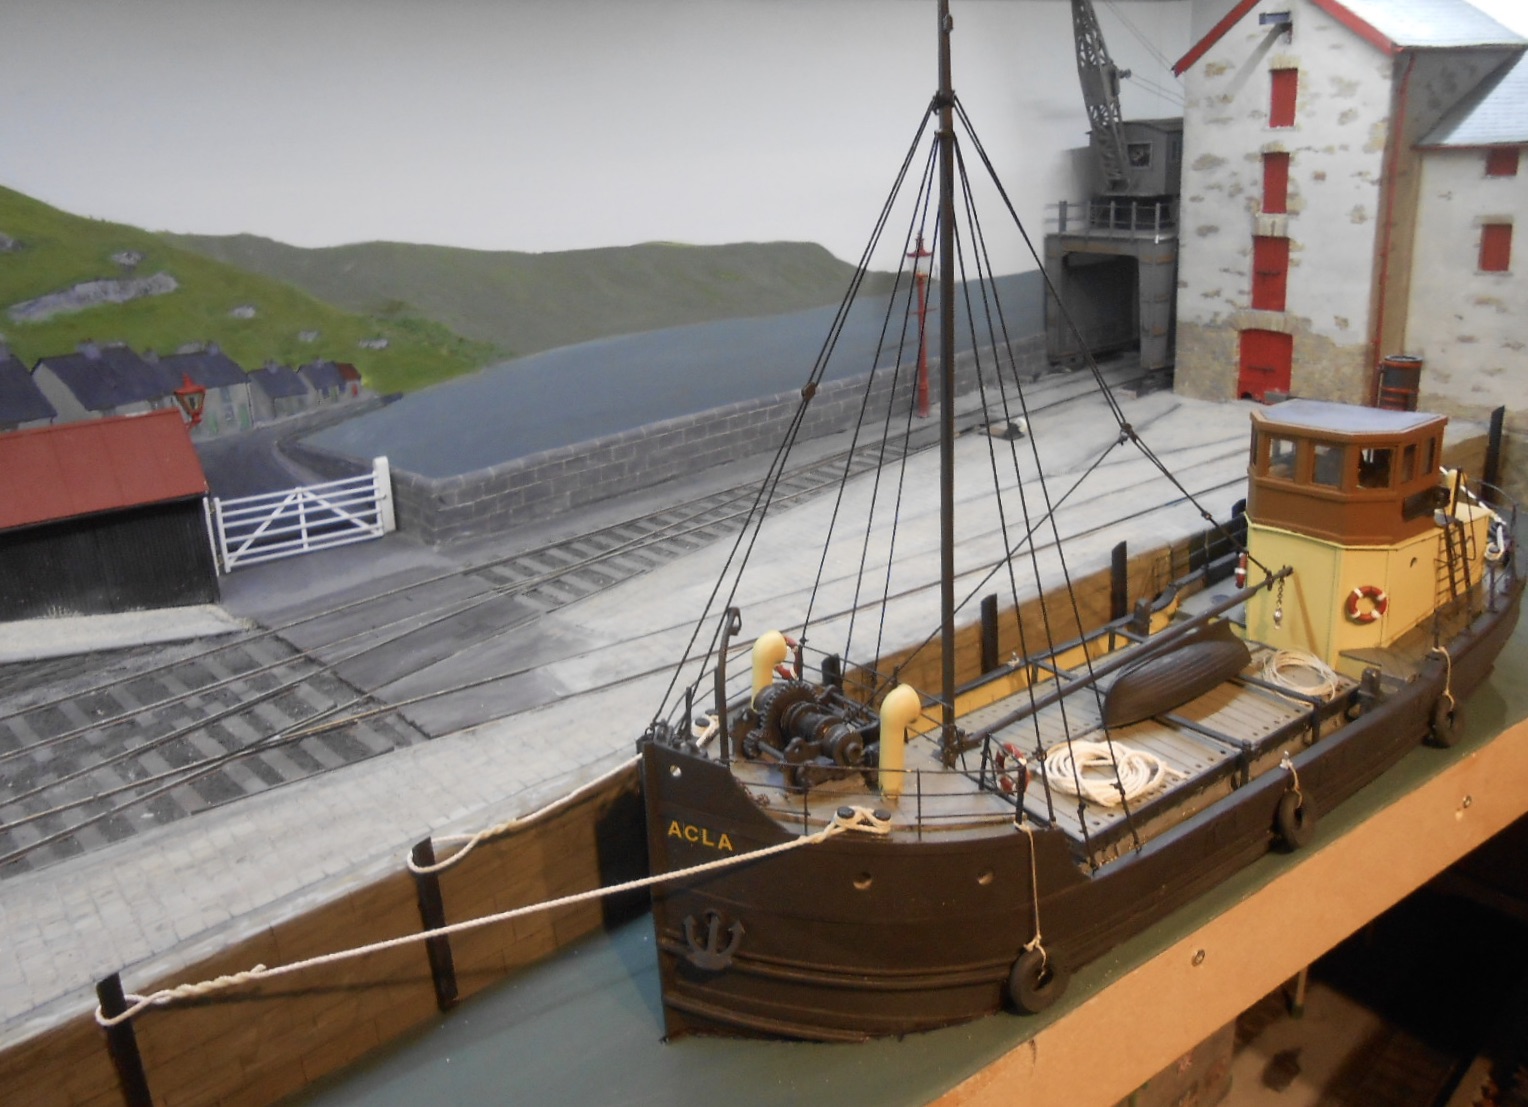
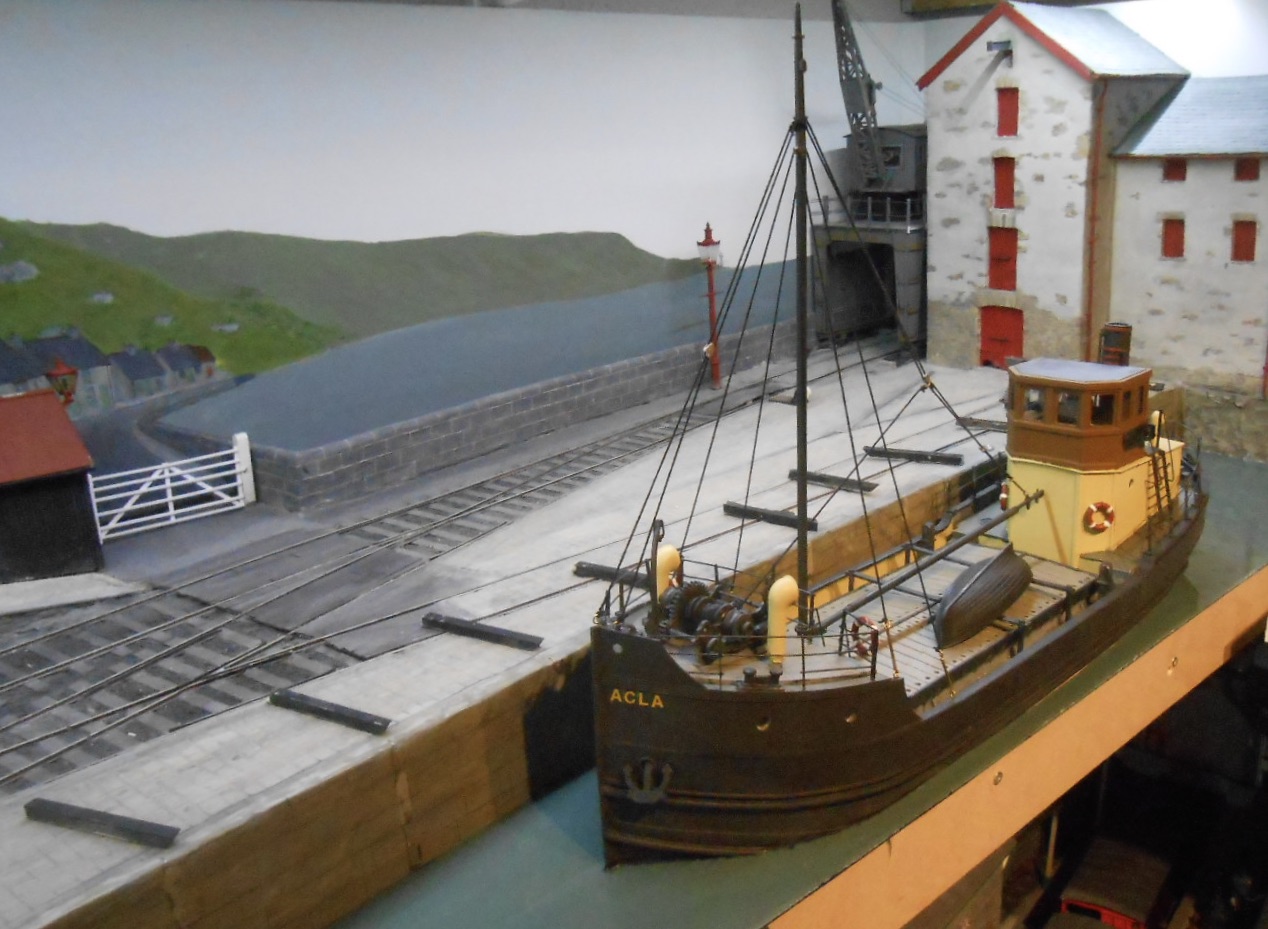
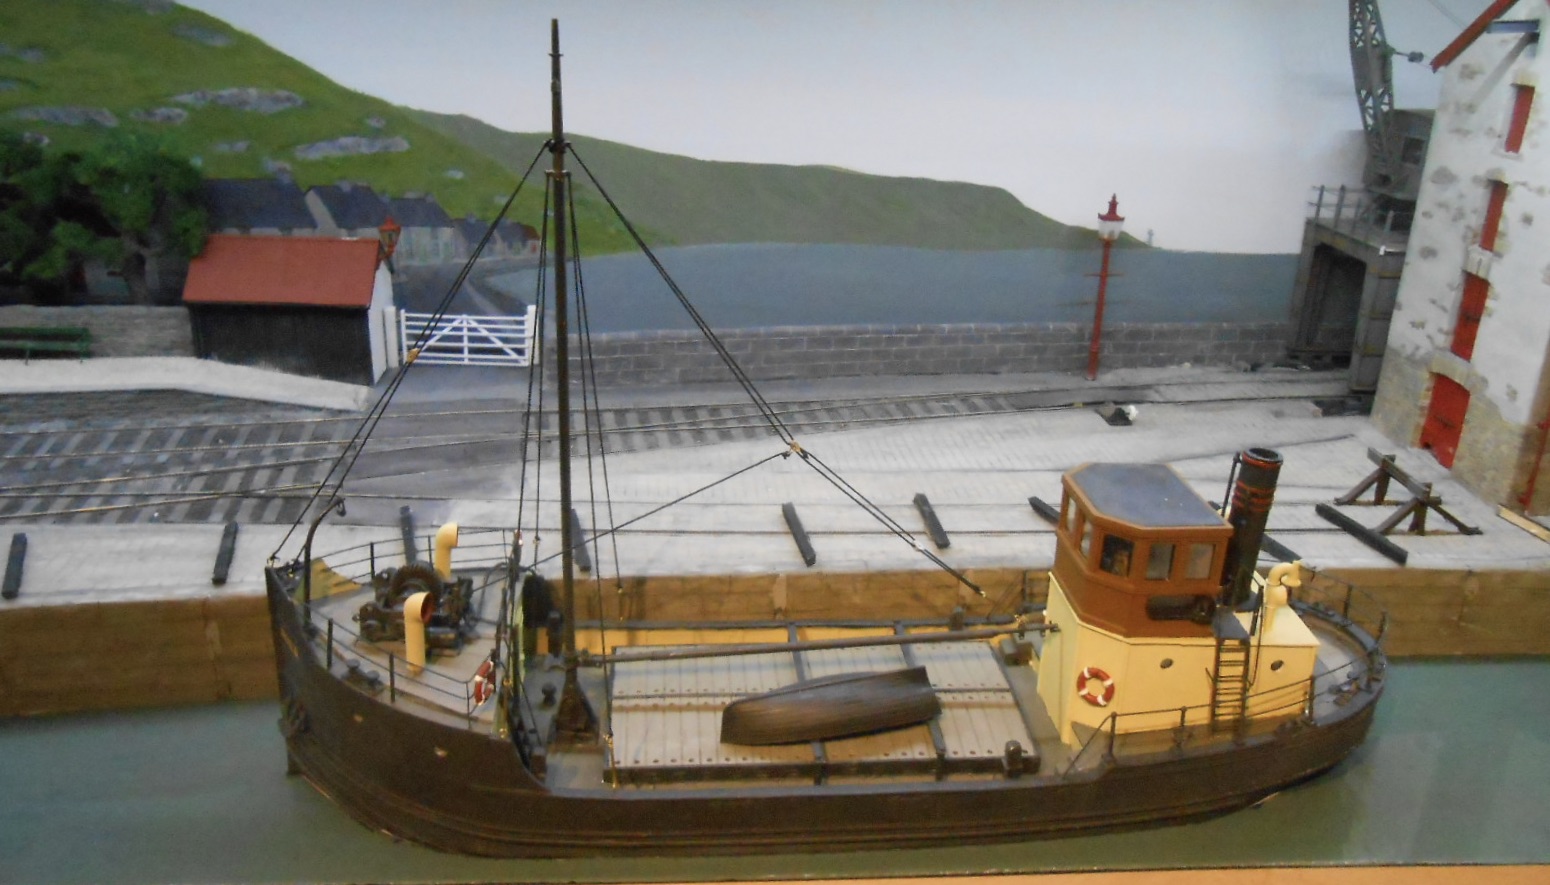
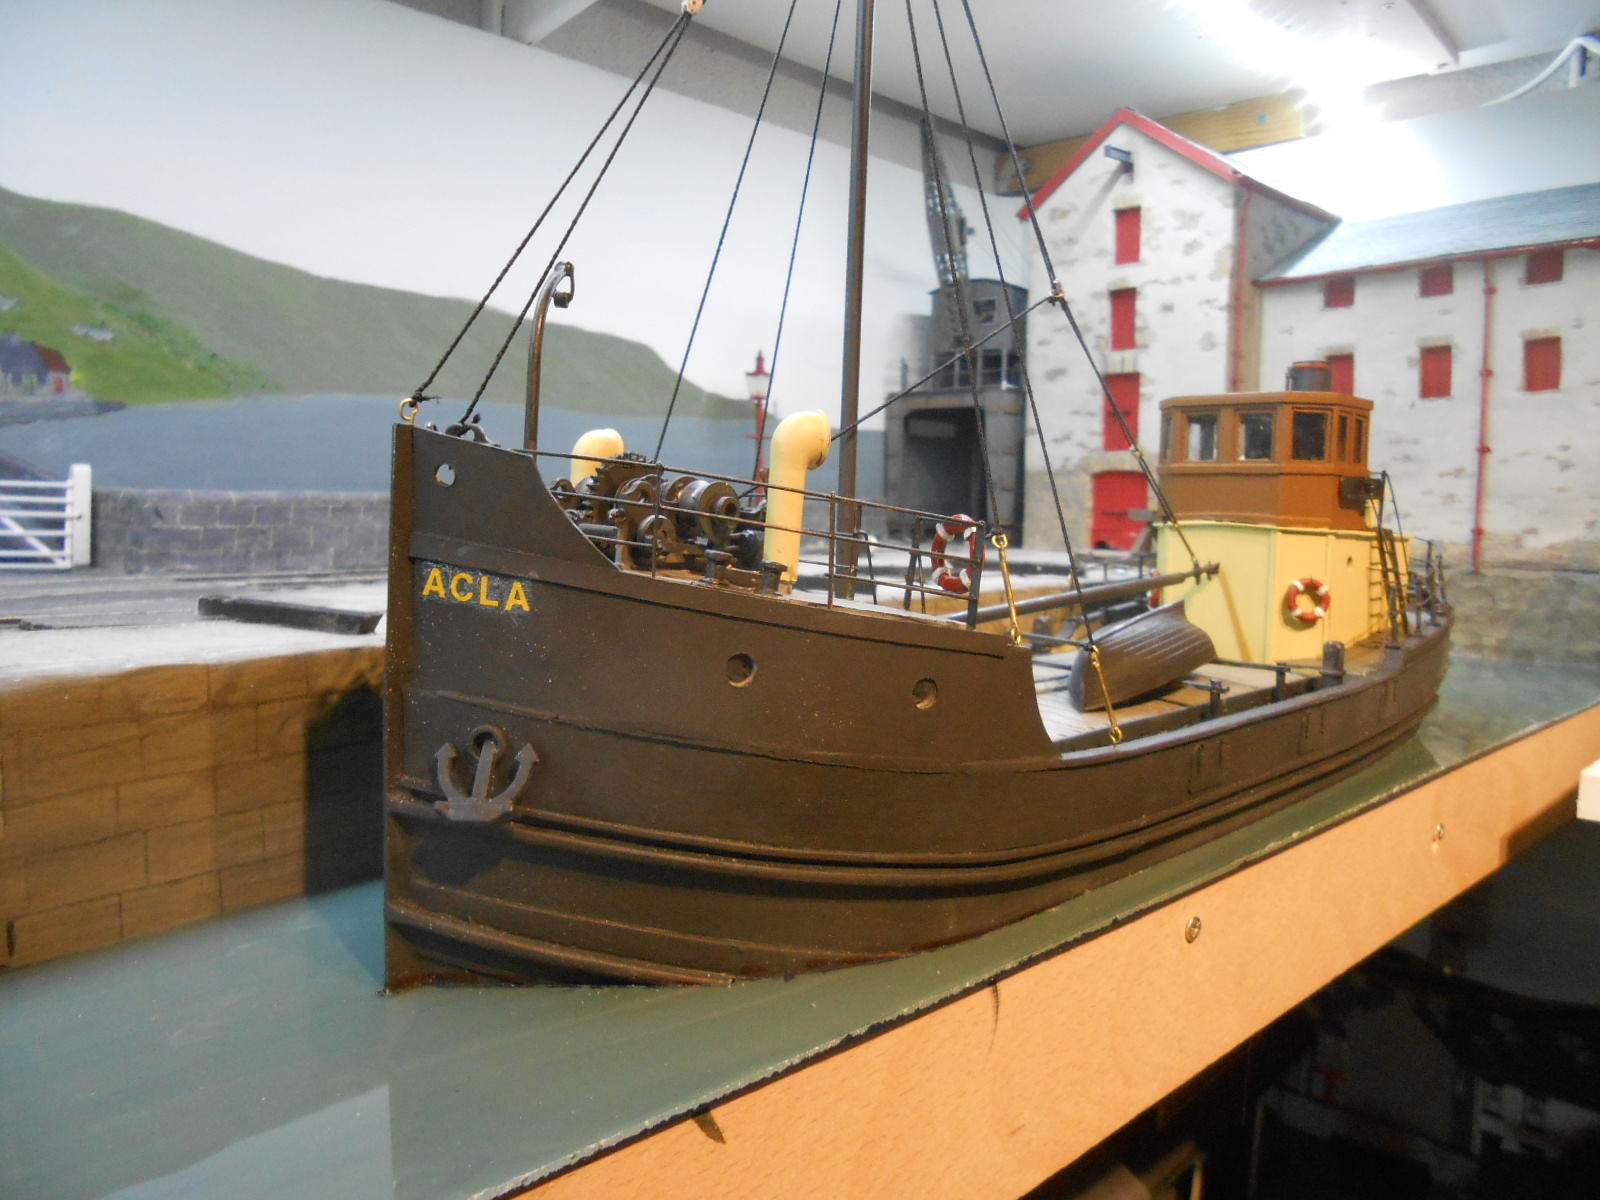
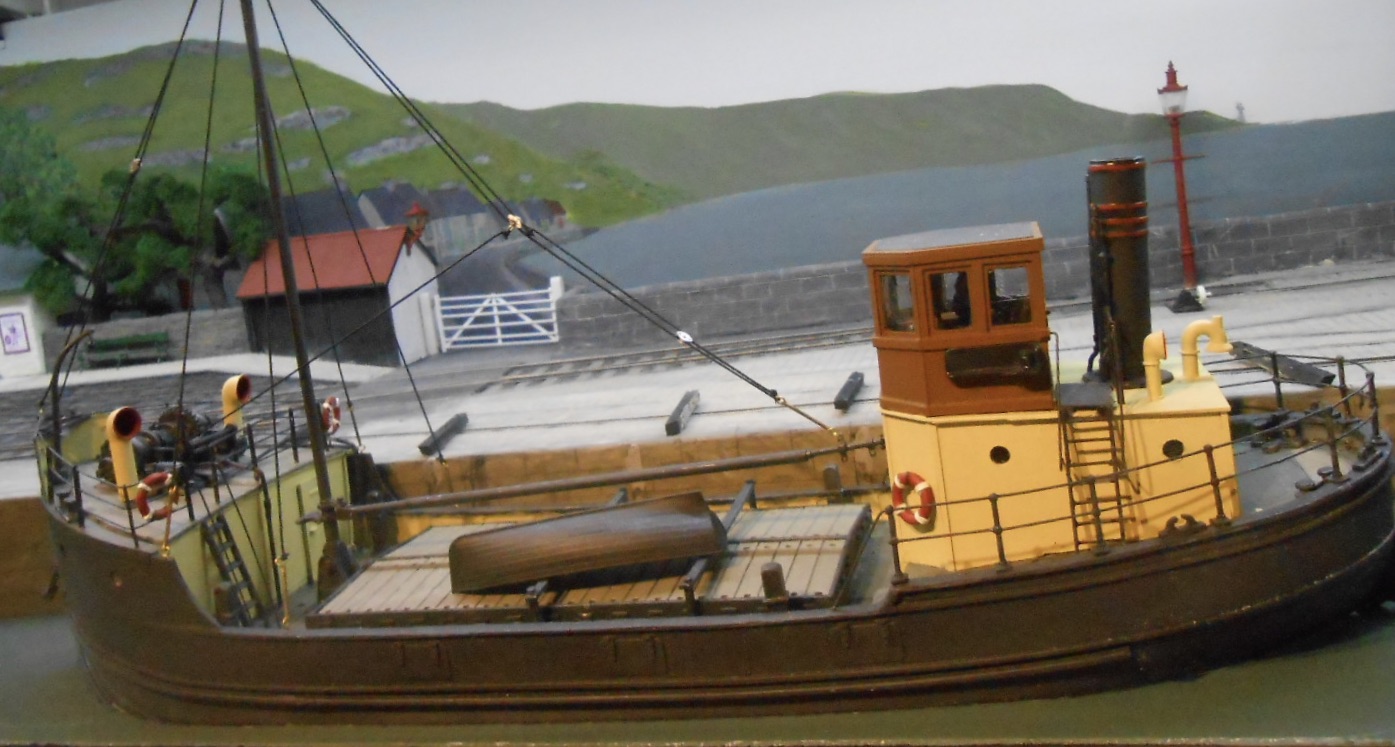
After several workshop posts, thought it was time to look again at the layout as a whole. Various small bits of work have been going on, notably painting, positioning & fixing of various scenic items, mainly to try and create a busier quayside, with various cargoes ready to load/unload. Several figures have been relocated from the platform on Belmullet/Northport, where, with the layout being turned round are no longer easily visible. The rather portly, dishevelled looking gentleman is a bit of a favourite, while readers of the Arigna/Belmullet threads may remember what happened when I went on line to look up details for painting the two nuns - suffice to say the search also threw up some interesting options for dressing up at the weekends! Another figure is the fishmonger, or maybe he is a high end restauranteur [sort of Irish Rick Stein], looking at the latest catch? The Acla has also received a bit more attention, with mooring ropes toned down to look less bright. It still needs some weathering though. In the general scheme of things, the left hand siding, nearest the tunnel, will only ever hold open wagons, so as not to block the view with taller vans. Hence there are lot of barrels waiting on the quayside, along with a few smaller packing cases. The track in front of this siding is where the rail mounted crane will be, so it is important to leave this space clear. The Irish Shell tank wagon may well be for fuelling local fishing boats. Similarly, the right hand siding, behind the Acla, is actually more of a shunting neck, to allow wagons from the off stage pier to be swapped with those from an incoming freight. Hence this needs to be left clear, which is why the various bits of loose cargo are stacked between the siding and the 'main line'. Given the recent Railcar thread, it was hard not to resist including Railcar 2b, though where it gets turned is current still a mystery!

- 257 replies
-
- 20
-

-

-
Walkers of Wigan certainly seemed to go their own way with railcar design, especially when almost everyone else was doing the conventional thing with a cab at each end and underfloor motors. But hey, it worked and some of their products ran up astonishing mileage. I guess that because they used fairly conventional practice, purchase costs were kept down, though the lack of being able to work in multiple meant the Donegal were paying three or more drivers on some of their special trains. Then there was the fact that early railcars couldn't run back to back in pairs, presumably because they only had a single reverse gear. The Colonel Stephens railcars had the same problem, with the rear facing one needing to be towed, in neutral. All sorts of weird stuff, from roof mounted driving cabs to Howden-Meredith patent wheels, but what a delight for historians and modellers!
-
Now we know why there is a sudden world shortage of bulldog clips.
-
N Scale Ballywillan, Co Longford.
David Holman replied to Kevin Sweeney's topic in Irish Model Layouts
Master modeller Gordon Gravett has been using this method for years, so you are in good company - though he mainly works in 7mm scale. Cutting window frames 0.3mm wide seems bonkers to me! Respect! -
Brookhall Mill - A GNR(I) Micro Layout
David Holman replied to Patrick Davey's topic in Irish Model Layouts
Can't open the videos on my tablet, but if it is not possible to separate tender body from chassis, can a hole be cut in the underside? Alternatively, liquid lead, held in place with 5 minute epoxy should do the job in terms of filling nooks and crannies on the underside without making any holes. -
There is that picture of Lissadell, albeit some time out of traffic, where there seems to be more rust and dirt than paint! Perhaps because my memories of steam are from the early 60s onwards ( and especially 66 onwards), I rarely saw a clean loco. I also think that it is not easy to make a convincing job of a clean black loco - especially a shiny one. Gloss finish looks too much to my eyes, while almost as soon as a loco begins work, then a patina of dirt and dust is inevitable, which on a model gives all important texture and contrast to an overall black finish. Indeed, there is little if any black in the photo of the prototype above, just many shades of grey. Fab photo either way. Nice looking track David - Code 100 flat bottomed, I presume?
-
Whisper it quietly, but it is significantly easier to do 5'3 in 7mm scale. There are several MGW kits available from Alphagraphix, including the E/J26, G2 and J19. All in etched brass, but a lot easier to build than in 4mm scale. Slater's do the broad gauge axles to go with their wheels. There is a range of 6w coaches too, plus several wagon body kits in card, with whitemetal chassis available. The axles on Slater's wagon and coach wheels are long enough to move the wheels out to 34mm back to back. Indeed, the only barrier to broad gauge is getting someone to turn up a 36.75mm track gauge, because C&L point kits are available, or you can buy crossing vee and blades ready made, or indeed ask Marcway in Sheffield to build points for you. 7mm scale is expensive - points cost over £50 rtr, a loco kit will start at £150 (double that for a tender engine) and even the bits for a wagon are £20 a time. There again, look at the prices of new 4mm rtr. Space is the other consideration, but my Arigna Town/Belmullet project is under 16' long in total and the scenic part of Northport Quay is just 7'6. Well worth thinking about, especially if you are starting from scratch and very addictive too...
-
Plenty of good advice here from people who KNOW. The key advice is you do NOT need to use P4 standards to do 21mm gauge. I've had the pleasure of helping operate Andy's Valentia Harbour and it all runs beautifully. My Fintonagh, albeit 7mm scale is 21mm gauge, but uses 00 wheels and track standards: 1mm flangeways in the points. On my wagons and coaches I replace the steel axles with 2mm brass wire, with the ends filed to a point to go in top hat bearings. Brass wire means the axles are not attracted to magnetic uncouplers. Back to backs of around 19.3mm seems to work just fine.
-
Inspiration for us all here, Ken!
-
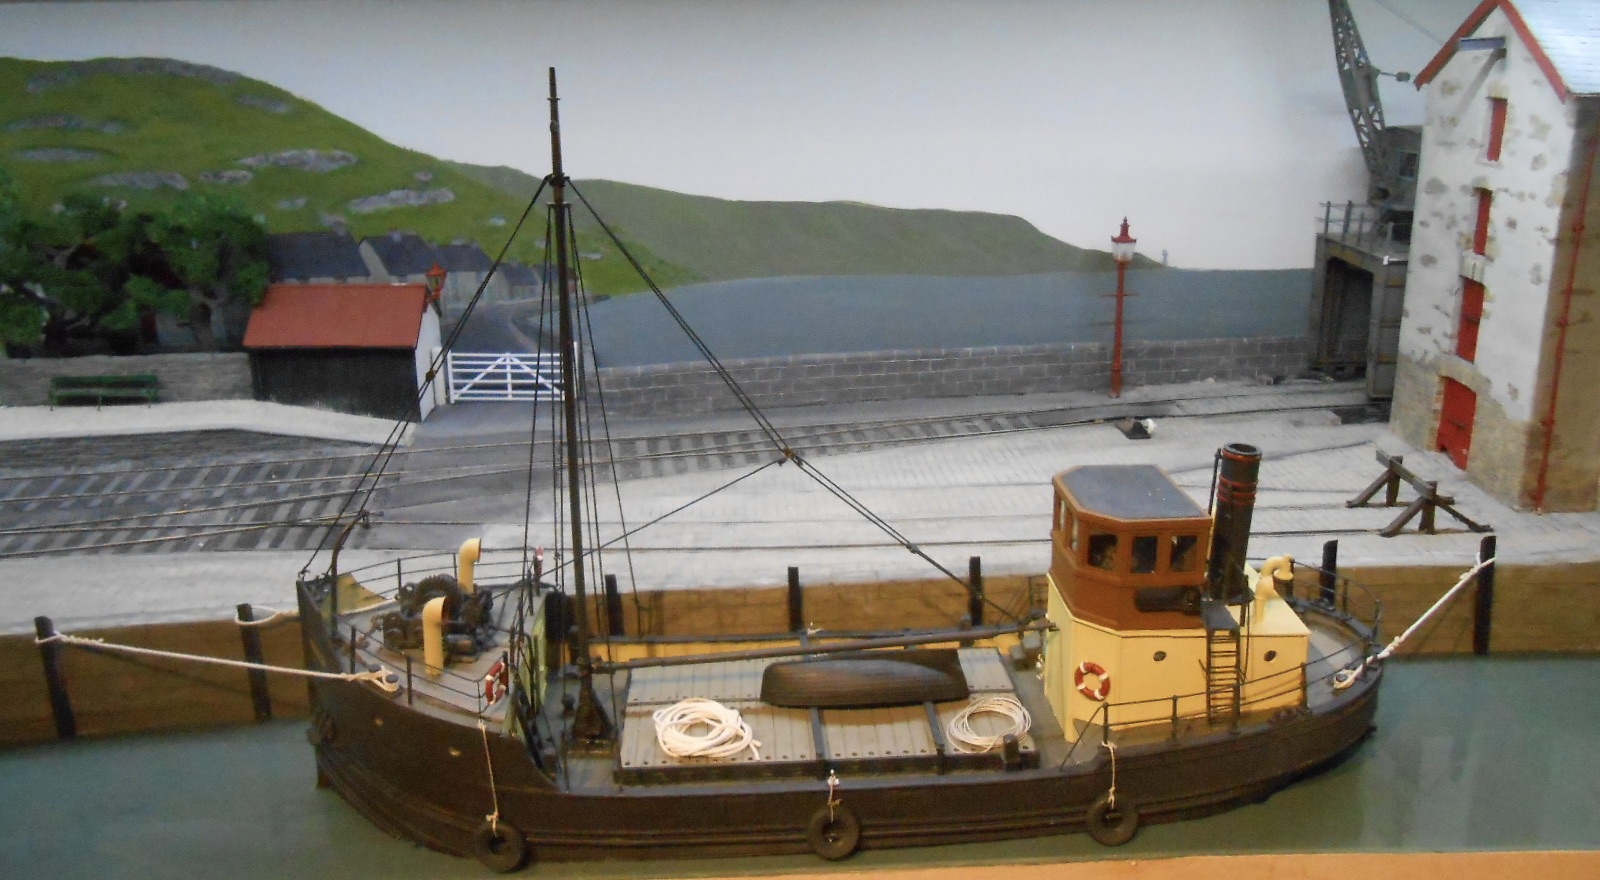
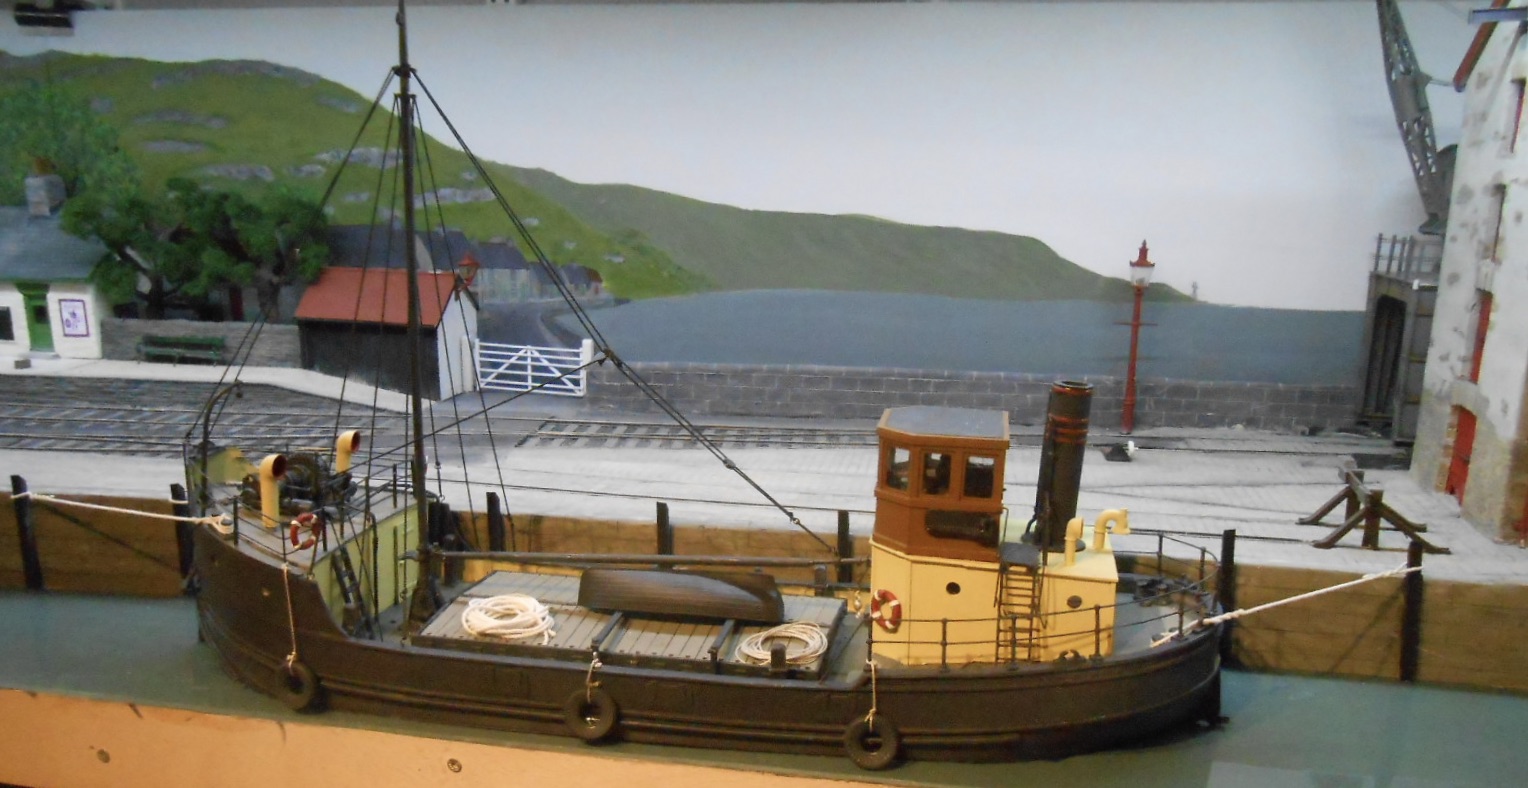
Not a lot of progress it must be said - or perhaps that should read much messing about for little apparent progress! Following George's wonderful pictures of his 1/24 Puffer, I've been scouring them and various web pages to see what additional rigging I might include. I've also been trying to see how the ship would be moored to the quayside, plus what other bits and pieces might be found on deck for added detail. Overall though, in truth feel I'm none the wiser, so I'm throwing myself upon the mercy of the court of the More Knowledgeable! What I've done is add a third rigging line on each side of the mast, plus a short chain and hook to the business end of the derrick. Can't for the life of me work out whether there would be an extra cable to the winch [along the derrick beam], or if the hook would be connected by rope to whatever was in the hold, with just the boom going up & down? Raising & lowering the anchor is also the cause of much head scratching. On the VIC96, the chain seems to go over a large fully on the steam winch and down below deck. A Puffer seems to have an anchor chain davit, though quite how this works I again have no idea. At the moment, the mooring ropes are looped over the vertical rubbing beams, though it may be more sensible to turn up a few hefty bollards to set into the quayside. A couple of loosely coiled ropes complete the picture, along with some old tyres as fenders. Quite how many more ropes/rigging I'll add, I'm not sure. My photos of VIC96 in Chatham Dockyard show any number, the purpose of which I haven't clue - while actually doing what I have so far has been far from enjoyable!
-
're both the above, he does indeed batch build, so not all stuff is readily available. As for scale, yes there are mostly 7mm scale kits, but these include 0n30 designs. Thus far, not sure any of my turntables have been built to the scale intended. Arigna Town first had the Dapol/Airfix one, then used the South East Finecast version (worth a look), both of which are 00. Belmullet's is the Kitwood Hill 0n16.5, while Fintonagh's is Peco N gauge - two changes of scale. In each case, I made a new deck and sometimes added new sides. Ultimately, a turntable is about the operating bits, which are the centre 'boss', the circular track, the pit and the deck. Indeed, on full size TTs, the loco sits just off centre, so only one set of guide wheels is on the circular rail in the pit, whereas on most model ones the boss takes the strain and why stereo jackplug and sockets are often used on home made versions - they can carry power to the track. All in all, not surprising ready to run TTs are expensive, especially if you want to feed an array of tracks, but with a bit of thought and care, cheaper options can be made to work well and the hand cranked Frizinghall Models kit is the one I'd recommend for simple, reliable operation.
- 29 replies
-
- 2
-
-
- turntables
- cie
- (and 1 more)
-
Those birds are tiny, but can nevertheless see we have mallard (ducks and drakes), plus herring gull. Fine painting to go with the printing, Ken.
-
The Dapol (old Airfix) kit is really cheap, but of course you need to work out how to get power to the track - and indeed to rotate it. Had one on Arigna Town, so might be worth looking up that thread. I think it works out at 60'. There are also useful articles online about how to make your own turntable. However, best option I have found is Kitwood Hobbies, who do a range of laser cut kits that are really well designed and also supply motoring kits. Belmullet has one.
- 29 replies
-
- 2
-
-
- turntables
- cie
- (and 1 more)
-
Splendid! I think they are getting worse, year on year. Rule number one though, must still be never proof read your own work. Once wrote a job application where I outlined my experience of working with children who had leaning difficulties! Occasionally such things have the capacity to amuse - in the early days of word processing, my surname always got changed to "hooligan", which I rather liked, while head teacher was always changed to "heartache".
-
A pox on spell checkers and predictive text!
-
My "personal jury" is still out on sound, especially at exhibitions. Probably works better for diesel than steam, because the smoke effects are still pretty crude. However, there are some things that I think could improve the sensory experience, but do not see available separately. One is either whistle or horn - a fixed unit under the baseboard with a push button to sound the standard warnings for train movements. Sound chips for locos are bespoke and hence expensive; there used to be whistle and horn units available a few years ago, but not now, it seems. Another aspect is smell. Oil, smoke and whatever freight might be carried or being emitted from local agriculture or industry. Now whether anyone really wants the whiff of the local fish dock, glue factory, sewage works, etc as part of creating atmosphere on a layout is debatable, but the gang of the sea or new mine grass might be nice.
-
Smart. Very smart indeed. Know next to nothing about the prototype, but the model looks splendid!
-
RTR or Kit, early 4 wheel CIE rolling stock
David Holman replied to Dave Dawes's topic in Irish Models
Stick with Provincial and JM Designs - they are authentic, not hybrids and you are supporting important suppliers to our modelling world. -
The JML magnifying glasses work well and are cheap at ten quid. You can wear them over your own glasses (Repair Shop style). They come with rechargeable LED lights too. Also have one of those headband magnifiers, though not as comfortable. A key thing for me is lighting, preferably the same as I will display under, so I have an LED strip over the workbench and layout, with LED spotlights on the ceiling too.
-
All looks pretty darned good to me. Louvres are nasty, awkward things to do, but the model goes from strength to strength.
-
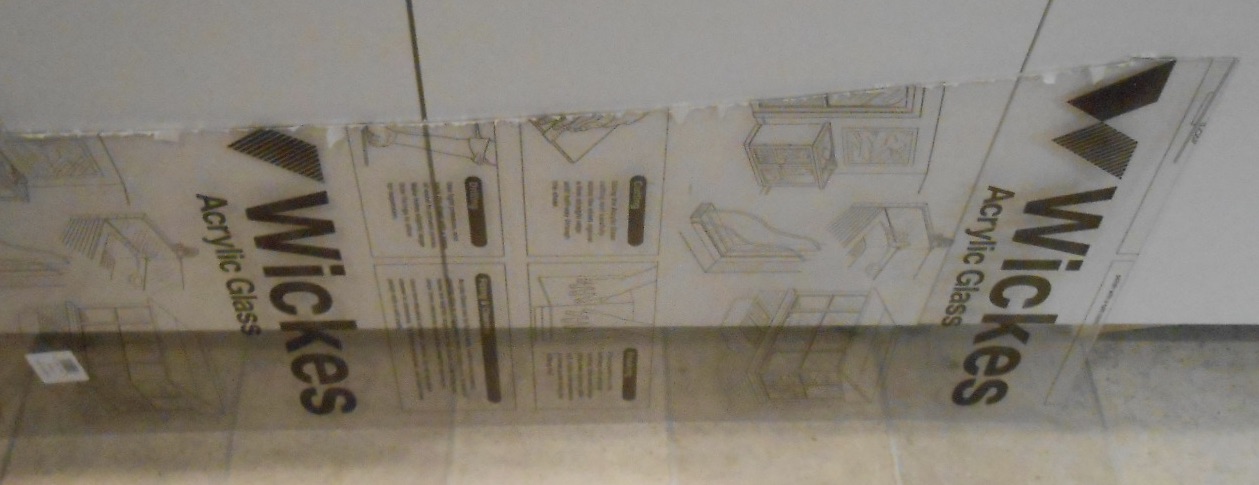
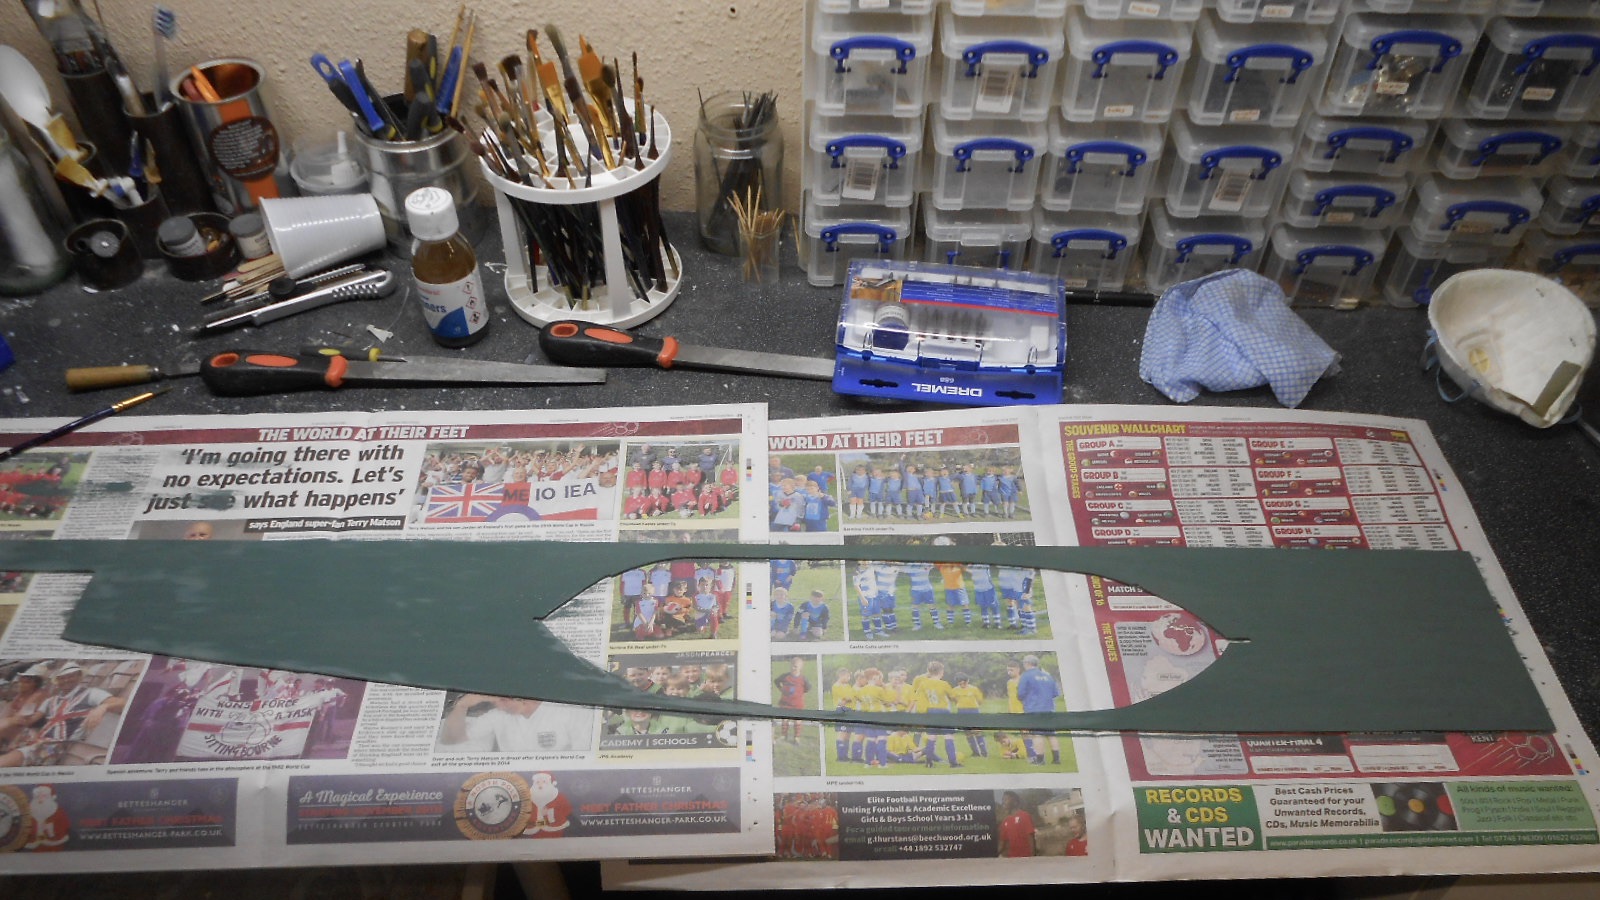
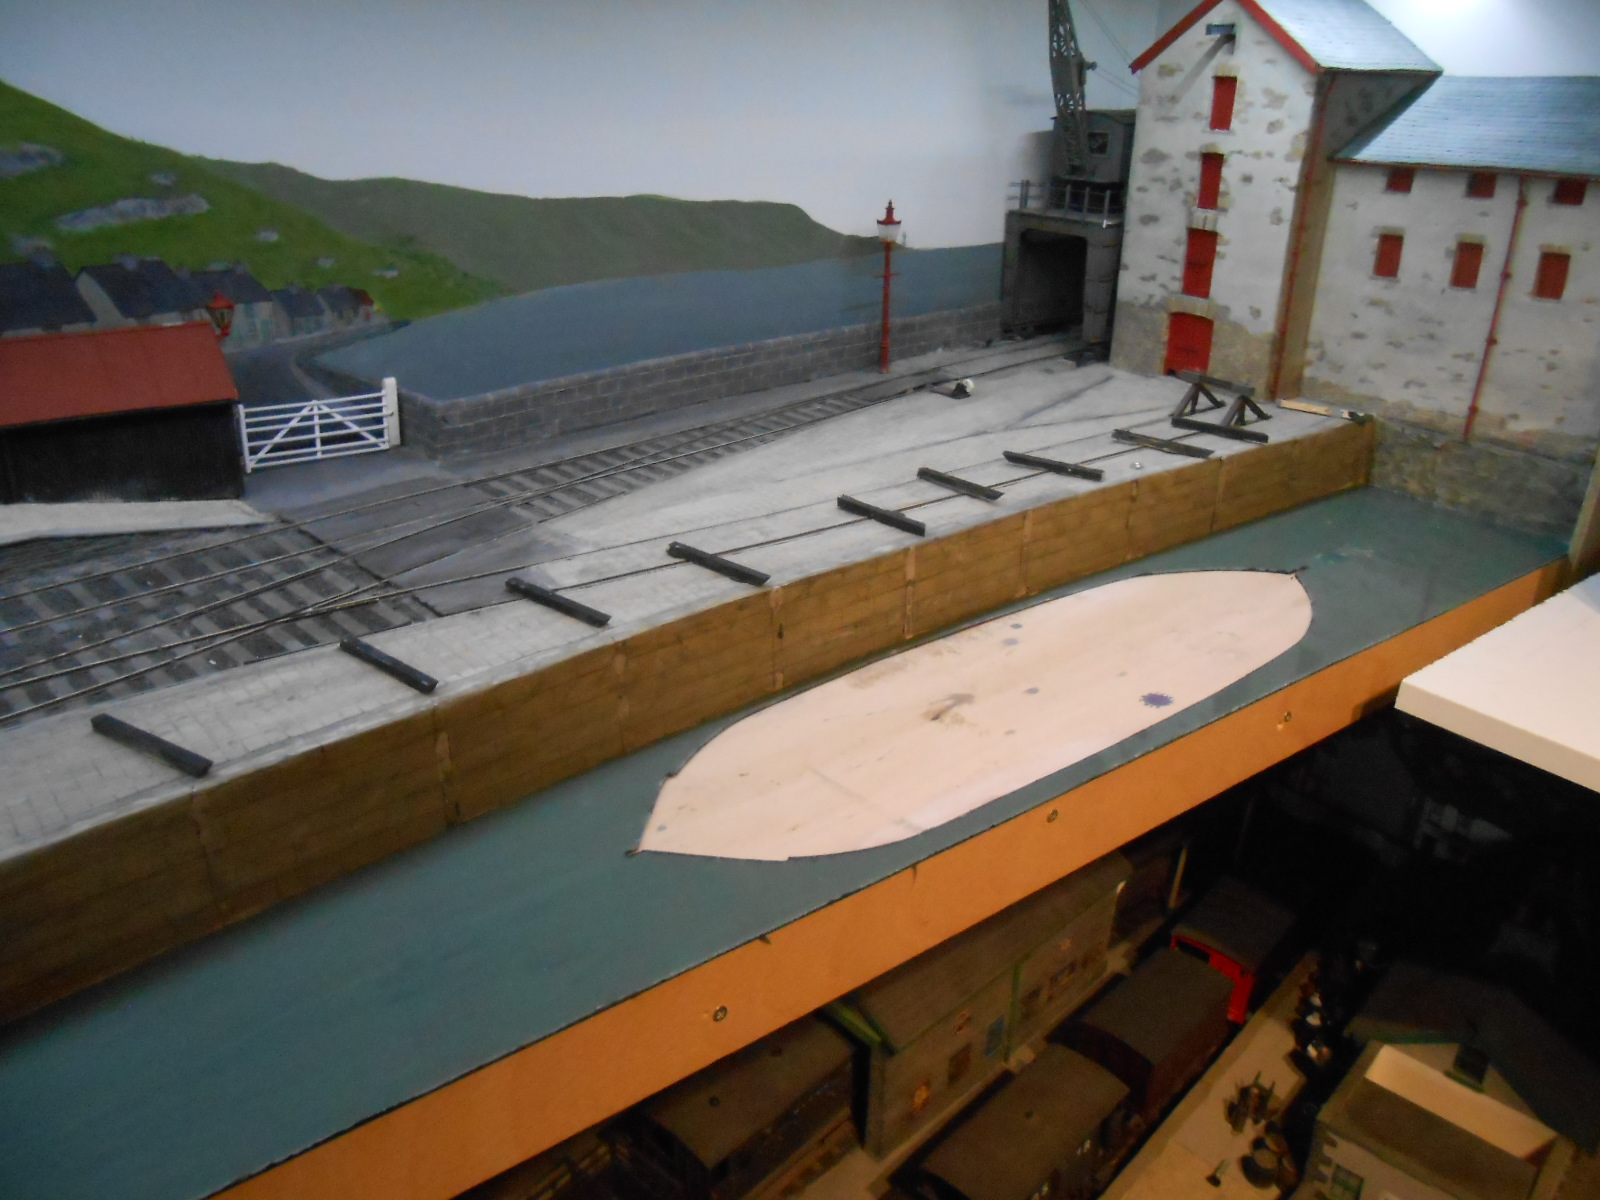
Have taken a break from the rigging to try another task I wasn't exactly looking forward to - the water. The options included: base colour covered with multiple layers of varnish commercial resin water kit papier mache, as per KCME's suggestion earlier acrylic sheet, as suggest by ace ship modeller Gordon Gravett, indeed just ace modeller In the end, decided to go for the last one, mainly because the Acla is very heavy and its mast & derrick rather fragile, meaning a need to be able to remove it from the layout for transport. So, a trip to my local Wickes DIY store resulted in the purchase of a sheet of 1.8mm clear acrylic glazing. This then needed a suitably shaped piece to fit the space where Acla sits, along with a cut out for the hull. The acrylic is similar in structure to plasticard, in that you can score it and then snap off the piece you want. However, the method isn't suitable for the complex shapes I required, so instead used a heavy duty slitting disc in the Dremel, along with a heavy duty face mask to avoid the fumes generated. I also decided to remove the wooden rubbing beams from the quayside wall, as it is easier to put these back later, rather try to cut out the acrylic to round them. Once this piece was cut and filed to shape, it was then a case of putting the Acla on it and then drawing round it to create a space for the hull to sit in. A fair bit more filing was required for this, though it turns out that a perfect fit isn't required - just the front edge, as the back is sandwiched between the hull and quay wall, so can't be seen. Also, a small gap isn't nearly as noticeable as a a space under the hull. Once the hull shape was cut out, I then painted the underside, first with a coat of Humbrol 31 [a sea grey/green], then 104 [navy blue], though the latter doesn't seem to make a lot of difference. The water is yet to be stuck down and I also need to get back to Gordon, to find out how he adds ripples to the surface of the acrylic, but for now, the Acla looks a lot better sitting in some 'water', instead of on a sheet of plywood.
-
That looks good stuff, not least because it is a blend, rather than a single colour.