David Holman
-
Posts
4,359 -
Joined
-
Last visited
-
Days Won
117
Content Type
Profiles
Forums
Events
Gallery
Blogs
Everything posted by David Holman
-
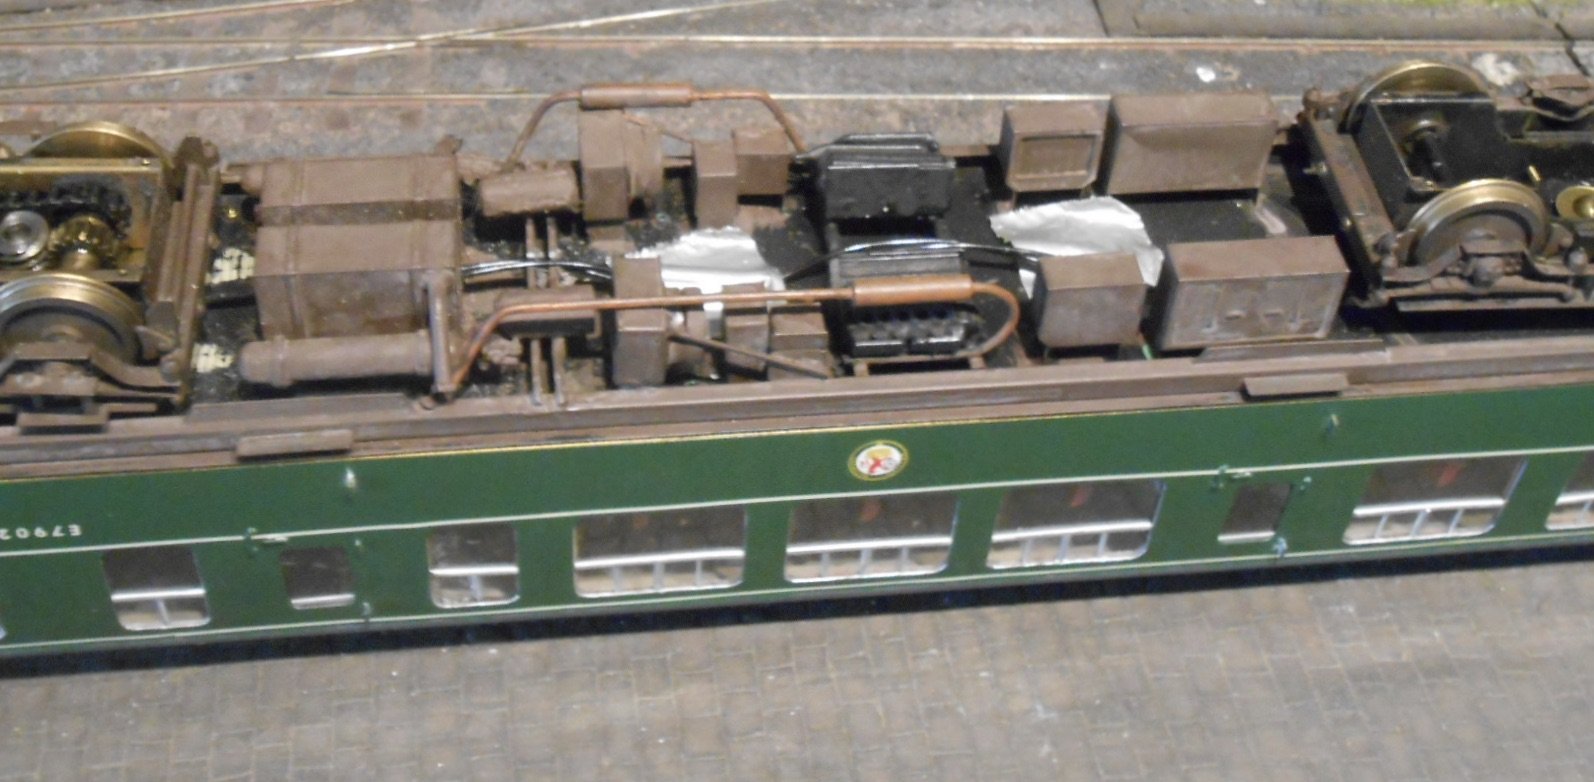
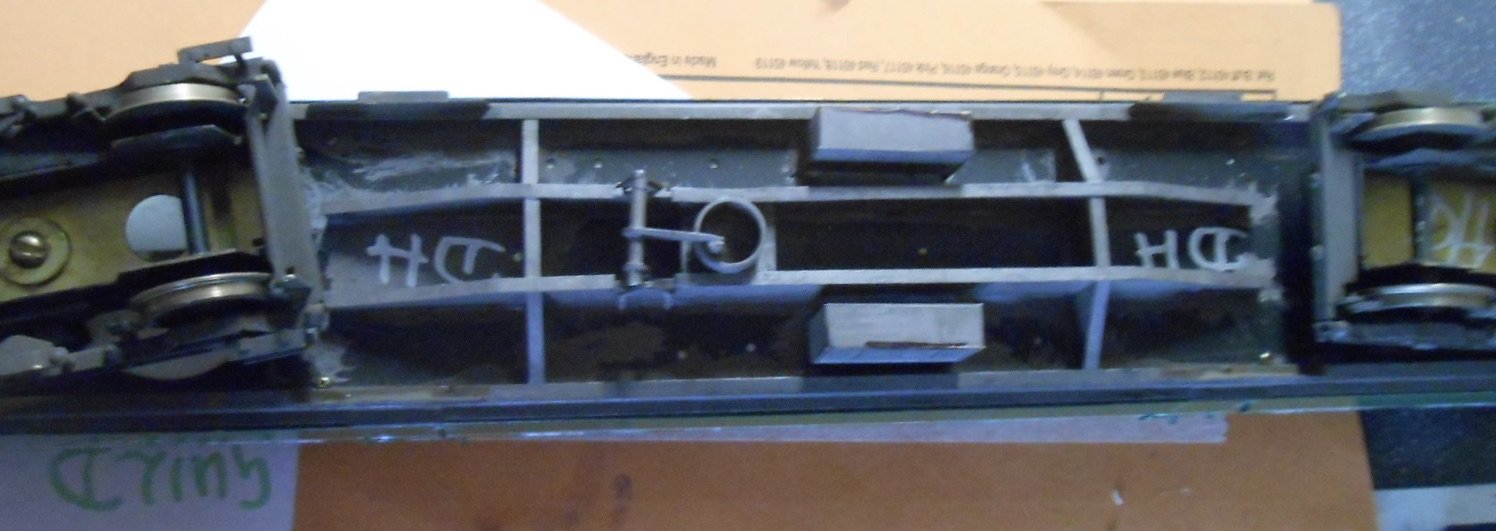
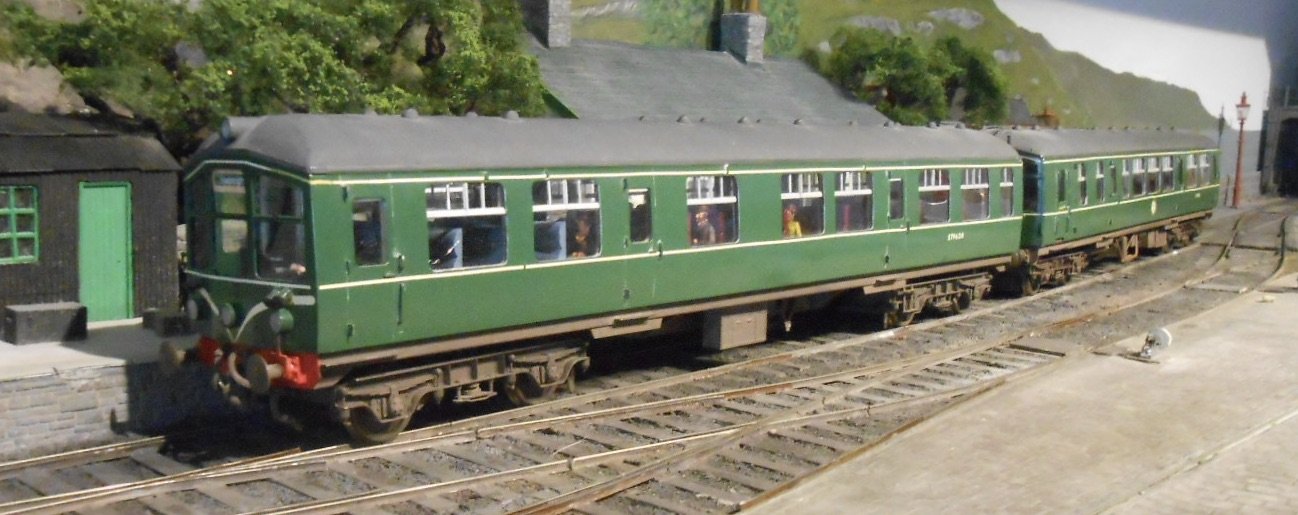
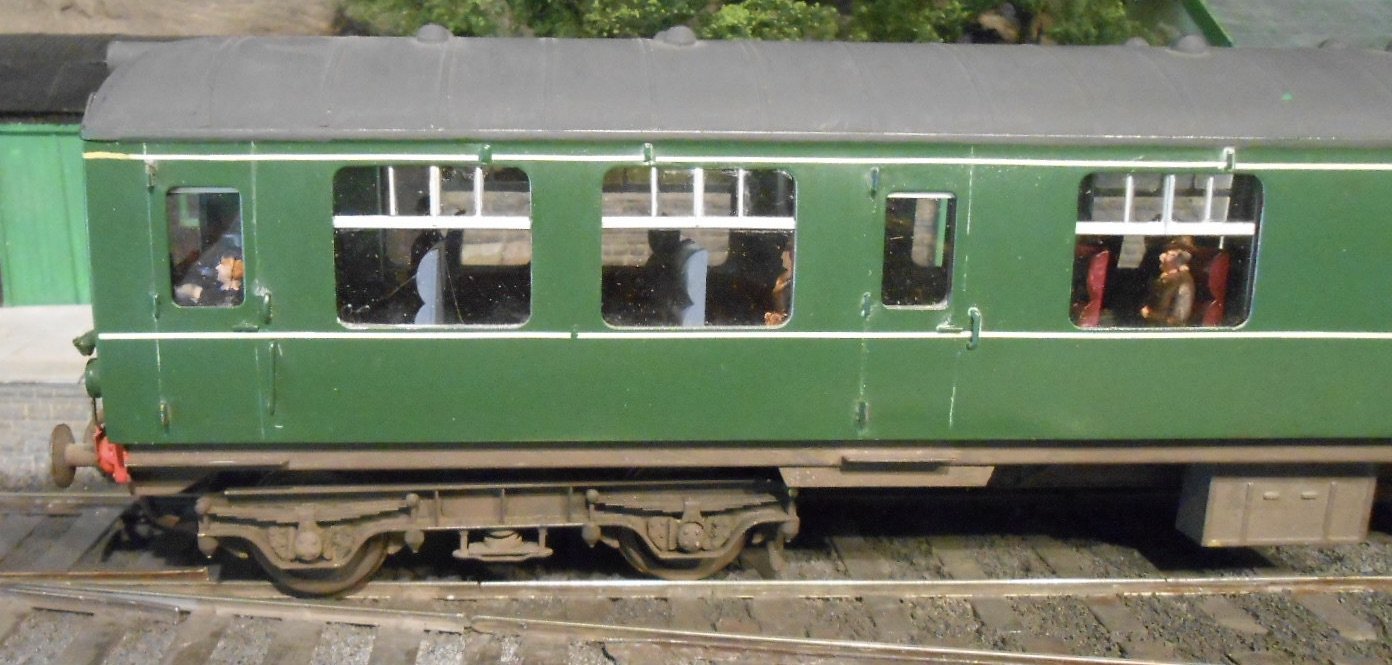
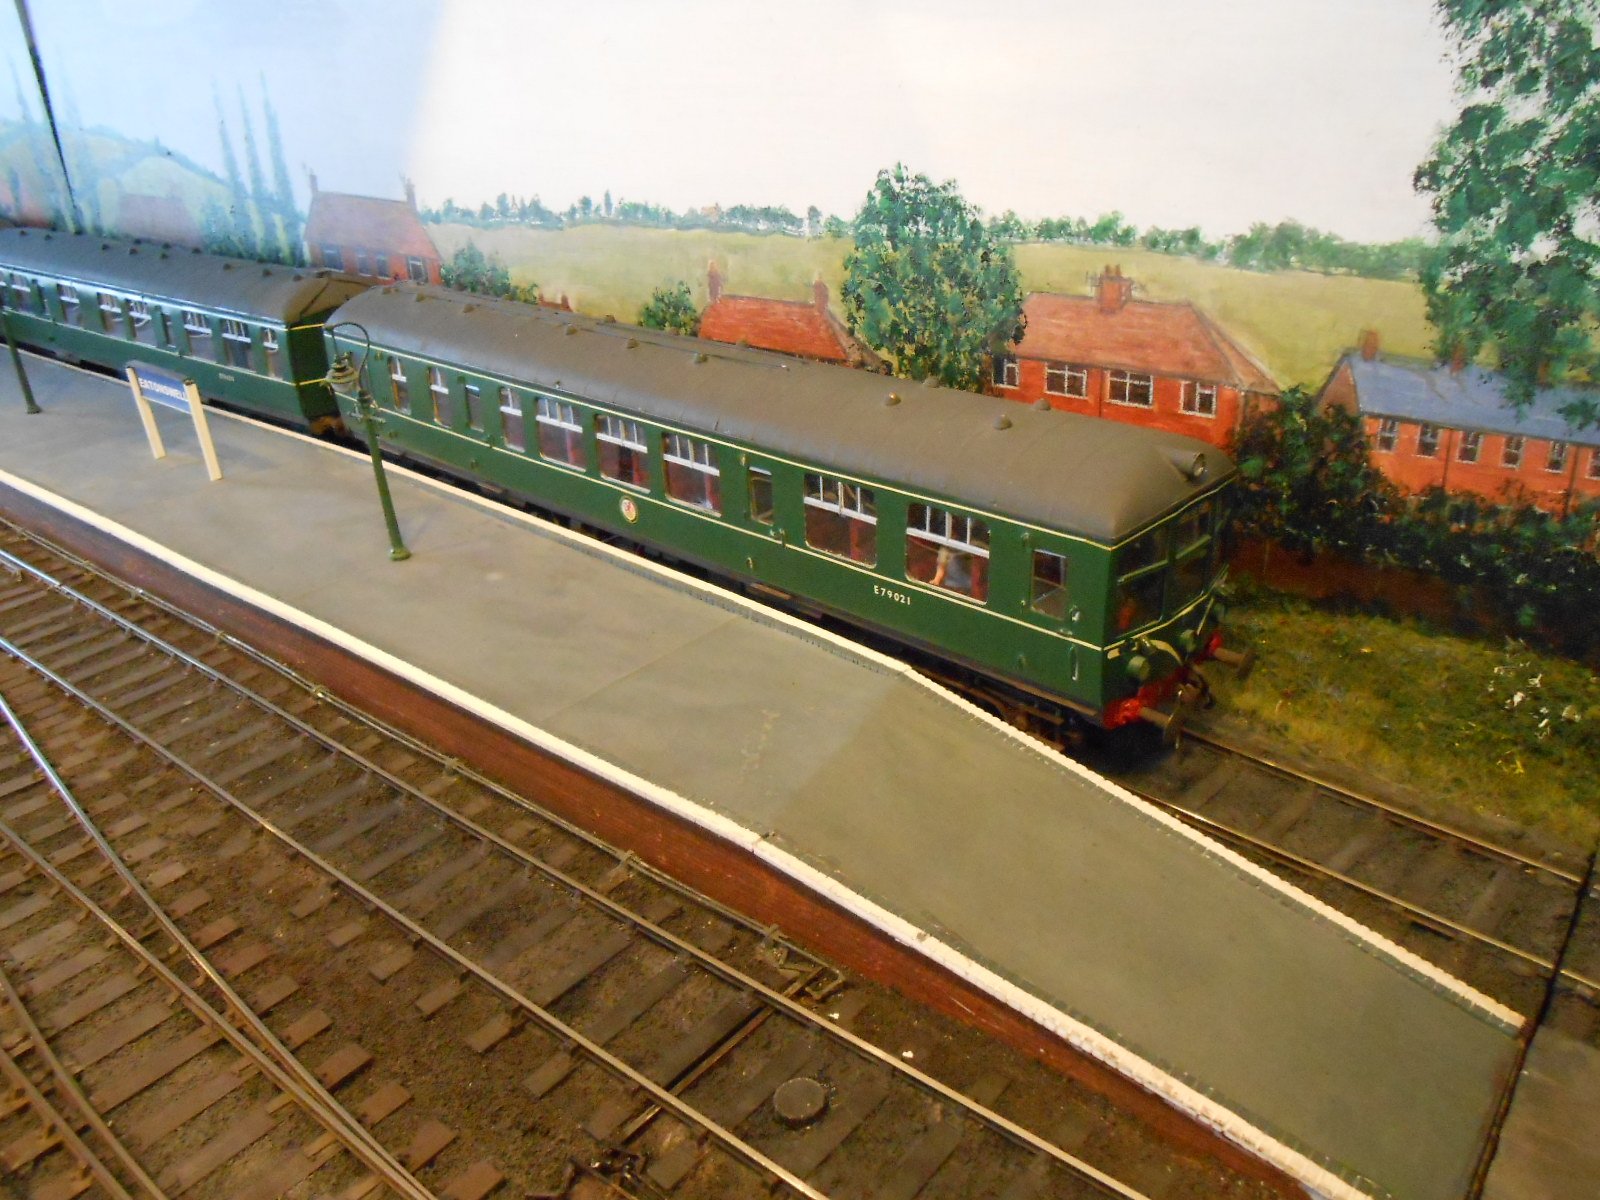
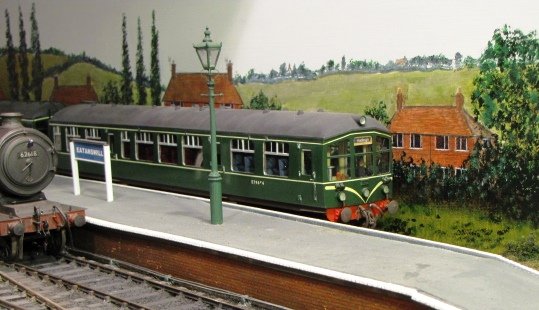
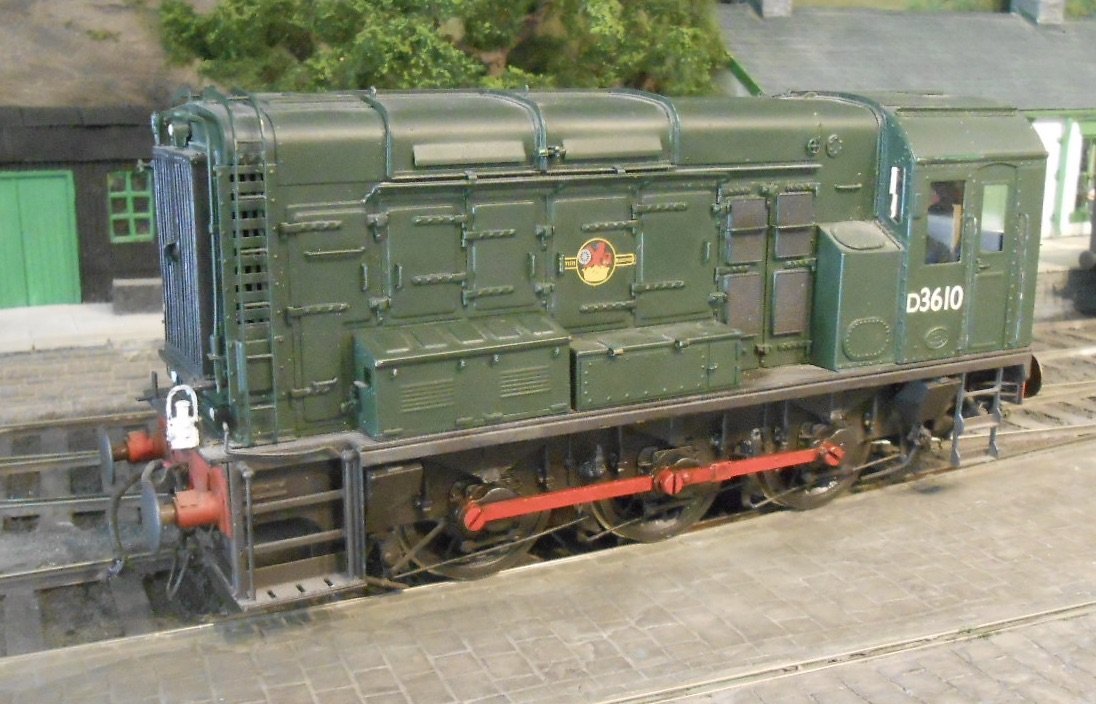
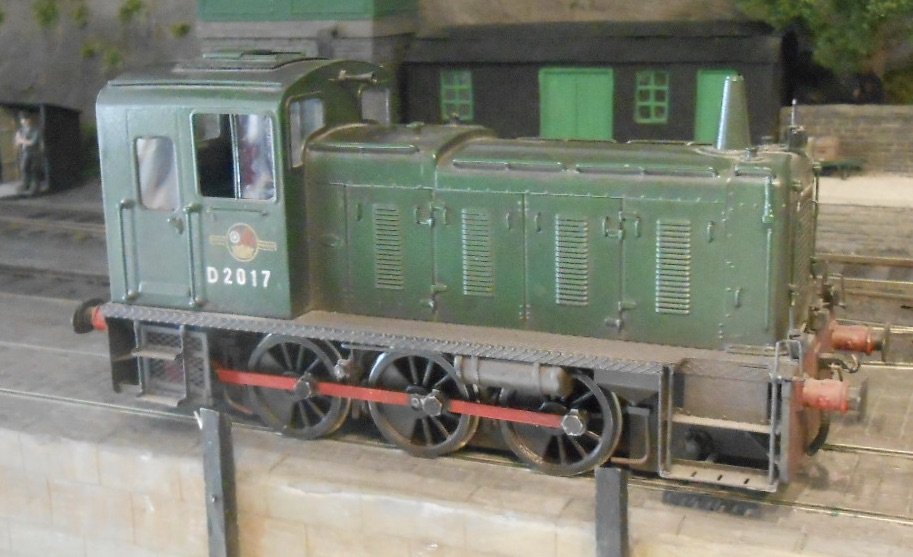
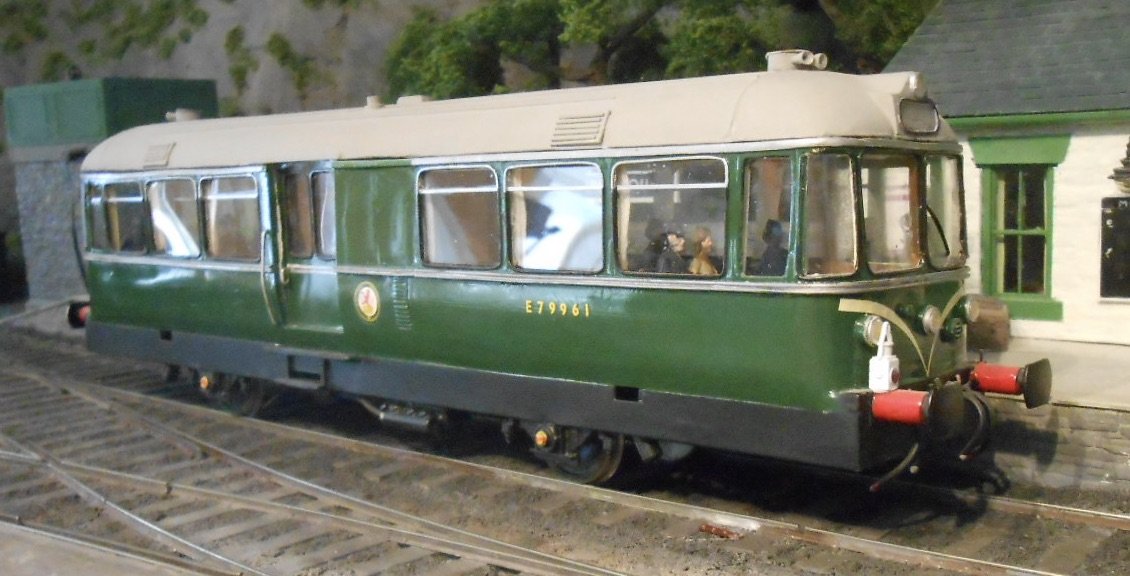
Ready to Run? Well, sort of: several items were bought when I was made redundant from Kent Education in 2011, though it must be said I was back at work the next day, but this time as a consultant. Such are the ways things still work around here, years later! First up were a couple of diesel shunters from Bachmann Brassworks. Nice models, but they came unpainted and the 08 in particular only had basic detail. It certainly ran well straight out of the box, but [I think] Modern Traction Kits did a detailing pack. Opening the latter, you were met with the words 'commiserations on buying the 08'. Well it didn't look that bad to me! Turns out the shape of the body is wrong - it should taper towards the top, but instead is very square. Nevertheless, the details were very comprehensive, with many tiny parts, often etched in stainless steel, so I set about adding as many as possible, though a couple got vaporised when I had my resistance soldering unit on too high a setting... A full paint job was required too, plus transfers from Fox. The 03 was pretty good straight out of the box, including some nice cab detailing, but like the 08 was in unfinished brass. Nowadays you can get both shunters for much less, ready to run. The 08 starts at under £200, I believe, but hey, these are both mine and I had a pleasant time working on them. The next purchase was much more of a problem child. Another Bachmann Brassworks, this time a Derby Lightweight two car DMU. On the face of it, another nice model, but the more you looked, the more you realised was missing, or even just wrong. Not good for £400 - and remember this was 14 years ago. First of all, there was no interior at all, while the more I looked at the windows, the more I really didn't like the very plain toplights. The under frames were very curious, The original units had two power cars, as they were intended for West Yorkshire, but those that worked in East Anglia had only one power car, due to the easier gradients. However, it was what was put underneath on the model which was really just odd. Lots of battery boxes [mostly in the wrong place] and what look like two electric motor casings, as opposed to diesel engine blocks. So, everything was stripped off and after a visit to the North Norfolk Railway to check out their preserved example, I set about trying to improve things. The picture below shows what was achieved by re-arranging the etched boxes and adding one or two castings, including a couple of large engine blocks. The non motor coach under frame was a much simpler affair, just needing some sturdy trussing made from plastic sheet, plus a brake cylinder and a couple of battery boxes. That just left the body work. After making up a full interior [lots of seats and a few passengers] for each coach, I then decided to cut out the toplights and make new ones from plastic strip. No small task given all those windows, while I also had to add glazing bars to the cab front windows. The original Derby units didn't have them, but it was soon found they were needed as the large expanses of glass developed a tendency to crack due to vibrations. A complete paint job was required too of course, plus the transfers, with the 'speed whiskers' in particular really bringing the model to life. Despite the faults, overall, it was a nice model, with some neat details, not least the corridor connections. You might just see I enhanced these with jumper cables which can be easily connected once the model is on the track. I calculated that the model needed over 400 separate pieces added [many of these for the windows], but I think it has been worth it, not least because, like many, I have fond memories of grabbing one of the seats behind the driver's cab to see the road ahead. Indeed, I once had a cab ride to Bleanau Ffestiniog in one. Like all the models pictured the DMU is sitting on Northport Quay and it is interesting to see how two 63' coach units dwarf the station. The final two models in this post were bought ready made from a fellow club member, Both are Connoisseur kits [always very good], but were painted in LNER livery, so I redid them in BR black, followed by some weathering, especially the F5 2-4-2T. The 0-6-0T is one of the J69 'Buckjumpers' So ready to run maybe, but definitely not straight out of the box.

- 90 replies
-
- 10
-

-

-
And it is 1/64, S scale, remember...
-
Safe to say we all liked the first version, Alan... Interesting to compare the two pictures. Is the roof slates material slightly thicker this time? The slates seem a little more defined. Likewise the ridge, while painting the downpipes a lighter colour makes them stand out less. Either way, enlarging the photo to study all this shows more detail and it is just sublime! The lichen on those coping stones is wonderful and the building oozes life.
-
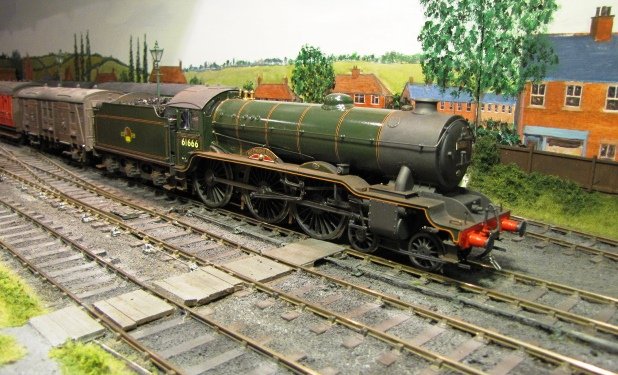
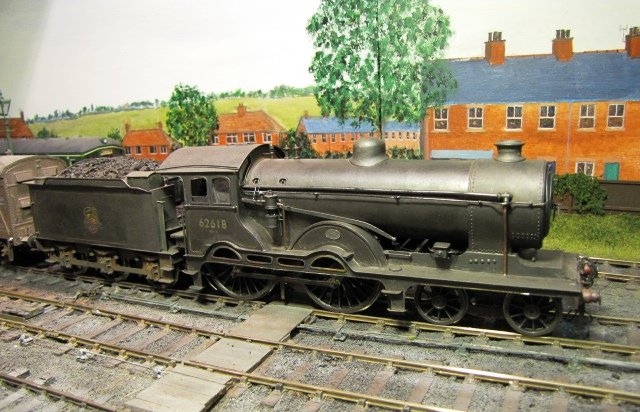
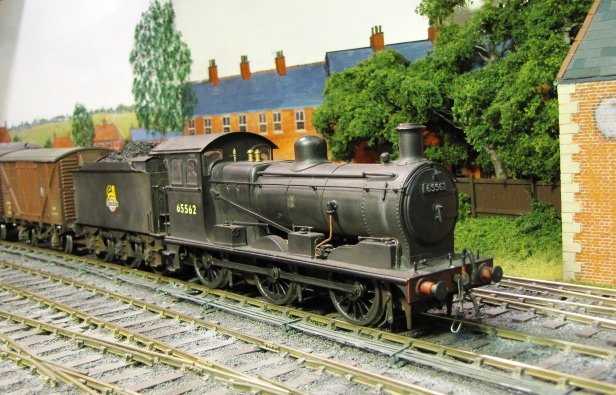
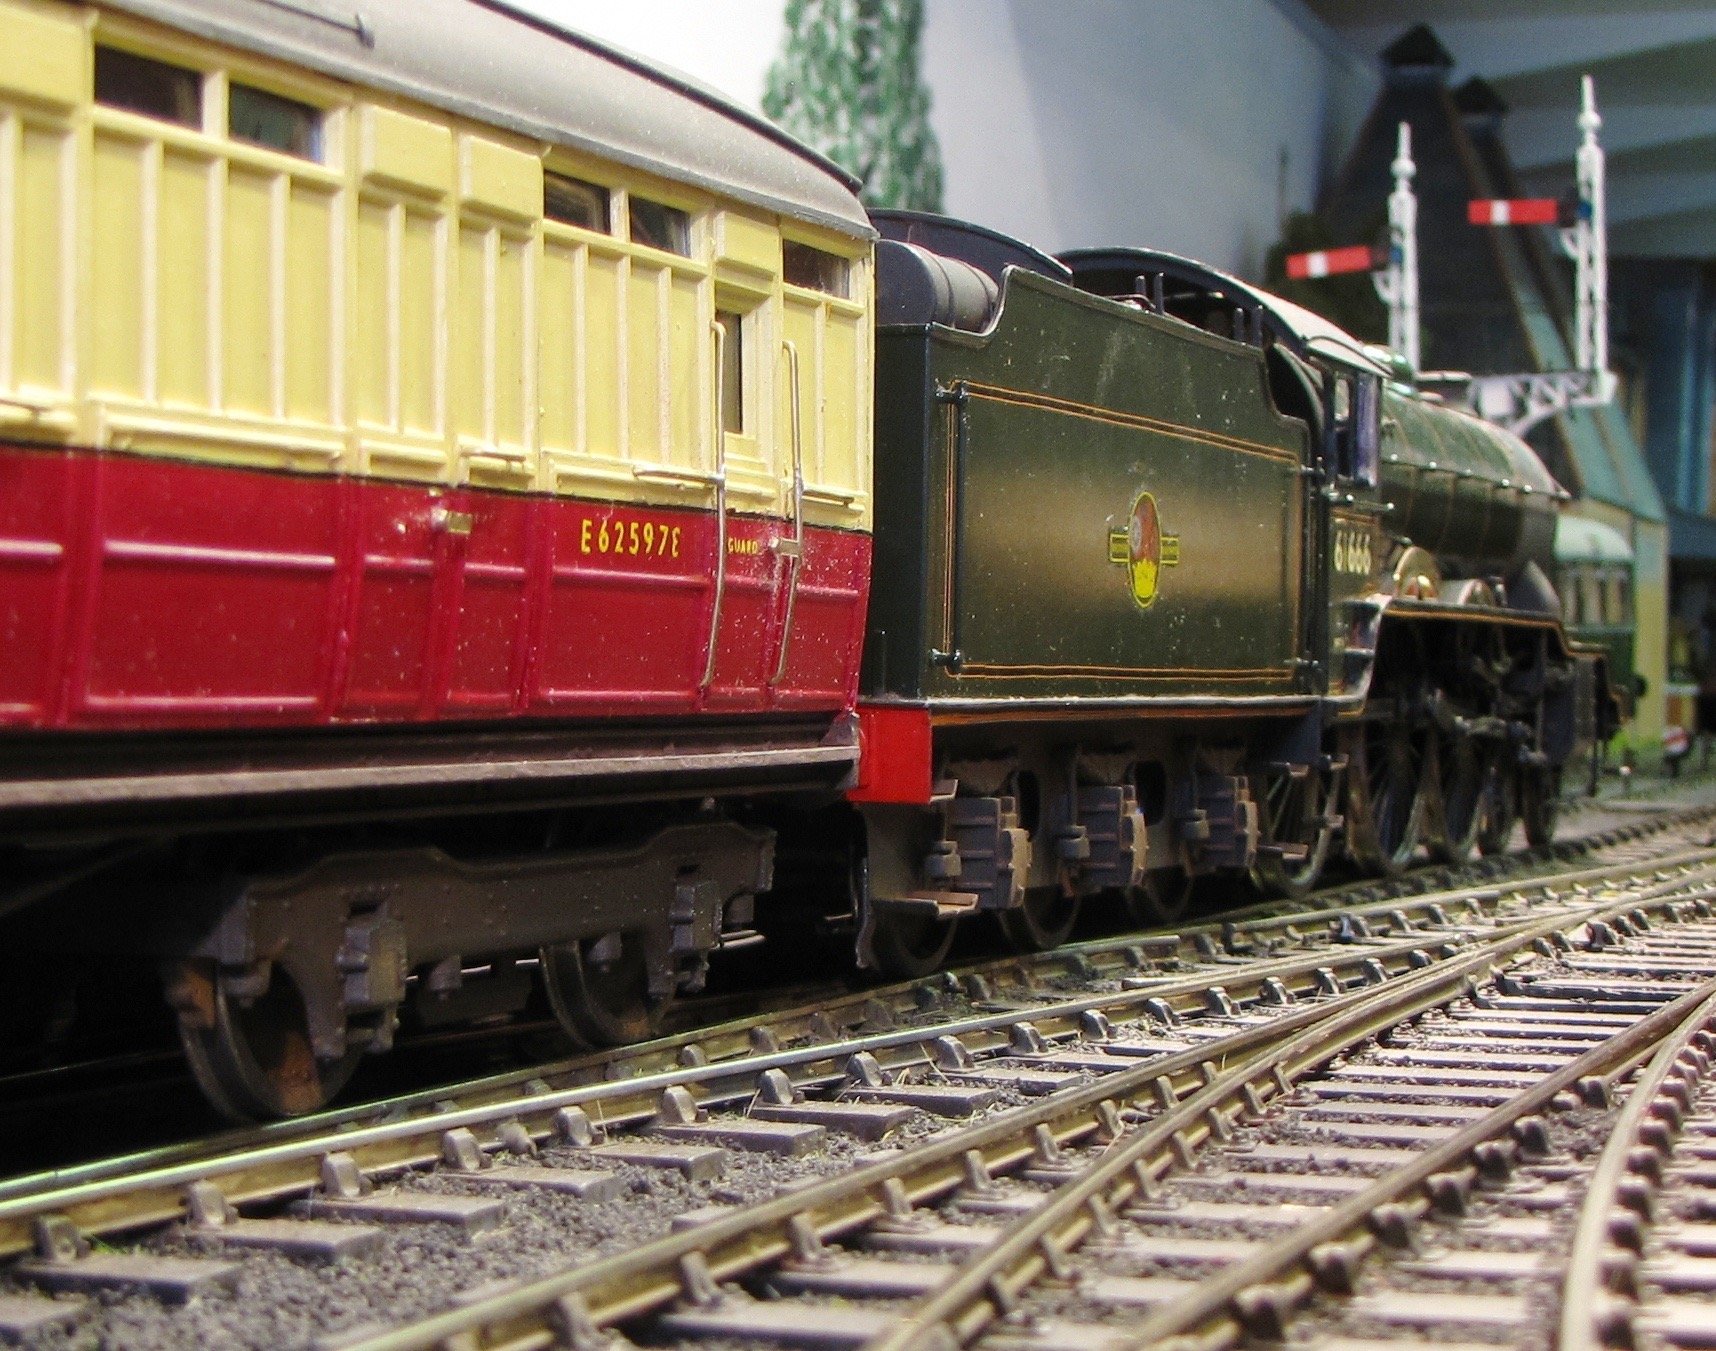
Pride of the line was undoubtedly B17/6 4-6-0 Nottingham Forest. Was born there, so have always followed the club, while 61666 was a regular visitor to East Anglia. The model is an etched brass kit and by some margin the largest loco I've built. Quite a complex job, with its outside valve gear and fully lined BR Brunswick Green, it is been a showcase model for the last ten years, but am tempted to run it at Chatham later this month The other mainline passenger loco was this D16/3 4-4-0. After the Wantage Tank, this was my first big scratch build and for some reason I chose one with the decorative splasher valences, just to make it even more difficult.. The big goods engine is a J17 0-6-0. Another etched brass kit, its long coupled wheelbase has meant it grunts a bit going through 6' radius points, but I've always liked the design. The Waggon & Maschinbau four wheel railbuses were used a lot in East Anglia, so decided I'd try and scratch build one. All those complex curves made it quite a challenge and then [Sodd's Law of course], a rtr one came out soon after. Still - its mine and no one else's! Forgot to mention that the layout used DCC control. No sound [way too expensive], indeed got away with one amp chips designed for 00, but as none of my locos drew more than 0.25 amps things were [mostly] fine. However, blew several of them because didn't insulate them properly in etched brass bodies - still better £15 quid than over a hundred... It was the Bachman Prodigy system, which I still have...
- 90 replies
-
- 13
-
-
-
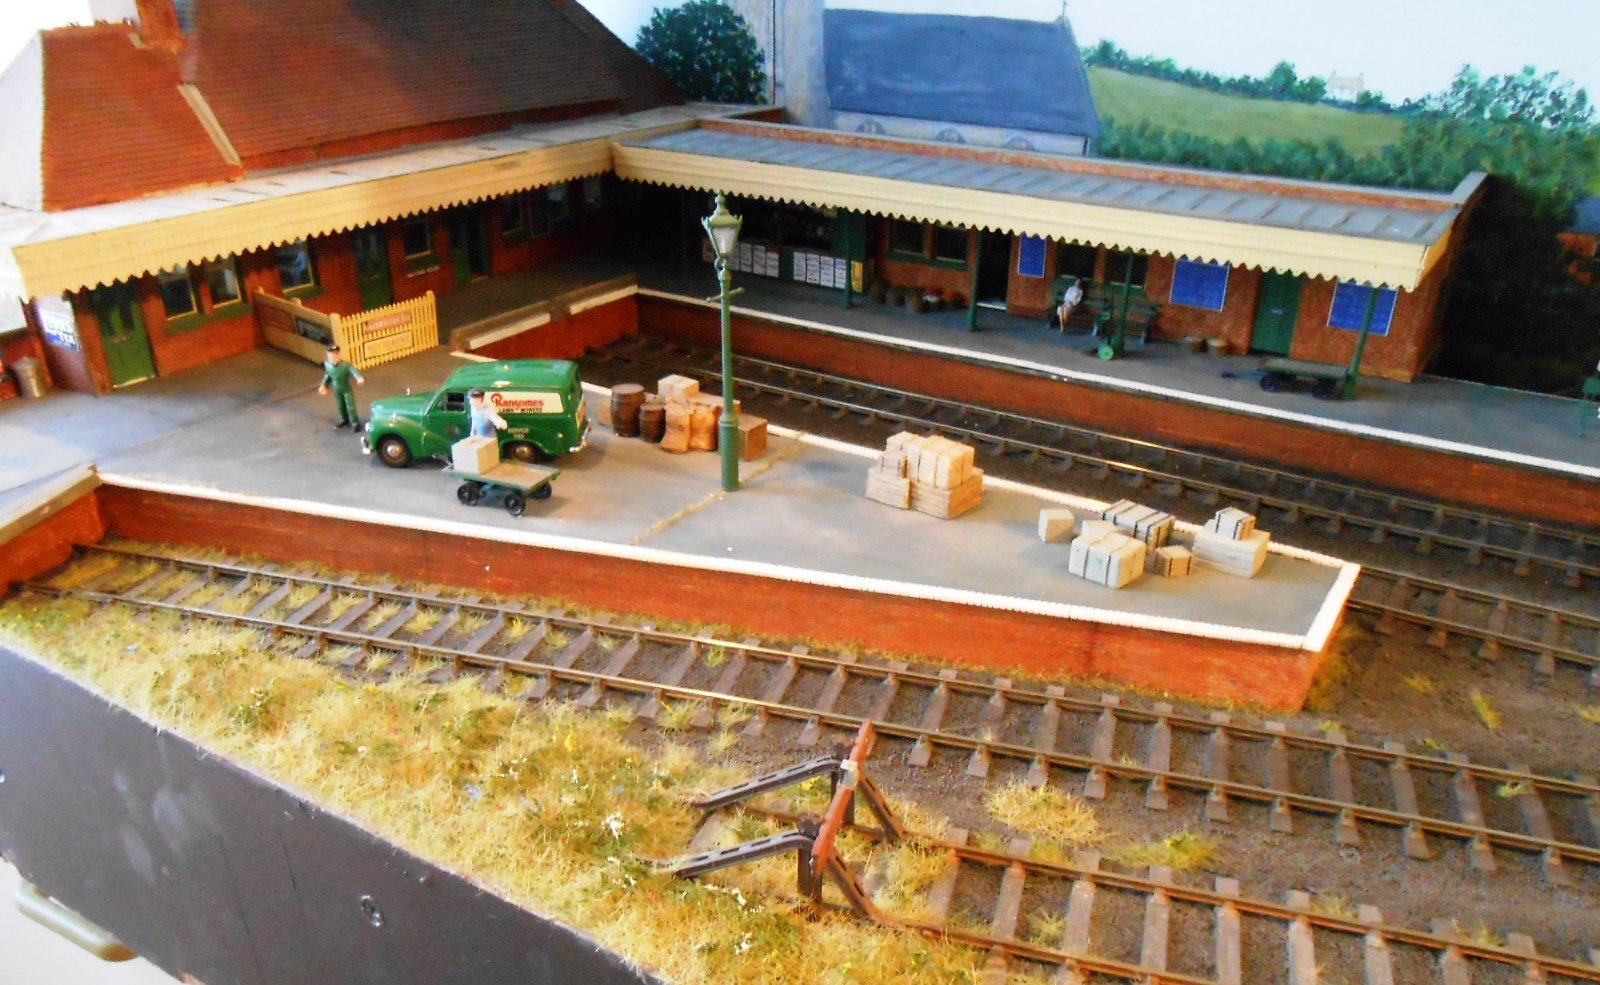
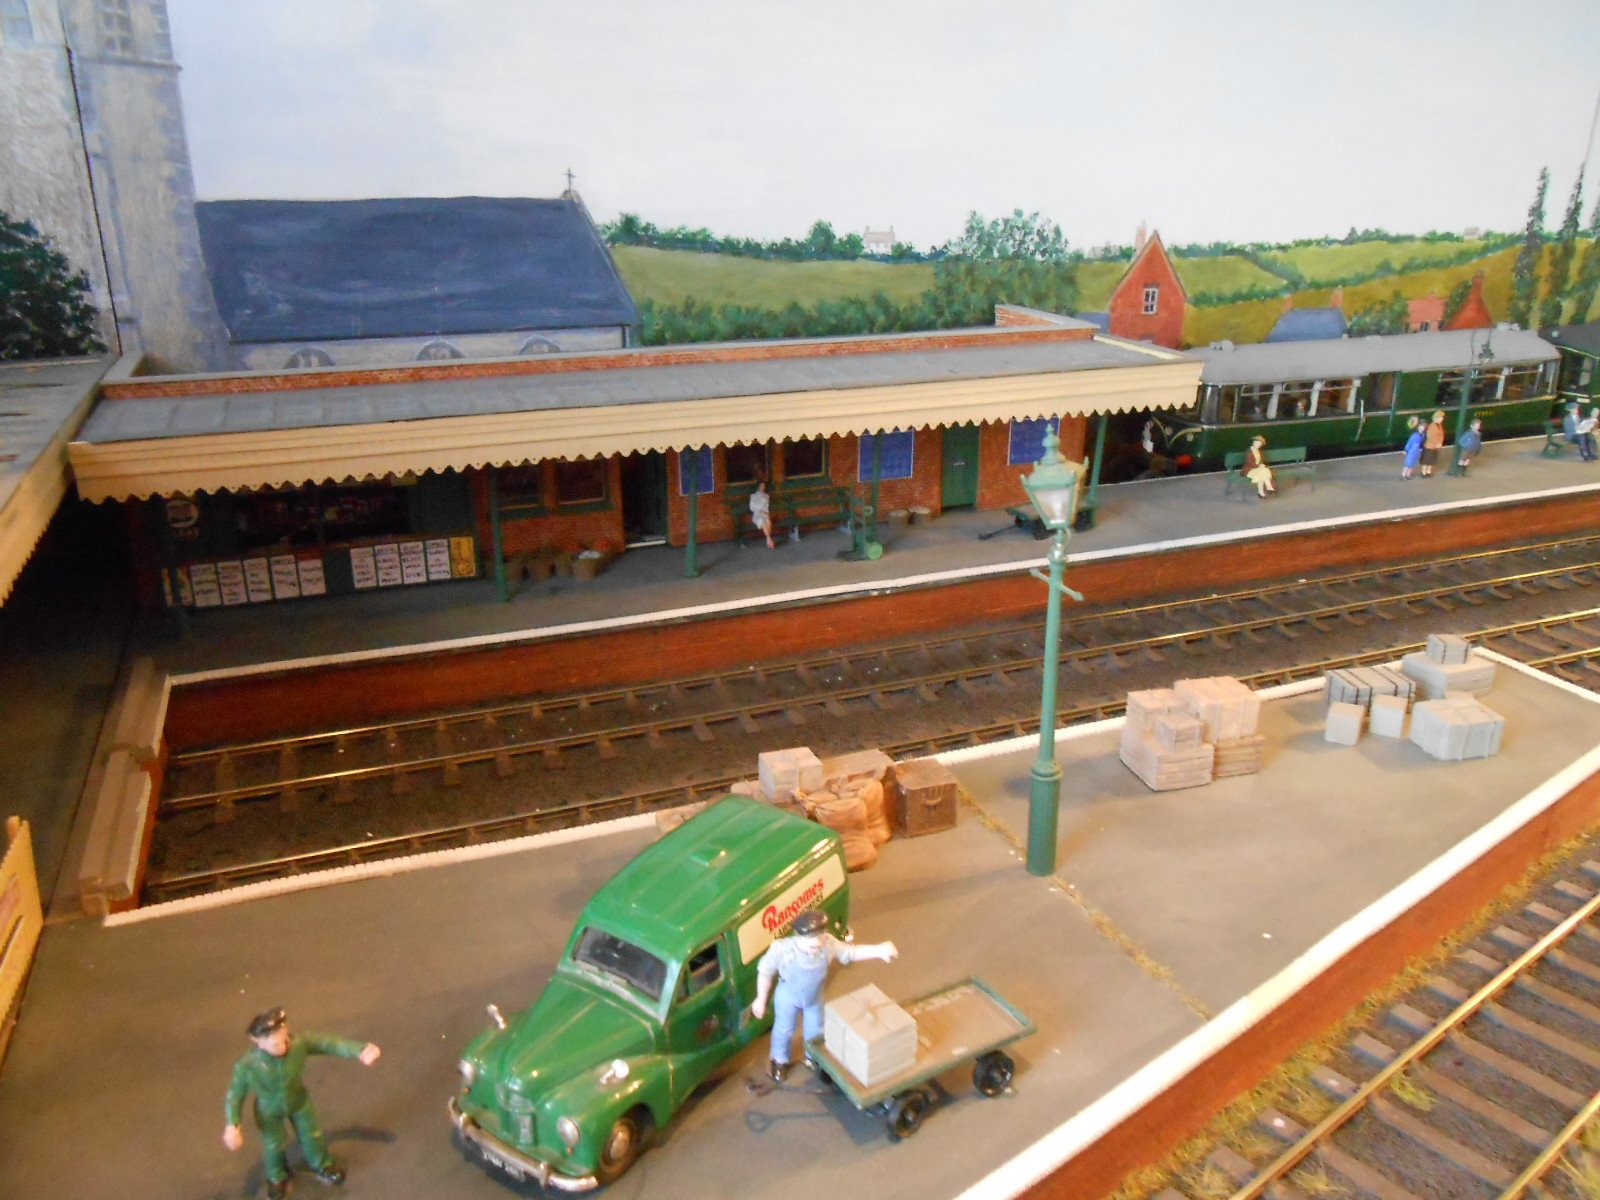
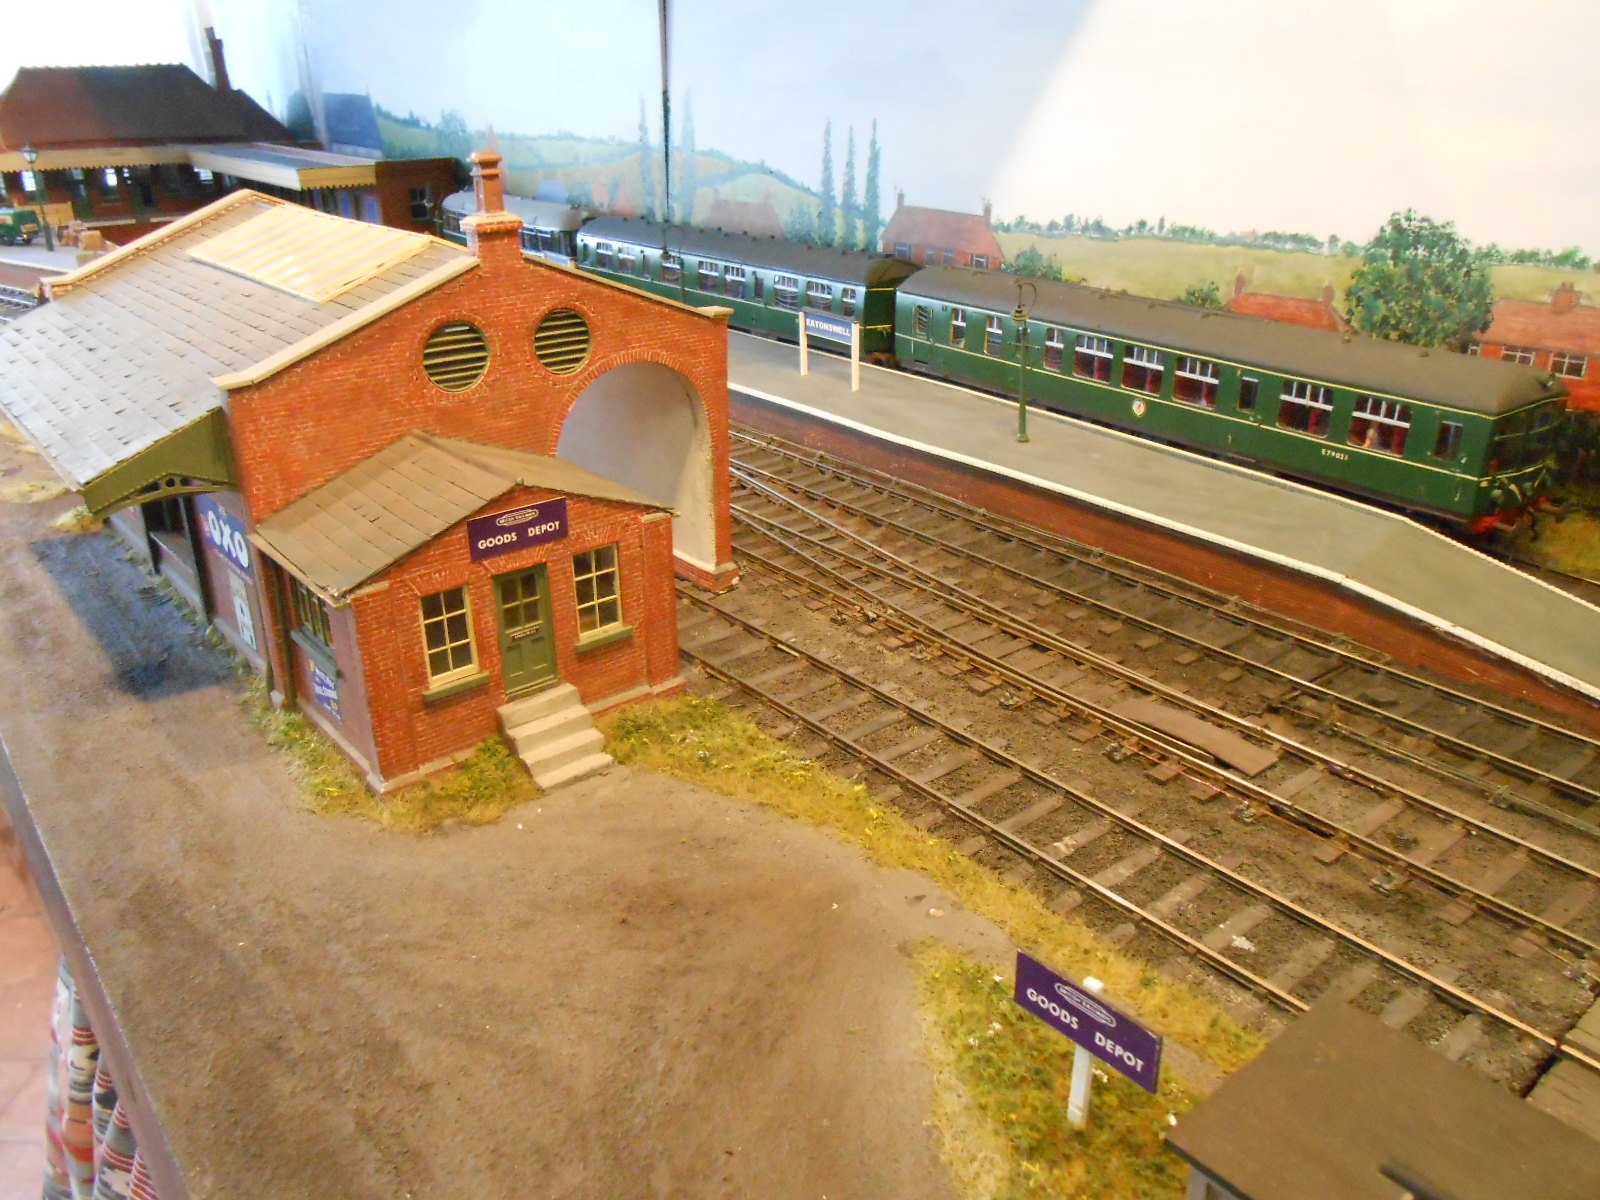
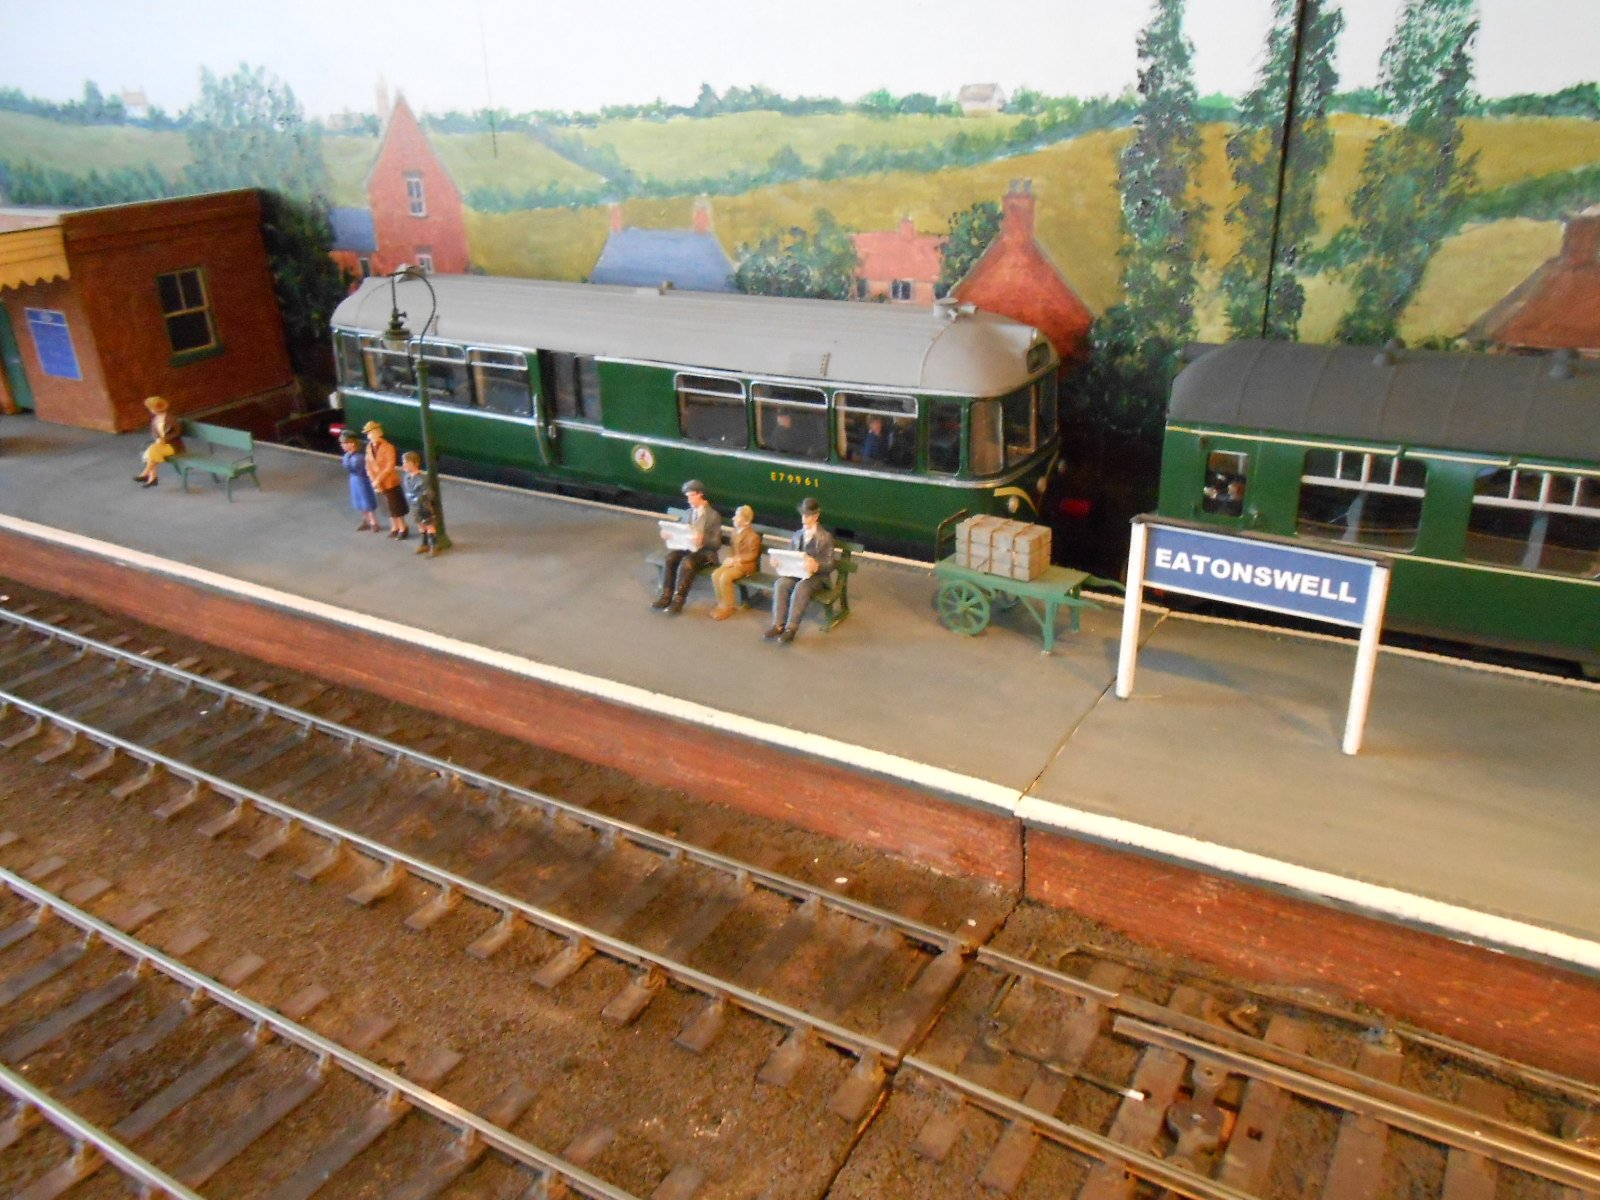
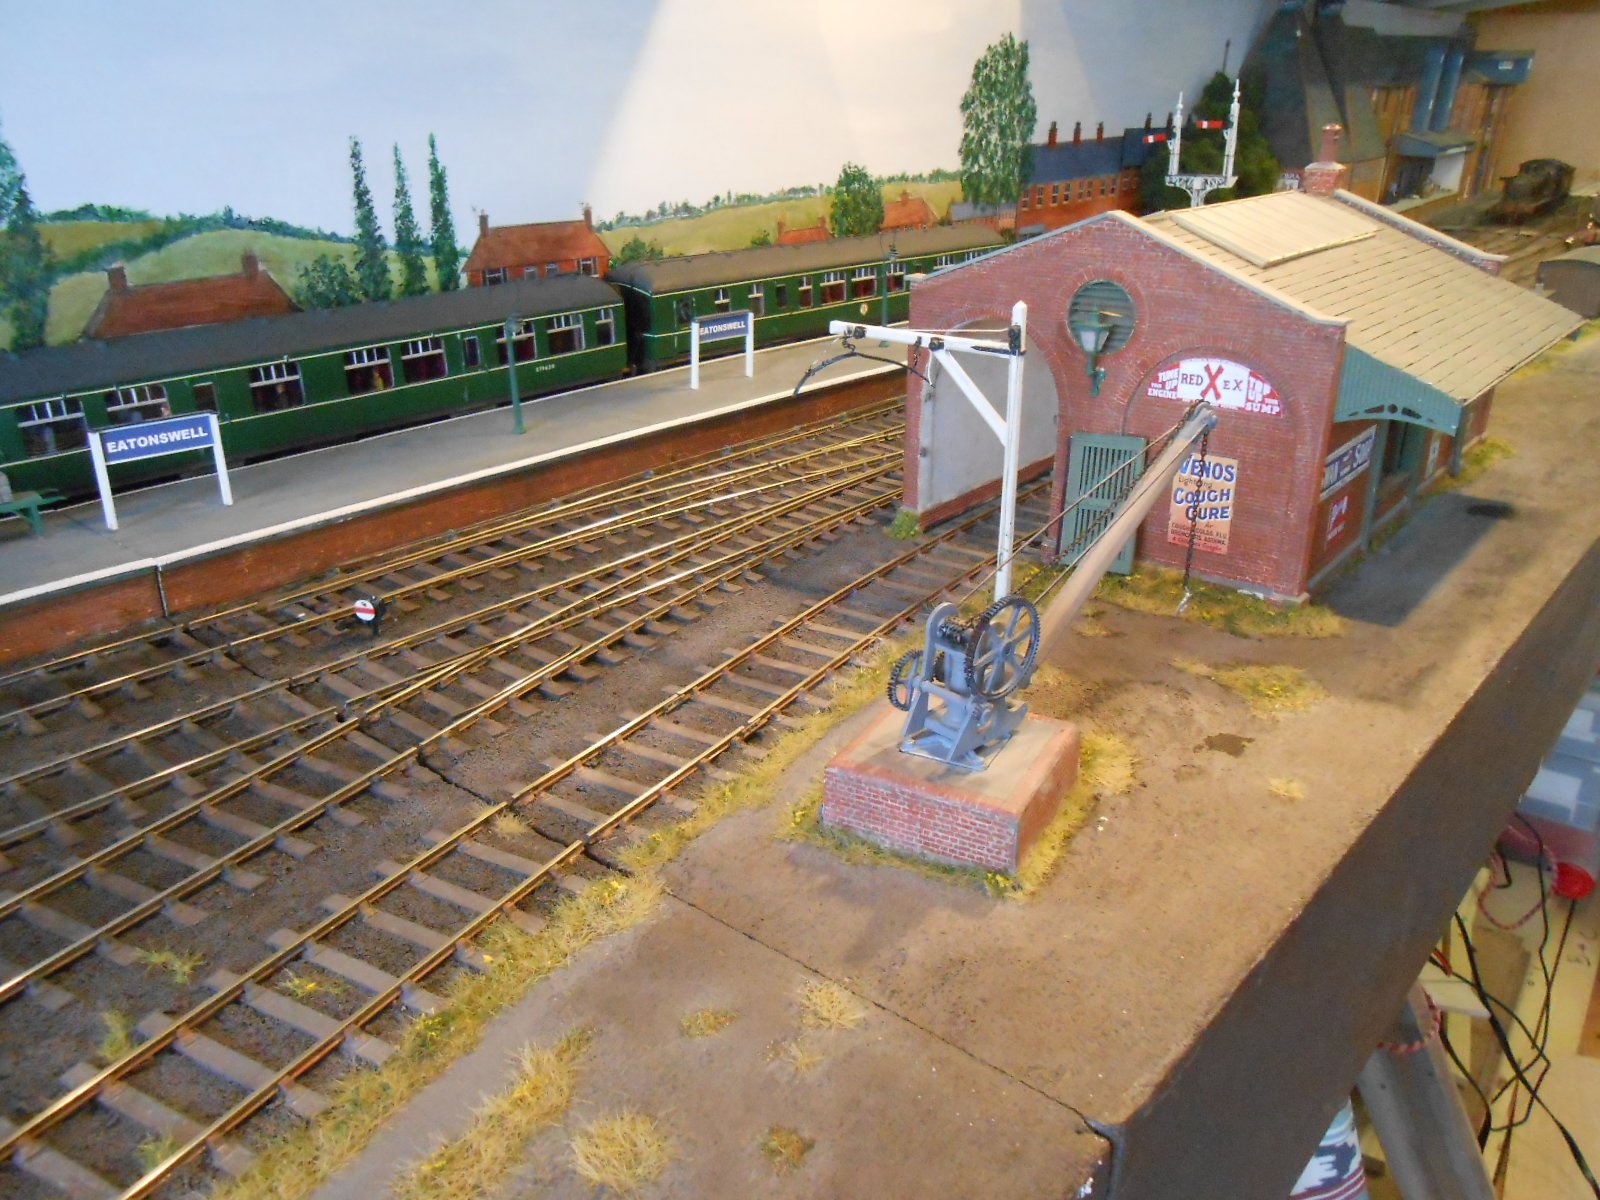
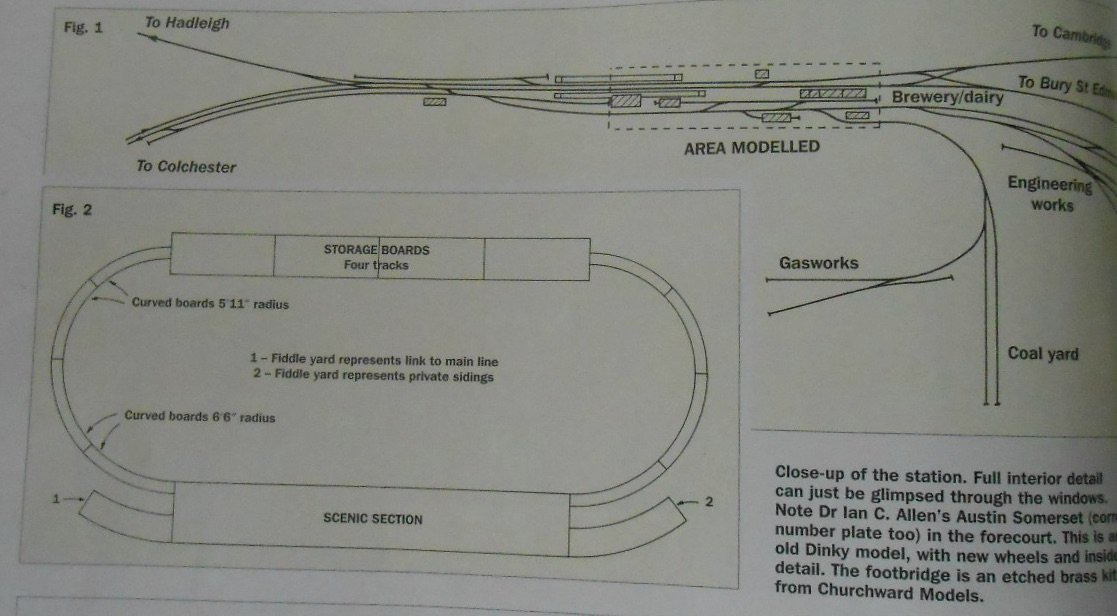
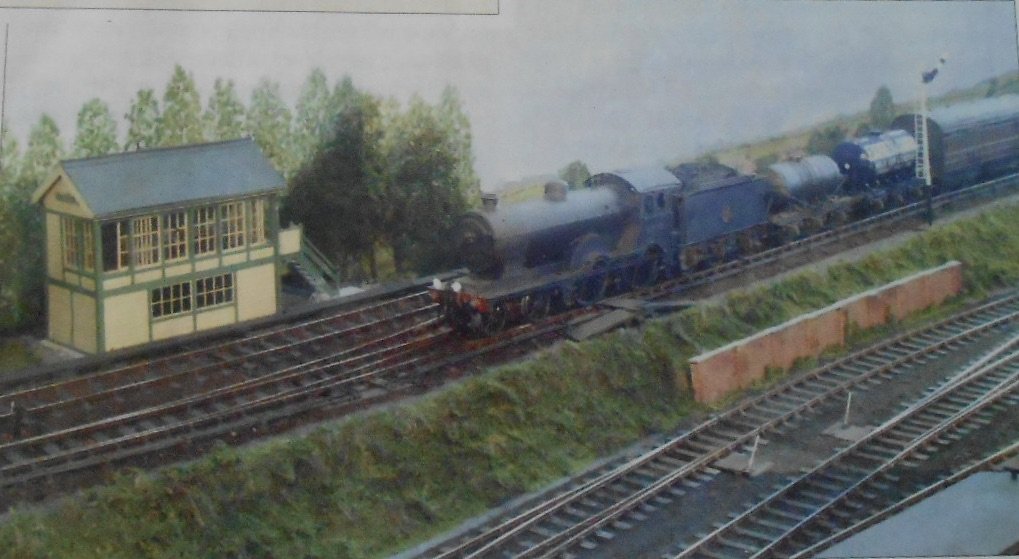
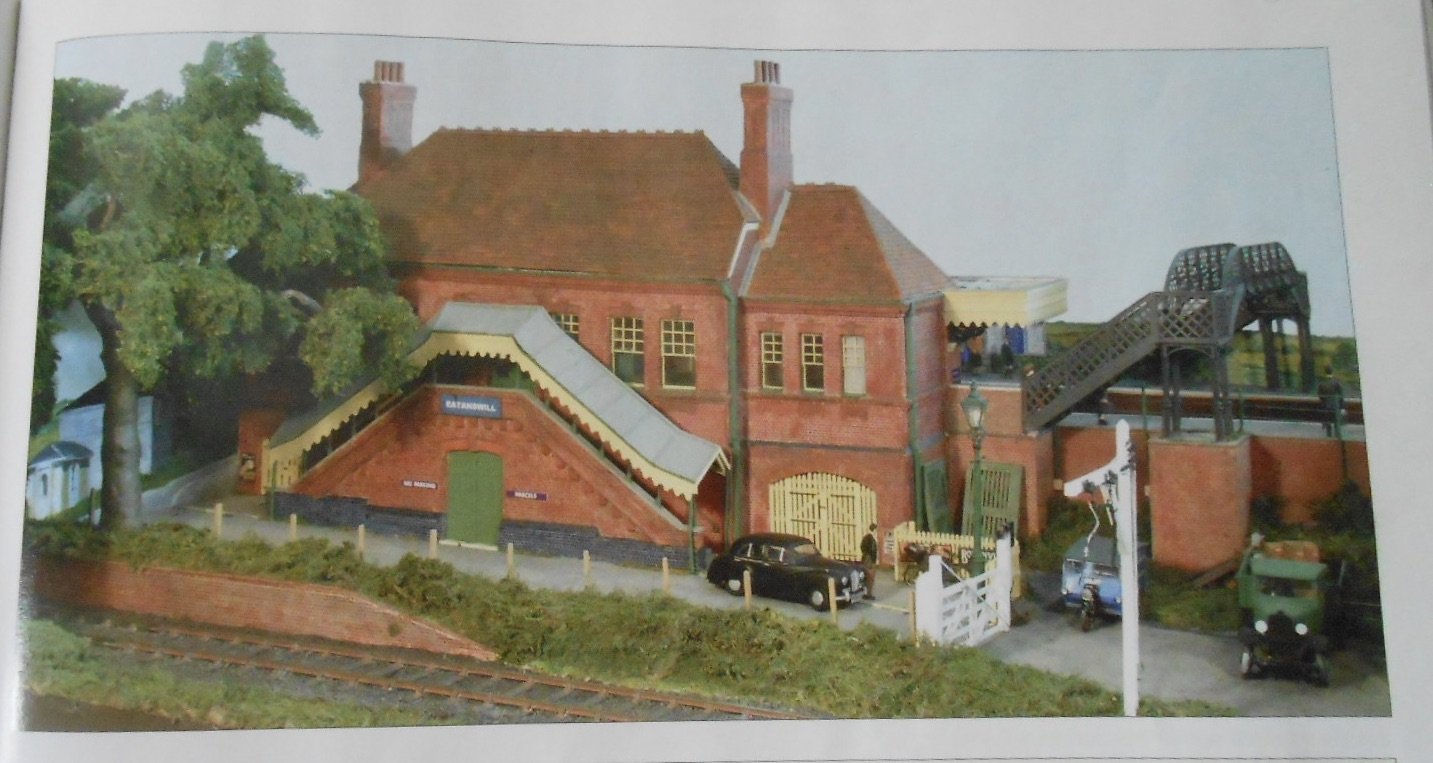
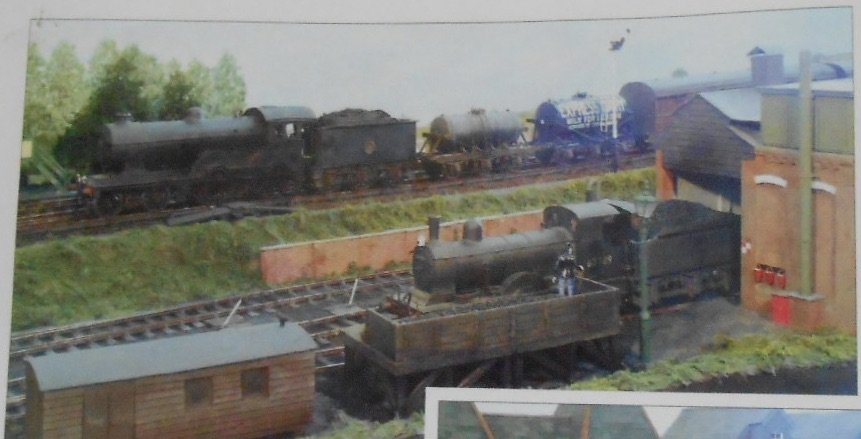
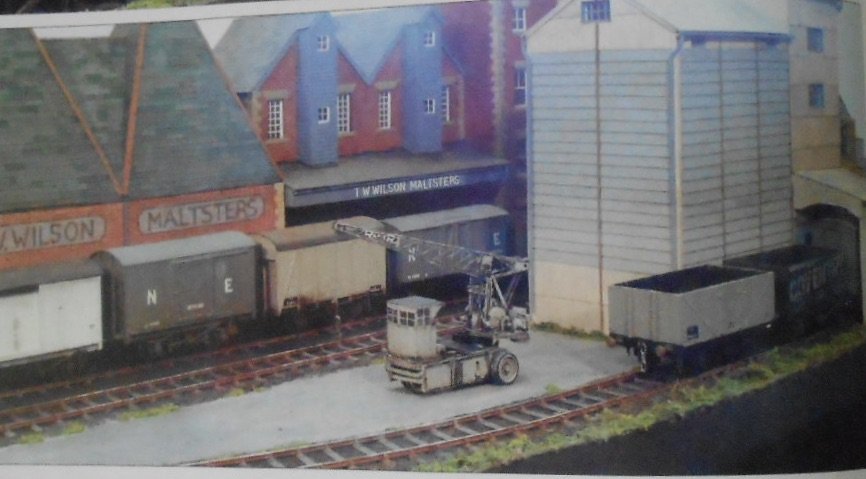
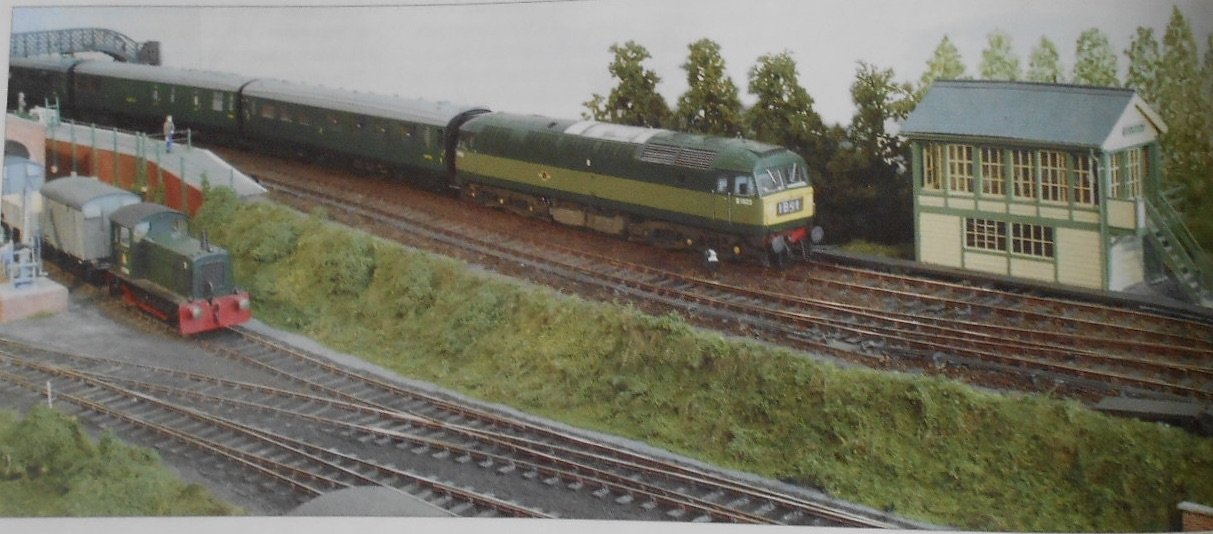
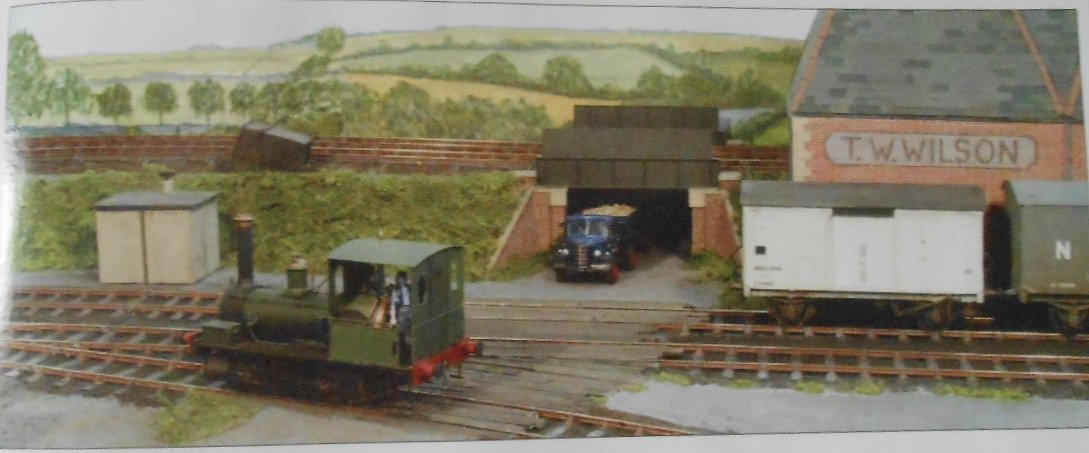
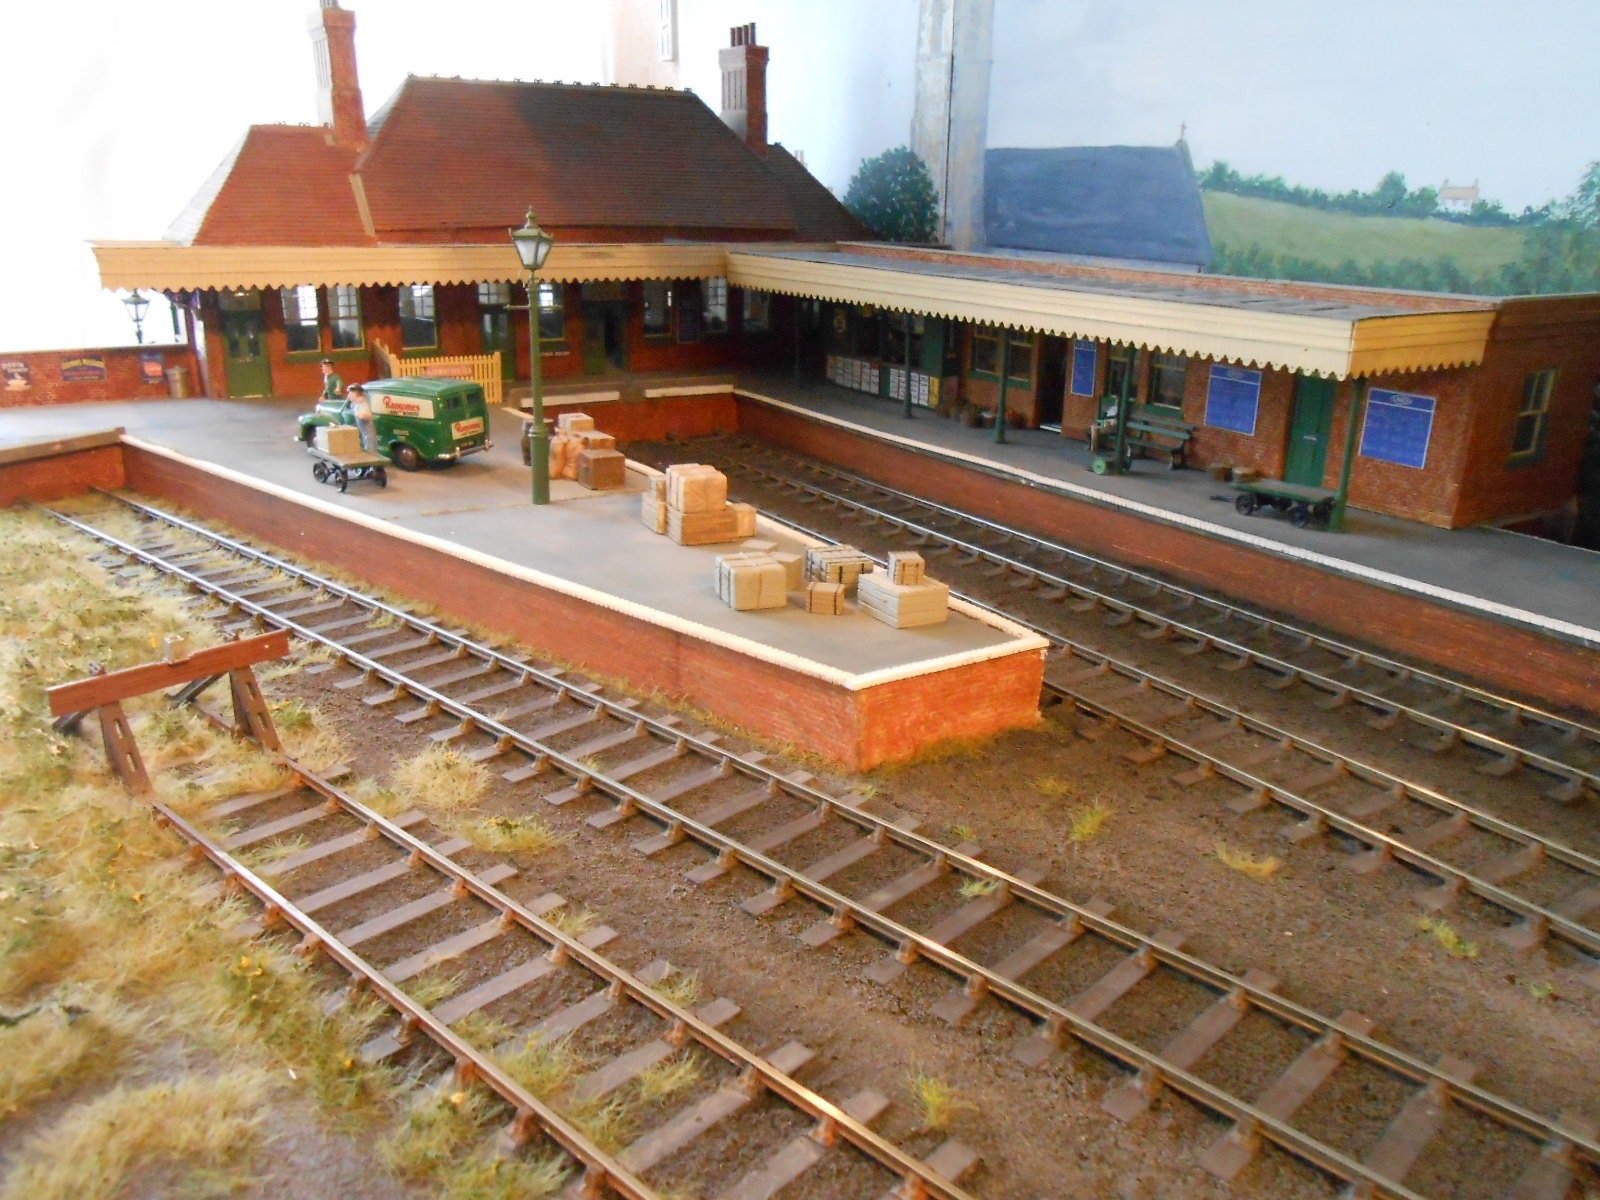
Back from a week in near 40c Umbria, Italy. Lovely area, but no sun tan as spent all our time in the shade. Anyway, now for Eatonswell Mark 3. After the initial oval and then the end to end with cassette fiddle yards, it was obvious that the format was impractical, not least because baseboards 4' long and 2'6 wide were desperately unwieldy. So, buildings were removed, track lifted and baseboards scrapped. The new layout was terminus-fiddle yard: four 3' 9 x 2' scenic boards and a 5' fiddle yard. There was a small additional scenic board which took the station building, at right angles across the end of the track. The fiddle yard still used cassettes, but this time I employed separate loco and train cassettes. The former could easily be picked up and moved to the other end of the train, while the latter only needed sliding back and forth. The 5' overall length meant there was enough room for a tender loco and three 52' bogies coaches. So, here we see the original station, at right angles to the tracks, creating a nice terminus. Looking the other way, you can see there was a single main platform, with a bay just beyond, while in the foreground is a double loading dock. Moving further along, we see the goods shed siding and the rest of the bay platform. This was mainly used for my Derby Lightweight DMU and W&M Railbus. Further pictures of these below. The final section of the layout had a run of maltings, severed by their own siding, while at the front edge was the loco shed, based on the one at Saffron Walden. After the trials of the Mark 1 & 2 layouts, this version proved eminently more manageable - five and a bit baseboards [all with integral legs] against sixteen, while also being capable of solo operation, though two or three people were better. With point and signal operation all being wire in tube, wiring was fairly simple. It only did five shows, but was certainly one of my better efforts until the Irish bug bit in 2012 and Eatonswell was sold - though I did keep the stock. More on the latter next time.
- 90 replies
-
- 12
-
-
-
Always though Courtmacsherry was a near perfect branch terminus. Loco shed or school to hide the fiddle yard, estuary in front, row of houses behind. Andy Cundick has done a very fine model of it, to scale in 4mm, but you could compress it down to much less. Even in 7mm, the essentials will easily fit into 3m or so. When we visited a few years ago, there was a race meeting on the 'strand'. An oval course had been marked out, with all the horses and jockeys gathered on the sea front above. A good crowd was there for the action, with the bars doing a roaring trade. Lots of music too. Magical!
-
Lovely stuff John. Plus nothing in the Work bench threads for several days and then you come up with two of your own. No excuses from me - really need to extract the digit.
-
Fascinating picture of Skibbereen. Knew about the curious train reversal (almost as if it was an Iain Rice design), but other photos I've seen suggest is was quite an urban spot, when it actually quite rural.
-
Always interesting to see layouts progress. Like the forced perspective and don't see why it shouldn't work - plus you can always control the viewing angles with strategically placed trees and bushes. Wondered why DAS had suddenly become hard to find
-
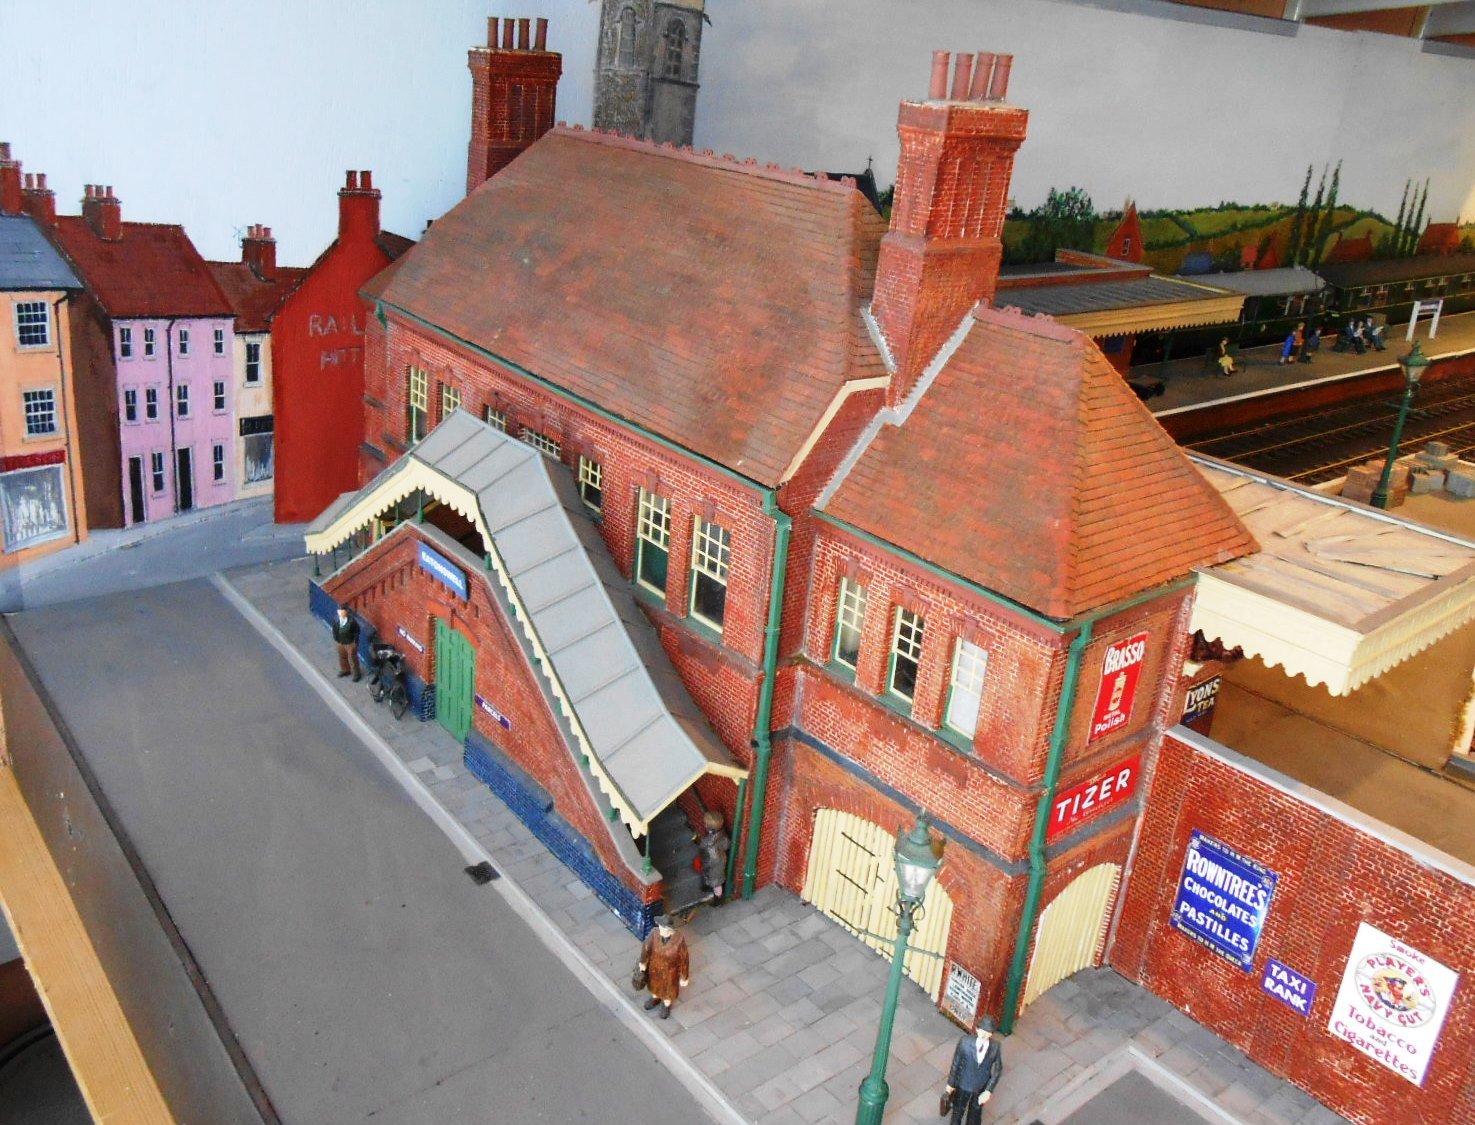
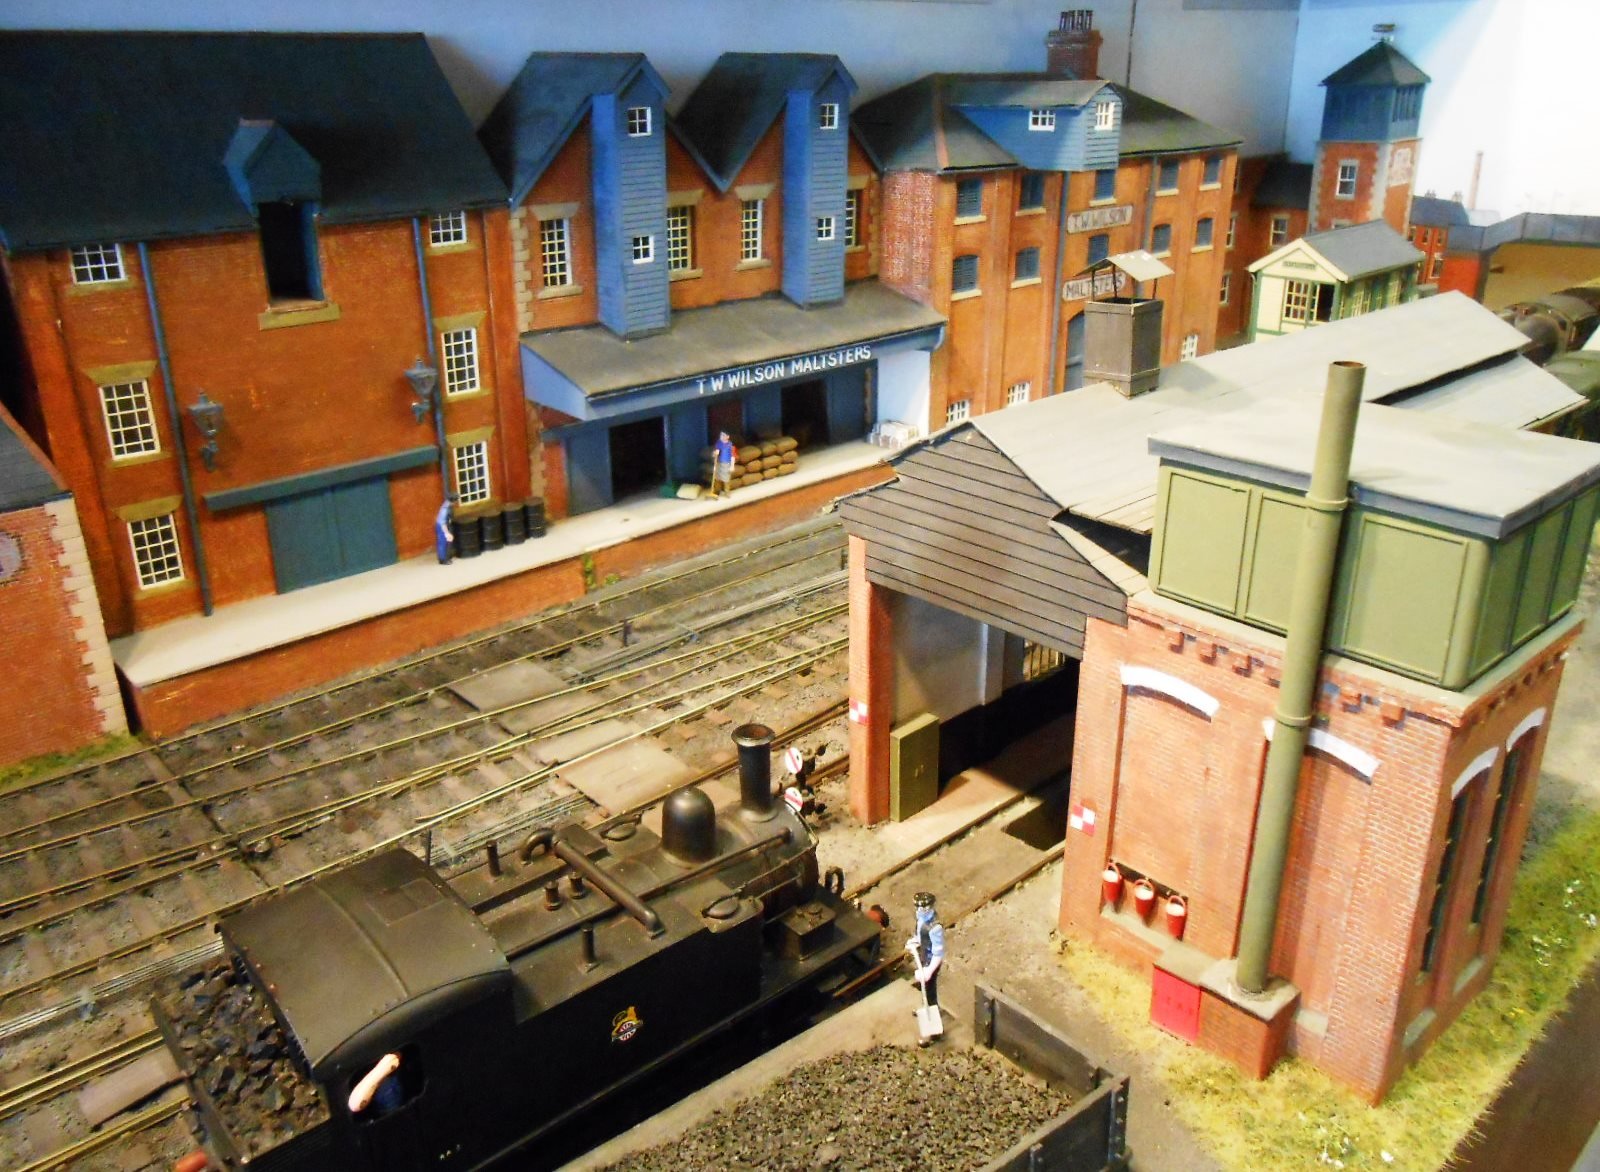
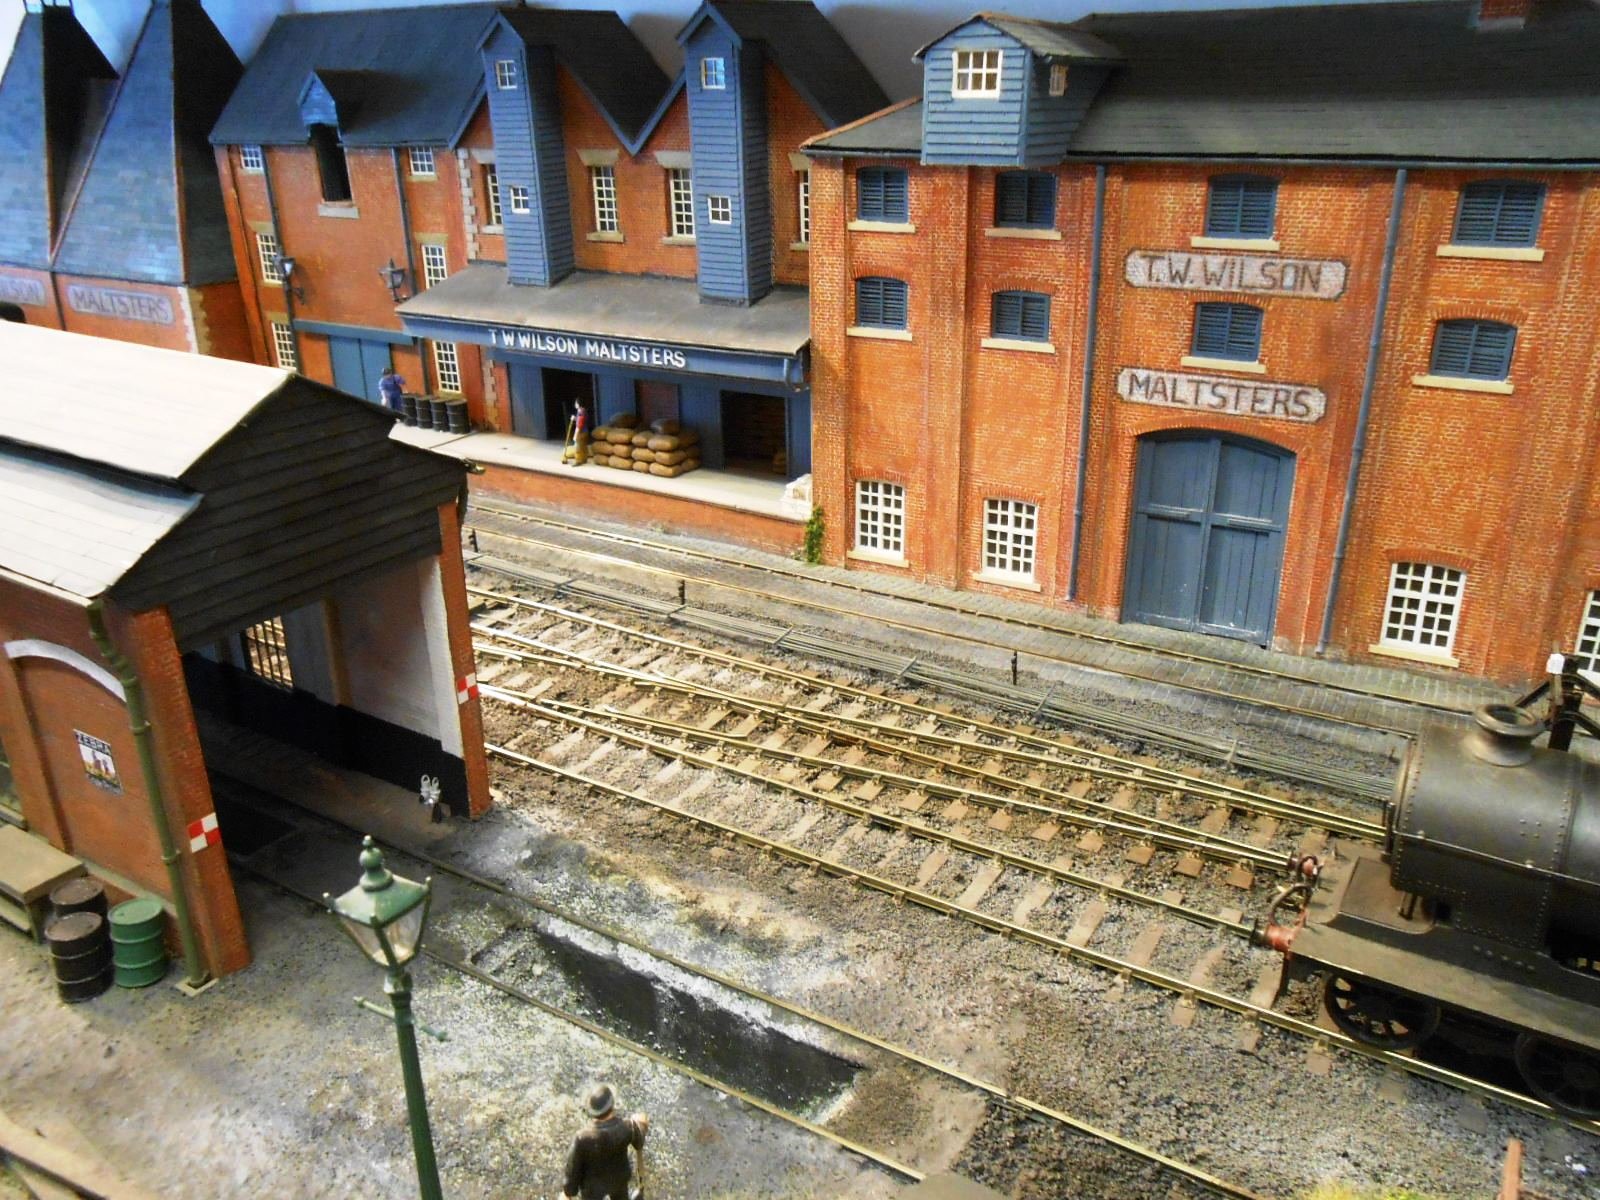
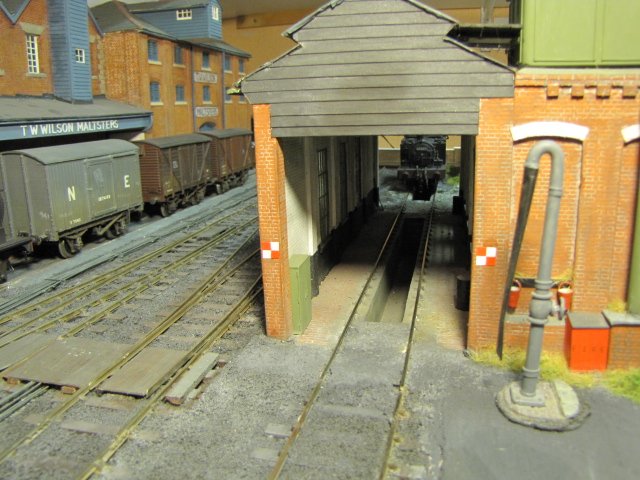
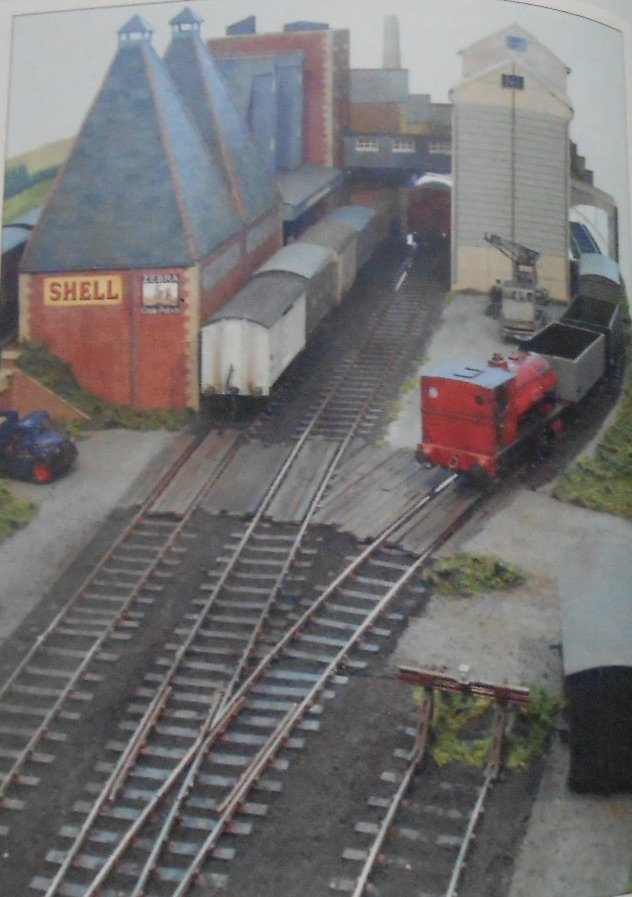
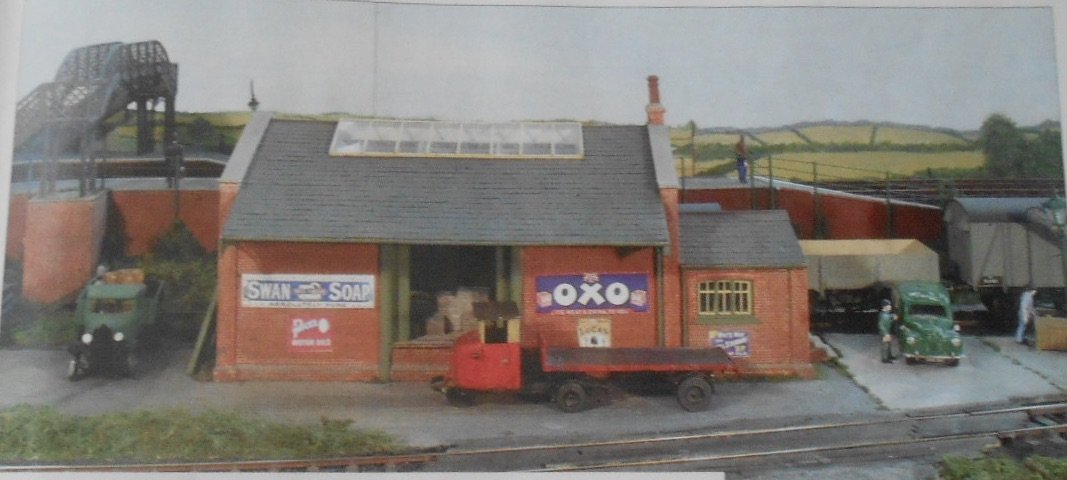
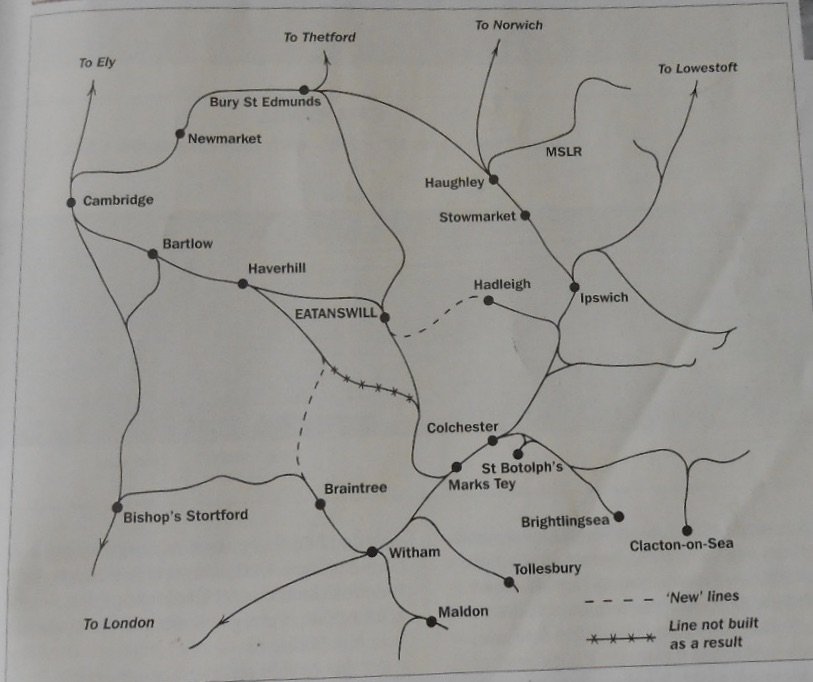
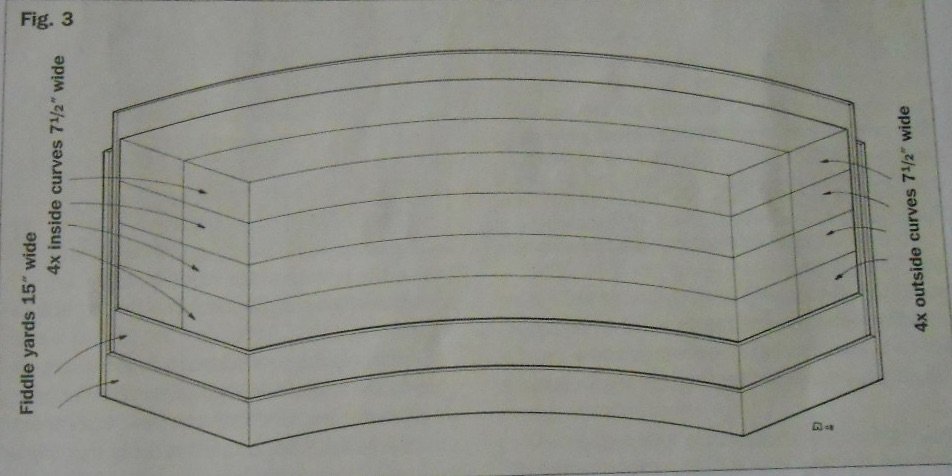
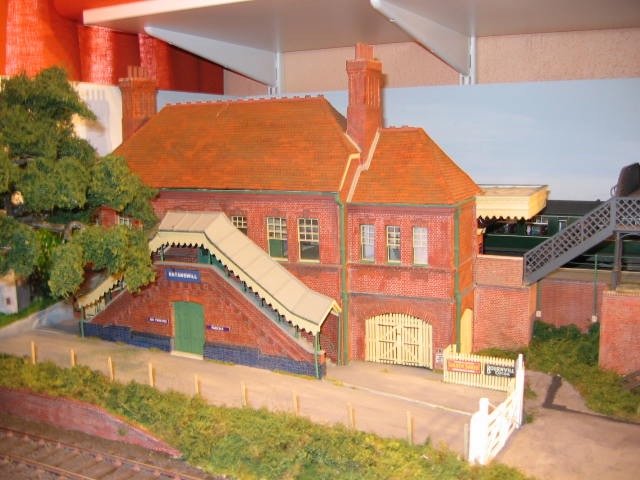
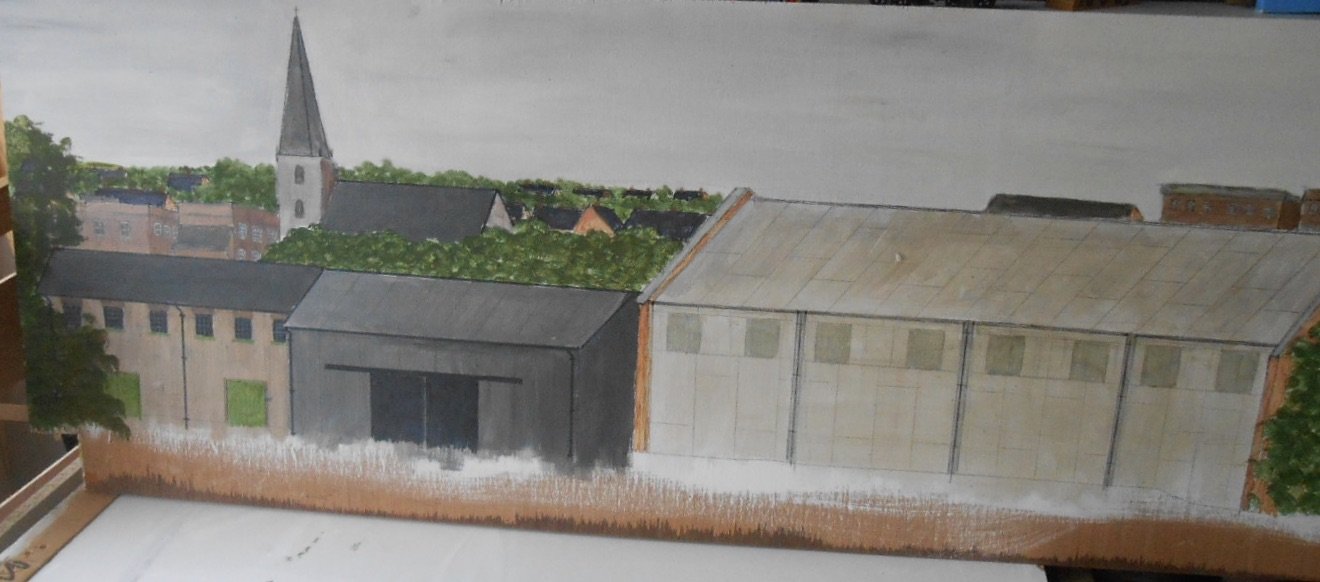
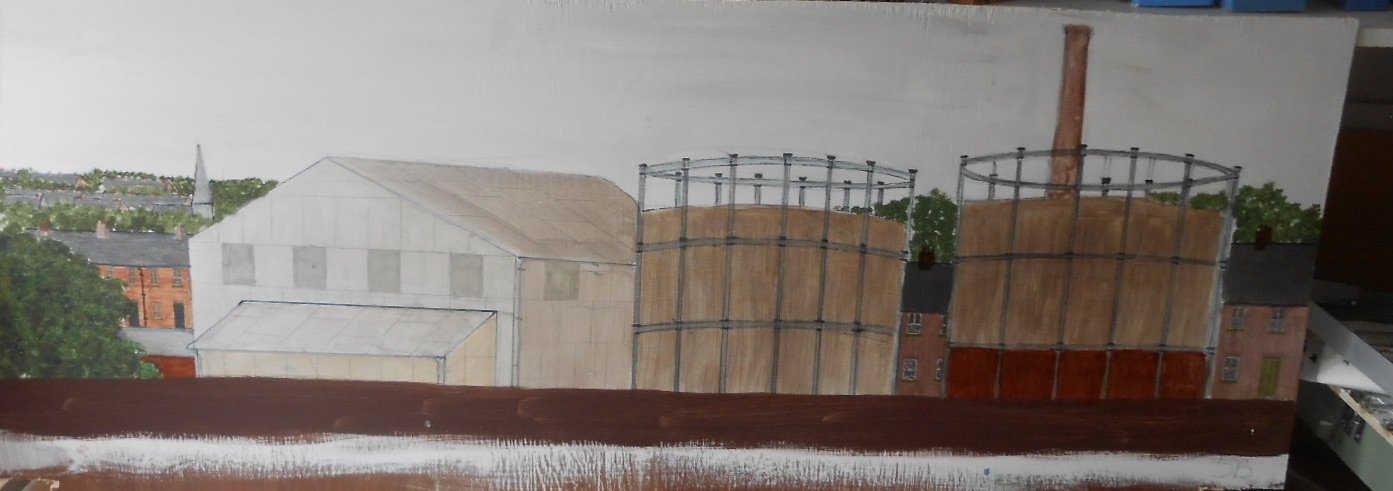
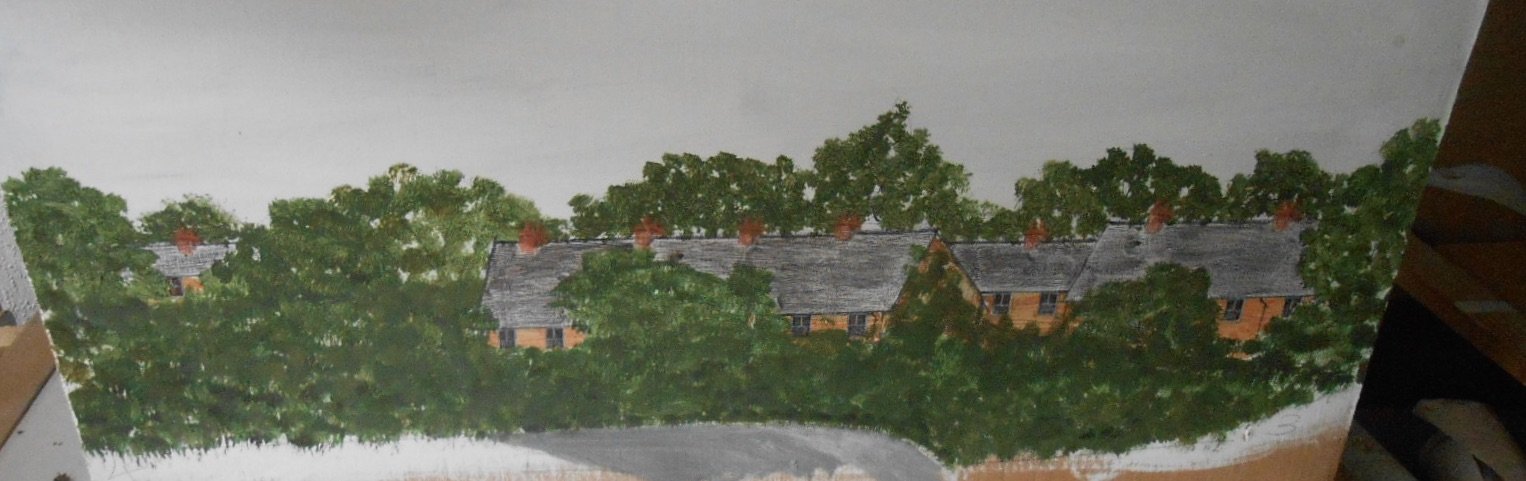
Eatonswell This layout was built in the early 2000s, in a pre-digital age - for me anyway. Hence most of the pictures here are photos taken of my article in the April 2009 edition of RM. Eatonswell was my first attempt at 'mainline' modelling, trying to depict a secondary line in East Anglia in the 1950s, as shown in the map below. The scenic part of the layout was about 16ft x 2'6, divided into four split level boards as shown below. As in many of my schemes, even in this relatively large area, it relied on off scene sidings to develop the scene, though as I wrote at the time a 16ft scenic section out of a total run of about 70ft wasn't exactly good value for exhibition managers. The eventual intention was to grow the scenic areas over time, but it soon all became too much to organise. Might have worked as a club project, but not a solo one! Indeed, the only thing that made it work in the first place was the innovative idea of making each 180 degree curve in two sections of different radii, so they could 'nest' with each other for storage and transport. RM staff did a nice job on all these drawings and likewise the actual track plan. As can be seen, the goods yard was at a lower level and fed by two separate fiddle yards, which used cassettes. Overall then, this supposed solo enterprise actually needed at least five operators, though with that level of help, we could get it set up in about ninety minutes and back in the van in about 30. Apologies for the poor quality of some of the photos. I'll do some up to date ones as stuff is being got ready for the Chatham Show this year. The photo was taken after the layout became end to end, in which form it managed several shows because it took up much less space. All things being equal, nearly 20 years on, it is nice to reflect on what, while ultimately a bit of a blind alley, still looks pretty good and actually ran well too [it was DCC by the way]; shame it was all a bit too big for me to manage...
- 90 replies
-
- 12
-
-
-
Thanks folks. Have occasionally thought about moving the wheels out on Shannon, but the loco is so tiny, there just isn't room.
-
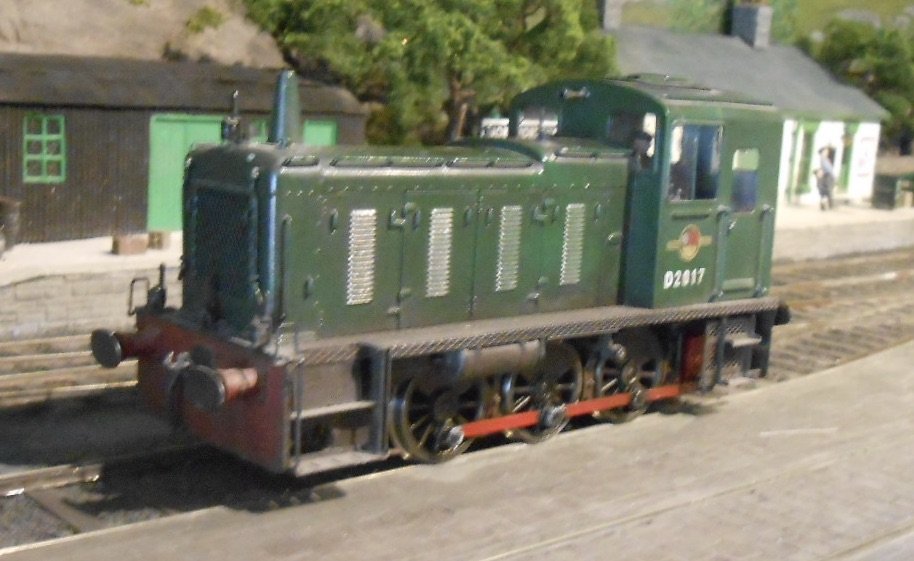
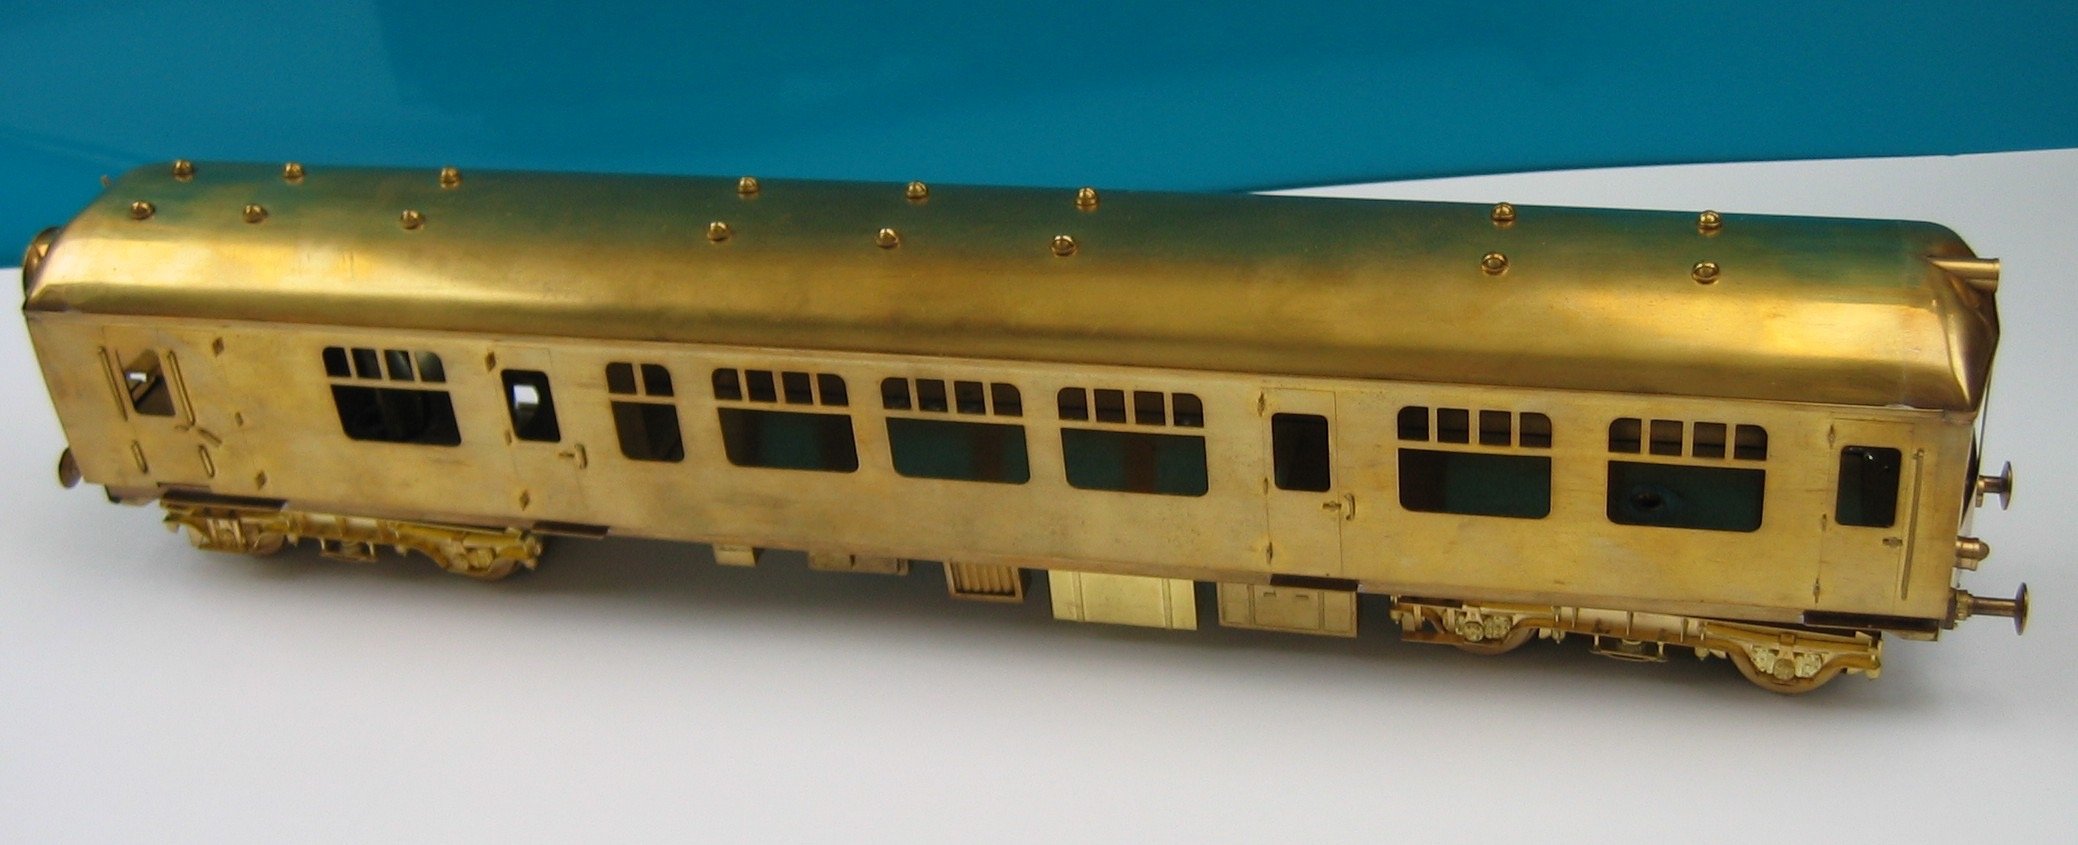
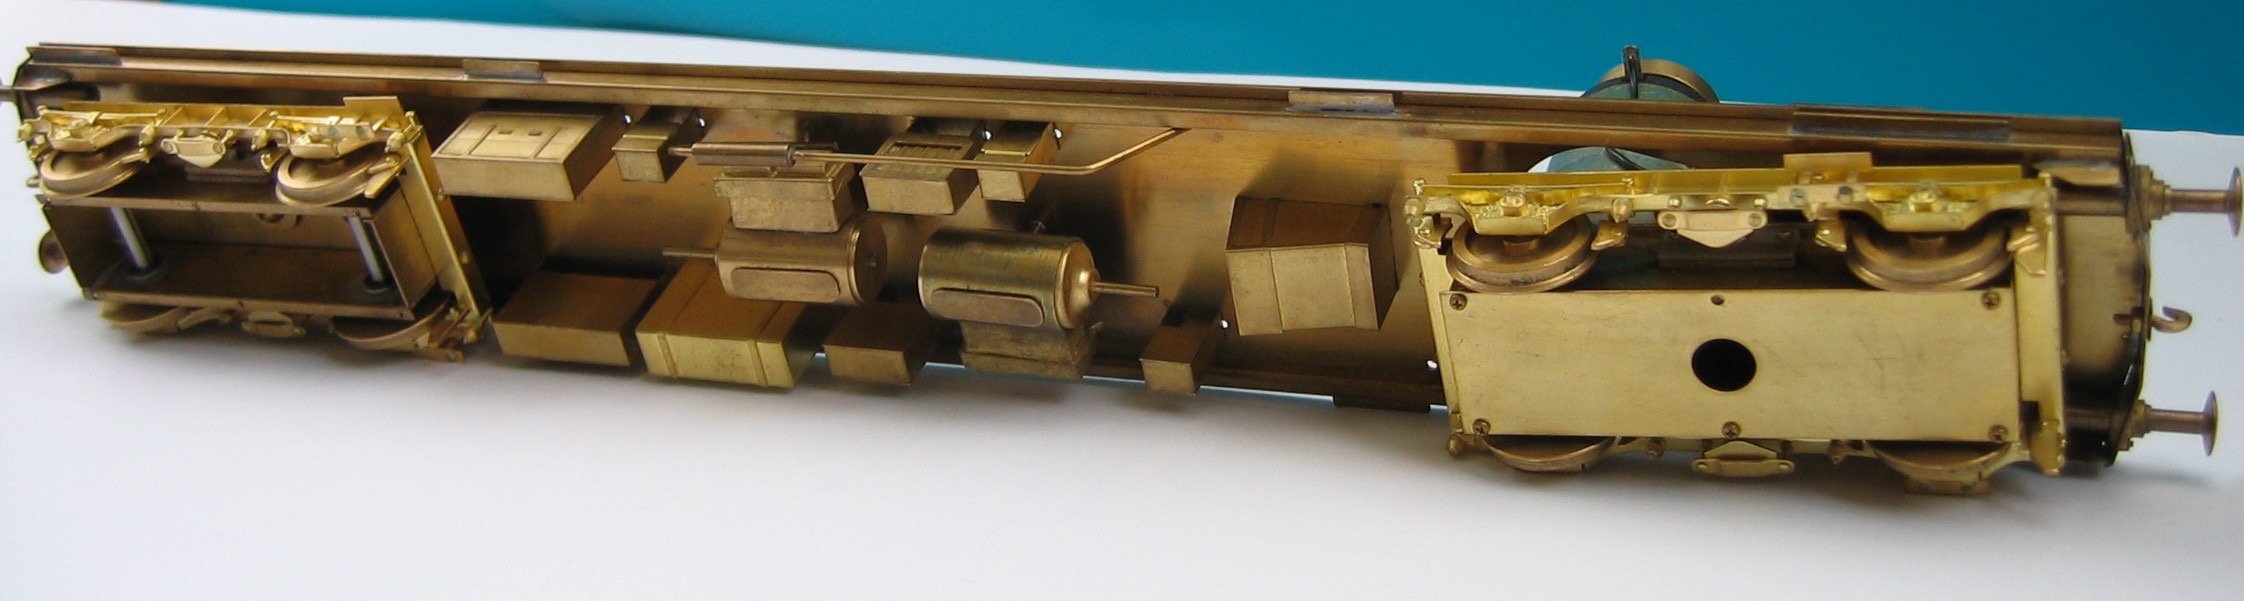
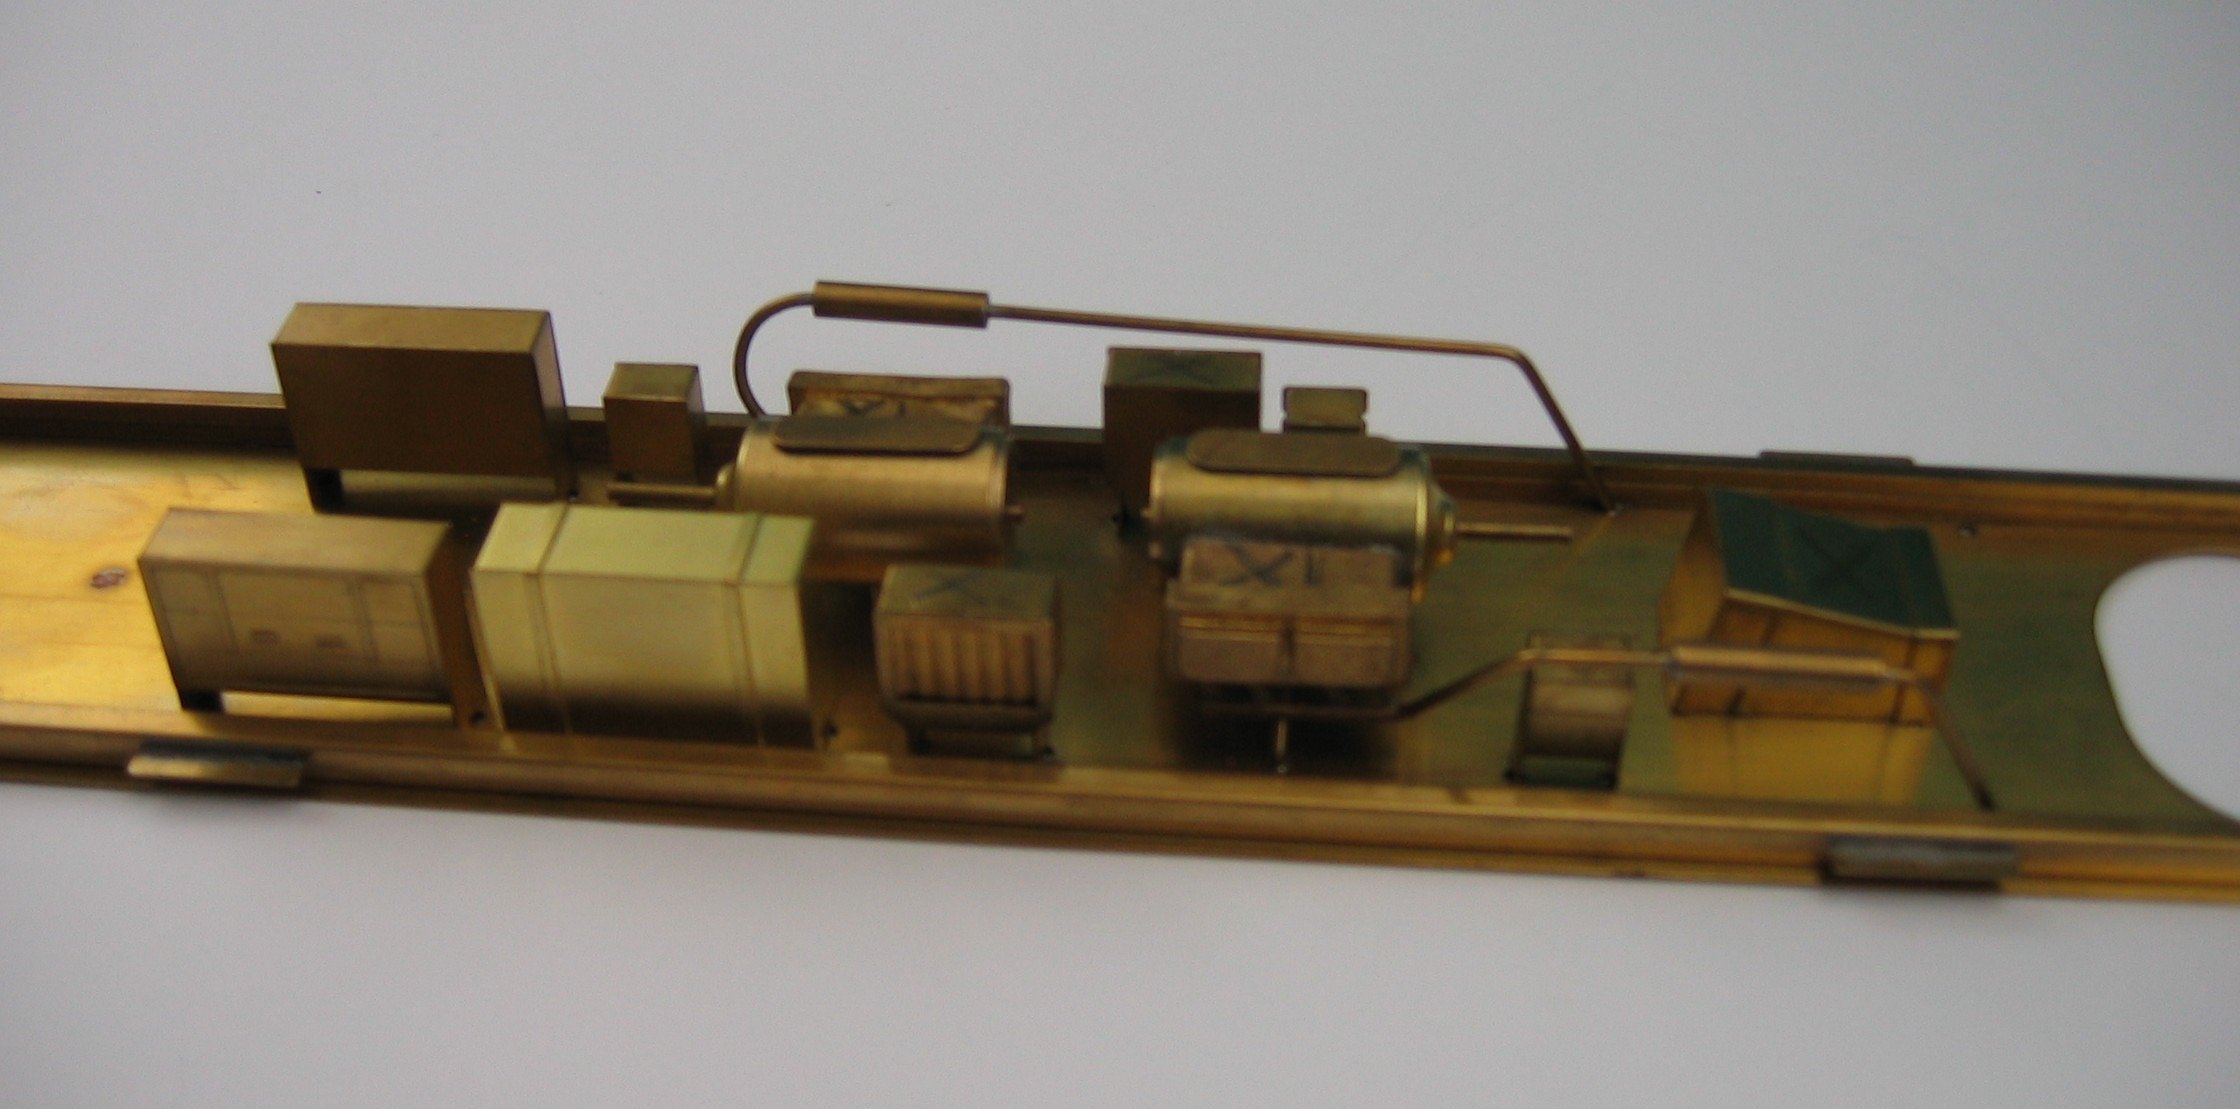
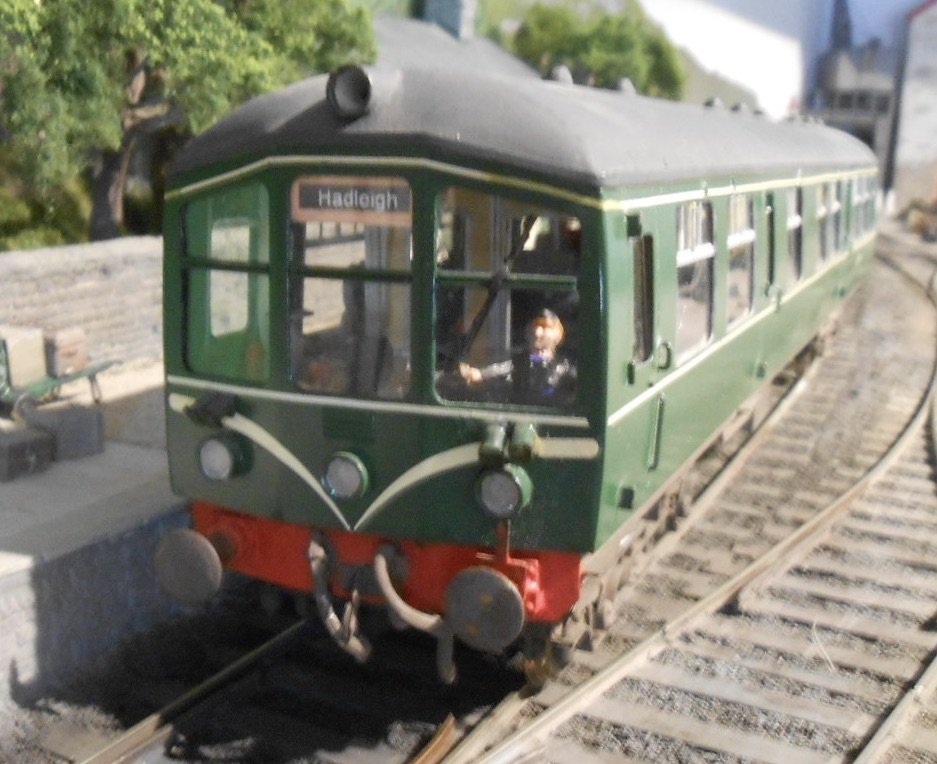
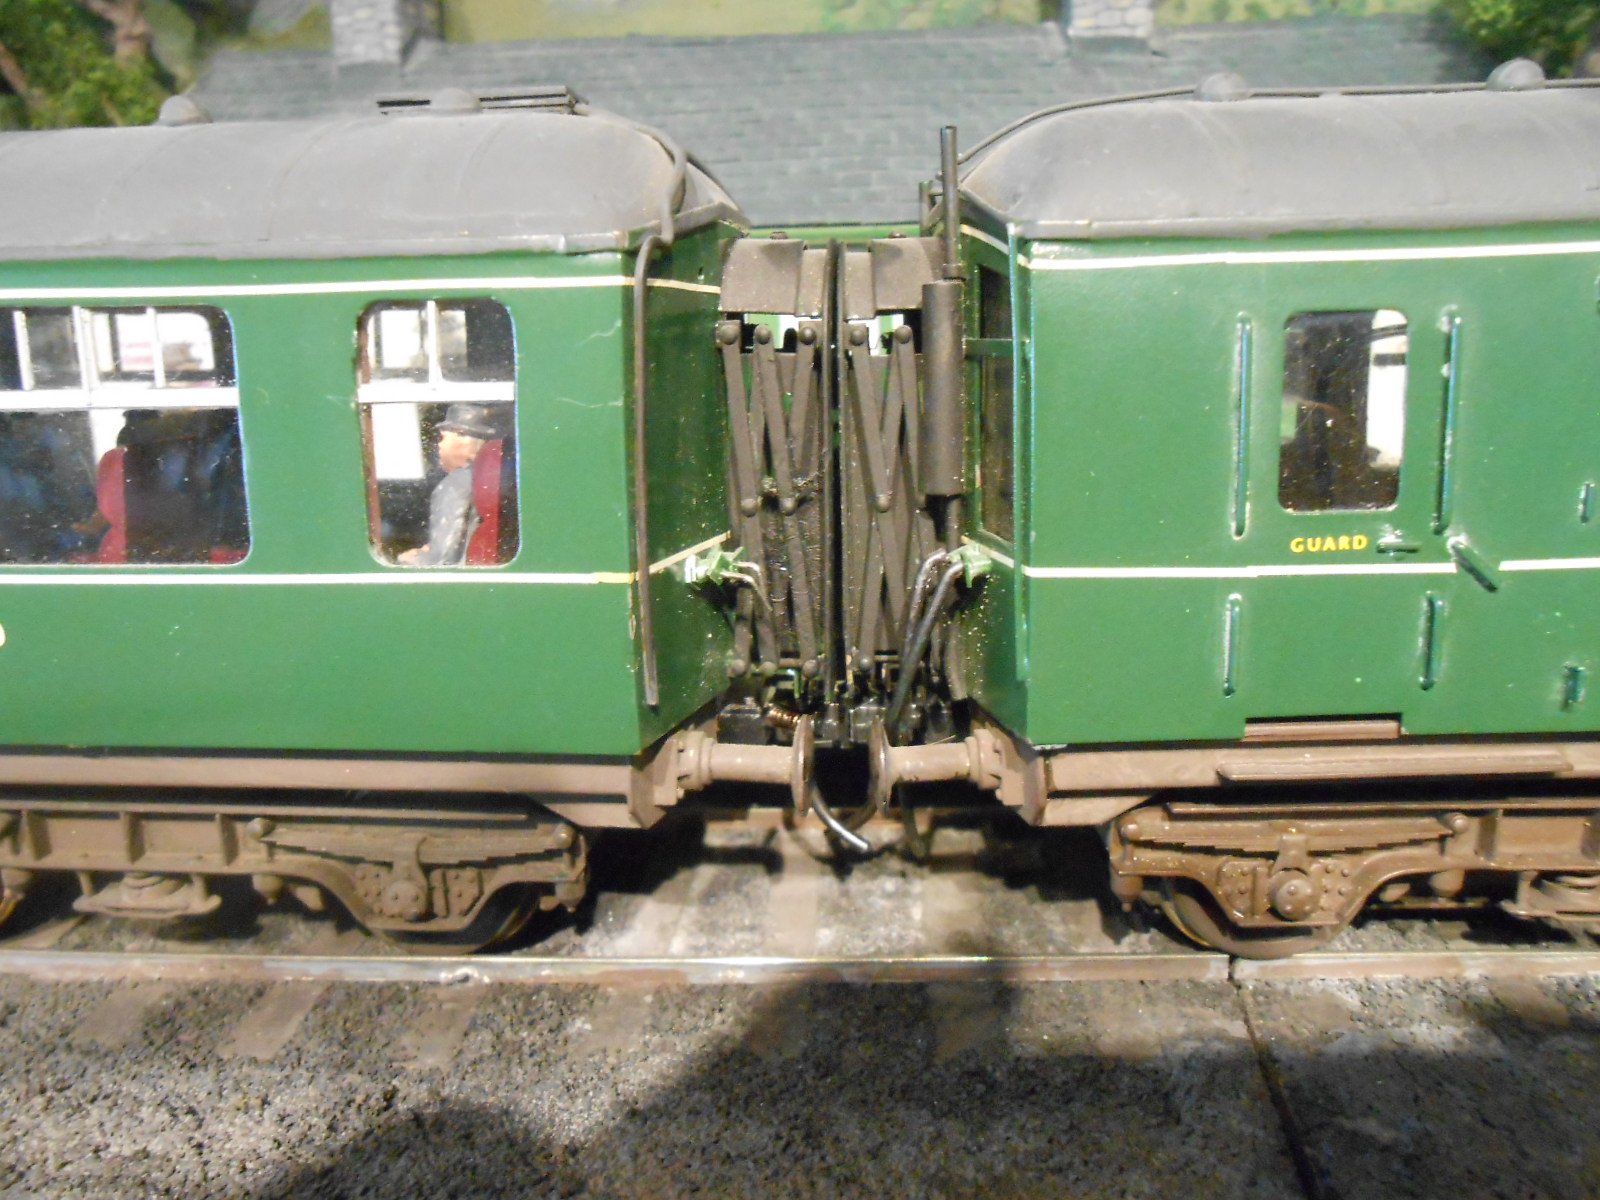
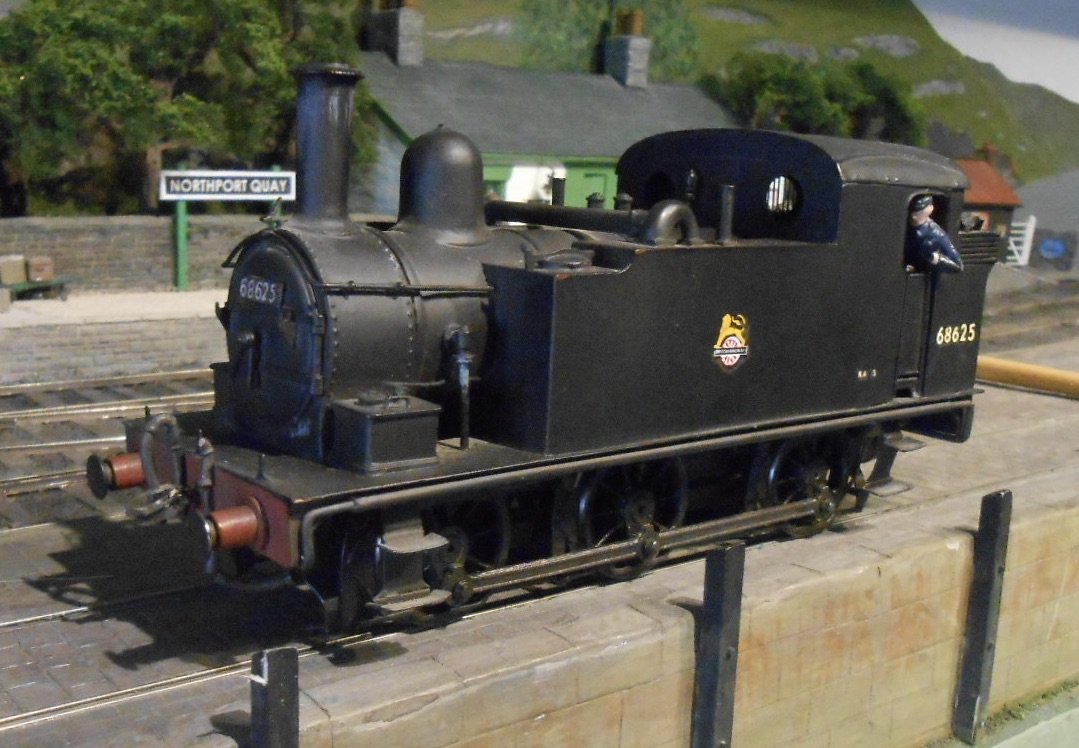
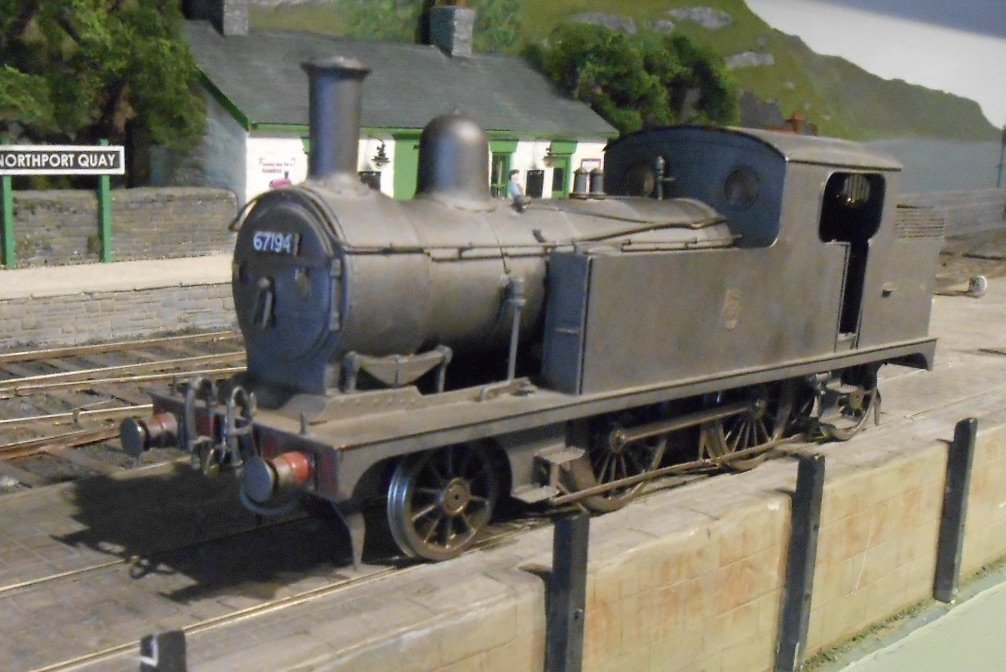
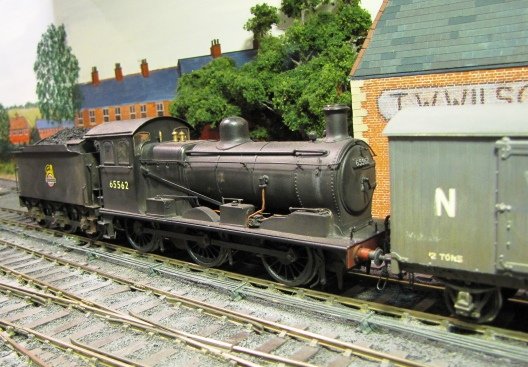
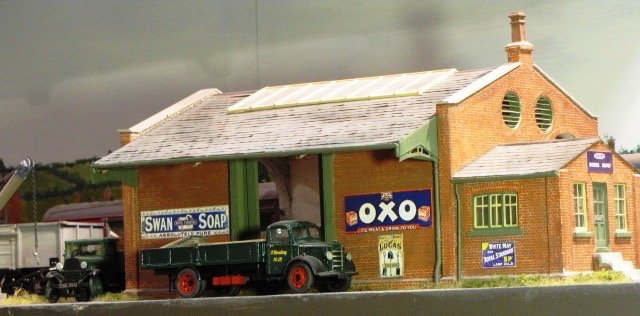
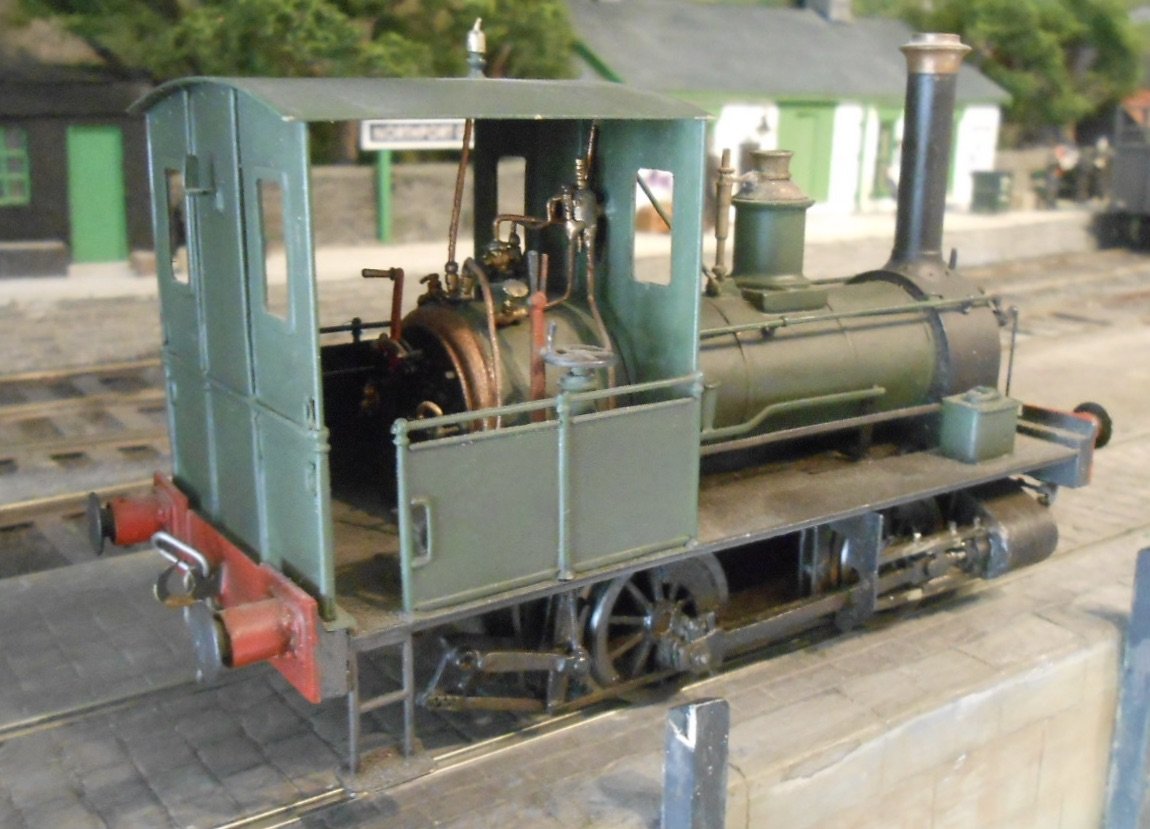
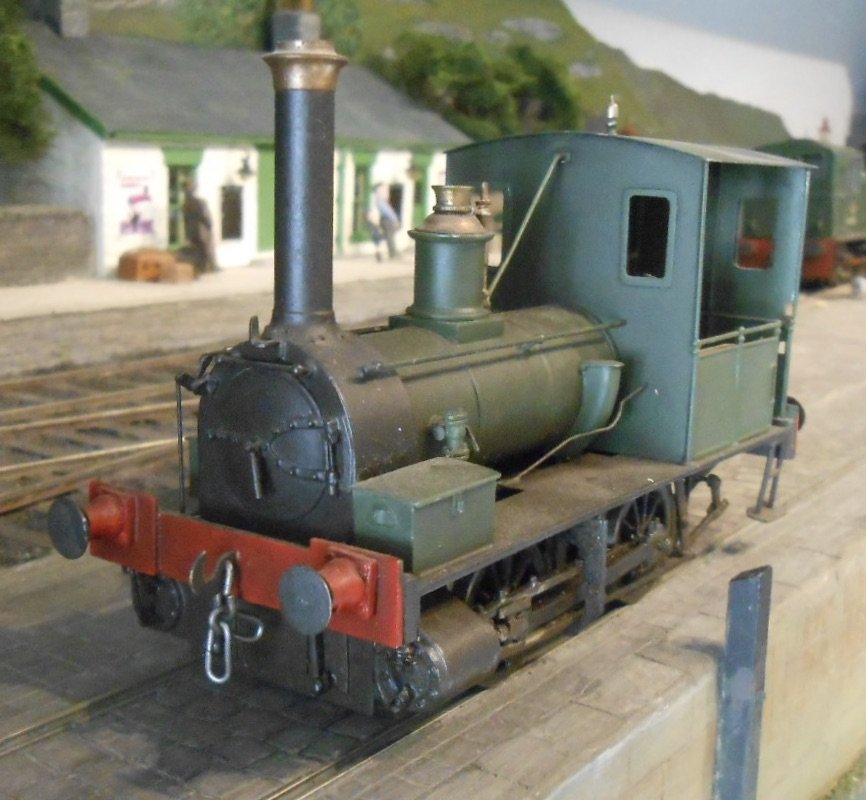
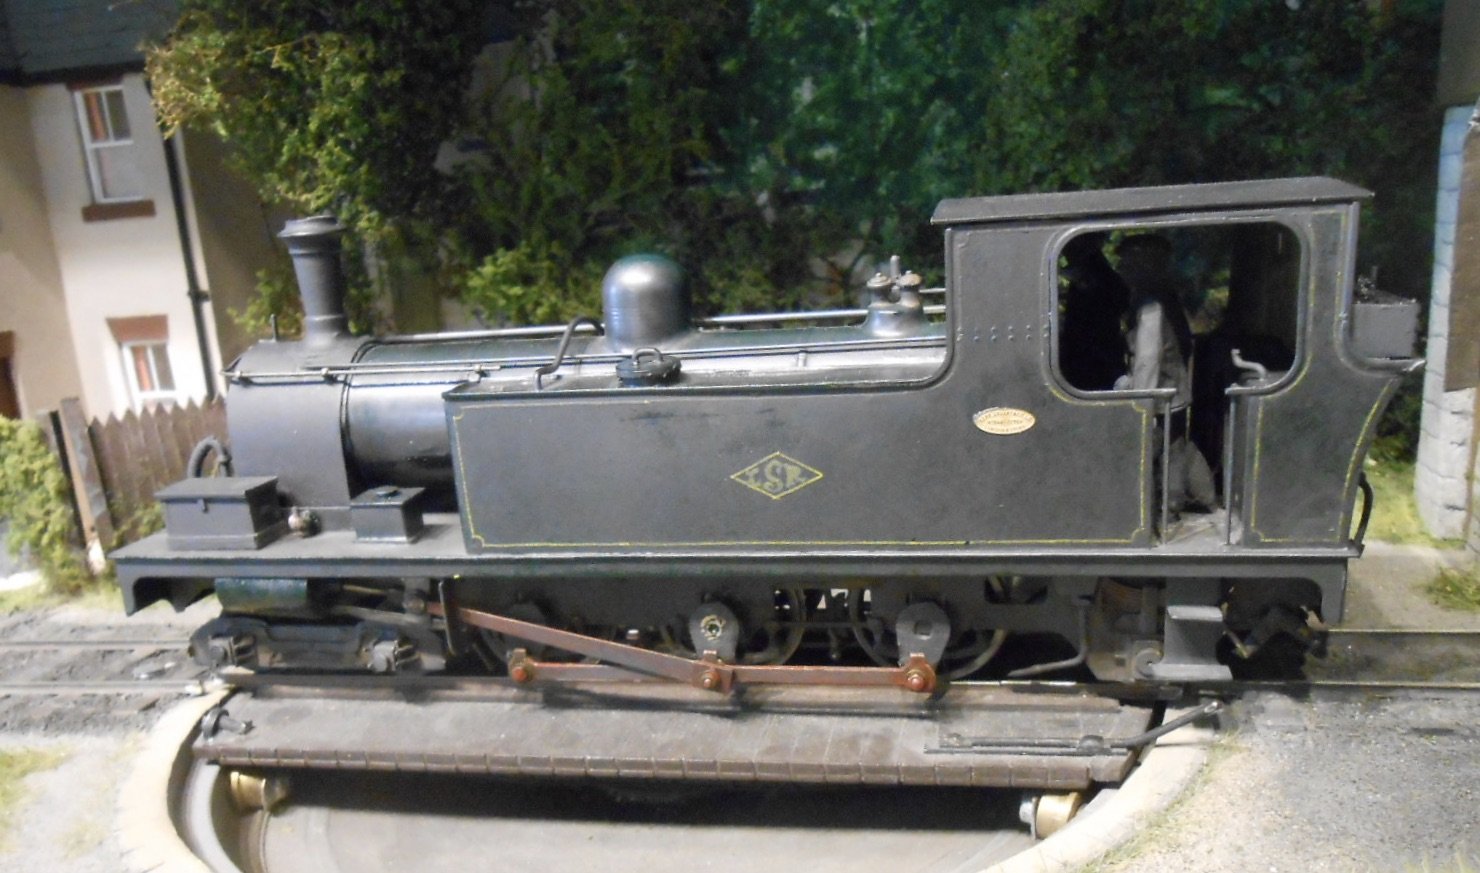
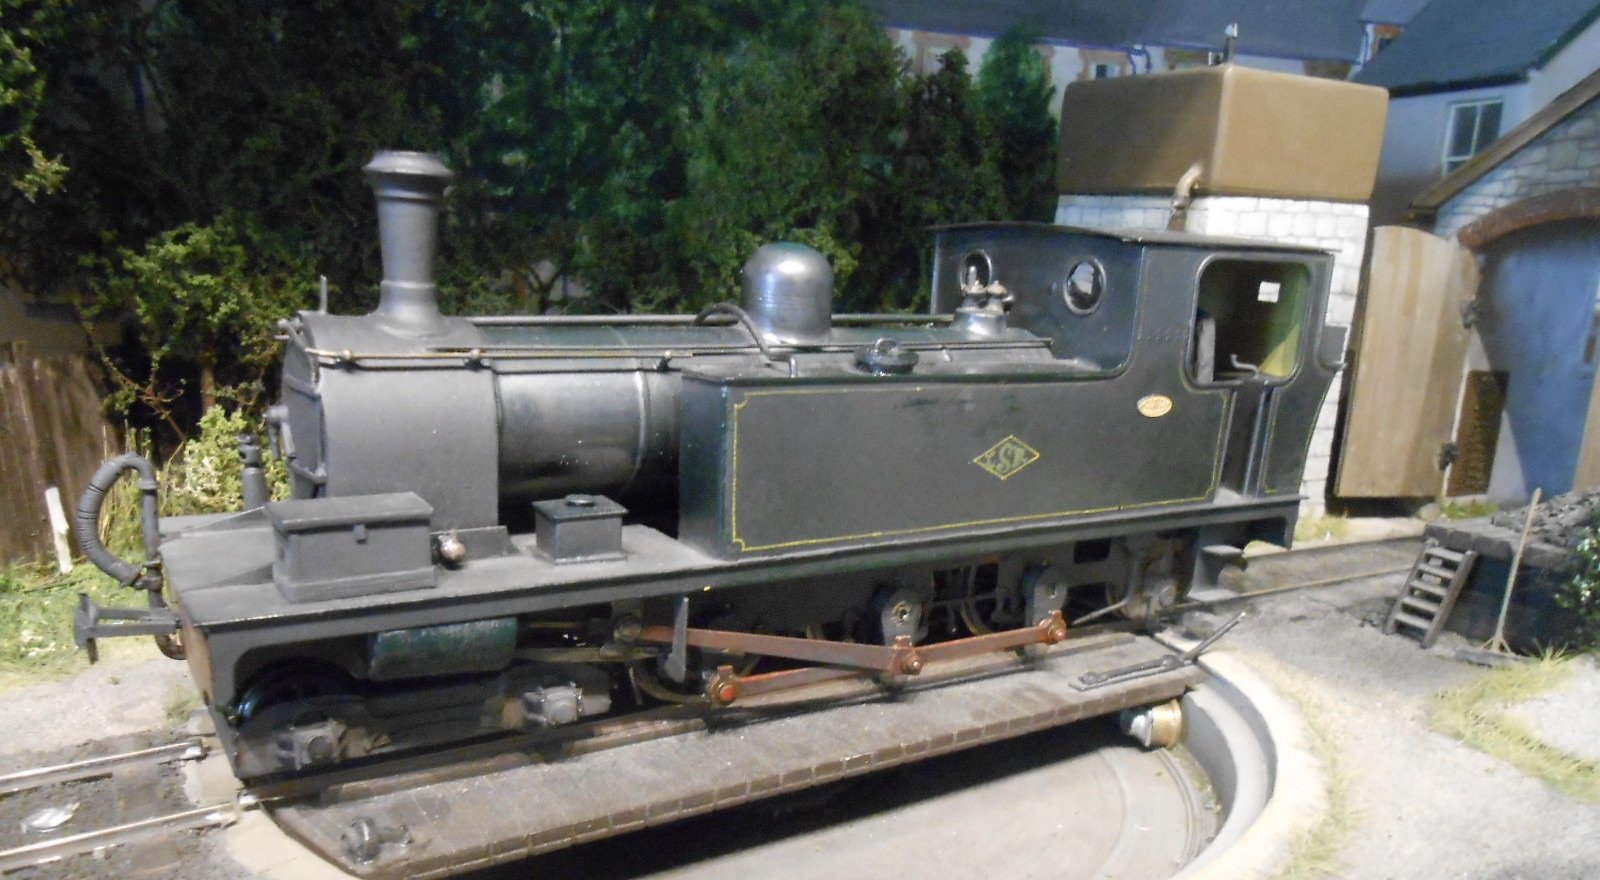
Going through my 0 gauge stock to get it ready for the Club layout's appearance at the the Chatham Show next month, thought it might be of interest to share what I got up to in the years prior to 2012, when I started modelling the Irish scene. After initially dabbling in EM gauge and then 7mm NG I eventually moved to 0 gauge with a Light Railway layout called Loose End - a Colonel Stephens essay of which there are no digital photos available, but which appeared several times in the Modeller from the late 90's. The next project was somewhat grandiose - a 10m x 4m oval, with a high level secondary line, modelled on the Marks Tey - Cambridge line which also included a low level goods yard. It was all way too big for a solo project, so eventually it got scrapped, but not before I salvaged the buildings to create a more sensible terminus-fiddle yard layout. It was called Eatonswell - an adaption of Eastanswill, which was the name Charles Dickens allegedly gave to Sudbury in Suffolk in the Pickwick Papers. Very much BR 1950s Eastern Region, I built a far bit of stock, which has been confined to either boxes or my display cabinet for far too long, so it will be nice to run some of it again. Below are some pictures covering a selection of views of the layout. The station was a fairly accurate copy of Chappel & Wakes Colne - chosen because of its two level design. I used Howard Scenics embossed brick papers, painted with water colours . The goods shed was a standard Great Eastern design, while a row of matings were inspired by those at Hadleigh and Snape. The loco shed was Saffron Walden. Pride of the line was my B17/6 "Nottingham Forest". My home town club, the loco itself did work in East Anglia. The Gresley Brake 3rd is a Kirk kit. Proof that I'm not entirely averse to ready to run models are the two shunters. Both are Bachmann Brassworks, which came unpainted in those days. The 08 needed a fair bit of detailing, but is a nice runner, while the 03, which also runs well, simply got a paint and weathering job. At the other end of the scale is this Waggon & Maschinbau railbus - because it was scratch built. A real challenge with all those complex curves to say nowt about the curved front windows. Finally, for now, one of my favourite models, the George England Wantage Well Tank. I'd started building it for Loose End when, very fortuitously Model Railway Journal ran a series of articles by Laurie Griffin as a scratchbuilding project. Even better was the fact they produced a range of castings to go with it. Building this little loco taught me a lot and gave me the confidence to later tackle a D16 4-4-0, leading eventually to all my Irish stuff. One day, I really must build a small shunting layout so this pretty little engine can run regularly again. Hopefully more stuff will appear later.
- 90 replies
-
- 17
-
-
-
While 3D printing may be the way forward for many things, don't forget about old school stuff like copperclad or ply and rivet sleepers. There is always the C&L method of plastic sleepers and separate chairs too, fixed with solvent, for anyone who wants to avoid soldering. Making track is a long way down my list of favourite pursuits, but on my 21mm gauge Fintonagh layout, I found I could construct a turnout in about an hour, using Code 83 fb rail and copperclad sleepers and Tempo of templates. The latter were the 'standard' three foot radius "Irish EM", printed straight from the website. Although 20.2mm gauge, it was easy to enlarge them to 21mm on the copier. Crossing and checkrail clearances used are the standard one millimetre for 4mm finescale. Both 4mm scale and Slaters 7mm scale narrow gauge wheels are fine with this combination, using 19.2mm back to backs. The main work involved in making your own points is first of all sourcing 21mm track gauges. Mine is a roller gauge, turned on the club lathe by a friend. The other job is filing rail to make the crossing vee and point blades. Neither are difficult, once you've made a couple, though worth noting that C&L supply both as ready made components, albeit only in bullhead rail. Anyone who has made their own track knows all this of course, but for anyone who hasn't, it is not had hard as it might seem. There again, there is Marcway of Sheffield, who are happy to take on commissions for trackwork and for any scale or gauge combination. Prices are about 50% more than Peco.
-
Heritage Railways in the Republic of Ireland
David Holman replied to Celtic_transport's topic in General Chat
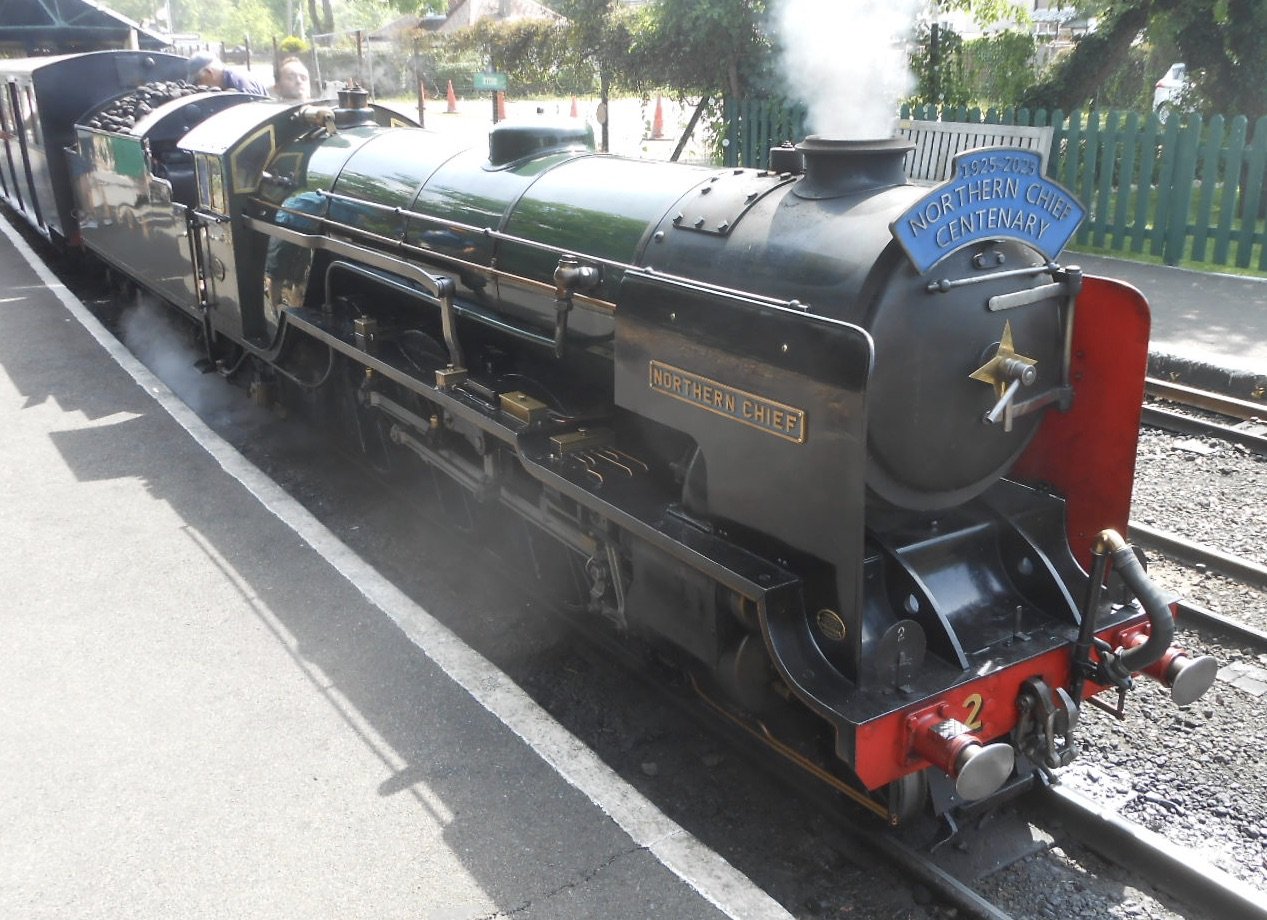
It was my birthday yesterday & my wife organised a day out for me on the Romney Hythe & Dymchurch Railway. Considering it was a Wednesday in term time, there were reasonable numbers of visitors & an hourly train service to Dungeness. OK the Romney is 15" gauge, but is very much run like a real railway. Indeed, at Romney itself, I doubt there are many preserved lines in the whole of the country with that amount of track and points, to say nothing of the multi platform station with its overall roof. There were four trains and five locos in action to operate the service, while a day rover ticket was about £27.00 Our loco, Northern Chief, is 100 years old this year! Not sure what this has to do with preserved railways in Ireland, other than with half a dozen other preserved lines within an hours drive, it shows how lucky we are this side of the water. We had a lovely day out, so long may they prosper!
-
Very neat. Had to do much the same on my sliding/rotating fiddle yard, where the bolts carry power to the track.
-
Heritage Railways in the Republic of Ireland
David Holman replied to Celtic_transport's topic in General Chat
Reopen Waterford - Tramore? -
Our 1970s built house has a breeze block garden wall, with vertical posts that are lightweight fb rails. The area has many old cement workings, a no prizes for guessing where the rail came from, especially as there was originally a much older house next door. Must have another look to see if I can find a maker's mark.
-
Heritage Railways in the Republic of Ireland
David Holman replied to Celtic_transport's topic in General Chat
Its true, there are many, many lines across the big island, even the Isle of Wight has one. It is probably because there is somehow a lot more interest in heritage transport, plus the population being 10-20 times bigger with plenty of large towns and cities close by. Where I live in Kent, we have the Bluebell, Kent & East Sussex and Spa Valley close by, plus the East Kent, Romney Hythe & Dymchurch Sittingbourne & Kemsley, Bredgar & Wormshill, Lavender Line - even Chatham Dockyard. All within an hour's drive and all seemingly doing well. -
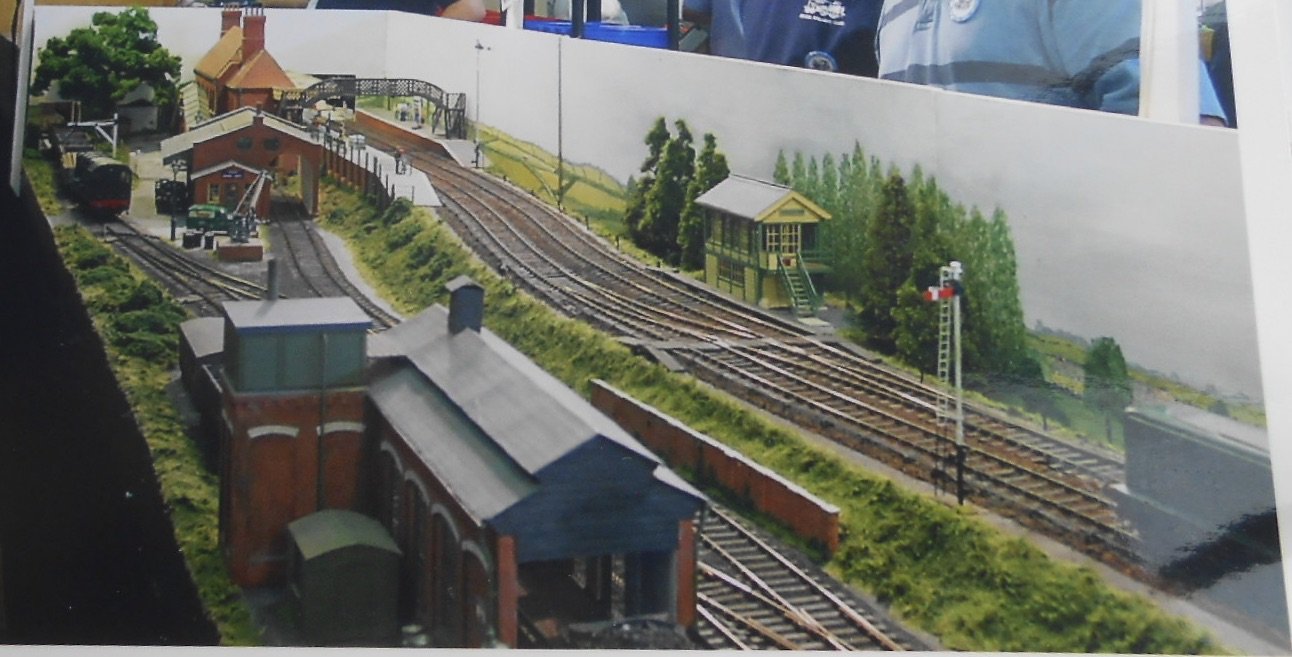
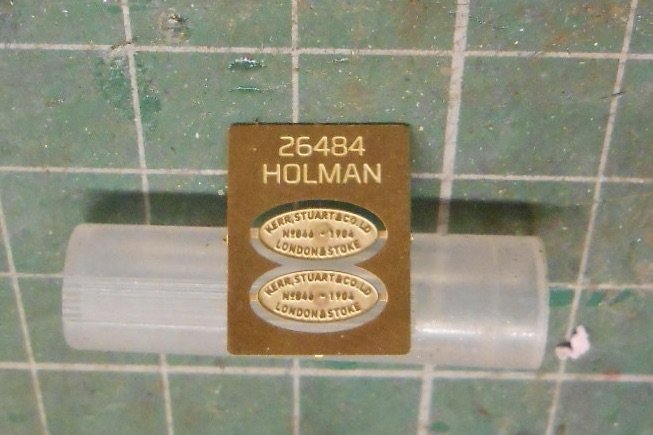
Seems like not a lot of anything creative going on chez moi for a while now - mostly down to getting stuff ready for Railex. Next on the horizon is the Chatham Show in July - essentially more exhibition stuff of which more in a moment. First though a [very] small package came through the letter box the other day - the final piece of my Swilly 4-6-2T. It's the builders plates I'd ordered. And very nice they are too, so thank you Narrow Planet. Stuff for the Chatham Show now revolves around the Club's 0 gauge layout. Called North Circular, it is a 10m x 4m double track oval, based loosely on the Tottenham & Hampstead line, but in this case deemed to be following the approximate route of the North Circular Road, hence the title. The concept [dreamed up by yours truly] is to allow pretty much most trains from the BR 1950s and 60s to run in a simple setting. Apart from the storage loops at the rear, it is all plain track, with no points, though the ground levels vary so we have cuttings and brick arch embankments. It is all built to a moderate standard, with most buildings using brick and slate papers, plus commercial windows to make life easy. However, we decided that a back scene would be important. This started out as a pale grey sky [white emulsion & black acrylic], but the creative muse got hold of me & decided to something more creative, essentially a mix of urban scenery, ranging from parklands to housing and industry. Nothing too fancy, just an impression, so stippling acrylics for distant trees, with slate roofs poking out between/above, then a mix of felt pens, water colour pencils & the like for the details. There are 15 boards in total, four of them 1.2m x 0.4m, the others 0.9m x 0.4m, so quite a task. The pictures below give an idea of some of them & will post a few more when I get everything mounted on the layout.
-
The weathering on wagon 99 is just splendid. If I had nothing else to do, that scene would make a fine diorama...
-
The larger the scale, the closer assembly gets to the prototype it seems. Fascinating.
-
No need to apologise , I saw that big grey shed in the photo. Should be good, will not need years to complete and has decent operational/play value.
-
Some nice elements there, such as the view blockers at each end, plus a couple front/centre too, which will help break up the scene and make the layout look bigger. Worth making a small mock up of the whole scenic section from card to further test sight lines. For example, you may find that the large depot building dominates the scene, Perhaps have it covering the rear siding might be better, so the front one is open and stock stabled there isn't hidden.
-
It has always been cork floor tiles for me, simply because they come flat, are easy to cut and glue down nicely. That said, am fairly sure there is no benefit at all in sound deadening, but find this doesn't matter because at exhibitions there is always enough background noise to render such things redundant. Hence all about providing the ballast shoulder of mainline track. Baseboard joins are a real issue on exhibition layouts, with earthquake cracks often very evident. Trick I learned from Gordon Gravett is to used car body filler between the joints. Put a layer on one face, then cover with cling film and clamp/bolt the boards firmly together overnight. Gives an almost invisible join, though same sort of thing required For whatever scenic go on top. For ballasting, I fix about 5cm worth either side of the join with undiluted pva. Again, leave overnight and, crossing everything beforehand, break the boards apart when dry and this (usually) leaves a nice irregular join which disappears when the boards go together again.
-
Converting a 00 Jinty to 21mm has anyone done it?
David Holman replied to Bob49's question in Questions & Answers
The biggest problem is likely to be the front splashers, because moving the wheels out to 21mm will certainly foul them. Clearances inside the tanks could also be a problem because of the thickness of the plastic moulding. Indeed, regauging the prototype caused similar problems, with the wheels being thinned. At the very least you will be looking at cutting off the current splashers and making new ones. Then there will be new axles, as the existing ones will be way too short. Hence wheels will need removing ( probably crank pins and rods too) along with the main gear. If this is nylon and a force fit, that could also be a problem because of it splits, then you'll need to source a new one. Once the wheels go back on, they will need to be quartered, so all in all, not an easy or quick fix!