murrayec
-
Posts
2,765 -
Joined
-
Last visited
-
Days Won
70
Content Type
Profiles
Forums
Events
Gallery
Blogs
Everything posted by murrayec
-
Hi All If you mess about with fibre optics for lights on your models- get down to Tiger for their 'LYSFIBERLAMPE' for €4.00- one of those dodgy droopy 60's fibre optic lamps run by battery- but it has about 237! optic strands sticking out the top that would keep a modeller supplied for a life time! Eoin
-
Hi Me to, looks really great and a fine article Congrats David well done- I see you had the same turntable problem with the bus and luggage wagon! Broithe - got to get yourself a brolly! Eoin
-
Hi Tony Isn't the English language a funny old business!! Boolean operation your looking for;- Invented by Mr 'Fred' Boolean for 3d solid modelling- adding 3d solids together, subtracting one 3d object from others where they intersect, and creating an object from the intersections of 3d objects!! A way to do doing this is to draw a polygon for the window ope and make it a solid with a thickness greater than the front wall and intersecting it, then use the window ope object to cut-out or subtract it from the front. That is the English version, now you have to find how your software does it. Once you have mastered one window ope- your away, and you will find this operation can be done on multi objects at one time- draw all the windows and then subtract in one go. Only joking about the 'Fred' bit- don't know the mans first name but he was pretty good at maths Eoin
-
Nice one WB Interesting point on the washing machine!!- don't think it was ever used... Eoin
-
Walter Send me a chassis or bring to next show- something in the 20m scale size, I can take a look and think about how..... Eoin
-
Hi All Thanks for taking a look and the great comments Come down to the Carlton Airport Hotel Show next Sunday, it will be there if you'd like to see Eoin
-

Cork Model Fair 2015 1st Feburary Note Venue: Metropole Hotel.
murrayec replied to Georgeconna's topic in What's On?
Hi I think I see you George there at the beginning and of course 4:20 is deadly and the best bit.... Yes, great little film, the Cork lads are smiling Eoin -
Hi Walter It was a very well attended show, great interest in the N DART, orders coming in..... Eoin
-
Hi Driver301 Take a look at the link below, there is something there you might like to see! http://irishrailwaymodeller.com/showthread.php/895-New-DART-8100-Model?p=65901&viewfull=1#post65901 Eoin
-
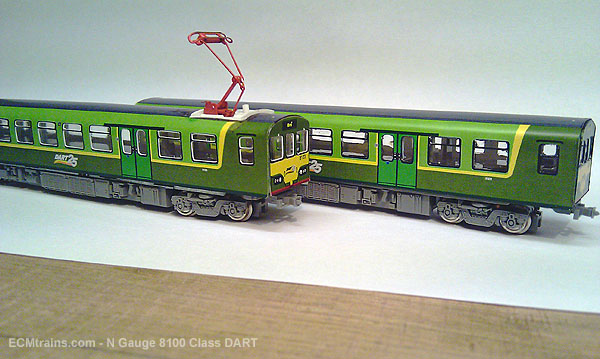
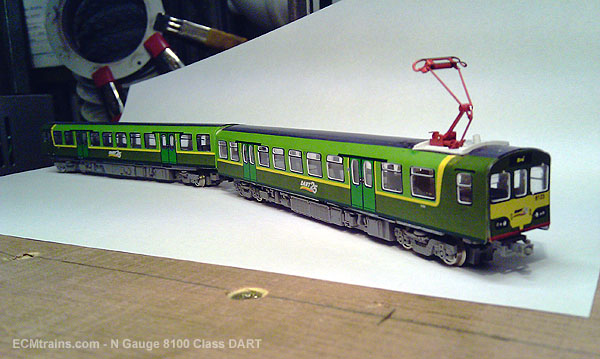
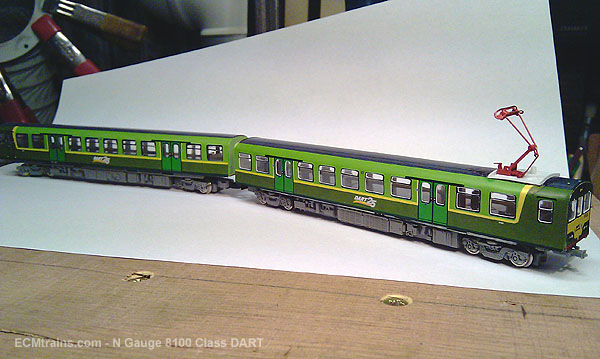
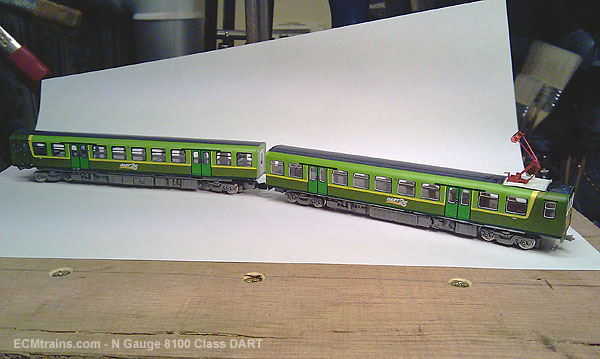
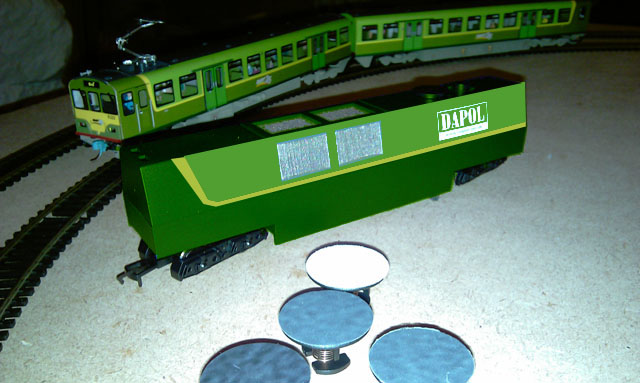
Hi All Here is a little sneak preview of the development of an N Gauge Two Car 8100 Class DART. This is my development prototype model hot off the bench with a number of things yet to be done. I showed it off at the Bray Show today and had great interest, so decided to post these photos up. Laser printed body wrapped onto glazing body structure on a Tomix 2455 chassis Next step is to finish off the moulds for the plastic detail parts and adjust the jigs a bit to take the rough edges off! Eoin

-
Hi Congratulations on the new addition, Careful now, these are self-propelled and have no wires! Eoin
-
Hi Here is a link to an earlier thread- it has a link to Mr Ferris's Book- http://irishrailwaymodeller.com/showthread.php/3174-Grey-121-RAL-codes?p=50042&viewfull=1#post50042 Eoin
-
Hi Check out http://eiretrains.com, they have a number of photos of the grey 121 livery with a dark line around the logo and the number on the front n' back, but not on the side. The Tom Ferris 'Irish Railways A New History' has a photo of 121s on plate 76- you can view this book on Amazon, in the photo again there is a dark line around the logo and number on the front. This was the way they were delivered it seems, no black line on this one;- http://en.wikipedia.org/wiki/CIE_121_Class#mediaviewer/File:GM_diesel_locomotive_B124_being_unloaded_from_a_ship_at_the_North_Wall_in_Dublin.jpg Eoin
-
Hi Yes, SR24 that's the stuff I use in the green thing! It does not harm plastic at all, and it can be used to clean motors and make smoke! Eoin
-
Hi Aaaah Borithe's been baking again Happy birthday Dave Eoin
-
Shorter couplings for MM Cravens and Mk2s?
murrayec replied to Noel's question in Questions & Answers
Hi Noel I had thought of that one, holes in the side but decided against it as you may experience difficulty getting the K's out, and then the TL's back in as the bayonets of the TL will want to go out the holes- unless you fill them! Let us know how it works, it is simpler if it works. To go back to TL's on my option above- two small pieces of styrene can be glued in to extend the sides of the socket back to its original size. Eoin -
Or in green?
-
Hi David It looks great, I did notice your problem on the turntable and after your post above I took a look through Mr Clements book but not much there to help, though I did notice that no. 659 was called 'Rapid' - that model is only rapid! Eoin
-
Shorter couplings for MM Cravens and Mk2s?
murrayec replied to Noel's question in Questions & Answers
Hi Noel I only did this mod on the front and rear coaches of the rake- Kadees for the look of a buckeye coupler. Tension lock couplers are retained on the rest of the coaches. If its gap closing your looking for;- the tension lock couplers have about 2mm play in them, from bar to bar of the coupler. One can close this down by sticking 1.5mm thick styrene strip to the inside of both bars, ensuring the depth of the strip still allows the locks to work. This will close the gap by the thickness of the card and looks better though forget tight radius curves in the area of radius 2! I will post a photo when I have this done..... Another thing that can be done is get yourself Mr. Keens corridor connectors;-http://www.keen-systems.com/Carriage%20Ends.html, he's very helpful and knows about Irish stuff. This is the best solution for no gaps! Eoin -
[video=youtube_share;iawx33OHVRU]http://youtu.be/iawx33OHVRU
-
Shorter couplings for MM Cravens and Mk2s?
murrayec replied to Noel's question in Questions & Answers
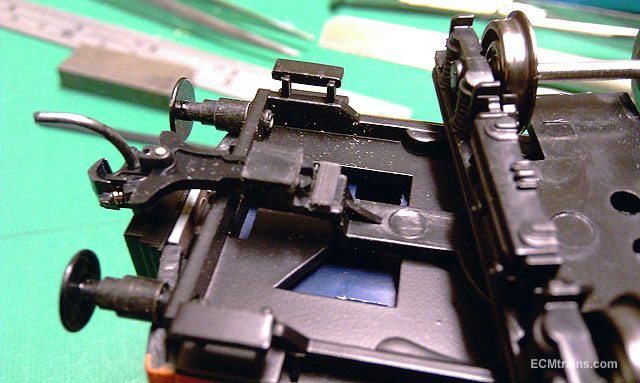
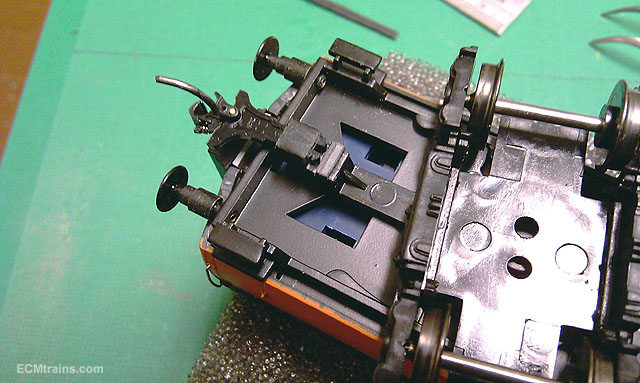
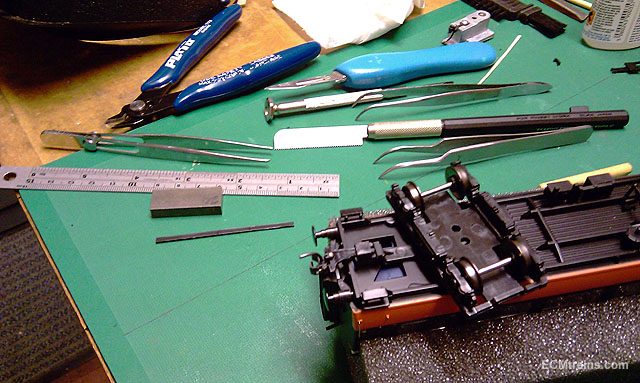
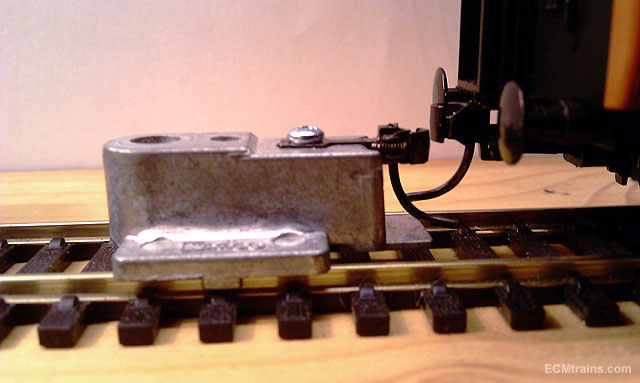
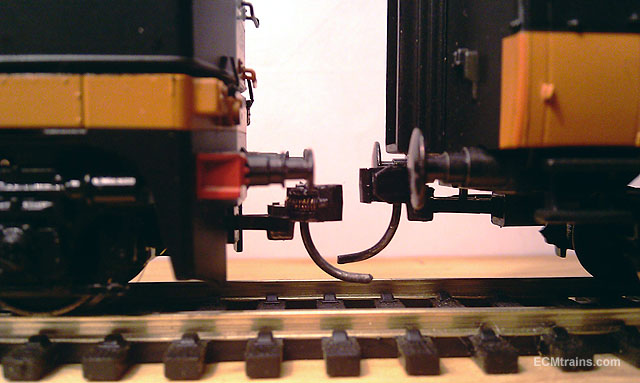
Hi All Maybe this will help I have modified the NEM socket by cutting 1.5-2mm off the back end, that is the end closest to the bogie, it might not be ones favourite way but it's relatively easy to do;- Mark a cut line across the base of the socket and cut a slot across the base with your razor saw- this can be done insitu with the bogie rotated out of the way, then cut the lower sides with a flush side track cutter just deep enough to line up with the cut slot, then cut the sides of the socket down to meet the lower cuts. Make sure you have the flush side of the cutters facing the bits your keeping. Clean up the cut-out with a sharp scalpel, paring the plastic away in slivers and clean up with a file. Stick a piece of styrene across the back of the socket far enough away so that the Kadee bayonets work- this will stop the coupler sliding in the now shortened socket. This photo shows the tools used;- This photo shows the Craven socket height compared to the Kadee Gauge;- This is a comparison to the socket on a MM 141;- Eoin
-
[video=youtube_share;7v6CMefA5i8]
-
Indeed, I have also had similar problems on short Hornby points- the air gap on the frog is shorter but the small wheels can fall in (less) and trip up on the frog point, generally the train goes through but there is a bang when the wheel hits! I have cut a small chamfer on both sides of the point to aid the wheel staying on track- this works. I'm going to put strips like above on the short points check rails when next in test mode.... Eoin
-
[video=youtube_share;y7h4OtFDnYE] Please add if you know of more...
-
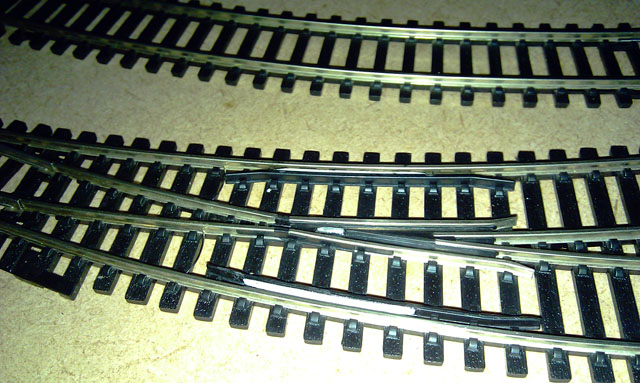
Hi All We've all experienced it- our most favourite model will not go through the points, so lives on a shelf never to be run on the layout. My experience and final investigation on the matter leads to this;- The main problem is with small wheels (10.5mm), the deep well & free air on the frog of Hornby points. The wheel falls into the well, this raises the opposite wheel of the axle up onto the check rail, the wheel in the well then crashes into the frog point which sends the bogie on the opposite route the points are set for- crash!! By adding a .5mm thick x 1.5mm high styrene strip to the check rail with chamfers at each end to check the wheel eliminates the wheel falling into the well at the frog. I used Deluxe Plastic Magic glue to stick them in with 3 cocktail sticks jambed in between the strip and the track rail. Main thing is to insure the strips start before the frog, are opposite the frog and finish after the frog. This photo shows the location to install the strips- this is white styrene so you can see it. Also note I added an extension to the frog point to test filling the well. This photo shows the same strips but in black styrene, I have not installed an extension to the frog point on this one, and it still works OK! Both examples are the express curve points which cause problems for the DART model with 10.5mm wheels- but not now. I have tested these points with 10.5, 12.6mm & 14mm wheels and they are fine, I have not tested some of my big steam locos wheels yet- their stuck right down at the back of the attic somewhere behind all the boxes! I will report on those tests later The old style chunky wheels- which have no business on a model layout, but I do have a few, don't work- time to re-wheel them! At last I can run that Caledonia single with the tiny wheeled pony truck at the front! Eoin