Mol_PMB
-
Posts
2,160 -
Joined
-
Last visited
-
Days Won
112
Content Type
Profiles
Forums
Events
Gallery
Blogs
Store
Community Map
Everything posted by Mol_PMB
-
I’m sure you will badger us with plenty of photos of yours!
-
What I need is for AS/IRM to announce something that fits my existing interests, so I can throw money in their direction without being distracted by another new whim of the week. Anything for my Swiss Om theme is highly unlikely, but I would settle for one of these in O gauge (perfect follow-up to the 88DS): Or I’d have at least three of these in 4mm scale (a natural development of the A class): I really have no use for a badger, despite my youthful memories of it, which are quite striking.
-
Are you STILL badgering me? I have not yet ordered one, though the shiny quartered buffers keep looking at me... In the dim and distant past, I recall that I had a cab ride in it, up and down a siding at Brush Loughborough. I was on a technical visit of some kind, and it was probably there for repair. My current line of defence is that they're out of stock at AS, and if I were to order from Rails I wouldn't get the AS loyalty points. There is also the small issue that I have nowhere to run it - I have only 21mm, 22.2mm and 32mm gauge track.
-
It was supposed to be backed up before - they were let down by their third-party storage provider, it wasn't the fault of those running the forum. It's still pretty common for RMweb posts to randomly disappear!
-
RMW certainly isn't an example to quote for good picture storage! There was a massive data crash a couple of years back and over a years' worth of missing images.
-
"Voiding the Warranty" - Mol's experiments in 21mm gauge
Mol_PMB replied to Mol_PMB's topic in Irish Models
Yes, that’s basically what I did though I used very thin plastic (about 5 thou) and embossed the detail of the nails holding it on. In reality the cladding seems to have slightly different sized panels on each van. My impression from photos is that the GNR nailed on thin sheeting, while the GSR replaced the planks with boards. Some of the GSR ones have a different arrangement at the edges of the roof, with no overhang. There are many different variants to go at! -
"Voiding the Warranty" - Mol's experiments in 21mm gauge
Mol_PMB replied to Mol_PMB's topic in Irish Models
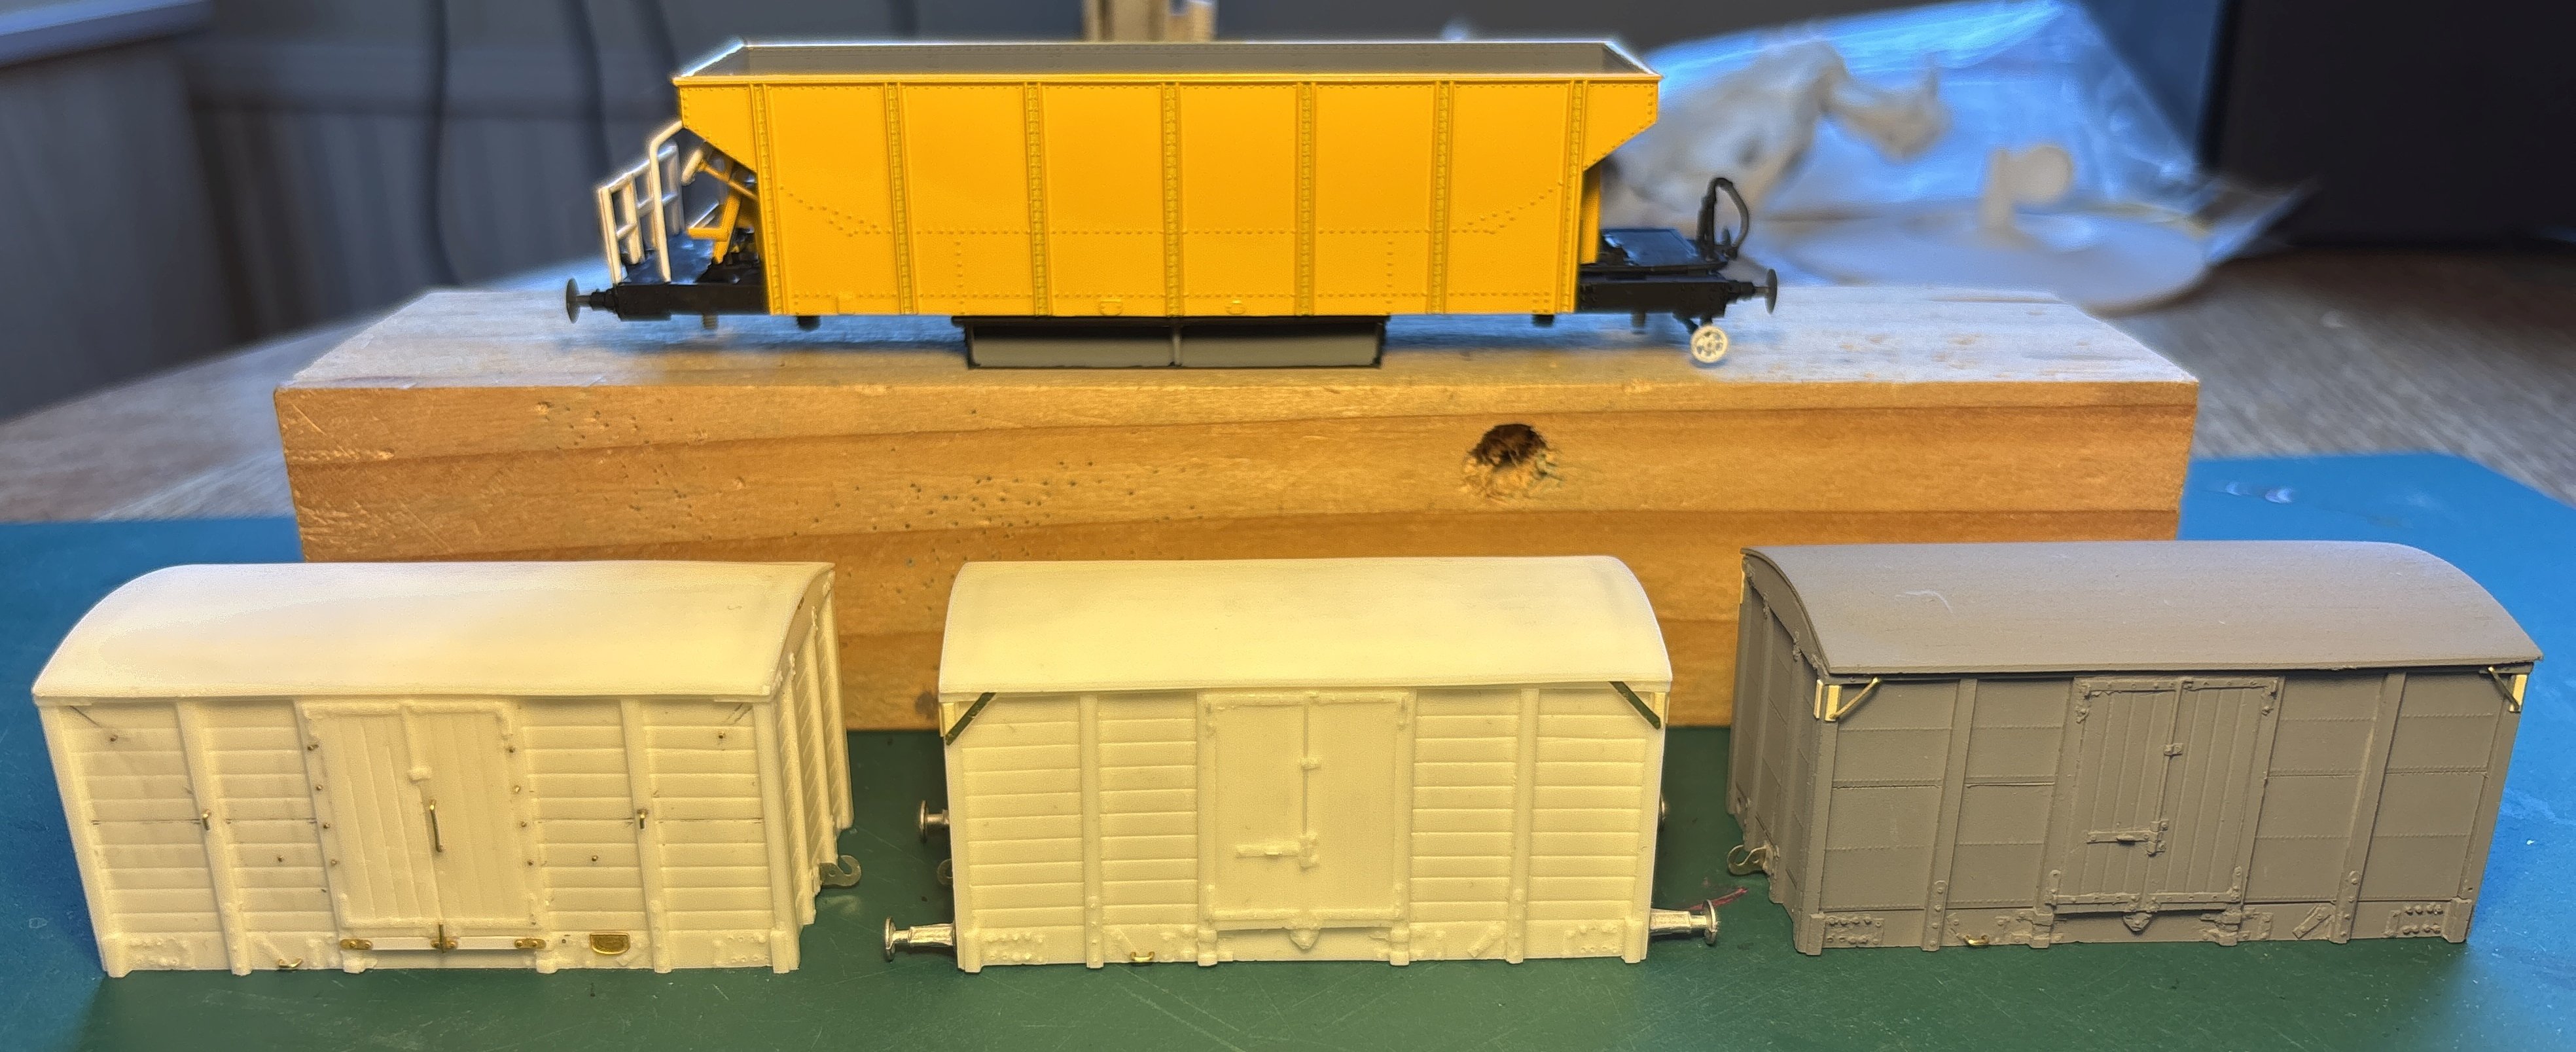
This weekend I have made some more progress on several wagon projects. Three IRCH goods vans from @leslie10646's last few kits of this type (GNR 10 ton van) I am building the left-hand one as an MGWR 'convertible', the middle one as a GNR vac-fitted, and the right-hand one as a GNR unfitted, with the sides covered in thin sheeting nailed on. They all have a variety of different details added to them. I'm planning to use etched W-iron assemblies to make these suit 21mm gauge. I'm also waiting on a few bits from Wizard Models to complete them. Also the Walrus has reached the paint shop stage, though I have yet to tackle re-gauging the bogies. I know it doesn't suit the time period of the others! I also know I need to add some more black paint on the solebar, but I've mislaid my lining pen so I've had to buy a replacement.
-
It's all about the badgers with you this week, DJD! Have you got yours yet? (with apologies to LNWRW1 for the thread drift!)
-
Good to hear from you, and there's really no need to apologise. Though I do like the style of an official notice from the management of your railway! Great to hear that you have been working with some like-minded people at Stradbally and have found that helps you. Keep at it! You might even find that working on the real thing is so satisfying that the models take a back seat for a while - that certainly happened to me. But good to hear you have some model projects in the pipeline and I look forward to hearing about them. Also, it would be interesting to hear what you've been working on at Stradbally. Even shovelling sh!t seems more rewarding when you're working as part of a team towards a bigger objective.
-
Very nice subtle weathering there. The grime seems to depend to some extent on traffic levels - busy lines get heavier doses of brake dust etc. Also of course there's localised deposits where locos stand still for a while. I think you've got it spot on.
-
Now that is looking superb! Very nicely designed, drawn and built.
-
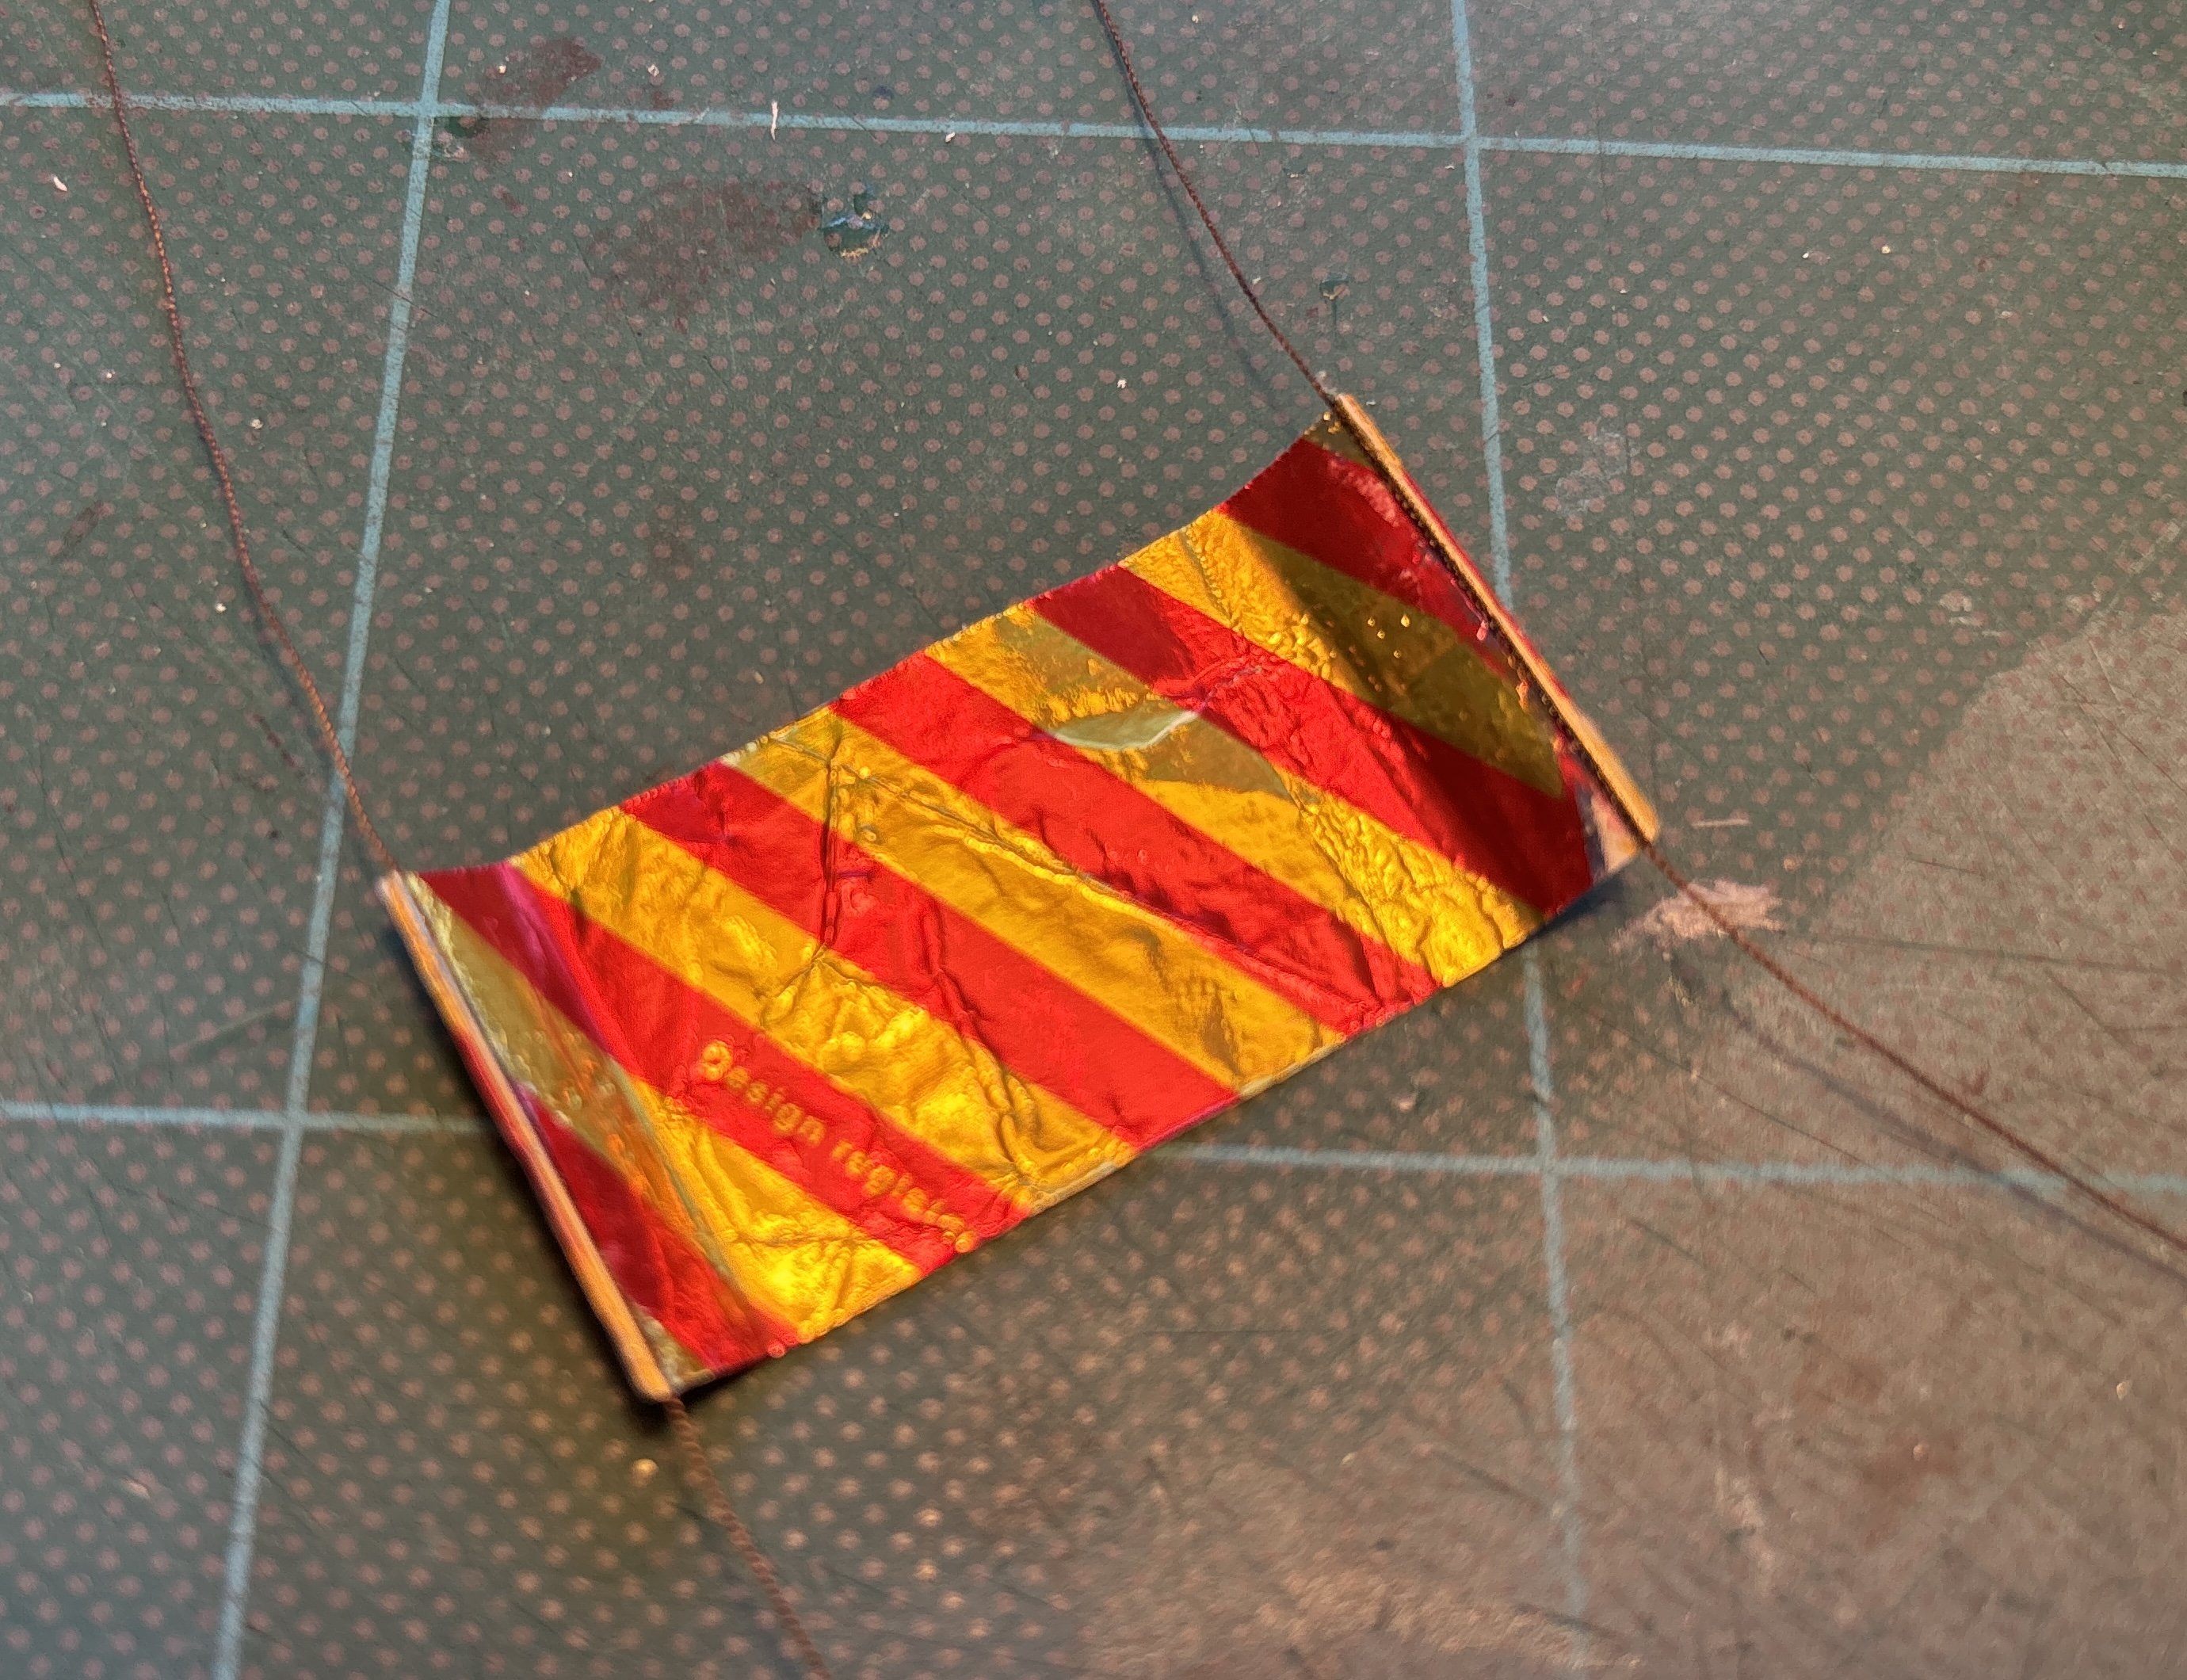
Thanks! Here is the sheet, made from a Tunnock’s wrapper, some fine wire and some fine thread. Once painting is more advanced I will fit it in place, you can imagine what it will look like with the ropes pulled tight and glued around the roping eyes: The Tunnocks wrappers are thin foil on one side and thin paper on the other.
-
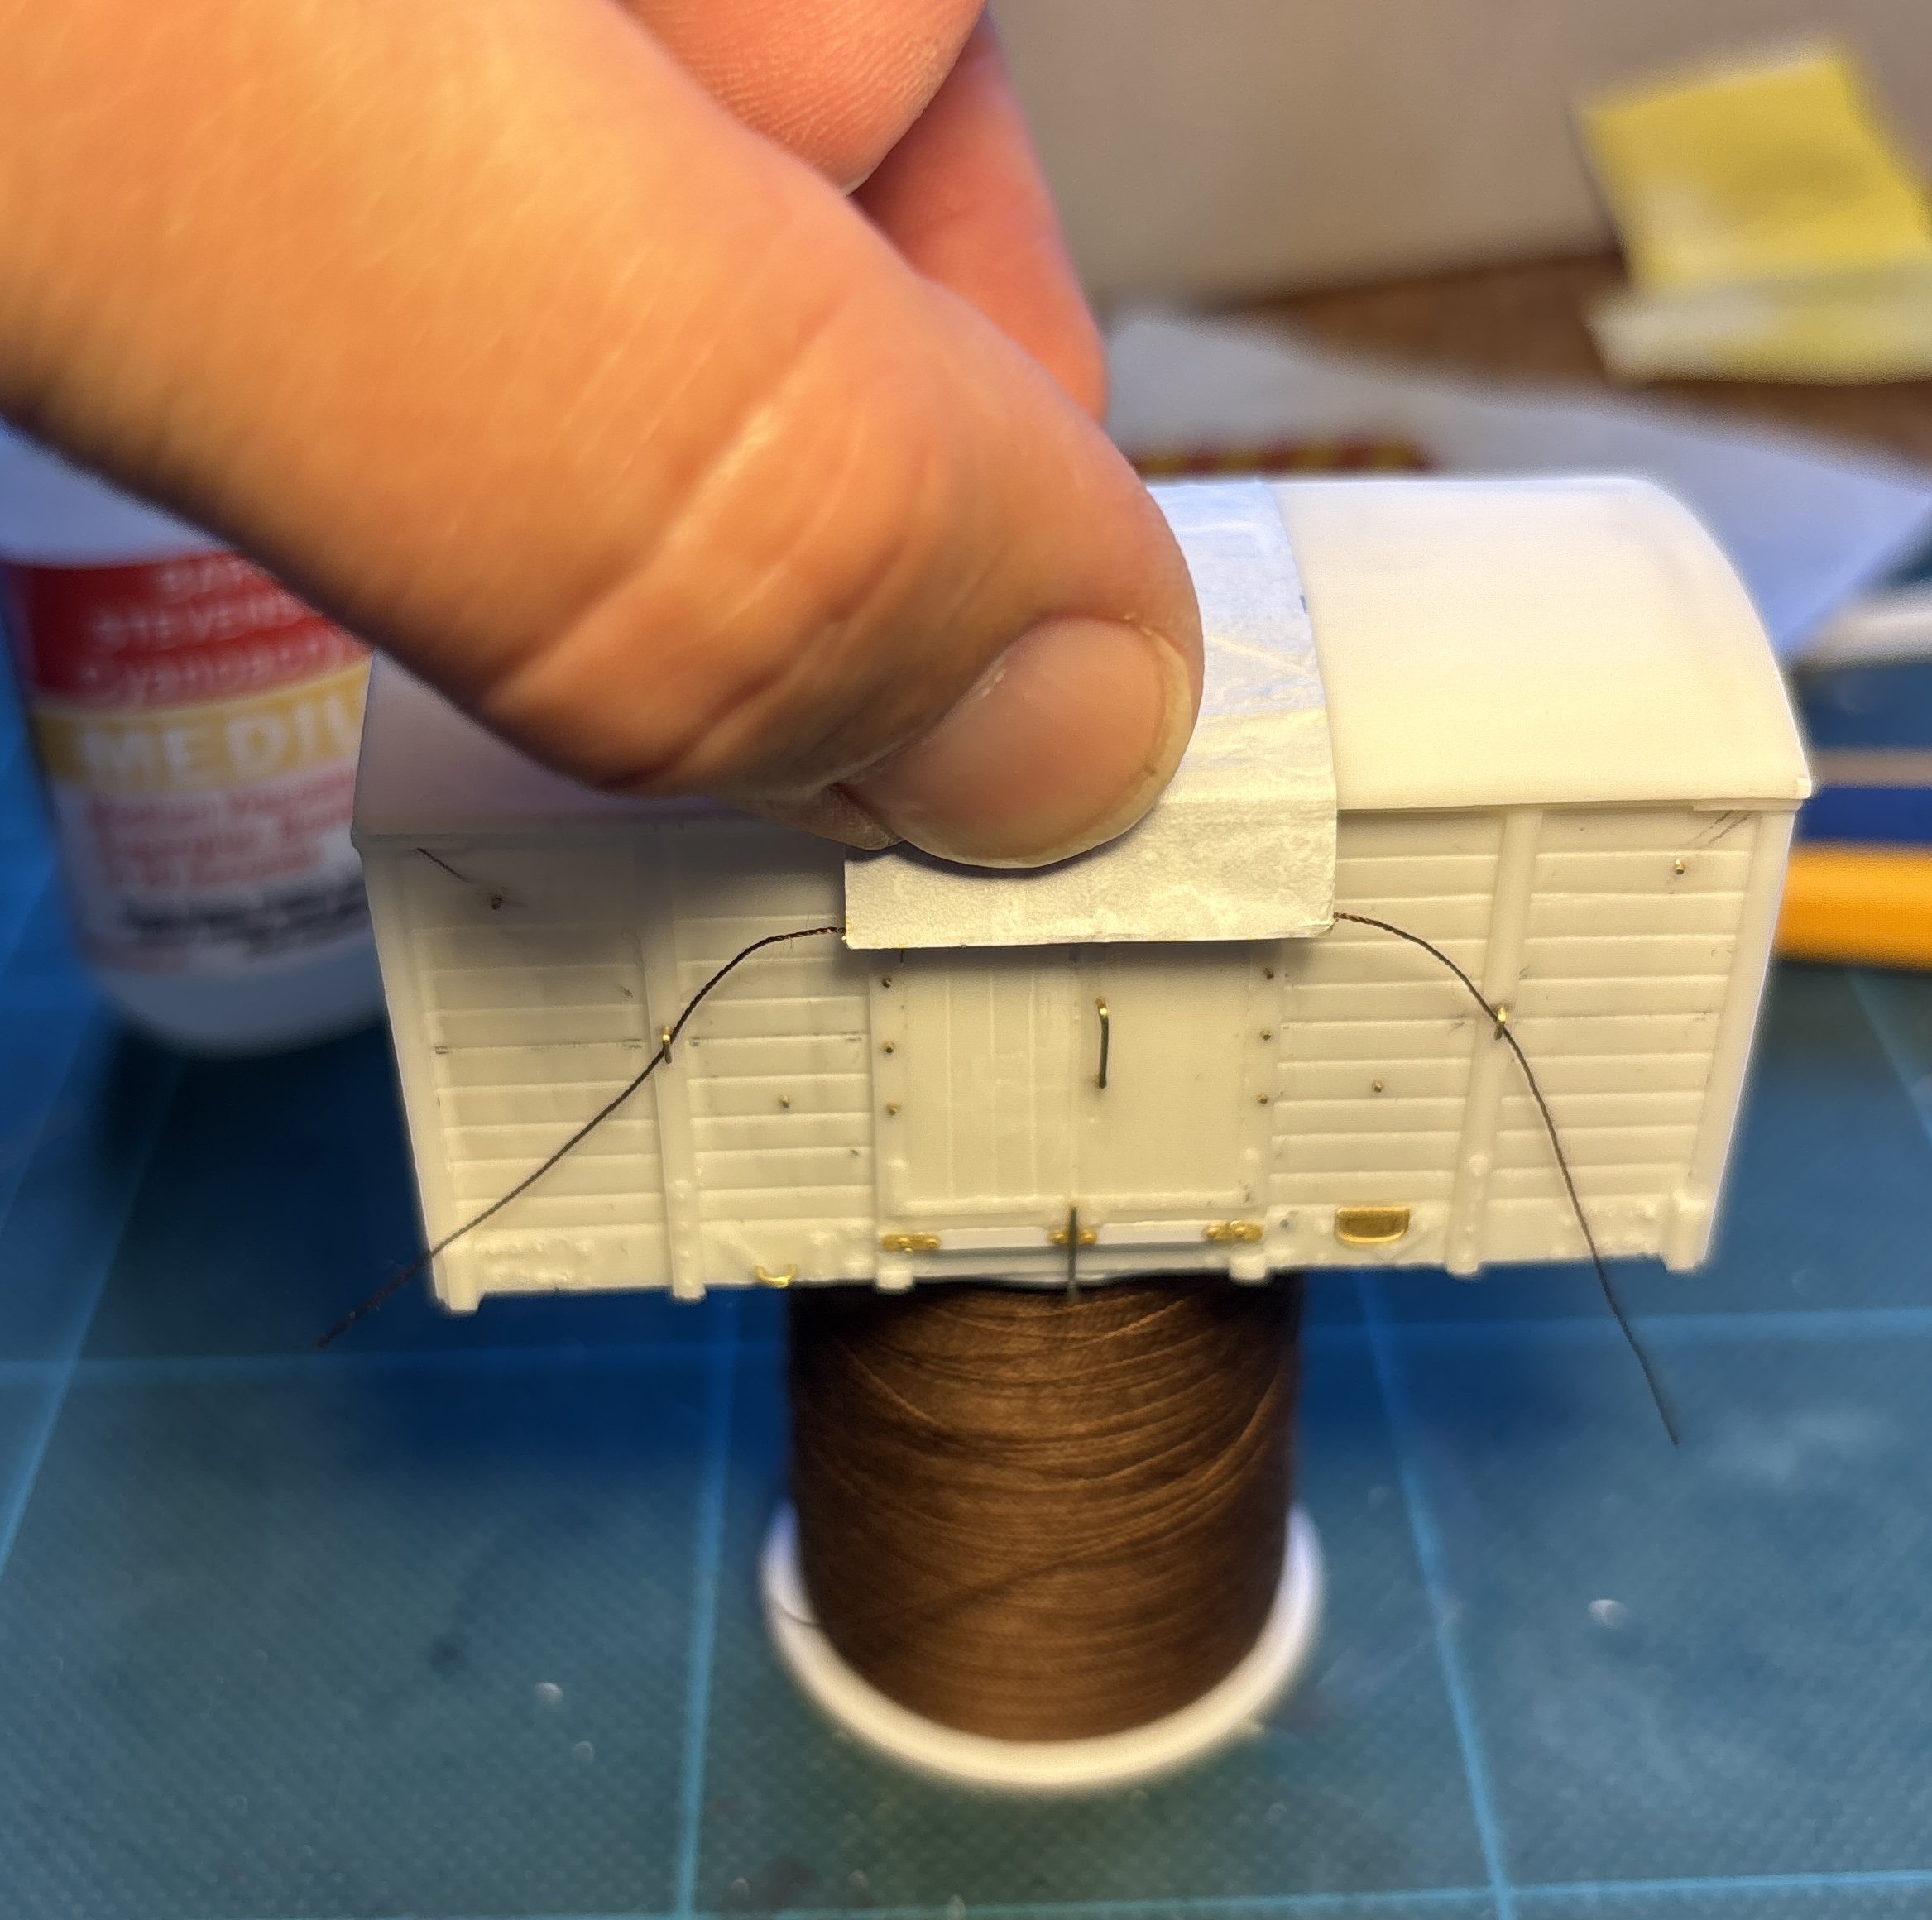
Some more progress on detailing up the MGWR van. This time I have drilled holes and inserted fine wire to represent the bolts. These vans had different door securing arrangements to the GNR vans. The door frame was reinforced too, owing to the lack of roof above it. I’ve elected to leave the middle bit of roof in place on the model but will cover it with a sheet tied down to the new roping eyes on the uprights.
-
Superb, very neat work indeed!
-
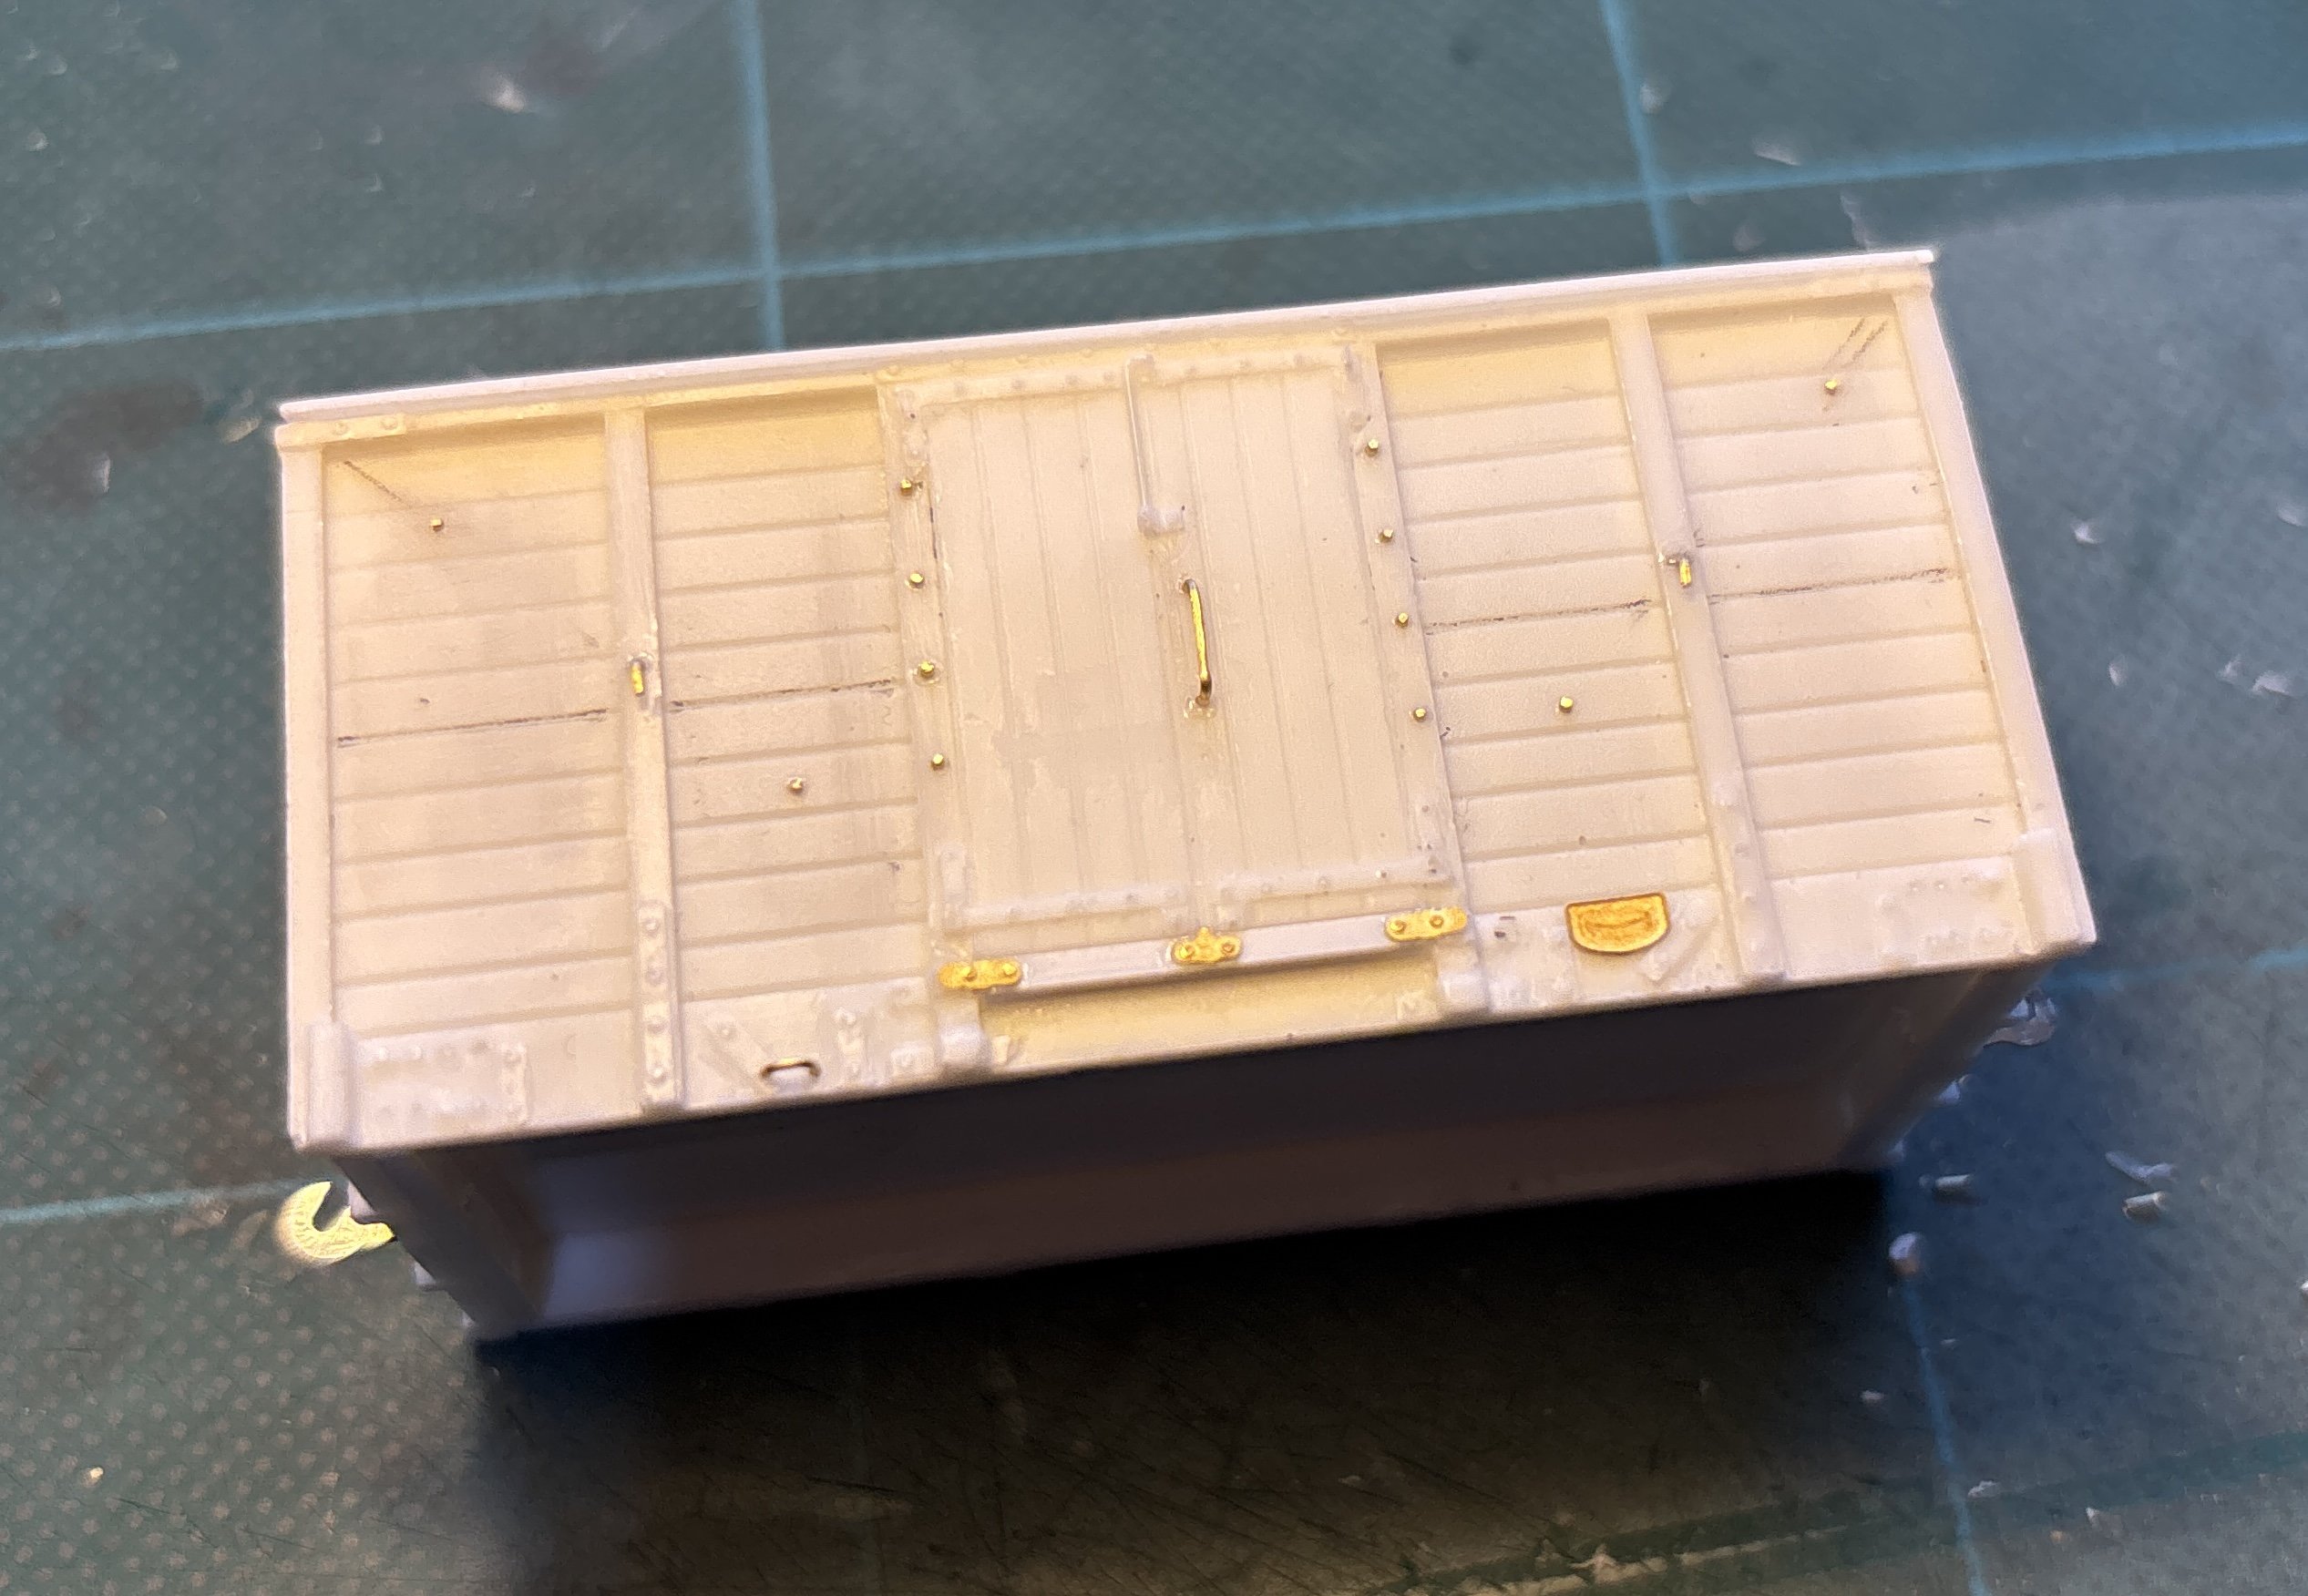
Here’s my attempt at that the thin sheeting nailed over the planks, as on the photo of 240N above. I had to give it a spray of primer to bring out the detail. They’re not all perfectly aligned or evenly spaced but then neither was the real thing. There’s still some more detailing to add, and some cleaning up to do in places, but this will look nicely different to the planked ones. I sanded the roof down to smooth it and reduce the arc of the curve a bit. It looks better now, still a bit too curved but it doesn’t look out of place compared to the H vans so I’ll stick with it. The ends won’t be so visible in a train.
-
Thinking back to when it was new, I'm sure it was the Anteater, rather than the Badger. Maybe it was the swallow livery that made it look more badger-like? If I needed one of these, which I definitely don't*, I'd be getting the original executive livery version. Come on IRM, make me some nice C class diesels or AEC railcars so I can spend my money on something that fits my themes. Or an AS O gauge RR-Sentinel shunter would do. *Repeat 10 times per hour until out of stock...
-
CIE corridor thirds 1350-1355 CIE’s next batch of carriages built in 1951-1952 were corridor thirds, to the subsequent standard 61’6” length. 1339 to 1350 were built at Inchicore, while 1351 to 1355 were completed at Dundalk. Colin Holliday’s list indicates that 1350 to 1355 were through-wired for railcar working, probably while they were still under construction. There is a good illustration of 1349 brand new in 1951 in ‘Irish Broad Gauge Carriages’ (Coakham) page 40 – this shows that the Inchicore batch were delivered in unlined dark green with unpainted aluminium window surrounds (as per the corridor composites described in the previous post). I cannot confirm whether the Dundalk vehicles were the same. Mike Morant’s photo dated 1954 shows one of these corridor thirds in original condition, marshalled in an AEC railcar set at Albert Quay: ‘Irish Railways in Colour’ (Ferris) vol.1 p97 has a particularly nice colour view of one of these coaches in a railcar set in 1955, and this has a waist line but no class designations on the doors. Perhaps the Dundalk-built coaches had a waist line from the start; alternatively this vehicle may have been repainted. The green colour matches that on the railcars. This 1957 photo shows one with a waist line and the class designation 2 on the doors, as seen here again at Albert Quay: https://www.flickr.com/photos/irishrailwayarchive/54253433960 They were still in use in railcar sets and elsewhere through the early black and tan era and into the 1970s, initially with 2 class designations on the doors and latterly without: https://www.flickr.com/photos/irishrailwayarchive/53511468903 There are plenty of photos of these coaches in railcar sets; they are surprisingly common given that apparently only 6 of these carriages were through-wired. It makes me wonder if more might have been wired but missed off the register. https://www.flickr.com/photos/irishrailwayarchive/53498712331 https://www.flickr.com/photos/irishrailwayarchive/53505734182 https://www.flickr.com/photos/irishrailwayarchive/54252969871 https://www.flickr.com/photos/irishrailwayarchive/54253199098 https://www.flickr.com/photos/irishrailwayarchive/54253199453 https://www.flickr.com/photos/irishrailwayarchive/54253211594 https://www.flickr.com/photos/irishrailwayarchive/54253199553 https://www.flickr.com/photos/irishrailwayarchive/54252073152 https://www.flickr.com/photos/irishrailwayarchive/54253212614 https://catalogue.nli.ie/Record/vtls000306548 https://www.flickr.com/photos/irishrailwayarchive/54255514105 https://www.flickr.com/photos/irishrailwayarchive/53447019368 https://www.flickr.com/photos/irishrailwayarchive/53447203394 https://www.flickr.com/photos/irishrailwayarchive/54419476641 https://www.flickr.com/photos/irishrailwayarchive/54419866325 https://www.flickr.com/photos/irishrailwayarchive/53445962837 https://www.flickr.com/photos/irishrailwayarchive/53446886101 https://www.flickr.com/photos/irishrailwayarchive/53569589337 https://www.flickr.com/photos/irishrailwayarchive/53570882930 Book references of these carriages in railcar sets are also quite numerous: IRRS Journal no.184 p66 Rails around Dublin (Murray) p53 The Cork, Bandon and South Coast Railway Vol.3 (Creedon) p30 Irish Railways in Colour (Ferris) vol.1 p97 Cork Bandon & South Coast Railway (Shepherd) p38 Irish Railways 40 Years of Change (Boocock) p23 The Cork, Bandon and South Coast Railway Vol.3 (Creedon) p67 Cork Bandon & South Coast Railway (Shepherd) p131 IRRS Journal no.182 p348 IRRS Journal no.182 p349 IRRS Journal no.186 back cover Rails Through North Kerry (Beaumont/Carse) cover Distinctive features of these coaches are an underframe with welded trusses directly beneath the solebar, and the body has 3 third class compartments at one end, plus 4 thirds at the other. In between, two smaller windows for the toilets flank a central door. More to follow in due course…
-
CIE corridor composites 2128, 2129 These were part of the first batch of six carriages built by CIE in 1951, numbers 2124-2129. They were on a 60’0” underframe, 18” shorter than subsequent vehicles. Colin Holliday’s list indicates that only the last two were through-wired for railcar working, possibly while they were still under construction or very shortly afterwards. Given that the railcars themselves had quite generous first class provision, I suspect that few railcar trains needed additional first class seats, and these may have spent most of their life in loco-hauled trains. As yet I have not found any photos of these two vehicles marshalled in railcar sets. This is a bit of an underwhelming start to the list, I’m afraid! Therefore, to illustrate them I will have to rely on photos of this type of carriage in other circumstances. There is a good illustration of the first of these coaches in 1952 in ‘Irish Broad Gauge Carriages’ (Coakham) page 43, and another can be seen in this IRRS photo dated 1955: https://www.flickr.com/photos/irishrailwayarchive/53511278711/ I believe this photo from Ernie also shows one of these coaches from the other side: The photos show that they were delivered in unlined dark green with unpainted aluminium window surrounds. The first class door was marked with a 1, but the other end was not marked. When first delivered this would have been third class, reclassified to second in 1956. Distinctive features of these coaches are an underframe with welded trusses directly beneath the solebar, and the body has 3 first class compartments and 4 thirds, with two smaller windows for the toilets in between. There is no central door.
-
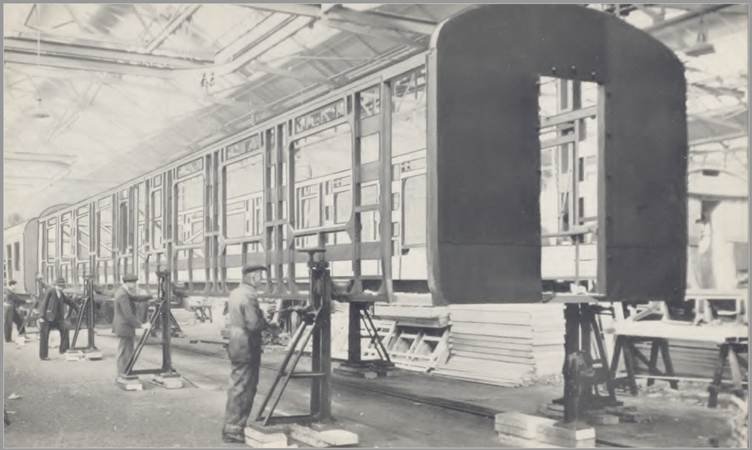
Overview of through-wired vehicles The book ‘Diesel Dawn’ by Colm Flanagan tells the story of Irish railcar development and includes a list of the coaches that were through-wired to work with the CIE AEC railcars. That list is credited to Colin Holliday. This is the basis of the vehicles described in this thread. I suspect that the list is based on a CIE carriage register published in 1969, which identifies the carriages through-wired for use with the railcars and lists the same vehicle numbers. I’m hoping to obtain a copy of the register in due course so that I can check this. I believe that Colin Holliday’s list is correct in what it includes, but may be incomplete, as I have found strong evidence of a few carriages not on the list that were wired for AEC railcar operation. Those additional vehicles will also be described in this thread. Broadly speaking, the carriages wired to run with the AEC railcars fall into the following groups: Carriages built by CIE in the period that the railcars were being introduced, and through-wired from new. Older catering cars, used to provide food service in railcar expresses until the CIE buffet cars could be completed. In most cases these were withdrawn once the new coaches were available. Other older carriages, wired to work with the railcars owing to delays in the construction of new carriages. Some of these remained in service for a surprisingly long time. New carriages built by CIE after the railcars were introduced. New carriages built by external contractors (Park Royal, Cravens). Driving trailers, with control cabs to enable shorter railcar formations, or longer trains to be split. There were a total of 66 CIE AEC railcars, excluding the ex-GNR vehicles which had a different, incompatible control system. Some of these spent long periods out of use owing to fire or accident damage, so it is probably reasonable to assume about 30 railcar pairs in service at any one time. Photos show that the railcar pairs typically operated with 0, 1 or 2 trailers. They did not have enough power to haul longer trains. It may appear surprising that at least 90 carriages were through-wired for railcar operation, when a maximum of 60 could be used at once. Of course, these could equally well be used in loco-hauled trains and many of them must have been. Some through-wired carriages appear to have spent most of their life working in railcar sets, whilst others (such as the state saloon GSWR 351) may have only run in a railcar set a few times in their life. The subsequent posts will consider each type of carriage fitted to work with the railcars. When additional capacity was required on a railcar train, and a through-wired vehicle was not available, any vacuum-braked carriage or wagon could be hauled as 'Tail Traffic'. See this thread for more details and a wide selection of examples: https://irishrailwaymodeller.com/topic/19369-tail-traffic/ Historical Background CIE’s first annual report (for the period 1st June 1950 to 31st March 1951) notes that they had placed an order for 60 diesel railcars for main line and secondary line traffic. CIE had also put into service 6 new coaches, the first since 1937 and part of a planned construction programme of 117 new passenger vehicles [These would have been composites 2124-2129, 60’0” long and closely based on GSR designs]. The report also notes that 7 new restaurant and kitchen cars were under construction, the first since 1931. The report includes a full-page image of the first new railcars 2600 and 2601, as well as a new coach body under construction (this would have been one of the 1339-1350 series of compartment standards, 61’6” long). However, all was not rosy. CIE’s progress was hampered by serious industrial relations issues, with strikes affecting engineering and admin staff as well as operations. These were to delay the full introduction of railcar services. The following year’s report for the period to 31st March 1952 shows that the industrial relations problems were continuing, and causing delay to the introduction of the railcar fleet as well as the construction of carriages to run with them. The 12 new carriages mentioned here would have been corridor thirds 1339 to 1350. The talk of new catering cars in the previous year has been replaced with the conversion of existing stock to run with the railcars! The workers at Dublin Port acted in support of CIE’s striking electricians and refused to unload some of the newly-built railcars. Further delays to new carriage construction were caused by shortages of raw materials, and CIE instead ordered new coach and wagon underframes complete from England. I think some or all of these 100 carriage underframes may have been of the triangulated type; after this date CIE only built 47 more carriages on conventional underframes. By the next annual report in March 1953, CIE were still mired in the electricians’ strike which delayed the construction of new coaches and the import of new railcars: The new coaches mentioned here were corridor composites 2130-2136, this first three open thirds 1356-1358, and the remainder of the batch of corridor thirds 1351 to 1355; the latter were assembled at Dundalk, perhaps in an attempt to bypass the industrial relations issues at Inchicore. Meanwhile, the catering department reported some progress; the first few of the 2405-2418 group of catering cars had been built, and 8 older vehicles had been refurbished: The electricians’ strike ended in November 1952 and by March 1953 there were 20 railcars available. By March 1954 there had been much more progress – the total number of railcars in service was now 40, and the existing batches of open thirds and buffet cars had been completed, along with a new batch of composites. There were still a few more railcars to come, but the future of diesel traction was to be in a different direction and the board also announced their order of 94 diesel locos from Metropolitan Vickers. In the next few years, the remainder of the railcars were delivered and entered service, and some more coaches were through-wired to work with them. The later railcars were adapted for suburban service, and many of the later coaches modified to work with AEC railcars were also of suburban types. This historical background may not seem that relevant to the story of the AEC railcar trailers, but in my view it helps us to understand which carriages were through-wired in the early years, and why some rather ancient vehicles were converted.
-
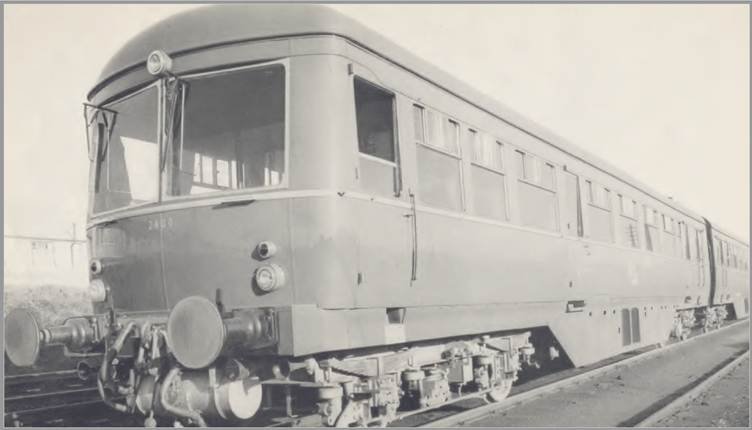
Introduction CIE’s fleet of 66 AEC-powered railcars are fairly well-known. Delivered in the early 1950s they lasted in service until the early 1970s and were then rebuilt into push-pull sets for Dublin suburban work, pending completion of the DART. By their final withdrawal in the mid 1980s they were very run-down and unloved, and only one car survives in relatively poor condition. RTR models are available from Silver Fox, and an etched scratch-aid kit is available from Worsley Works. Each of these approaches to modelling them have some challenges. Personally, I’m hoping that IRM eventually produce an AEC railcar model. Perhaps if I waffle on for long enough about them, it will provide them some encouragement! The AEC railcars were operated in sets with conventional coaches as intermediate vehicles. These coaches had to be through-wired to work with the railcars, and only a small proportion of CIE’s total fleet had this wiring. So in model form, you shouldn’t couple any random carriage in your railcar set – there are particular types that worked with the railcars, and others that were physically incapable of doing so. In this thread I will examine and illustrate the carriages that worked as intermediates in the CIE AEC railcar sets. CIE also inherited a few AEC and BUT railcars from the GNR. Despite being of similar appearance, these had a different, incompatible control system. Some carriages were through-wired to work with them but they were mostly of GNR origins. I do not intend to cover the ex-GNR sets in this thread. This photo from Ernie on Flickr shows a nice variety of through-wired carriages as intermediate trailers, including a former GSR suburban coach, a Park Royal, and towards the rear of the set is a CIE 'laminate' in unpainted aluminium 'silver' livery: It wasn't just modern-looking carriages that ran with the railcars; there were some very old vehicles through-wired to work with them too. I think the oldest was GSWR diner 343 of 1898, one of two clerestory carriages which could run with the AECs:
-
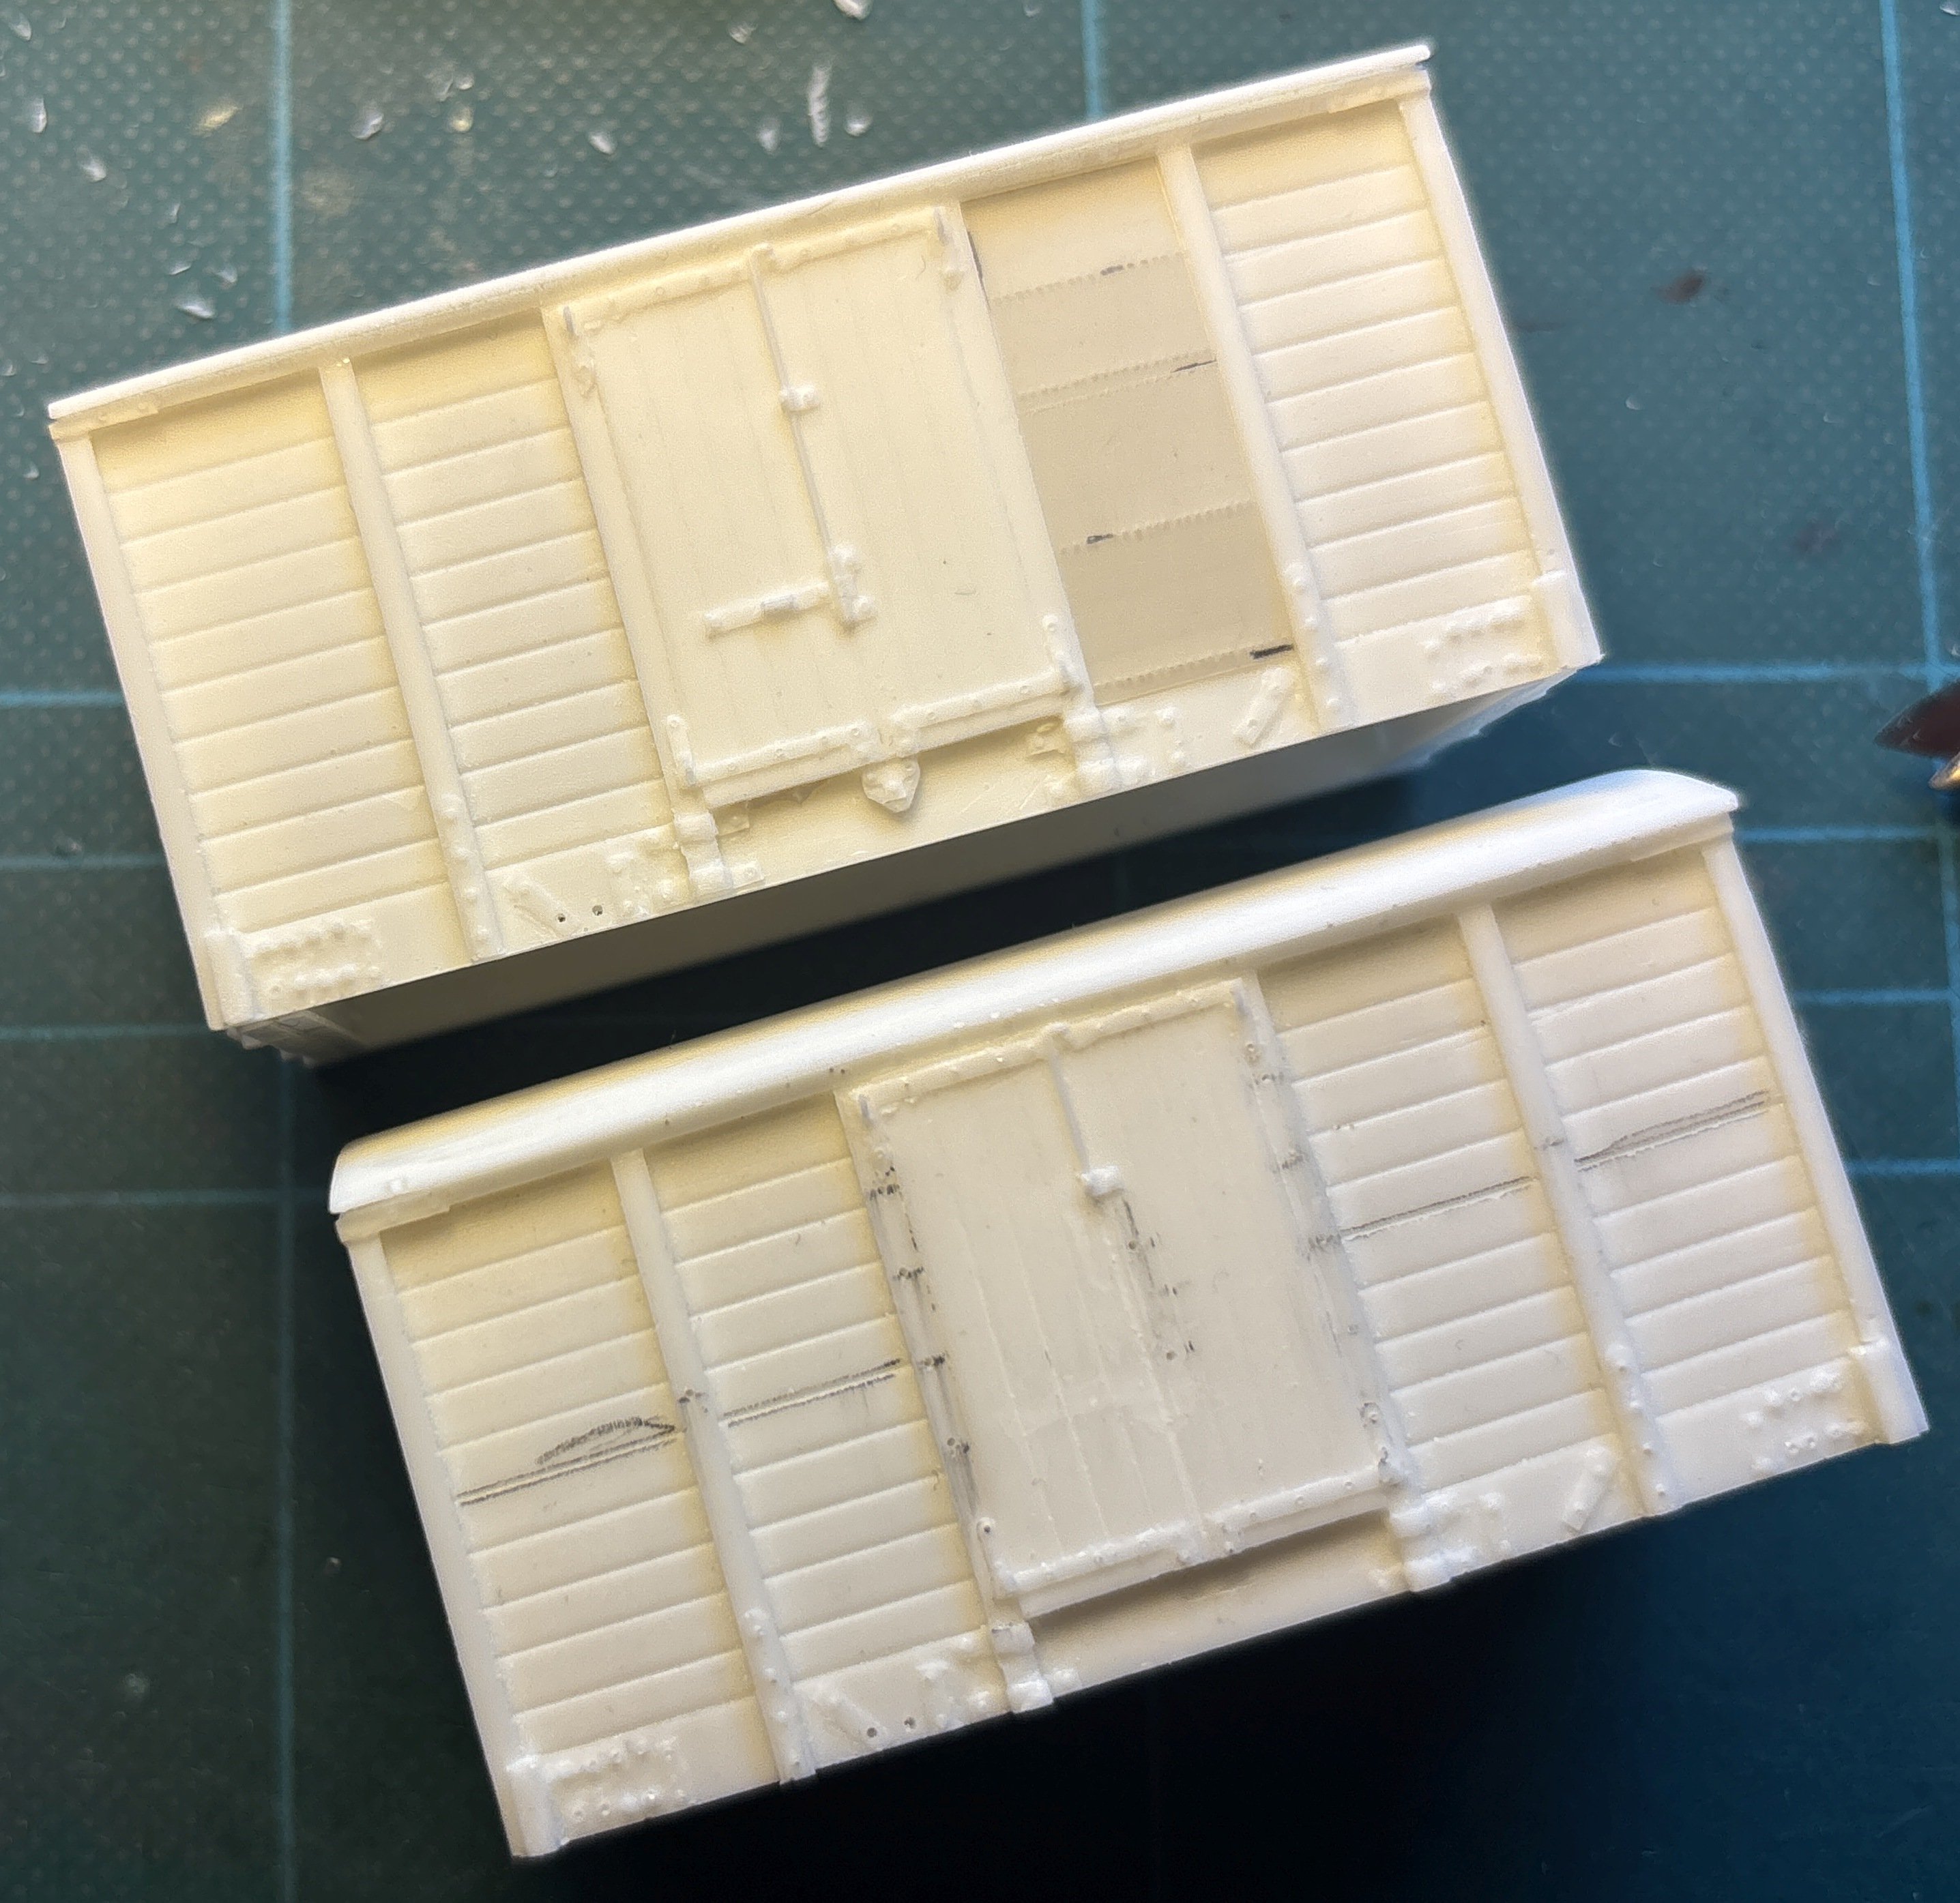
Upper: first attempt at an overlay panel for the sheeted side version. Extremely thin plastic sheet, cut to size, scored and then rivets embossed at 0.5mm spacing using a centrepunch and a steel rule (just pressing with light hand pressure). Not 100% even but then the prototype (above) looks a bit random in places too. Not sure I'll have much sanity left after making 14 of these... Lower: work progressing on the MGWR version: door detail removed, plank joins re-scribed and holes drilled for replacement detailing. Holes also drilled for the roping eyes used for attaching the roof sheet. I have ordered some axleboxes, springs and buffers from Wizard. I might need to buy a packet of Tunnock's Caramel Wafers, just in case I've run out of wagon sheet material! Pretty sure I have a few still wrappers in stock but I'm feeling peckish...
-
They do look stunning! I try hard to avoid 'Rule 1' purchases so I held back on this which doesn't fit any of my modelling interests but is nevertheless a loco I've always been fond of. I expect that one day I'll spend the price of a model on a ticket to ride behind the badger.
-
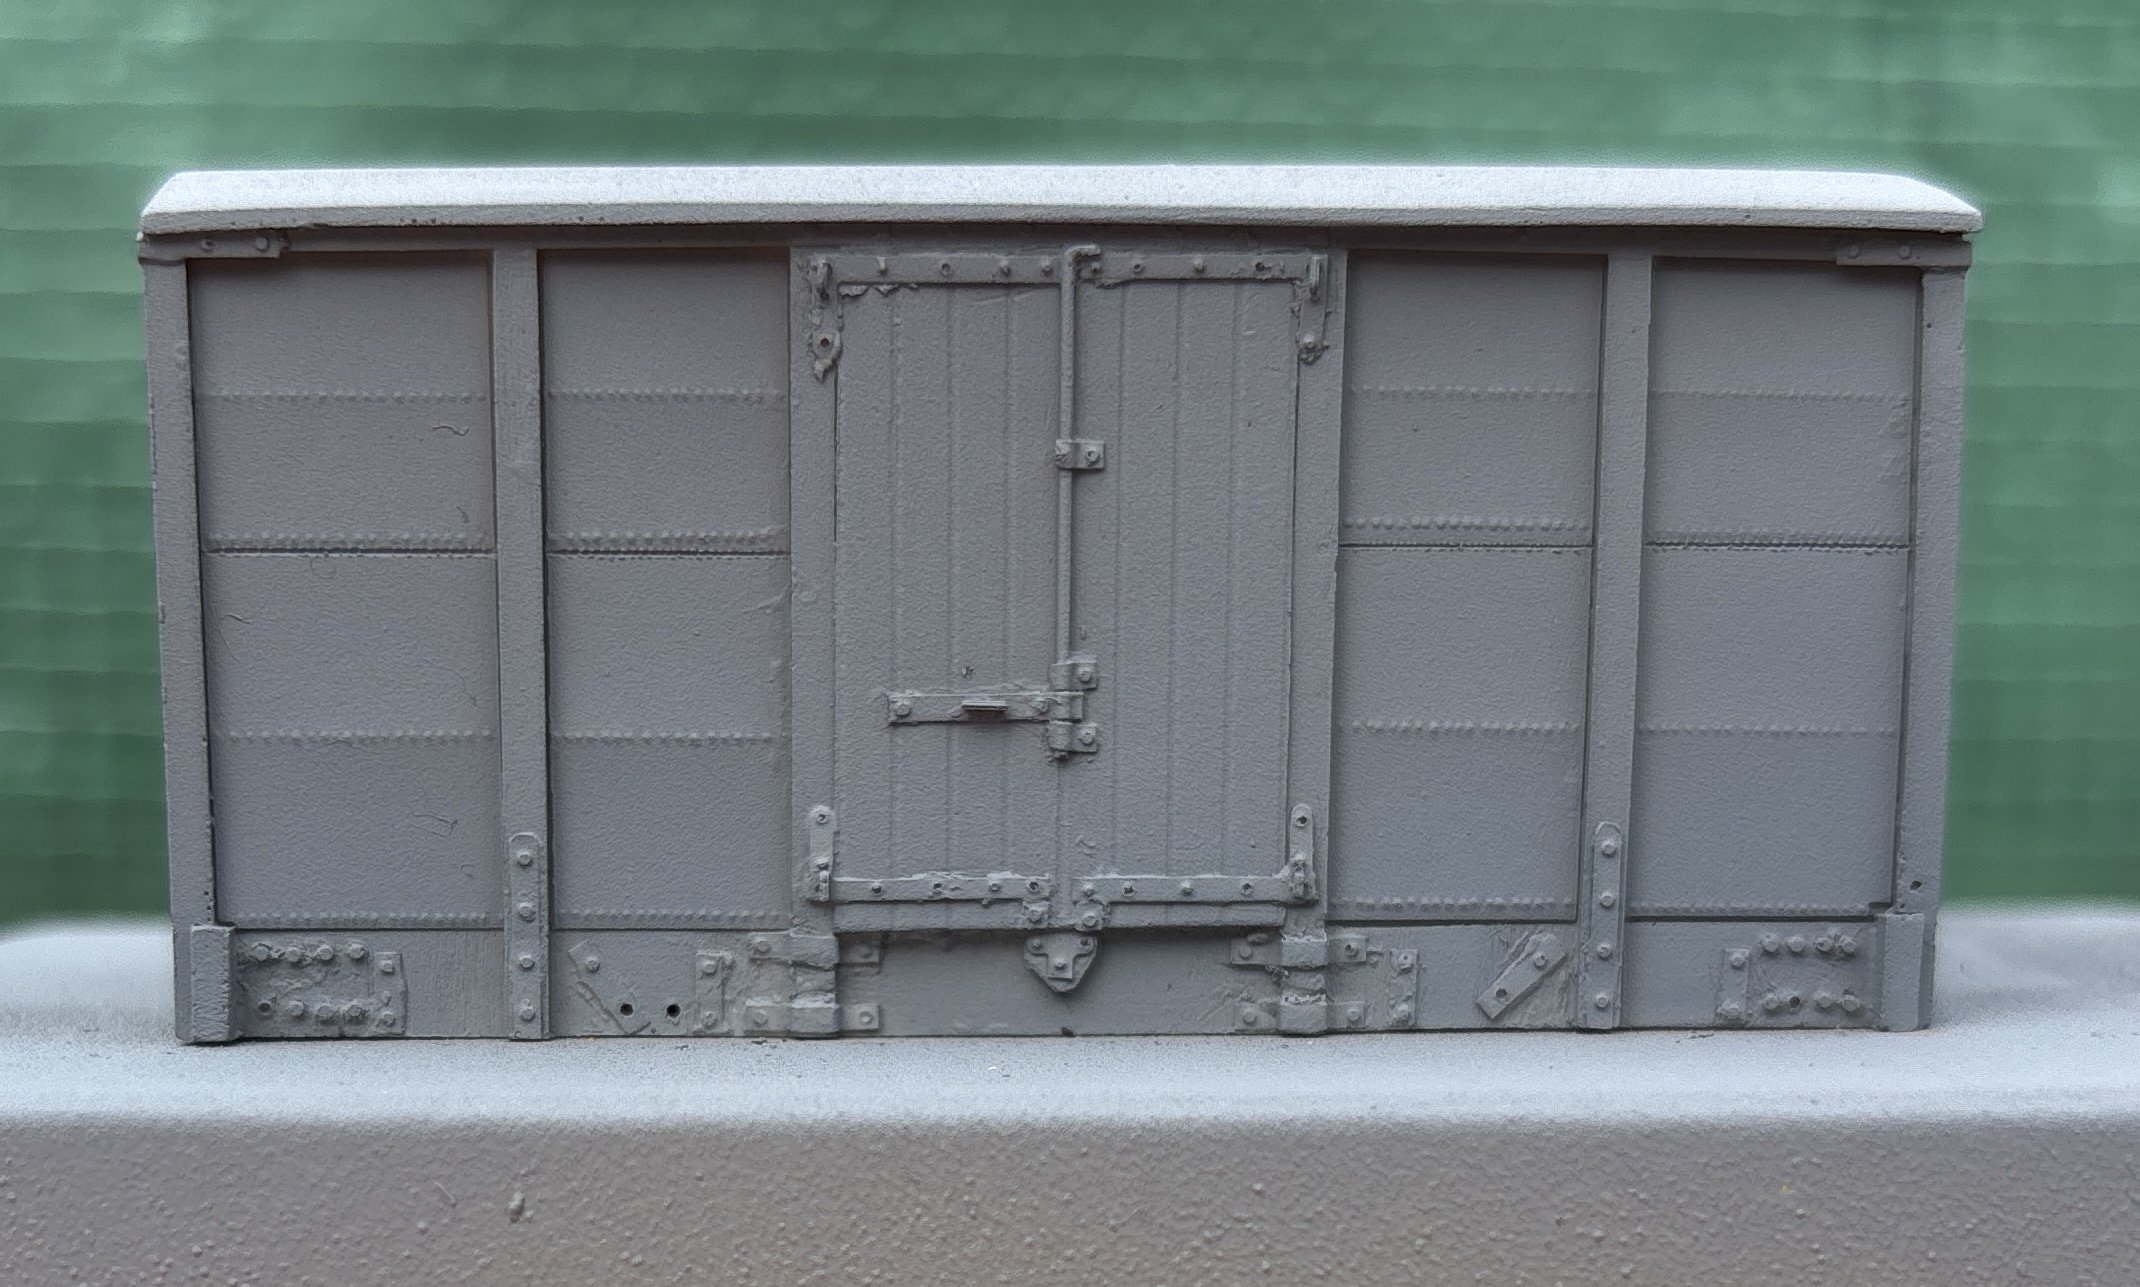
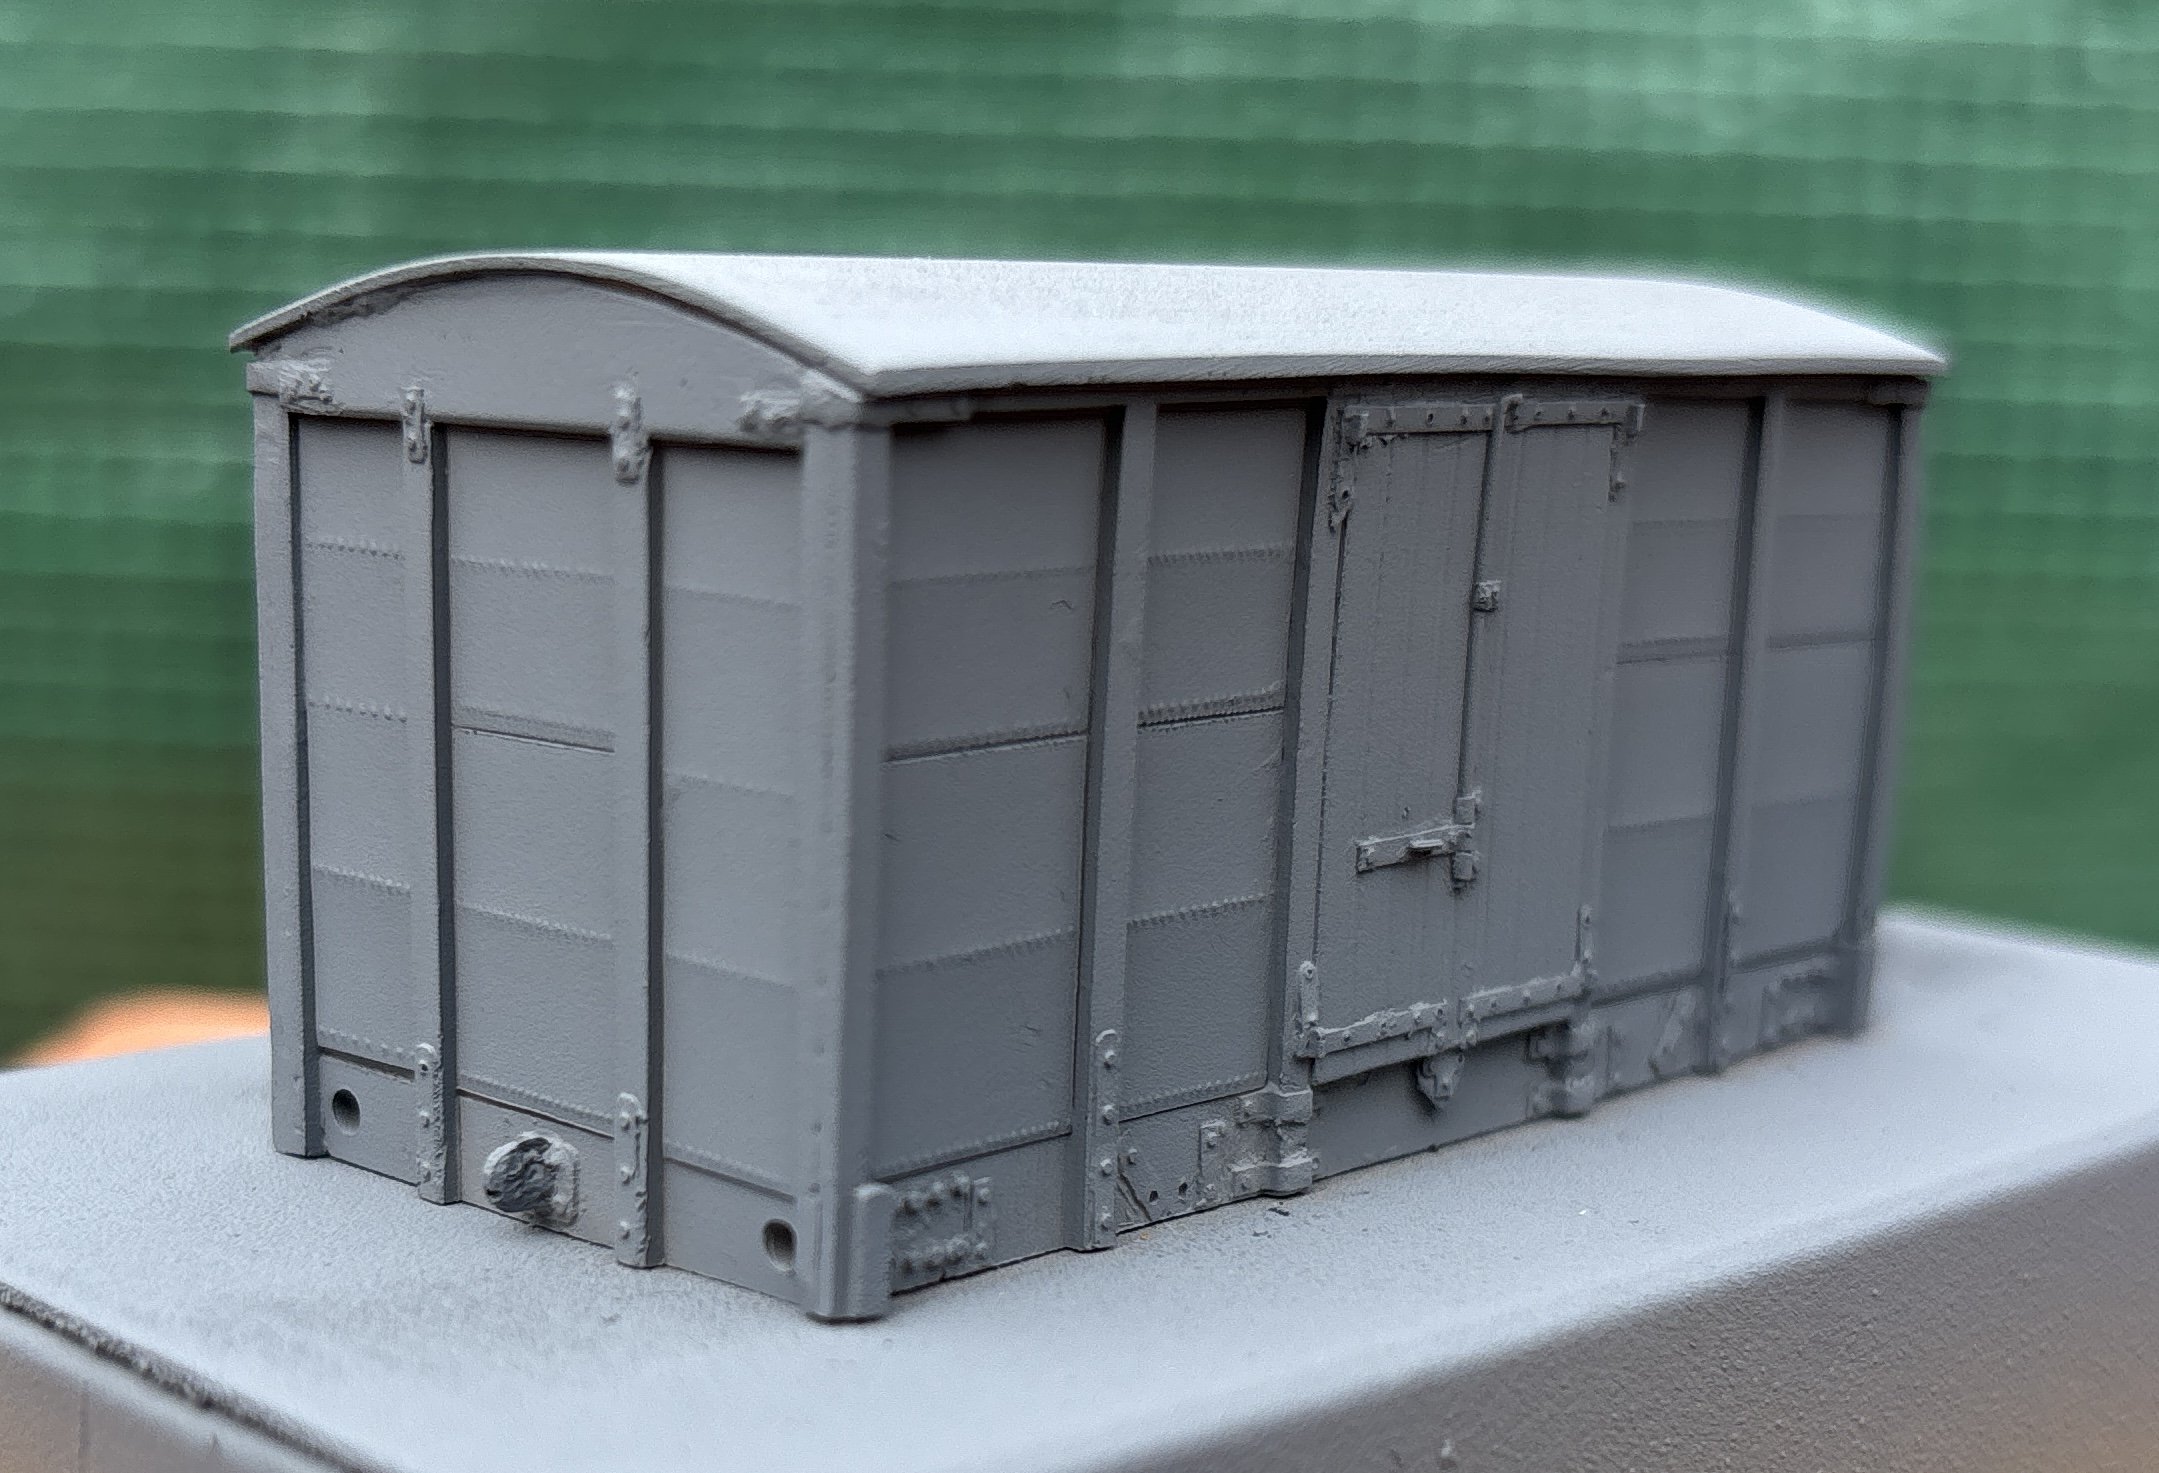
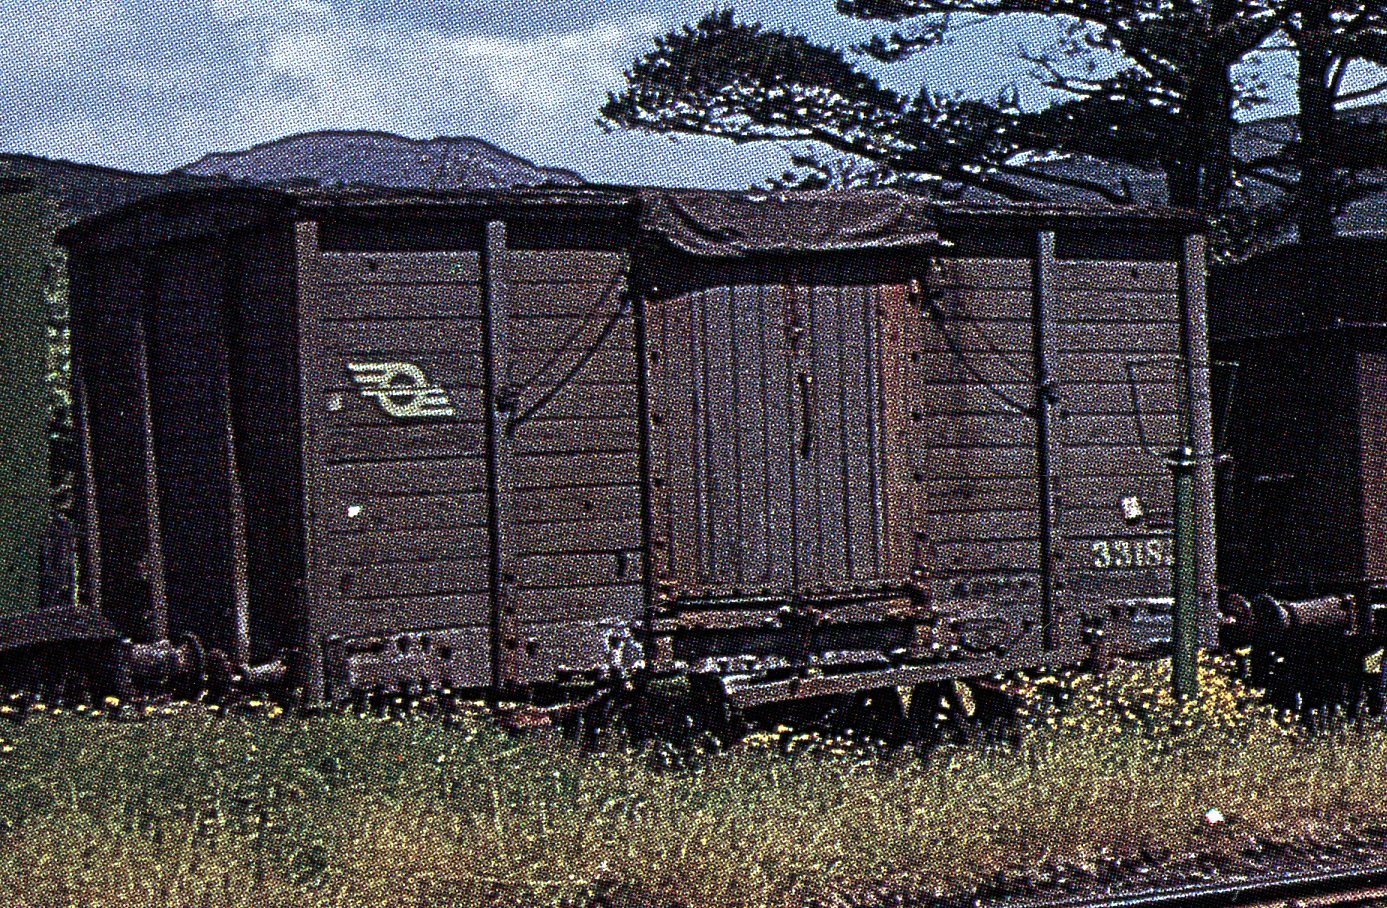
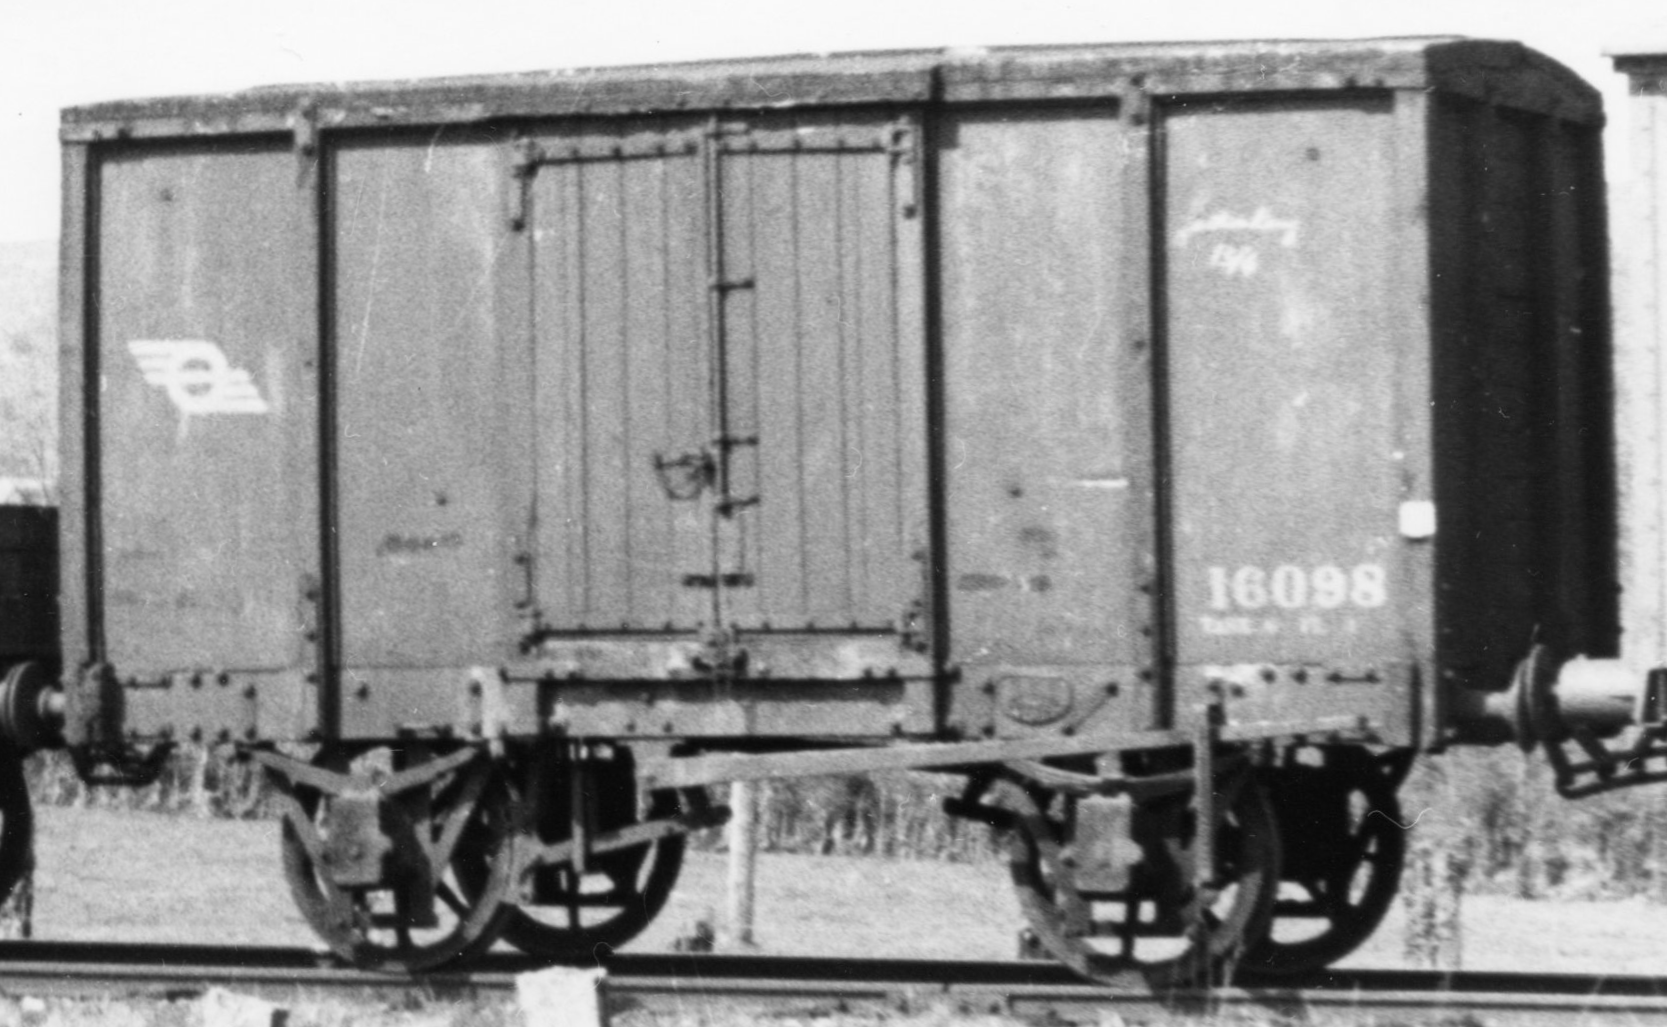
Here's another photo I've found in the RCTS archive - a nice view of GNR fitted van 2024 at Limerick in 1962, still in GNR bauxite livery but with a CIE stencil. Also a board marked 'Return to Dundalk when empty' which is a nice detail. Note the screw couplings and very long spindle buffers on this fitted van: https://archive.rcts.org.uk/shopviewer.php?pg=44347&code=CH06457C The RCTS archive also has this image of GSR 16342, a double-skinned van, in CIE brown livery with roundel at Limerick in 1974: https://archive.rcts.org.uk/shopviewer.php?pg=44305&code=CH06415C I've been struggling for enthusiasm for modelling recently, but yesterday I had a day off and decided to leave the computer turned off all day and build some wagons instead. I assembled the bodies for three of these IRCH wooden-framed goods vans from Leslie's kits, although I added extra internal bracing and weight to them. Although leaving the computer turned off meant that I actually made something, it also meant that I didn't have a good selection of images of the prototype in front of me. I wish now that I hadn't been in a hurry to glue the roofs on, as now I've looked at the images in this thread I think the arc of the roof is a bit high compared to the prototype. I'm trying to decide whether I can live with it, or whether I need to take the roofs off (likely to be a destructive process) reprofile the ends and fit new roofs from thin brass sheet. Mulling this over is likely to procrastinate any further modelling! It's not too bad, and more visible from the ends than the sides. Maybe some gentle sanding of the roof profile will ease my conscience? I have many more small details to add to these bodies, also the chassis to build for 21mm gauge. Having done the research documented in the thread above, there are more than 3 variants I'd like to model, so with these 3 vans I'll have to choose carefully. Leslie's kits represent the GNR vans, whereas the IRCH designs used by the GSR and MGWR had a some detail differences, and of course there were plenty of variations among the GNR vans too. At present I think I'm aiming for: 1. ex-GNR 4166N (vac fitted), in CIE bauxite with white snail, CIE stencil and number: https://www.flickr.com/photos/irishrailwayarchive/54257197990 2. ex-MGWR 3188M (convertible roof), in CIE mid grey with snail and number in eau-de-nil 3. One of the vans with the sides (and perhaps the ends) covered in sheet material, but I haven't yet decided whether it will be a GSR or GNR vehicle, but it will be in CIE grey with white snail and number: As well as one of them being vac-fitted, all three of these vans have different buffers, door bolts and bracing details, also different roof surfaces and spoked/disc wheels. There are several others I'd consider adding to my rake of vans, including one or two later survivors with CIE roundel, a GNR fitted van with drop door, and I am sorely tempted to modify one into the grain hopper version. Plus of course some double-skinned variants. But first I'll need to find my modelling mojo again!
-
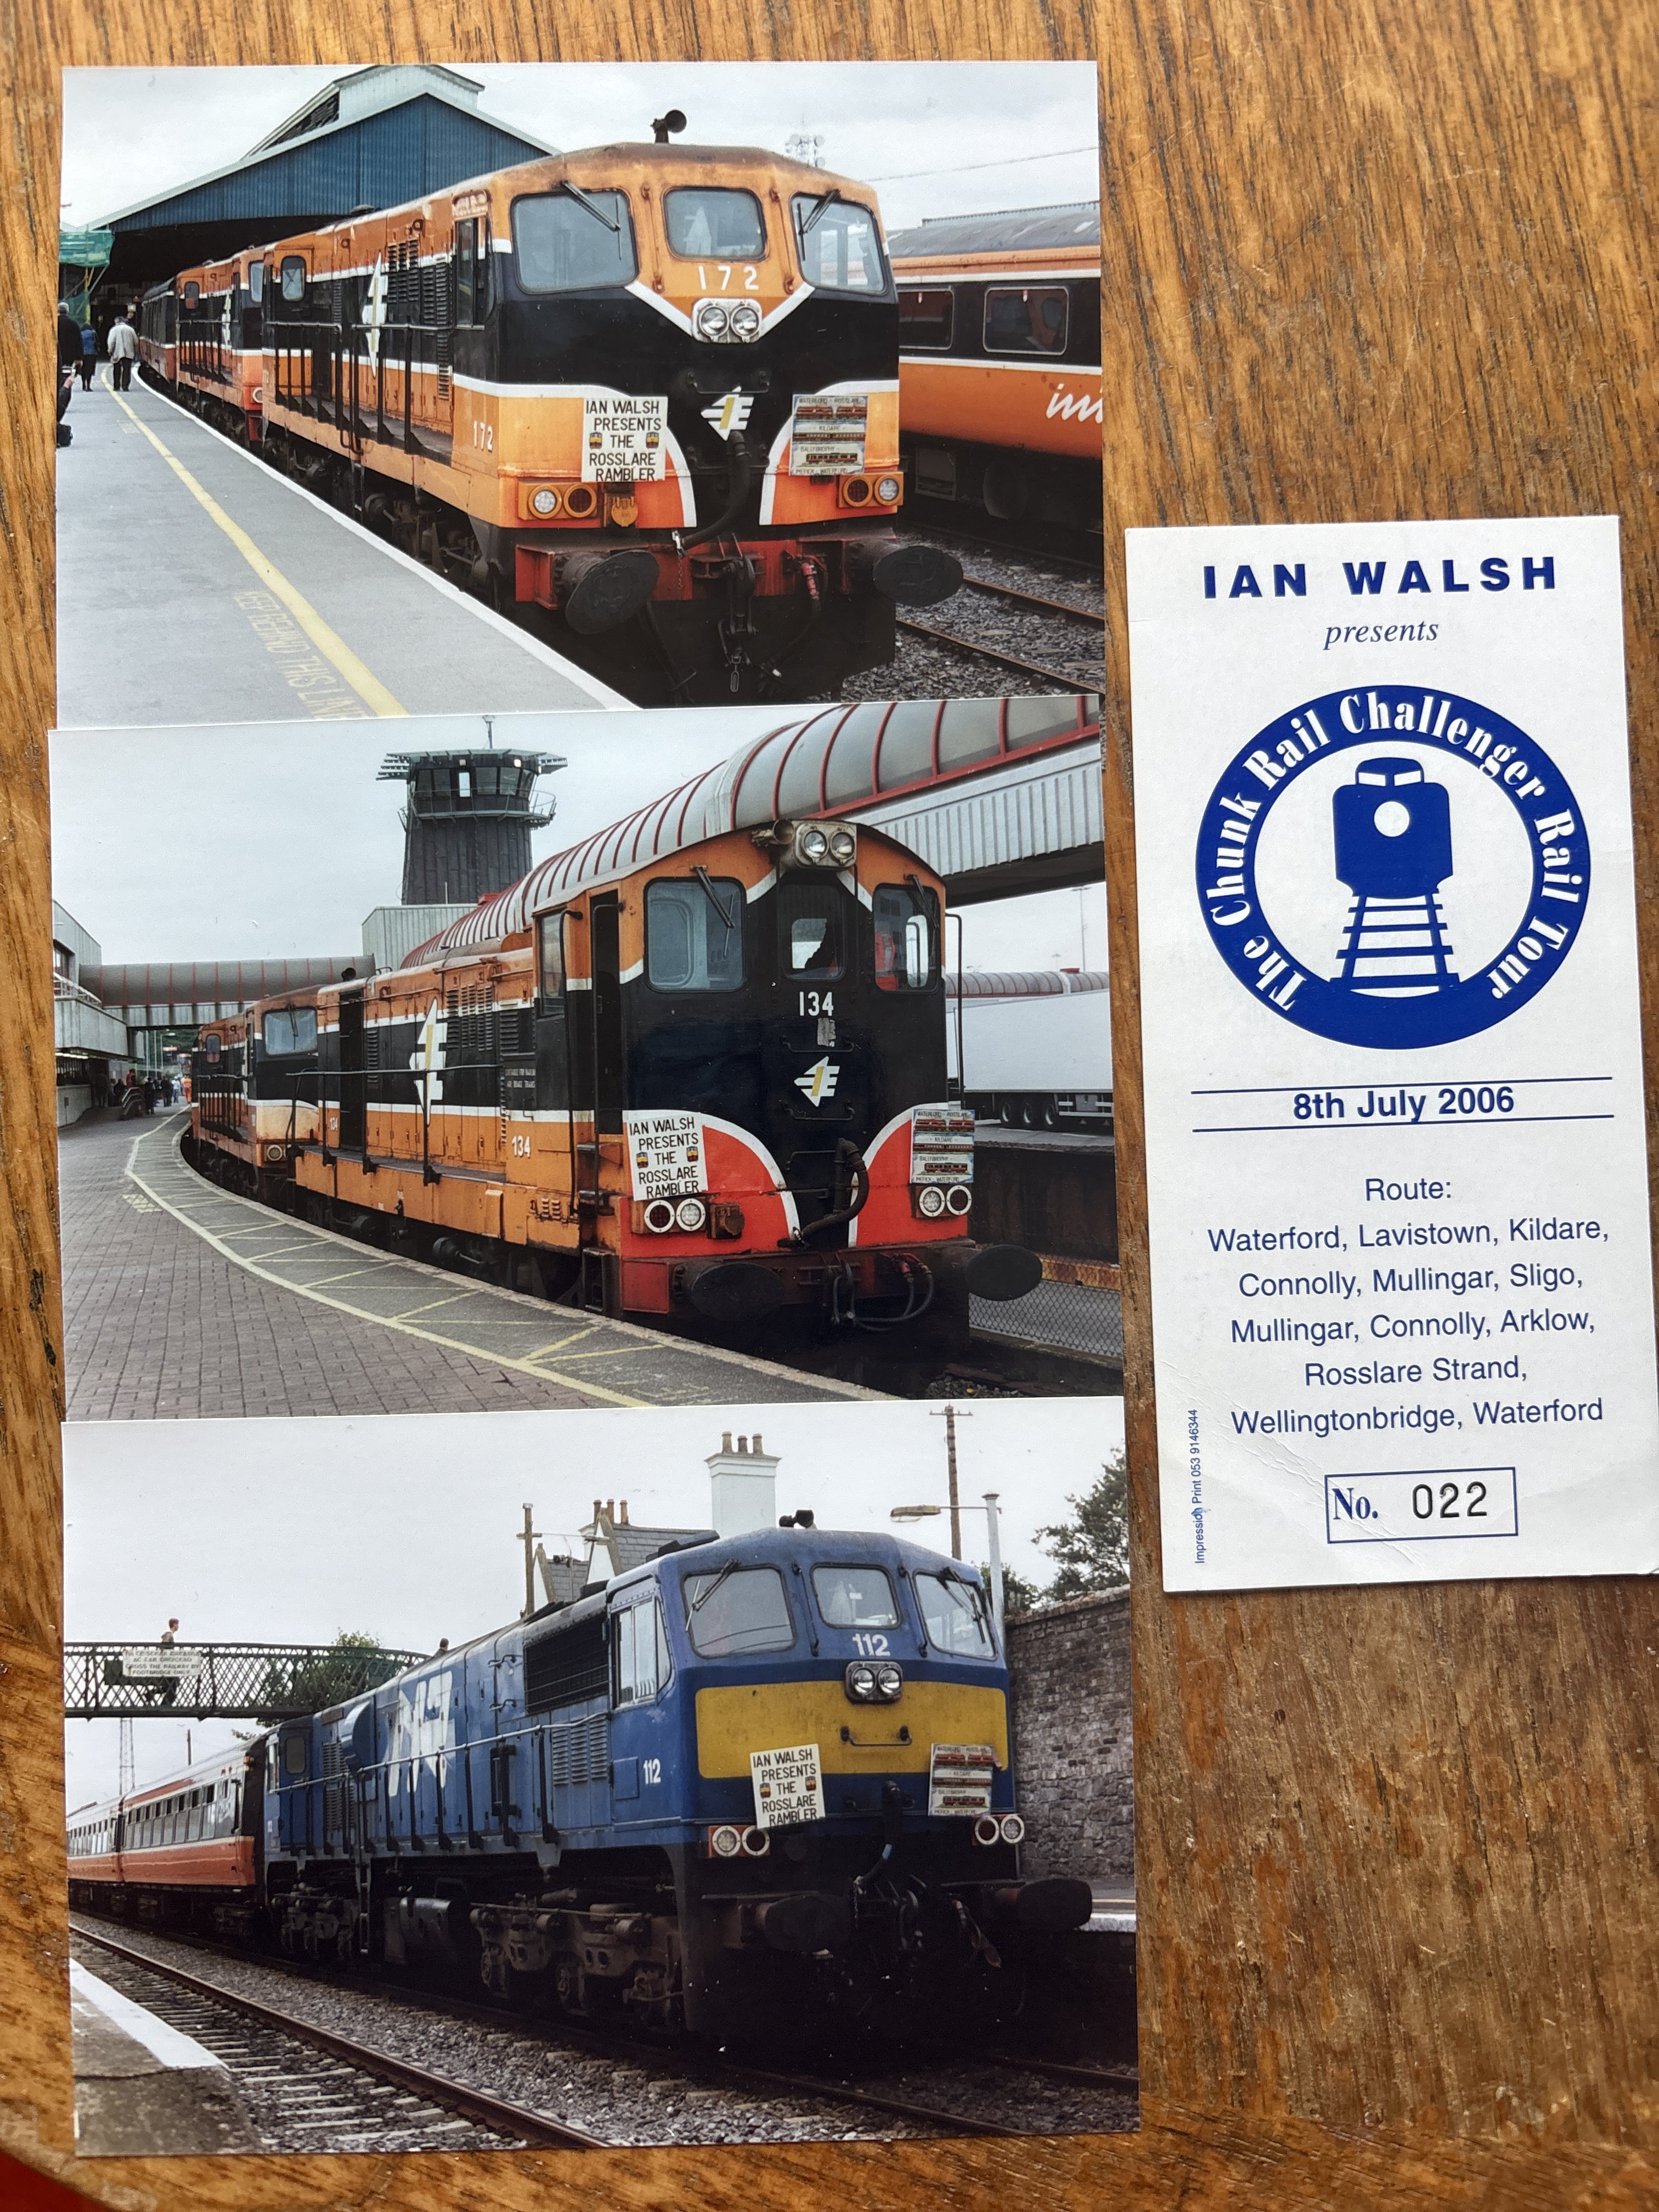
Varied traction on Ian’s ‘Rosslare Rambler’, and my ticket for the ‘Chunkrail Challenger’. Not so many photo-opportunities on that one as I recall - it was a long trip! Ian was great at making unlikely things happen!
-
There's also some info in this thread over on RMweb - several different approaches it seems: HELP - SHUTTLE END TO END - DCC Help & Questions - RMweb