Mol_PMB
-
Posts
2,166 -
Joined
-
Last visited
-
Days Won
112
Content Type
Profiles
Forums
Events
Gallery
Blogs
Store
Community Map
Everything posted by Mol_PMB
-
This is a good question! I'll have a look at my notes later; there may be a clue in the WTT wagon number listings. The well-known pre-GSR survivors (things like the plough van and the presidential coach) were former GSWR vehicles so they didn't have a suffix. You've probably right that it was one of the former MGWR bogie flats used for PW duties. Possibly some ballast wagons of various types? Unfitted vehicles lasted longer in PW usage. Very interesting info, many thanks John. The 15147-16812 series included a variety of designs of various dimensions and forms of construction. I think there were at least 4 types in blocks within that number series and I'm presently trying to make sense of these. The info and reference for the 1938-1940 construction are therefore very helpful.
-
So here’s a photo reproduced in Donal Murray’s ‘Great Southern Railways’ showing such a vehicle. The photo is undated. It’s not an LMA van (no corrugated ends) nor an H van (no triangulated underframe) so is probably a mid-1940s build as referred to in the quote above. The absence of diagonal strapping is notable, and I need to investigate this some more. I think the photo has been flipped horizontally when printed in the book, because the brake lever seems to point the wrong way.

-
Most of us lose out when rules and finances are in turmoil. But those with a lot of money and an appetite for risk (or some insider info) can make millions in times of turmoil. Someone’s winning, somewhere…
-
Agreed, for the heating vans the later 1959/60 batch were built in green as far as I can tell, so there were a reasonable number of green 'tin vans'. A handful of the earlier 1955/6 batch of heating vans were repainted in green, but only a small minority. The rarities (based on the photos I've reviewed) were luggage 'tin vans' in green. There was certainly one, and there are a disproportionate number of photos of it as it was used on an IRRS railtour. But I don't think there were many. And as far as I can tell, none of the CIE-built TPO's carried green until the preservation era, when at least two of them did! As always, I'd love to be proved wrong by photographic evidence if anyone can provide it!
-
Further to my previous post, a few more images of Turf wagons for those who might be interested. All these from Robin N Clements who was clearly interested in the subject! The interior view will be important for modelling purposes. RNC_CMDR_32RA_Maynooth_06_Mar_1949 | [Photographer: Robin N … | Flickr RNC_GSWR_8829_1915A_Kildare_03_April_1949 | [Photographer: R… | Flickr RNC_GSWR_956_Leixlip_27_March_1949 | [Photographer: Robin N … | Flickr RNC_CMDR_11RA_Leixlip_27_Mar_1949 | [Photographer: Robin N C… | Flickr RNC_CMDR_13RA_Leixlip_27_Mar_1949 | [Photographer: Robin N C… | Flickr
-
Accurascale's entry to the NG7 market?
-
Hmm Custardy or should it be Custody? Nice work as always!
-
Back in the day I attempted two Q kits, for the A and C class. They were hard work and I was never happy with them, though they did run and look more like the prototype than a Lima class 33! Keep up the good work with the MTK heavy metal. I now wish I hadn't binned my MTK Irish coach kits; I think they would have been salvageable with my present skills even if I made a mess of them 25 years ago.
-
Whilst the coming of steam locomotives, and later electric traction, were expected to oust the horse, I find it fascinating that CIE's rail division was using horses in Dublin as late as 1968, so the humble Dobbin survived later than steam traction, and later than electric traction, working for CIE in Dublin. The Drumm trains, the Dublin city trams and the GNR trams had all gone well before that. Later, of course, DART and LUAS would come. And who knows, maybe one day some more knitting for the main lines. A similar scenario occurred in 1979 for the Pope's visit. It's amazing to read of the special arrangements made for that by CIE, which was at the time in the midst of a funding crisis and serious industrial relations problems. But for the crucial few days, everyone pulled together and somehow it all worked! Please supply us some more of these wonderful notes from the past!
-
Interesting that there were two stages to their rebuild. There are some photos of them in the 1947/8 condition in the IRRS archives, along with some open wagons converted with 'greedy boards' to carry a larger volume of turf. For example: RNC_DSER_53D_Inchicore_21_Aug_1947 | [Photographer: Robin N … | Flickr RNC_CMDR_14RA_Inchicore_21_Aug_1947 | [Photographer: Robin N… | Flickr RNC_GSR_10627_Inchicore_26_Apr_1947 | [Photographer: Robin N… | Flickr RNC_CMDR_32RA_Clonsilla_01_Aug_1948 (2) | [Photographer: Rob… | Flickr RNC_CMDR_32RA_Clonsilla_01_Aug_1948 | [Photographer: Robin N… | Flickr I recall reading somewhere that CIE tried Irish Tweed, as an attempt to support home industry, but that it wore badly compared to normal carriage upholstery materials. Not sure if this was that occasion. It had several minor modifications, and was eventually purchased by BR and painted in normal carriage livery, which rather ruined the effect. Some photos on Flickr by Robert Carroll:
-
This has got @Darius43 written all over it. A grotty 1980s kit for an imaginary diesel loco. https://ebay.us/m/o2DlTT
-
On the subject of the H van cladding, here's another photo from Ernie dated 1966. A pair of H vans in the foreground - the one behind the pole is freshly painted in the pale grey and roundel livery. But to its left, the nearest one is still in snail livery, with the panels extremely pale silver-grey. The steel framing has lost its paint, gone rusty and looks very dark by comparison. So are the panels aluminium-faced ply rather than plain ply? For comparison, here's a freshly-painted one in mid-grey snail livery:
-
All this info is extremely interesting - many thanks! I'll pick up on this bit now as it does indeed mesh nicely with my research into the various types of van and open wagon produced from the mid-1920s onwards. Post-WWII there was a surplus of aluminium, because production had been massively increased in wartime for building aircraft, and that demand had dropped suddenly. Also there were thousands of surplus aircraft, potential sources of recycled aluminium. However, good quality timber was in short supply. This led to some innovations in rail vehicle construction. The reference to "new aluminium-sided box wagons" could relate to either: The LMA (light metal alloy) goods vans, which I believe had the entire body structure made of aluminium sections and sheeting. They had corrugated ends and different framing and roofs compared to the wooden-bodied vans. More conventional goods vans broadly to the 1924 IRCH steel-framed design, but using aluminium-faced ply instead of planks. The ply could be made from lower-quality timber sources, while the aluminium facing helped to keep it weather-proof and reduced the need for painting. Both of these variants were built at Inchicore and I can look out some photos later. They used conventional steel underframes rather than the triangulated Bulleid design. Later a similar aluminium-faced laminated material (including timber and insulation elements) was also used for carriages at Inchicore. What I haven't got entirely clear in my head is whether the sides of some of the H vans had an aluminium facing originally. Photos of later survivors where the paint has deteriorated clearly show that the outer surface was ply, but by then that might have been substituted for the original material. 1950s photos show them in a very pale greyish colour, so pale that the white lettering is almost invisible. I did wonder if that was weathered unpainted aluminium, or whether the grey paint just faded very badly. Photos of vans being overhauled at Inchicore at that time show newly-painted overhauled H vans in a mid-grey (this was still in the snail period). Photo from Ernie dated 1961, very pale grey H vans contrast with the mid-grey colour of the 'Big Boy' van and the freshly repainted H on the right: Also 1961, photo from John Phillips showing newly-painted mid grey H vans: JPS_GSWR_Sambo_03_June_1961 | [Photographer: John Phillips] … | Flickr Maybe the grey paint just faded very badly.
-
Considering the standardisation in EMD products, it wouldn't surprise me if they are a useful source of parts to keep the 071s going. Some of those parts may now be hard to find elsewhere.
-
This photo shows the blank side and the skylights: https://flic.kr/p/2pwCmf3 There are 3 TPOs here, two 4-wheelers and a bogie one. The 4-wheelers are opposite ways round. Another view of the same train: https://flic.kr/p/2pwByWw This photo of Fry’s model shows the other side in original condition, though I’m not sure that the number style is correct: So I think you have one side of the vehicle fairly original and the other modified.
-
I can link a selection of photos for you, maybe tomorrow. In original condition one side had no windows at all, but there were skylights in the roof. They originally carried silver livery, then black and tan, but I’ve never found a photo of one in green.
-
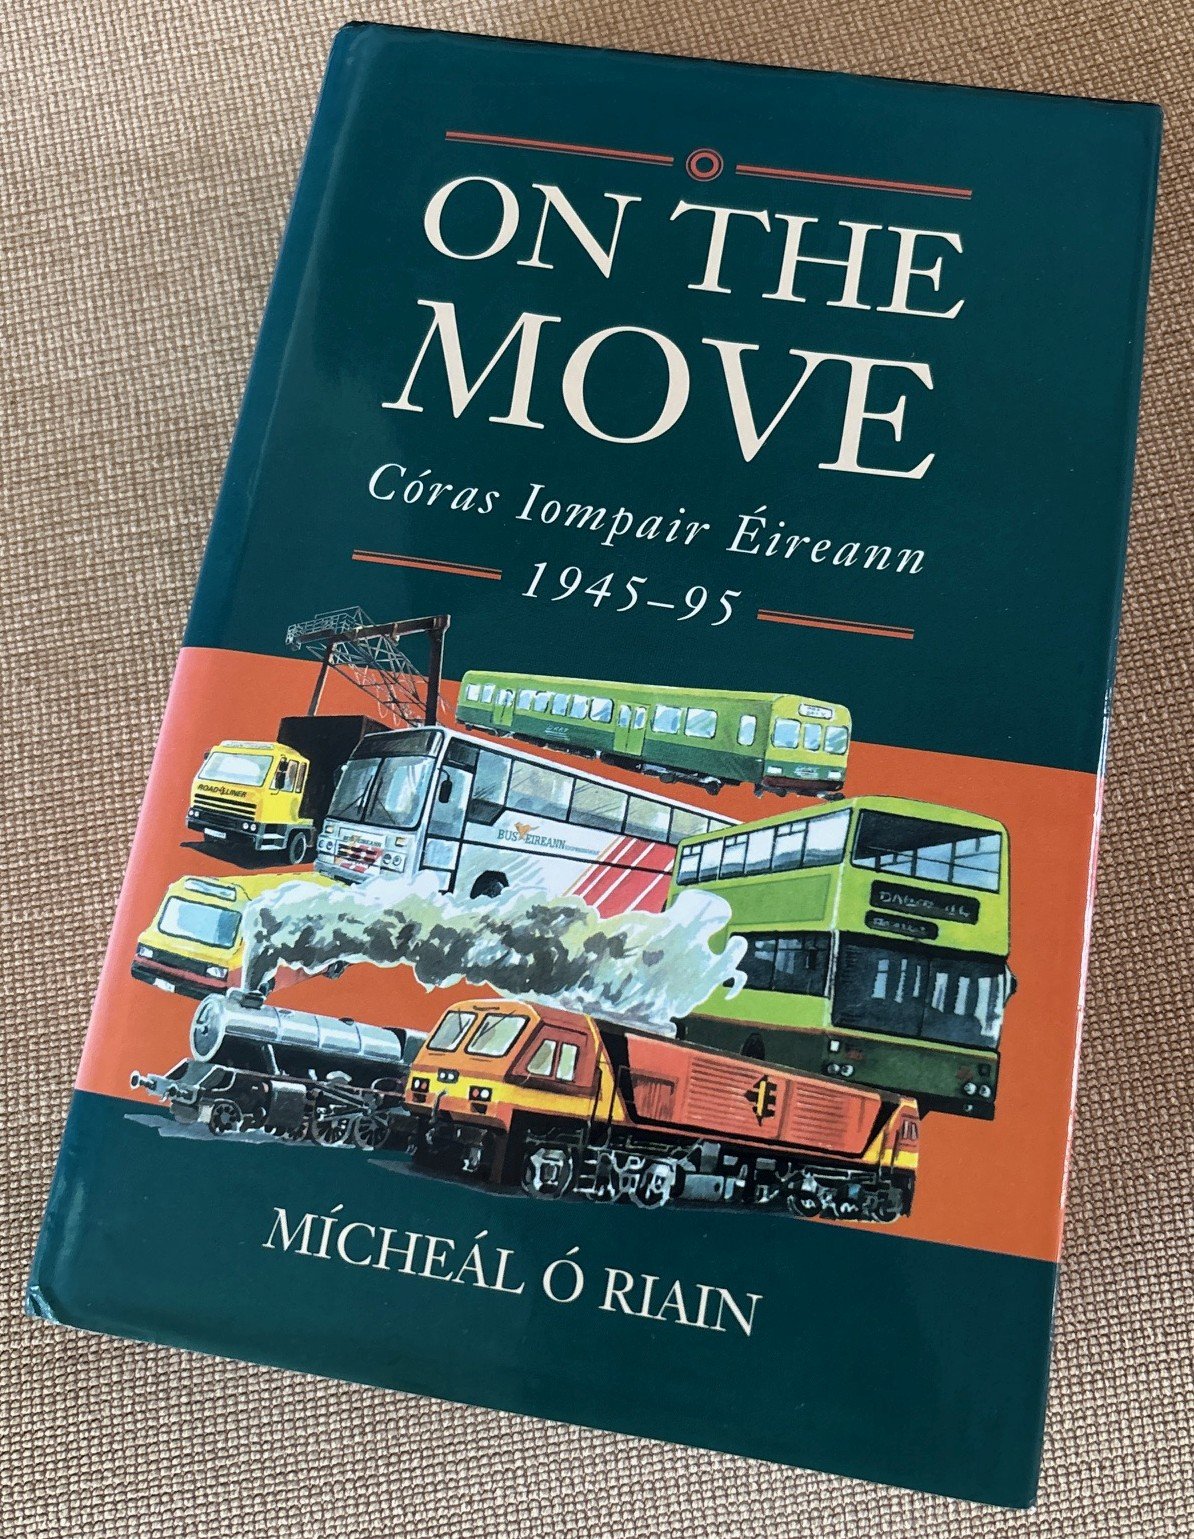
Recently I have been reading this heavy tome: I have found it very interesting, although I suspect it may not be for everyone. Its 470 pages are heavy on text and light on photos, and the story is told from the point of view of the CIE board and their perennial battles with government about funding and strategic direction, and with staff unions about productivity. On the other hand it does mention many details of the transport innovations which occurred behind the scenes. What I found fascinating was that it provided a context for all the other CIE history which we as modellers are more familiar with - loco and rolling stock orders, network rationalisation, changes in freight handling, relationships between rail, road and other transport modes. It gives the other side of the story from the normal enthusiasts' or travellers' point of view '## branch line should never have been closed' or 'why on earth did they try and introduce ## service without enough carriages?', or 'why is my bus always late?', and things that I certainly wasn't aware of, such as when CIE delayed publication of their entire accounts for over a year because the hotels subsidiary had been bankrupted by the effects of the Troubles. Published in 1995 it ends on an upbeat note with increasing traffic on both rail and bus services, new stock being delivered and improvements to infrastructure. It would be interesting to hear this side of the story brought up-to-date for the 30 years since then. The book is readily available secondhand.
-
- 5
-

-
I've been having another trawl through the IRRS photo archive, predominantly for wagons but I've picked out a few silver carriage photos too. It's not often you see a consistent silver train, without light green, dark green or black'n'tan carriages. But I think this counts - and it's the Loughrea branch train: https://www.flickr.com/photos/irishrailwayarchive/53447303315 It's even got some silver Bulleid wagons at the back, though I confess there are some grey ones too. This photo shows three tin vans of the steam-heating variety, two brand-new and one which looks like it may have caught fire. These are all of the first batch with full-depth profiled doors: https://www.flickr.com/photos/irishrailwayarchive/54252968221 I have read that these vans were originally designed so that their boilers could be removed in the summer months and the boiler space used for luggage. While that would be technically possible it seems unlikely to have been done regularly in practice. Does anyone have any more info on whether this actually happened? An interesting photo showing what is presumably the Ballina branch train formed predominantly of silver vehicles - a filthy A9 and THREE tin vans. Other liveries represented by the solitary passenger carriage (a composite in green) and a horse box: https://www.flickr.com/photos/irishrailwayarchive/54253391500 See, IRM, people do need more than one tin van per train, a model might be worth it! Fresh out of the box, a tin luggage van in 1957: https://www.flickr.com/photos/irishrailwayarchive/54253212254 This is an interesting one - a tin heating van, with the bottom of the (body-profile) doors shortened, and looking very clean silver (apart from the roof), in 1958. Perhaps was one of the 1955/56 batch which had been overhauled, the doors modified and the sides heavily cleaned? However, others receiving the same treatment seem to have been outshopped in green. I don't think it's one of the later 1959/60 batch as they had recessed doors and I think they were delivered in green (and after the stated date of the photo). https://www.flickr.com/photos/irishrailwayarchive/54253198373 A nice contrast in 1957 with a brand-new silver carriage formed into a rake with ancient 6-wheel and bogie stock: https://www.flickr.com/photos/irishrailwayarchive/54252116022 Another contrast in shape, showing the difference in profile between the 4-wheel TPO and luggage variants of the tin van: https://www.flickr.com/photos/irishrailwayarchive/53527763295 Looking through the photos again has led me to wonder whether any of the CIE-built TPO vehicles carried green livery in service. I know that one was painted green when preserved around 2000, but I have yet to find a photo of any of them (bogie or 4w) in green in the 1960s. I suspect they went directly from silver to black'n'tan. Can anyone prove me wrong? Is this another example of a preserved vehicle being painted the 'wrong' colour?
-
Two rare greenies in one shot, dated 1963. On the far left, a glimpse of a green H van, and centre-stage a green 'tin' luggage van - there were even fewer of these: https://www.flickr.com/photos/irishrailwayarchive/53570663808
-
Useful, though perhaps a bit Facebook-heavy in the links, and it makes no mention of this forum (!) or the Irish section of the RMweb forum. Also I don't see Enda's @Past-Avenue range on the list of suppliers.
-
Maybe famous Irish racehorses would be less contentious than people? If you chose the right place, Arkle would only require a minor change to the signs! Shergar would be another good candidate, but multi-word names like Sea the Stars would be less practical.
-
Other hurdles to overcome would be establishing a safety management system, operating license, negotiating paths and terminal facilities etc. None of this is impossible but expensive, time-consuming and could probably only be justified by a firm with considerable traffic to haul. I wonder whether an organisation like the Port of Foynes would be permitted to start a rail freight arm? Some of the GB rail freight operators started off small with second-hand locos, some purchased out of preservation and returned to main line traffic. If IE didn’t want to play ball with the 201s, I’d be looking at the 3 blue locos as the start of a fleet. Buy them, fix them, lease them back to NI for ballast trains and use them for freight the rest of the time. Do a deal with the RPSI to update their small GMs (new radios / signalling / whatever) in return for using them as standby locos In fact a tie-up with the RPSI could go as far as operating their railtours too. Both sides of the border. Now I’m just dreaming…
-
If you’re looking for more names I’m sure there are some railway pioneers, promoters, engineers etc that would deserve something named after them. Dargan, for example. But if you’re looking for a name for a closed station then perhaps someone like Beddy would be more appropriate?
-
Interesting - thanks. Over ten times the average! It's especially bad since these figures are per train-km, and Ireland's freight trains are much shorter than most in Europe. If it was done by wagon-km (which better represents the earning potential) then I would expect an even bigger differential. I wonder what proportion of the total train operating costs the TACs are? To run a freight over a 200km route the IE TACs will be about EUR 5000. The loco's probably going to burn 200 gallons* of diesel at maybe EUR 4 per gallon so around EUR 800. The driver might earn a few hundred more for the trip. Harder to quantify are the maintenance and terminal costs, overheads etc. But it looks like the TAC might be the dominant factor at IE rates, whereas it would be a smaller percentage in other countries. * rough estimate based on: https://heritagerail.org/wp-content/uploads/2022/09/EMD-TABLE-FUEL-CONS-NOTCH-HP-VARIOUS-MODELS.pdf
-
Recommended books - 1960s to 1980s
Mol_PMB replied to west_clare_wanderer's question in Questions & Answers
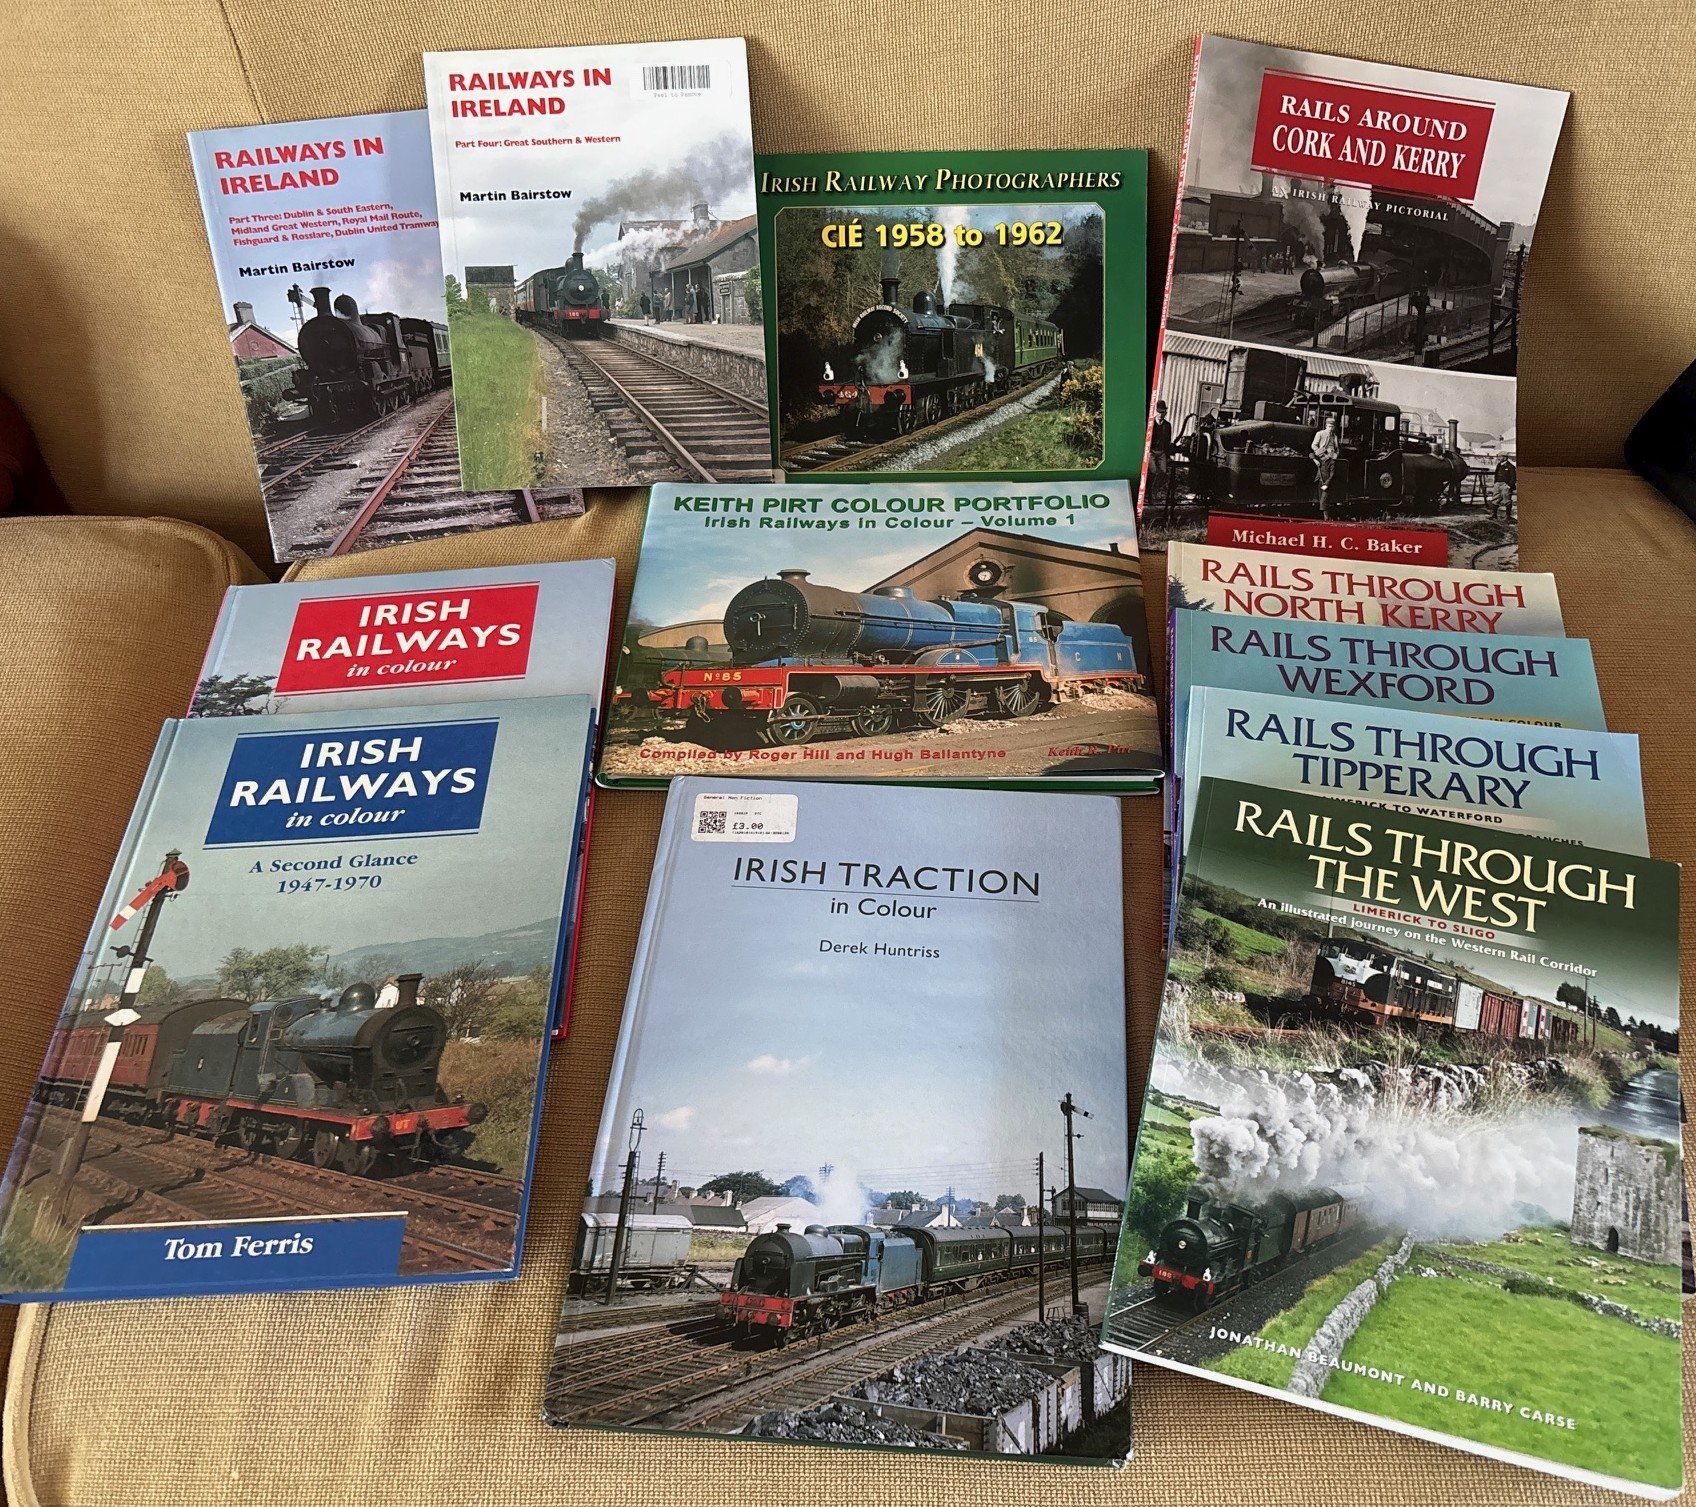
Welcome to the forum and feel free to ask questions! I also have fond memories of the Limerick, Clare, Cork and Kerry areas, though from numerous holidays rather than living there. Here are a selection of books which are predominantly picture albums, and which include the area and time period that you mention: Some of these cover the whole island of Ireland, and the books covering the 1960s can over-represent the GNR and UTA/NIR because steam lasted longer there, so people took more photos. Nevertheless there are some nice southern photos in them too. Others cover specific lines - the 'Rails Through...' series is excellent (though can be hard to get hold of): the photos are mostly the 1970s-1990s period so some may be a bit late for you. The 'Railways in Ireland' series are a mix of text and pictures, rather than just a picture album. They're geographically focused though - there are 4 volumes in total. Of course there are also many superb books which are more focused on the history of each line, predominantly text and many of the pictures in them tend to be earlier than your preferred period. I haven't shown those, but if you're interested then Ernie Shepherd has written some nice ones including (in your area) those on the WL&WR and CB&SCR, while Alan O'Rourke wrote a book on the North Kerry. Most of these books are out of print but available secondhand online.