Mol_PMB
-
Posts
2,159 -
Joined
-
Last visited
-
Days Won
112
Content Type
Profiles
Forums
Events
Gallery
Blogs
Store
Community Map
Everything posted by Mol_PMB
-
I'd say a Park Royal would be quite plausible rolling stock for a branchline in that area in the mid-late 1970s (and indeed the 1980s), and the suburban ones weren't limited to Dublin. At that time, it wouldn't be solo: there would have to be a heating/guards van of some sort, and probably another passenger coach or two almost certainly of a different type (hopefully with a toilet!). As a starting point for your rake, the Park Royal is a wise purchase, and it looks like they will be super models. Services of that nature would be Limerick to Junction, Ballybrophy and Waterford/Rosslare, also Cork to Tralee and Cork-Cobh. Jonathan Allen has some superb photos on Flickr from this era. https://www.flickr.com/photos/152343870@N07/albums/
-
Ok, Sorry, I had looked at the content rather than the identity of the person posting. As someone who has given close to a thousand man days and tens of thousands of pounds/euros to railway preservation projects I get particularly wound up by people saying ‘someone’ should do ‘something’! I confess my involvement in Irish preservation is limited to a weekend working on 226 with Aidan Brosnan at Carrick, and spending a chunk of money on railtours and entrance fees at various sites.
-
If you want to make a difference, donate some money or put in some time on the restoration projects. What will writing letters achieve?
-
"Voiding the Warranty" - Mol's experiments in 21mm gauge
Mol_PMB replied to Mol_PMB's topic in Irish Models
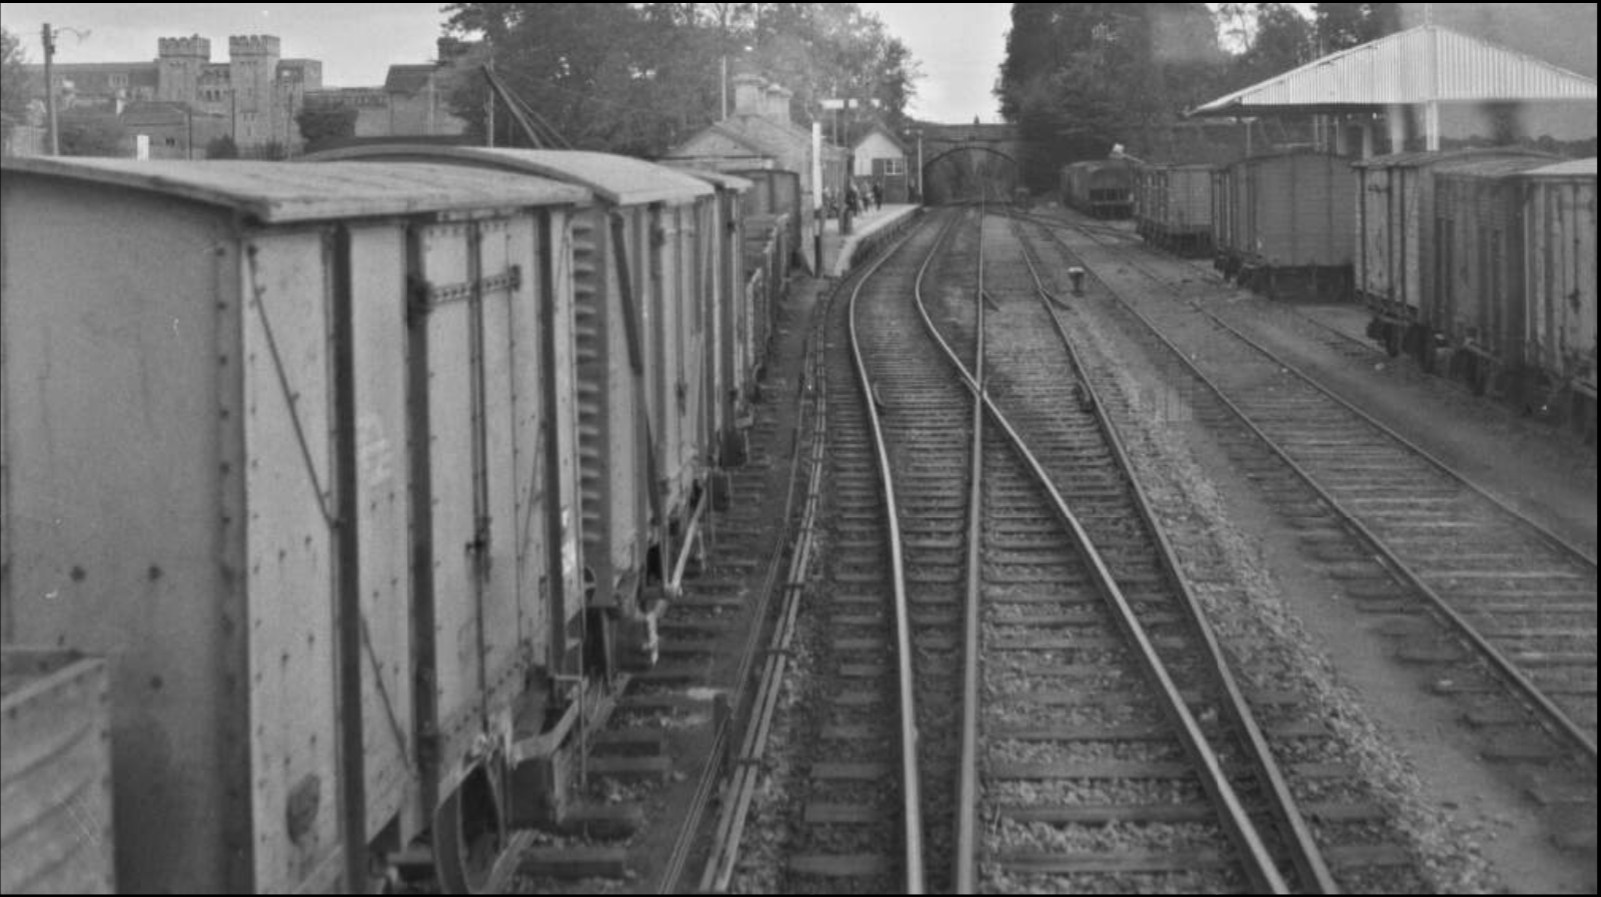
It's photos like this one in the NLI archive that make me want a variety of goods vans, rather than a whole train of the IRM H vans (which are, admittedly, superb models). https://catalogue.nli.ie/Record/vtls000305732 We're at Tullamore in 1961. On the left, the nearest van is an H, followed by a former GNR 1950s 12-ton cement van, then some opens and another H at the end. On the right, a GNR 9-ton van, then a GNR ventilated vac fitted van, then a GSWR 'Big Boy'. A gap, then another GSWR 'Big Boy' and an H van. Another gap, three cattle wagons and then in the distance is a GSR bulk grain van. There are at least 3 different types of open wagon as well, with 6-plank opens on both wooden and steel underframes, and a Bulleid corrugated too. What a variety! It's not like this is a massive marshalling yard, it's a mediocre main-line station and we're only looking at the contents of 2 sidings.
-
Limerick to Foynes railway reopening plan
Mol_PMB replied to spudfan's topic in What's happening on the network?
That sounds very feasible to me. If it's single track then they can avoid the need for lifts, bridges etc and simply have a ramped access to the back of the platform. Platforms can be built quickly these days with some innovative techniques (e.g. giant polystyrene blocks) or for a temporary facility a gang of scaffolders could do it in a weekend. Would the railway need planning approval for operational infrastructure on its own land? It wouldn't in GB but maybe the laws are different in Ireland. -
"Voiding the Warranty" - Mol's experiments in 21mm gauge
Mol_PMB replied to Mol_PMB's topic in Irish Models
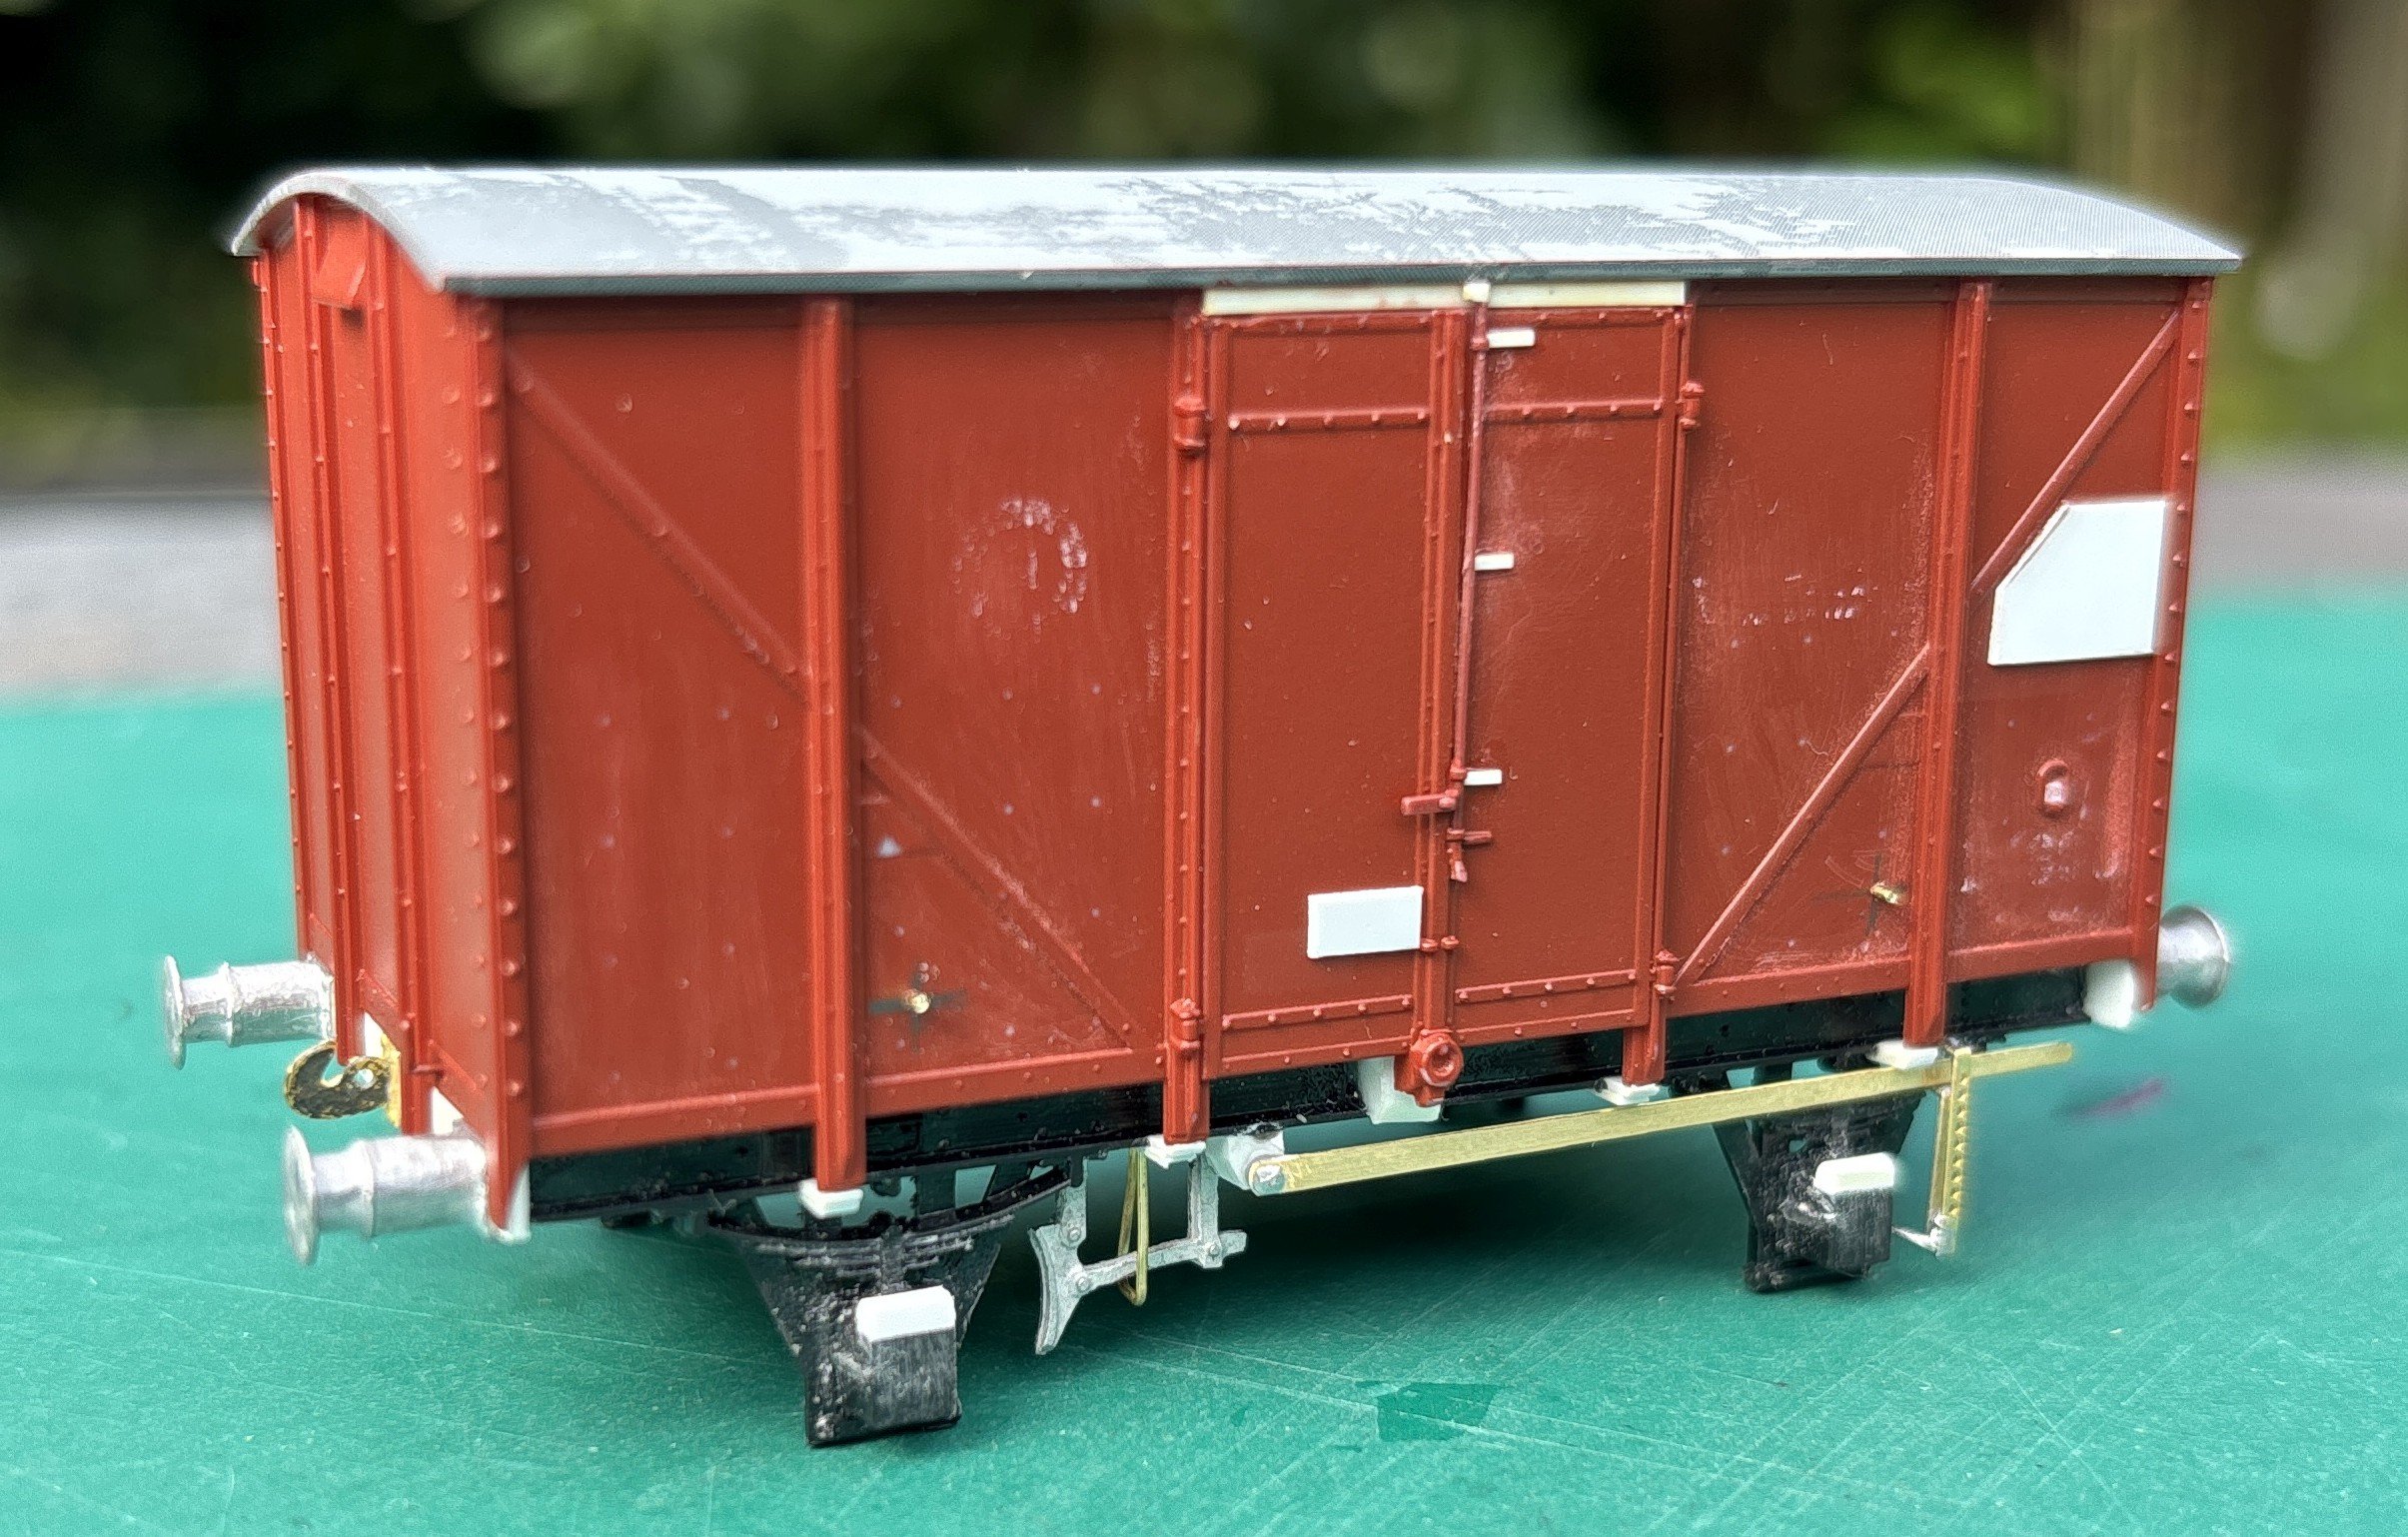
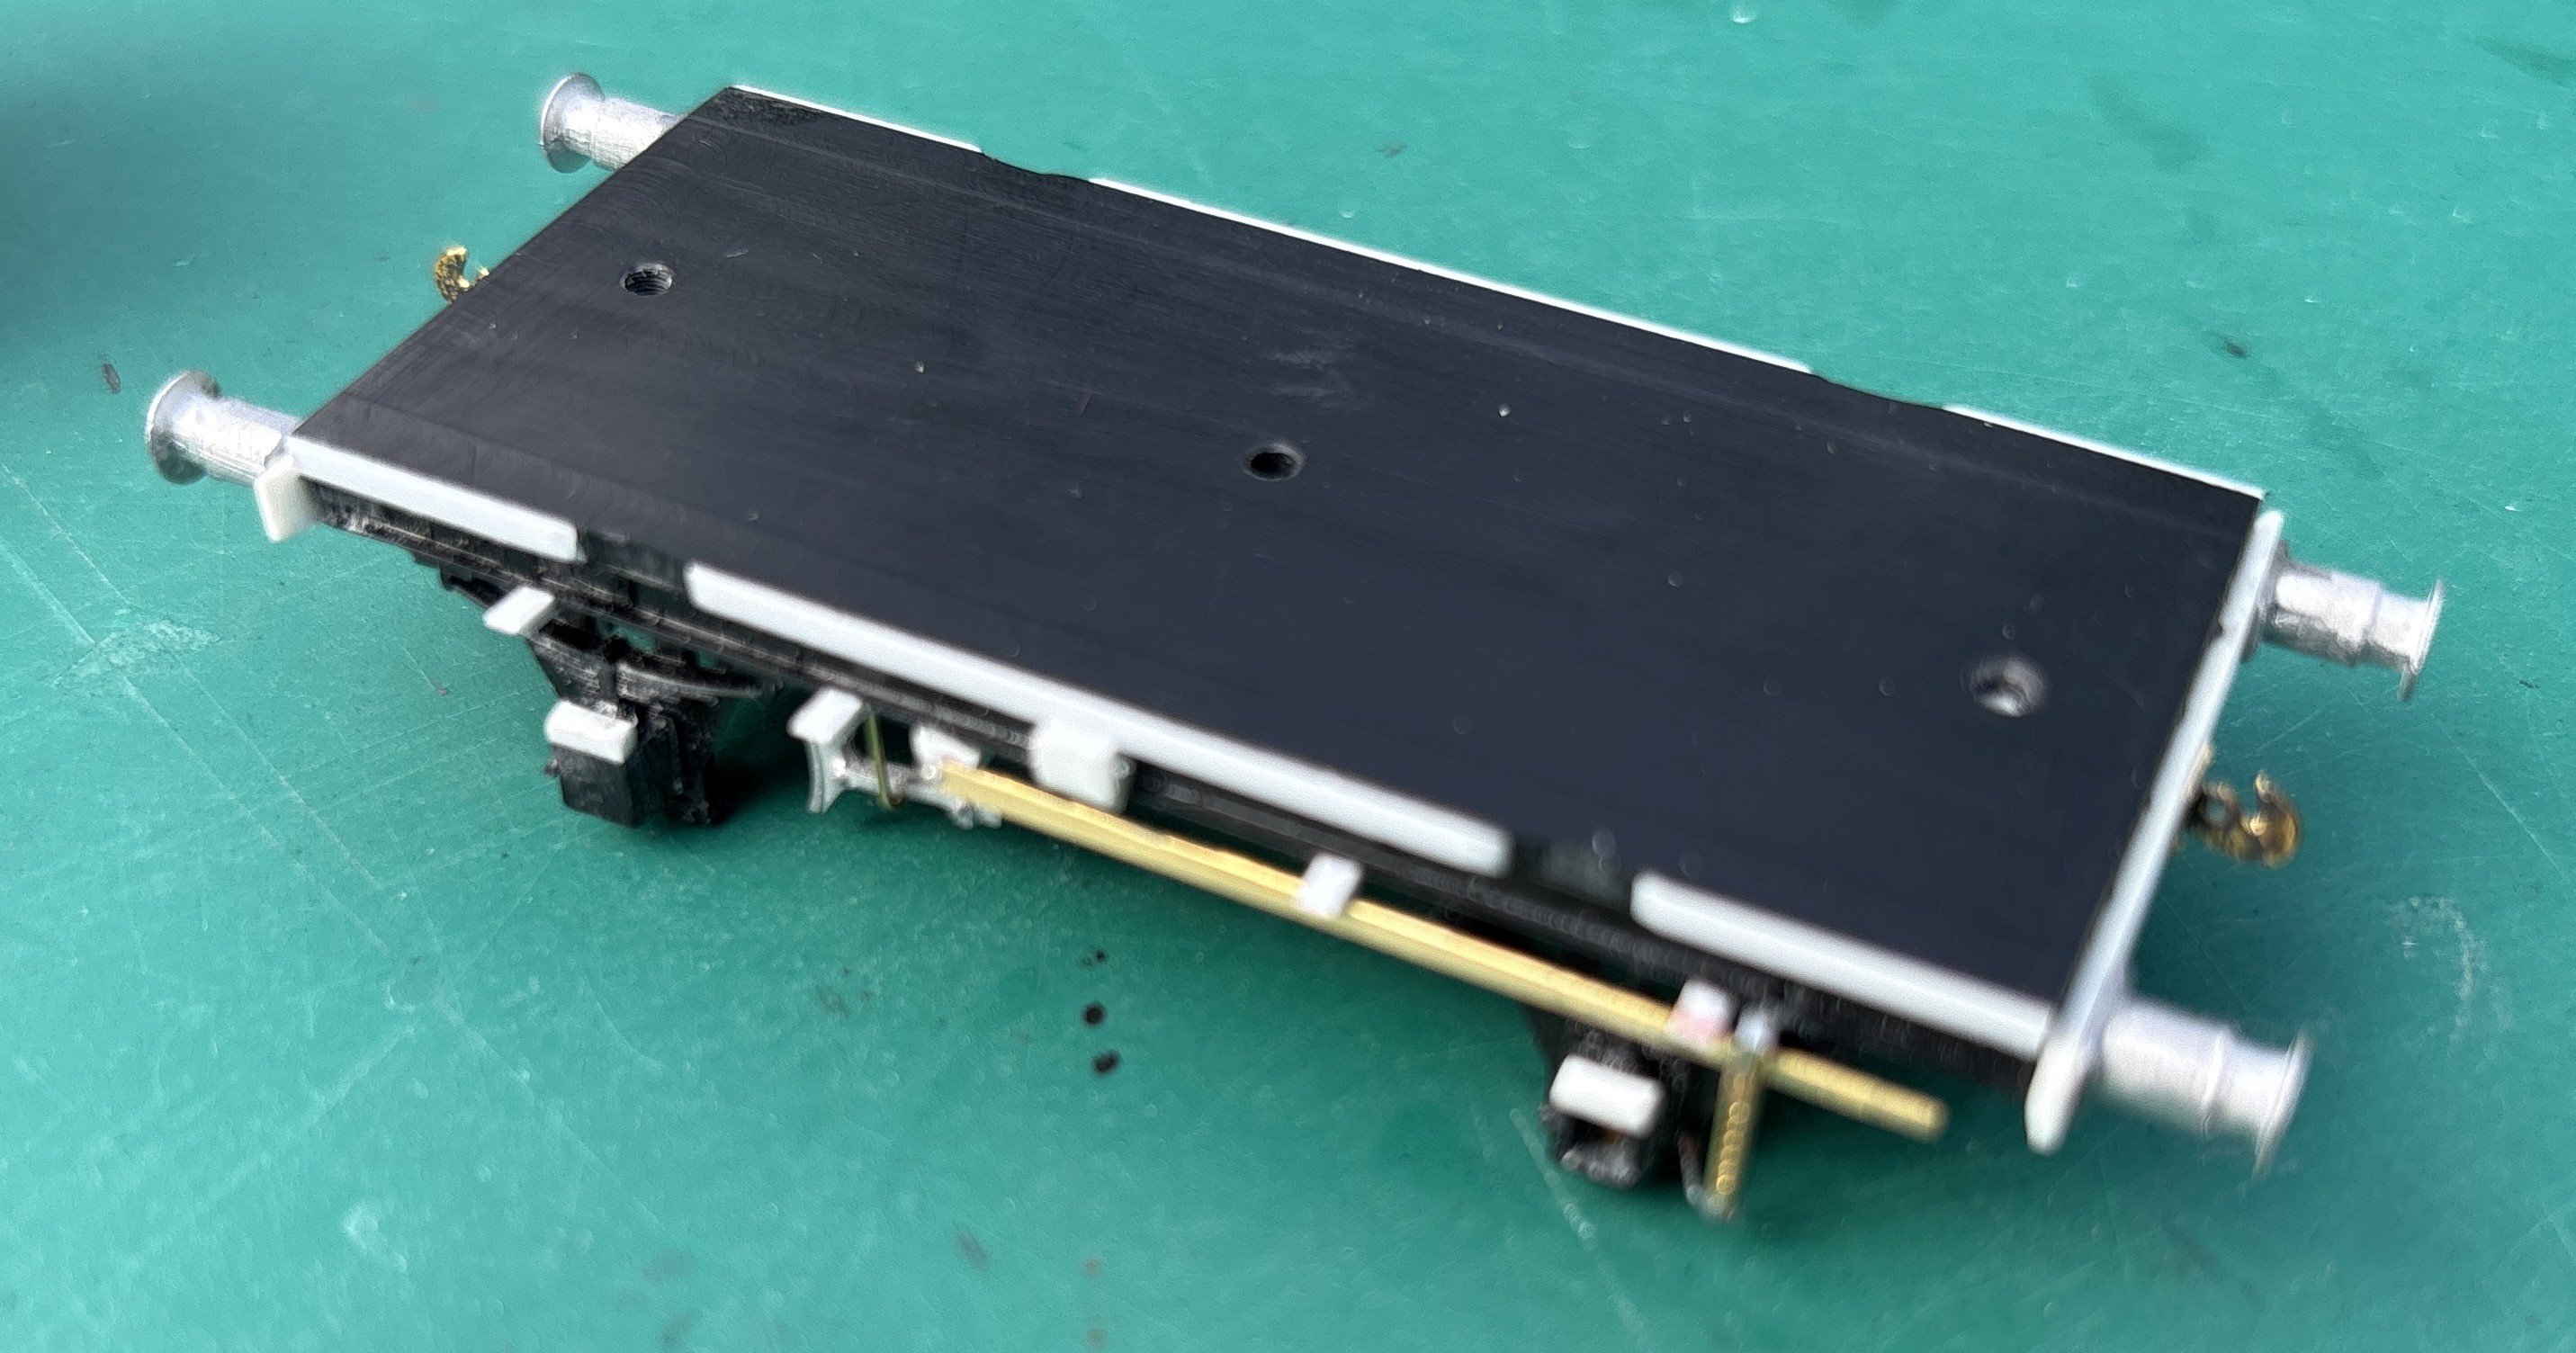
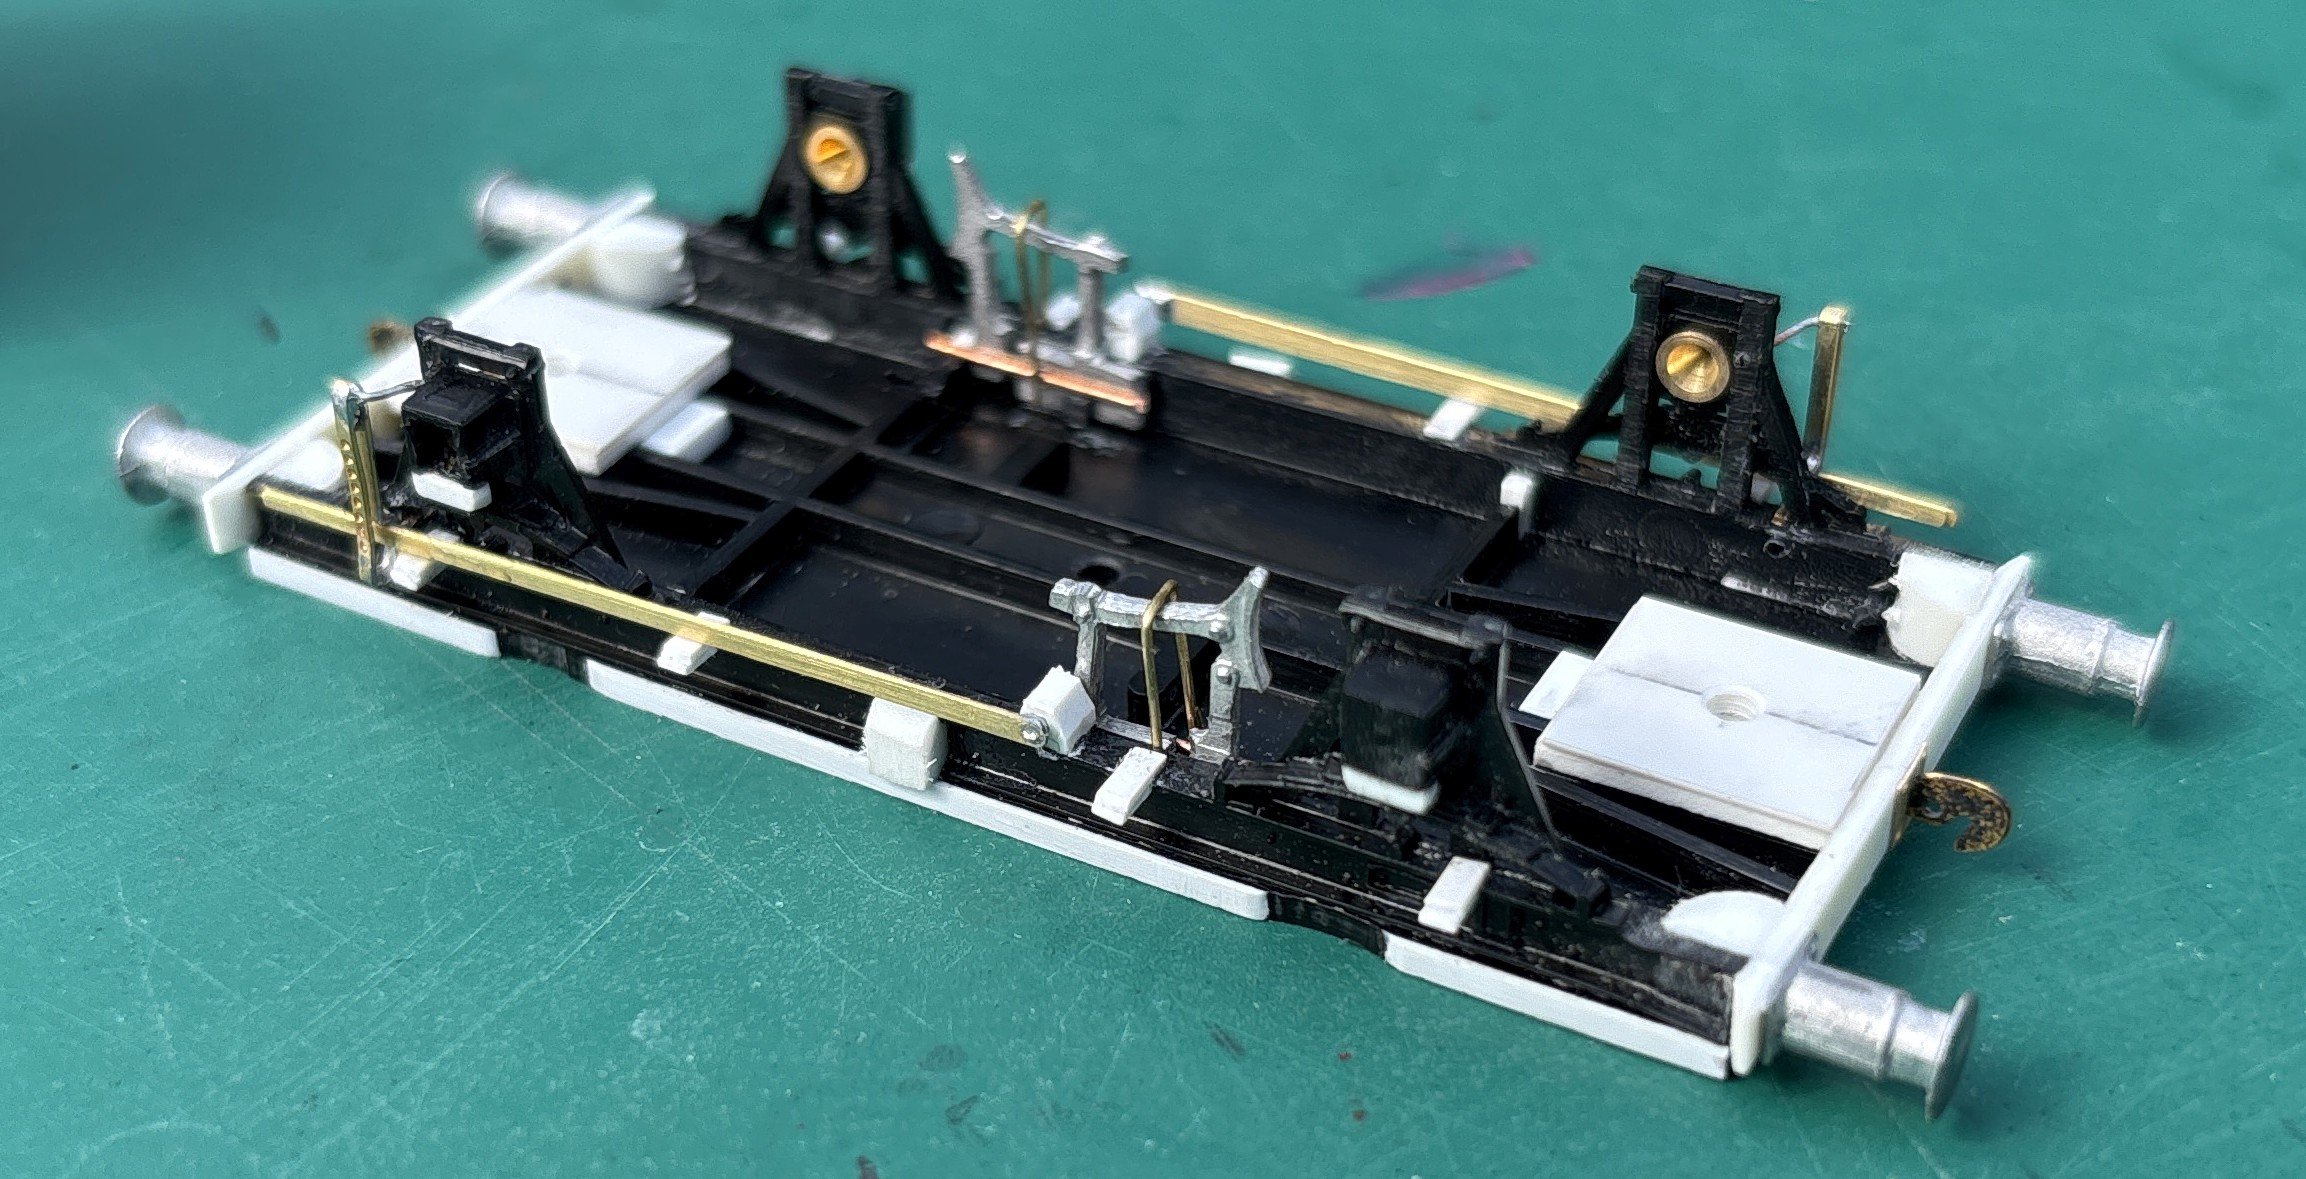
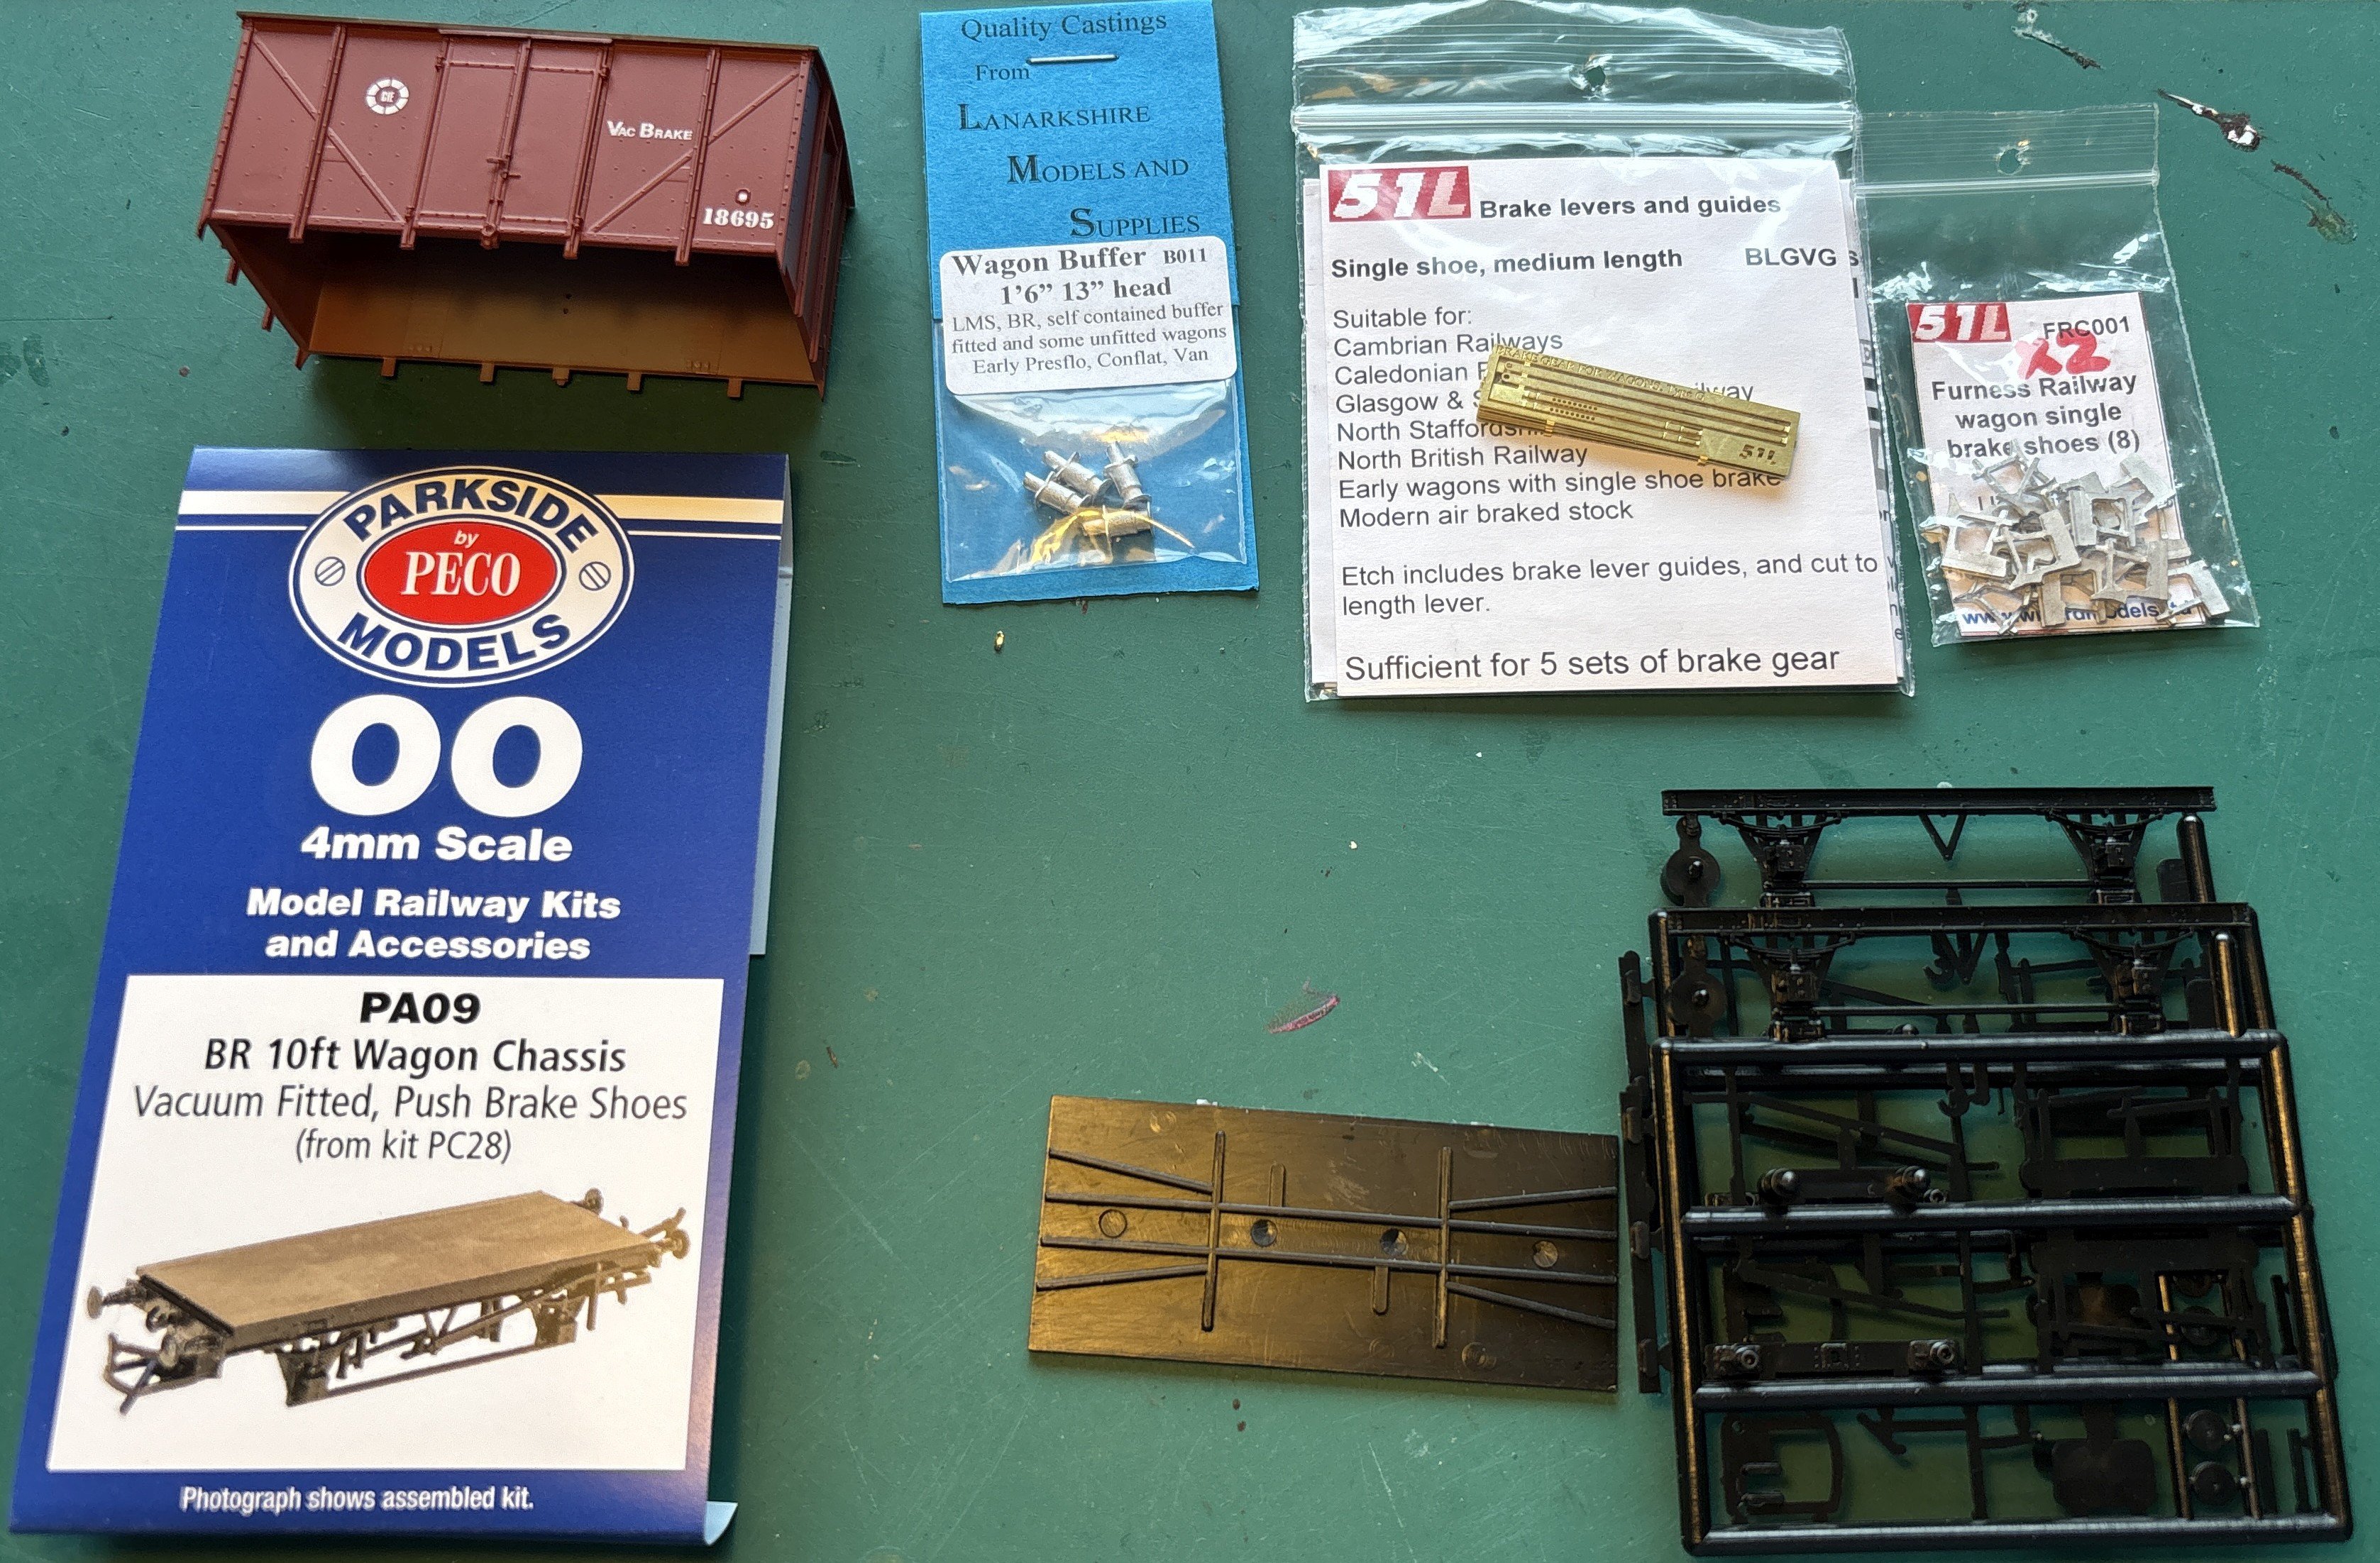
My research on goods vans is out of step with my modelling of goods vans. However, I have done a nice little Friday project to re-chassis one of my IRM fitted H vans. This was the starting point, along with a few odds and sods from the bits box: The chassis uses the Parkside solebars, W irons and floor, modified to suit the H van dimensions and 21mm gauge. Buffers and brakes are from other sources. The body has had some minor detail modifications but is largely unchanged: This now represents one of the 200 vans built by CIE in 1946, numbers 17012 to 17211. The body was very similar to the later H van, but the underframe was a conventional steel one rather than the Bulleid triangulated type. From a distance, the most obvious difference is the long brake lever. This close, the camera is a bit cruel, but I think some of the imperfections will disappear under a coat of paint and some weathering. This IRRS photo shows a real one, 17043, when brand new: https://www.flickr.com/photos/irishrailwayarchive/53507783407 The livery was dark grey with eau-de-nil snails, low down on the left panel of the side (an unusual position). Twelve years later, those which hadn't been repainted were looking a bit tatty - here's a nice photo of 17080 from Ernie: In the mid-1960s they were repainted in pale grey with roundel, as shown in this photo of 17198 by linked to Jonathan Allen's flickr image dated 1971: From 1970 they received the red-brown livery, as shown in this 1976 photo from Ernie. This is 17194: I've finished the build and will give it a wash while I decide what livery to apply. It will probably end up with snails. I do have enough parts to convert another one.
-
Same issue for me - the wrong gauge! So are these Genesis coaches from the same seller - but may interest the majority: https://www.ebay.co.uk/itm/135866523346 https://www.ebay.co.uk/itm/135866491713 https://www.ebay.co.uk/itm/135866535723
-
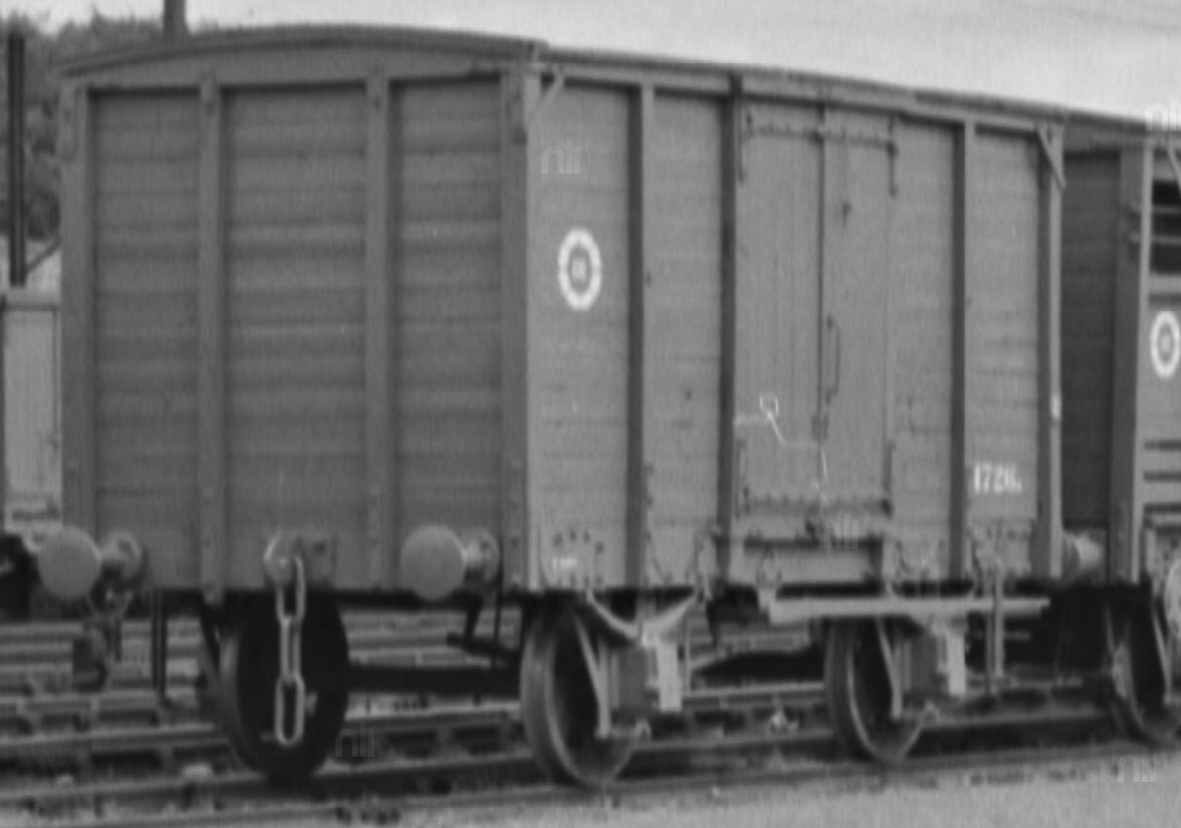
John, Very many thanks for providing that valuable information - from a source I didn't have access to. It's interesting to hear about the Guinness vans that were predecessors to the IRCH standard ones, and I'll keep an eye out for photos of these, I'm sure I've seen one or two though they may have been GNR examples. Regarding the MGWR IRCH vans, it's great to know that there were 150 'convertible' and another 150 with continuous roofs. I suspect that the small height difference you quote was a result of the longitudinal rib across the middle of the roof opening (visible in two of the photos in my previous post). The number lists are very useful. It's interesting that all the numbers I had identified from photos are in the 3200-3350 range of the 1923 batch. I think there are 289 numbers listed so almost all of them. 18 built in 1922, 188 in 1923 and 83 in 1924. I wouldn't have guessed at all the random numbers of the other vans (no doubt replacing withdrawn older vehicles with those numbers). There's another NLI archive image of a rake of freshly-overhauled wagons at Limerick in 1964, which includes several IRCH-type vans. One of them is 1726, seen below. The number has a suffix but I couldn't read it, and potentially it could be N or M. https://catalogue.nli.ie/Record/vtls000307038 We now know from the number listing you quoted that the MGWR had a van of this type numbered 1726 (in the 1924-built batch). So I think it's likely that this image does show 1726M rather than a former GNR van. It has a continuous roof, which may be an original feature or a later modification. The livery here is pale grey with white roundel and lettering. Thie IRRS photo dated 1955 shows an IRCH van in CIE snail livery, with a suffixed number - again the suffix is illegible. There's also a very similar photo in Ernie's collection on Flickr, also linked below. https://www.flickr.com/photos/irishrailwayarchive/53501264990 Since 1955 was before the GNR split, I think this must also be an MGWR example. The visible part of the number is 370 but there may be another digit hiding in the shadow. Thanks for the summary of the models - the whitemetal kit would appeal to me if it were still available but it sounds like they're long-vanished. The construction style of these vans is very different from most GB goods vans, particularly the side planking flush with the solebar, and the vertical timbers. I haven't found anything similar to use as a basis. Here's a link to the image of the GNR 10-ton van on Leslie's website. I asked whether he still has many (any) in stock, but he's on holiday at present and not in a position to check. Given Leslie's impending retirement, I think these IRCH vans could be a good subject for a 3D printed kit. They would be prototypical for a 50-year period (1920s to 1970s) across the whole island, and could be lettered for MGWR, GSR, GNR, CIE, or UTA. The drawings are available (see link in the first post of this thread) so it should be possible to make them dimensionally accurate without any guesswork. In due course I'll write about the GNR vans and the GSR double-skinned variant. I need to do some more research on both of those first! This nice photo from Brian Flannigan on Flickr shows one of each, in 1971:
-
A few more images of the system on the IRRS archive: https://www.flickr.com/photos/irishrailwayarchive/53570708153/ https://www.flickr.com/photos/irishrailwayarchive/54418647342/ https://www.flickr.com/photos/irishrailwayarchive/54418647332/ https://www.flickr.com/photos/irishrailwayarchive/53510358297/ https://www.flickr.com/photos/irishrailwayarchive/53511251981/ https://www.flickr.com/photos/irishrailwayarchive/53511570284/ What I had not realised until just now is that this is the same place! My own photo:
-
See also...
-
Tomgue in cheek there were 94 CrossLeys on CIE... The slide is in the Mason Photographic Collection in the NLI archive. The glass plates are described as follows: In Collection: Mason Photographic Collection Description: Lantern slides are organised under box numbers M1-52. M1- M10 Irish Industries; M11- M13 Ireland At Work; M14- M15 Dublin City and County; M16 Box A; M17 Box B; M18 Box 3; M19 Box D; M20 Box E; M21 Box F; M22 Box G; M23 Box H; M24 Box I; M25 Box J; M26 Dublin Scenes; M27 Christchurch; M28 The Normans (includes handlist); M29 St Patrick's; M30 St Patrick's (includes handlist); M31 St Patrick's; M32 Irish Manuscripts and Their Cases; M33 Irish Croziers and Shrines; M34- M37 Antrim; M38 Carlow/Cavan; M39- M40 Clare; M41 (Mason T.) Boyne and Tara (includes handlist); M42- M48 Irish History; M49- M50 Isle of Man; M51- M52 Foreign/ Unidentified and unnumbered. Also in his collection, this image shows a Dublin-registered canal barge laden with turf: https://catalogue.nli.ie/Record/vtls000519034 There is also this image of turf stacks in the Bog of Allen: https://catalogue.nli.ie/Record/vtls000519037 Given that part of his collection is categorised 'Irish Industries' I wouldn't completely discount the railway being in Ireland. The arrangement of the trolleypole matches that on the electric locos illustrated on the Annaghmore Turf Railway, in the little book mentioned by @Galteemore. I bought a copy last week following that recommendation! The bodywork of the loco is different, but the book says that was built locally so it may post-date the NLI photo.
-
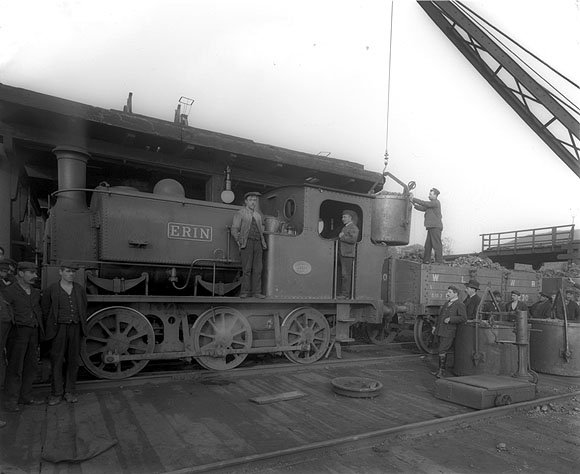
Continuing the theme of lesser-known locos at Fenit, here is 'Erin', early in life when it worked at Waterford. A photo in the NLI archive. https://catalogue.nli.ie/Record/vtls000036650 It is recorded that 'Erin', later GSR 300, worked at Fenit in the late 1920s, but was then scrapped in 1930. Sister 'Shamrock' GSR 299 lasted much longer. I also found a photo of GSR 100 at Fenit in Martin Bairstow's book 'Railways in Ireland Part 4: GS&WR' page 89. Plenty of choice then if I fancy an 0-6-0 tank engine!
-
In the NLI archive, alloy-skinned containers being built at Inchicore in 1959: https://catalogue.nli.ie/Record/vtls000304518 These are a very distinctive shape and I've never seen them on a railway wagon. Perhaps normally used by the road transport division? This one on the other hand is a more traditional shape and material, and nicely painted in CIE 2-tone green livery and on a flat wagon at Drogheda: https://catalogue.nli.ie/Record/vtls000305422 Could that be Shipping London chalked on the side? Also of note is that it's on a flat wagon (rather than the more usual open wagon), indeed LB flat wagon number 23415 of the type produced by IRM. So you CAN prototypically put a container on an LB flat!
-
Here's another green H van, even in shades of grey, in the NLI photo archive in 1961: https://catalogue.nli.ie/Record/vtls000305518 By enhancing the image I'm fairly confident that the number is 18776, which is within the expected number series. As with other green vans, it has a black underframe and ends (clearly darker than the green sides), and packing behind the buffers.
-
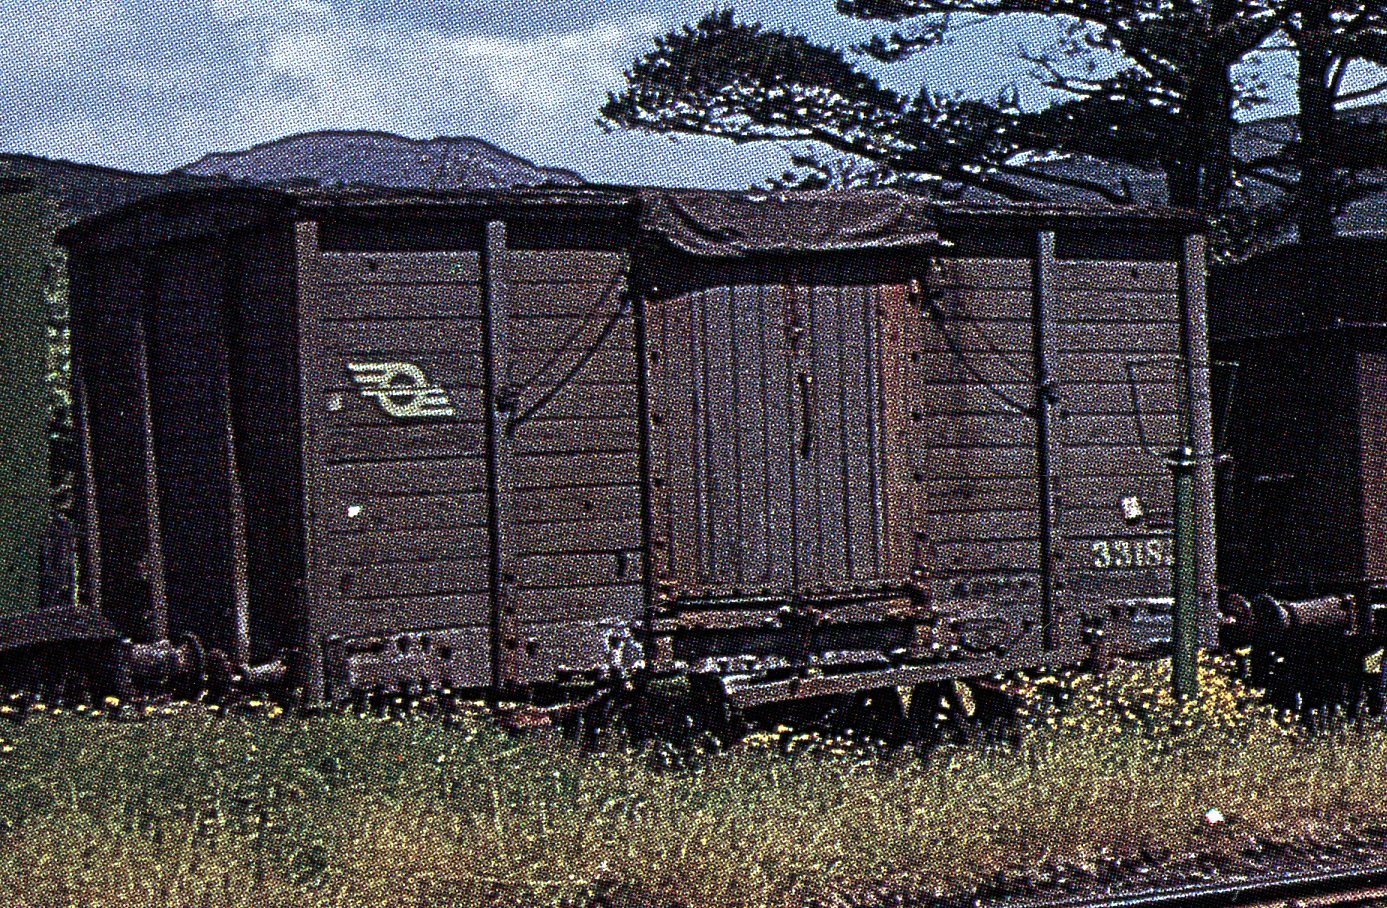
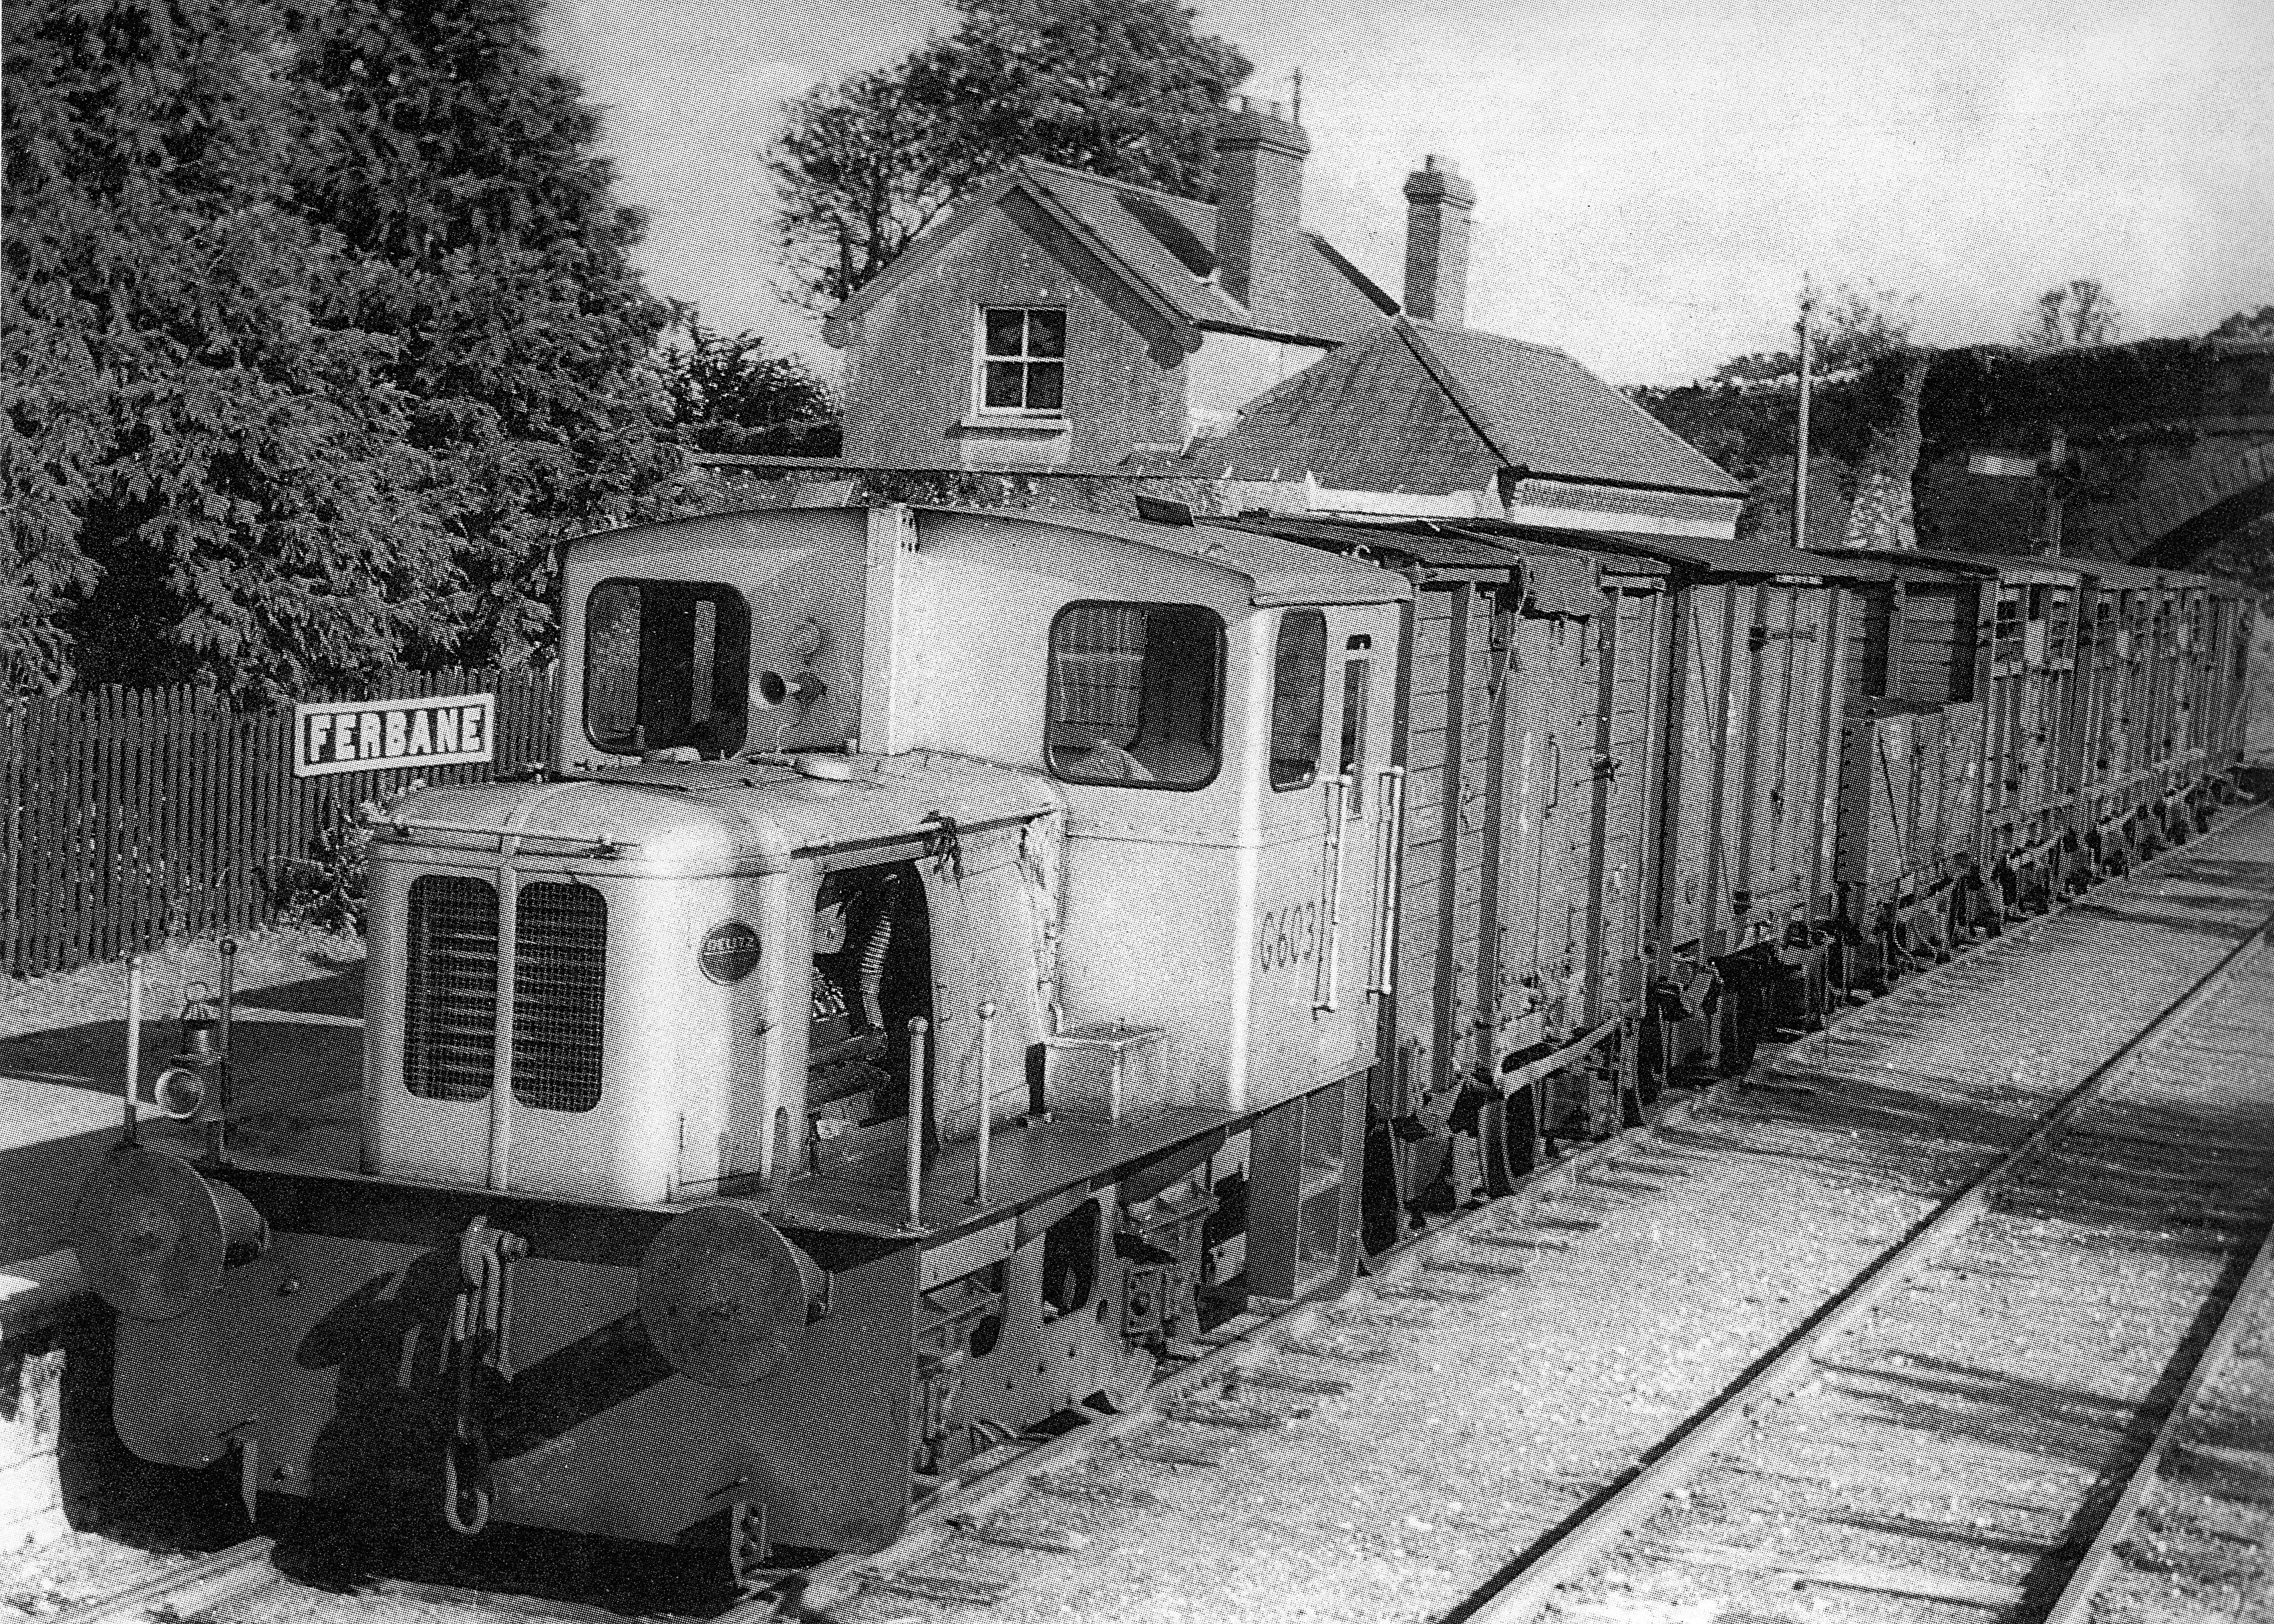
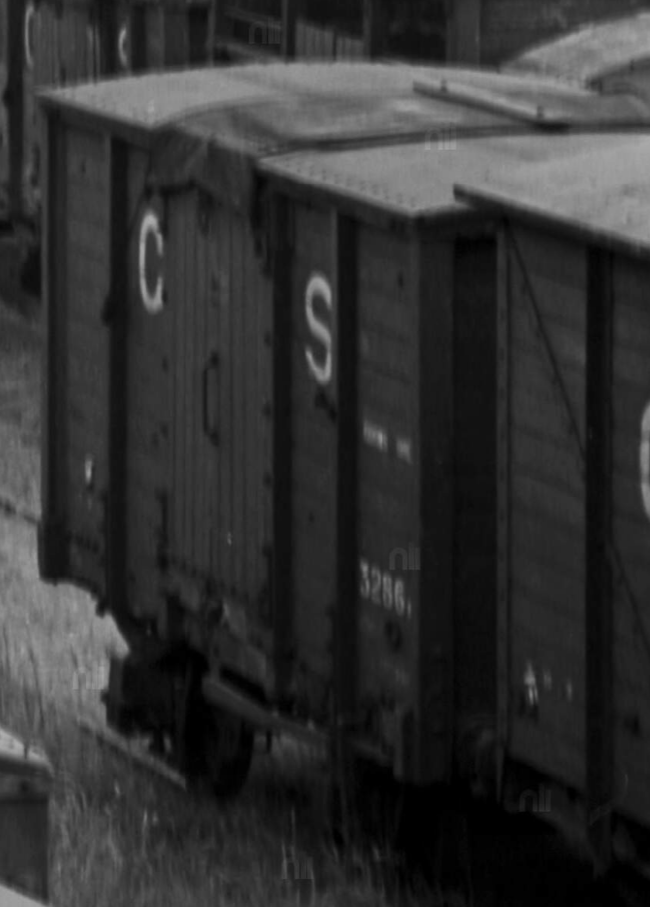
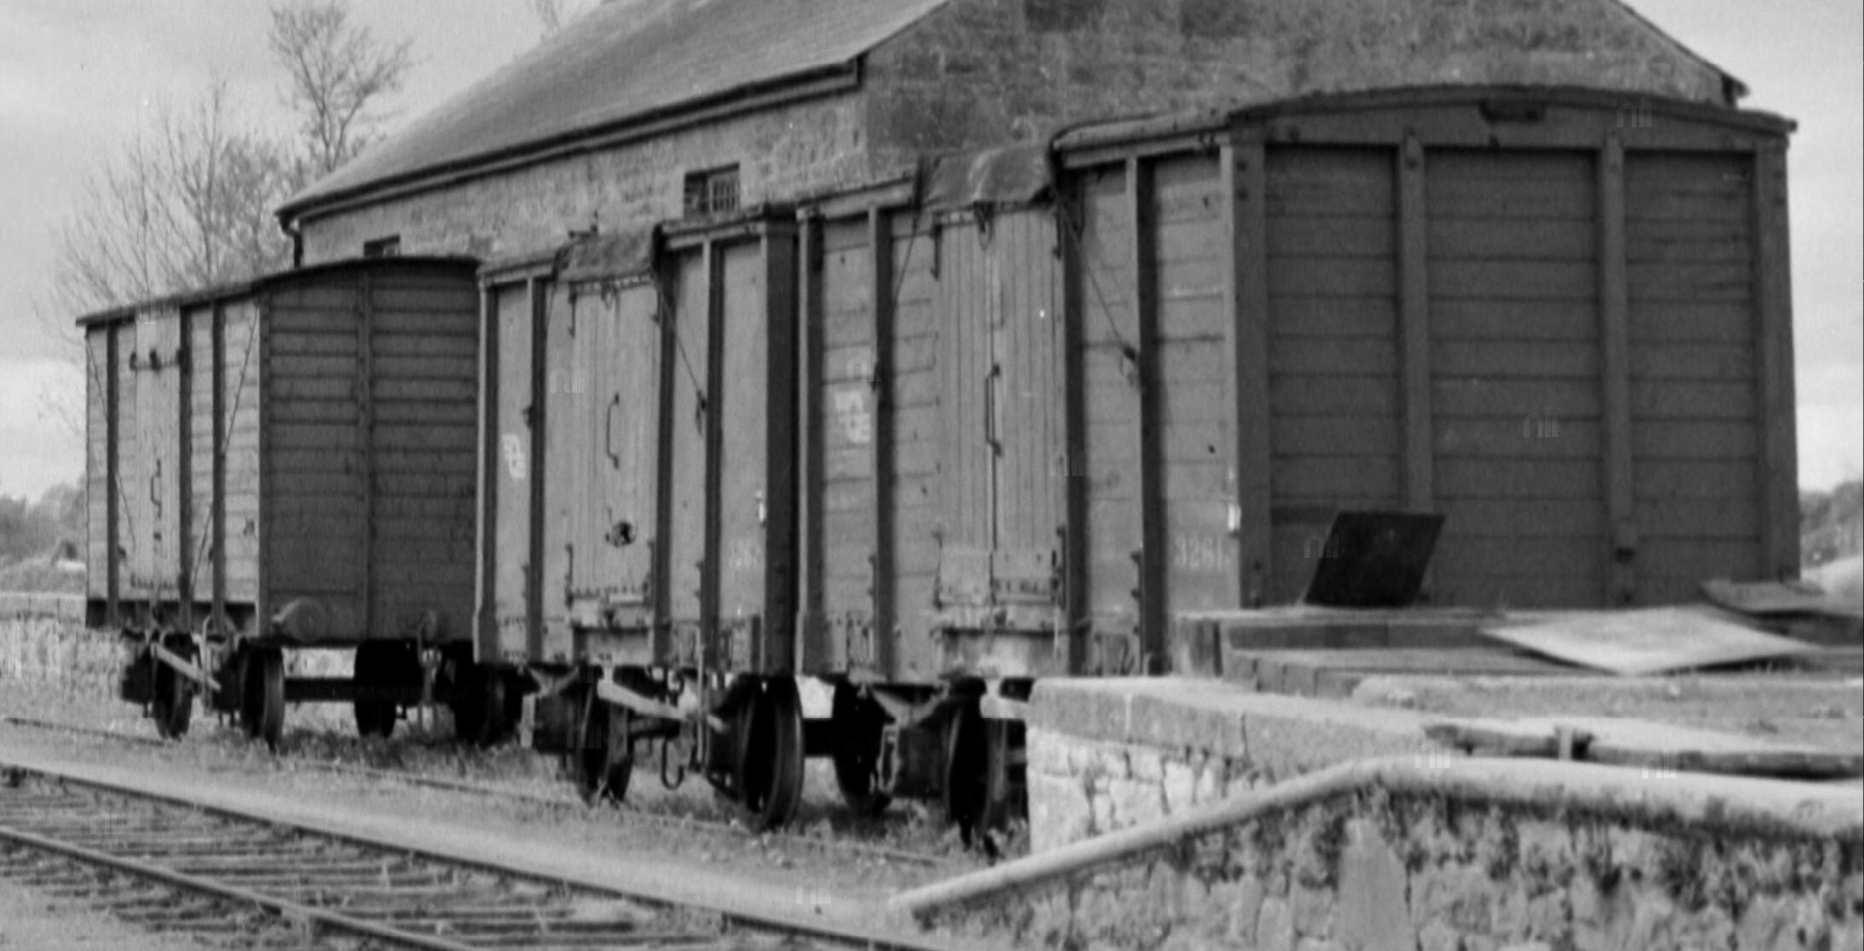
I'll now look at the MGWR vans to the IRCH wood-framed design. Some, perhaps all, of these were built as 'convertible', i.e. the centre part of the roof above the doors was missing, and designed to be covered by a tarpaulin. They had special roping eyes on the side uprights so that the tarpaulin could be held taut. Some may have been modified with normal roofs later. Here are the few photos I've found: 3318M at Kenmare in 1958, from 'Irish Railways in Colour: a second glance' (Ferris): Ferbane in 1958, wagon number not legible, from 'Lost Lines Ireland' (Welbourn): From the NLI archive, here's 3286M at Liffey Junction in 1939, a useful view of the roof. This is part of a much larger image that will interest wagon nerds: https://catalogue.nli.ie/Record/vtls000303458 Another NLI Archive image, this time dated 1950 at Tuam, shows antother convertible with a conventional roofed van behind. Neither number is visible. https://catalogue.nli.ie/Record/vtls000303499 Here's a very nice NLI view of two ex-MGWR 'convertibles' at Ferbane (again) in 1959 - numbers 3261M and perhaps 3262M. The latter has been re-clad in sheet material replacing or overlaying the planks. A GSWR 'Big Boy' is visible beyond. https://catalogue.nli.ie/Record/vtls000304064 Some of these MGWR vans survived into the 1970s, and there's an excellent IRRS photo of 3259M at Limerick in 1970, newly overhauled and repainted in red-brown livery with roundel: https://www.flickr.com/photos/irishrailwayarchive/53511621949 This number falls within the series of MGWR 'convertibles' but 3259M has a normal full roof and I'd guess that it was modified at some stage in its life, losing the roof hatch. The identifiable numbers of the MGWR IRCH vans are as follows, and these suggest they were numbered in a block of at least 60 vehicles: 3259M, 3261M, 3262M, 3286M, 3318M I have a couple of books on the MGWR but they don't give specific details of these vans. The MGWR wagon statistics quoted in Ernie Shepherd's book have some odd gaps in the table for covered vans in the 1920s. One of these would provide an interesting variation in a train of newer CIE vans.
-
I have asked the question on the Industrial Railway Society egroup. Someone there will know for sure.
-
I did wonder where it was, and failed to find any references online other than coming back to this photo. The NLI photo archive does include some photos from abroad (including a few Swiss trains, for example) so it might not be Ireland.
-
I stumbled across this interesting photo on the NLI archive, showing an electric loco hauling a turf train: Context: Cross Ley Peat Plant: No 15 Turf. One figure, motor with wagons of turf arriving from bog.
-
I’m still working my way through my books and other online sources such as the nli archive. Happily I am finding some more good photos including three more MGWR vans of this type. I’ll have reviewed over 40,000 photos by the time I’m done. Even Ernie’s most recent uploads are adding to the dataset - many thanks! I’ll aim to do an MGWR update this week. I’m quite well placed for the GSR double-skinned vans too. Hopefully I can get some more GNR info soon.
-
I expressed a strong interest in a Bredin 3rd from SSM a couple of months back, along with a couple of other items. Still waiting to hear back when they are available. But I'm in no rush. Given that they're not yet listed as in transit, the IRM Park Royals will have to be put on a fast boat to get here in 2025 Q2 as well...
-
"Voiding the Warranty" - Mol's experiments in 21mm gauge
Mol_PMB replied to Mol_PMB's topic in Irish Models
Yes, my plans for the vans have changed a bit since IRM indicated that they'll be producing Palvans. I'll still do one of the fitted H-palvans though. I must get back to the H vans soon - that one pictured above is still in pieces. Once it's back together as 21mm gauge I've got some green paint ready for it. -
The location is Ballybrophy, and gives an interesting indication of the state of the Dublin-Cork main line in the mid-1980s. Even the section that has been relayed has a woeful lack of ballast shoulder.
-
"Voiding the Warranty" - Mol's experiments in 21mm gauge
Mol_PMB replied to Mol_PMB's topic in Irish Models
You’re very kind - thanks. I do cheat a bit by using some CAD and designing etch and transfer artwork, then getting them made. There are lots of other very gifted modellers on here too, some produce wonderful unique models hewn from raw materials, for which I have particular respect! Thanks David! It doesn’t look quite so pretty on the inside; my design principles are to try and hide the solder inside where possible. I do like soldered construction, it’s enjoyable to do and produces a strong and long-lived model with crisp detail. And with the right tools and materials it’s not difficult at all. -
Depends which loco you buy. There should definitely be treats with this one:
-
These vans were based on a GNR design, so I ought to start with the GNR vans. But they're also the most complex and I'm still hoping that the IRRS will respond to my request to buy a scan of the GNR wagon diagram book, which will hopefully give me some more information on these. So I'll start with the GSR. Information on these is also sparse but is unlikely to get better! The GSR followed the GSWR system of allocating wagon numbers in blocks according to type. Based on legible numbers in photos published in books and online, the following numbers are known for GSR vans of this type: 157##, 15832, 15903, 15958, 15987, 16165, 16222, 16238, 16290. It's likely that these formed a continuous number series of several hundred vehicles; they are generally common in photos. The older GSWR steel-framed vans had numbers up to at least 15762, and the bulk grain hoppers started at 16400, so these IRCH wood-framed vans probably filled most of the intervening series. I'll link some of the better photos of these that I've found so far. Note that you'll need to be an IRRS member to see those in the irishrailwayarchive; thanks to Ernie, Roger and Brian for making theirs available to all: Here's an earlier photo in GSR livery, 16165: https://www.flickr.com/photos/irishrailwayarchive/53507984162 A partial view in GSR livery: https://www.flickr.com/photos/irishrailwayarchive/53509299965 16222 in early CIE livery: https://www.flickr.com/photos/irishrailwayarchive/53508861551 More examples in the 1950s: https://www.flickr.com/photos/irishrailwayarchive/53500839161 https://www.flickr.com/photos/irishrailwayarchive/53501264990 The lowest-numbered example I've found, 157##, frustratingly the end of the number is cropped off: 16238: A nice pair in 1964: On the GNR main line but this appears to be a GSR-built van in the 15### series: An excellent view of 16290: https://www.flickr.com/photos/irishrailwayarchive/53511648564 Partial detail view of of 15987 at the brewery: Nice view of 15958: https://www.flickr.com/photos/irishrailwayarchive/54255280358 15903 as seen already, roundel livery in 1971: Another unidentified van hiding in the background, included here because it illustrates one in the post-1970 livery, in 1971; though I can't be sure this is a GSR van: These vans often appear in photos in books but rarely with legible numbers, an exception is 15832 in 'Steaming in Three Centuries' by Pryce, McAllister. I hope this is of interest. I'll look at the MGWR vans next, then GNR, and then some of the variants. The GSR also had a double-skinned variant (built later than the ones shown above, and in a higher number series) and I'll look at those after I've dealt with the standard ones.