Mol_PMB
-
Posts
2,160 -
Joined
-
Last visited
-
Days Won
112
Content Type
Profiles
Forums
Events
Gallery
Blogs
Store
Community Map
Everything posted by Mol_PMB
-
If possible, I'd recommend a multi-track sector plate, as it will give you more opportunities to exchange stock. It does require the tracks on the sector plate to be curved though. I'll see if I can get some photos of the one I made for my O gauge shunting layout.
-
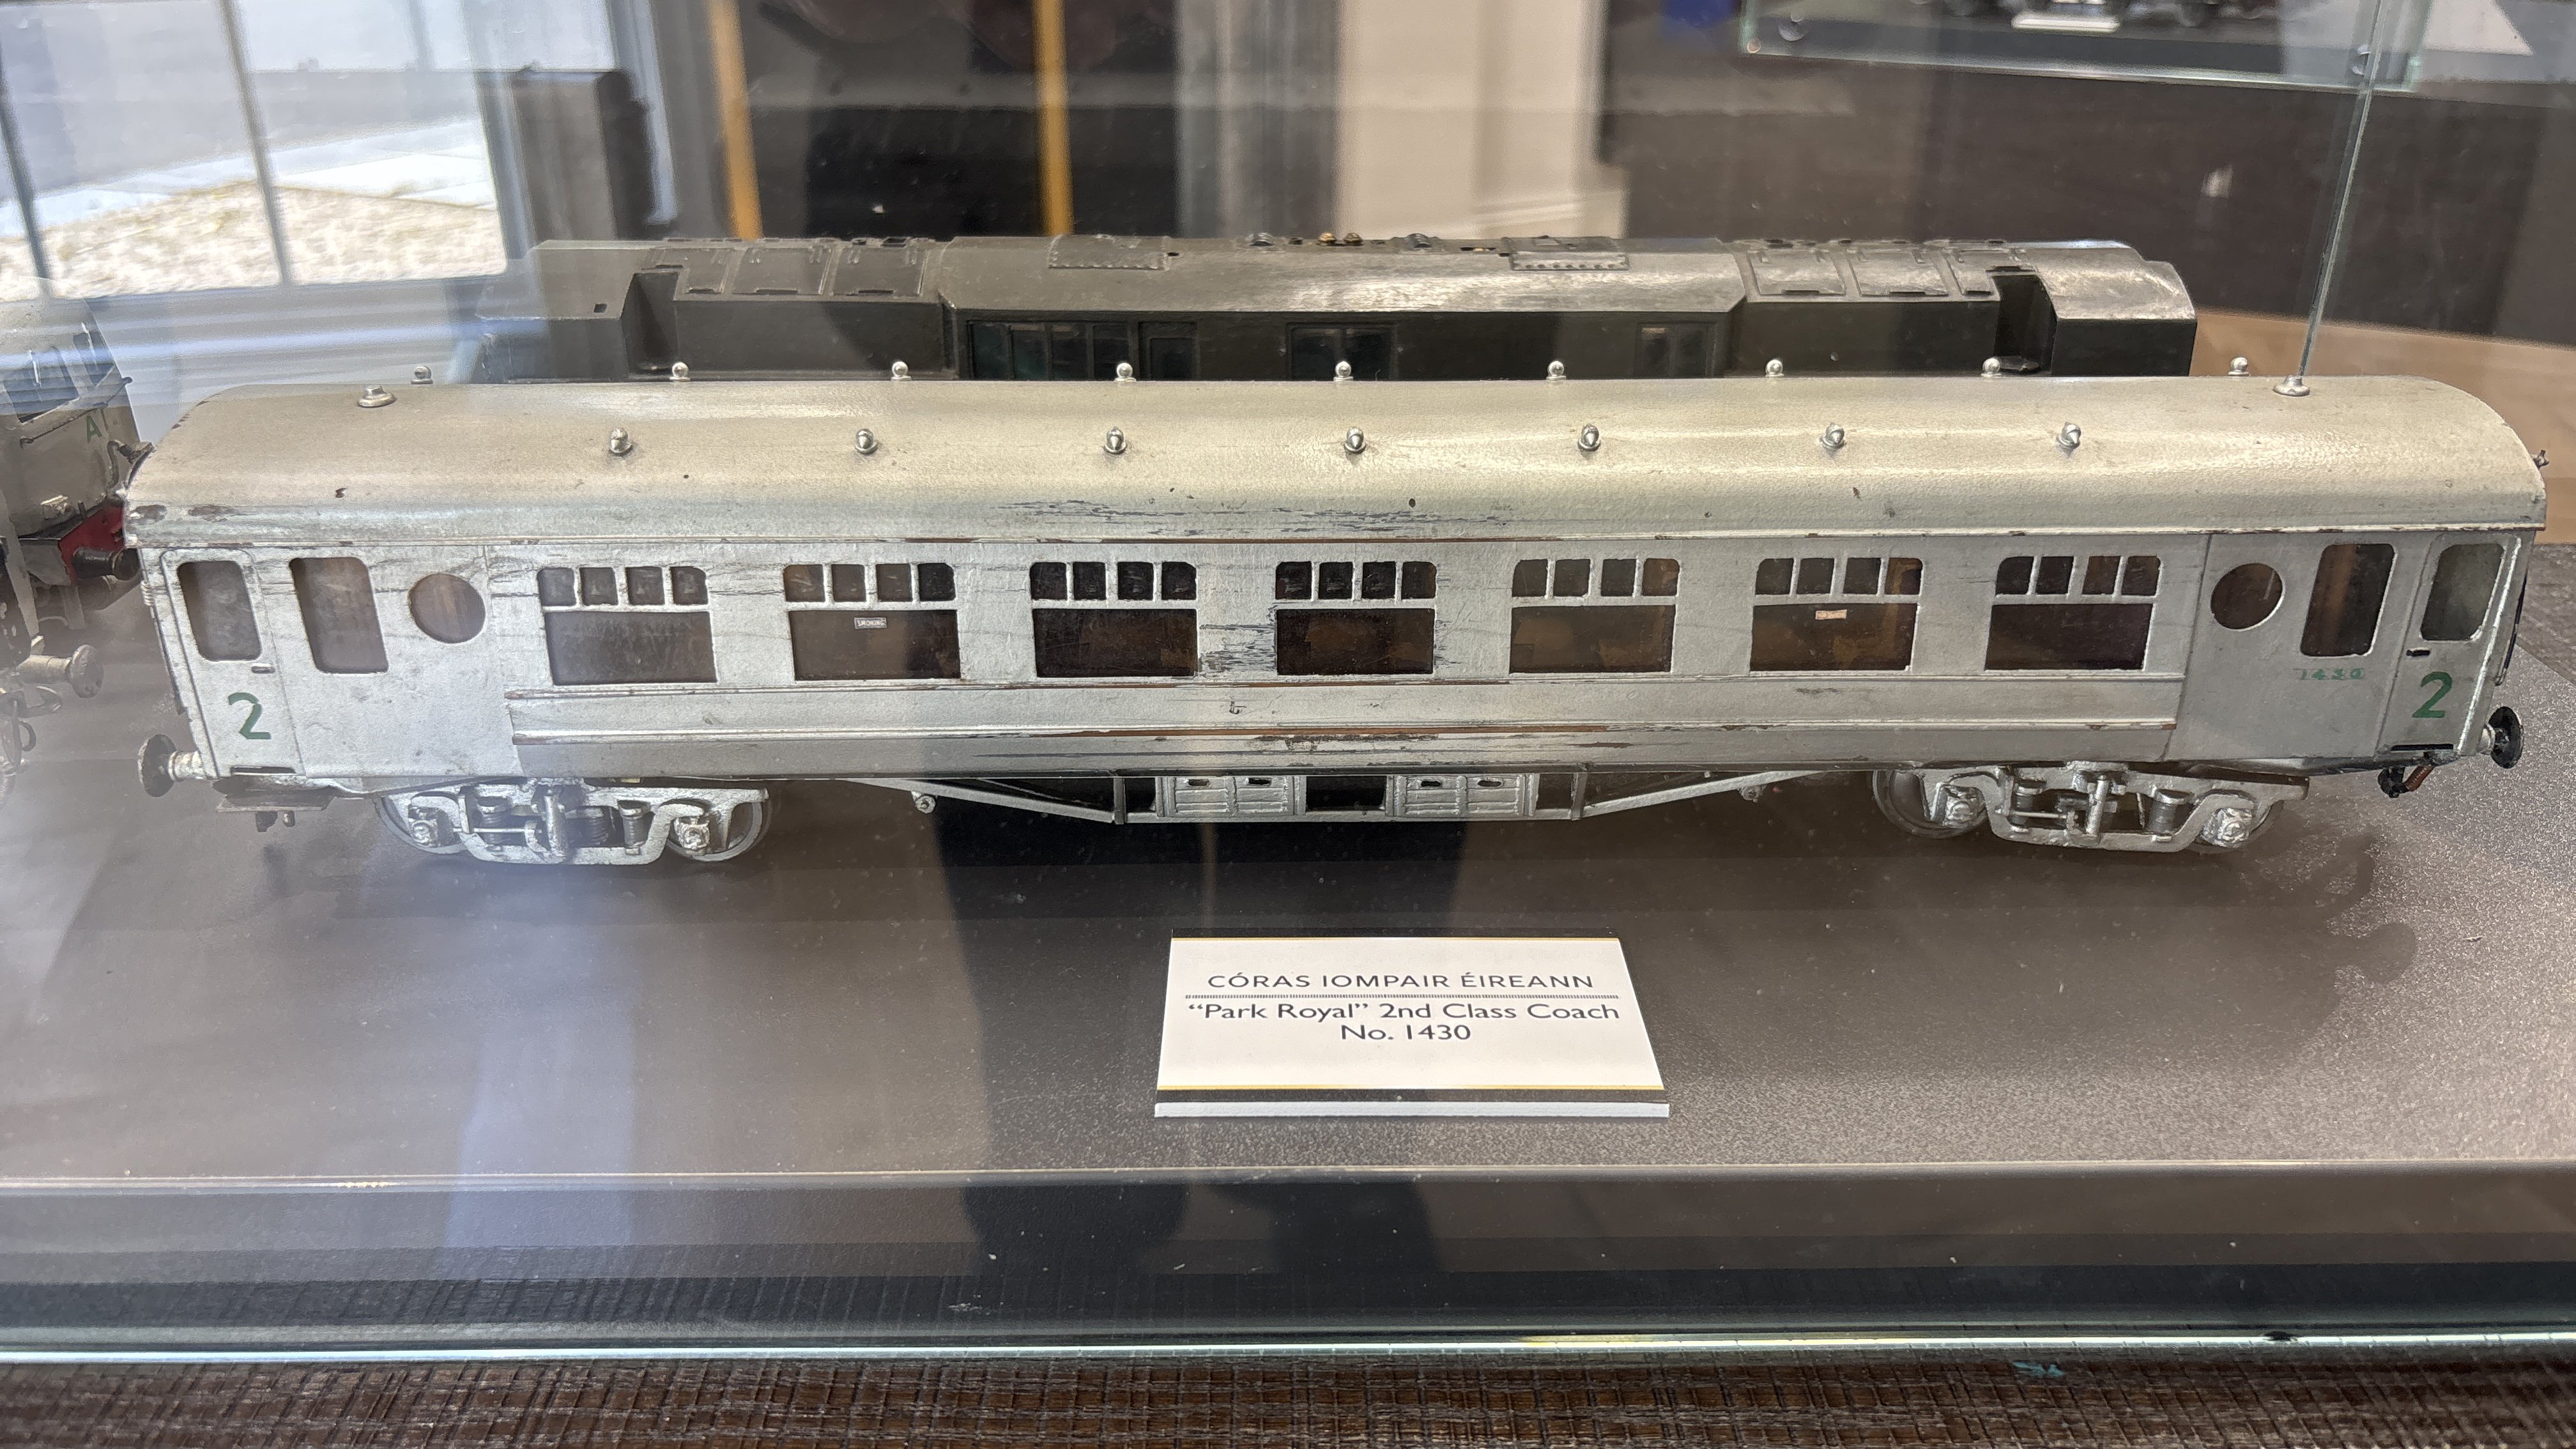
Your last point is a very good one, that I had overlooked. In reality, 1430 was a silver coach, but it wasn't a Park Royal - it was one of the early laminates. Of course the laminates were naturally silver, unless painted. Whereas a Park Royal would need to have been painted silver. Here are some being built: https://www.flickr.com/photos/irishrailwayarchive/54251537558/ The bogies and underframes were painted silver, though they quickly got filthy: https://www.flickr.com/photos/irishrailwayarchive/53506776188/ https://www.flickr.com/photos/irishrailwayarchive/53505733947/ BRAY, 185 6Sept1955img106 | Ernies Railway Archive | Flickr Photos of the laminates under construction show them in unpainted aluminium; it appears that the later ones that entered service in green were only painted when complete and mounted on bogies. https://catalogue.nli.ie/Record/vtls000303796 https://catalogue.nli.ie/Record/vtls000304461 https://catalogue.nli.ie/Record/vtls000304517 Thanks for the link to the photo at Arklow - It is tricky to interpret. It could be silver but it's not entirely conclusive - it could be freshly-painted light green and a more flush-sided coach catching the light more than the panelled coach in front of it. I'm sitting on the fence with that one! There are some other puzzling photos which appear to show silver coaches of non-laminate types, such as this one where the second coach is an ex-GSR type but looks more silver than green: What we need to find is a clear photo of a 'main line' Park Royal around 1956-57. They can be distinguished by the toilet windows and water filler pipes.
-
Very nice! Were any Park Royals silver when new? My gut feeling is no, and I have never seen a photo of one, but the IRM model description suggests that the mainline 10 were silver, and Fry built a model of one in silver…. If this is a myth it would be good to put it to bed, but maybe it really happened?

-
Would these have been in village shops on bus routes?
-
"Voiding the Warranty" - Mol's experiments in 21mm gauge
Mol_PMB replied to Mol_PMB's topic in Irish Models
Minor update on the prototype Palvan, which now has both body and chasses complete and in grey primer. Ciarán has very kindly provided me with a high-quality scan of the photo which has a grey one in the background, and whilst still not 100% clear it gives me enough clues to work out the livery and lettering style. So my prototype palvan will be finished in grey. Not the very pale grey used with the roundels, but the mid-pale grey latterly used with snails - it is clearly different in shade from the adjacent normal palvans. One marking that is clear in the image is the 'Vac Brake' stencil, which is in the style applied in the mid-1960s on the pale grey/roundel livery. The location of the number on the door is also visible, the same as on the green prototype palvan (but not quite the same as the production palvans). The number is not legible so I will either have to use the number from the green one, or guess! There does not seem to be any logo, either a snail or a roundel, and given what I can see I think it would be visible if it was there (certainly the roundels on the adjacent normal palvans are obvious). There was a brief transition period between the two in the early 1960s when neither was used; road vehicles and containers had block letters C.I.E. but locos, carriages and some wagons emerged without a logo in this period - and it's quite plausible this prototype palvan was repainted at that time. That's probably too much detail, but I'll be quiet for a few days now as I'm about to arrive in Scotland for a few busy days working. -
Converting a 00 Jinty to 21mm has anyone done it?
Mol_PMB replied to Bob49's question in Questions & Answers
I haven't done this myself, but I'd agree the front splashers will definitely need attention; I suspect that the insides of the tanks can be thinned if necessary to provide clearance. Of course you'll also need to modify aspects of the chassis like the brake gear. I do note that High Level Kits make an etched chassis for the Bachmann Jinty. Although not for 21mm gauge specifically, it's possible that it would make an easier starting point than modifying the Bachmann chassis? At least if you built it with the P4 frame spacers, the frames would be the correct distance apart. Jinty | High Level Kits Hope that helps Paul -
While looking for something else in Ernie's albums, I stumbled across this nice photo showing a pair of Worsley Works laminates - the green ones in this Enterprise set. Thought I'd post it here as inspiration...
-
"Voiding the Warranty" - Mol's experiments in 21mm gauge
Mol_PMB replied to Mol_PMB's topic in Irish Models
The body is now ready for cleaning and painting. Still a few details to add to the chassis. Whilst I'm expecting IRM to produce the production series Palvans (26000 series), I'd be surprised if they do one of these prototypes. But by sod's law, it will be announced the moment I've finished this one... I still haven't decided whether it will be grey or green, but a coat of grey primer is the first move whichever.
- 320 replies
-
- 10
-

-

-
Since whatever I build will be in 21mm gauge and I'll have to make my own turnouts, I can design the geometry to fit the space available and the style of the prototype. I have just downloaded Templot - there will no doubt be a learning curve once I get to grips with it! But I've managed to set my track gauge and standards, so that's a good start.
-
As ever in modelling, there are many schools of thought! One of the main benefits claimed for a resilient underlay is sound-deadening, and this is probably true, especially for a layout with relatively lightweight baseboards that can amplify sounds and vibrations. On the other hand, if you then ballast your track with stone ballast stuck down with PVA, that makes it pretty rigid and probably counteracts most of the benefit of the underlay. Having said the above, this is exactly what I usually do! Some people use ground cork and Copydex (or other rubber-based glue) for ballasting, so that the track remains flexible. One thing to avoid is using pins to nail down track on underlay - this definitely contributes to uneven track geometry and would worsen pickup on rigid locos. My view is that the the typical underlay (3mm cork or foam) is sufficiently stiff that it won't be compressed noticeably by a loco, even a heavy one, and so I wouldn't expect an improvement in pickup though that. Personally I like my track to be a little higher than the trackbed, making it easier to represent ballast shoulders, trackside cess drains etc. Underlay is a convenient way of lifting it a few mm, purely for appearance. I tend to use 3mm thick cork underlay. I have a friend who uses 3mm dense foam sheet with great success. Open-celled foam (as once supplied by PECO etc for track underlay) is a bad idea as it deteriorates over time. As for fixing rails at board joints, I'd say these need to be rigidly and firmly fixed to protect them. As an alternative to copperclad, some people use brass screws screwed down into the board and then the rails soldered to them. If you did want a flexibly-mounted baseboard joint, a possibility would be to terminate the tracks an inch short of the baseboard edge, and have a short removable section to bridge the gap. You would need a couple of teaspoons of loose ballast applied each time the layout is erected.
-
Good thoughts, thanks David. I think most modellers have to do some compression in length, and the key to making it work successfully is to keep the relative positions of the main features about right. I think that's possible with taking a couple of feet out of Fenit, but trying to squash it more than that would lose both the character of the place and the ability to run trains long enough to look right. I'm not very comfortable with truncating the layout at the station footbridge. At the moment I'm thinking that my original idea of modelling the pier could be done quite well (though still compressed) in my space. It's not such a 'pretty' scene as there are acres of concrete, and of course it's freight-only. Another disadvantage of the pier is how to deal with empty/loaded wagons because in reality all the freight was transferred to/from ships and that's difficult to represent in model form. That aspect is solved if modelling the station, because the empty wagons disappear off to the pier fiddle yard and come back loaded (or vice versa). For now, I'll postpone the decision and keep building wagons!
-
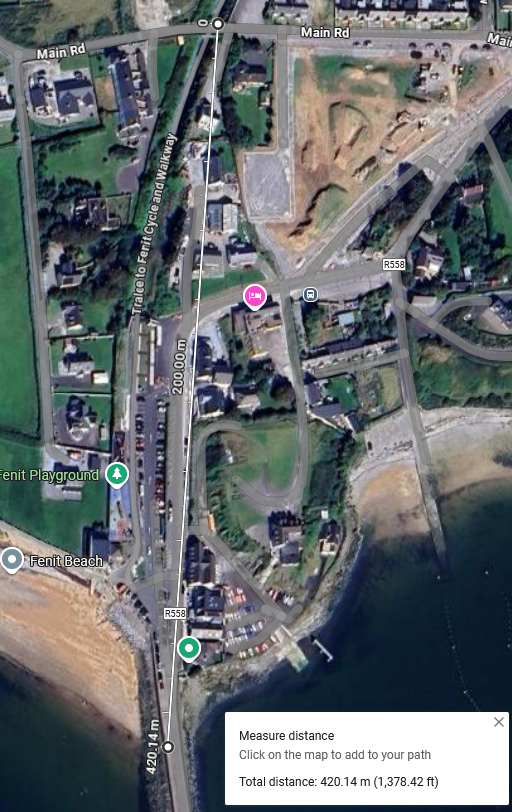
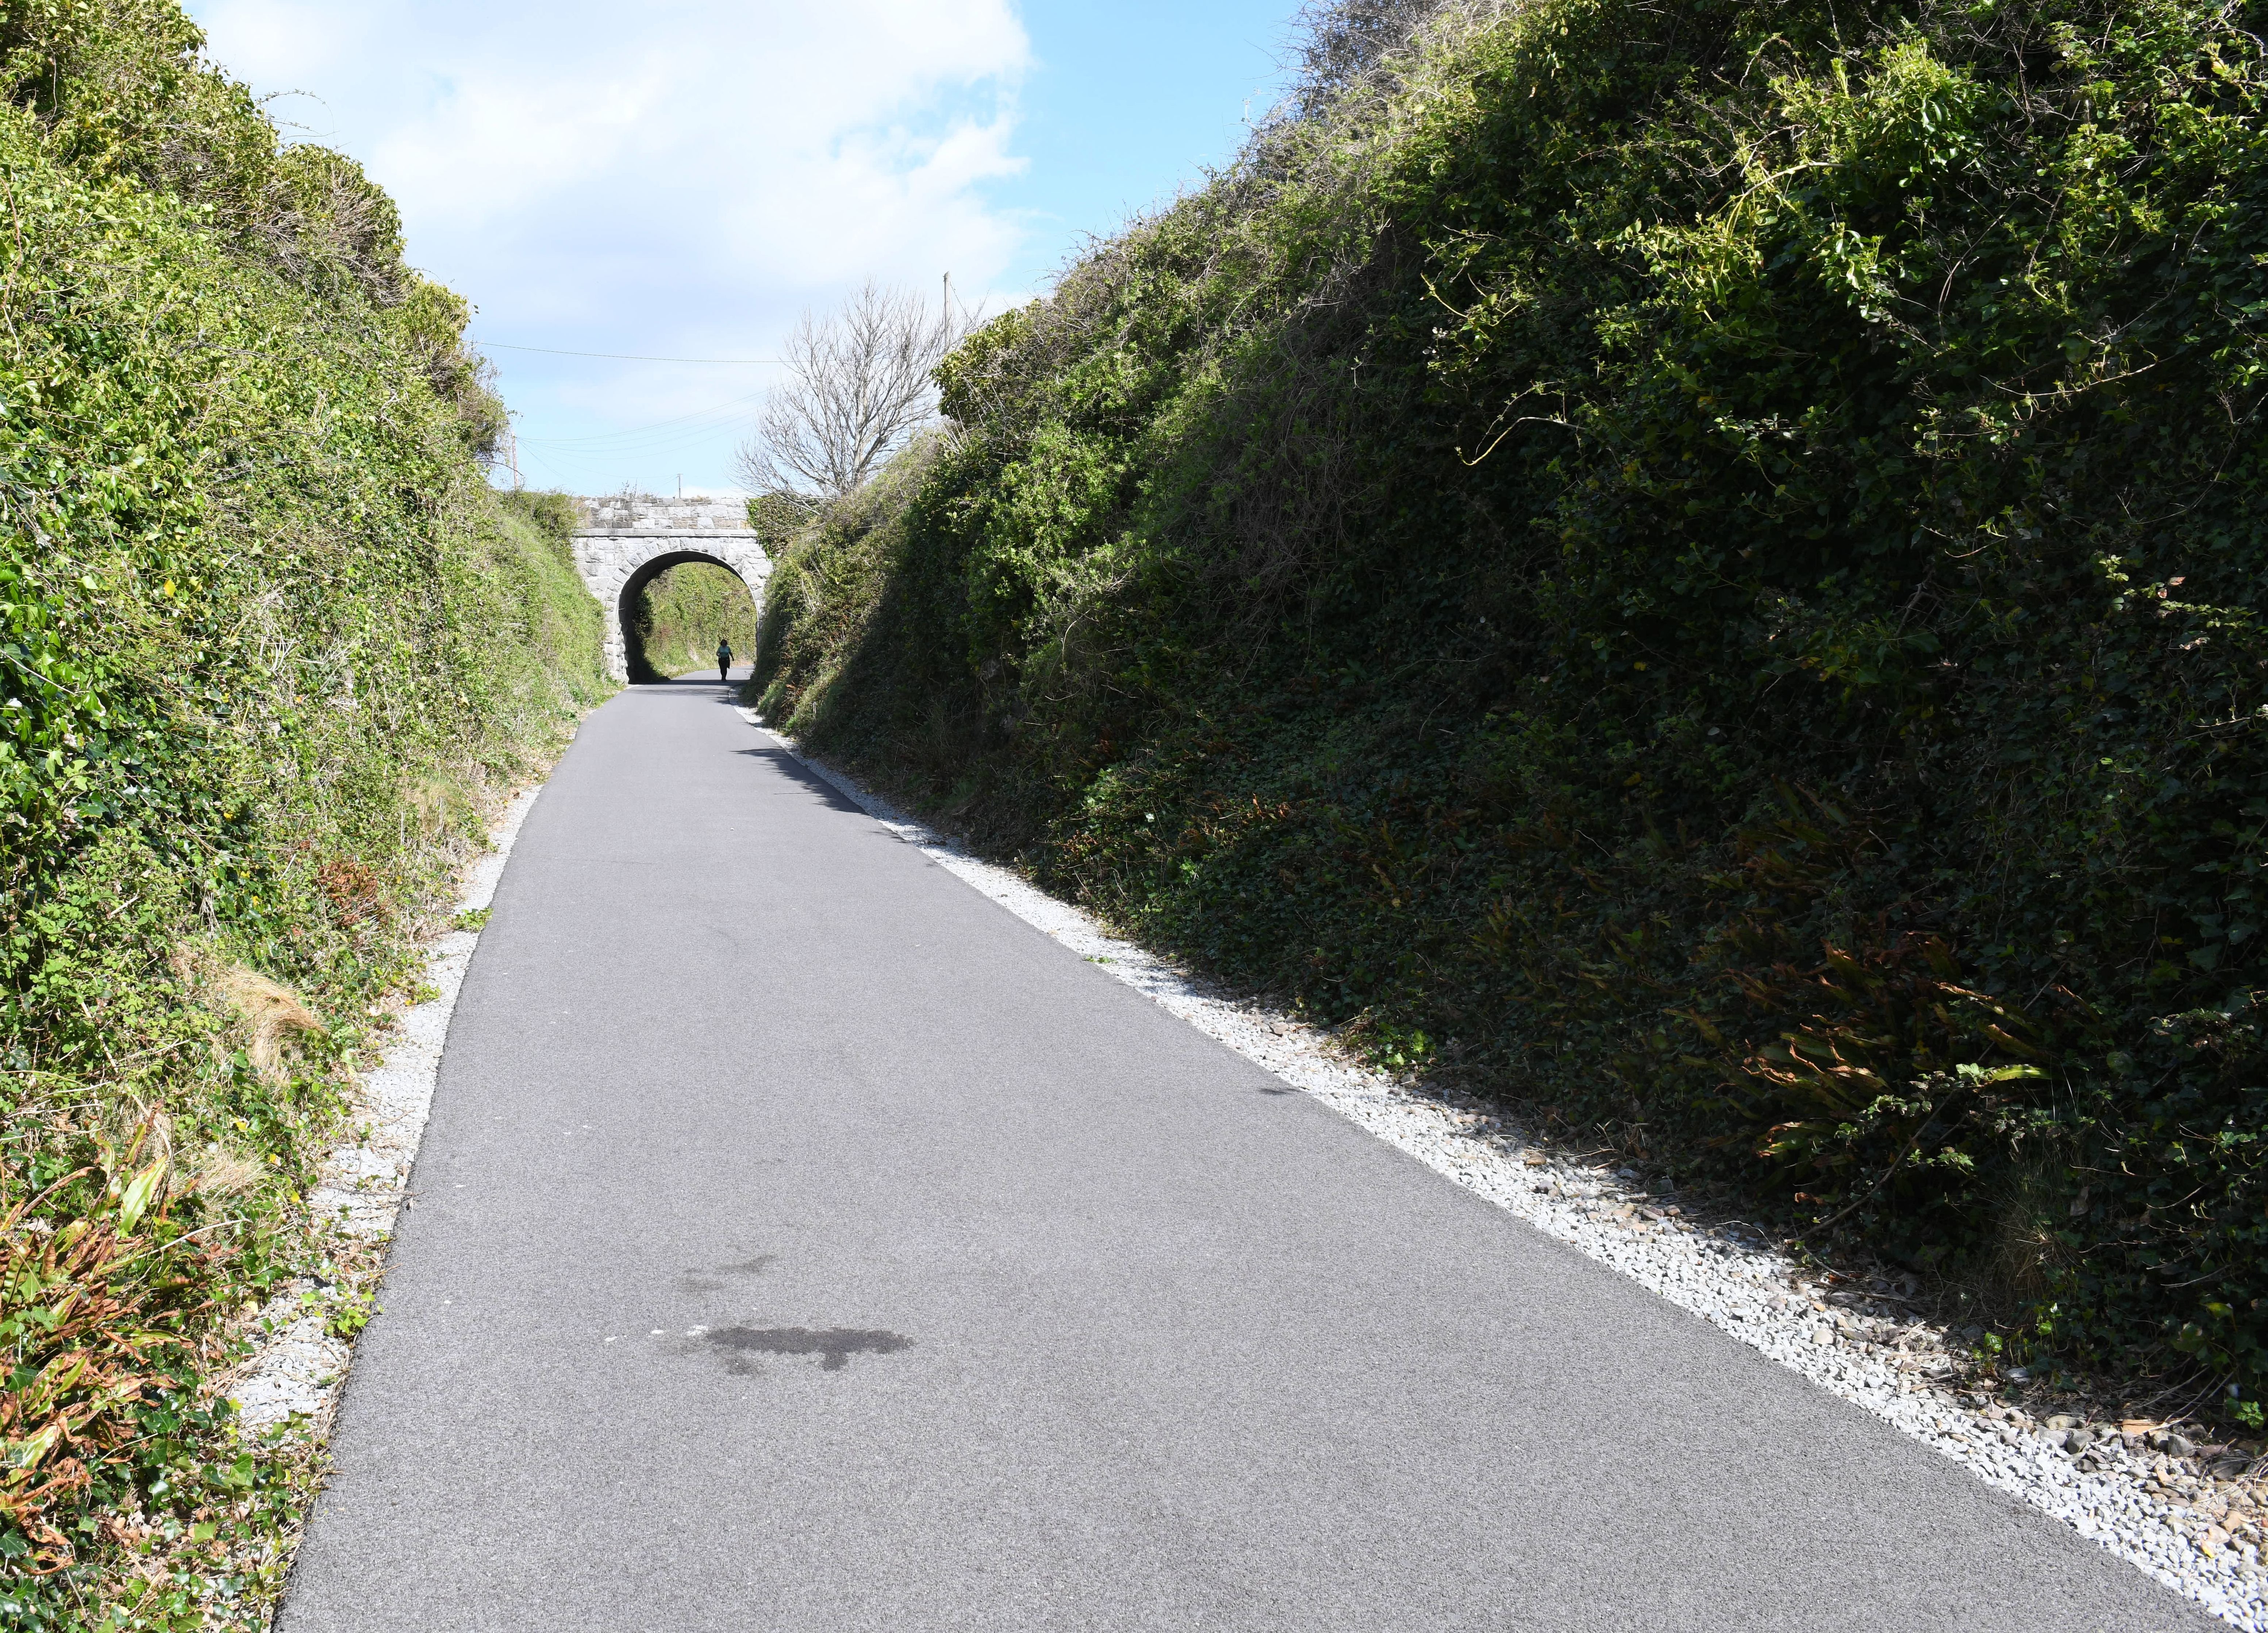
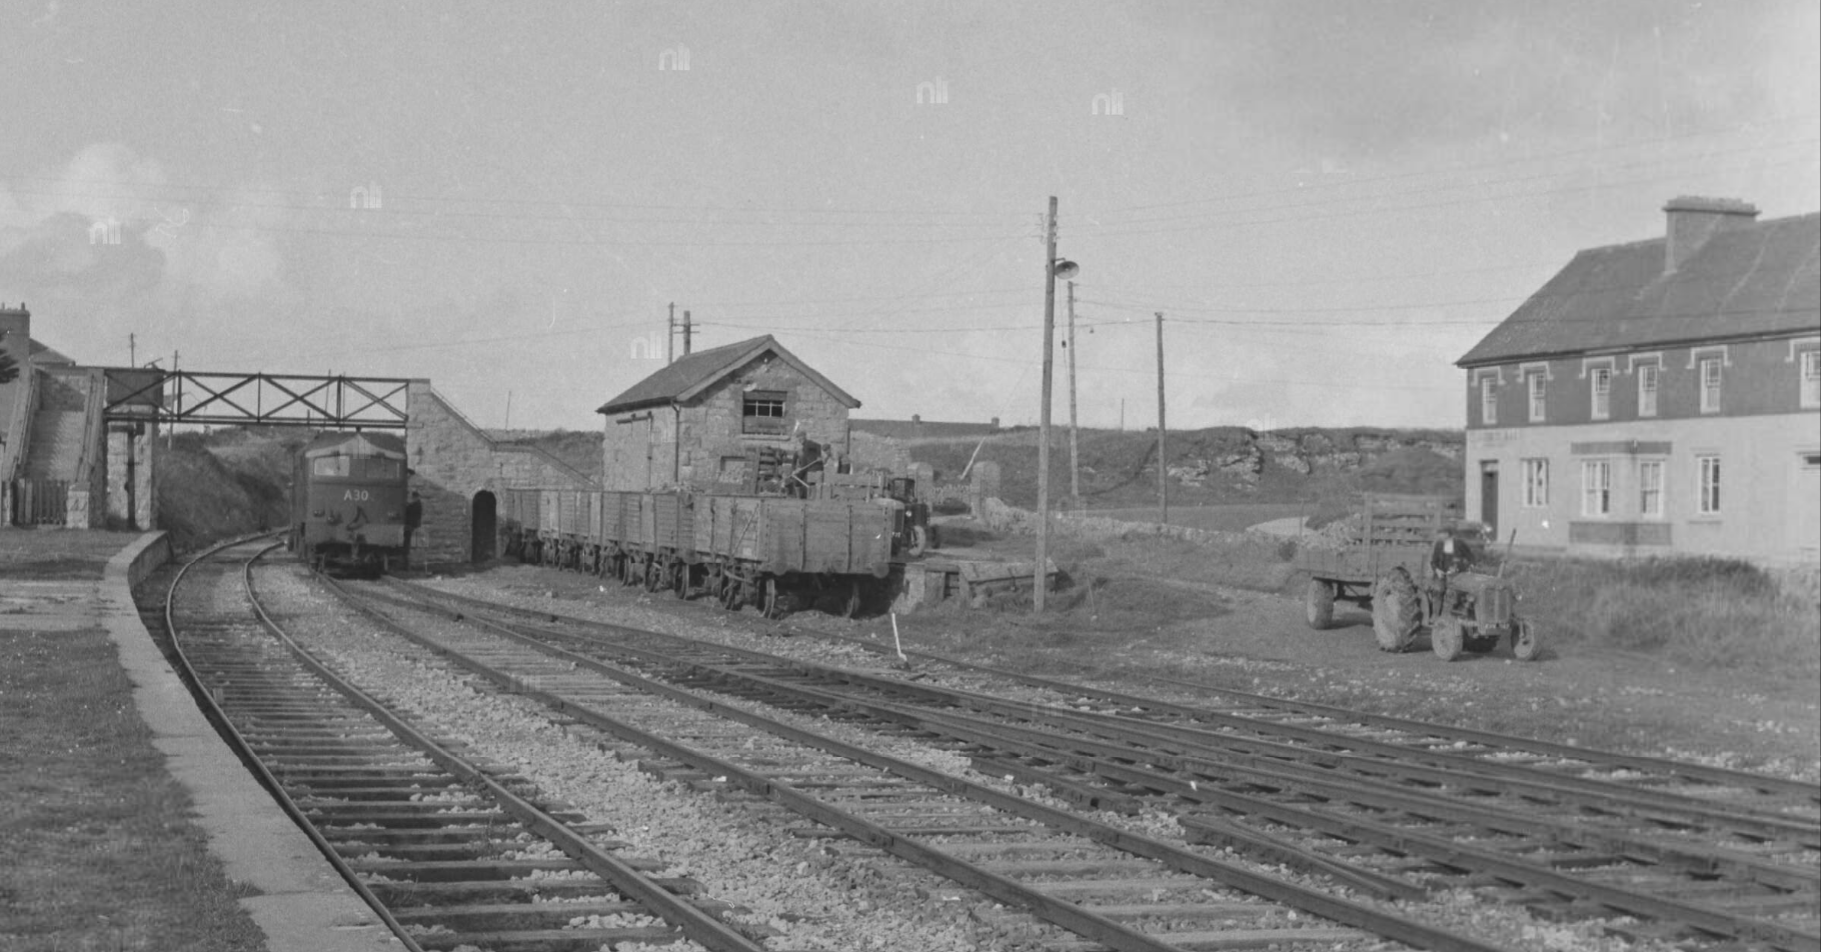
I'm still mulling over ideas for a layout based on Fenit. After some Guinness-fuelled discussions in the RPSI bar car a few weeks ago, I'm wondering whether the Fenit station on the mainland would be feasible. I tried to model this once before, about 30 years ago, but didn't have enough space or modelling skill to do it justice. The advantage of modelling the station is that there would be some passenger traffic in the form of summer excursions, and a lot of freight wagon marshalling as long trains from the branch are broken up into shorter cuts of wagons to go onto the pier, and vice versa. I'll do a bit of thinking aloud in this post. One problem is that although Fenit (mainland) is a terminus, it's also a through station because the line to the causeway and harbour continues on beyond. Much of the interest of the operation would be marshalling freight trains to and from the harbour, and that would require a fiddle yard both ends (or modelling of both the passenger station and the harbour). I don't think I have space for that. How big is the station itself? Well the ideal scenic break would be the Main Road bridge, where the line is in a curving cutting with steep, rocky sides. At the other end of the station the line runs onto the causeway, and to enable shunting you would need at least a loco-length beyond the toe of the goods loop points, which can be seen just behind 186 in Jonathan Allen's photo here: That distance is 420m in reality, or in 4mm scale model form 5.5m or 18 feet. Quite big, especially when you add a fiddle yard or two! That's what I tried to model in my teens, but I only had about 12 feet length. An alternative scenic break at the Tralee end would be the station footbridge, which would mean omitting the turntable, king points and water tower, but the two tracks under the footbridge could go directly onto a sector plate or traverser type fiddle yard. Illustrating with Ernie's photos, this bit would be missing: And the layout would focus on the station area (this is the view from the footbridge): That distance is 250m in reality, 3.3m or 10'9" in model form. Now we can start to think about selective compression. At the real Fenit, photos indicate that the platform and run-round loop were long enough for 4 bogie coaches, 4 and a tin van at a squeeze. Some trains were only 3 bogies and a tin van though, so it wouldn't be too bad to shorten the platform and loop by a carriage-length. 3 bogies and a tin van would be fractionally over 3' (0.92m) in model form, and freight-wise that length would accommodate 10 wagons and a brake van, which also seems a reasonable train length. From the footbridge to the buffer stop at the end of the platform headshunt would thus be about 6' (allowing for the points and headshunt). Looking now to the sidings, I suspect that the arrangement of 3 turnouts shown in the photo above could be compressed a bit, perhaps to match the reduction in platform length but not by much more. Some of those turnouts are already quite short. So after those 3 points, the goods loop would only really start about 3' from the footbridge. If the goods loop was also made 3' long, then the far end of it would be next to the bufferstops at the platform headshunt, then nearly another 3' would be needed for the goods loop points and headshunt. So the total length of the scenic section (footbridge to the start of the causeway) might be squeezed to 9' (2.7m). The Tralee-end fiddle yard would need to be about 4', but the causeway end could be as short as 2'. Total length 15'. Potentially possible in the living room. Hmm. I will continue mulling rather than actually make anything! From Roger Joanes, an unusually busy moment at Fenit, as G617 takes a break from shunting wagons - it had to shunt the passenger train to release 186, as the train was too long for the loop. And from the O'Dea collection in the NLI archive, a beet-loading scene looking the other way: https://catalogue.nli.ie/Record/vtls000307416
-
Very neat work! It will certainly transform the operations. Just a thought - would it be worth having a couple of short, fixed dead-end tracks off each end of the traverser section (flanking the through line)? This would allow you to store spare locos and swap locos onto trains without handling them. They wouldn’t be accessible from all the traverser tracks but should be able to access some of them.
-
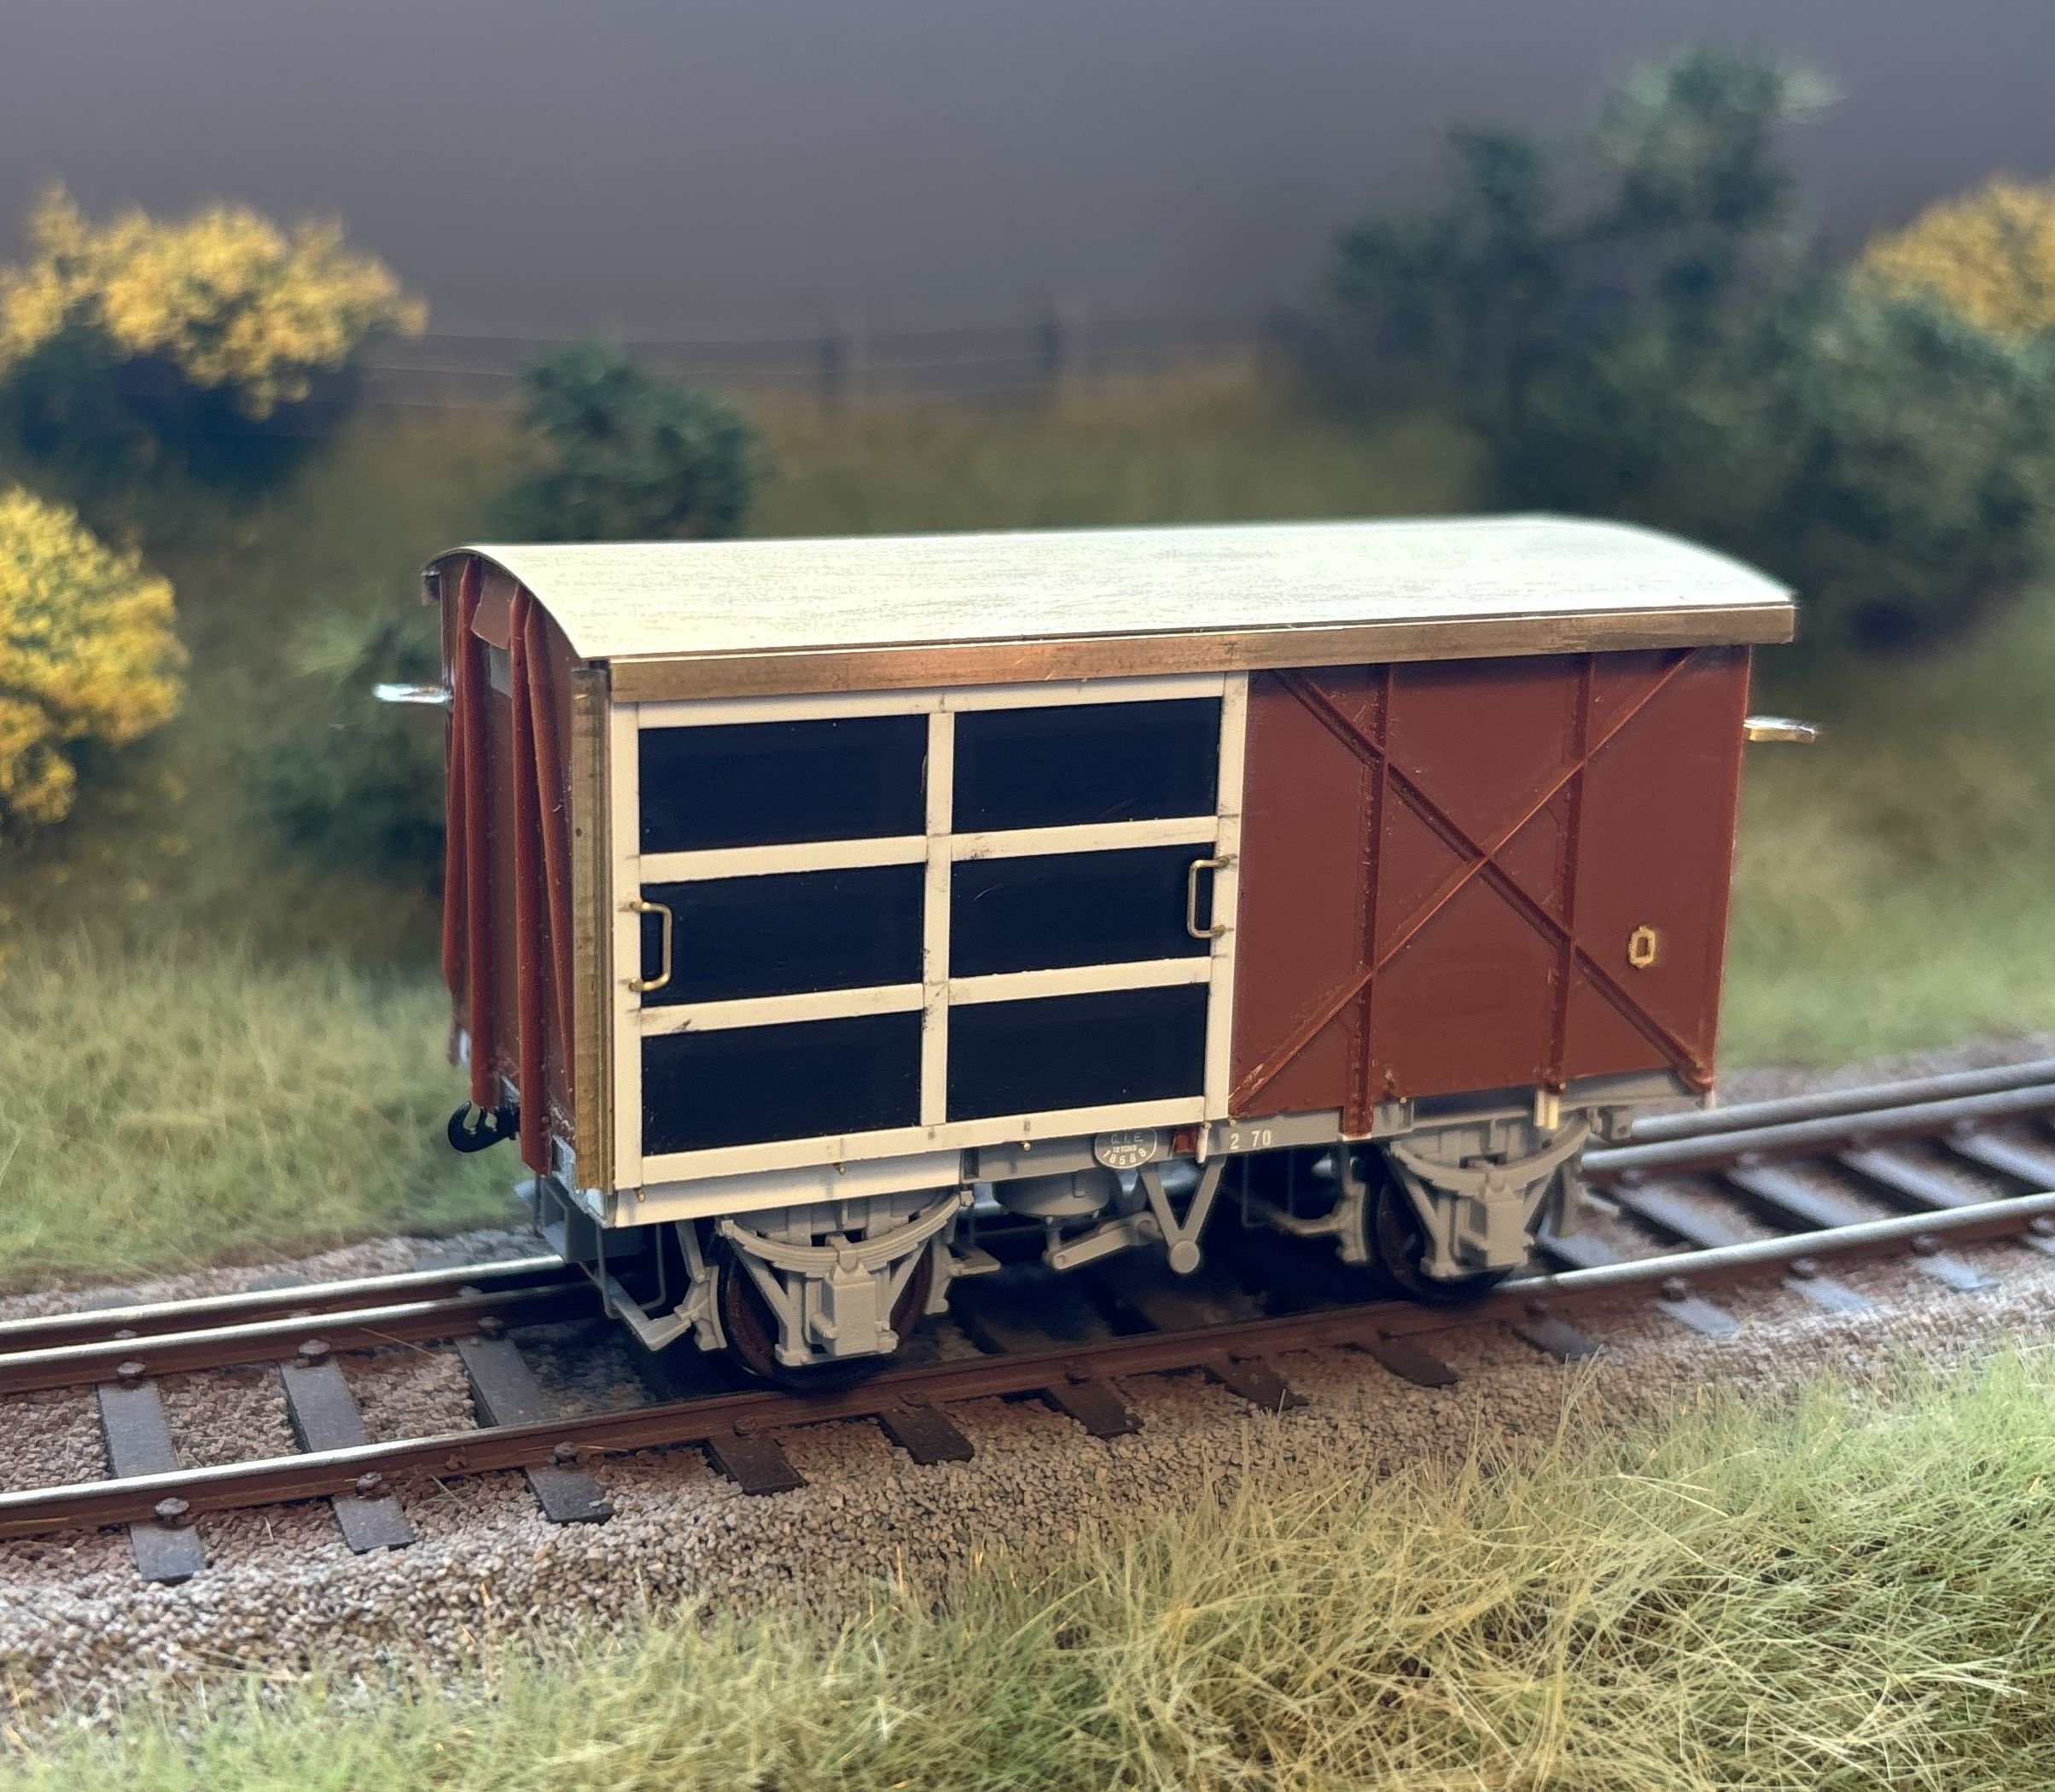
In the first photo, there's an interesting vehicle visible on the left margin. It appears to be a combined goods van and brake van, what would be called a 'Road Van' in GB though I don't know if that term was used in Ireland. I know the CB&SCR had some vans of this concept, but I don't think I've seen this one before. It's quite a long wagon and the long open verandah is distinctive - like a GSWR plough van (or a GWR 'toad'), but neither of those types had doors in the sides of the van portion.
-
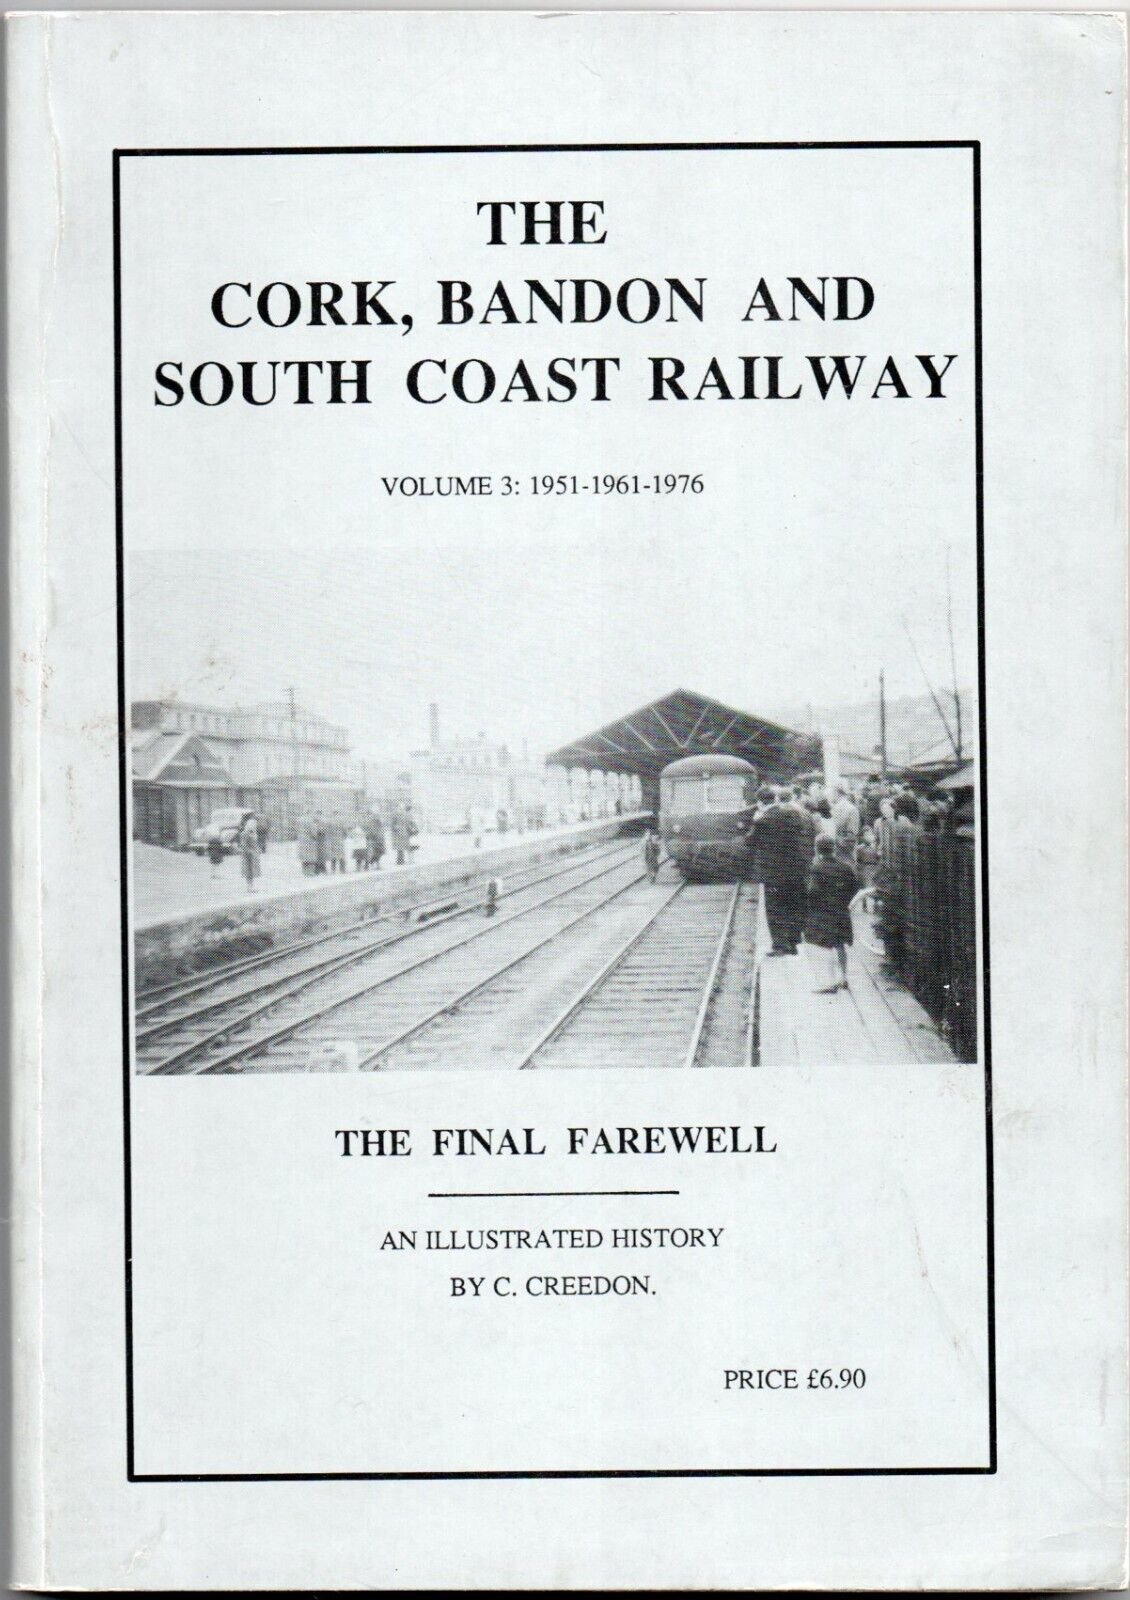
Books on the CB&SCR by Colm Creedon - worth getting?
Mol_PMB replied to Mol_PMB's question in Questions & Answers
Many thanks Ernie. It looks like these books have a lot of interesting snippets and photos. I've decided to buy the Vol 3 on ebay (at a good discount) and will keep an eye out for Vol 2 at a better price. Cheers, Mol -
For what it's worth, I've put some money in the pot and (re-)joined the ITG. Would encourage others to do the same.
-
Wow, that's impressive evidence of quite how robust the GMs are! Well done for all the hard work and I look forward to my visit to Downpatrick in August.
-
I was very tempted but am already booked on a steam excursion on the Manchester Ship Canal. I hope all goes well for you, and I look forward to travelling behind Uranus131 in future.
-
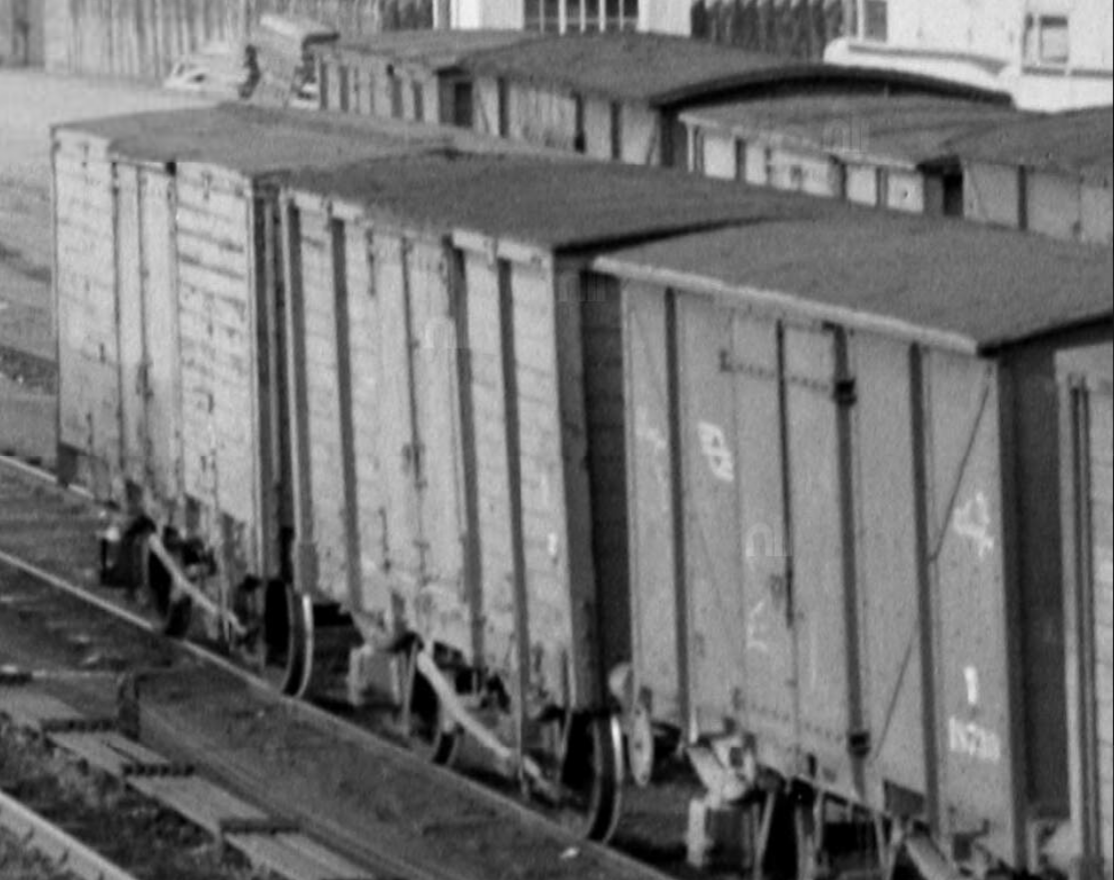
OK, so some later photos of the double-skinned vans by which time the snail was being superseded by the roundel. Some IRRS links: https://www.flickr.com/photos/irishrailwayarchive/53508632798 https://www.flickr.com/photos/irishrailwayarchive/53527501678 https://www.flickr.com/photos/irishrailwayarchive/53511614184 https://www.flickr.com/photos/irishrailwayarchive/53511123921 https://www.flickr.com/photos/irishrailwayarchive/53509178074 https://www.flickr.com/photos/irishrailwayarchive/53445964687 https://www.flickr.com/photos/irishrailwayarchive/53448459957 Some of Ernie's views in grey livery with roundel: And one in the scrap line from 67C 42909 on Flickr: And finally, some that received brown livery with roundel: https://www.flickr.com/photos/irishrailwayarchive/53511737035 https://www.flickr.com/photos/holycorner/7080217621 I think these double-skinned vans were some of the last survivors of the IRCH wooden-framed vans; perhaps the additional strength and weatherproofing provided by the second skin was a factor. I hope this has been a useful review, and perhaps will inspire some models of this wagon design that lasted 50 years and travelled over the whole island. Whilst the standard design was common to GNR, GSR and MGWR, 3D printing technology could make the variants fairly straightforward too. I would welcome additions to this thread, if you have any more photos, drawings, diagrams or information on number series. Perhaps I've missed a variant - please help to fill the gaps! Up my sleeve I have some research on the IRCH steel-framed vans, which may follow in due course...
-
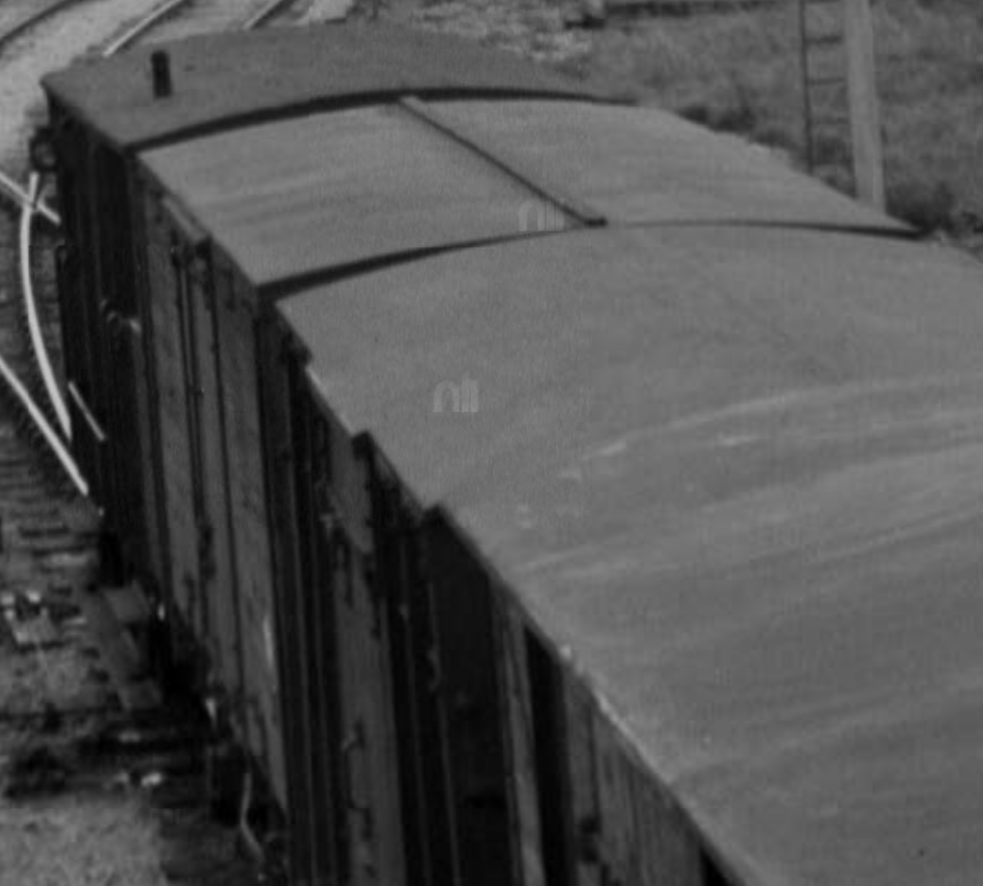
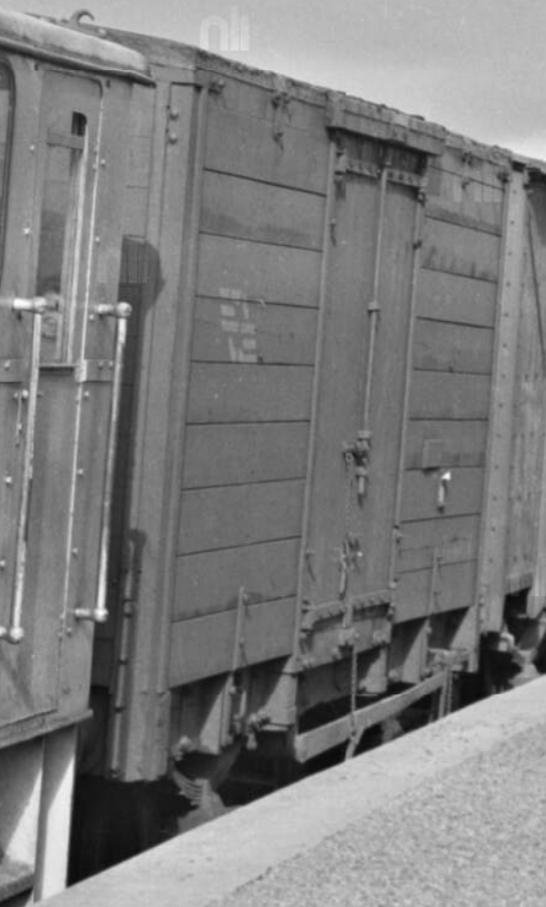
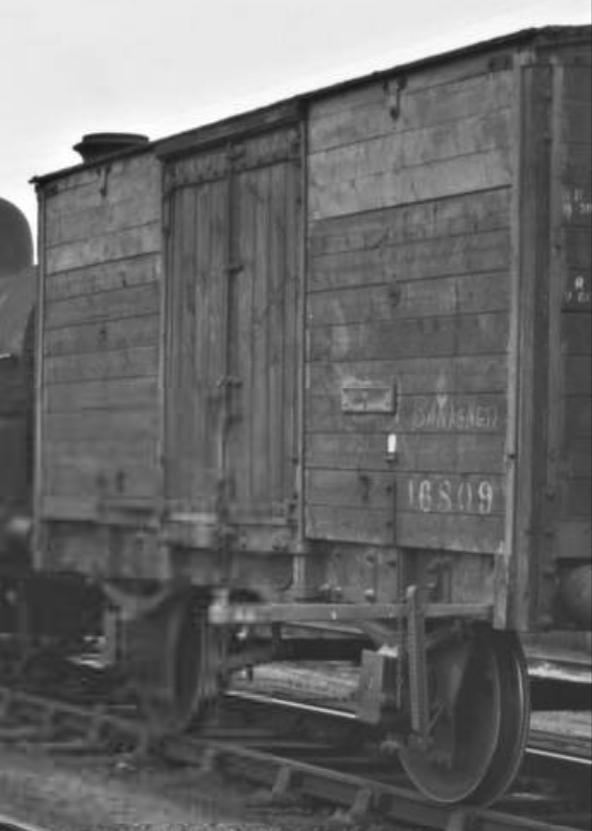
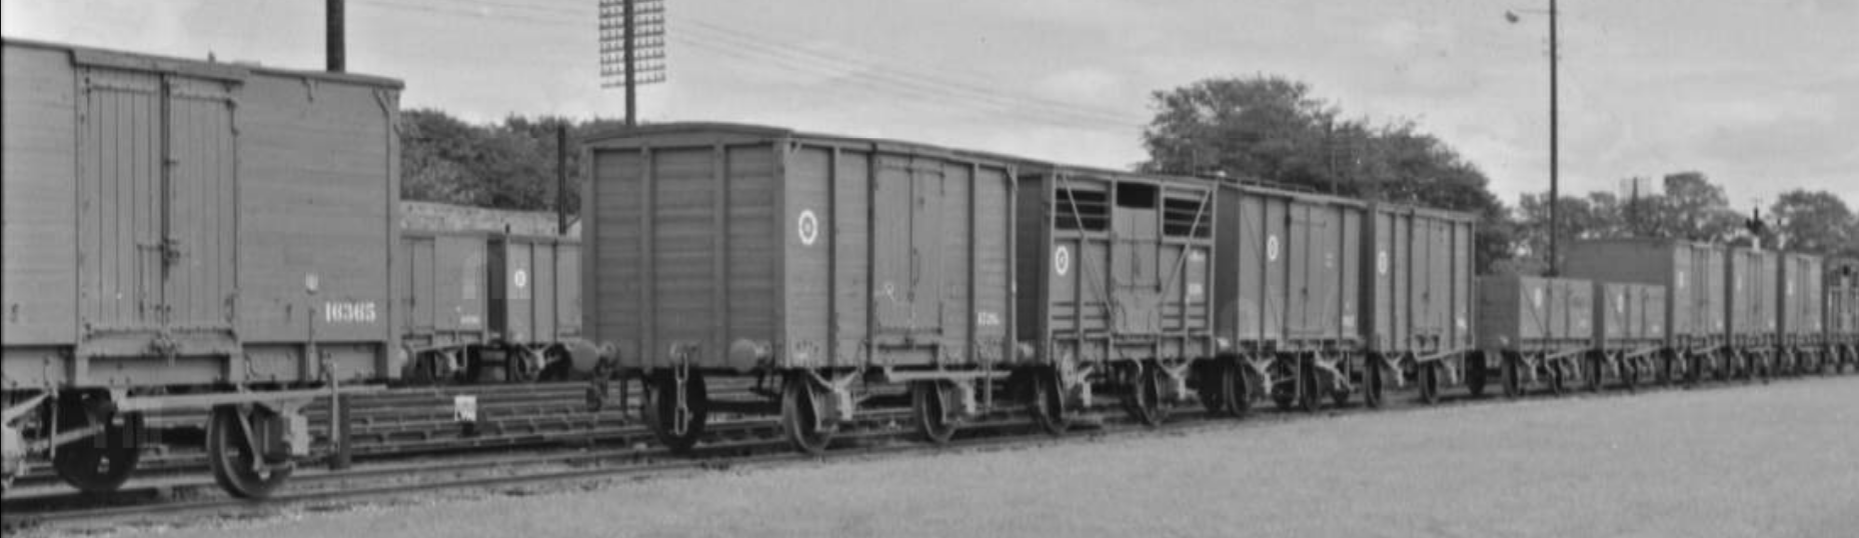
Until I can get some more info on the GNR vans, the finalvariant of the IRCH wood-framed vans to consider is the GSR 'double skinned' or 'flush sided' type. In the 1930s, the GSR developed the IRCH wood-framed van design into a double-skinned type, with an additional layer of planking on the outside of the wooden uprights. The design had similarities with their older butter vans but had a conventional roof. Double-skinned sides would still have provided improved protection from the weather, including thermal insulation and better waterproofing. In later years these vans survived surprisingly long in cement traffic where a dry interior was crucial, and were also seen in flour traffic. Some survived into the mid-1970s almost to the end of unfitted freight trains, and Brian Flannigan's photo (that we've seen already upthread) nicely illustrates 16549 in brown roundel livery in 1971, alongside its GNR sister: This photo of 16753 in the scrap line shows some of the outer cladding missing, revealing that underneath the van is almost identical to the standard IRCH type: https://www.flickr.com/photos/irishrailwayarchive/53511737475 Some older photos show these vans at the front of passenger trains, implying that some were vacuum fitted, or at least through-piped. However, none of the close-up photos found to date show evidence of vacuum fitted vans of this type. This is a mystery yet to be resolved. Numbers that I have identified from photos are as follows: 16365 16432, 16445, 16460, 16481 16526, 16549, 16551, 16576, 16586 16634, 16639, 16694 16753, 16760 16809 All the known numbers are in the series 16365 to 16809, following the 'blocks of numbers' approach started by the GSWR and continued by GSR and CIE. Prior to this block in the number series were the GSR wood-framed IRCH vans without the double skin, for which the highest known number is 16290. We looked at those further back in the thread. Within the number range for the double-skinned vans, there is a known block of numbers 16400-16411 which were the GSR bulk grain vans introduced in the mid 1930s. After the block of double-skinned vans, the next known number very soon afterwards is 16812, first of the aluminium alloy bodied LMA vans. Both the bulk grain vans and the LMA vans were on steel underframes and had few similarities with the wood framed vans being considered here. Based on the number series, there may have been up to 500 double skinned vans built through the 1930s. The earliest photo of one yet found is dated 1939 and shows 16460 in GSR livery: https://www.flickr.com/photos/irishrailwayarchive/53508914253 Moving forward to the 1950s, there are some useful photos in the NLI, IRRS and Ernie collections. https://catalogue.nli.ie/Record/vtls000303493 shows a nice roof view, with a distinctive longitudinal rib that wouldn't be visible from ground level: Another early 1950s image from the IRRS: https://www.flickr.com/photos/irishrailwayarchive/53508949033 This photo from Ernie dated 1953 only shows part of a van, but in excellent detail: Turning round we can see a bit more of it, though the number isn't quite visible: This IRRS photo shows a pair of these vans at Ennis in 1955: https://www.flickr.com/photos/irishrailwayarchive/53498783586 Back to the NLI for a 1959 view at Thurles. Again this shows the longitudinal rib on the roof of the double-skinned van (but not on any of the other types): https://catalogue.nli.ie/Record/vtls000304005 Photos become much more numerous in the early 1960s. I'll give a load of IRRS links first and then look at the ones that will embed in this thread: https://www.flickr.com/photos/irishrailwayarchive/54253242773 https://www.flickr.com/photos/irishrailwayarchive/54253435290 https://www.flickr.com/photos/irishrailwayarchive/53498932083 https://www.flickr.com/photos/irishrailwayarchive/54253234479 (notably some of these don't have the roof rib) https://www.flickr.com/photos/irishrailwayarchive/53445962692 https://www.flickr.com/photos/irishrailwayarchive/53569640052 https://www.flickr.com/photos/irishrailwayarchive/54255304174 https://www.flickr.com/photos/irishrailwayarchive/54419684699 https://www.flickr.com/photos/irishrailwayarchive/54419738558 https://www.flickr.com/photos/irishrailwayarchive/54419892155 https://www.flickr.com/photos/irishrailwayarchive/54251543484 This view from Ernie shows 16694 on the Guinness branch in 1960: And this beautiful view at Shannonvale Mill with 16576 in 1961: Dromod and Ballinasloe in 1961, again with double-skinned vans lurking in the edges of the shot: Fenit, early 1960s, in a photo by John Powell, and a double-skinned van interrupts a block train of H vans: There are also some good NLI images of these from the early 1960s: https://catalogue.nli.ie/Record/vtls000304916 https://catalogue.nli.ie/Record/vtls000304980 https://catalogue.nli.ie/Record/vtls000305420 https://catalogue.nli.ie/Record/vtls000305816 https://catalogue.nli.ie/Record/vtls000307038 I'll leave it there for this post, and cover the late 1960s and 1970s images in a follow-up post.
-
Lovely! They bring the footplate to life. The finish on the clothing is very good, touches of gloss on the greasetops and boots are spot-on despite the dirty working environment. The overalls look well cared for but not pristine, as one would expect.
-
Books on the CB&SCR by Colm Creedon - worth getting?
Mol_PMB replied to Mol_PMB's question in Questions & Answers
Many thanks both, much appreciated. -
"Voiding the Warranty" - Mol's experiments in 21mm gauge
Mol_PMB replied to Mol_PMB's topic in Irish Models
Work in progress on the prototype palvan, shown alongside the green H van for comparison: The basic body shape is done now, based on parts from the Parkside BR palvan kit which has become a bit wider and shorter to match the Bulleid triangulaed underframe. The ends from the kit are almost right for the prototype CIE palvan, except the curve of the roof which I have altered to match the H van. The production CIE palvans had quite different ends (and several variants of them too). Next steps are to add the reinforcing strips on the door, and the door handles and door stops. The chassis needs a little more work but is nearly there. I'm only aware of two photos of these prototype palvans; there were apparently 15 of them. A clear photo of one van in a rake of three brand new in green livery: https://www.flickr.com/photos/irishrailwayarchive/53510273317 A single van in the background of an image dated 1972, by which time it was painted grey but the photo isn't clear enough to show whether it had a snail or a roundel, or what number it was: https://www.flickr.com/photos/irishrailwayarchive/53510435292 I'm undecided on which colour the model will be - I quite fancy the grey variant so I can run it with some 'normal' Palvans when IRM make them, but I have better info on the lettering of the green one and it would pair nicely with my green H van. Any more info on the prototypes would be very welcome!
-
Books on the CB&SCR by Colm Creedon - worth getting?
Mol_PMB replied to Mol_PMB's question in Questions & Answers
Wonderful - many thanks for the advice. The third one is also of most interest to me in terms of the time period covered. The ebay seller sent me quite a reasonable discount offer on the third one so I might get that, and see if I can pick up the others more cheaply. Thanks for the link to a 'free' volume 1. The only one I found on Abe books at present is the £70 volume 2 which is a bit steep for me! -
Books on the CB&SCR by Colm Creedon - worth getting?
Mol_PMB posted a question in Questions & Answers
One of my ebay searches recently turned up an Irish railway book I hadn't seen before: Note that this is volume 3, and despite the cover price of £6.90 the seller wants £50 for a tatty secondhand copy. A search elsewhere has found volume 2 is also available from a different seller, cover price of £4.50 and a price of £70! I can't find volume 1 anywhere. Are these books good? Does the quality of the content justify the high prices being asked? Or is it just a case of 'it's scarce - so it must be valuable'? I already have the Ernie Shepherd book and the Chris Larkin book on the CBSCR.