-
Posts
3,490 -
Joined
-
Last visited
-
Days Won
11
Content Type
Profiles
Forums
Events
Gallery
Blogs
Store
Community Map
Everything posted by Glenderg
-

IRM Cement Bubble Poll - Mercig Factory Weathering or Pristine Finish?
Glenderg replied to Warbonnet's topic in Irish Models
Nice work Mr Ruxton! If I'm honest, my focus was getting running numbers of the Ivory livery, and all the livery variations on point - which wore "BULK CEMENT", which had the broken wheel, and the rare Irish Cement in blue branding. I didn't think there would be that much interest in either the grey or orange liveries, so never paid too much heed to dates of livery alterations. The only thing I can think of regarding liveries, is that at some point there were grey wagons, with the older chassis, and the orange set with the newer chassis. Perhaps the livery alteration was to distinguish the two different types for some reason? All liveries will be produced, all we need is a daycent A-Class to pull the buggers.... R. -
You'd want to take the sides out and move them sideways a few centimetres too, to get the window spacing right. In other words, neither MK3 nor MKIV is a suitable donor for the IE MKIV's, sadly.
-

IRM Cement Bubble Poll - Mercig Factory Weathering or Pristine Finish?
Glenderg replied to Warbonnet's topic in Irish Models
1967 Grey 1978 Orange 1981 Ivory That's not definitive, but based on photographic evidence. Messrs. Hirsch, Doyle, Carse et al. might have a more accurate timeframe. -
Noel, MKIV coaches are silver and green, introduced in 2005 (ish); MK3's, (supertrain & tippex orange) introduced in 1980 and withdrawn in 2009 are the ones shown above.
-
trains@oxforddiecast.co.uk Have to say they do look quiet enticing, but the rubber gaskets on the windows are far too big and look identical to the lima's. You'd think after all these years they'd get the flush glazing and such right. The Witness marks on the buffers is annoying me, as is the tumblehome curve (looks too shallow) but I'll be defo buying a rake for conversion. The bogies look delicious, hope they make them available as extras/spares. R.
-
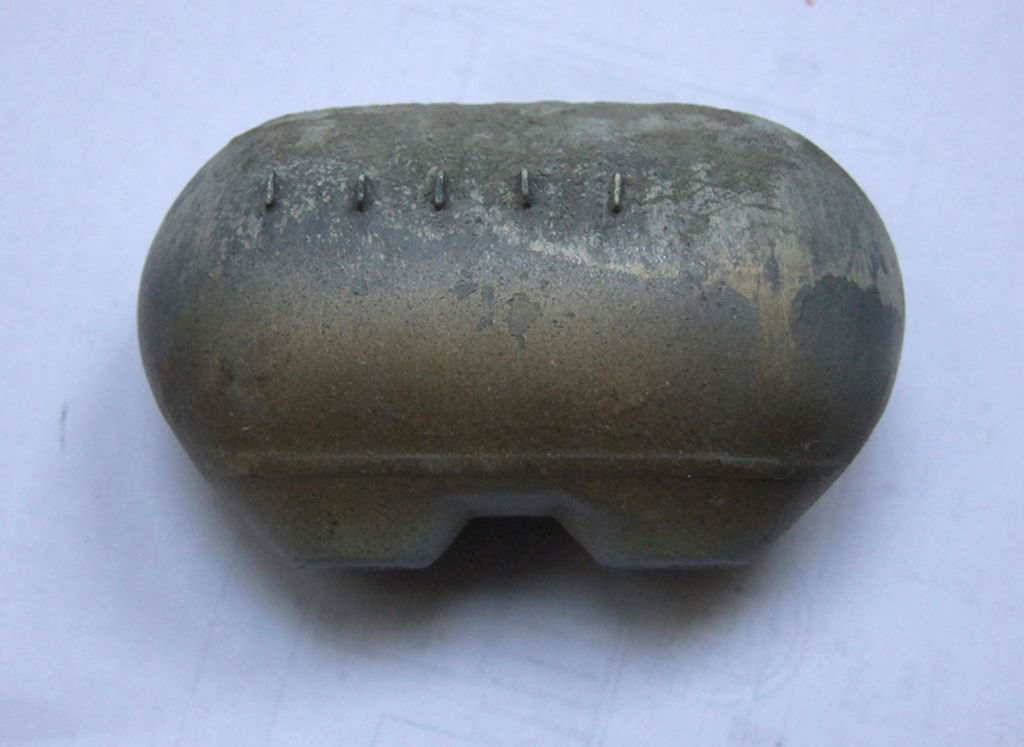
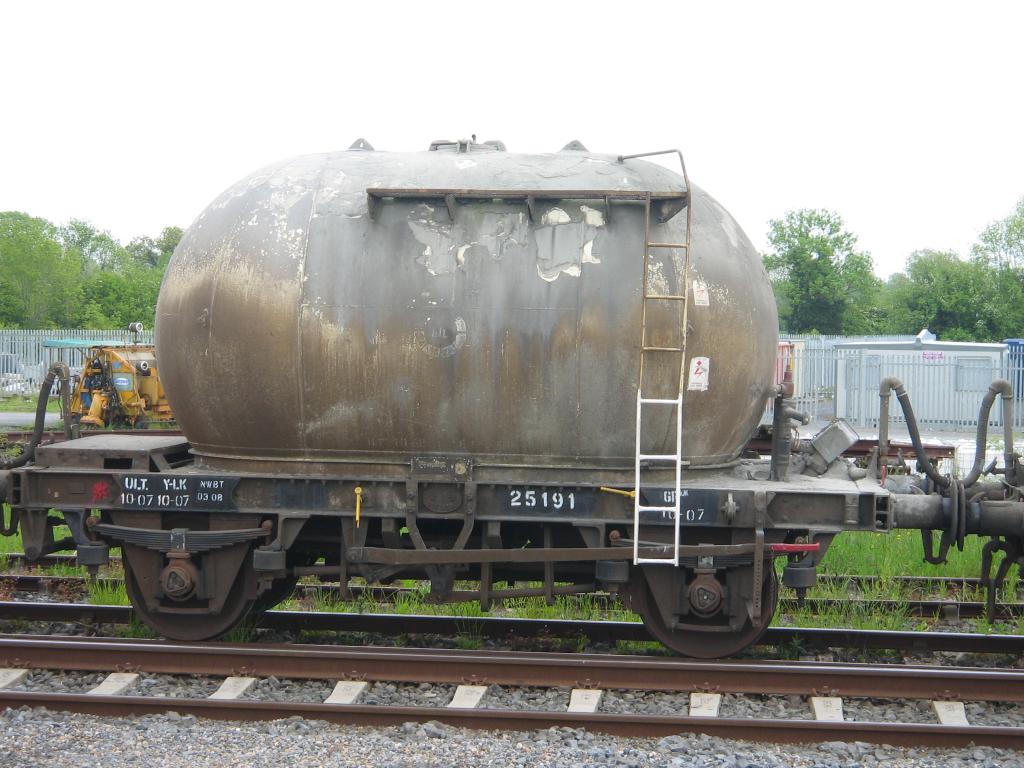
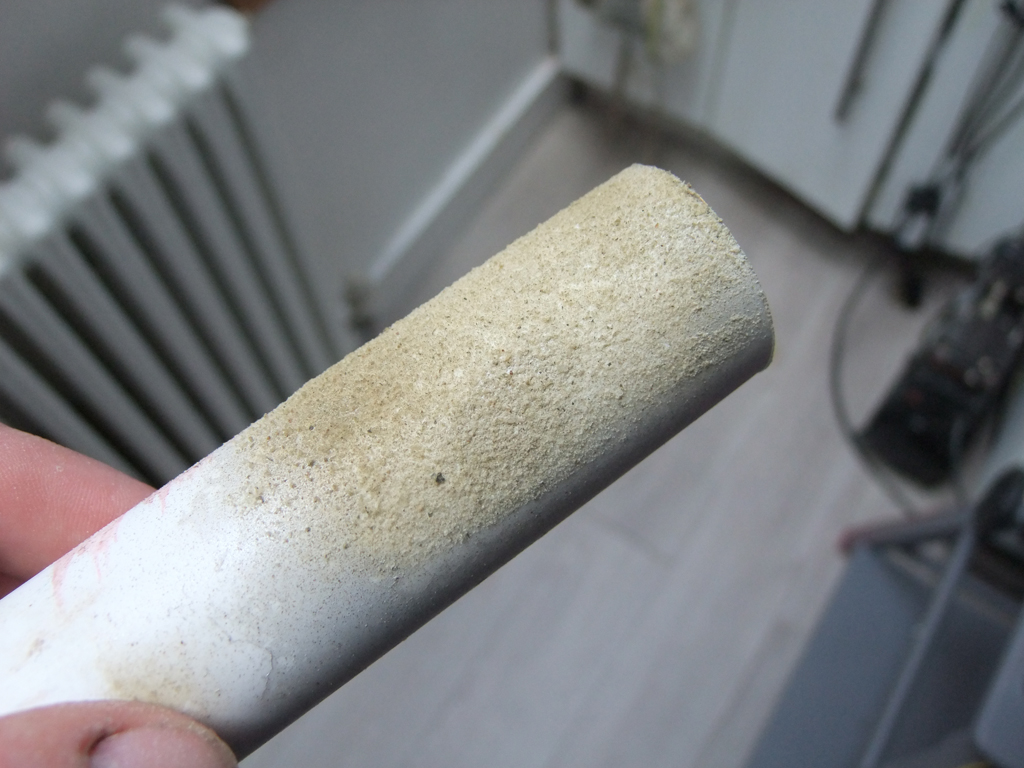
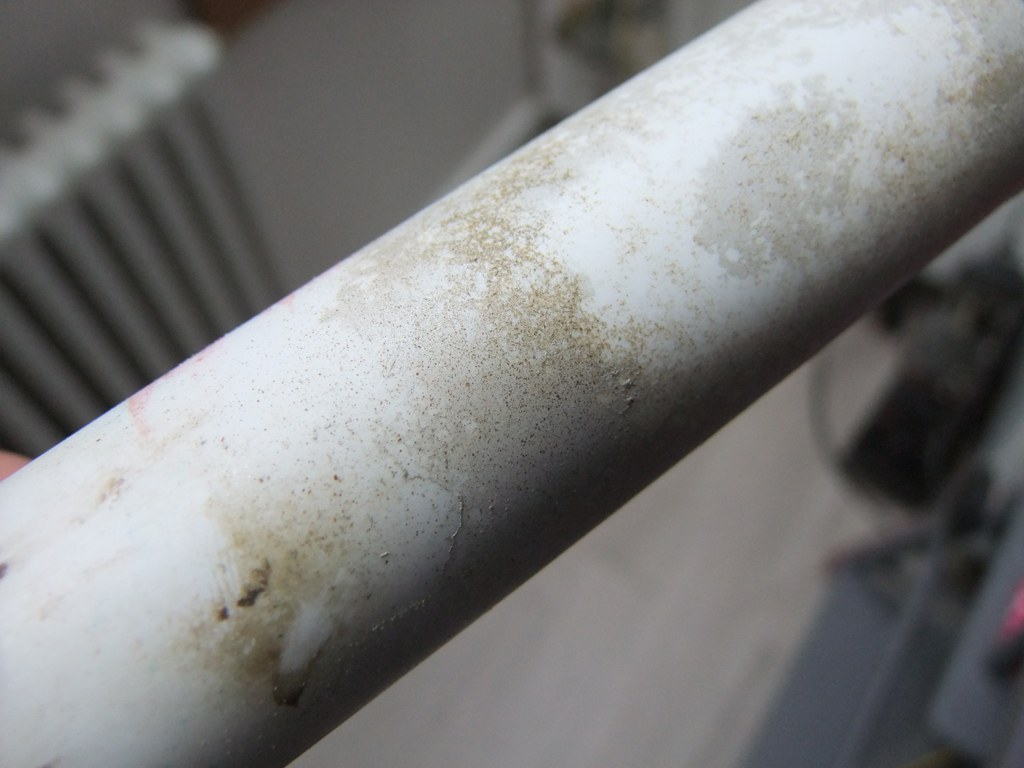
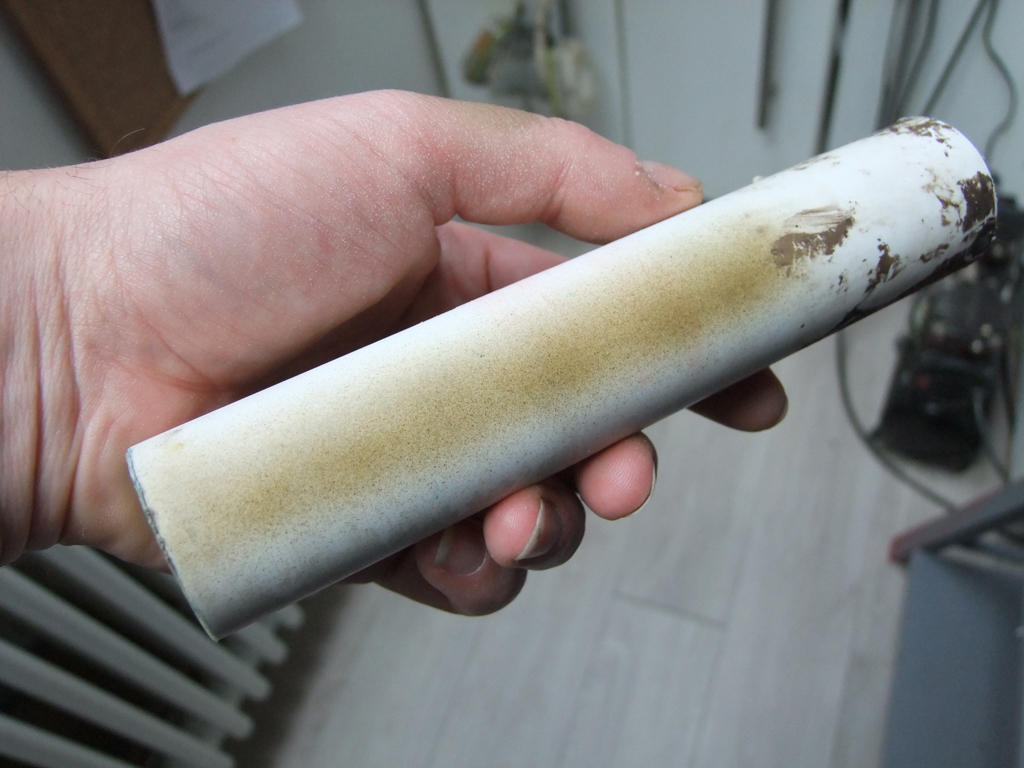
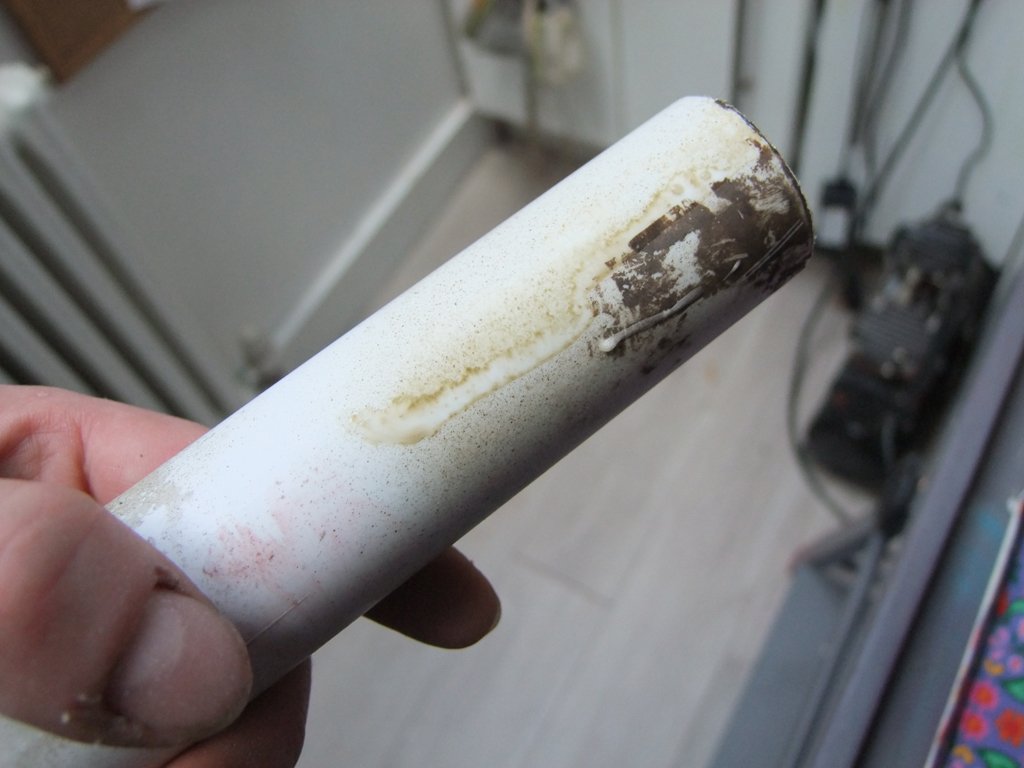
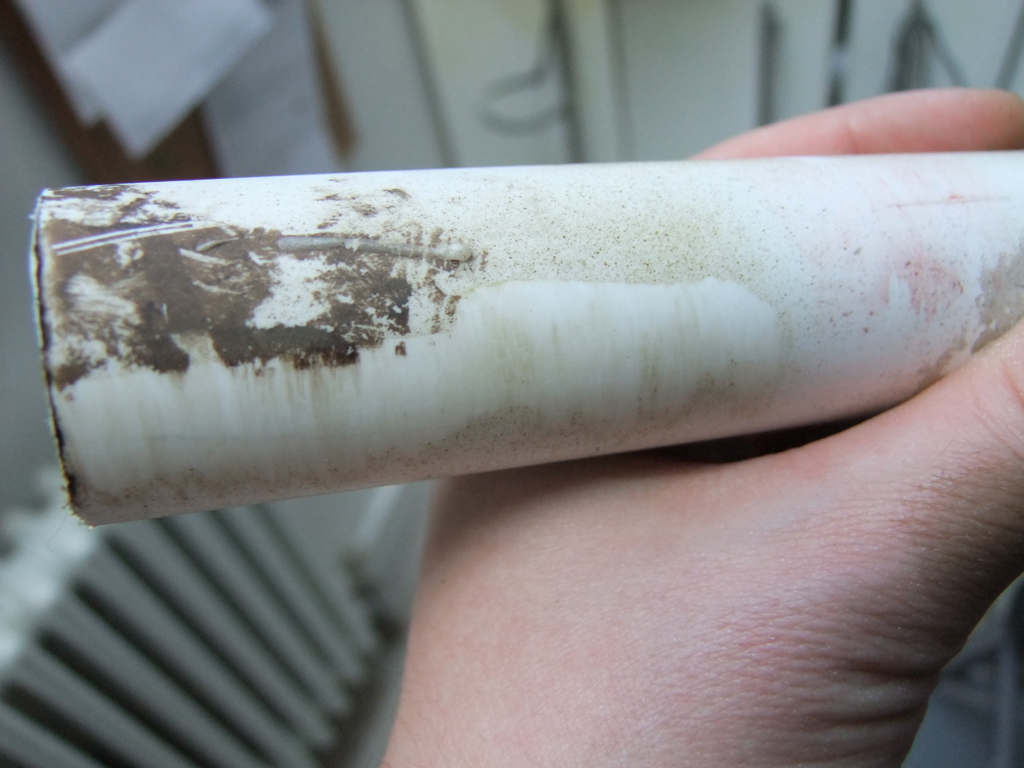
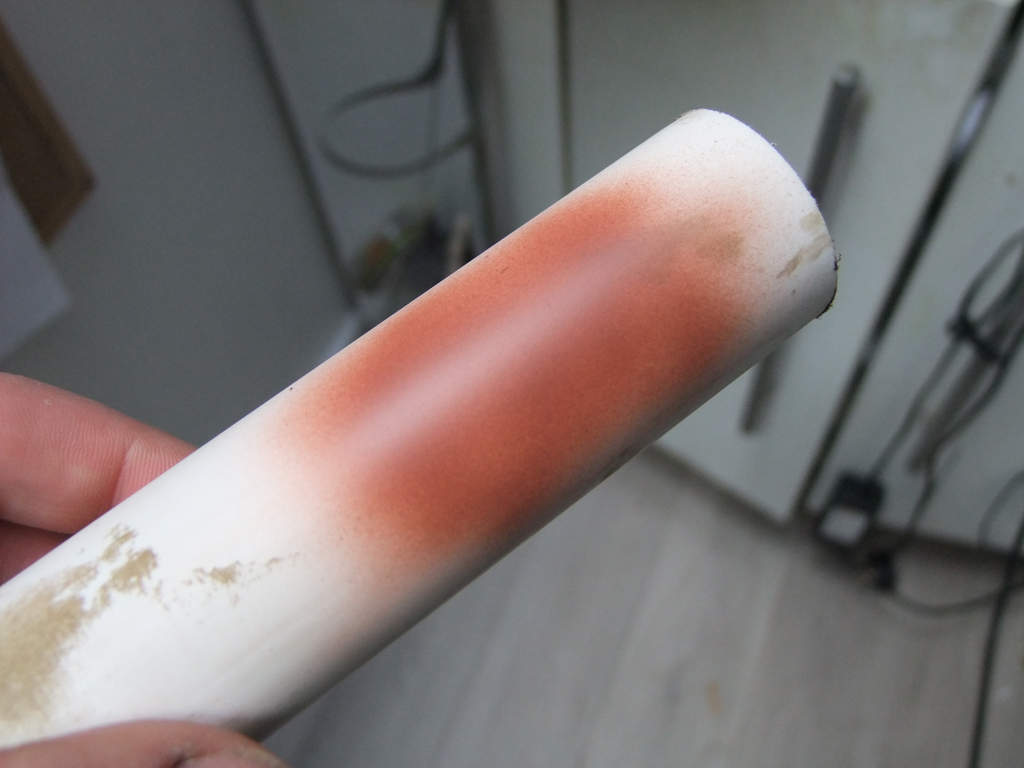
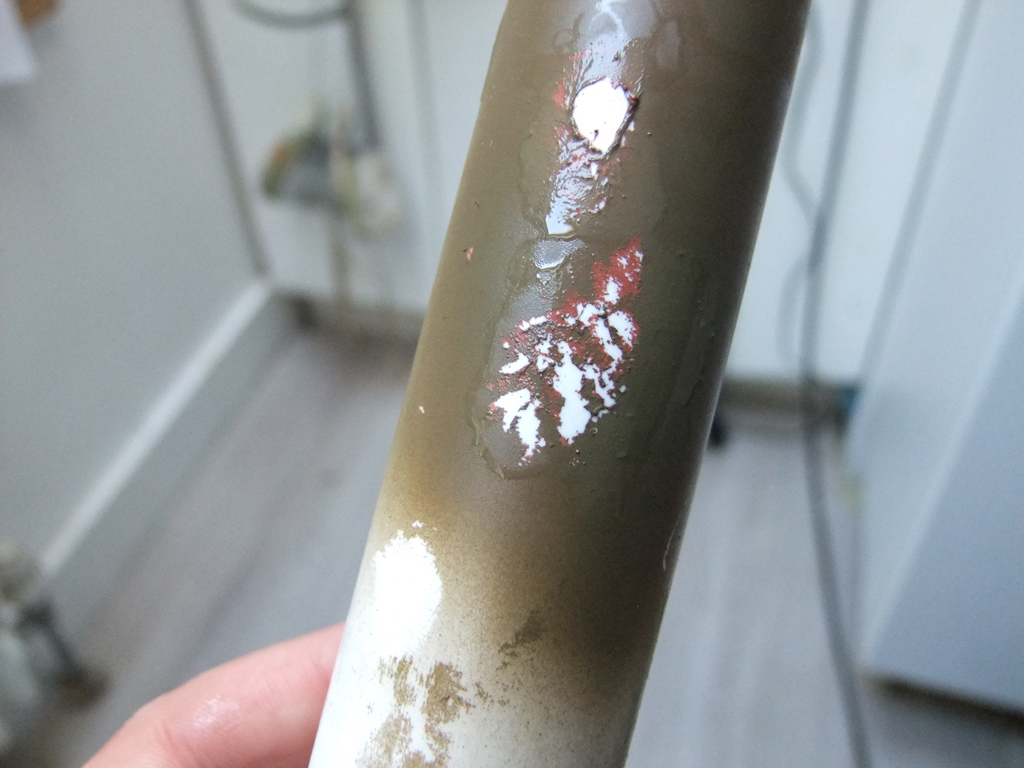
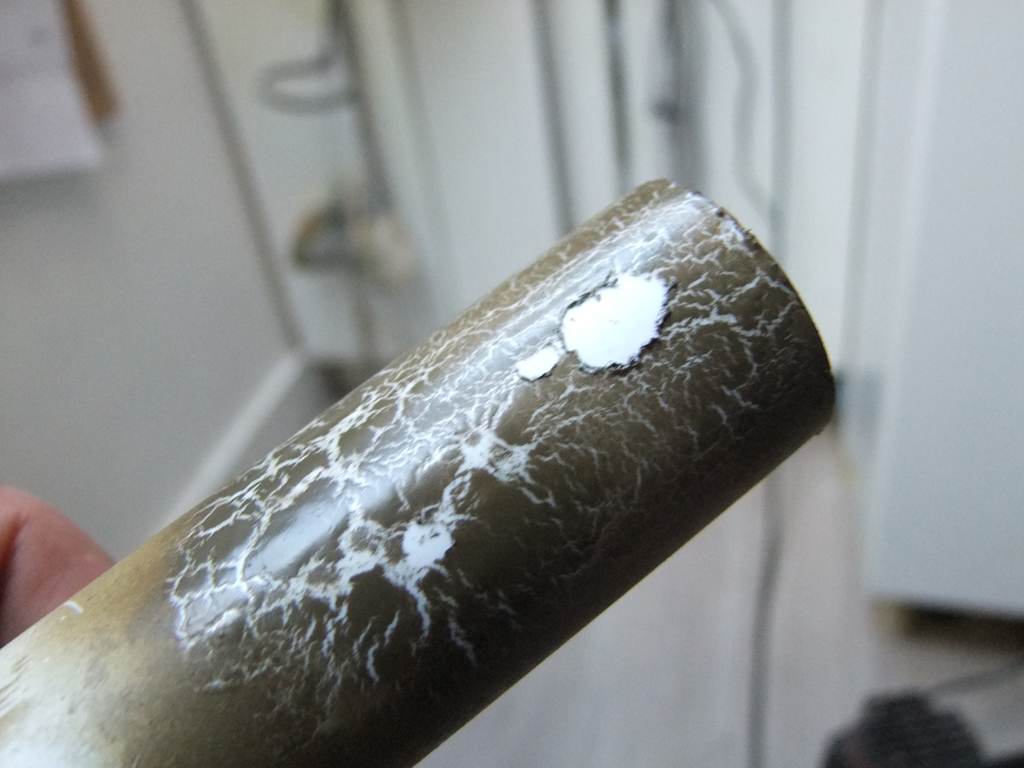
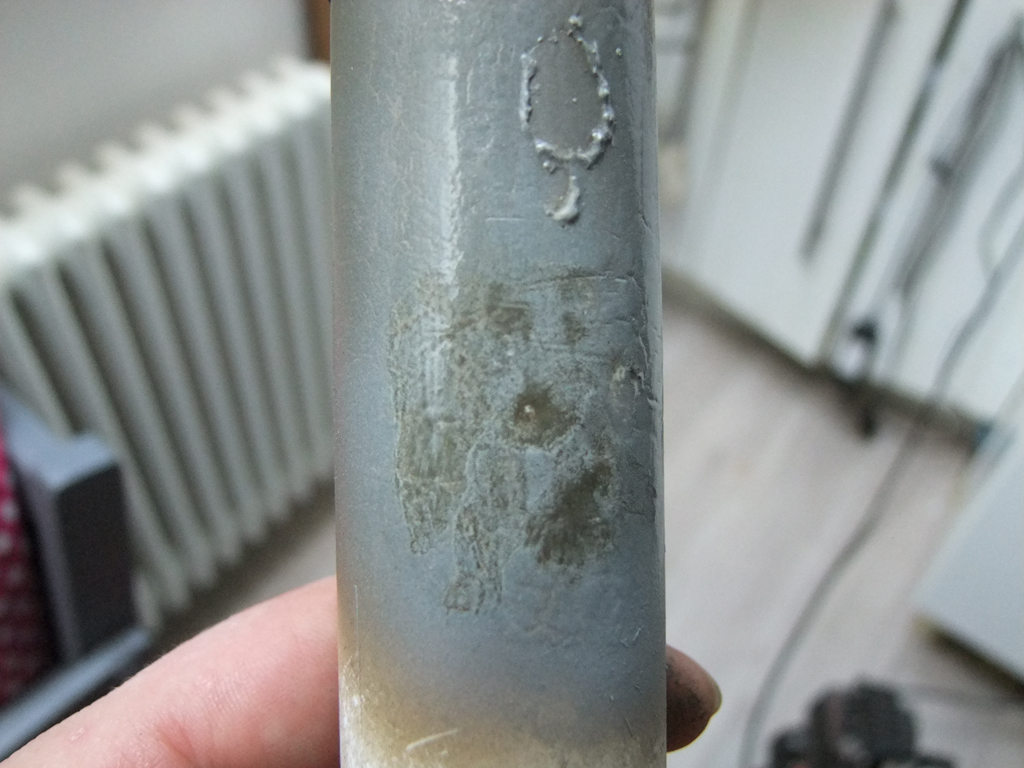
Since there was a fair bit of discussion regarding weathering and so on, I thought I'd post up a few images of simple techniques that can be achieved using an airbrush and an offcut of some pipe. On the off-chance that they can't be weathered to our satisfaction, I thought it would be worth experimenting for an hour this afternoon. The wagon itself has multiple layers of colouring, cement, road dirt, you name it. What Ivory is left visible, has turned a pale sand colour, and there is a general mix of road dirt and cement wash on the bottom half, caked, speckled, and peeled cement layers of varying tones on the upper level, all split by a nice tide mark in the middle. First technique is the rock salt method of masking. The surface is coated with water with a drop of washing up liquid to break the surface tension. Onto that is sprinkled rock salt, but I've used herb salt. The salt and water combine in 2 or 3 minutes, and stick to the surface. After a light coating of grey paint, which is hit with the hairdryer for speed, the salt is brushed off leaveing a speckled mottled effect. The larger rocksalt particles work great to get big patches of exposed rust versus paint. Wire Wool Technique A light coat of olive drab is sprayed onto the test pipe. As soon as the shine of drying paint has left, I've just lightly wiped in a downward fashion with 0000 wire wool. This method can be very effective at blending different layers of streaky muck together. Water Masking Technique This was an accidental find, but if you see the tidal mark on the cement bubble, there's almost a sharp change in colouring between the road dirt and pale sand colour, and the edges feather nicely. I've just brushed a little water onto the area I want to mask, and waited until it started to dry off. I've sprayed on a light coating of dirt, and the water leaves a nice soft edge between the two layers. I've just wiped the water mask off, and it's left some nice streak effects. This method is about exposing various levels of paint. Apply base coat - Apply top coat and using Nail varnish remover on a gummed up brush I gently agitated the surface to the get the lower effect. The upper one was a mess. This technique can create some weird results - apply a thin coat of PVA to the surface, and immediately paint with a coat of whatever. As soon as coverage is complete, give it a blast with a hairdryer. The two materials dry at different rates and provide the effect below. Heavier paint produces heavier cracking, a lighter spray gives more yet thinner. I peeled away a bit of the glue to see if it would replicate the peeling cement layer, but it's not great. I've gave it another light coat of glue, and some grey over the top, and again just put a light coat of nail varnish remover on it. All the layers started to interact, and it produced this nice mottled effect. Anyway, I fooled about with a MIR bubble here, even used cement dust on the top, but there are many more tests to be conducted to see if I can get the peeling layer effect right. Hope this is of help. Richie. (No idea why vBulletin is double posting all my images)
-
Duly noted! You might fix the finial too whlie your at it!. Layout looks superb, as always. R.
-
werkspoor droopy looking yokes. I don't know of any cosmetic bogie sideframes that are commercially available (EMc?) or what the most suitable wheelbase chasis donor is. 8'2 and change wheelbase. http://irishrailwaymodeller.com/content.php/262-Werkspoor-Dutch-GSV-Van-Drawings - but be careful of these drawings. I scratchbuilt a model using these dimensions, and it looked like an ogre.
-

IRM Cement Bubble Poll - Mercig Factory Weathering or Pristine Finish?
Glenderg replied to Warbonnet's topic in Irish Models
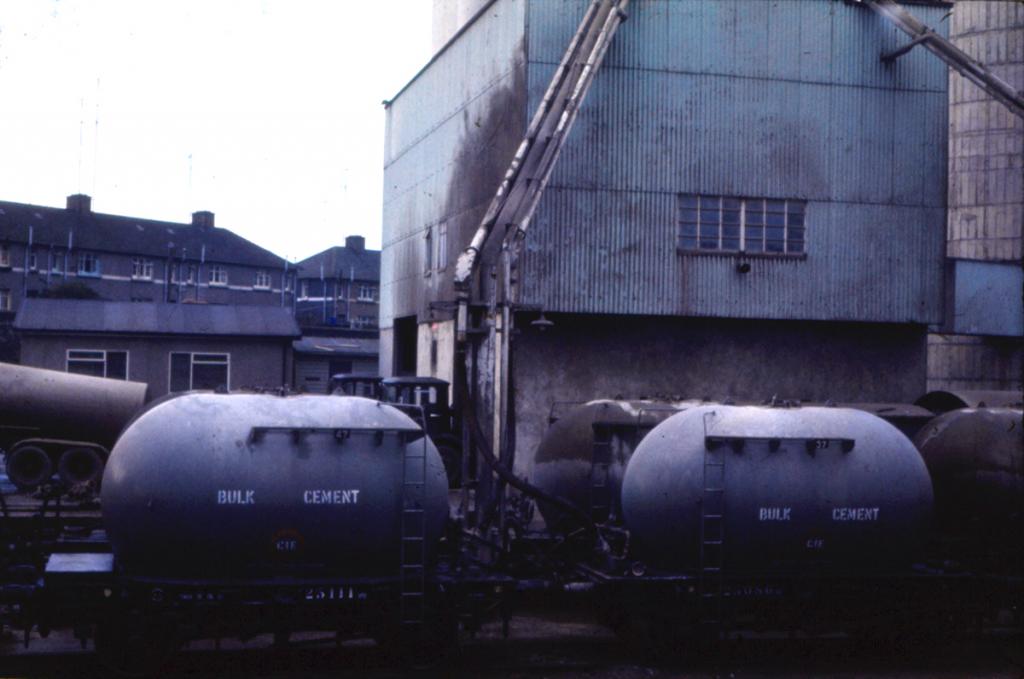
Very lightly weathering seems to be how they looked in grey. Also note the placement of BULK CEMENT stencil varies in height. Also the numbers on the walkway don't match with the last three letters of their running numbers, as it did in later wagons. -

IRM Cement Bubble Poll - Mercig Factory Weathering or Pristine Finish?
Glenderg replied to Warbonnet's topic in Irish Models
Noted Noel. Ad Infinitum. You don't like weathering on your toy trains, but this is a modelling forum, and in the world of naval, aviation, or armour modelling, weathered work puts the representation of the miniature into the realm of the realistic, even works of art I'd wager. You've had 9 posts on this thread so far, and IRM is trying to gauge sentiment of the community. The thread is in danger of becoming your personal crusade about weathering issues. -

IRM Cement Bubble Poll - Mercig Factory Weathering or Pristine Finish?
Glenderg replied to Warbonnet's topic in Irish Models
Noel, One of the skills of any dedicated weathering specialist, is not, in fact to exactly replicate the weathering, but to also scale it down accordingly. Were you to weather a wagon to that extent, you'd also be obliged to weather track, ballast, buildings and everything in sight accordingly, but that's not particularly visually pleasing. Secondly, the hatches of these wagons were caked in layers of cement dust, up to 12mm thick in places, and no amount of effort by our Asian friends is going to replicate that. A flour sifter, cement dust, and some interesting techniques will get you there. Lastly, that's not gentle weathering up top. That's how they all looked, and limerick junction looks like the Serengeti. -

FOR SALE silver fox kits and Irish Cement silo
Glenderg replied to richrua's topic in For Sale or Wanted
Are the photos very small ? -
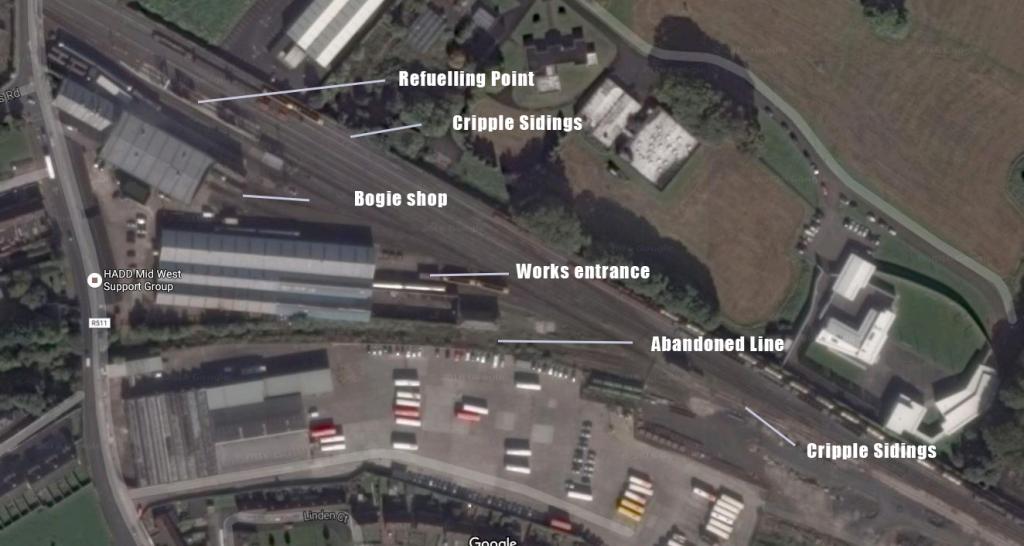
This is a hurried, and probably wrong layout thing, (snapper is gonna ate me) but it's an idea of things, not prescriptive at all.
-
Welcome aboard Speccy, a gutsy start! I have a few comments - primarily based on the fact that I hate any rail design on a computer. It's like fine dining coming out of a microwave, but don't let my old skool approach of encouraging the pencil and paper interfere with your enthusiasm! Many a bugger on here hasn't even put a two pieces of track together the layout doesn't look particularly "Irish" - have a rattle through Inchicore Dublin, Carew Road Limerick, North Wall Alexandra Road, Connolly Dublin on google earth/maps to get an idea of how they stable locos and utilise buildings. CIE/Irish Rail tend to utilise the layout of their inherited environment. Unlike their compatriots in the UK, they tended not to spend money on wholesale redevelopment and creation of TMD's, so you could get away with a crumbling red brick admin building beside a brand spanking new refuelling line. (Limerick again, I'm thinking) If I were you, I'd print out what you have and sketch in the buildings - these are an absolute necessity. they could be 180 year old random rubble stone things beside recent ones. Get that right, with the help of google maps, and it'll tell you exactly where the rails should go. Keep pushing on, it's got the bones of a really grimy, brilliant layout, the smell of drizzle and fuel oil in the background! Richie.
-
Alas, this "fear" exists everywhere. How many have felt comfortable to weather the pristine MM Cravens, to show them in the finish they ran always in, let alone get the surgeons saw to something... Technically, it would be possible to create slides for each coach side, but you have so many roof variants, that only underframe and corridor ends would be similar. Until you get into GSR stock.... Even for a resin manufacturer, or brass kit manufacturer, the enormity of the challenge wouldn't be repaid in orders, and only passionate folk like your goodself are willing to lay the shilling on the line to provide a "as close as" solution with donor sides. I have to say, they do look superb, but somehow a touch too clean! Are these sides still available? Rich.
-
Wow, that is a really impressive piece of work. The rust on the roof panels is sublime....hnnnng....
-
What's being said here is that your so-called "scale speeds" are too slow. Real speeds are almost 2.5 times faster in real life than your model speeds, so you're seeking perfection for a thing that does not happen.
-
Ha! that's pretty effective! One thing I'd say is to get a rubbish brush and load it up with your weathering material and really jam it in around the roof vents. Roof dirt generally was uniform until the tumbledown where the wash brushes gave it an irregular finish. Good work though, +1 for a bit of hard effort R.
-
And that kids, is why you stay in school. or out of the pubs, cos that stuff rots yer brain....
-

Belmond Hibernian - Luxury Touring Train
Glenderg replied to Broithe's topic in What's happening on the network?
Once upon a time my boss, lord rest him, paid for my trip to Cork first class. We had a great time, he had some wine, I had some guinness, and it was superb. If I had the money to spare, I would happily spend it. I certainly wouldn't begrudge anyone the spend. Irish rail get such a tough time, but when you pay for it, they make it worthwhile. -
This is possibly one of the finest engineering /design crossover threads on this forum. The attention to detail is astonishing. The bodging of rivets to make them look right, even better. But, I think it says something pretty disappointing when this thread has arrived amongst the Belmond fervour, and only a few respond. This should be inspiration to any modeller on this forum.
-

Full Set of IE MK3's including Genny Van
Glenderg replied to tonto.irl's topic in For Sale or Wanted
If it's 7 coaches, which I suspect it is, and a mirolo job, this is a bloody bargain.- 29 replies
-
- mk3 coaches
- irish rail
-
(and 2 more)
Tagged with:
-
Ultimately, it boils down to detail. To make a mould for anything, be it injection moulding or resin, the master is key. Look at mayners mgwr whitemetal axle boxes and you can tell he's put effort it. It shows in the end product, but that was most likely hand made with some etched brass. 3D printing has an enormous way to go, but when it gets there, you'll be able to have cottage industries producing master tools at a fraction of the price a spark eroding company would. Whether you manufacturer in China or Charleville, getting the moulds right is king. If the accuracy and detail are there,and the resin product and the fellow behind it are squared away, you can get RTR levels of detail, without compromise. Brittania Pacific Models in th UK are case in point. Best resin casting I've ever seen....
.png.c363cdf5c3fb7955cd92a55eb6dbbae0.png)
