-
Posts
3,490 -
Joined
-
Last visited
-
Days Won
11
Content Type
Profiles
Forums
Events
Gallery
Blogs
Store
Community Map
Everything posted by Glenderg
-
First time I've seen that insulating foam used to most convincing effect, outstanding Sca. (p.s. which corkmans face you going to carve into that Mount Rushmore patch in the first photo? Keano? JBM? )
-
Superb! A mad looking yoke altogether. That scale length shot is inspring.
-
Superb shots indeed!
-
I think he's allergic to fixed prices Tom!
-
So much stock...so little footage Great stuff!
-
Yeah, a little bit of thinners/water (dependant on enamel/acrylic) is a must. I thin all my stuff to the point where it's good enough to handpaint and still airbrush. The only way I can explain it is that if you dip a brush into a tinlet and it holds a drop for one second or less, you're on the right track. Too long for the drop to fall and the paint is too thick, too many drops, and it's too thin and runny. Consistency of the yoke of a soft boiled egg maybe? Tony, I've had two compressors without the tank, and I've never noticed this pulsing that's talked of. It has an auto cut-out when it's pressurised too. I'm wondering if that's a myth/hangover from when compressors may have been more industrial or have I just been lucky enought to have had compliant & quiet "putta-putta"s? R
-
Just glad I can help Shem
-
It's really straightforward lads, no smoke and mirrors to worry about. The compressor is just a pump which feeds pressurized air out through the hose. On it's way is usually a moisture trap - this takes the moisture out of the air going to the gun, otherwise you get splatters of water droplets running up to the gun, firing out onto the model unannounced and ruining any finish. Then there is a regulator which is supposed to adjust the pressure up and down. I have one on my compressor but it's like the banking regulator. Doesn't really do anything useful as far as I can see. The gun itself is straightforward enough. There is either single action or dual action. Single means it fires pressure and paint when engaged. Dual action allows you vary air/paint by rocking the trigger so you avoid drowning a model. This is a must IMHO. Then there is the way the paint goes into the gun - by cup at the top which feeds into the air flow or via suction by a jar. Unless you're doing large volume spraying, a cup is sufficient. Lastly, there is nozzle size. 0.3mm is enough to get started (.2,0.5, and 0.8 are also available) but you can buy nozzles and needles afterward and swap them about with the same airbrush - think caligraphy nibs on fountain pens. This is very very similar to the kit I bought a few years ago when I killed my last compressor, and can't recommend these guys highly enough. http://www.ebay.ie/itm/AIRBRUSH-KIT-AIRBRUSH-COMPRESSOR-AIR-BRUSH-COMPRESSOR-/290631202312?pt=UK_Crafts_DrawingSupplies_EH&hash=item43aaf83608 R
-
The airbrush itself doesn't look up to much, but good for getting used to cleaning, technique, do's and dont's. After that a cheapy dual action can be got on fleabay and you're away in a hack. The genny is good value too, though I don't see a moisture trap. Worth a punt if you're interested I reckon. The also have large swivel bench vices on this week along with digital calipers, which might be of interest also. http://www.lidl.ie/cps/rde/SID-555AE564-A5FF93B6/www_lidl_ie/hs.xsl/Offers.htm?id=244 R.
-
Most impressive john. Had a go at scratchbuilding one some time ago, but the layers of strapping and detail are immense (total failure incidentally), and you've done a superb job on capturing the detail. And god bless the late des coackham, he loved his aul horseboxes! Richie.
-
On foot of that bit of guesswork, I'm doin the lotto this evening!
-
Sure did see it Shem, and looking forward to the dirty results. Current per way fetish is the Cable train shem.... but if I can get any more photos on the electrification, why not?! Well done Dave, it looks smashing so far. is that the consist on the left?
-
Niggles? Jaysus pat, it's a million miles from what it used to be, thanks to your efforts. The improvement on the drawings is welcome though..... Some fine articles, and not a railcar/plashtic in sight.
-
Blacked out windows and not a decal in sight? Bargain, bid away...
-
How did you get all that from that grainy shot?!? Anyhoo, anything to do with dart electrification is really thin - perhaps the early eighties and trainspotting were the worst bedfellows. Trying to get some info on the overhead line maintenance (flat roof on a bredin) vehicle that was in vogue at the time is equally baffling. Just based on logic, and this is just a crackpot theory here, use of 42 flats is unlikely. I know a few park royal chassis were used as flat wagons and the lowmacs were still in use, so it's quite possible it was a motley assembly. I reckon josefstadt here might have the skinny...R
-
Lead time on the RTR is dependent on whether I have a donor vehicle or not! Being sensible, I would say two weeks from order to post office, to allow for the donors to be sent from the UK etc. Hope that helps.
-
the blood and custard scheme spattered about the network mostly on the MGWR for a bit, seen in carrick on shannon and longford in Ernie Bracks collection on flickr. Brunswick green and cream seem to have been a general pattern onthe GNRI both north and south for manys a year post war, supplemented with a baby poo green in the sixties. Photos of laytown in its heyday show this lighter palette. Places like limerick junction havent ever gone through any major overhaul of colours historically. Main plaster finish buildings were cream/white wash lime as budget dictated, and various shades of grey and green were swapped over and back over the years on timberwork. Decorative quoins on corners were either picked it out in limestone/gunsmoke blue/grey or gloss black, but this was usually short lived. I'll try and get photos up tomorrow that show some of the historical oddities!
-
I did build the tanks from scratch using british standard pvc 1" pipe, not too stressful if you have a large enough pipecutter. The other thing you need is the 20' Container - not sure if there's a suitable off the shelf donor out there. Basics needed are three 42' flat wagons a glass of wine and a browse through this lot If you can sort 3 42' flats, I can help with the tanks and the container. R.
-
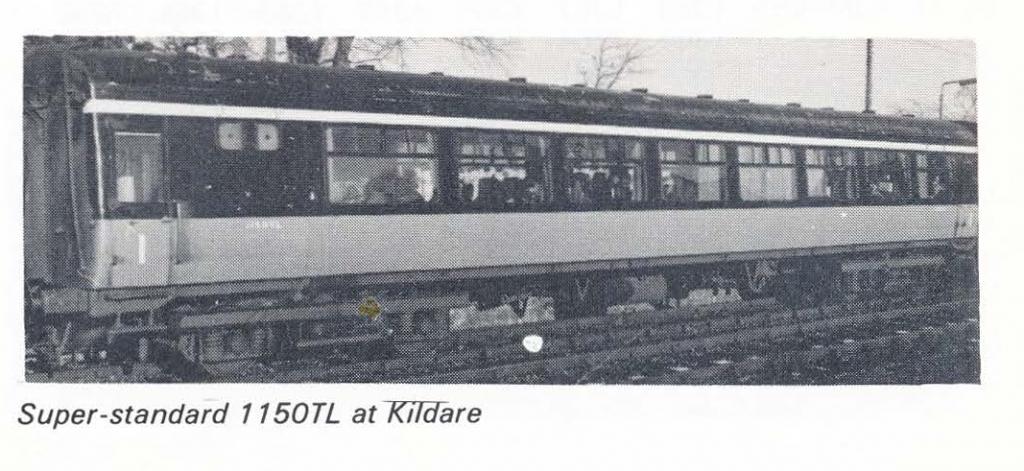
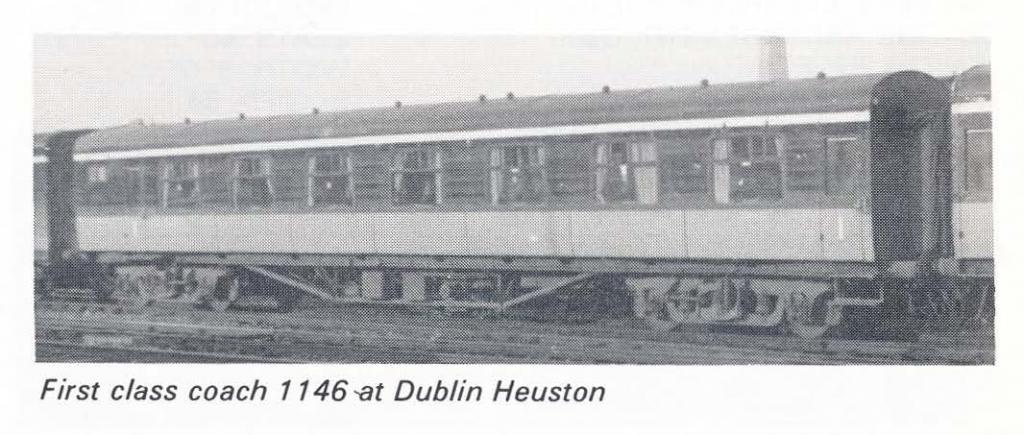
I don't think the 1145/46 pair were Cravens per se - I believe they were bredin mk2/laminate stock merely tarted up with curtains, window stickers and better more generous seating - known as First Class. The other pairing 1149/1150 were Craven stock though. I believe this is the tail end of either 1145 or 1146 here. Richie
-
I say it on FB Nelson, but it warrants repeating here - they broke the mould when they made you. Top top stuff lad.
-
Possibly the funniest thing I've read on here in a long time Alan. The everlasting trials of a modeller! I saw a news thing about solder fumes in 1984 and hold my breath every time I solder - hence why I despise brass, but please don't despair, even if you are a Mac user. Richie.
-
Goddamned that's impressive.
-
This has been an epic campaign to get a suitable donor and get her built, so I'll be showing is up here - including all the experiments and failures! Mad per way nut myself, but you two may as well get dressed up for the occasion Weedkillin time....
-
I was bursting to respond with a comment about how well the stone work looked and then you say you're not happy with it! If you're unhappy with the finish - I can't see why personally - seal the walls with matt varnish etc., get some gouache watercolour - a mid grey, mix it with water and wash the whole building with it. When it dries, use a big chisel brush and draw off the excess. It'll cool down any bursts of colour and make the joints pop. Or charcoal dust on a knackered brush? All reversible .....
-
Dave182 - yeah, I have the etches made up and the donor butchered. The etches are for 628a in it's final state, just prior to the cutting torch, so every additional panel and rust covering is taken in to account, solebar pipework and all. It should be ready for consumption at the weekend to keep the Per Way Kommandant happy. At this stage Dave I'm not fully convinced that it's kit"able" in the same way as it's older brother - it involves a "cooked" roof and other madness - but it can be done. She's the right fat and the right long, but the roof needs "bredinized". I will keep you informed Spence - cheers indeed, and welcome aboard! Richie
.png.c363cdf5c3fb7955cd92a55eb6dbbae0.png)


