
BosKonay
-
Posts
8,838 -
Joined
-
Days Won
2
Content Type
Profiles
Forums
Resource Library
Events
Gallery
Blogs
Store
Community Map
Everything posted by BosKonay
-
For perspective, our first ballast run was 2,499 wagons. This run is nearly 5 times that. So while the Irish market remains small relatively it is certainly thriving and growing. (And these runs are not ‘small’ in real terms. This run runs to healthy 6 figures in cost)
-
Our A Class loco project continues to progress (as you can see here in our latest update) but one area we have been working hard on behind the scenes is the sound project with our friends at ESU. We can now give you a first preview of our new ESU Loksound 5 A Class sound chip featuring the distinctive and unique sounds of these iconic Irish locomotives. Featuring real sounds recorded from the ITG's preserved A39r by professional sound engineers played through two high quality speakers, the roar of the rebuilt A Class can soon be enjoyed on your layout! The sound is still being tweaked but this preview below will give you a taste of things to come! Please note that this video was recorded on a mobile phone, and in person the sound is much more crisp and bassy. As you can see below, there is a comprehensive list of functions on this chip, giving modellers a whole host of operational possibilities. Of course, the A Class used two engines during its career, with this sound chip featuring he rebuilt EMD 645 rootes blown engine the locomotives were rebuilt with at Inchicore. This is suitable for the following locomotives in our A Class release programme: 007 017 018 A23R 027 036 A39R 048 054 056 The earlier Crossley engine is a rare beast, with very few lasting in service and no sound recordings good enough to use. However, there is a similar Metropolitan Vickers locomotive preserved in Australia which features the Crossley power unit. It is our intention to have ESU record this locomotive, but efforts so far has been hampered by wild bush fires and of course the COVID pandemic. Once the pandemic restrictions ease we will get this locomotive recorded and offer the Crossley sound chip at a later date. We will also be offering standard DCC non-sound chips soon, so keep an eye out for that! In the meantime, you can pre-order your GM-EMD sound chip which will arrive in stock with the locomotives in May 2021. Each A Class model will come pre-fitted with a twin speaker set up, as well as an ESU power pack, so all you need to do is plug in the chip and you can enjoy that glorious A Class soundtrack. Pre-order your chips here for €124.94 and your A Class locomotives for €189.95 here. View the full article
-
As Fran said they are the same tools bar the Newly tooled gypsum loads As such the couplers are cranked just as before.
-
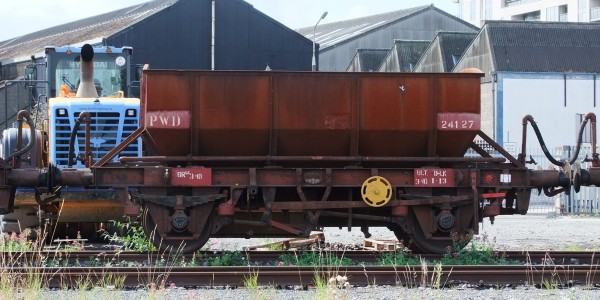
The highlight of our calendar is the October Bank Holiday weekend, when we "play at home" as they say and exhibit at the Dublin model railway shows, held each year on rotation by the Model Railway Society of Ireland and the South Dublin Model Railway Club. That's where it all began for us five years ago, when the good folk of the SDMRC gave us some space at the very last minute (we will be forever grateful for it!) to meet the modelling public for the first time and announced our intentions to produce an Irish outline model railway wagon; the humble CIE hopper. A lot has happened in those five years, as IRM goes from strength to strength and the Irish model railway scene enjoys support and growth like never before. Of course, we didn't see that we would be in this position today back then, and certainly nobody could've predicted the strange times we are now in that causes us all to miss out on the Dublin show, but there's always positives ahead! We have decided to revisit that first model we announced back in 2015 amid much fanfare among those who knew us, but one that was missed out by many others who have only learned of our existence in recent times. Yes, our lovely little hopper is back, in a host of new guises and including the gypsum wagon variant for the very first time! Beginning with the ballasts, a mere 833 packs were produced in our first run as we tentatively entered the market for the first time. Since that run, we have gained many new friends and people "in the know" when it comes to research material, including a man who wishes to remain anonymous. Let's just dub him "The Archivist". The Archivist had some amazing research material which allowed us to bring back the ballasts back with a bang, offering a number of packs spanning three distinct eras with some unique and tasty markings covering their lifespan on the network! Starting with CIE featuring their iconic roundels, before progressing into the IR post 1987 era sporting the points logo and text, and then entering their final years in IE guise with a smorgasbord of interesting markings and painted out patches. Of course, these hopper wagons were used for other services too. Hoppers numbered 26666-26694 were built by CIÉ in 1972 to cater for mineral traffic from Irish Gypsum’s railhead at Kingscourt in County Cavan, which served Irish Cement factories at Drogheda in county Louth, Castlemungret in County Limerick and Platin in County Meath. Initially, these wagons could often be found in mixed rakes along with ‘Bulleid’ corrugated open wagons. On such occasions the hoppers would always be located closest to the locomotive as they featured continuous vacuum braking, while the open wagons were loose-coupled and required a brake van to be included at the rear of the train. By the 1980s gypsum traffic was carried exclusively by the hopper wagons and this remained the case until the flow ceased in 2001. This long lived and widely travelled working featured A Classes, 141/181s as well as 121s during its life, even with the odd 201 featuring in later years in the Limerick area! We have tooled some all new loads to give the distinctive variety of shape and size of the gypsum as per the real thing! The best part (apart from variety, multi eras covered, gypsum variants with newly tooled load etc) is the price, with each pack costing just €99.95 each! This is a €10 reduction on our first run and is our way of saying thank you for your support since we started, as well as a little helping hand during these uncertain times. Ballast packs will be available in CIE, IR and IE bundle packs, with three packs per bundle along with their respective plough vans for just €370 (11 wagons per bundle including ploughs.) The gypsums are available in four packs of three wagons at €99.95 each or €375 for all 12 wagons. You can order the ballasts by clicking here and the gypsums by clicking here. Due to COVID restrictions on factory slots the production runs have been limited in size so order early to avoid disappointment. Delivery is due in late November 2020! View the full article
-
Thanks Robert, It certainly helps but Irish models and related items under the noses of nearly 1500 registered members and many more again guest users! I think that particular A has a Hornby 55 chassis underneath.
-
Good morning all! Fed up with eBay charges and fees, want something more targeted than done deal? Your very own Irish railway modeller community now has a new addition - Classified Ads! Free to list, no charges or commissions, you can provide full details of the items you have for sale, exchange, wanted or free to a good home. You can find this new area under 'Classifieds' on the top menu. https://irishrailwaymodeller.com/classifieds/
-
https://www.keymodelworld.com/article/hornby-magazine-model-railway-awards-voting-2020
-
As the factories in China return to normal post COVID19 shutdown, we are able to bring you the latest updates on our previously announced projects. Today it's on our A Class locomotives. As you know, the A Class is our very first locomotive. It's one that has been close to our hearts since childhood and when we first started IRM it was the holy grail. We really wanted to do this locomotive justice. Of course, we started small with our wagon range, which delightfully found favour with modellers and allowed us to build up to this mammoth project (both in cost and complexity.) It also gave us some experience in producing models so we could take on a locomotive. We tore into this project with enthusiasm and worked tirelessly to bring a RTR A Class of the highest quality to market for you all to enjoy. However, mistakes were made. Sloppy mistakes. A couple of these issues were from the China side, such as missing out on the radiator elements behind the side grill, and the prism effect on the glazing, but most were from us. We moulded the roof mounted radio antennas instead of making them a separate part. These were only added in the 80s so made the earlier SuperTrain and the rebuilt Black and Tan locos incorrect. These are now a separate part which will be factory installed where appropriate. We missed off a pipe on the bufferbeam for the speedo cable, the footsteps for the original Crossley locomotives were wrong, a receptacle for the front vac pipe was missing and the modified cut out fuel gauge which was added to some locomotives when rebuilt was not tooled, so a slide to account for this was created. However, instead of ignoring these issues and continuing to market, we sent the A back to the tooling shop and tooled these amendments at considerable expense. It has to be right at the end of the day. Sadly, that was not the only problem. The other issue was the decoration of the models, which to say the least, was poor on the samples we received. Incorrect chevrons on the SuperTrain and IR models, wrong fonts, incorrectly placed numbers, oversized logos, incorrect CIE broken wheel logos, some wrong colours among other issues meant a serious rethink when the models were scrutinised in depth. As a result, we have scrapped 80% of the printing masks (not cheap!) All in all a 50 page document of changes and corrections has been sent to China to amend these locomotives to ensure they are the very best they can be. We have also learned a harsh and expensive lesson and have taken some very strong measures to ensure such mistakes do not occur again. What does this mean for the A? Well, our plan had be to land them in time for the three day show at the end of October this year. However, with COVID rearing its ugly head, we have been subjected to delays in China for tooling amendments and production. The knock on has hit both re-tooling and production slots badly. The tooling and new decoration samples will arrive with us at the end of November, and then once they're up to standard production will begin in December. This will be completed post Chinese New Year with a delivery of May 2021 envisaged. We can only apologise for this delay, but as you can see from above it is for valid reasons and we do not want to put a substandard locomotive on the market. We want it right, and we have put in measures now to ensure it is right and will be top quality. This will also give modellers budgeting breathing space between the 121s due from Murphy Models later this year which we know was a concern for many modellers. It's not all bad news; we have completed the GM sound file with ESU and will be demonstrating it with a video early next week, so keep an eye out for that. We are still working hard to secure a Crossley engine for sound recording, but events this year have made it somewhat tricky. We will continue to work towards making it happen. If you wish to pre-order your A Class, you can do so here. View the full article
-
Ultimately growth and success in the UK space will power growth in the Irish market and allow us to grow both in a strong and sustainable manner.
-
It's probably worth mentioning that Mr. Hubbard was the Bachmann 'end' of the Murphy Models 141/181 partnership
-
Do try to keep the thread on the 121 gentlemen
-
We have an extra bonus release on project 42; empty liner flats! These are perfect for those of you who wish to bolster or build your liner trains and already had some CRail 40ft containers in stock, or fancy adding some of their colourful container range to your fleet and need wagons for them, or add your IRM beer keg cages! Our factory was able to offer us additional capacity during the assembly of the weed spray wagons so we were able to avail of a limited run of empty flats in packs of three. However, this run is quite small and limited in size with one pack on offer for €115. These wagons feature new running numbers separate to our previous 42ft flat runs too! Perfect for 40ft containers with additional more modern touches in decoration. Perfect for your 121s, 071s, 141s and 201s! These beauties are now in stock and available to order here. This brings to an end our extensive 42ft project. We have something a bit different for our next newly tooled model, which we hope to reveal late 2020! View the full article
-
It's a customs requirement. As I said, we're looking at options.
-
More and more carriers are needing it over certain values as a customs thing (also Brexit) We're looking into the options...
-
This forum, and IRM as a business would not be here were it not for Paddy Murphy.
-
We've just updated to version 4.5 of the forum software
-

Feast or Famine - Passenger Stock for A's and 121's
BosKonay replied to DJ Dangerous's topic in Irish Models
Perhaps it’s something a crowdfunding type model may work for but we’ve our hands exceedingly full for the next year or two -
A complete update and delivery slot confirmation is coming for the A class project. As is complete details of the sound project. once the A’s are in stock the website will show the stock levels like all other products.
-
IRM Hits the Road: We Commission Rail Link Buses!
BosKonay replied to Warbonnet's topic in Bus models
'Tacsai' ? -
Apprently the odds are somewhat good https://irishrailwaymodels.com/blogs/announcements/irm-hits-the-road-we-commission-rail-link-buses
-
IRM Hits the Road: We Commission Rail Link Buses!
BosKonay replied to Warbonnet's topic in Bus models
Maybe hit refresh? They are on sale now -
Well then, how many of you saw that coming? We have commissioned Britbus of Hong Kong to produce a batch of Dublin Bus Volvo Olympian bus in the distinctive Rail Link colour scheme using existing Britbus diecast tooling! Four Volvo Olympians were delivered new in this new branding for Rail link from Walter Alexander bus builders in Northern Ireland to Dublin bus in mid-1999, registration numbers 99-D-517, 99-D-518, 99-D-519 and 99-D-520, with a fleet number of RV 517, RV 518, RV 519, and RV 520 respectively. All four buses were based at Conyngham Road Garage for Route 90 operation between Heuston Station and Connolly Station via Tara Street station. They also found use on the 91 bus route between Heuston Station and Aston Quay. They also infrequently operated other routes such as the 78A, 51B/C, 76 and others on rare occasions! By May 2000, Guinness sponsored the all over adverts on the four buses and the rail link livery disappeared. By June 2003, the four buses were repainted into normal Dublin Bus fleet livery. The attractive nature of the livery meant it lived long in the memory. We have been looking at doing road vehicles for a while and felt that this already tooled model in 1:76.2 model would be of interest to both our existing railway modeller customer base with its railway connections and bus collectors alike. If these models prove to be successful we will be looking at opening up to do other road vehicle as accessories, including newly tooled models from scratch! Two different bus numbers, one as RV517 (99-D-517) with the route 90 – Connolly Station, and the other as RV520 (99-D-520) with route number 91 Heuston Station. Please note the pair photographed here are pre-production samples and the production models will feature slight corrections. Both are highly limited in number, with just 252 of each being produced. They also come in special IRM branded sleeves mimicking the livery! These 00 gauge buses make the perfect vehicle for your Irish outline layout and collection. Prices are €59.99 each and they can be ordered now for dispatch following their arrival from China in two weeks time by clicking this link! IRM would like to sincerely thank BritBus, Adrian Lemon, Derek Farrelly and Darren Hall for their invaluable assistance in this project. View the full article
-
We have a planned roadmap that sees us through most of 2021 at the moment and are planning 2022-2023 right now. While we agree GSVs are a target there are more numerous options that make better sense in the short term particularly on the UK side (which effectively pays for the Irish models)
-
We do offer flexible installments on preorders with Direct Debit as well as card and PayPal options. As Fran said in another thread the only ‘surprises’ were the accessory packs. Everything else is long announced. The catch 22 being that if we announce then it takes time to deliver (like A or 42) we get daily ‘are we there yet’ queries to deal with What we’ve settled on is that we will share first samples. So the long tooling window (which can be over 60 working days) and the research and development window (usually at least 6 months) are complete, leaving room for feedback and adjustments and preorders with usually a window of 50-60 days for decorated samples and depending on the item and run between 3 and 6 months assembly time. This allows a window of opportunity for preorders between 6 and 9 months between launch and delivery.
-
Probably cheaper to buy the Spoils