PaulC
-
Posts
169 -
Joined
-
Last visited
-
Days Won
1
Content Type
Profiles
Forums
Events
Gallery
Blogs
Everything posted by PaulC
-
I'm not entirely sure what you mean. My only advice would be to visualise a train running on your track. Can it get from point A to point B. For example, can a train arrive at platform 3, say, and depart back on to the correct line. Does a train get stuck if it arrives at a certain location. Installing a passing loop may be required. And so on. Just drive your train and if you come across any difficulties address the issue. Best discovering this now than when track is down or you may hamper your operational potential of the layout. From anything I've learnt, the railway company's did everything they could to save money so very expensive installation of points would have been kept to what was needed and no more. Paul
-
Hi Patrick, I'm using Peco point motors and have wired up a couple to change simultaneously. Like you, I'm using a CDU to aid driving power to the motors - the Gaugemaster one. All droppers and points have 16/0.2mm wire used with no problems. For a power source for the point motors I am using an old 16v transformer from a Scalextric set or similar and again serves its purpose well. The only thing I can't help you with is the female connectors as I've gone with the soldering approach. As an alternative to those connectors could you solder short wires to the motors to dangle away from your foam baseboard and then meet that with another wire and solder together at that point. Using the heat shrink wraps would then protect those joins. Paul
-
Stunning work from your weatherer (?). At some point I'd like to get a few of my locos done. I know TMC do it and prices aren't shocking, who, if you don't mind me asking, is your man? Paul
-
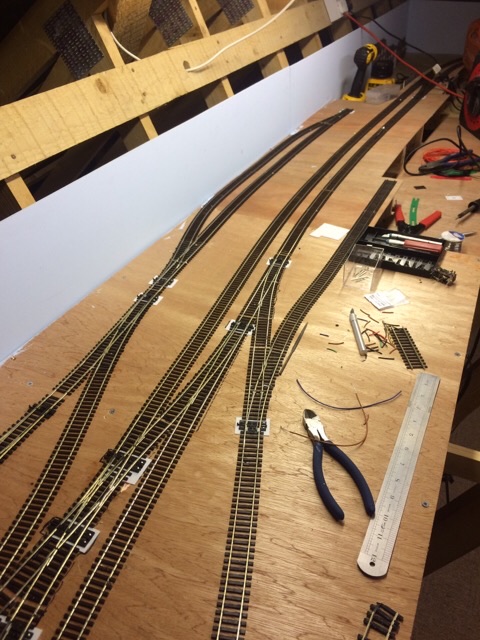
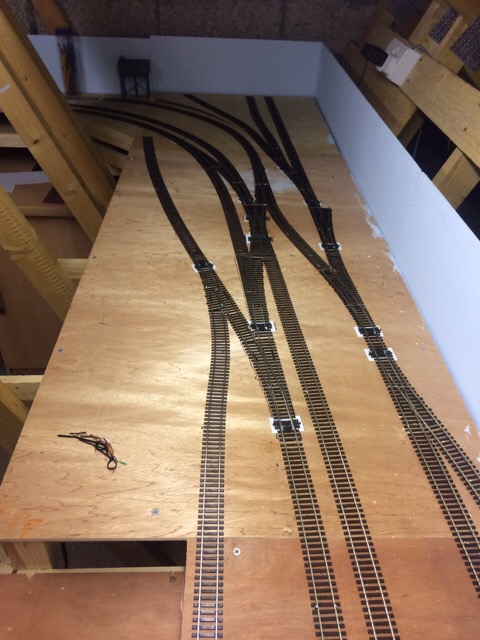
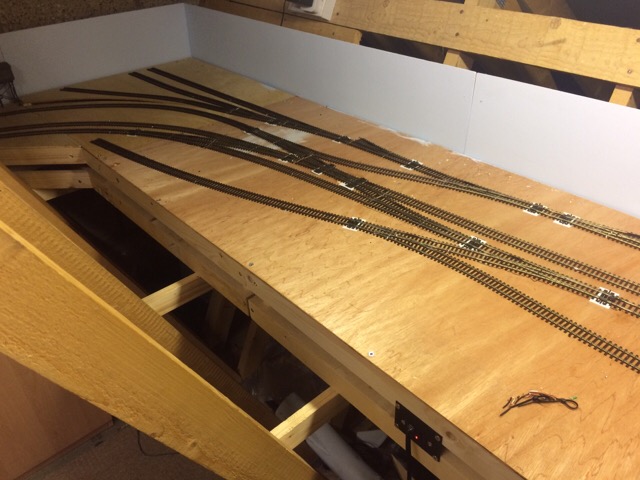
Scratch builds have taken a sideline as I finally got hands on the track I'd ordered from my local stockist some 3 months previously. I want to get these final stages of track down to allow me to move forward with the scenics. Track laying isn't something I particularly enjoy but a necessary evil. I have added a passing loop to the terminus siding to allow for simpler movements. There were no signs of this on my survey maps from the mid 60's but I understand that a siding did exist to facilitate a factory next door to the station. It would seem likely to me that a loop would be needed to allow locos to pull coaches back out of the station on its return journey and perhaps used this siding line for that purpose. I need to add one piece of track at the end of the far point to complete this work. The engine shed in Ballymena was a four road affair with additional track to the left of it including a raised coaling stage. I want to represent this as best as possible within the given space available. To that end, I have space to install a 3 road shed and two roads to serve the coaling stage. I'm short one left hand point that I intend to pick up this weekend. the two roads to the left in a 'V' formation will be for the coaling stage. I envisage the right hand of these roads will be for coal wagons to deposit coal to the stage with the left for locos to collect. The one completed road to the right of the stage roads is the first for the shed with the other two feeding off the right hand point. The short goods sidings to the left of the picture have also been installed and Ive also started work on the branch line with it veering off to the left and down the hill. Much more work to do here yet though. Paul

-
Its certainly not essential and really comes down to what the modeller is after. If watching trains running is your bag then a roundy roundy can have more potential. If organising freight in goods yards etc is more your thing then an end to end can be the perfect setup. Some dislike an end to end because they can't get trains up to full speed. Equally a roundy roundy can prove to be a no go as it tends not to appear prototypical. The corners on any layout tend to be the problematic areas for achieving any sense of realism as we have to bend that track so much from the prototype. It can also make things difficult to install points unless these are hand made. Just to throw another idea in to the pot. Have you considered the option of using, say, two or three sides as scenics and the third/fourth as a fiddle yard much like you would get with exhibition layouts. You might be able to get the scenics more to your liking with smoother curves leaving tighter non protypical corners for the non scenic areas. Sorry if this adds to the thoughts rwttling through your head! Paul
-
Thanks for the info. I must look at adding it to supplies. Paul
-
Noel, they look fabulous. What's this Mr Surfacer 500 you are talking about! Paul
-
Trackshack seem to pride themselves on providing top customer service, fast delivery and low costs. Those big box shifters on the mainland should take note. Returning to your post from yesterday and looking at your two lines exiting st the bottom of the plan. Am I right in reading that the left one of these is your line to the fiddle yard and the one on the right is your line to complete the circuit of the shed? If so, my only concern would be that locos entering from the fiddle yard cannot access the loop line without first entering the goods yard and then reversing out. The crossover points connecting these two lines should be positioned in the other direction allowing trains to access the layout and to exit back to the fiddle yard. Paul
-
Stunning work once again. I must look at this watercolour paper for rendering walls as you have done. It looks very effective and a much more straight forward approach than pasting with filler or such like. Paul
-
A very nice rake of wagons. Since coming back to the hobby I have spent that time absorbing all things British regarding stock on the railways. It is very refreshing to follow progress of many of the modellers on here with the Irish stock and none more than wagons such as these. Paul
-

Bridehurst - SR Region 3rd Rail - Now no more.
PaulC replied to Georgeconna's topic in British Outline Modelling
I do like a layout with long sweeping curves and little or no straight lines, very prototypical. Not so keen on straining to see a layout through the funk of junk! Paul -
I think some use foam underlay as an alternative to ballasting. Others use it as a method of dampening the noise of trains running over the boards whilst it can also be used to create a realistic shoulder for the ballast. Foam underlay does have a tendency to deteriorate over time resulting in many using cork underlay instead to counter this. I, personally, can't be bothered with the faff or cost of either, preferring to just lay the track direct to the baseboard. The sound deadening of cork or foam is not a foolproof solution as the construction of most boards means noise still resonates in the voids beneath and if ballasting this also acts as a conduit for the sound to reverberate. Paul
-
GNR, I don't wish to hurry you and know all to well the cost of gathering track up for a plan. The pic posted is more than enough to satisfy my curiosity of how the layout is progressing. I enjoy the read of a layout build warts and all and if a picture only shows me some woodwork and a paper drawn track plan it still serves a purpose for me to see how you are doing. Paul
-
The three way point is a versatile addition to any layout to save space, much like the single and double slips. You keep teasing us with these little verbal updates but when oh when will we see a photo or two? Paul
-
The model making is perfect, the painting and weathering equally toned to perfection and the little details just make this an exquisite build. Far superior to any resin made example in my opinion. Will you be modelling the turntable in front of the shed at some point? Paul
-
Track in stock, check. Loco for testing, check. Track plan, check. There's no stopping you now. Paul
-
Thanks Wrenneire, the more I look at this the more I'm tempted to reproduce it. The lean to is a nice added feature to it. Where is this box located? Paul
-
That's a cracking looking box Seanrail, I may just nick that for my branchline station. Did you take these photos and if so, did you capture anything from the rear? Paul.
-
A stunning building, the water in the open tank is the icing on the cake for me. Paul
-
Perhaps it's a little stereotypical, but I wouldn't expect to find that story regarding the kit car to be on anything but an Irish based forum! Pulling it back on topic, that Model T is just superb. I really hate white metal kit building with a Springside models offering still sitting on the workbench a year later. The epoxy gluing doesn't bother me so much, it's applying things such as windows that has halted me. Paul
-
That bullhead track looks really good when you see it laid and a loco sitting above it. Paul
-
Stunning work there Mr Lubricator. Looks like there are a few more conversions pending on the workbench. Paul
-
weathering powder sets Weathering Powder Sets.
PaulC replied to Rails_of_Belfast's topic in General Chat
Now that would be a site walking through the make up counter aisles. Middle aged gentlemen sat on the make up stool cradling their prized loco as a glammed up dolly applied the final touches to it. I'd pay to see that. Paul -
I'd agree with the above comments, dropping the height of the bridge would make it look more prototypical. The other alternative is build your own! This one springs to mind. Paul
-
In monetary terms, you probably aren't wrong in your assumption that a kit built version with all the bells and whistles attached will come close to, if not more than, the price of a RTR alternative. The big difference and the one that would keep me on the kit built/bashed road is that every time that wagon, coach or loco I've built trundles past I have the knowledge that I created that. I painted it, weathered it, added the extra details not included in the RTR version, I made something that isn't even available as a RTR and I took pleasure from building it. Money can't buy that. That's the hobby for me, emerging myself in the scratchbuild, kit build, scenic creation and reading round the subject I'm working on to learn more to help that build. Some people just want stock on their layout and see it run. I want those sheets of plastic on the workbench to bring something to life. Paul