2996 Victor Posted April 30, 2020 Posted April 30, 2020 (edited) The time has arrived to start a workbench thread for my projected MGWR branchline terminus layout, where I'll be building wagons, carriages and eventually locos, plus of course structures and the other little bits and bobs that go into creating a hopefully convincing model railway. The period I'm interested in is 1900-1905. This is the timeframe I usually go with, and my other projects are almost all set in this period of transition from Victorian to Edwardian eras. My standard gauge projects, Great Western Railway in Somerset and Cambrian Railways in mid-Wales, will be to EM Gauge Society standards. I'm a member of that Society, and for consistency's sake I want to stay with EMGS standards but using the correct gauge for 4mm/1ft scale of 21mm. While I applaud anyone who can create a convincing model railway, no matter the scale or gauge, personally I think its particularly important to use the right gauge as this is such a characteristic feature of Ireland's broad gauge railways. I've always found that one of the more difficult aspects of model-making is setting the standard to work to consistently. Unfortunately, I'm not a fast worker - continental drift is quicker - which means that while I strive for excellence I don't want to take forever to achieve it! Thus, I've reached the point where my specification for A N Other Goods Wagon will be: 21mm gauge, EM Gauge Society standards Etched axleguards with whitemetal, plastic or 3D-printed axlebox/spring assemblies Rigid underframe (fit inside bearing compensation unit if necessary), although I may compensate.....moving the goalposts already! Improved brakegear if a kit Sprung buffers Couplings - ? - I haven't decided yet but they must be unobtrusive So that's the preamble out of the way, and we can move on to something that's hopefully a bit more interesting! Edited April 25, 2022 by 2996 Victor 5
2996 Victor Posted April 30, 2020 Author Posted April 30, 2020 (edited) My first project on here will be the scratchbuild of MGWR open box wagons, using the drawings in Ernie Shepherd's book, the first two wagons will be completed as locomotive coal wagons which from the photograph in the book show some detail differences to the drawing. So here goes: First off is a photo showing my copy of Ernie Shepherd's book, some notes made for dimensions, together with my TV and the corner of my weathering tray! http:// The second photo was taken during preparation of the sides and ends, plank lines and door outlines scribed in on both sides! The base material is 30thou plastic sheet, this scales out at approximately 2-1/2", which was the common thickness for side and end sheets of wagons in the late-Victorian era. I use an Olfa P-Cutter to scribe the lines as this removes a sliver of plastic rather than indenting a line which usually causes a distortion. Used with care, by angling the P-Cutter its possible to create a prototypical chamfer on the top edge of each plank. The first set of sides/ends are cut out, the second set are in strip form, and three more sets are still on the sheet. http:// The third photo shows the first two sets assembled; these will be the loco coal wagons. I use simple butt corner joints as its far easier to keep the length of the sides and ends correct than if you try to file a chamfer where its easy file too much and accidentally shorten something! I use the grid on the cutting mat to keep things square, and add the floor afterward having measured the internal dimensions of each wagon individually. http:// Photos 4 and 5 show one wagon having had its floor, headstocks and solebars added. The floor is a bit of a cheat in that its cut from Evergreen 100thou (2.5mm) spacing V-groove sheet, 40thou thickness. Its cut 2mm narrower than the internal width of the wagon body, the edges being made up by a strip of 40thou square which is intended to represent a curb rail. Before adding the headstocks and solebars, the underside of the wagon body/floor assembly was sanded smooth on a flat surface so that the underside provides a flat base to mount the headstocks and solebars. These are cut from Evergreen 60thou x 156thou strip, the headstocks are wider than the wagon body, and these are cut over-wide to allow for filing down to the correct dimension using a template. http:// http:// Thats it for now as it's time for dinner - I'll post up some more photos tomorrow showing how I create the corner plates. All the best, Mark Edited April 30, 2020 by 2996 Victor 6 3
Galteemore Posted April 30, 2020 Posted April 30, 2020 Nice work, Mark. It’s very satisfying when those flat sheets start taking shape and you see the character of the wagon emerging. 1 1
Midland Man Posted April 30, 2020 Posted April 30, 2020 (edited) Wow Mark you are amazing at modeling. Will you please build a midland break van with the lettering as they are a firm favorite of mine. Wish I was as good a you but it takes time. MM Edited April 30, 2020 by Midland Man 1
2996 Victor Posted May 1, 2020 Author Posted May 1, 2020 Dear All, many, many thanks for all your kind words and encouragement, if my efforts can in some little inspiration to others to have a go, then I'll be happy indeed! MM, thank you - I'm just doing my best! I started scratchbuilding goods stock probably thirty-odd years ago and was building kits before that, although there was a long break in the middle, and really its all a matter of practice. The greatest trick I found is to take my time, take maximum care marking out and cutting out parts, and get the basic structure square and to the correct dimensions. If I'm not happy with something, I just try again - I've scrapped more models than I care to think about! At the same time, I've also found its important to set a standard to work to and to stick to it for all my builds - it's all too easy to get caught up in super-detailing to the Nth degree, but it can become a millstone when one vehicle takes three weeks to finish and you've twenty more exactly like it to build! As someone once said, strive for excellence, not perfection! I'm no expert and I'm certainly not saying my way of doing things is necessarily the best way, but if I can help with any hints, tips or advice, please, please do ask a question! I'm planning on a brake van soon, and its progress will be on here - watch this space! With kindest regards, Mark 3
2996 Victor Posted May 1, 2020 Author Posted May 1, 2020 I meant to add that the basic materials I use are styrene sheets, strip and sections of various thicknesses, mostly Evergreen although there's a fair amount of Slater's Plastikard, too. For assembly, I use solvent adhesive for styrene parts, MEK for preference as its not too strong, but if I need a bit more oomph I use PlasticWeld. Any other materials that need to be joined to my wagons are fixed usually with cyano and occasionally with epoxy. For smoothing, I have various grades on fine sandpaper, some well-worn, and for filing my preference is to use a wood-cored emery board, such as women use for their nails, as they are strong and file a straight, flat surface. To cut the parts, I either scribe with the Olfa P-cutter and snap, or use a Swann Morton scalpel and No.10 or 10A blade. A small update on the loco coal open box wagon builds with the addition of corner plates, which are made from two widths of Evergreen strip, 10thou x 80thou and 10thou x 100thou. I cut off over-length sections of four of each width per wagon making sure that one end at least is square! The narrow sections go on the ends of the wagons, with the "square" ends at the bottom flush with the top of the headstocks. They are set so the edges line up flush with the corners of the wagons but with no overlap. The wider section strips form the faces of the corner plates on the wagon side, and again the "square" ends are set flush with the tops of the solebars. Bearing in mind that these strips are 20thou wider, they are set so that their inside edges are 2mm in from the end of the wagon, giving a narrow overlap of 10thou over the edge of the end plates. I'm afraid that all sounds a bit confusing - a sketch or two would probably be clearer, but hopefully this photo should help: http:// Although the corner plate strips have been trimmed to length, you can see the light behind the overlapping edge. This photo shows one wagon has had its corner plates added and trimmed to length, while the second one is still a work in progress with the Evergreen strips to one side: http:// Wagon corner plates were pressed steel, of course, and should have a rounded fold. The way I achieve that is to gently file the overlap down til its gone, and then file a small 45 degree chamfer onto the corner which is finally rounded off to a small radius. The trick again is to not overdo - photos are the best way to get a feel for how much to file away. Hopefully this photo should show the slight radius to the finished corner plates: http:// Its easier to finish the corner plates before adding the end pillars or side strapping, as the latter just get in the way! Anyway, back to the bench! Kind regards, Mark 6
NIR 450 ‘Castle’ Class Posted May 1, 2020 Posted May 1, 2020 21mm? Love the sound of that! Spectacular box wagon bodies, they’re so well rendered. Amazing! 1
David Holman Posted May 2, 2020 Posted May 2, 2020 Sharp, clean work - looking forward to seeing things develop! 1
2996 Victor Posted May 4, 2020 Author Posted May 4, 2020 Over the weekend, I've started adding the details to the pair of 7 ton Loco Coal wagons: http:// As usual, I've made almost exclusive use of Evergreen styrene strip. The end pillars are a bit awkward, as they scale out at about 50thou square, which isn't a size that's available, of course. My solution is sand down 60thou square strip (yes, really!) until it's the right section. To try to keep it square during sanding, I keep hold of one end of a strip, and pinching it between a folded piece of sandpaper I draw the strip through the paper half a dozen times, sanding two opposite sides at once. I then rotate it through 90 degrees and repeat, and so on until I've rotated the strip 360 degrees. Then I check the size and repeat as necessary! The iron work consists of the corner plates which I've already talked about, plus washer plates and side knees (usually referred to as "strapping"). On wooden-framed wagons, the side knees are usually internal and are positioned either side of the door openings to support the wagon's side sheets, passing through the floor and turning under to be bolted to the frame members. As they have a structural job to do, the side knees are usually quite hefty iron. The remainder of the iron work is a bit lighter and consists of washer plates whose job it is to prevent the bolts holding everything together from pulling through the woodwork. Hence, there are washer plates for the end pillars and corner plates which are visible inside the wagon bodies: http:// The side knees haven't been added as I found I didn't have any 20thou styrene strip left, which is a bit annoying! The remainder of the iron work is represented by 10thou x 30thou strip for the washer plates and 10thou x 40thou for the vertical hinge plates on the doors: http:// The wagon on the left of the two has had its end pillar washer plates sanded down to about 5thou thickness; 10thou is a bit on the thick side, scaling out at 3/4" thick at 4mm/1ft scale. The layout of internal washer plates is conjectural but typical, and I'm following Derby practise and leaving them smooth - Derby used countersunk square-headed coach bolts with the countersunk head on the inside of the wagon. External bolt heads will be represented by Archer Rivet Transfers. I've also sanded the headstocks to their correct widths, using a packing piece to ensure they're all filed squarely and to the same size. Hopefully, I'll make a bit more progress this afternoon with the door iron work details, but until the material for the side knees arrives, these two will be stuck in limbo. With kind regards, Mark 4 1 2
Galteemore Posted May 4, 2020 Posted May 4, 2020 Excellent sharp work. As you also suggest, building like this actually gives you a real insight into what stuff on the real thing was actually there for! 1
2996 Victor Posted May 4, 2020 Author Posted May 4, 2020 Hi @Galteemore, many thanks for your kind words! Wagon construction is actually quite fascinating, but from a modeller's point of view its useful to have an insight into what's what on the visible parts of any given vehicle. If anyone's interested, I can do no better than refer to Chris Crofts' series of articles in Model Railway Journal Nos.12, 13, 14 and 15. With kind regards, Mark 1
Midland Man Posted May 4, 2020 Posted May 4, 2020 Wow Mark amazing stuff can not wait to see the more to come. MM 1
2996 Victor Posted May 8, 2020 Author Posted May 8, 2020 Not a great deal has been happening on my workbench since my last post, with one or two things around the house to sort out. I'm waiting on the 20thou styrene strip for the Loco Coal wagons' internal side knees, so no progress there, unfortunately. In the meantime, I thought I'd make a start on a short rake of three or four ballast wagons from the HMRS drawing. Tuesday afternoon was spent working out the dimensions of the wagons' components, while on Wednesday I tried to make a start on a couple of floors. As the floorboards are 11" wide, they need to be hand scribed, and my efforts ended up with a couple of rather too wonky planks. Yesterday I tried again with a successful outcome, but at that point progress was interrupted. Thankfully, I'm planning on running two or three of these with a full load of ballast, so they won't need any interiors: the one with the best interior will have a load of a few sleepers and other PW odds and ends. Hopefully today will see some sides and ends marked out, and perhaps even a bit of assembly..... Kind regards, Mark 3
2996 Victor Posted May 8, 2020 Author Posted May 8, 2020 Well, I've succeeded in marking out the sides and ends for four ballast wagons. But having realised I've got eight ends to file to the same rounded profile, this afternoon I've directed my efforts into fabricating a template to achieve some consistency. So that's it for today whilst the glue is hardening! Cheers for now!
2996 Victor Posted May 14, 2020 Author Posted May 14, 2020 Dear All, I realise that I haven't added any additional posts for quite a while, so here is a short update. First off, the microstrip for the Loco Coal wagons' side knees has arrived at last, although I haven't yet had time to make use of it. The ballast wagons have had their ends filed to their rounded profile, and all four have been assembled around their floors. I've made my choice as to which of the four would run mostly empty but with a few PW bits and bobs. My IRRS journal back issues have arrived, and I've been poring over Padraic O'Cuimin's article on MGWR goods stock, which has so much useful information I'm overwhelmed. There's a fantastic photograph of a Loco Coal wagon, too! However, in POC's article, although he mentions ballast wagons, there are none that tie in to the HMRS drawing with respect to dates which leaves me in a quandary: do I complete the ballast wagons I've started, or abandon them? I'll post a few photos soon! All the best, Mark 2
Midland Man Posted May 14, 2020 Posted May 14, 2020 Good to see that your making progress. After the wagons you should build one of theses.... 1
Noel Posted May 14, 2020 Posted May 14, 2020 On 5/4/2020 at 11:21 AM, 2996 Victor said: Over the weekend, I've started adding the details to the pair of 7 ton Loco Coal wagons: http:// As usual, I've made almost exclusive use of Evergreen styrene strip. The end pillars are a bit awkward, as they scale out at about 50thou square, which isn't a size that's available, of course. My solution is sand down 60thou square strip (yes, really!) until it's the right section. To try to keep it square during sanding, I keep hold of one end of a strip, and pinching it between a folded piece of sandpaper I draw the strip through the paper half a dozen times, sanding two opposite sides at once. I then rotate it through 90 degrees and repeat, and so on until I've rotated the strip 360 degrees. Then I check the size and repeat as necessary! The iron work consists of the corner plates which I've already talked about, plus washer plates and side knees (usually referred to as "strapping"). On wooden-framed wagons, the side knees are usually internal and are positioned either side of the door openings to support the wagon's side sheets, passing through the floor and turning under to be bolted to the frame members. As they have a structural job to do, the side knees are usually quite hefty iron. The remainder of the iron work is a bit lighter and consists of washer plates whose job it is to prevent the bolts holding everything together from pulling through the woodwork. Hence, there are washer plates for the end pillars and corner plates which are visible inside the wagon bodies: http:// The side knees haven't been added as I found I didn't have any 20thou styrene strip left, which is a bit annoying! The remainder of the iron work is represented by 10thou x 30thou strip for the washer plates and 10thou x 40thou for the vertical hinge plates on the doors: http:// The wagon on the left of the two has had its end pillar washer plates sanded down to about 5thou thickness; 10thou is a bit on the thick side, scaling out at 3/4" thick at 4mm/1ft scale. The layout of internal washer plates is conjectural but typical, and I'm following Derby practise and leaving them smooth - Derby used countersunk square-headed coach bolts with the countersunk head on the inside of the wagon. External bolt heads will be represented by Archer Rivet Transfers. I've also sanded the headstocks to their correct widths, using a packing piece to ensure they're all filed squarely and to the same size. Hopefully, I'll make a bit more progress this afternoon with the door iron work details, but until the material for the side knees arrives, these two will be stuck in limbo. With kind regards, Mark Very sharp and crisp 1
2996 Victor Posted May 15, 2020 Author Posted May 15, 2020 18 hours ago, Midland Man said: Good to see that your making progress. After the wagons you should build one of theses.... Hi MM, yes - that's exactly the sort of loco that I need to be building - a stalwart of the branch lines! Kind regards, Mark
2996 Victor Posted May 15, 2020 Author Posted May 15, 2020 (edited) Some photographs of the progress on the ballast wagons: Two floors scribed, along with enough side sheeting for four wagons: http:// And some ends marked out: http:// Two of the wagons had their interior planks scribed as the intention is to run one of them semi-empty, with just some things a track gang might need - I did two just to make sure one turned out alright! Here, they've been assembled, and the other two are part-assembled as well. On the latter two, I haven't bothered to scribe their interior planks and the floor is plain 40thou styrene sheet: http:// The simple jig I built to get the curvature of the ends the same: http:// And lastly a close-up of the better of the two with the full interior - at least, it will have the full interior in due course: http:// Apologies for the lack of clarity in some of my photographs - they should come out well as its a decent camera, but the light in my workroom, which great for modelling purposes, isn't great for photography! Hope to have a proper update soon! Regards, Mark Edited May 15, 2020 by 2996 Victor 5 1
2996 Victor Posted May 15, 2020 Author Posted May 15, 2020 24 minutes ago, Midland Man said: They were used on the north wall. Not really appropriate for a rural branch, then, but a handsome loco nonetheless! Kind regards, Mark
2996 Victor Posted May 15, 2020 Author Posted May 15, 2020 I also meant to add that the SSM kits of the MGWR convertible wagons have also arrived, along with some etched axleguard sets, so I've got plenty to be getting on with! Cheers for now, Mark 1
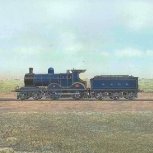
Galteemore Posted May 15, 2020 Posted May 15, 2020 (edited) It’s an E class and they got pretty much everywhere. This one, ‘Achill‘ became CIE 560 (in altered form) and was used on the Tramore line amongst others. If you have any kind of MGW layout you can justify one. May end up building one as pilot for Rosses Point.... Edited May 15, 2020 by Galteemore 1
minister_for_hardship Posted May 15, 2020 Posted May 15, 2020 (edited) 13 minutes ago, Galteemore said: It’s an E class and they got pretty much everywhere. This one, ‘Achill‘ became CIE 560 (in altered form) and was used on the Tramore line amongst others. If you have any kind of MGW layout you can justify one. May end up building one as pilot for Rosses Point.... They were used on most if not all of the short branches, Athboy, Killeshandra, Edenderry. Achill and Clifden branches as well, although think they were banned in later years, both of those would be a bit of a strain on a small tank with limited fuel and water. After amalgamation, DSE section, Tramore as you say, Courtmac, Cork City and quays, Fenit branch. Edited May 15, 2020 by minister_for_hardship 1
2996 Victor Posted May 15, 2020 Author Posted May 15, 2020 6 minutes ago, Galteemore said: It’s an E class and they got pretty much everywhere. This one, ‘Achill‘ became CIE 560 (in altered form) and was used on the Tramore line amongst others. If you have any kind of MGW layout you can justify one. May end up building one as pilot for Rosses Point.... Hi @Galteemore, Thanks for confirming that - I still have a lot to learn! Was it the 'P' Class that were the North Wall banking locos? Best regards, Mark
Midland Man Posted May 15, 2020 Posted May 15, 2020 doh its a E class losing the old memory. This is a P. 1
Galteemore Posted May 15, 2020 Posted May 15, 2020 (edited) MMs beaten me to it. They do have a resemblance, although the P has clearly enjoyed a high protein diet. Edited May 15, 2020 by Galteemore 1
2996 Victor Posted May 15, 2020 Author Posted May 15, 2020 19 hours ago, Midland Man said: Good to see that your making progress. After the wagons you should build one of theses.... 3 minutes ago, Midland Man said: doh its a E class losing the old memory. This is a P. Hi @Midland Man and @Galteemore, Thanks for clarifying - as I said, I have a lot to learn! Interesting to note that both the 'E' and the 'P' have (brass?) numerals on their sandboxes. Was this an MGWR or a GSR practise? I'll definitely need at least one 'E' Class, but there may be a 'P' as well, even though I can't really justify one..... Best regards, Mark 1
Galteemore Posted May 15, 2020 Posted May 15, 2020 MGWR style, Mark: the GSR wouldn't have tolerated such excess! 1 2
2996 Victor Posted May 15, 2020 Author Posted May 15, 2020 11 minutes ago, Galteemore said: MGWR style, Mark: the GSR wouldn't have tolerated such excess! Excellent! Style, it certainly is! Kind regards, Mark 1
minister_for_hardship Posted May 15, 2020 Posted May 15, 2020 14 minutes ago, 2996 Victor said: Excellent! Style, it certainly is! Kind regards, Mark The GSR went to great pains to remove traces of past ownership, name plates, number plates/numerals and works plates went into the melting pot. Only a very few locos, those that rarely or never got called to Inchicore for attention escaped. 1
Recommended Posts
Create an account or sign in to comment
You need to be a member in order to leave a comment
Create an account
Sign up for a new account in our community. It's easy!
Register a new accountSign in
Already have an account? Sign in here.
Sign In Now