David Holman
-
Posts
4,359 -
Joined
-
Last visited
-
Days Won
117
Content Type
Profiles
Forums
Events
Gallery
Blogs
Community Map
Everything posted by David Holman
-
Now there's a thought. Thanks both. I looked up some Castle Rackrent photos on the web and Richard had the inverted buckets, with torpedo vents each side. As you say Eoin, they are pretty ugly. Ernie Shepherd's book on the MGW suggests the first conversions to electric light began in 1895, with around 20 six wheelers still on oil by 1923, so maybe that could be the route. The trouble with coach roofs is that they are far more visible than underframes!
-
Possibly the finest set of photos ever to appear in this magazine. Check out Gordon Gravett's astonishing work in this month's edition and be inspired.
-
Can anyone enlighten me on coach roof details in the early 1900s, please? Evidence in Des Coakham's book, plus Ernie Shepherd's history of the MGW certainly shows oil lamps, a bit like top hats, with a suggestion that torpedo ventilators came in from 1890 onwards. However, early photos show what appear to be circular fittings sitting on three legs (?), next to the lamp tops and linked by seems to be a wire. Is there a handle on the lamp tops too? In the Coakham book, there is a nice picture of a WLW 30' centre van third of 1895. This has gas lamp tops on the roof. Presume it was built this way? Any thoughts welcome.
-
You could try the scribed DAS clay method. Tedious, but gets you round corners and means there are no joints between sheets. Equally, DAS will do that with Slater's or Wills anyway. Painting can be acrylics or enamels. A couple of washes to start off with, then picking out individual stones in a range of greys.
-
7mm scale 101 - a tribute to Richard Chown
David Holman replied to David Holman's topic in Workbench
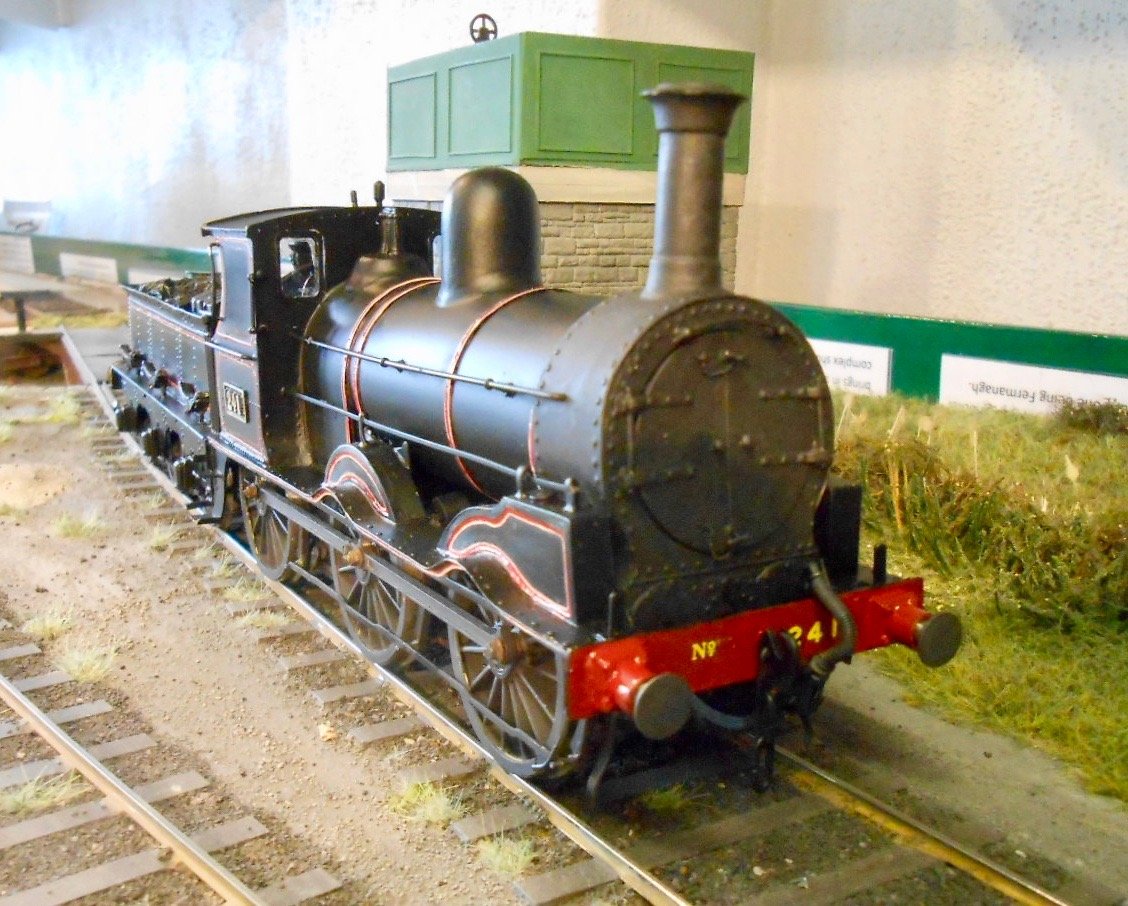
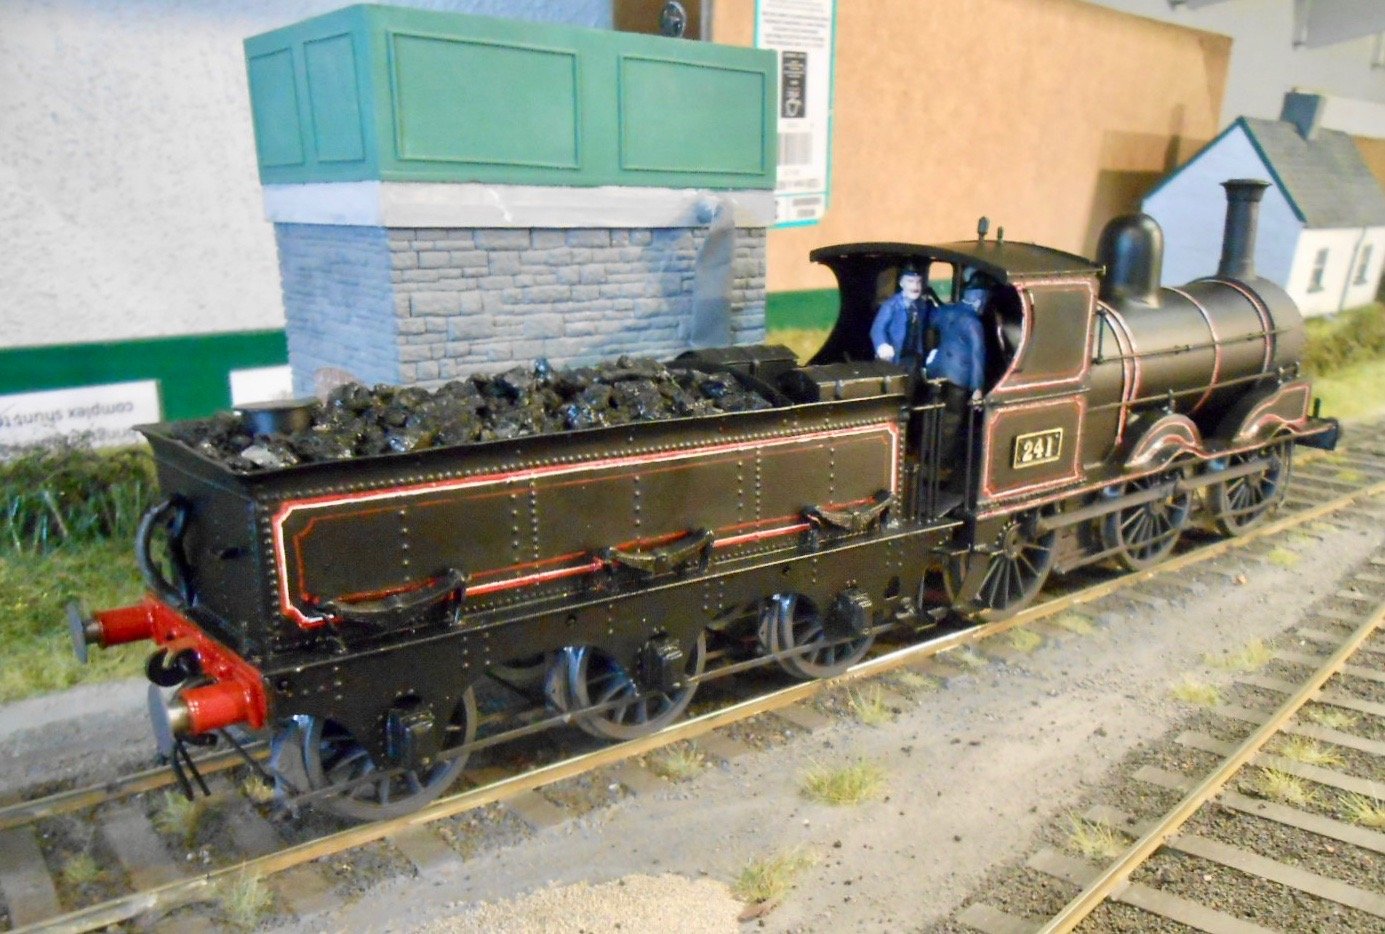
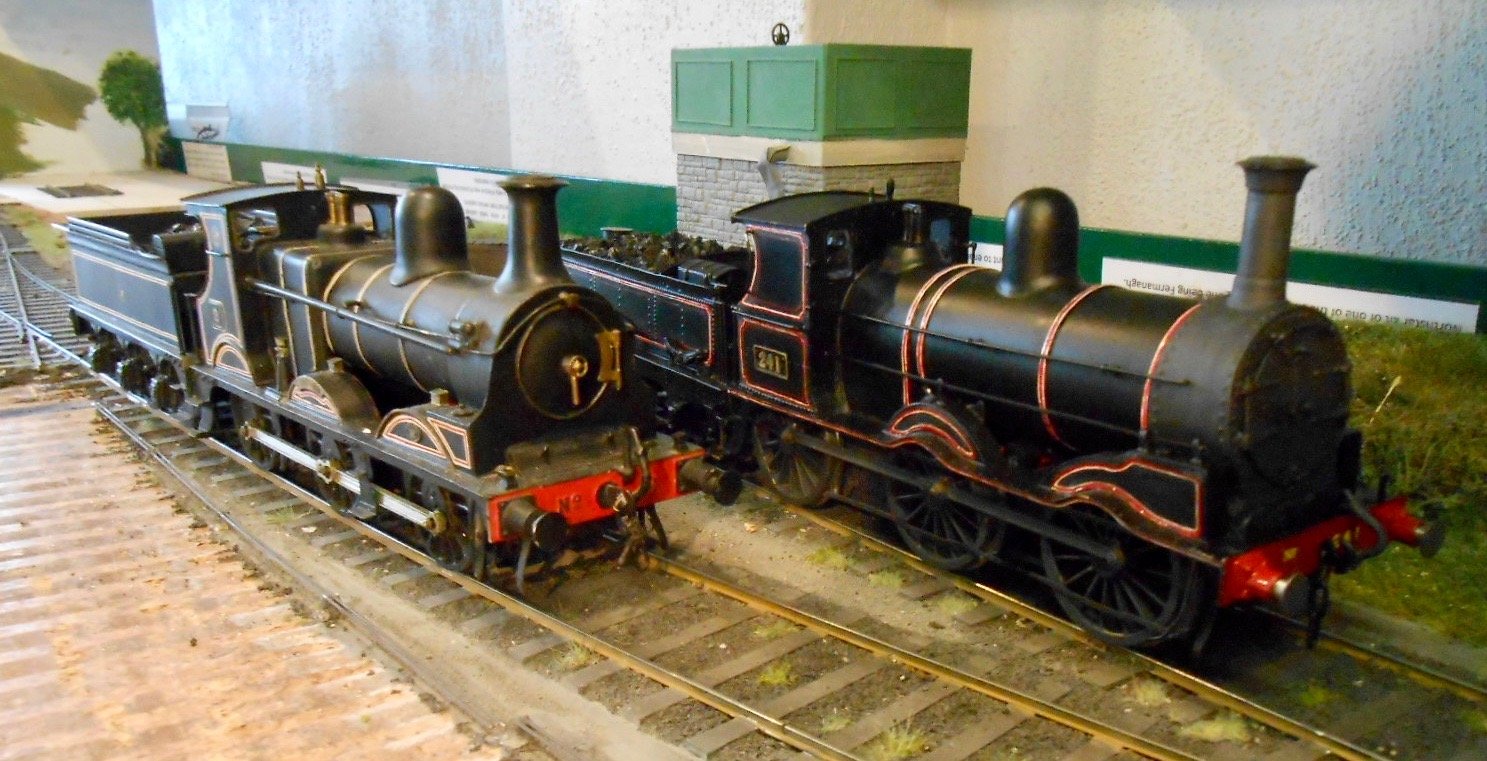
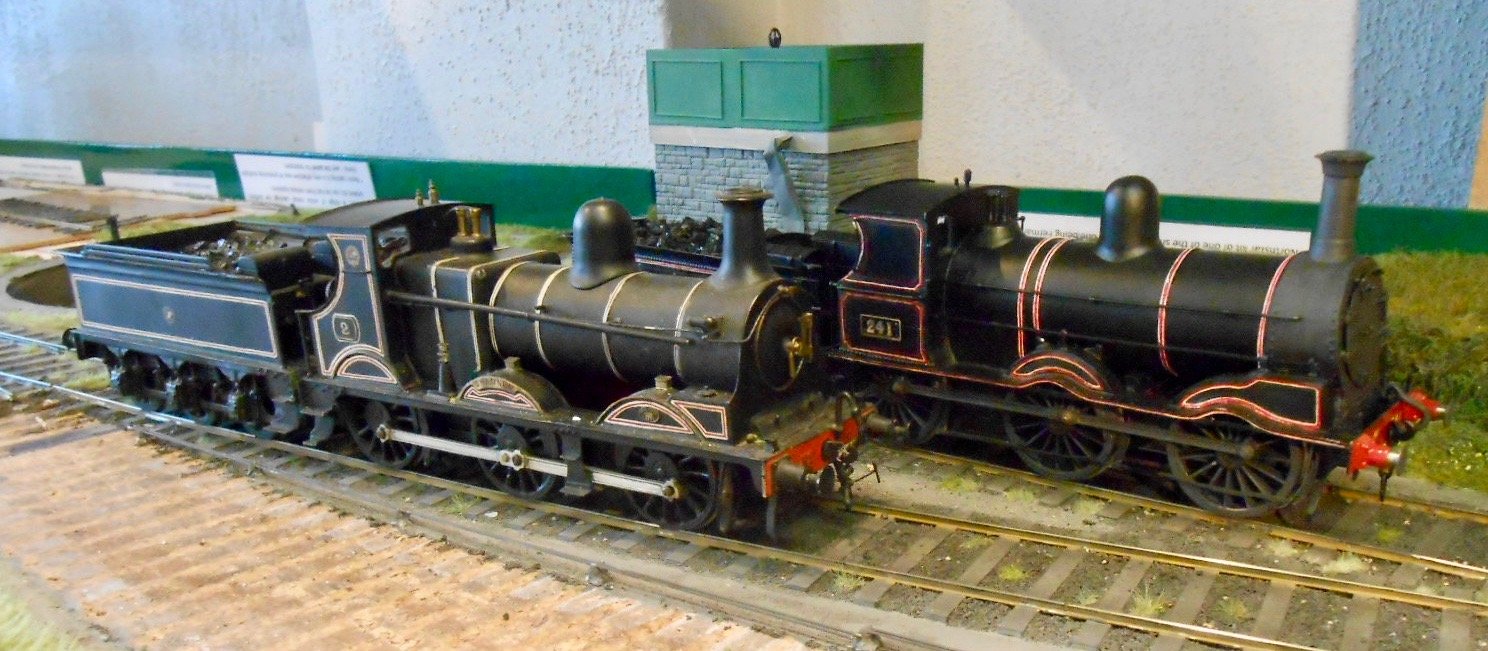
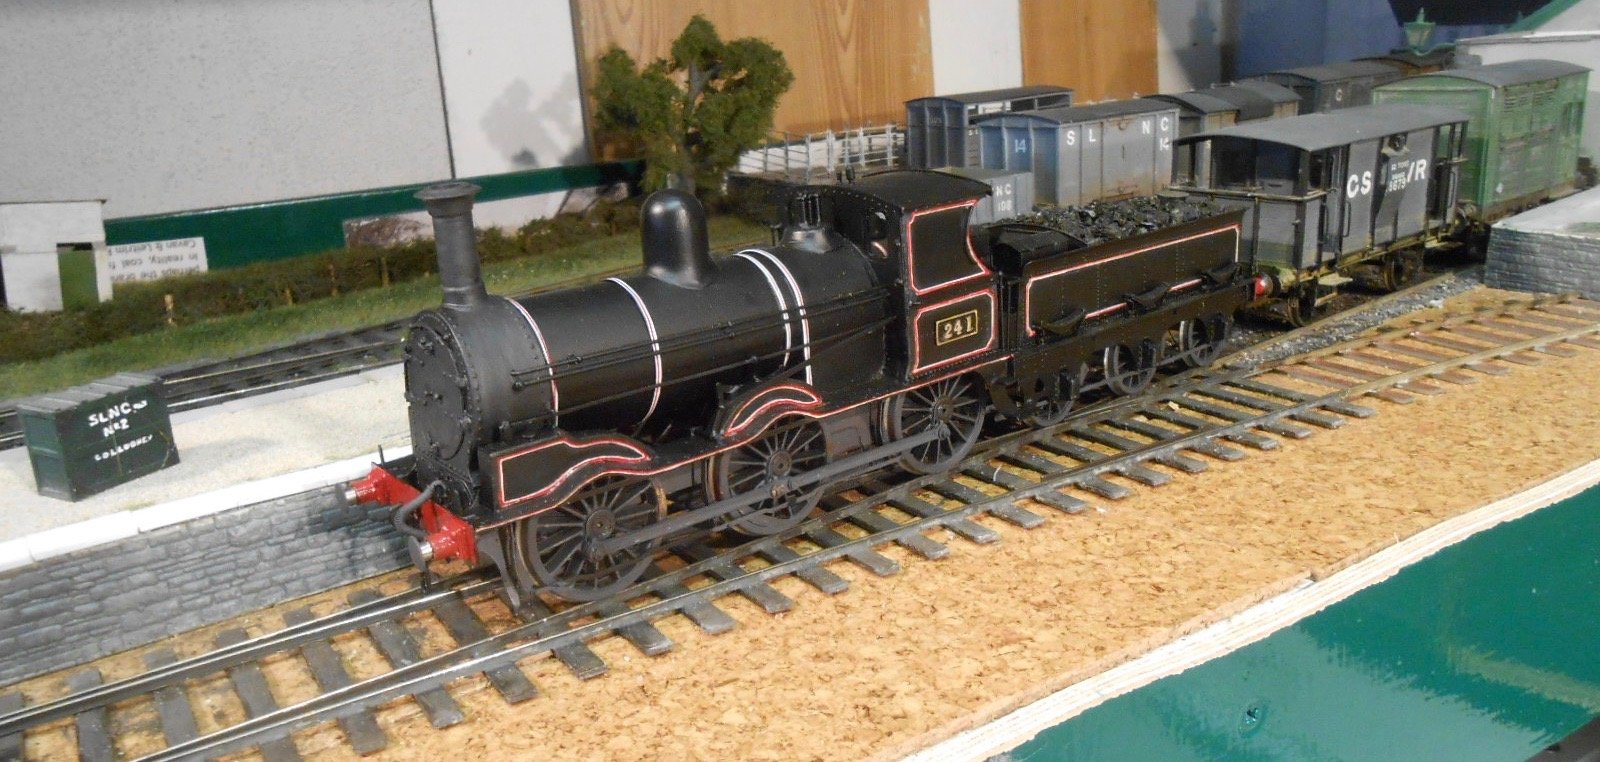
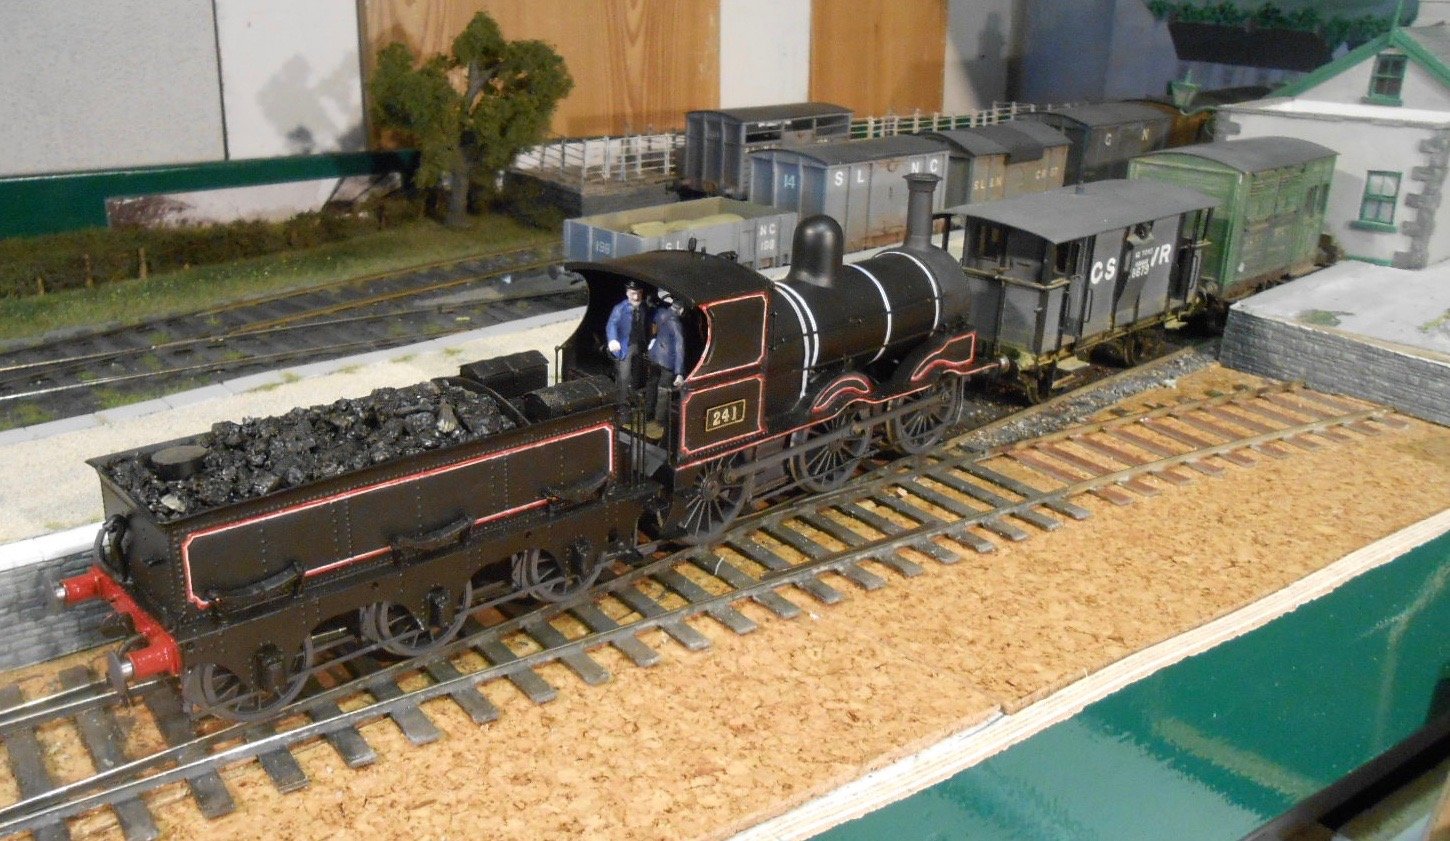
What I hope will be the penultimate update on this project. The tender now has coal and the buffer beam has its number, while the boiler bands have been improved and additional, inner, red lines put in on the tender and cab. All that remains now is to wire up the tender pick ups to the loco, then give the model a coat of satin varnish. For comparison, have included a couple of pictures with Richard's own first broad gauge loco - WLWR Shannon, scratch built in the early 1970s. Hopefully, 101 number 241 sits well alongside it. This has not been a project to outdo the maestro, but to build what was his own unstarted kit as something that sits well alongside Shannon as I attempt to move my modelling back to the early 1900s. After so many years doing everything in plain black [with errors easily covered by weathering], the learning curve has been, and remains, steep.
-
The catalogue has a price of £2 on the cover, so suggest emailing Roger to ask him re alternative payment methods. Doesn't do credit cards either, yet on the other hand, his etches are clearly CAD. Very good value and a fantastic resource across a range of media. Easily the widest range of Irish stuff that is readily available, especially for 7mm scale. The Worsley Works catalogue possibly has more, but not all at the same time and the etches are just that, no castings or instructions for that matter. Great starting points though.
-
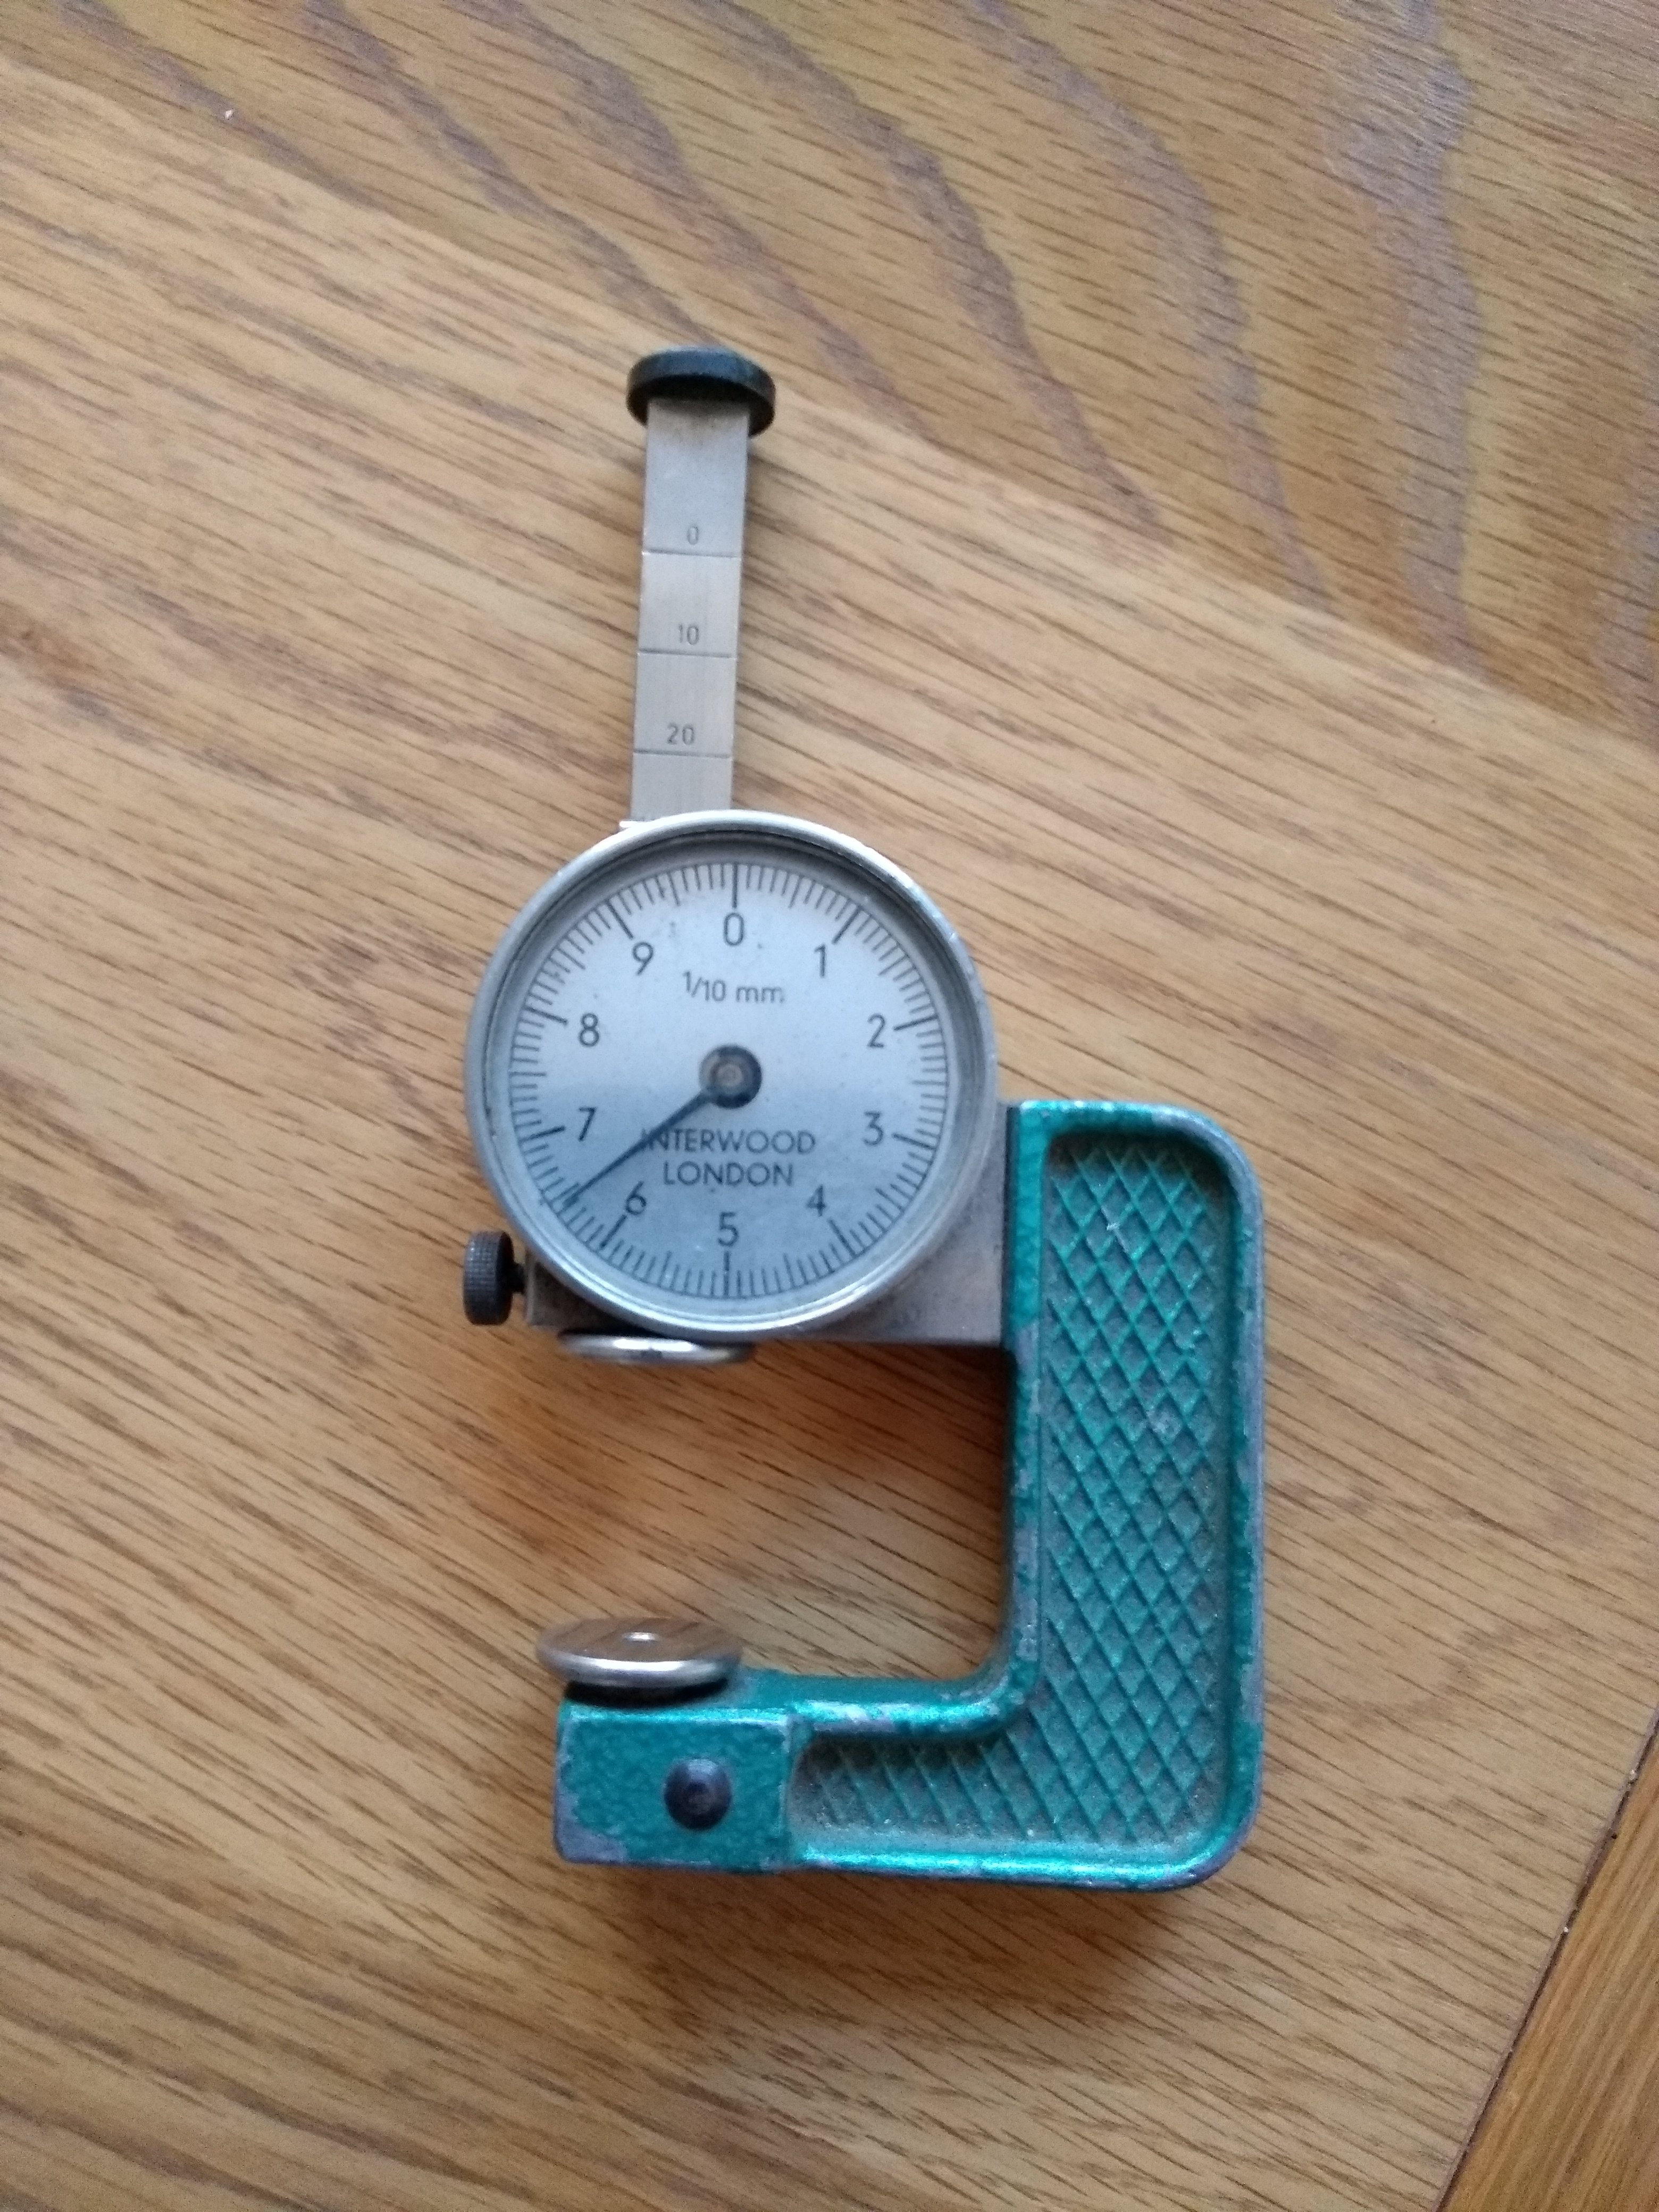
Fascinating. One of my favourites it this little device, which measures thickness down to 0.1mm. Great for checking sheet metal/plastic and wire)tube diameter.
-
Looks very good. Must admit that, though I've bought many card kits from Alphagraphix, I've never actually built one. Instead, just use them as very handy colour drawings as a start for scratchbuilding. Maybe I need to give one a go. Cutting card does take its toll on knife blades though, which is why I've long used the snap off blade variety. It is the tip which blunts so quickly and a snap off blade means you can renew it instantly.
-
Of course, a different section. Thanks Broithe.
-
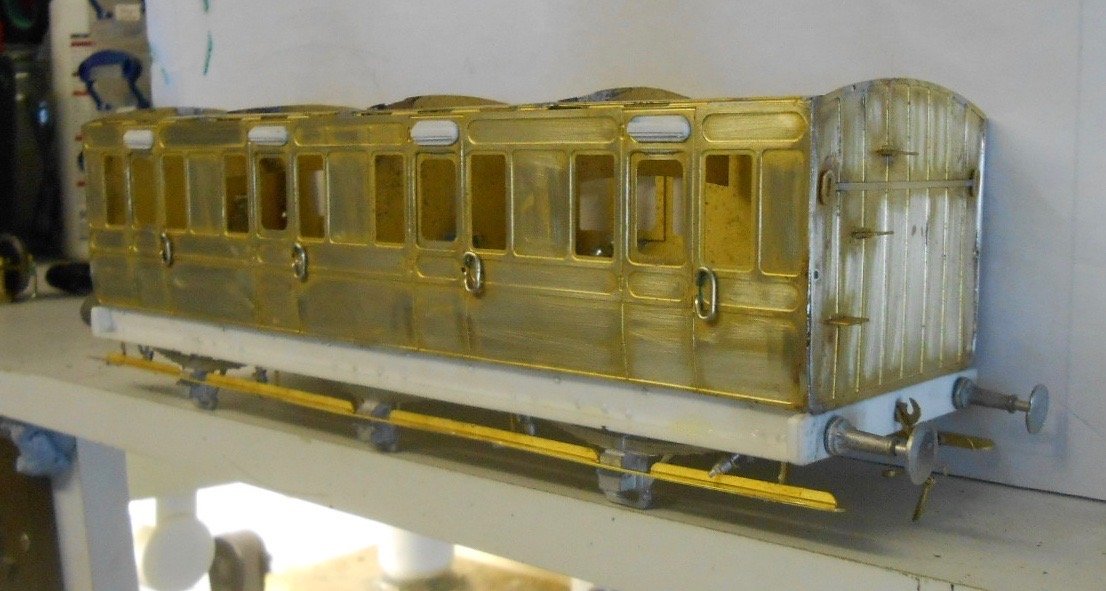
Was sure I'd posted that what Eoin has created is his own version of the R L Moore lining pen, but doesn't seem to be here. A clever idea, nevertheless. First picture is of the drawing set I found on a general stall at a local antiques fair. Don't often attend these, but have been on the look out recently, just in case, as such things are not readily available anymore in these days of computer aided design. The set, in its original box [sadly no maker's name], was on sale for £28, but in best 'Bargain Hunt' tradition [you can see how I spend my lunchtimes], I offered the lady a £20 note, which was accepted. Given my second hand bow pen cost me £12 on its own, this set looks an absolute bargain and the bow pen that is part of it looks better quality too. The other pictures are of an Alphagraphix GSWR six wheeler. It is the 'sleeper' coach, which has a clerestory roof, but I have left this out and am building it as one of the '300' series 4 compartment firsts. I picked up the model partly finished as part of bits left over from the Richard Chown estate. He had made the body shell, but when I opened the box though all the castings were present, the sole bars, buffer beams and Cleminson chassis were missing. However, there were several other bags of bits which should prove useful [castings and etches]. Having built more than a few coaches in my time, making up solerbars, floor etc wasn't a problem, so I ordered a Cleminson unit from Alphagraphix. This is a really clever design that works just as well in standard as broad gauge. There are white metal castings for buffers, springs, etc, but you have to make the ventilators yourself and also the grab handles for the doors. These are an especially fiendish item, each requiring no less than six bends; I also need to buy some more door handles. Otherwise, the model is ready for the paint shops am hoping to find a car spray paint to match the GSWR 'dark lake'. Black and white photos appear to suggest that ends were the same colour as the sides - if not, am hoping JHB can put me right!
-
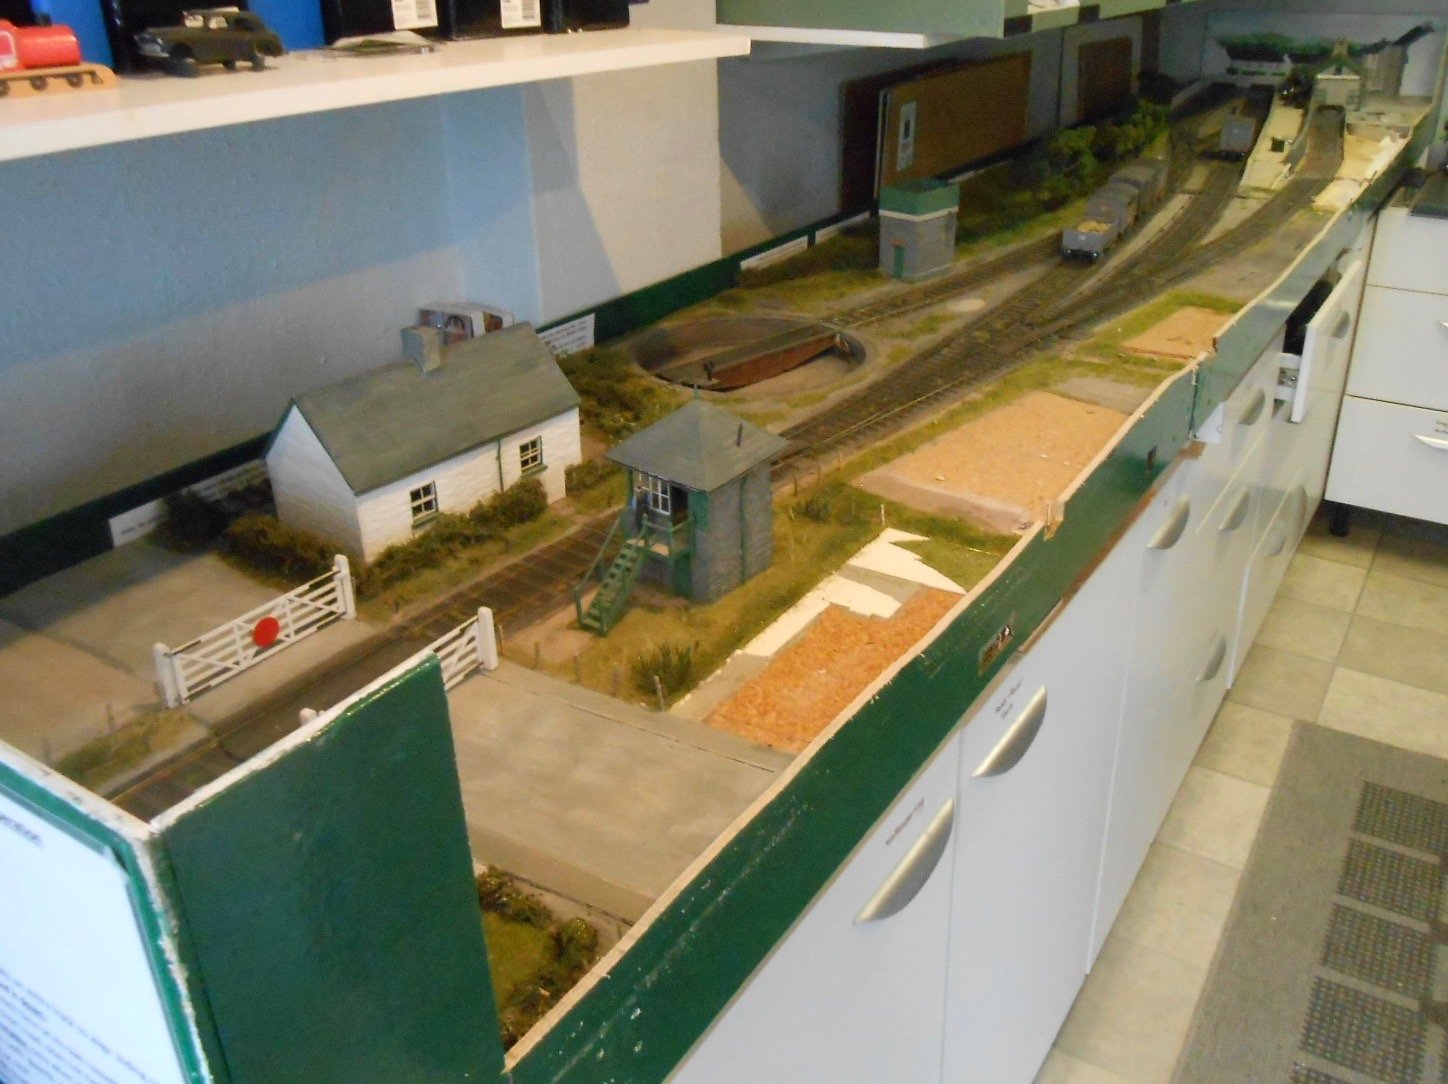
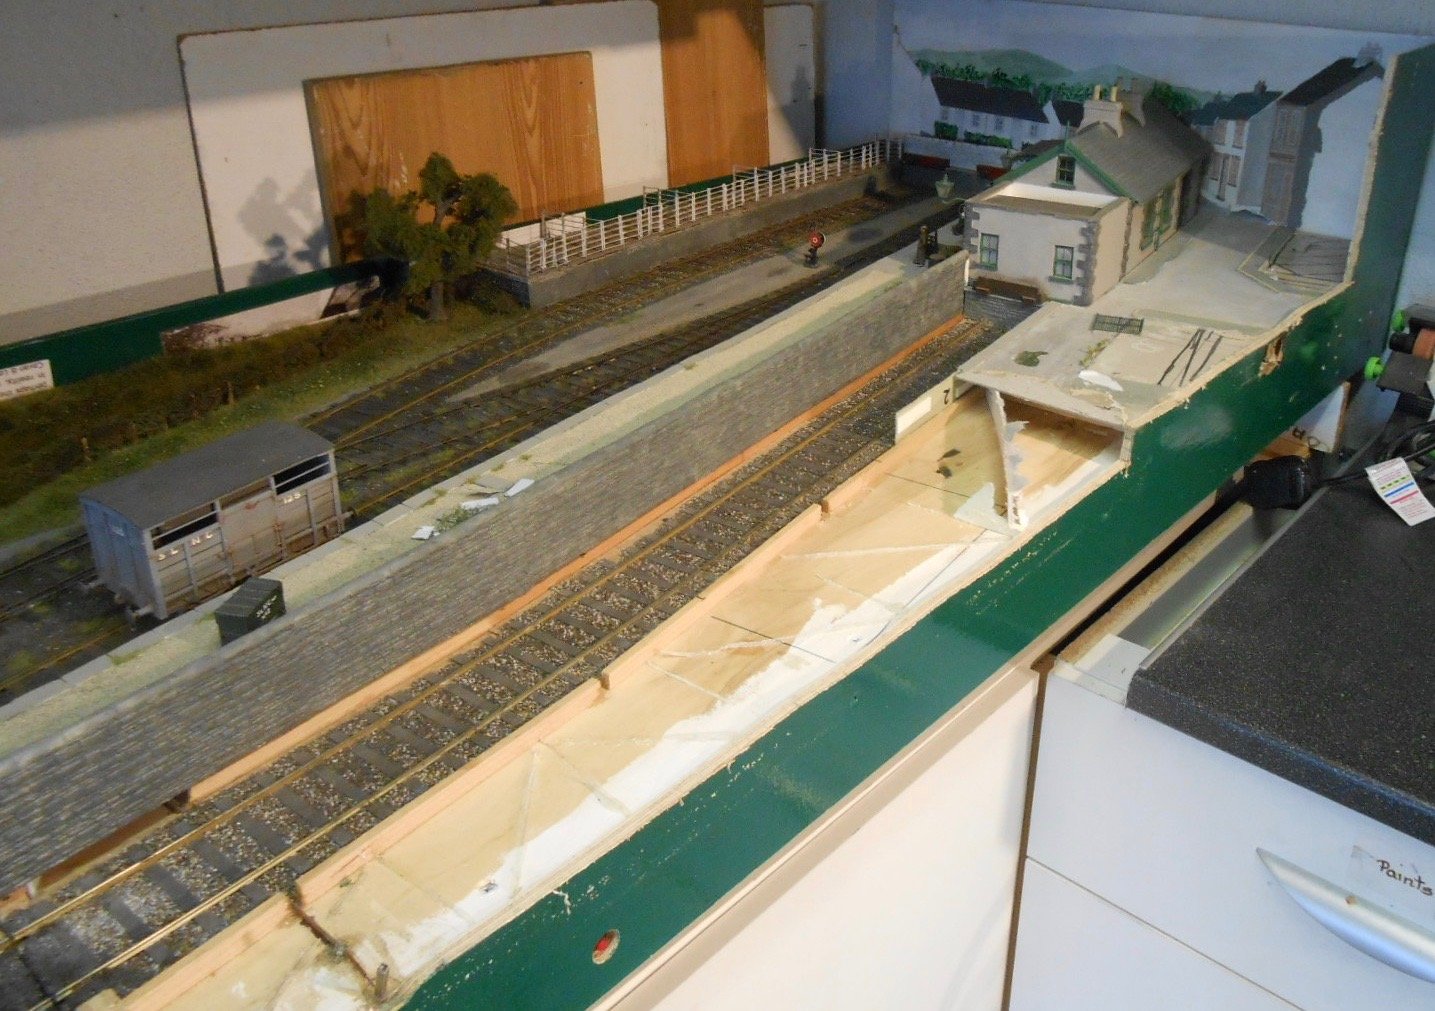
In a land full of fine pubs and bars, that is praise indeed! A bit more work has been done on the Belmullet project & have also included a picture of the new island platform with its turnout to the end loading dock. The wiggly tin barn and signalman's cottage have been temporarily put in the new settings - the aim being for one end of each building to help mask a baseboard join. The other picture is of the site of the loco shed. Managed to find a sheet of good quality 3mm plywood, which will form a sub base on to which the shed will be built, including the track & screwed to the baseboard when finished.
-
My first loco build - MGWR ‘Titania’ class 4 tank
David Holman replied to Galteemore's topic in Workbench
Definitely looks the business and much better looked after than Hazlewood, or heaven forbid, Lissadel in the 1950s. 36.75mm definitely the way to go in 7mm scale. Axles not a problem, just a bit more effort needed with track, but the results speak for themselves. -
A lily well and truly gilded.
-
Very impressive!
-
That's the idea. Just need to psyche myself up to get the bow pen and fine paint brush out again.
-
Looking good Ken. One of the many positive aspects of modelling Irish railways for me is the short stock. Compared to most British 4w wagons, Irish ones are around an inch or more shorter in 7mm scale and overall in the same space that would only fit six British wagons, you can get seven Irish ones.
-
Couldn't have done it without your help, JB. However, to my eyes, the boiler bands need toning down a bit, so the red stripe is wider and the white either side less prominent. That's how it appears in black and white pictures anyway. Want to do the inner, fine red line on cab and tender too. Buffer beam number, a bit of light weathering - this is depicting an almost new loco - then a spray of satin varnish and that should be it. Hopefully!
-
Lovely stuff! Have always liked the 'semi' vans, so now have an excuse to build some more!
-
Superb - and such delicate work too!
-
That certainly deserves to be finished!
-
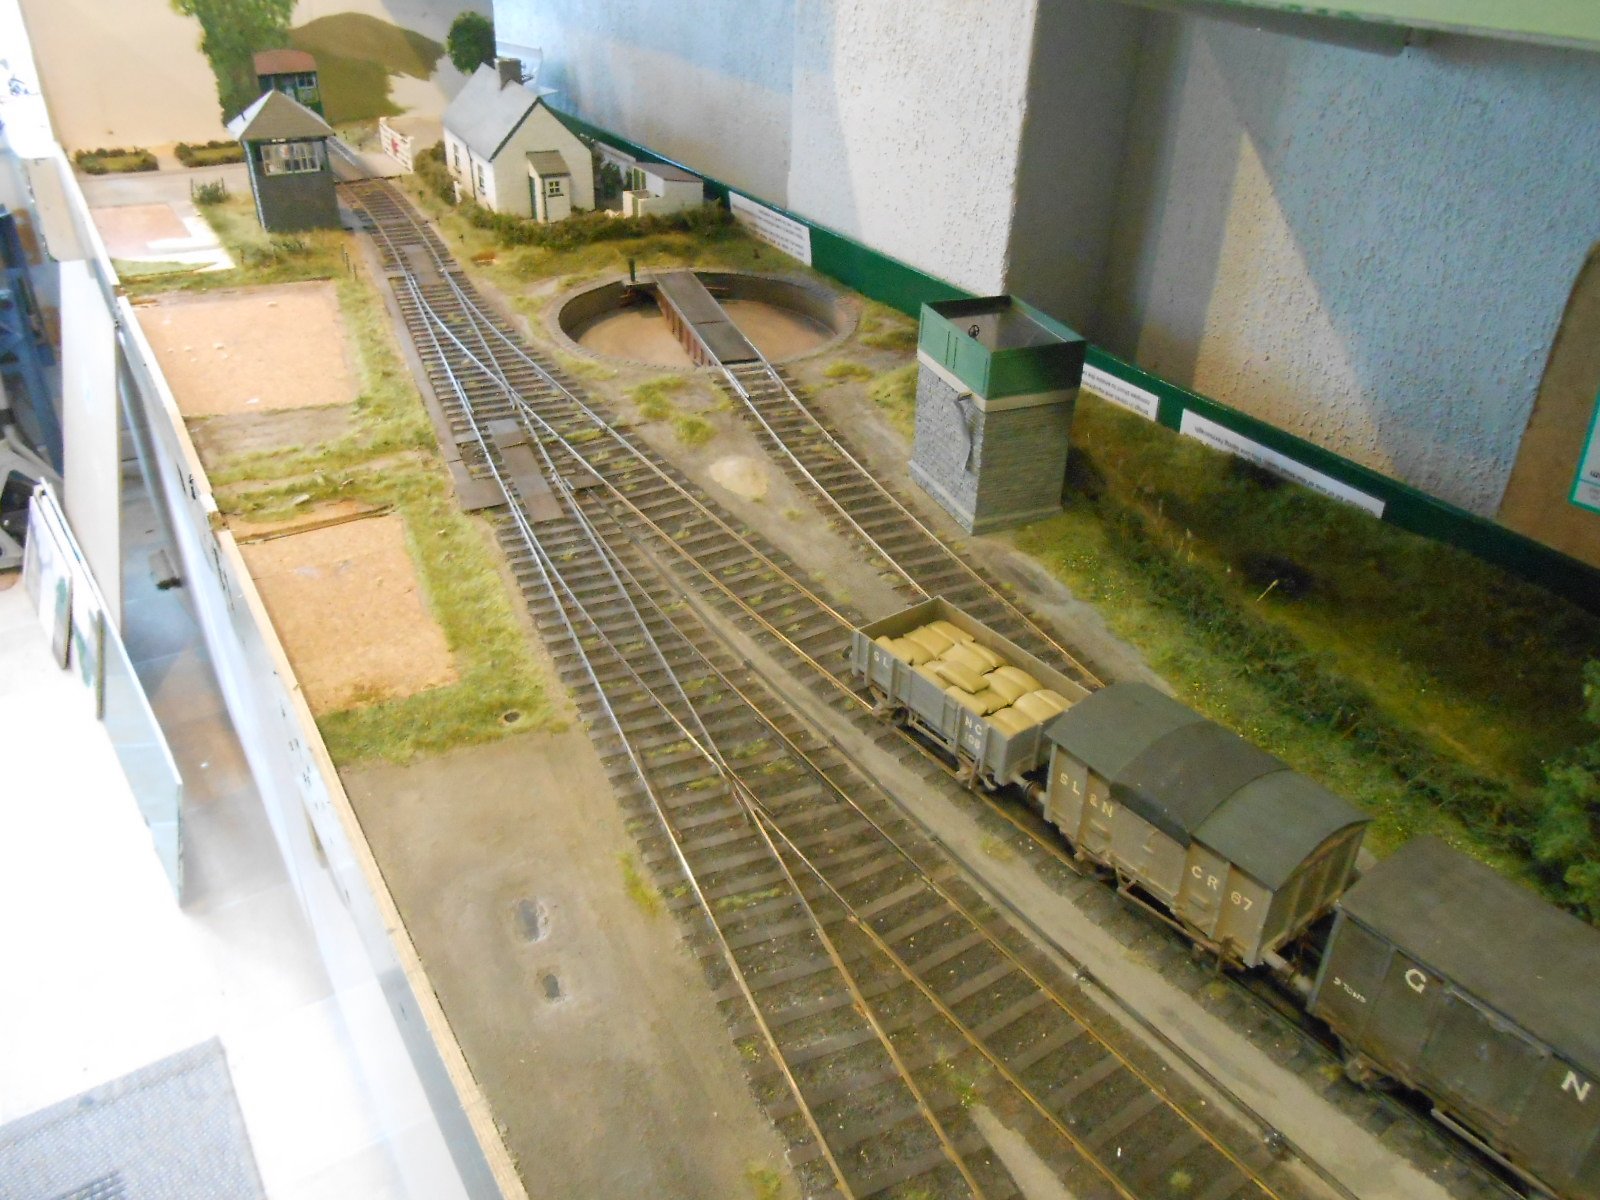
Thanks for all the comments, folks. Would love to visit the area eventually. In the past, have managed to get to Burtonport, Clifden, Achill, Westport and Sligo, so really need to make the effort to go back to the far north west. Have often wondered if the intention of a railway to Blacksod Bay would have gone down the peninsula to Blacksod itself - from the pictures on Google, it looks stunning. Am going to stick with the Belmullet concept, because it works with the way the layout is orientated, but could yet include Belmullet for Blacksod Bay as the station sign - though in bilingual form it would need a pretty large space! In the last few days have managed to do most of the destructive work on the layout, culminating with the one bit of track lifting required - removing the point to the goods siding, so it can eventually be replaced by the single slip. The point came up really well, a tribute to its robust construction by Marcway, but it immediately set me thinking that I could actually still use it. So, it has been moved a couple of feet up the goods siding and now forms the turnout to an end loading dock beside what has become the bay platform. The very end of the bay now has a platform both sides, which will work as a dock for a horse box, giving an extra bit of shunting, if required. Meanwhile, the 'Railway Bar' fits very nicely in the front right corner, opposite the station building. The end back scene, behind this will need to be re-done in order to capture that aspect of Bellmullet town leading to the short canal between Broadhaven and Blacksod Bay. As far as I can tell, the land from the station parallel to the Bay consisted of narrow fields. Have also included a couple of pictures of my new 101, in the the bay platform with a GSWR brake van made by Richard Chown and a SLNCR horse box [ex WLW], which is the limit of my1900s livery stock at the moment! The 101 is still not completely finished, but is starting to look the part.
- 27 replies
-
- 12
-

-

-
I think a lot of layouts actually end up scrapped, Stephen, though a few get sold and some, like Arigna, get refurbished. Of the exhibition layouts I've built myself, the first two were scrapped, the next two got sold [not for very much] before the next was scrapped and two after that got sold as well. With most layouts you can usually move them on without the stock, because they are to a known scale/gauge. The problem with Arigna Town was that if I was going to move it on, it would mean a fair amount of stock would need to go with it because so few people work in 7mm scale, 36.75mm gauge. That then becomes very expensive with scratch and kit built locos involved. Hence the refurb. Corrections However, even at this early stage, a couple of corrections are necessary. Firstly, my fictitious history and a bit of geography. The link from the Burma Road to the Ballina branch should read Swinford to Foxford, not Longford as I first mentioned. However, looking at both map and history, a potentially more realistic bit of imagineering would be that the Athenry & Tuam Railway was extended much earlier to Claremorris instead of waiting until 1894. It was actually the Great Northern & Western that built the lines to Westport & Ballina - the Midland & Great Western not taking over until later, though they did work the lines. The WLW got in on the Burma Road from Claremorris to Sligo largely because the MGW weren't interested and indeed, weren't exactly over enthusiastic about taking on the Ballina line either. So, my revised bit of history supposes that, with the GNW, the WLW built the line to Ballina - on a slightly different route - starting out on what became the Burma Road and following the river valley from Kiltimagh to Ballina, reaching there in 1873, as per actual history. When the Burma Road was opened in 1895, it included a link from Swinford to Foxford [and therefore on the Sligo, Enniskillen etc] as part of the WLW/SLNCR line to Belmullet. Stung into action by this invasion of their territory, the MGW built a line from Mallarany to Belmullet, thereby satisfying my needs for a model railway with WLW, GSW, MGW and SLNCR trains appearing alongside each other. Works for me anyway... The other change is that I am now going to call the project 'Belmullet' instead of Blacksod Bay. Much as the latter is a rather evocative title for a model railway, a couple of fellow modellers have suggested it might not be entirely pc in these enlightened times and they may be right. That said, there is a layout doing the rounds called 'Fawkham Hall' [say it carefully] based on a village of that name while locally, we also have villages called Pratts Bottom, Thong and Wormshill - the latter often annotated by the local wags with a cross bar to the double L. In addition, looking at the sketch plan in Rails to Achill, the orientation of the proposed terminus at Belmullet fits nicely in with the old Arigna track plan, with the new harbour branch able to curve away around the back of the town to the actual quayside on Broadhaven. In viewing the layout from the opposite side, the back scene can include inner Blacksod Bay with the low hills of the peninsula behind and the sky on a separate sheet/board beyond that. Google Belmullet and you will soon see what i mean. Yesterday, I ordered the single slip I need from Marcway of Sheffield. Sharp intake of breath at the price, which was £180 [I know!]. However, remember this is a somewhat specialist commission being 36.75mm gauge and code 100 flat bottom rail. Peco it ain't. Given a single slip is actually two over lapping points points and a bit more - and my original points came in at £60 each seven years ago, then maybe £180 isn't so bad after all. That is certainly what I keep telling myself anyway! Payback arrived unexpectedly quickly, when at a local antique fair today, I found a nice boxed 10 piece set of drawing pens, compasses, dividers and so on on sale for £28 and actually bought them for 20.They look good quality and seem in good condition and I reckon there is potentially about £100 worth, so that balances out the cost of the single slip nicely, while I know I could not build a single slip myself to that quality.
-
Like the look of that fish van and often wondered how the traffic was catered for in Ireland. Did fish vans have a specific livery, like the white used in England? Don't recall seeing any pictures of specific fish trains either - presumably it was more a case of a wagon or two tacked on to an ordinary service train? Needless to say, a concept that would suit my new project very nicely!
-
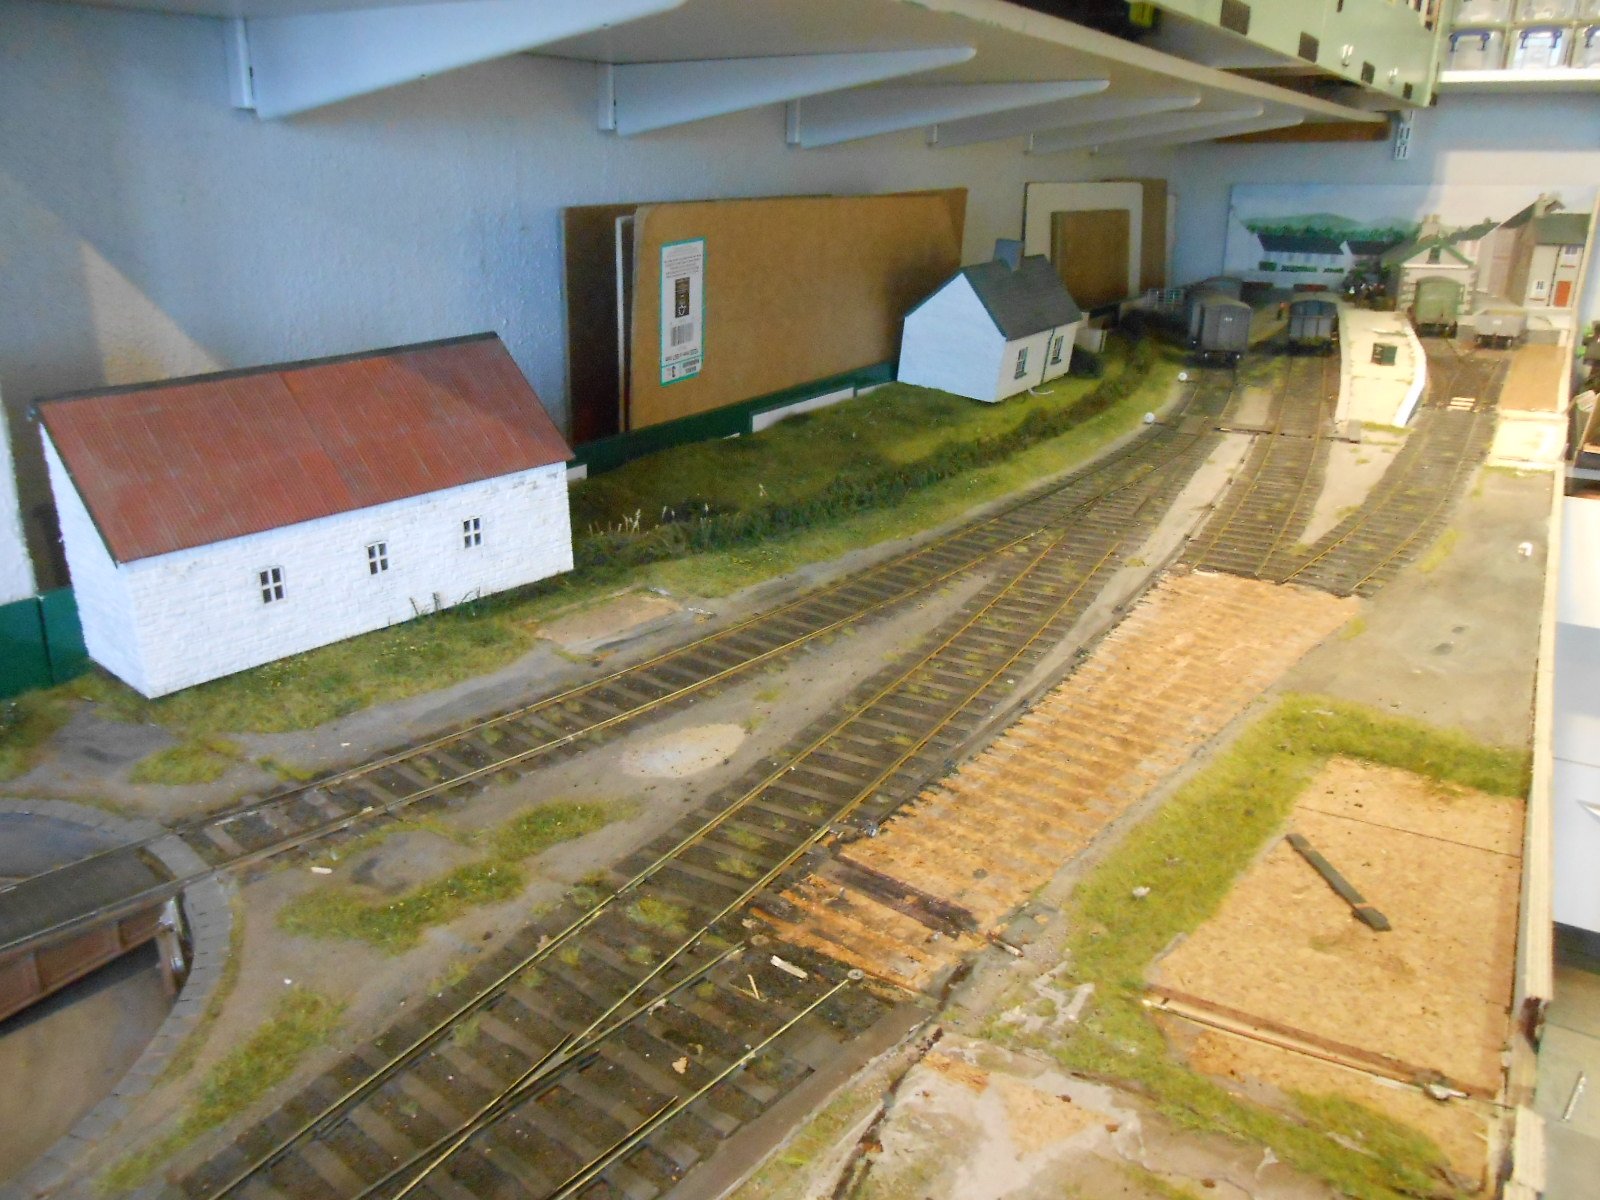
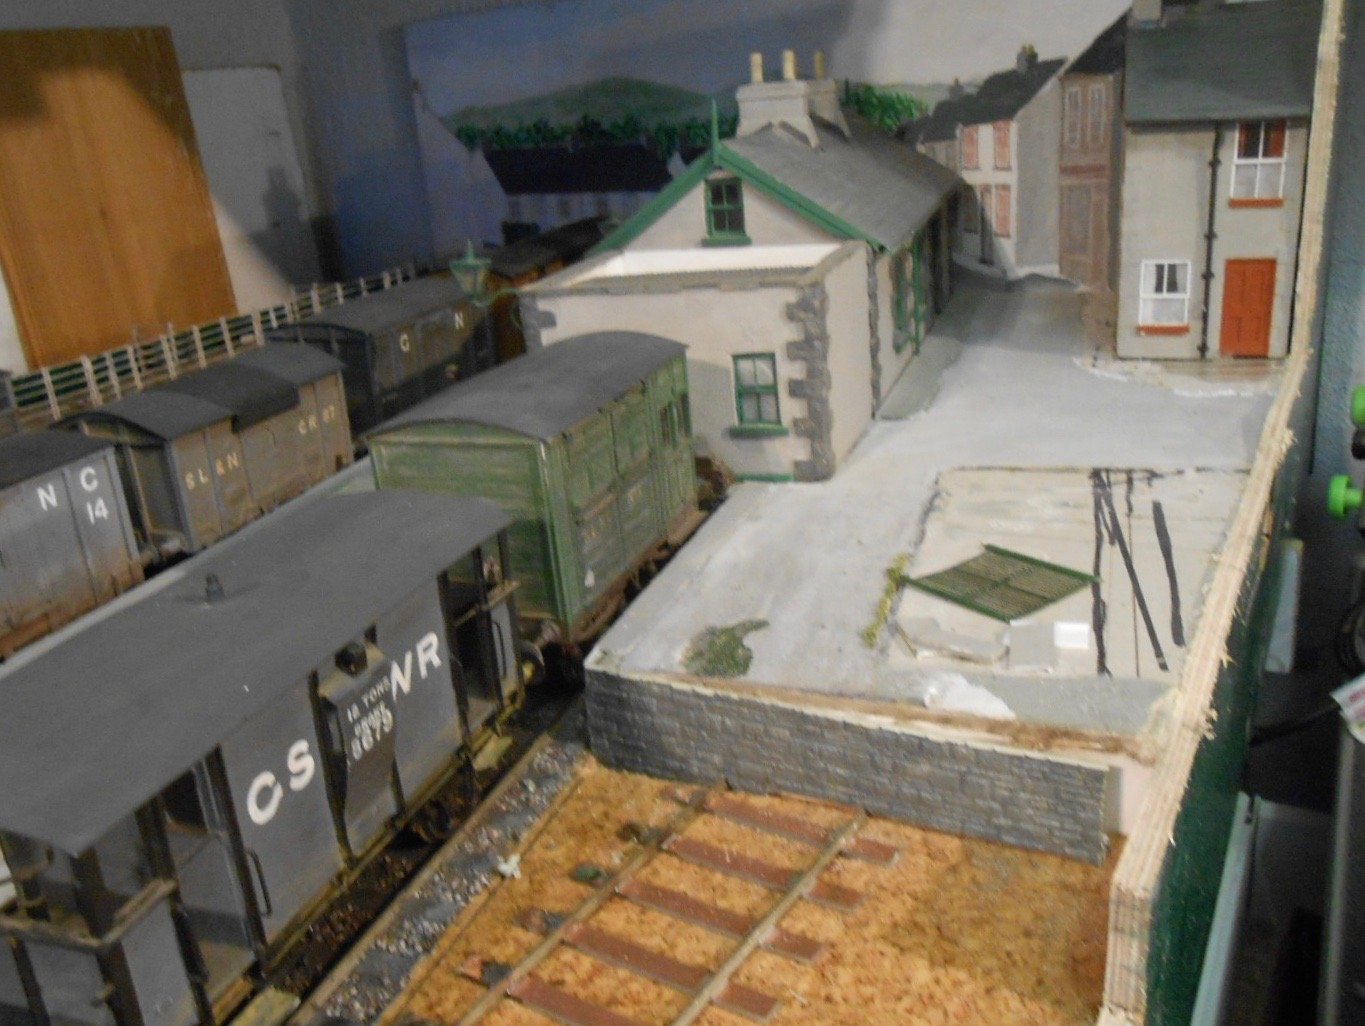
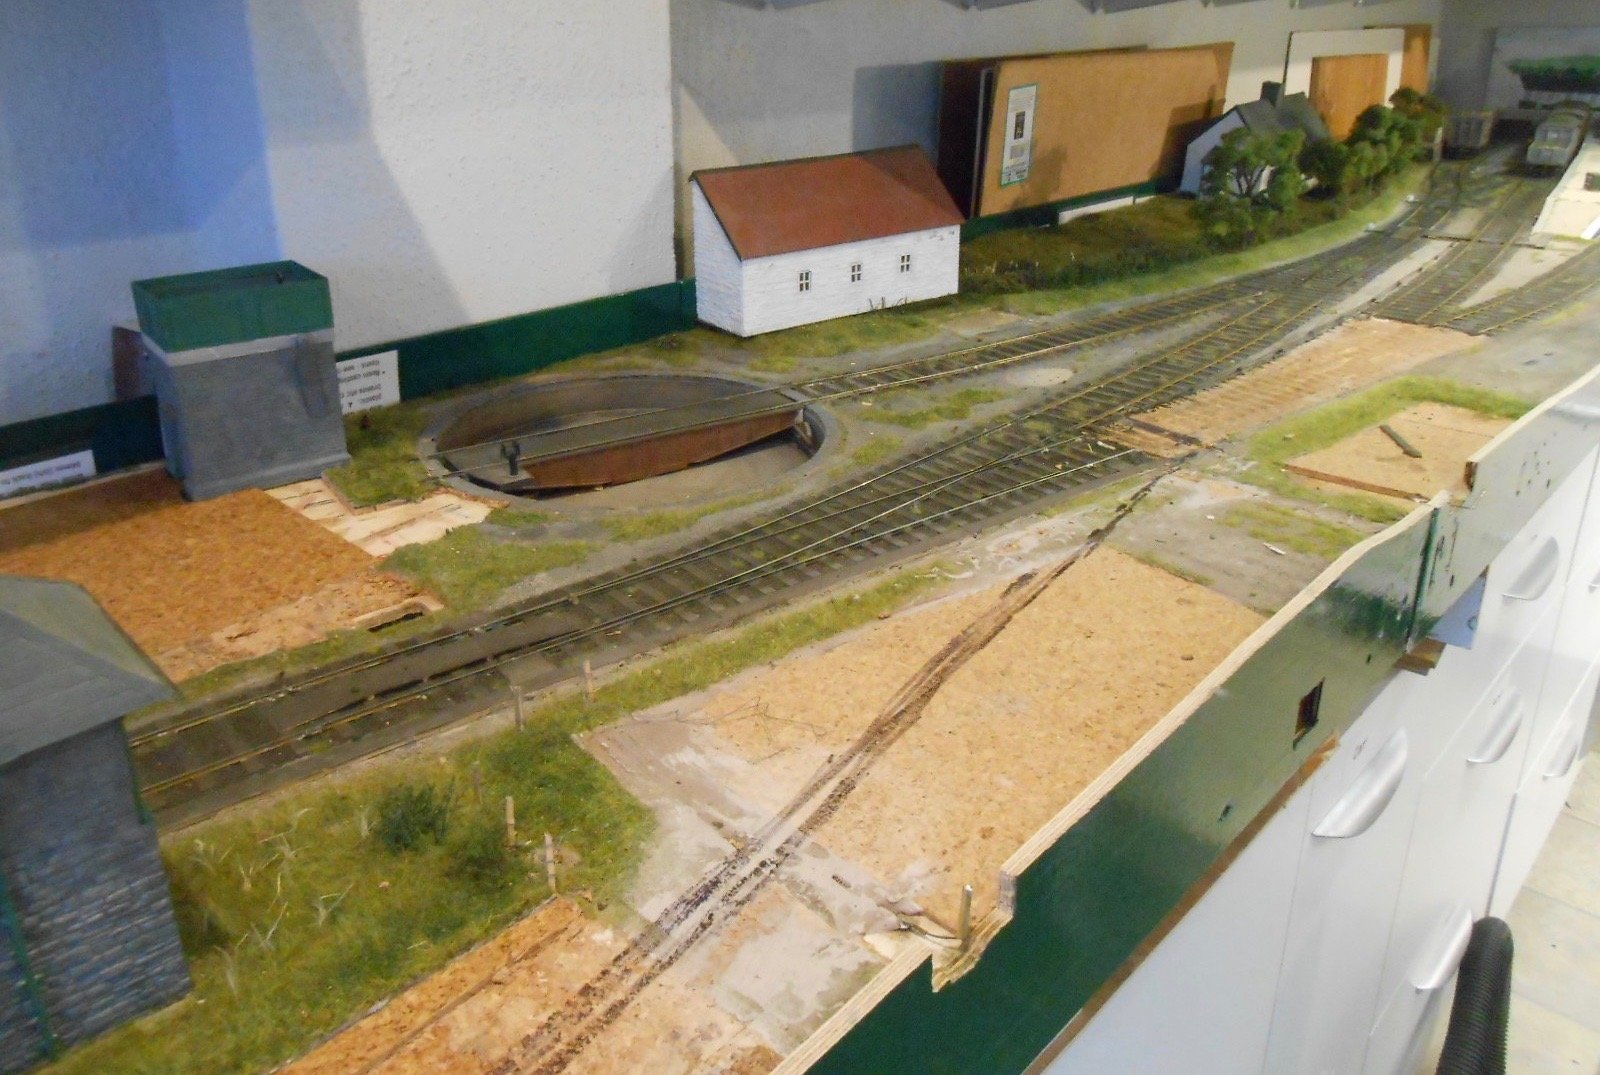
Ariana Town re-imagined Seven years after construction began, with four and a half years on the road and 39 shows, Arigna Town is now being reconfigured as a new project. What is being done is that the layout is being reversed, so the side that was the back scene will become the front and vice versa. Over the weekend have removed all the buildings, apart from the signal box and station at what was the rear of the layout, then got the jigsaw out and reduced the back scene pretty much to track level. Drastic, but once I removed the first building [the trees will all go as well], my feelings have been largely neutral. Yes it has been a good layout to operate and likewise nice to look at, but I can now look forward to developing it as a new project. The plan is basically as follows, though liable to change as things progress: The baseboards are still solid, being 6mm birch ply The track plan largely stays the same, although the turnout that lead to the goods siding will be replaced by a single slip. The extra track from this will go in front of the signal box, exiting to the fiddle yard as a branch to the harbour. In addition, two new tracks will lead off the turntable to a loco shed, which will now be at the back of the layout Turning the layout round, now means the wire in tube controls are at the front. Useful at home, but when the layout goes out again, it will be front operated, but with point motors and/or servos for remote control. A new turntable will be fitted & this will also be electrically powered. The new track layout means the will need to be a two doll starter signal at the platform end. Where the cattle dock has been until now, will be the site for the goods shed [a 'drive through' type], with the Leitrim Co-op building moving there too. The corrugated roofed barn and the signalman's cottage will be moved to the rear edge of the layout The new back scene will be profiled to the outline of distant hills, with either a separate, hard sky scene behind or a one piece, roller blind sky scene instead. There will be a new, single road, loco shed, with the second track in front for also storing locos. The water tower will be moved past the turntable. Where the white, Georgian house would have hidden the hole in the sky to the fiddle yard, this will be replaced with something like a warehouse or maybe something which suggests a distillery. In addition of course, I have already hinted that I am backdating my modelling to include locos and stock of the very early 1900s, so at least a couple of new locos [I already have Shannon & the 101], plus several new coaches and wagons to suit. The fiddle yard remains the same, but I am planning on making a second, seven track, train table, so I can continue exhibiting my SLNCR/CIE 1950s stock too. So, plenty to do! Blacksod Bay? Blame Jonathan Beaumont, of this parish, for his splendid book 'Rails to Achill', which sowed the seeds in my mind of an interesting 'might have been'. Have brooded long and hard on this, so the scenario is as follows: There were several proposals to build a railway to Bellmullet in Co Mayo. From the south a line was to run up from Mallarany on the Achill branch. From the west, there were essentially two separate proposals, one which hugged the coast from Killalla, the other a direct route from Ballina, through Crossmollina. All of these would have been in MGW territory had they been built. Bellmullet is a small town at the head of Blacksod Bay, a large, deepwater harbour, protected by the Blacksod peninsula from the ravages of the Atlantic. For a while, it was seen as a transatlantic port for Canadian Pacific steamers, in the days when mails and passengers could complete the journey quicker, by rail and ferry, than staying on the ship. Thus far, I have yet to see where on Blacksod Bay this port would have been, but that is fine by me, because it gives me a bit of a blank canvas to 'imagineer' my new project. The idea is as follows. The first line was built along the direct route from near Ballina to Bellmullet, not by the MGW, but by the Waterford, Limerick & Western, in conjunction with the SLNCR. A connecting line from Foxford to Longford enables direct running to Collooney, Sligo, Enniskillen, etc. This line terminates at Blacksod Bay in a setting not entirely unlike that at Burtonport [another favourite]. The MGW then gets in on the act by building its own line to Blacksod Bay from Mallarany on the Achill line. Implausible? Absolutely! However, given the way my collection of Irish locos and stock has developed during the Arigna Town project, the scenario above enables my SLNCR, MGW, WLW & GSWR stock to all rub shoulders, as indeed actually happened in Sligo. So, there you are. Arigna into Blacksod Bay. The station becomes an island platform, so there will be room to park the mails, while it will also be the headhunt for the harbour branch, worked [depending on period] by either 0-4-2T Lark or the G class diesel. An opportunity for all sorts of additional traffic which can't be accommodated in the station itself. The SLNCR is expected to work livestock and maybe turf traffic, along with a mixed train. The MGW [in the early 1900s anyway] will be responsible for the mails, for which I hope to built Achill Bogie 'Wolf Dog'. The WLW will do general freight using Shannon and the GSWR train will be a mixed, using the 101. That's the current plan anyway, but things could change, not least because I'm probably looking at around two years to complete the project, then hopefully, it will be exhibited again. In the meantime, watch this space & to either whet your appetite, or maybe make you shed a tear, below a few pictures of what has been done to Arigna. The buildings and trees that don't get reused are promised to the Chatham club's 0 gauge layout, by the way.
- 27 replies
-
- 12
-
-
-

-
Check out any of Iain Rice's books on the subject.: Finescale in small spaces Urban Layouts Cameo Layouts As well as fun with shunting, you can make the layout look good too.