David Holman
-
Posts
4,359 -
Joined
-
Last visited
-
Days Won
117
Content Type
Profiles
Forums
Events
Gallery
Blogs
Everything posted by David Holman
-
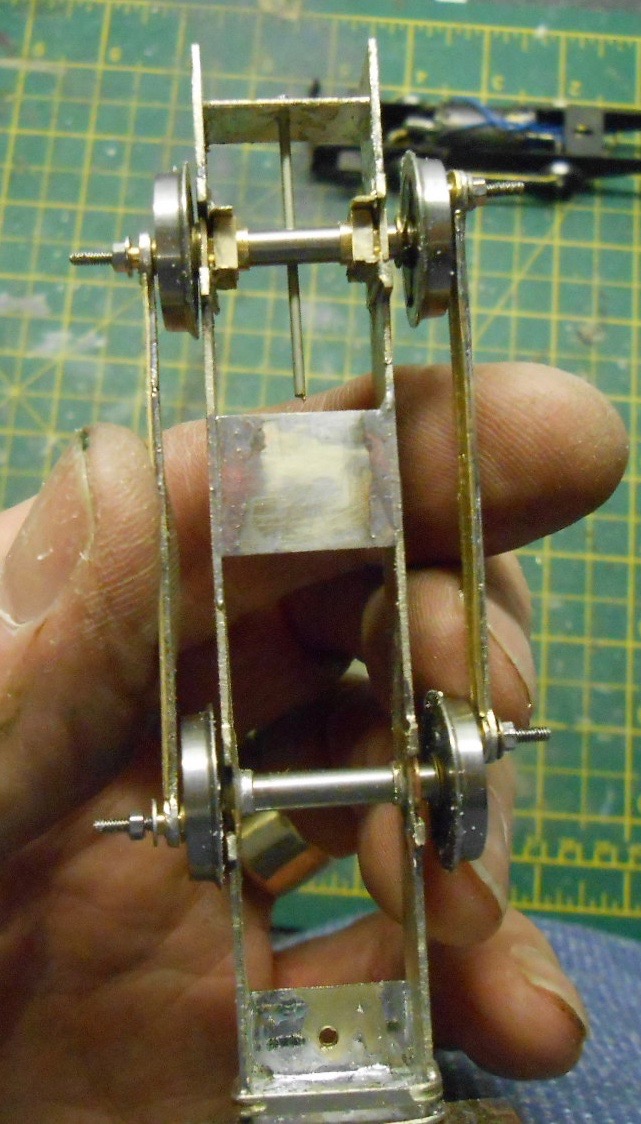
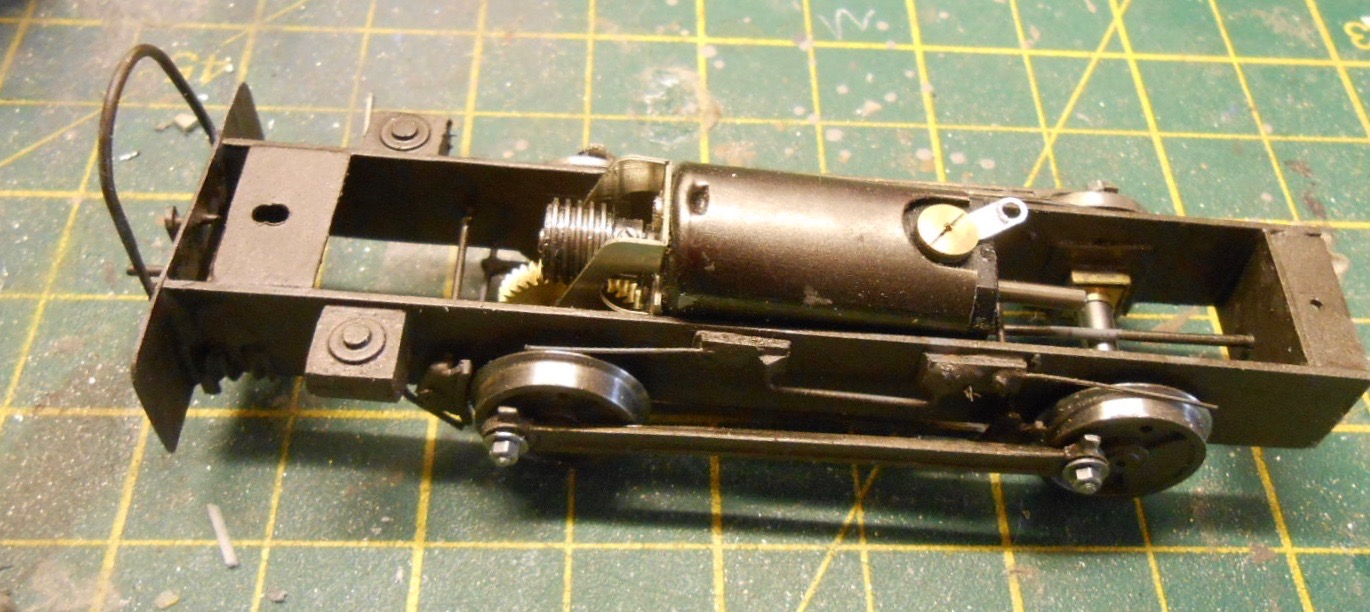
Much to my surprise, the hornblocks and bearings arrived in the post on Monday, despite the website suggesting up to 21 days - so well done Dart Castings & the Postie. Any ideas of continuing with the cab of the railcar were therefore ditched in favouring the chassis completed & this is what I have been doing these past few days. Having made a rolling chassis that really did run well first time, there was more than a bit of trepidation in modifying it, but the hornblock/compensation system is very forgiving. Indeed, I could probably have left the front axle as it was, but decided to follow the instructions and cut four slots 6mm wide and 4mm above axle centre line in the frames. A small engineers' square and a scriber was all that was needed, along with a slitting disc in the mini drill to do the cutting - seemed a tad more subtle than the brute force of the Dremel... A bit of tidying up with files and I was then able to solder in new fixed bearings for the driven axle. The sliding hornblocks have to be made up from the etches supplied. Nothing daunting, just a couple of folds and a bit of solder. A bit more filing was needed to enable the bearings to slide freely, but they were soon ready to be fitted to the chassis. It was at this point that I found my hornblocks alignment axles were 3/16" diameter, but it was not too difficult to make some 1/8 ones out of some old standard gauge axles in the scrap box. The axle ends need tapering, so you can fit the coupling rods over them, to ensure they are properly aligned. Just a few rude words and with the help of a couple of hair grips, the hornblocks were soldered in place. All that was then needed was a pivot, to ensure the rear axle sits level. This was easily done by drilling a hole in the rear spacer & soldering a piece of 1mm wire along the centre line of the chassis, thereby giving it the characteristics of the three legged stool - ie it will always sit level on the track, regardless of imperfections, with obvious advantages for electrical pick up as well as running quality. However, while I know the above to be true, I am also a devout believer in the Law of Sod, so there was a certain amount of trepidation when re-assembling the wheels & rods, but all was indeed well. Course, it then needed dismantling again, so I could fit the motor/gearbox! A small Mashima & 40:1 gearbox was duly installed, along with pickups [0.3mm phosphor bronze wire], followed by a bit of test running, before it was all dismantle AGAIN, to enable painting. Hopefully that will be the last time I have to re-assemble it for a while! A bit more work has since been done on the cab, while the two sandboxes were filed up from some 80thou plastic, laminated to the required thickness. Finers crossed, I'll be able to make a start on the passenger section soon, though attention is back on Arigna Town at the moment, with a show at Brighton over the weekend - so a bit of TLC required on locos - wheel cleaning, pick ups, lubrication & the like. As for the latest photos, the bottle of meths is always close at hand in my workshop - purely for cleaning purposes of course!

-
... and were you to ever get as far as a 7mm scale version, I would be very interested too. An utterly delightful loco.
-
Not surprised to see the model going together well, Eoin. Did my one using the Tyrconnel/Alphagraphix kit. A relatively simple affair [like me], seem to remember it only took about 40 hours start to finish - painting & weathering included. Runs extremely well, which still surprises me as the chassis was a single fold up etch, several levels below your workshop practice!
- 45 replies
-
- 6
-

-
- gsr class 551
- j26
- (and 1 more)
-
Definitely worth space on the layout!
-
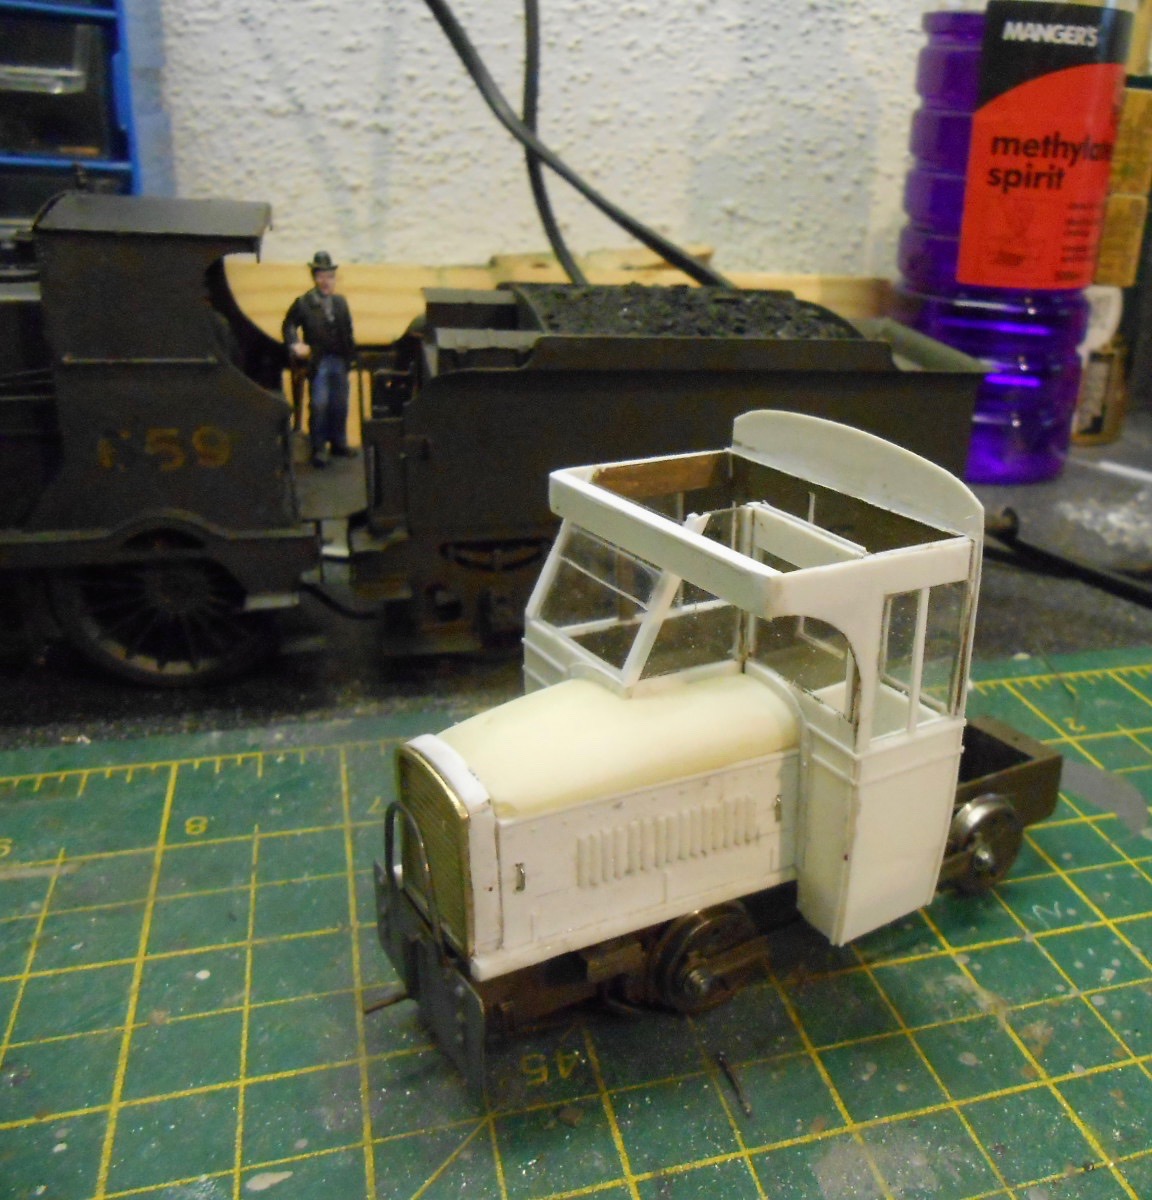
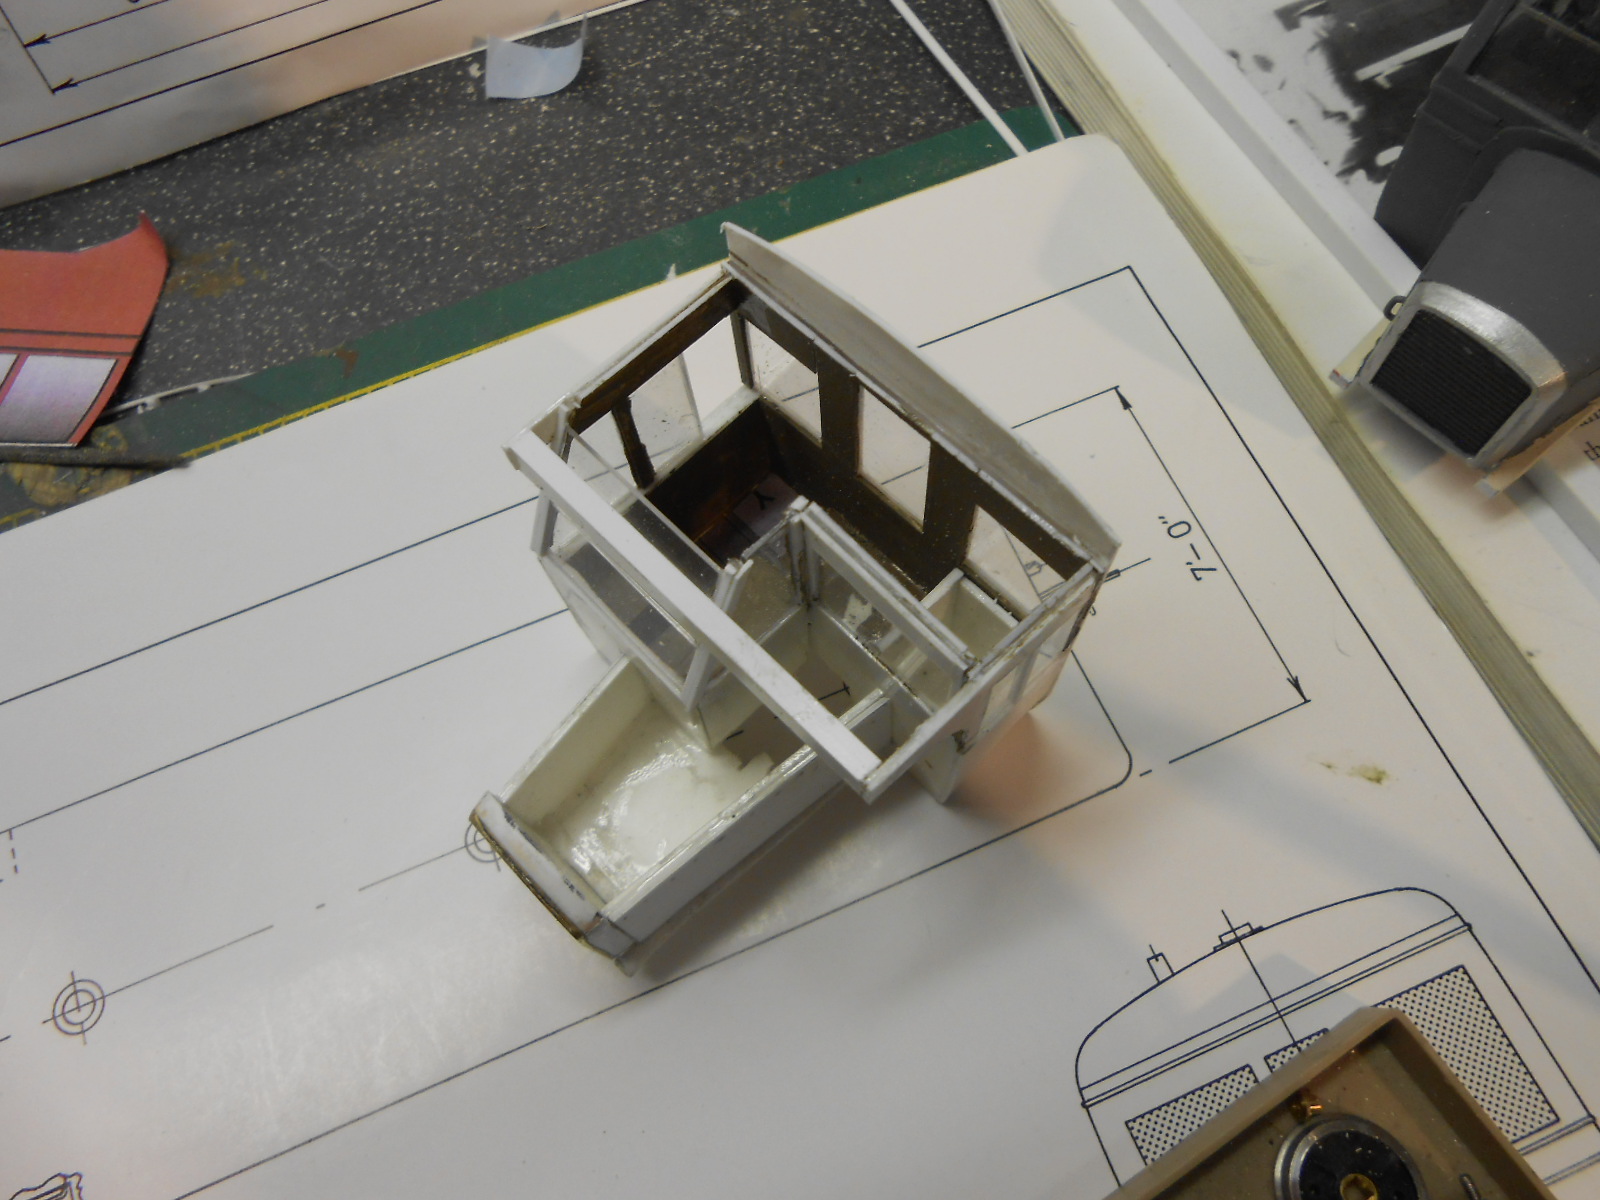
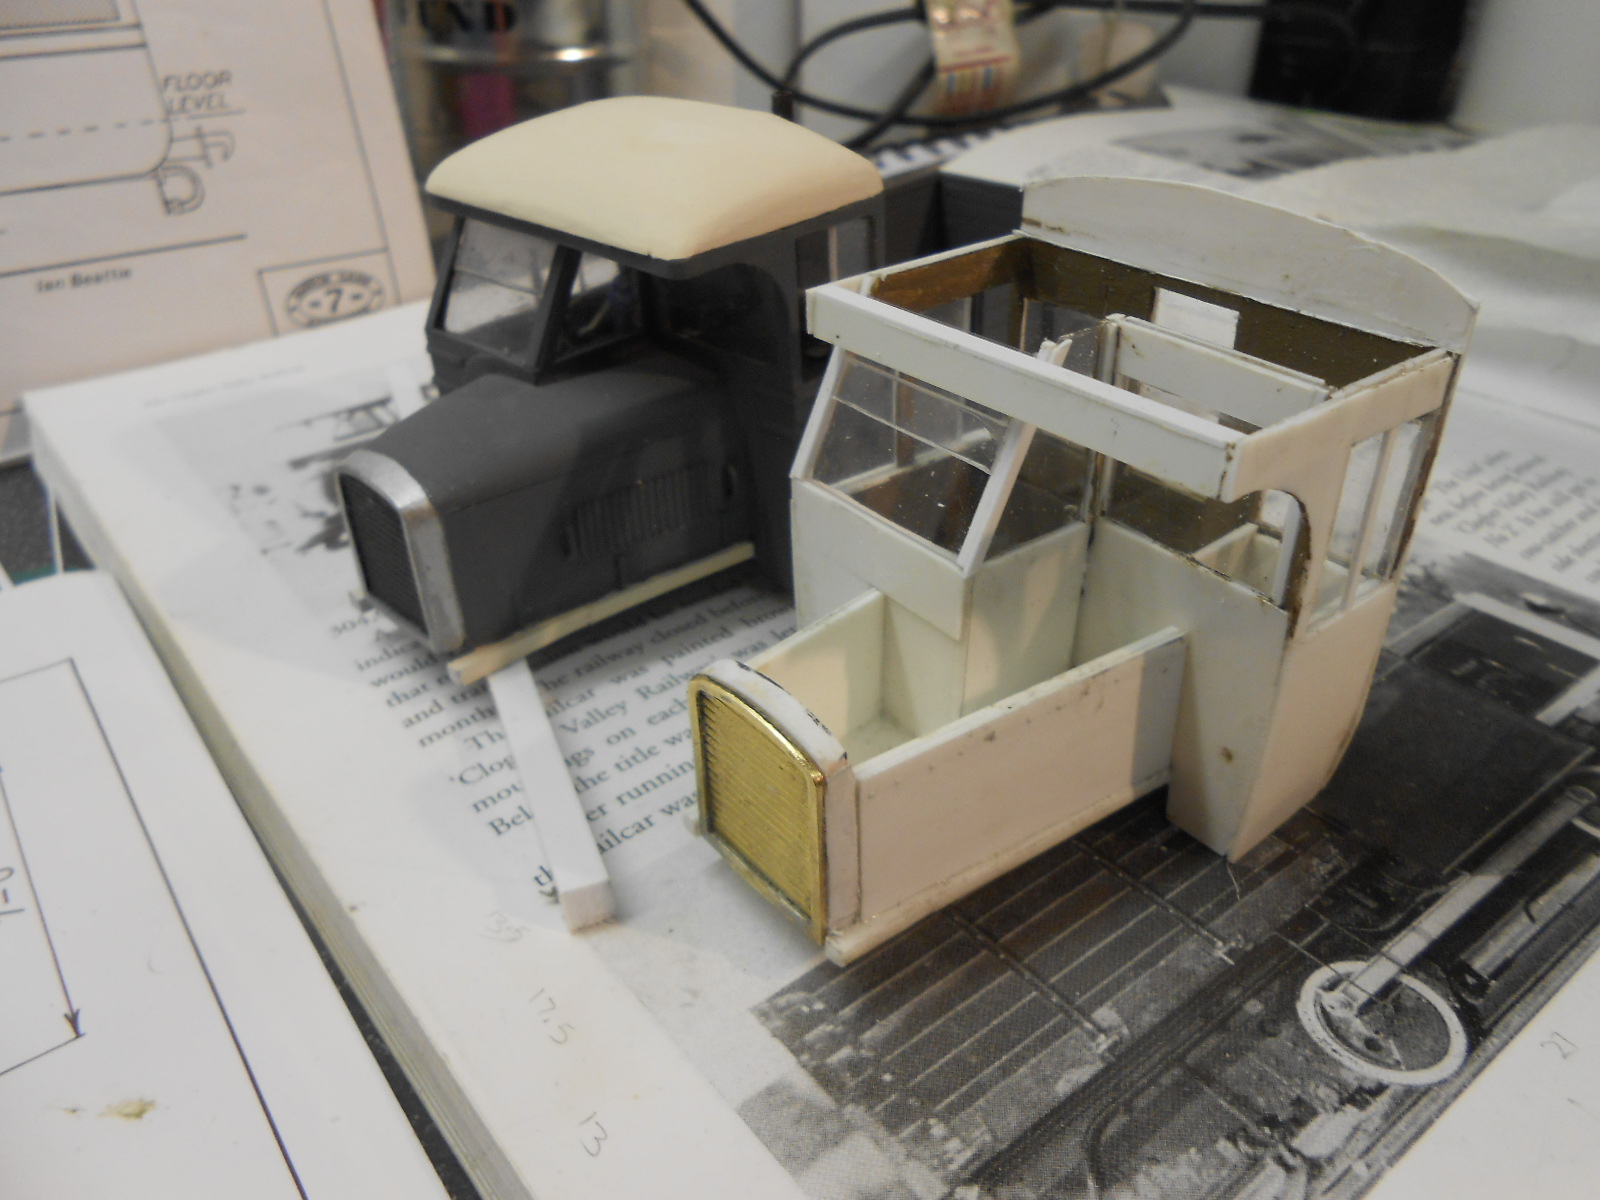
Measure twice, cut once... It had all been going so well, but then the wheels arrived in the post from Slaters & upon fitting them, it soon became apparent that the chassis was sitting much higher than that of the 'Unit'. I'd taken the latter apart, so I could compare & contrast with 'the one I'd built earlier' & I found I'd drilled the bearing holes too low in the frames. So, a pox on my measuring then. A bit of head scratching [& not a little bad language] seemed to indicate two options - build a new set of frames, or investigate fitting new bearings in horn blocks, thereby adding springing or compensation. I'd done this a few years ago with a couple of Slater's Manning Wardle kits & it must be said, the locos ran superbly. However, the Slaters website only seems to have horn blocks for 3/16" axles, but the Railcar ones are 1/8". A bit more searching turned up some of the latter on the Dart Castings website. Seems they are intended for the Sharman 'flexichas' compensation system & given this is an 0-4-0 I'm working on, am hoping a fixed driven axle, with the other one able to 'rock' ought to be possible. Bearings and horn blocks are just £6. Shame postage is another £3 though! So, while waiting for these to arrive, I made a start on the bodywork for the tractor unit. A 'footplate' was cut from 80thou [2mm thick] plasticard, with a slot cut in the front, so I could let in the radiator casting I'd made for the Unit. Here, another unwanted issue presented itself. On the completed Unit, I'd put the distinctive 'side beams' level with the top of the buffer beam, when they should actually sit just above. Something else on the 'to do list' then. The cab bodywork has proved extremely challenging to get my head round, because it is made up of all sorts of different angles & levels. In itself, it is just a collection of plasticard rectangles, but working out what to cut when has caused a lot of thinking & several false starts. Using the completed Unit as a reference point has not been helpful either as its dimensions are not consistent with the 7mm Narrow Gauge Society drawings. Hence, am sticking to the latter, though the Alphagraphix card kit [which must be based on same] is helpful both as templates & for some of the inside cab detail. The 'dashboard', for example has simply been cut out & stuck in place. Same for the cab floor. Realised it was also necessary to paint the cab interior at this stage & that was done with acrylic brown, which of course dries quickly. The body work was built in layers, with a 40thou inner shell and 20thou outer shell to enable the tumblehome on the cab sides and make the bonnet sides appear separate. This work was only done up to the base of the windows, because it seemed to make sense [to me, at least] to make the upper glazed section separately & then fit the resin cast bonnet & roof sections around this. Only time will tell if this is success or not! However, while the Unit is not quite going to be the identical twin of the Railcar tractor unit, its chassis has enabled me to try the cab body on it & if the two will not be interchangeable like the real things, it is helping me carrying on building till the hornblocks arrive. Photos show progress thus far - the castings need quite a bit of fettling, while the bonnet needs a run of louvres on the long side, plus there is a fair bit of beading to add. Am just hoping I don't see any fresh errors when I go back to it...
-
Fabulous. Each component is a jewel in its own right, so the ensemble really will be quite something.
-
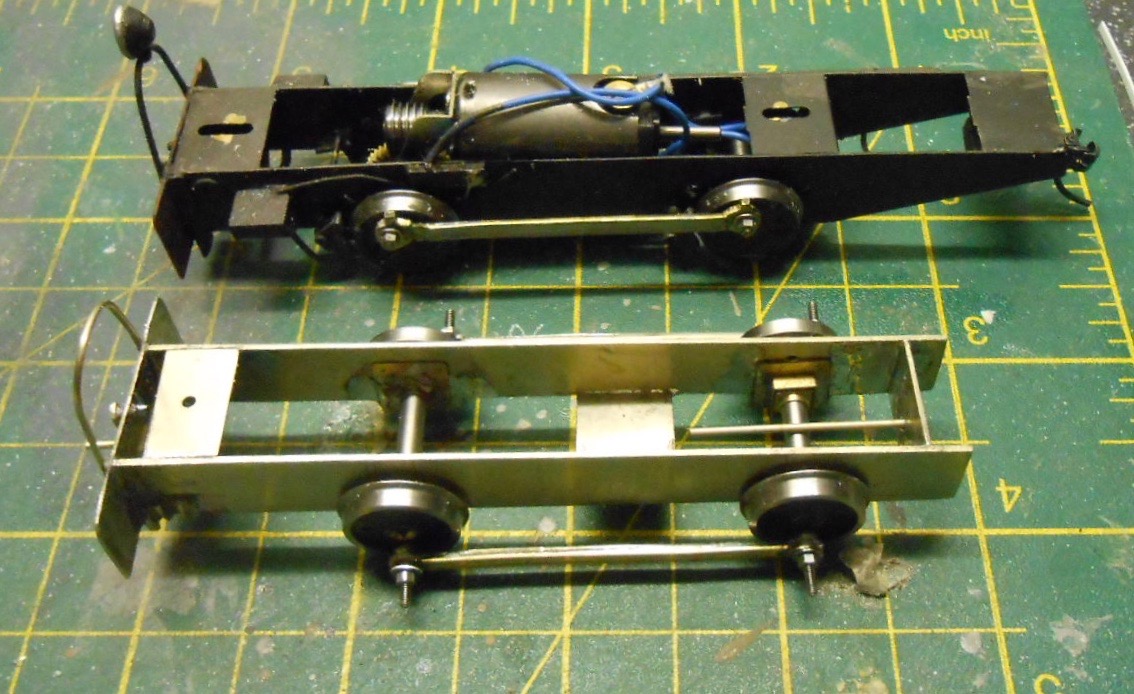
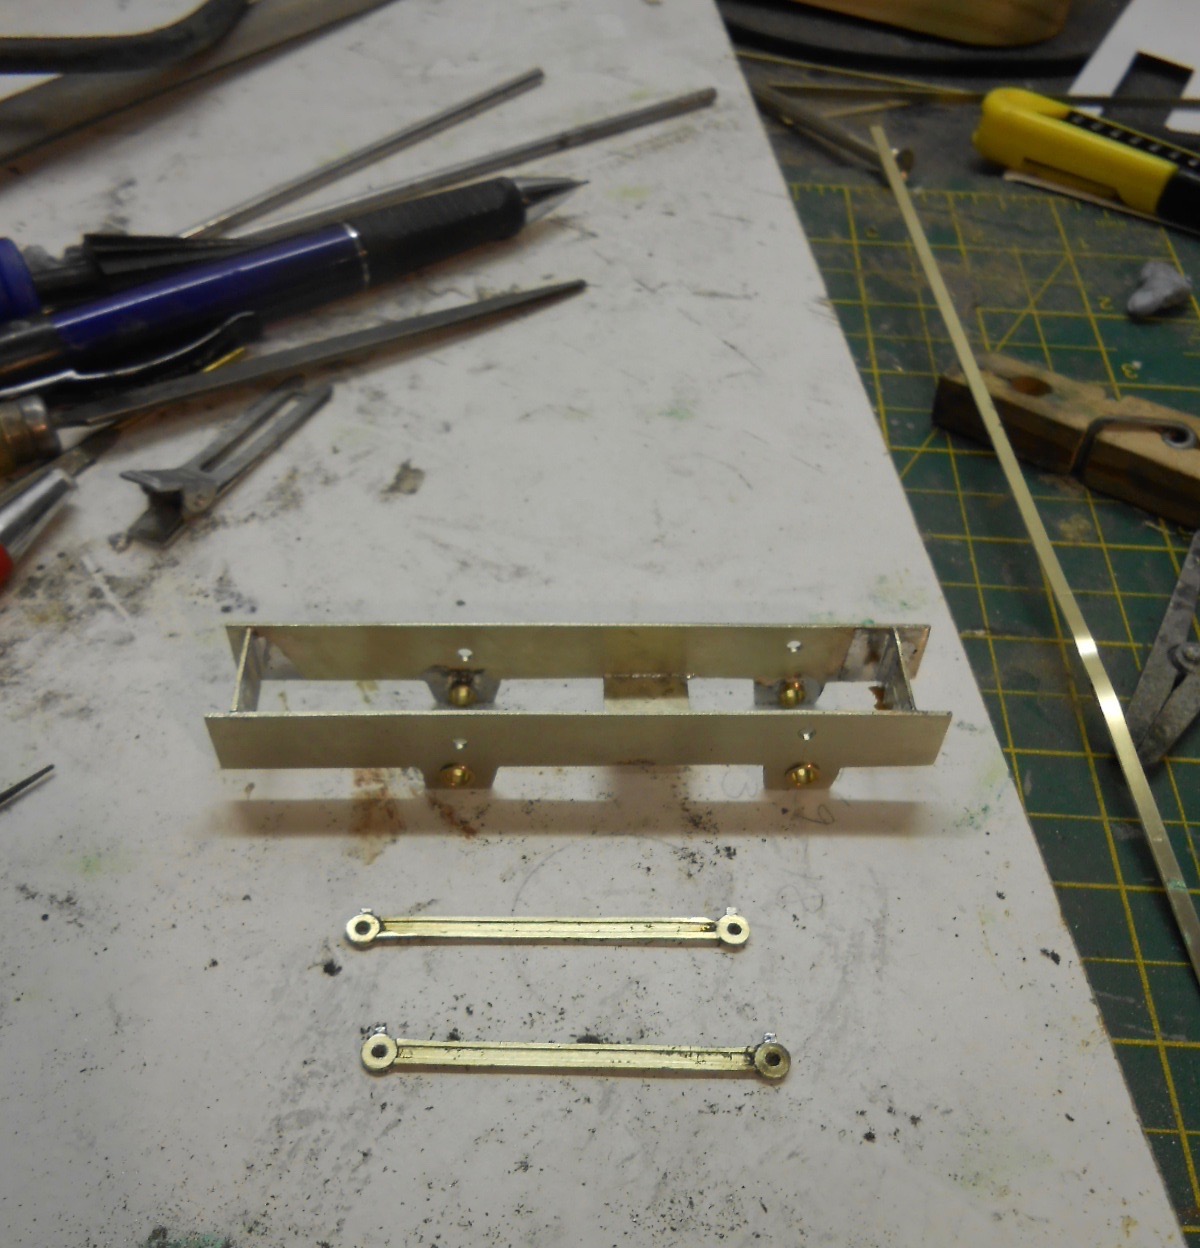
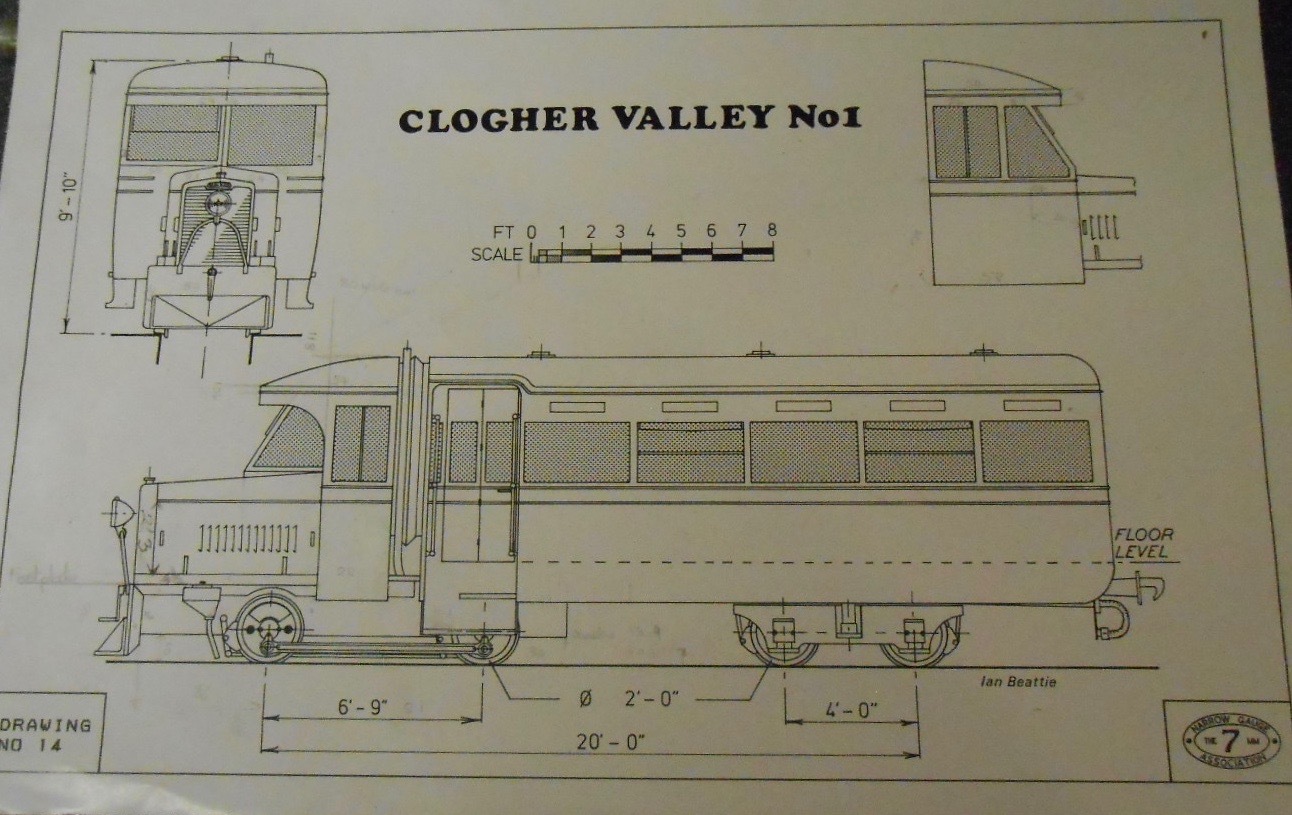
A good day's work? One of the advantages of being a serial layout builder is that I frequently go where the muse takes me. A bit of a butterfly mind one would say & maybe a dustbin one too... Anyway, after tidying up the workbench following recent efforts with Fintonagh's baseboards & infrastructure, I decided to have a go at something new. Actually, not quite true, as I'm always plotting what might be the best way to move my projects forward & CVR Railcar No1 has been working its way up my mental list for some time. Indeed, I'd hoped to buy a set of etchings from Worsley Works at Expo Narrow Gauge a week or so ago, but sadly the redoubtable Alan Doherty seemed to have everything but, while the website suggests it may not be available for a while. So, a scratch build then. Not too much of a problem [hopefully!], as I've built several of the beasts over the years, starting with a 4mm scale Taurgem kit of a pair of Colonel Stephens railcars & then going through various 7mm narrow gauge versions including a 'rail-lorry' made from a Corgi Lipton's tea van, then a Waggon & Mashcinbau BR railbus [just before the Heljan one came out], before finally doing the SLNCR railbus and Walker railcar for Arigna. I've got the 7mmNG Society drawing, a range of photos in books and ones I took myself at Cultra, plus the Alphagraphix card kit and even some bits left over from the CVR 'Unit' I made from Worsley etches earlier this year. On the latter, knowing I was going to do the Railcar at some point, I made my own castings for the roof and bonnet sections, so I've got a fair bit to get me started. The plan is that the chassis of the tractor unit will be in nickel silver, while most of the rest will be plasticard, with seats cast from resin. So, this morning, I delved into my 'nickel silver' box [there's a brass one too], to see what bits were available. There was [just] enough 30 thou sheet for the frame sides, while frets I'd kept from the two SLNCR 'small tank' kits yielded material for frame spacers and coupling rods. I follow what I believe is the standard practice for making a simple chassis. Two pairs of 'blanks' were cut, one for frame sides, the other for the coupling rods. I'll confess to being a bit of a heathen here, preferring to use a reinforced slitting disc in the Dremel to a coping saw any day.Each pair was soldered together, then the rods were clamped & soldered to the frame sides, so I could drill for the rods and axle holes through all four pieces. This then means the axles and coupling rods line up perfectly - not always a gimme where kits are concerned, I've found - though newer ones [probably drawn on computer] are much more accurate these days. Once drilled, each pair of rods and frame sides were separated & filed to shape. Finally, all four pieces were separated, then I cut for frame spacers so I could assemble the frames, using one eighth stainless steel rod through the bearings to ensure everything was nice and square. Finally, for today, I added small brass washers to the rods to beef up the bosses, plus some fluted brass strip to make them thicker and the correct profile. All this took getting on for five hours and the pictures below don't seem to amount to much, but [fingers crossed], once the wheels arrive, I should have a working chassis in fairly good time after. Watch this space!
-
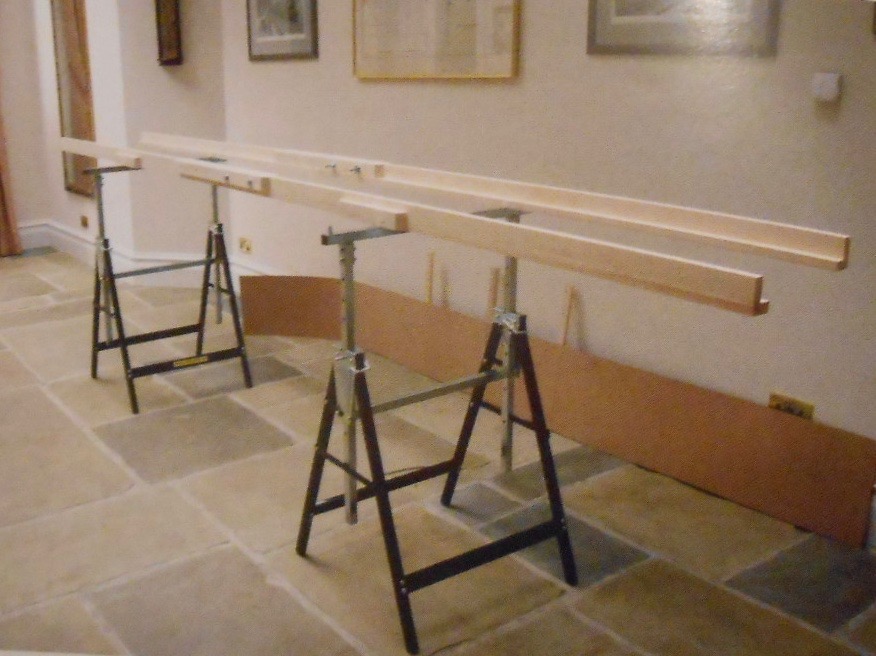
This year's Uckfield was utterly superb - probably the best ever and must rank as the best 'small' show anywhere in the country. Arun Quay, Denton Brook [remote controlled 7mm scale lorries & working cranes], Bridport and Trever Nunn's latest S gauge project very much the highlights, but there were no average layouts & any one of them could have been a best in show contender anywhere else. For me, it was also a reminder that in a year's time, Fintonagh is booked to make its debut there & I have but one baseboard completed, no fiddle yard, no legs or fascias, plus just two locos, two coaches and four wagons. Time to get things going! As the photos show, have paired the two boards and been working on the area around the join, together with the back scene on the second board, plus the road surface. The latter is card, painted with gloss grey & covered with talc. The fiddle yard is coming along and just needs the turntable top cutting. It is fairly simple being a 6mm birch ply box, with a 9mm MDF top and more on the latter forming the train turntable. With just five tracks, there will be none of the complications of Arigna's sliding/rotating jobbie & is a lot lighter too. The sub-structure of the layout is now the Mark 4 version [!]. Mark 1 was using Arigna's original trestles & beams, with higher cross supports, but proved far too unstable, so Mark 2 was 1.2m trestles, but these seemed also less than stable. Mark 3 was simply an idea taken from Iain Rice's Cameo Layouts book & was going to involve short [50cm] internal legs, mounted on standard trestle tables at shows. However, thinking about it, these can be less than ideal in some, so ditched that in favour of another Rice idea. This uses two Screwfix height adjustable steel trestles. At just £25 each, they are a bit of a bargain & can hold up to 250kg, so my layout ought not to tax them. Have made two 3m folding beams from 30mm x 12mm softwood. The picture is from maestro Rice's book, but my set up is a straight copy. Will post some of my own pics later, including the fascia/pelmet arrangement which will make the layout fully enclosed.
-
Slaters corrugated plastic sheet, Popye. It is quite thin, so possible to bend to the arc of a roof. I wrap it round plastic water pipe first. Prefer Wills [4mm] corrugated asbestos sheet for buildings though, as it replicated the 8'x2' sections of the real thing.
-
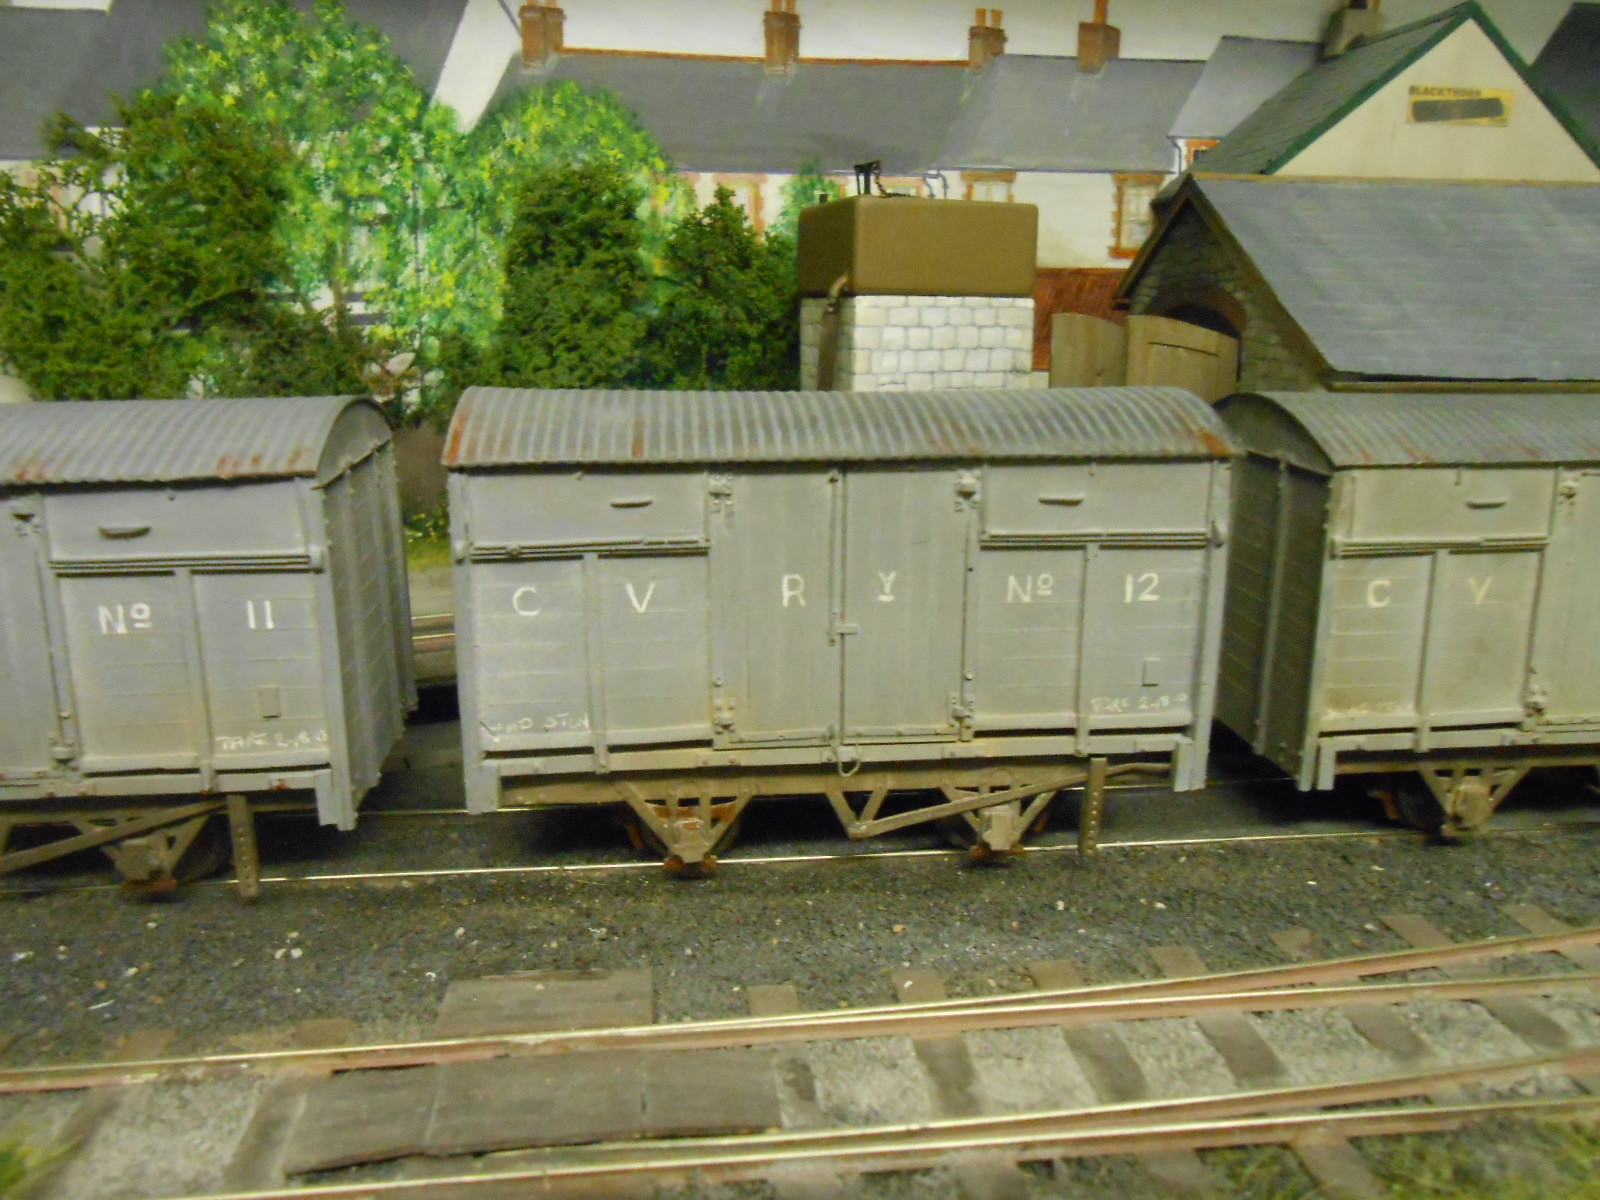
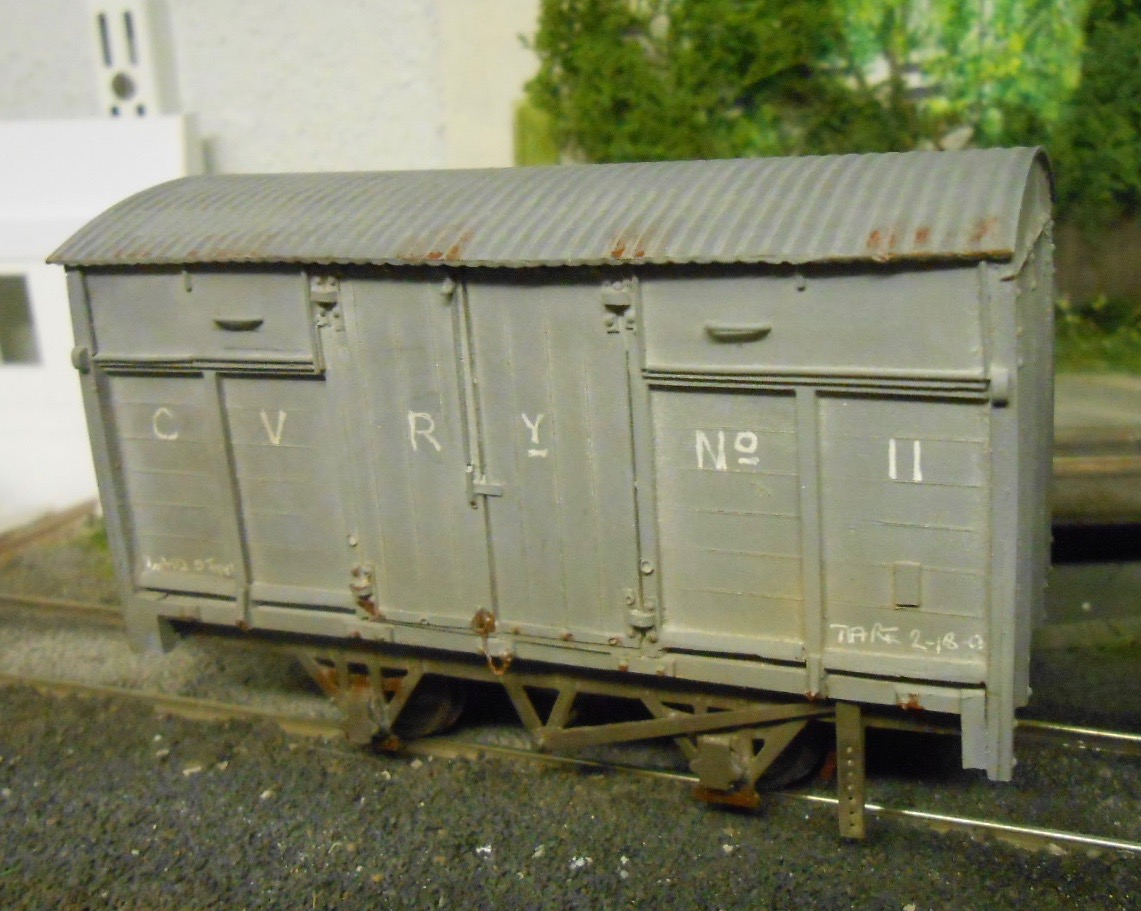
The wagons are now almost complete, with 4/6 having couplings fitted this afternoon. Am kicking myself for not buying some more Kadees at ExpoNG last weekend... Painting was initially straightforward, Halfords grey primer being both under and top coat. Like many Irish vehicles, under frames are the same colour as bodywork, though get fairly dirty of course, so it was the usual Martyn Welch weathering mix [Humbrol 133 & 53] brush painted. Lettering came next, hand done, using a white gel pen. One of these days I will get round to acquiring a proper bow pen, but for now I find that the gel works ok as long as you don't look too close... The corrugated roofs got the same author's treatment, this time running a dilute weathering mix into the grooves and [once dry] dry brushing Humbrol 64 [light grey] to highlight the ridges. Bodywork then got an even more dilute mix of the weathering colour, then after an hour or so, once it was dry, but not fully 'set', I got to work with weathering powders. I find this works well in terms of the powders not needing to be sealed with varnish as they are fixed by the paint.
-
Welcome back - always good to see folk being creative.
-
Impressive!
-
Note that Mashima motors are no longer being made, so stocks are increasingly finite. Also, remember that single axle drive will severely limit haulage power, but on the sort of vehicle you are considering should not be a problem as long as you get plenty of weight on the driven axle.
-
Now there's a can of worms, Tony! I have no knowledge of set track, other than the curves will be visually tight unless short wheel based stock is used. In 4mm scale, a minimum radius of 3ft/900mm is usually deemed appropriate, not least to avoid buffer locking when propelling stock - though tension lock couplings will prevent this of course. However, it should be possible to use radii down to 750mm with care and things still look/work ok. Even 900mm radius is incredibly tight in prototype terms, but compromises have to be made when space is a premium. However, one thing to investigate will be 'transition curves'. In other words, start with a gentler radius and gradually tighten it as the curve develops. It will prevent sudden changes of direction as stock takes the curve, but also require the use of flexitrack - though this should be no harder to lay than set track. Get the latest Peco, or use SMP or C&L & it will look better too - even if you go with the dreaded 16.5 I believe templates for making transition curves are available commercially.
-
MUCH, MUCH easier to post too.
-
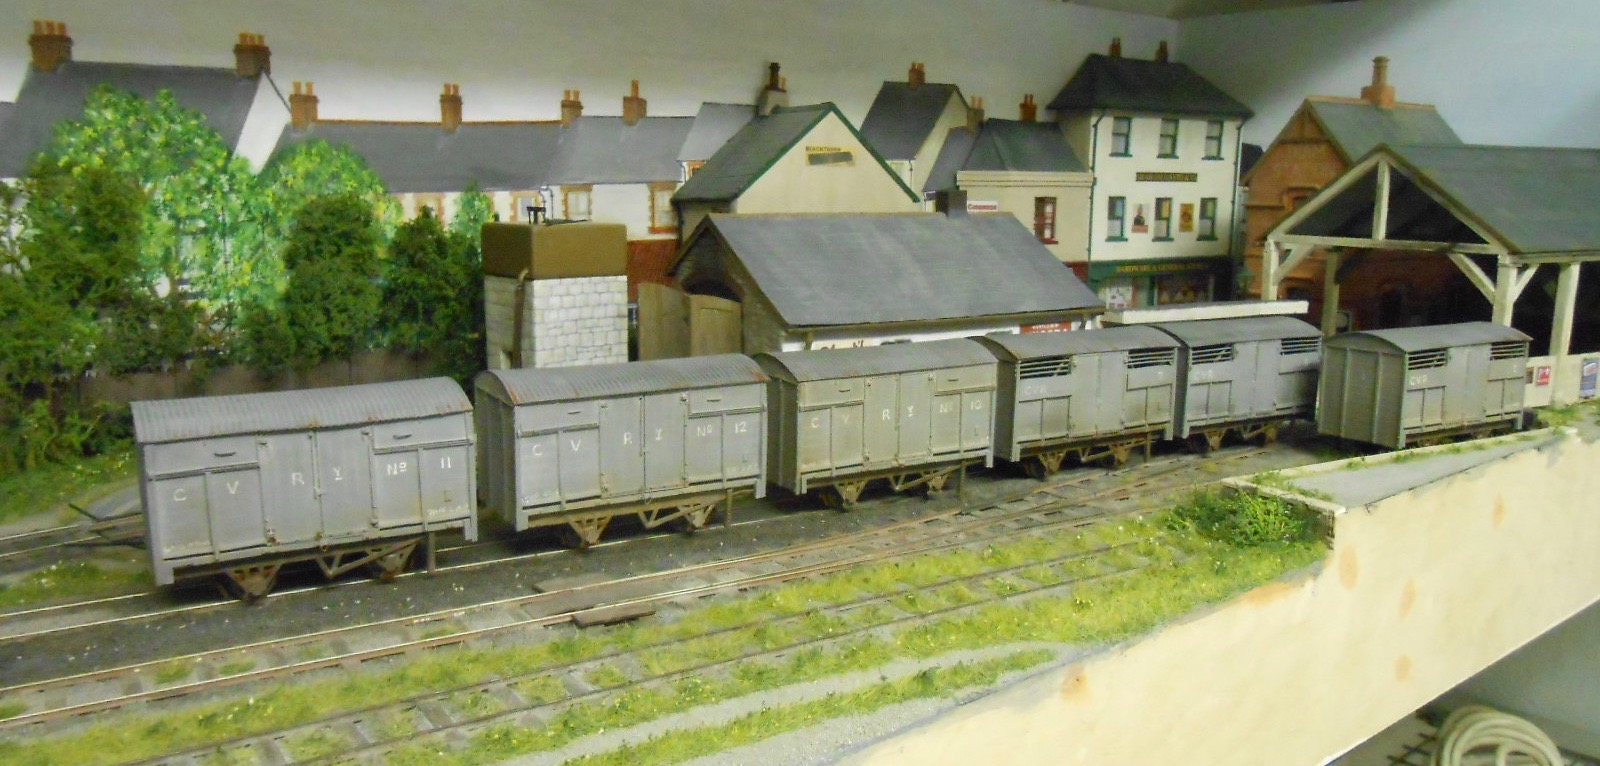
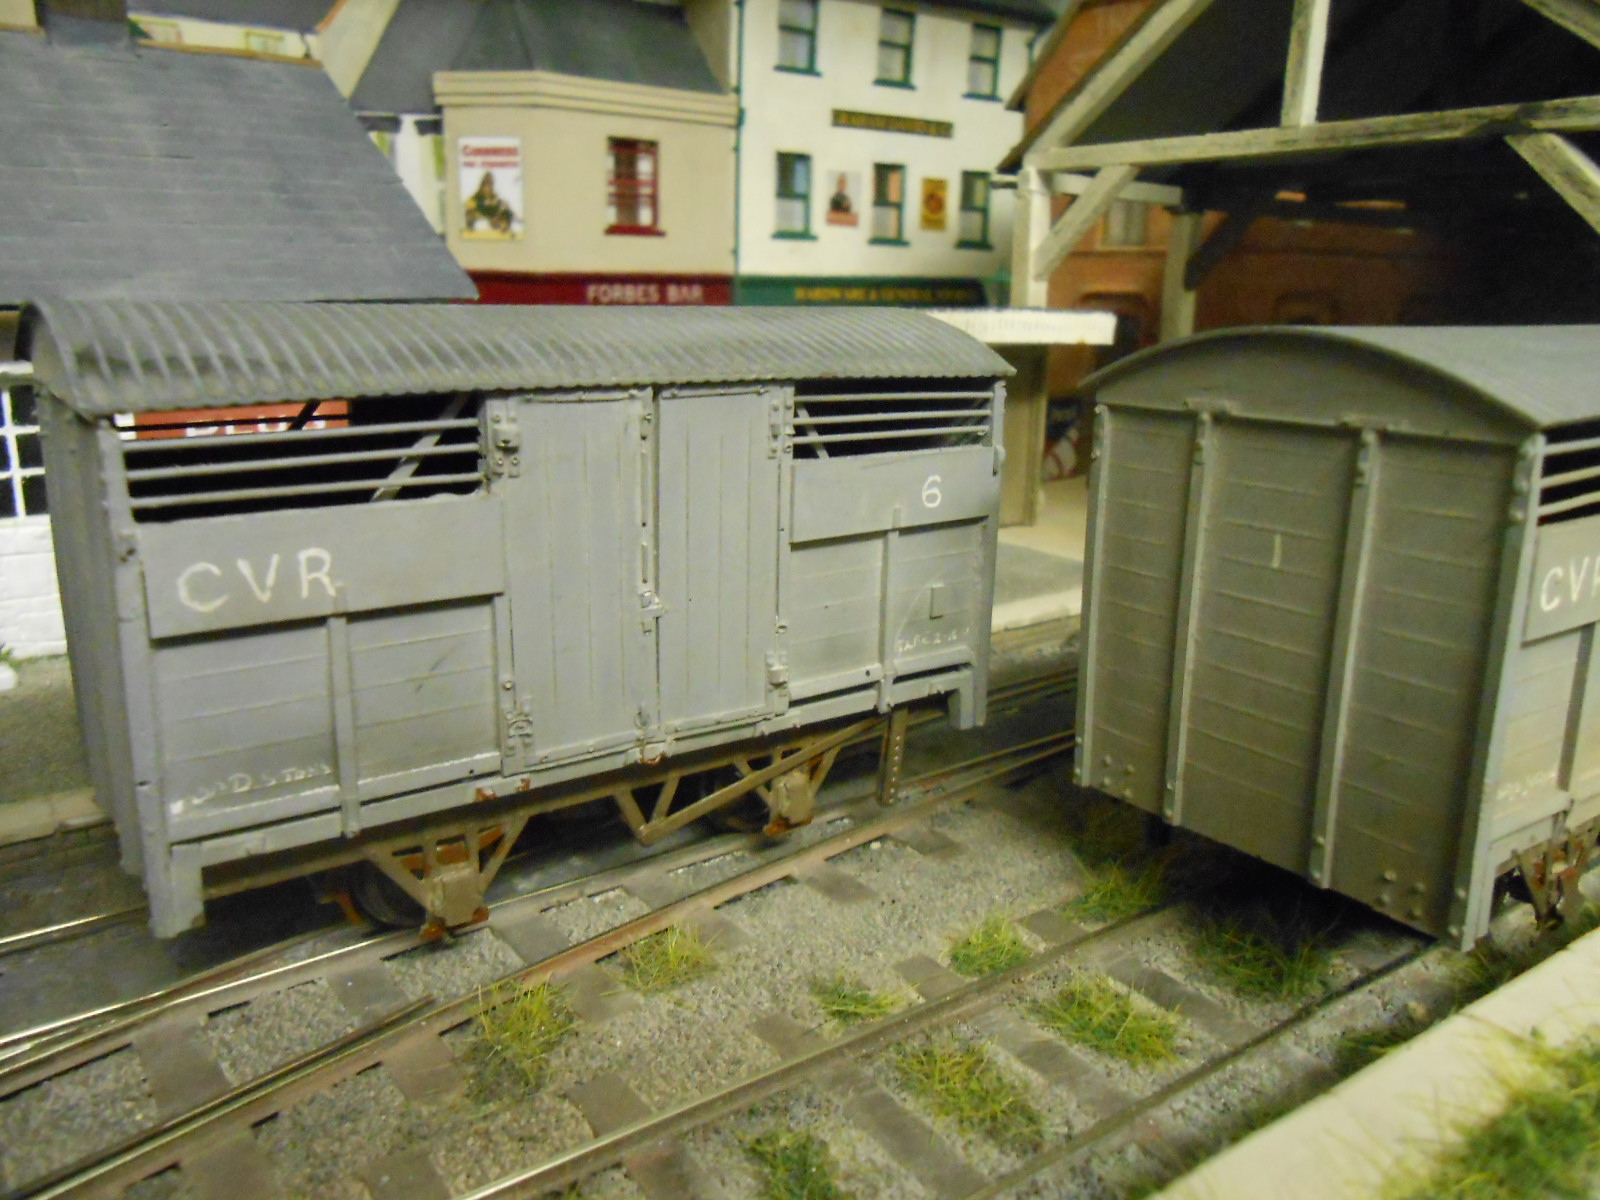
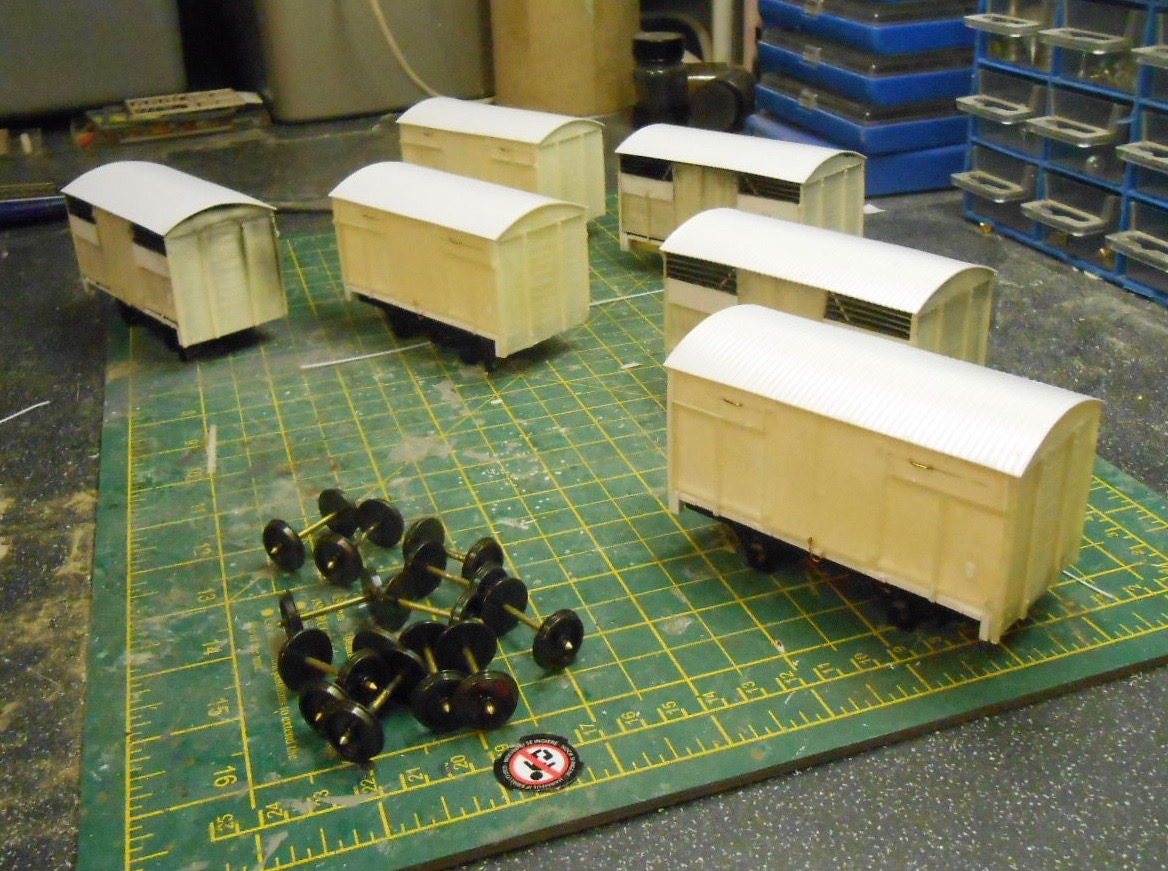
Wagons... Back in July, I posted drawings of Clogher Valley wagons that I'd made resin castings for. After what seems like an eternity, at long last a batch of six are nearing completion. All are cattle wagons, though half have their drop down sides closed, enabling them to serve as ordinary goods vans. Had hoped the resin sides & ends would speed construction & I suppose they did, but it has still proved a laborious process because the semi open nature of the wagon bodies meant I have had to add a lot of additional detail which could not be cast. There were also some areas which needed fettling because the castings did not come out as well as I'd hoped - mainly small details missing. In their unpainted state, you can pick out the areas concerned - mainly along the base, where there is a gap to allow old bedding to be swept out. The open sided cattle wagons also needed the bars adding, while the roofs were a bit of a pain, being corrugated iron. Slater's sheet was used for this, pre curved by wrapping it round a piece of plastic water pipe. The chassis are Branchlines, with wheels on new axles made from 2mm brass rod. Back to back dimension is 19.5 mm, with pin point ends fashioned on a slitting disc in a mini drill. Crude but effective. The brass wheels and axles will not get attracted to the rare earth magnets I'm using for uncoupling the Kaydees [yet to be added]. Another minor detail is the door chains, which I make from a single strand from multi strand wire, just twisted with a loop on one end.
-
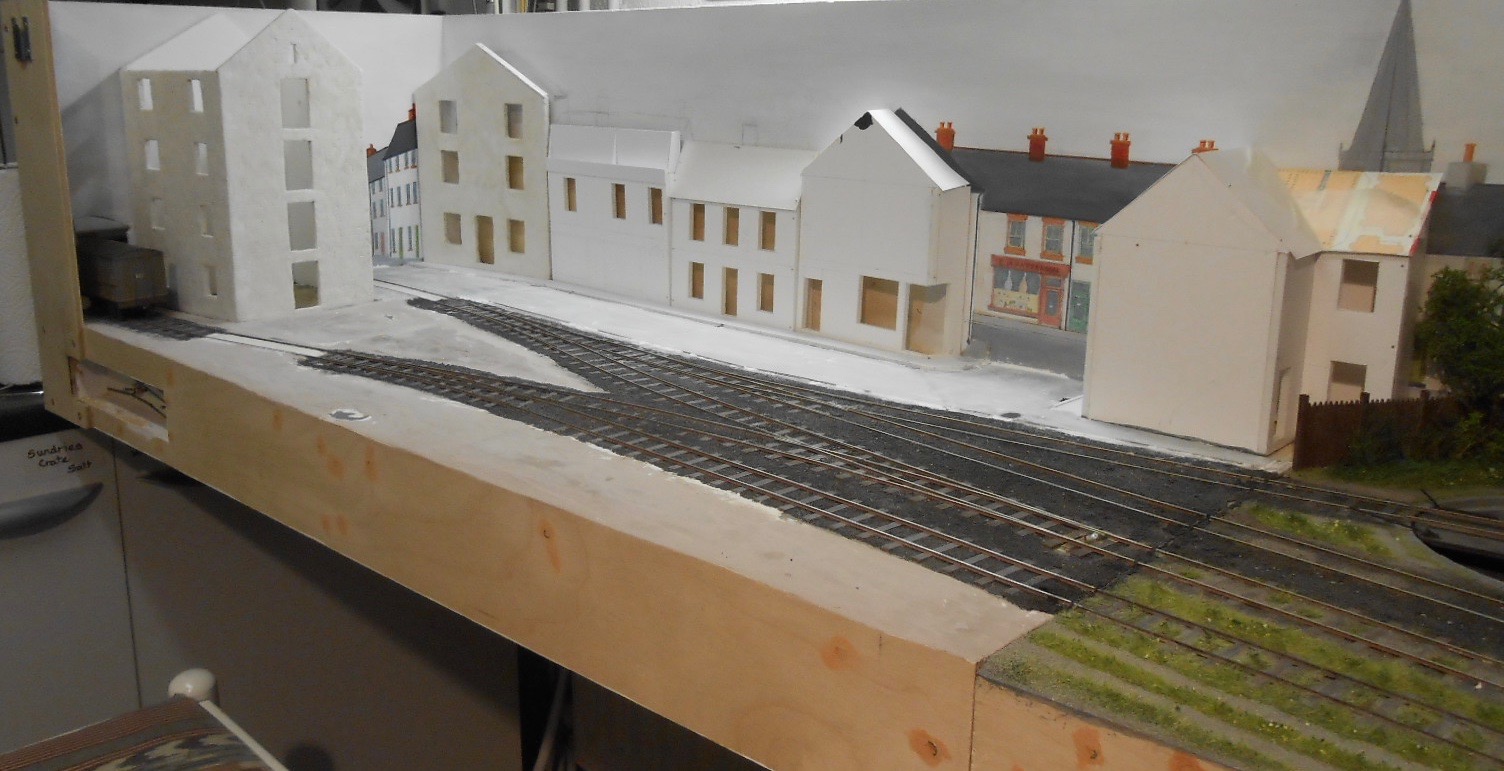
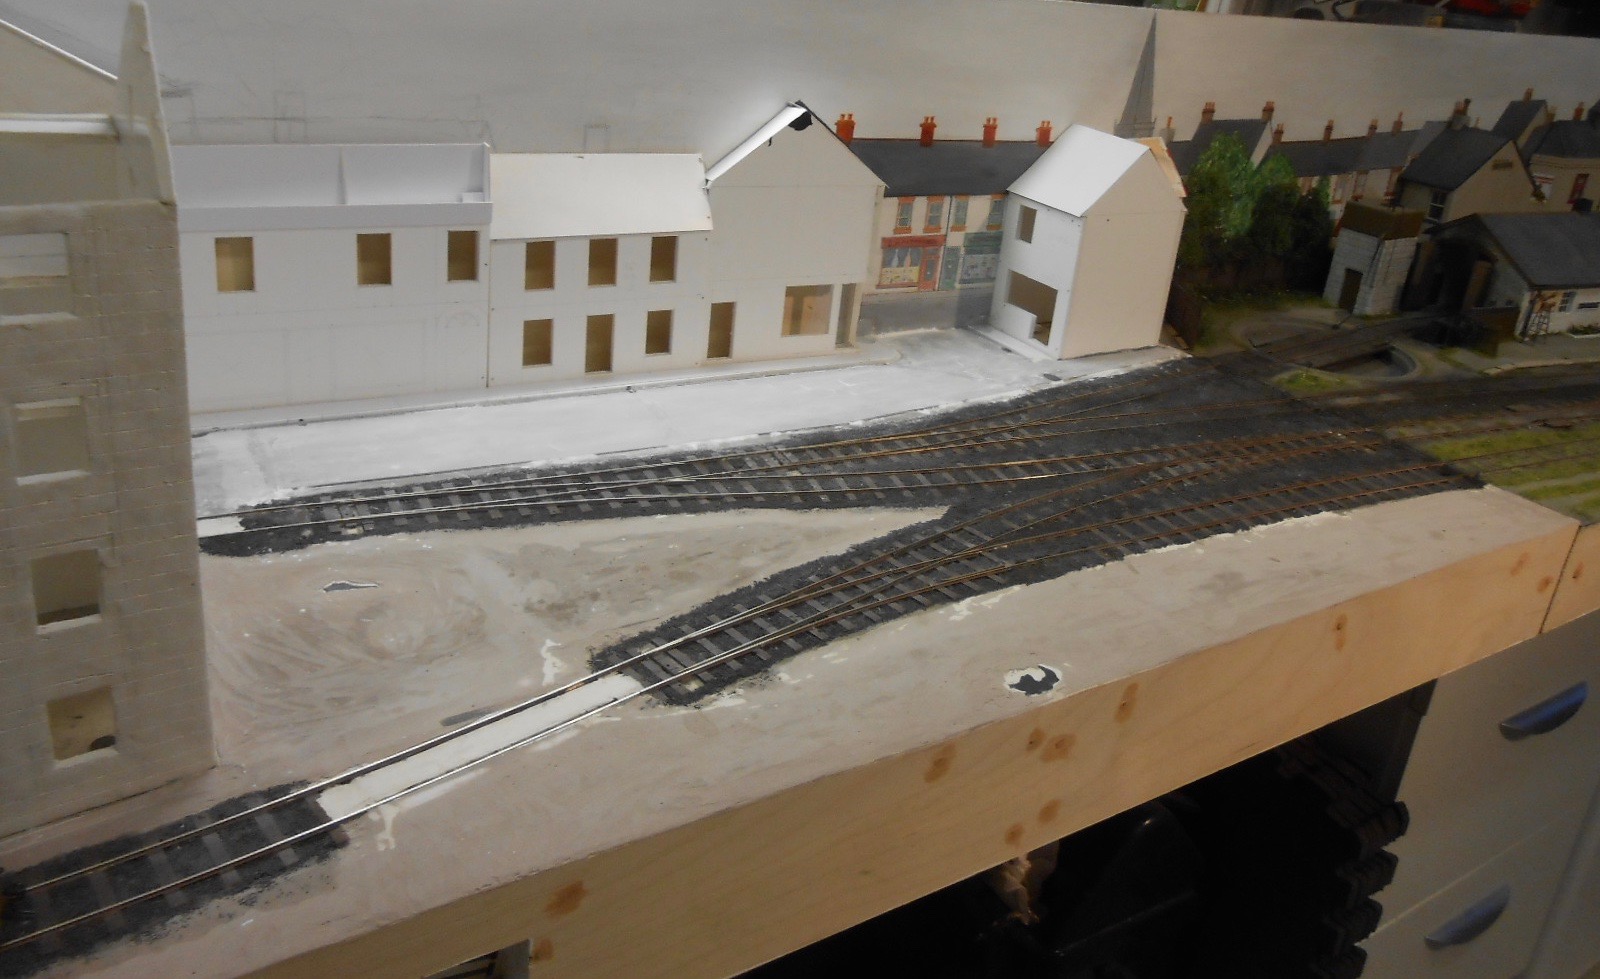
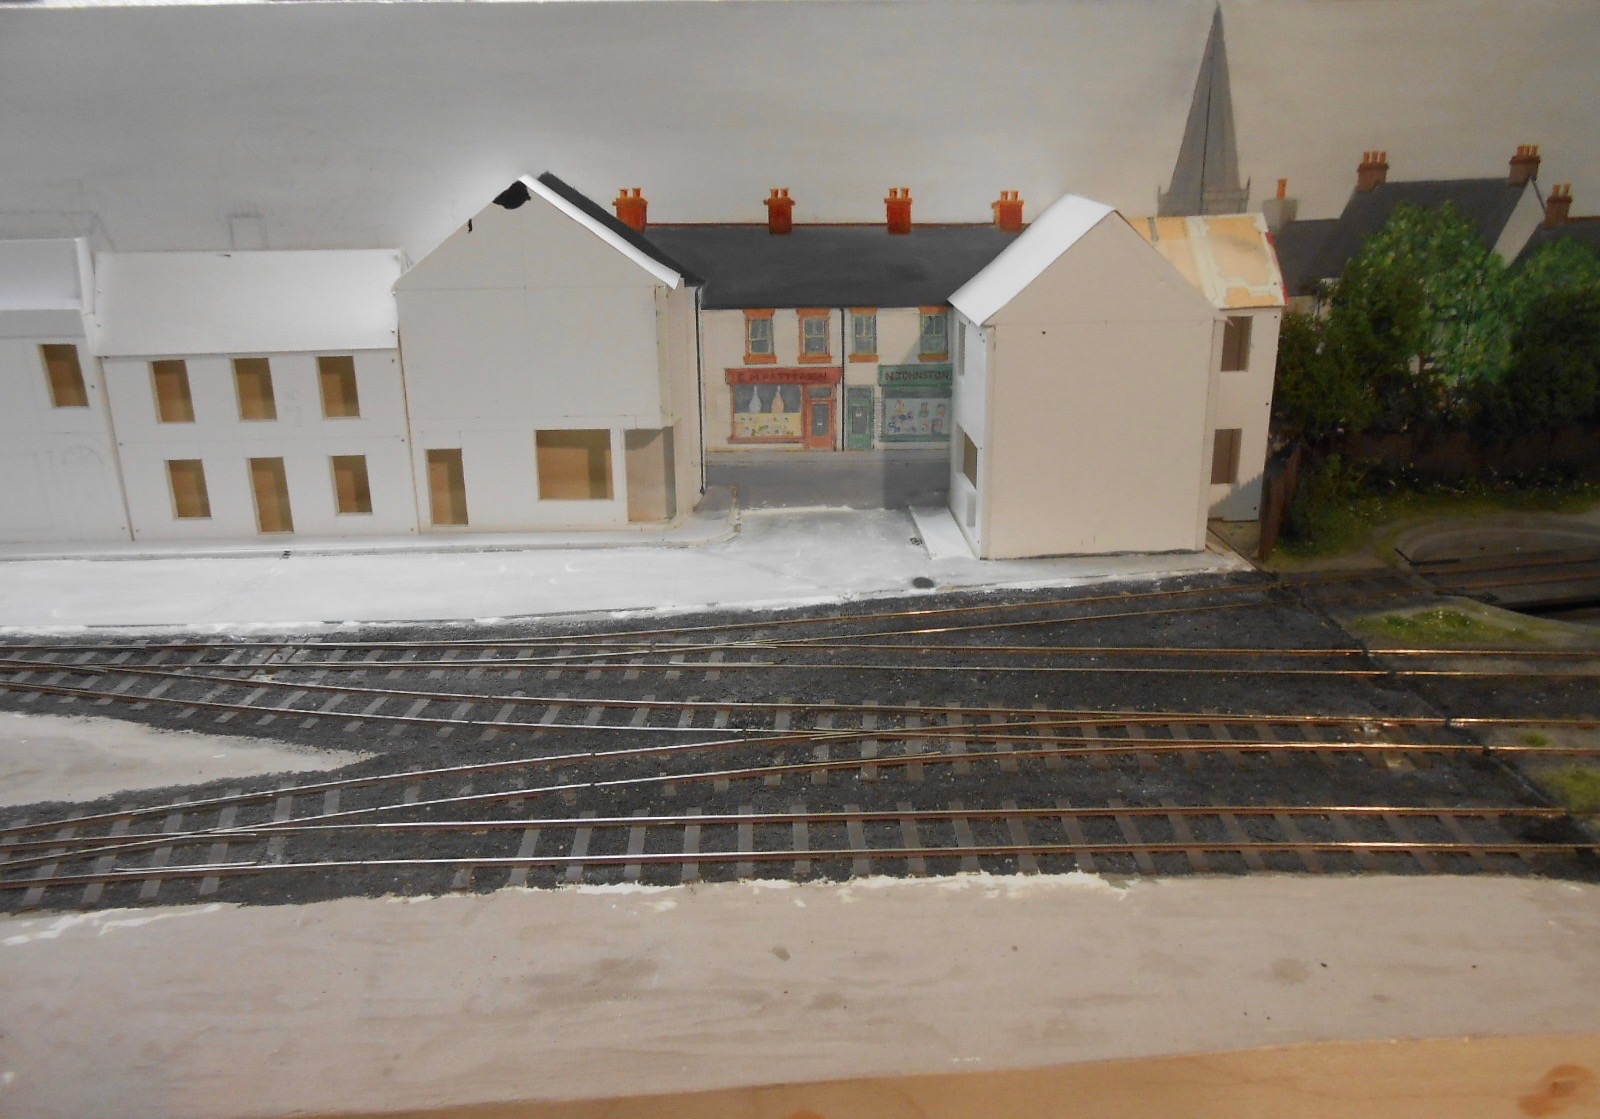
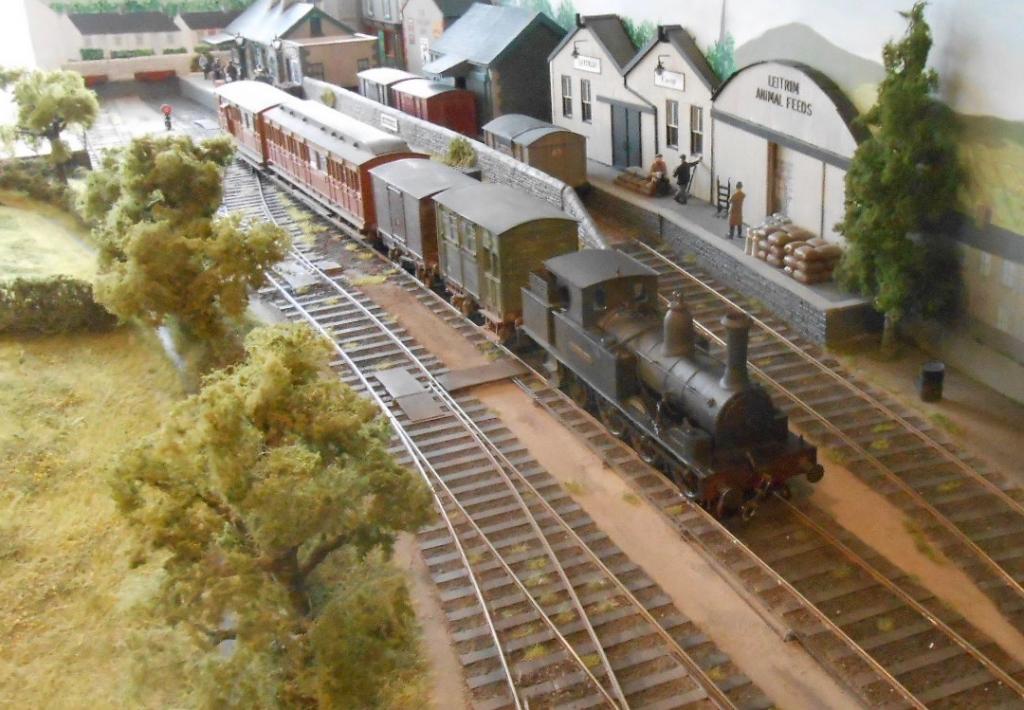
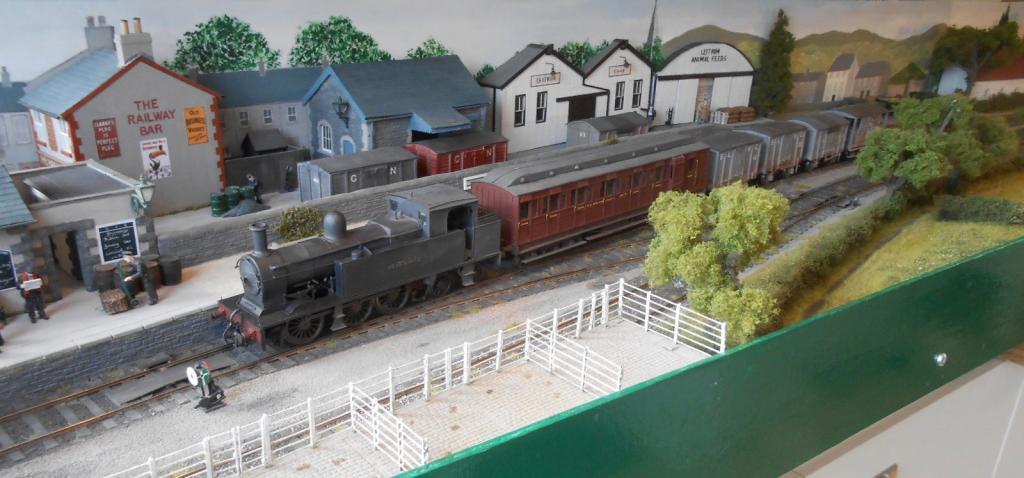
Arigna Town - this week's scenery
David Holman replied to David Holman's topic in Irish Model Layouts
If anyone is interested, there is a short piece of video on RMweb from the Farnham show last weekend. In the exhibition section, easy to find. -
Managed to get a copy on Saturday from Railbooks at the excellent Farnham Show. Well written and lovely photos. Well done chaps!
-
Only used it to give me drawings of 3' radius points in 21mm gauge for my Clogher Valley project. Prefer to use pencil and paper for planning, then wallpaper for full size. However, from what I hear, with time and patience it can be very effective.
-
If the goods yard is 1700mm in 4mm scale, then in 7mm it will be just under 3 metres. Food for thought?
-
2mm fine scale might work well. The Society now produces flexitrack and easy to make points, while there are replacement wheel sets which can be fitted in a matter of minutes to diesels. We're 3D printing to come up with some loco bodies, then considerable potential would be possible. The extra half millimetre of 2FS would make a different too, especially with correct profile rail. Broad gauge should be 10.5mm, which works out at only about 1mm wider, compared to 4.5mm if using 00 track in 4mm scale.
-
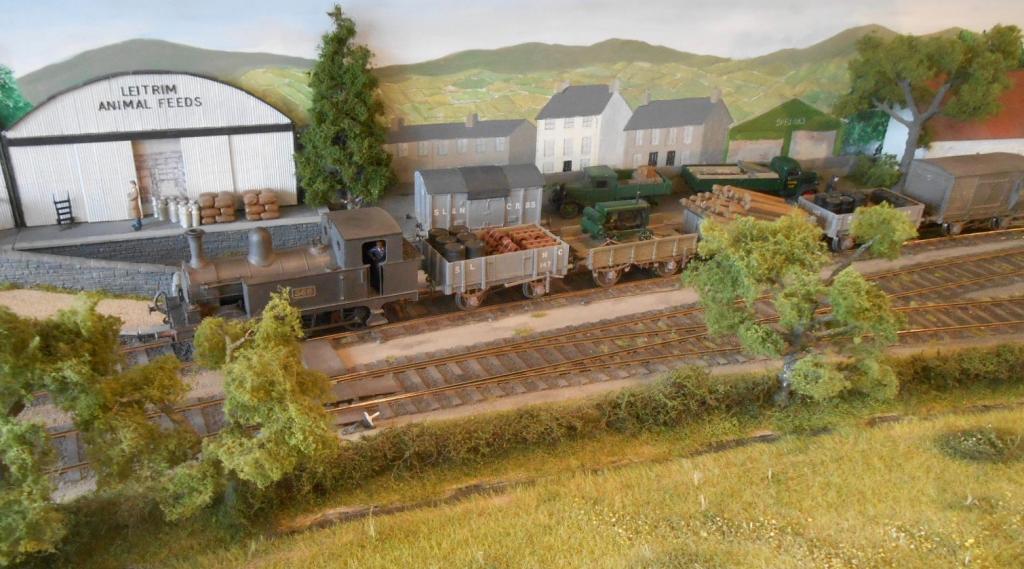
Arigna Town - this week's scenery
David Holman replied to David Holman's topic in Irish Model Layouts
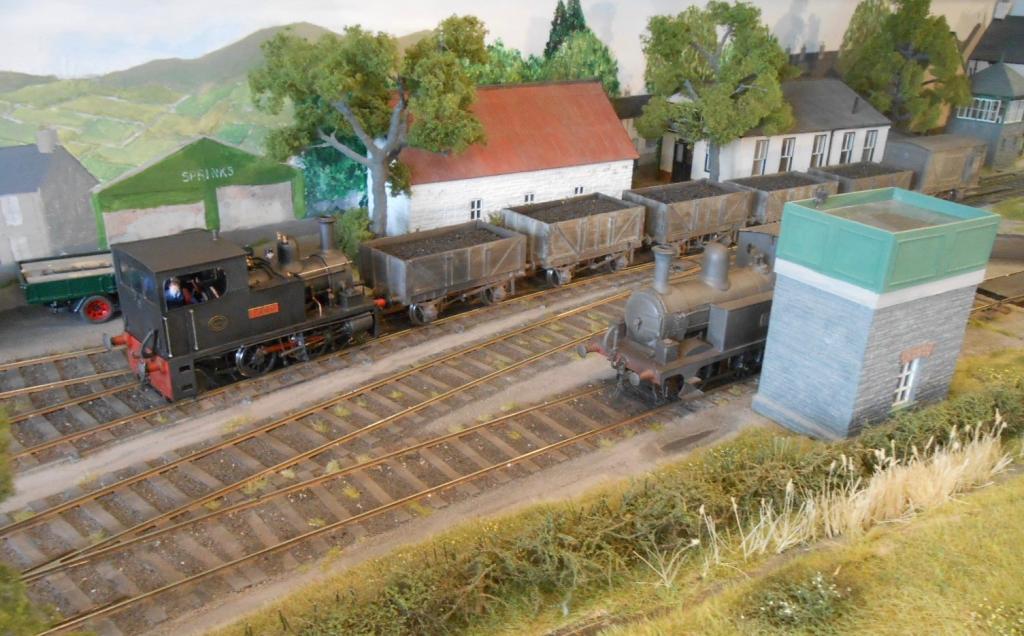
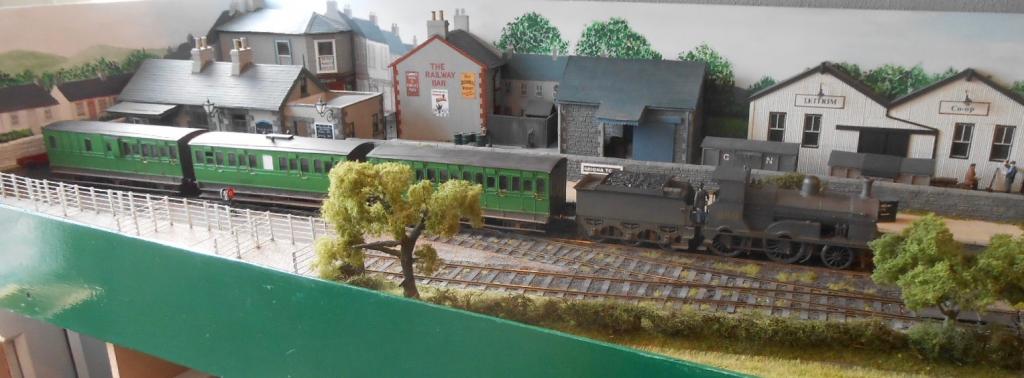
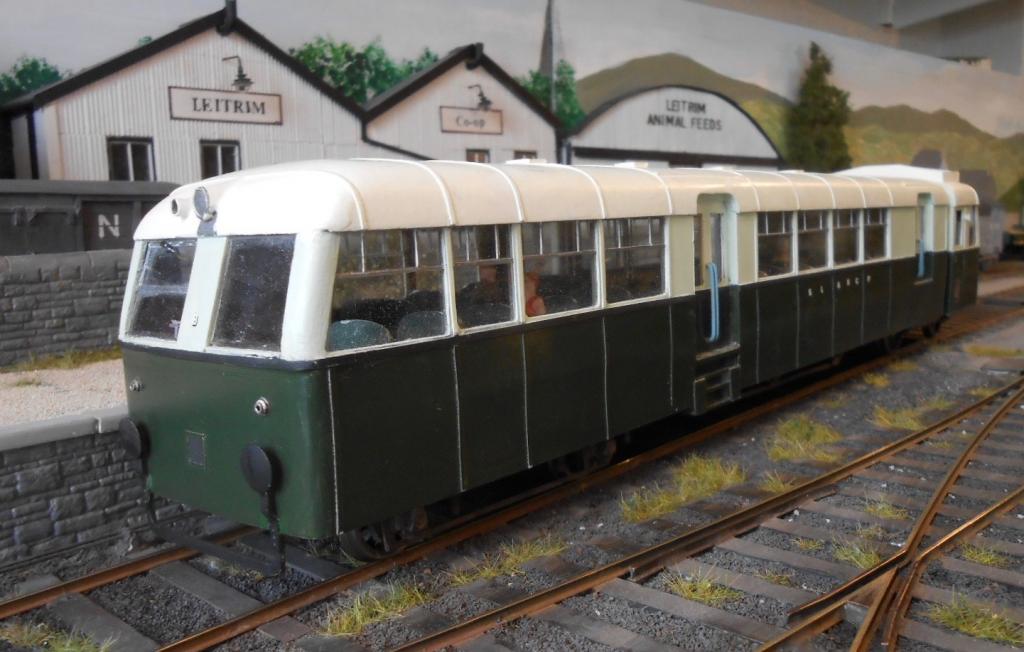
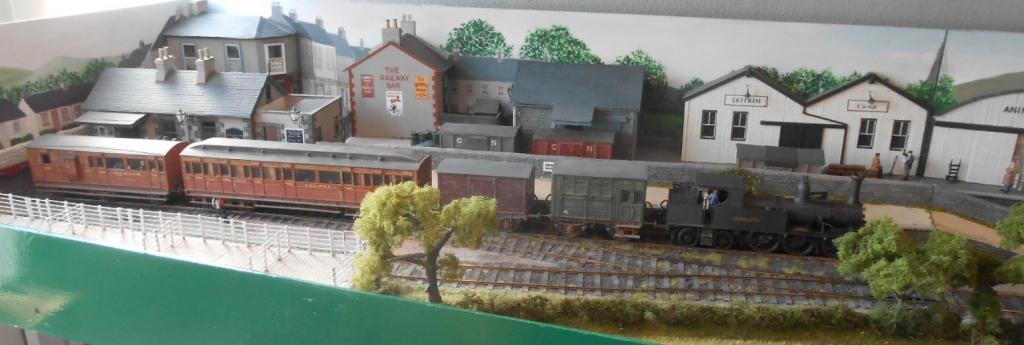
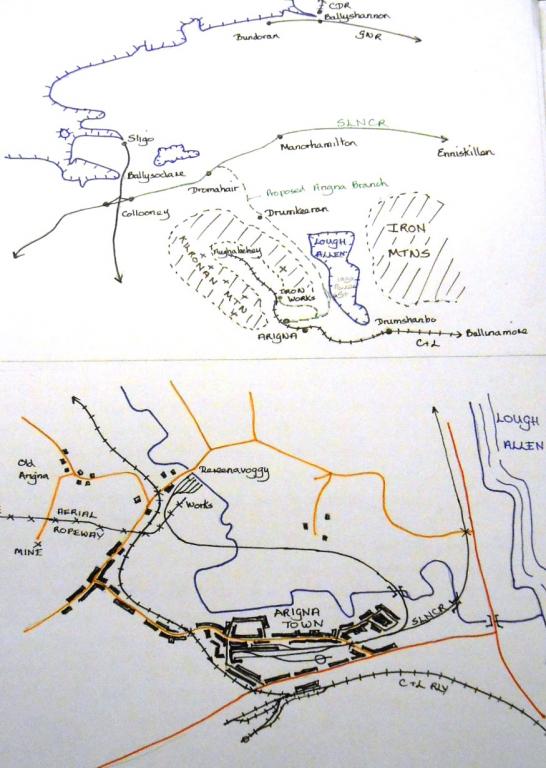
September 30th 1957 saw the closure of the GNR route through Enniskillen to Omagh & Derry. As a result, the Sligo, Leitrim & Northern Counties Railway promptly perished too because its sole line from Sligo to Enniskillen now had nowhere to go. There were proposals to keep the line from Enniskillen to Omagh open as a [very] long siding, to enable the SLNCR to still have an outlet, but this came to naught and of course would not have lasted for long as Omagh lost its railway in 1965. In my version of the SLNCR, the railway would almost certainly have had a future for many more years. Between 1902 & 1914, the railway considered various proposals for a line to tap the Arigna coalfields. Nothing happened of course, but my model assumes a line was built, jointly with the Midland Great Western. Running south-east, then south from Dromahair, it skirted the shore of Lough Allen, before turning west to reach Arigna. A short branch to the foot of Kilronan mountain [meeting an aerial ropeway from the coal mines] would have no doubt scuppered the Cavan & Leitrim's narrow gauge branch. However, being wholly in the Republic the SLNCR Arigna Branch may well have survived the 1957 closure of the mainline. Indeed, from 1959 onwards, Arigna coal was sent to a small power station on the shore of Lough Allen & given the Arigna branch would have gone past its front door, it seems safe to assume the railway could have survived until the power station closed in 1991. Now, Arigna Town's fiddle yard is actually full & has been for some time, but I still have hopes of doing a diesel period one day. Maybe the mine engine, 'Lark', would have kept going long after the end of steam on the branch. Alternatively, a G Class [Deutz] diesel could have been just the thing. Any mixed freight would presumably have been in the hands of C class or 121 diesels, while one would hope Railcar B would have stayed on to deal with local passenger. I do actually possess a DCC controller, so could even consider adding sound - assuming chips exist from the Deutz, C, etc, plus a Gardener diesel, of course! Anyway, to commemorate the anniversary, I've taken a few new photos, from slightly different perspectives. The usual 'exhibition' trains all feature, though some are a bit longer than normal, as I don't need to be limited to five wagons and a brake in this instance. Depending on what order the photos upload, there is the map of the system as I imagined it [which now comes up on a Google search for SLNCR!], then the mixed train, cattle train, excursion, MGW excursion, coal train, stores train & the railcar. The SLNCR was a fascinating, unusual & highly individual railway, so this is my tribute 60 years after closure.
-
'Sixty years since Border rail transport ran out of steam'
David Holman replied to Garfield's topic in General Chat
...and 60 years since the Sligo Leitrim closed too. -
As always, time spent now on preparation should be well worth it in the long run. Enjoy!
-
Arigna Town - this week's scenery
David Holman replied to David Holman's topic in Irish Model Layouts
Not 'over the water' any time soon, I'm afraid. Cultural last November was my only excursion that way thus far. A four day trip for a one day show! Would not have missed it for the world, but with a 300 mile drive just to a ferry port it is quite an undertaking... Coming up at Farnham in October, Brighton in November, Lincoln in February and Derby in May. Guildex (Telford) in September, plus Warley next year are other trips north.