David Holman
-
Posts
4,359 -
Joined
-
Last visited
-
Days Won
117
Content Type
Profiles
Forums
Events
Gallery
Blogs
Everything posted by David Holman
-
We wish!
-
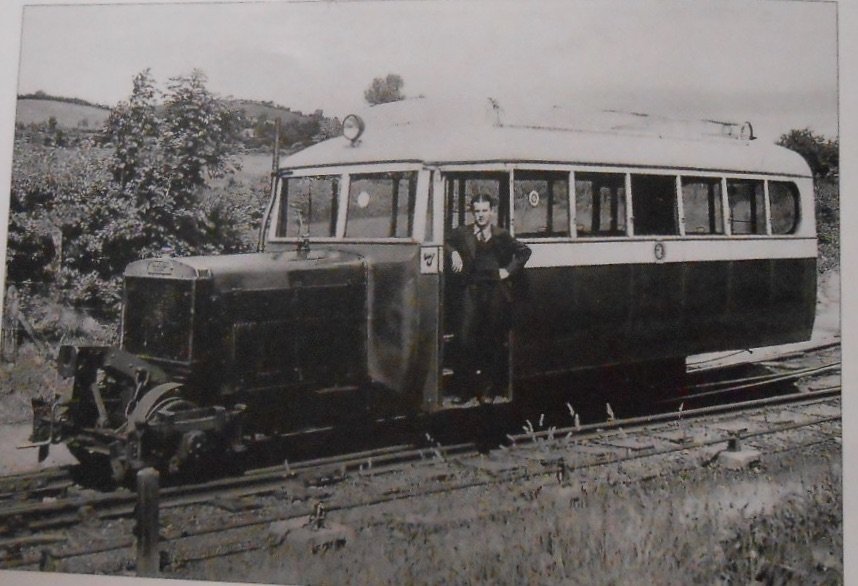
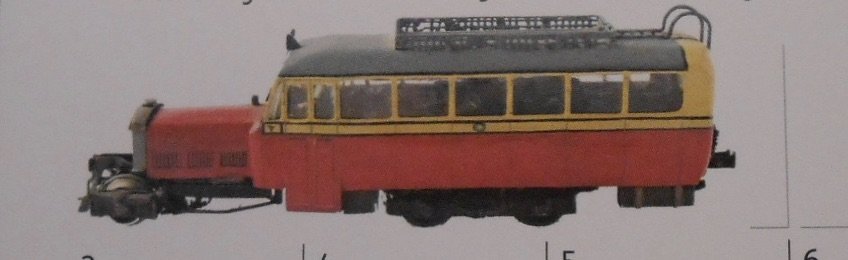
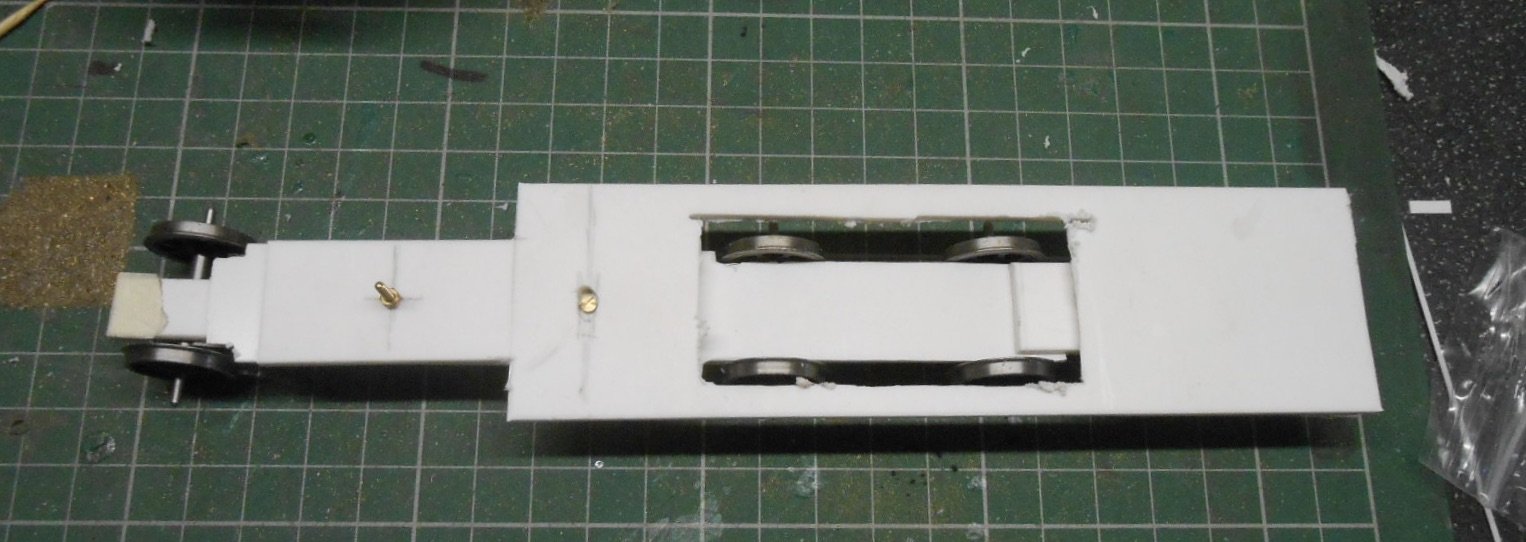
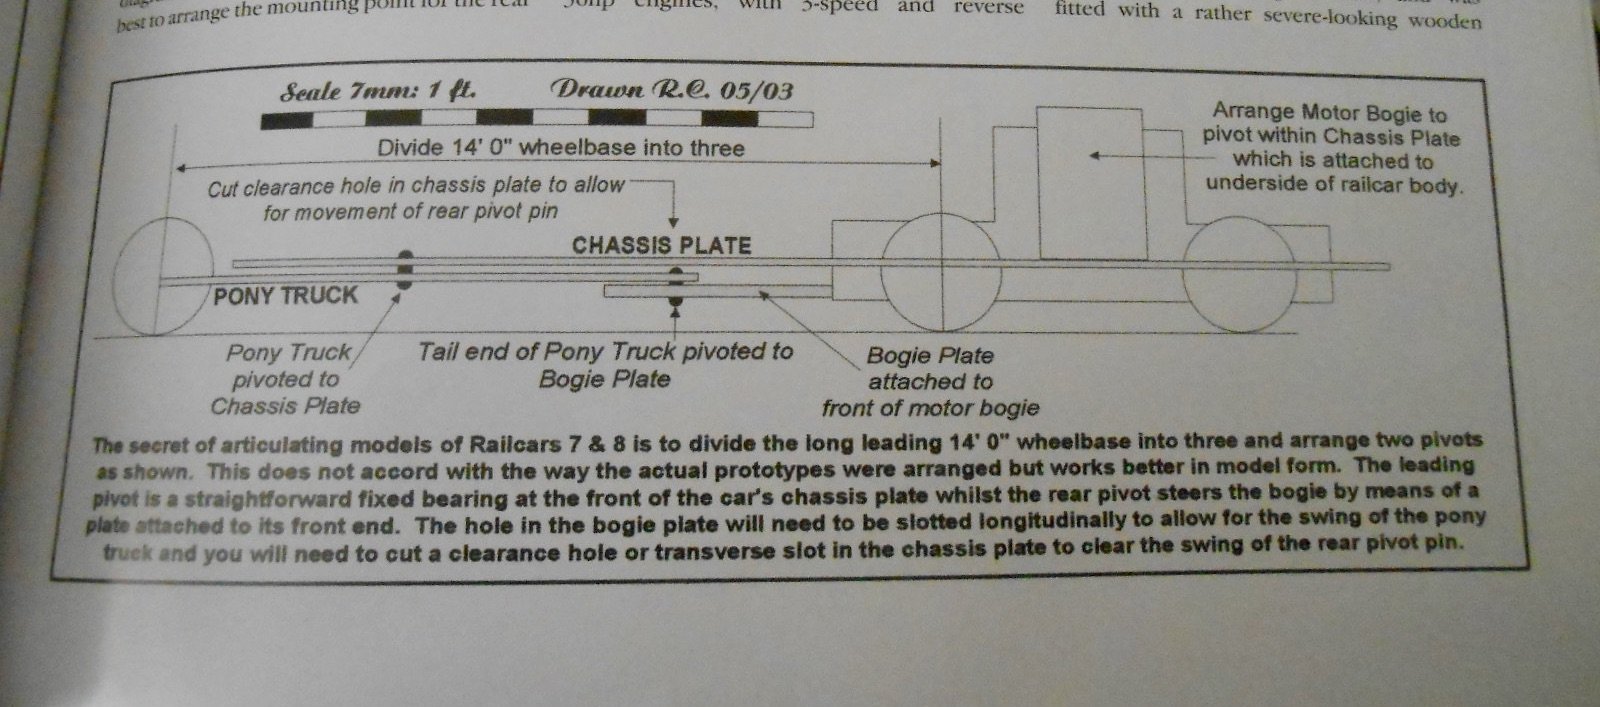
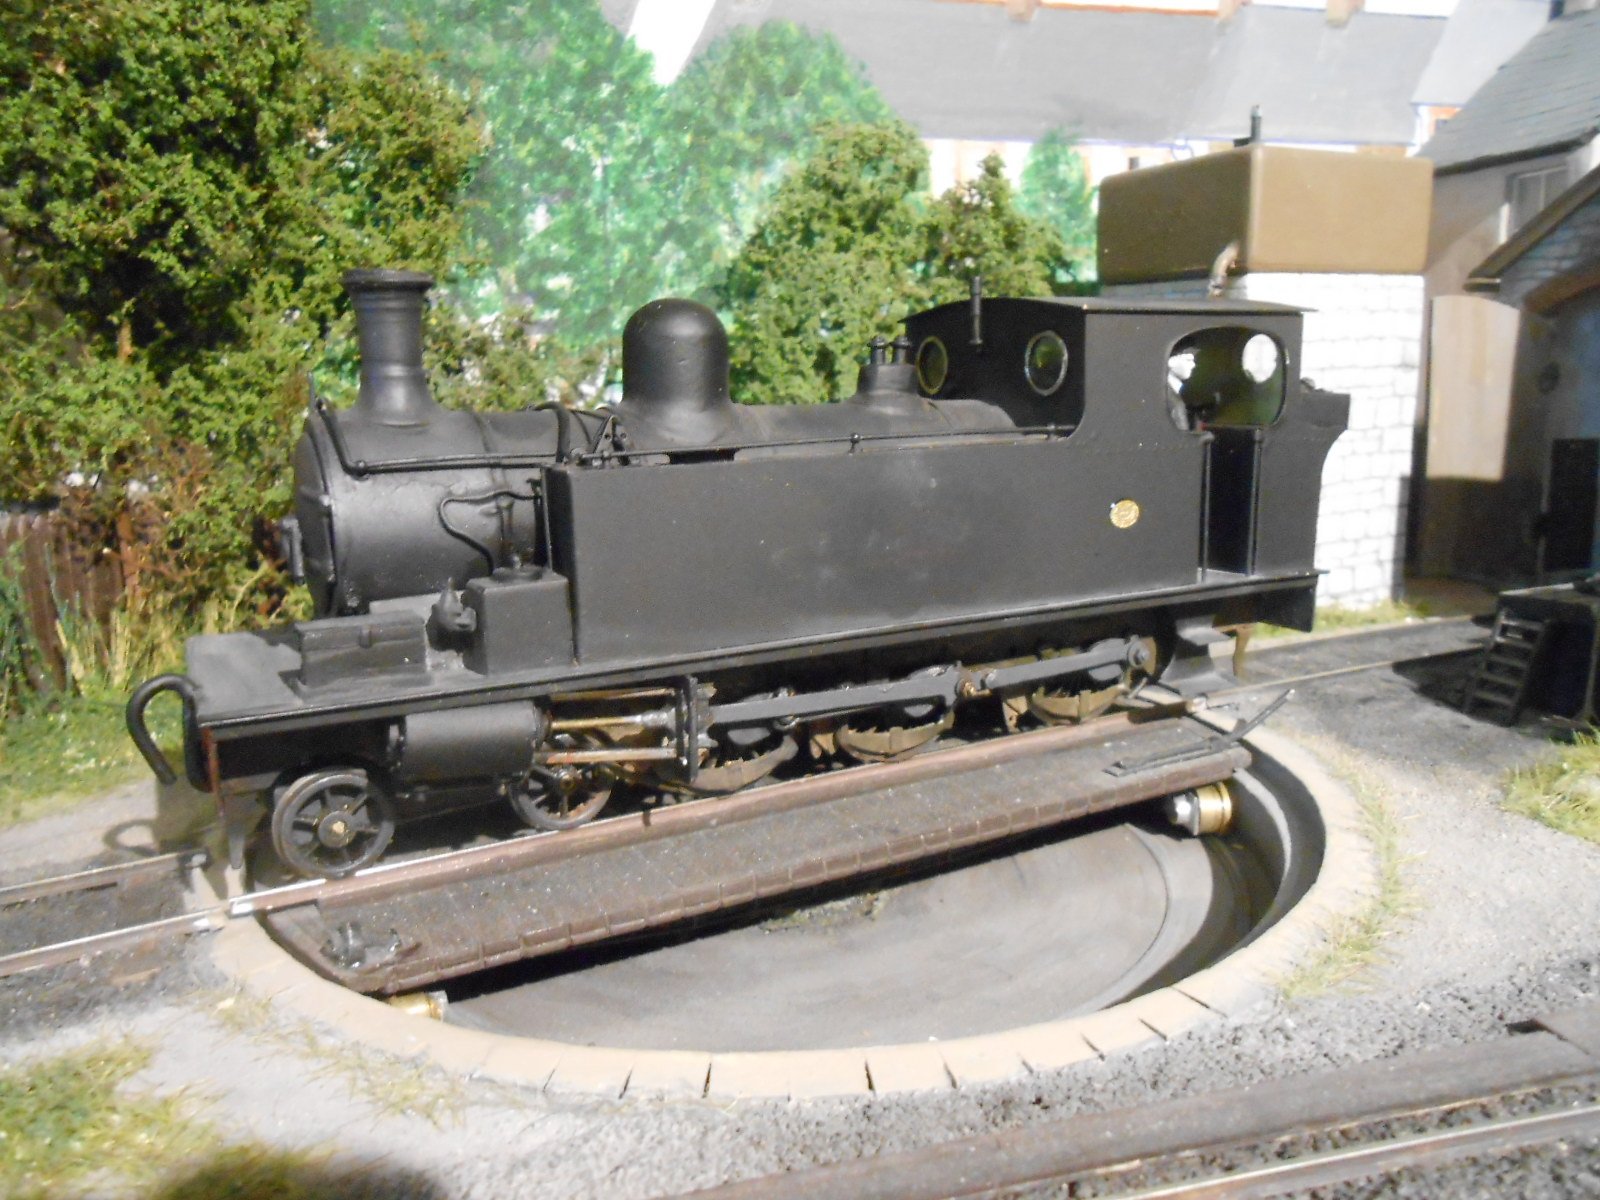
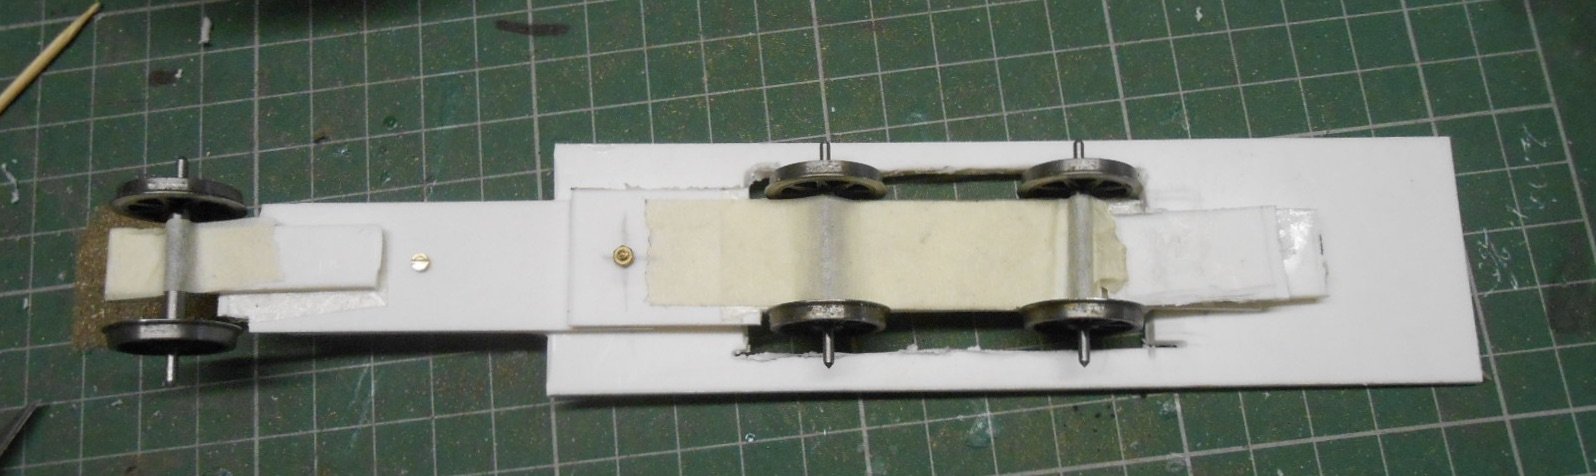
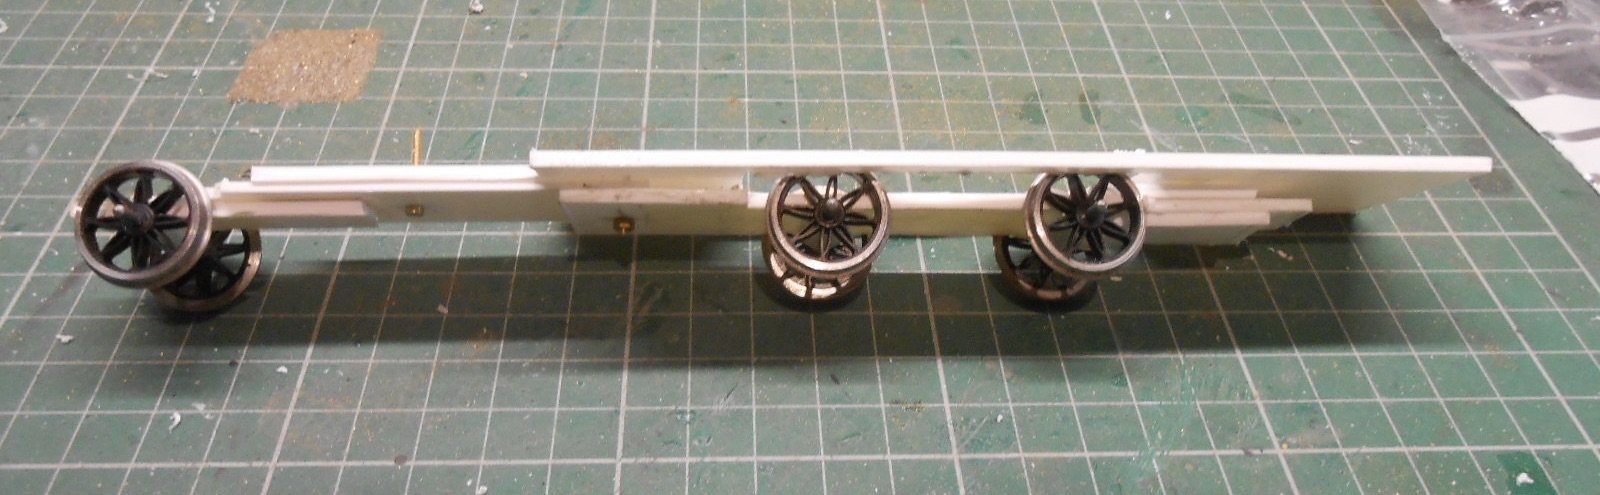
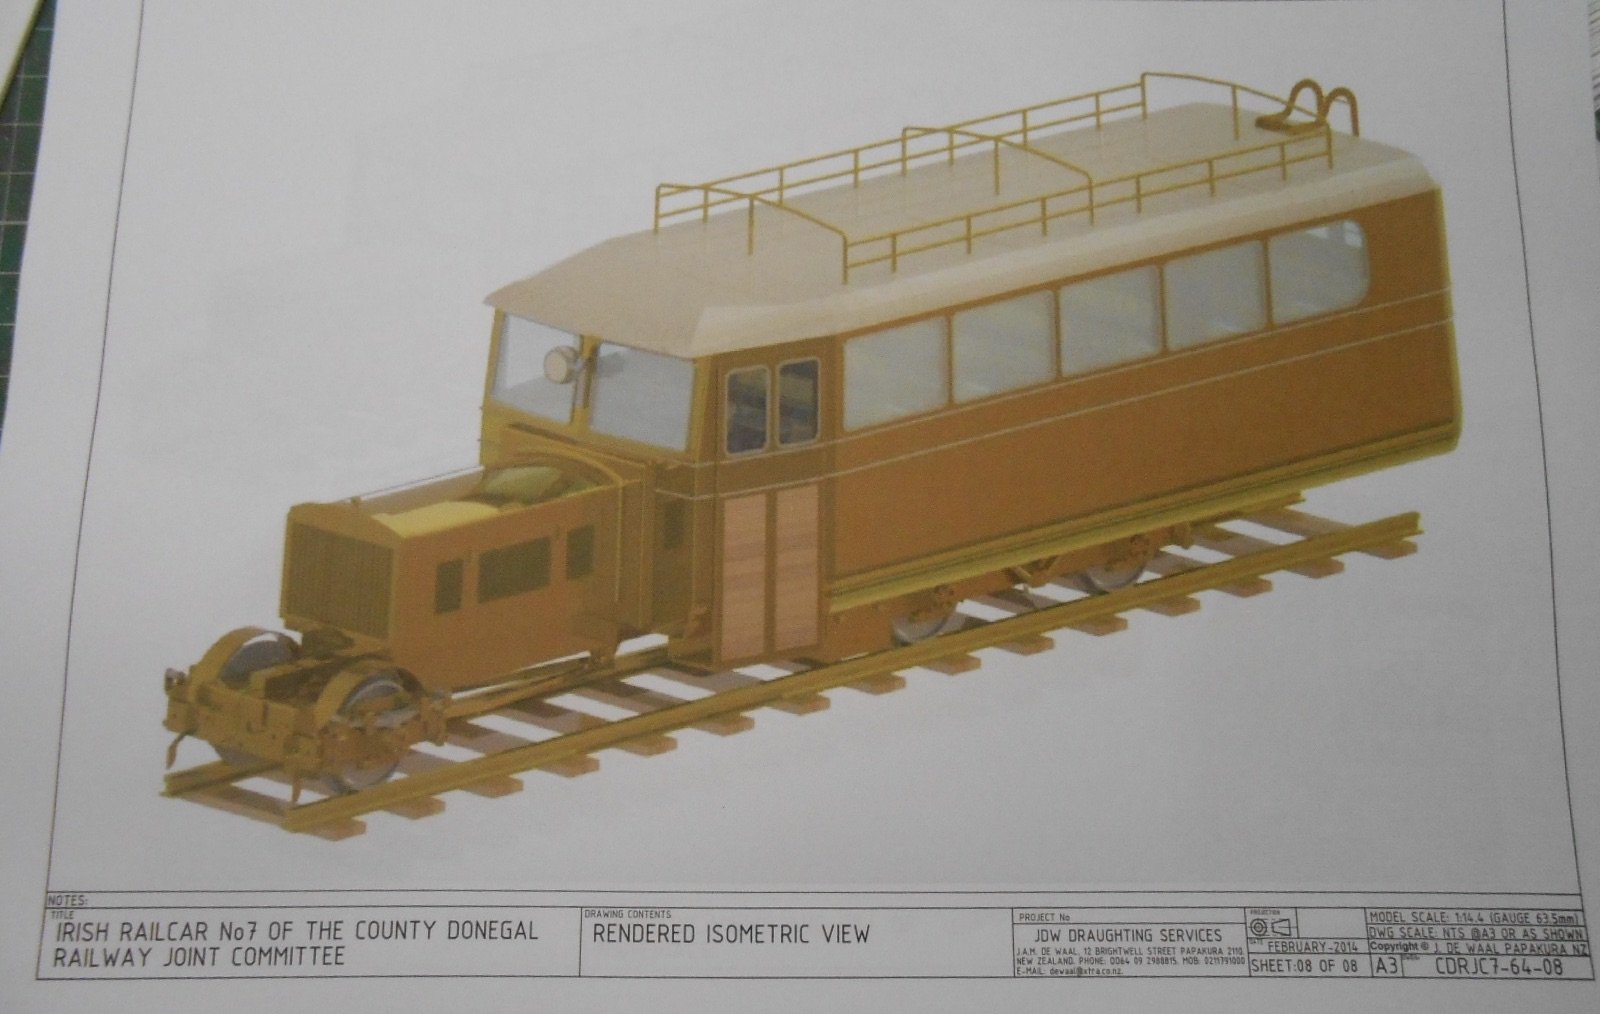
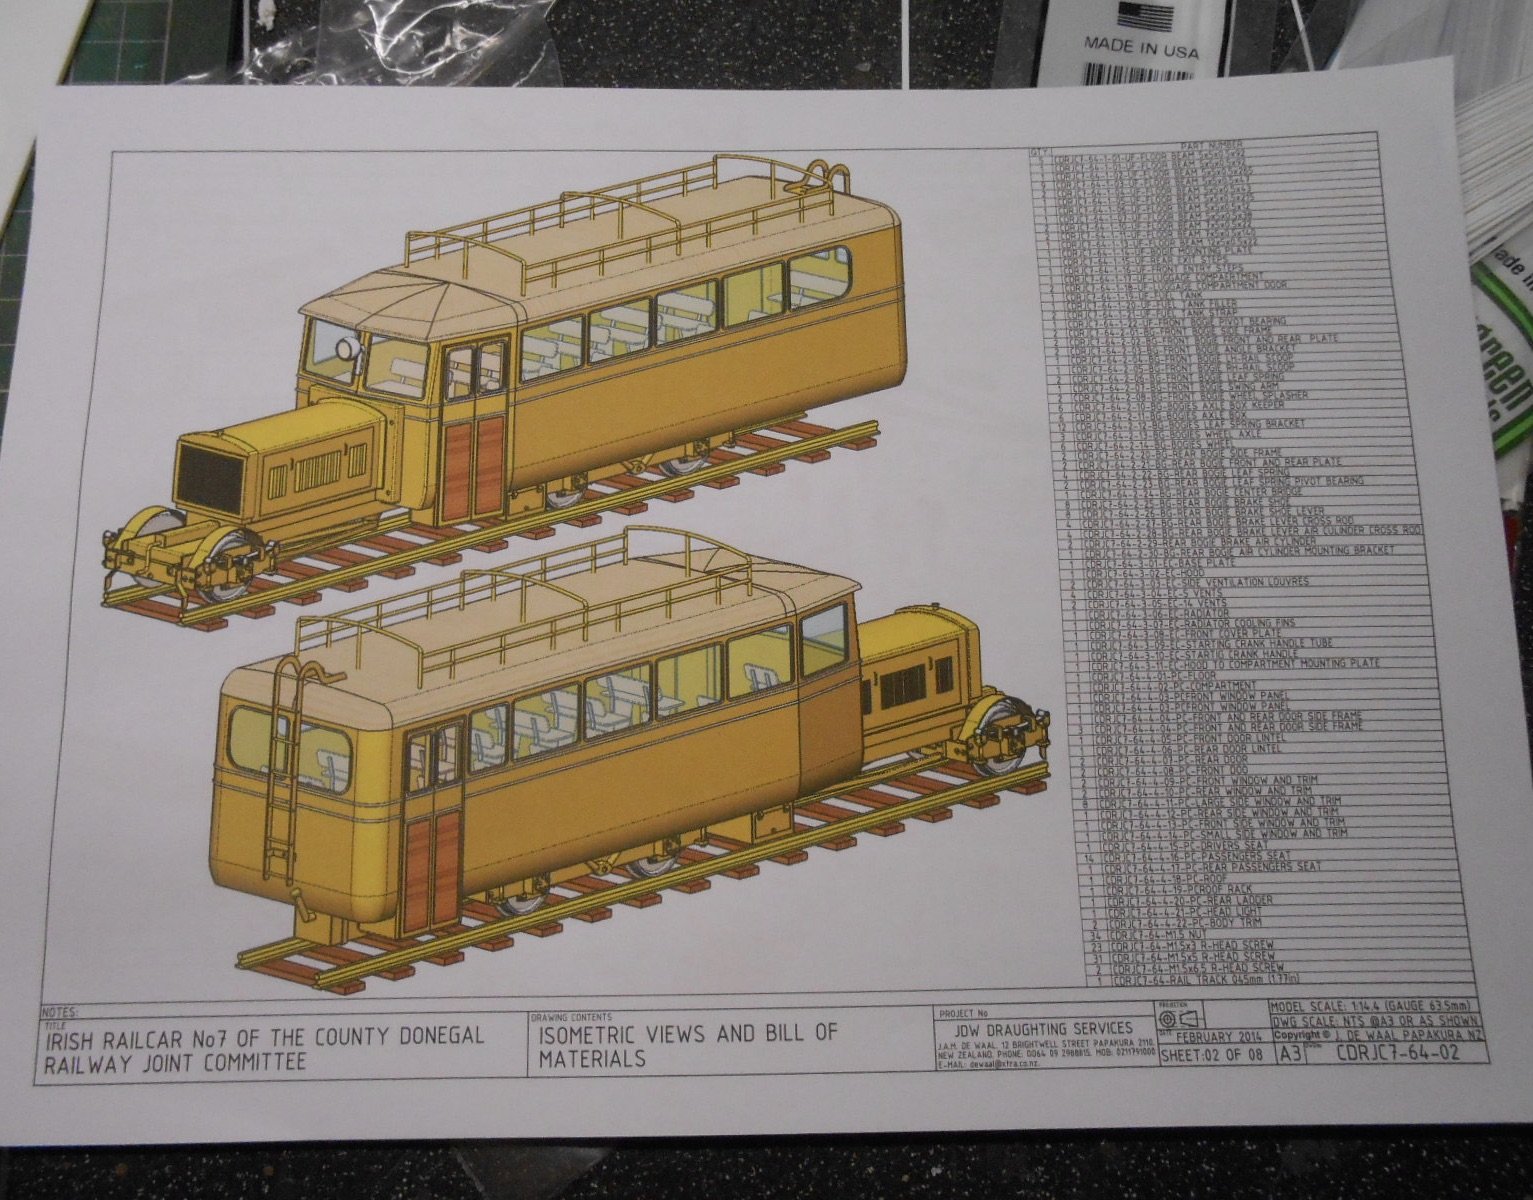
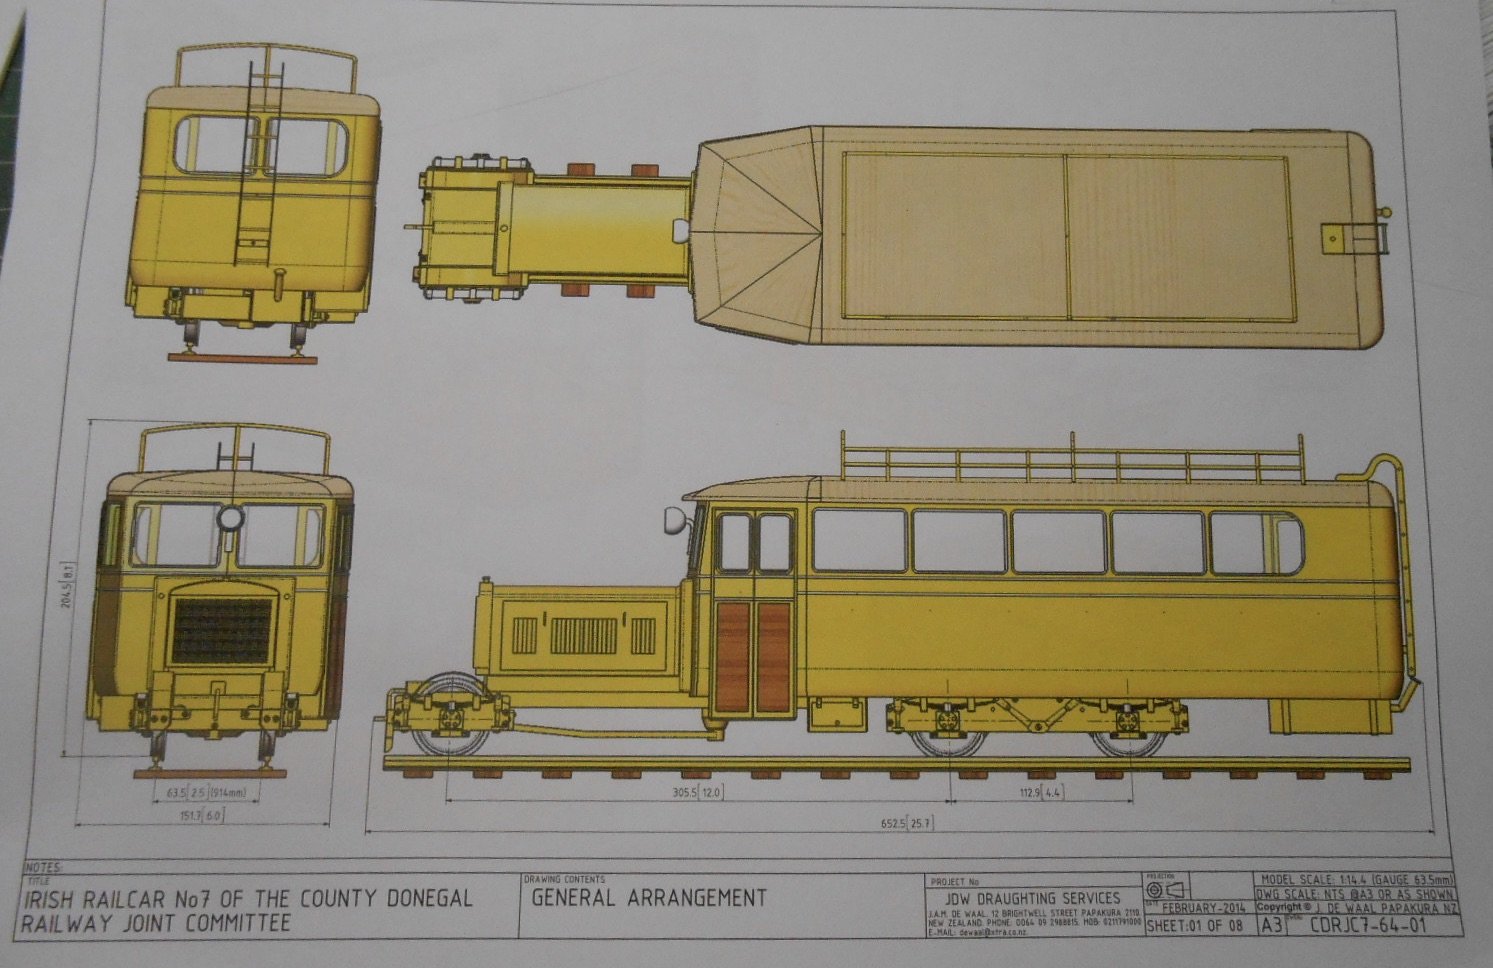
The builders plates finally arrived for the Barclay tank, so have now been glued in place. Slightly disappointed with them as they are not legible, but they only cost me a fiver, whereas the set I commissioned for Wolf Dog came to over forty quid. You pays your money... So. while there are unfinished projects with both Swilly and Donegal wagons, decided it was time to start looking into a brand new project, namely Donegal Railcar number 7. Part of my Swilly-Donegal makeover for Fintonagh involves repainting Clogher Valley Railcar No 1 and likewise making Phoenix out over the Atkinson-Walker tractor. However, I want at least one more railcar and it will need to be one of the earlier models as none of the later, four coupled ones will fit on my turntable. So, number 7 it is, or indeed number 8. They were historic vehicles, being the first ever diesel railcars, certainly in these islands and maybe anywhere. They could haul up to four wagons and often worked in tandem with other railcars. Photos are available & I have a couple of decent drawings, plus there is a useful section in Roger Cromblehome's County Donegal Companion. So should be straightforward then? Well, not exactly it seems. The main issue is the chassis, with a scale 14 feet between the rear bogie and the front pony truck. The latter is pivoted just under the driving position on the prototype, but Roger suggests this will not work well on tight curves in model form. The bogie itself is 5'6" wheelbase, which if trying to adapt a 4mm scale one means 38.5mm and so far, have not been able to find anything suitable. However Mark Clark's 'Locos & Stuff' website offers a host of 3D printed options and with Mark being a Chatham Club member, this seems the way to go. Mark is also one of life's genuinely clever people who has taught himself 3D printing, in the process learning how these machines actually work. He also understands way more about mechanical things than me & agrees with Roger's description on making the railcar's chassis. The photo above shows the basic principles, while those below show my lash up, in plasticard, which I did this morning in an effort to understand how it works myself. The wheels are just held in place with tape [they are too big anyway], but despite my doubts, the idea does indeed seem to work. What fuddled my brain most was the single fixing point to the chassis plate [at the front pivot]. The front pony truck swings on this while the motor bogie will pivot from a second point further back. What wasn't clear [to me anyway] in Roger's drawing is that the main chassis plate [which is fixed to the bodywork] rests on the rear of the motor bogie giving all important weight to this and therefore aiding traction. Anyway, am leaving this to Mark as [like one or two folk on this forum] actually finds this stuff fun! So, watch this space. Am sure it will not be a quick build and in any case will need to fit round other stuff. However, discovered something that Mayner is no doubt familiar with the other day, in the form of a fine set of large scale drawings for a 1:14.4 [64mm gauge] drawings of the railcars. Scroll down far enough in a Google search and you'll eventually come across them. They appear to be made for what looks like a laser cut wooden kit, but certainly offer a lot of interesting detail.

-
To regauge or not to regauge that is the question
David Holman replied to TippTrainLad's topic in General Chat
Nobody should think 21mm gauge requires P4 standards. 00/EM finescale (ie existing wheels) should be fine. However, do not expect to use sharp radius curves or points - they will need to be at least 3 foot radius, unless you are using short wheelbase stock and even then two feet will be pushing it. Also, while modern diesels seem easy enough to convert, steam outline models are not. -
No great links to the Irish scene, but they are closing after 50 years of making some very fine kits. Fortunstely, Squires are taking over. Meanwhile the Warley Club are going to run a new exhibition next year at Statfold Barn with its rather splendid collection of narrow gauge locos. The above from the latest edition of Railway Modeller.
-
- 3
-

-
May be wrong, but my impression was you can't do much with these Mamod engines other than run them round a circle of track, so once the initial novelty wears off, suspect most will have sat on shelves/gone back in their boxes. Apart from the general lack of controlability, as already outlined, they work via the cylinders rocking up and down like a see saw, as per other Mamod products, so not exactly prototypical either. That said, as a project for a tinkerer, there is scope to get them running nicely, but not for the faint hearted.
-
Production Complete - A First Look At Our Bulleid Open Wagons
David Holman replied to Warbonnet's topic in News
Looks another fine model. Who is going to be first in giving them some serious weathering? Looking forward to seeing the results. -
Great news Paul - and about time! If I had mine again (and knowing what I know now), S would be very tempting. Lovely scale, lovely size and that rather enigmatic, imperial track gauge too. Sixty three sixty fourths of an inch for those who didn't know. Looking forward to reports as the project develops and what a jewel Elf is too.
-
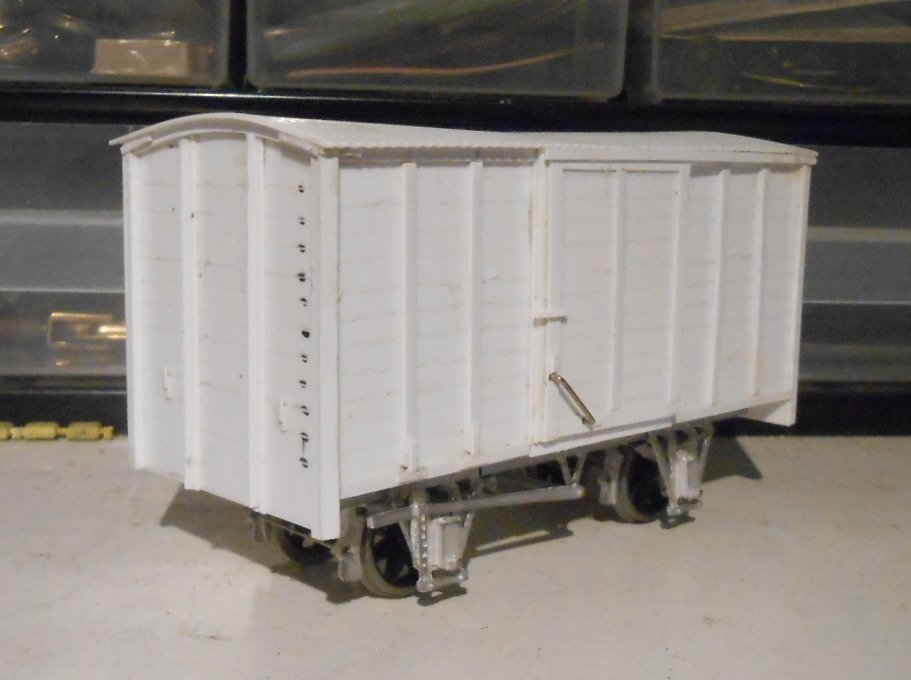
After the delights of a week touring the south of Spain, the return to Blighty seems to have coincided with a series of soft days to rival anything from over the water. A good time to get back to a bit of modelling... Am afraid the Barclay has gone through another livery change, though only minor this time. Decided that my Swilly logo attempt wasn't good enough [far too big to my eyes], so it was out with the meths to remove it. Swilly locos varied in having the lozenge, lettering, or even nothing at all, so on the basis that if I can't [yet] get the first two right, then nothing at all is the best option for now. Currently on the workbench are two Donegal sliding door vans. These are scratch built, plasticard bodies on Alphagraphix white metal chassis, with Slater's wheels. Plenty of detailing still needed.
-
Had the "Emergency" turned out differently, such things might just have happened...
-
As long as nothing is getting hot, would hope all is well.
-
Fantastic bit of work. Love it when simple ingredients come together like this - and the paint job is superb. Not just the wood but that lovely dark rust on the ironwork
-
Another 'Oh my!' from me Ken. The loco looks great and am sure the detailing will gild the lily, as it were.
-
Excellent! Though credit must go to Alan and Ken for the idea in the first place. Personally, I'm waiting for the woodwork muse before I begin mine...
-
For Ian Rathbone's book on painting and lining and he does the same. Reading about it not quite the same as doing it though!
-
Stuff! The bandof our lives, JB - we all have way too much of it. Be ruthless? Easier said than done. Reorganize? As above Dig down? Expand upwards or outwards? All down to money... Don't envy you.
-
Thanks again folks, but am starting to think my time would be better spent working on my hand lettering skills. That said, fine white marker pens are hard to find, so looks like I need to practice more with my lining pens!
-
LNERW1 Starts Arguments-Episode II: The Thomas Menace
David Holman replied to LNERW1's topic in General Chat
I much prefer the "original" Thomas series, as voiced by Ringo Starr. Main reason being they were actual films, which used (I think) Gauge One models and were based on the Awdrey books. Less sure about all the new stuff, which seems a bit twee and cartoon like. Nostalgia IS what it used to be! However, if it gets kids interested in railways, that's fine by me. Serious, 0 gauge modellers should note that the Connoisseur LNER Wisbech and Upwell Tramway etched brass kit comes complete with a nice set of Toby nameplates. Built one years ago and bought the Awdrey book so I could draw a face on a piece of card for each end. Was initially worried what the purists might say, but it just made everyone smile and kids loved it. -
Me three! Fitted them to Sir Henry and they still need tweaking.
-
I really must try to be neater when soldering. Always great to see skill in action.
-
Shades of the Triang Big Big train - battery powered on plastic 0 gauge track. Got a set back in my class teacher days and my Year 6 pupils and I had a lot of fun building a model village around it. Before the National Curriculum came in, of course, when we could do pretty much what we pleased. Happy days!
-
Classy. Lovely work, Ken. Can only agree these things require care and patience.
-
Works well. Especially like the hazy view towards the station.
-
The delights of 7mm narrow gauge
David Holman replied to David Holman's topic in Irish Model Layouts
How fab is that? Great to know the layout is still giving good service and the new stock is wonderful. -
Nowhere near scruffy enough! Brilliant idea for a shed and have occasionally wondered if anyone has ever repurposed an actual goods wagon as a model railway room. It would be a reasonable amount of space inside, albeit a bit cold and draughty. Near the Kent and East Sussex Railway, there are several refurbished wagons in use as holiday lets, including a GWR brake van. The owners usually have an advert in Railway Magazine.
-
Vaguely remember back in the early days of P4, that Scaleform (or whatever it was called then) held haulage trials. The winner was nearly always a rewheeled Lima diesel, full of lead. Whether they had two pancake motor bogies, or just one, I have no idea!