David Holman
-
Posts
4,359 -
Joined
-
Last visited
-
Days Won
117
Content Type
Profiles
Forums
Events
Gallery
Blogs
Store
Community Map
Everything posted by David Holman
-
Nice models JB, while we are all grateful for that hair shirt you wear! Such knowledge is so valuable and therefore essential it is used properly.
-
Many thanks! Was wondering where the steam exhaust went. The cab roof is only temporary, but will be drilled out to take a piece of brass pipe from the top of the boiler. Amused myself yesterday evening going through my spares boxes (just the six of them), looking for castings to adorn the boiler. Guess like most, I never throw anything away, so came up with quite a useful selection of taps, valves and the like. Most of these vertical boilers seemed to have a few scattered around, plus the all important water and pressure gauges. On the model, they will barely be seen inside the gloom of the cab, but hopefully will create an impression. That's the plan, anyway!
-
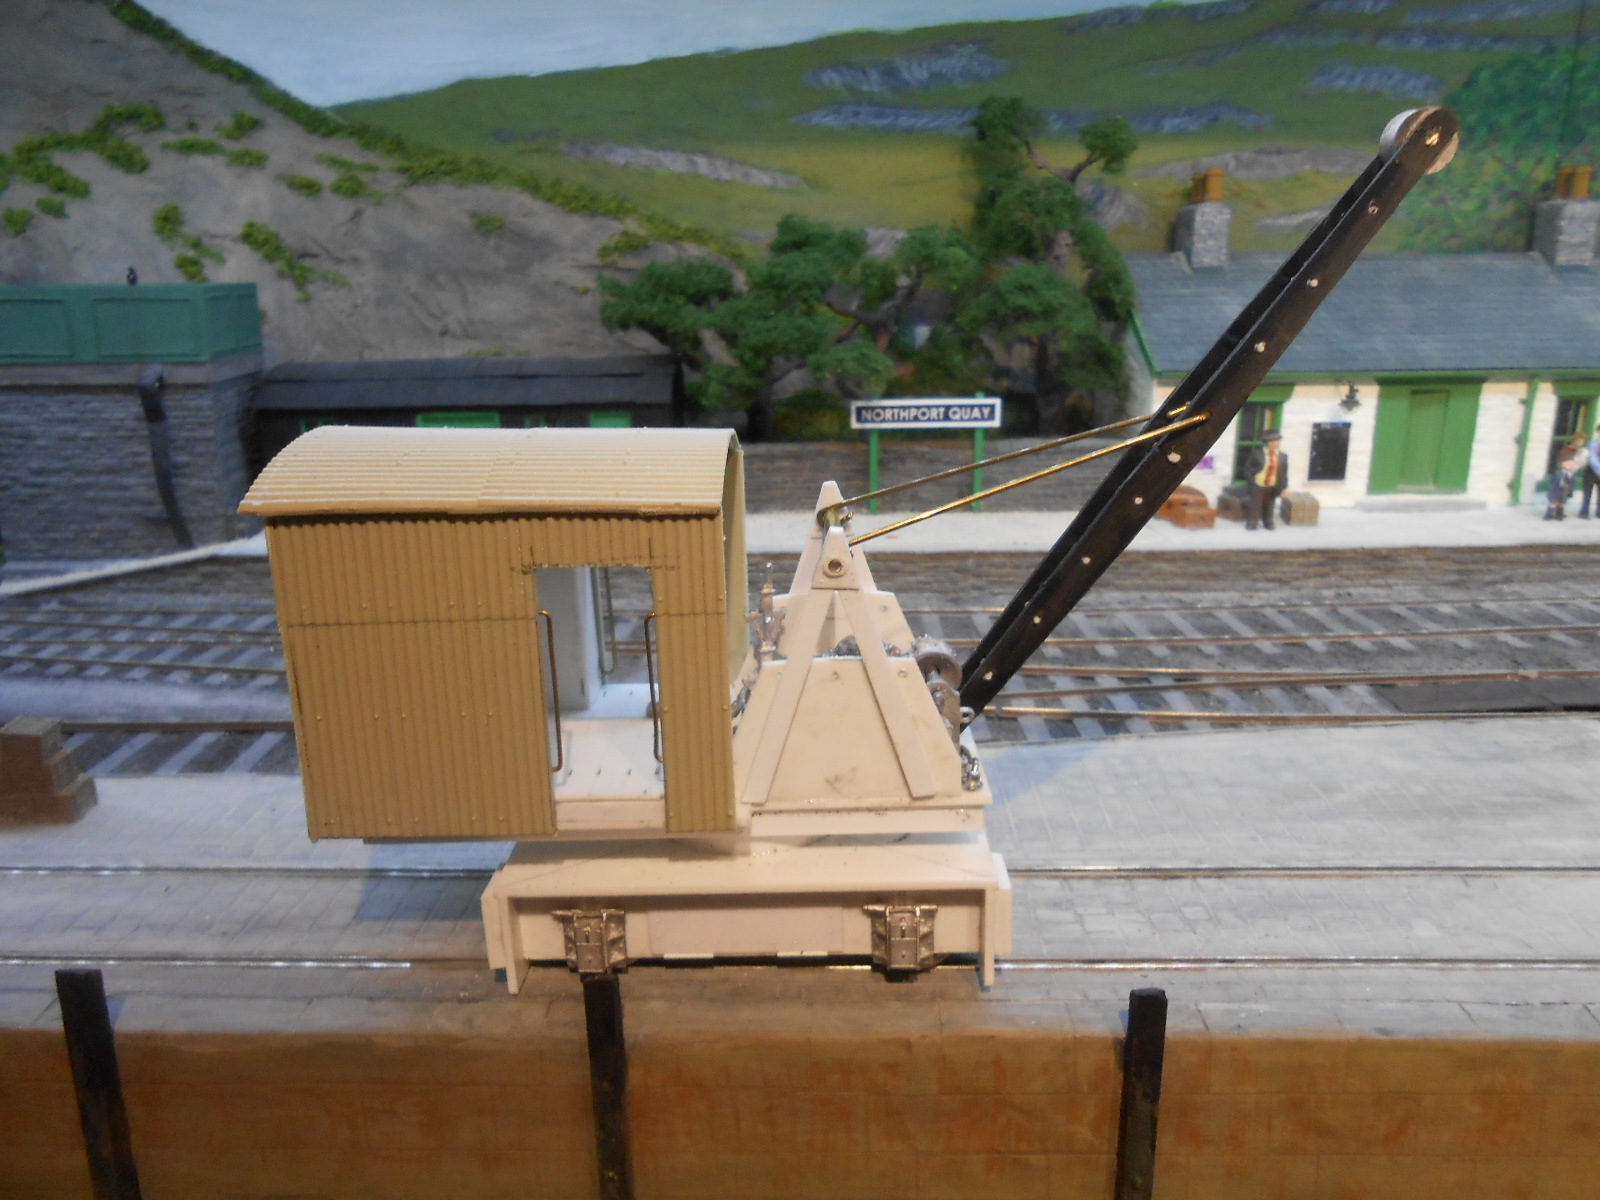
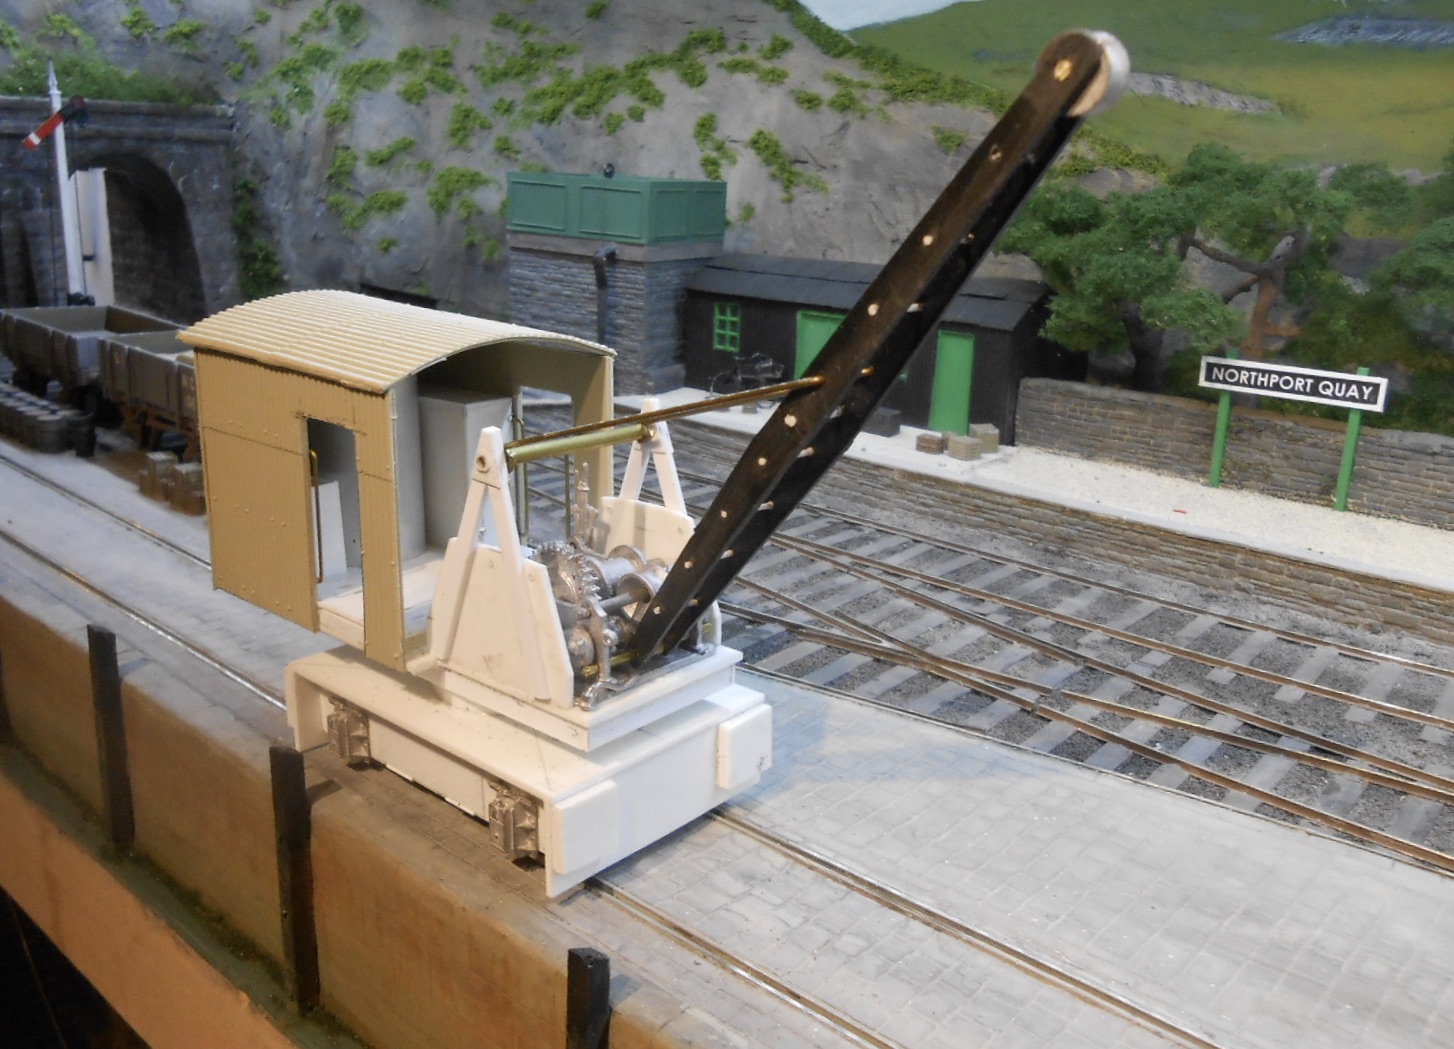
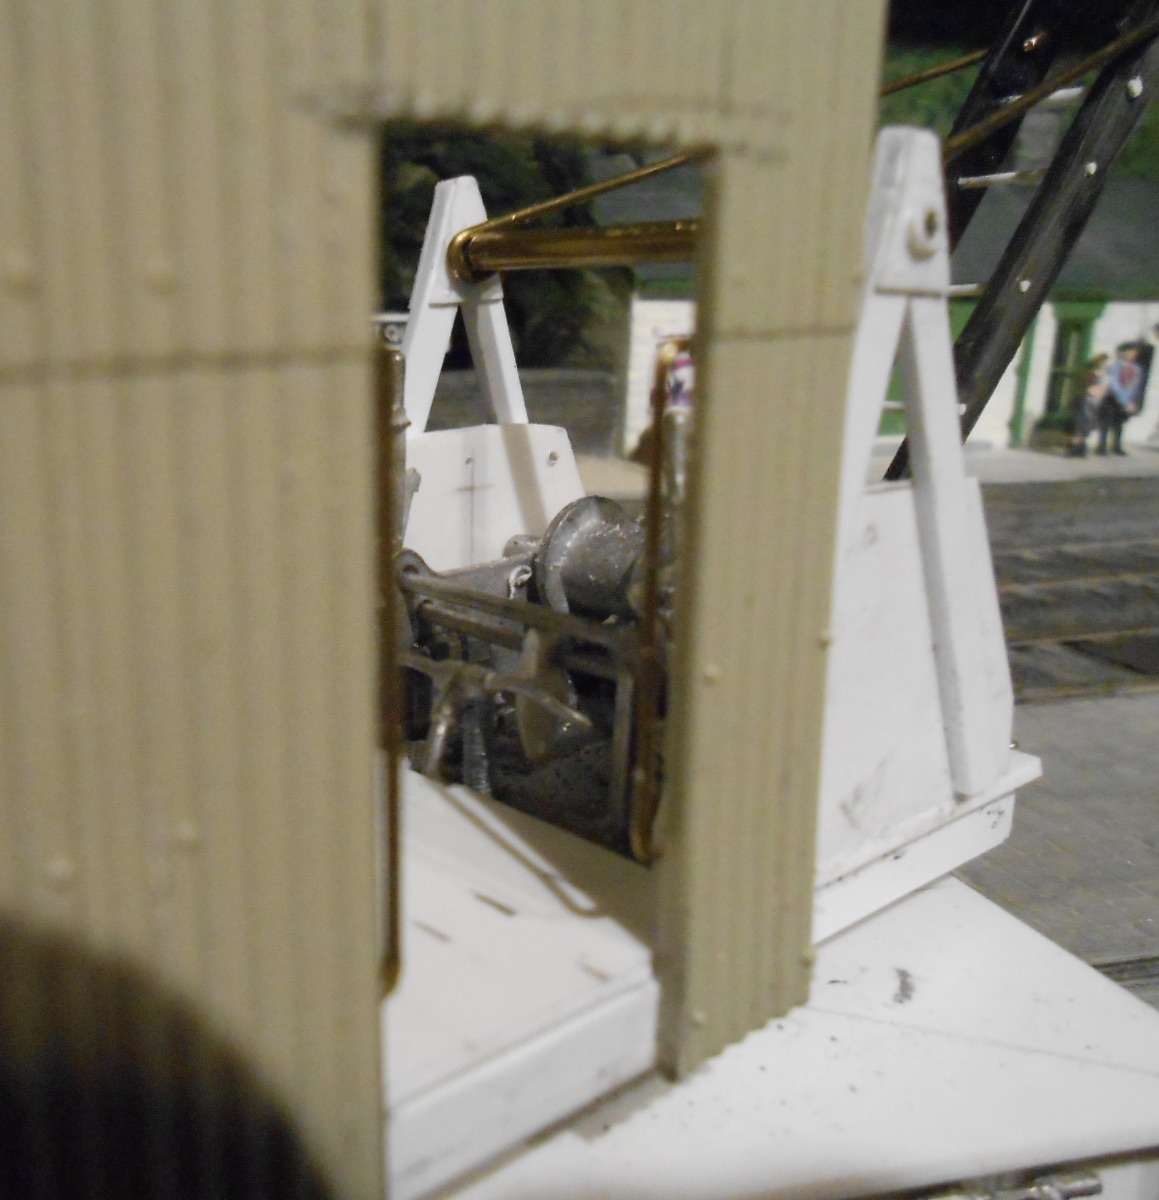
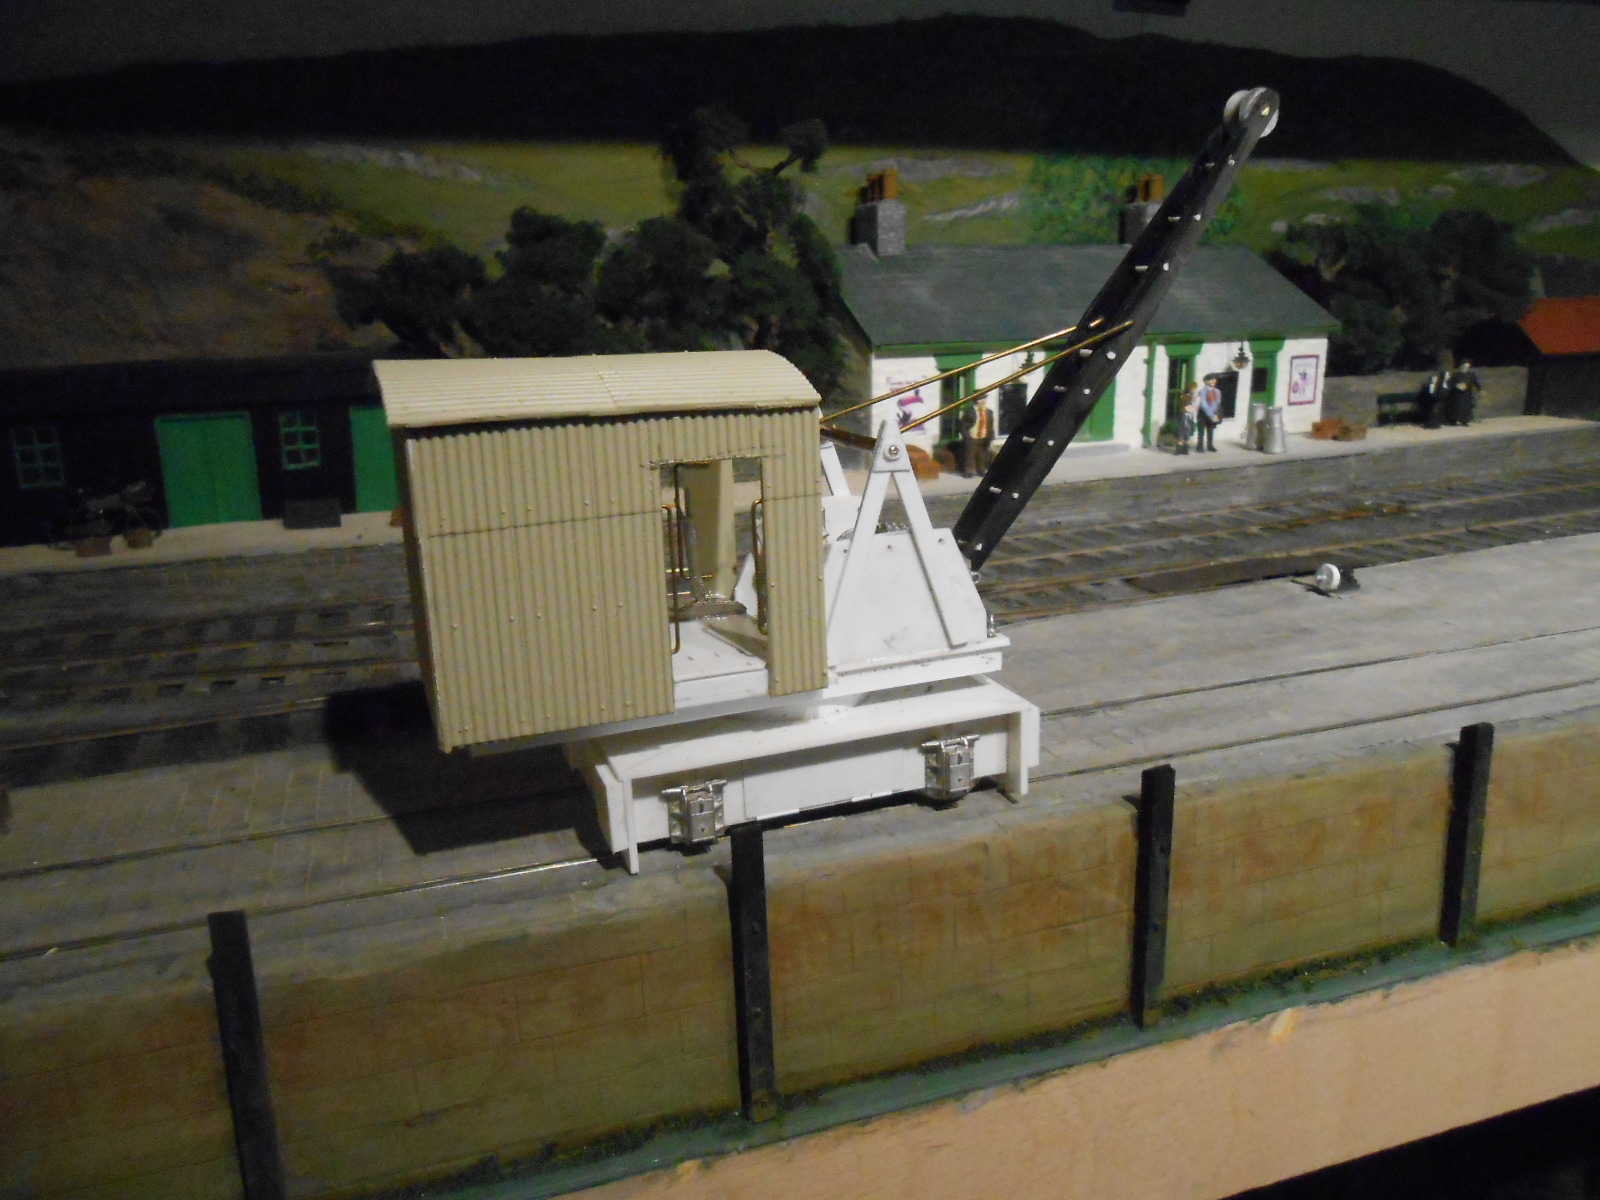
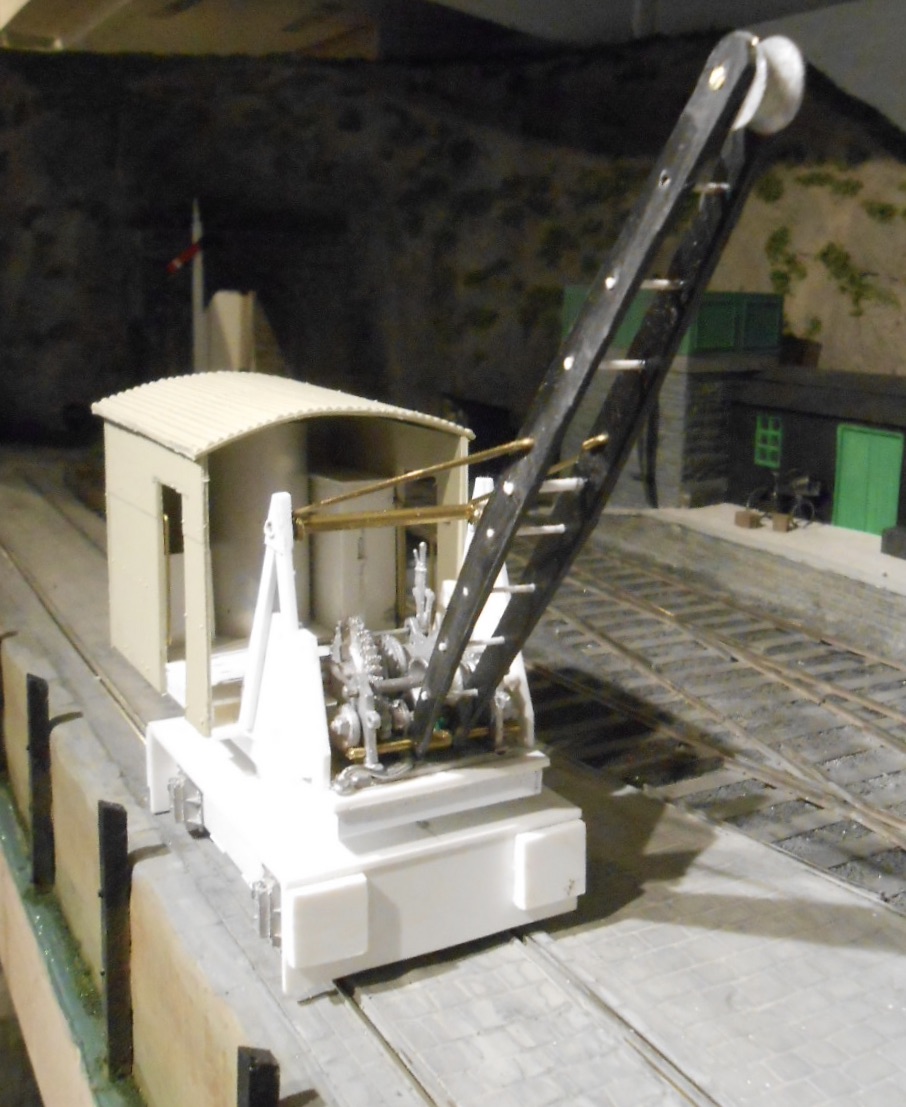
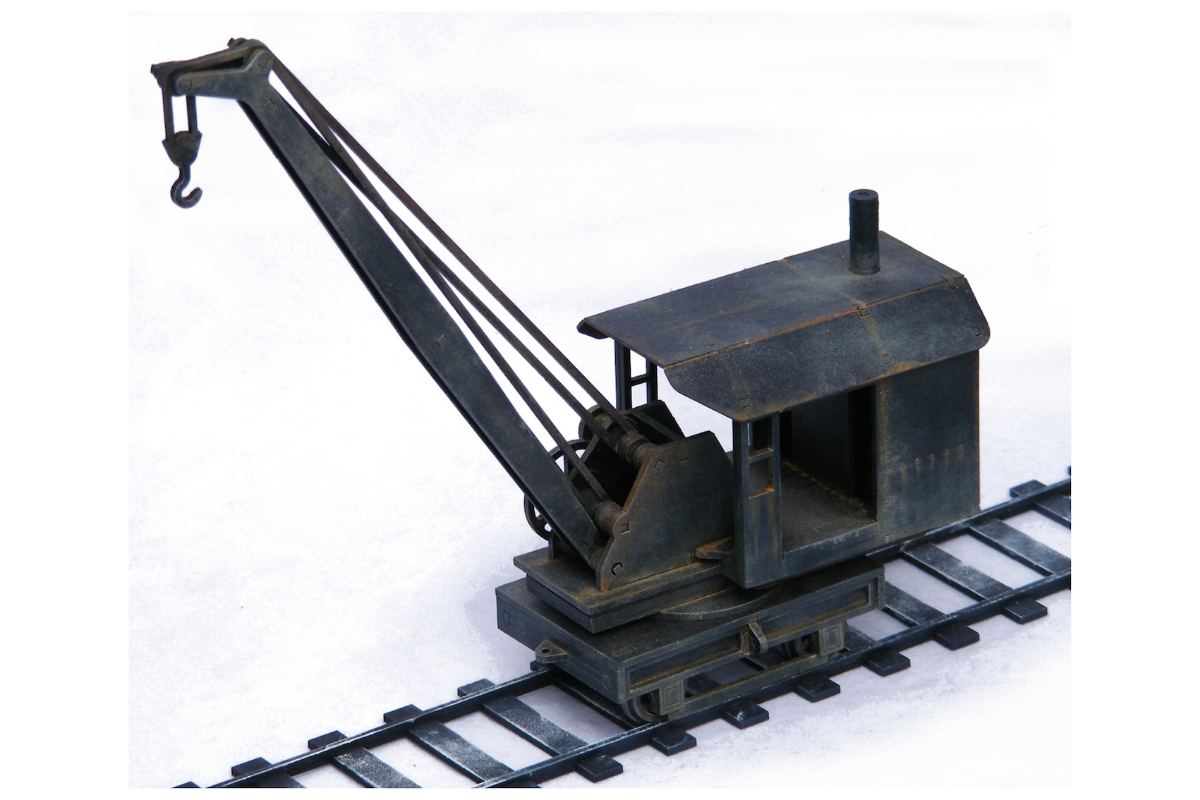
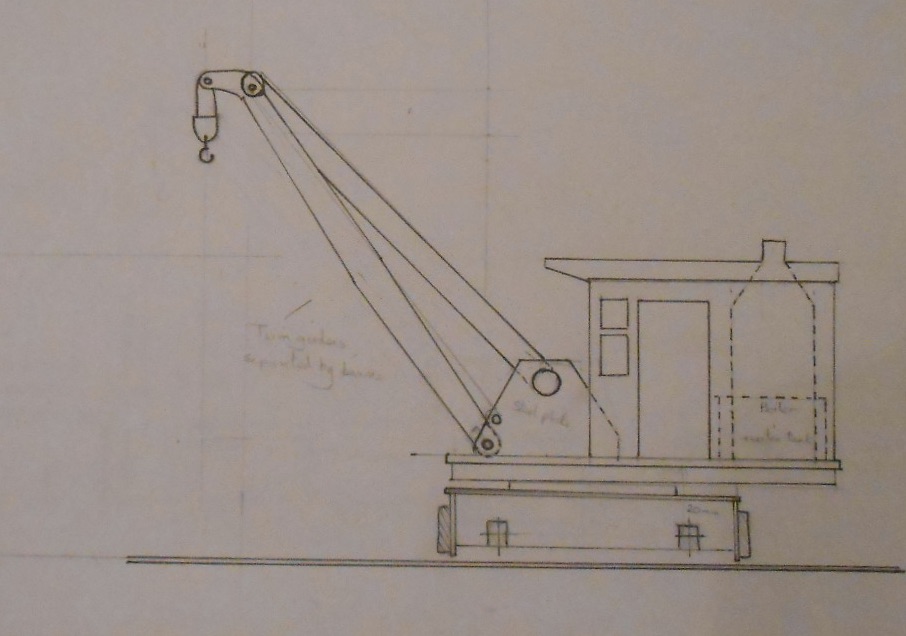
The last couple of photos made me realise that the winch section of the crane didn't look right, so cut down the side frames & added a pair of A frames to help brace the jib. I also realised that, even with a fixed jib, the crane would still need controls to move back and forth, and swing from side to side, as well as making the hook go up and down. Spent a fair bit of time looking at prototype photos, particularly ones of the more basic types & gradually formulated how this might be done. Rightly or wrongly, have come up with the following: A lever to control steam from the boiler entering the cylinders, including the ability to go back and forth A lever to move the main gearing from the winch to sloughing [turning] and moving the crane along. Gears for these last two are assumed to be linked by chain drive to drive the rail wheels and also slough the jib. A third lever to switch between the two above. The winch kit includes two levers, as well as a footbrake pedal, so the third lever comes from the spares box & is actually one from a signal cabin. The motor gearbox of the model needed to be kept hidden, hence the deep sides to the crane's chassis, but it seems appropriate to ensure there would be access on the real thing, so have added a couple of simple hinged covers, made from 20thou plastic. The jib itself is assumed to be two hefty girders, kept apart by steel crossbars - all plastic rod and strip on the model. The spares box came to the rescue again with a couple of pulleys for the top of the jib and to go on the winch. The bottom of the jib is held by a piece of 2mm brass rod, with a short piece of tube separating the girders here. The same method is used to keep the braces apart on the A frame. All a bit fanciful, but it seems to fit in with what photos are telling me - and none of it works, of course! This afternoon, added a water tank on one side of the cab and a coal bunker on the other, plus a mock up of the roof [not fixed yet], to try and give a better overall picture of what the model will look like when finished. A lot of dealing still needed, but it has [mostly] been good fun so far.

-
Have used Tortoise motors for 20 years and they never go wrong. However, being over 7cm deep you need similar baseboard framing. Not cheap either. Servos at the other end of the price scale and even with suitable circuit boards to control them, can work out pretty economical. The Megapoints system uses servos and offers bounce for signal arms and the like. Worth a look, but costs can quickly spiral, especially if you use the plug and play components. If you don't fancy electrickery, then wire in tune is both simple and cheap!
-
What paints and varnish brands did you use, Alan? Your misfortune could yet help others avoid such problems. However, seems to me you did the right thing in waiting three days for the paint to harden, so no idea why this should happen, though thinking about it there may be a 'rule' that says acrylic-enamel only works one way. Hopefully others will confirm and explain. Either way, much too good a model to discard, as that coat of green proves! Pause, deep breath and go again. Profanities and rude words optional, but certainly work for me.
-
The Official Irish 'Might Have Beens' Thread
David Holman replied to minister_for_hardship's topic in General Chat
Lovely stuff, everyone! -
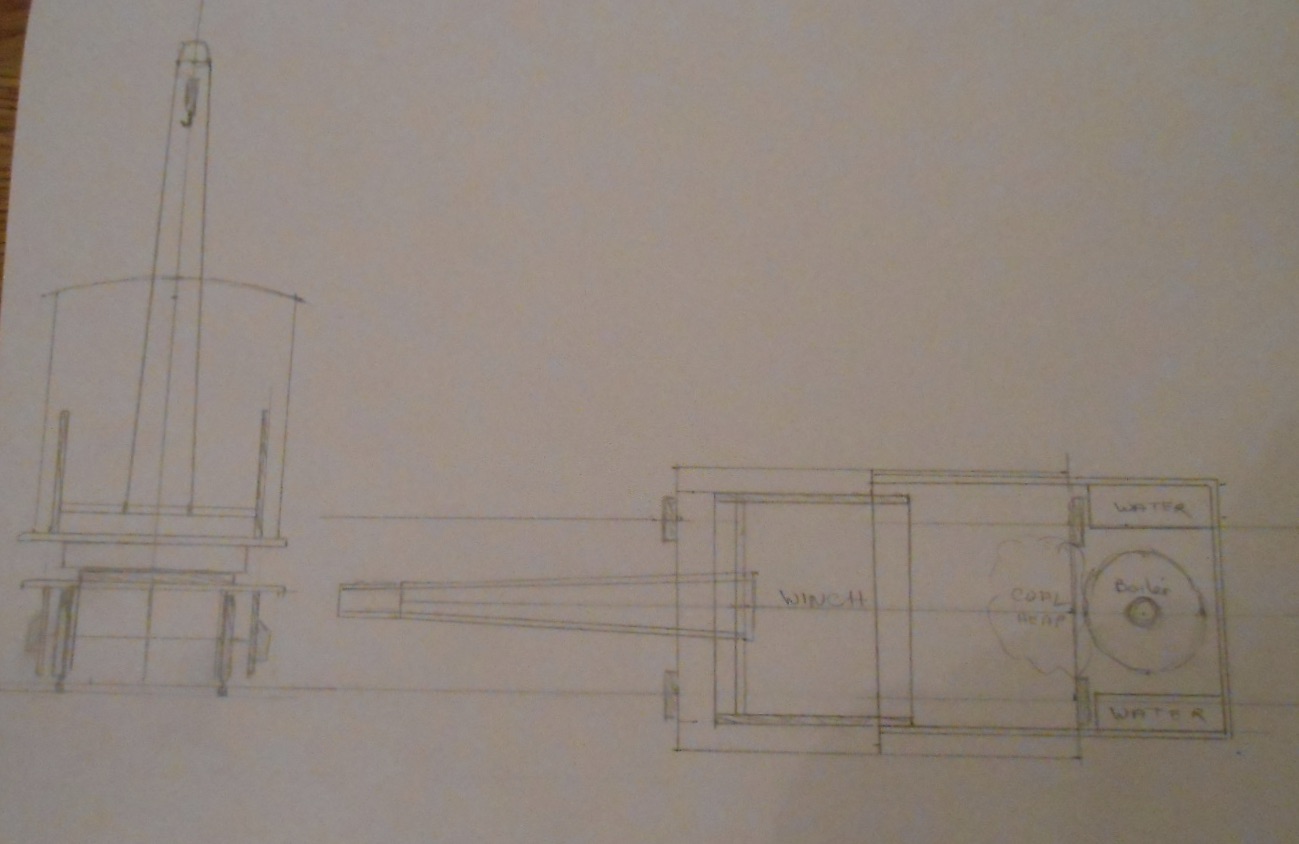
Santa duly delivered the Langley steam winch kit on Christmas Day and this afternoon played around with the parts to go on my crane. As this would like as not have had a fixed jib, have simplified the winch so that it just appears to power the single winding drum, while some hefty steel side plates will hopefully support the jib.
-
The Official Irish 'Might Have Beens' Thread
David Holman replied to minister_for_hardship's topic in General Chat
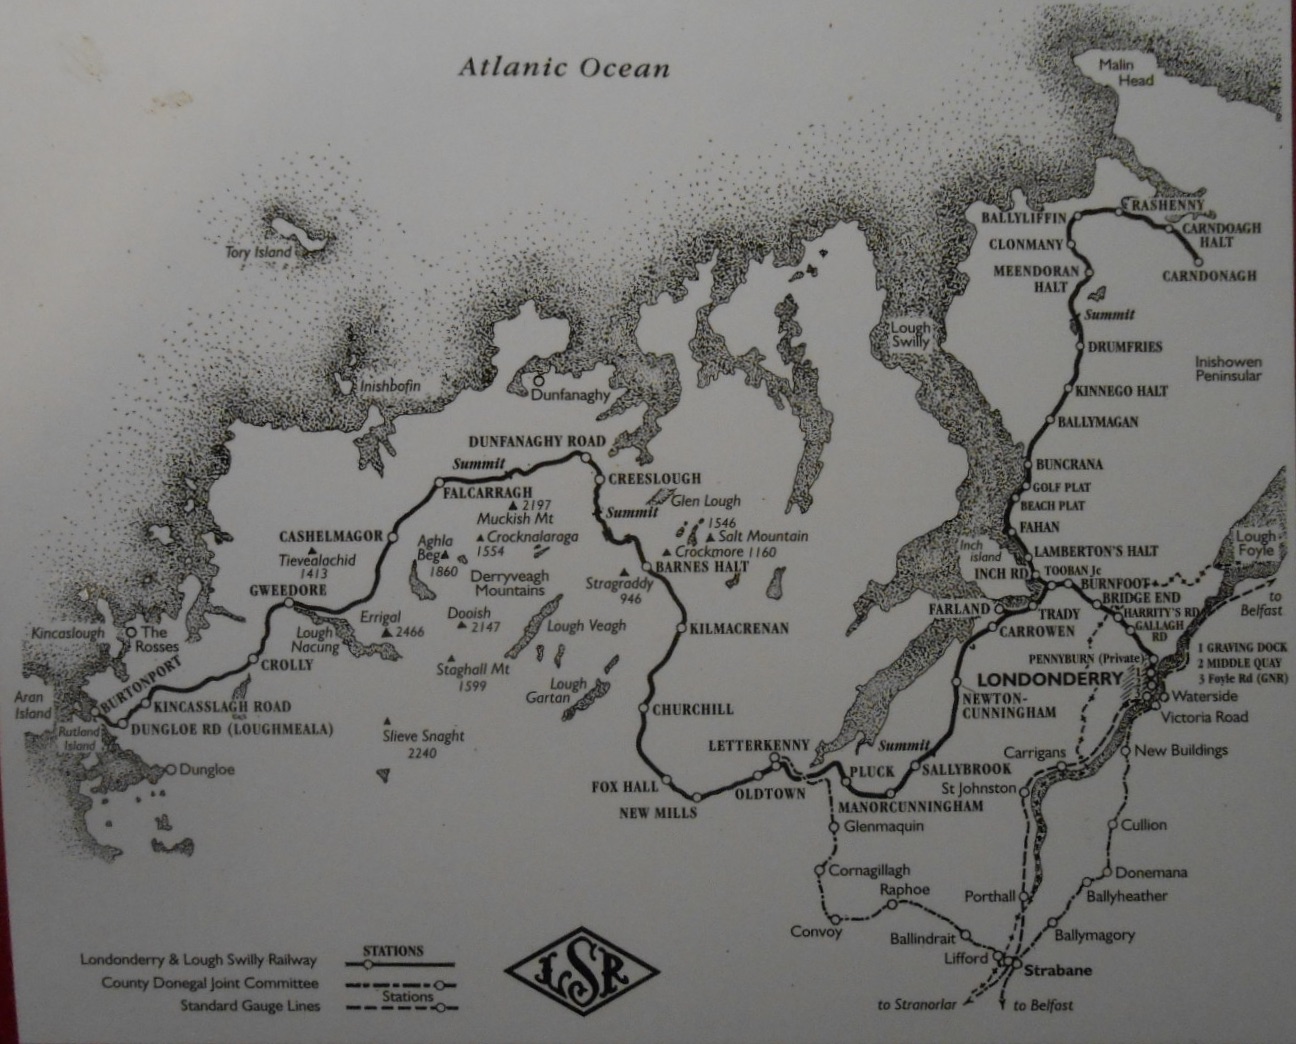
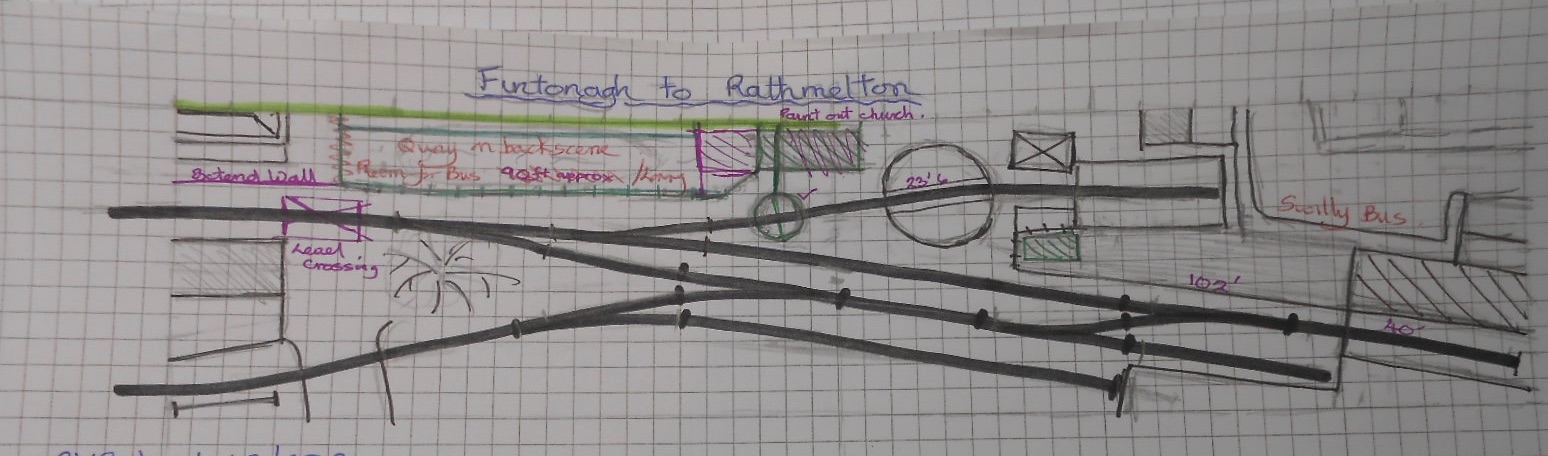
Scratching the Itch! For Christmas, my wife gave me two new books and a calendar, which I tactfully pointed out might be nice, when we were looking at the Donegal stand at Cultra. Reading these has been a delight, especially as there is never much on TV over Christmas, and this got me thinking that a Swilly/Donegal project might not be so difficult after all. Looking through my other books on the railway, was interested to see that there had been an alternative route proposed to Burtonport, one that would have gone via various small harbours, rather than across the central wastelands. On the map below, this would have gone via Rathmelton [on the first inlet north of Letterkenny, then Millford [on the next inlet], before eventually turning west towards Creeslough. Now, much as I like the big 4-8-0 and 4-8-4T locos, they are too impractical for the space I have, but the 4-6-0T and pacific tanks are, to me, just as attractive, while there of photos of them on short trains of just three 6 wheel coaches, or three vans and a brake coach - trains which would actually fit on my CVR Fintonagh layout... Out came the pens and pencils to see what might be done. I've a bit of previous here, of course, having reversed Arigna Town to produce Belmullet. Fintonagh would not reverse well, but by removing the low relief buildings on the left hand board and repainting the backscene, I began to realise that a Rathmelton style quayside might well be possible, as the sketch below shows. I've added a wagon turntable, to suggest a line going off at right angles into the backscene, maybe through a warehouse. At the moment, I'm very committed to getting Northport Quay ready for its exhibition debut in October. Fintonagh meanwhile has a few more shows booked, but once NPQ starts going out may well take a back seat, so the idea of adapting it to something else is quite attractive. Interestingly, that could include quite a lot of the stock too: CVR Railcar 1 became Donegal 10 The Donegal also bought the 'Unit', though more as a spare for the railcar The Atkinson-Walker tractor became Phoenix Quite a few CVR wagons went to both the Donegal [becoming the 'Red Vans'] and the Swilly As far as building new stock is concerned, the Swilly's Barclay 4-6-0Ts will fit on Fintonagh's turntable, as will their smaller 4-6-2Ts. The Donegal's larger tank engines are all too big, as are their articulated railcars [apart from 10], but the earlier ones would make nice models and there are plans available. A couple of Swilly coaches for a short passenger train, plus a brake coach to go with a short freight, along with something similar for the Donegal side of things might well be achievable. Date wise, I'd be looking at the mid to late 1940s, with both companies running trains on a short branch from Letterkenny. Maybe the station could be called Rathmelton Quay, being a short extension from a larger station in the town itself? Trains could include: A short Swilly passenger train - 4-6-2T and a couple of bogie coaches A Swilly goods - a 4-6-0T, three vans and a brake coach, shunting the off-scene siding[s] A short Donegal freight, using Phoenix or the Unit, shunting the front siding Railcar 10 & a van or two, shunting the loading dock Railcars 4 and 6 or 7, covering other passenger duties To me, this has a nice feel about it and would certainly enable that 'Swilly Itch' to be scratched. Indeed, for now, I feel it already has been to some extent, having been able to produce a viable scheme. Whether I go ahead with it or not doesn't matter for now, but once Northport Quay is finished, it could be a tempting way to breath fresh life into Fintonagh.
- 412 replies
-
- 11
-

-
I wonder how many of us got a train set for Christmas!..........
David Holman replied to LARNE CABIN's topic in General Chat
Recent 009 locos are quite something -they not only look good, but run well too. Have seen quite a few 009 cameos at shows and the overall standard of modelling has been brilliant. A tiny footprint, but still with operational interest because they run beautifully. Set up and pack away time is minimal too. Makes you think... -
Brookhall Mill - A GNR(I) Micro Layout
David Holman replied to Patrick Davey's topic in Irish Model Layouts
Proof that smaller layouts really benefit from neat framing. Another Lily properly gilded! -
Have a good one, folks and special thanks for all the inspiring posts, kind comments and incredible wealth of information this splendid forum brings.
- 30 replies
-
- 12
-
-

-
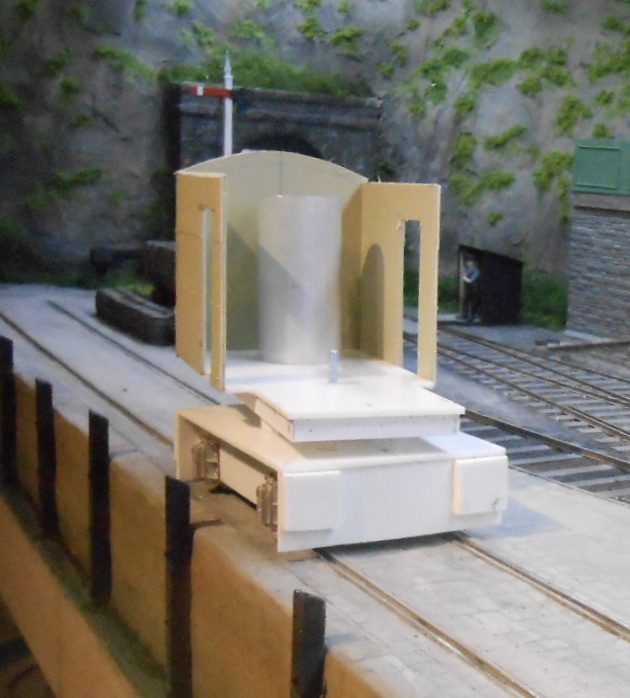
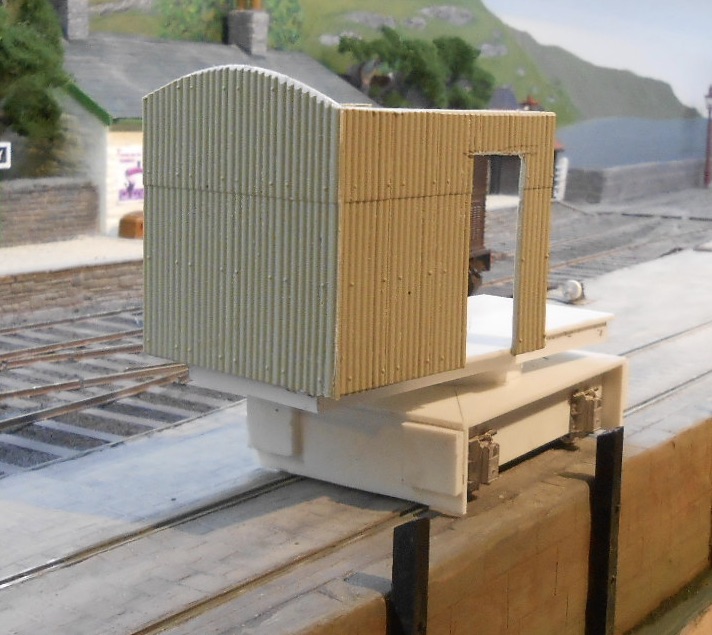
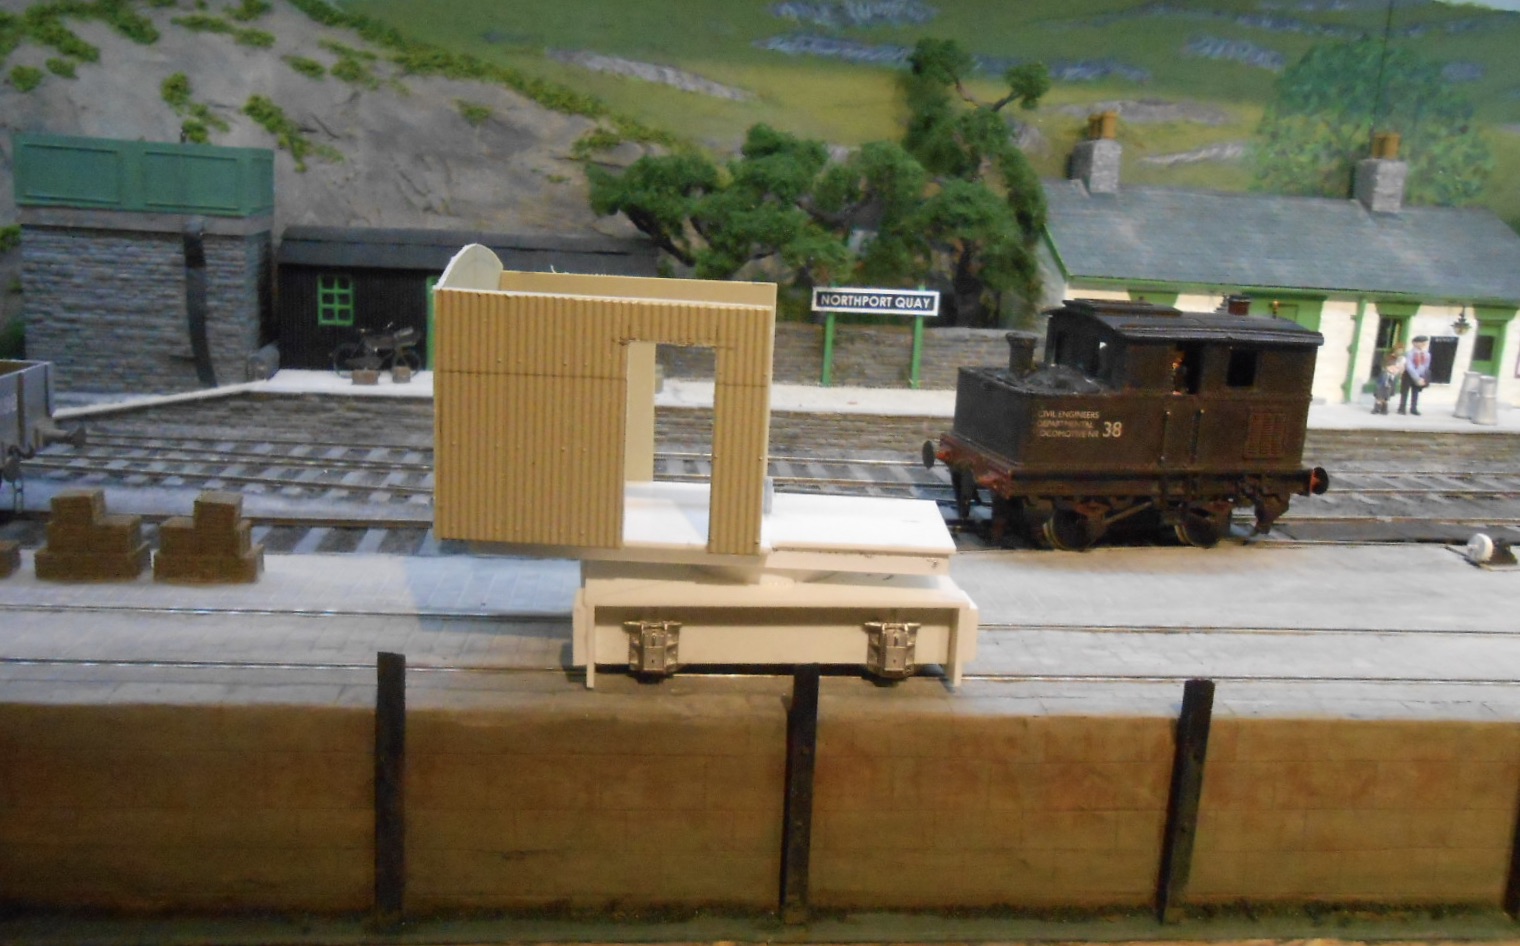
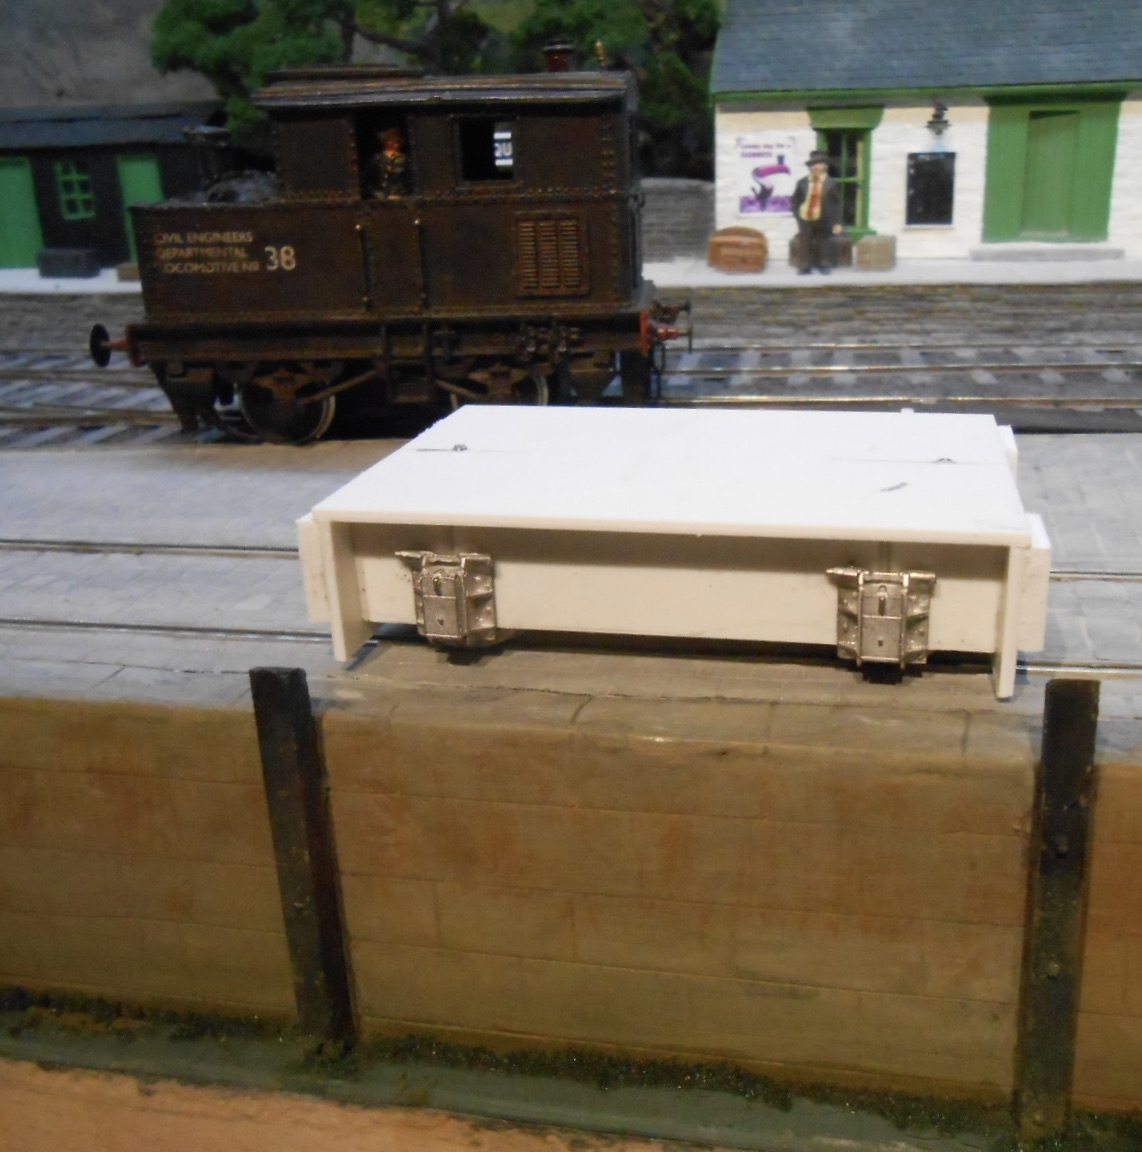
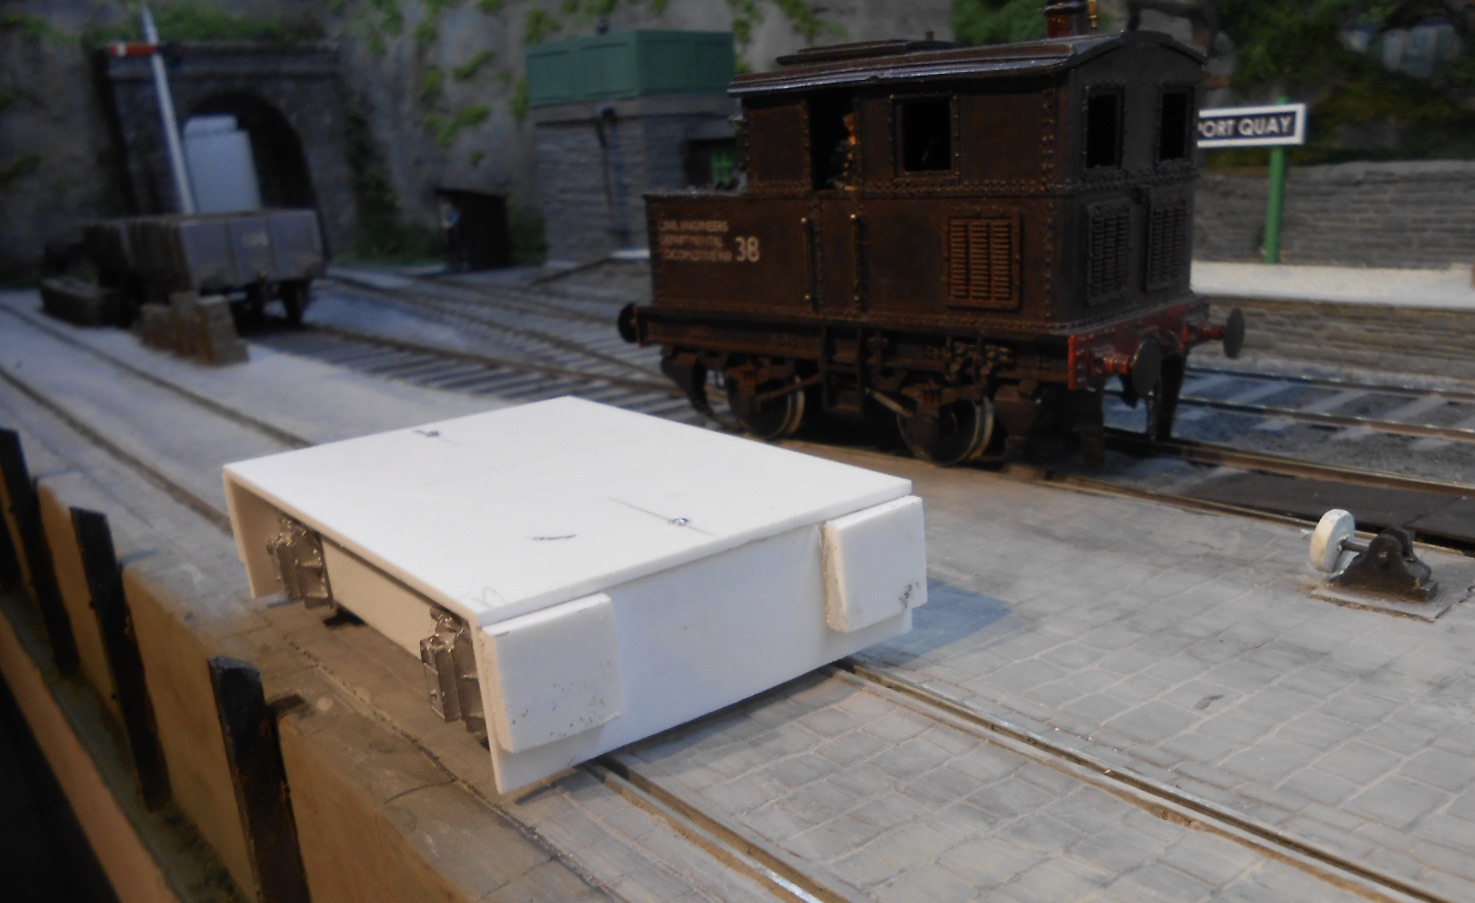
Added a bit of bodywork from Will's corrugated asbestos sheet - meant for 4mm scale, but looks ok for iron in 7mm scale. Found a piece of aluminium tube [left over from a roller blind kit], which may well do for the boiler. The 'turntable' section on the chassis is a piece of plastic tube from an old vacuum cleaner pipe. The crane can pivot on an 8BA bolt, though only for photographic posing. Overall, I see this as a crane that would have been built locally, from whatever bits and pieces were to hand, but will certainly aim to add as much detail as possible. Merry Christmas everyone!
-
I wonder how many of us got a train set for Christmas!..........
David Holman replied to LARNE CABIN's topic in General Chat
Much as modern Lego is impressive, their kits to build specific models are both a backward step and very expensive. Guess it is good for business, but in my day, the whole point was about creating your own stuff. We made ships and aeroplanes and, when various types of wheels appeared, railway and road vehicles too. There was also the brilliant "Legotechnic" - kits aimed at schools. We had several of each in my class. Motorised and unmotorised, they allowed you to explore simple concepts like levers, pulleys and gears. In the latter case, a couple of bright sparks put all the gears together in a train that produced ratios into seven figures and we then did the maths to work out how long it would take for the wheel at the far end to turn! Happy days, before the National Curriculum, of course. Am sure Lego was part of my scratchbuilding education. Didn't realise it at the time, but definitely helped me learn how to visualise a model's construction. Shame I missed out on other stuff - could easily have been a rock star instead of failed triangle player... -
I wonder how many of us got a train set for Christmas!..........
David Holman replied to LARNE CABIN's topic in General Chat
Triang for me and looking back pretty awful. The Jinty was vaguely representative, while the 'diesel dock shunter' looked like nothing British. It did have a light though and ran at warp speed round right angle corners. It could pull five coaches too, three more than my Princess Royal... Scalectrix, Lego and Airfix kits took over until the inevitable sabbatical to push up the value of brewery shares and chase members of the fair sex! The return to modelling was perhaps unconventional in that I decided to go EM and light railways, for which their was very little RTR. A Wrenn R1 got me started, then came K's Terrier and Adam's Radial kits before more esoteric stuff like a Colonel Stephens railcar. 7mmNG came next, then 0 gauge light railways, BR 1950s East Anglia and finally Ireland! Guess the one philosophy I have stuck to is basic "needs v wants". I only buy what I need, so have never had drawers of unmade kits - currently a Branchlines Clogher Valley coach and an Alphagraphix six wheeler is the sum total, though the wish list certainly extensive! -
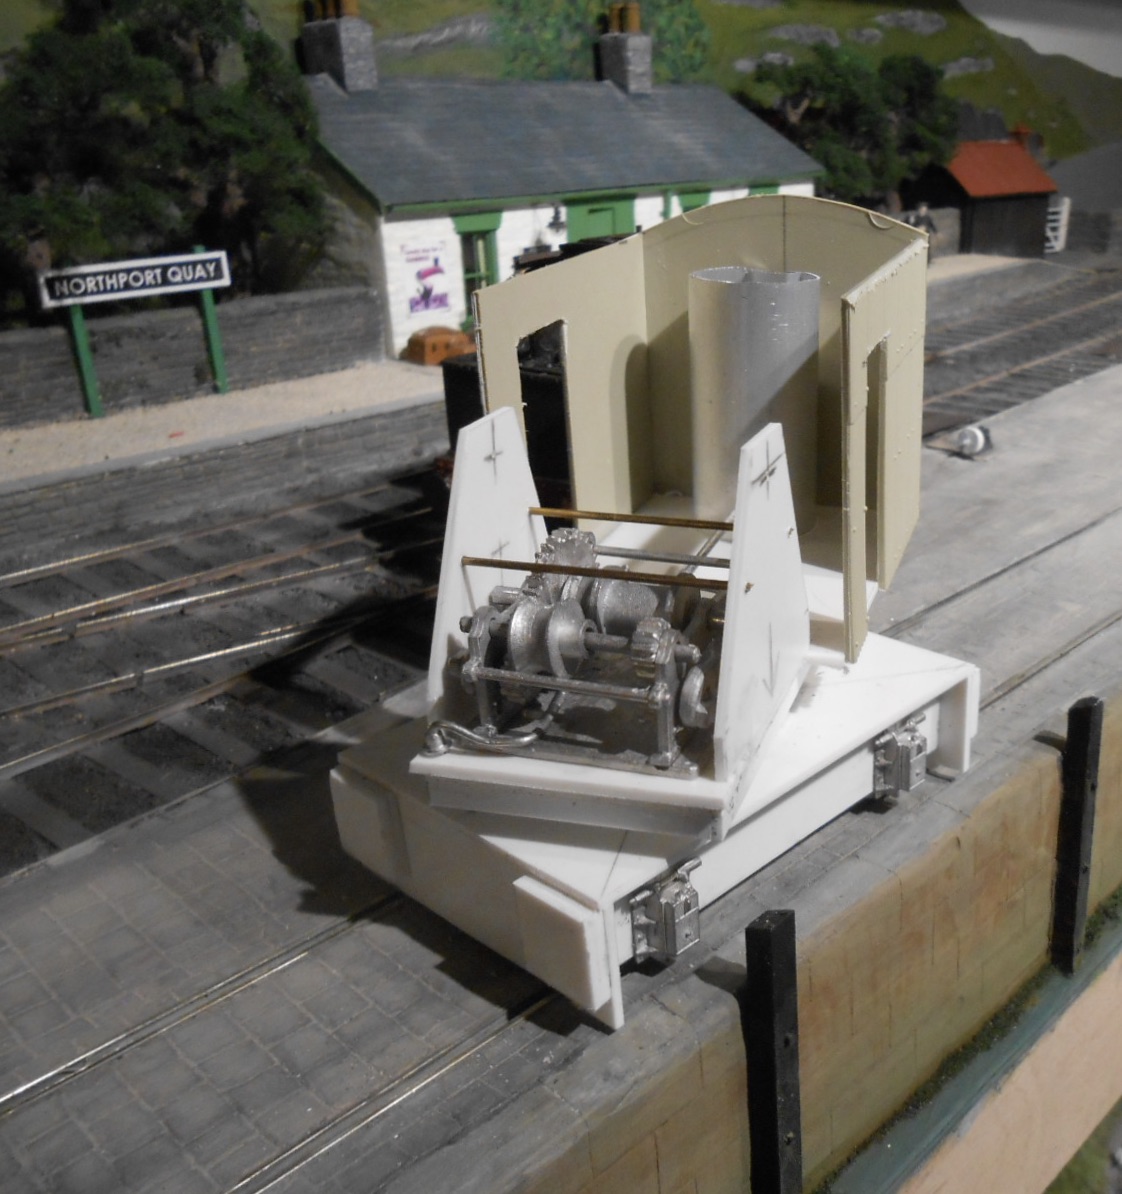
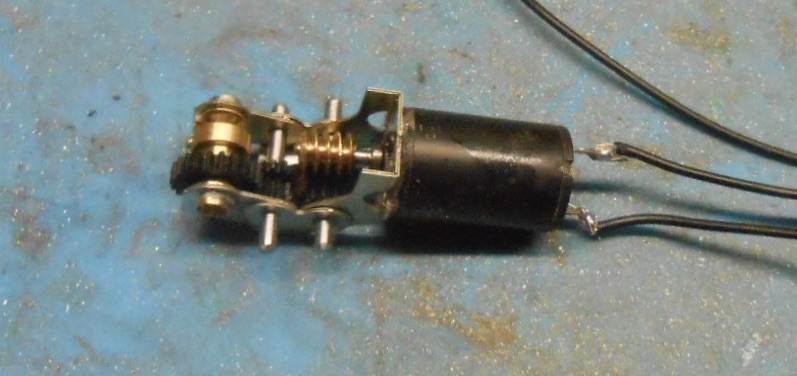
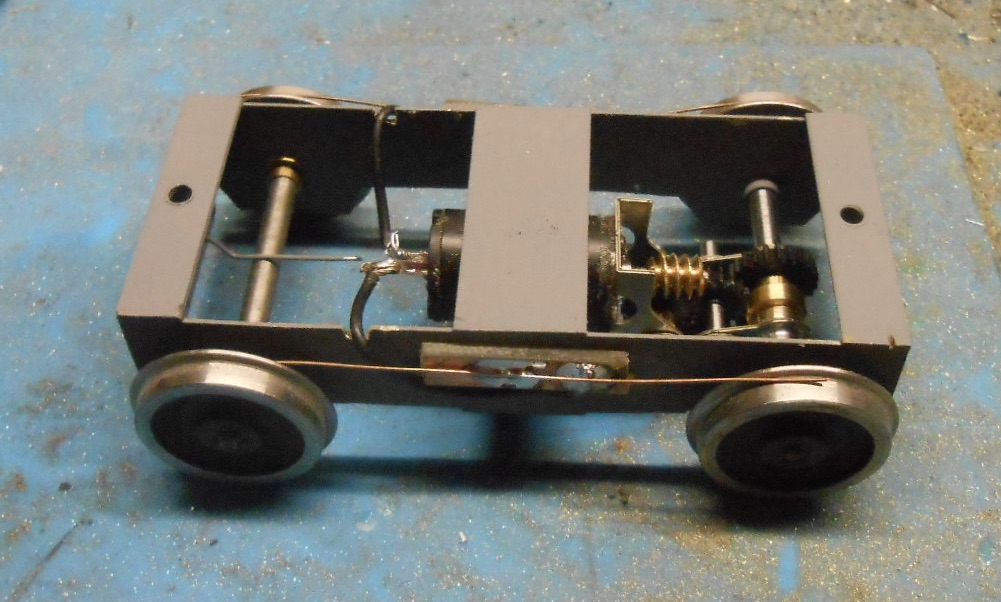
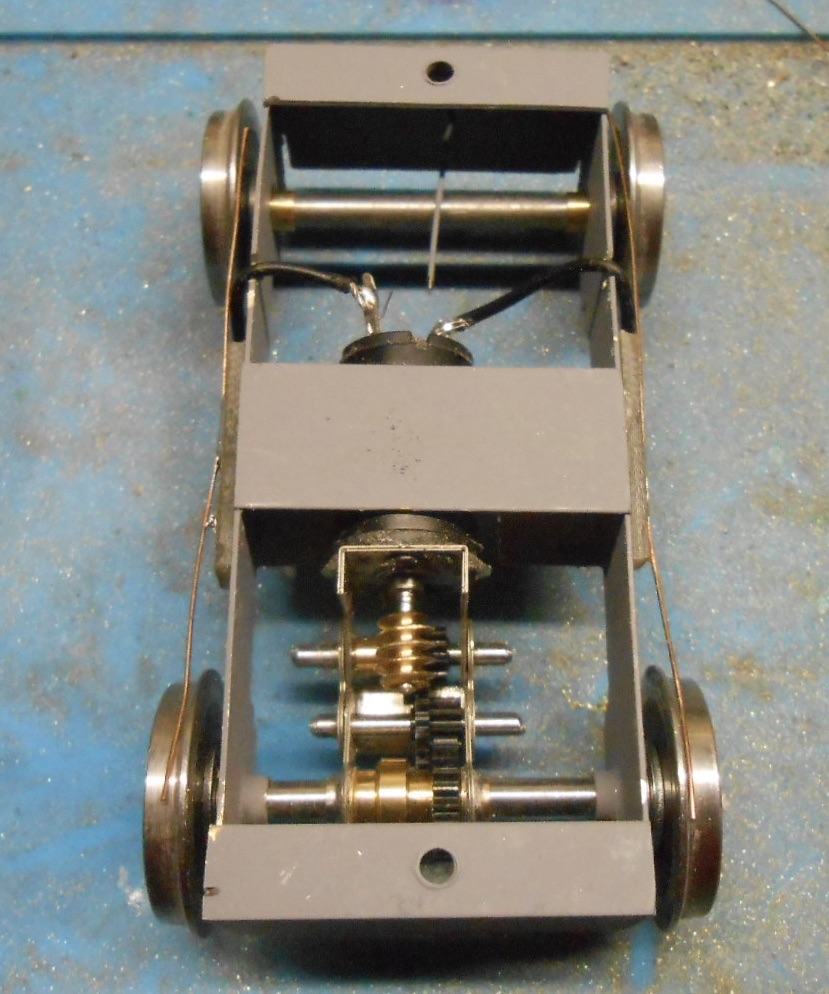
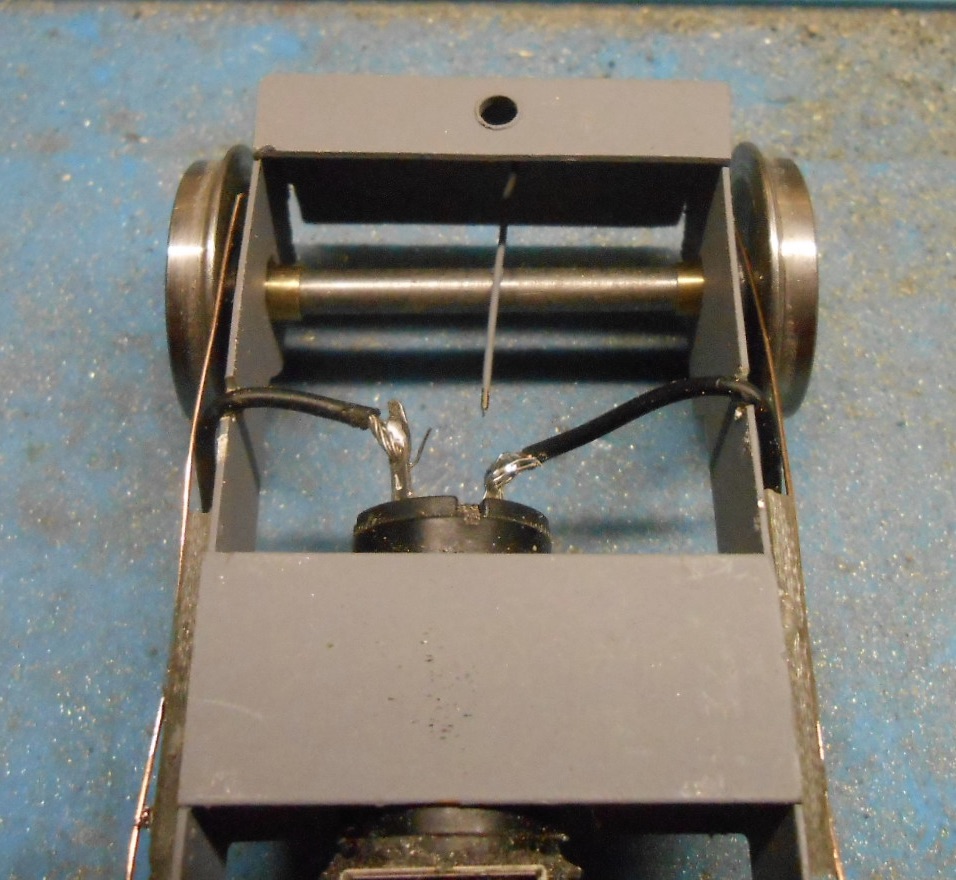
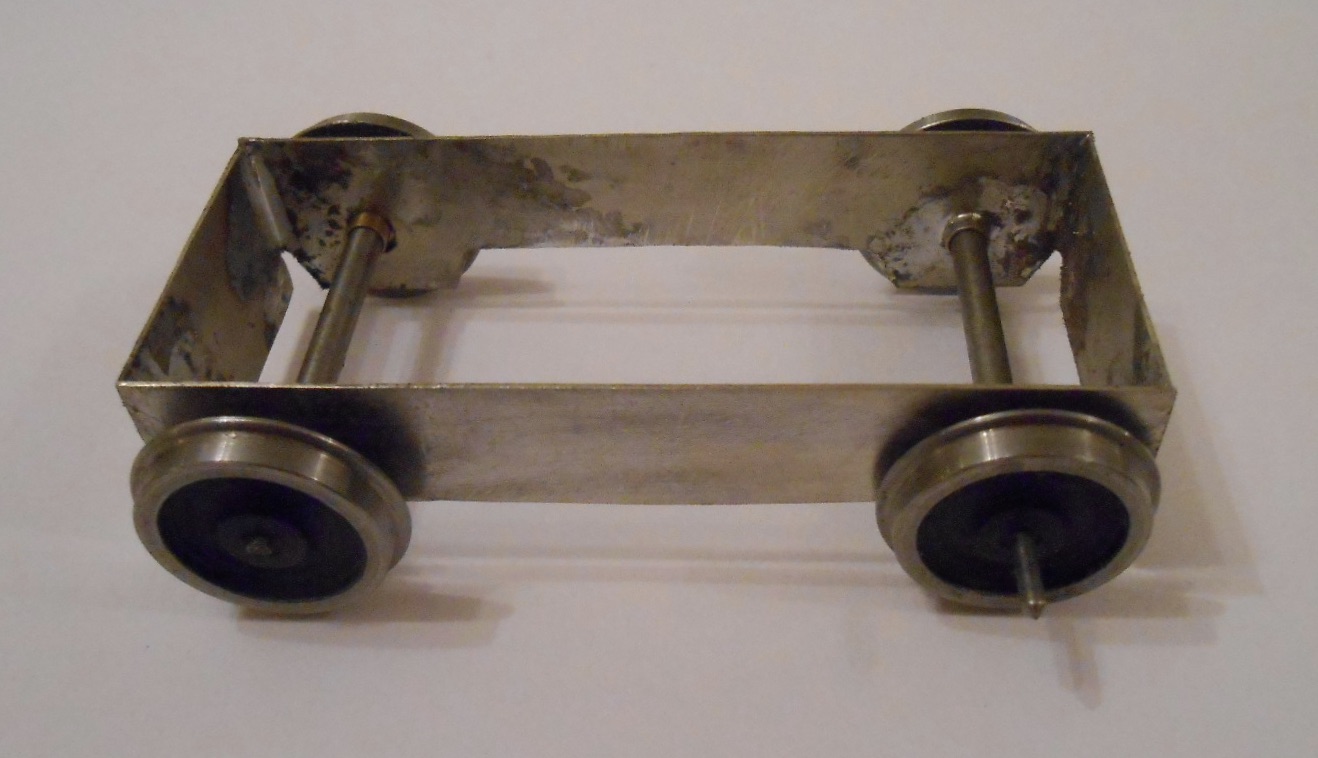
There's nothing like some gentle freelancing when it comes to a bit of progress. The last couple of afternoons have seen the motor-gearbox assembled, fitted to the chassis and pickups added, along with a quick test. The motor is a 1215 - absolutely tiny for me [am more used to 1933s], ordered from High Level with a Lowrider 90:1 gearbox. Very neat indeed, though would say an essential for assembly are some tapered broaches to make sure the axle bearings and gear shafts [1/8" and 1.5mm respectively] are a nice, snug fit. Apart from that, it all seemed to go together easily. I then added four cross pieces to the chassis. One each end at the top, drilled to take an 8BA nut to fix the the chassis to the body, plus two more in the middle, to hold the motor in place. I also soldered a piece of 0.7mm NS wire to the the end where the floating/compensated axle is, so this can press down lightly on said axle to hopefully keep all four wheels in contact with the track. Pickups are 0.5mm phosphor bronze wire, soldered to a strip of copperclad glued to the outside of each side frame, with some fine wire then going to the motor terminals. The crane will only be single axle drive, but with the jib overhanging at the front and the boiler part of the cab overhanging at the rear, am hoping there should be enough weight for the model to move itself along without problems. Flushed with success, I made a basic outer chassis from some 80 thou plasticard, then drilled holes for the fixing bolts, reaming them out enough for the bolts to cut their own threads. Two bits of 'garnish' are a couple of white metal axle boxes from the spares box and four basic buffers from more plasticard. Don't tell anyone, but could only find two axles box castings, so there aren't any on the other side at the moment and these could well be different when I do eventually find some!
-
Thanks John and JB. Have indeed looked at the photos you mention, while there is a vast amount of stuff on the internet and the real thing outside the clubroom in Chatham Dockyard. Unfortunately, most are a bit too big for my layout and I did even consider a manual powered wagon crane at one point, but in the end decided on something smaller. Inspiration came from a war game model, apparently 1:50 scale, from Arcane Models, along with some lightweight prototypes from America. All a bit hybrid, but then so is the whole layout! Am thinking the bodywork will feature a fair bit of wiggly tin.
-
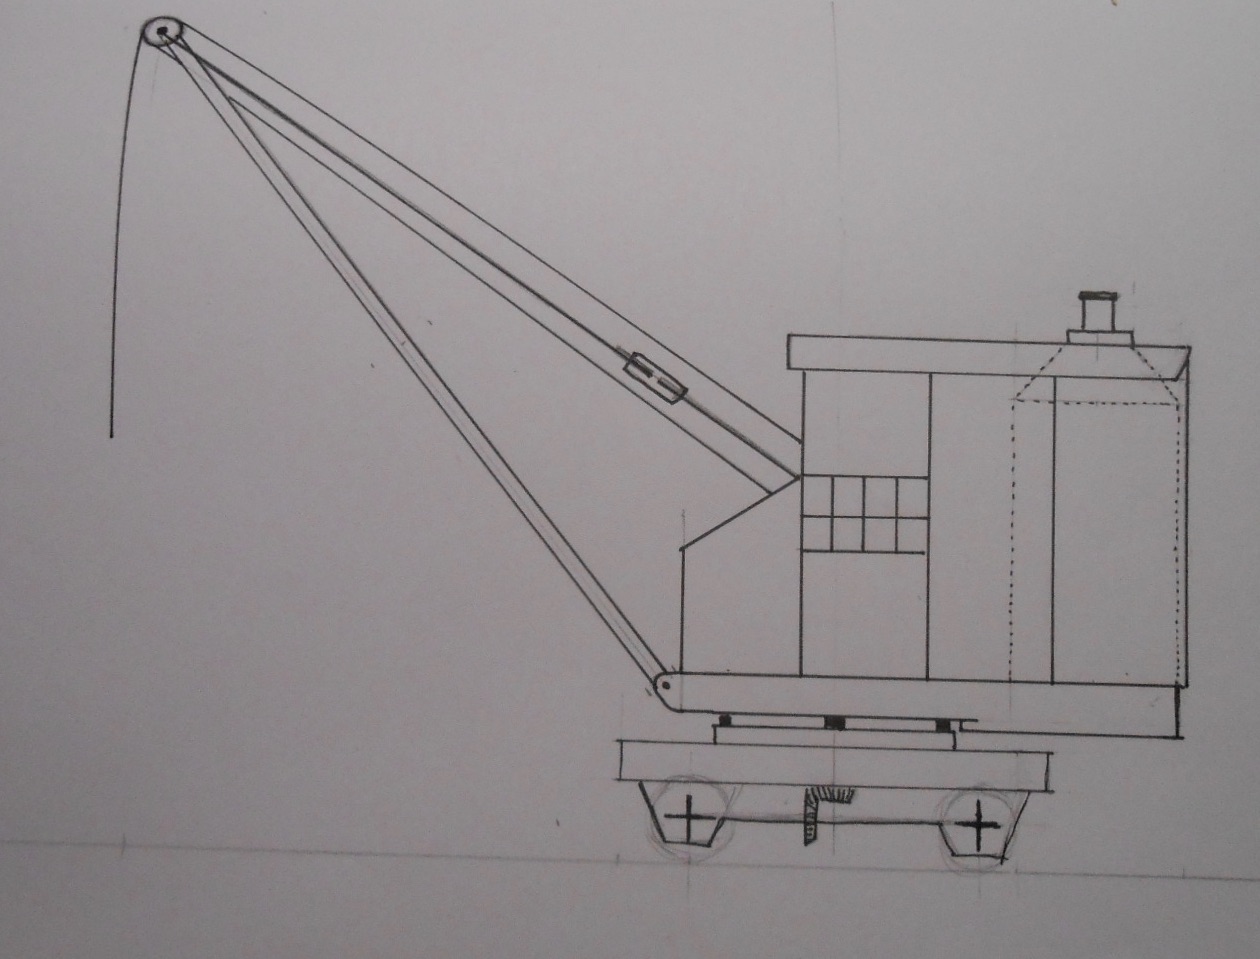
Travelling crane Time for a new project and what is [for now anyway] the last major component for Northport Quay. Right from the planning stage, I've fancied a rail mounted crane, running on its own stretch of track next to the harbour wall, its purpose being to load/unload smaller vessels that don't have the benefit of their own derrick, unlike the Acla. NPQ has another crane of course - the one I built from the old Airfix/Dapol kit, which is deemed to run out along the [off scene] harbour wall. It is all a bit fanciful, but then that is very much the gist of a cameo layout for me. In reality, NPQ should be three or four times longer and wider, but hopefully these key elements all hang together effectively. A while ago, I posted my original drawing for the crane, based on examples in both Chatham and Gloucester Docks. However, I've come to realise that it was far too big, with amain boom around 24 feet long and 20 feet high. Hence have cut it down to something smaller, as shown below: The track is still 5'3 and only a metre long, though I intend making the model at least able to run up and down - hopefully on a push button basis, so that there is something moving on the layout while trains are being swapped in the fiddle yard. Whether I'll get the rest of it working is another matter! I have bought Giles Favell's book on the subject and I guess I could add another piece of water in front of the quay wall and a small ship to go with it and items to load/unload - but not yet! Anyway, thus far, I've made a [very] simple chassis from four pieces of nickel silver, cut out with a slitting disc in my Dremel. Crude, but effective. Wheels are 2'6 'Lowmac' on a couple of Richard Chown's wagon axles from his spares box. The motor and gear box are from High Level: a 1219 and a 'Lowloader' with 90:1 gears, which is small enough to fit between the frames. It will be single axle drive, with the other axle able to float a bit to aid pick up. The other bought in item is the steam winch from the Langley Puffer, which is available separately, but has been sent to Santa, so I won't be doing the body work until after Christmas.
-
That looks rather splendid.
-
Coming along very nicely!
-
Exactly what I was thinking about and great to see. Thank you! Suggest that when we find something, it is posted there. A 7mm scale PP kit from Studioscale - never knew that till now!
-
Reading recent posts, I am often surprised at what is out there if you look hard enough. Most know about the rtr, but knowledge of kits and components seems a bit of a dark art beyond the obvious suppliers like Alphagraphix, Provincial Wagons and so on. Then we have Worsley Works - a vast portfolio, but (for obvious reasons) not always available and similarly the likes of Shapeways, who will print whatever you might have, for a fee. It points to a sort of Wikipedia of models, because no individual could possibly create, let alone maintain such a resource. However, could our esteemed Moderators set up a section on this forum, for the rest of us to contribute what we know and use? Maybe it would need separate sections for each scale, or maybe all that is needed is for folk to supply website and email contacts? Could be a very useful reference, methinks.
- 11 replies
-
- 13
-
-
-
Some people take to bow pens like ducks to water, rather like an air brush. I've got both, but have yet to gain confidence in either! I've adapted lining in the past - trimming with a scalpel and going over with another colour too, but very fine lines mean every blemish sticks out. These can be removed, once half dry - you apply thinners with a fine brush and it comes away like magic. Very time consuming though, but useful on hand drawn corners.
-
One thing is certain, whatever Accurascale eventually produce will be good, so all power to their collective elbows.
-
The 7mm hand crafted brass stuff is often stunning, as shown by the D class above. Also, as Galteemore says, when you consider the hourly rate and skills required, construction costs are fair too. There seem to be enough people around to justify these models as well. What most ordinary folk want though is something mass produced at a more reasonable price, which Mayner shows just ain't going to happen. So, if you want something badly enough there seems to be only two options - save up, or build it yourself! The latter is the route many of us originally embarked on when rtr and poor kits meant there was no alternative and in all sorts of ways find myself grateful that I made the effort. Likewise to those who helped along the way, in print and reality. These days we look more and more to CAD as the saviour and maybe it will be for a lot of things, especially as I fear many of our small parts suppliers will not keep going forever. Like we nearly all have our own copier printer, the day when we can have components emailed to our own 3D printer is not that far off. Now there's a thought I rather like, especially if it means I can keep crafting my own models. RTR can be very nice, but there is nothing quite like making your own stuff for ultimate satisfaction
-
Blimey - hope they are big packs Ken!