murrayec
-
Posts
2,775 -
Joined
-
Last visited
-
Days Won
70
Content Type
Profiles
Forums
Events
Gallery
Blogs
Everything posted by murrayec
-
Stunning Brendan never does anything by 1/2s Eoin
-
Hi Guys Just to be clear on the NMRA advice about weight- generally their rule is being applied to long 'Cars' as they call them, we have coaches! The NMRA's idea of adding more weight if experiencing problems, is to do with long cars and mainly with bogie running gear- because of the transverse buzz over curved track! 2 axle 4 wheel wagons are not referred to and 35grams total weight is adequate- if still difficulties after that its down to- track, wheels, couplers, and general straightness of the model- ie;- all four wheels sit on the track and the model when pushed lightly will roll along without de-railing Eoin
-
Hi Joe 18 to 27 grams max should go into a wagon- no more unless you want to burn your loco motor out! If you still have problems with de-railing it's down to bogie, or coupler, or track problems! Run one wagon behind the loco with weight in it try 18grams first- if that works ok keep it hooked up and couple on another- test that and see if it runs ok, go through all wagons testing like this with the same working one hooked to the loco, connecting the one to test to it, and then you will find the problem..... Eoin
-
until
-
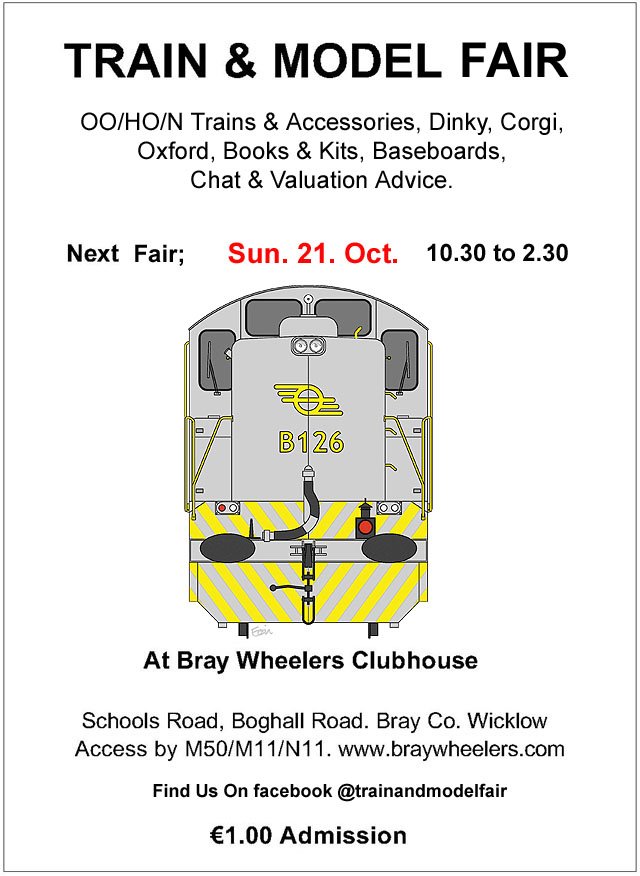
Date for the next Fair;-

-
Hi sayhall27 For a first kit ever build- I would recommend starting with something a bit simpler and smaller- wagons, vans or for a little more complex to test the skills- a SSM guard van... don't cost to much for practising on, these are generally quick builds, so finish quickly for best gratification when starting Here is a quick generic shopping list;- Chassis;- Motor & Gearbox Bogies Bogie Side Frames Bogie Electrical Pickups Wheel Sets Couplers - for two coach units use electrical couplers Buffers Hose pipes Underframe details- Battery box, Dyno, Break Equipment, Water Tank, Fuel Tank, etc.... all depending on the level of detail you want Corridor Connectors Steps Directional Lights Screen Rain Wipers Horn Interior;- Seats Corridors Fittings? People Interior Lights Body;- Roof - if not in kit? Roof Vents Rain Strips Roof Bands Door handles Hand Rails Glazing Other detail parts as required? Decals I think I've covered most things, but if not I'm sure it will be added I also recommend some research on model building and the trains your going to build- Ian Rice books are a must and George Dent's books on building Locos and his second book on rolling stock. There are loads more out there to choose from. Tools! plenty of tools. Building models is great fun Eoin
-

Narrow Gauge in the Rockies not quite
murrayec replied to Mayner's topic in US / Canadian Railway Modelling
Looking great John -
Eek is right! I generally stay away from screwfix I just found a few appropriate springs in the scraps box, they are now earmarked for a little project on the lathe. Thanks Eoin
-
I agree with George, do not buy the Microbox sets- every bit under .6mm is as blunt as hair-clips. Though drill bits from expo tools in the small sizes are excellent and generally come ten in a pack- a pack is the same price as the .3mm in Eileens For the best tungsten carbide and most economical I use CNC drill bits from Amazon, again a box of up to ten bits is the same price as one .3mm in Eileens, post is free in the UK and I use addresspal for €3.75 to here, here is an example of what you get;- https://www.amazon.co.uk/Carbide-Dremel-Jewelry-Engraving-Circuit/dp/B072R2YP13/ref=sr_1_4?ie=UTF8&qid=1537461593&sr=8-4&keywords=cnc+drill+bits Borithe, post or send us a link to that set of punches? Eoin
-
Walker Diesel Class F - ECMbuild in 4mm for OOn3
murrayec replied to murrayec's topic in Irish Models
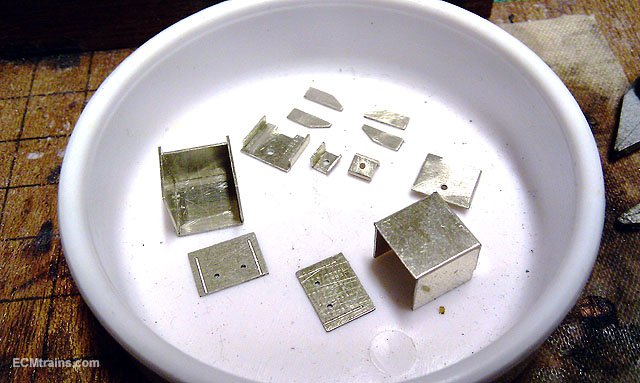
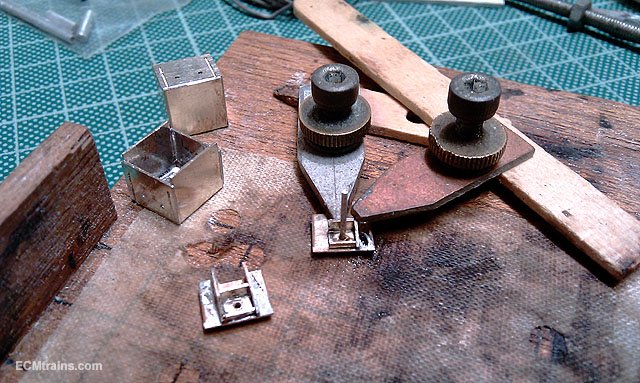
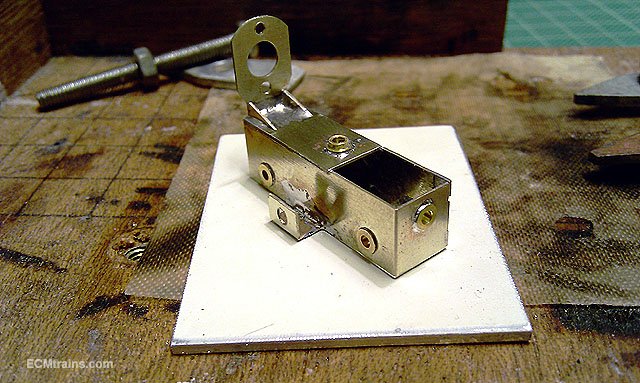
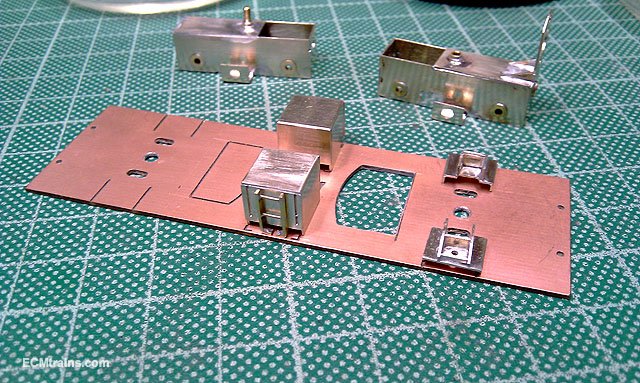
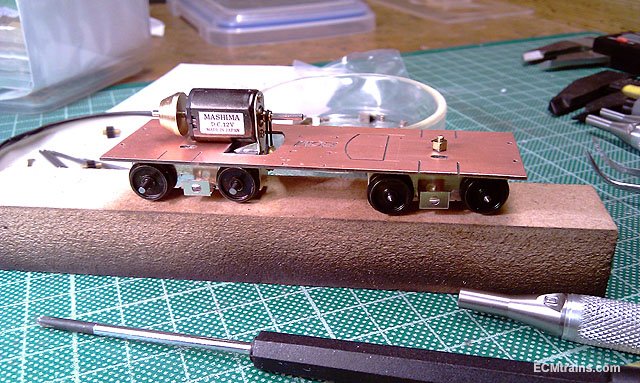
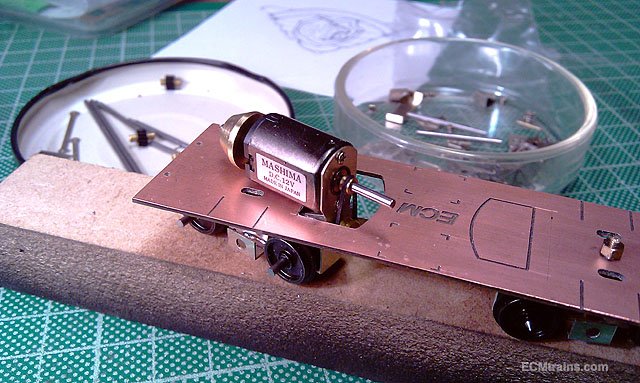
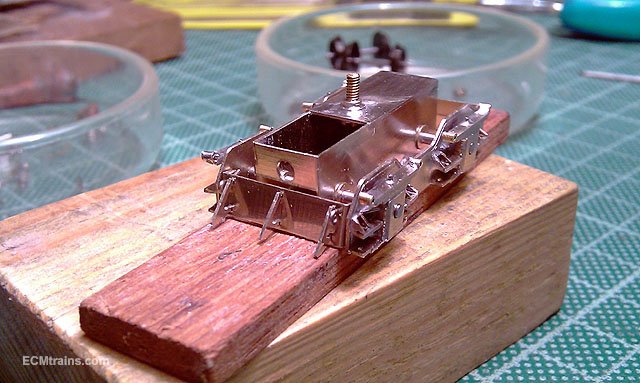
Walker chassis bits. Some of the underframe parts were cleaned up and prepared for soldering- two diesel tanks and one set of bogie bolsters. This is the holding set-up for soldering the bolster parts together, there is a 1.5mm hole through the base parts, a 1.5mm aluminium rod is inserted to keep alignment and the clamp fingers hold it all together- leaving the hands free to do the soldering. The motor bogie drive shaft bearings were adjusted to improve the gear meshing to the axles, this was done by broaching out the holes after the bearings were removed, it needed about .3mm adjustment and the bearings were soldered back in- good mesh now. A top-hat axle bearing is soldered on the top of the bogie for pivot fixing to the chassis plate, the motor will hold the bogie in place? Underframe parts cleaned up and sat on chassis plate, the cut lines provide positioning and the parts will be eventually soldered on. The chassis plate and bogies assembled and motor installed The motor bogie pivots nicely in place and the motor holds it together as expected! with a bit of side tilt n all. You probably noticed the chassis plate is up-side-down! A test run will be next on the chassis, but I have to hold off as the axle gears have to be glued on and I'm not at the final axle length stage- I've made some mods to the bogie side frames so new parts need to be cut first. Eoin
- 136 replies
-
- 3
-

-
- class f
- west clare
- (and 1 more)
-
Fooling the eye.... Eoin & CM
-
Don't forget the Fair is on this Sunday
-
There was a thread a while back on Youghal Station with some info that may help;- Eoin
-
Hi David These guys do a unit for just under £200.00 http://www.rosewarnejunction.me.uk/RAS_Sound_Systems.htm Kato unit;- https://www.amazon.co.uk/Kato-22-101-Analog-Sound-locomotive/dp/B00QUMHMNK A dcc sound card, speaker, and a simple dcc controller would cost you around the same amount- wire it up and stick it in a mdf box and away you go! Another option is in the audio device systems, one can buy a small audio recorder like an mp3 player- they come with buttons for looping and playing sound files that one loads up from your computer. There are also apps for mobile phones for doing this, allied with a bluetooth speaker you could have a Rocking Railway Sound System- RRSS!! Eoin
-
Cork, Blackrock and Passage Station building at Crosshaven
murrayec replied to Colin R's topic in Irish Models
Hi Colin I seem to remember that https://www.facebook.com/search/top/?q=weir park books and models had a packet of card enamel signs in their display box of card kits at recent shows, you could message Diarmuid on facebook to see if he still has it Eoin -
Cork, Blackrock and Passage Station building at Crosshaven
murrayec replied to Colin R's topic in Irish Models
Two searches in google turns up this https://www.google.com/search?q=irish+railway+enamel+signs&client=firefox-b&tbm=isch&tbo=u&source=univ&sa=X&ved=2ahUKEwifi_HS3rDdAhXrDsAKHTxJB1kQsAR6BAgGEAE&biw=1280&bih=891 https://www.google.com/search?q=antique+irish+railway+enamel+signs&client=firefox-b&sa=X&tbm=isch&tbo=u&source=univ&ved=2ahUKEwik--2e37DdAhVUecAKHaXhAsMQsAR6BAgGEAE&biw=1280&bih=891 You could also try the product names on the signs in the photos above of the station Eoin -
Here is a mad one I came across;- http://www.engineersjournal.ie/2016/09/06/louis-brennan-torpedo-monorail/ It would have been like- on the back of a motorbike! Eoin
-
Cork, Blackrock and Passage Station building at Crosshaven
murrayec replied to Colin R's topic in Irish Models
Hi Colin R Have a look here;- http://catalogue.nli.ie/Record/vtls000040470 http://catalogue.nli.ie/Record/vtls000331562/Map and in the other direction;- https://oldphotosofcork.files.wordpress.com/2014/05/crosshaven-railway-station.jpg Eoin -
Some strange goings-on at Greystones today;- ...and a surprised n enthused bystander. Closetmodeller should be along shortly to explain this lot..... Eoin
-
Hi George Set yourself up with An Post's Addresspal- very handy for stuff they wont post abroad, but will send it to your UK address and you collect from your post office for €3.75 when it arrives... Eoin
-
Nice find David I'd like one of them, but reckon they are very rare Eoin
-
until
-
The date for the Sept Train & Model Fair
-
Hi Peter I'm still bogged down with the printer guy for getting the colour right- it's on going, but slowly. The motor bogie is been worked on, I reckon I have it mastered! if you look at the Walker thread in Irish Models- its the same bogie system but slightly bigger for the Walker. This should have it's first test run at the weekend. Eoin
- 55 replies
-
- 2
-
-
- 141 gauge n
- 141
- (and 1 more)
-
Walker Diesel Class F - ECMbuild in 4mm for OOn3
murrayec replied to murrayec's topic in Irish Models
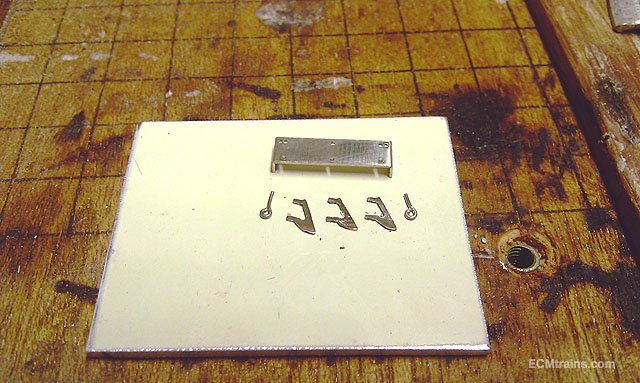
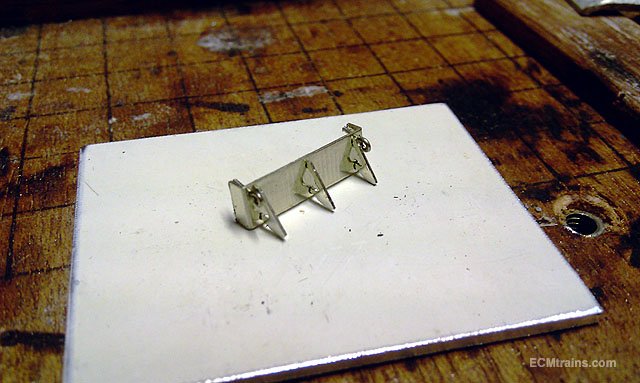
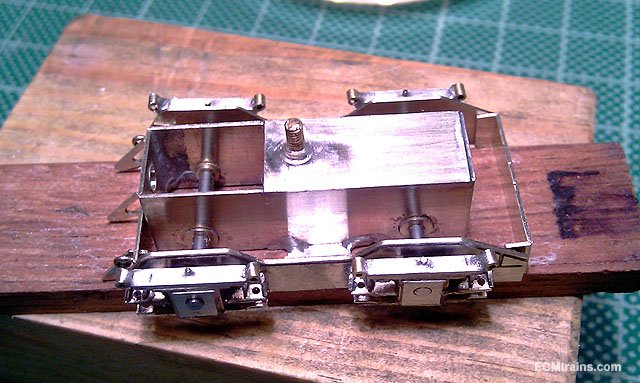
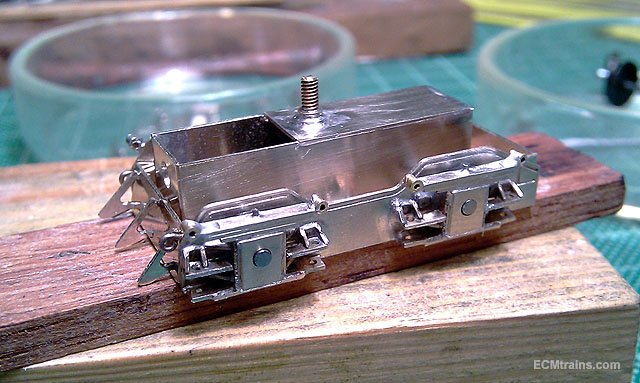
Springs On! Made up little .4mm NS coil springs for the suspension on the bogie sides. Lying a bit sideways at the moment! These are the components for the bogie front with the guard iron brackets and chain hooks. Fitted up and ready for soldering, three .4mm NS wire bars will be soldered across the brackets. and now that a set of sides are complete it's time to test fit to the bogie?? As suspected earlier, the hornblocks stick out further than intended and the pre-cut axles stick out only a smidge- not enough to get the crank weights on, the weights are .6mm laminates which means the axles need another 1.2mm. New axles will have to be cut, or, but its time to decide to proceed on this way or go back to cutting revised parts. There are other other issues that new cut parts would resolve... It's a cute little mechanism though and loads of fun doing! Eoin
- 136 replies
-
- 5
-
-

-
- class f
- west clare
- (and 1 more)