Mol_PMB
-
Posts
2,297 -
Joined
-
Last visited
-
Days Won
126
Content Type
Profiles
Forums
Events
Gallery
Everything posted by Mol_PMB
-
June 2025, vol 31 no 217
-
Interesting. There was an article about the Opera Specials in a recent IRRS journal. I only once saw the exec carriages in that livery, in a train at Heuston.
-
That could be a ‘when the real thing looks like a model’ thread. The trees are reasonably well modelled but only partly disguise the join between the layout and the backscene - the latter seems to have faded in the sun while the layout uses a very garish colour palette. There’s been no effort to weather the rolling stock, and painting a sheet of ripple glass a bilious yellow colour does not make a realistic river! On the plus side, the bridge is very nicely modelled, but it’s let down by the layout presentation with poorly-placed strip lighting.
-
"Voiding the Warranty" - Mol's experiments in 21mm gauge
Mol_PMB replied to Mol_PMB's topic in Irish Models
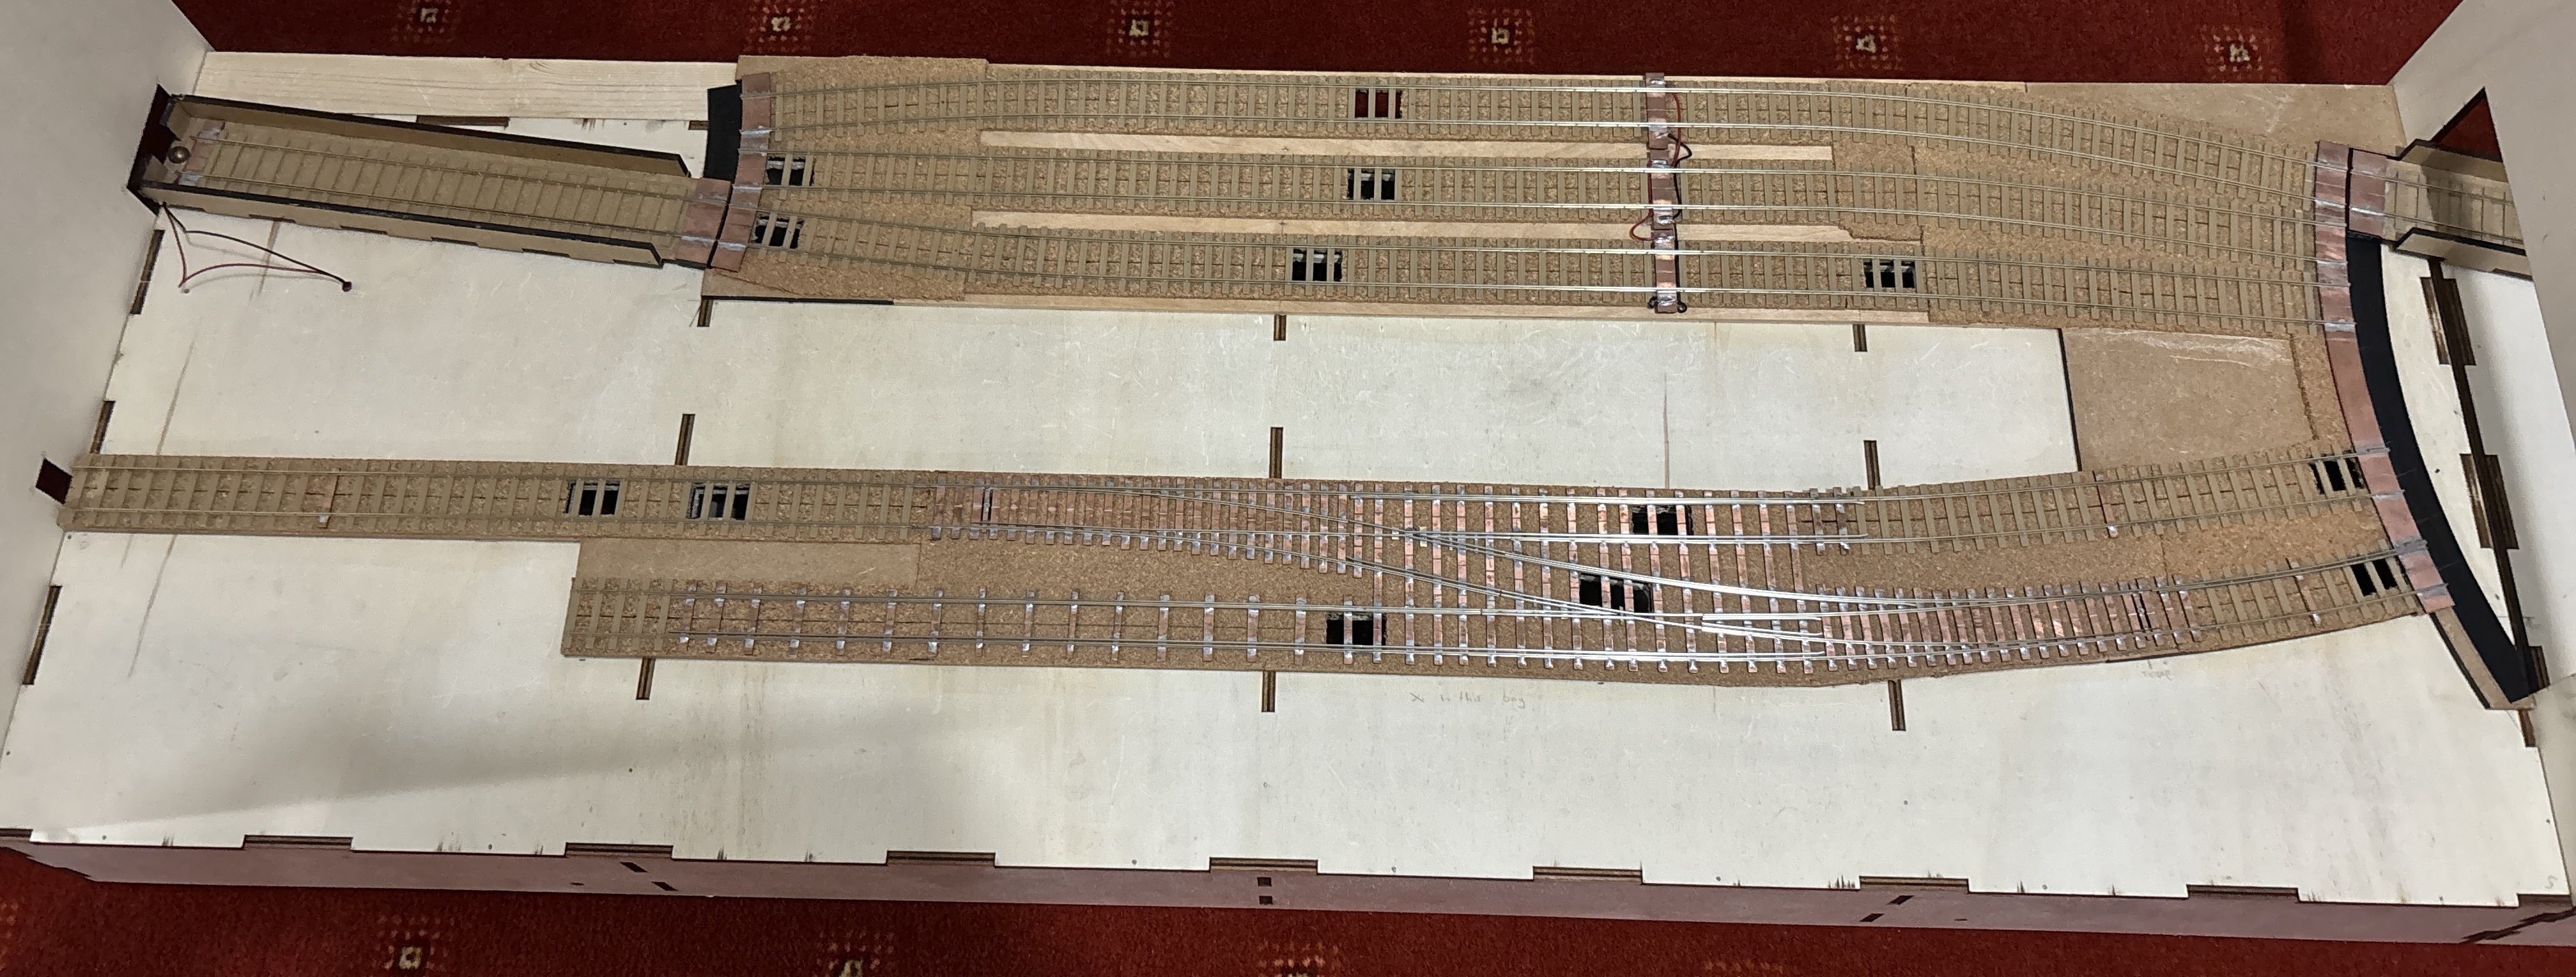
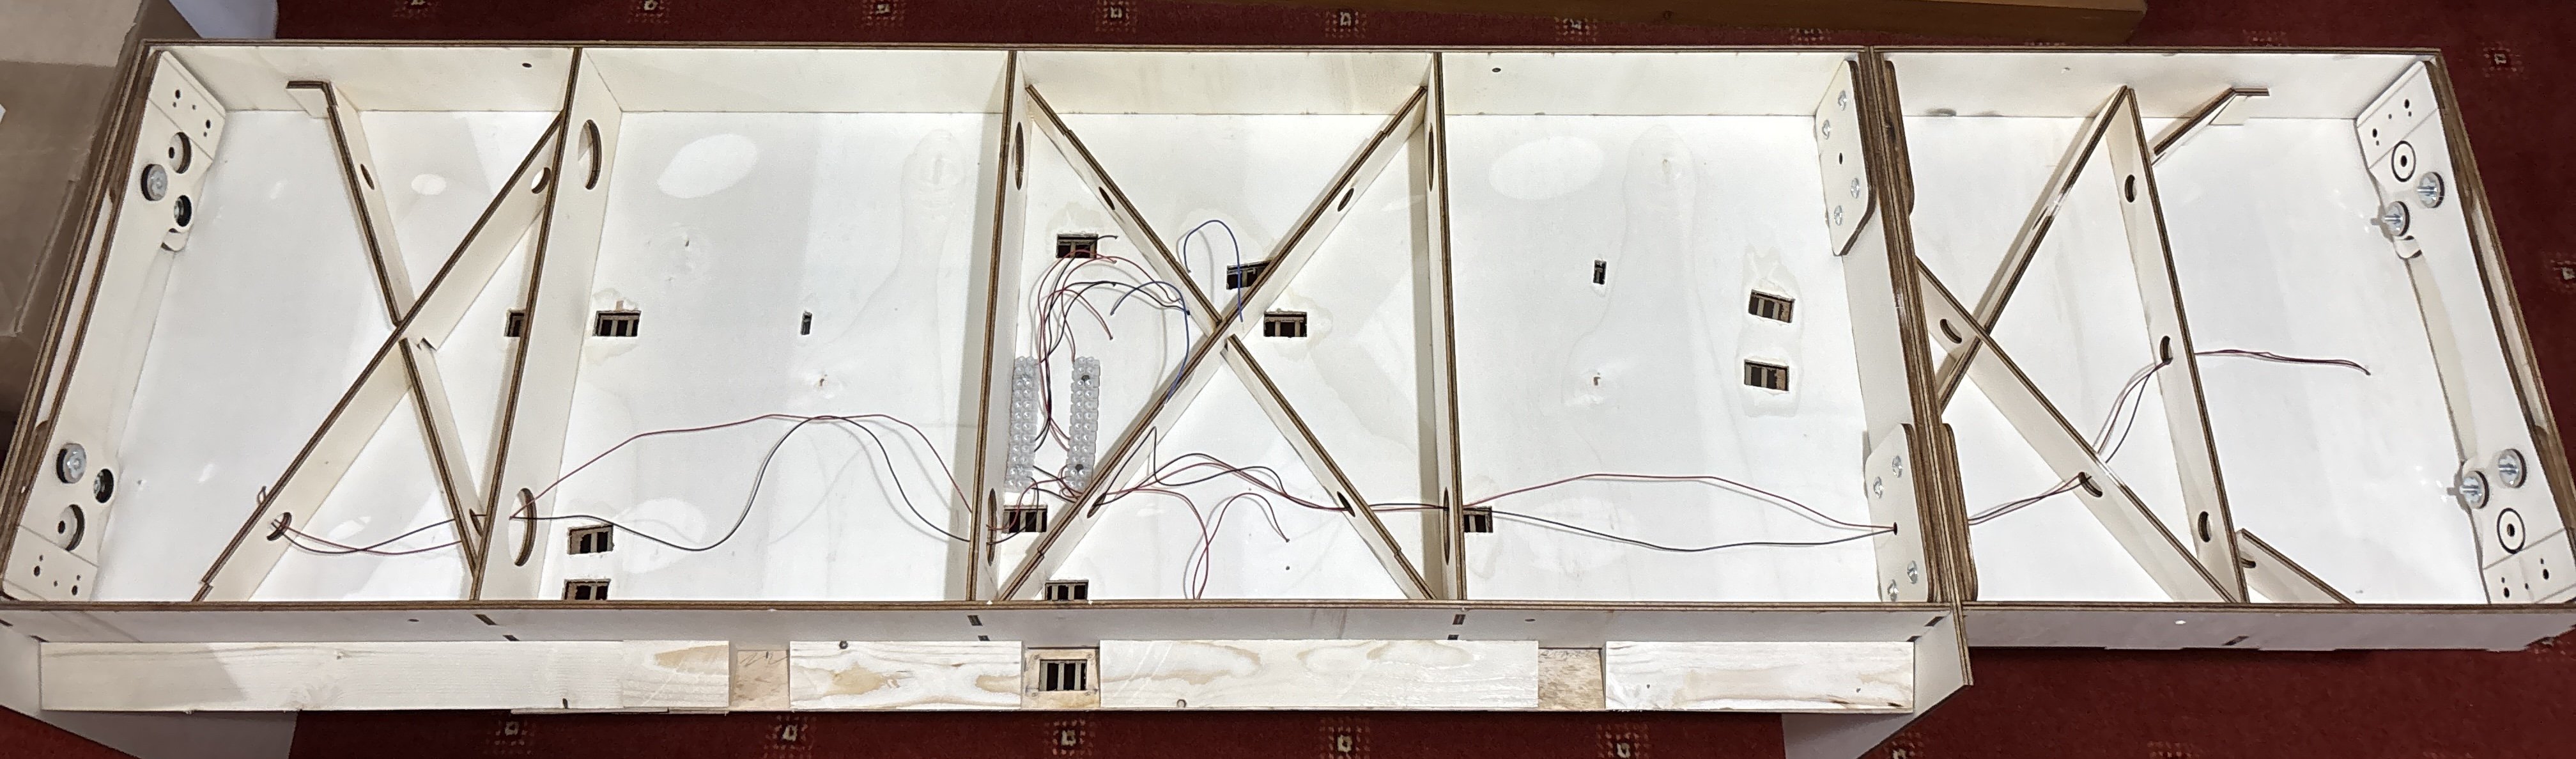
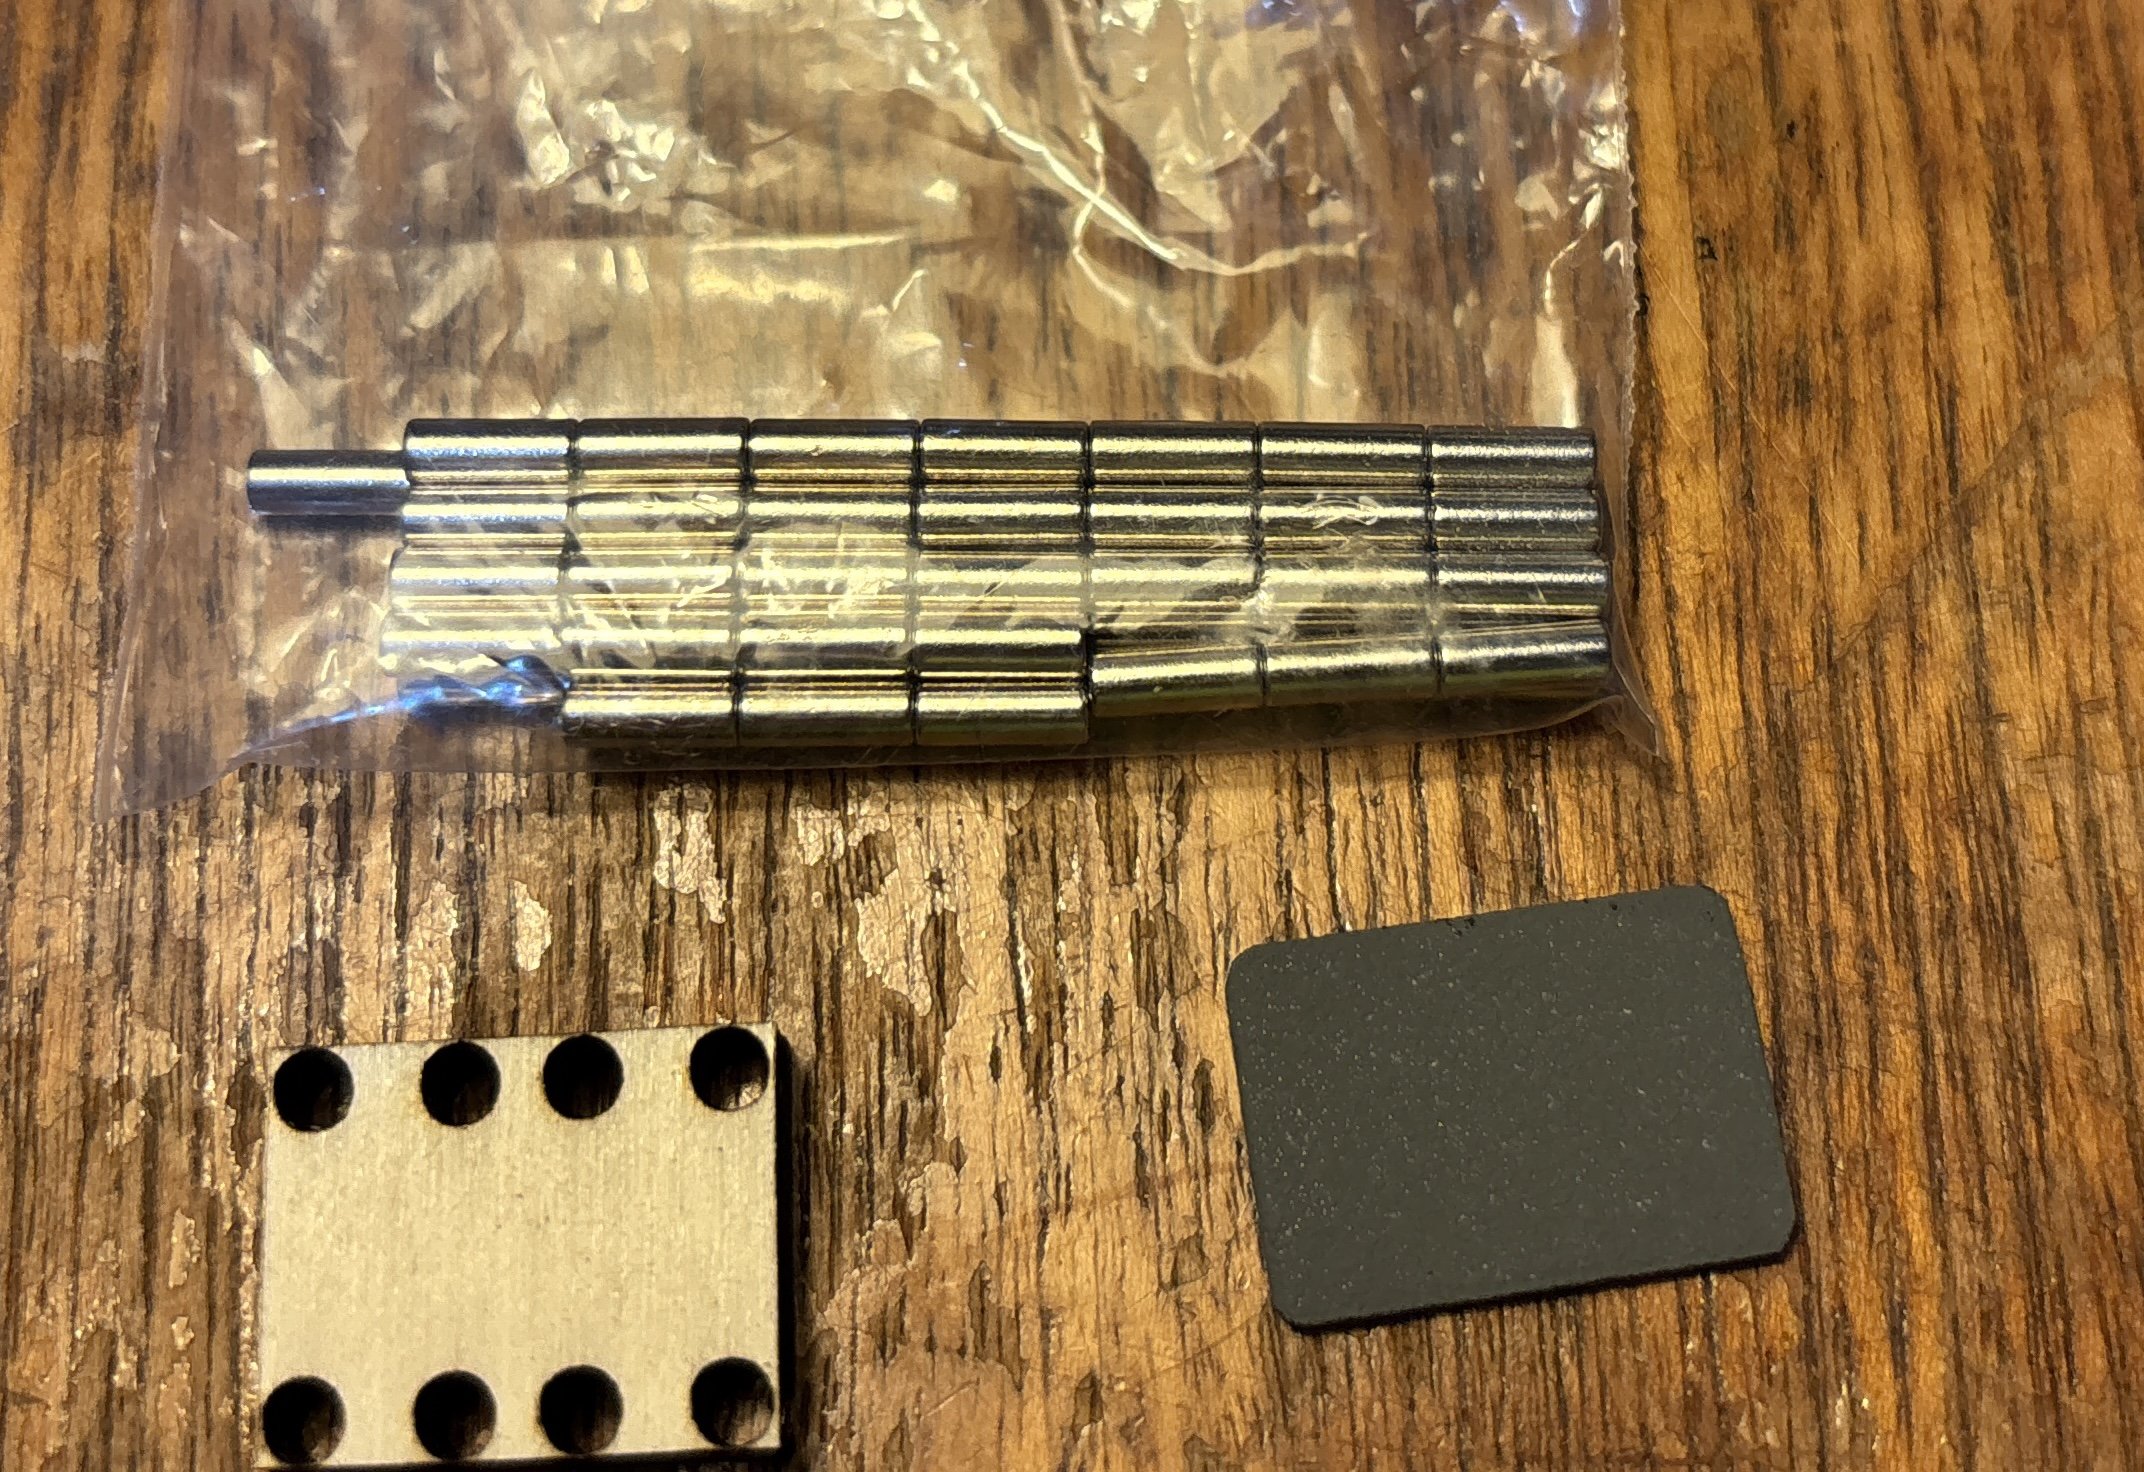
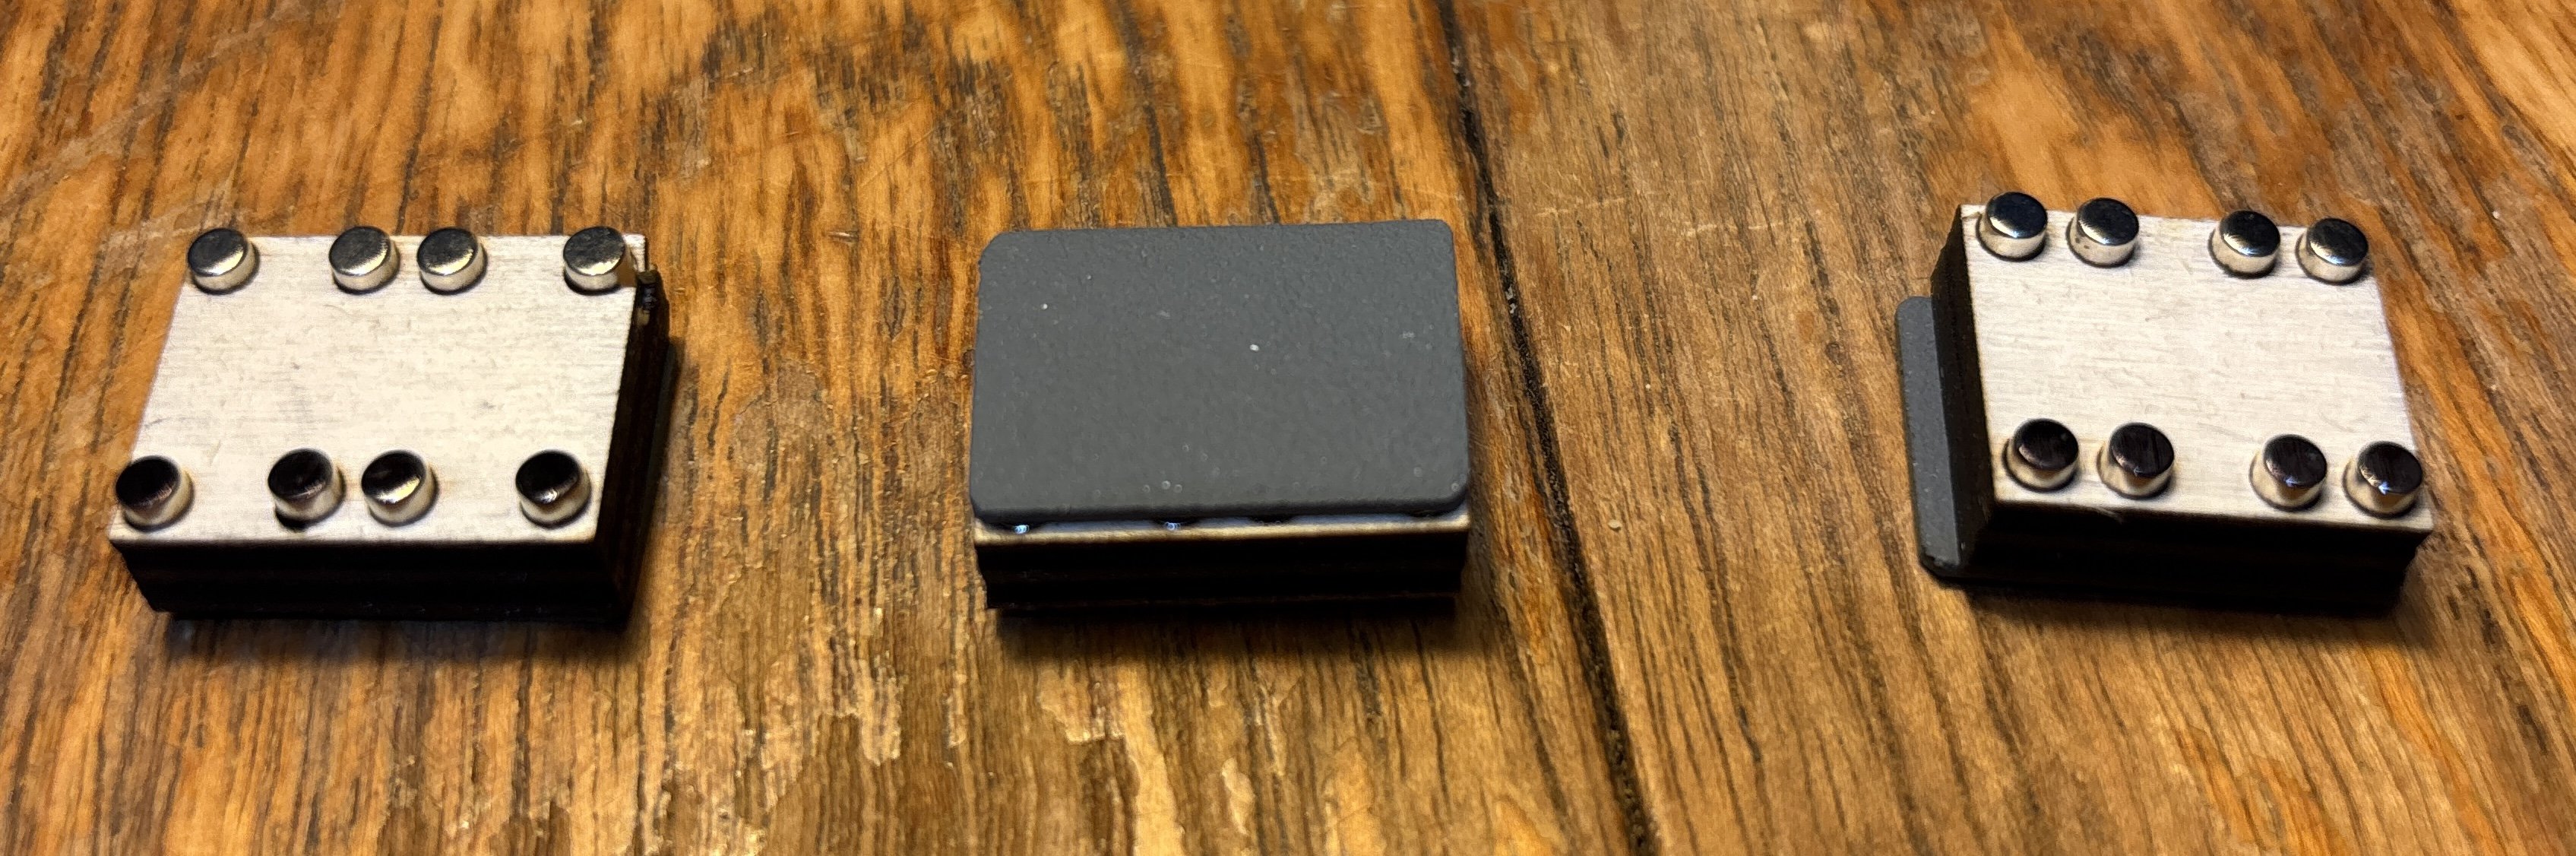
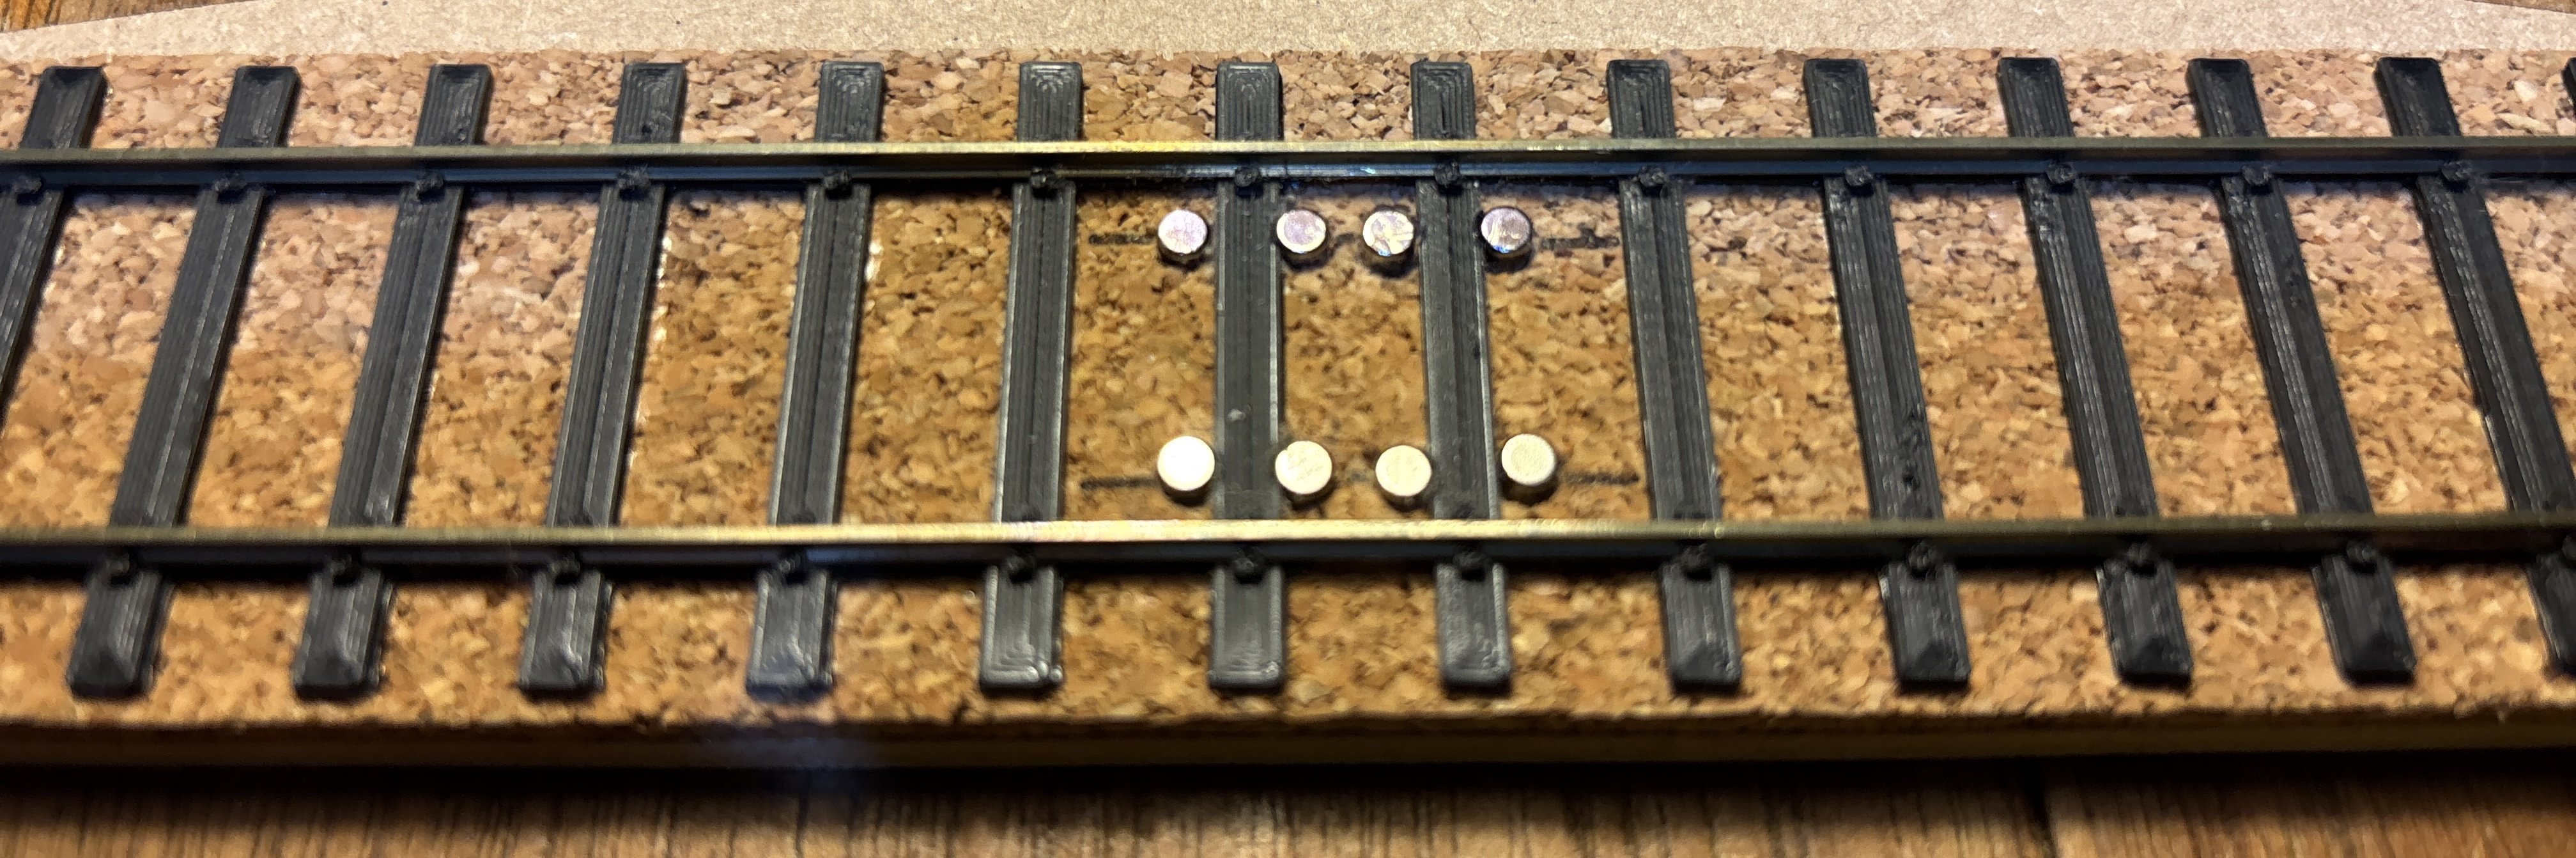
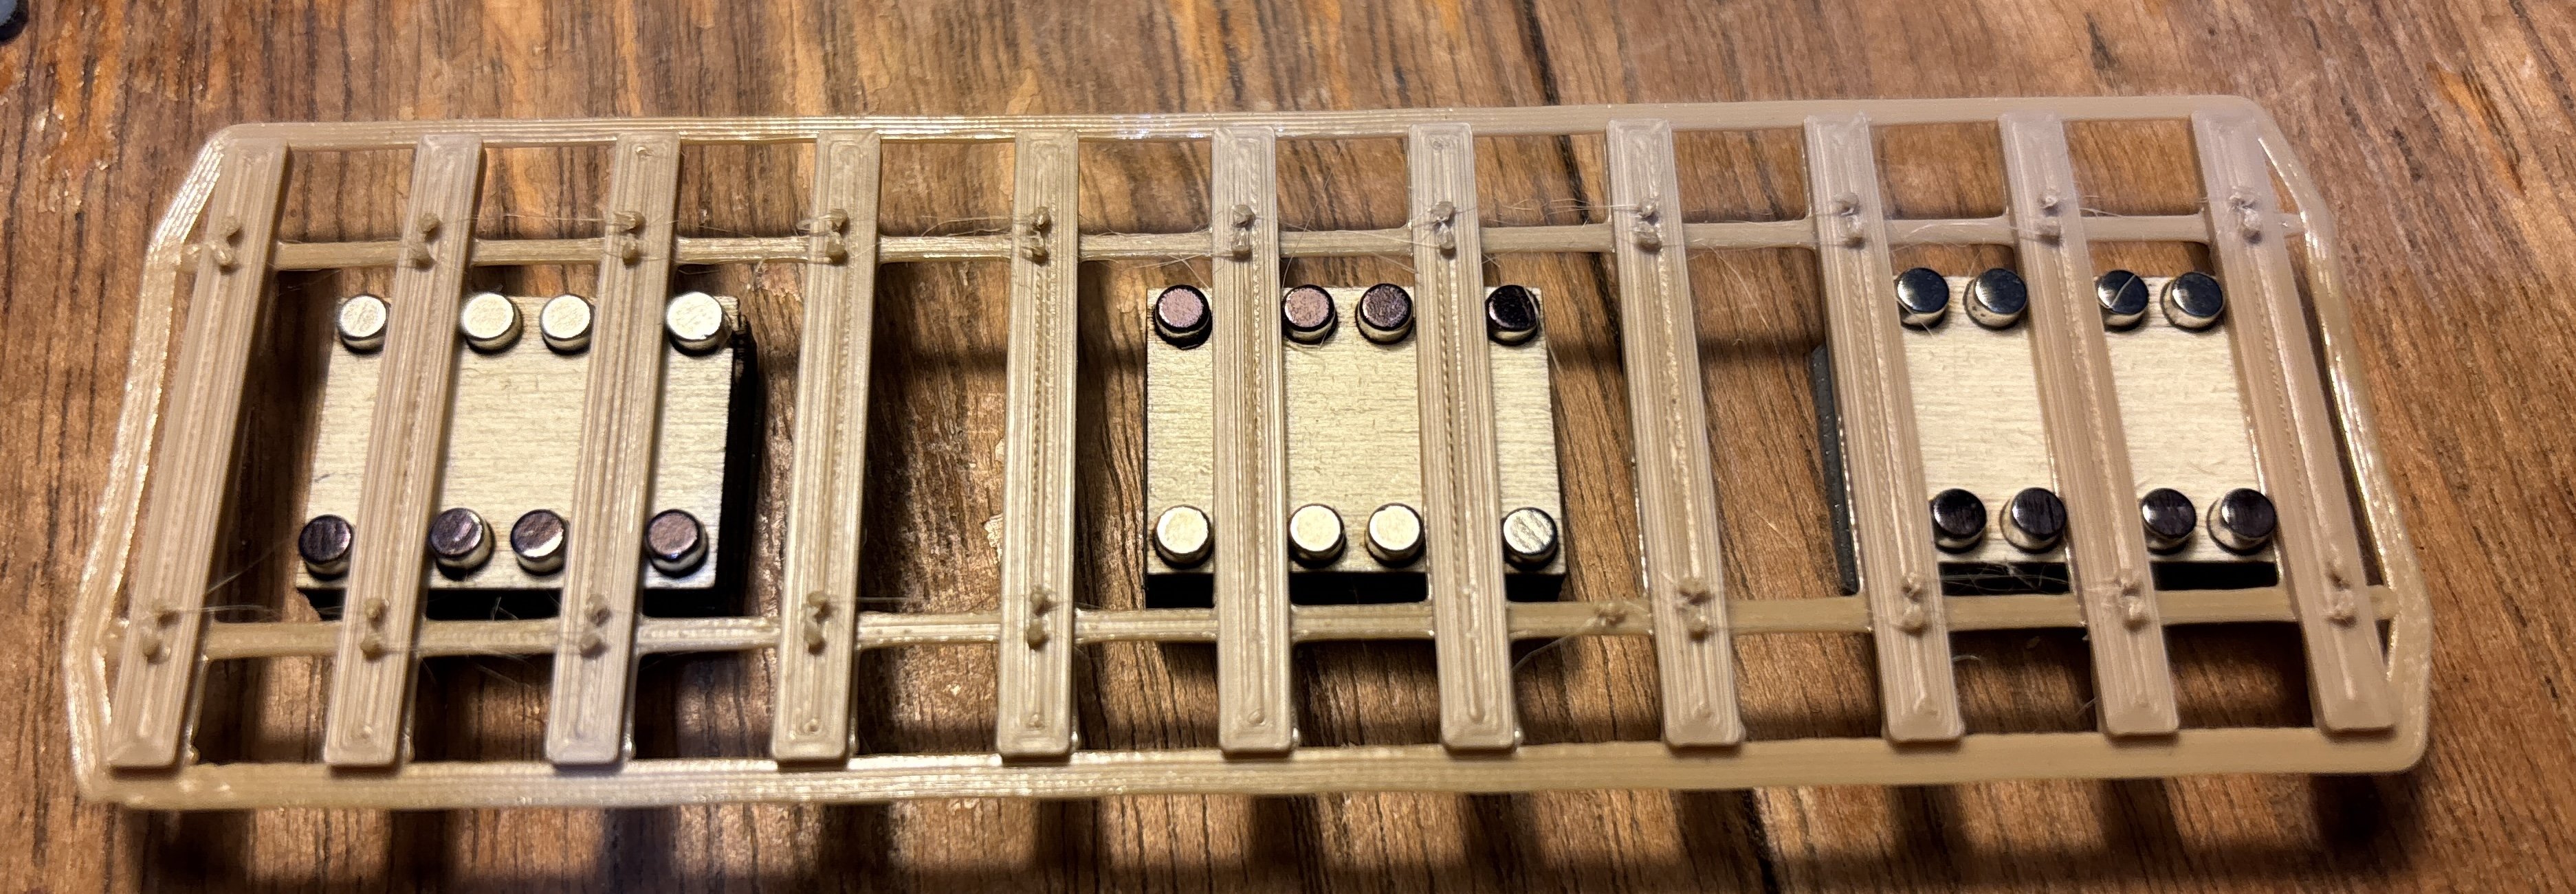
Some layout progress to report from the last couple of days. Firstly, all the track is now fixed down and the sector plate interfaces completed. Under the board I have done most of the wiring. It’s just the switched feeds to the two frogs that I haven’t dealt with. I’m planning to use some simple dowel rods to work the points, and to have them activate a microswitch to change the frog polarity. That may be a job for tomorrow. Secondly, I had been doing some experiments with uncouplers for the Kadees using rows of miniature magnets (an idea I saw on RMweb). This seems to work quite well - here are a couple of photos of my trial piece (not on the layout, this is made from oddments). The magnetic field is stronger with a steel plate underneath to connect the bottom poles of the magnets. So for the production version I have made some little ‘dominoes’ (or are they licorice allsorts?). The ingredients are a plywood block with holes in (laser-cut), 8 little magnets, and a steel plate: When complete they look like this: By adjusting the hole spacing in the wooden block I can make them fit between the sleepers of the track: The tops of the magnets are level with the sleepers so once the track is painted and ballasted they will be unobtrusive. They are also cheap - 100 magnets cost me less than £10 including postage, and the other materials cost me nothing. I have a few more of these to make, and will then get them installed on the layout. By making them as separate units I hope I can fine-tune their position to optimise performance. Some time in the coming week I hope to be testing the track, points and magnets with E410 and a few wagons.
-
It's also worth noting that Rapido have collaborated with a 3D printing firm to offer alternative bodies for one of their other recently announced locos. Narrow Lines - 009 Kerr, Stuart and Co. Sirdar 0-4-0 (Long Tank) - Rapido Trains - RMweb Presumably they shared their CAD for the chassis/mechanism in that case.
-
T2 is rather chunkier. Again, shorter bogie wheelbase and smaller bogie wheels, but 2' longer at the back than the C2 / C12. Driving wheel dia 5'9" Bogie and trailing wheel dia not listed Wheelbase 5'3" + 6'10.5" + 8'3" + 8'0" Length over buffers not listed As for the GSWR, the earlier locos were 37-38, 317-320: Driving wheel dia 5'8.5" Bogie wheel dia 3'0" Trailing wheel dia 3'9" Wheelbase 5'3" + 6'5" + 7'9" + 6'0" Length over buffers 35'11" The later batch were 27, 30-32: Driving wheel dia 5'8.5" Bogie wheel dia 3'0" Trailing wheel dia 3'9" Wheelbase 5'3" + 5'5" + 7'11" + 6'6" Length over buffers 31'. I don't seem to have many dimensions for the DSER locos in my library.
-
For those wondering what it might fit, key chassis dimensions of the real C2 / C12 are as follows: Driving wheel dia 5'7.5" Bogie and trailing wheel dia 3'7.5" Wheelbase 6'3" + 6'9" + 8'3" + 6'0" = 27'3" Length over buffers 36'6.25". Front overhang 4'0.25", rear 5'3". (Source: GN loco history volume 3a, Groves) It's not a million miles out from a GSWR 4-4-2T, but that had much smaller bogie wheels, a shorter bogie wheelbase and was generally shorter at the front end.
-
British locos and stock that can be disguised as Irish
Mol_PMB replied to Westcorkrailway's topic in Irish Models
The 'difficult' bits with handrails are drilling the holes in the right place, and forming the wire to the right shape. That can be helped by: Put dimples in the 3D print to guide where the holes need to be. Provide a separate (also 3D printed) part which is a bending jig for complex shaped handrails. Then you can get the shape right before fitting it to the model. -
British locos and stock that can be disguised as Irish
Mol_PMB replied to Westcorkrailway's topic in Irish Models
IRM and Murphy have both produced models with the correct Irish buffer spacing, equally they have both produced other models with GB narrower buffer spacing. It depends which model you pick! 3D printed buffers are often fragile, and easily broken. Ideally I wouldn't want the buffers included on the main body print at all - I would prefer to fit separate buffers (usually cast metal). Let the modeller drill the holes for them at their preferred spacing. You could probably include a couple of small 'dimples' at each spacing to help start the drill in the right place - the other dimple would end up hidden behind the buffer housing. -
British locos and stock that can be disguised as Irish
Mol_PMB replied to Westcorkrailway's topic in Irish Models
Agreed. The modern desire for DCC, sound and heavy weight has encouraged the manufacturers to fill every available bit of space inside the bodyshell, especially for smaller steam locos. That means that a modern chassis is less likely to fit a different shape body. However, with older chassis there's something else to watch out for - are they actually accurate to the original prototype? It's all very well finding that your J11 has the same wheelbase and wheel diameter as a GWR 57xx, but does the older model 57xx have the right dimensions? For older models manufacturers used the same chassis for several different prototypes and the dimensions may well be a compromise. Also note - a 57xx is a couple of feet longer than a J11 - can the ends of the chassis be trimmed off without losing anything vital? Will the mechanism still be hidden? At least with a 57xx there are several different models to choose from, including Hornby, Mainline, Bachmann and Accurascale. My gut feel is that it's best to stick to the true prototype dimensions as much as possible. Once you start changing the proportions of the loco then it soon looks wrong. But this is an area where every individual modeller has their own level of 'good enough'. -
I reckon Santa will be glad of his furry costume after a day on a 450 in wintertime! Good to hear tickets have sold well.
-
I spotted this on the IRRS website, ideal for all of those trying to justify mixing GB and Irish prototypes on their layout: When I first started work in Derby in the late 1990s I recall we also had some Iarnrod Eireann Mk2 and Mk3 coaches come in for crash damage repairs.
-
A reminder of the IRRS Manchester meeting tonight, in person and online: “Railways of the IOM” by Alistair Renfrew - Irish Railway Record Society It's a Manx theme this time - of course there was much in common between the Irish and Manx narrow gauge steam-worked lines, but they were both pioneers of electric railways too. I think the talk will cover all the rail-borne Manx transport systems over the years. I'm intending to be there, should be a good show.
-
Alan, that’s some very nice work indeed. It’s great to see how you have arranged the compensation and the motor/gearbox too. I look forward to following your progress with this.
-
"Voiding the Warranty" - Mol's experiments in 21mm gauge
Mol_PMB replied to Mol_PMB's topic in Irish Models
It was quite a big class, for Ireland, with 20 locos originally. Most were withdrawn in the late 1950s but 6 survived into the early 1960s. 653 and 654 almost saw the end of steam, being withdrawn in 1963. They weren't confined to former MGWR lines - there are also numerous photos of them working on the DSER section, like this one at Bray (also from Ernie): For me, assuming I ever get round to building it, the loco will have to be a special visitor on a railtour. A J15 would have been a more logical purchase really! -
"Voiding the Warranty" - Mol's experiments in 21mm gauge
Mol_PMB replied to Mol_PMB's topic in Irish Models
My parcel from the Antipodes has arrived safely - many thanks to @Mayner for these. Hopefully they will soon be joined by another JM design kit that I have acquired second-hand: That will give me far too many projects for the winter season, but hopefully I can make progress on some of them. I've been having an initial look at photos of the 650 class and it seems there was much variation between locos in the class. Individual locos also seem to have had various different types of boiler and smokebox over the years, as well as modifications to springing, cabs, chimneys and domes, and tender details. It's a minefield! When I get the kit I'll have to see which variants it caters for, and then choose a suitable prototype. Preferred options at present based on withdrawal dates and the number of good photos available are 653, 654 and 655. Pics from Ernie:
-
Indeed - they were superb. I have fond memories of a surprisingly fast performance by No.4 on that run. And a spectacular Whitehead-Connolly run by No.186 which crested Wellington summit at about 50mph, and arrived in Connolly with a great glowing smile across its face. The mince pies were washed down with liberal quantities of stout, and much fun was had.
-
Yes, after a couple of beers I couldn’t stop myself. What’s it worth to you? I wonder whether my 450mm sector plate is long enough for a 2-4-0 and a carriage?
-
I must confess I'm in danger of buying this myself, even though I don't need it and it will probably just sit in the cupboard of shame and never get built! They were good-looking machines: Though I'm not sure I'd want the devil's engine:
-
Better not to discuss the size of my parcel... I have several carriage etches as well as two tin vans on the way (remind me why, when I'm building a freight-only layout...)
-
"Voiding the Warranty" - Mol's experiments in 21mm gauge
Mol_PMB replied to Mol_PMB's topic in Irish Models
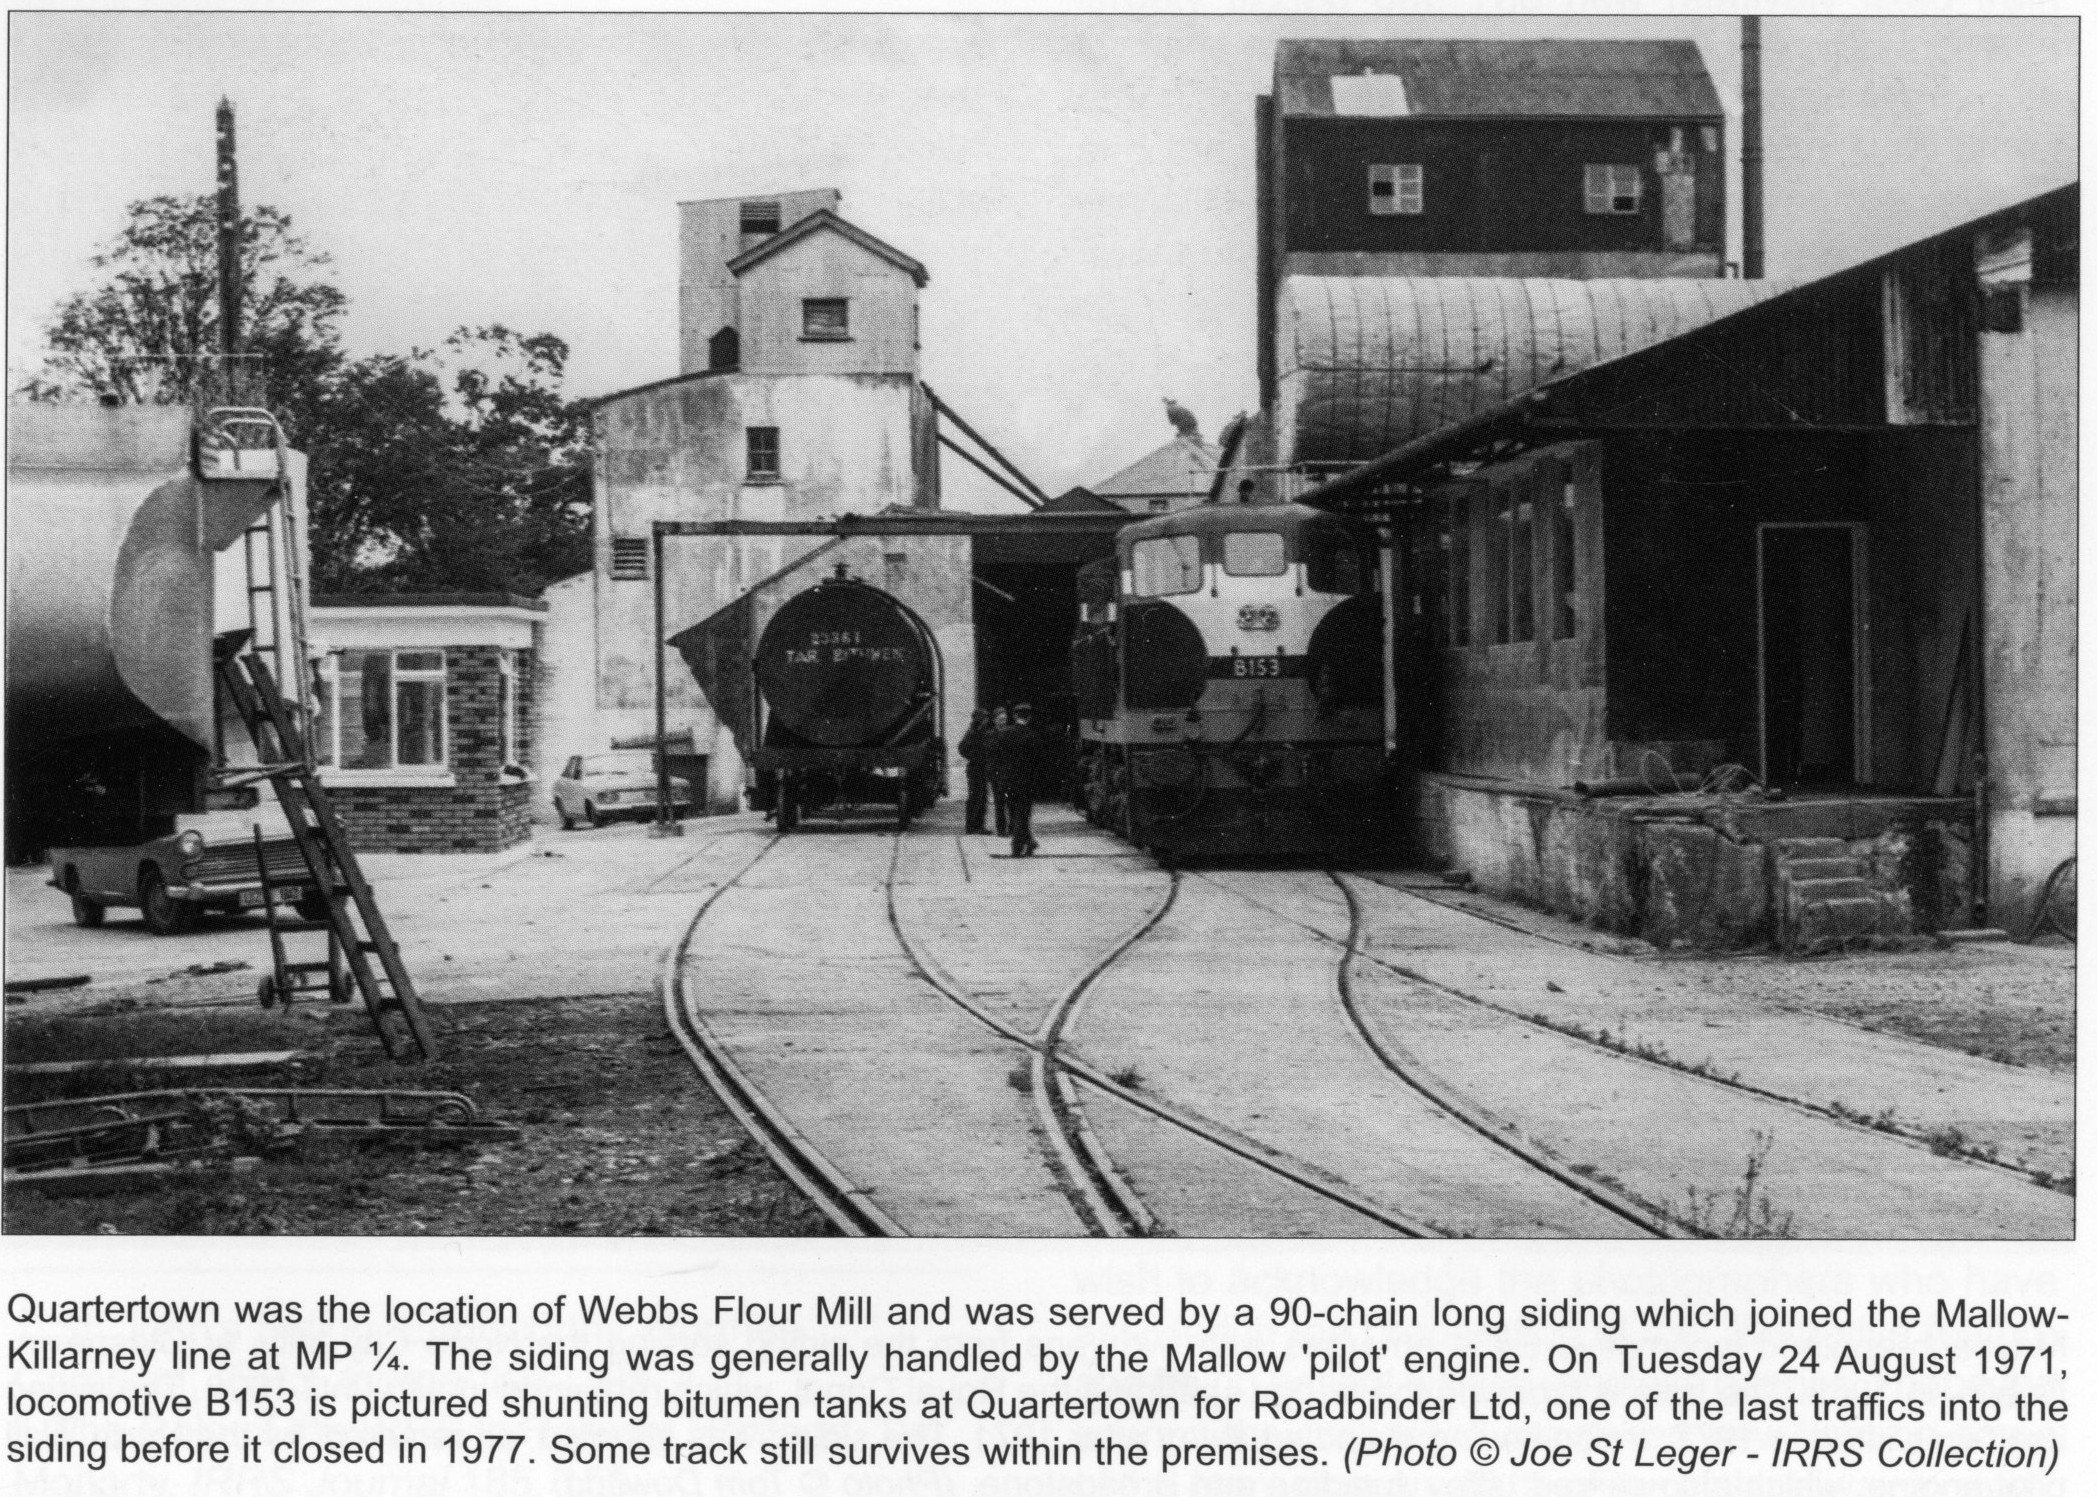
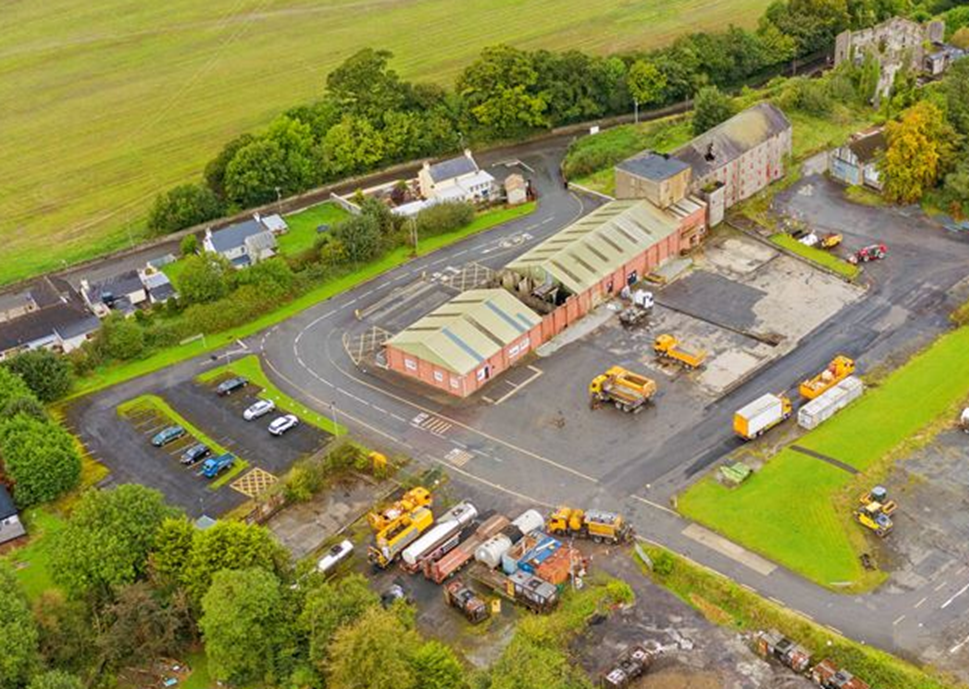
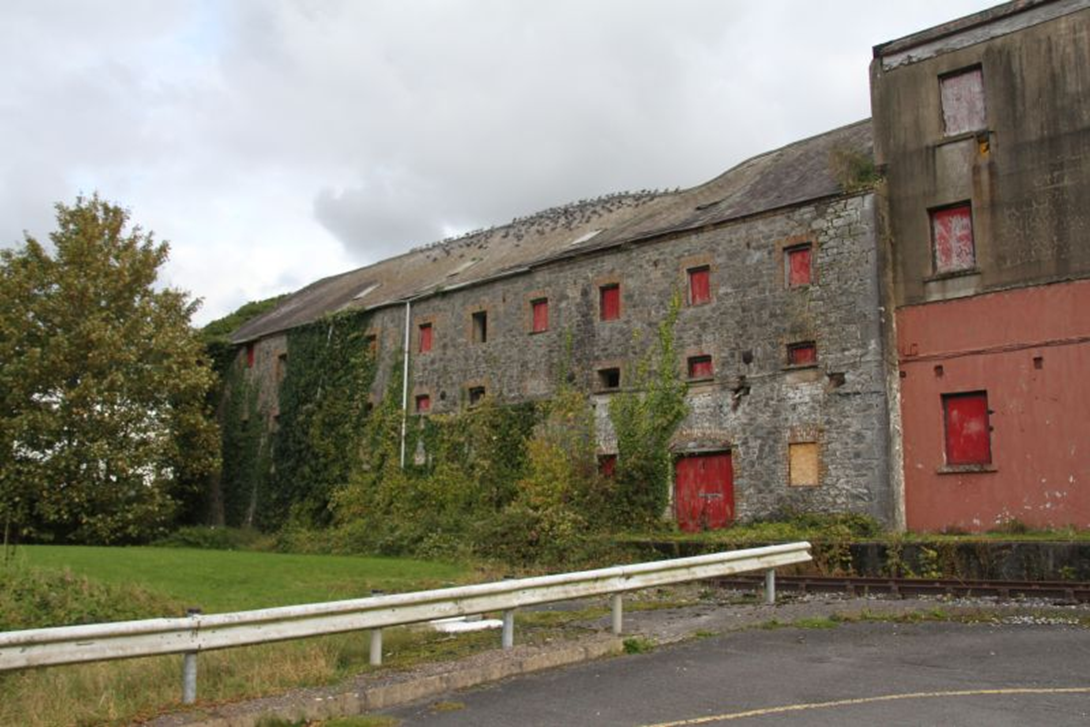
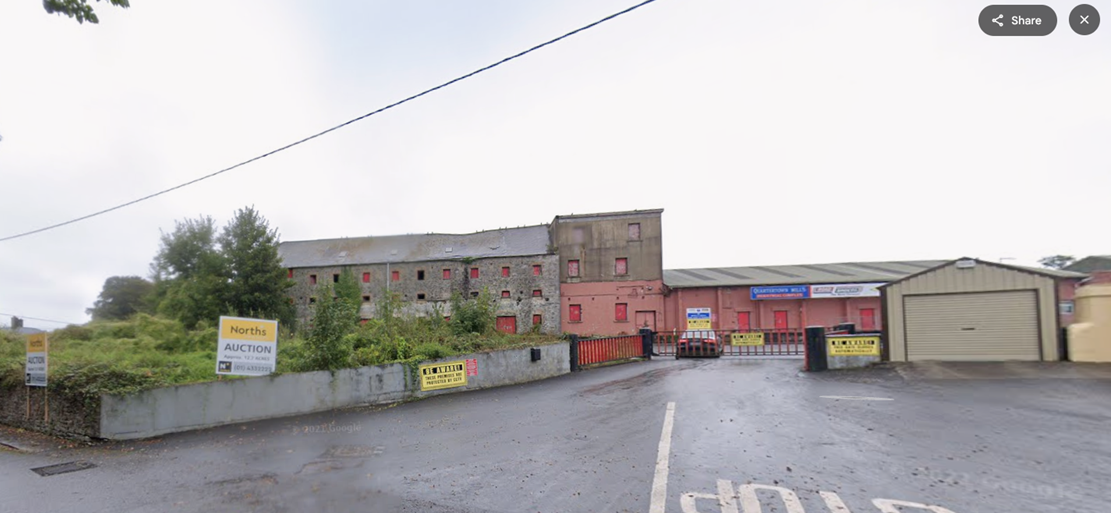
Thanks for your kind comments. I've got a busy couple of weeks ahead so I may not have much time for actual modelling, but I've been thinking ahead to the buildings needed on the layout. This image from Colm Creedon's album is a good overview of the structures around the sidings I'm modelling: The buildings to the right of the track all still exist, with some changes over the years, though perhaps not for much longer as they have been sold for redevelopment. The buildings behind the loco have all vanished. Broadly, the layout backscene will be at the ridge-line of the buildings to the right. The footprint can be modelled almost to scale, with a bit of selective compression. This is an aerial view of the surviving buildings, but from the 'wrong' side - the tracks were on the far side. The middle, lower building has lost the canopy over its railway-side platform, but is otherwise not changed too much. The tallest square block used to be taller still, with a corrugated-iron storey and pitched roof on top. The oldest, stone-built part on the right has remained almost unchanged. The 'gap' in the buildings was there in the 1960s but was different in detail, and the nearest buulding seems to have changed quite a lot. Here are some fairly recent views from the side with the track. The buffer stop is a red herring - it should be at the other end of this length of track. https://www.flickr.com/photos/183791426@N02/51141882491/ So, from left to right I have the following buildings to represent: An old, stone-built mill structure A tall tower, seems to be rendered, originally with another corrugated-iron storey and pitched roof A lower, concrete building A gap, with a wall behind A smaller low building, perhaps not much more than a loading canopy in the 1960s These can all be modelled in half-relief against the backscene, and there will be platforms and canopies in front of them adjacent to the track. I'm reasonably comfortable with the info I have on these structures from maps and photos, that I can create a reasonable impression that will look right and fit the space available. It's worth noting that several of the old photos show different features on the roofs of these buildings - I'll have to choose which period to represent. Then, at the front left of the layout in front of the track, there's the complex of buildings that no longer exists, which I will have to estimate from photos. This appears to be a slightly chaotic structure of concrete and corrugated asbestos cladding, associated with bulk grain handling. There's going to be a lot of guesswork in representing this (I don't like guesswork) because it only appears in the background of a few photos, all from similar angles. I haven't yet found an online map that shows this structure. I guess it was built in the 1930s and it was still extant in the 1970s. The 1971 photo above also shows a new, brick-built single storey office/gatehouse structure that's not in the older photos. I probably won't include this on the layout. On more practical matters, I visited my parents this weekend and they still have a 'proper' traditional model shop in their town. I have bought a load of materials for these structures, as well as a couple of wagon kits and a donor carriage for conversion to an Irish prototype. And even a bufferstop for all of 50p which I need for the siding at Quartertown.
-
Stunning work! Good to hear that you're mended and modelling again. I thought I was going to see a photo of a Lego castle but you've gone a lot better than that. The Lego Castles page looks great though - Cahir is a very impressive model. Bunratty Castle was an annual visit for me as a child, and always a super day out. I have many fond memories of the place, not just the castle itself but the village. There was another historical site in that neck of the woods with much older (bronze age / iron age?) settlements recreated, one of which had an escape tunnel 'the souterrain' which to an 8-year-old me was the third* most exciting thing in Ireland. * The top two were (2) Bunratty Castle, and (1) a train trip from Ennis.
-
Excellent! I've paid the duty on mine and expecting the parcel on Wednesday.
-
Stunning. What a beautiful layout and a nicely balanced palette of colour and detail so it all looks ‘just right’ together.
-
Very nice. Just this morning I went shopping for some corrugated sheet materials to build a 1930s ish corrugated asbestos clad grain store for Quartertown. The photos I have of my prototype are all from the same angle so I’ll need to guess some of the architecture. I must look for some photos of Clara to see what that looked like for more inspiration.