Mol_PMB
-
Posts
3,401 -
Joined
-
Last visited
-
Days Won
204
Content Type
Profiles
Forums
Events
Gallery
Blogs
Everything posted by Mol_PMB
-
Excellent. It's amazing how the weathering on the tankers has transformed them from a toy to a convincing model.
-
It would be interesting to make a list of those that worked in Ireland. There were several in Cork and Kerry over the years, including the Bandon Yanks, the Allman's locos, and the former Shamrock and Erin. Guinness, LP&HC and Courtaulds were other users of the type.
-
Saddle tanks have to fit over the boiler, dome, safety valves, and in this case chimney. It's rare to find a secondhand one that would fit a different loco.
-
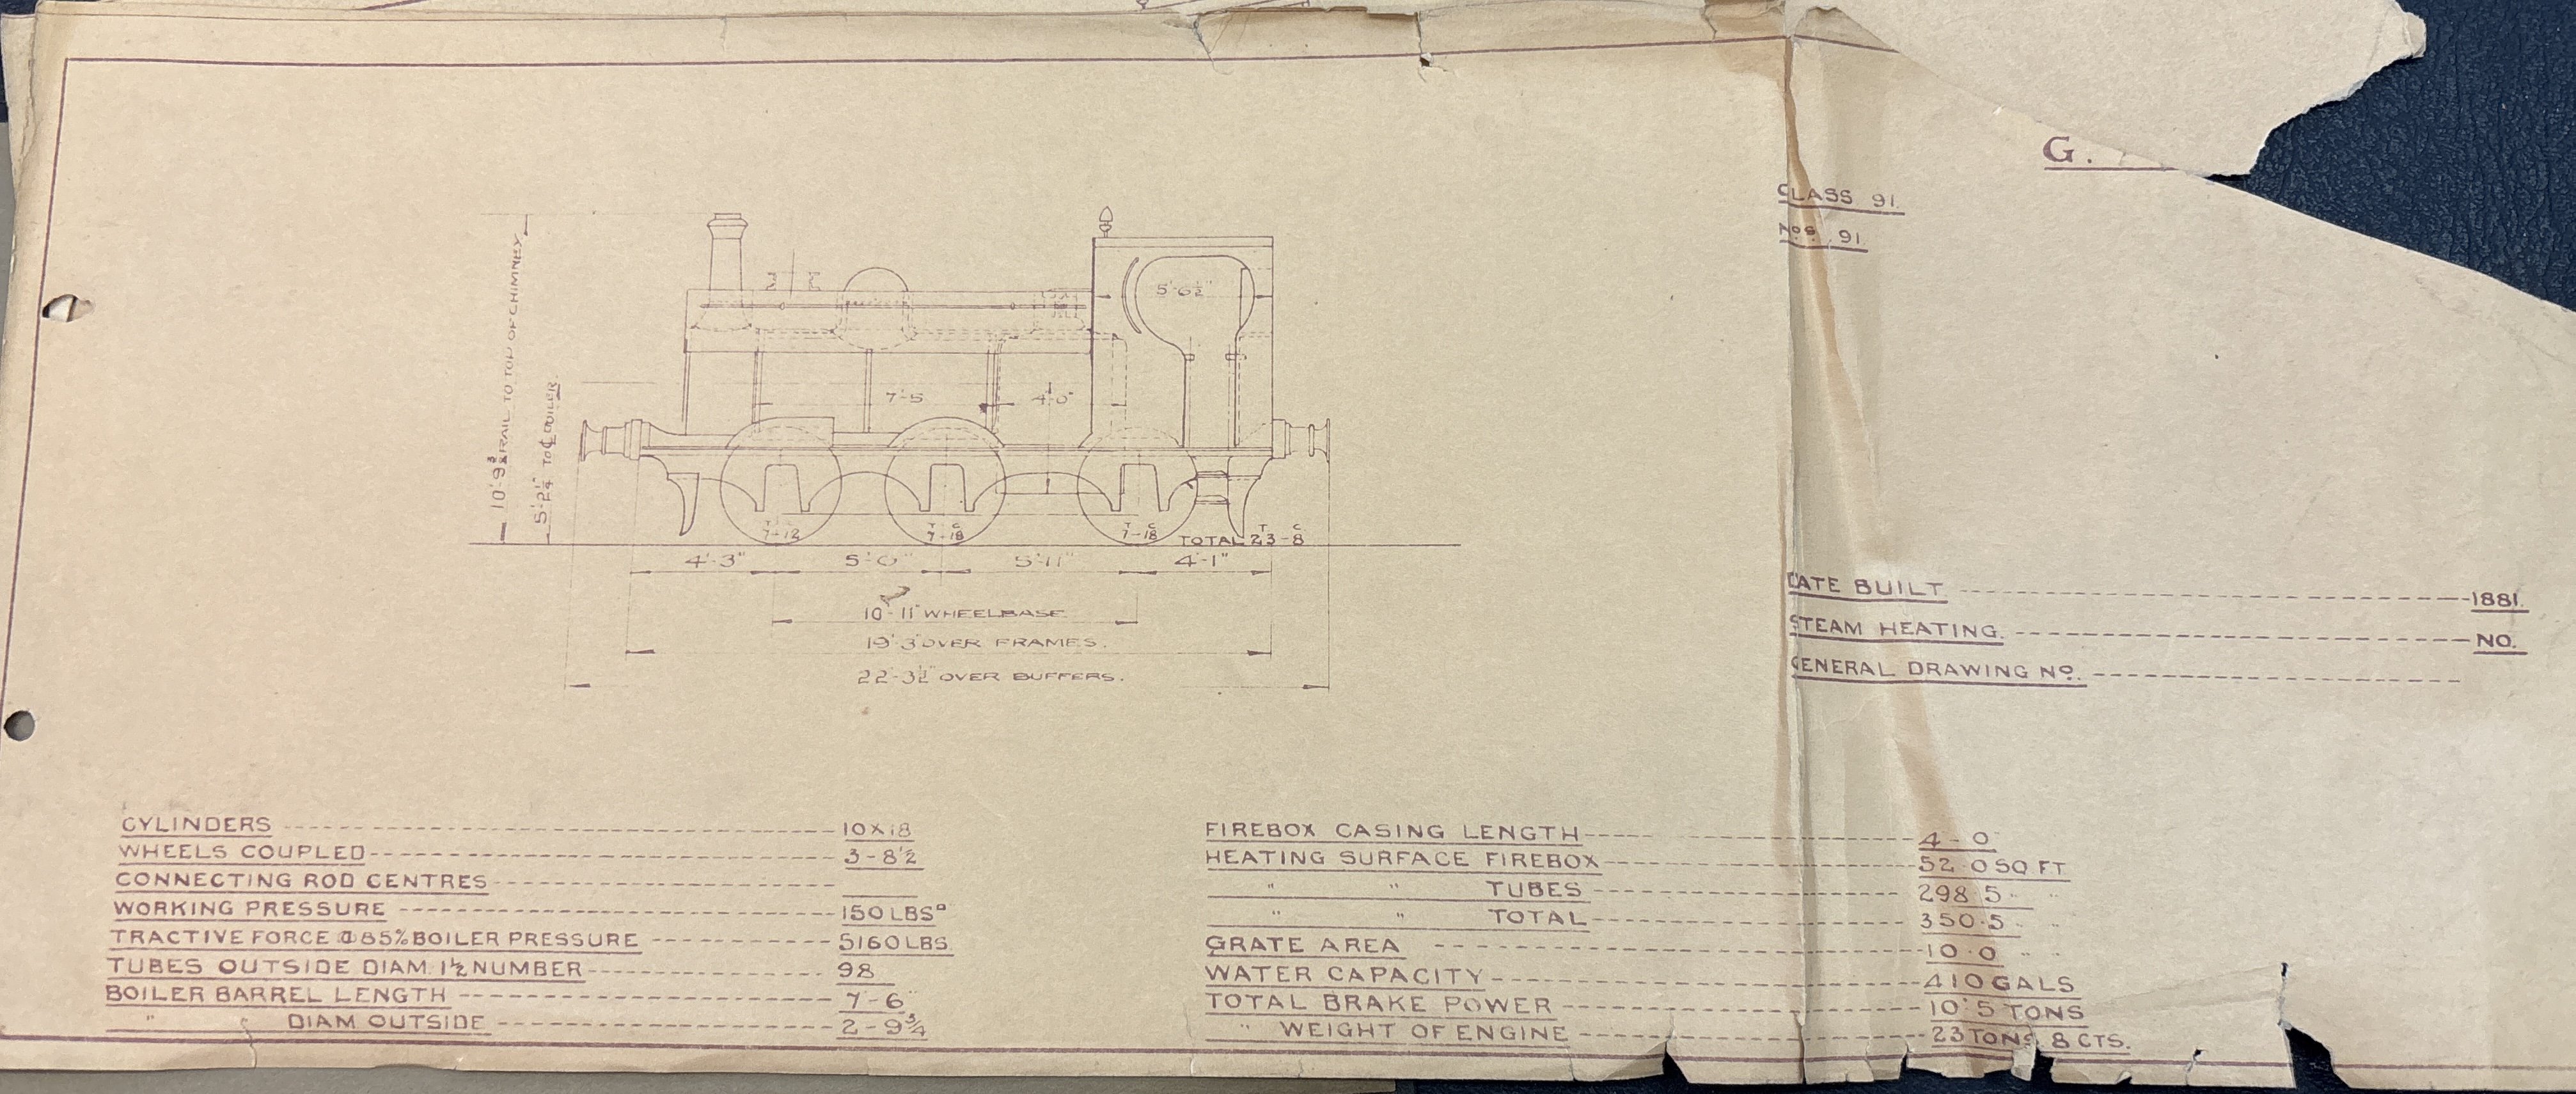
Here’s a photo of the diagram of 91 in the IRRS archives. This is just a phone snap, it’s not flat or square so not suitable for scaling dimensions. Looking at the photo you can see how the saddle tank gave better maintenance access to the clacks and reverser linkage than a side tank would have done. Also better access to the inside motion from above. The awkward saddle dimensions may have been chosen to minimise alteration to the pipework and boiler fittings? However, I think the side tanks would give better weight distribution.

-
The camping coach was converted for the 1960 summer season so its stay there must have been very short.
-
"Voiding the Warranty" - Mol's experiments in 21mm gauge
Mol_PMB replied to Mol_PMB's topic in Irish Models
The tour was great, and I met some old friends and new ones too. Most of the railtour was spent discussing Irish railway history with @Westcorkrailway and others - most enjoyable! One of the interesting things we discussed was GSWR 91, sister of 90, which was rebuilt as a saddle tank. In that guise it barely gets a mention in the GSWR locos bible but a drawing and a photo exist. Maybe it's in the GSR book but I don't have that. Although I took over 600 photos of documents in the archives I'm reluctant to post more than a few tasters here, as I'm not sure how the IP rights of the original material are controlled and I don't want to get into trouble or cause ill-feeling with the archivists. Richard MacLachlan has done a great job of digitising the carriage drawings and some of the loco and wagon drawings, and I plan to encourage him to continue that work with more loco and wagon drawings in the IRRS collection. There is plenty more to go at, although some of it takes a bit of finding in the drawers and boxes! I'd also encourage other IRRS members to spend some time with the archives. It is, after all, the Irish Railway Record Society and so we should be studying the Irish Railway Records! It would make for a more interesting evening if 2 or 3 of us were to arrange to be there at the same time and share our discoveries. -
That's a lovely model, and thanks for sharing the drawing which I'm sure will inspire others to build one too. In fact it would be quite easy to produce a laser-cut kit for the standard design. A quick google found some photos of these in the NLI archive: Holdings: [House of Mrs Bridget Kelly, Lisvalley Vesey, near Tuam, Co. Galway] :: Library Catalog Holdings: [House and grass farm of Michael Turner in the townland of Cloonmoyle, Co.Galway] :: Library Catalog Holdings: [Mrs Philban's house and farm, Ballymacragh, Co.Mayo, one of the first to be purchased by the Congested Districts Board in Mayo] :: Library Catalog Holdings: [New dwelling house in Monivea, Co.Galway] :: Library Catalog Interestingly, at first glance they don't look that much better than what they were supposed to be replacing: Holdings: [Two cottages in Newtown village, Castlebar district, Co.Mayo] :: Library Catalog Holdings: [View of a house in Graigue, Co.Galway that is to be improved by the tennant with the aid of a Congested Districts Board grant] :: Library Catalog Holdings: [View of congested village of Graigue, Co.Galway, from where migrants were taken to holdings in Graigueachuillaire] :: Library Catalog Many thanks again for the inspiration!
-
As you'll know I'm interested in liveries and this has led me to a question about spray painting. The book 'The Works - Celebrating 150 years of Inchicore Works' contains many reminiscences of works staff and one of those relates to the introduction of spray painting for carriages (page 54). This notes that the traditional method of painting required 6 coats of paint applied by brush by skilled painters. This had been identified as one of the most labour-intensive and time-consuming practices in the works but carried on "through to the late 1950s". The tale in the book says that many spray-painting trials were carried out, using a wide range of paints, but the paint would never stick properly to the coach surface. Eventually this was traced to a chargehand who had been deliberately contaminating the paint with paraffin. Presumably over a fear of job losses if a quicker, more efficient painting process was introduced. I'd be interested to try and date this more accurately, as there may be a connection to observed changes in livery in the 1950s. The method of application and the number of coats can influence the appearance of paint, even the same colour paint can look different. But often the change to spray painting was accompanied by a change in paint formulation and supplier too. I've also seen some 1950s photos of carriages where the paint appears to have peeled off, and there are other mentions of experiments in the 1950s with different shades of green paint which could not be kept clean in service. Can anyone give a more definitive date for the introduction of spray painting at Inchicore? Many thanks, Mol P.S. It's worth remembering that for the 1956-8 period, new-build carriages from Inchicore weren't painted at all on the body. Older carriages would still have needed repainting though. Green was reintroduced as a livery for new carriages in late 1958 - might this tally with the introduction of spray painting or was it more to do with the departure of Bulleid?
-
Worryingly, a ferkeltaxi would probably be the prototypical passenger train for your branch line!
-
Those look good! Thanks for the info.
-
Indicative dates for the next RPSI diesel tours were informally announced as follows. Details TBC and these are not fully confirmed, but may be useful for your diaries: 8/8/26 Dublin-Galway 17/10/26 Dublin-Tralee I think these are both billed as 071s but there is talk of a baby GM coming out to play in the future Apart from this coming weekend’s Midlander trains I haven’t seen any future main line steam advertised yet, but they tend to be at fairly short notice. If anyone has more info, please let us know.
-
Excellent work - that looks very neat considering the challenges you have had to deal with! In my day job I often use the track geometry data recorded by that unit. I've never actually been on it - though I have been out on the 'big sister' NMT.
-
Sorry for not responding properly before. I think 'SIDHE' looks excellent, well done in creating such a unique and attractive model which is pretty much hewn from raw materials. I sometimes find myself looking back critically on a completed model and thinking 'I wish I'd done xyz' but I'd bet no-one else would notice the minor shortcomings, and once it's placed in the cabinet or on the layout I'm happier to move on to the next challenge.
-
Back in the dim and distant past, for my first 16mm scale garden railway attempt in my parents' garden I dug a trench approx 100mm wide and deep, and then used green plastic lawn edging to line the sides and filled the middle with gravel, adding the track on top. It didn't work very well. After a year or two I dug out the gravel and filled the trench with concrete, and that worked better. Before casting it, I put in some wooden pegs to set the level every foot or so, and to give me something to screw the track into. I later ballasted it with a mix of gravel and cement. For my third attempt (in a different property) I abandoned the ground level idea and built brick walls with the railway on top. A lot of work but a more comfortable operating height, though derailments could be more perilous! That line never got finished as I had to move again, and I gave up on garden railways after that and sold off all my stock. It would be embarrassing to list all the different scale/gauge combinations I have tried over the years, and probably not really finished a layout in most of them. Four attempts have been Irish prototype including the current one, and all different gauges!
-
A close friend of mine who lives nearby has built a large HO DR layout. His is set in the 1980s though, mostly diesels, so the opposite end of the date range from Northroader. He doesn't post much online but has done some really impressive work with automation of the trains and some lineside features. If he commands a loco to go on shed, then the computer sets the route, opens the shed doors and moves the loco, then closes the shed doors again. Way beyond my electronic skills! He's also spent a lot of time fitting lighting to the coaching stock, similar to what you have just done. He has far too many ferkeltaxis for my liking, but then he's also a Pacer enthusiast...
-
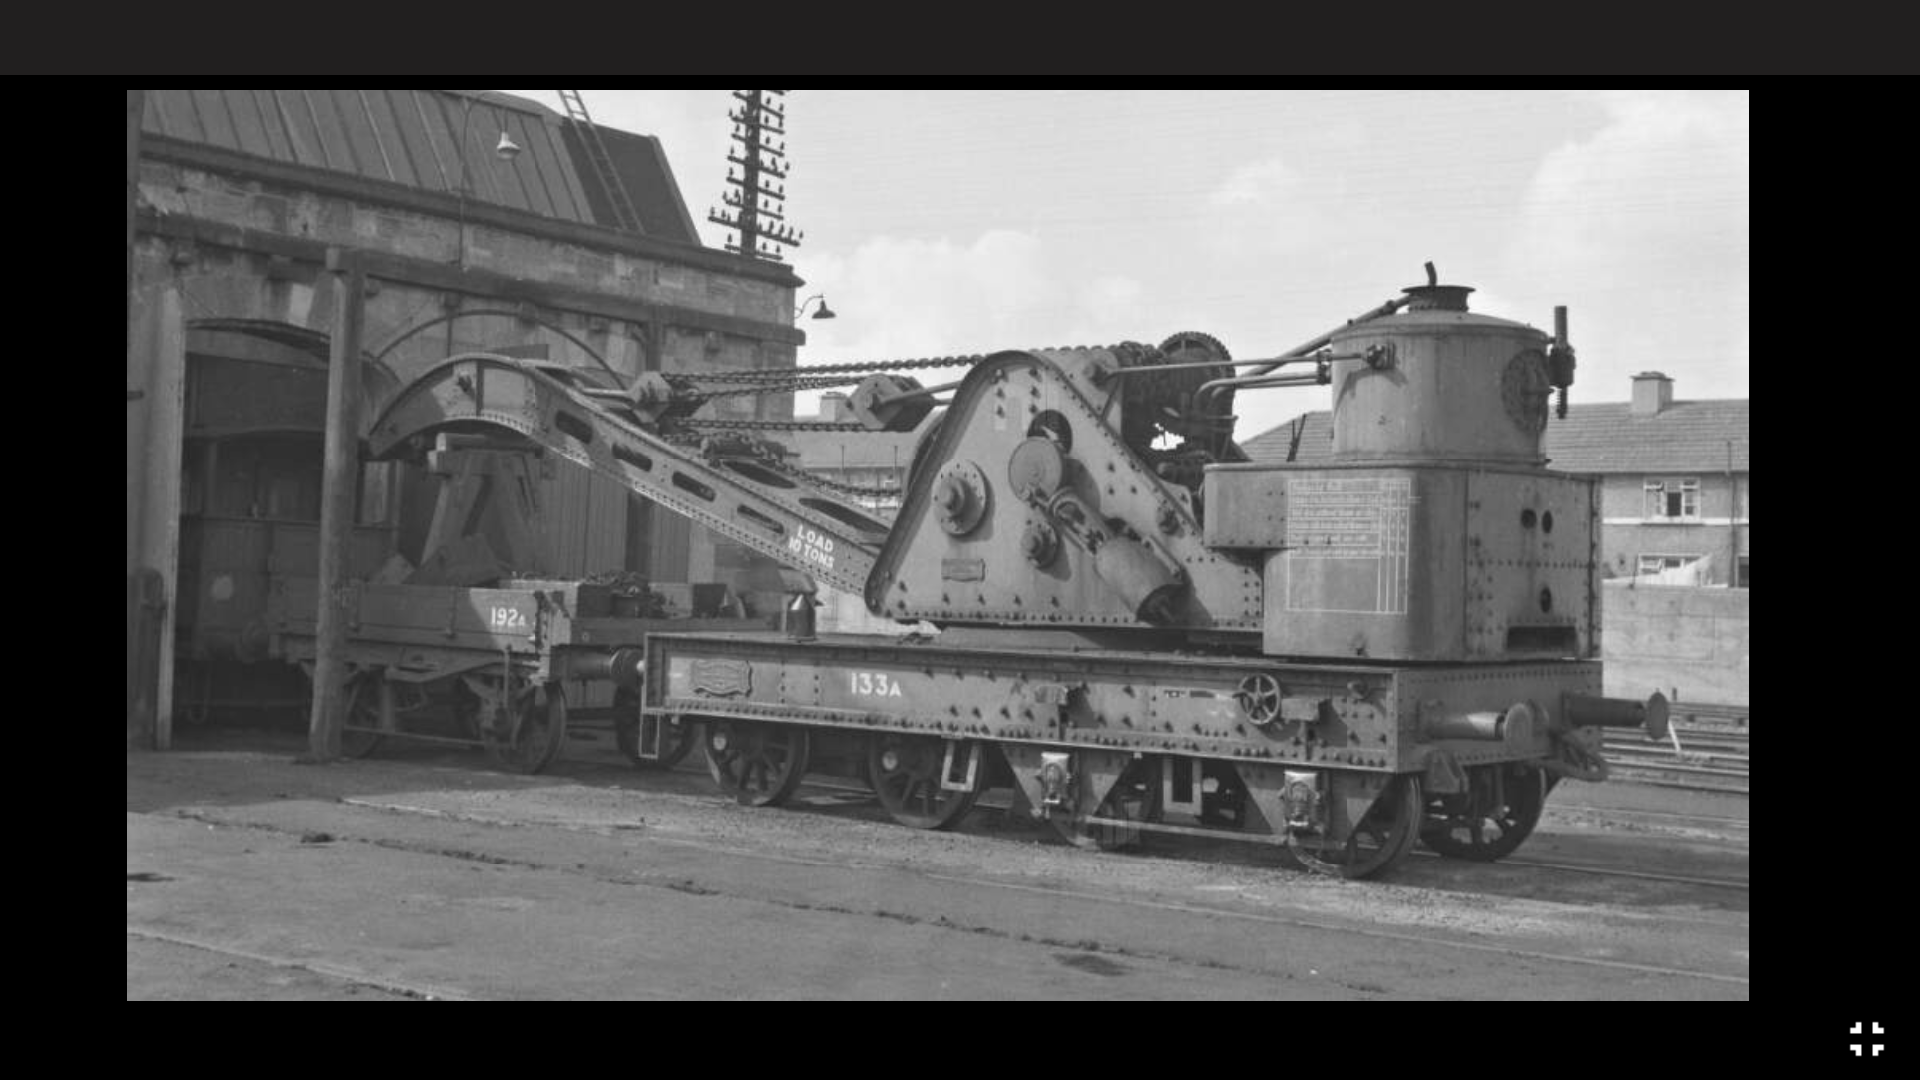
Some recent updates on this model which is proceeding well: Search results: 4 results for "Cowans* Sheldon*" Oxford Rail Reveal Cowans Sheldon Crane Update – Rails These were a 'standard' design used by many railways in GB and worldwide, including several Irish lines. Of course there were a host of detail variants, and Oxford are initially producing 4 models of GB prototypes, including both the early and late jib types: The RPSI have one at Whitehead, with the simpler type of jib. 2 Crane From the NLI O'Dea collection, here's another Irish one with the more elaborate jib design: Holdings: 10 ton crane x CBSCR, Inchicore, Co. Dublin. :: Library Catalog
-
Excellent!
-
I heard talk at the weekend that a charging point is to be installed so that the Ryder Cup services can be operated by the new DART trains. I'm not sure how much substance there is to this, but if so I do look forward to them being rebranded Foynes Area Rapid Transit I suppose that given IE's shortage of rolling stock and the desire to portray public transport in a good light, a brand new train might be a fair option compared to a tatty, noisy 29000.
-
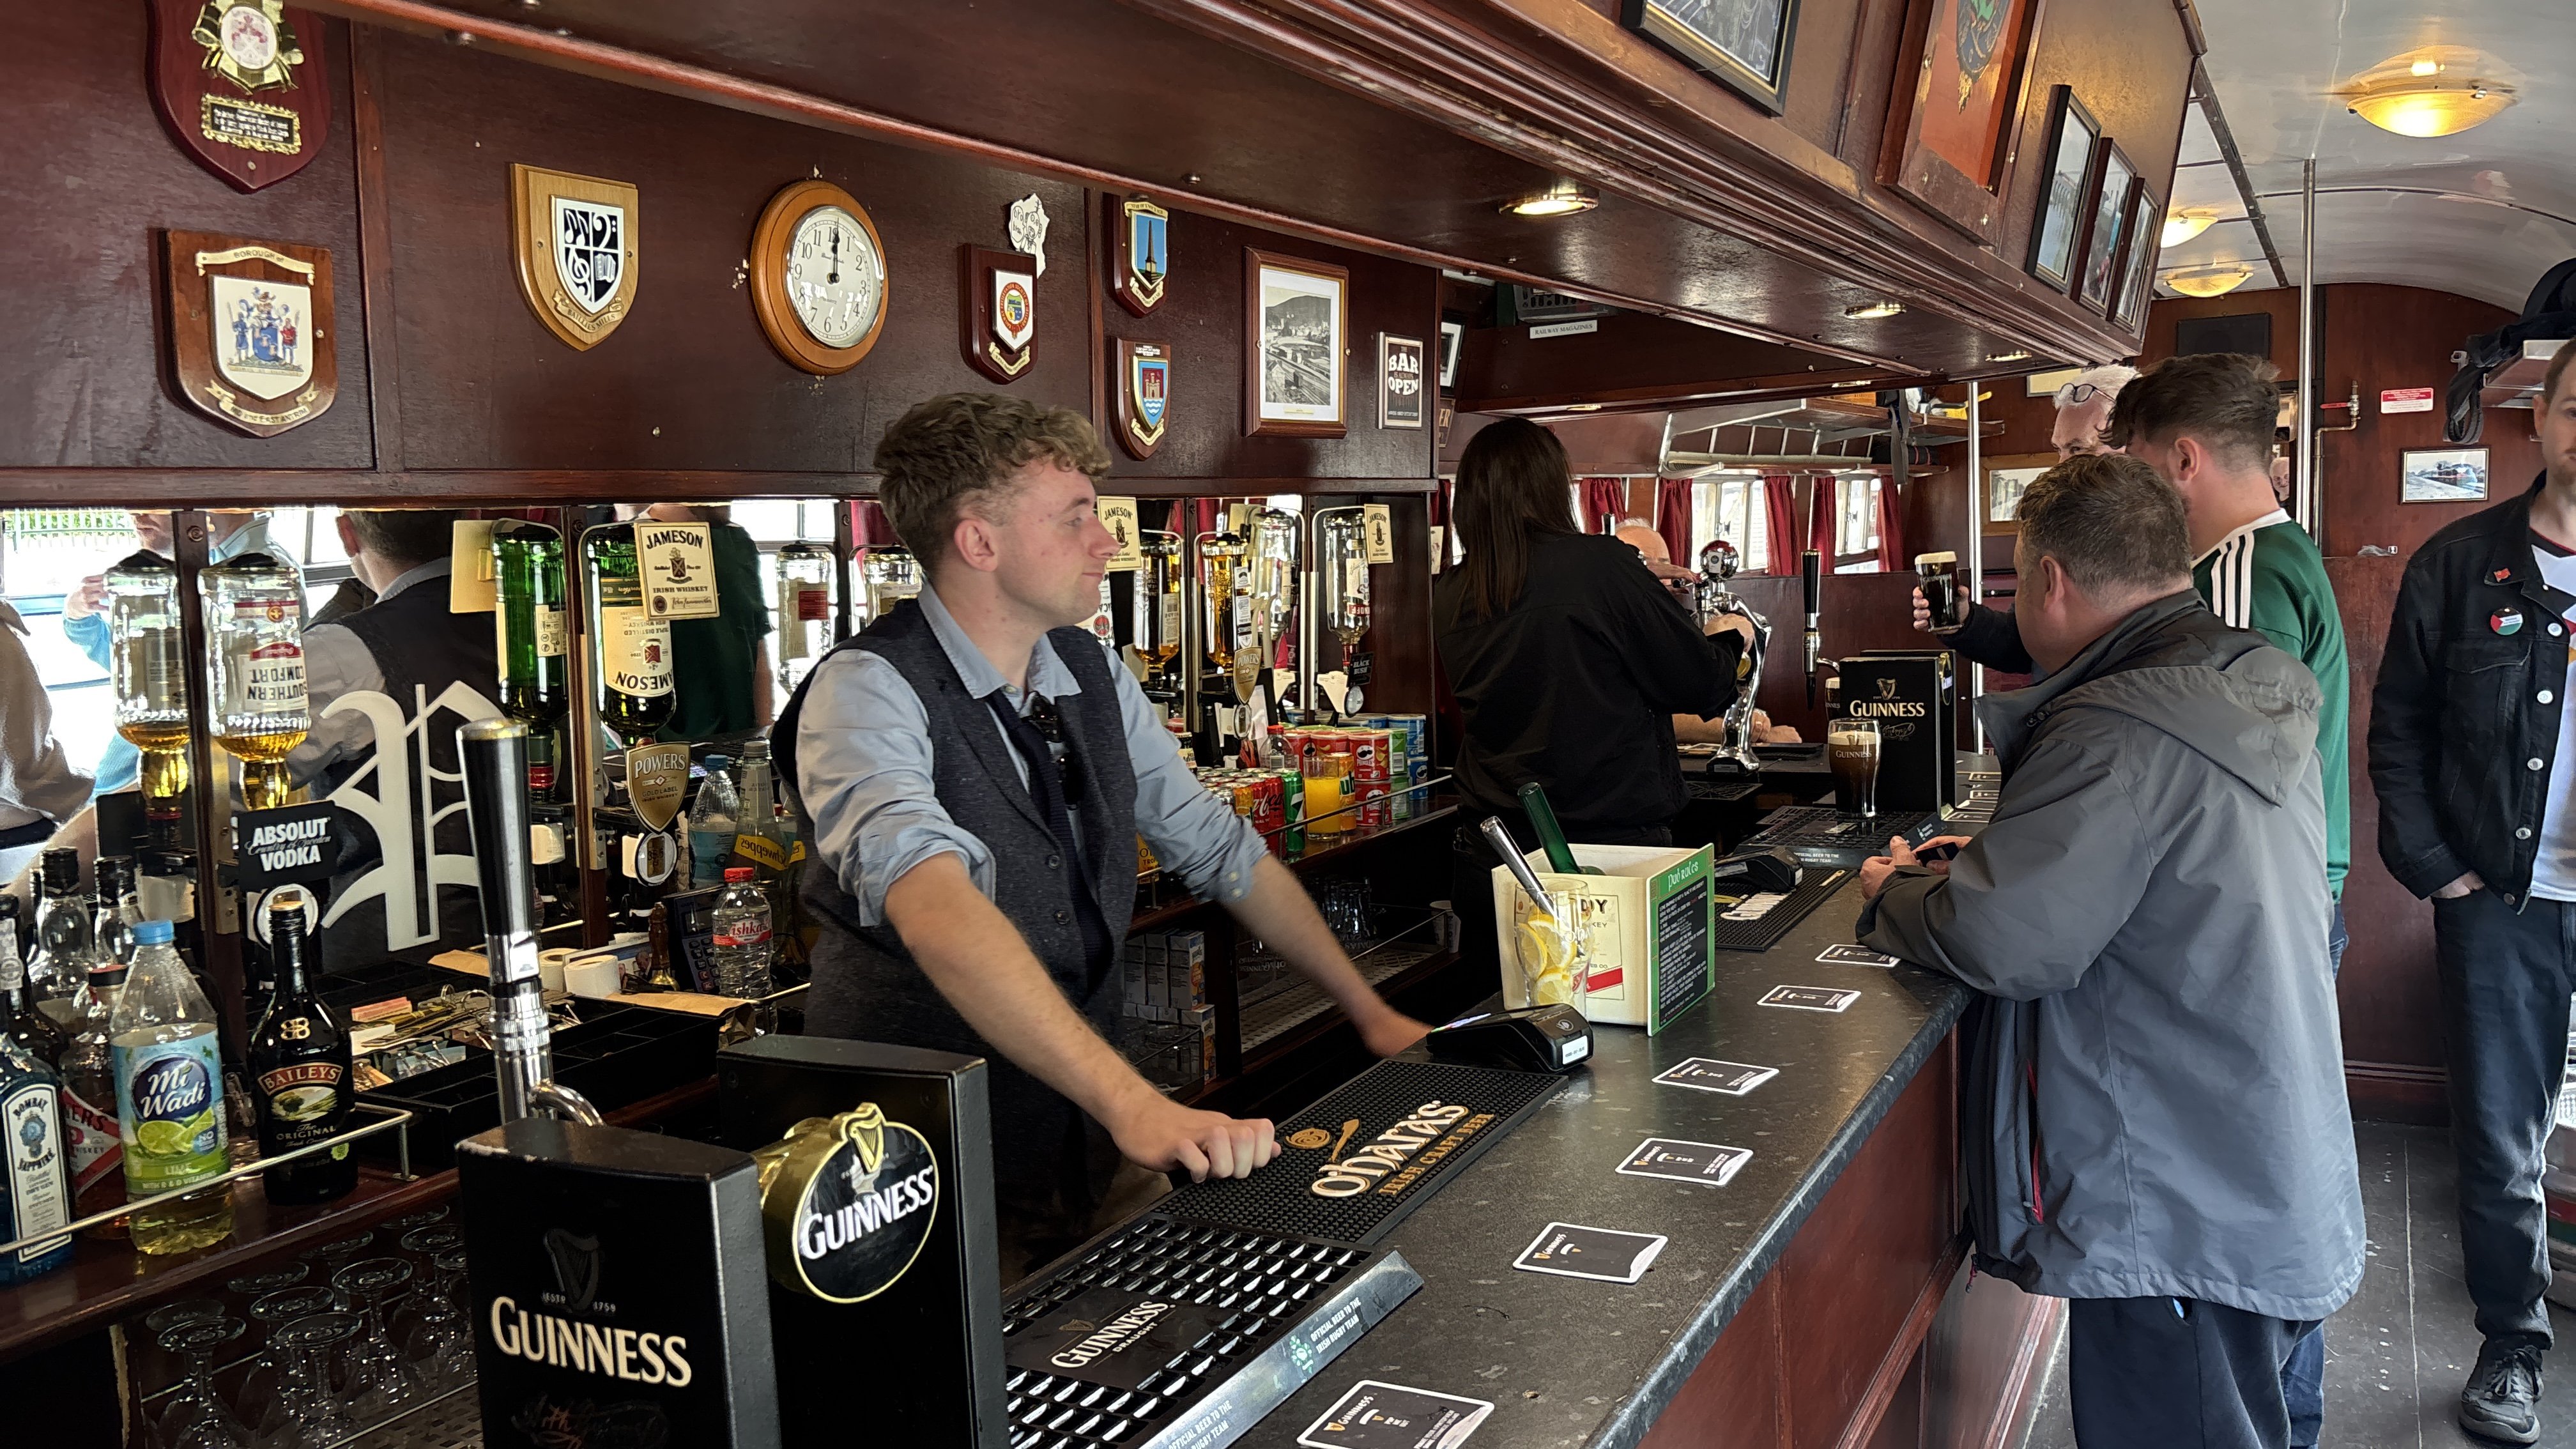
Medicine for the day was dispensed in plentiful quantities from the RPSI bar car
-
"Voiding the Warranty" - Mol's experiments in 21mm gauge
Mol_PMB replied to Mol_PMB's topic in Irish Models
Well I’m back in Ireland, again, so still no modelling progress to report! And I’ve frittered away my afternoon on a boat trip and some birdwatching! I am most of the way through cataloguing the hundreds of photos I took at the IRRS archives last week, and I will be adding some more info to several threads in due course. One of the boxes I looked in on a whim was marked ‘catering’ and turned out to include a whole host of information about buffet cars, tea cars etc from 1940s through to 1970s. Fascinating stuff and some useful info on GSWR 838 and 841. These were the first catering cars through-wired for use with the railcars, and 841 is a carriage I plan to model using my custom etch. Despite being recommended for scrapping in the mid-50s, and narrowly escaping being burnt to a crisp on a Sligo train when the railcar next to it was burnt out, it survived until the early 60s and was formed in the last passenger train on the CBSCR. I might see one or two of you on the RPSI tour tomorrow - I have a seat booked in the bar car. @Eiretrains Cheers, Mol -
A couple more candidates for this thread, from the GNR. The first isn't a railcar but a push-pull or 'motor train': The second is a true railcar, with a driving trailer as well:
-
Superb!
-
I can imagine myself developing a sudden but brief interest in golf around September next year...
-
Thanks for setting me right, JHB. There's some great photos on that Flickr site but we obviously need to interpret the captions with more caution than I had done.
-
While laser-cutting can engrave, it can't provide smooth areas of half-thickness etch that we make much use of in etched kits. Hobby desktop laser cutters like my Creality Falcon 22W machine won't cut even the thinnest metal, they are the wrong wavelength and not sufficiently powerful. You would need a professional machine. In the past when I had access to a water jet cutter I managed to get that to cut 10 thou brass quite neatly. It could also cut 2" thick steel on the same machine! But again, no equivalent of the half-etch. In my view, etching is the right technology. It can be done at home with a hobby setup though I prefer to pay a professional to do it.