Mol_PMB
-
Posts
3,401 -
Joined
-
Last visited
-
Days Won
204
Content Type
Profiles
Forums
Events
Gallery
Blogs
Everything posted by Mol_PMB
-
Inherited Livery: GSR Maroon When CIE was formed at the start of January 1945 in a doomed attempt to resolve the financial crisis at the GSR, it was still wartime across much of the world and Ireland had been suffering from desparate shortages of fuel and materials for 5 years. Railway services had been reduced to a skeleton timetable, some lines were closed entirely and at times even the main lines only had 3 or 4 passenger trains each week. Scarce resources were focused on moving indigenous fuel and foodstuffs. Fuel shortages remained a problem into the late 1940s, especially during the severe winter of 1947. Material shortages, particularly steel, continued into the 1950s. An example of these challenges is that in 1947, the board approved a £40,000 investment to fit electric lighting to 105 gas-lit coaches, but it took until late 1948 to procure the materials (dynamos, batteries etc.) and by the end of 1949 only 6 carriages had been converted. With little money and shortages of materials, the GSR and then CIE had struggled to maintain their carriages in the 1940s, but conversely fewer carriages were needed owing to the very limited service being offered at the time. As Ireland began to return to normality, there was a carriage maintenance backlog to overcome to provide a fleet to operate the trains. In the late 1940s there still wasn't much money or steel to build new vehicles, so CIE initially focused on repairing and repainting their old carriages. Contemporary records state that 94 coaches were repaired between 1/1/1949 and 28/2/1950, equivalent to about 80 each year. It would have taken a decade to refurbish the whole fleet at that rate. Consequently, in the first few years of CIE operation, the GSR livery was still very much in evidence. So although this is thread on CIE liveries, I'll start with a few illustrations of the GSR livery in CIE days. I'm not going to describe this in detail as I haven't researched it, and I think it has been well described elsewhere. Here's a photo of GSR 1335 when it was operating with the RPSI and restored to GSR livery: https://www.steamtrainsireland.com/rpsi-collection/48/1335-corridor-third The 1940s GSR livery was very similar to the contemporary LMS livery - although by the late 1940s it was faded and worn. A rare colour illustration dated July 1947 is included in Irish Railways in Colour vol 2 (Ferris) page 31, copied below. Two and a half years into the life of the new CIE, and the majority of the train remains in tatty GSR maroon; only a couple of vehicles are in the new green livery which I will describe in the next post. Looking at photos from the 1940s, there isn't an obvious order of priority for the repaints. Obscure vehicles like stores vans could be repainted years ahead of relatively modern bogie coaches. These two IRRS photos dated March 1948 shows one of the 1930s GSR coaches still in GSR maroon (same scheme as the RPSI coach pictured above), while a couple of 6-wheel vans carry the new scheme: https://www.flickr.com/photos/irishrailwayarchive/53507880537 https://www.flickr.com/photos/irishrailwayarchive/53507976717 Here a GSWR bogie coach is still in GSR colours in 1948: https://www.flickr.com/photos/irishrailwayarchive/53508746631 Some of the 'Special' coaches seem to have been a long way down the queue for repaints, perhaps a reflection of the austere times. Here are the MGWR saloon 346 and the GSWR inspection car still in GSR livery in 1948: https://www.flickr.com/photos/irishrailwayarchive/53507880577 https://www.flickr.com/photos/irishrailwayarchive/53509173735 Tea car 74D was certainly in use in the 1950s and wasn't withdrawn until 1962, but is seen here in tatty GSR livery in CIE days, apparently '1950s'. https://www.flickr.com/photos/irishrailwayarchive/53509025733 In the late 1940s there were rows of carriage rotting away at Inchicore (and elsewhere) still in the remnants of GSR livery, and I suspect that these were withdrawn in the cull of 1949 (see first post) and never received CIE livery. https://www.flickr.com/photos/irishrailwayarchive/53507775092 https://www.flickr.com/photos/irishrailwayarchive/53508664186 https://www.flickr.com/photos/irishrailwayarchive/53508838758 In the next post I'll get onto the first proper CIE livery. Note: I'll be linking to a lot of IRRS Flickr photos in this thread, because it's by far the largest source of old photos of Irish railways. To illustrate what I need to, it is hard to find alternatives in many cases. You need to be an IRRS member to see the IRRS Flickr archive, and I would highly recommend it. Apologies to those who aren't members, you won't be able to see many of the linked images.

-
Spray painting at Inchicore - when did it start?
Mol_PMB replied to Mol_PMB's question in Questions & Answers
Ah, that's very interesting, thank you. I thought you might be the man who would know. So the technique and equipment changed several times, even in the orange and black era. Although there's an anecdote of spray painting being trialled at Inchicore in the late 1950s (with some problems), perhaps it wasn't successful at that stage and had to wait another decade. I think British Rail introduced the airless spray system in the mid-1960s with the blue livery, but again there were several changes in equipment and technique. -
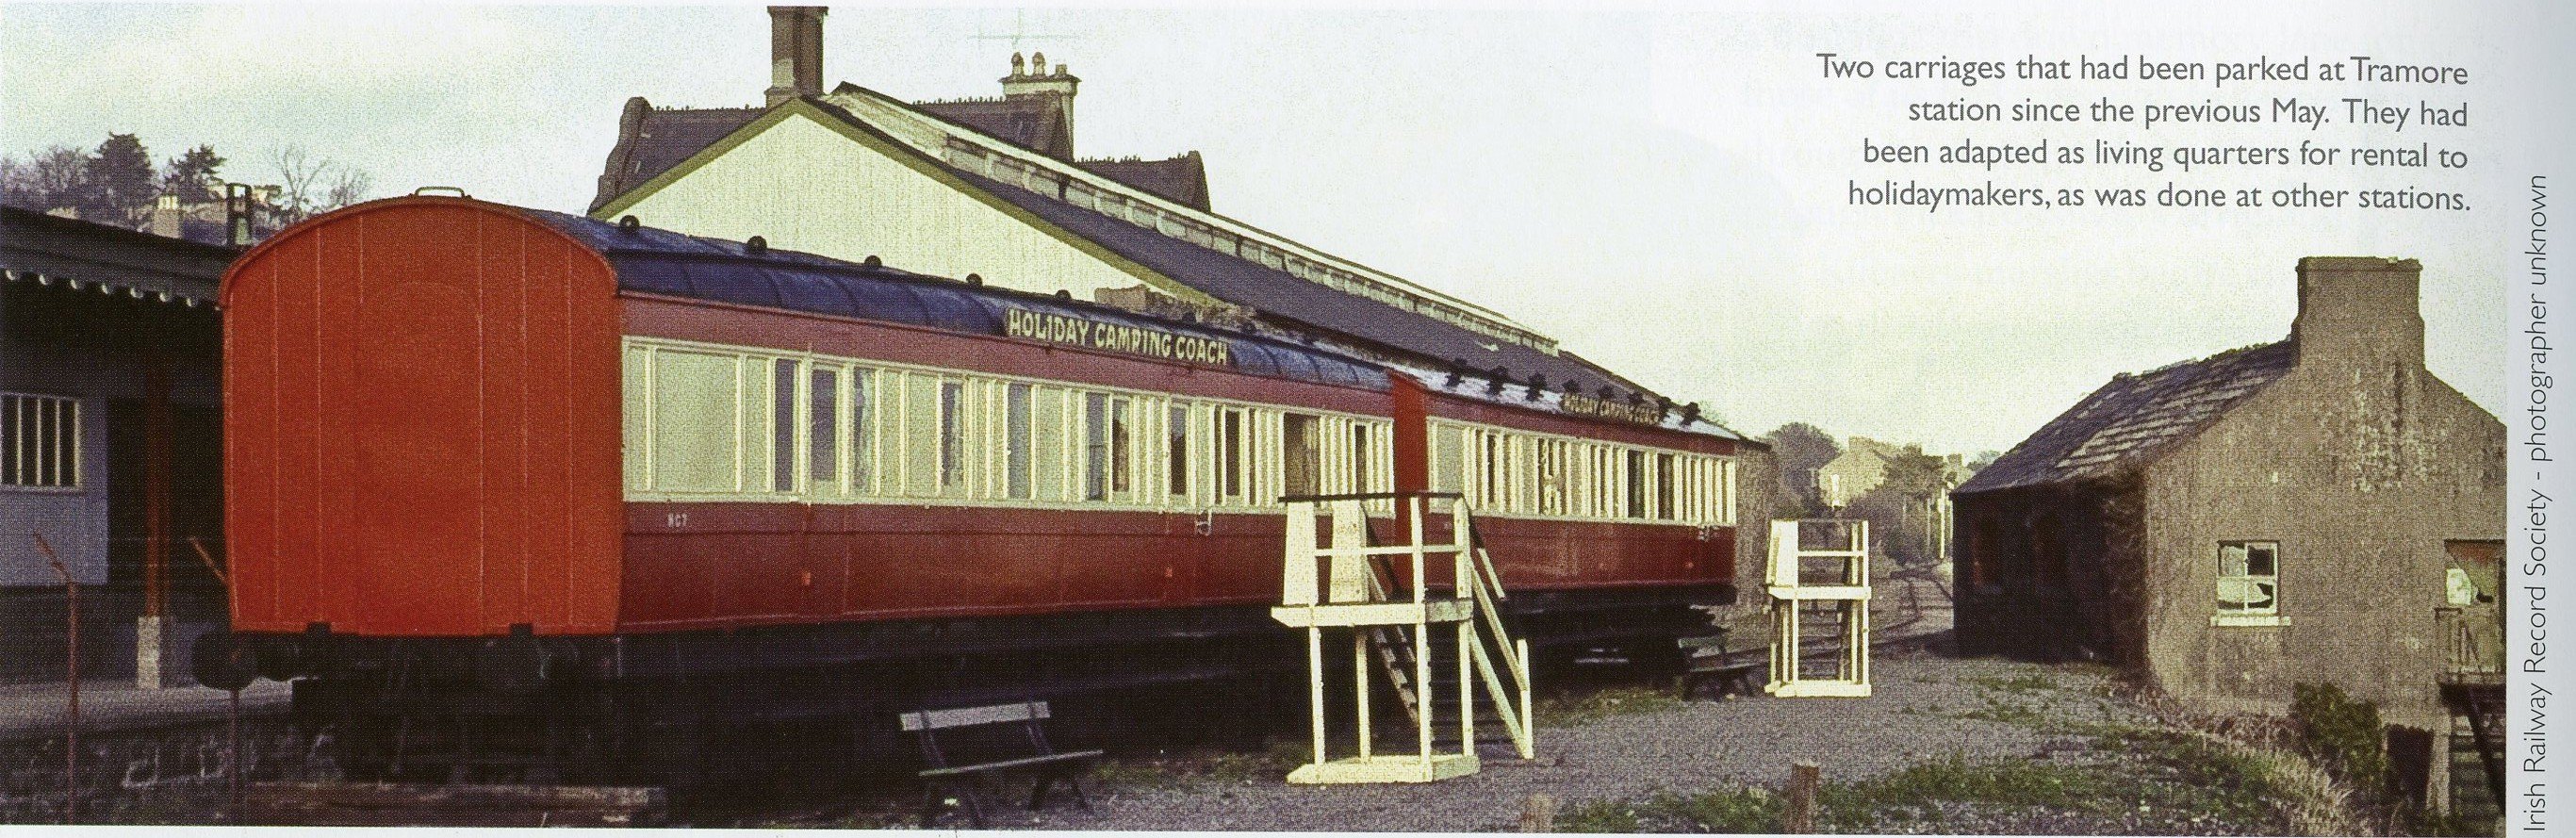
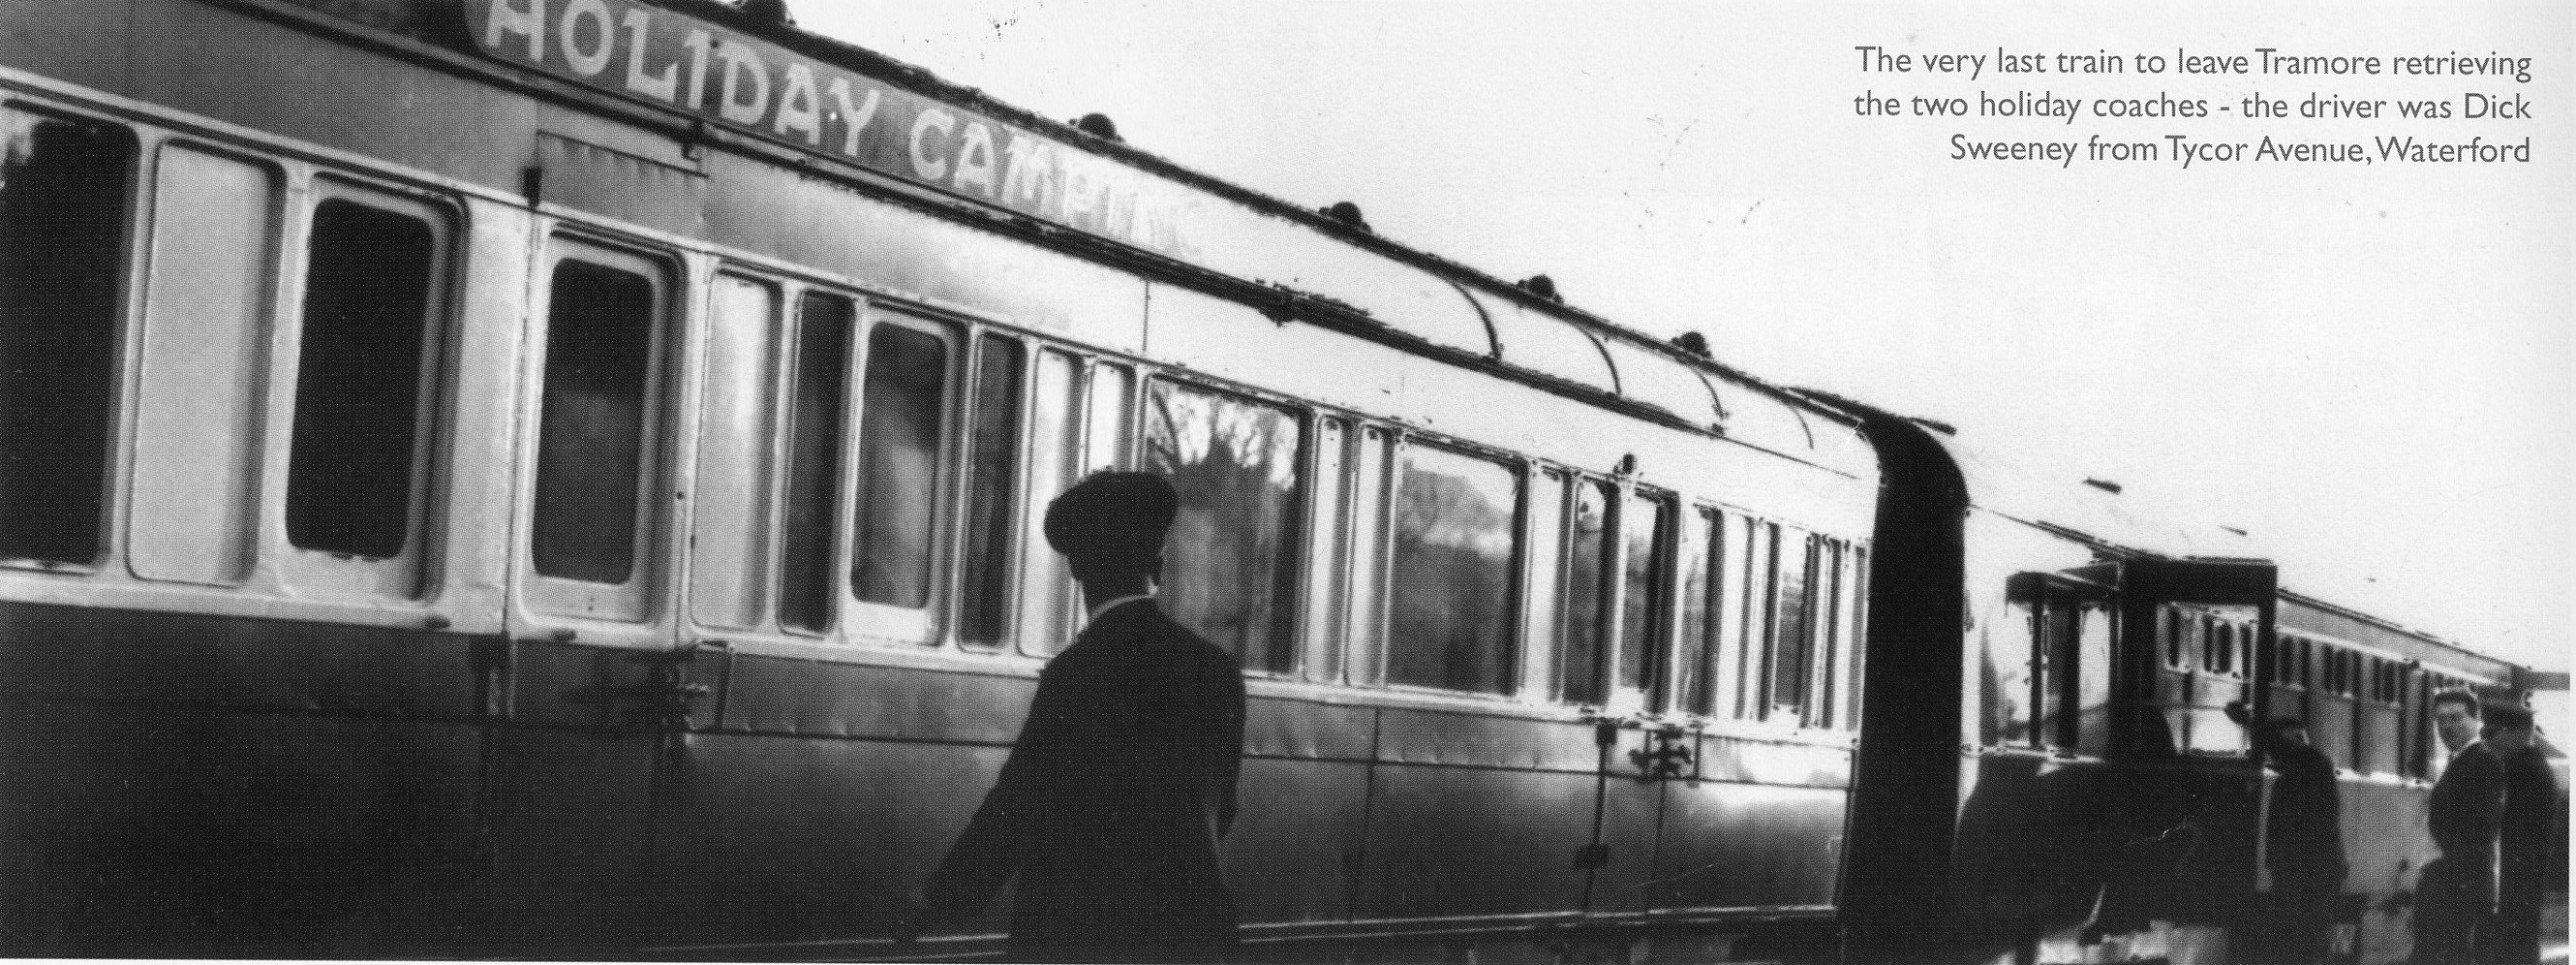
I've scanned a couple more photos of the camping coaches from the book 'The 5-Minute Bell' (Frank O'Donoghue) which is a good read for those interested in the W&T. One of these may need to go in my thread on AEC railcar tail traffic too!
-
Interesting - thanks! That's good to know. 100 worked there too, at one stage. Like Castleisland and Courtmacsherry, Fenit seems to have attracted the smaller locos.
-
21mm gauge wheel sets for IRM Park Royals and Mark IIs
Mol_PMB replied to lucas's topic in Irish Models
I have a wheel puller and I have made some extra tools for it including a hollow-tipped one so that I can push on a pinpoint without blunting it. However, the non-insulated IRM wheels on 2mm axles are very hard to shift. I can do it, but if the ones on 1mm axles are as tight a fit then I'd be wary of bending the thinner axle. I tend to discard the IRM wheels and replace them with EM profile wheels as the IRM wheels have a surprisingly coarse profile. I guess that's to suit a wide range of OO track standards, but it's not ideal for EM. I put the EM wheels on the IRM 28mm axle once I've pushed the old wheels off. That's OK when the axles are 2mm diameter but doesn't work for 1mm axles. The EM profile wheels I use are insulated so would not be ideal for lighting pickups either. All these problems can be solved but it's a faff, hence the attraction of getting a batch made up of exactly what we're after. -
21mm gauge wheel sets for IRM Park Royals and Mark IIs
Mol_PMB replied to lucas's topic in Irish Models
Thanks. And since almost all replacement wheels will suit 2mm axles, it's not an easy fix. I'll try and find my pack of B4 bogies tomorrow and have a closer look and a measure. -
201 class in IR livery: From the February 1993 IRRS journal.
-
21mm gauge wheel sets for IRM Park Royals and Mark IIs
Mol_PMB replied to lucas's topic in Irish Models
Presumably the length over the pinpoints is then also too long? is it possible to shift the wheels on the stub axles? -
Here's another view of the Tramore camping coach, from a different angle: https://www.flickr.com/photos/irishrailwayarchive/53527322206
-
While you're waiting for me to get my finger out and write some more posts, here's a short interlude.
-
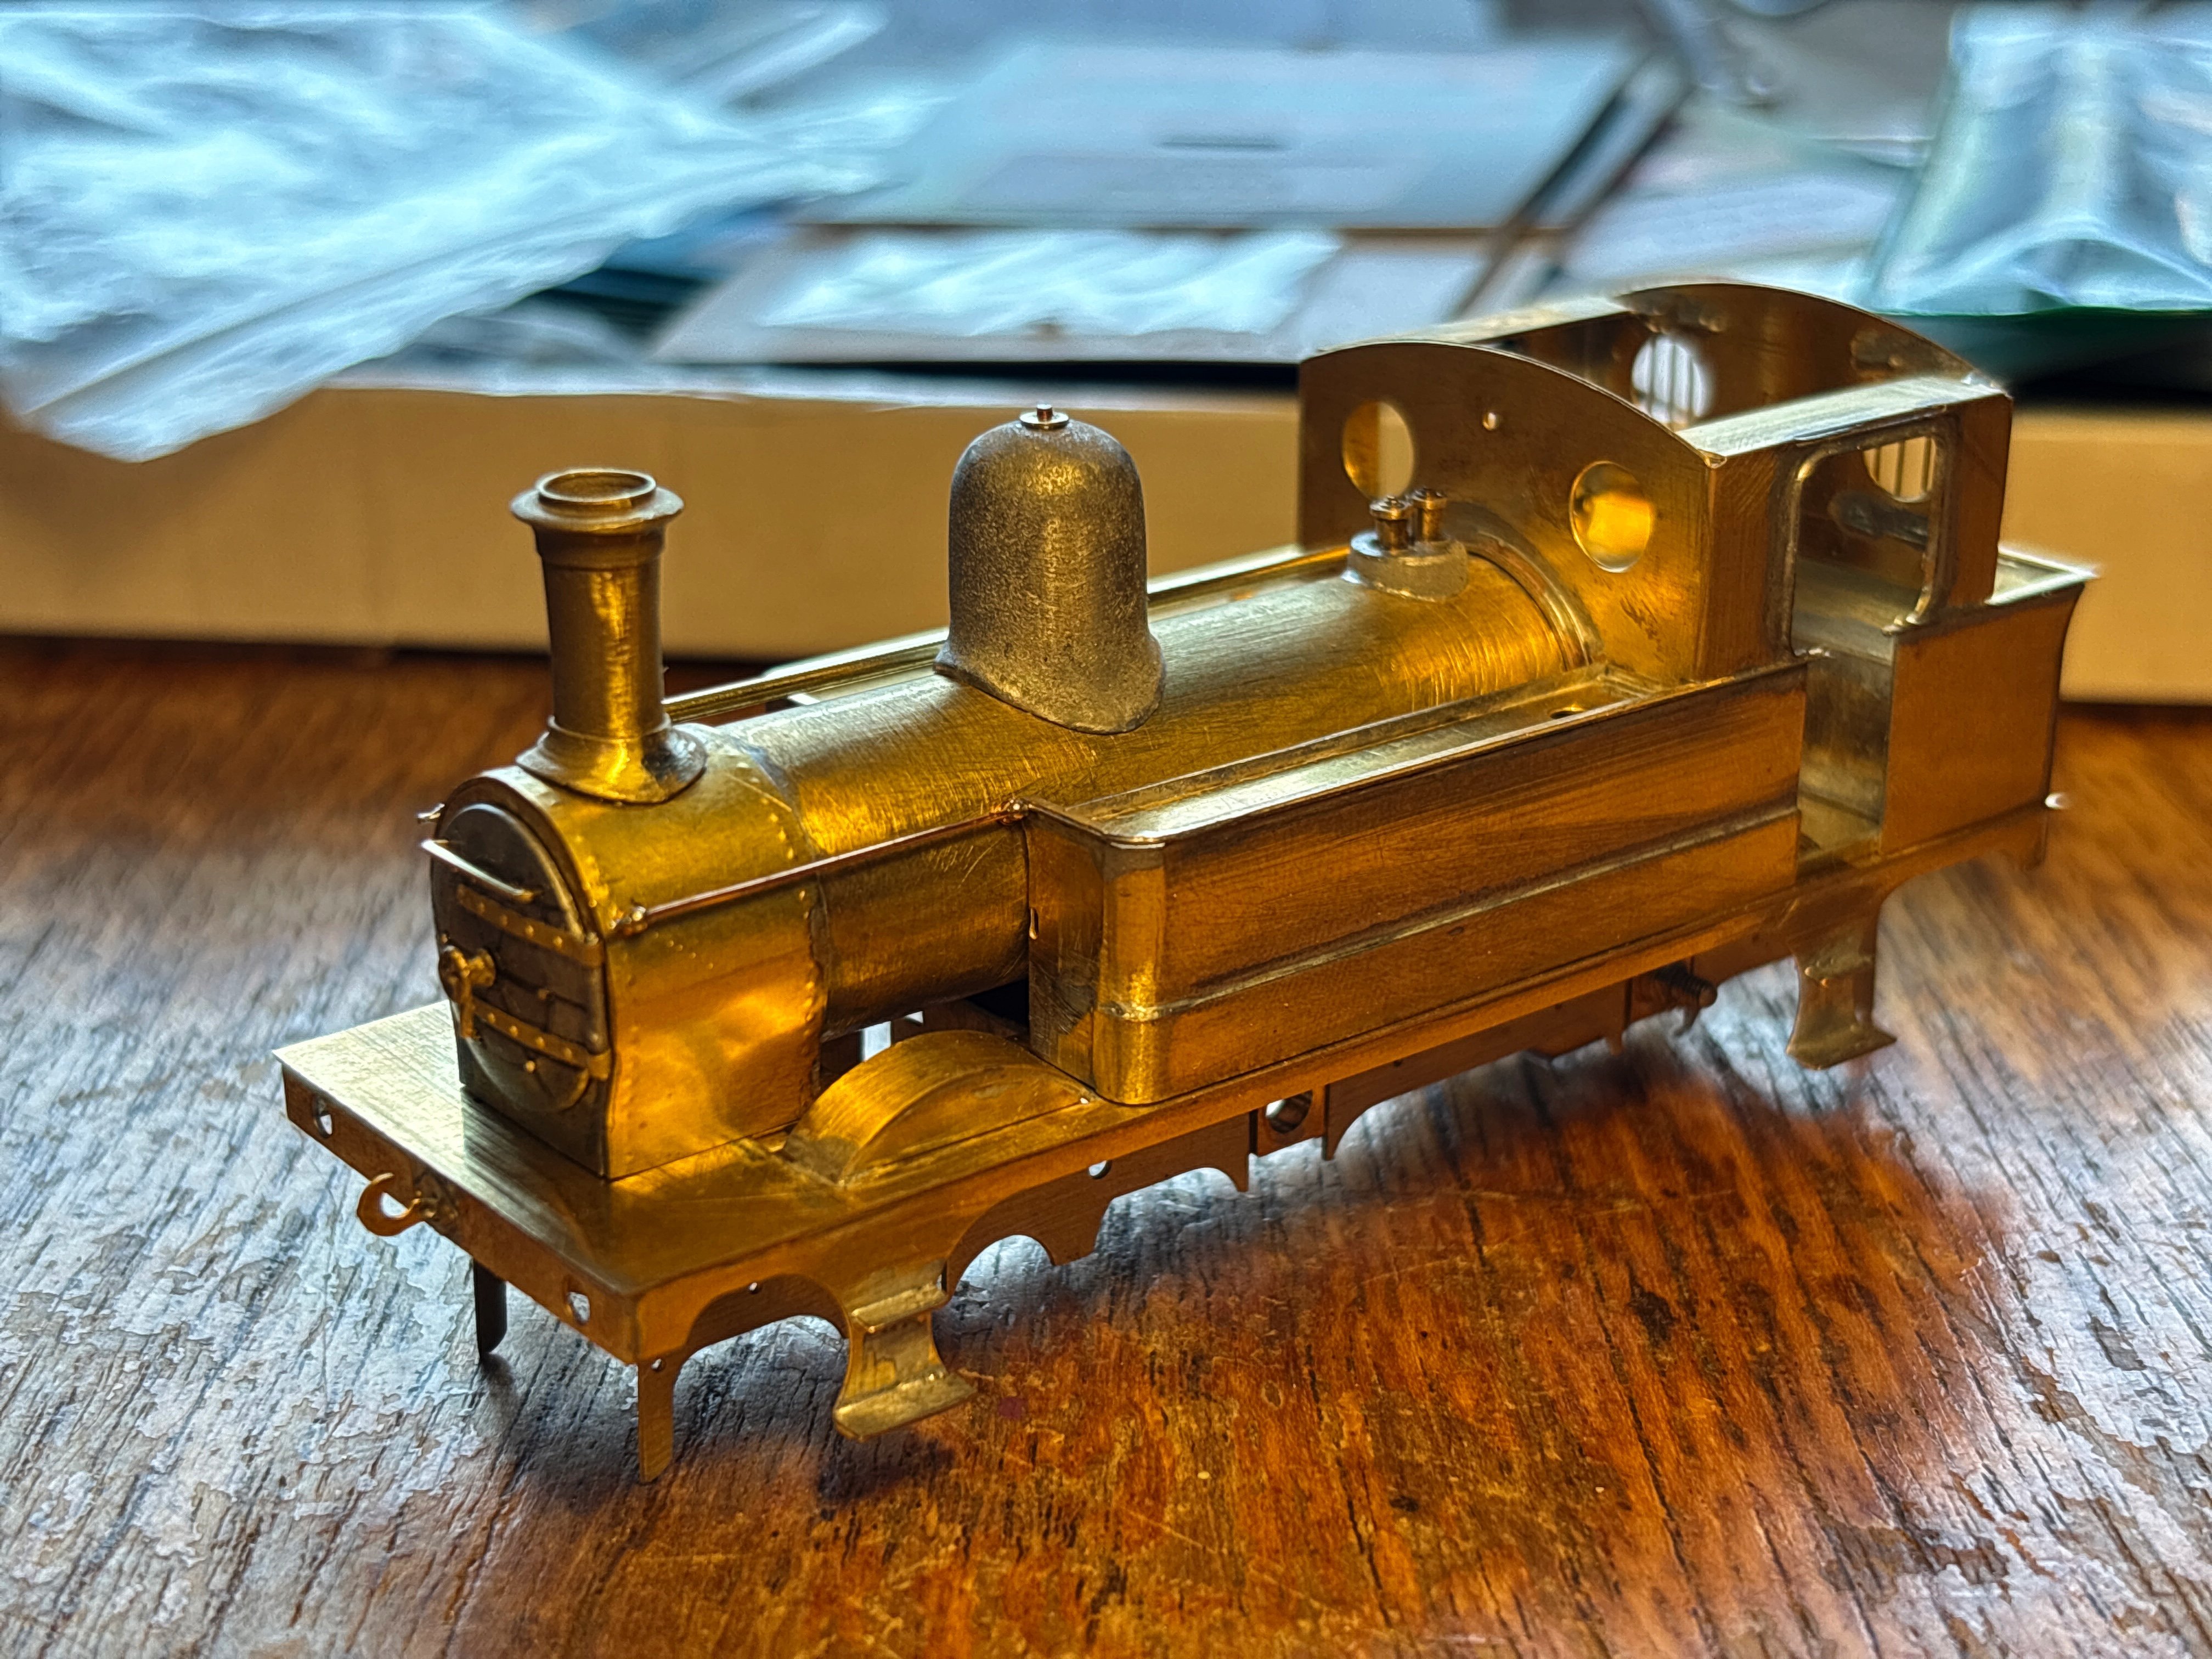
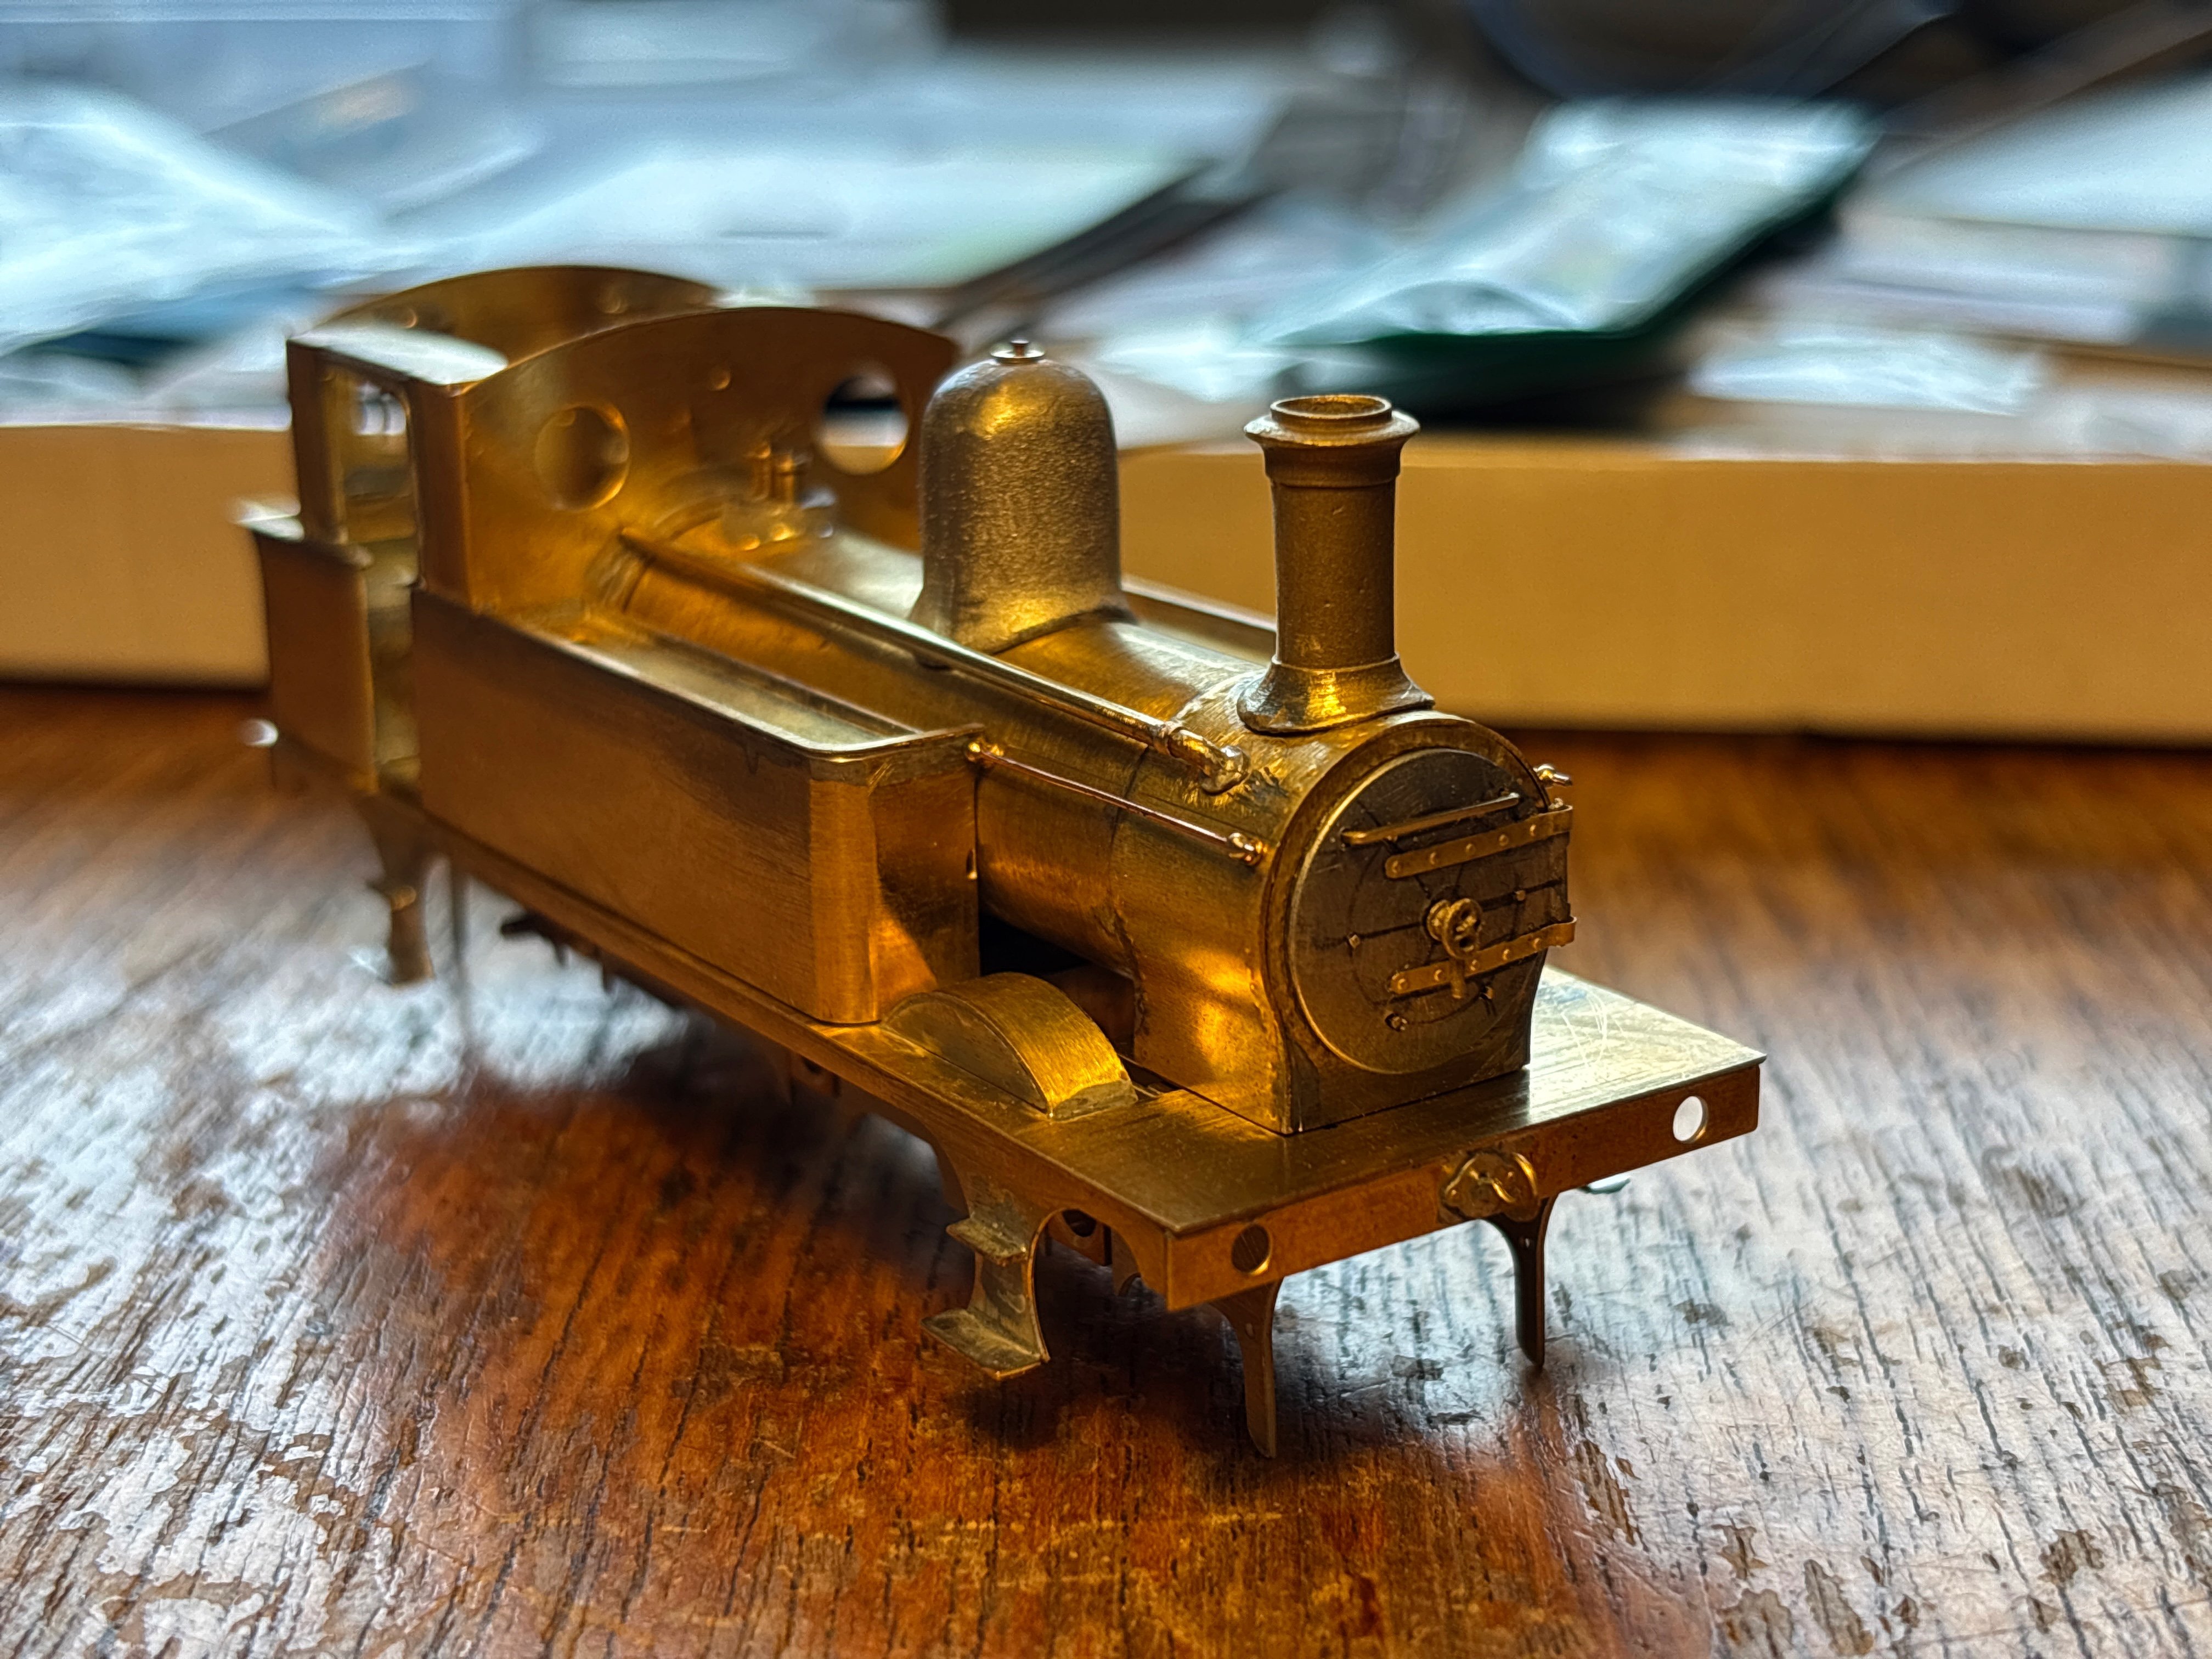
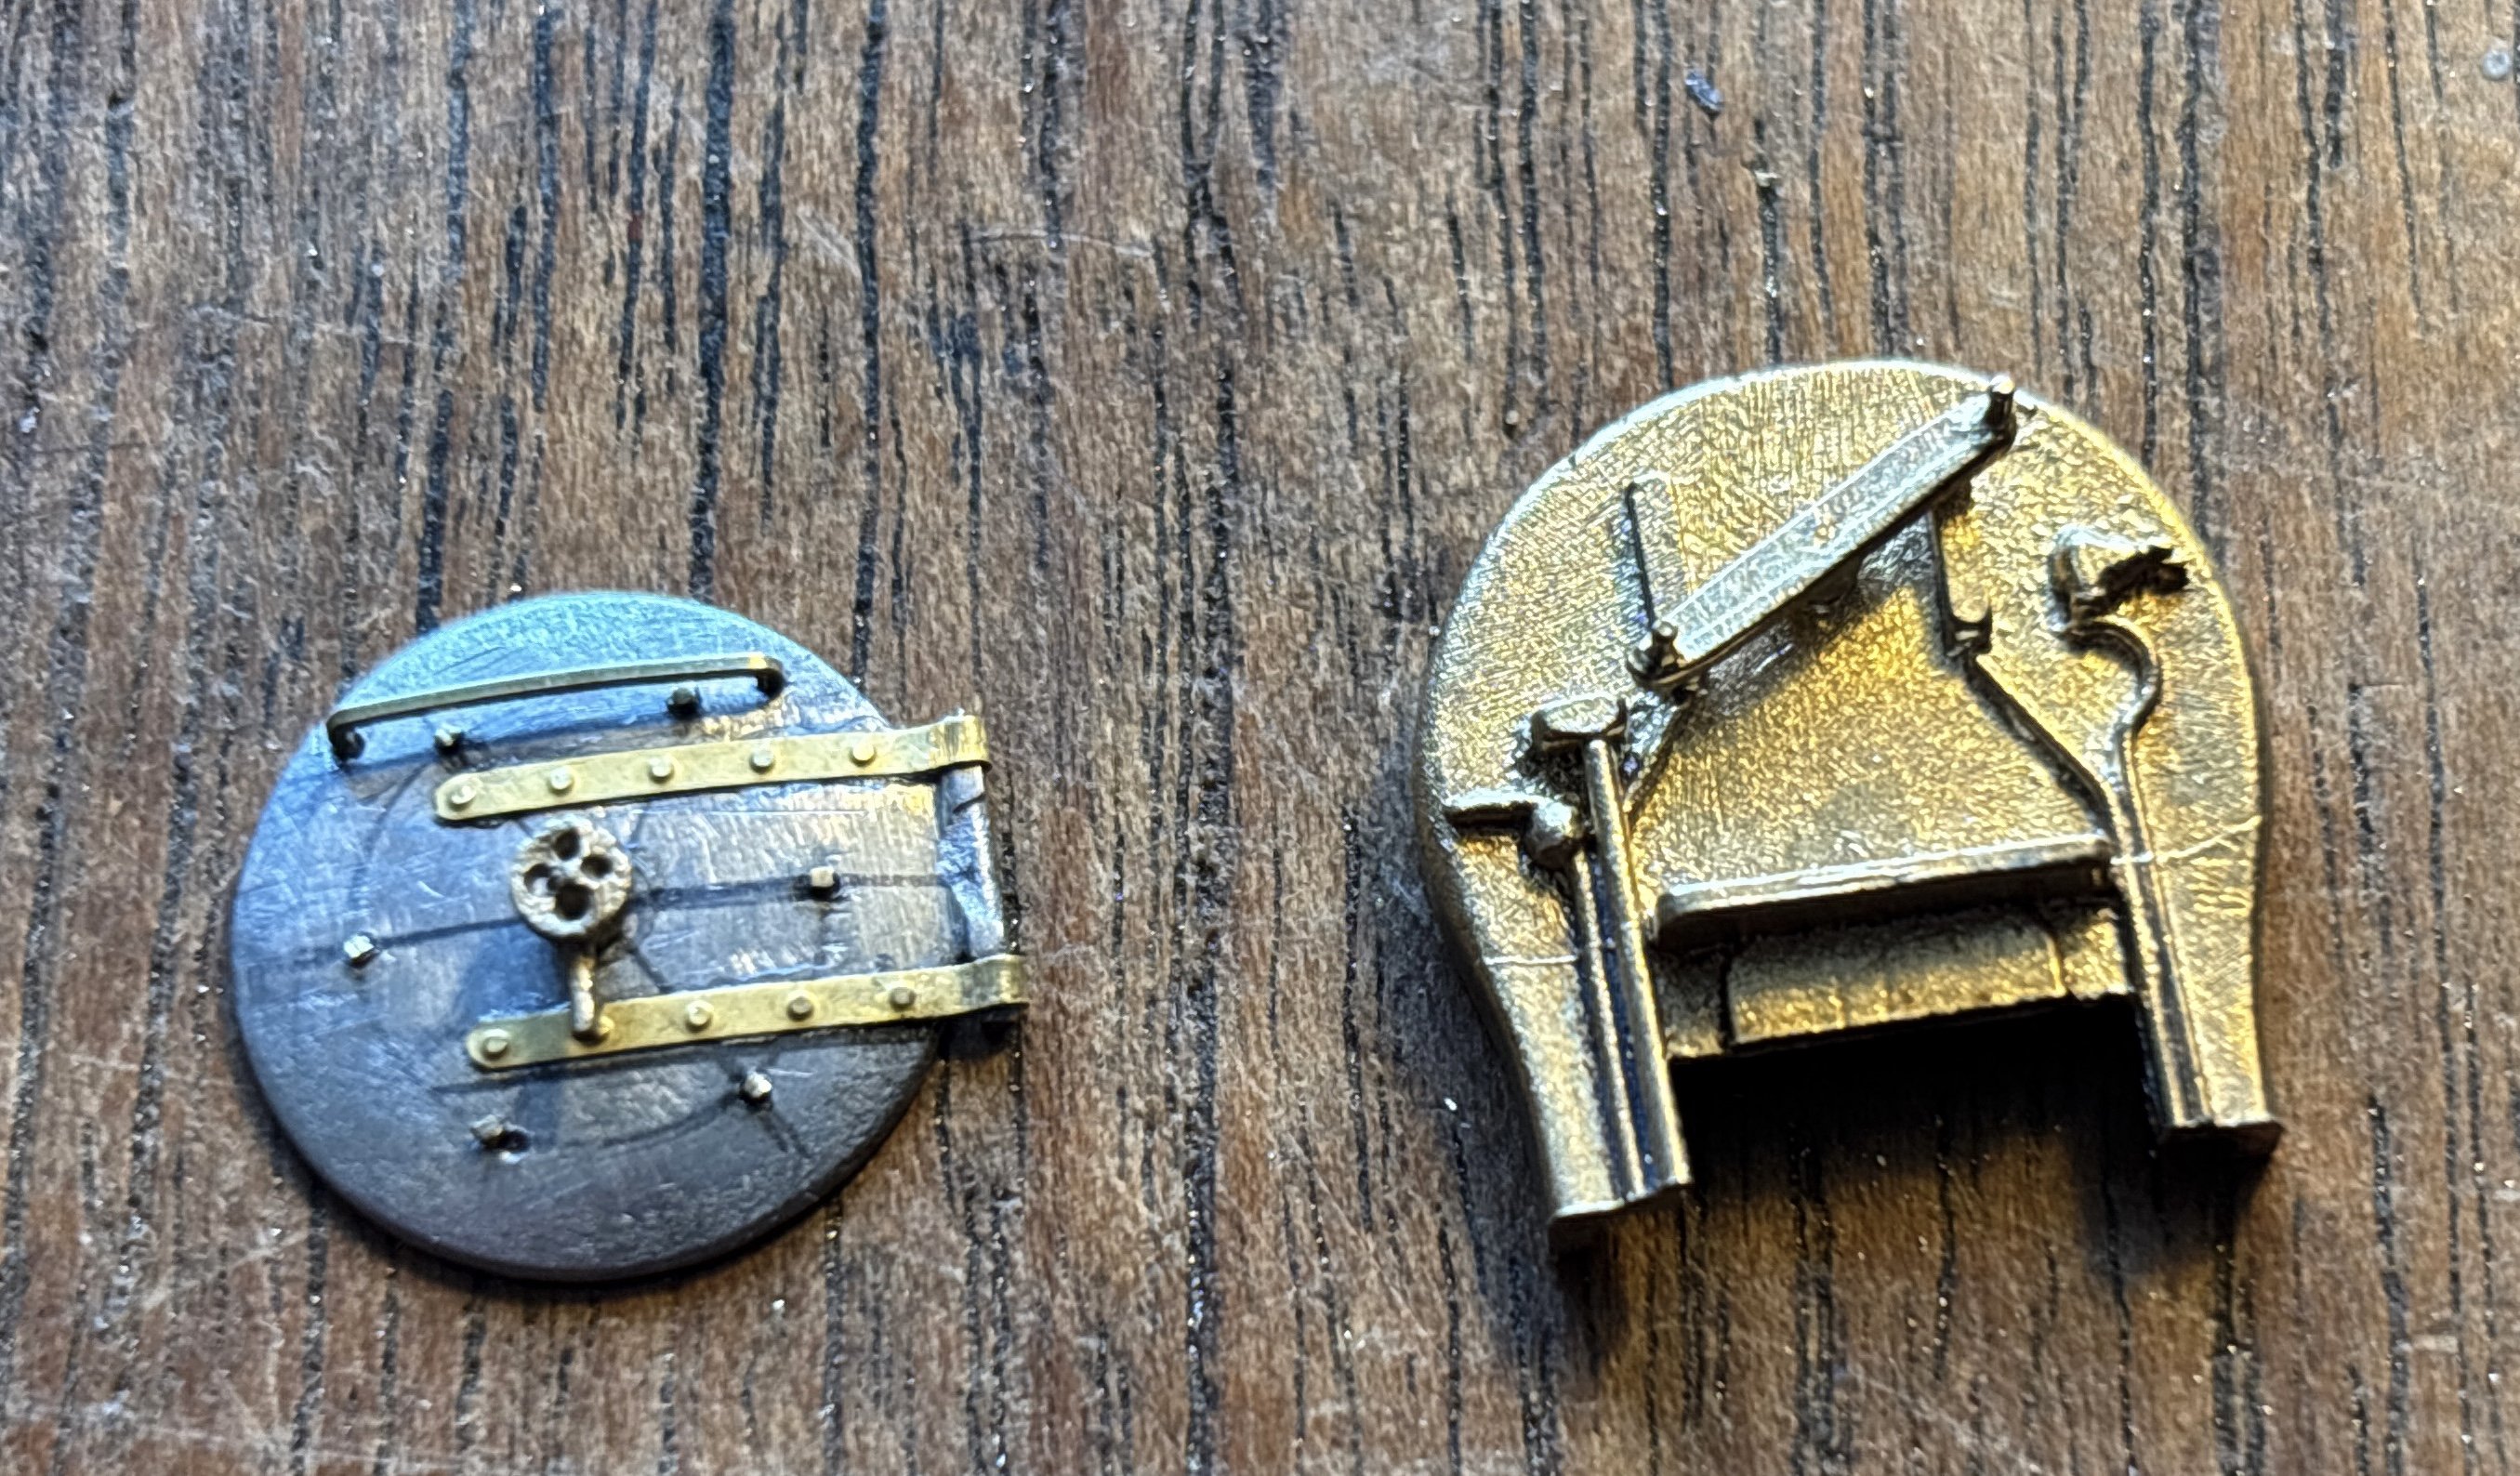
"Voiding the Warranty" - Mol's experiments in 21mm gauge
Mol_PMB replied to Mol_PMB's topic in Irish Models
I had boxed myself in with the smokebox and I confess that the chimney and smokebox door (and the details on the door) are glued in place. Everything else is soldered, with bolted connections between the four subassemblies. -
"Voiding the Warranty" - Mol's experiments in 21mm gauge
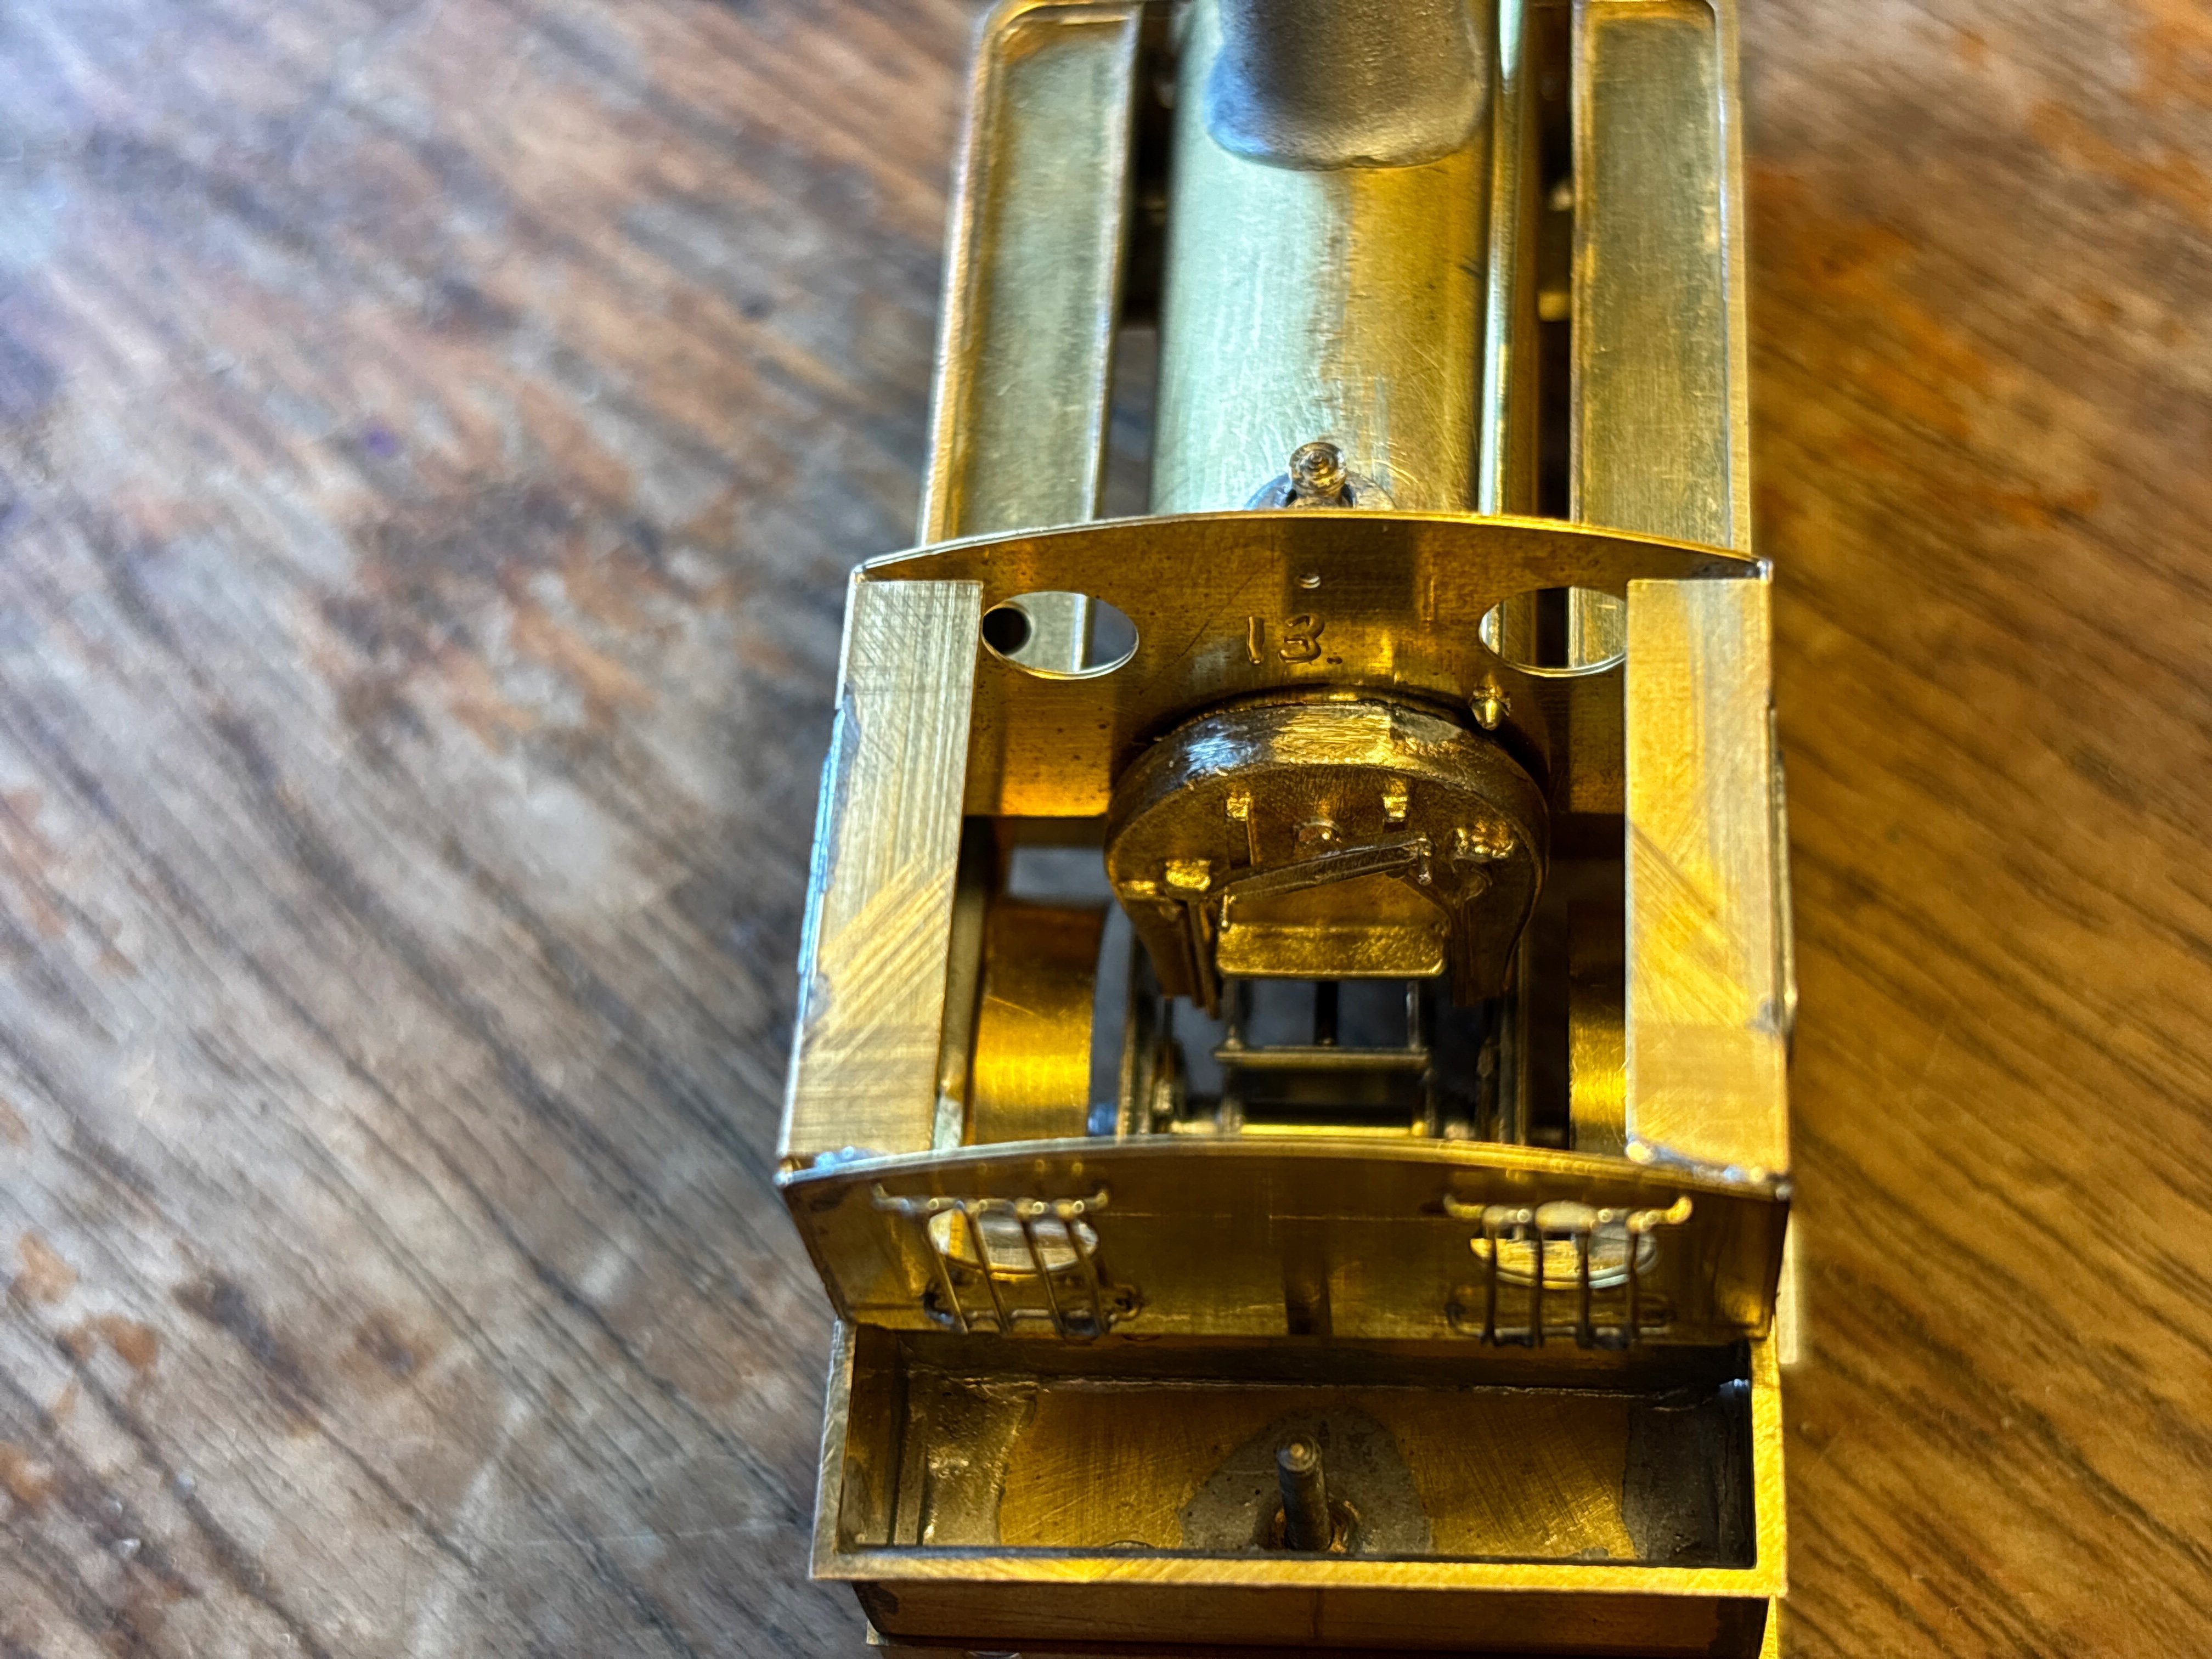
Mol_PMB replied to Mol_PMB's topic in Irish Models
The boiler fittings are now fitted, and here’s a trial assembly of the body to show how it looks at present. You can just see the end of the gearbox below where the firehole door ought to be. Once I have fitted the cab floor, more cab interior detail and some crew I think it will be invisible. I have also been preparing wheels, crankpins, and trial-fitting my extended axles. They are looking promising. Still plenty more detailing to do, and getting the chassis going, but I have a weekend ahead of me.
- 762 replies
-
- 16
-

-

-
21mm gauge wheel sets for IRM Park Royals and Mark IIs
Mol_PMB replied to lucas's topic in Irish Models
This sounds like an excellent plan - thank you for taking the initiative! Somewhere I think I have a spare pair of IRM B4 bogies from the first batch of Mk2s that I could measure up, if that would help? No guarantee the wheelset interface is the same as the Park Royals of course. Potentially I would be interested in enough for 20 coaches. I’m in GB so if there was a way to avoid getting taxed twice that would be advantageous! Cheers, Mol -
"Voiding the Warranty" - Mol's experiments in 21mm gauge
Mol_PMB replied to Mol_PMB's topic in Irish Models
Finally back at the workbench today and I’ve been working on boiler detailing. The smokebox door is the original with all the detail taken off and replaced. The backhead (and the smokebox door dart) are lost wax castings from Caley Coaches, adapted to fit. I’ve also been fettling the dome, chimney and safety valves to get a better fit to the boiler.
- 762 replies
-
- 10
-
-
Reaching for one of my purchases on the RPSI train last weekend…
-
Would a train of a carefully selected 6-wheel compo and a bogie brake first go well with that? (only a serious GNR carriage enthusiast will get this one)
-
Oh, I agree. I just thought a single 121 on such a long train might be a bit pedestrian!
-
Some 'shunter-shaped' locos in green which might be compared to your green B121s. Colour Rail slide IR637 shows a dark green D class in colour: This IRRS image is a nice colour view of 1004 in dark green: MMR_CIE_1004_Inchicore_11_July_1963 | [Photographer: Michael… | Flickr The only other colour image I've found in this livery is in the background here: MPC_CIE C216 Inchicore 22_Aug_1964 | [Photographer: Michael … | Flickr There are of course many monochrome photos of them, such as these two examples: RNC_CIE_1000_Inchicore_11_Aug_1948 | [Photographer: Robin N … | Flickr RNC_CIE_1001_Inchicore_22_Apr_1948 | [Photographer: Robin N … | Flickr The last link shows some fine lining round the edge of the front panel which appears more clearly in some other images. Only one of the D class D303 was painted in light green (with black roof) and it was one of the locos displayed at the 1958 Inchicore Works event. Quite a few locos were repainted especially for that event, which represented the end of Bulleid's time as CME, hence the end of silver/aluminium on locos and coaches, and a reversion to green. The dates on the images of D303 in light green suggest that it may have got the livery a bit earlier than 1958. https://www.flickr.com/photos/irishrailwayarchive/54336333309
-
Thanks! The one in the Tom Ferris book is B123. The written reference is in IRRS journal 37 (June 1965) which says: "Several more of the earlier (single-cab) G.M. locomotives have been repainted in the grey/yellow livery, and look very well, especially when this is embellished by bright red buffer-beams." It's interesting that these did not get the BnT livery at this time. The 121s had been one of the vehicles for which drawings were sent to Signa (designers of the BnT scheme) but they had struggled to make their scheme suit it. After describing the application to an A class, "The other one [i.e. the other loco, the 121 class], which makes no pretence to streamlining, has been treated purely as a machine. But the scheme could be carried through to the cab only." The red buffer beams would make an interesting livery variation on a model.
-
Tom Ferris Irish Railways in Colour vol.2 p42, it’s rather distant but definitely red.
-
Meanwhile I had been trying to identify the carriages by their roof details... Also note the rail-mounted mess 'caravan' next to the baby GM, successor to the 6-wheel sleeping car. I'm not into cars but I think I see a Randy Lover and a Renault 4. The buses aren't any CIE livery that I recognise, but I'm not into buses either! The nearer ship has an unusual colour scheme too - buff on funnel and masts was common but a buff hull wasn't.
-
Having had a quick search I agree with B127 as seen here: https://flic.kr/p/2pqXouh https://flic.kr/p/2qEu9zb I think B123 has red bufferbeams here too: https://flic.kr/p/2pwAE5Y
-
Those look very smart! Tomorrow I’ll dig out my colour images of D class in dark green as a comparison to the first one. I think the 1958 light green is more plausible given when they were delivered. Maybe add red bufferbeams? I found a written reference to some 121s getting red bufferbeams when in grey/yellow, but haven’t found a photo yet.
-
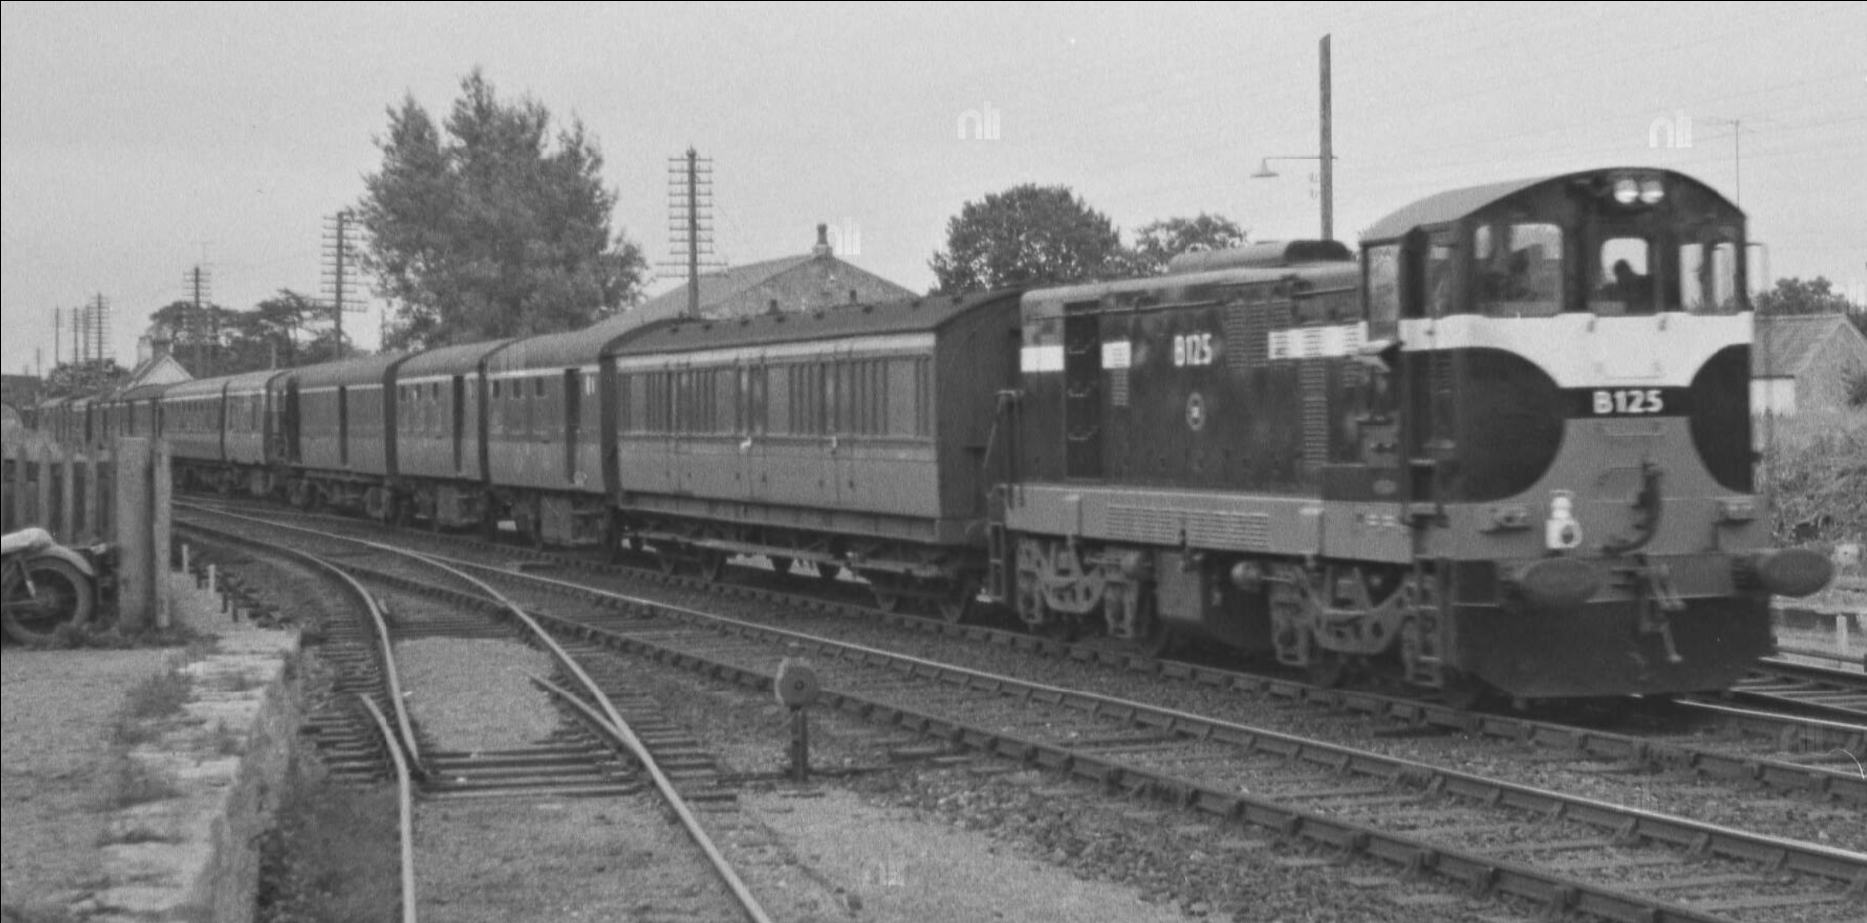
For fans of TPOs and mail trains, this is an impressive rake: https://catalogue.nli.ie/Record/vtls000306219 (O'Dea collection, 1967) I think I count 3 TPOs, 4 bogie mail/parcels vans, 2 tin vans and a solitary passenger coach. The rate of progress of the mail behind a single 121 must have been distinctly 'second class'.
-
Very nice - I am tempted by a 4mm scale one when you go into production Because you have printed it flat, the layer lines on the horizontal planks don't look out of place - they could be wood grain. If it were mine I'd lightly sand the outer faces of the vertical timber ribs to remove the layer lines where they run across the grain. Only a few minutes work, hopefully.