-
Posts
3,490 -
Joined
-
Last visited
-
Days Won
11
Content Type
Profiles
Forums
Events
Gallery
Blogs
Store
Community Map
Everything posted by Glenderg
-

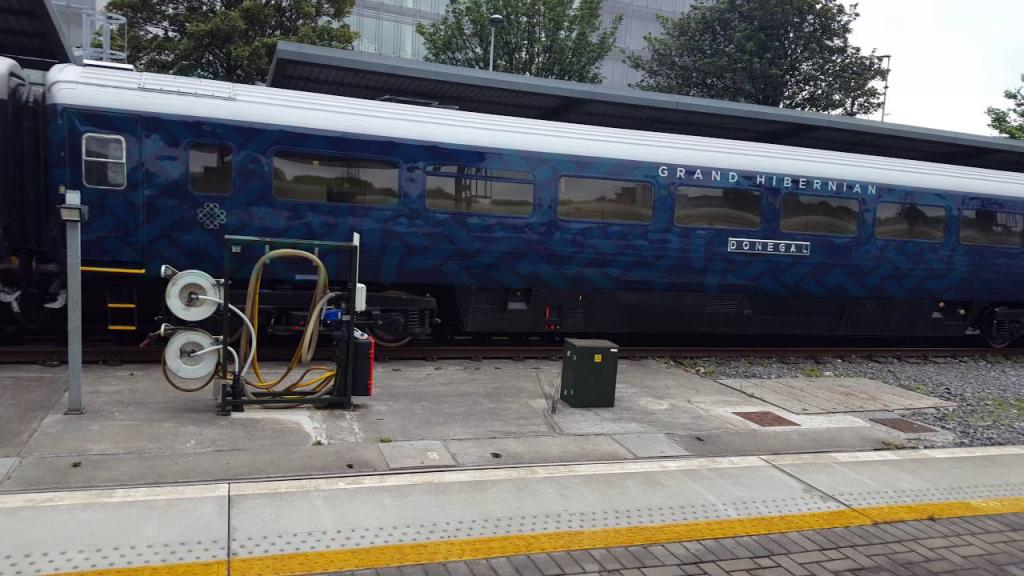
Belmond Hibernian - Luxury Touring Train
Glenderg replied to Broithe's topic in What's happening on the network?
-

Belmond Hibernian - Luxury Touring Train
Glenderg replied to Broithe's topic in What's happening on the network?
Too close to the RPSI's previous livery, I suspect. -

Belmond Hibernian - Luxury Touring Train
Glenderg replied to Broithe's topic in What's happening on the network?
I hadn't realised that the coach profiles for each were so unique! Lot's of windows filled in or openings altered. As for the livery, I think it's the bees danglies.... -
FDM is the roll method and is limited in it's resolution - effectively you'll still get a toothpaste finish. 0.01mm resolution is too coarse for finescale modelling and just looks rubbish. SLA is stereolithography printing where UV light dictates where liquid resin cures, so has a much tighter resolution. https://all3dp.com/best-sla-3d-printers/ Way forward for making home grown masters from which to make moulds for resin from.
-
I was in Georges Market thing not so long ago and picked up 2 from one of the oddball bookstands. 1964, I think, Guinness loco workings, and the introduction of the new fangled 141 class. Fiver a piece. I've seen them upstairs in Chapter's book shop on Parnell Street for a tenner a go, and they don't move too fast, so you should email them asking.
-
google search terms: Plasser & Theurer "MU07-16" for NIR Plasser & Theurer "07-16B" for CIE.
-
To be fair, the last Raheny show had one of those converted Renault Coffee Van type things out front, so I'd stop stressing about that, or else rinse out the flask. I've heard good things about the Bray Wheelers, especially if you're looking for something "unique", and worthy of support. And Ed, that's a job bridge gig if I ever heard it. Firing up the Burko Boiler to make tay for the troops is hardly "Catering Manager" status....
-
Whilst I can't comment on how well earned or not it is, what are your "train mule" fees like? Kadee 10.5 mm wheelsets in particular...
-

Photographic Website Updates
Glenderg replied to thewanderer's topic in Photos & Videos of the Prototype
Think thats a trick of the light. Zoom in on They are spotless. (Superb shots Neil) -
Didn't know A4 Mallard had a YouTube channel now.....
-
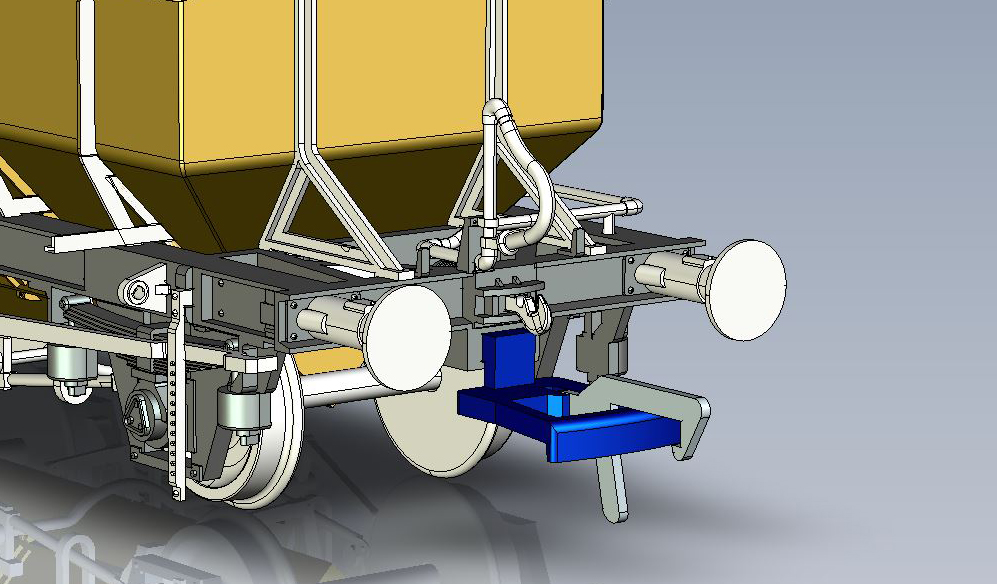
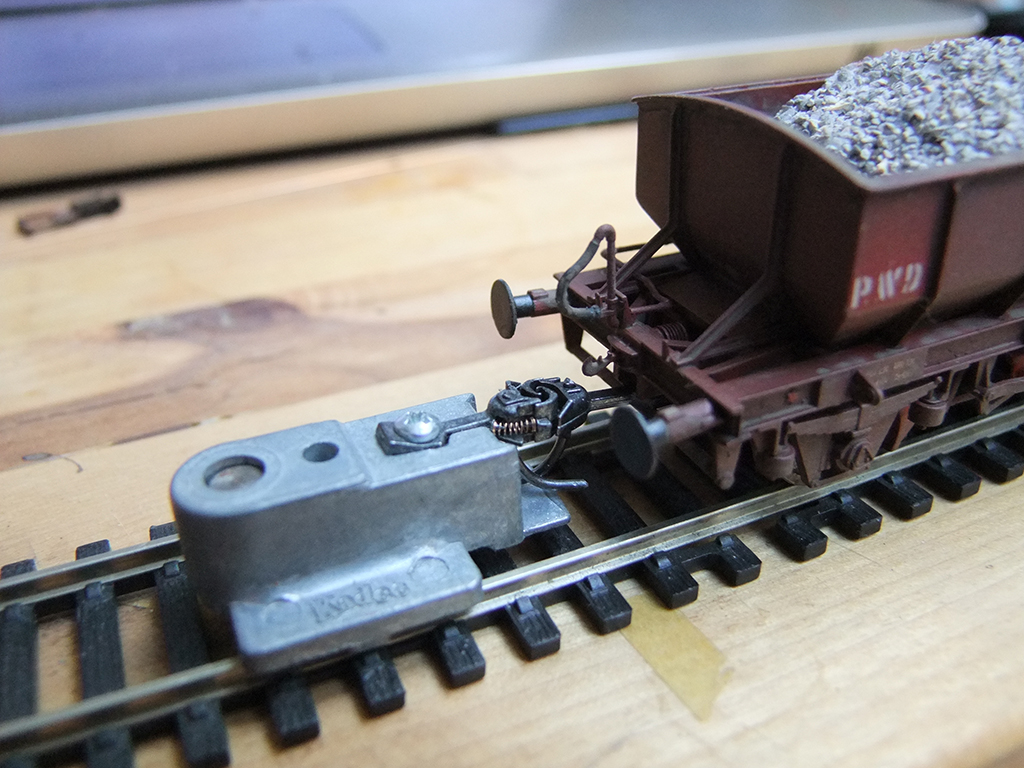
See below.... Evening Folks, As we have outlined, this is Engineering Prototype 01 (EP01), concerned with overall appearance, and the look of the model, whereas EP02 generally deals with the business of polishing the tooling to a smooth finish, removing any imperfections, and getting the wheels turned (these are custom to our run) and sorting out any coupling issues. There have been a few concerns raised both here and on social media platforms about coupler height. Since everyone appears content with the overall shape, we chose to tackle this head on. It couples to a 141, but anyone with a track mounted de-coupler would have an issue. In order to resolve it there are four different elements that have to be taken into account, principally: - The centre line of the coupler box is 2.1mm too high, by NEM standards. - The NEM socket is moulded to the buffer beam, so cannot simply be removed and dropped to a chose height. - If there is a substantial design change, then re-tooling must occur, which means a delay in production. This would involve both the ballast wagon, and the cement bubble. - There is a horizontal crossbar for the vacuum cylinders that is in the centre line of the NEM socket. So here’s the condensed version of a very long conversation (72 hours?) amongst all stakeholders…. 01 – If we drop the whole NEM pocket and extend it down to its desired height, it will interfere with the vacuum chamber crossbar, which will require a re-tooling, and create a big lump of plastic hanging from the wagon. Thus all visual finesse will be lost. 02 – We could drop it down, and extend the crossbar downward, but again this would require a retooling, further delay and, well, look nasty. Plus, the crossbar would now be fraudulent. 03 – One of our teams’ stock is fitted with Kadee’s and brought their compatibility to the table, so that has to have a suitable resolution. (We did not find any Alex Jackson Coupling Enthusiasts on our travels…..) 04 – A cranked or swan neck fitting would do the trick, but it is to an older standard and this would leave the NEM pocket in an unsuitable position for Kadee fitted stock. After much discussion, some brain lubrication juice, and calliper activity, we have settled on the swan neck fitting as it keeps production pace steady, does not compromise the visual fidelity of the wagon we bust a gut to achieve, keeps the crossbar intact, and will marry up nicely with your Murphy Model of choice. As for the Kadee issue, it can be mounted directly to the underside of the NEM pocket (you’ll have to file off the IRM stamping, alas) and it fits perfectly between the crossbar and underside of the pocket – a no. 18 or 19 will work. This also lines up perfectly with the Kadee track gauge. Please see photos below. Comments welcome. Richie
-
-
The model is not based on any drawing, as drawings, especially from CIE, are notoriously inaccurate.It is based on a physical measured and photographed survey of a wagon in the North Wall Yard, so I'd hesitate to use any of the dimensions along with a calipers to check. It's a scale representation of the real thing, with the only compromises relating to manufacturers abilities. This is a 21mm wagon on a 00 wheelset, effectively! I'll be getting the wagon later and putting it through the NCT for the coupler height. Richie.
-
Not sure why it wasn't thought of before now, but it's the way forward for all IRM projects. Jamie, this one may be slightly contentious, but the buffers are the right size, and right spacing. When we got the initial CAD back they had applied UK standards to them, but were quickly corrected to Irish sizes and spacings. I did spend a day in the North Wall with Dave Jones, and trust me, they are absolutely bang on. (I thought the same initially and checked, but who'd have thought irish buffers were 2 foot long - not me for a start!) When you see it in the flesh though, it makes sense. It just looks "right" - fat, wide, chunky. Not at all like that Narra Gauge stuff from across the ditch! R.
-
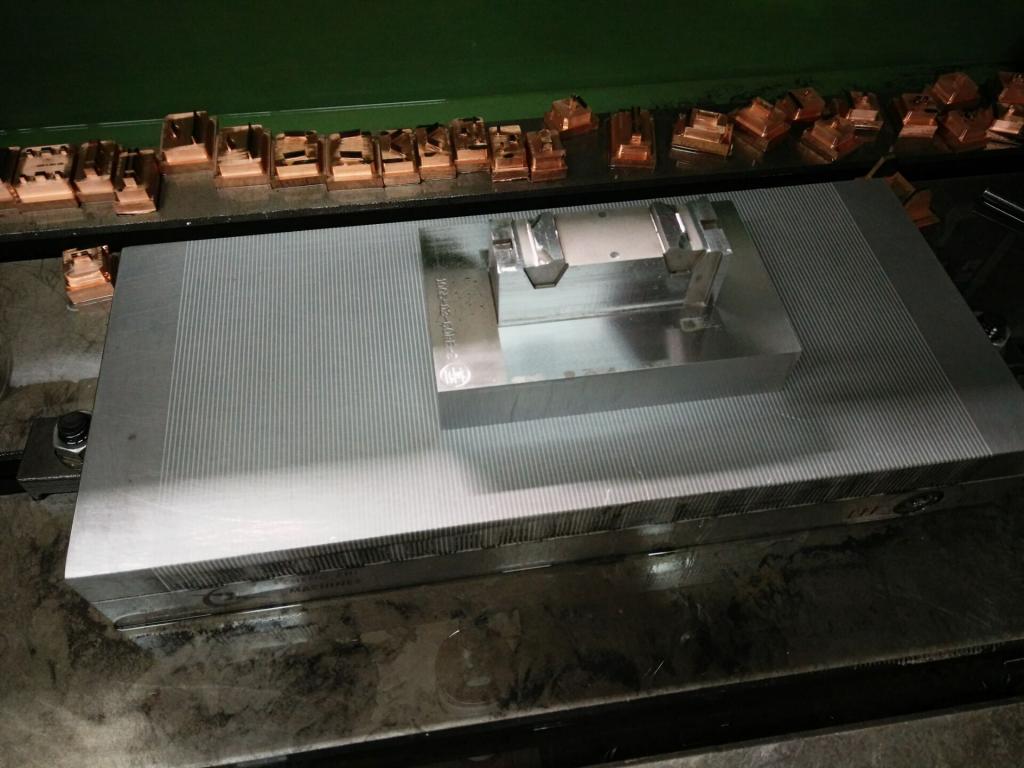
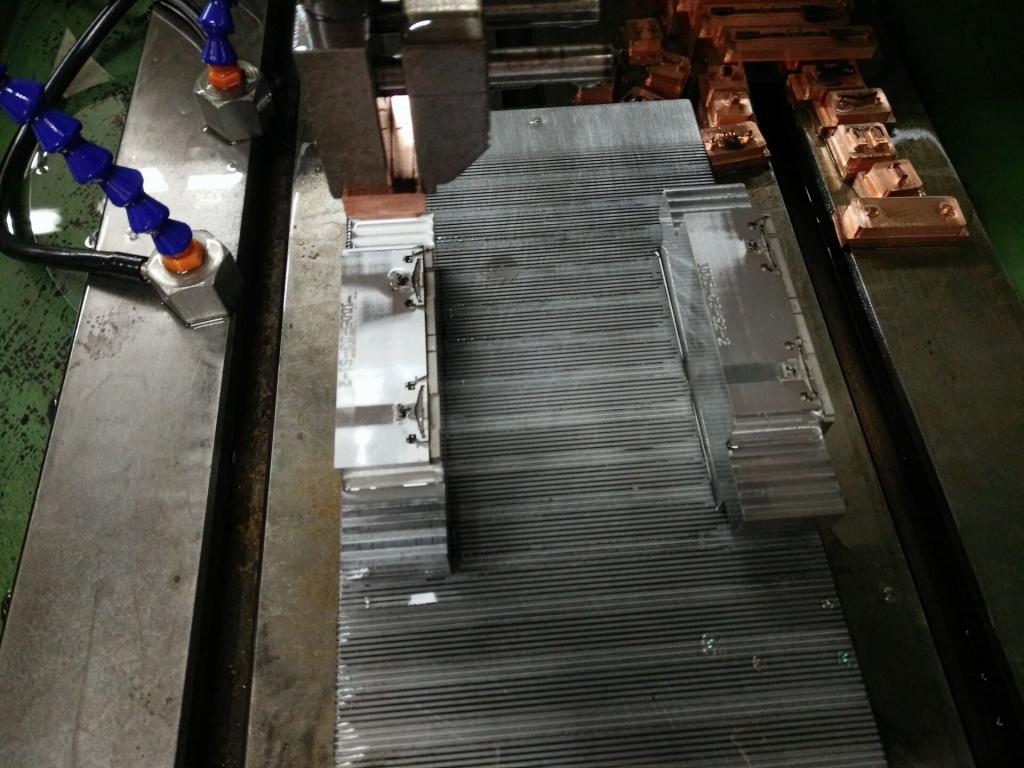
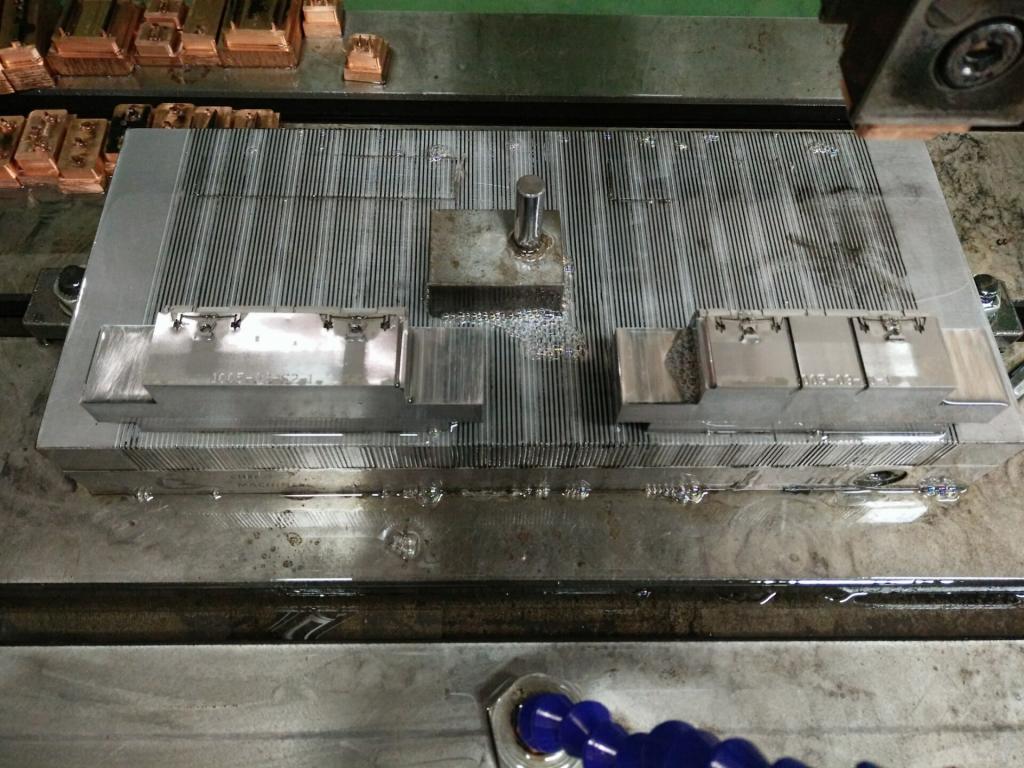
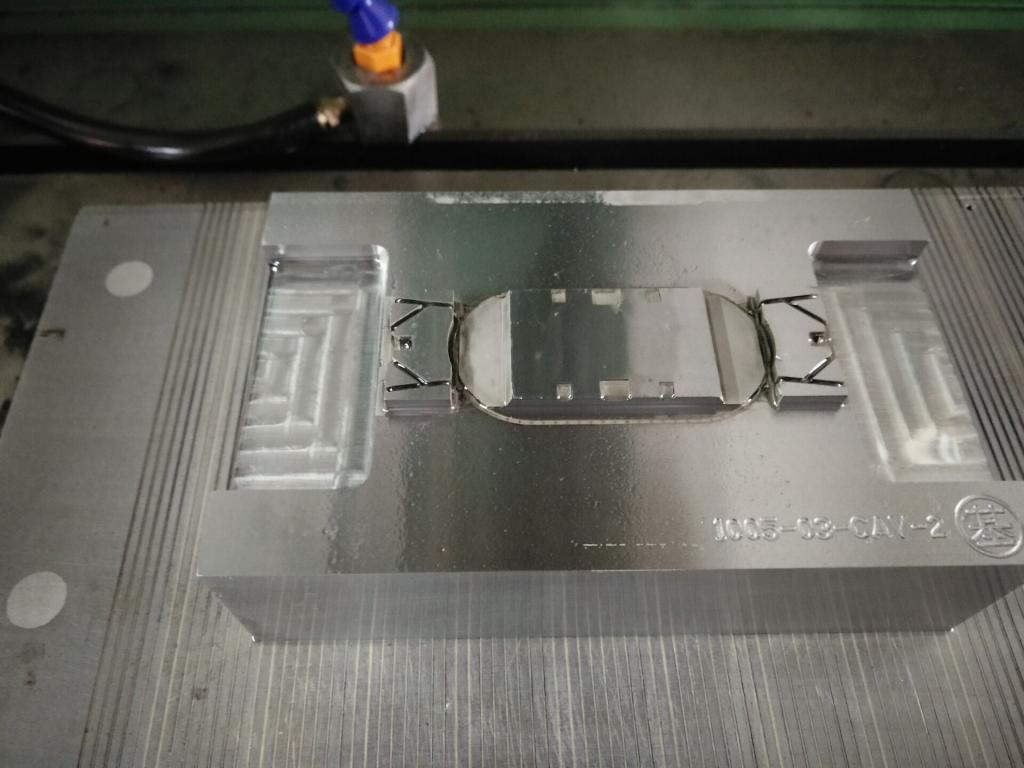
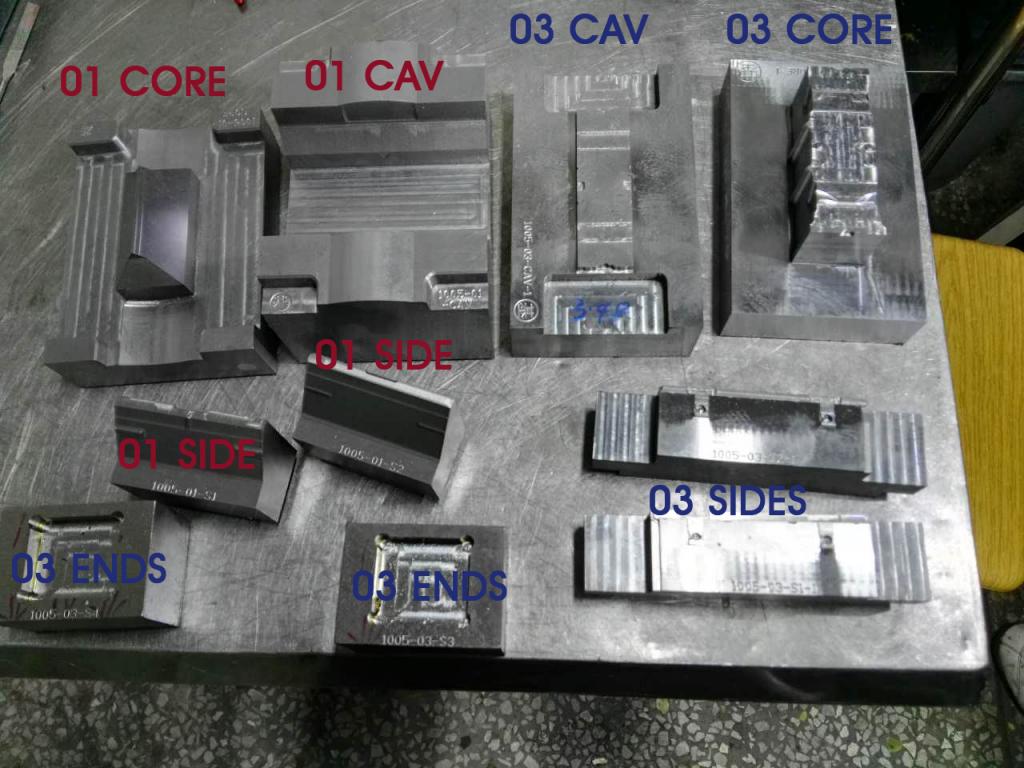
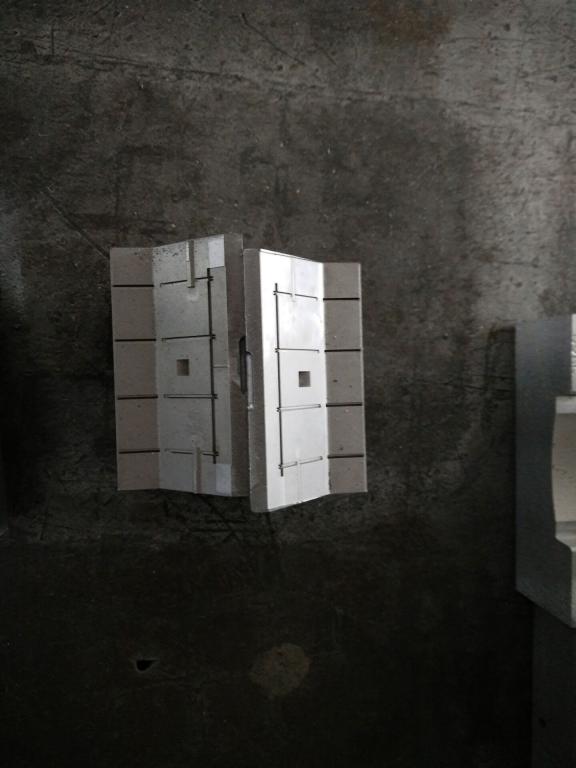
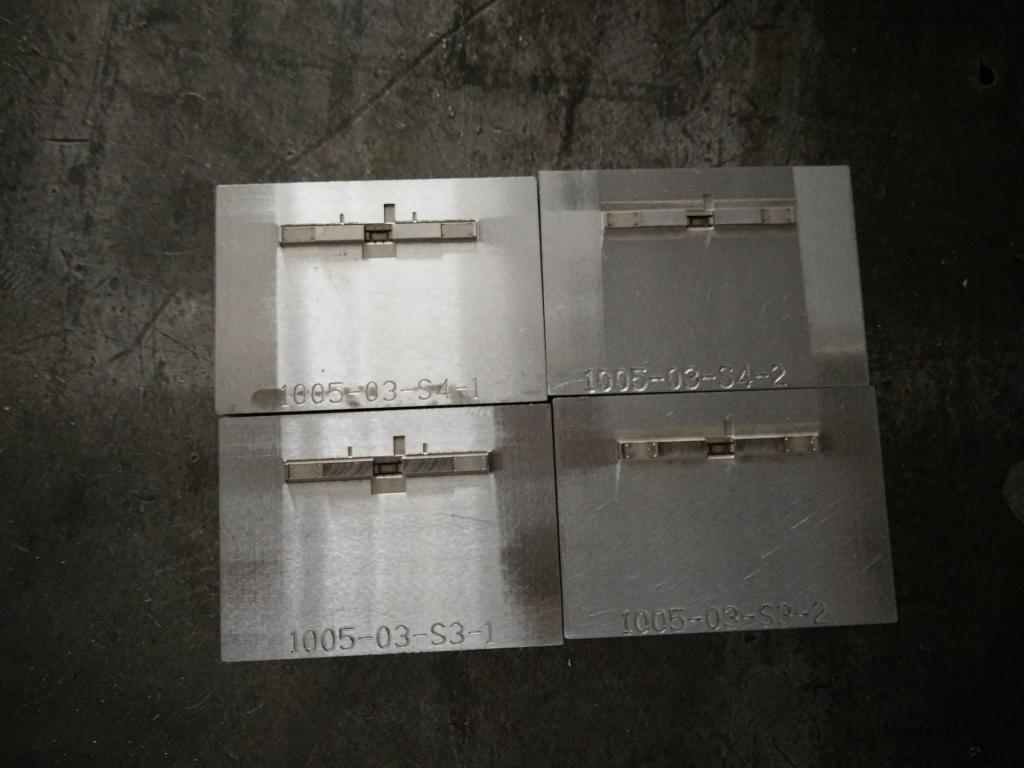
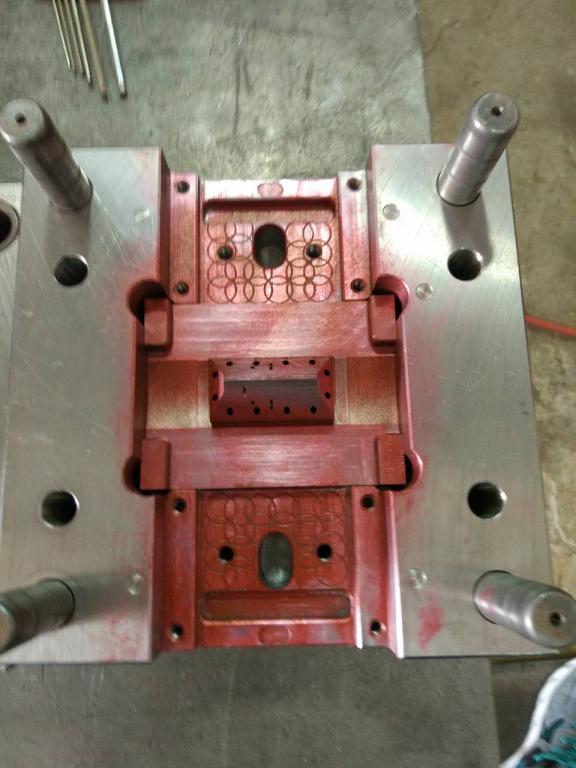
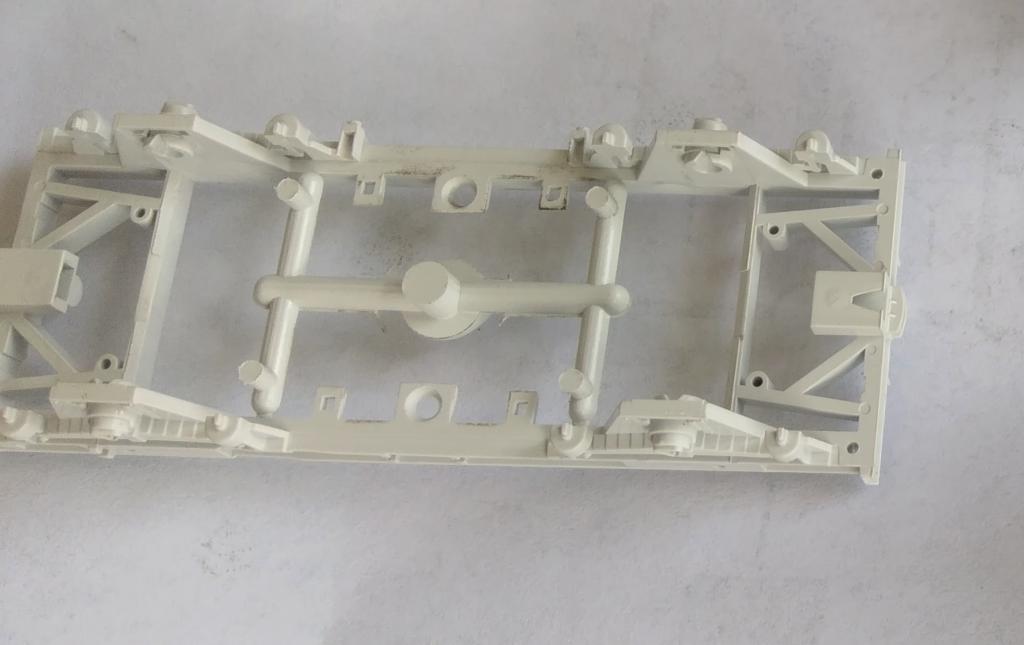
Afternoon all. In advance of this evenings posting by the IRM team, I thought it would be timely to run through what is actually involved in making, not one, but actually two wagons, utilising the same chassis. As one can imagine, the Cement Bubble and Ballast Wagon have violently different upper and lower components, but the base chassis is identical. So one problem from the off is where to screwfix the bodies to the chassis', in a place that works for both. Thankfully that was sorted in the CAD stage and it comes down to a simple thing of making them....Now this is after months and months of getting the CAD approved first, which by now you've all seen I'm sure. It's like a big jigsaw, and at the start the manufacturers start by cutting large lumps of steel which will all interlock eventually. This took a bit of figuring out for us, get our heads around cavity and core units, but we were off! Spark Eroding is the term you need to google if you'd like to learn more. Essentially, every single cut, groove and rivet on the chassis is individually made of a copper electrode. They are the items in the upper part of the image. The steel lump in the middle is going to be the female part of the chassis, and you should be able to see the NEM pockets on either end. As I understand it, they are placed where they are supposed to go (robotically) dunked in some magic fluid, a charge passed through, and as the copper is pushed toward the steel, it sacrifices itself, and there is a perfect shape of the copper unit left behind. Needless to say, this process has to be repeated over and over again for each part. You can see the robot arm clamping a copper piece as it's off to create another rivet, makers plate or something small on the solebar of the chassis... So on the die on the right, you can see the gates cut in - these are the channels that the plastic runs into to get into the wagon sides. But just keep a note of the jigsaw shapes of the dies for the moment... No prizes for guessing what wagon this is from, but it shows the little rivets dotted around the base where the bubble joins the chassis. Hnnng..... Then there are the slides for the side of the hopper, with the locations noted for the supporting strakes outside..... Now all these parts fit together as a complete puzzle, interlocking with each other, leaving only the gates and runners open for the plastic to be injected into. I'm assuming here that the colour is related to a test fit/squirt, like a release agent, but you can make out the male and female parts of the mould. The last part of the process, that I have seen at least, is where all these parts are assembled together and put into the rig you see. The four holes on either side of the shape there represent where the inside of the ballast hopper is, and all the metal dies pile on. So you've seen how the majority of both wagons are done, but there is one vital ingredient, and that's the detail. Here's a (mighty wobbly) shot of the detail rig, both male and female. At the bottom you make out brake hangars, coupling bars, ballast release wheels, and cement wagon ladders. All the detail for both wagons will be on the same die, design clever they call it. (The ladders will be metal on the final bubble, they need to be made in plastic to make sure they fit etc.) Once plastic is squirted it comes out on sprues, much like your airfix kit. All in one piece.... These are neatly removed, the detail added, and the whole lot assembled. I'm told the process of making one is less than a minute, but what these manufacturers have done in 18 weeks is quite remarkable. After this they will be sprayed (I'm trying to make the paint samples to send to them currently) then tampo printed with the running numbers and oddball stencil placement and fonts we are so used to with the prototype, but for the moment that's all I have to share. Most manufacturers don't ever go into this detail for some reason, but we felt since ye've been along for the ride since day 1, it would be nice to see what happens behind the smoke and mirrors. Props to our Chinese Engineers, who may have rubbish cameras but they know what they are doing, and Dave "Handy as a small pot" Jones, of DJModels, for making all of this possible. Richie.
-
Looks like the same thing I have. The tip is chiselled mind. You'll need to get fluxes ( like ear wax that you rub on the area to be jointed and it helps or allows the solder run along the joint. Otherwise it won't stick to the brass or just stay as a blob. You can get high end flux like Carrs, but go into a hardware shop, ask for plumbers flux (comes in a shoe Polish Tin) and use a cotton bud to apply it lightly. Use a few off cuts to test on, and you'll be on the pigs back in no time.
-
Ha ha ha, Quote of the Week, if not Month! So true.....
-
You did indeed, sh!tstirrer. Working on your Sulzers at the moment. I was.
-
Apologies if I came across as "slamming the door", not my intention. Kind of what I was thinking about from the beginning of this process back in March of 2015. Try and design a chassis that's as adaptable as possible and also provide alternatives so that the likes of yourself and Dive (and myself) would have a way of making up rakes of alternative wagons, without diluting the accuracy of the chassis. (Hence why we're not using this chassis for earlier beet/molasses/bauxite/spoil/ etc.wagons) The bizarre thing is it's sometimes easier to produce brass & resin parts at home than it is as injected moulded plastic in China, so this methodology makes sense given the low volume of hoppers, and having established relationships with specialists. We don't, but we try and work it so that those who want to bodge, can I'd be chuffed to bits if this worked out. A ready to run 20 ft chassis, with wheels, NEM pockets, couplings, the whole shooting gallery... and please god, dirt cheap too... Richie.
-
Decals will be Tampo printed, so can be removed using existing techniques (can't remember off hand, but deluxe materials make a superb stripping fluid). The dolomite wagons were near identical to the original ballast wagons in that the decals/brake test codes etc. were all along the solebar, not on the hopper. The only difference in the 26XXX (older chassis design) series to our 24XXX (newer chassis design) series is the open type of W-irons and the flat grease type axle boxes. Garfield would be upset if I didn't point out the axle box difference This can be emulated by filing down the ones on our model. Before and After for reference. Hope that helps, R. (Thx to Wrenn for the first photo)
-
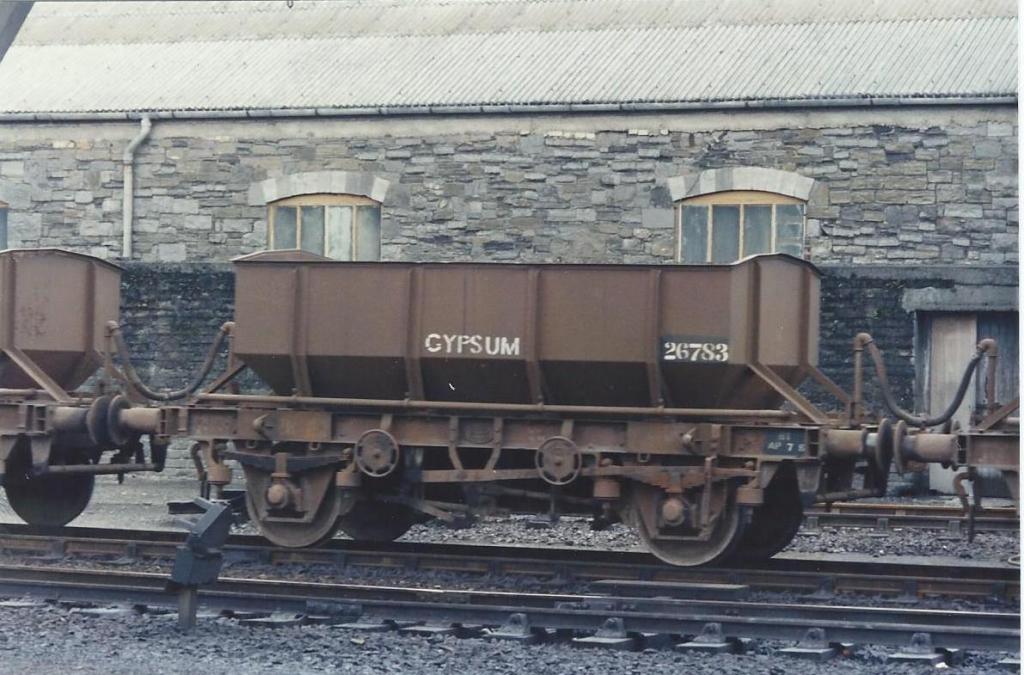
The Gypsum wagons are identical (for the most part) to the ballast wagons. The hopper has all welded seams as opposed to curved sides, paint the discharge wheels brown oxide and it's all good. I've no doubt that your local friendly decal supplier will produce the decals to suit. Also, I'll be providing the paint to China to avoid colour misrepresentations and so on, and my hope is to use an "off the shelf" paint, so that anyone can paint further bits and pieces to keep rakes uniform. That's the plan anyway. Personally, the magnesites do it for me, but then again I'm kinda sick of the ballast wagon by now. My intention is that once the EP samples of the wagons arrive, I'll strip the wagon down, get out the calipers and make a start on a prototype for a brass hopper with the walkways and ladders too, ideally to be manufactured for when the main delivery arrives. I'm assuming there wouldn't be any more demand than 50 hoppers, so expressions of interest to any one of our IRM email addresses would be useful.
-
The tooling costs are simply too high to justify any alternative hopper, be that magnesite or any other variant. The minimum run is 1000 units to start with, so I have been researching ways of getting alternative hoppers produced in either resin and/or brass for all variants to be produced at low cost. I've asked China about the possibility of getting unassembled and undercorated parts, effectively the sprues in a bag, ala Dapol Prestwin kits, but I've had no response as yet.
-
This made me smile. Was full sure there was going to be a "then it all went horribly wrong" bit. Nice work.
-
Nope. Fixed. I may have done the RPSI some service in this regard.
.png.c363cdf5c3fb7955cd92a55eb6dbbae0.png)




.jpg.16644493aadd5341a07c6e882e38c7d0.jpg)
.jpg.73f362c13d8d04b48694cf44aa07d54a.jpg)
