.png.c363cdf5c3fb7955cd92a55eb6dbbae0.png)

BosKonay
-
Posts
8,911 -
Joined
-
Days Won
2
Content Type
Profiles
Forums
Events
Gallery
Blogs
Everything posted by BosKonay
-
It's actually on our todo list - with full route maps, etc - @Garfield will sort it
-
 The first of our 2019 announcements is a new run of our beautiful cement bubble wagons in new liveries and numbers after feedback from customers in our recent poll on the Irish Railway Modeller forum! The iconic bubbles sold out in a record 9 days in Irish Cement livery when we produced our first run of them in 2017. Since then we have found three new running numbers for this iconic and much-loved livery, so have produced a new pack with the Irish Cement branding on ivory livery. We are also producing an additional set with CIE roundels with new numbers to push your ivory cement trains to further prototypical lengths as seen in their final years of service. In addition to these, we will also be doing the bubbles in their as built 1960s livery of original slate grey. The bubbles wore this attractive livery from introduction in the mid-1960s until repainting into orange in the early 1970s. The slate grey bubbles ran mixed with their then newly painted orange counterparts for a few years into the 1970s too, as well in mixed freight formations. They will make a perfect companion for our forthcoming A classes in green, black, black with yellow end and black and tan, as well as 141s, 181s and 121s of the era in black and tan and grey and yellow in the case of the 121s. Two sets are in line to be produced, with unique running numbers as you come to expect from IRM. These bubbles are the first in several new announcements coming from IRM throughout the course of 2019, which will include items such as ballast hoppers later in the year. The price of the bubble packs is €125 for a pack of three wagons, with a bundle deal of €450 for all four packs. Pre-orders is now open for a delivery date in late May 2019. Pre-production models are on show at the North Down Model Railway Society show at Bangor this weekend and production is already underway. Place your order here: https://irishrailwaymodels.com/collections/cement-bubbles View the full article
 -
Hi mphoey Drop an email to support@irishrailwaymodels.com or use the live chat option on the website with order details and we can check it out@
-
They look very very at home
-
Our new ballast plough vans have just arrived in stock, and should be arriving with modellers in the coming days. Here is a quick guide on how to disassemble them and fit a DCC chip, as well as the addition of the detail parts provided. It should be said that taking the plough van apart is a tad tricky, but since our PR and Marketing Director is extremely hamfisted, we decided that he should have a go, because if he can do it, anyone can! Step 1: The Contents! Take the vans out of the box and pop them on a table or similar flat surface. Step 2: Plastic Fantastic The first rule of step to is DO NOT REMOVE THE SCREWS UNDER THE BODY! This merely holds the interior in place and does not secure the body. What we need is plastic! It can be two pieces of plasticard, or old debit or credit cards, on in this case a leap card. The body is held to the chassis by two tabs towards the back of the van (near the tail-lamps). To make it easy to remove, slip the plastic between the chassis and behind the body. This will help release the tabs and the body will then slide off with some jiggery-pokery. The tabs are denoted by the red arrows below and are on both sides of the body in the same mirrored position. Pop off the plough blade itself if you find it obtrusive. The body should then just slide off. Watch those steps too! Step 3: Chipping in! Once the body is removed you will be faced with this sight of your plough interior. As you can see, the PCB resides in the roof of the van. The plug for the chip is an 8 pin interface which is on the underside of the PCB, once again getting a fly-by from the Red Arrow of truth... Remove the plug, and plug in your chip with the orange wire corresponding to the number 1 on the PCB. We recommend a direct plug chip as the wires from a standard 8 pin chip can fill the small space in the van. Step 4: Reconstruction Once you are happy that the chip is fitted, put the van on its roof (preferably in your hand, or a cradle) and line up the chassis, easing the interior in first and taking care not to snag the wires. Push down until you hear a click from the tabs and everything is lined up. Step 5: Test Place your van on the track and test the light functions for both the interior and tail lights. Once they are functioning you know the installation has been a resounding success! Step 6: Detail In each plough pack there are two long pipes provided. These are for the braking system for the van, and need to be added AFTER you chipped it, as they run under the chassis and are attached to the body. To attach the pipe add a touch of polystyrene cement on the tip of a cocktail stick, and pop it on the opening in the solebar for a permanent fix. If you intend on removing the cab again, a less permanent solution would be PVA applied in the same fashion. It is placed on one side of the van along the solebar. And that's it, your plough is now a part of the digital revolution! Of course, there are switches under the van meaning that lights can be turned on or off too, meaning you dont have to take the van apart, but this way gives you full remote functionality for shunting etc from your DCC controller. Fancy some ploughs to call your own? Order now! View the full article
-
HELP! Bachmann Iarnrod eireann train set wanted
BosKonay replied to TrainMammy's topic in For Sale or Wanted
Welcome to the community! I've shared this to FB and twitter also! -
Wow that was fast @Railer ! Drop us a line to support@irishrailwaymodels.com or hop on the livechat on the site and we can check the other order for you!
-
https://irishrailwaymodels.com/blogs/announcements/sneak-peek-inside-our-a-class Read more at the link above, and more updates as we progress
-
Here is a sneak peek of the internals of our forthcoming A Class! As you can see it will have a nice, weighty chassis block and a large five pole skew wound can motor with twin flywheels and all wheel drive for excellent traction and pulling power. China has now completed the internal design work of our A Class and tooling for the chassis block and drive train is already underway. There is also ample room for placement of sound chips and multiple speaker set ups, with a factory fitted sound option for the A Class currently being investigated. We expect to have news of this in the coming months. This is another major milestone passed in the development of the iconic A Class locomotive! Are you as excited as we are? Place an order for your A Class today! View the full article
-
We didn't feel there was much value to add in providing decoders, so we recommend the ESU Lokpilot or DCC Concepts Zen, 8 Pin, Direct Plug decoders for installation. We'll put together an install guide / video once the production stock arrives.
-
Thanks for the grab Noel Perhaps lots of things for Hornby to worry about
-
Hi Wrenn, The Liners will be away from the factory first, then the Fertiliser Wagons, then the Spoil wagons, the Guinness Keg Wagons and the Weedspray Packs, then we'll possibly do a run of 'unloaded' flats if there is enough demand. We've also several projects underway quietly in the background that will be announced
-
Correct Railer
-
Not much longer https://irishrailwaymodels.com/products/056-a-class-locomotive
-
A's release, will the IRM logo have a loco curving towards us instead of
BosKonay replied to WaYSidE's topic in Irish Models
... and shade of green -
Thanks Broithe, It's now also possible to create accounts with Twitter logins (in addition to Microsoft and Facebook) and you'll be able to sync Status updates on Facebook and Twitter to your status here if you wish
-
We've finally made the move to SSL, a new CentOS 7 server, and various other updates. Any 'oddness' over and above the default, do let me know
-
Typically one goes for a high price, so a few eager sellers hop on the proverbial bandwagon.
-
Hi Robert, Do you mean on the A class? Chinese New Year has been essentially ongoing the last two weeks, and the factories are only coming back online at the moment. It will be another week or so before they are back up to speed as workers return from 'up country'. The Plough is in the final assembly phase, and the 42' project and A class are in the toolroom however. Updates as we have them!
-
Irish Rail Puts Out Tender For Pre-owned D.M.U.
BosKonay replied to StevieB's topic in What's happening on the network?
Not at the moment, no -
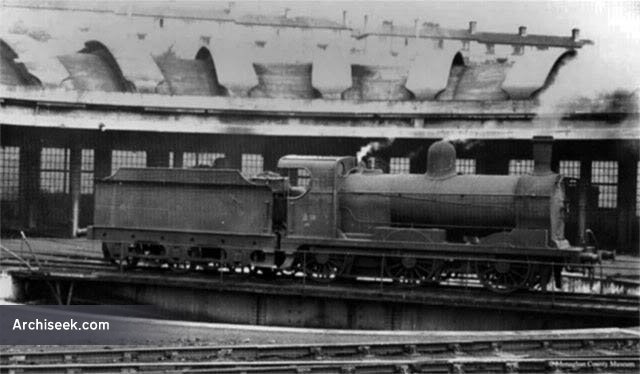
http://archiseek.com/2009/1926-former-great-northern-railway-engine-shed-clones-co-monaghan/ http://archiseek.com/2014/engine-roundhouse-portadown-co-armagh/

-
Check out these options https://www.modelrailbaseboards.com/storage-units @Dave
-
Our market research would indicate, particularly for the UK market, that the 'KEY' era(s) for modellers is from roughly 1945-1975
-
We're working on it....
-
IRM Bubbles Almost Sold Out. Would you like more?
BosKonay replied to Warbonnet's topic in General Chat
Lot of love for Slate grey!