Tullygrainey
-
Posts
949 -
Joined
-
Last visited
-
Days Won
56
Content Type
Profiles
Forums
Events
Gallery
Blogs
Store
Community Map
Everything posted by Tullygrainey
-
Thanks David. After marking it out, I drill a few strategic holes and roughly cut out the unwanted bits with a piercing saw, a little way inside the lines. Then I file the edges back to the lines. This is where those Valorbe Swiss files earn their keep!
-
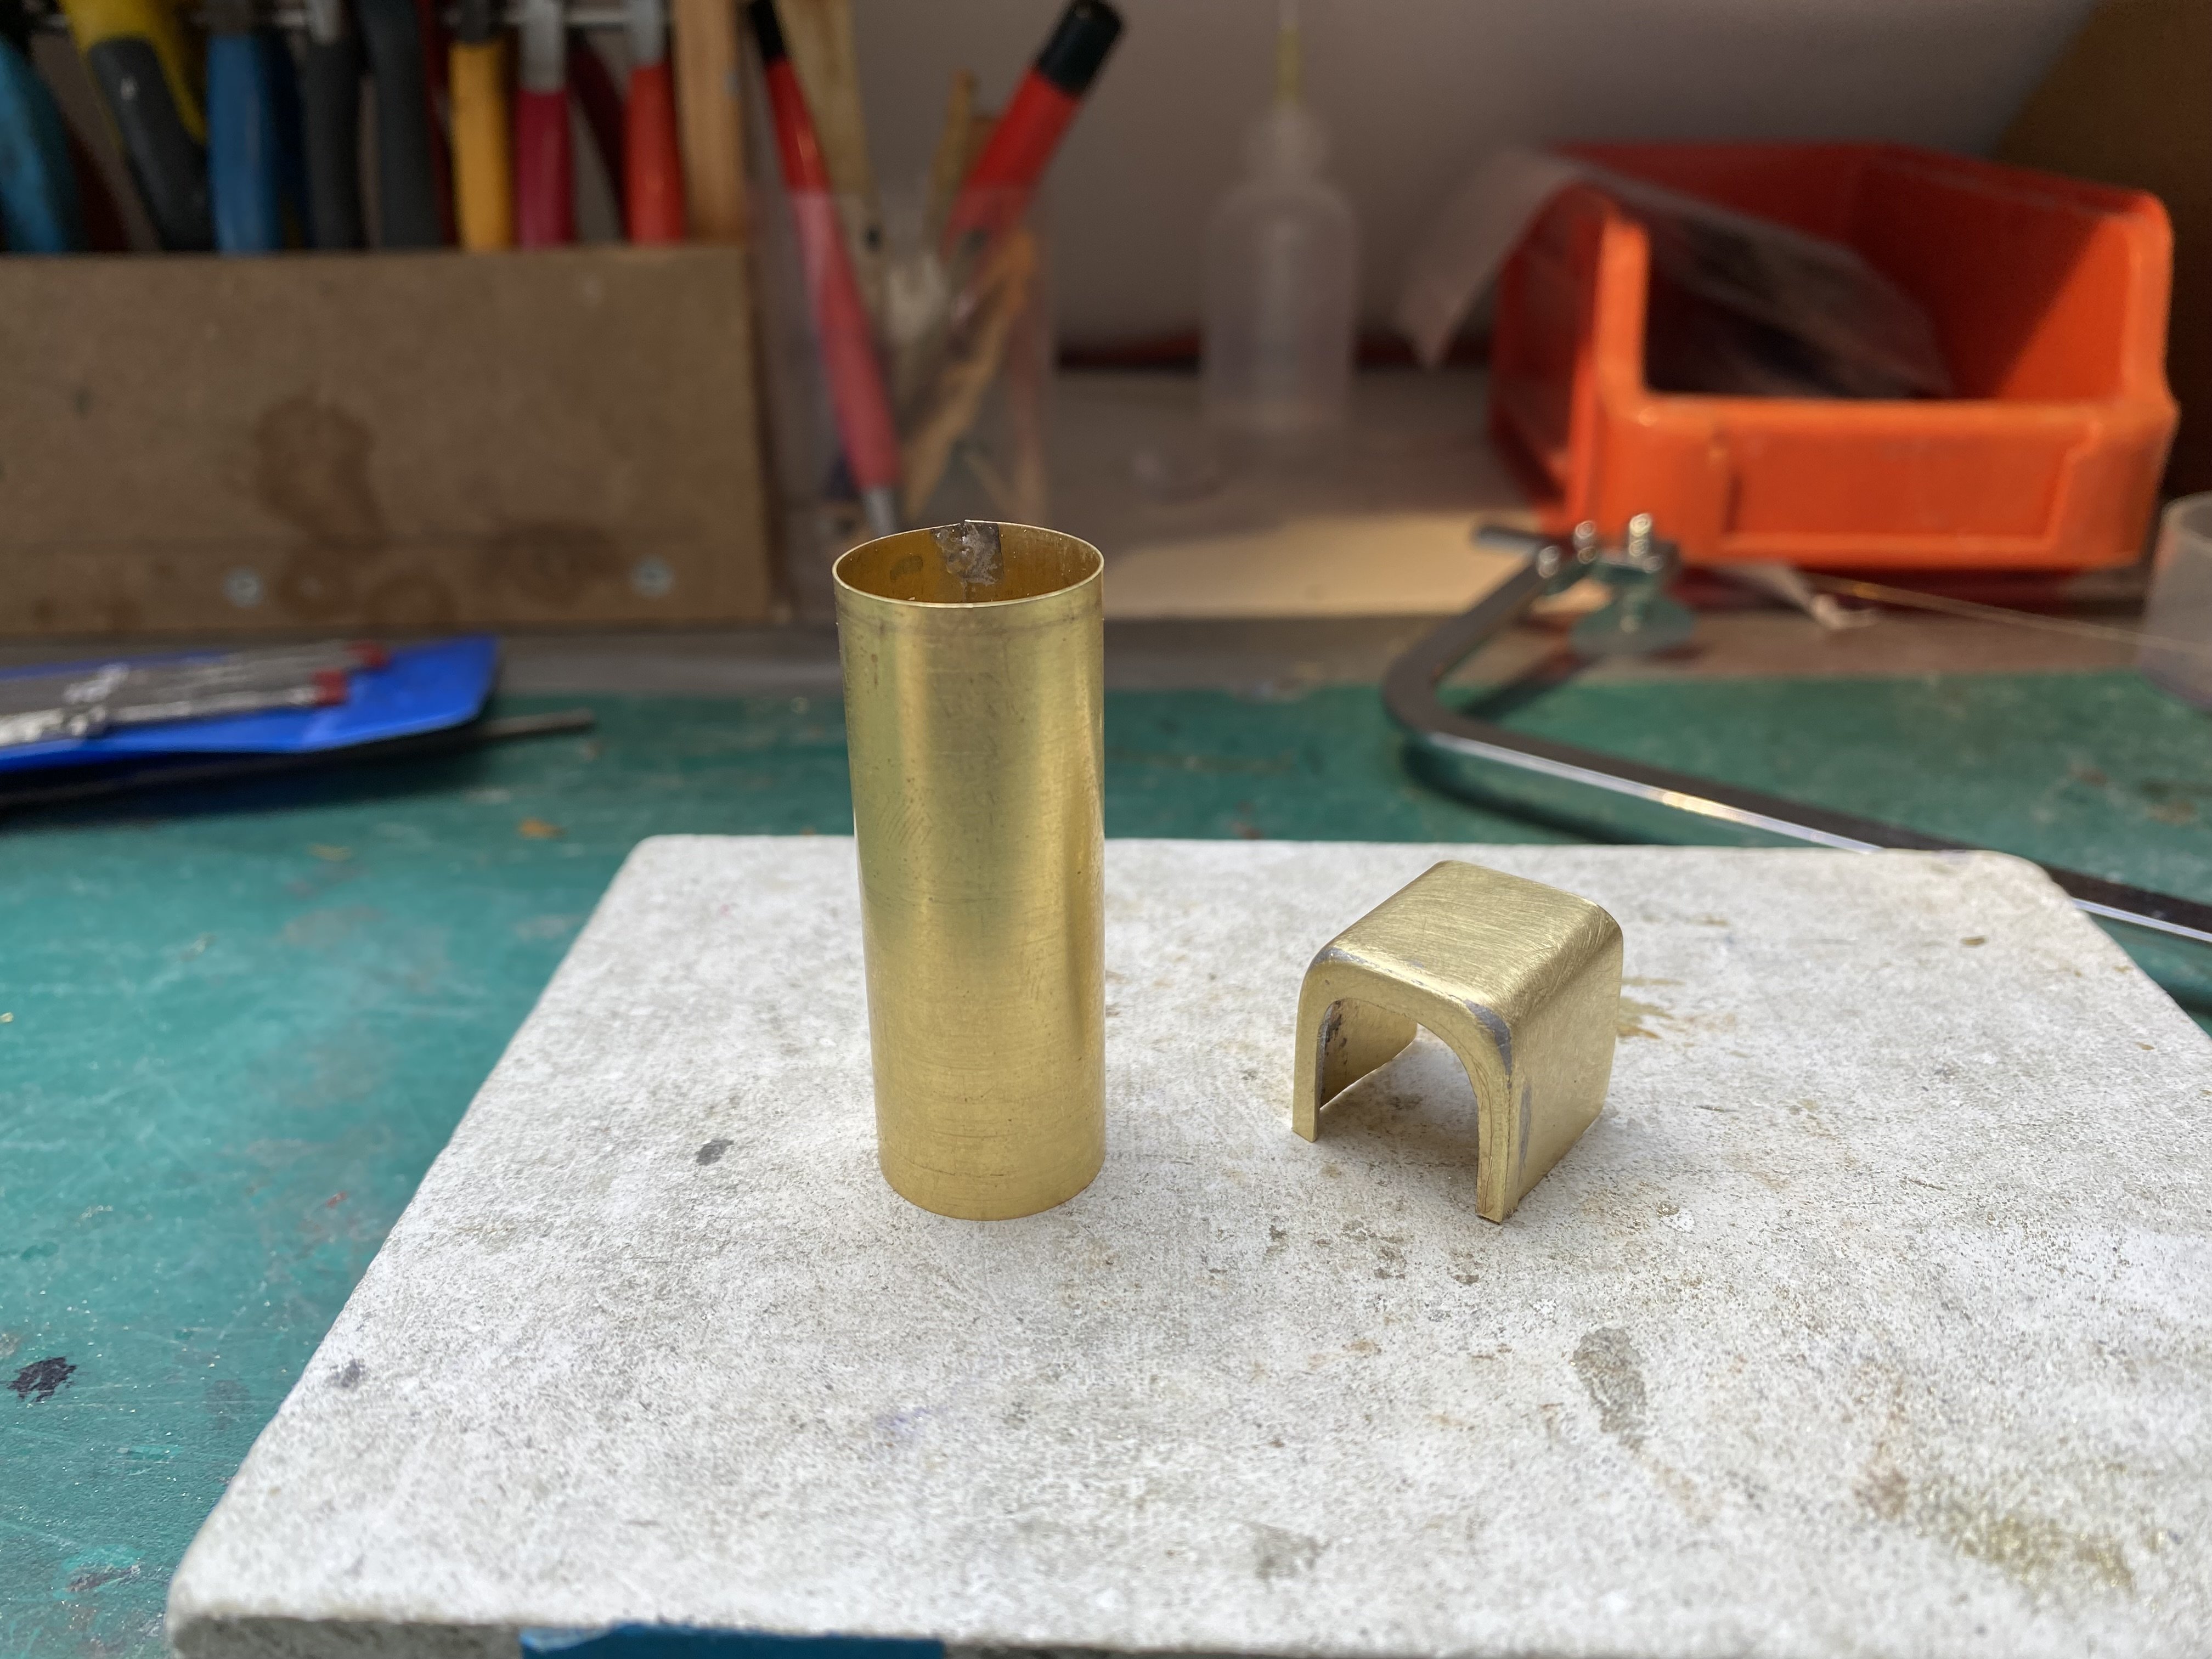
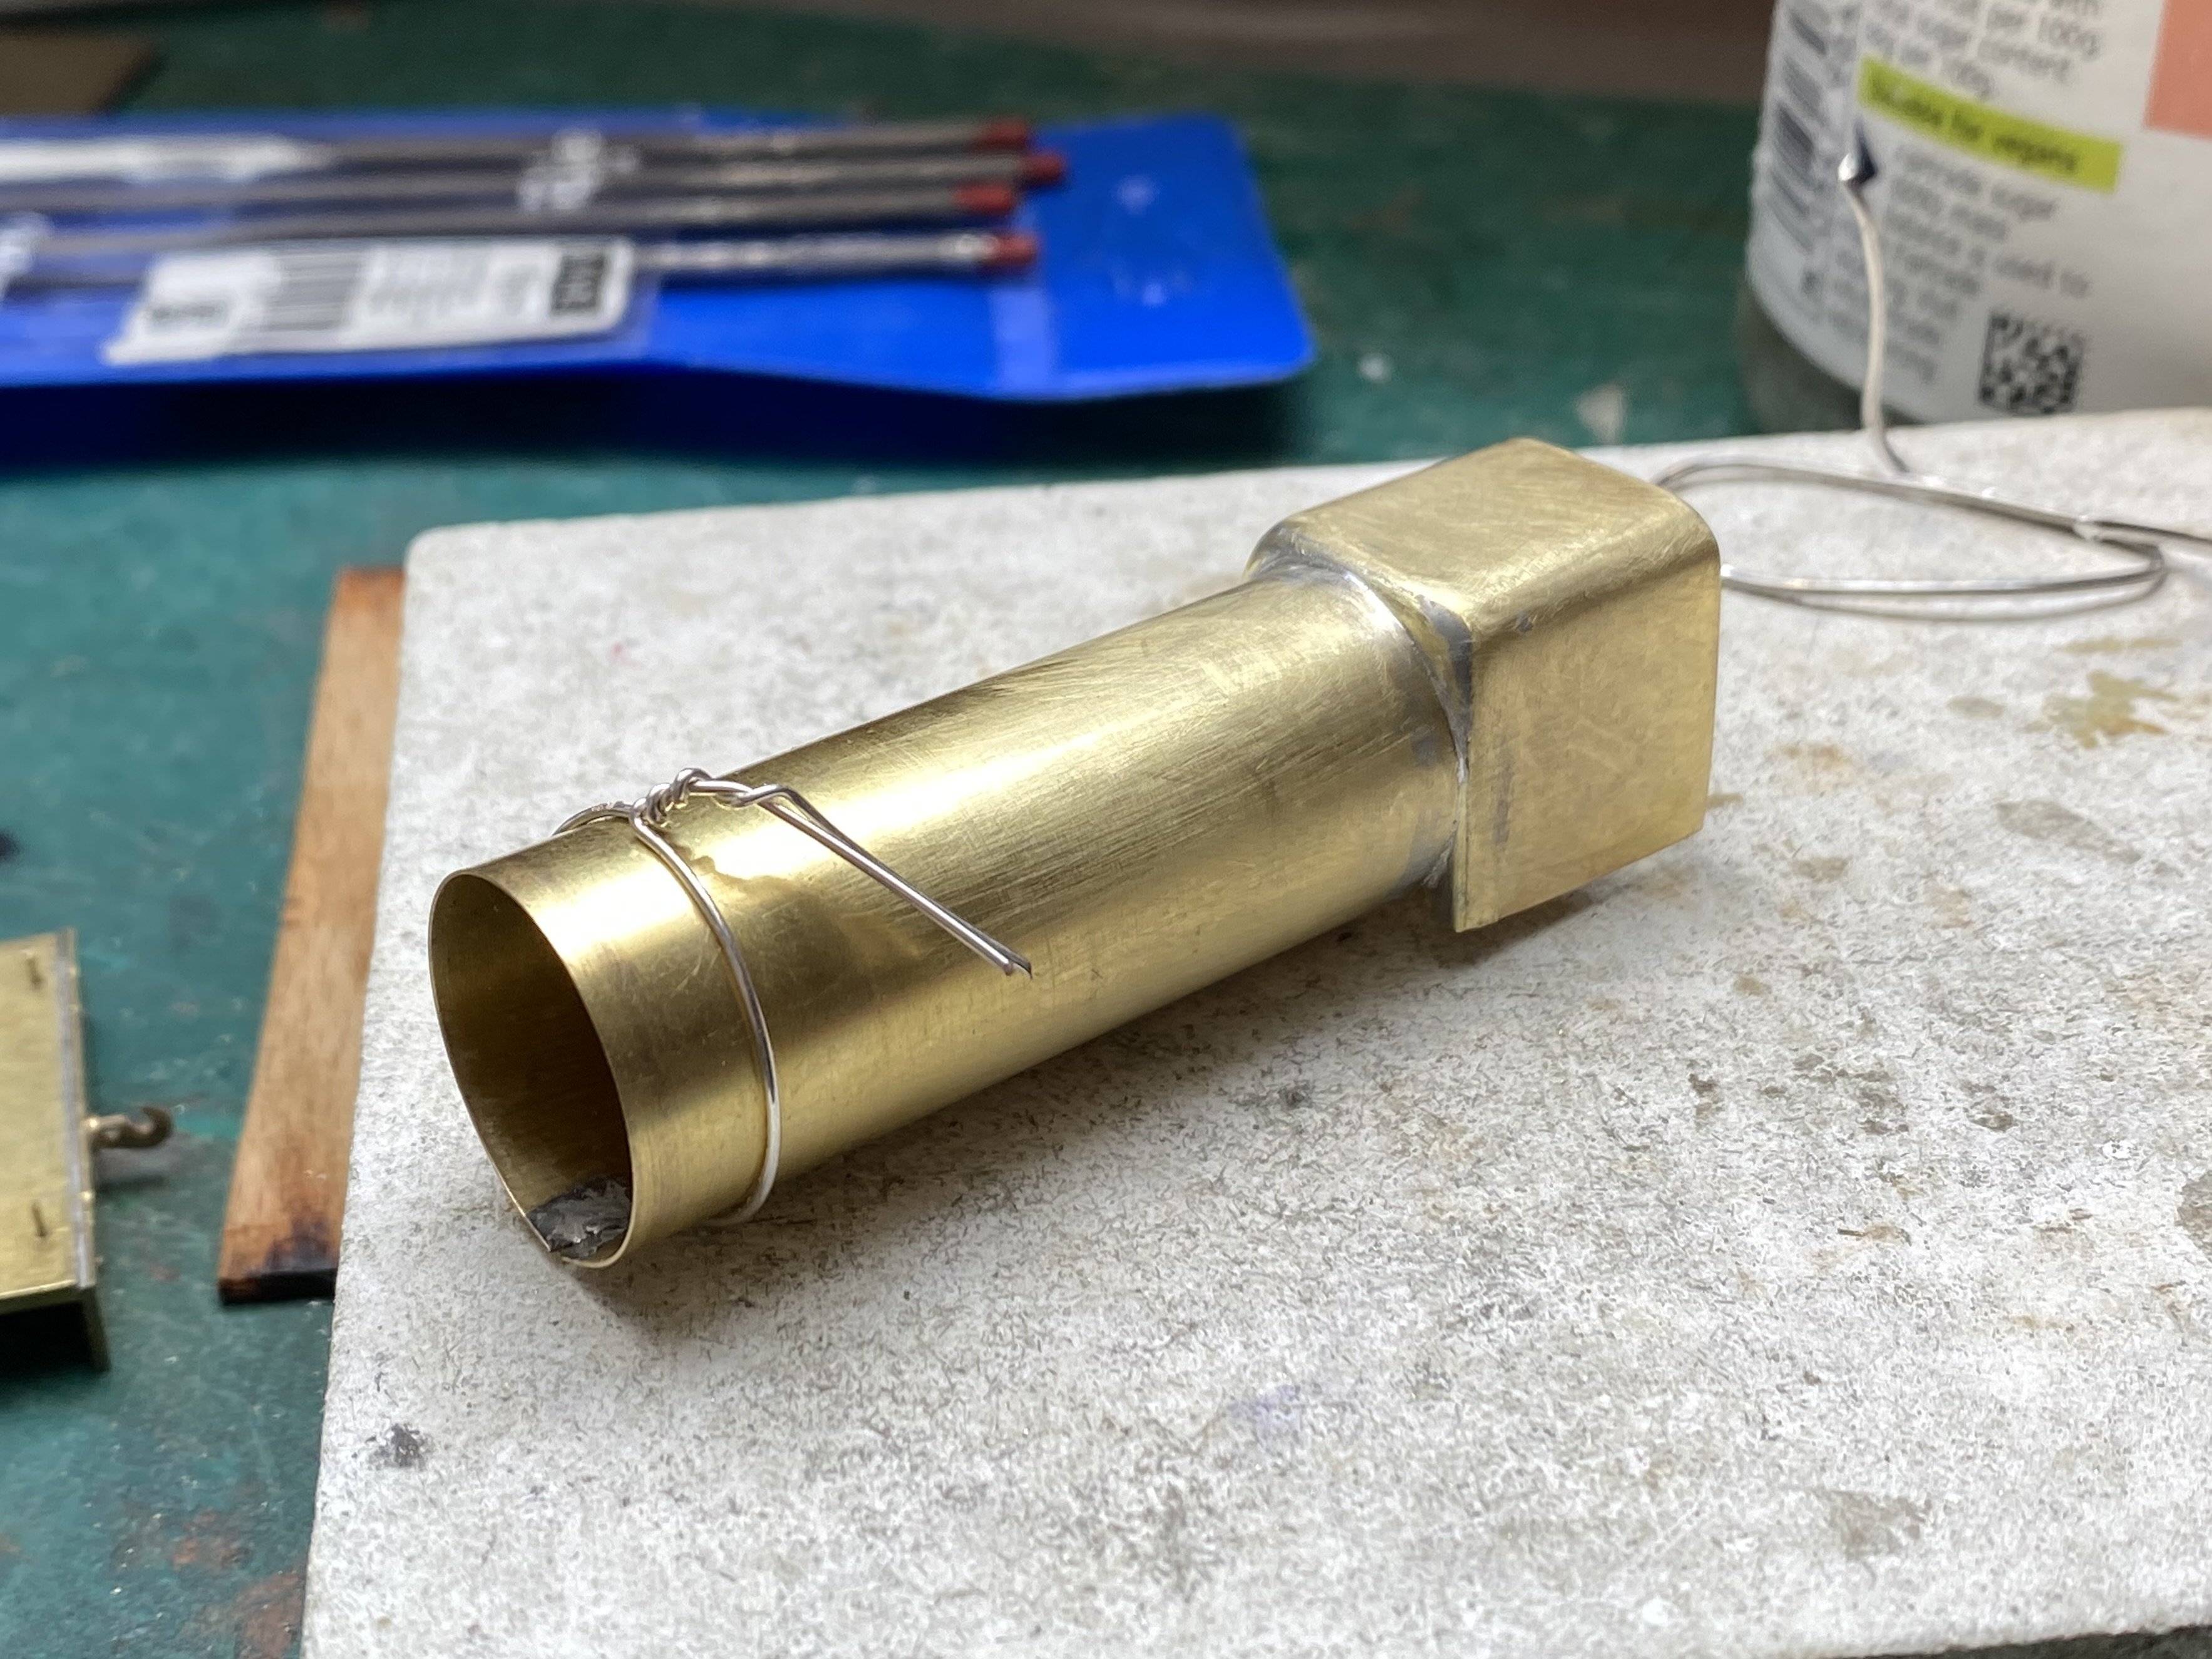
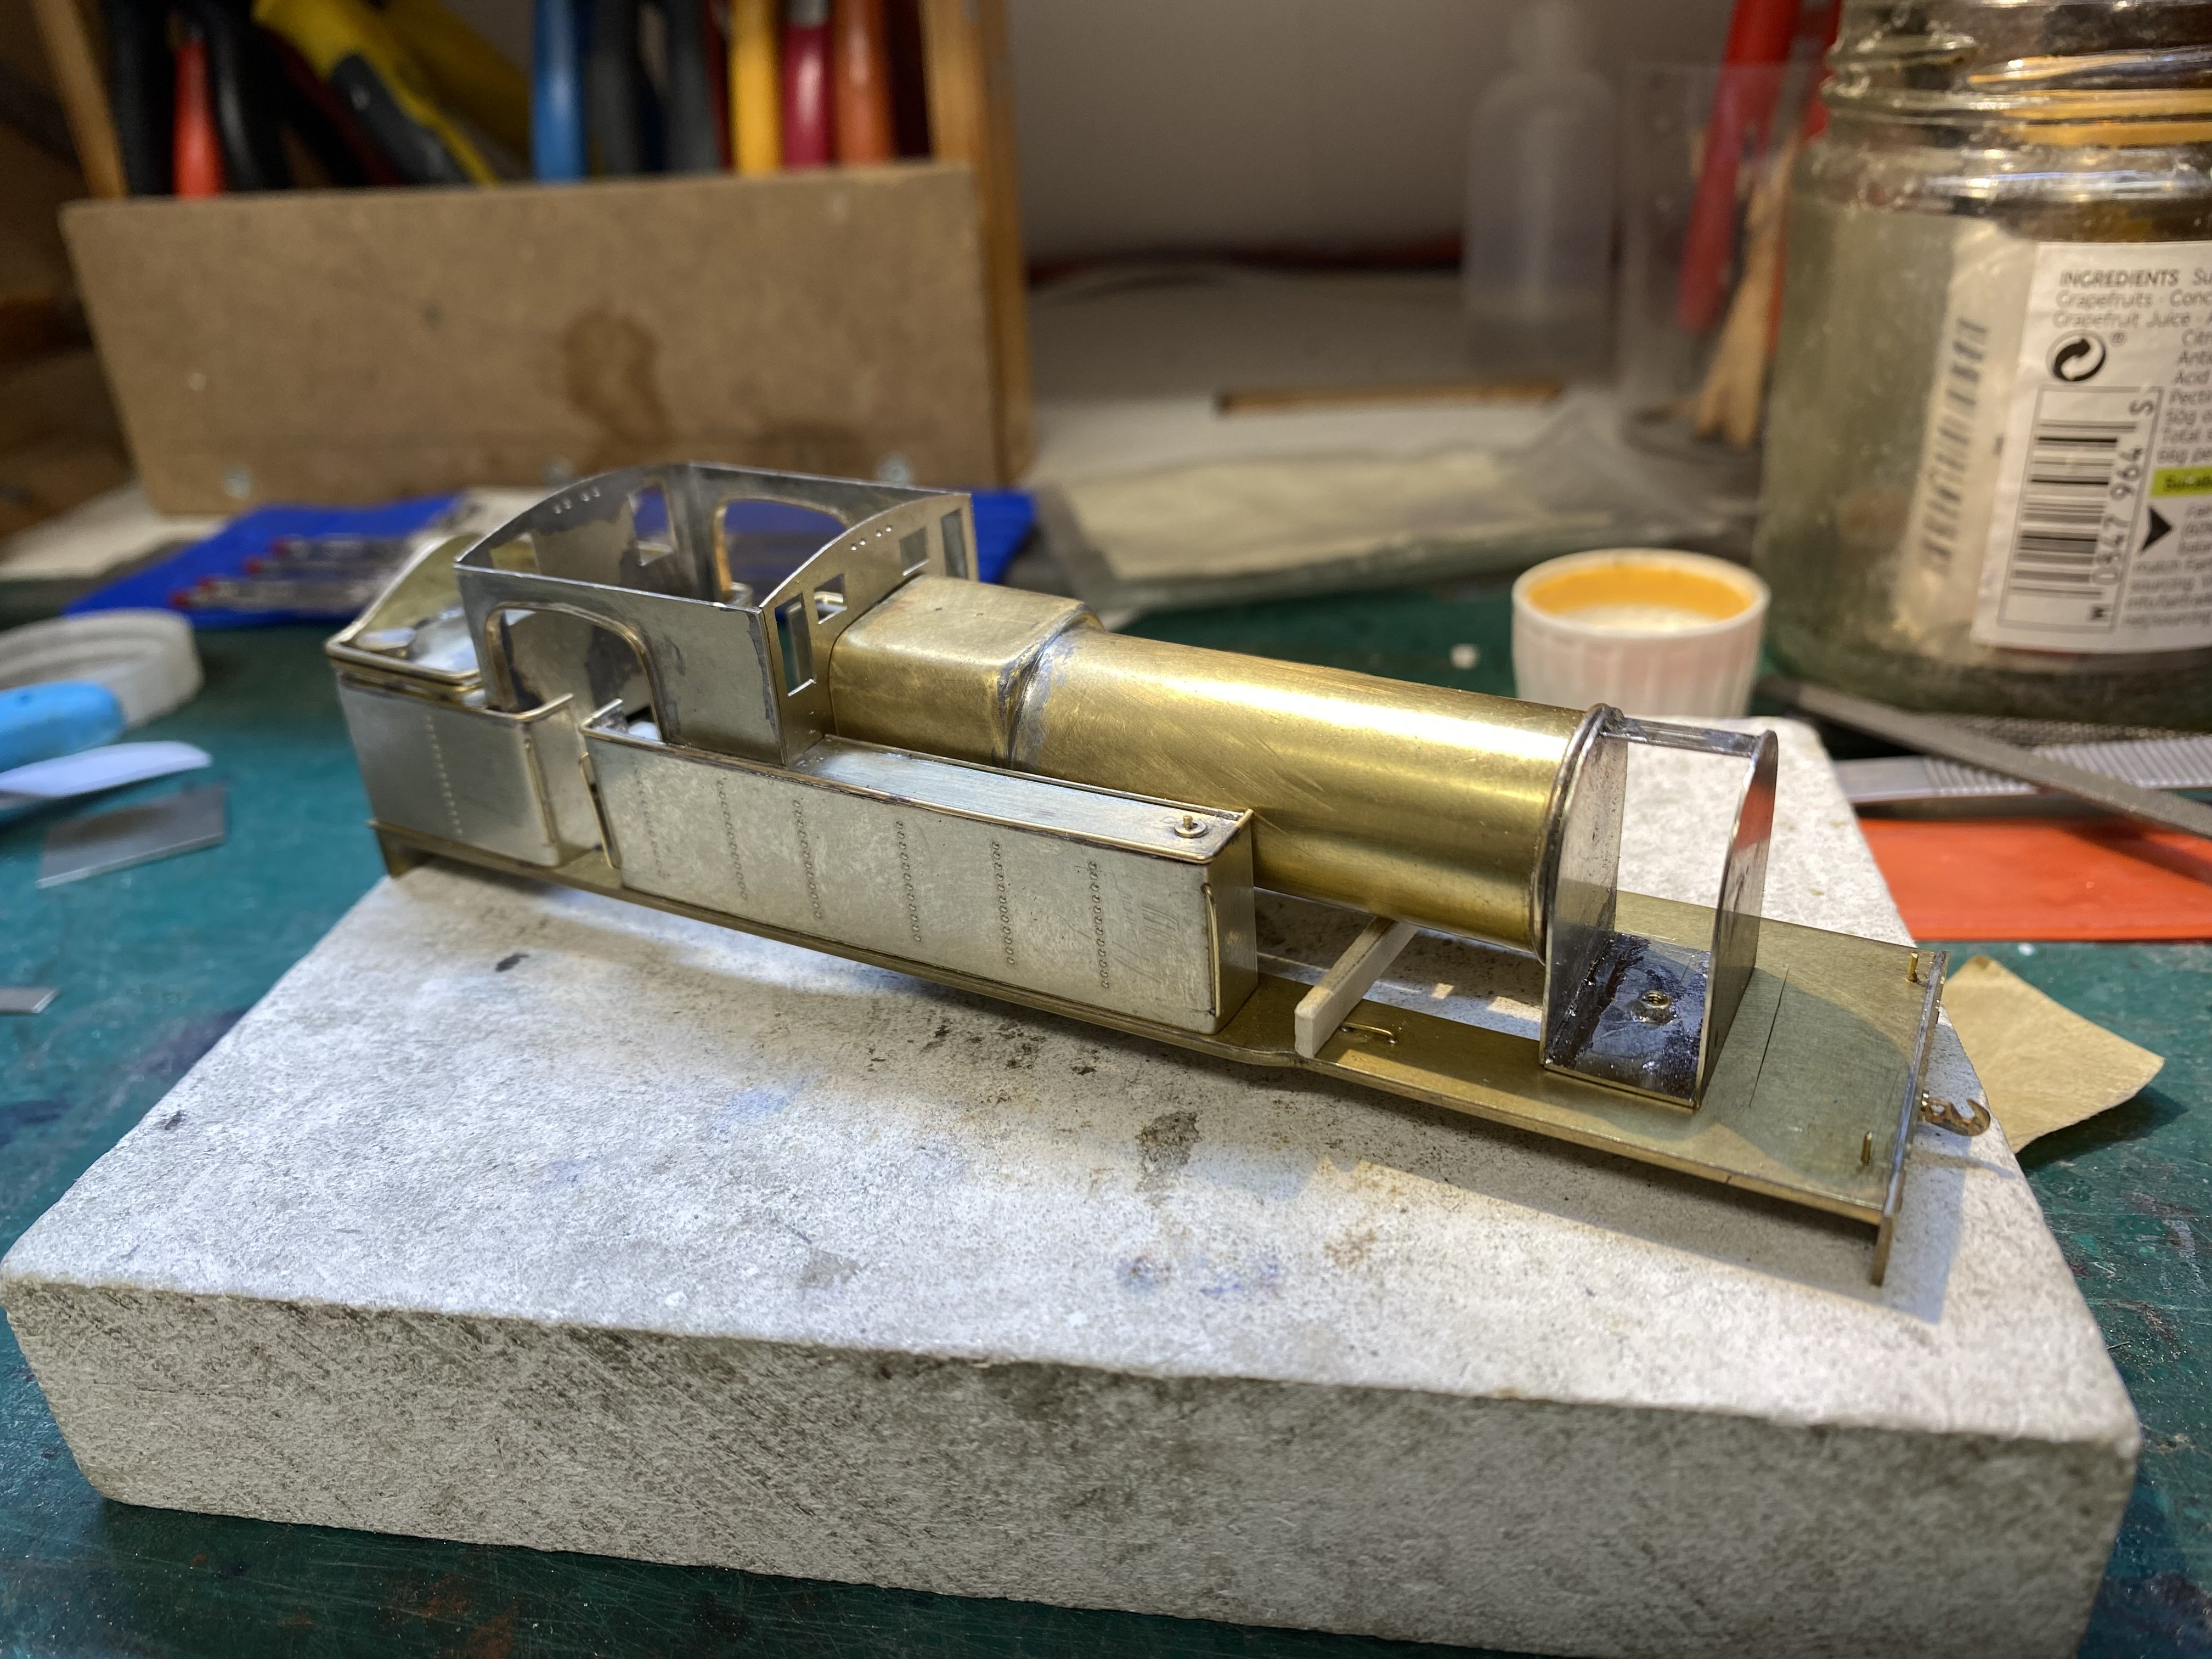
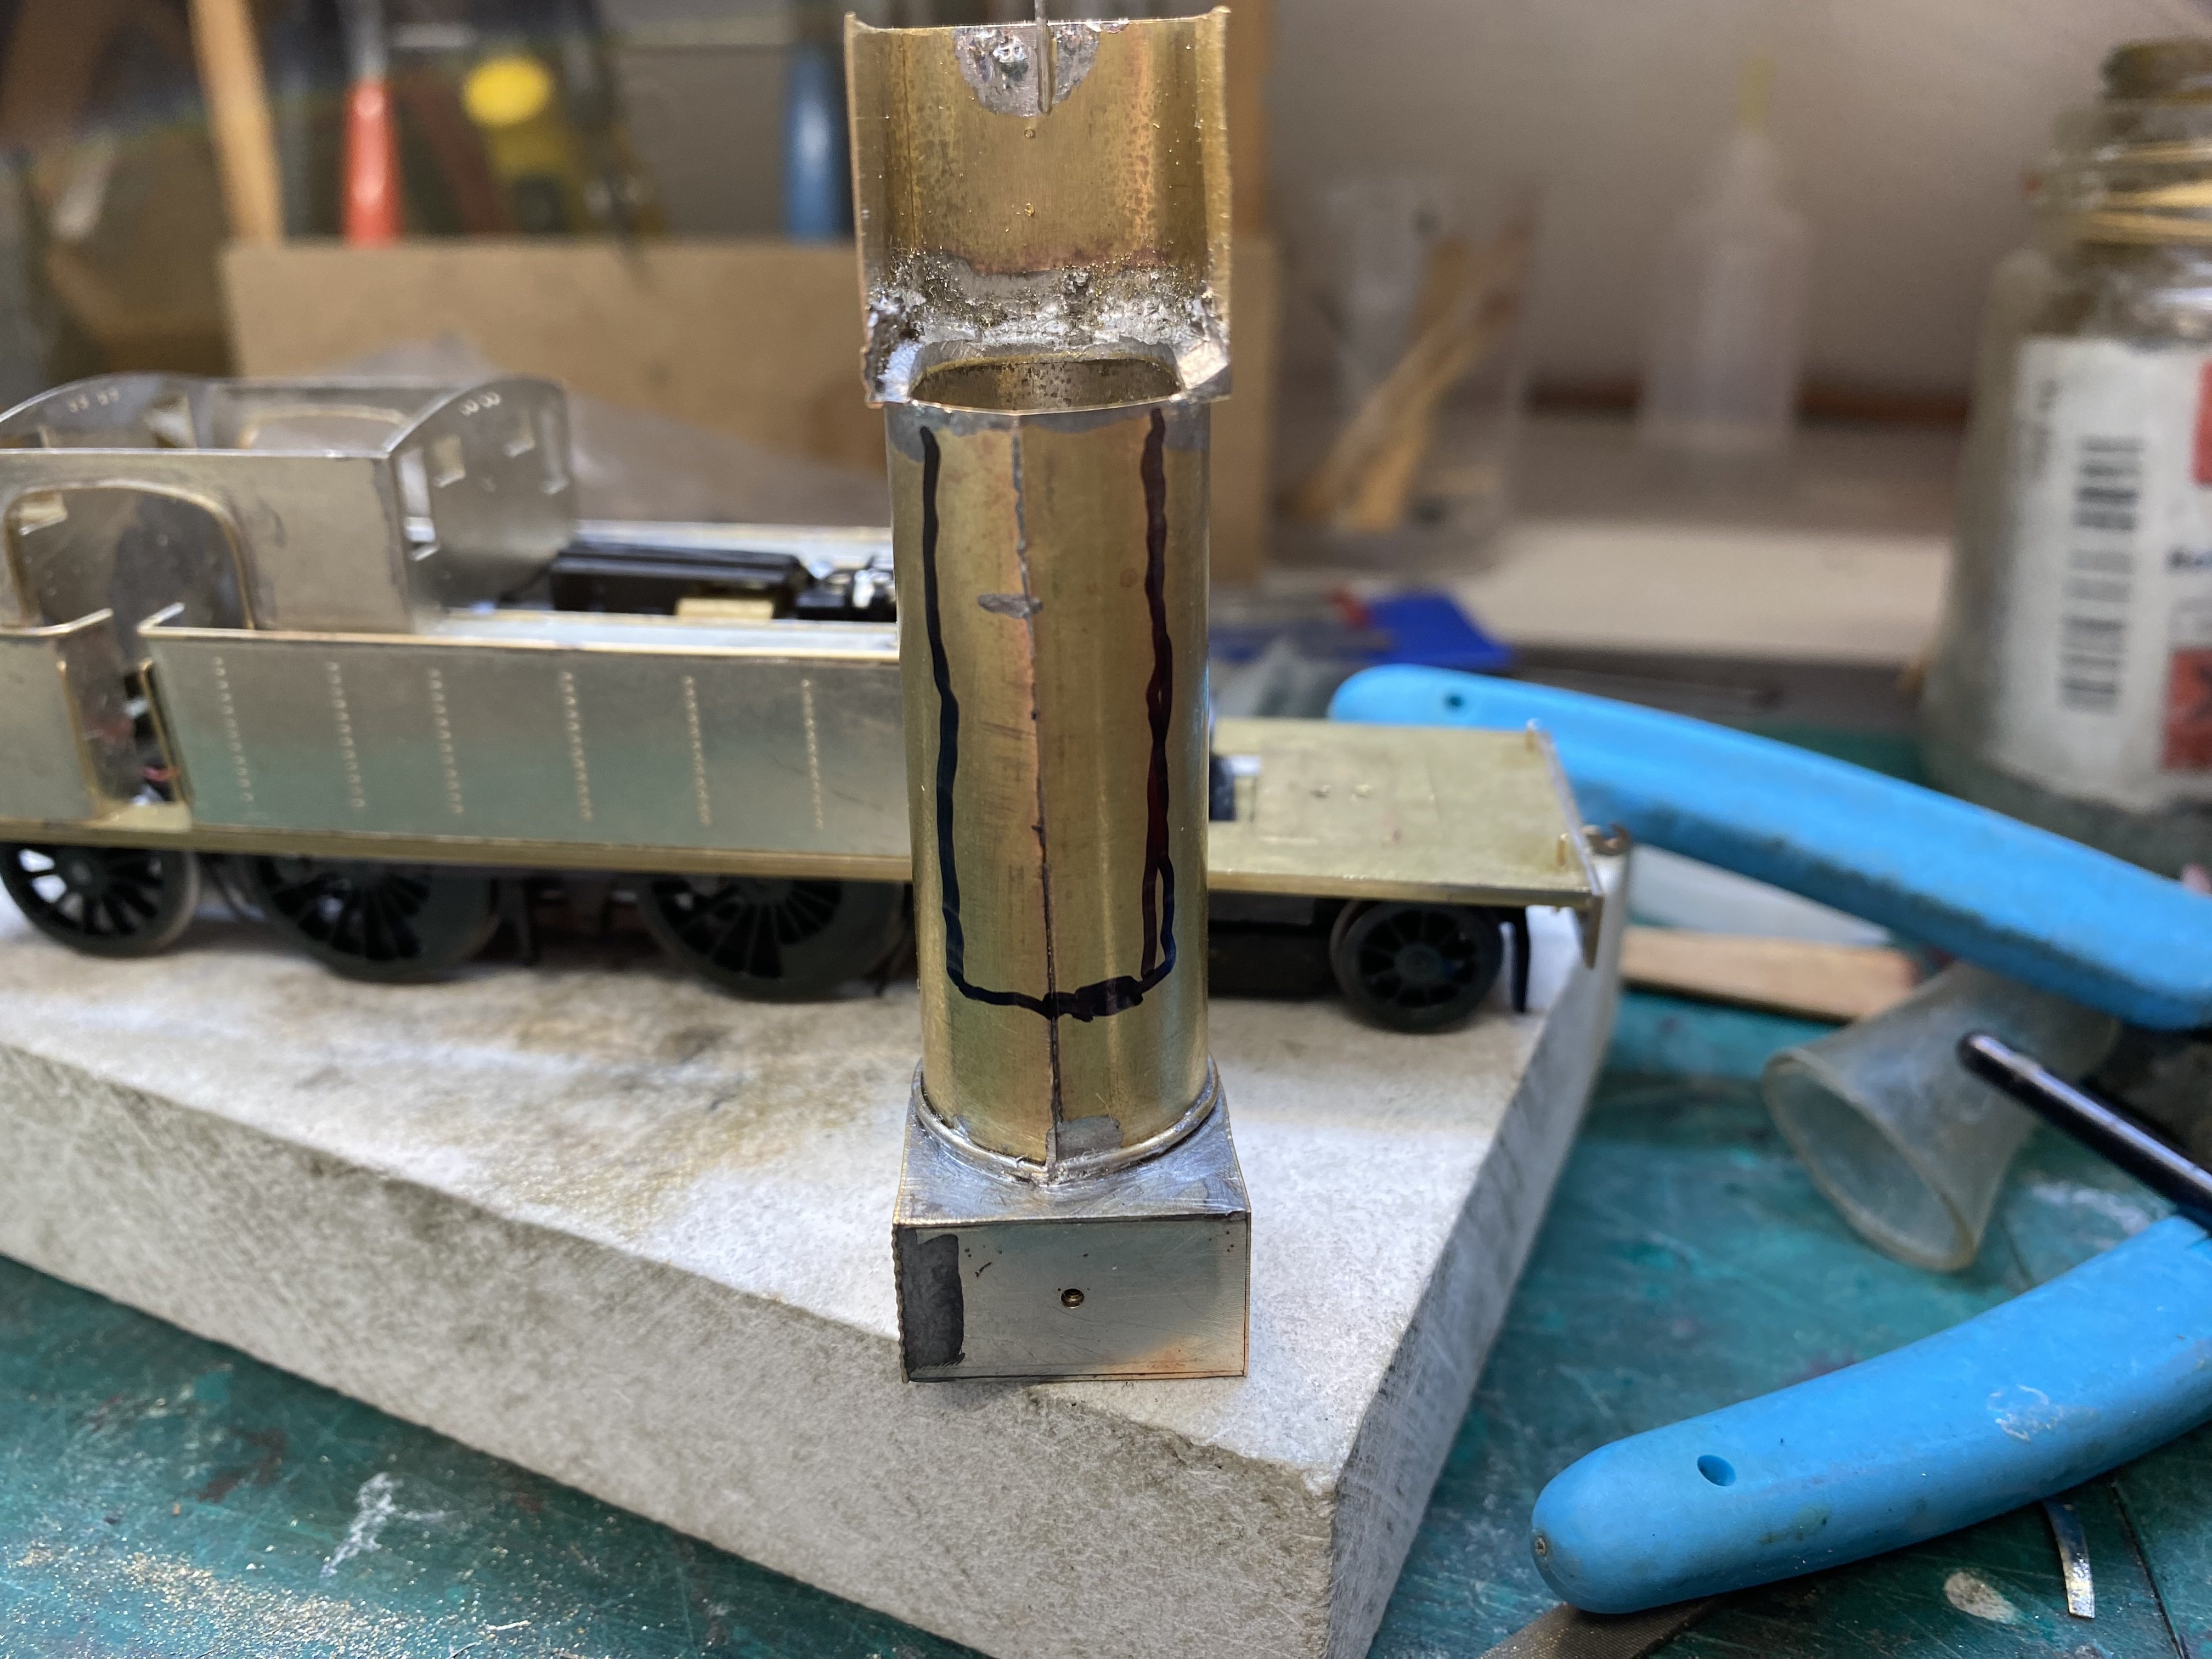
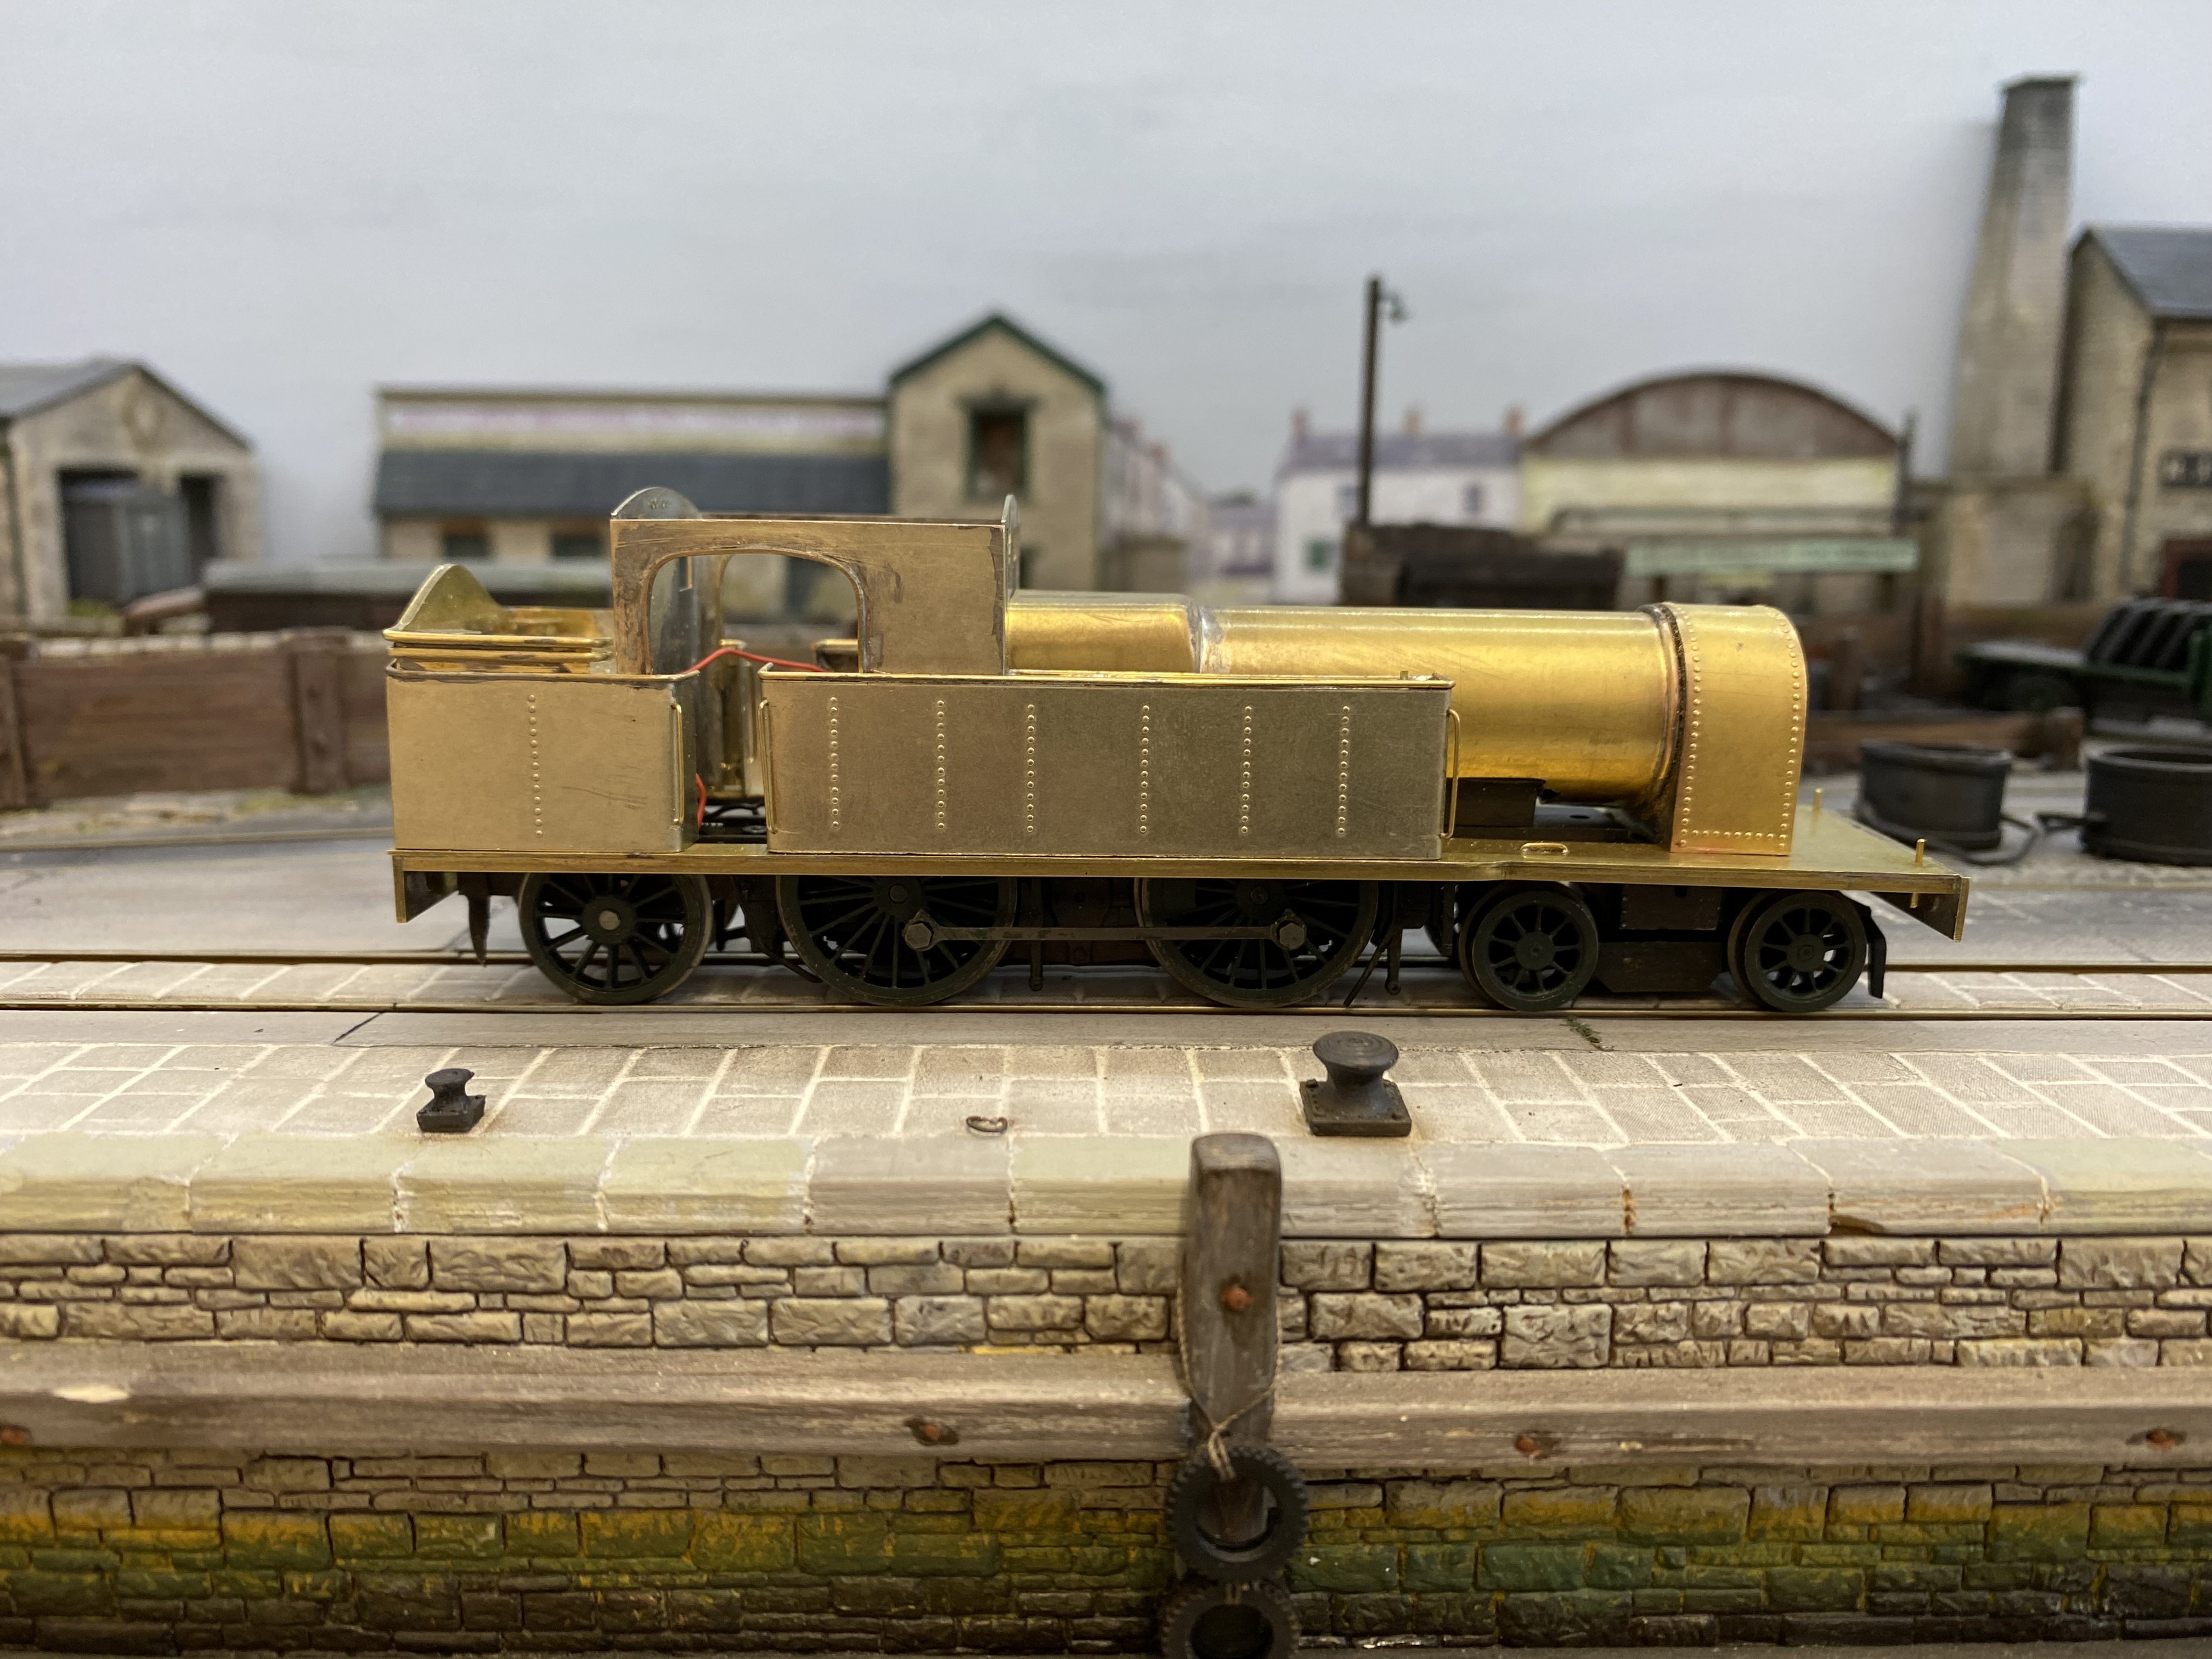
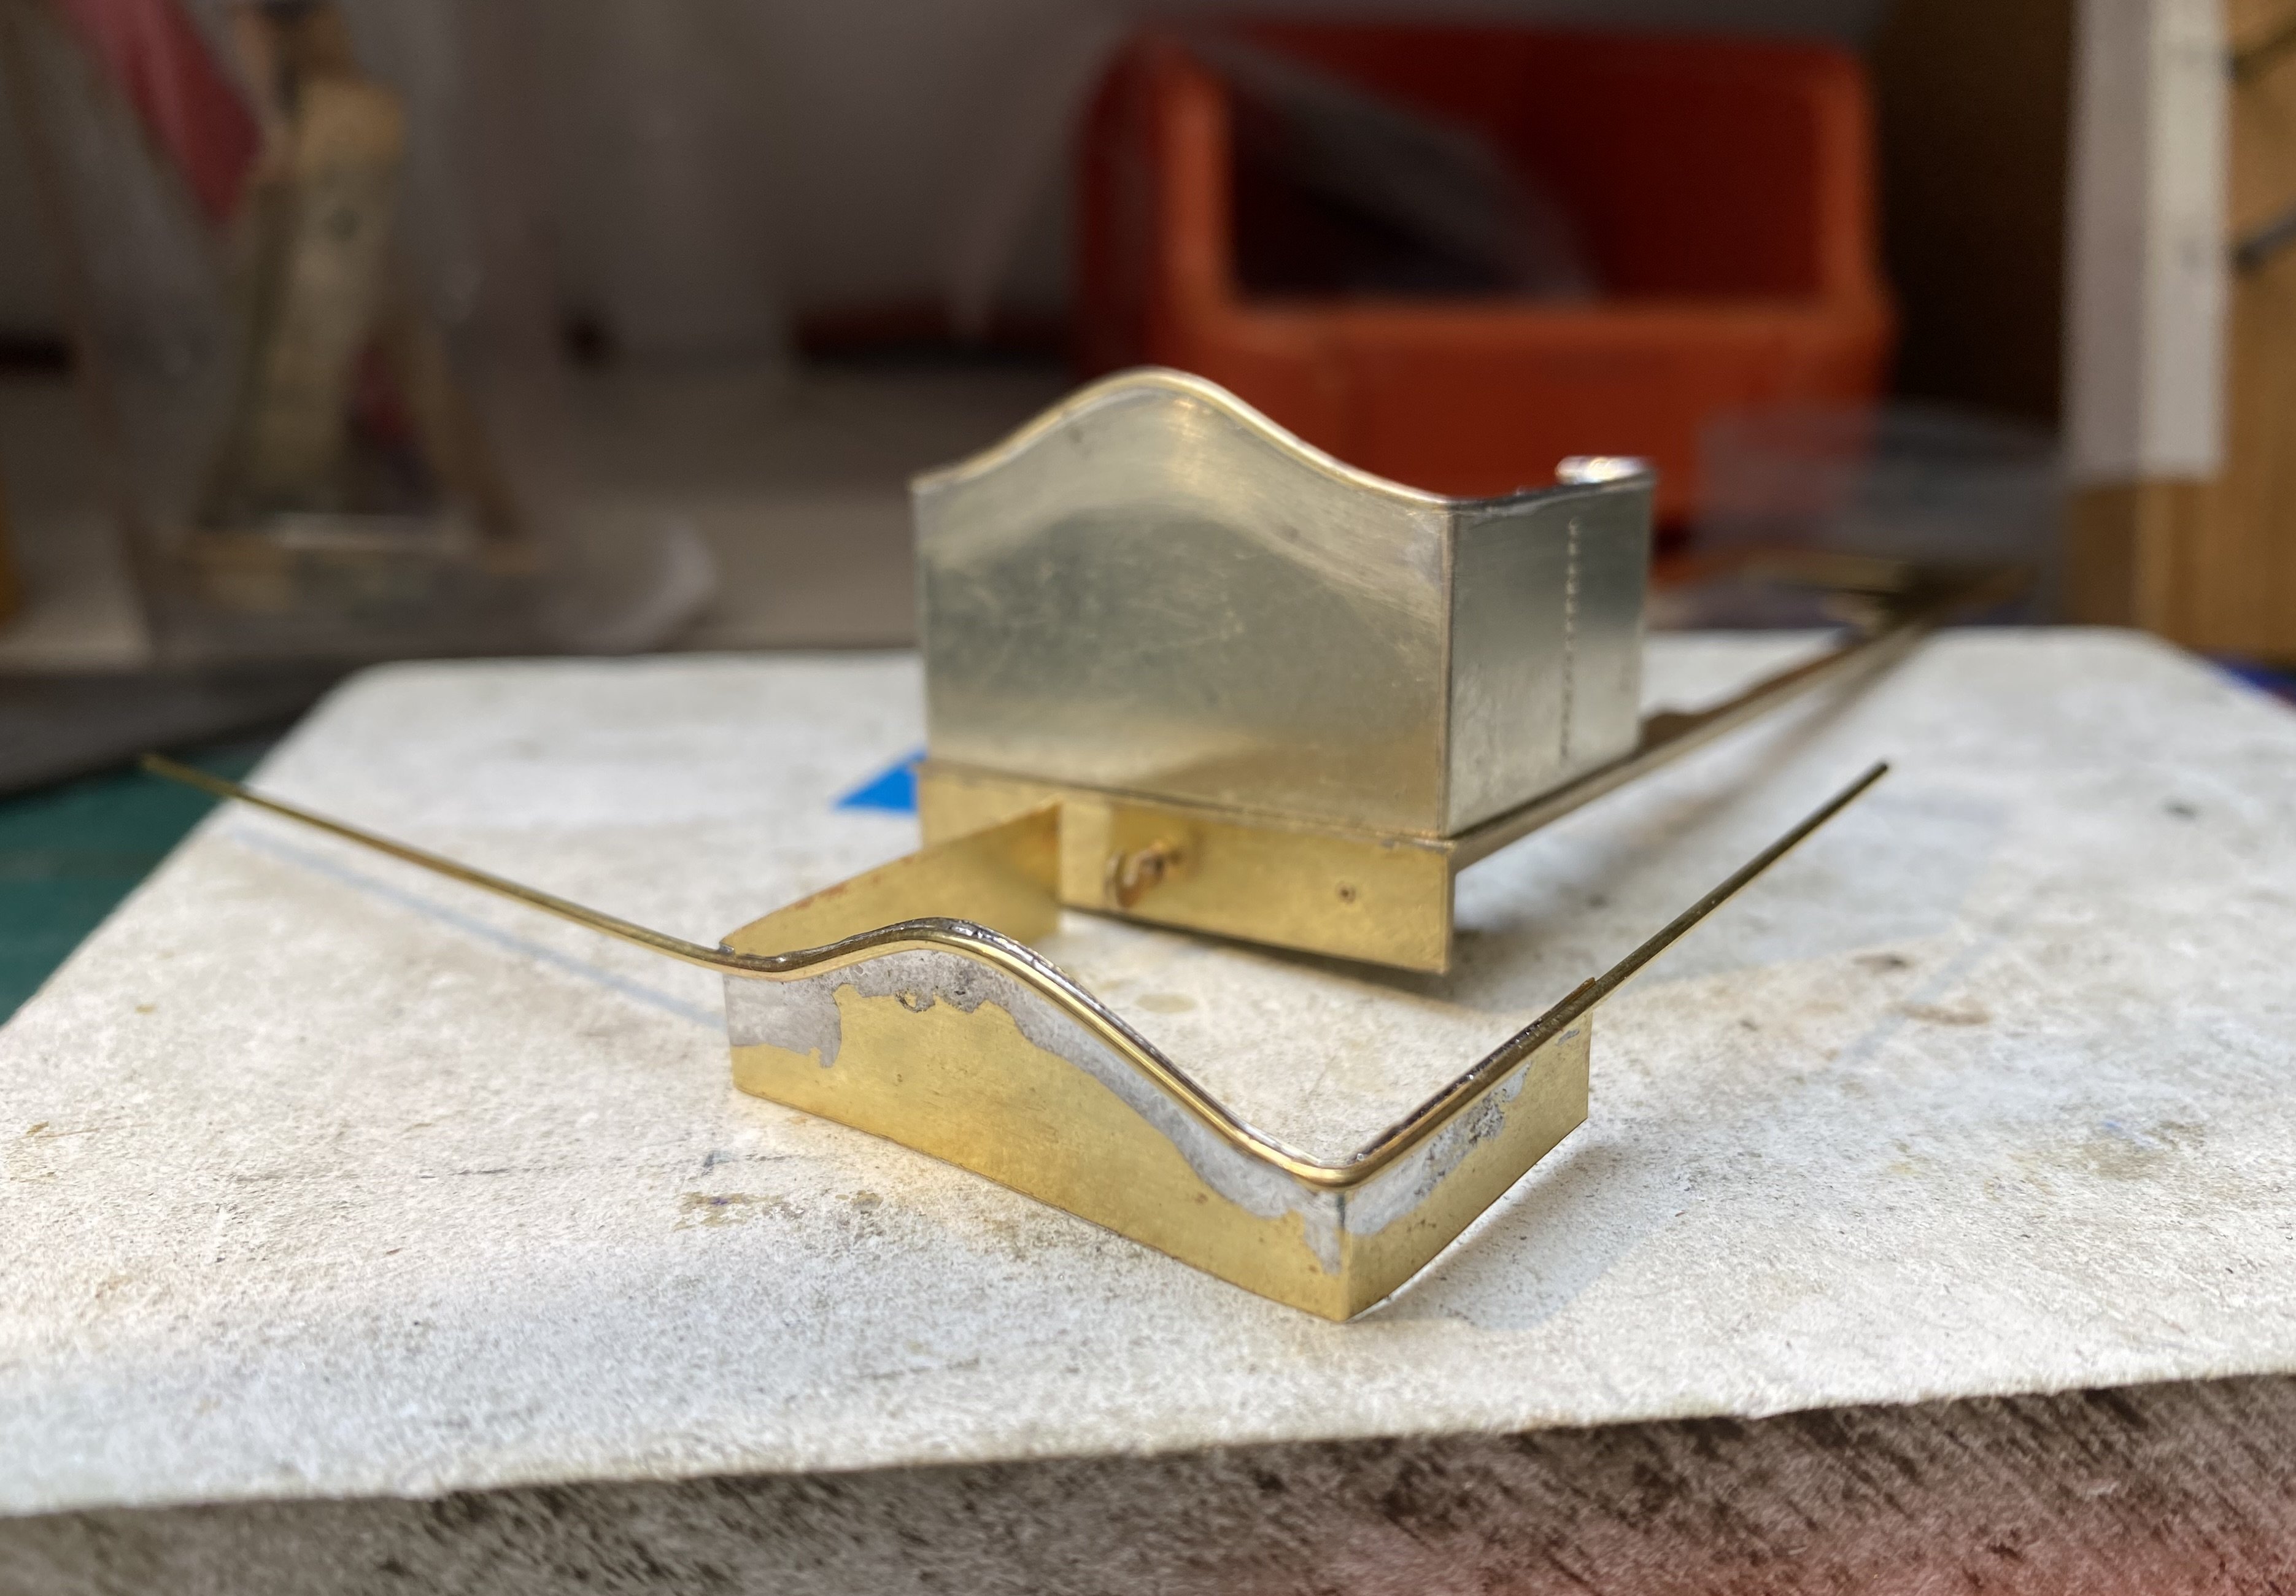
Still making progress despite the usual scratch-building shenanigans - boiler too long, then boiler set too high, then lowered boiler fouling wheels. Among other things. I rolled the boiler (10 thou brass) before adding the tank tops so I knew how much space would be needed between them. Having the boiler also allowed me to get the firebox (more 10 thou brass) the right width to match. This has plumber's solder puddled inside the joint to give some meat for filing its curves. Tank tops, fitted and soldered to the cab front. 0.45mm and 0.7mm brass rod for the beading. Smokebox saddle is 15 thou nickel silver with a captive nut in its baseplate. Smokebox wrapper is 10 thou brass. The boiler had to have a very large hole hacked in it to clear the rtr chassis, even bigger than this in the end. Beginning to look like a locomotive at last. The chassis will need some TLC. It's full of brass filings Alan

- 641 replies
-
- 13
-

-

-
Regarding sprung buffers, I would echo the comments above. They can ease things on curves and prevent the derailing that can happen when rigid buffers clash. I fit my scratch builds with sprung buffers from Alan Gibson and always try to make them work. I've lost a lot of springs to the carpet monster though...
-
Sending my hopes and best wishes to you and your family John for recovery and a calmer time ahead. Alan
-

Driving Wheel availability (4mm scale Irish steam locos)
Tullygrainey replied to Mol_PMB's question in Questions & Answers
It's a worry isn't it. I'd hate to think we'd have to give up kit or scratch building because we can't get wheels any more, not to mention all those other little details that are difficult to make from scratch like buffers, chimneys, domes, axle boxes and so on. We might have to find a new hobby I'm no good at knitting and jigsaws don't really hold my attention. -
Driving Wheel availability (4mm scale Irish steam locos)
Tullygrainey replied to Mol_PMB's question in Questions & Answers
Not much to choose between them, quality wise, I would say. The Sharmans have the advantage of coming with the crankpins already moulded in. The Gibsons have a hole pre-drilled and the crankpins cut their own thread as you screw them in. There's always the risk of them not going in square, at least when I'm doing them Sharmans on this little RSH shunter.
-
Driving Wheel availability (4mm scale Irish steam locos)
Tullygrainey replied to Mol_PMB's question in Questions & Answers
Your assessment of the supply situation for 4mm wheels is about right in my experience. Markits are unavailable either directly or from secondary suppliers like Wizard or Roxey Mouldings as their supplies run out and Ultrascale lead times are extremely long. I did manage to get some Sharman wheels from Phoenix Paints who bought the tools to make them but their stocks are running out now and they don't intend to do any more production runs because the tools are worn out. Alan Gibson seems to be almost the only reliable source left now. I've nearly always used Gibson wheels for my steam loco builds and I buy them directly from Gibsons. I find their service reliable and I've never had any difficulty getting what I need from them - my last order was October 2024 so things might have changed since then regarding availability. Delivery times can vary a bit depending on whether or not things are in stock at the time of ordering but I've never had to wait an unduly long time for anything. I'm no expert on wheel profiles but I think the Gibson flanges are small enough for Code 75 track. Alan
-
White metal kits are pretty challenging to build so I'd advise caution. As Eoin says above, you need low melting point solder and it's very easy to melt the metal while trying to solder it. Even with a temperature controlled soldering iron, I've managed to vaporise white metal parts all too often. Brass and nickel silver are a good deal more forgiving and, to echo Andy's comments above, you can usually undo and redo joints without much damage to the metal itself.
-
Making an ‘E’ – the Maybach Diesel Model Assembly thread
Tullygrainey replied to Mol_PMB's topic in Irish Models
What a little beauty. Wonderful work! -
Oh yes! One to be proud of David. It really looks the business. I can appreciate how challenging it is to build outside frames and cranks so more power to your soldering iron. And that chimney and that dome are mini masterpieces. I’ve enjoyed watching it all take shape.
-
All the above is sound advice, especially the recommendation to start simply. Building any etched kit is challenging when you first attempt it. Be prepared to make mistakes and get things wrong but don't be discouraged. Hang in there and it will come good. It's all part of the learning process and we all have failed projects in our repertoire (and in a bottom drawer). It's difficult to generalise about London Road Models kits. As you can see from their website, the catalogue includes kits designed and originally marketed by many different people, some a considerable time ago. However, LRM has updated and improved them in line with developments along the way so you can be sure they are all of serviceable quality. The only LRM kit I built, a L&Y Barton 0-6-0 was well made and straightforward to build - at least it would have been if I hadn't been trying to convert it into a Belfast and County Down loco. Have a look at High Level Kits website. There are some very nice small engine kits there as well as chassis kits to fit under ready-to-run bodies. High Level's kits also have the best instructions I have ever seen. You can download these from the website to give you an idea of what's involved. I'd also endorse Eoin's booklist above, especially the work of Iain Rice. It was his writing that inspired me to give kit-building a go. I suspect both are out of print but second-hand copies can be found - try Abebooks. As regards tools, an exhaustive list of 'essentials' would probably break the bank! For myself, I gradually built my tool set up over time, buying things when I found I needed them. For example, I only acquired a pillar drill when I began scratch-building. Having said all that, there are a few things you'll need from the get-go, a soldering iron being the obvious one. As Mol says above a 25 watt iron will do the job and I managed without a temperature controlled one until fairly recently. It's impossible to build an etched kit without a set of broaches for opening out holes and a few needle files for fettling and tidying up so I'd recommend those as essentials. In general, buy the best you can afford. Welcome to the community of modellers with burnt fingertips. It can be a frustrating activity but it's also hugely satisfying. Good luck with whatever you decide to do. Alan
-
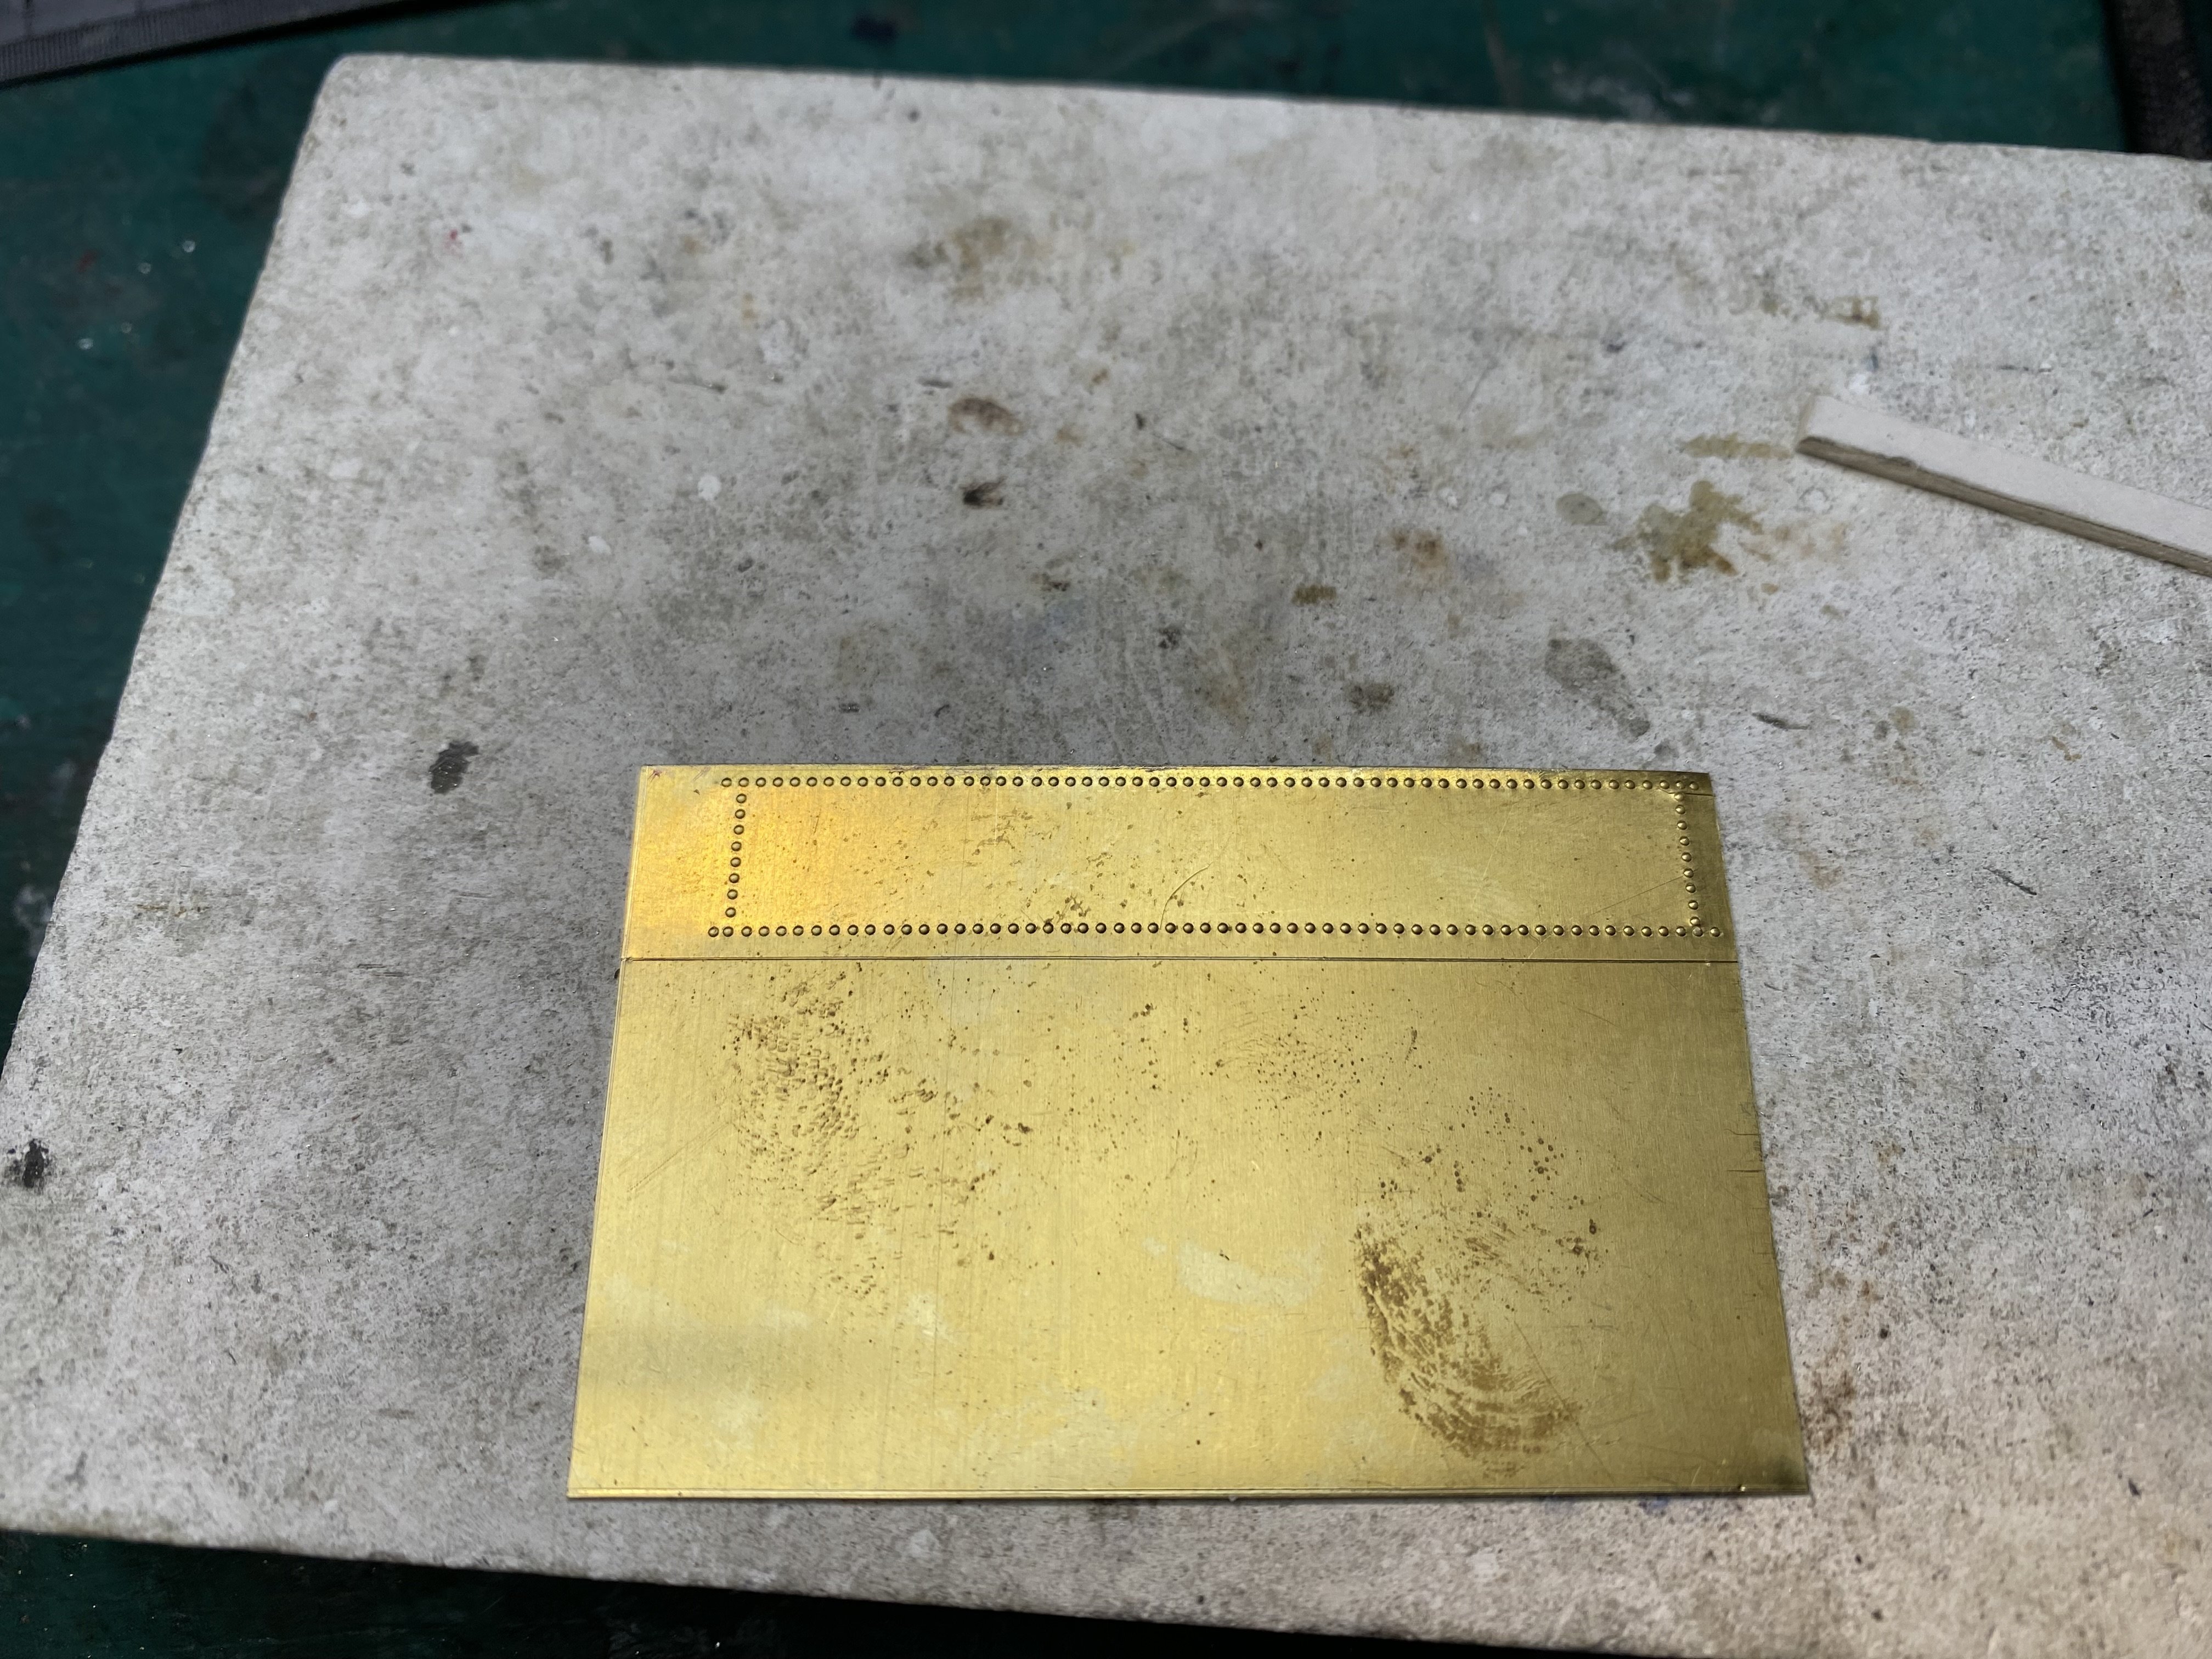
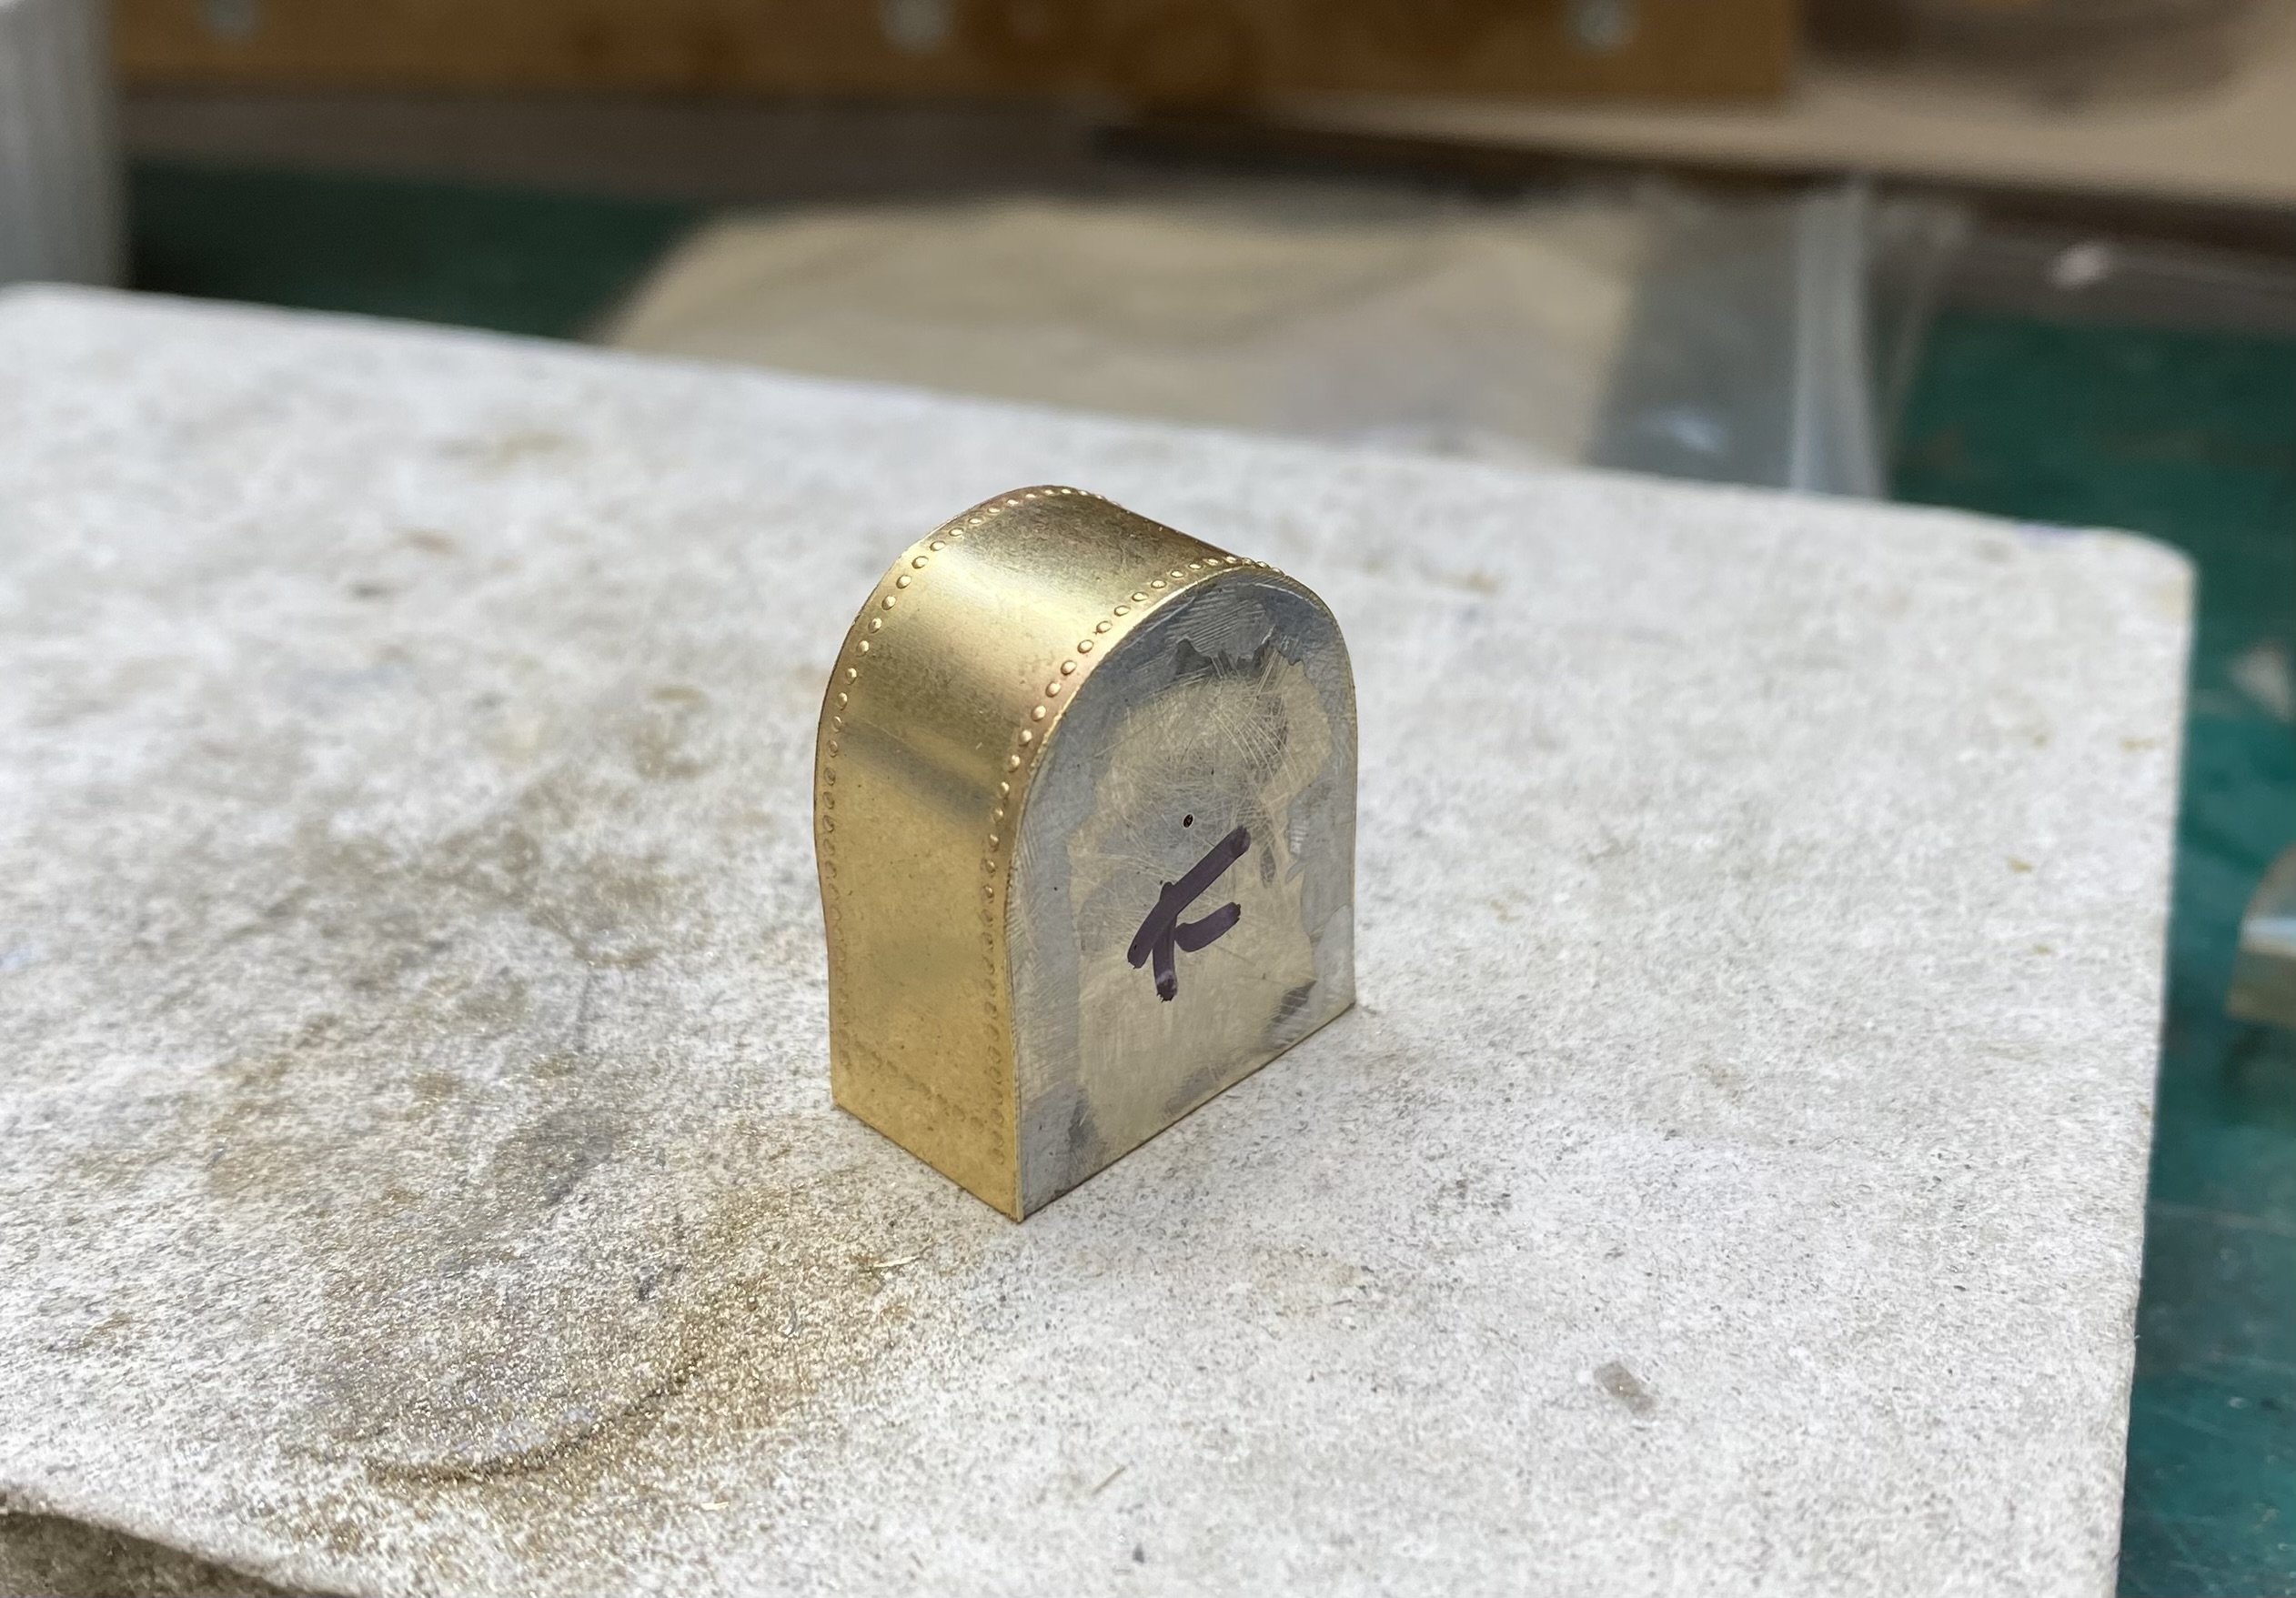
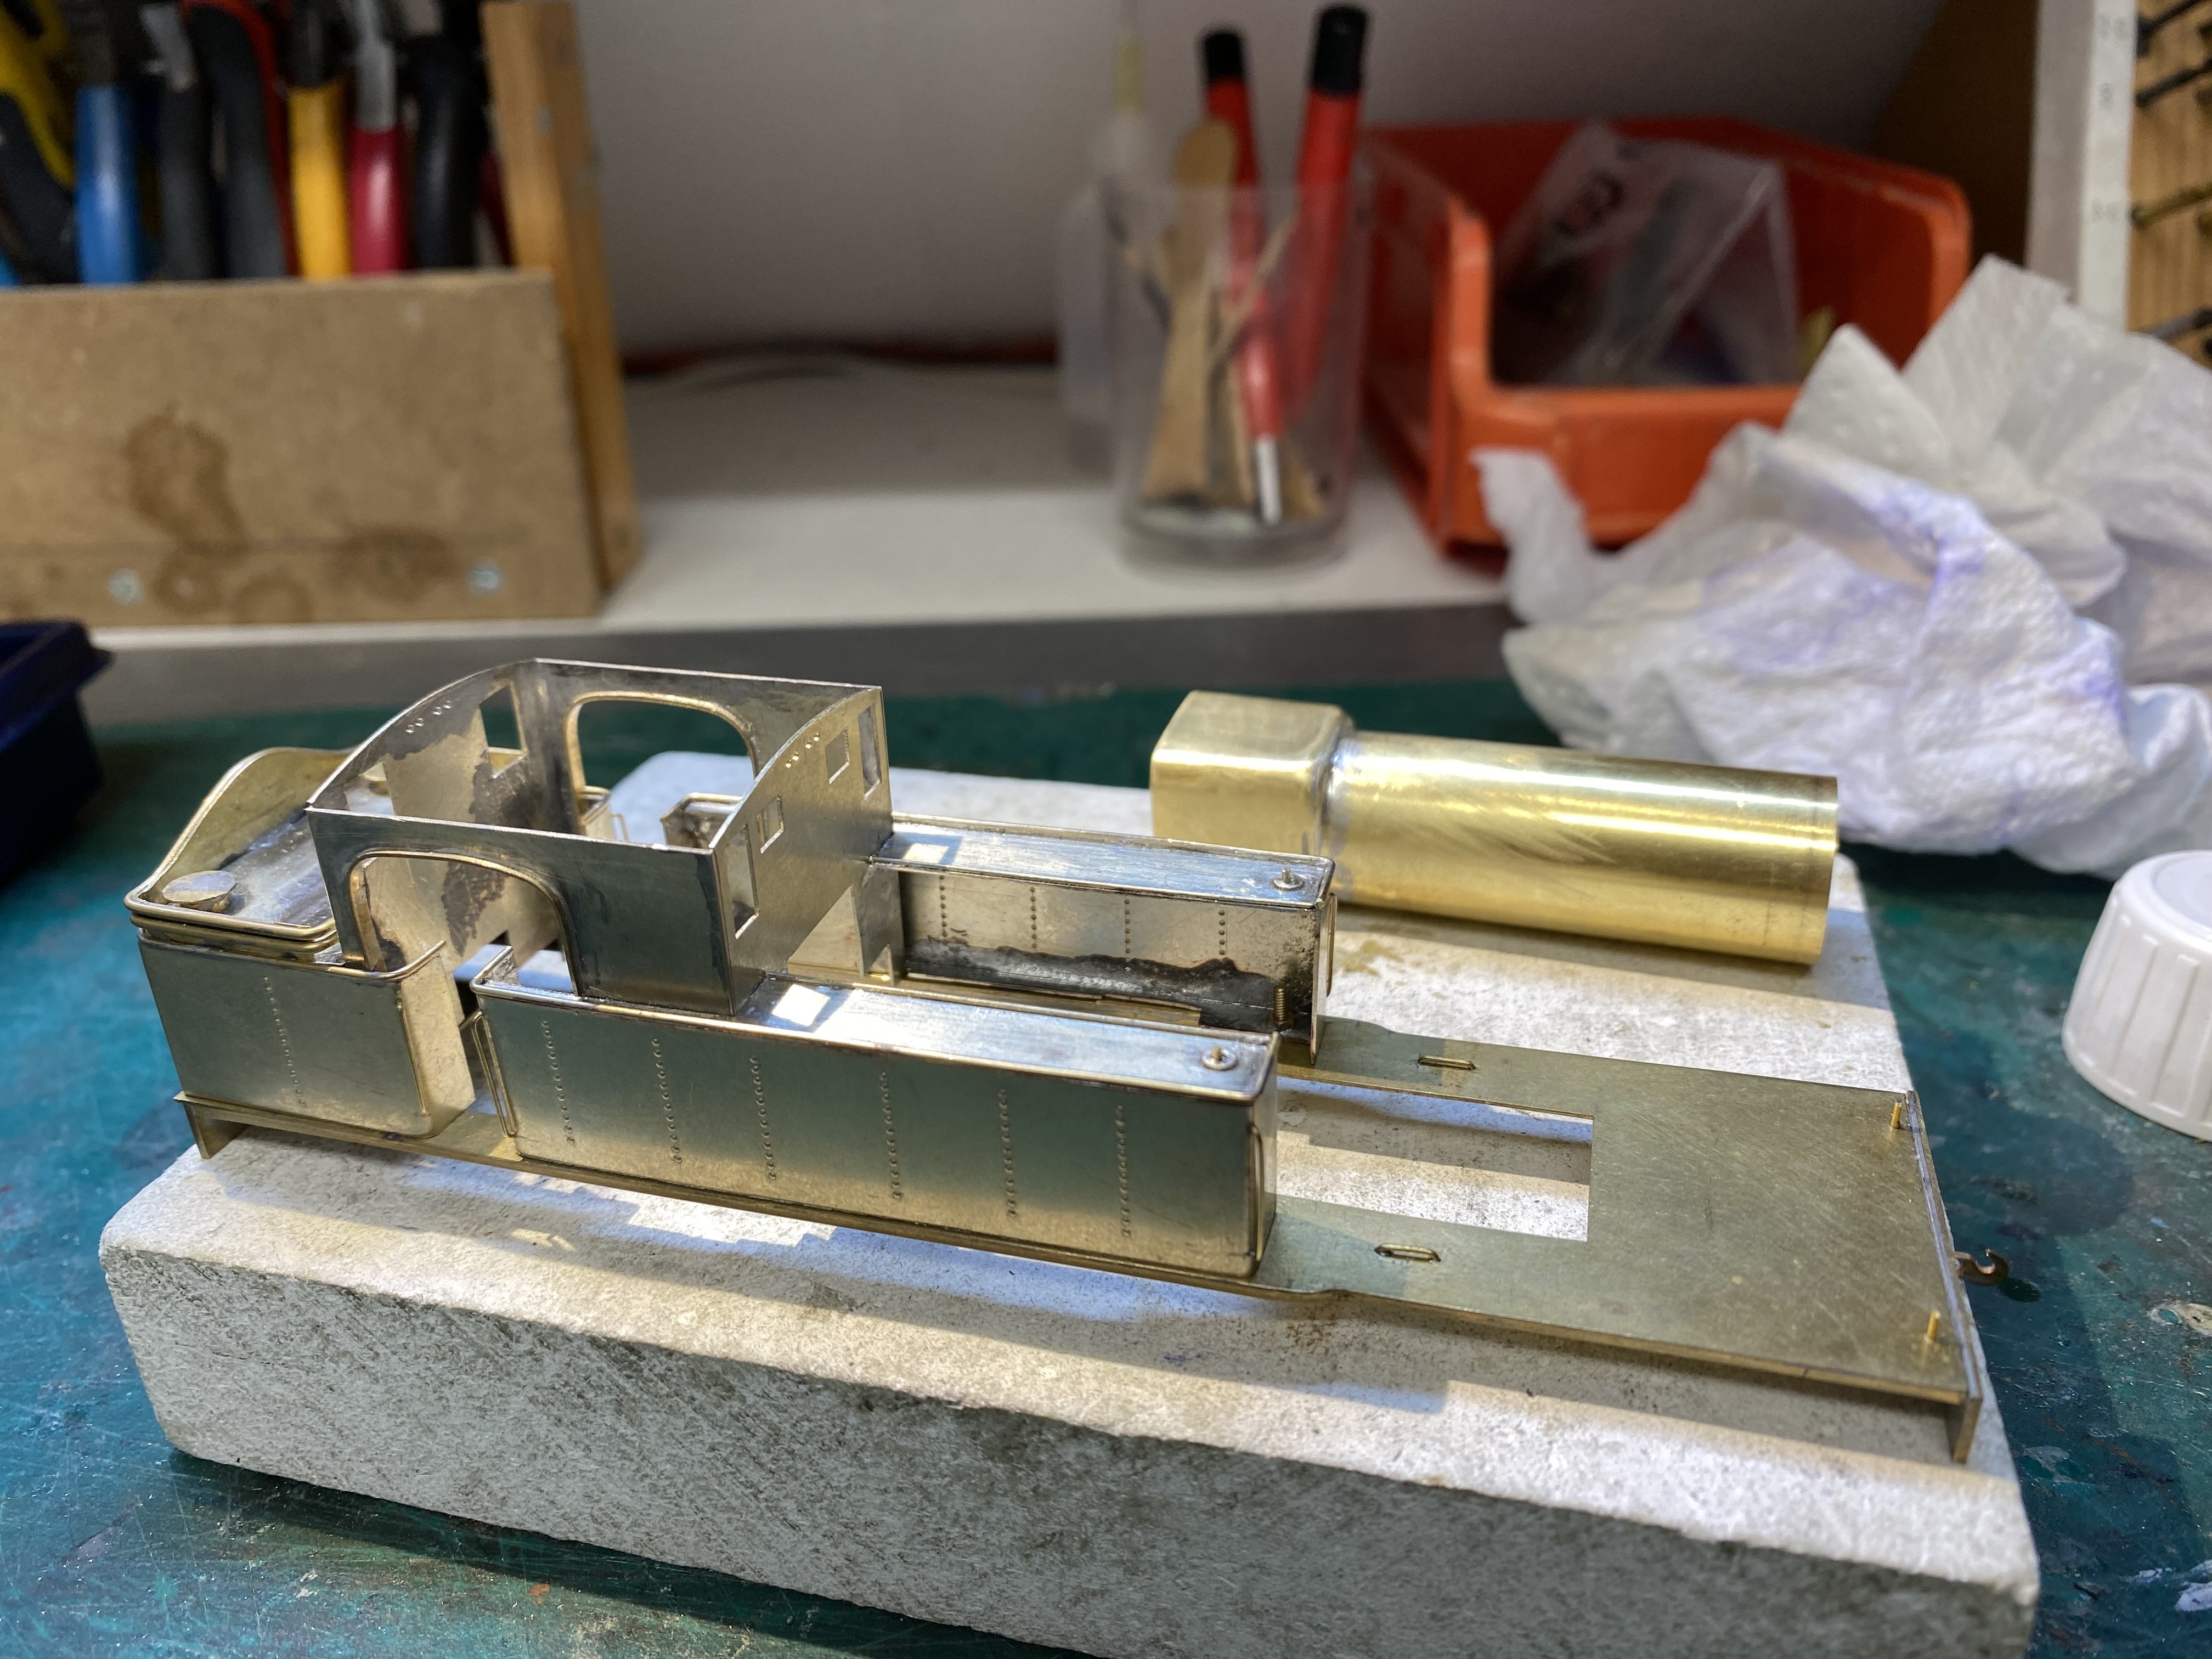
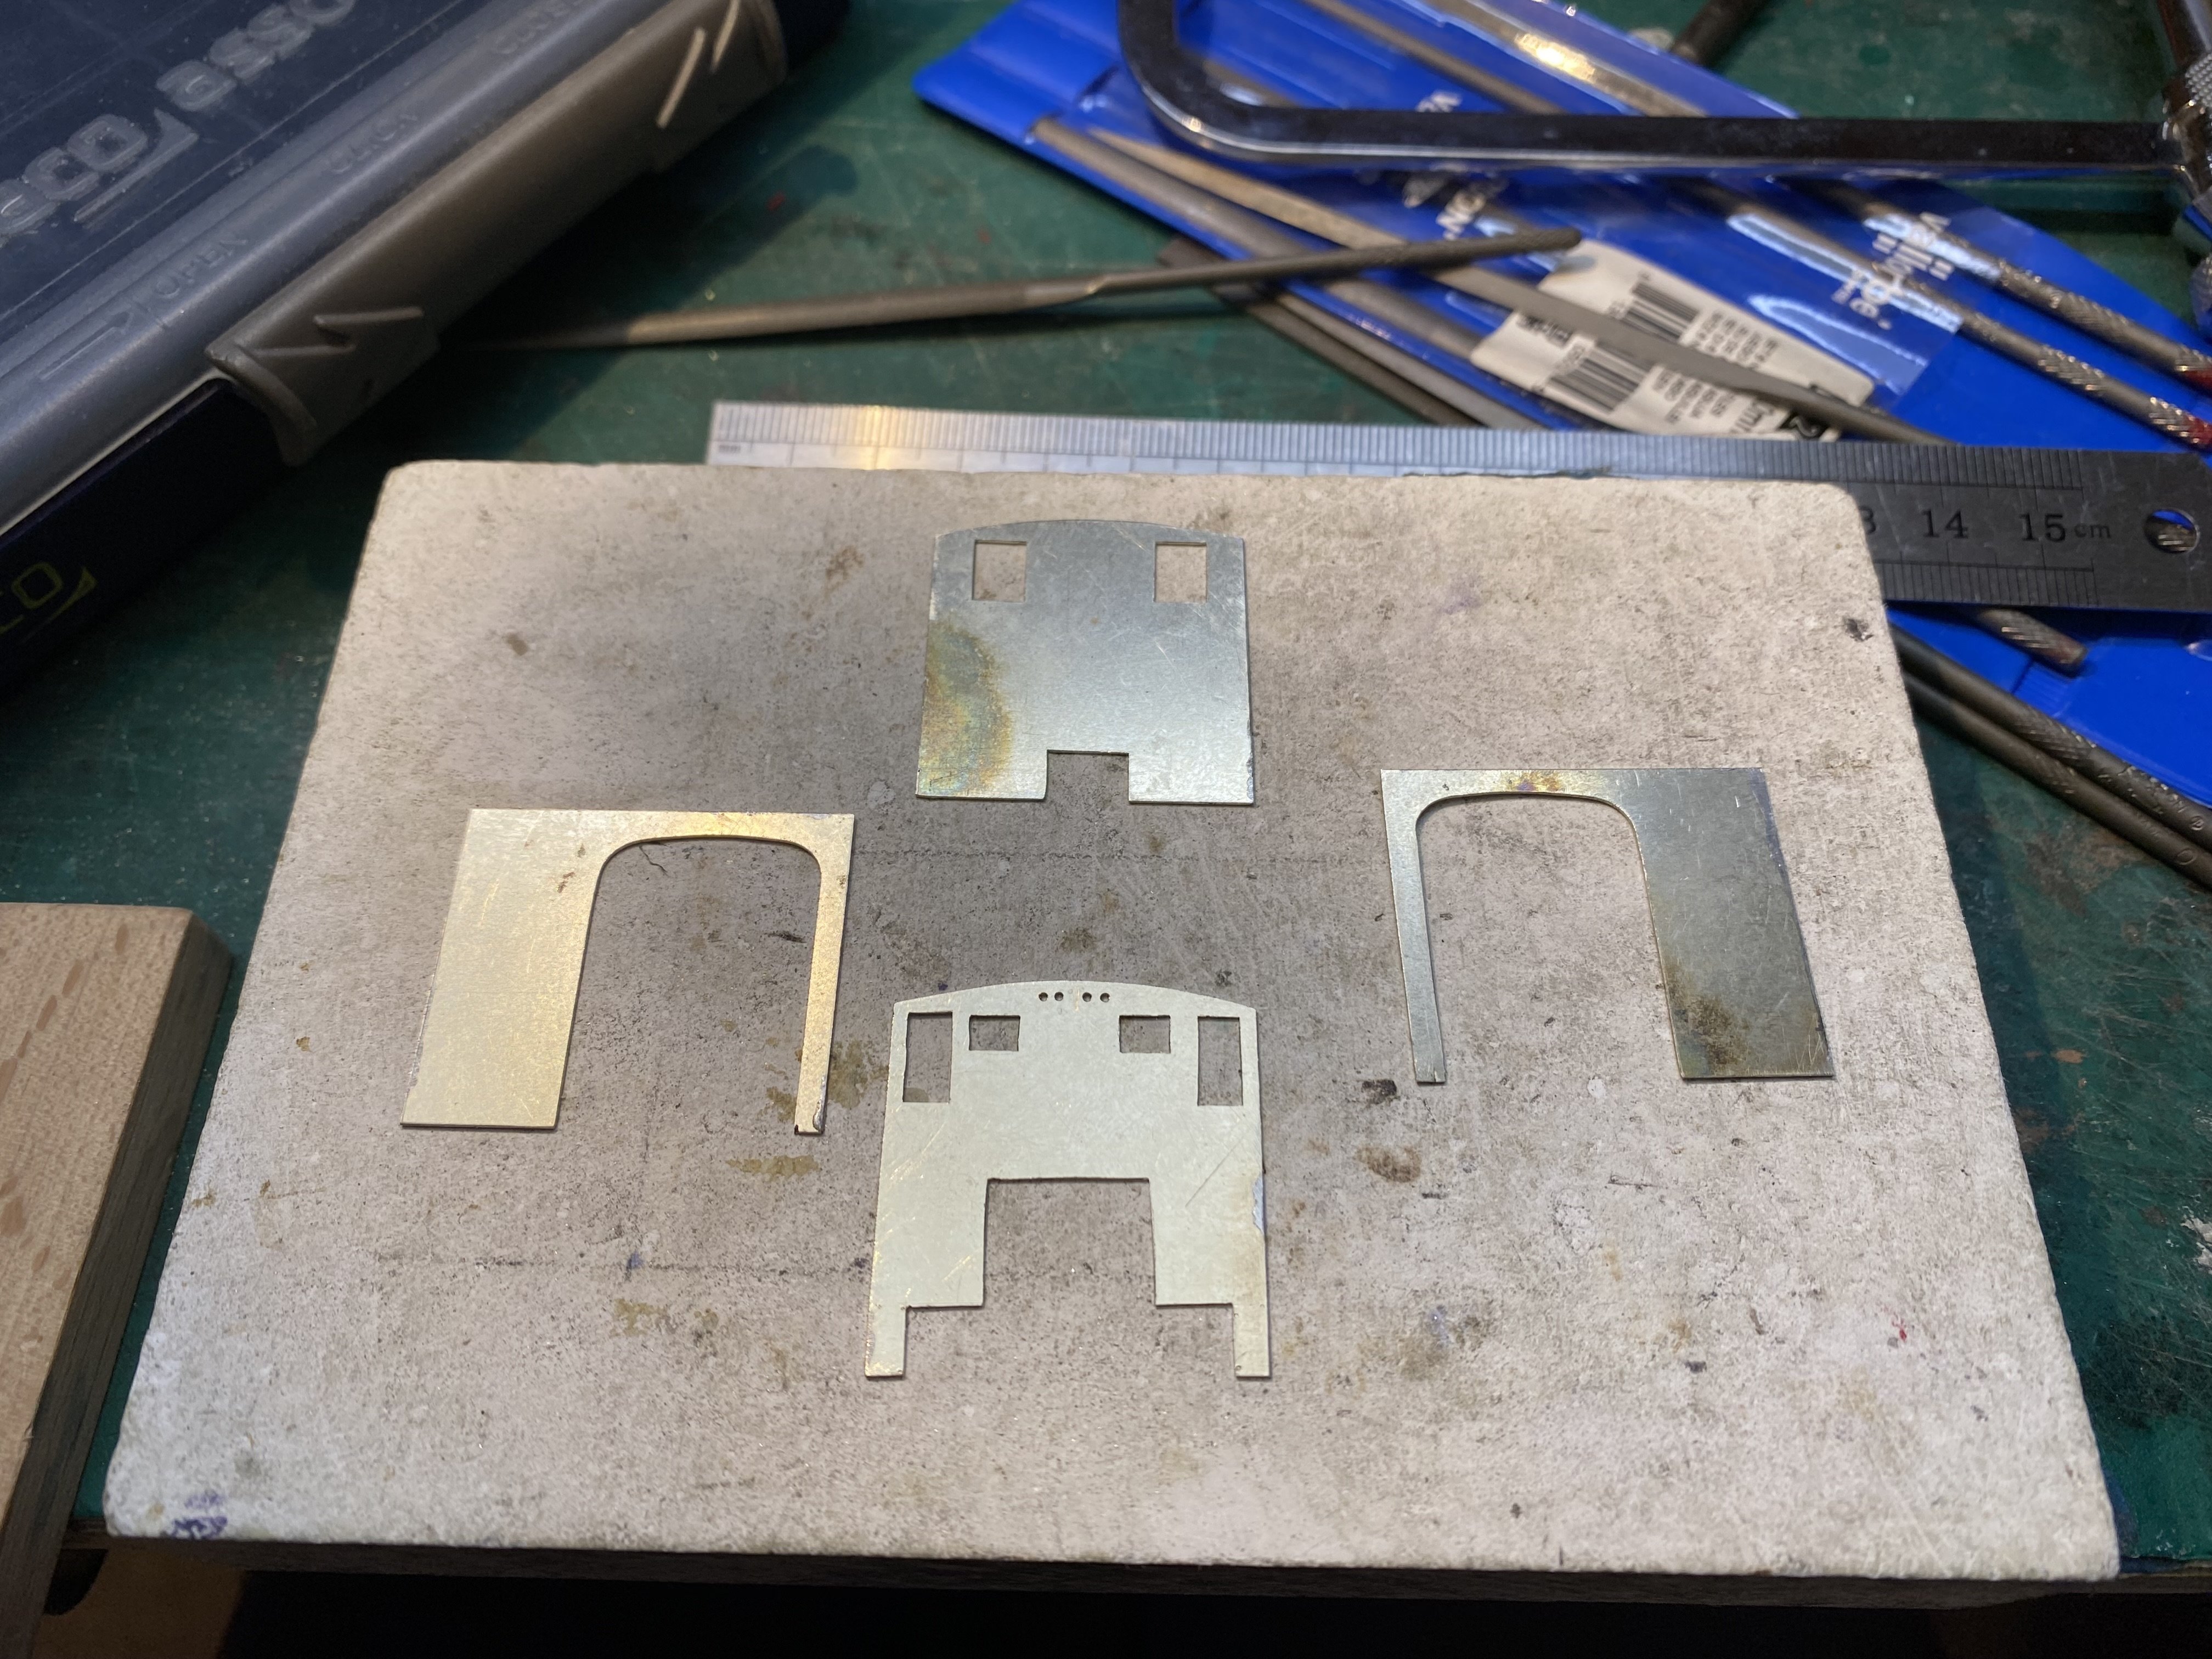
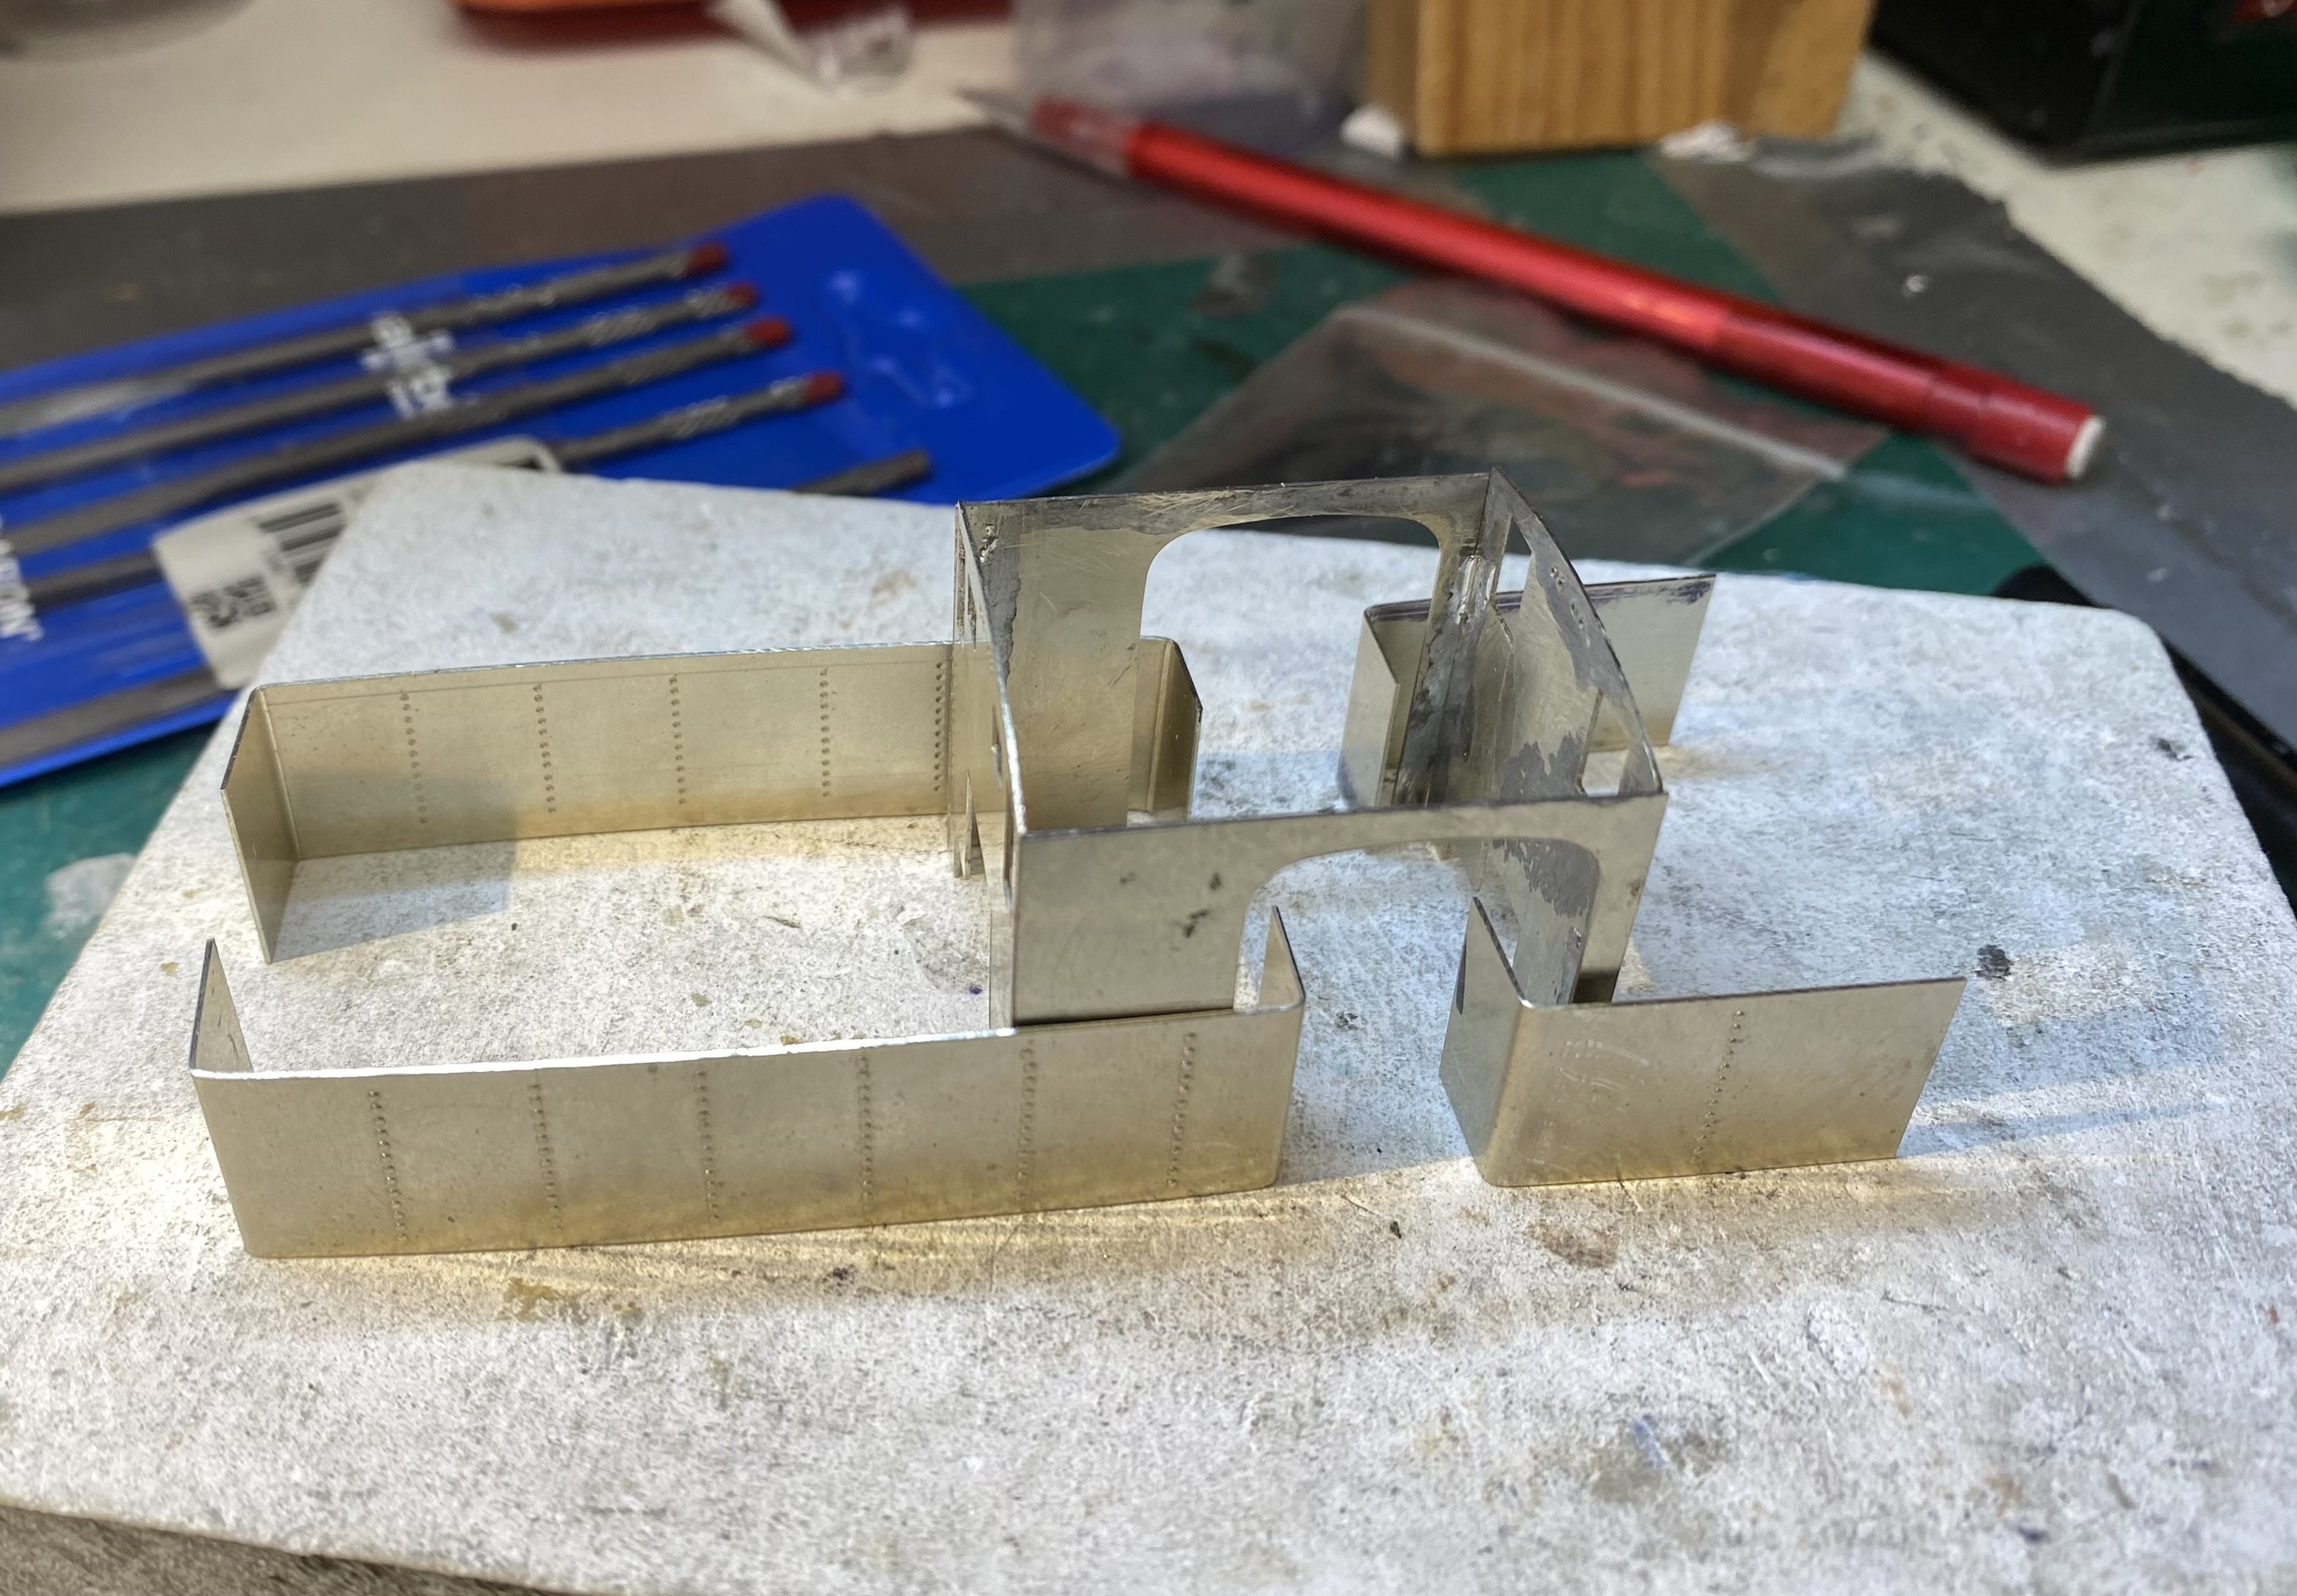
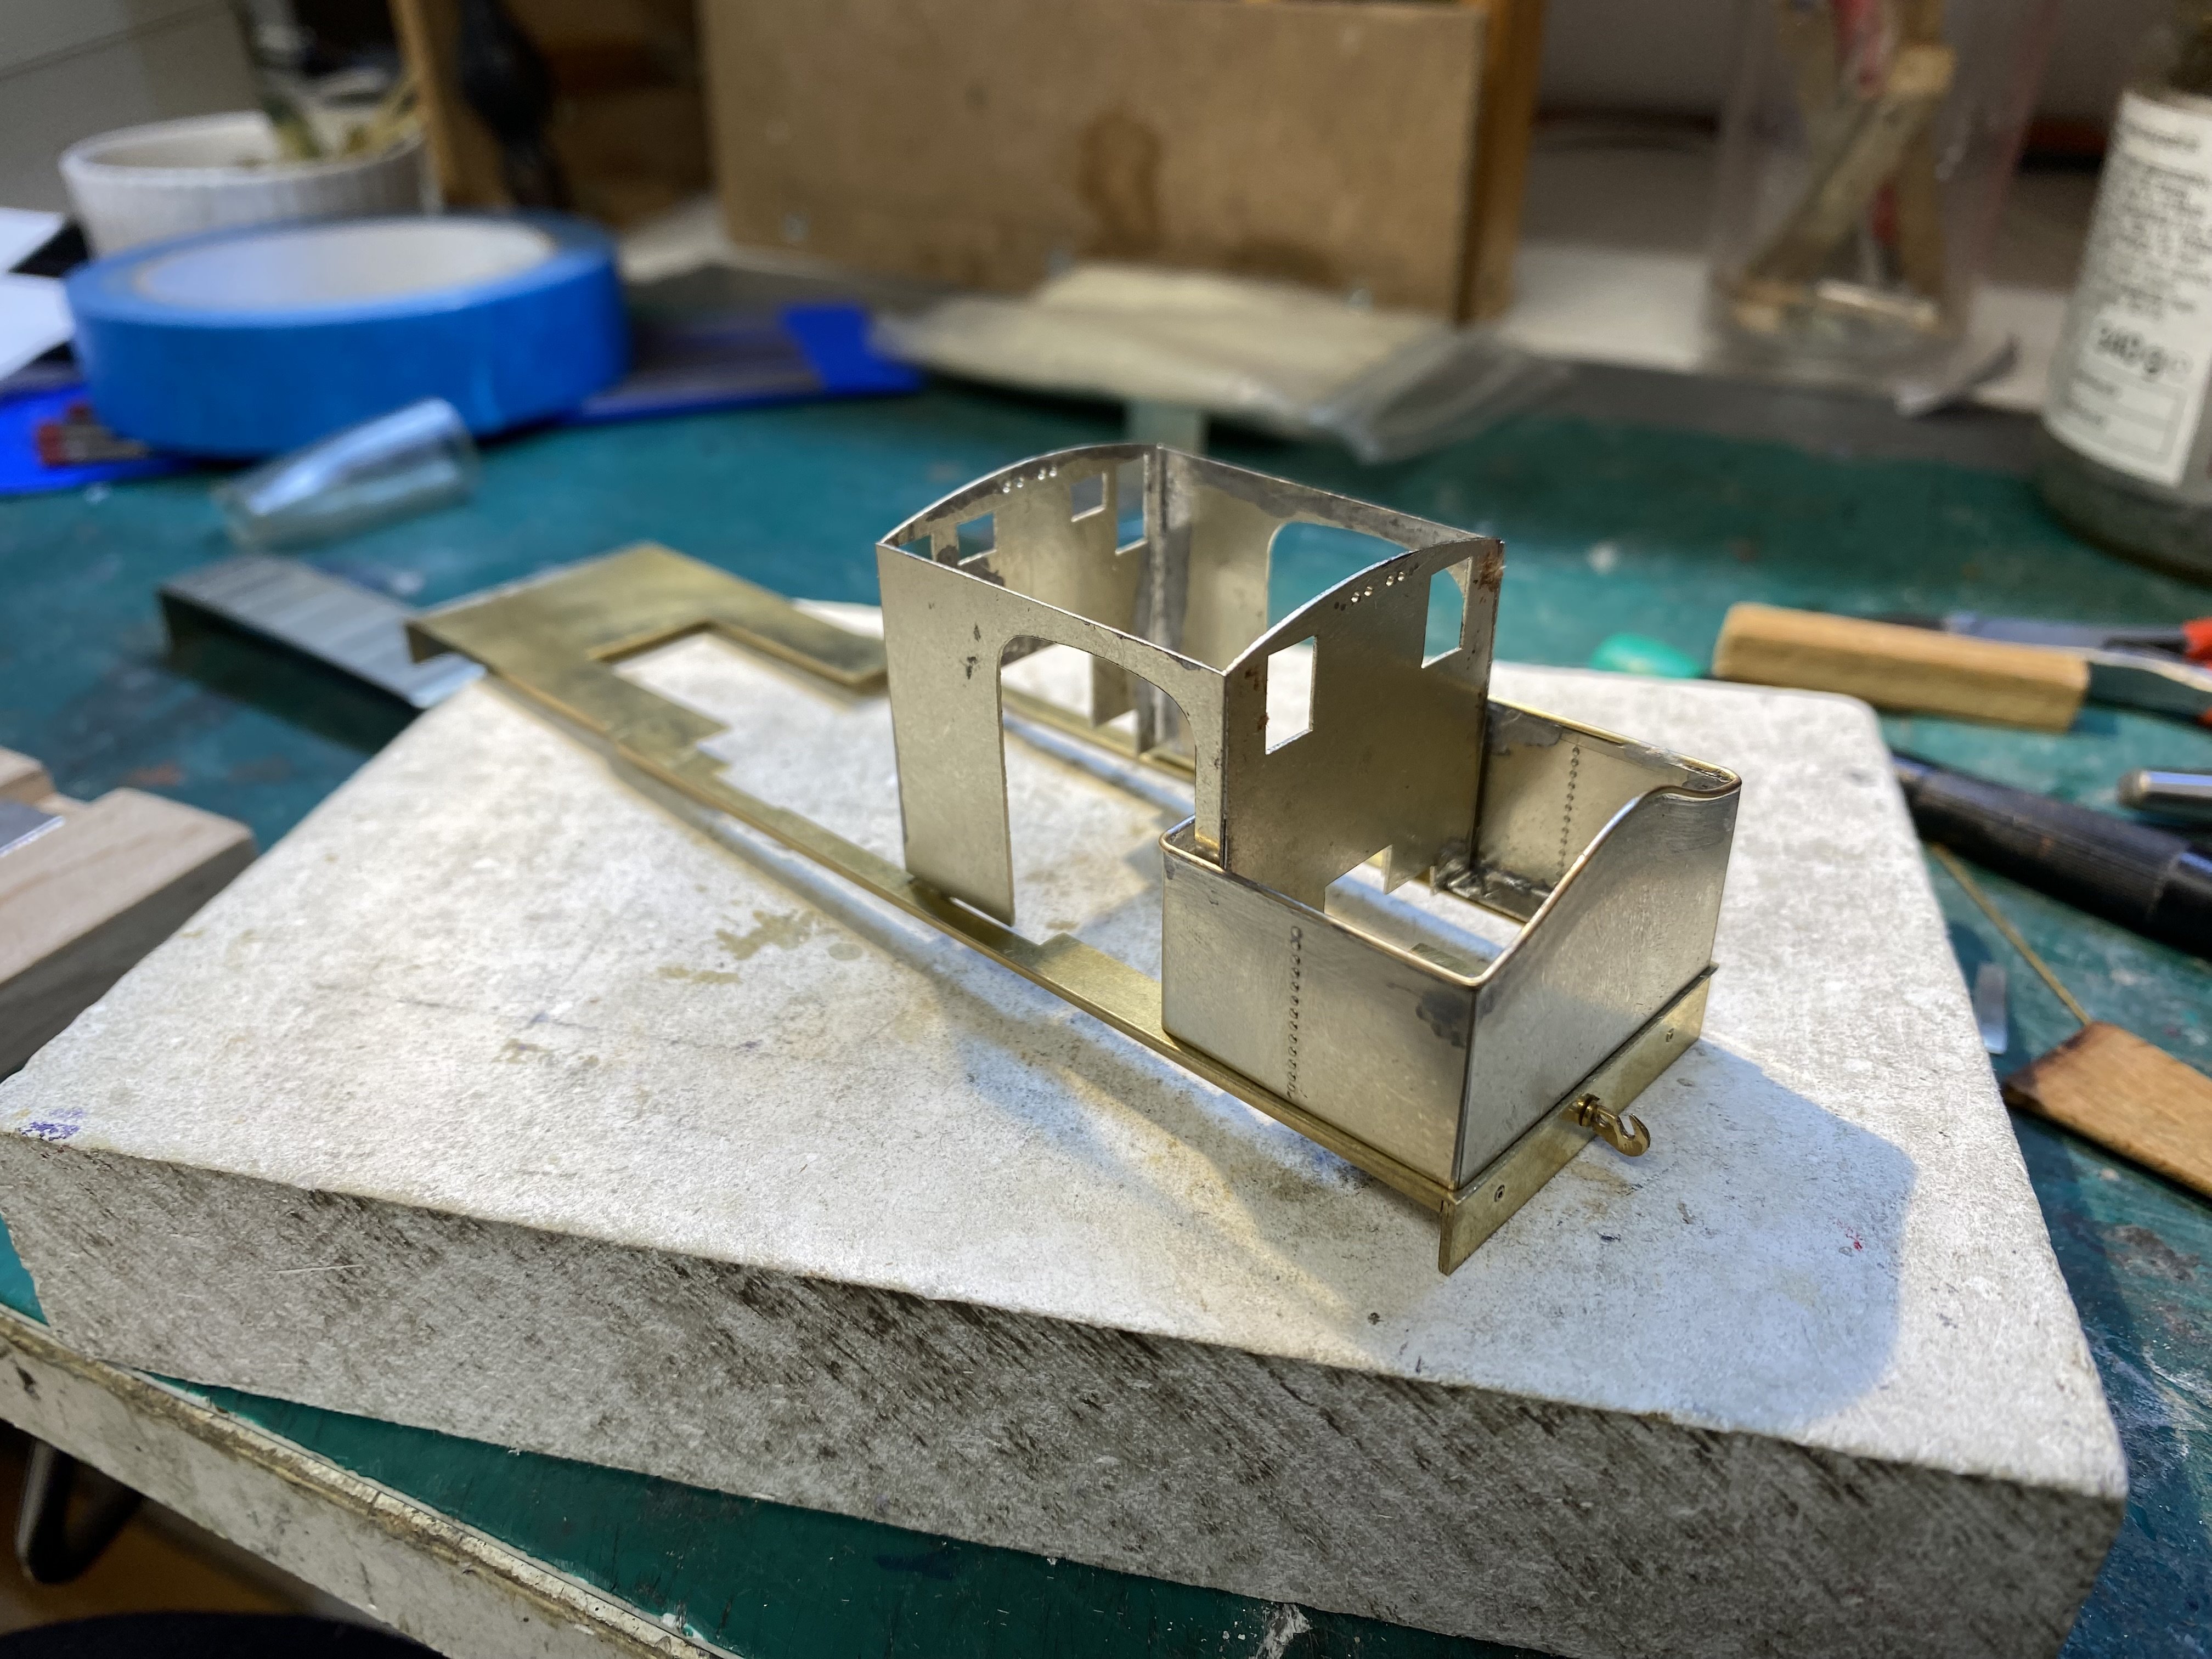
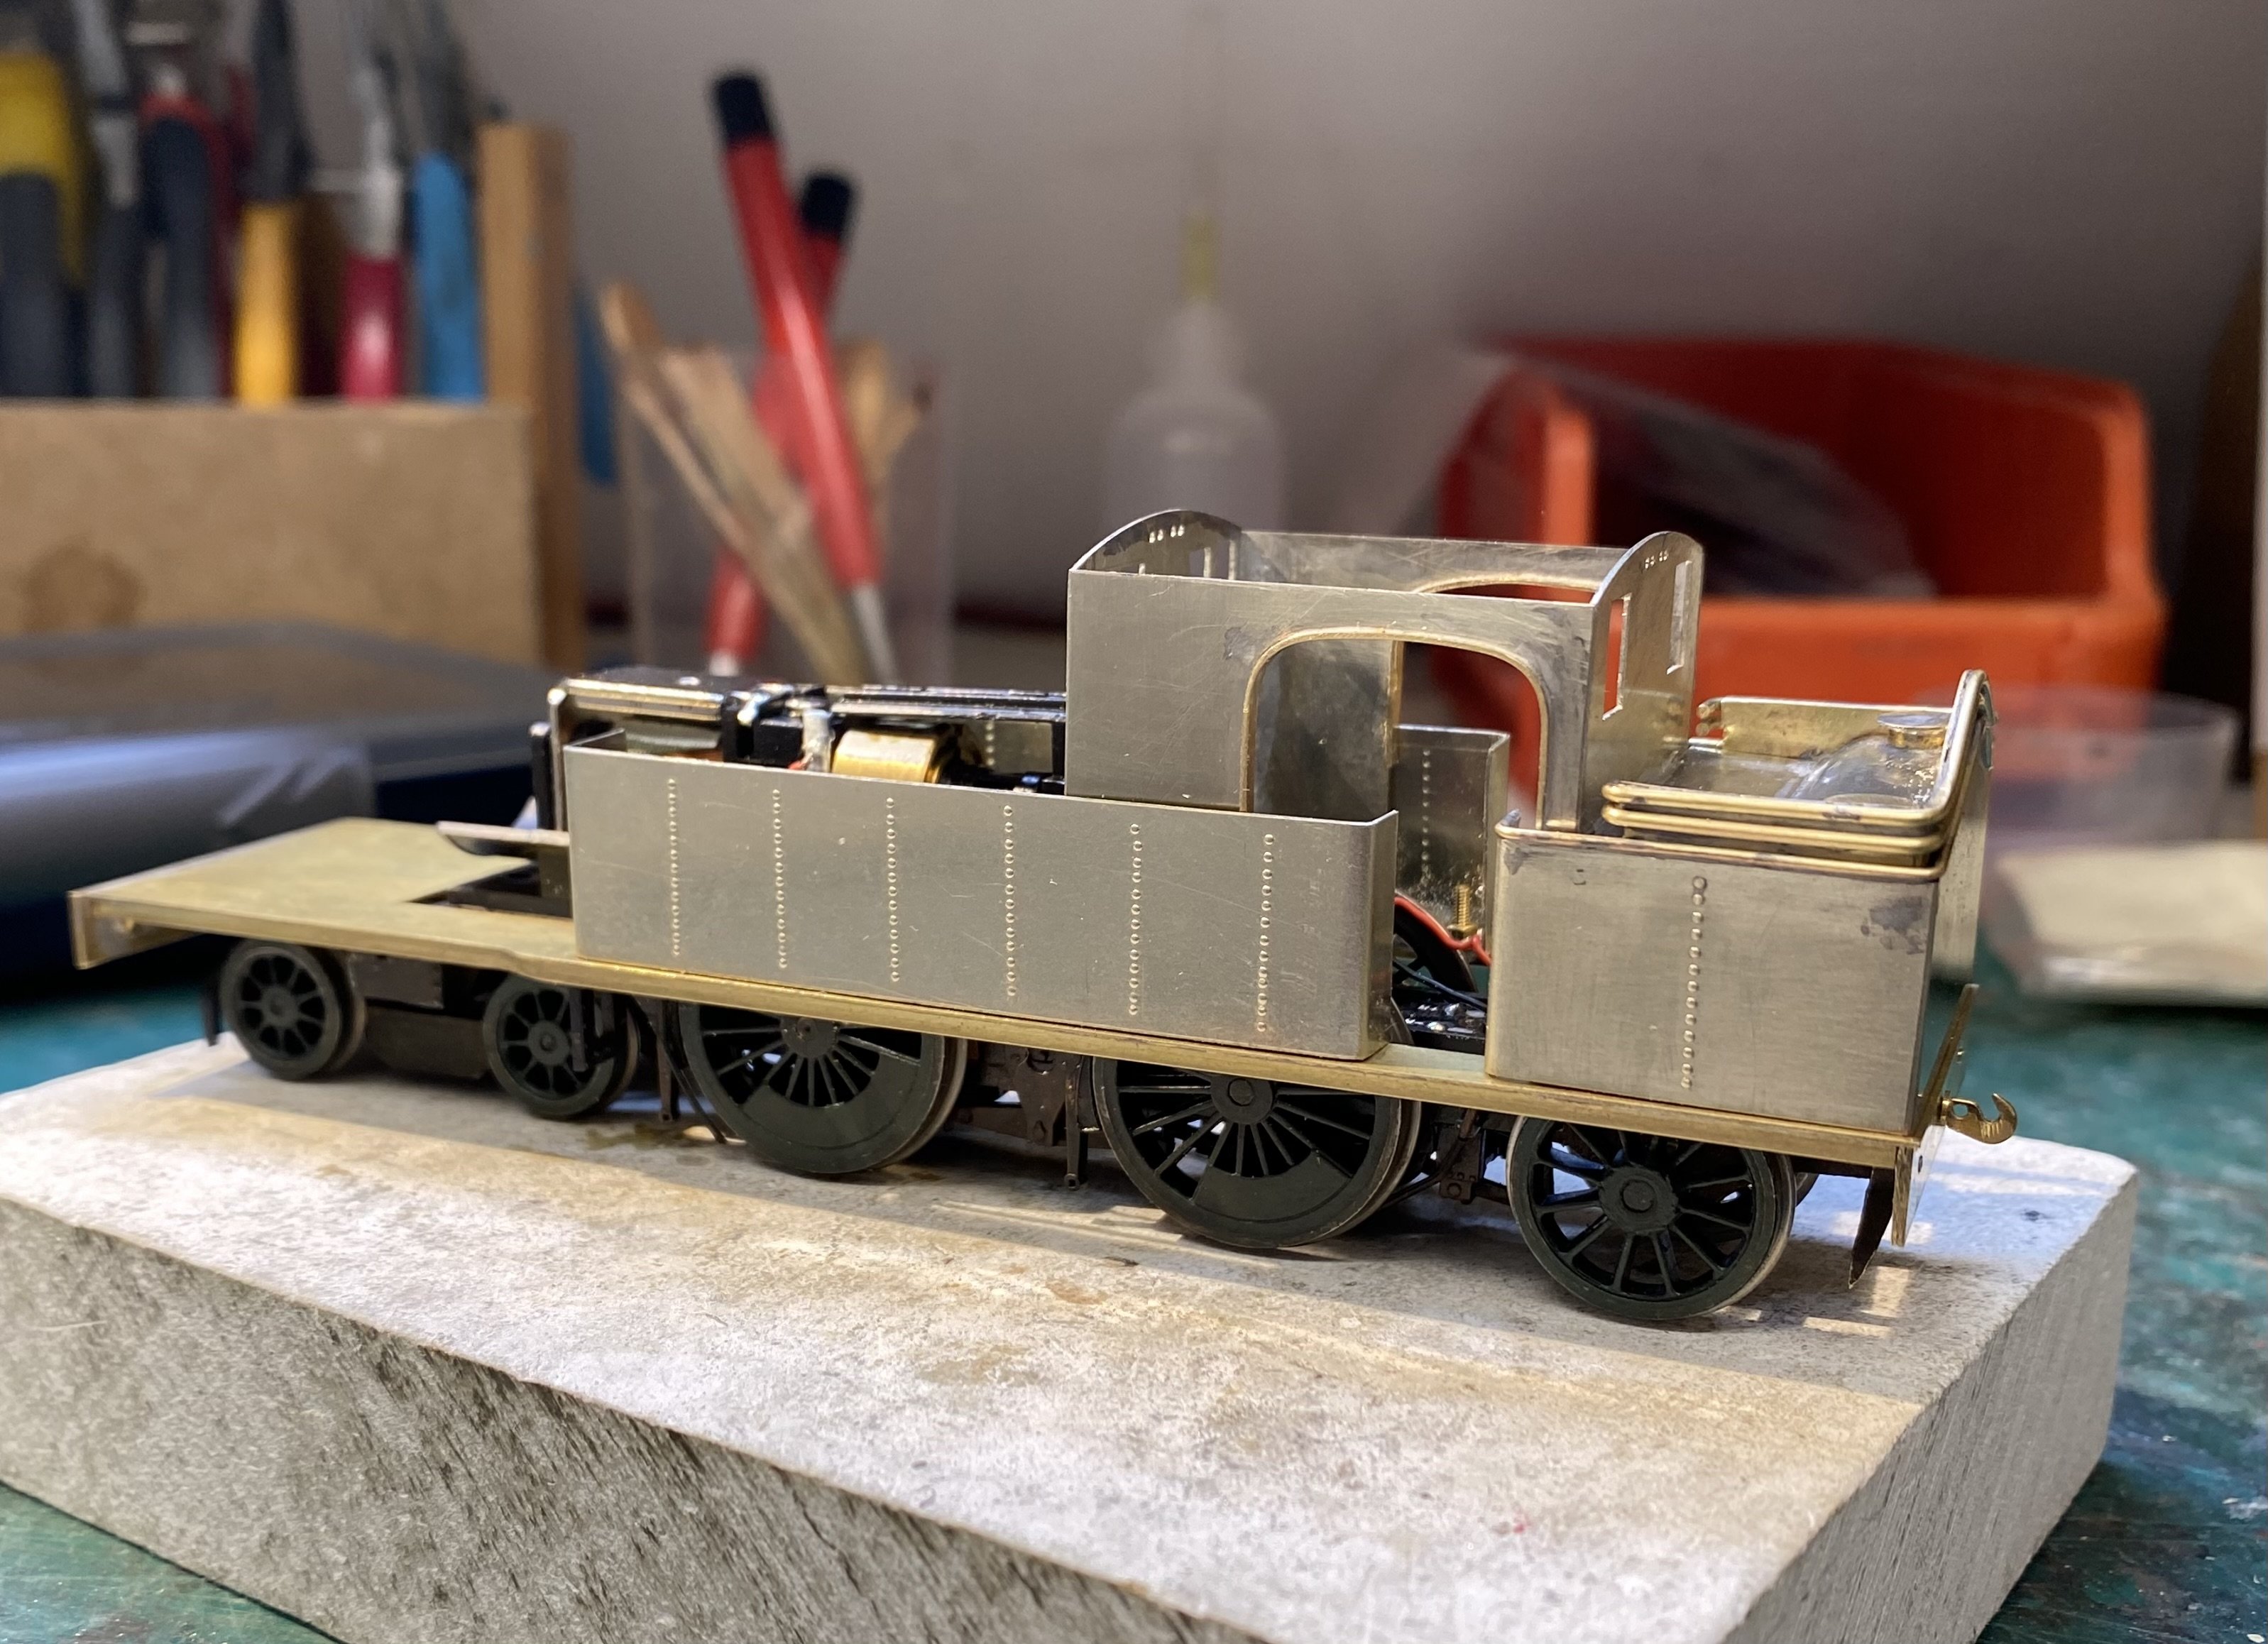
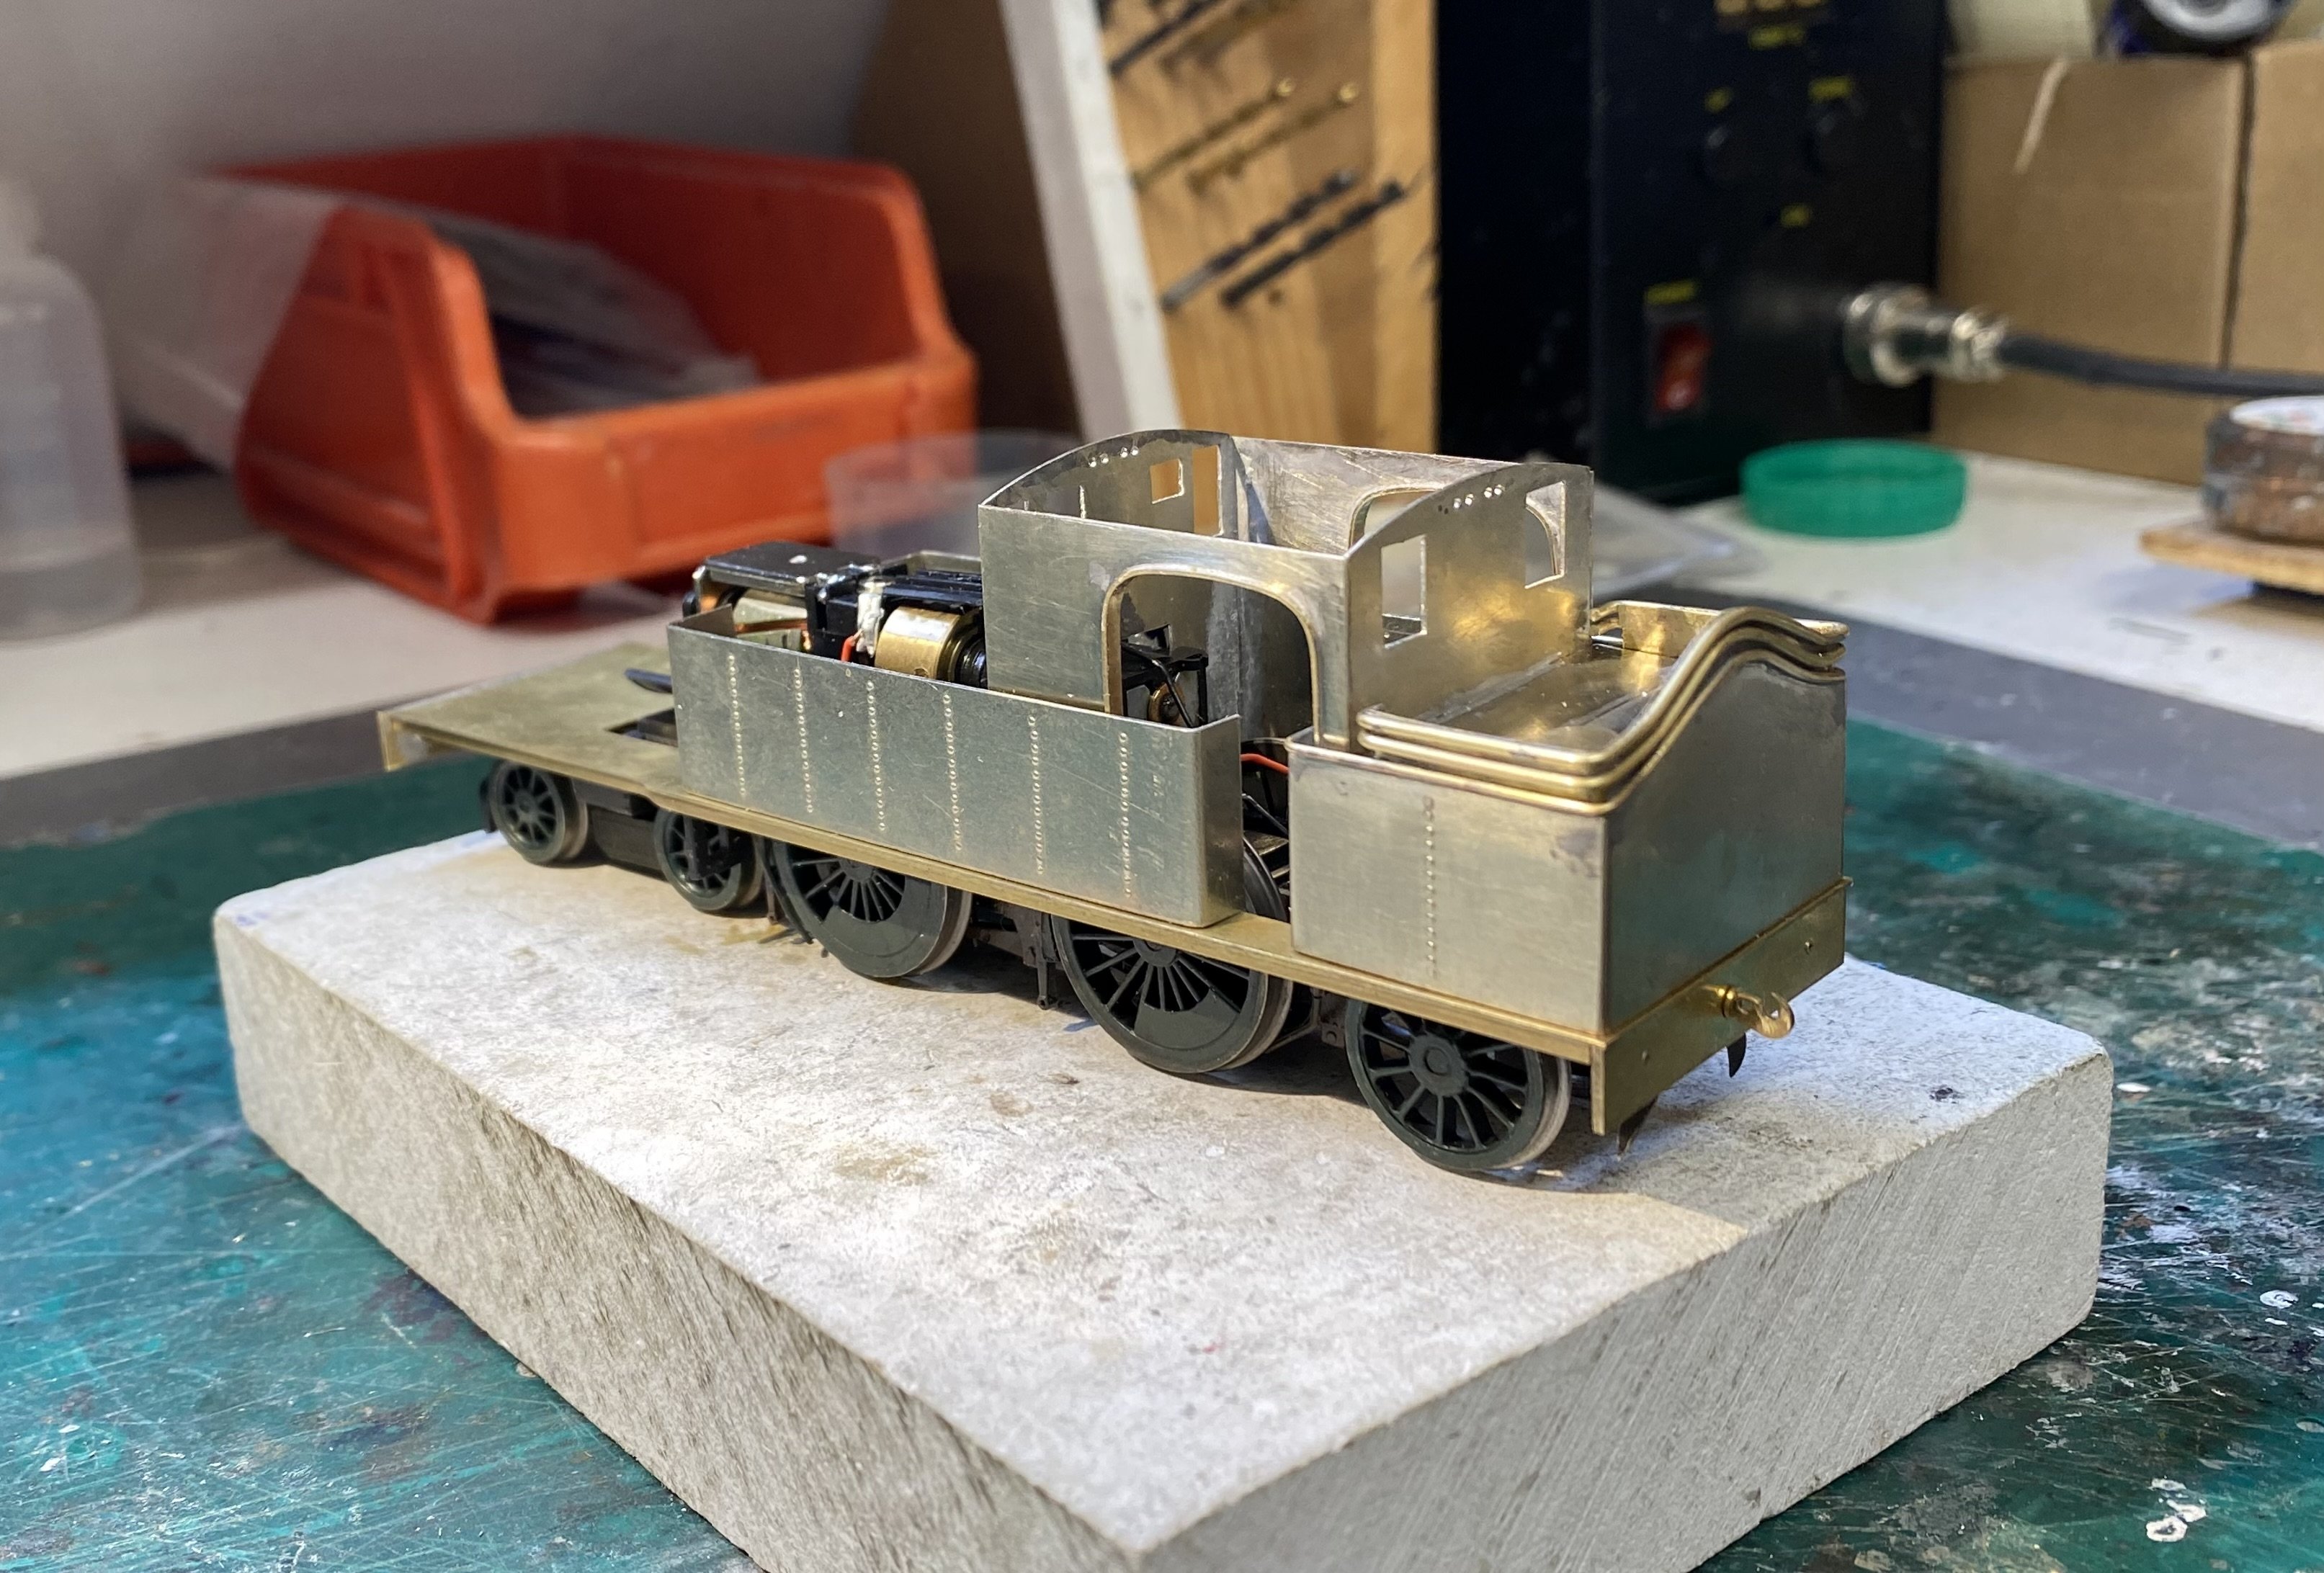
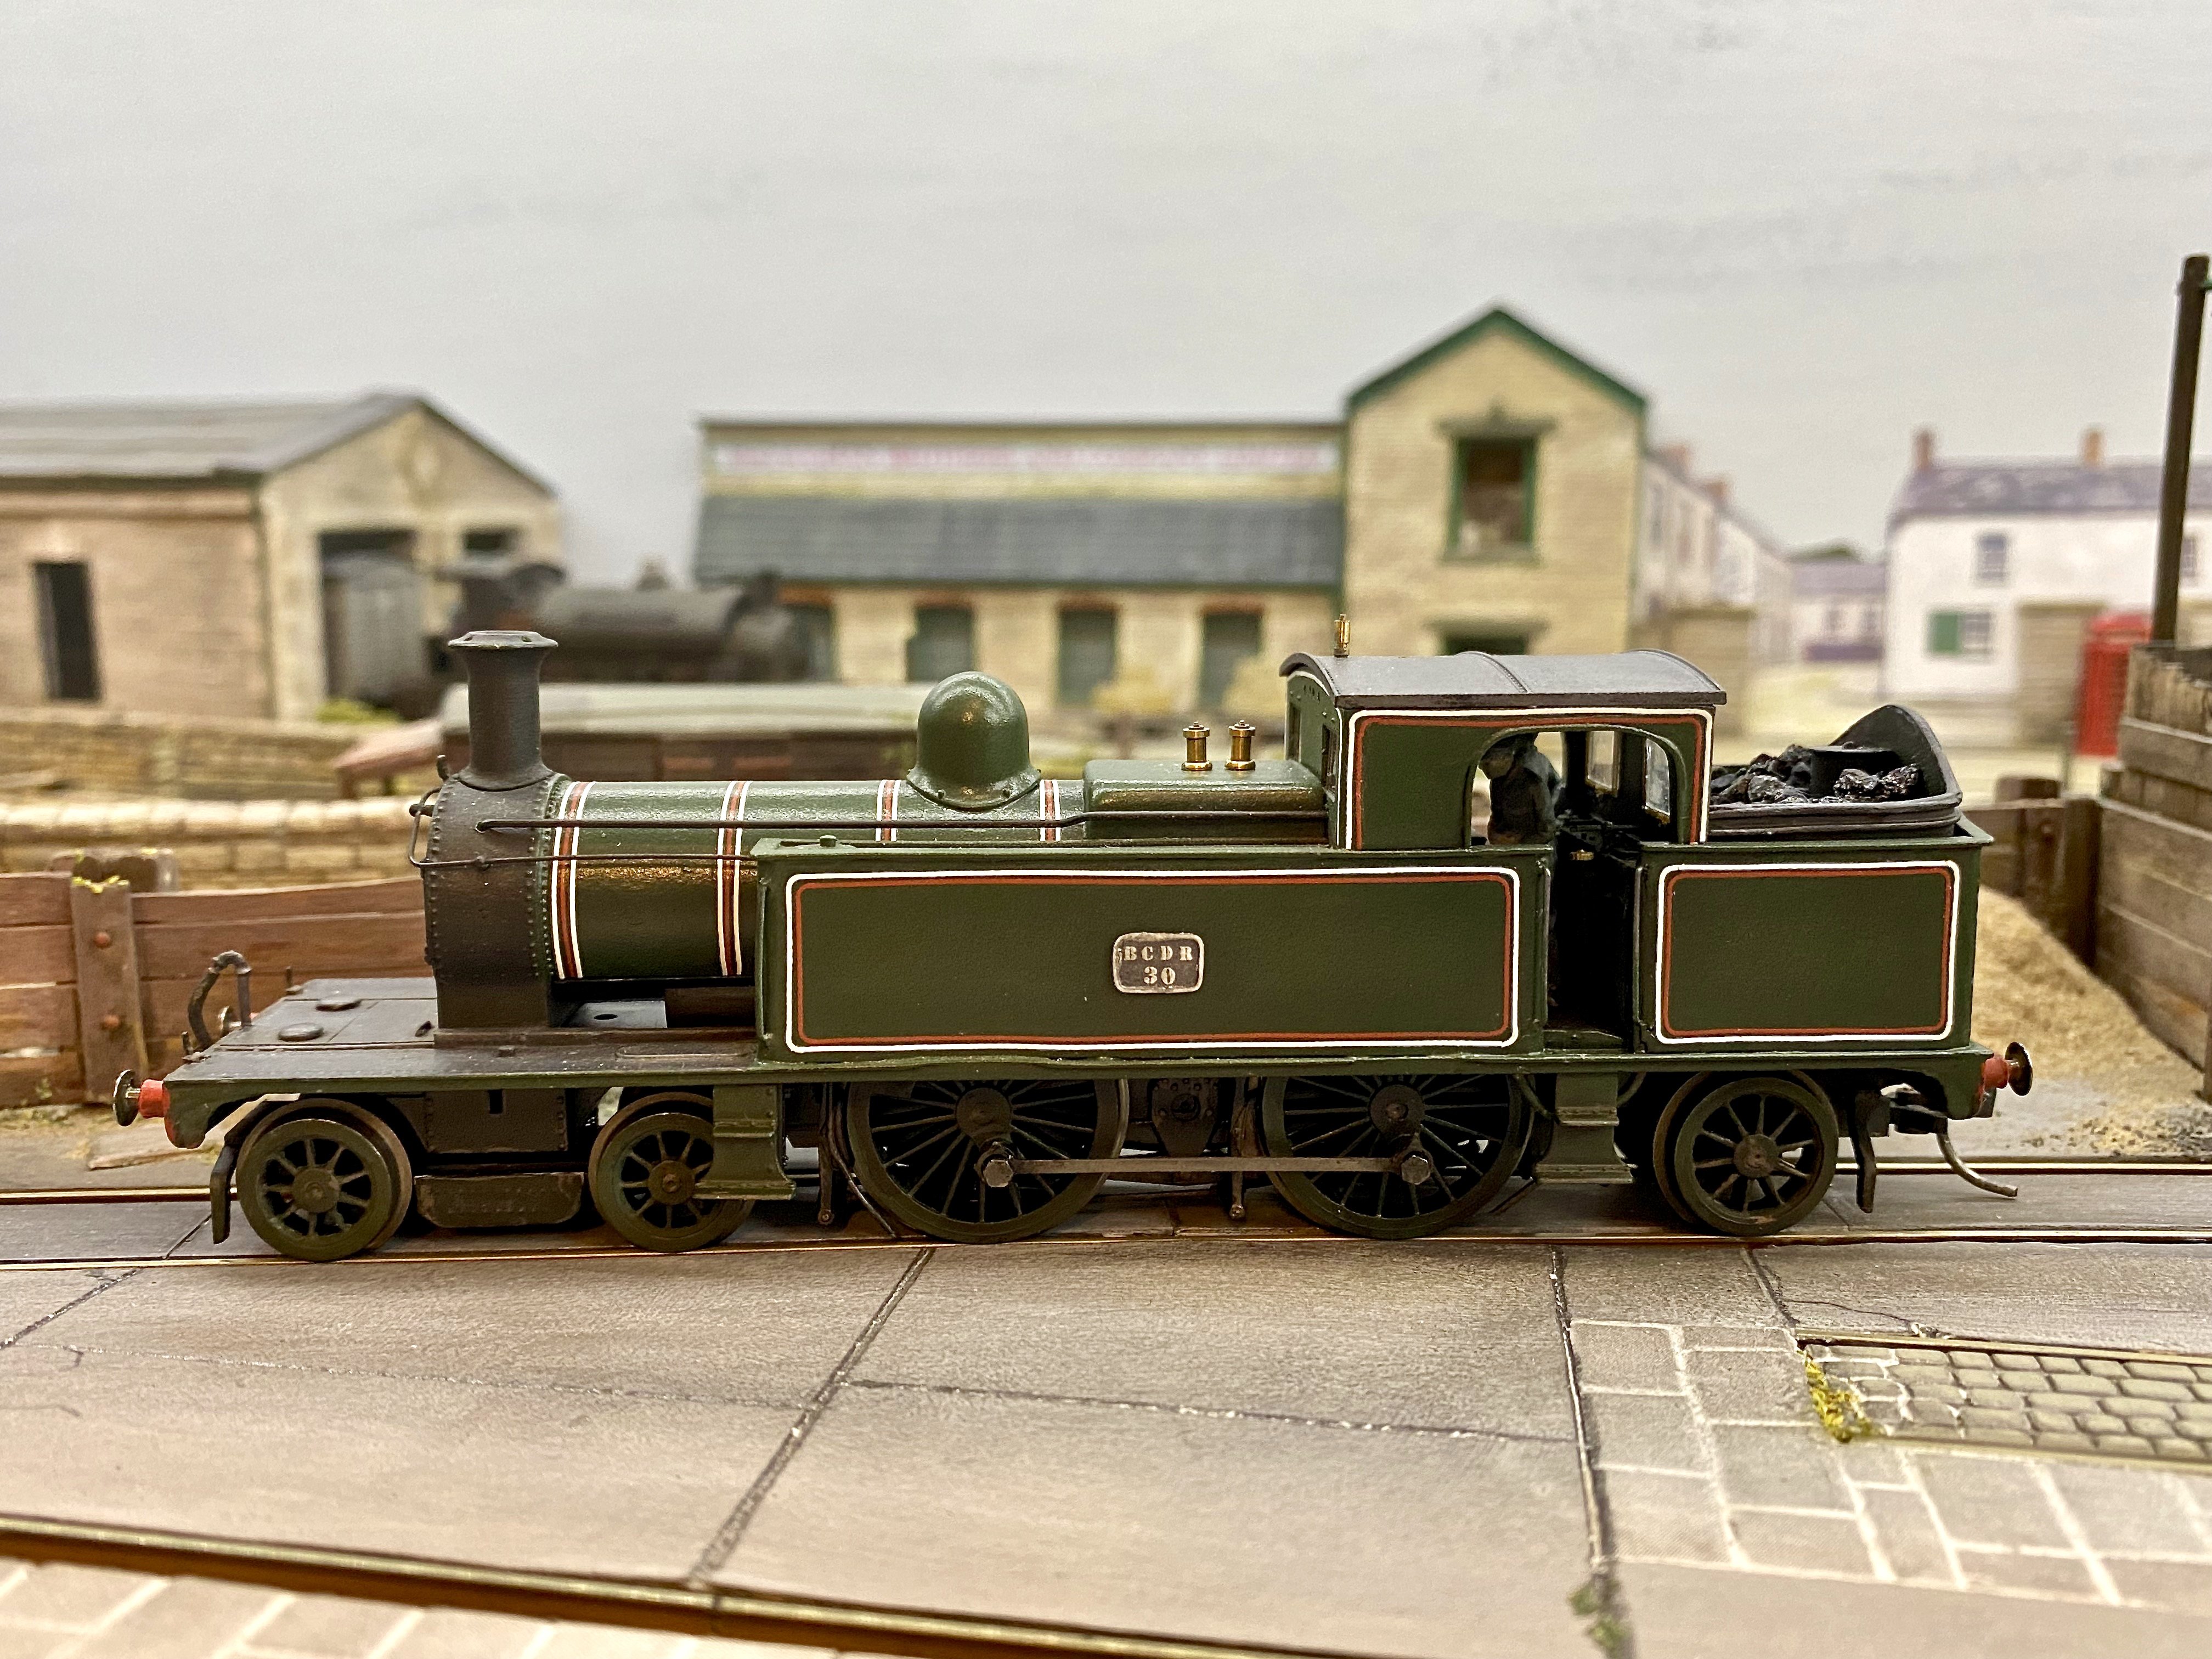
Some progress on the superstructure for the BCDR bogie tank. I'm using 15 thou nickel silver in preference to brass for most of it. Here's the cab flatpack - fairly simple shapes but the cutting and filing takes ages and soldering them together is always entertaining. The beginnings of tanks and bunker. Some of the rivets have been embossed but I shied away from embossing rivet lines close to edges for fear of the metal distorting. I'll use resin transfers for these. The curved back sheet on the bunker made attaching the beading (0.7mm brass rod) tricky. Plenty of toasted fingertips. Matching the curve with the coal rails (0.9mm brass rod) was even more of a challenge. The rtr Adams Radial chassis takes up a lot of space and large sections of the running plate had to be cut away to clear it, so anchor points for the superstructure were hard to arrange. Got there in the end. There are 2 captive nuts in the floor at the back of the tender, and each tank has one at each end. (12BA, I've given up on 14BA. I can't see them any more) The bunker and cab are soldered together and when the tank tops are in, the tanks can also be soldered to the cab making one strong unit.
- 641 replies
-
- 18
-
-
-
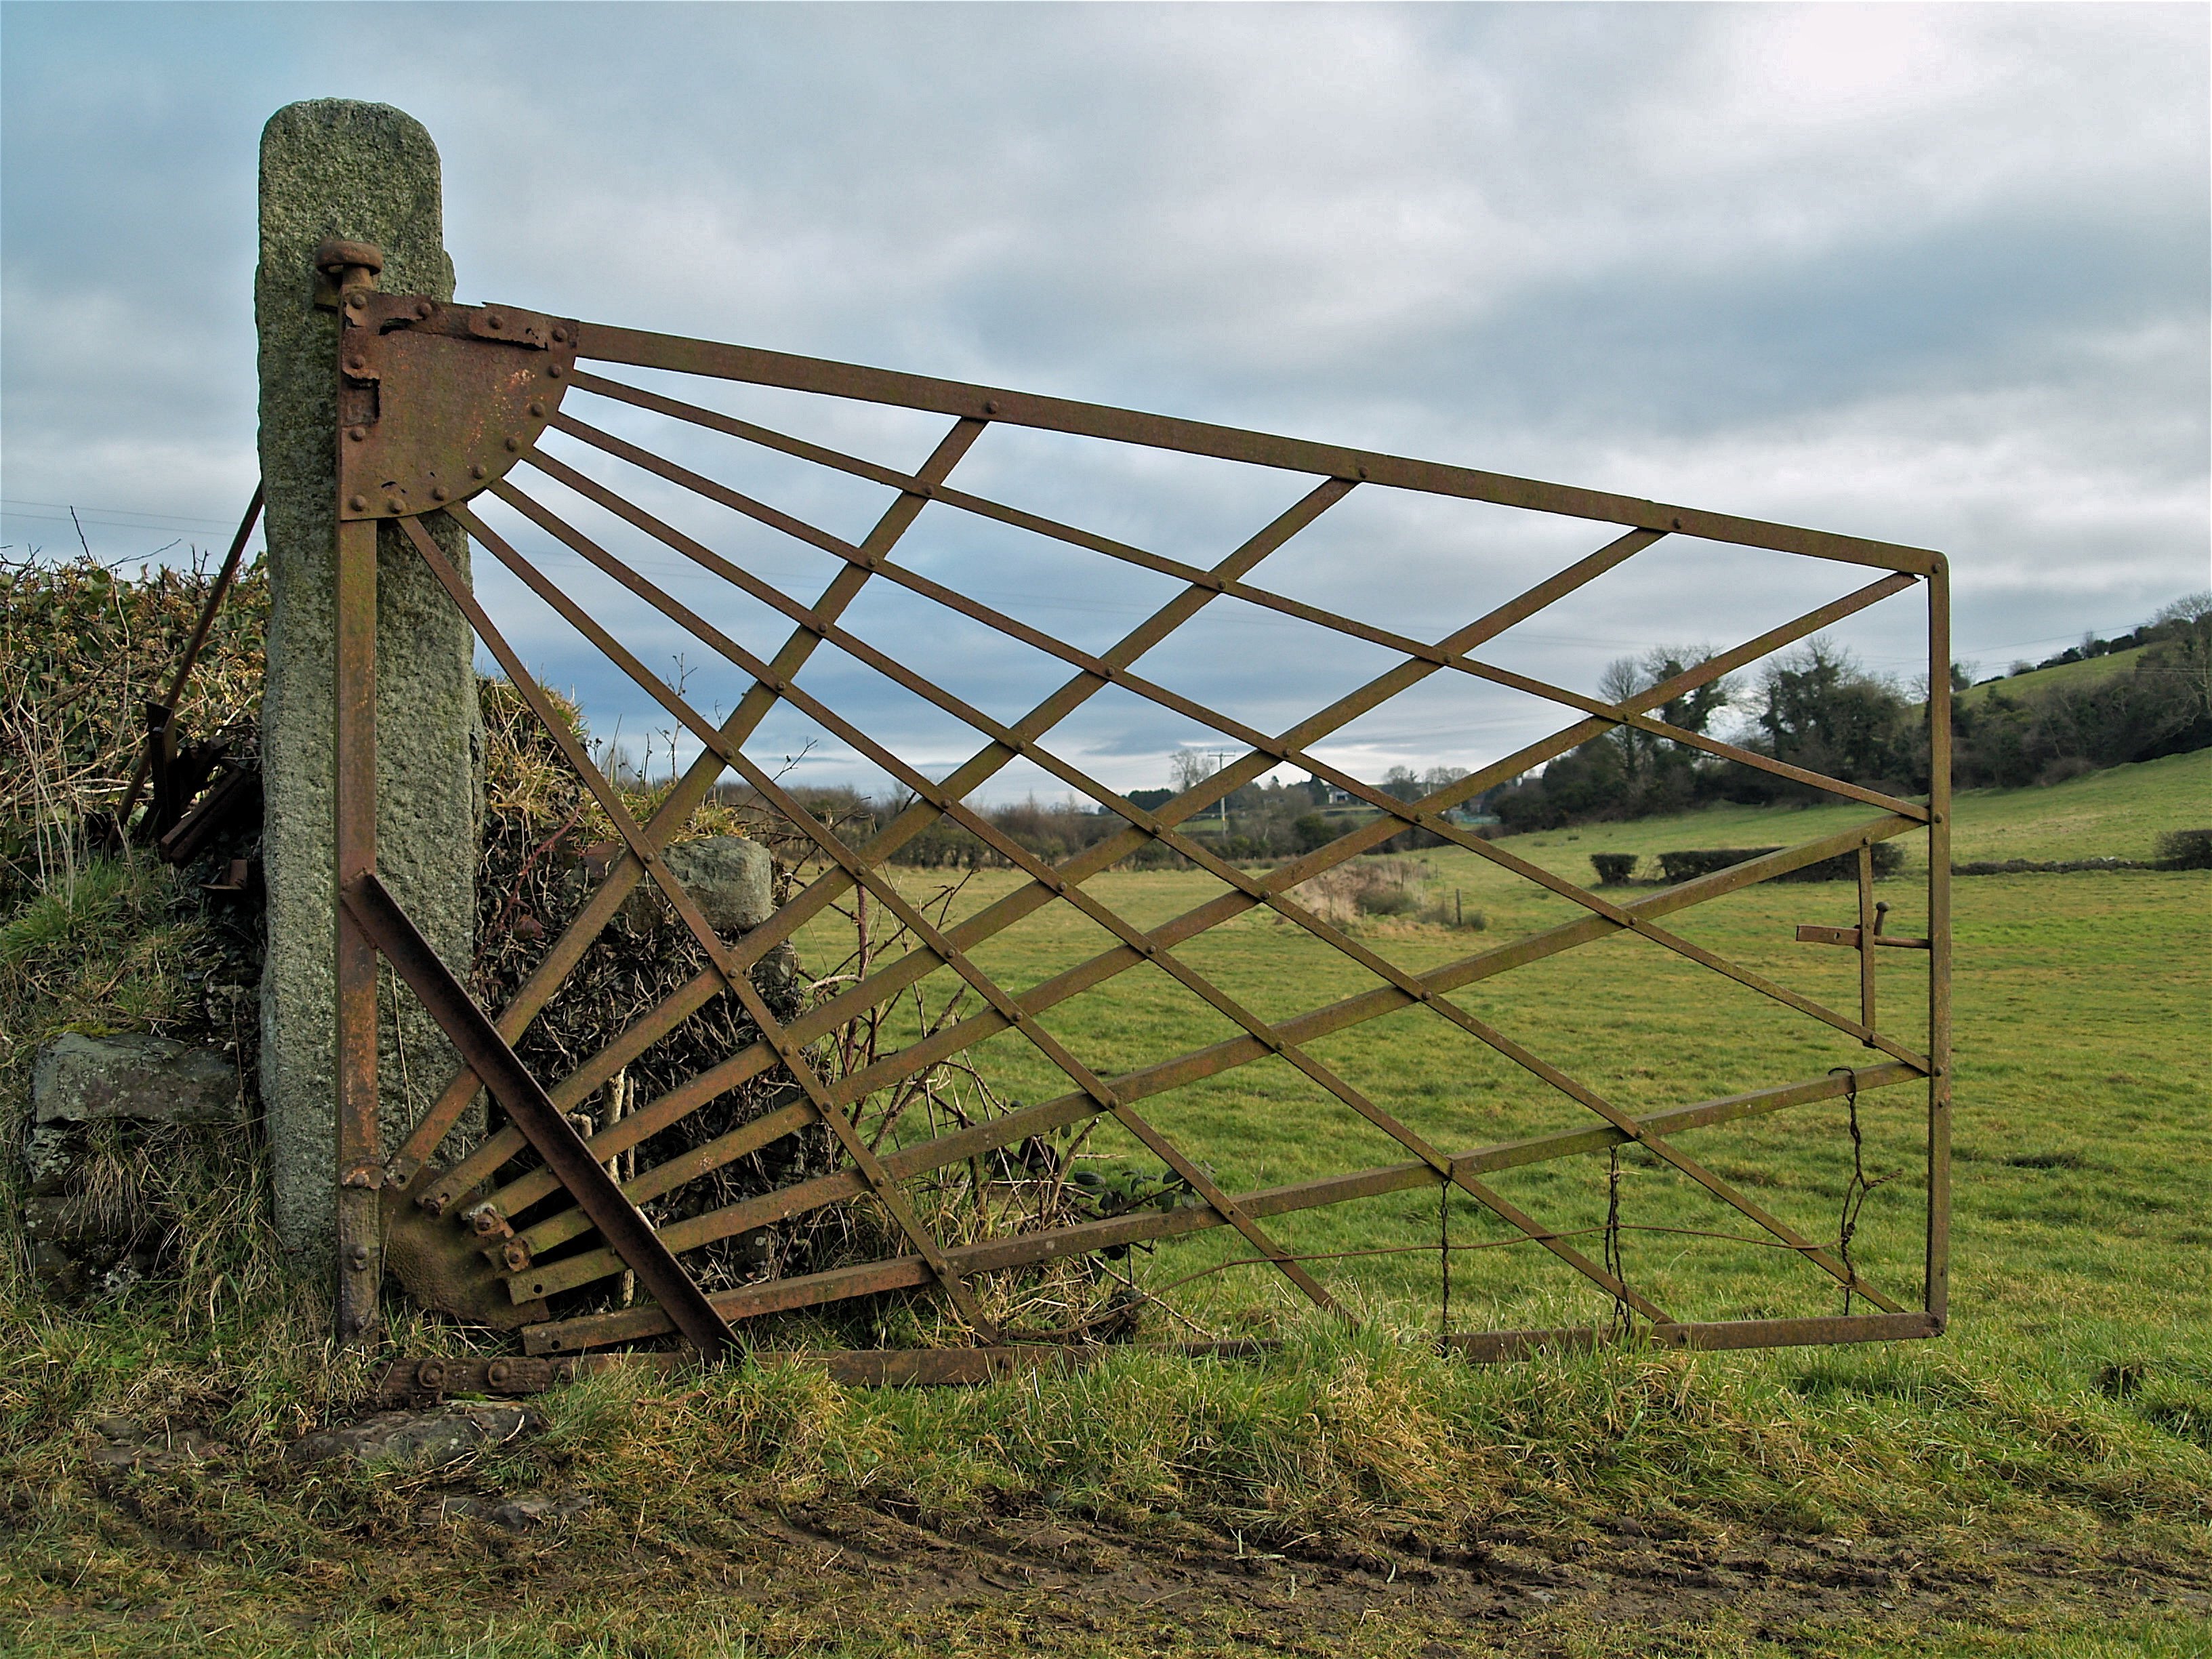
Interestingly, the BCDR gates are symmetrical. No extra bars. No small animals in County Down?
-
Making an ‘E’ – the Maybach Diesel Model Assembly thread
Tullygrainey replied to Mol_PMB's topic in Irish Models
A really fine bit of work. You've built a chassis in less time than it usually takes me to identify all the bits on an etch! From the pics, you've clearly designed this one really well and it seems to have gone together without any drama. That's no mean achievement. I like the gubbins tray - brilliant idea! That one's gone in the notebook for future deployment. Good luck with the track tests. My guess is that this one will run as wells it looks. Alan -
Brassmasters have some offerings which might suit. https://www.brassmasters.co.uk/3-link_couplings.htm https://www.brassmasters.co.uk/screw_couplings.htm
-
Yes indeed. This one on the Belfast and County Down between Ballygowan and Saintfield. There was another one at Ballynahinch Junction last time I looked.
-
Lovely lovely!
-
That is truly magnificent. Thanks for sharing it Leslie.
-
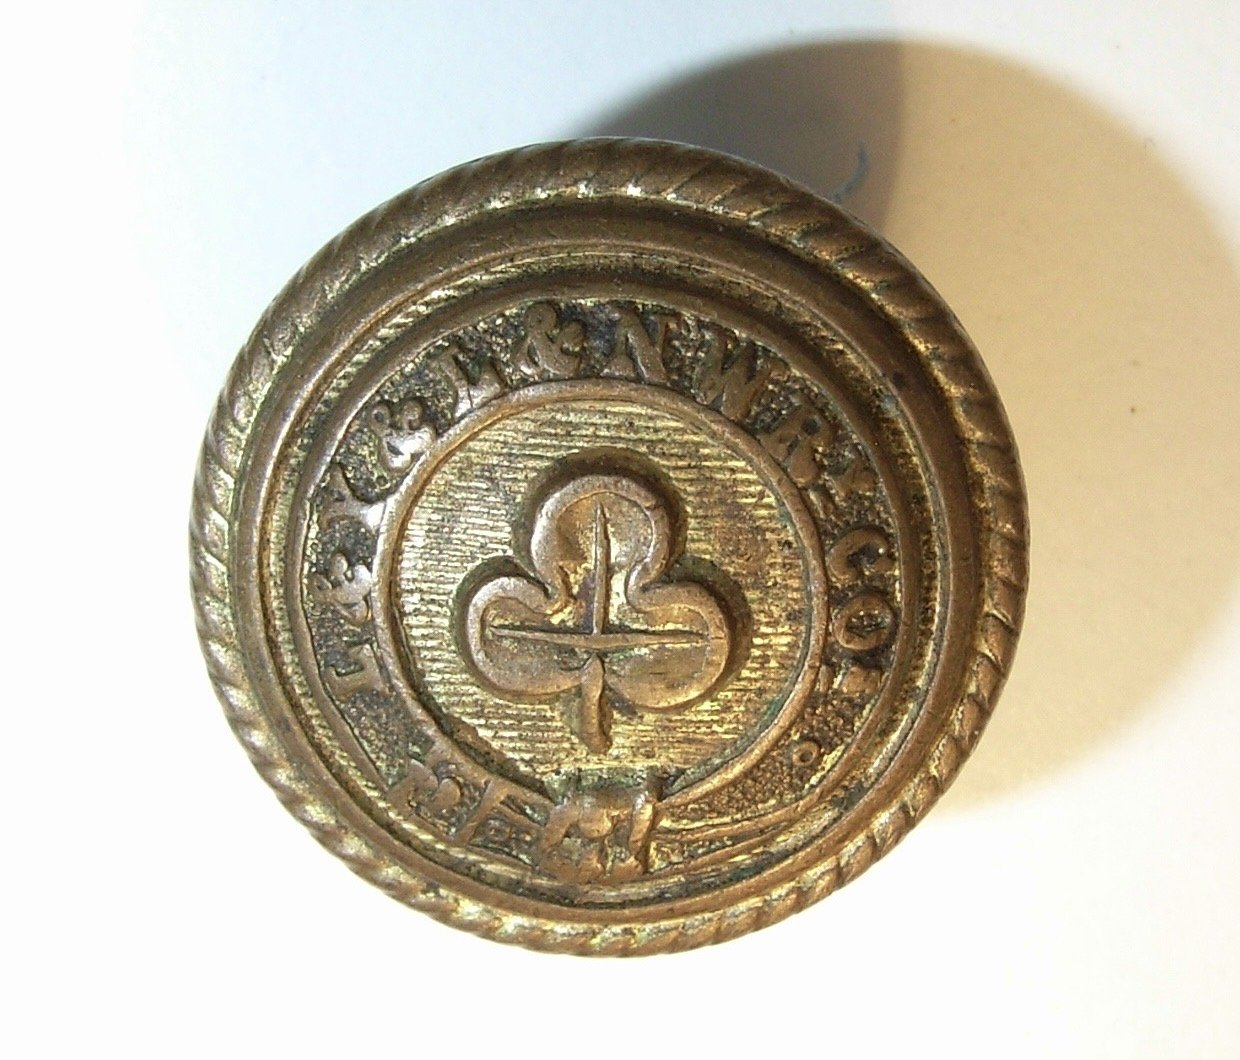
That might explain how it ended up in a back garden in Holywood. I gather the company also ran steamship services across the Irish Sea.
-
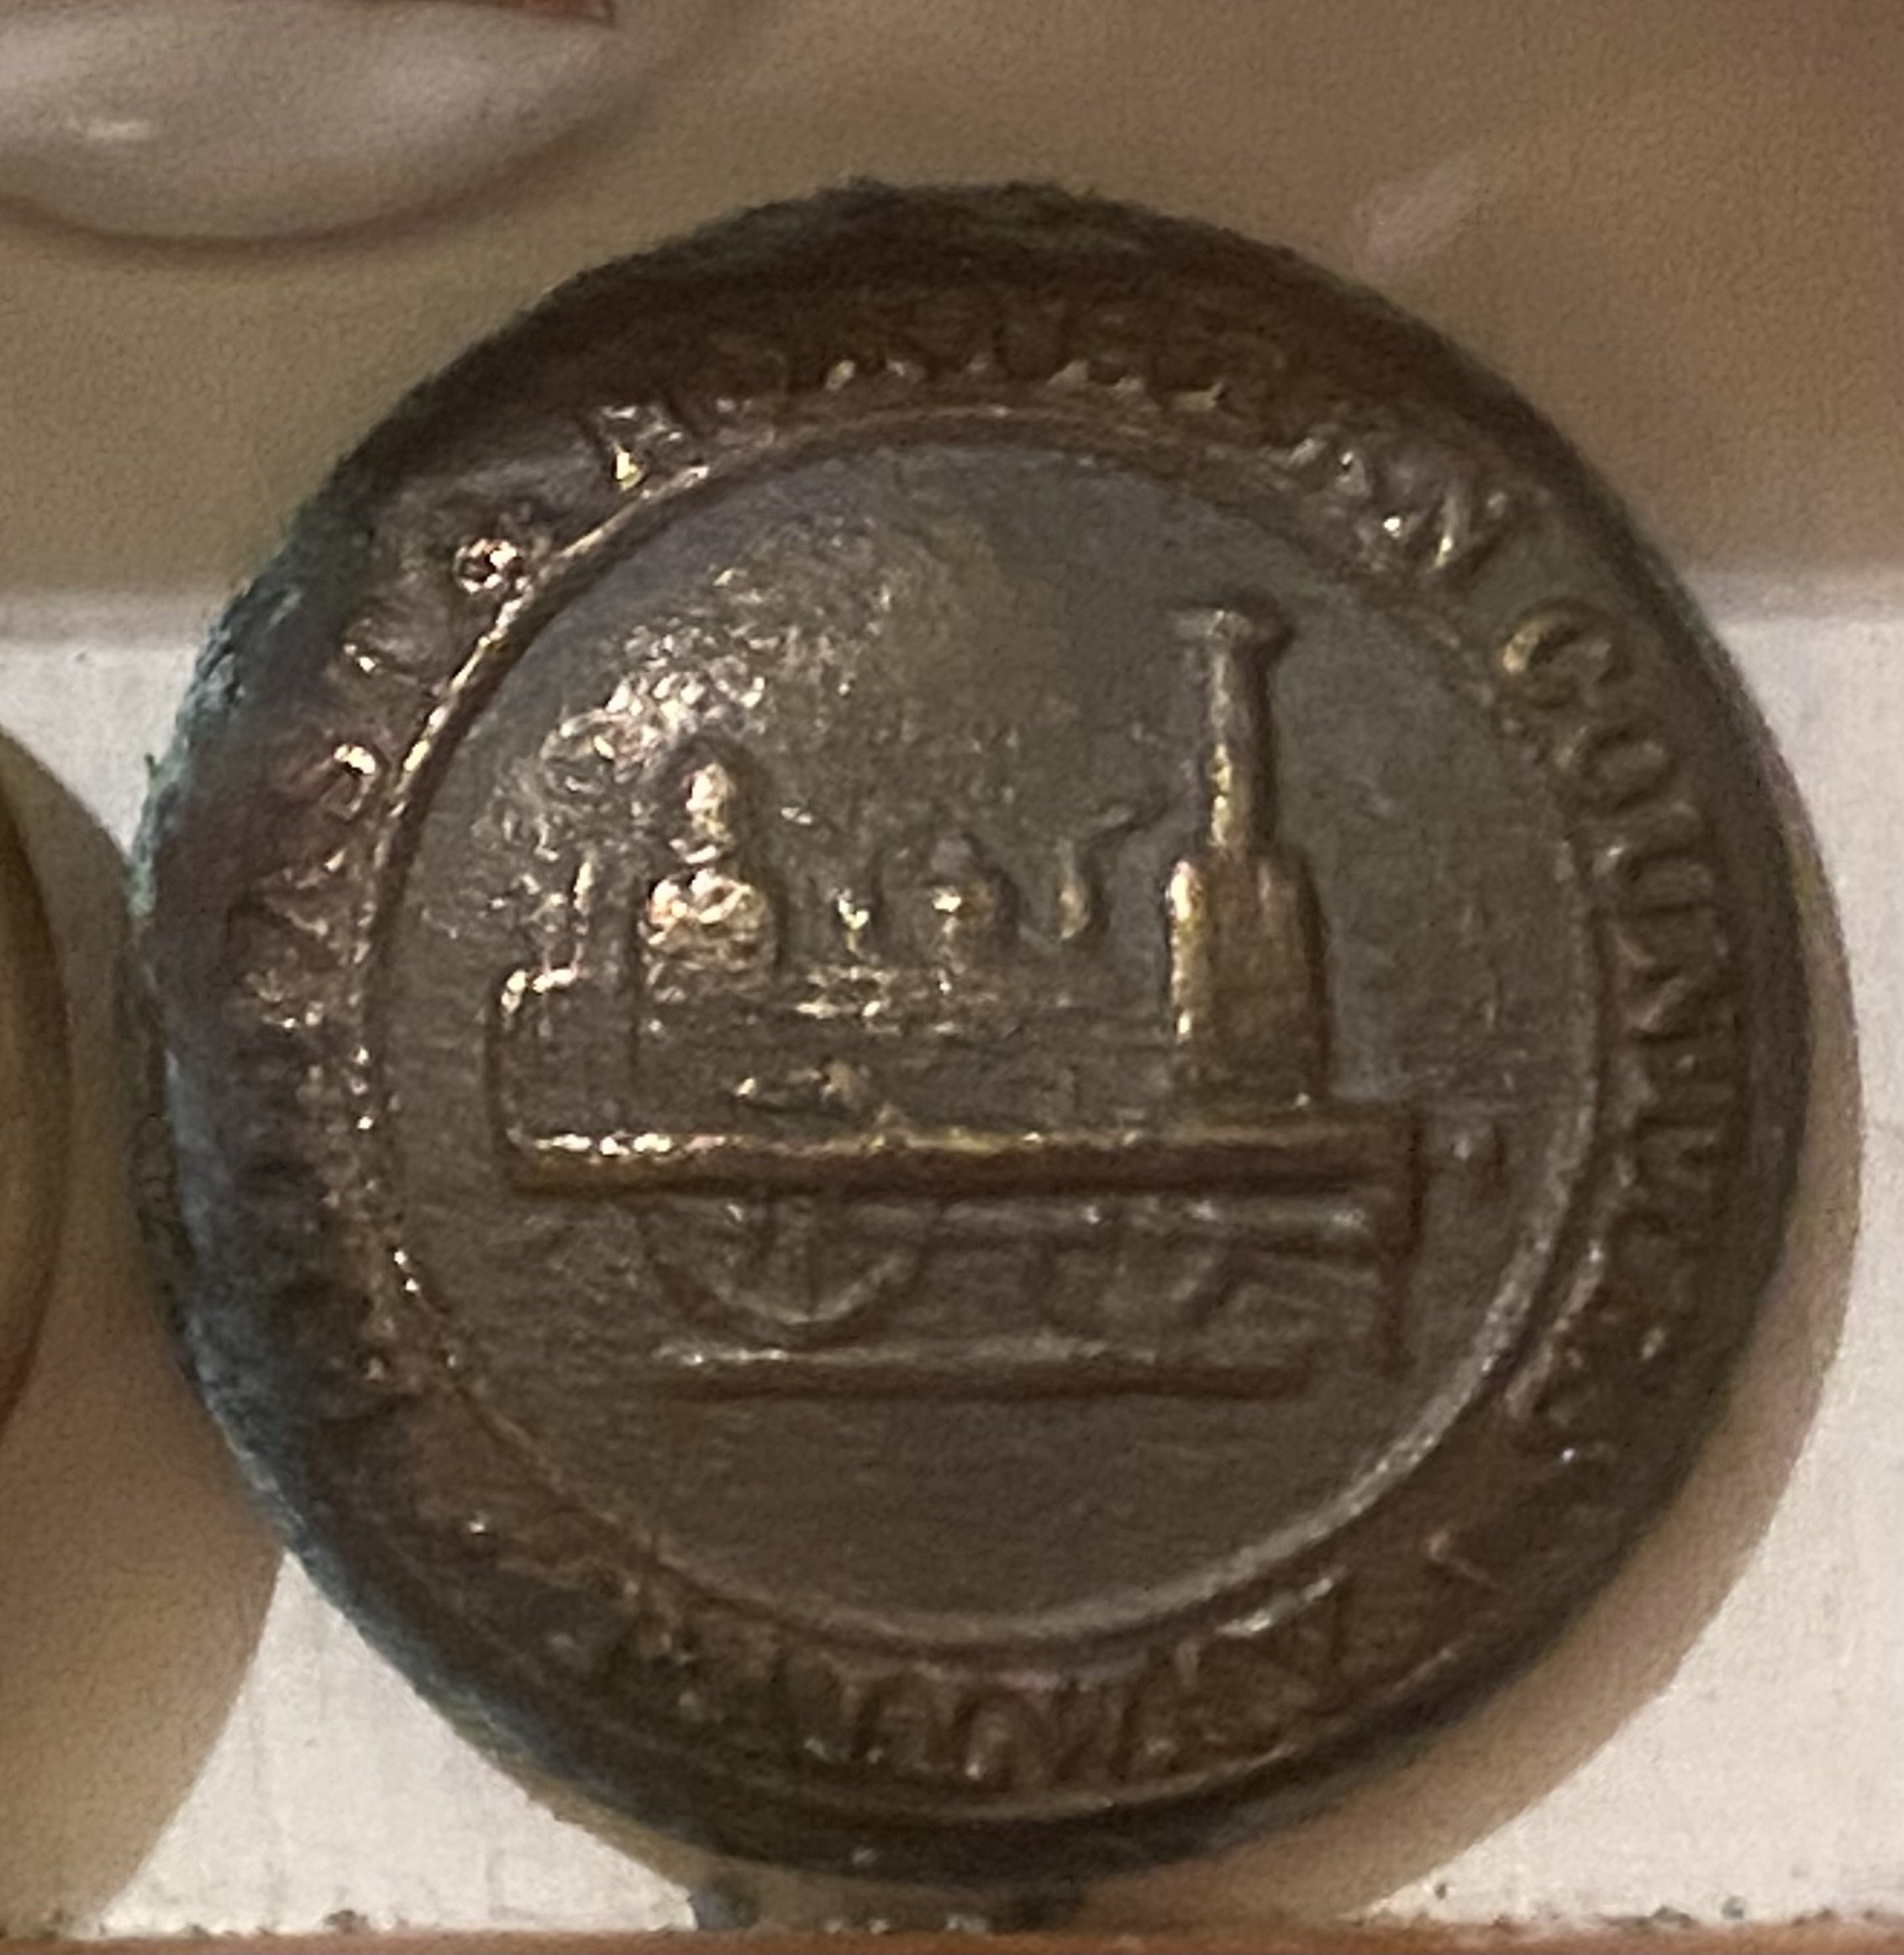
As an aside to this topic, during the 1980s I lived in a Victorian terrace house backing almost onto the Belfast-Bangor railway line (the former BCDR line) very close to Holywood station. Digging in the back garden often turned up interesting objects, including 2 railway uniform buttons. Neither of them were BCDR. Belfast and Northern Counties Railway (absorbed by the Midland Railway in 1903) Lancashire & Yorkshire and London & North Western Railways (they amalgamated in 1922)
-
Belfast and County Down Railways 2-4-0 Number 6 was recently spotted in the vicinity of Kirley Junction, on the scenic route to Queen's Quay with a passenger working and demonstrating its reputation as the BCDR's fastest locomotive. The Station Master and Principal Traffic Controller at Kirley Junction very kindly cleared the line for this unscheduled working and permitting line side photography of the event. Many thanks Kieran. No6 at Kirley.mp4
-
It's those tedious little details that take the time and tax the patience! And there's always that moment when you think "Why am I doing this? Isn't there something decent on the TV I could be watching instead?" But then there's the great sense of achievement when it comes good and you remember why you do it. Great work David. The stiff drink and the lie down both well earned!
-
I remember talking to you there and being mightily impressed by Arigna Town. I took these photos on the day. 2016 I think.
-
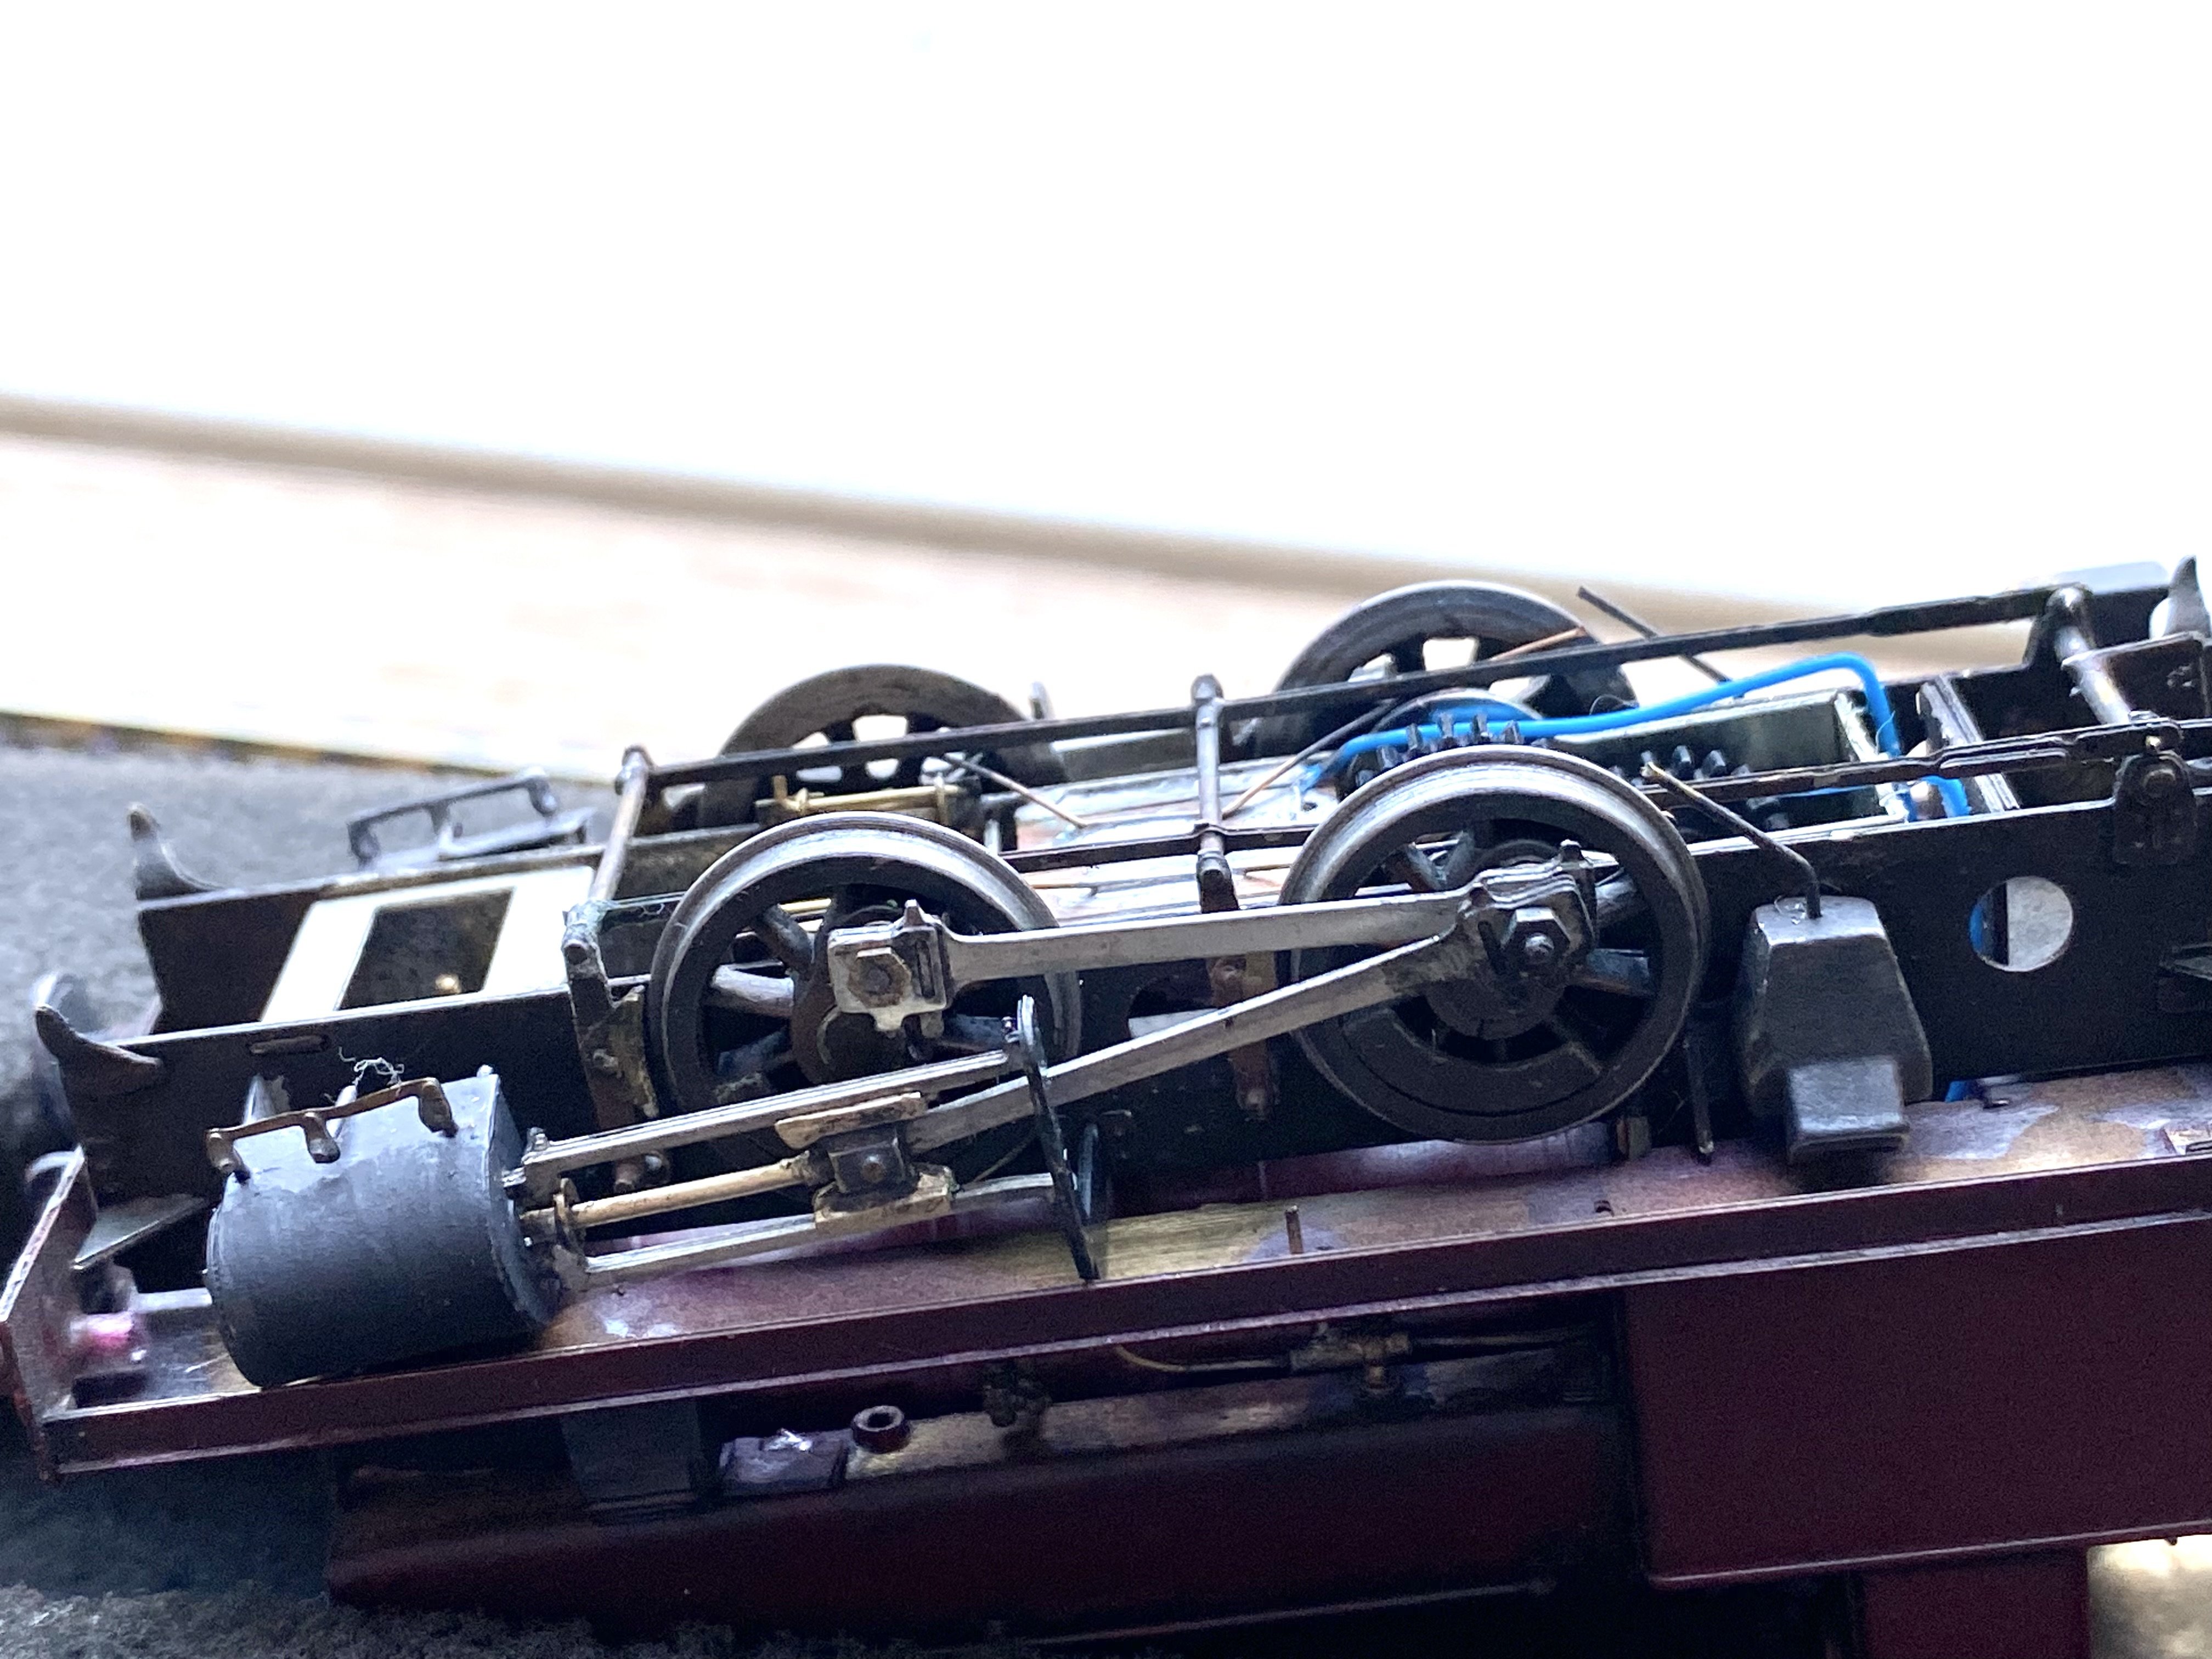
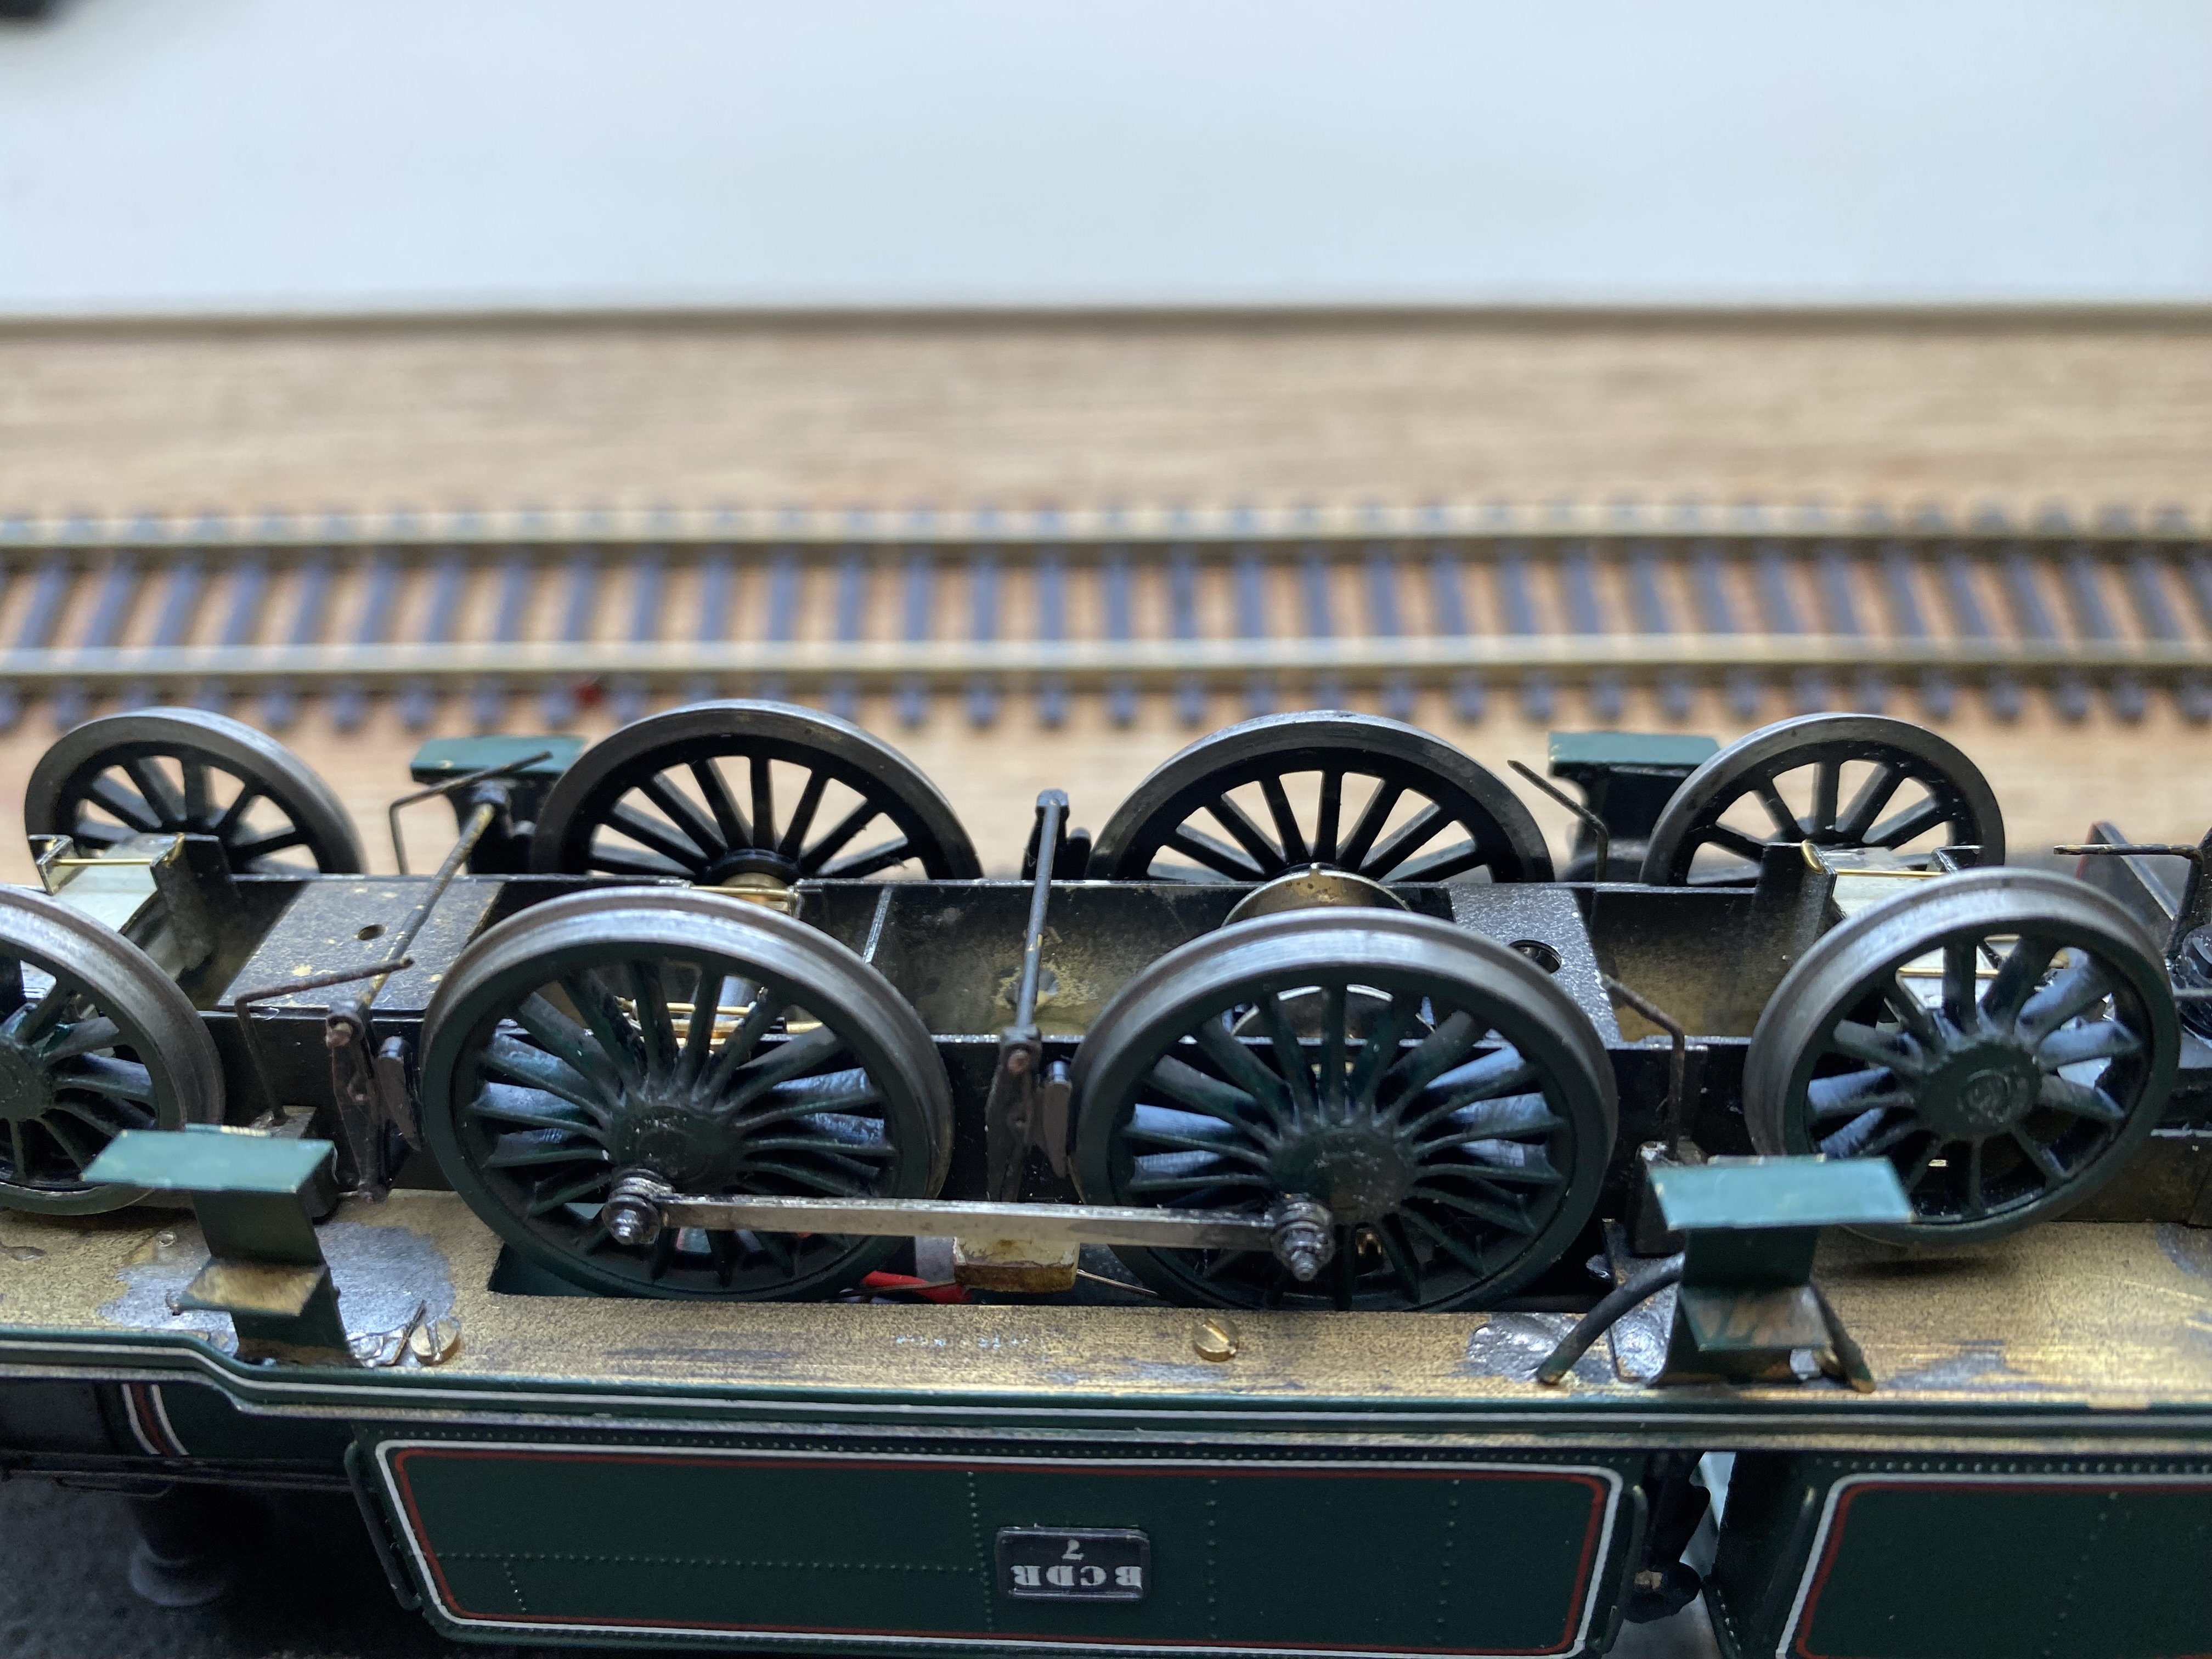
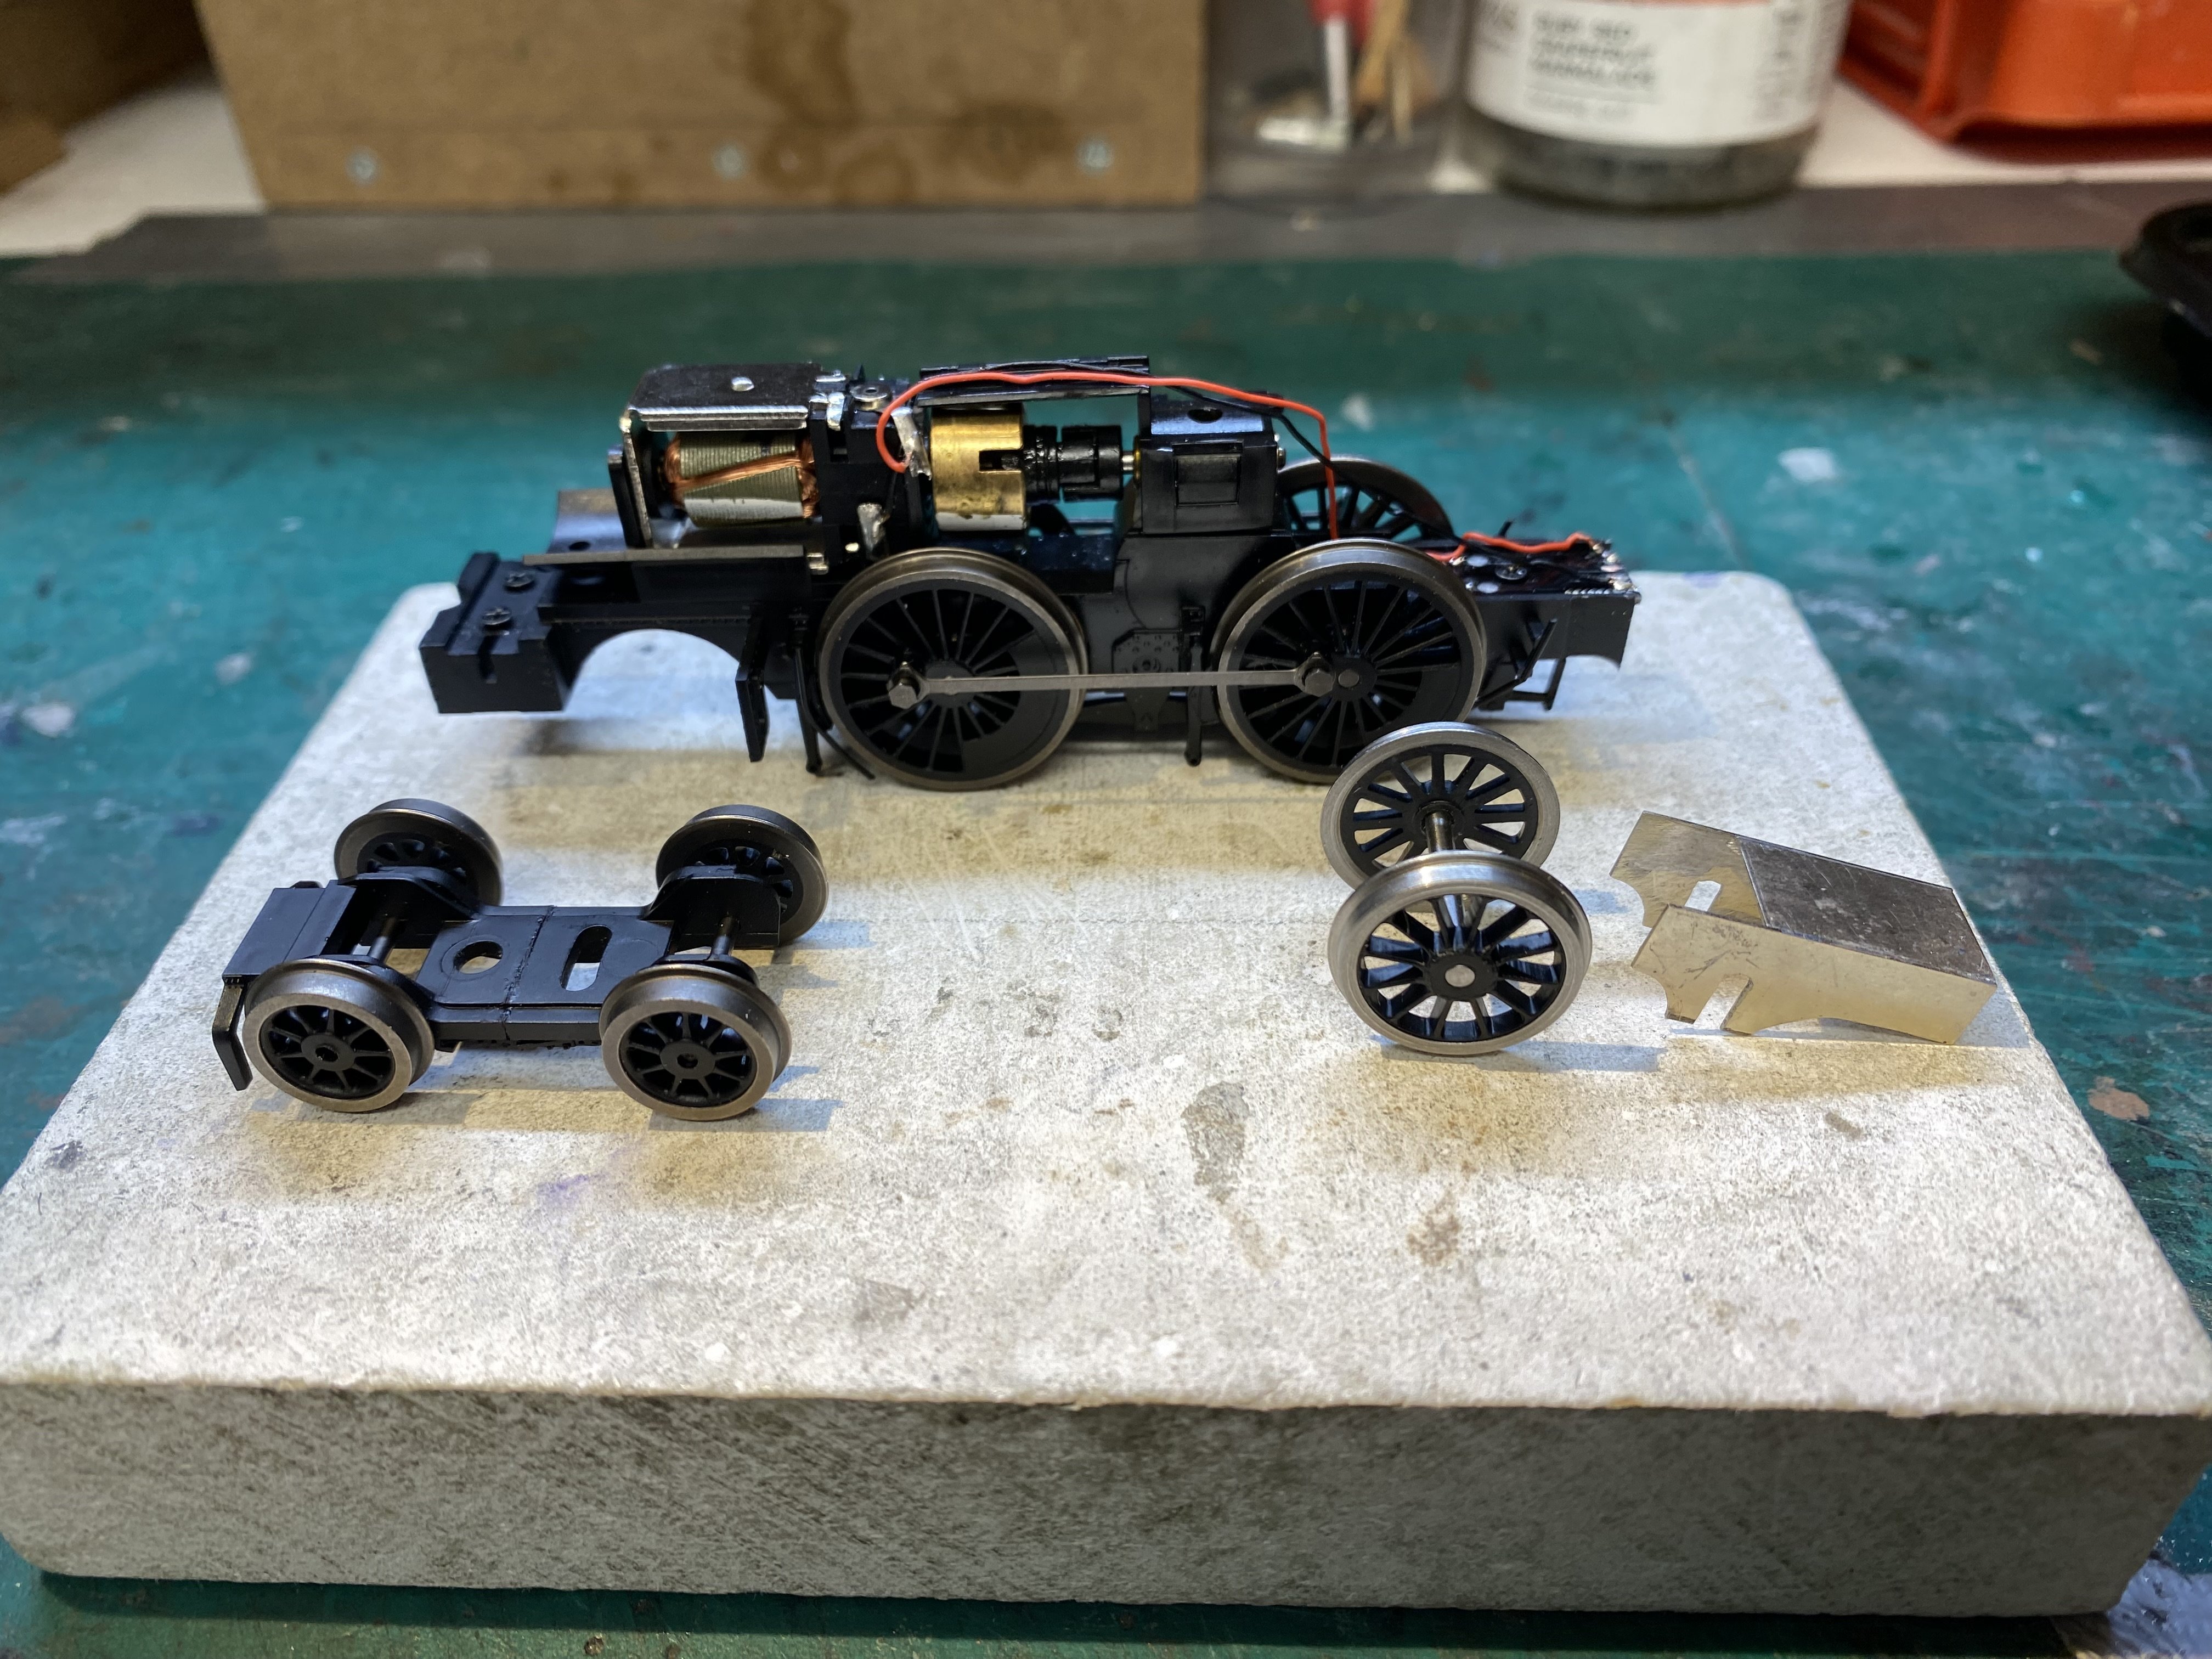
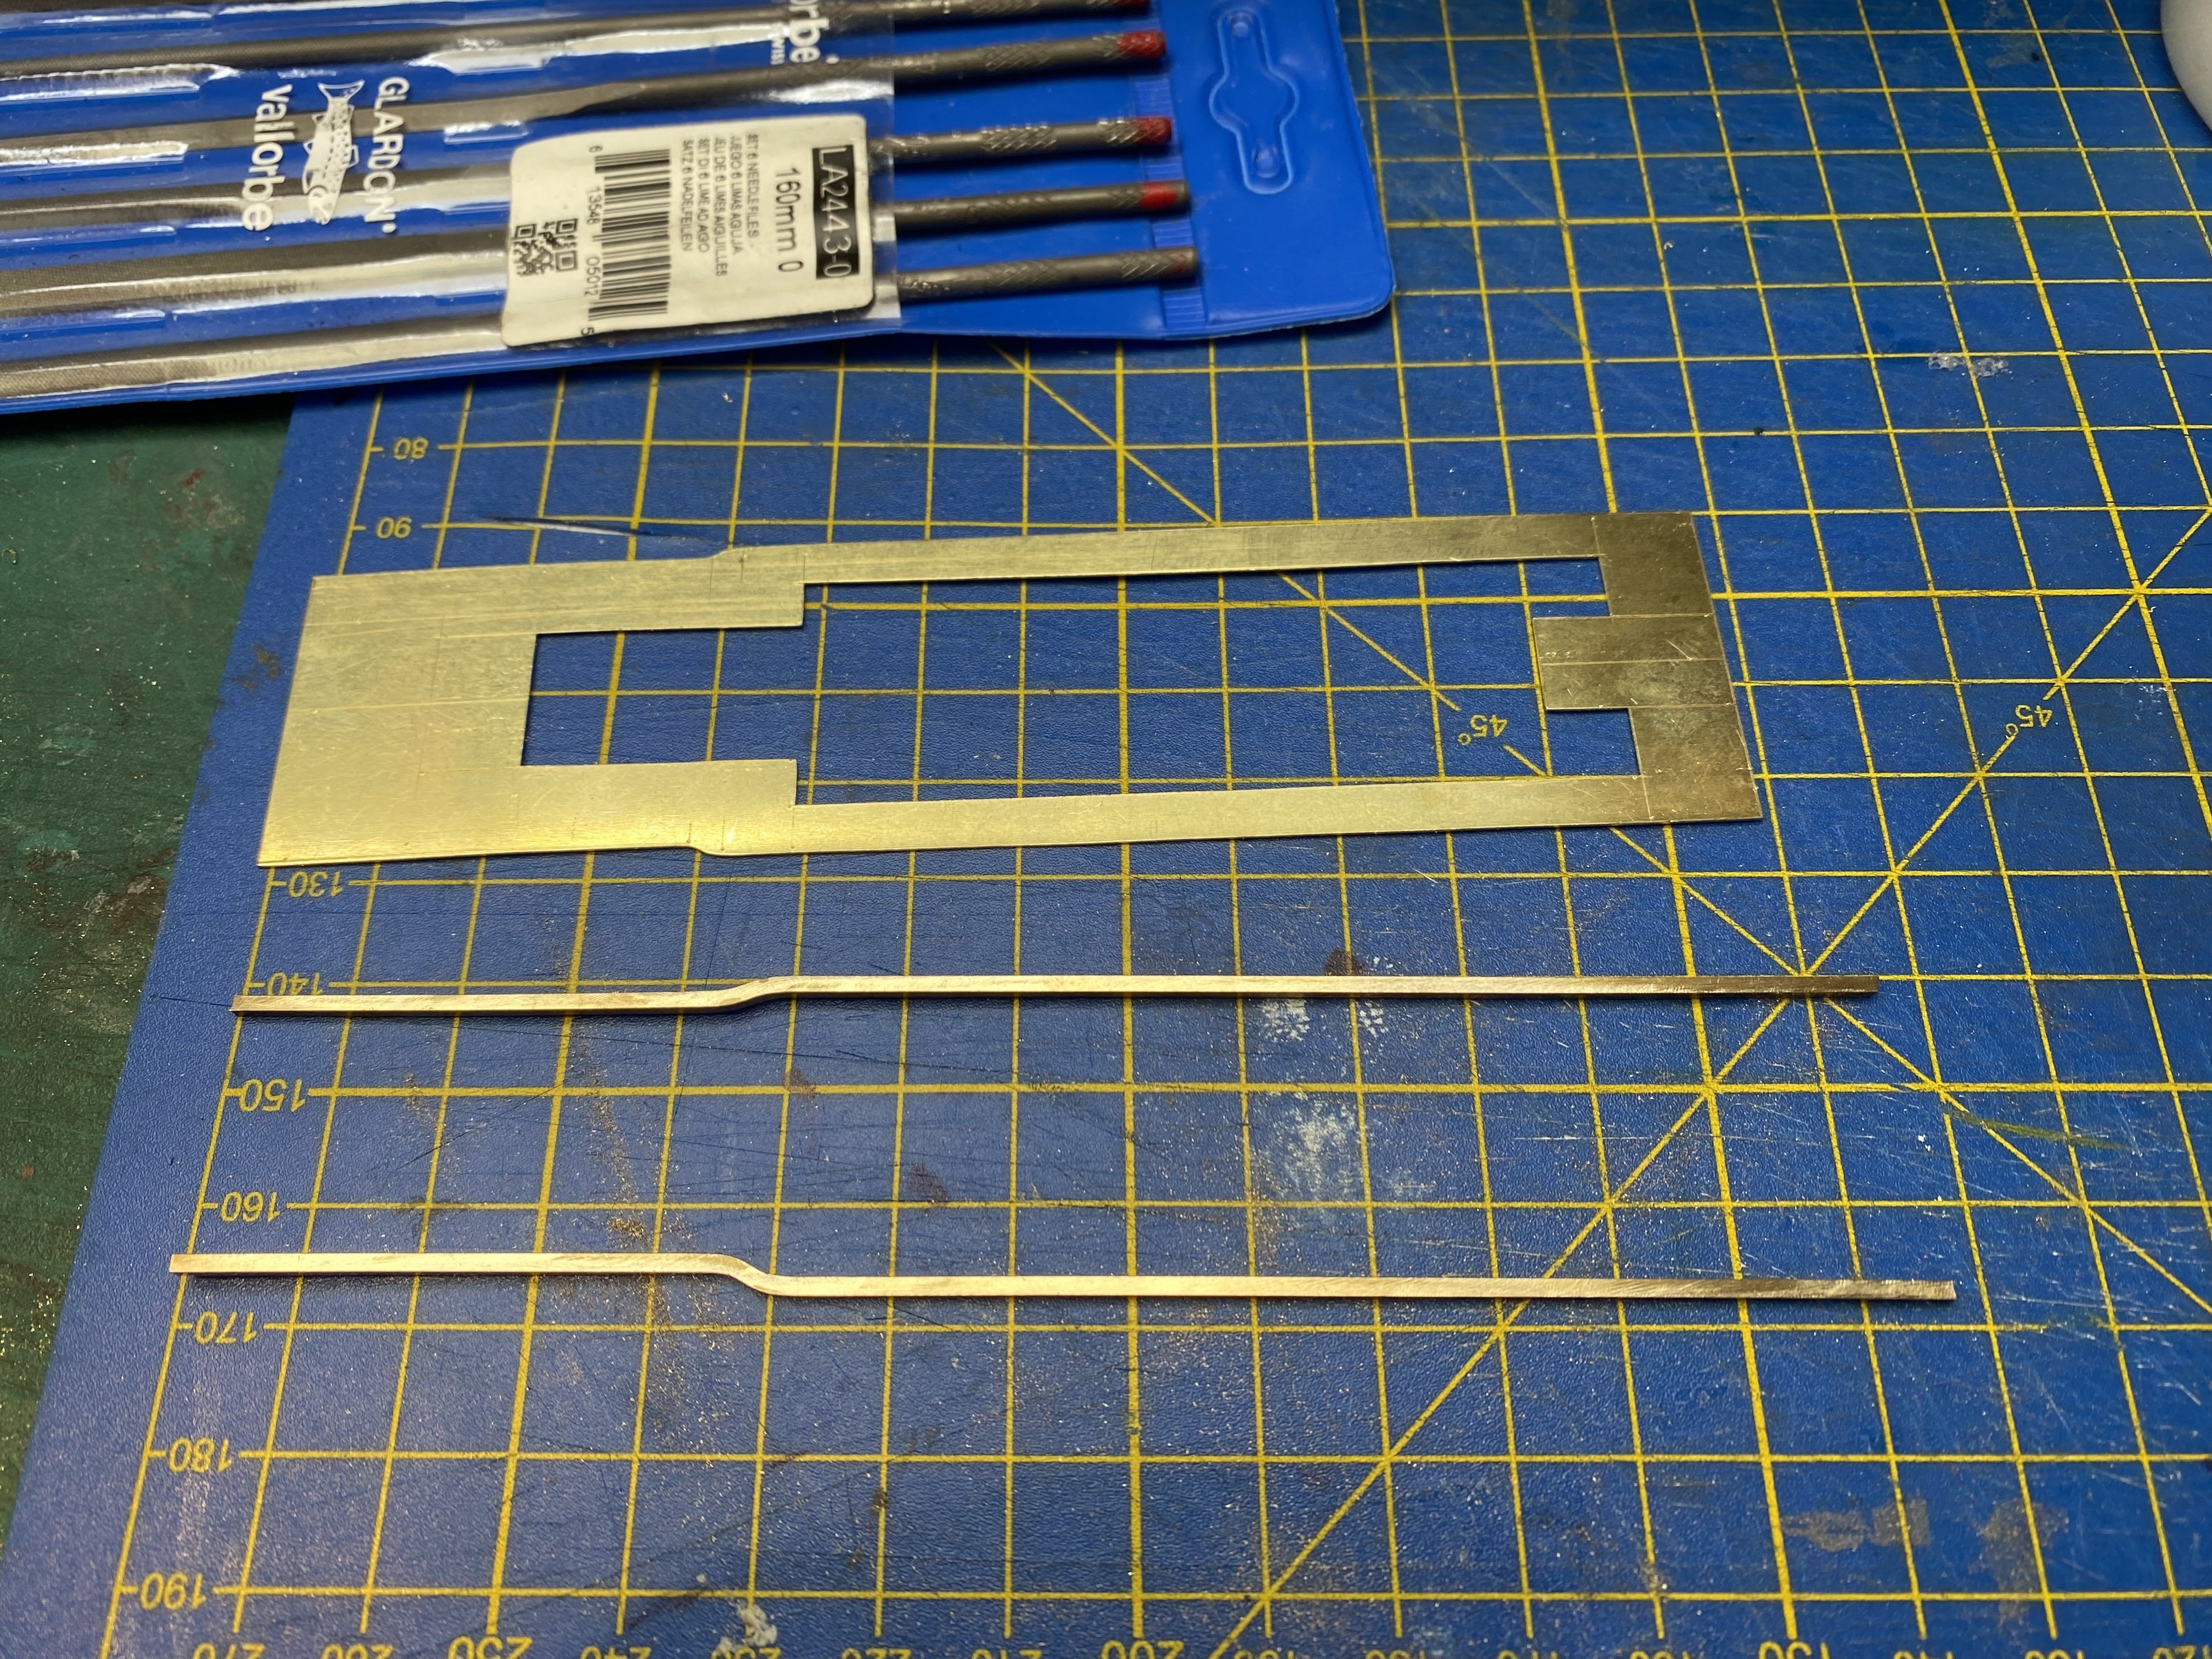
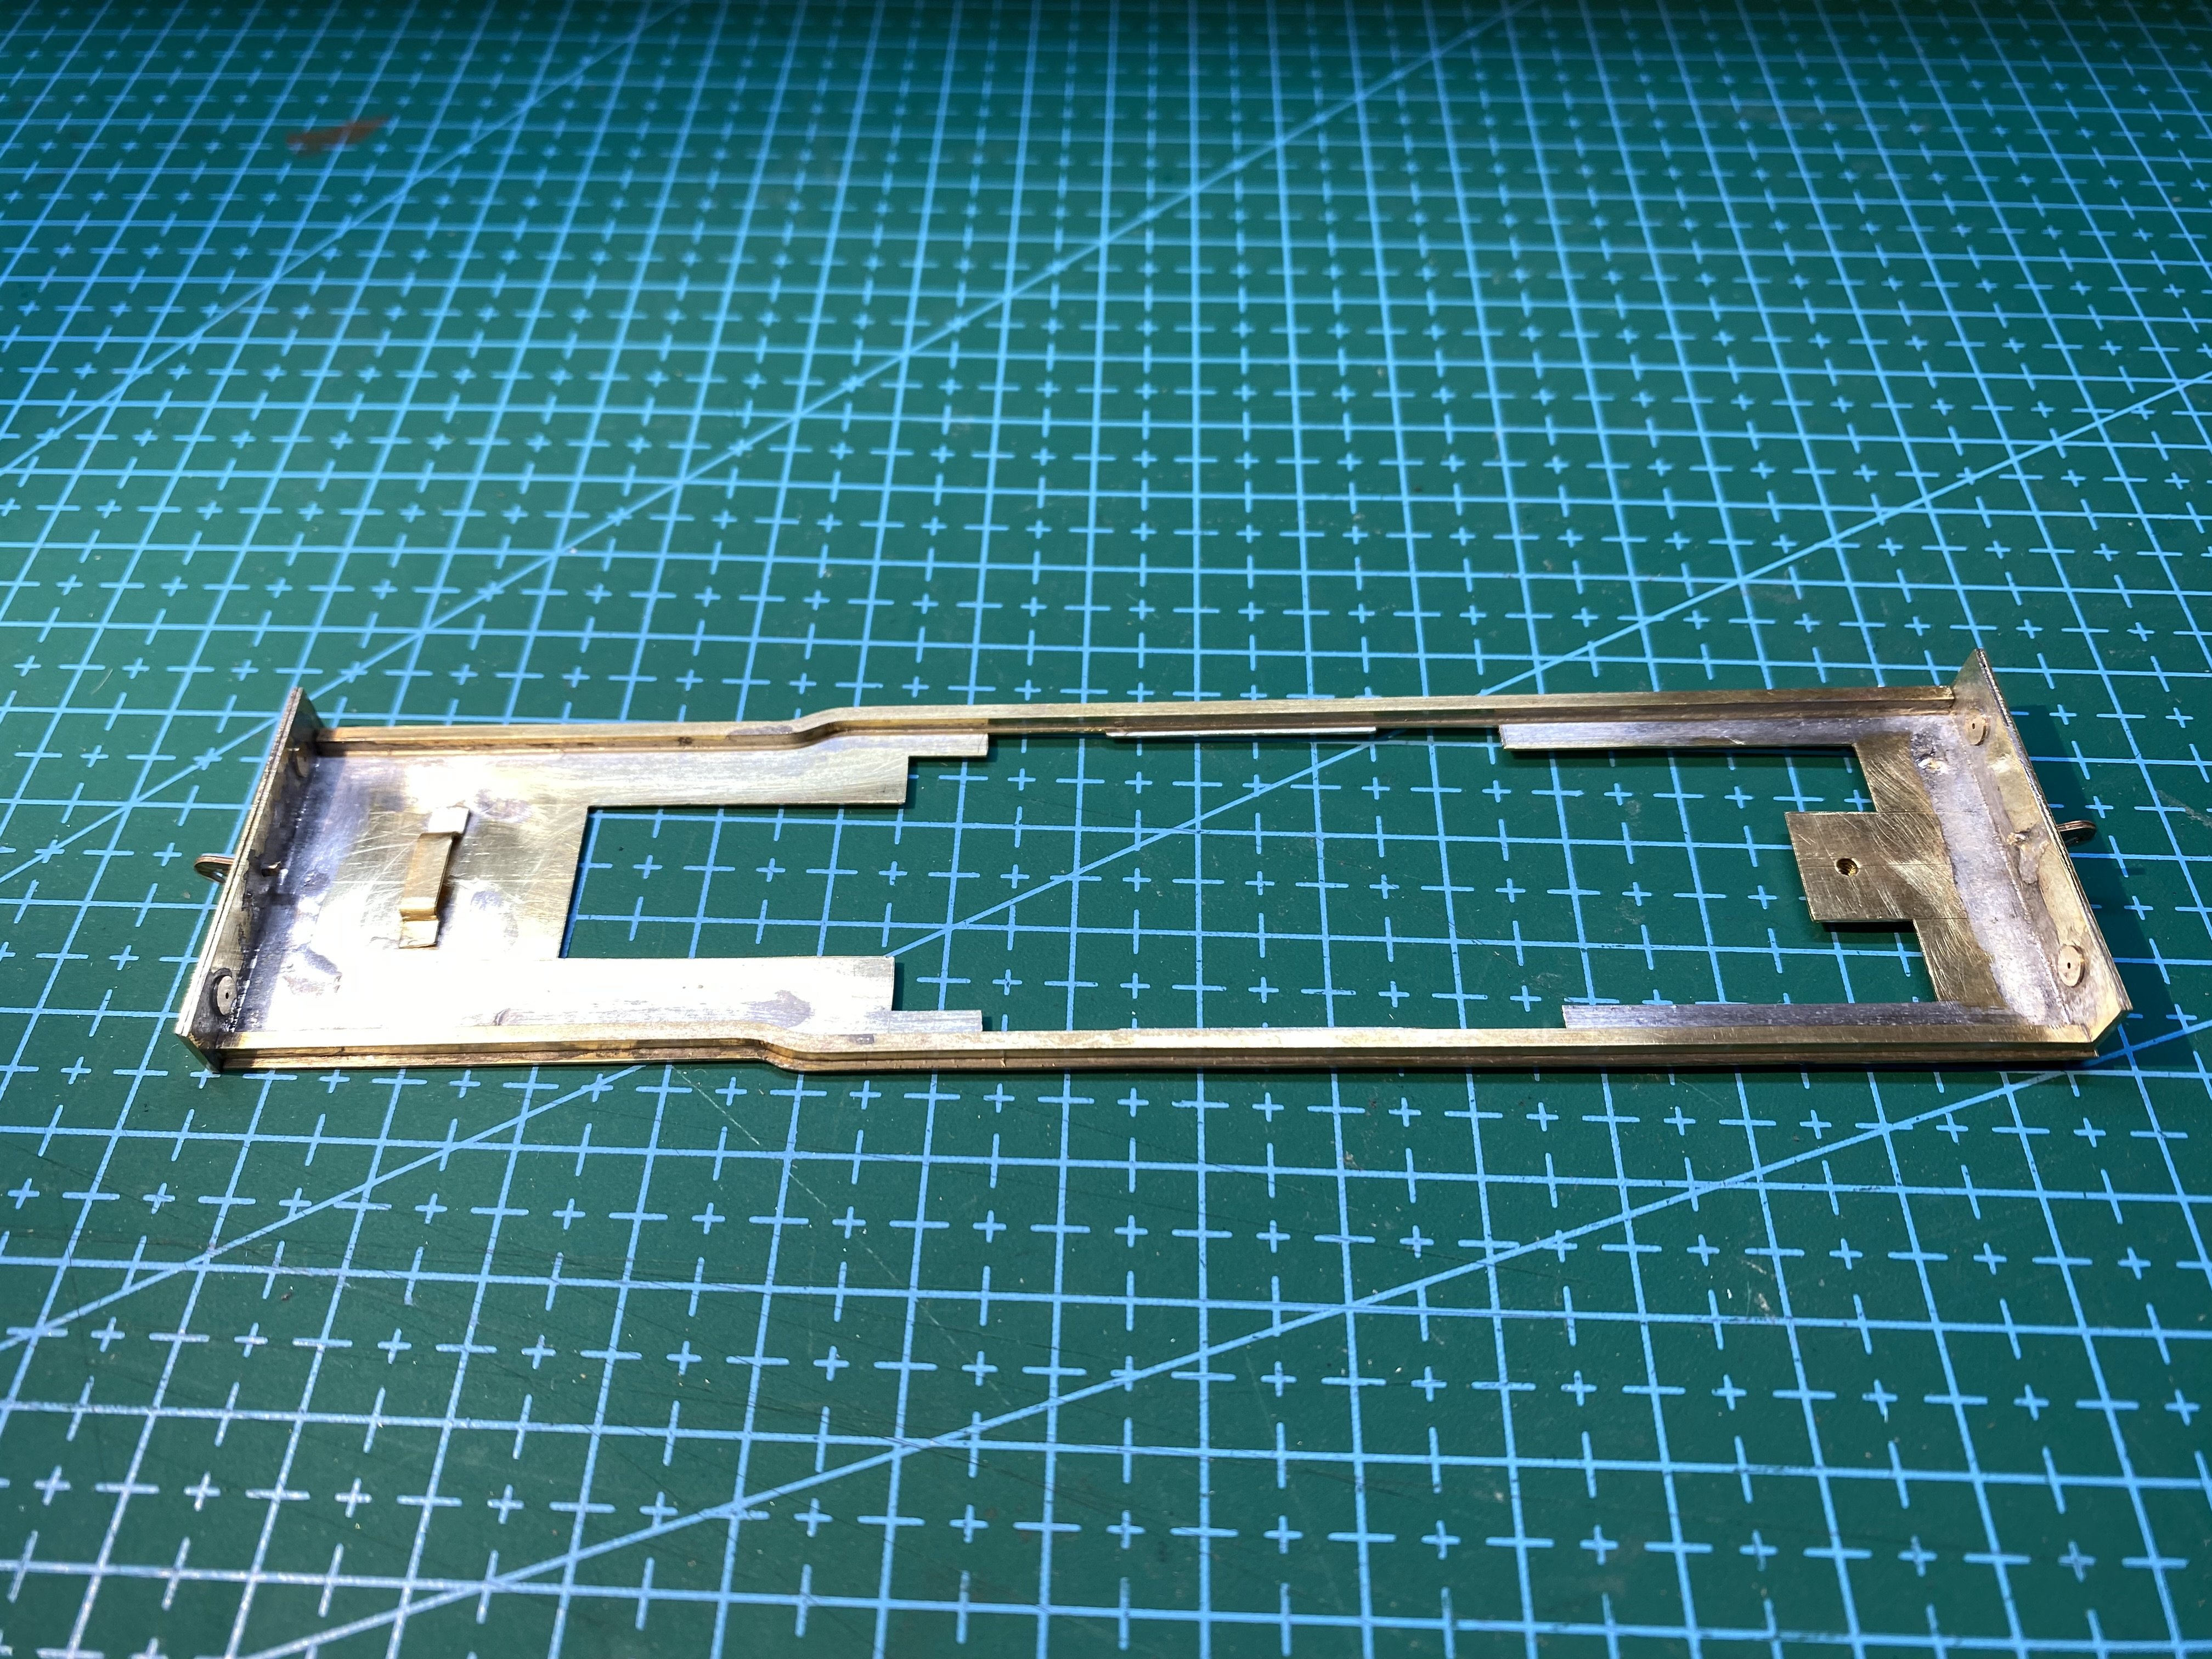
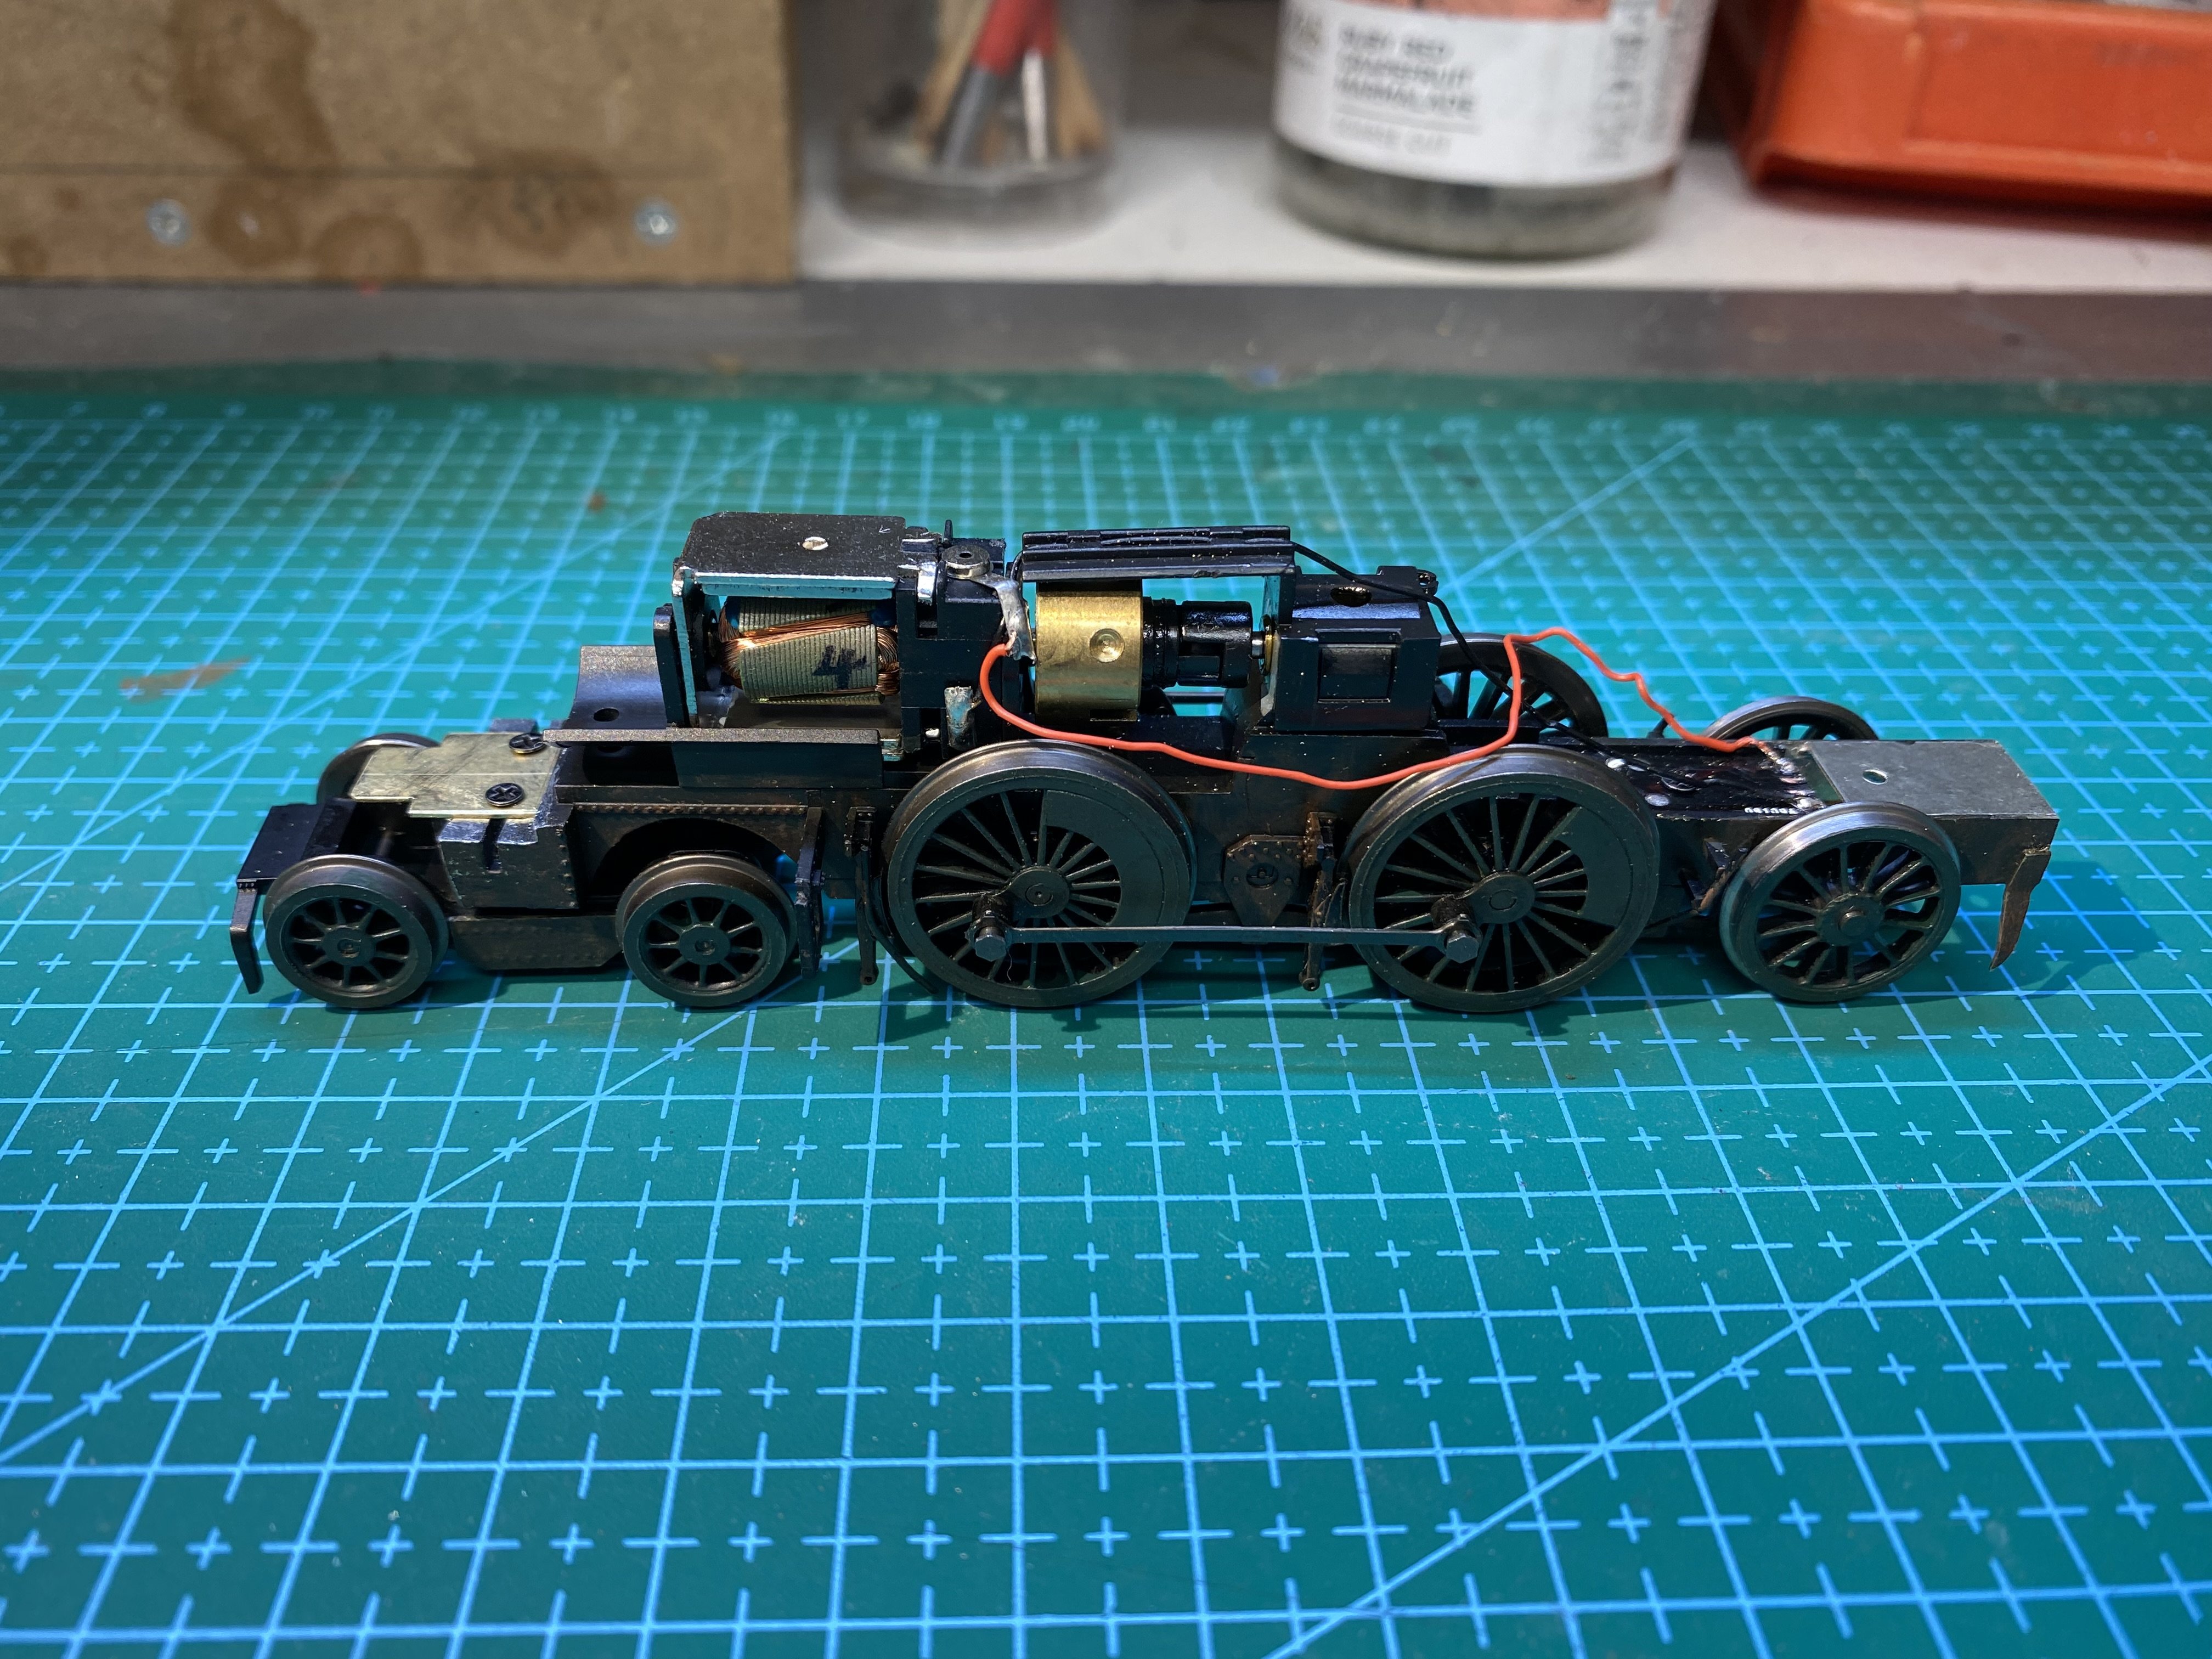
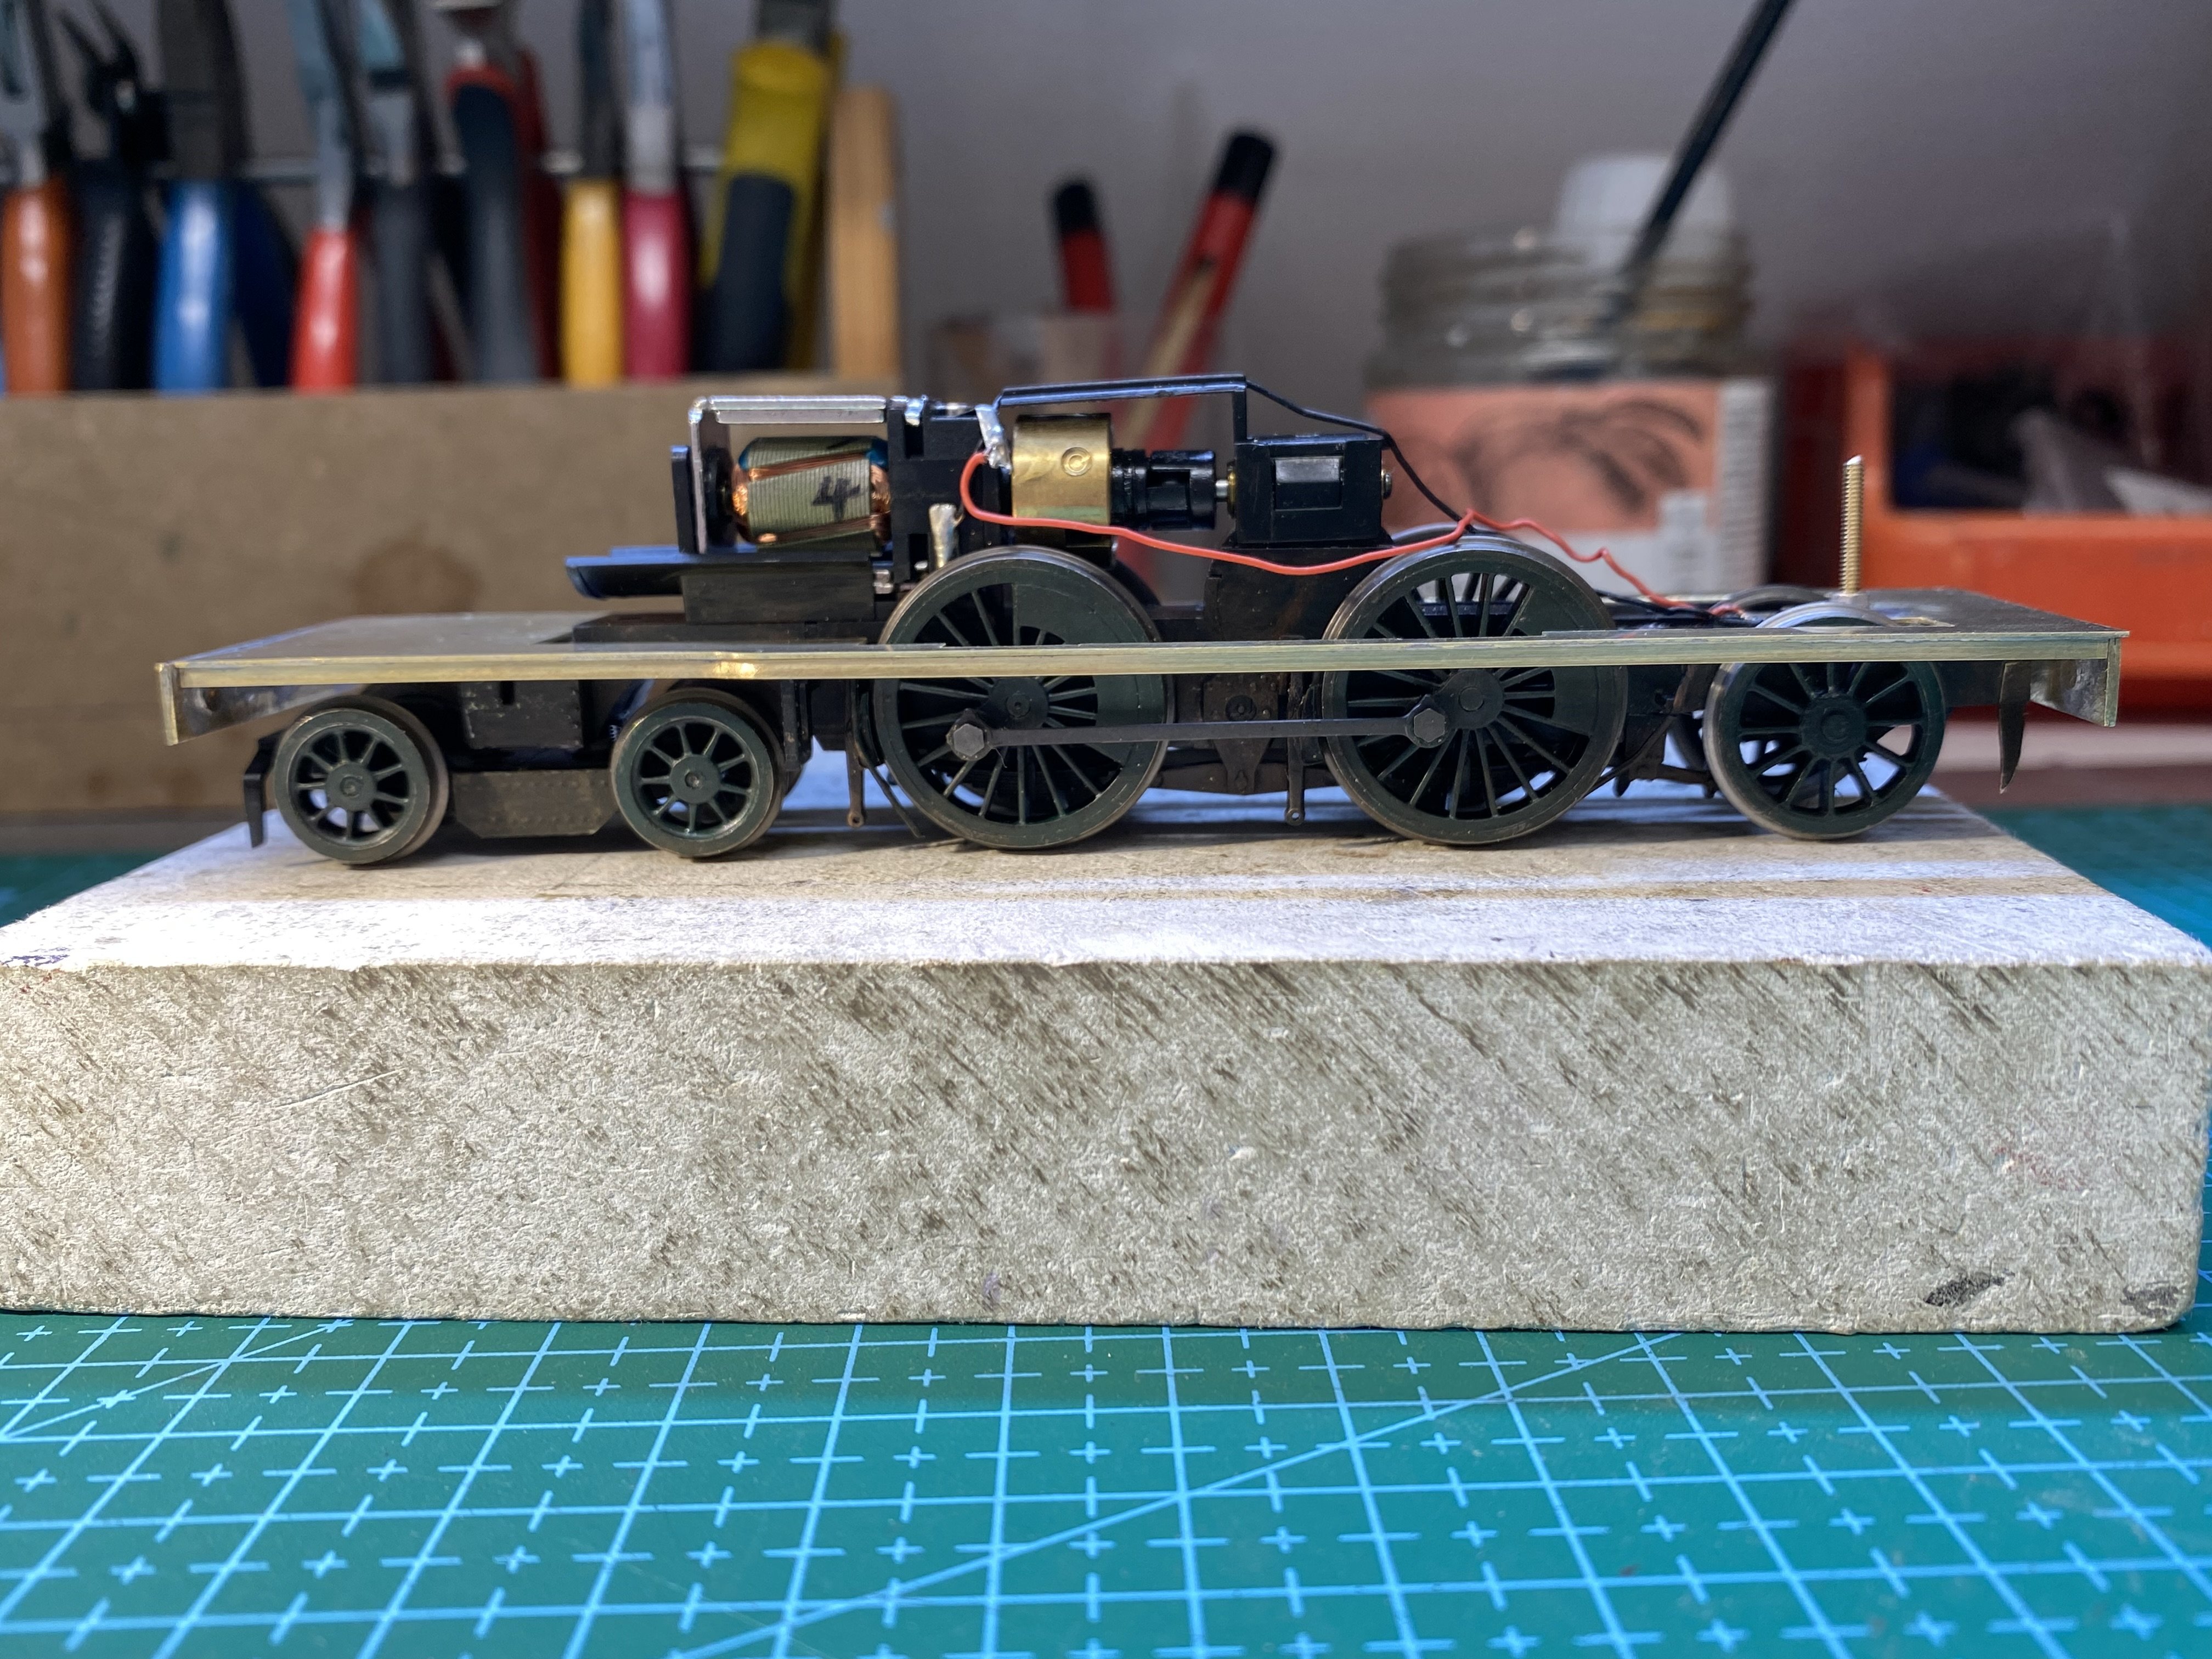
Something slightly different. My first attempt at a Belfast and County Down locomotive a few years back was a model of 4-4-2T bogie tank No. 30 (the one preserved at Cultra) using an Oxford Rail Adams Radial as the basis. Apart from removing the outside cylinders, the chassis was left as was. The superstructure was remodelled in plasticard. I was reasonably happy with it and it's a nice runner but in truth it strains the limits of the 2 foot rule. The proportions aren’t right. At the time I bought a second Adams Radial with the intention of doing another one and it’s lain in a drawer until now. Time to have another go. Comparing the Adams chassis with a BCDR bogie tank, we can say that: the driving wheel diameter and wheelbase are fairly close. Best left alone. May as well scratch-build a new chassis as tackle that, which defeats the object of this exercise. the leading bogie is too long and its leading axle too far ahead of the leading drivers. the trailing truck is too far behind the rear drivers and the wheels are too small. These things ought to be remediable. Starting with the front bogie, it was cut in two across the middle, 2 mm removed from the centre and the two halves glued back together. Being plastic, it was fairly easy to do. The front of the chassis block needed cut back to allow clearance for the front bogie axle. The rear of the chassis block was cut off and discarded about 10mm aft of the rear drivers and replaced with a new section made up in nickel silver to bring the axle line forward. This is glued and pinned to the chassis block. The Oxford bogie wheels were replaced with larger 17mm 12 spoke wheels (Alan Gibson 4851). The new axle is sprung with 0.33mm brass wire. Sawing through the chassis block destroyed the printed circuitry attached to it so the chassis is no longer ‘DCC ready’ but that’s not the end of the world. The intention is to discard the Adams bodywork and scratch-build a body in brass & nickel silver. A running plate in 16 thou brass with valances made from 1.5mm square brass rod is as far as I’ve got. We’ll see how it works out. Alan
- 641 replies
-
- 12
-
-
Neat! That's coming along very nicely David. I like your jig for lining up the square tubing on the axles. Simple but effective. I'm going to wait till you've solved all the problems of building chassis with outside frames and cranks before I tackle one! That High Level gearbox looks minuscule in there - I'm used to them taking up half the space in the boiler.