Tullygrainey
-
Posts
1,139 -
Joined
-
Last visited
-
Days Won
60
Content Type
Profiles
Forums
Events
Gallery
Blogs
Everything posted by Tullygrainey
-
It's often said that beauty is in the eye of the beholder. So is colour I would say. I've had surgery to one eye (to fix a macular hole) with the result that I have slightly different colour vision in each eye. The operated eye sees things cooler than the other one. So where does that leave me when it comes to assessing colour?
-
Ah... thank you Paul. That makes perfect sense now you point it out. Those bits were vaguely bothering me but clearly not enough to make me read the instruction sheet properly! It does say "upright panels can now be fitted along the top edge of the side flares". As to why Kieran and I both made the same mistake, builder fatigue might have something to do with it. The relevant instruction is close to the end of a long list. This should be a joy to fix Cheers, Alan
-
That would’ve been easier if I’d included them in the first place!

-
Whoops... missed those David! There's no mention of them in the written instructions but they appear in one of the diagrams- and in all the prototype photos of course so no excuses for not noticing Many thanks. I'll add those.
-
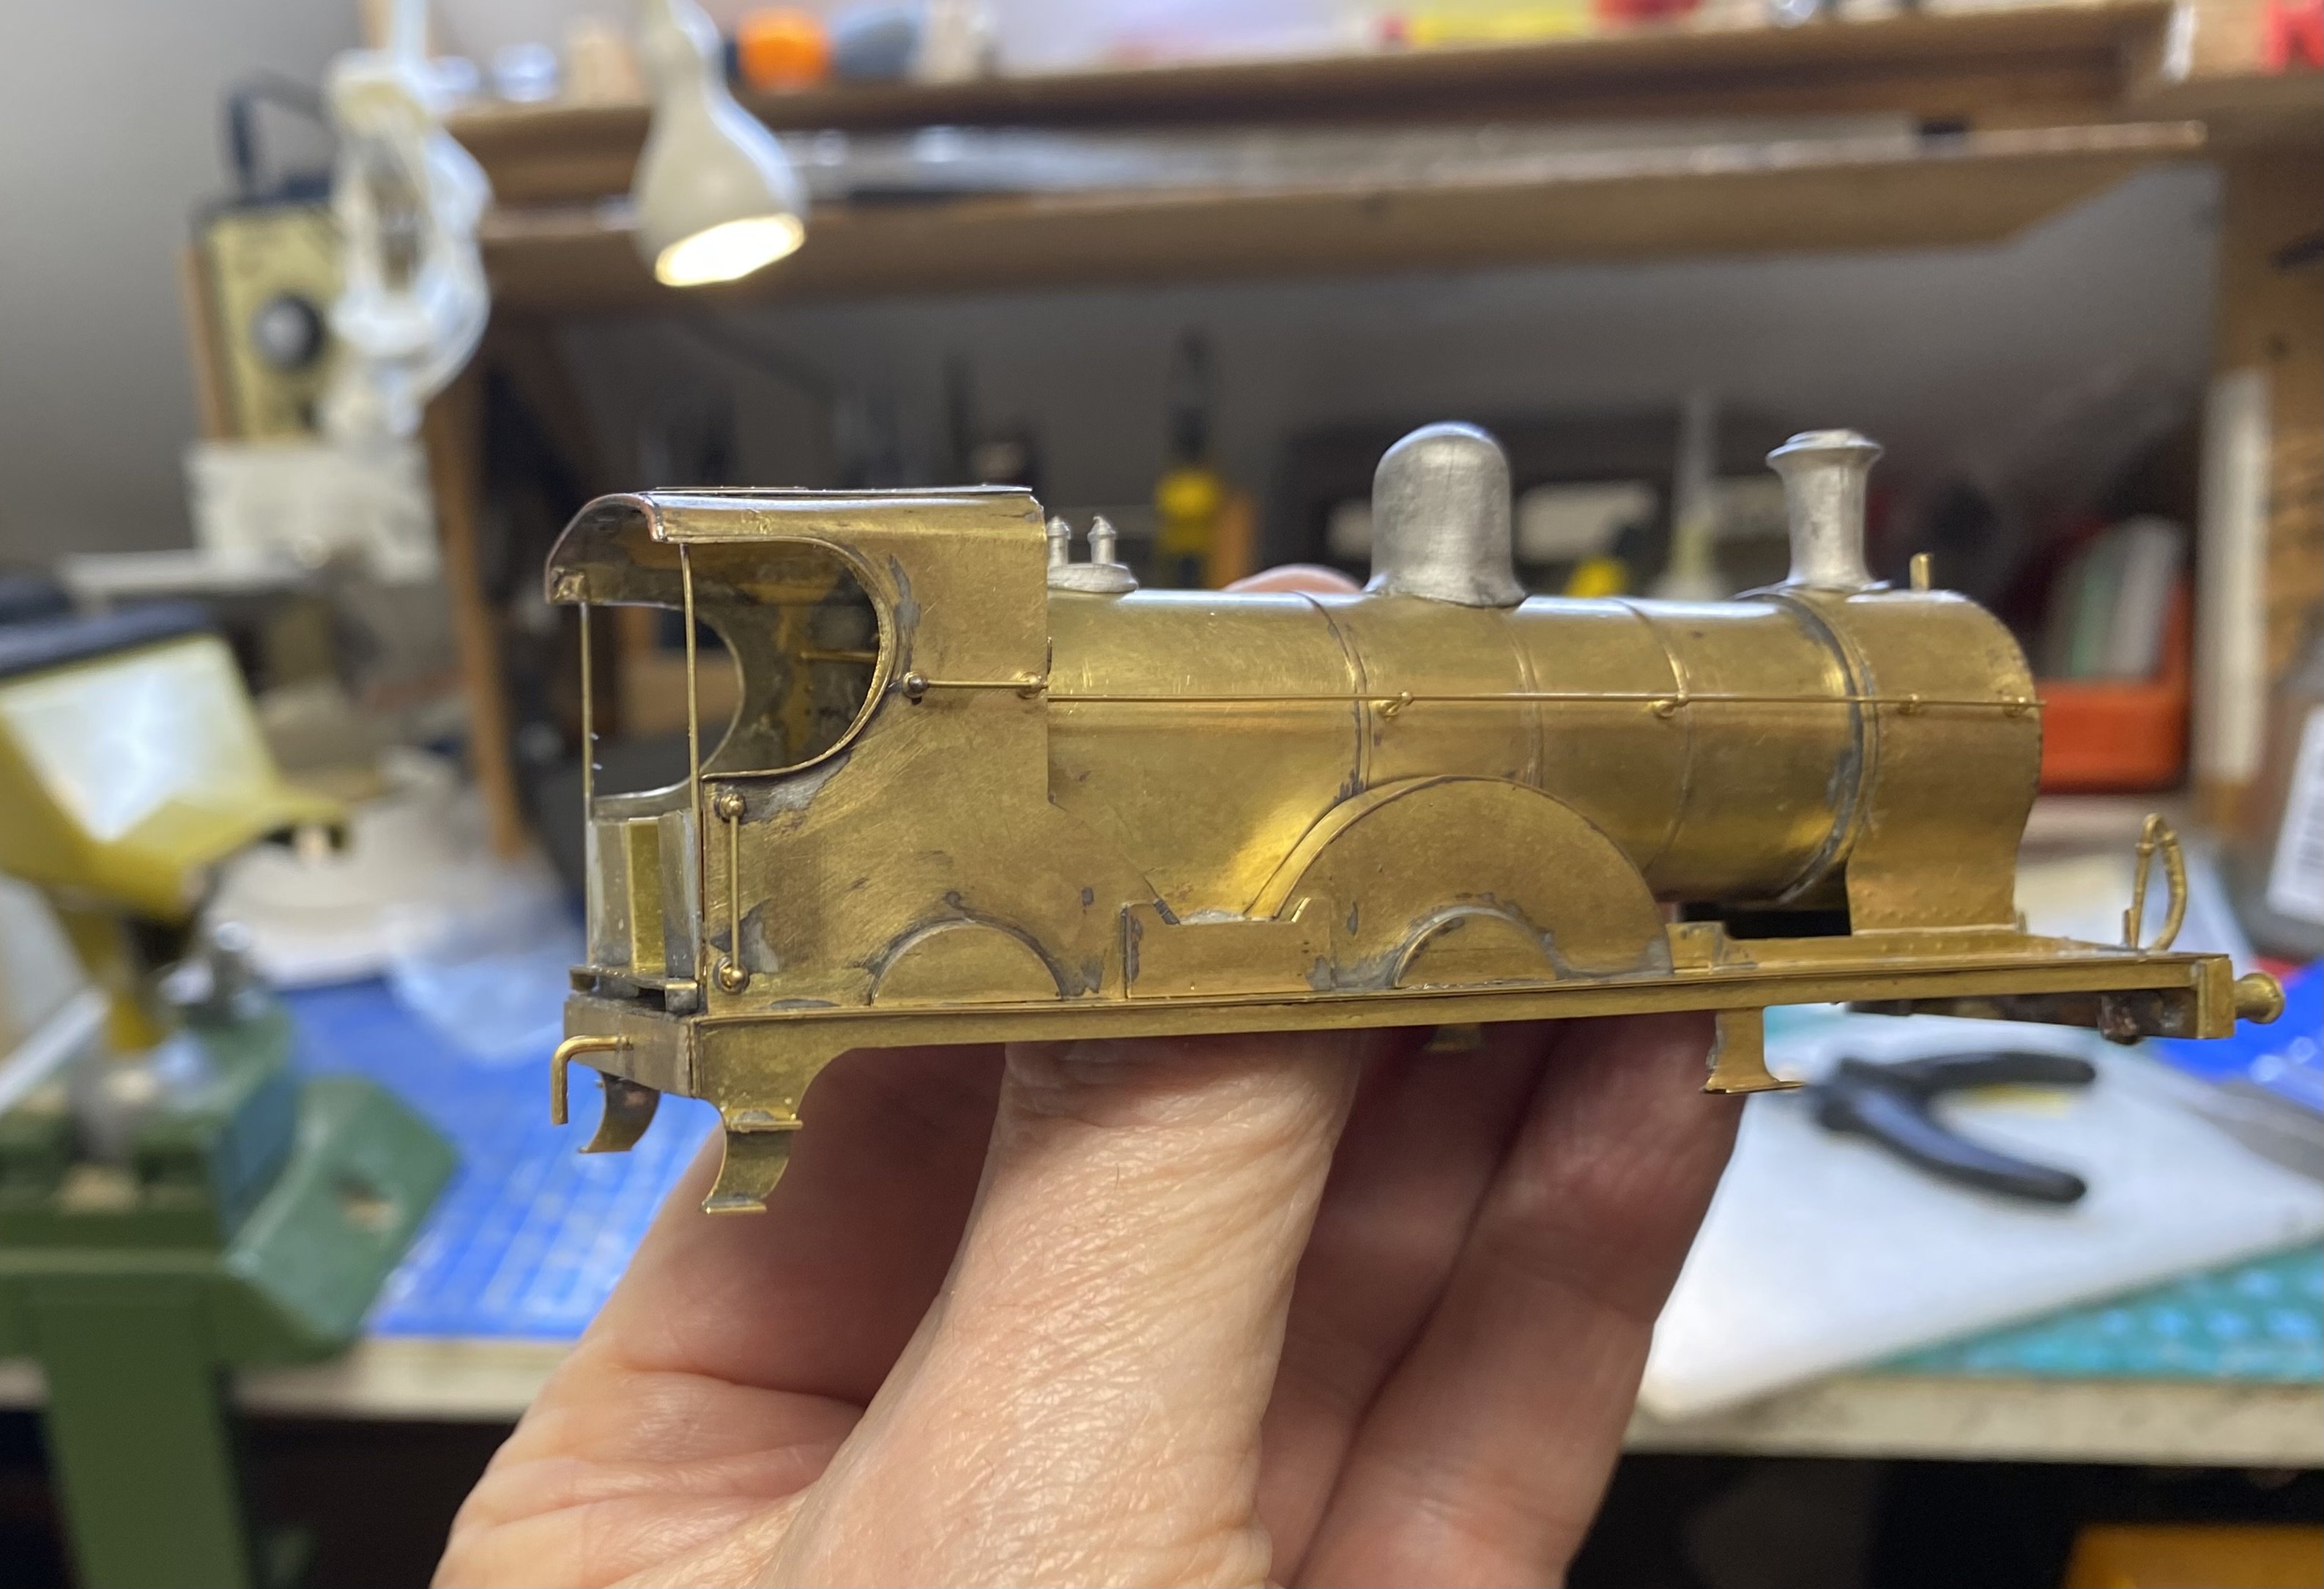
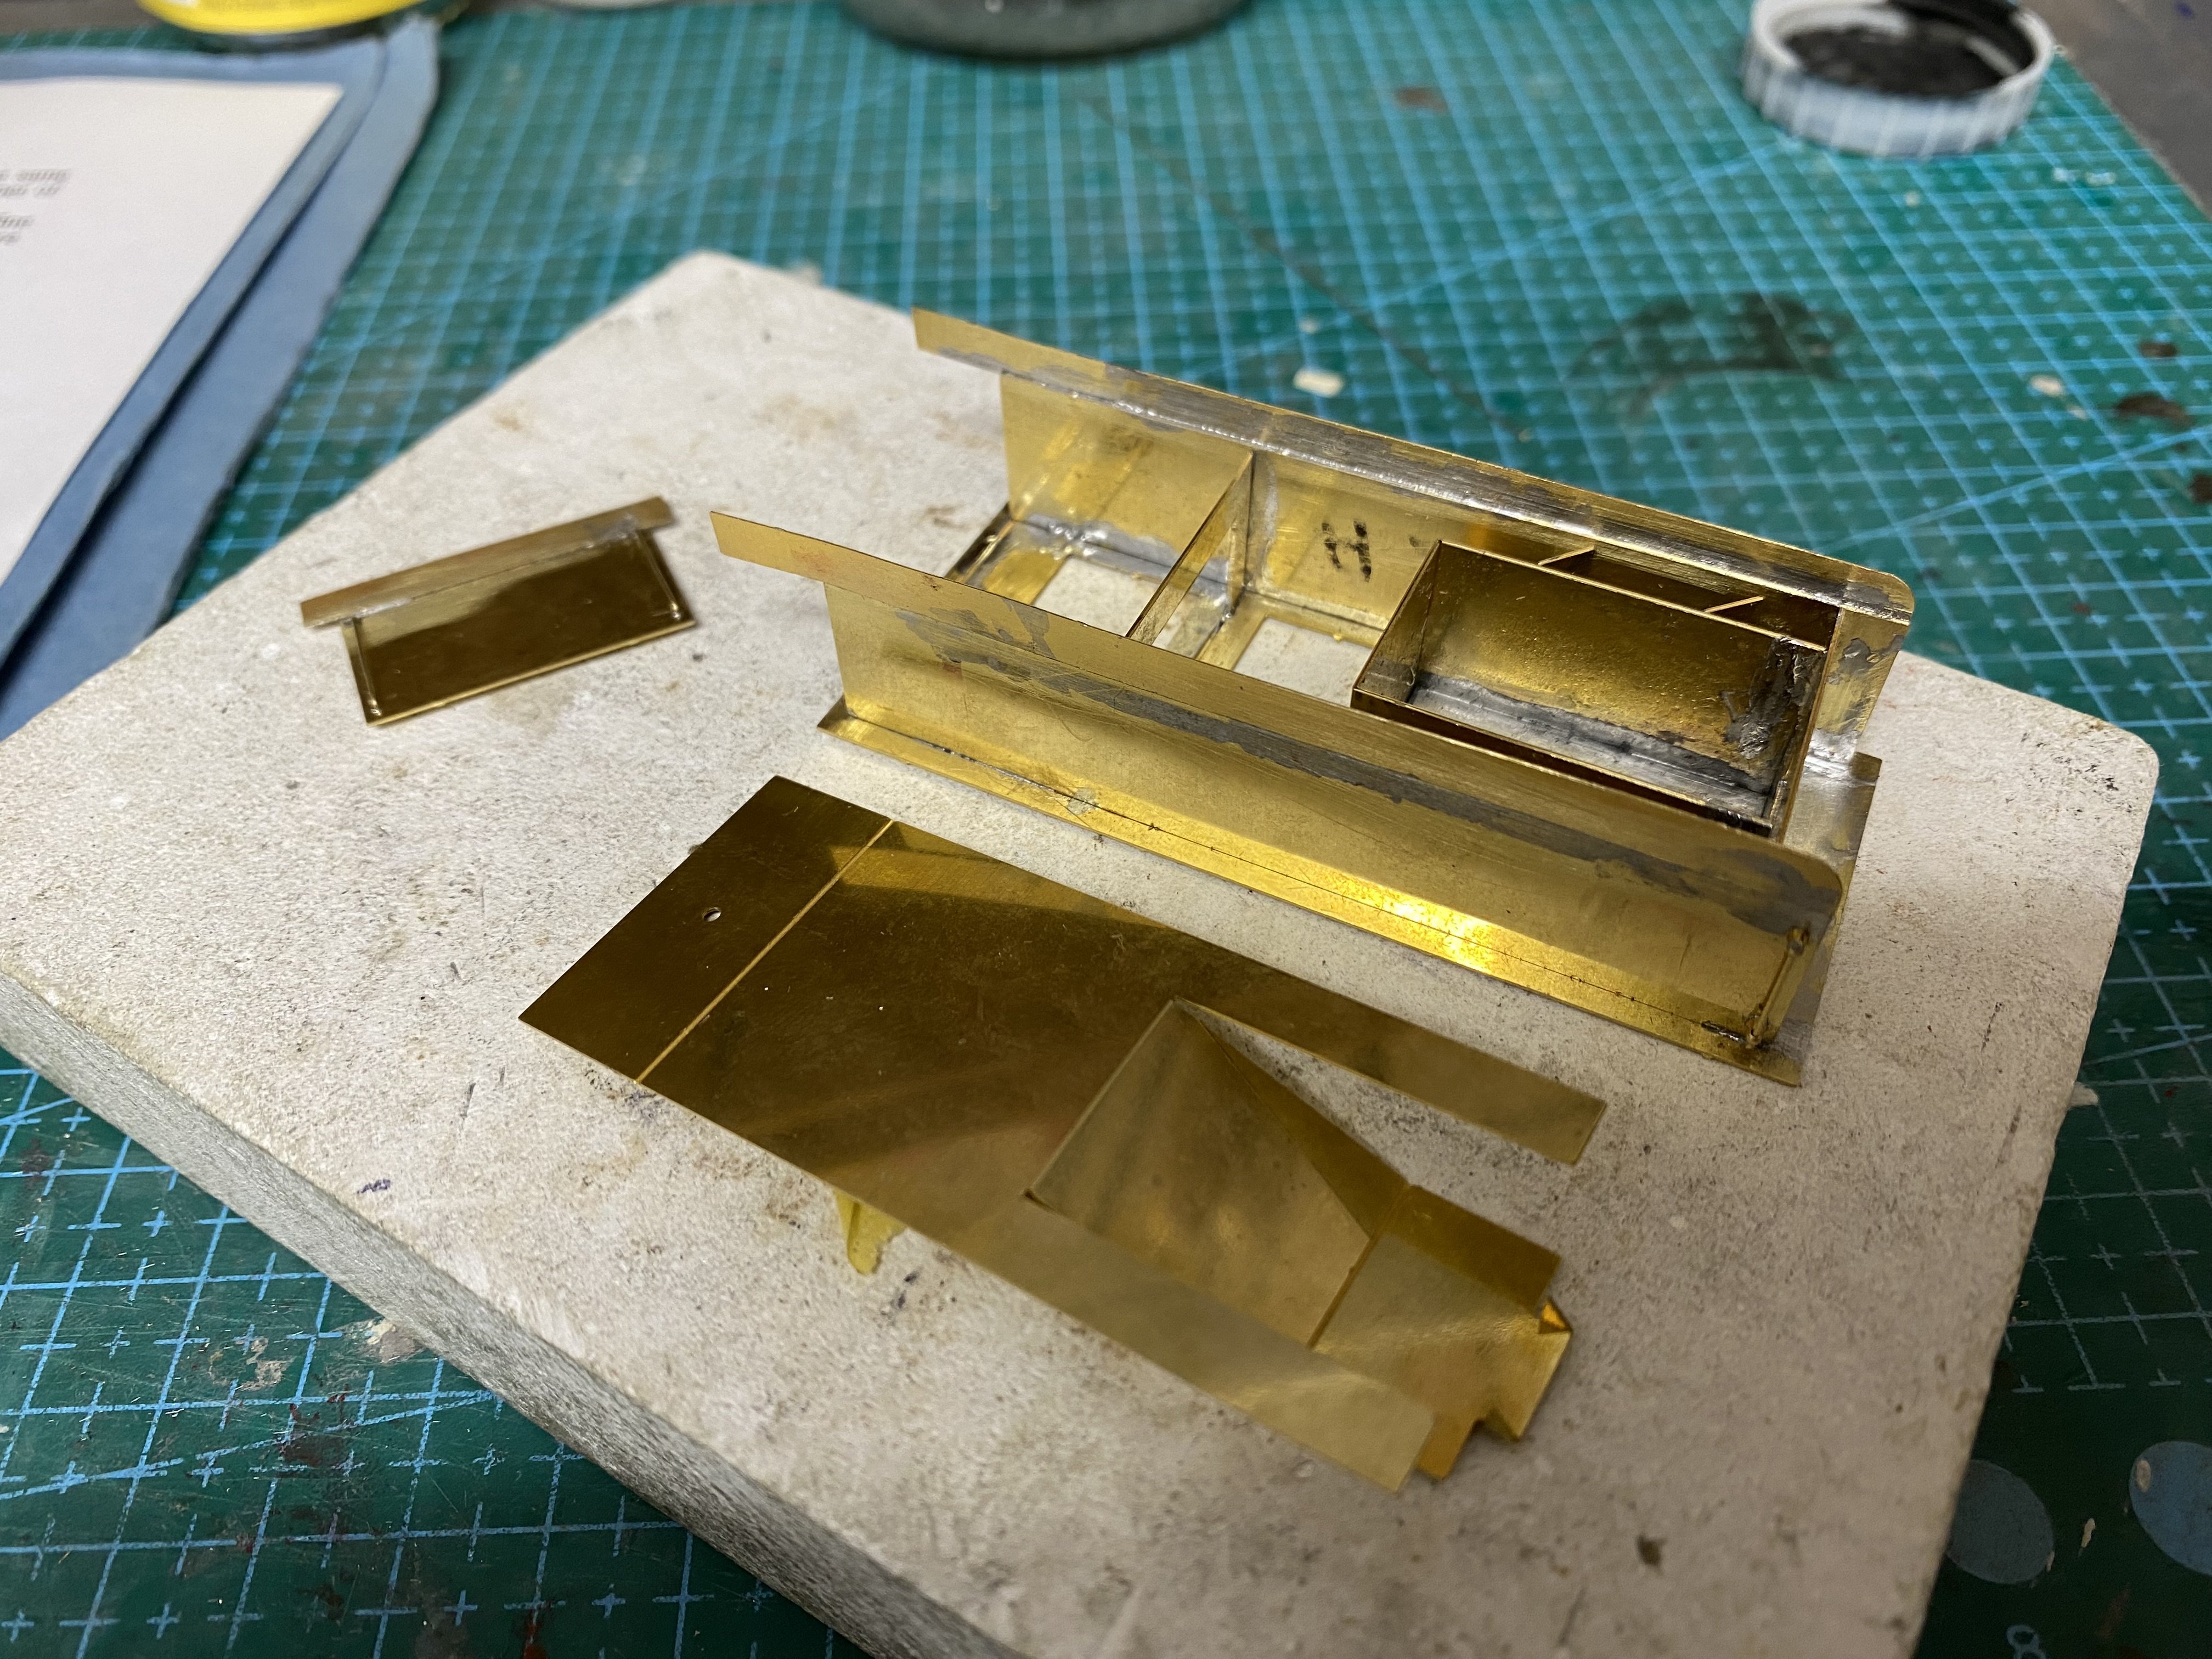
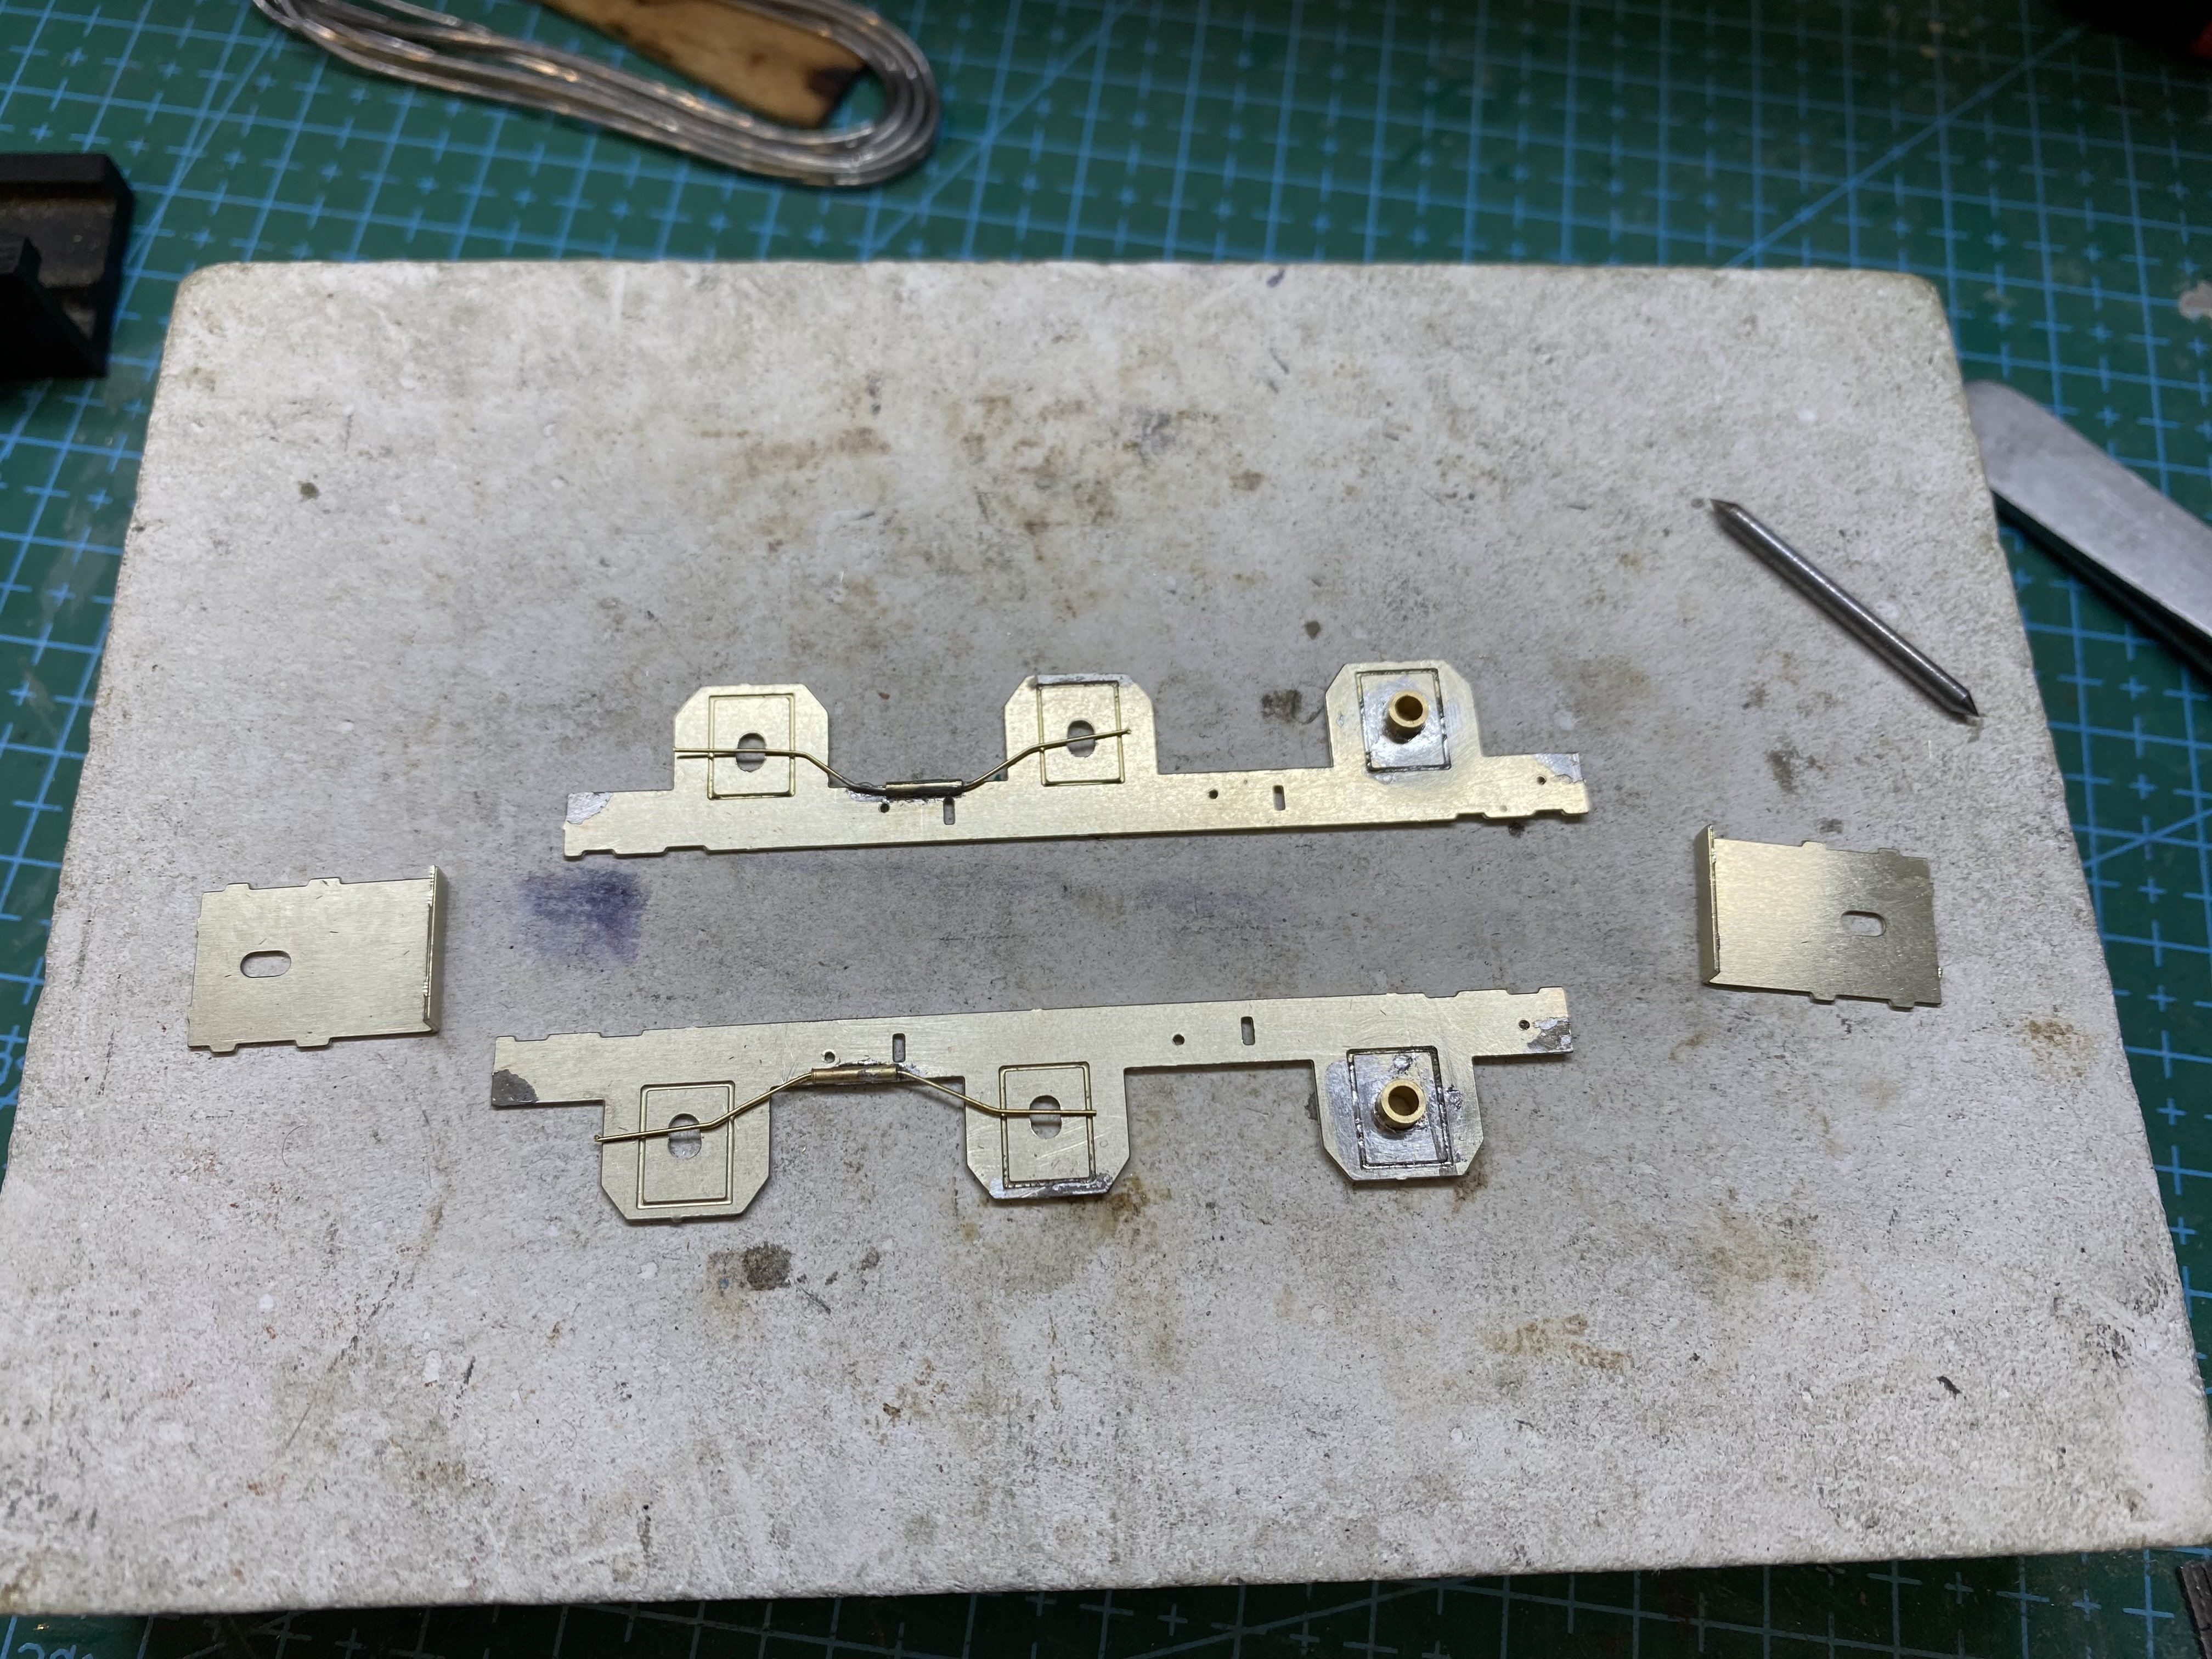
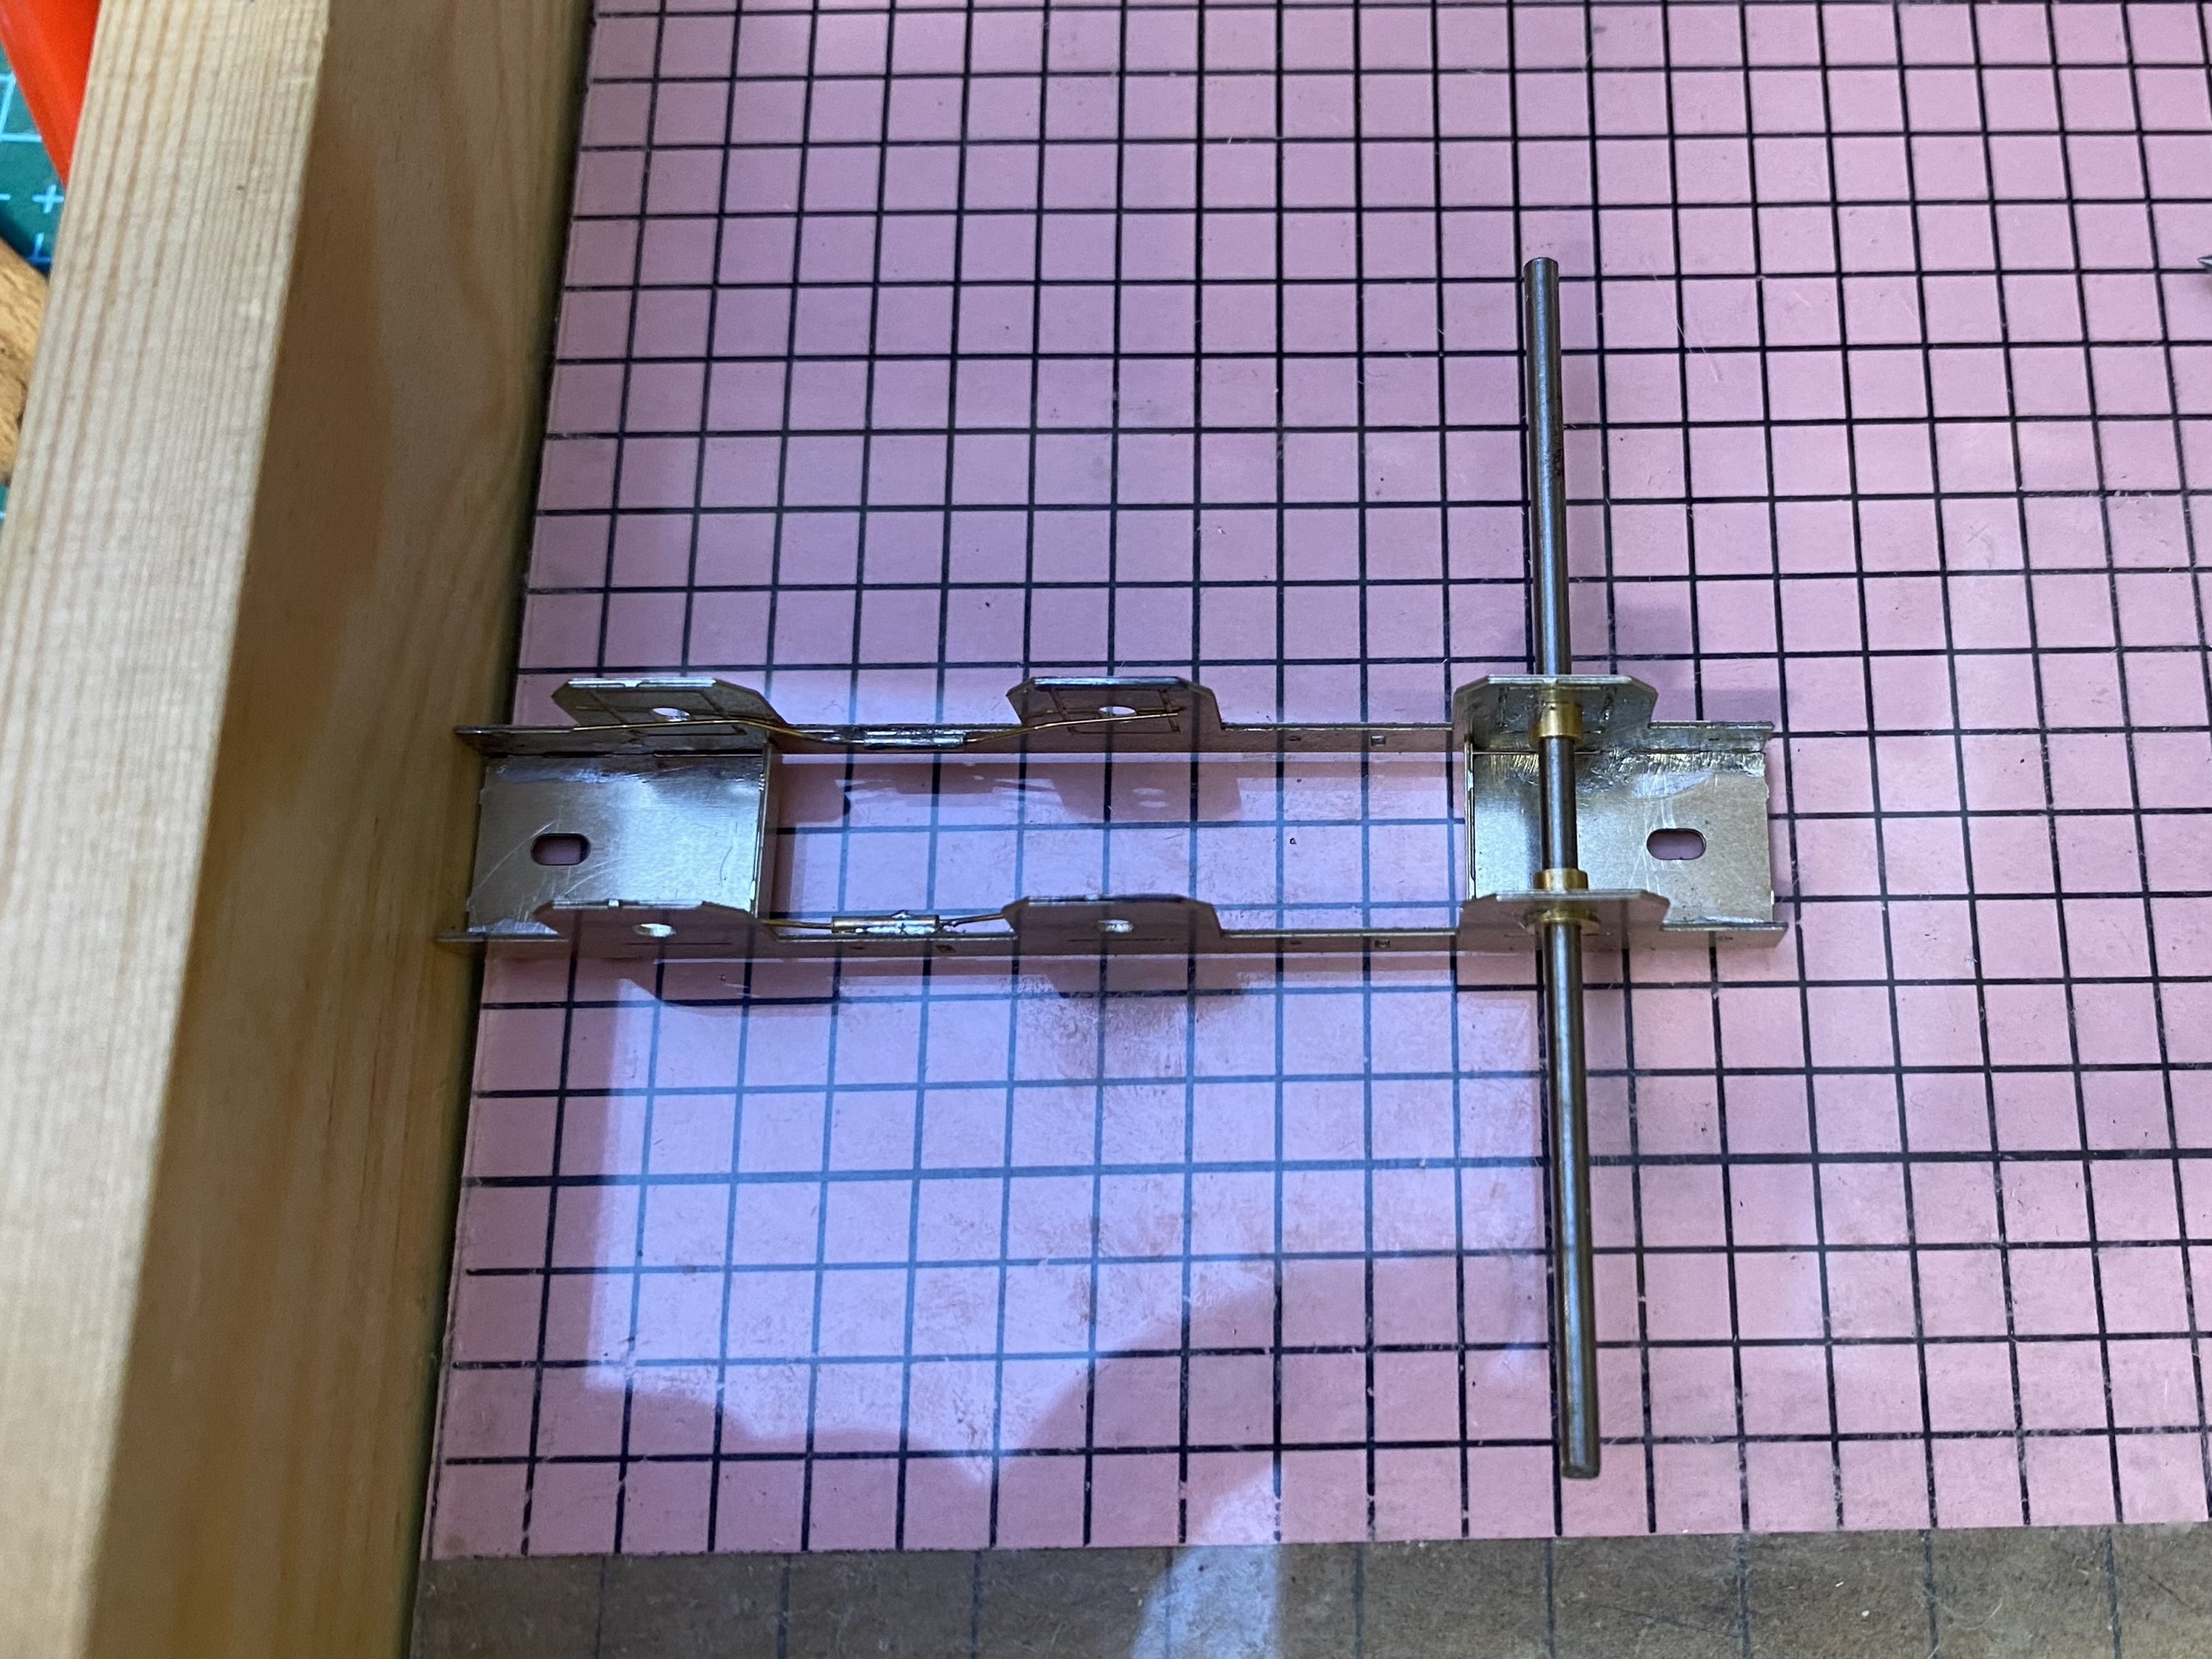
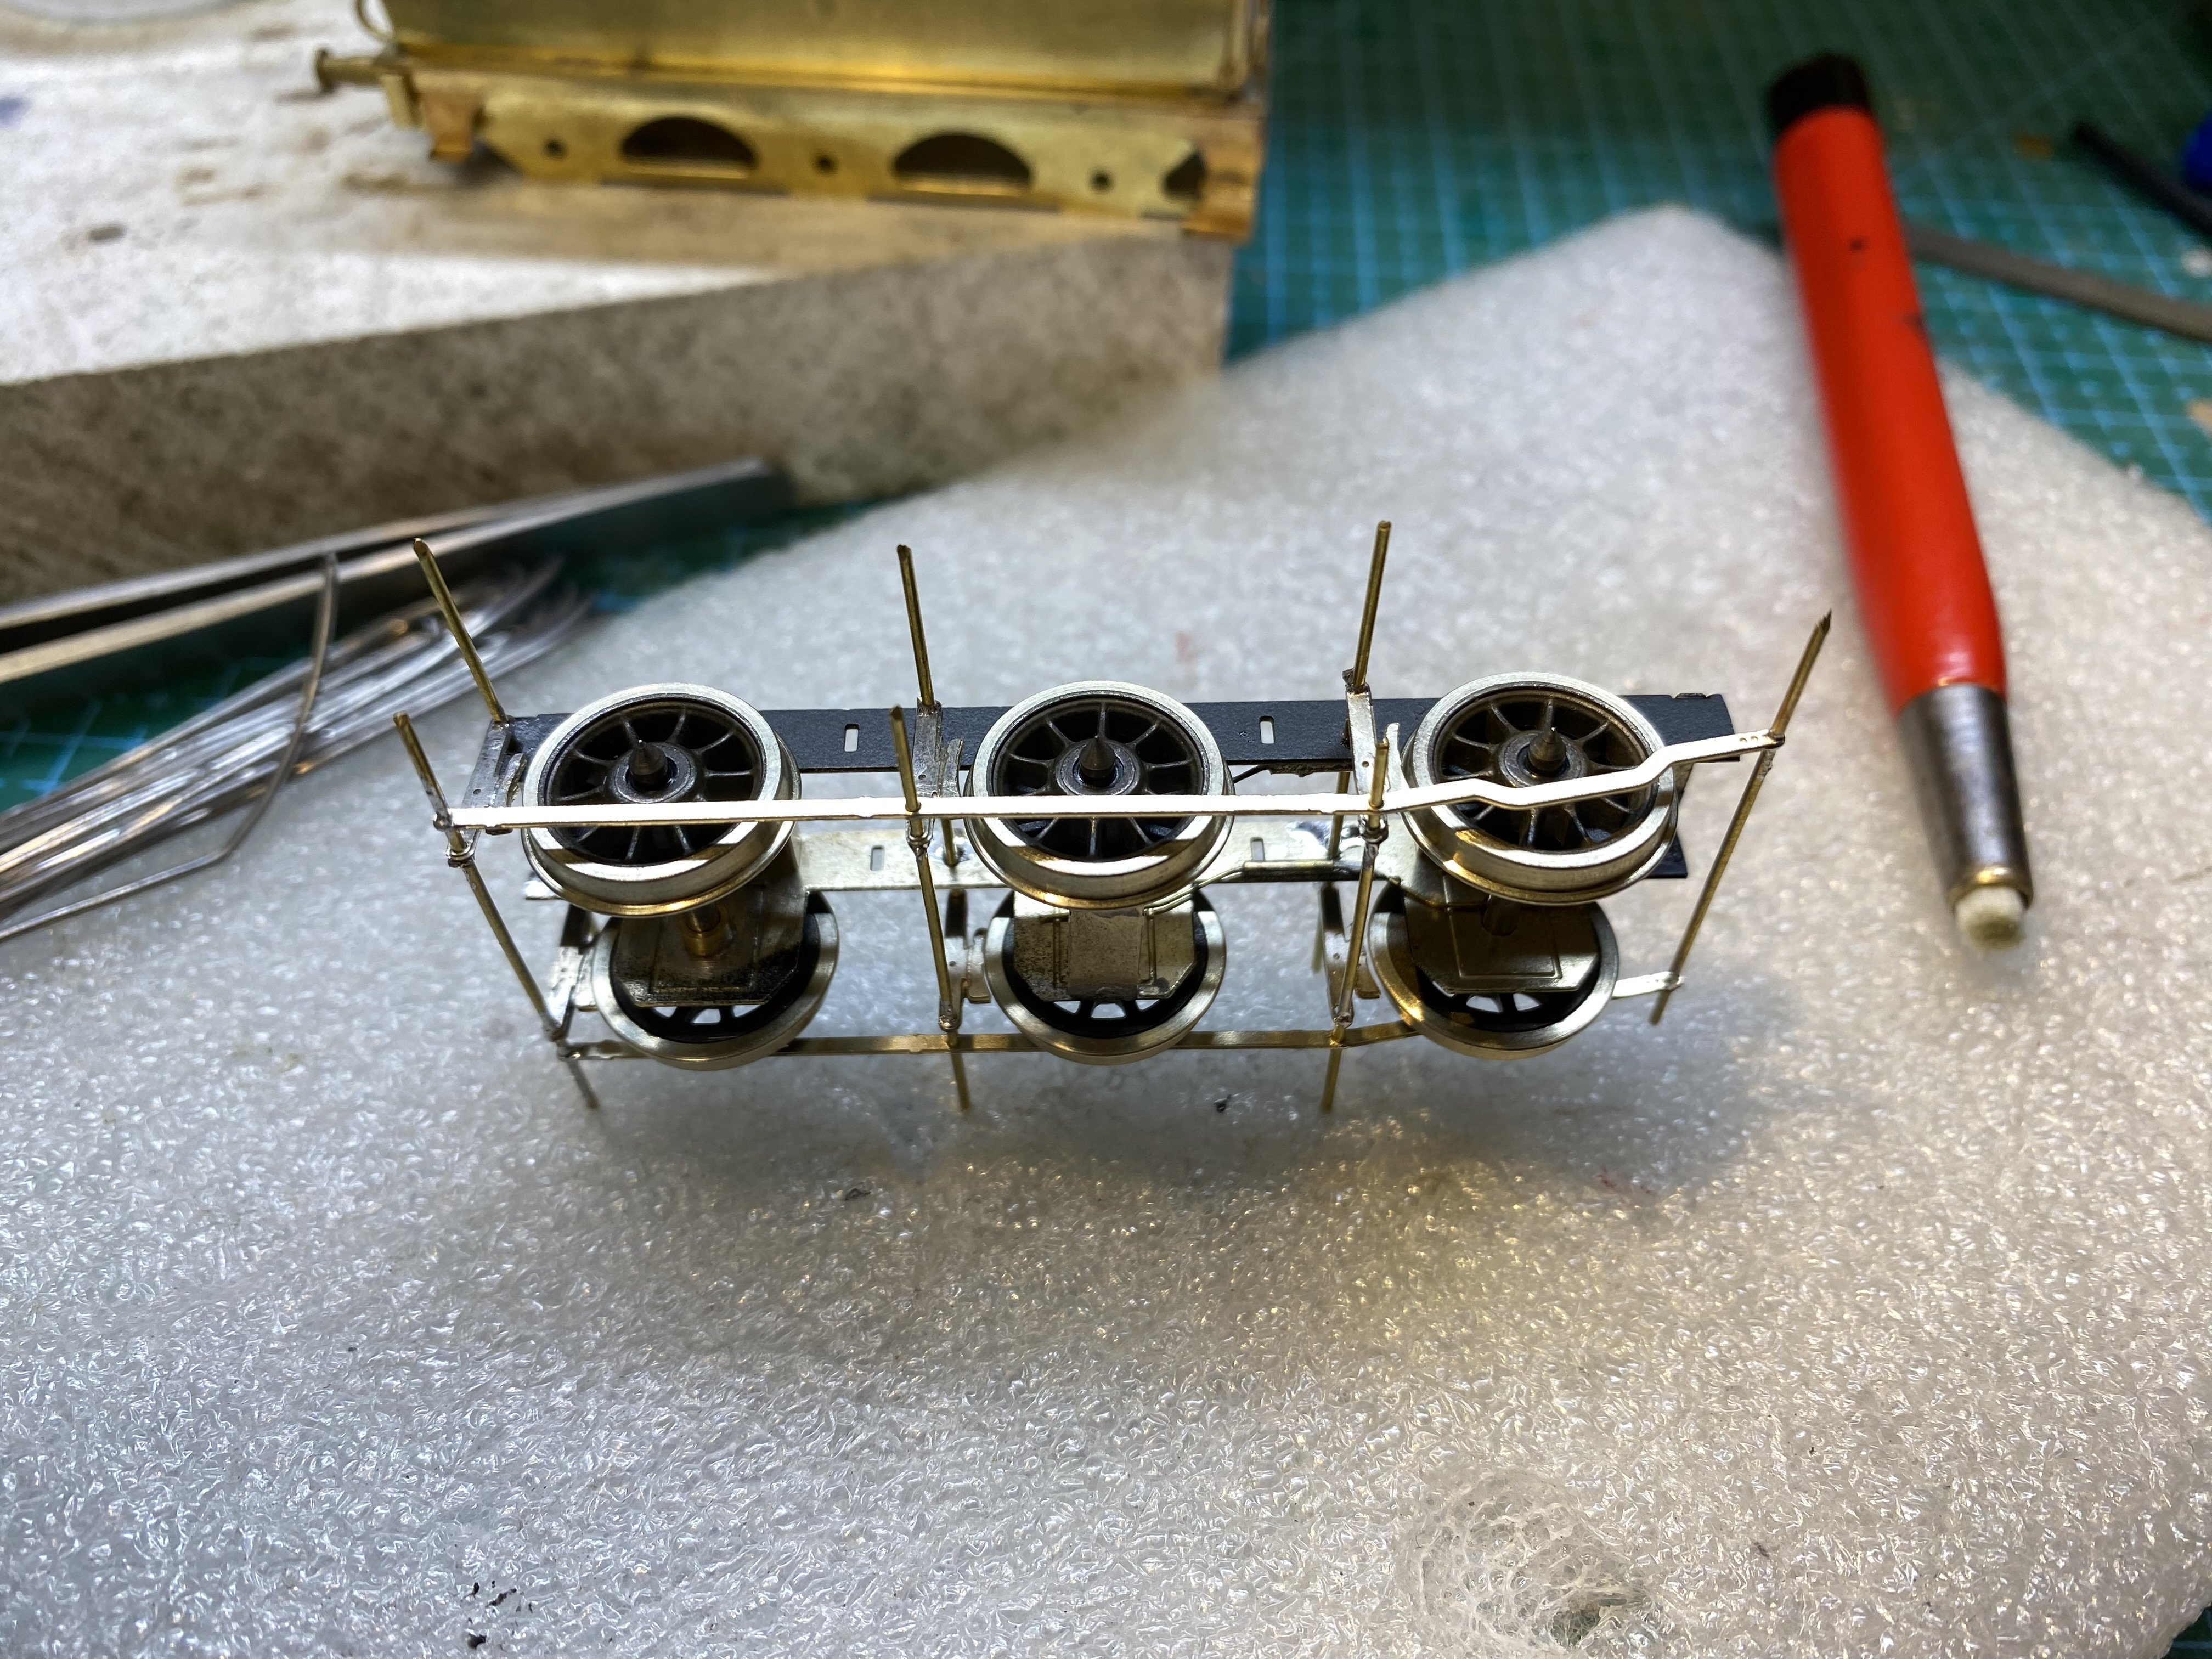
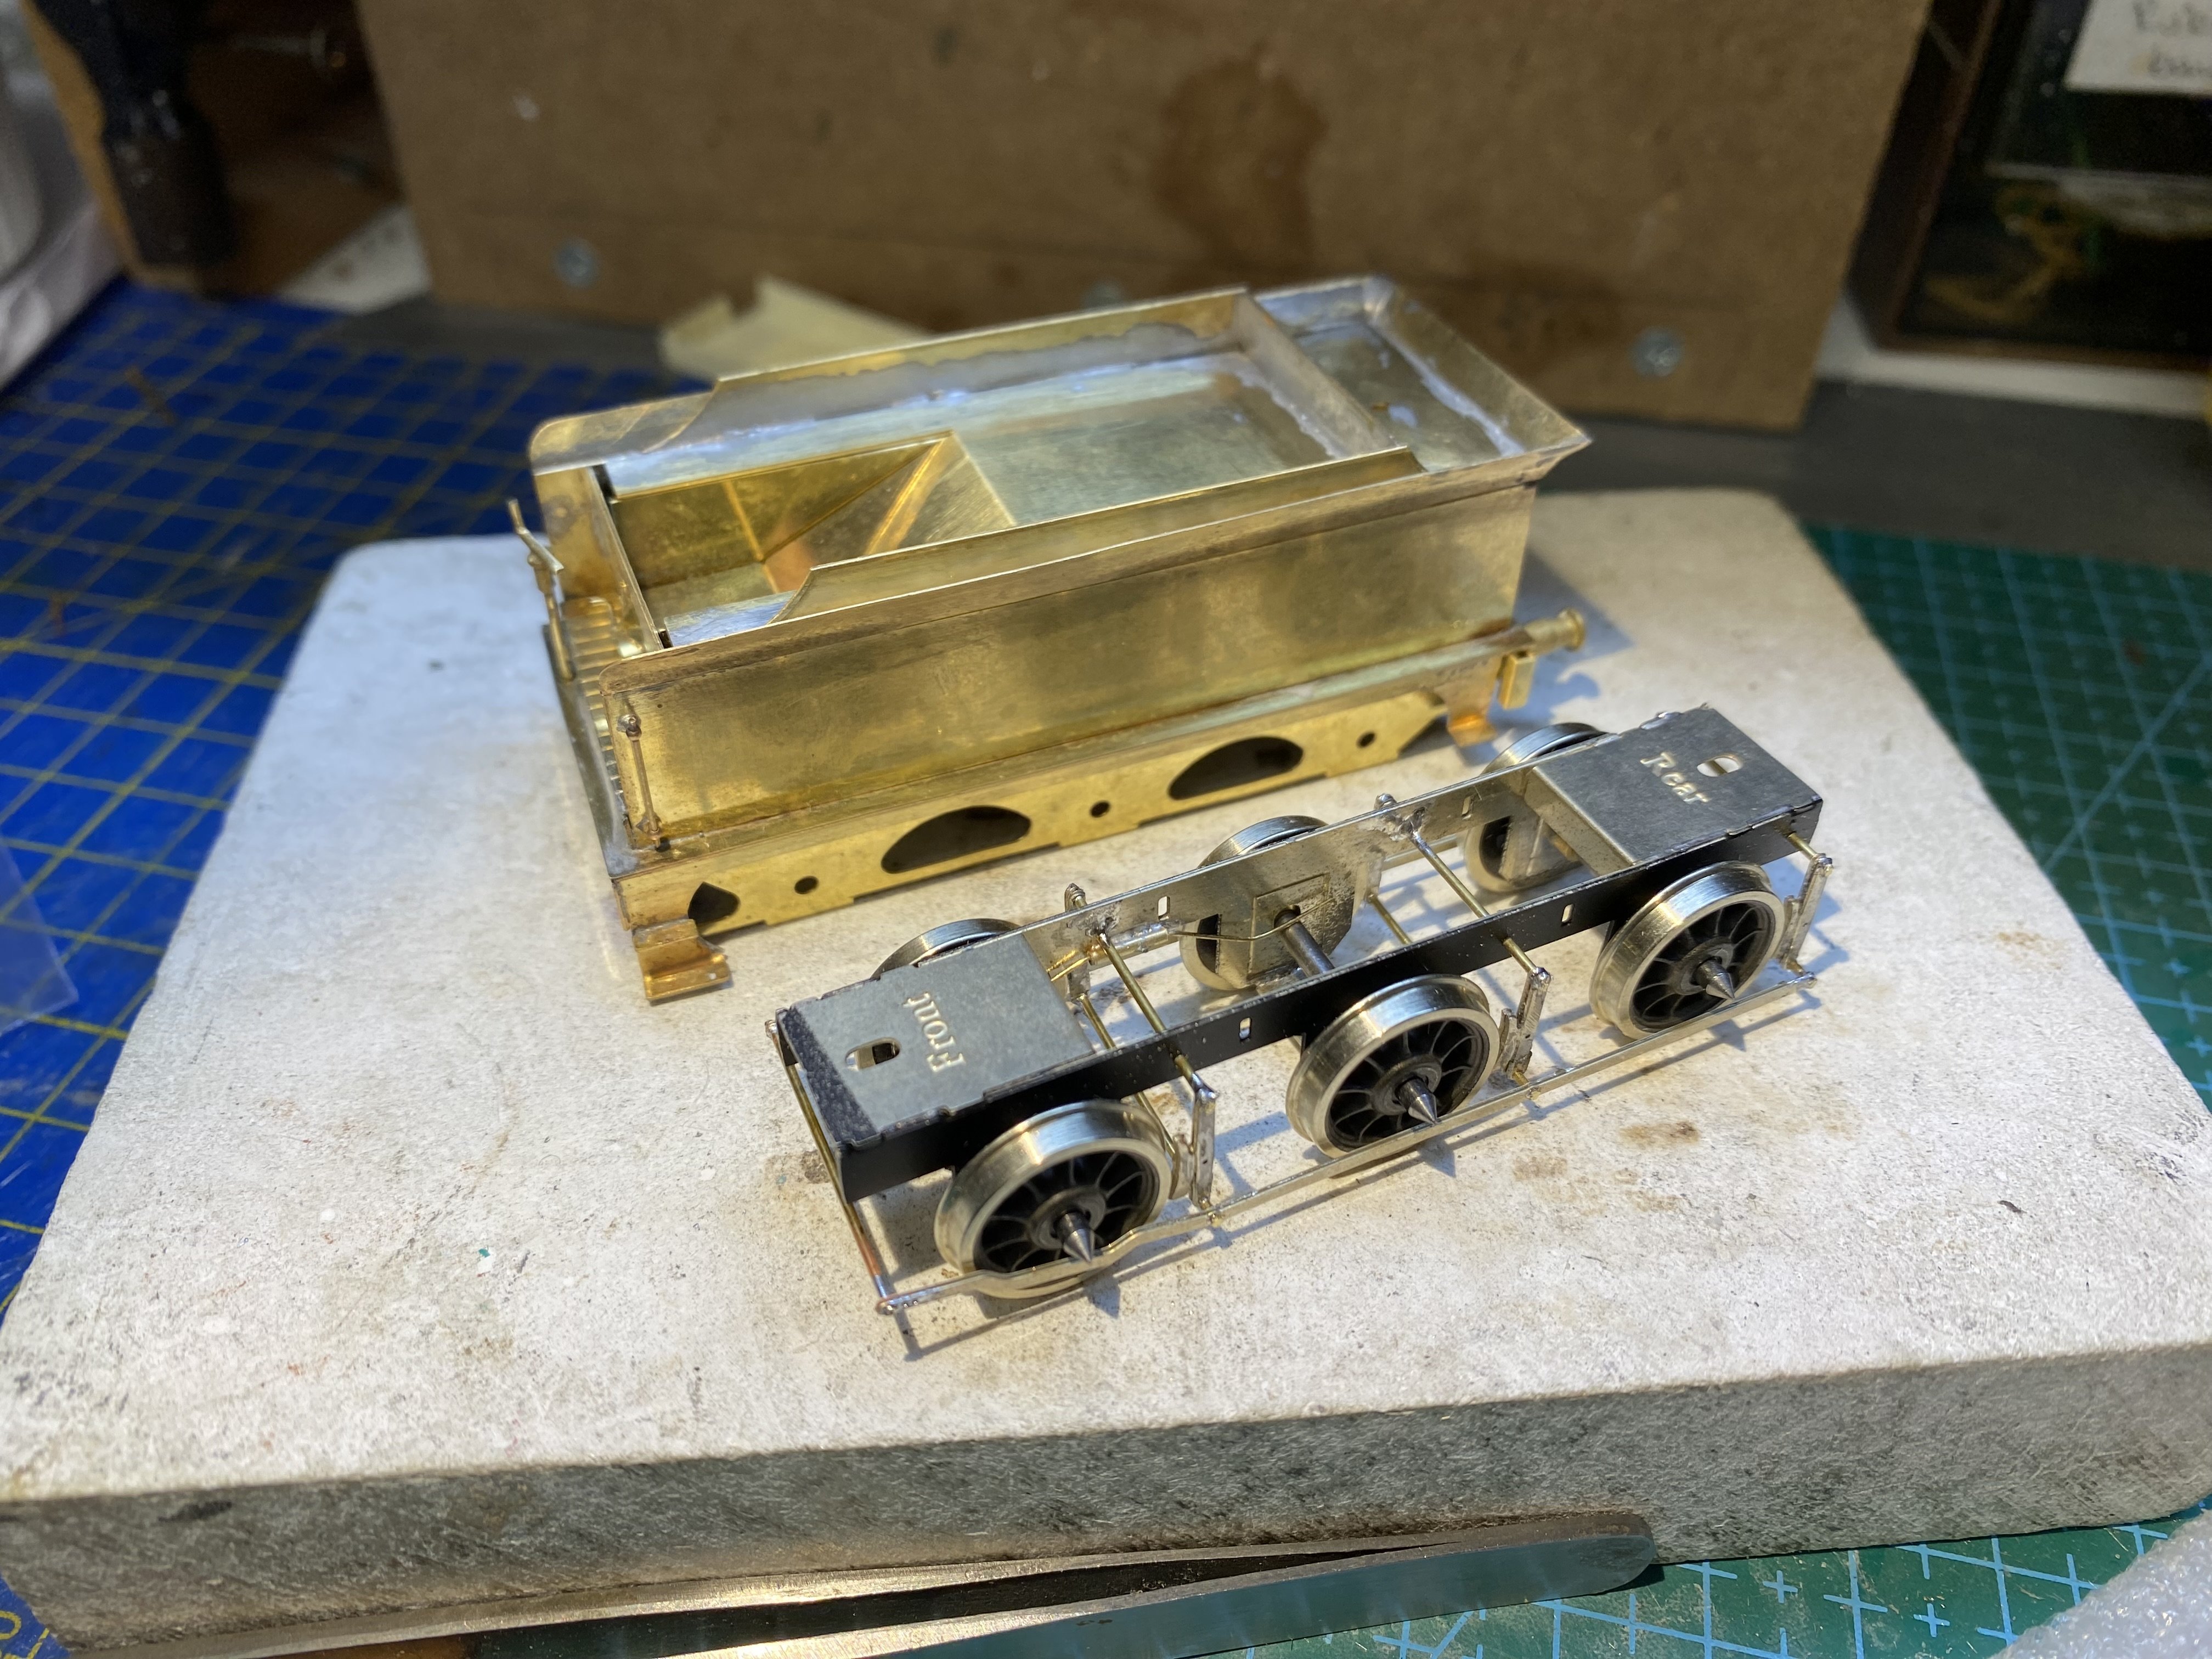
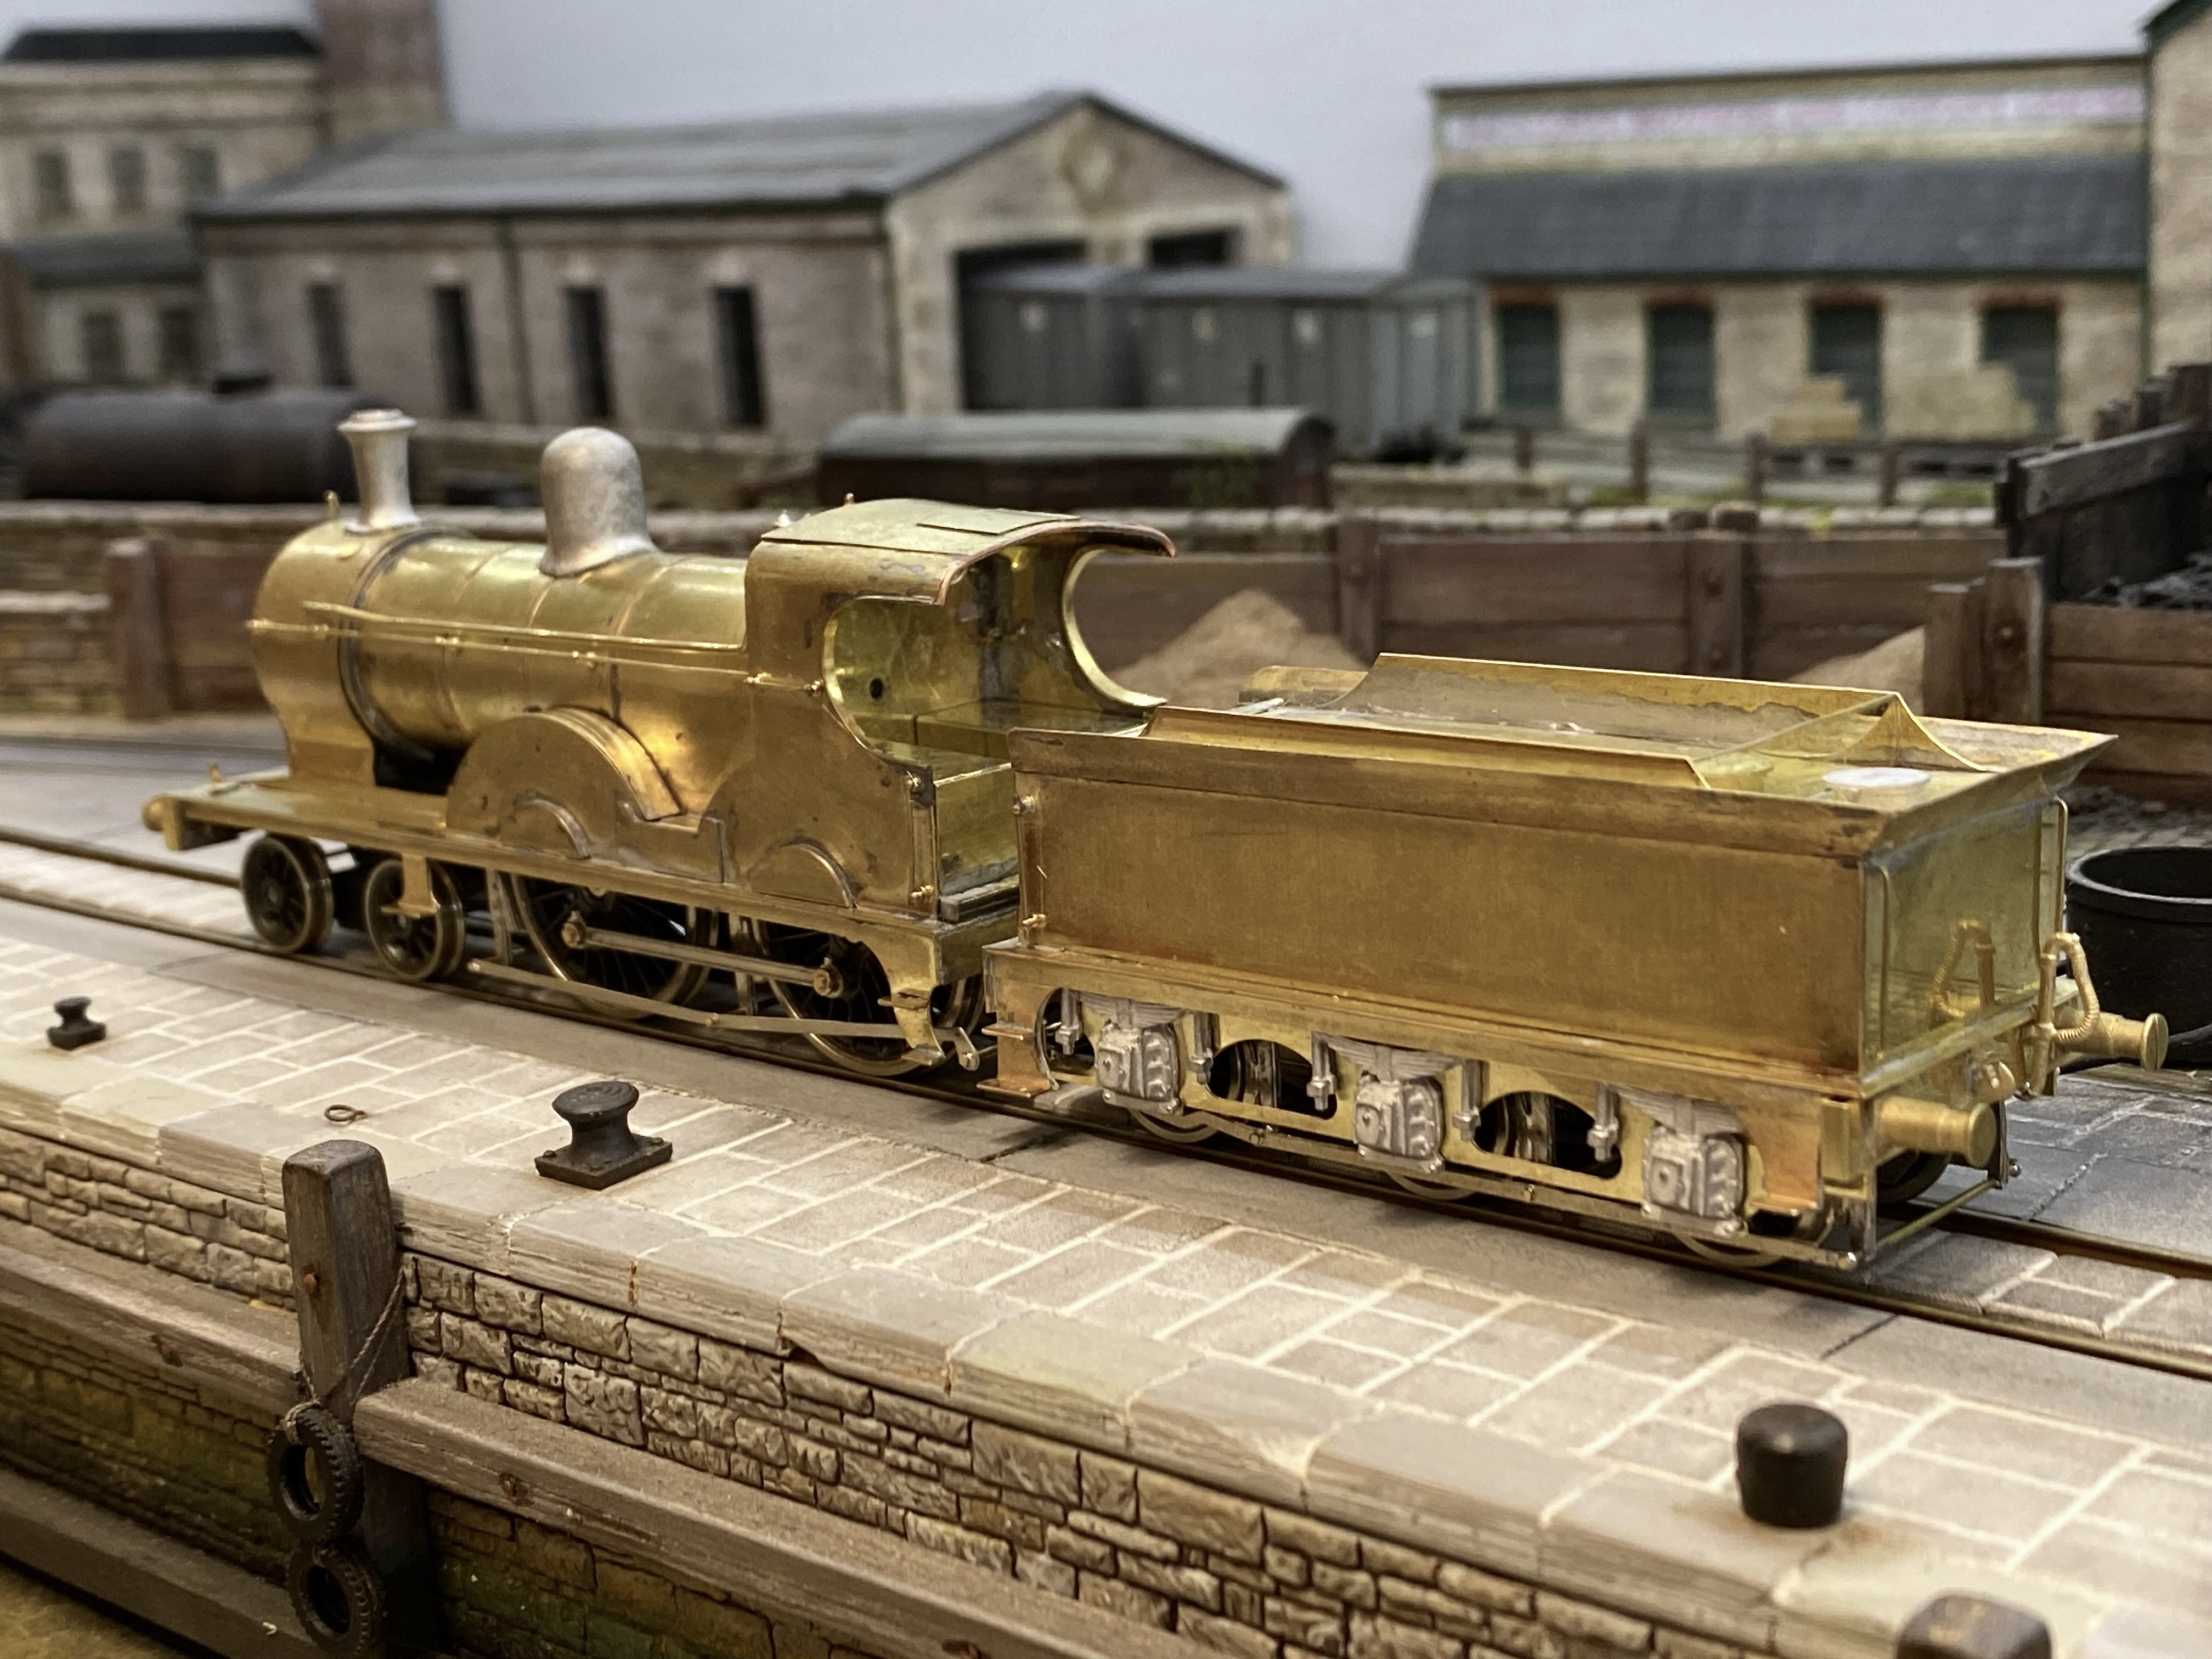
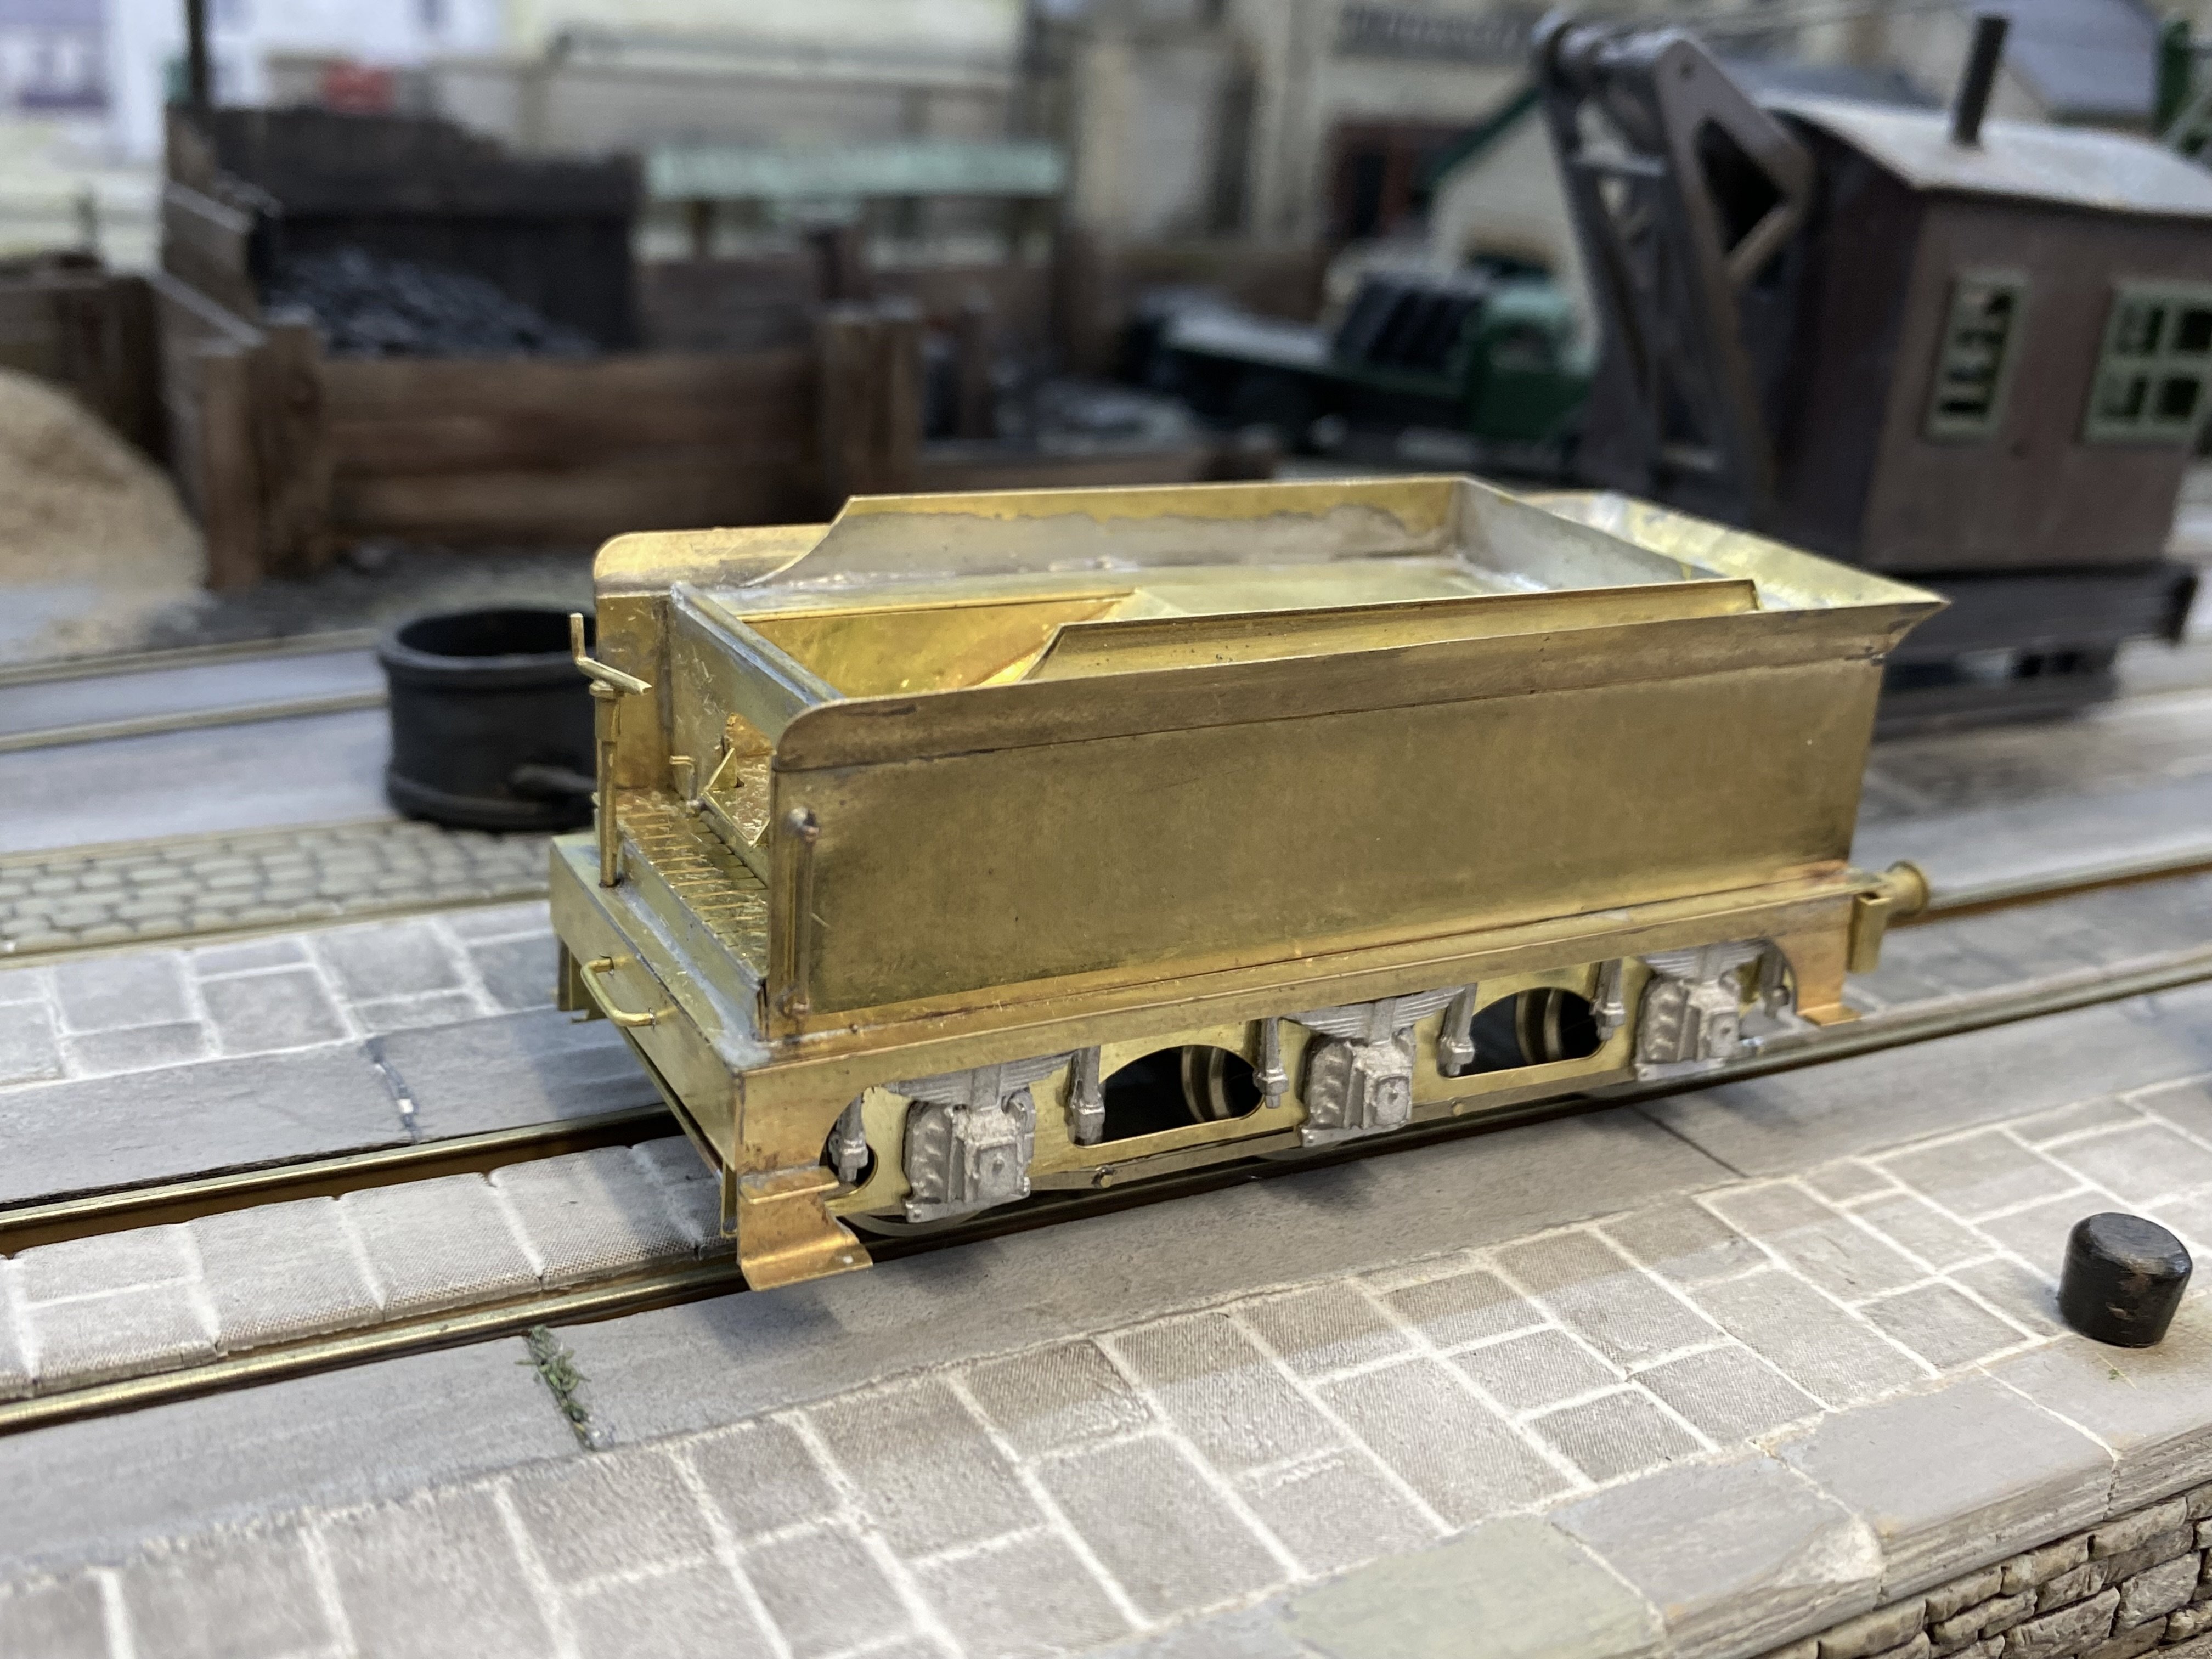
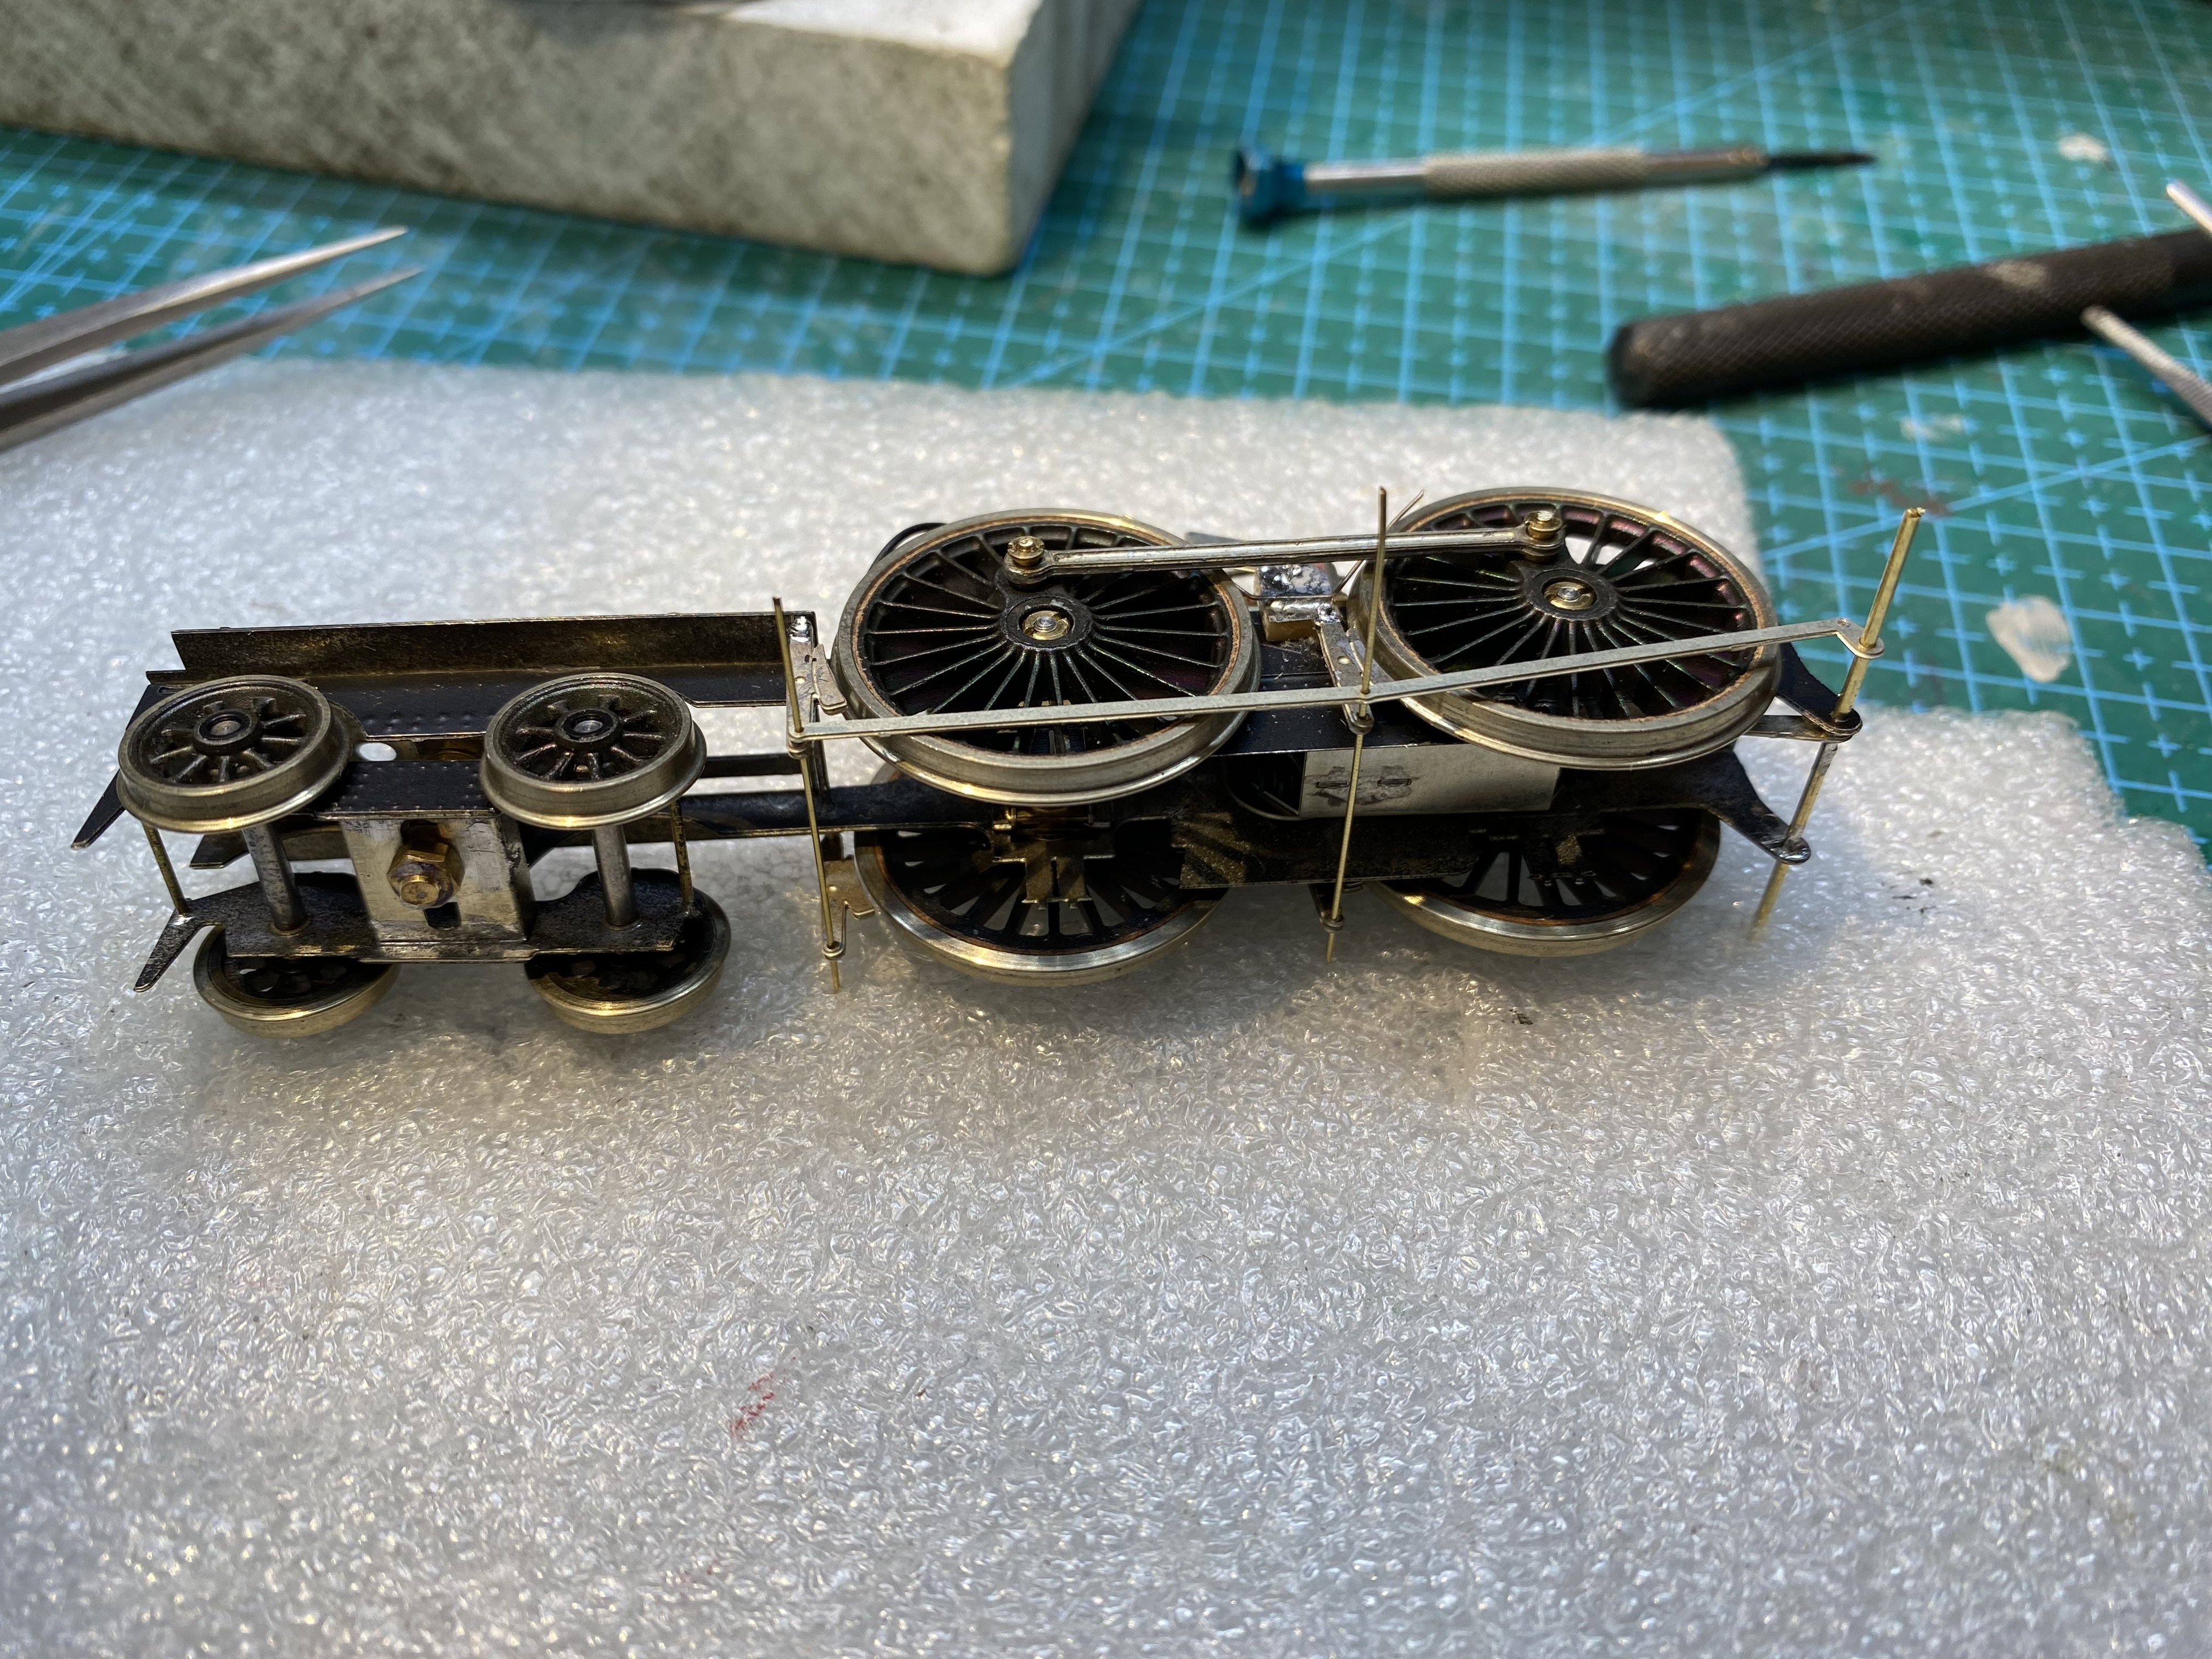
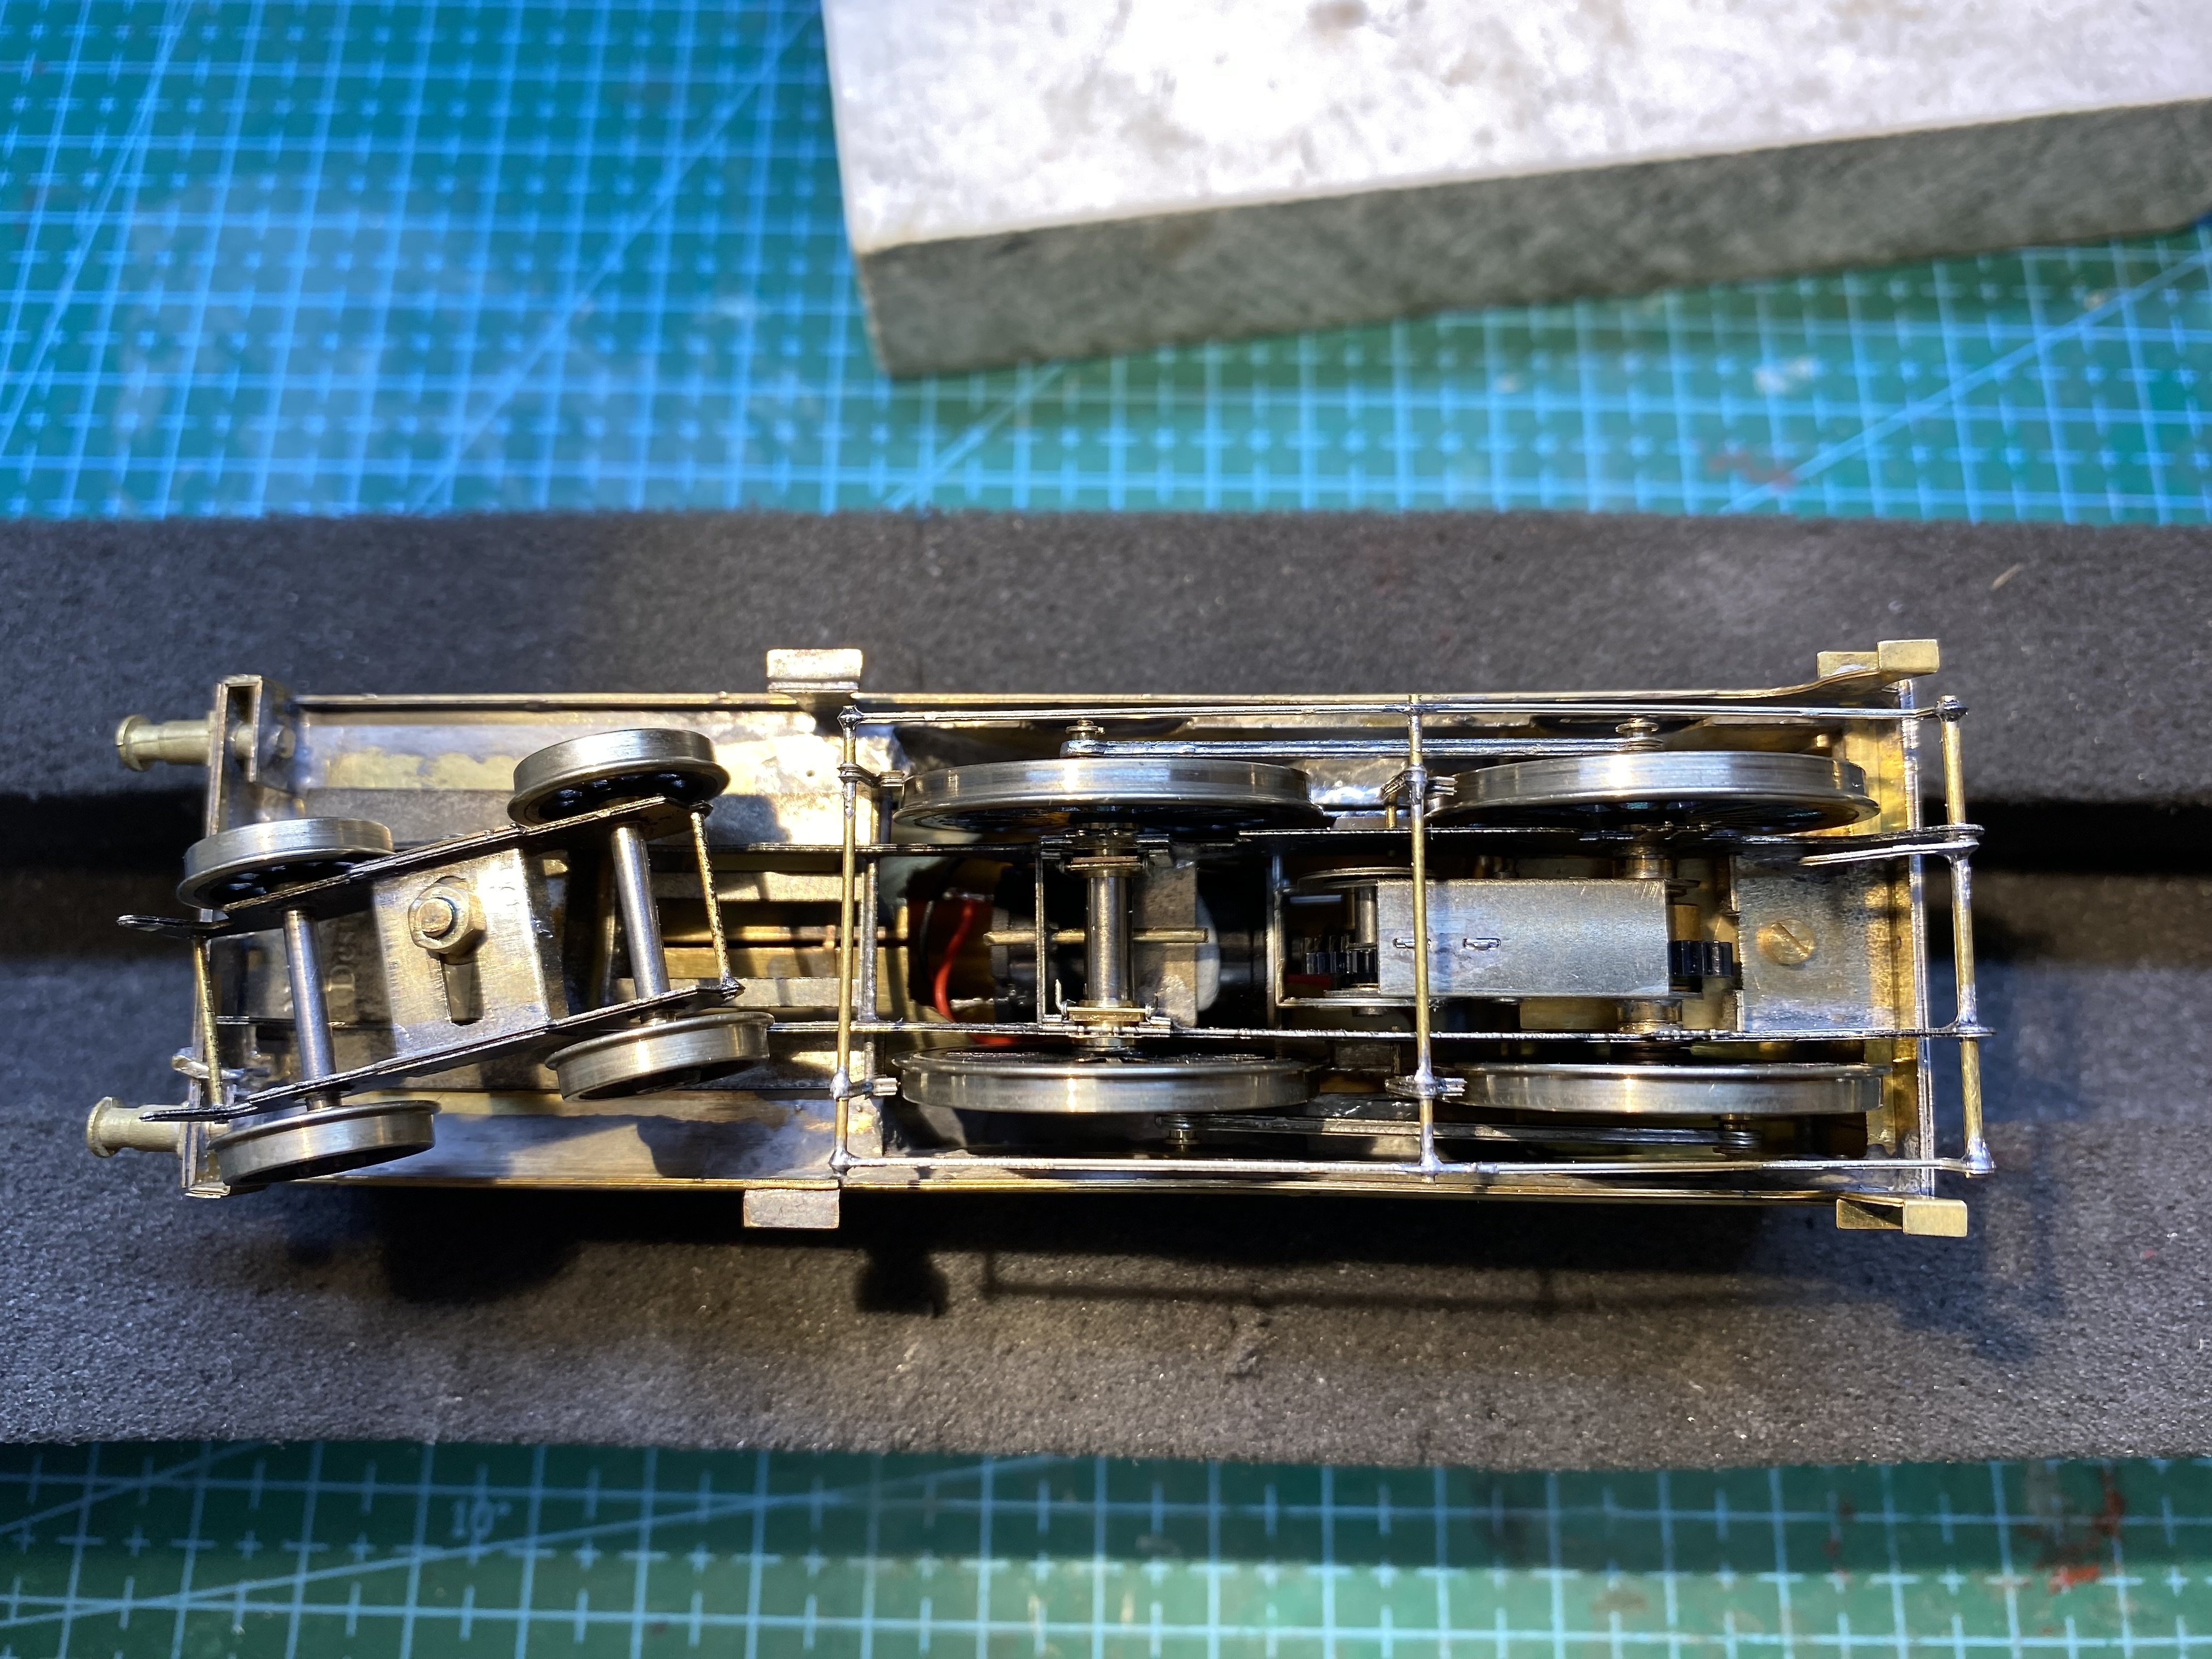
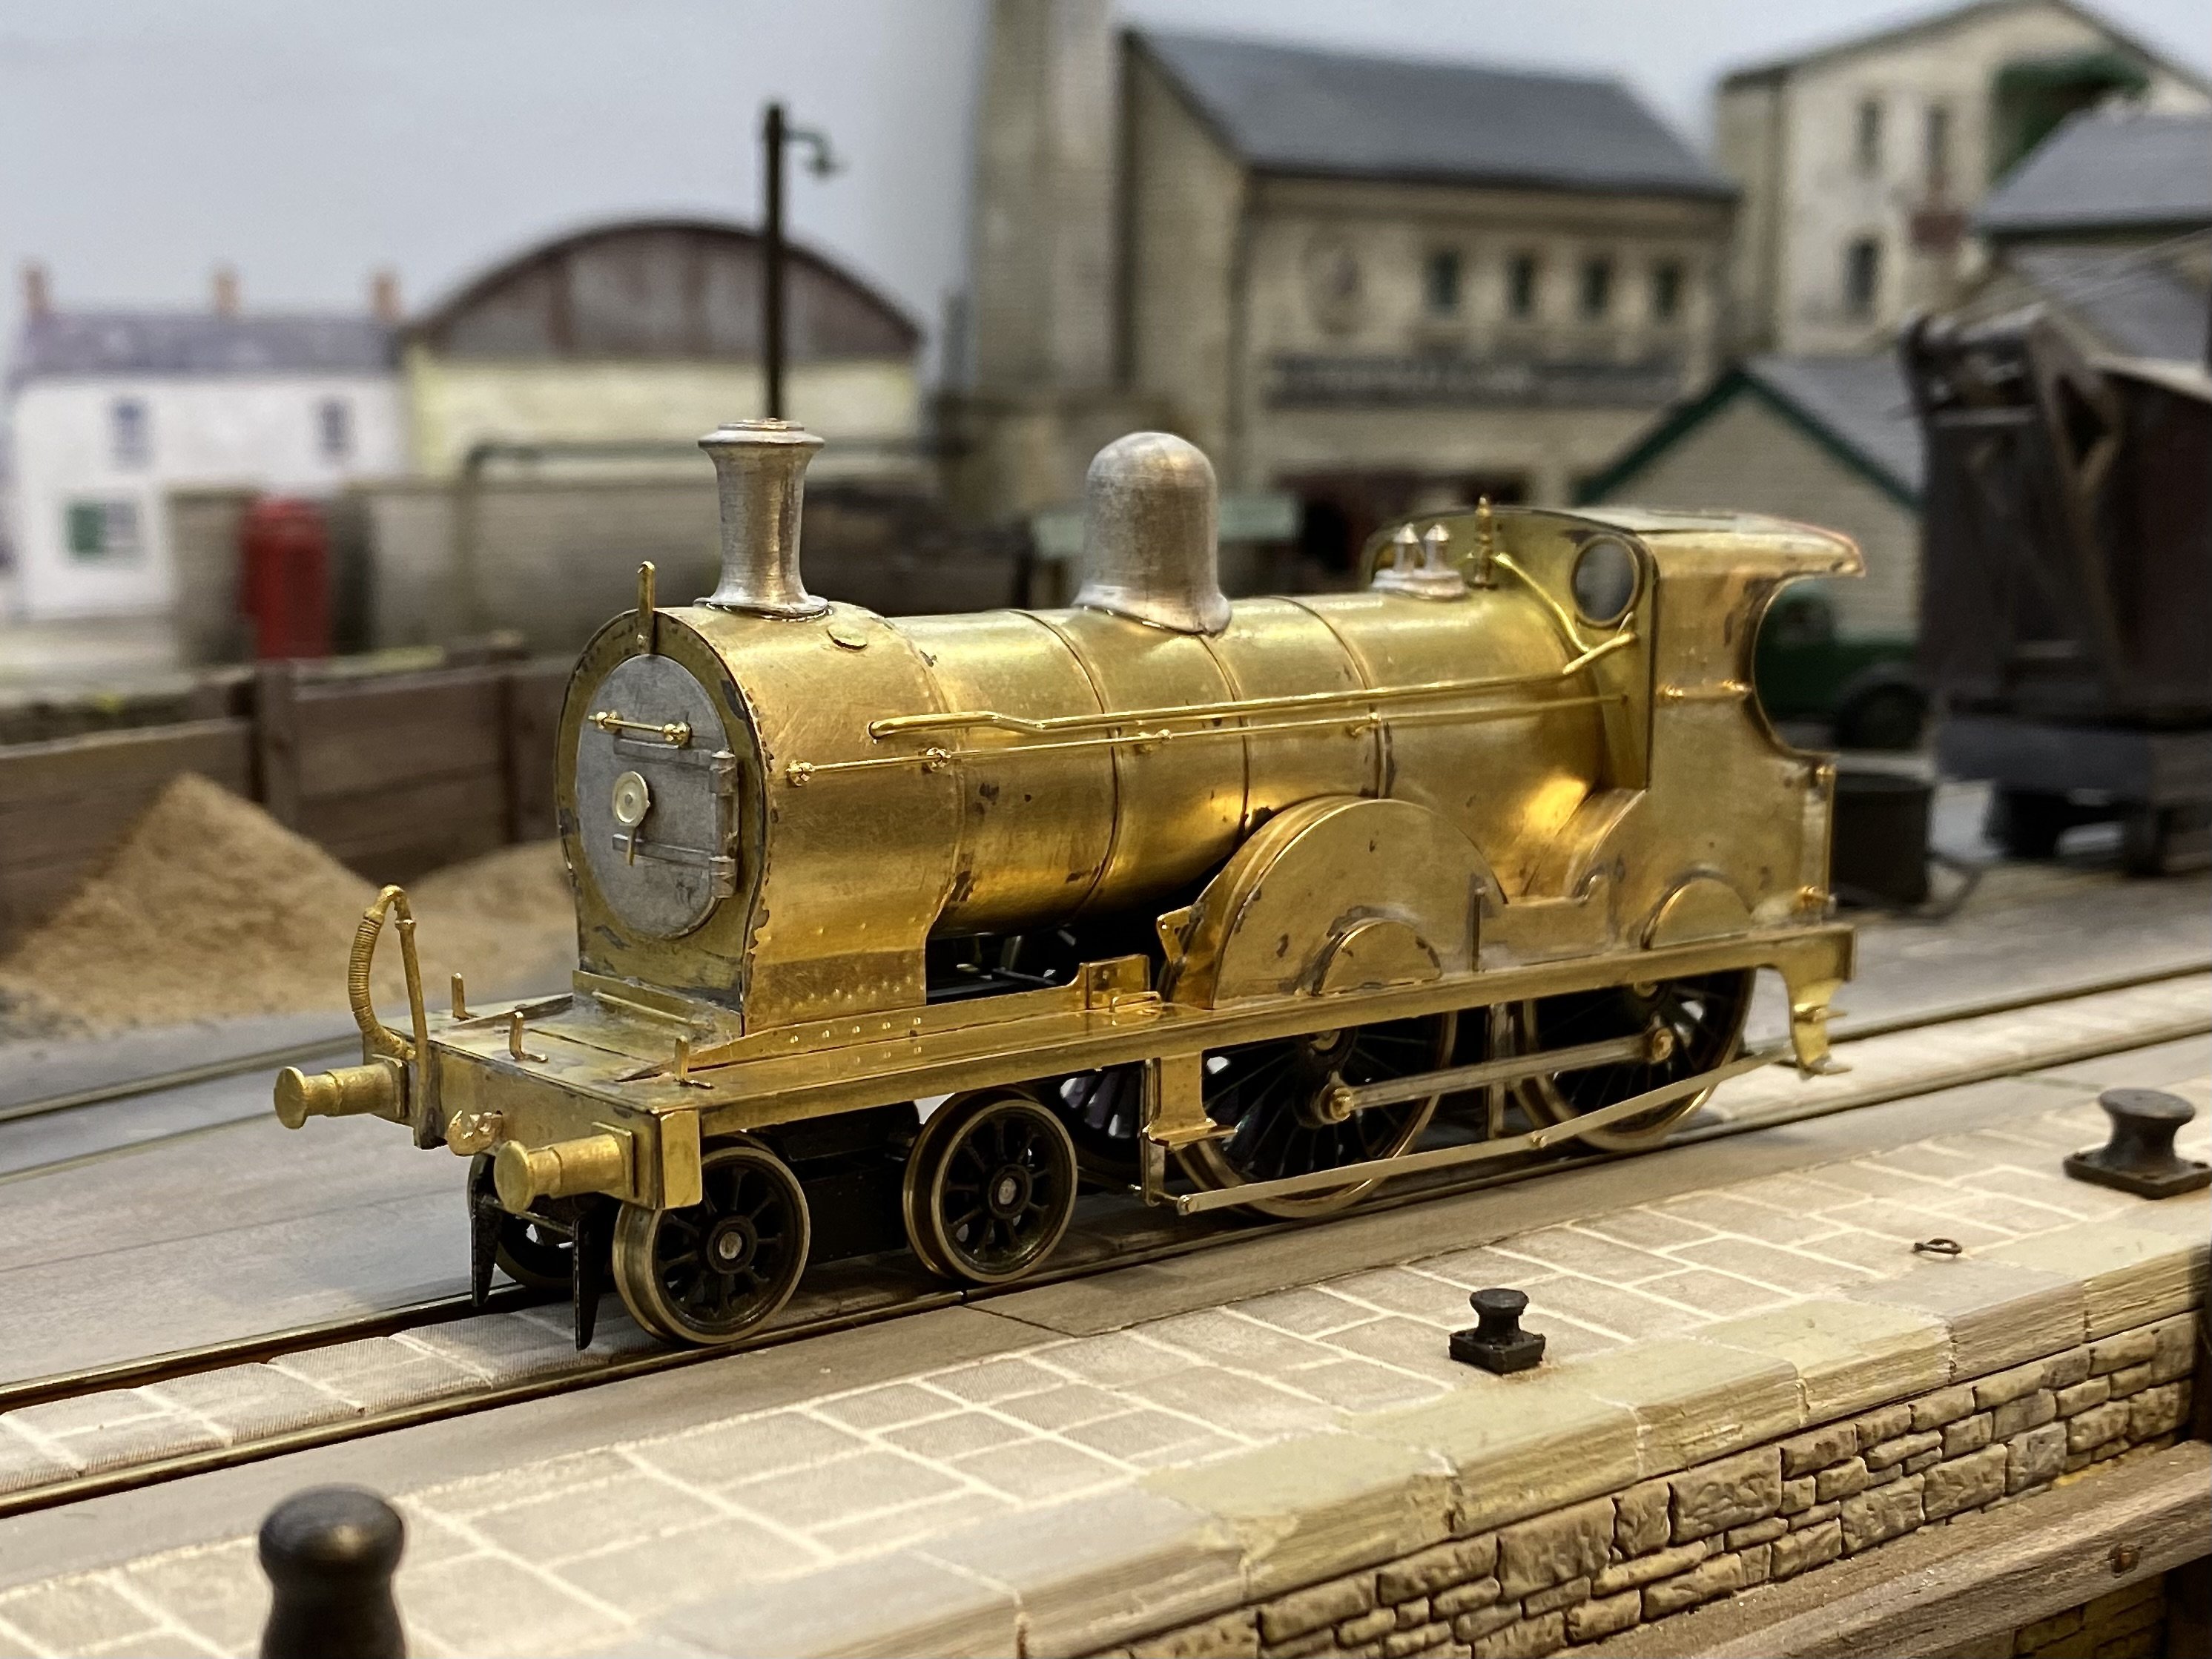
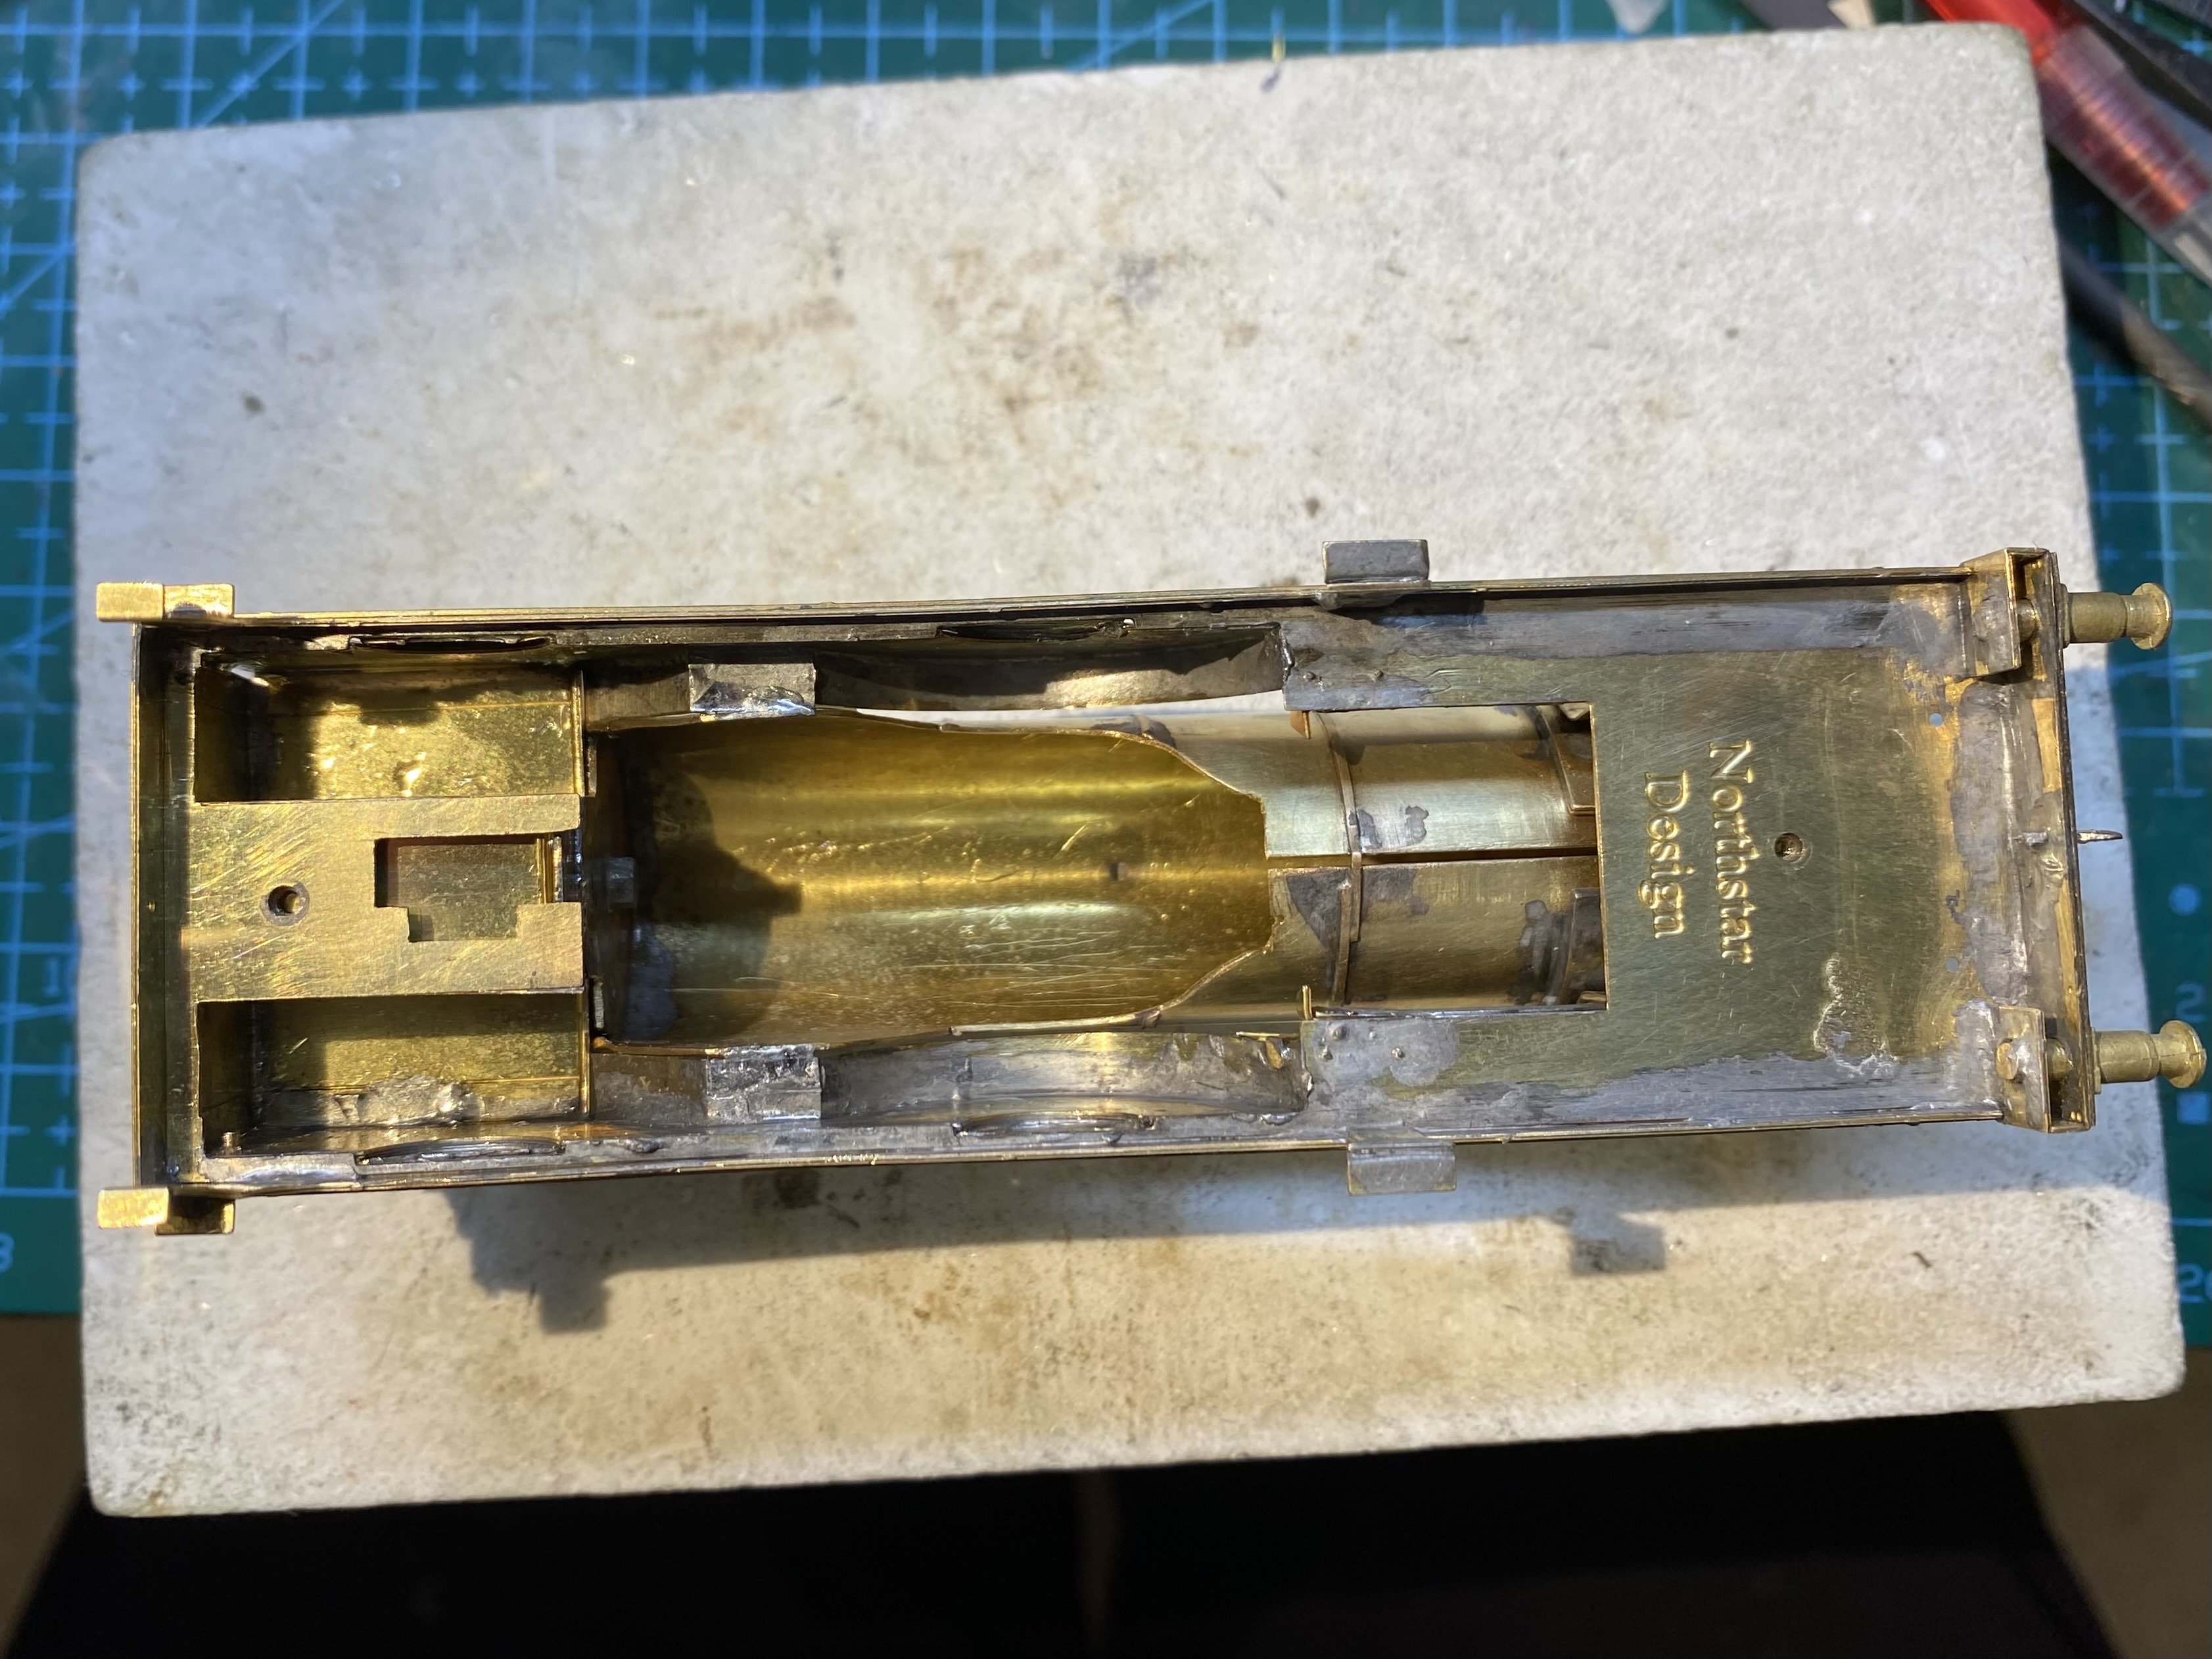
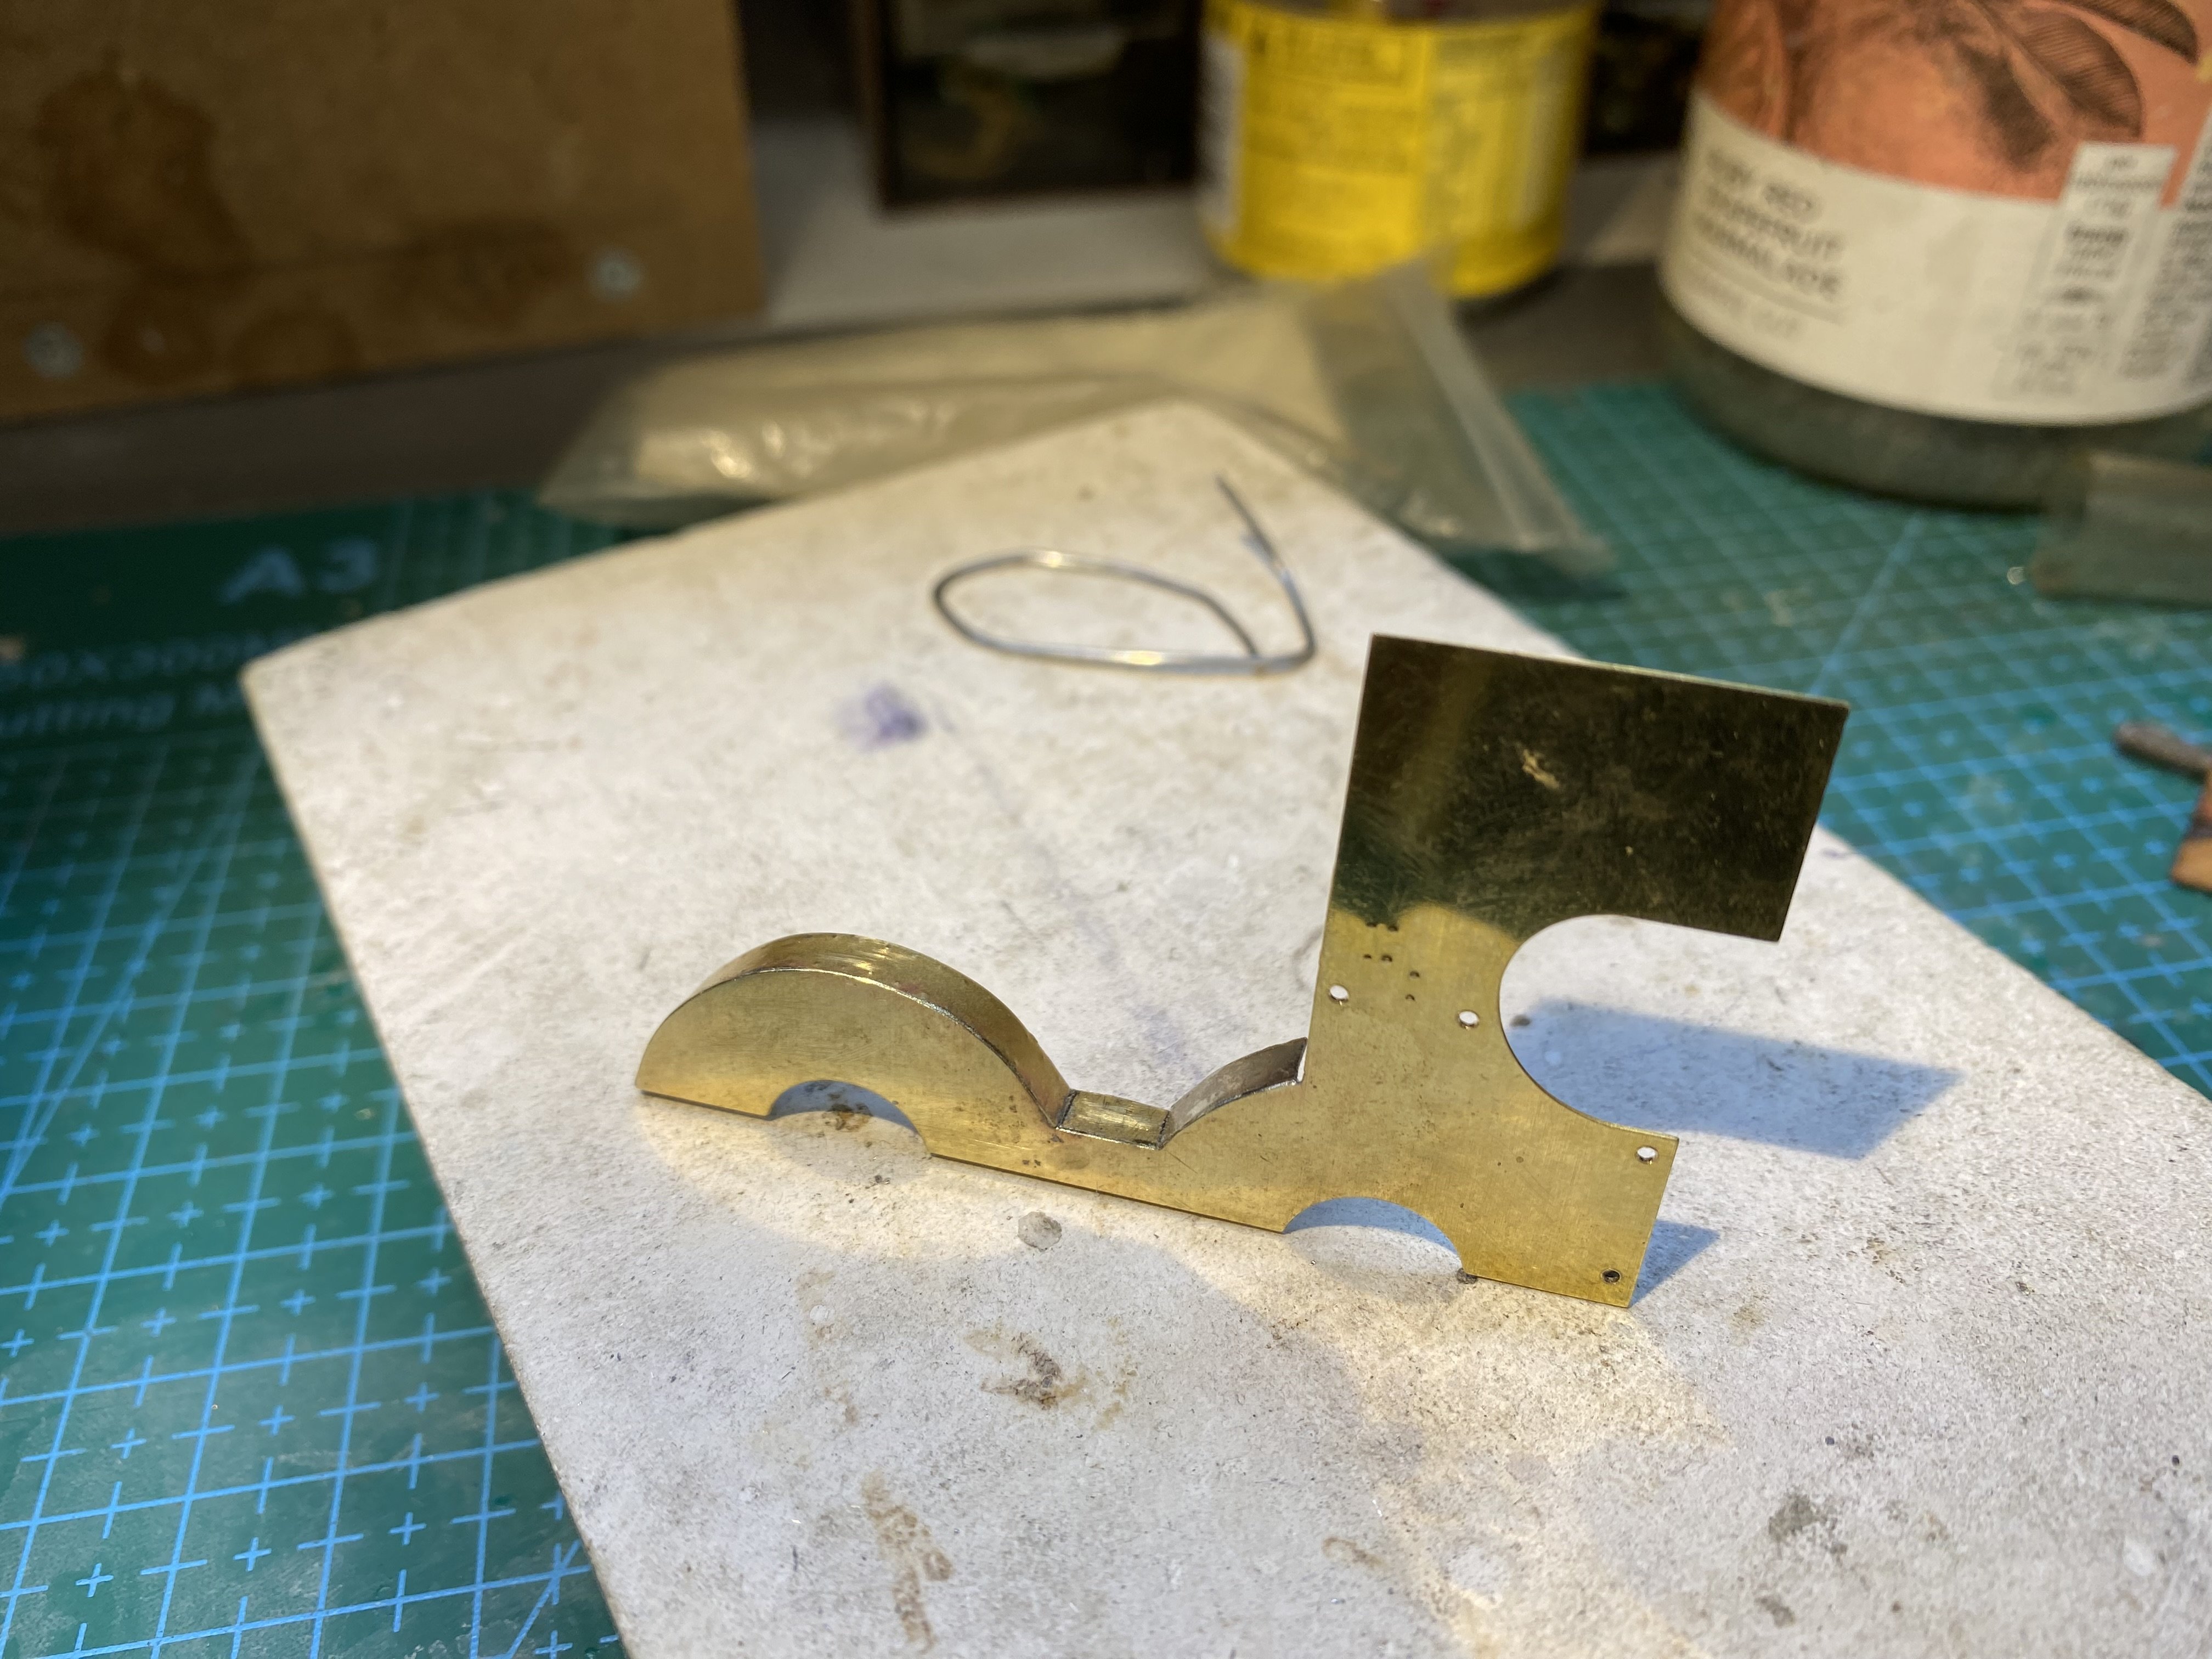
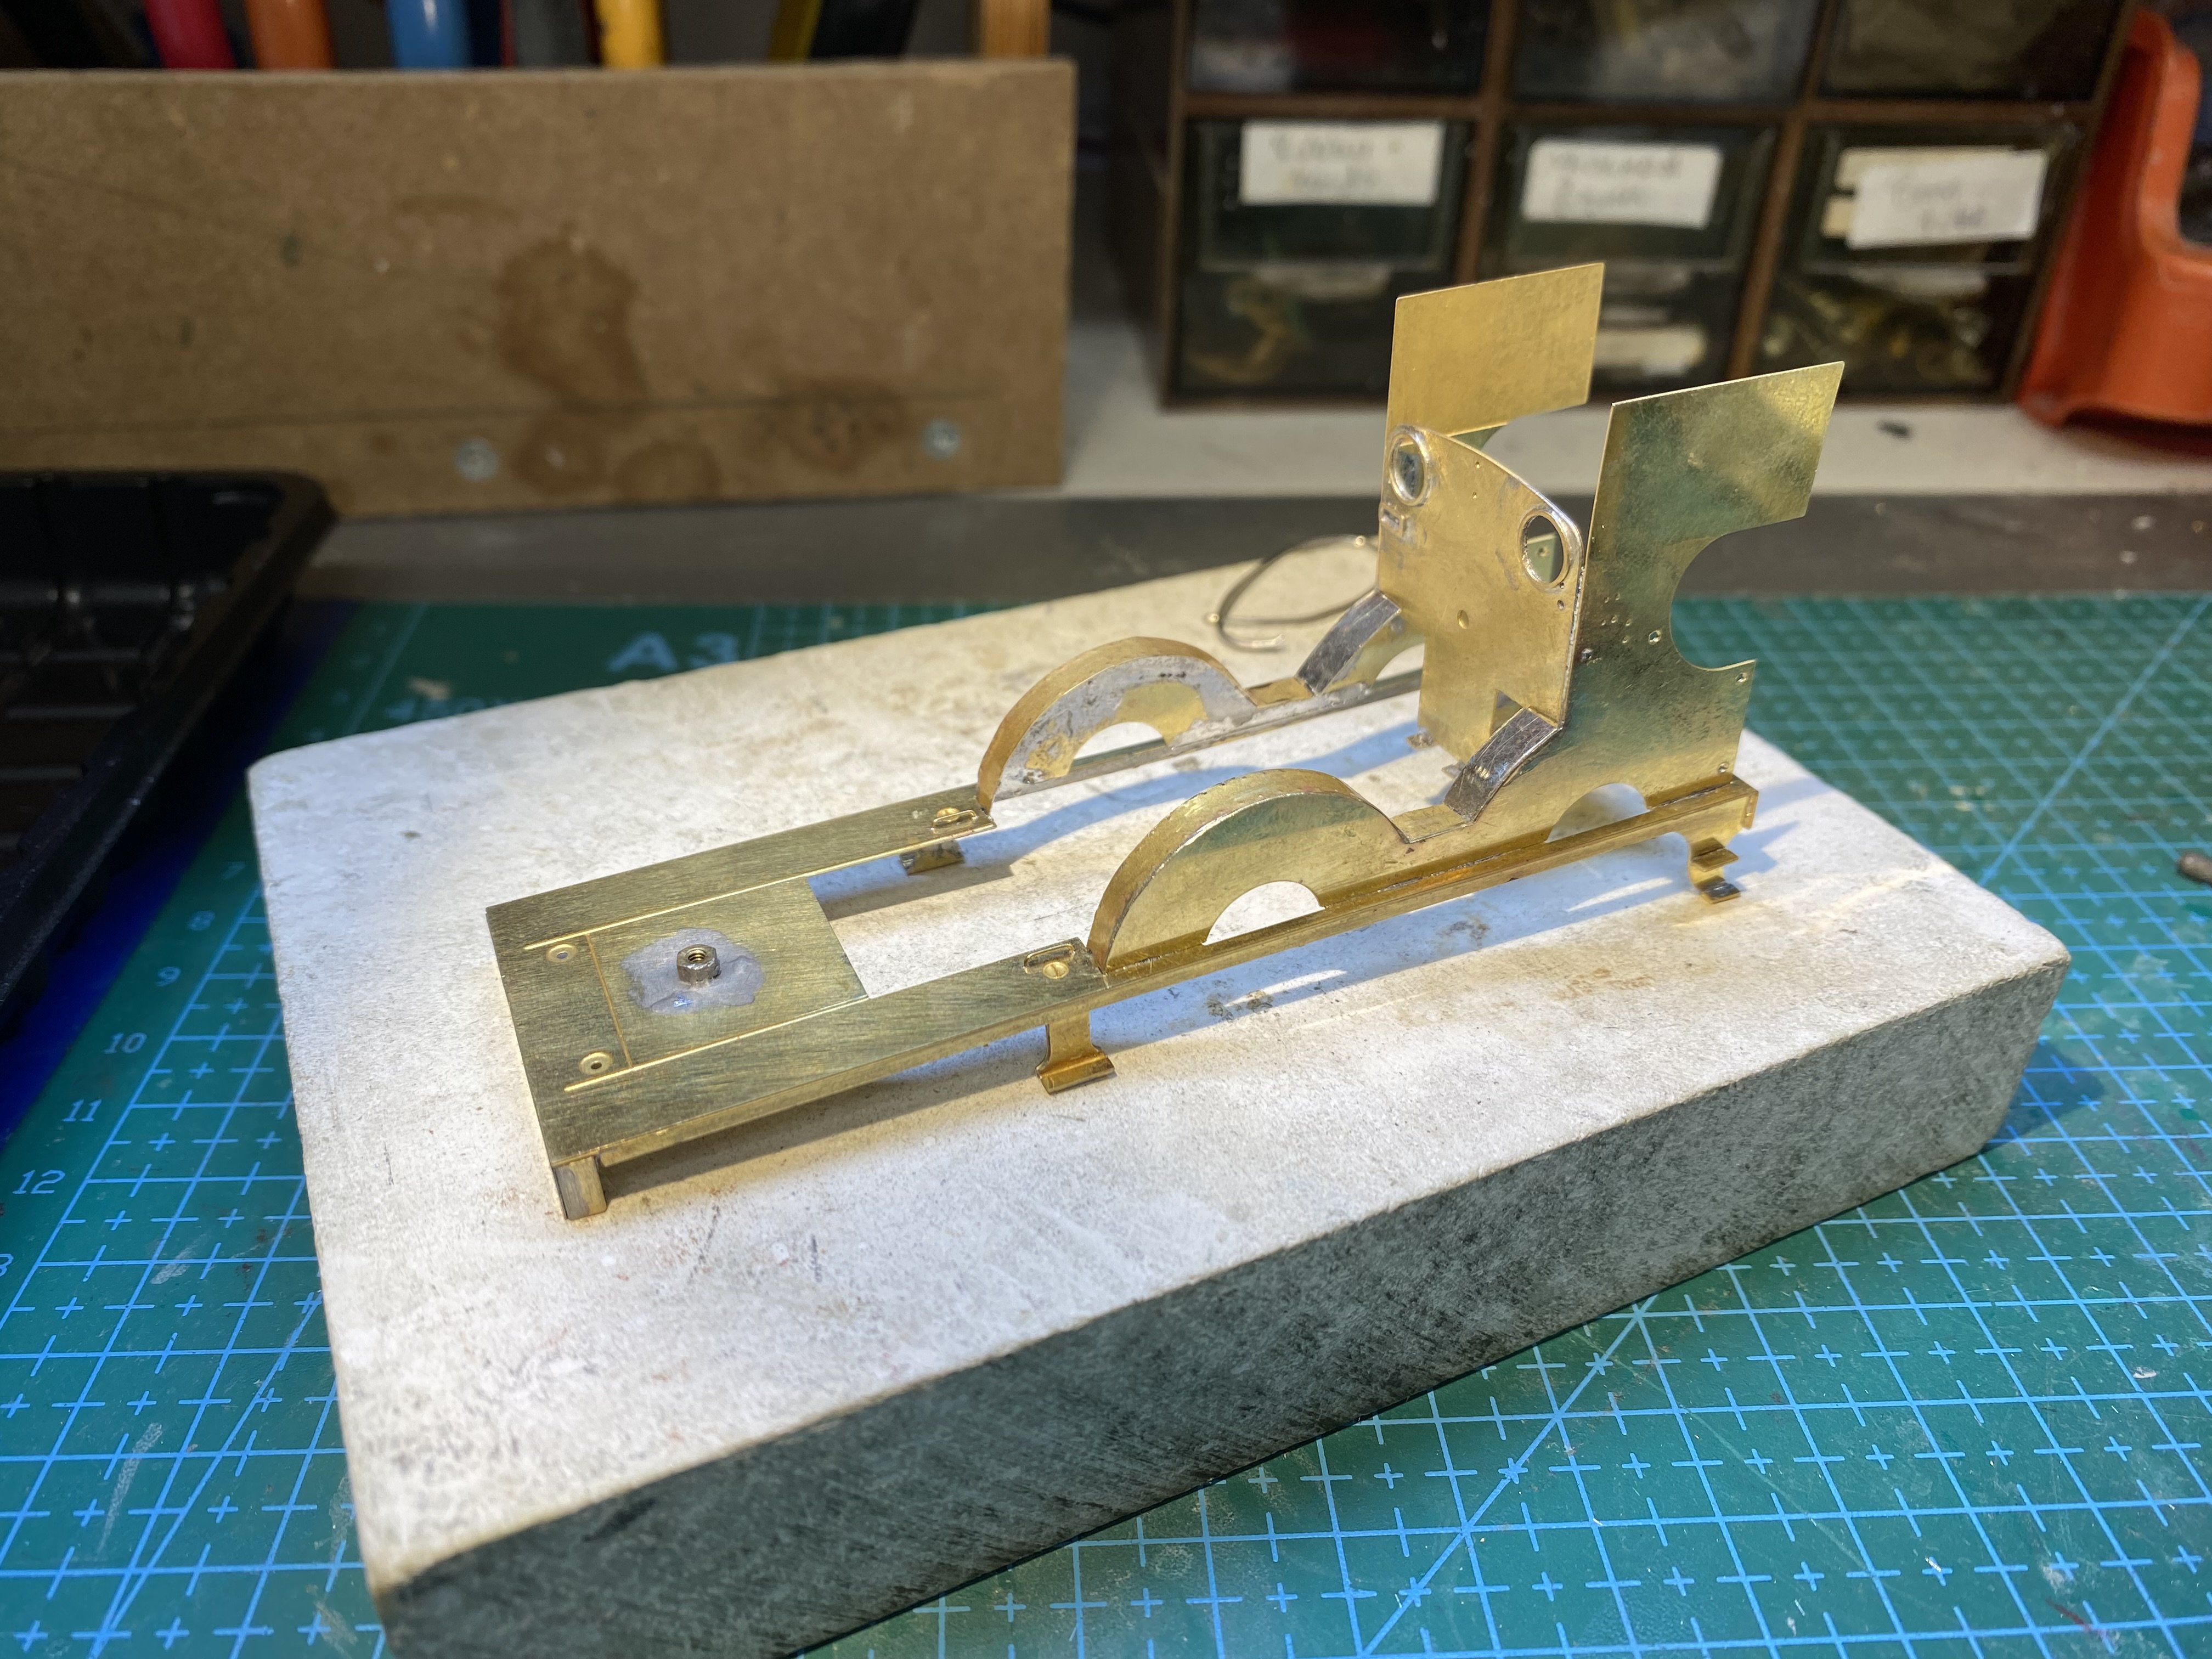
The rest of the PPs kit has now succumbed to my tender mercies. It was a challenging build partly because there are lots of seam joins which are tricky to get at if the aim is to keep as much of the solder as possible out of sight on the inside. Few fingers remained unburned. The etch also had a number of small errors and the instructions were peppered with work-arounds to deal with these. The tender chassis was built with the rear axle in fixed bearings and the other two moving up and down about 1 mm in slots and sprung with 0.33mm brass wire. Brake rigging was put together using much the same approach as for the loco. This small sheet of foam plastic packaging is very useful for keeping things in line while the solder goes in. Not much more to do now - arranging a coupling between loco and tender and fitting pickups to the rear tender wheels. The loco is only picking up on the 4 drivers so a bit of extra help from the tender would be useful. Essential maybe. Alan
- 860 replies
-
- 15
-

-

-
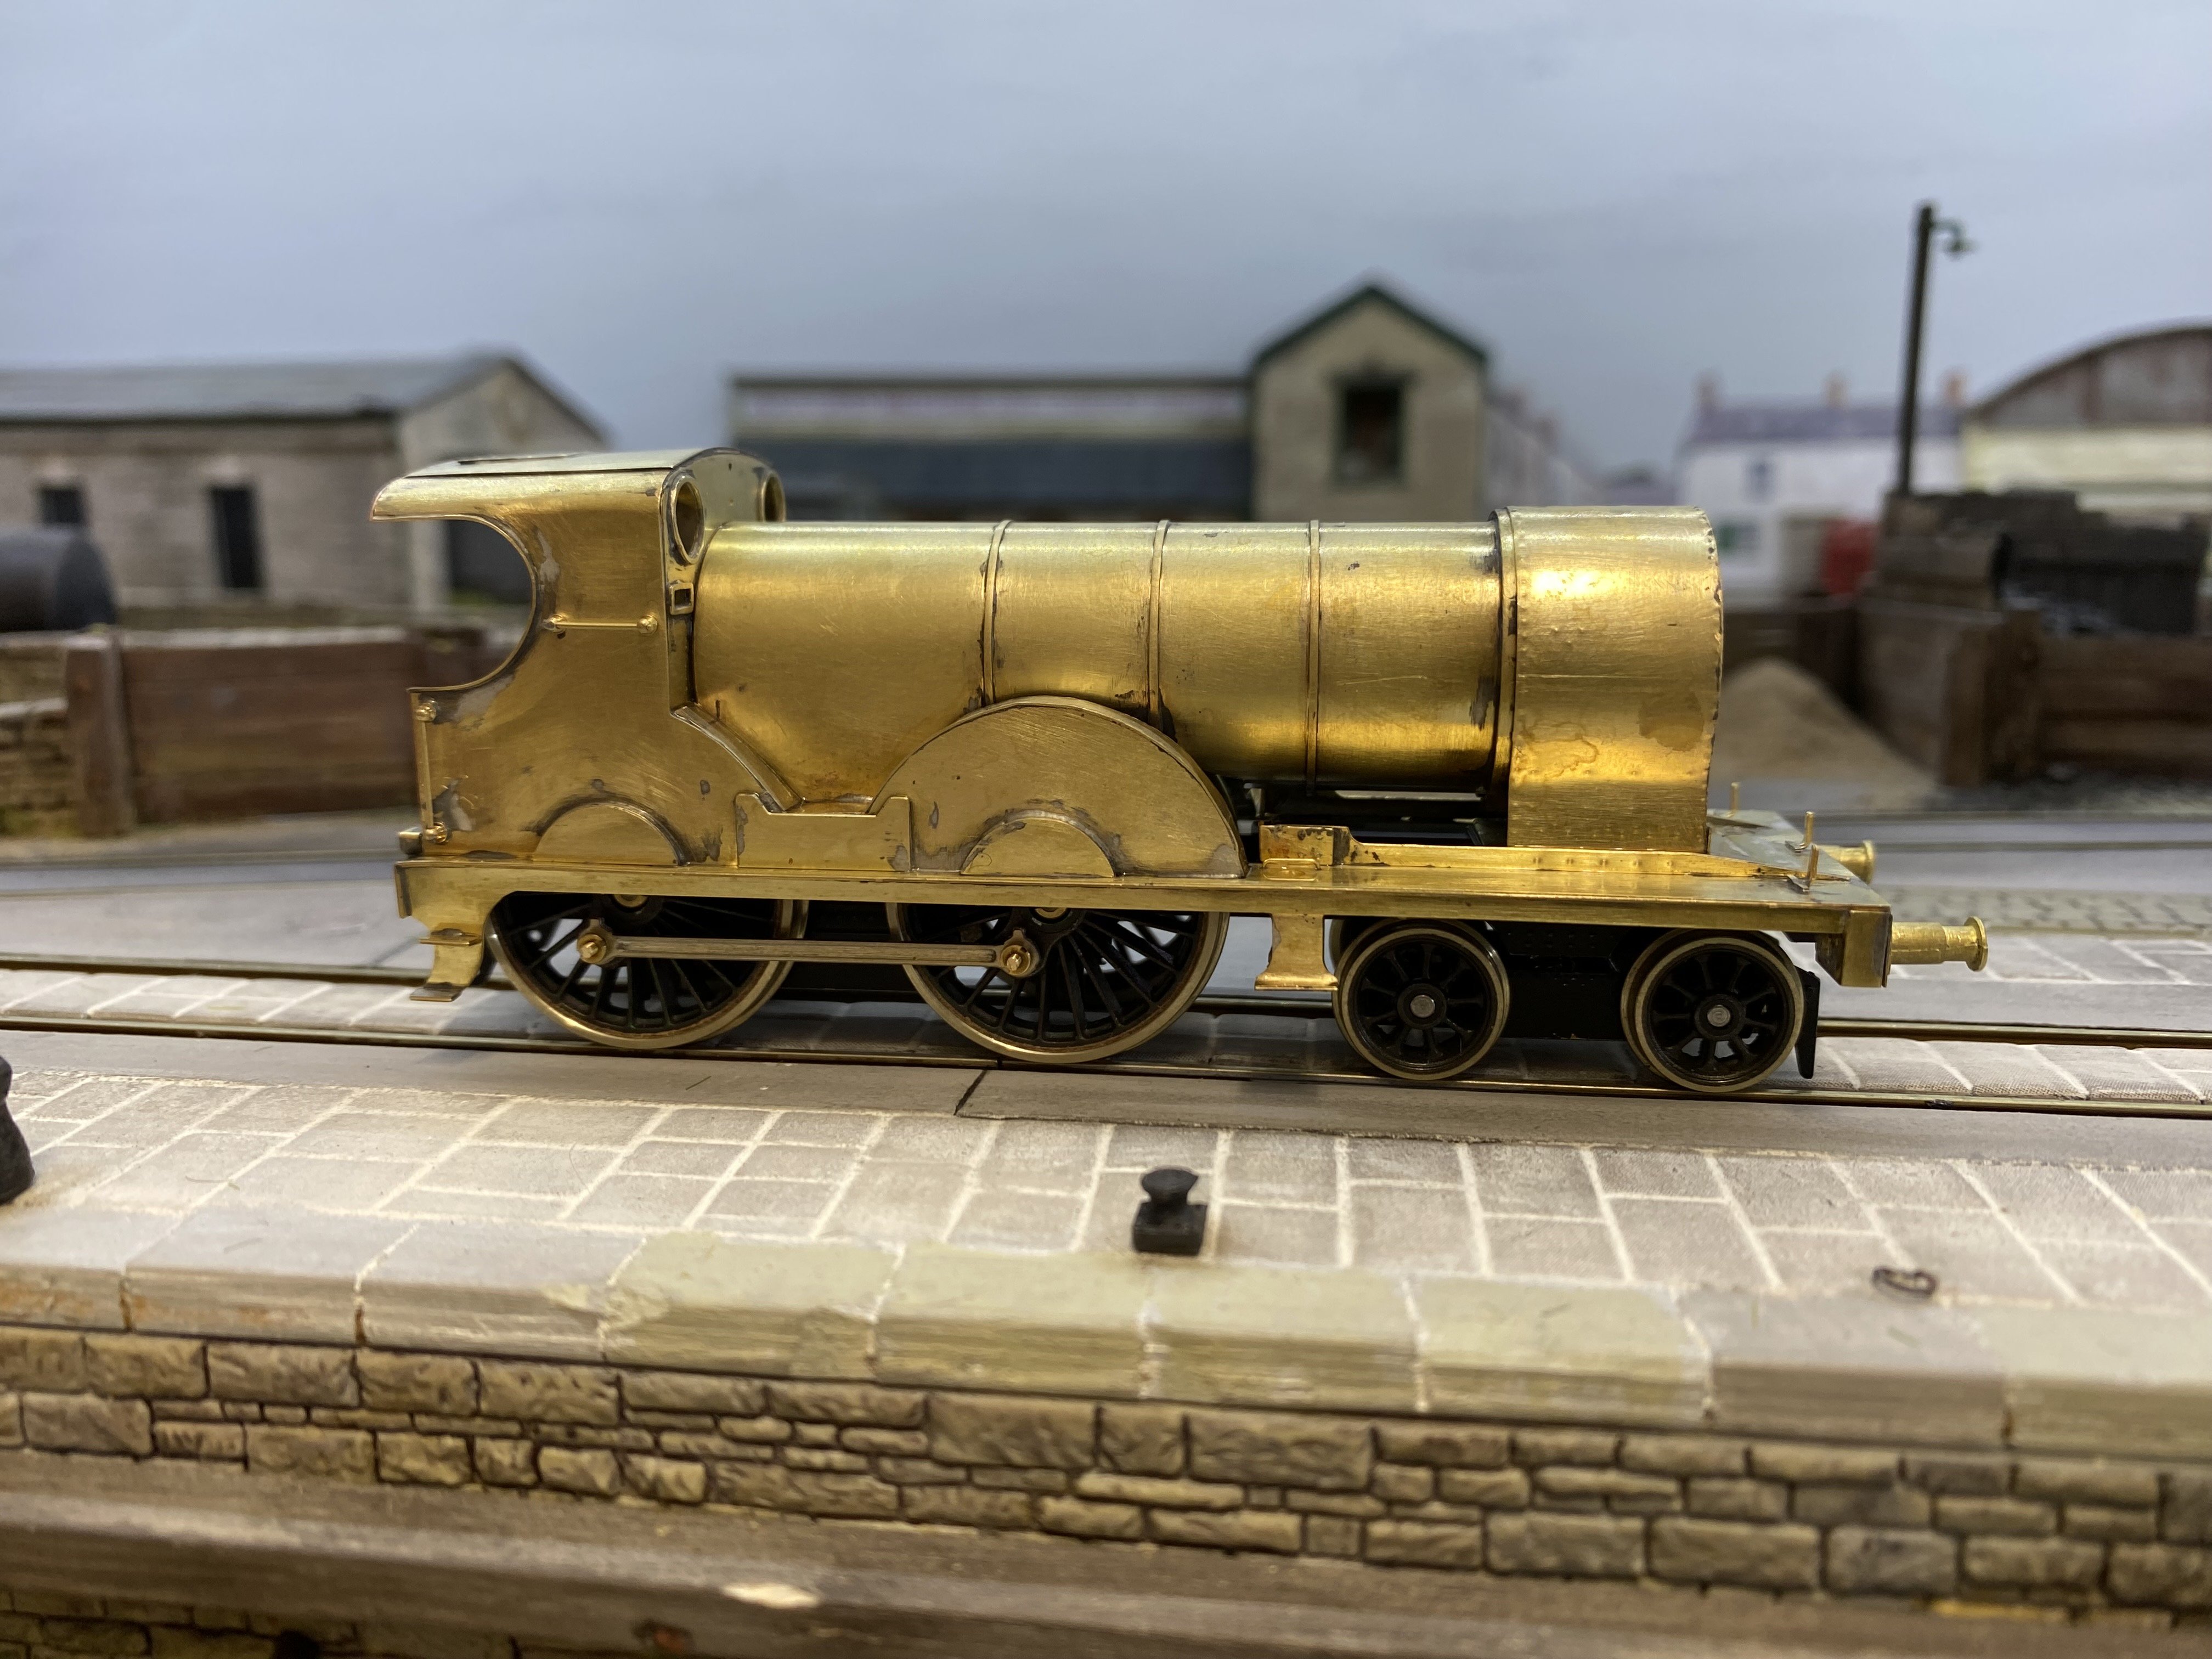
Thanks everyone. I have to say, I'm pleased with it. This NorthStar kit was well designed and went together without major trauma, though like many etched kits, there were the moments when three hands and asbestos fingers would've been helpful and the instructions sometimes leave you to your own devices. "Set up (chassis) frames in the preferred manner" makes sense if you've done it before but would leave a first-time builder at sea. Incidentally, my clever clogs centring spring for the bogie (see post Nov 12 above) didn't work. It just succeeded in derailing it. I think the idea might be sound but the wire I used, 0.45mm diameter brass, was too hefty. I took it out, intending to replace it with 0.33mm but I found it ran ok without anything so that's how it is at present. The bogie is still likely to be a problem child. It has a small vertical coil spring exerting down pressure, the tension of which can be adjusted by tightening the nut holding the bogie in place. There's a fine line between getting enough tension to keep the bogie happy but not so much that the bogie starts propping the front coupled wheels off the track. More fun anticipated. Alan
-
Thank you Killian, very much appreciated. However, much as I'd like to claim this one as a scratchbuild, it's a NorthStar kit for a change
-
Me neither, David. In fact, I'm not a fan of fitting brakes of any type. There's always the risk of brakes shorting on wheels, especially on compensated axles where the wheels are moving up and down and tilting so I tend to play safe and end up with a bigger gap between wheel and brake than I'd like. In some of the scratchbuilds, I've used plastic brake gear from Gibsons which eliminates the risk of shorts but gluing these in place is never as secure as soldering metal ones. Swings and roundabouts
-
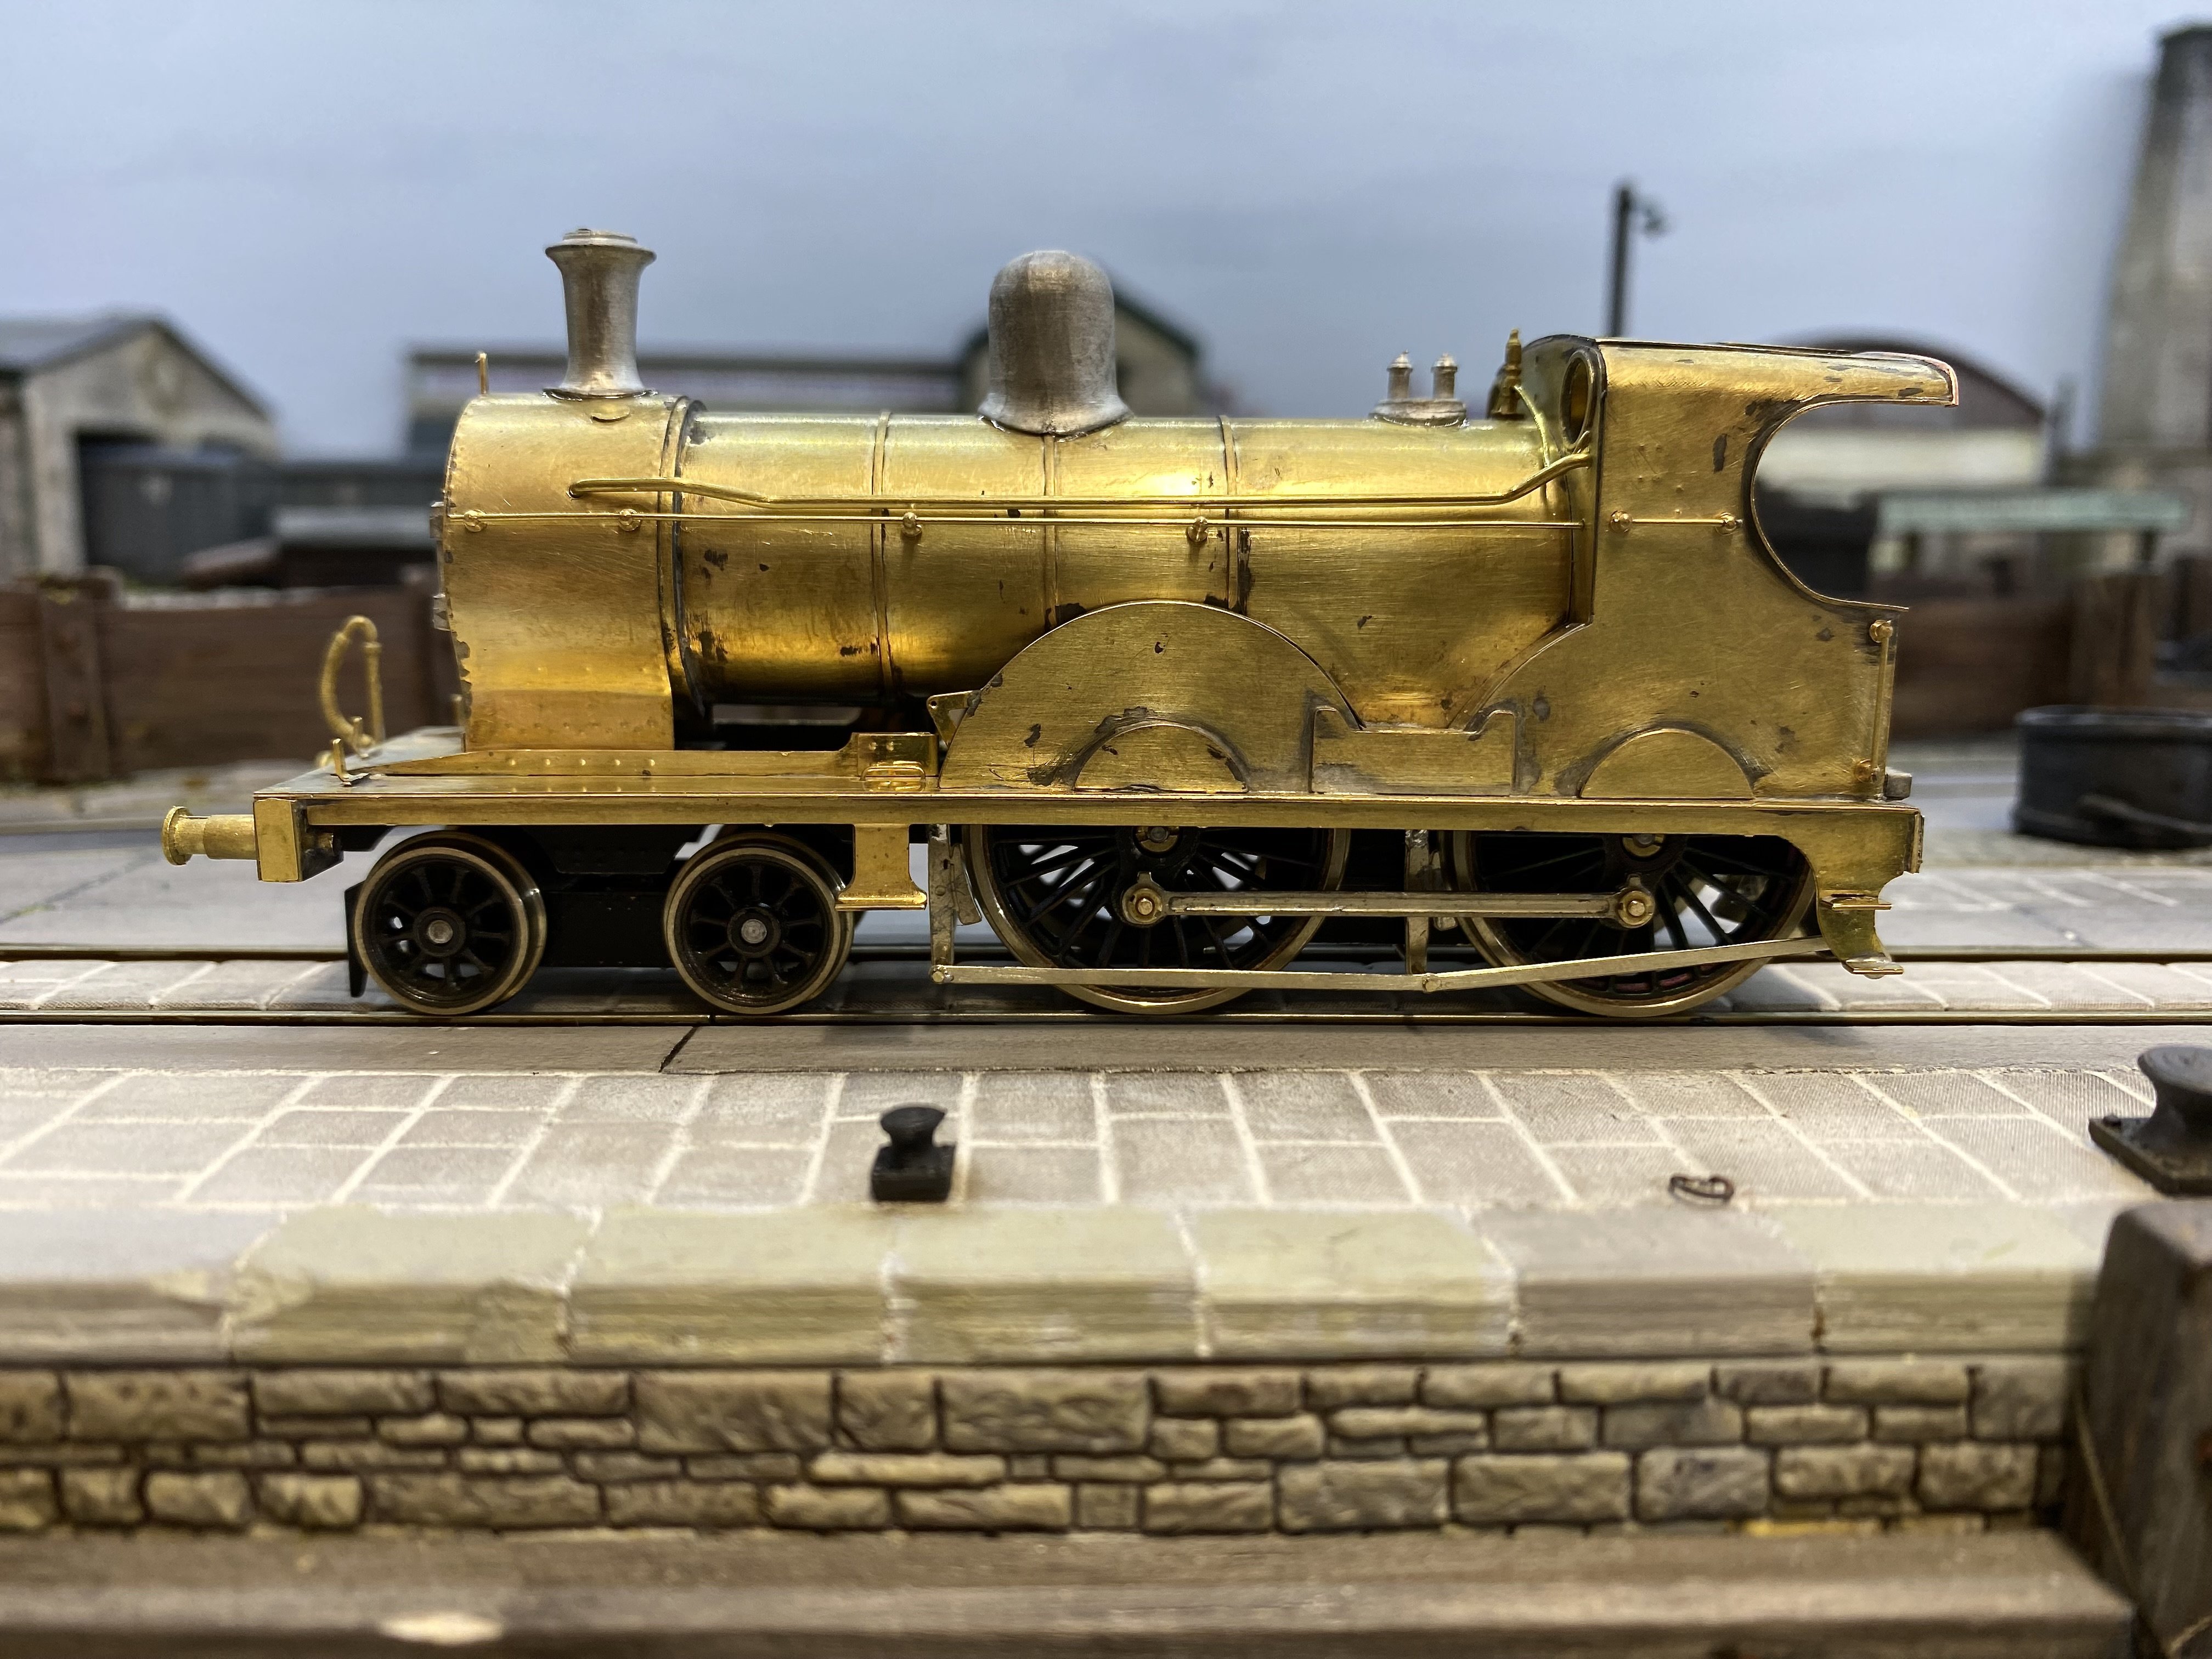
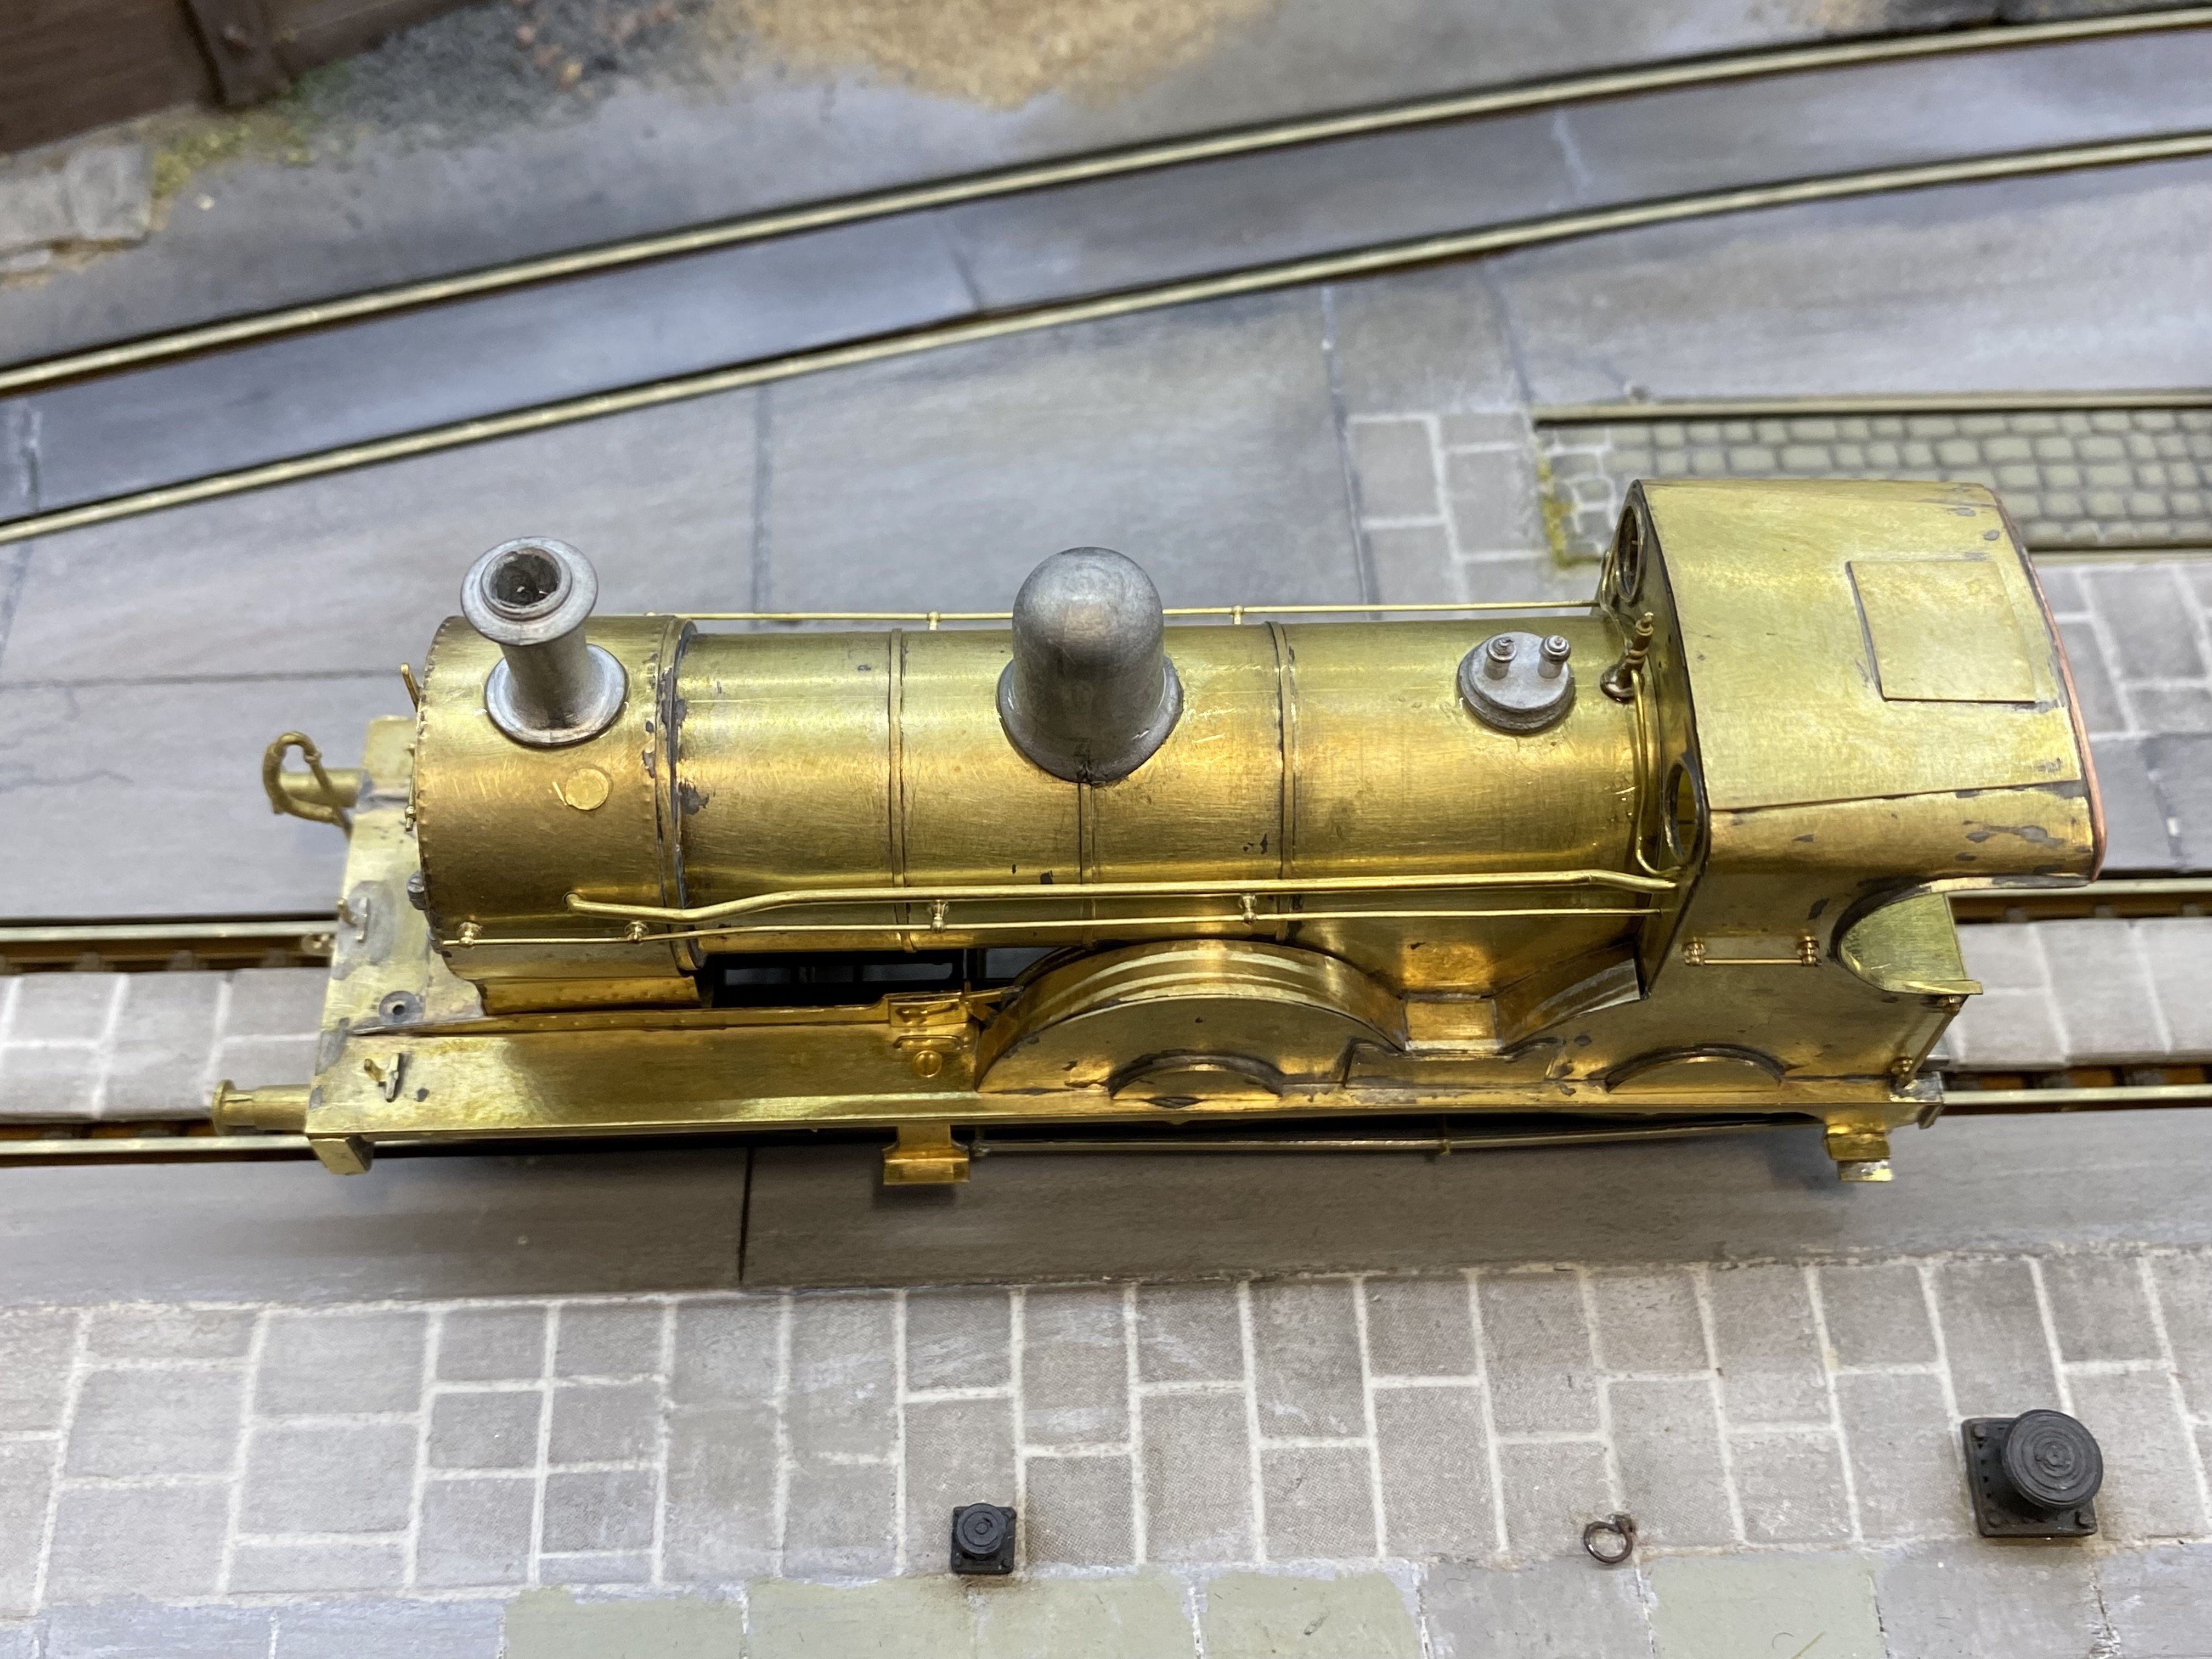
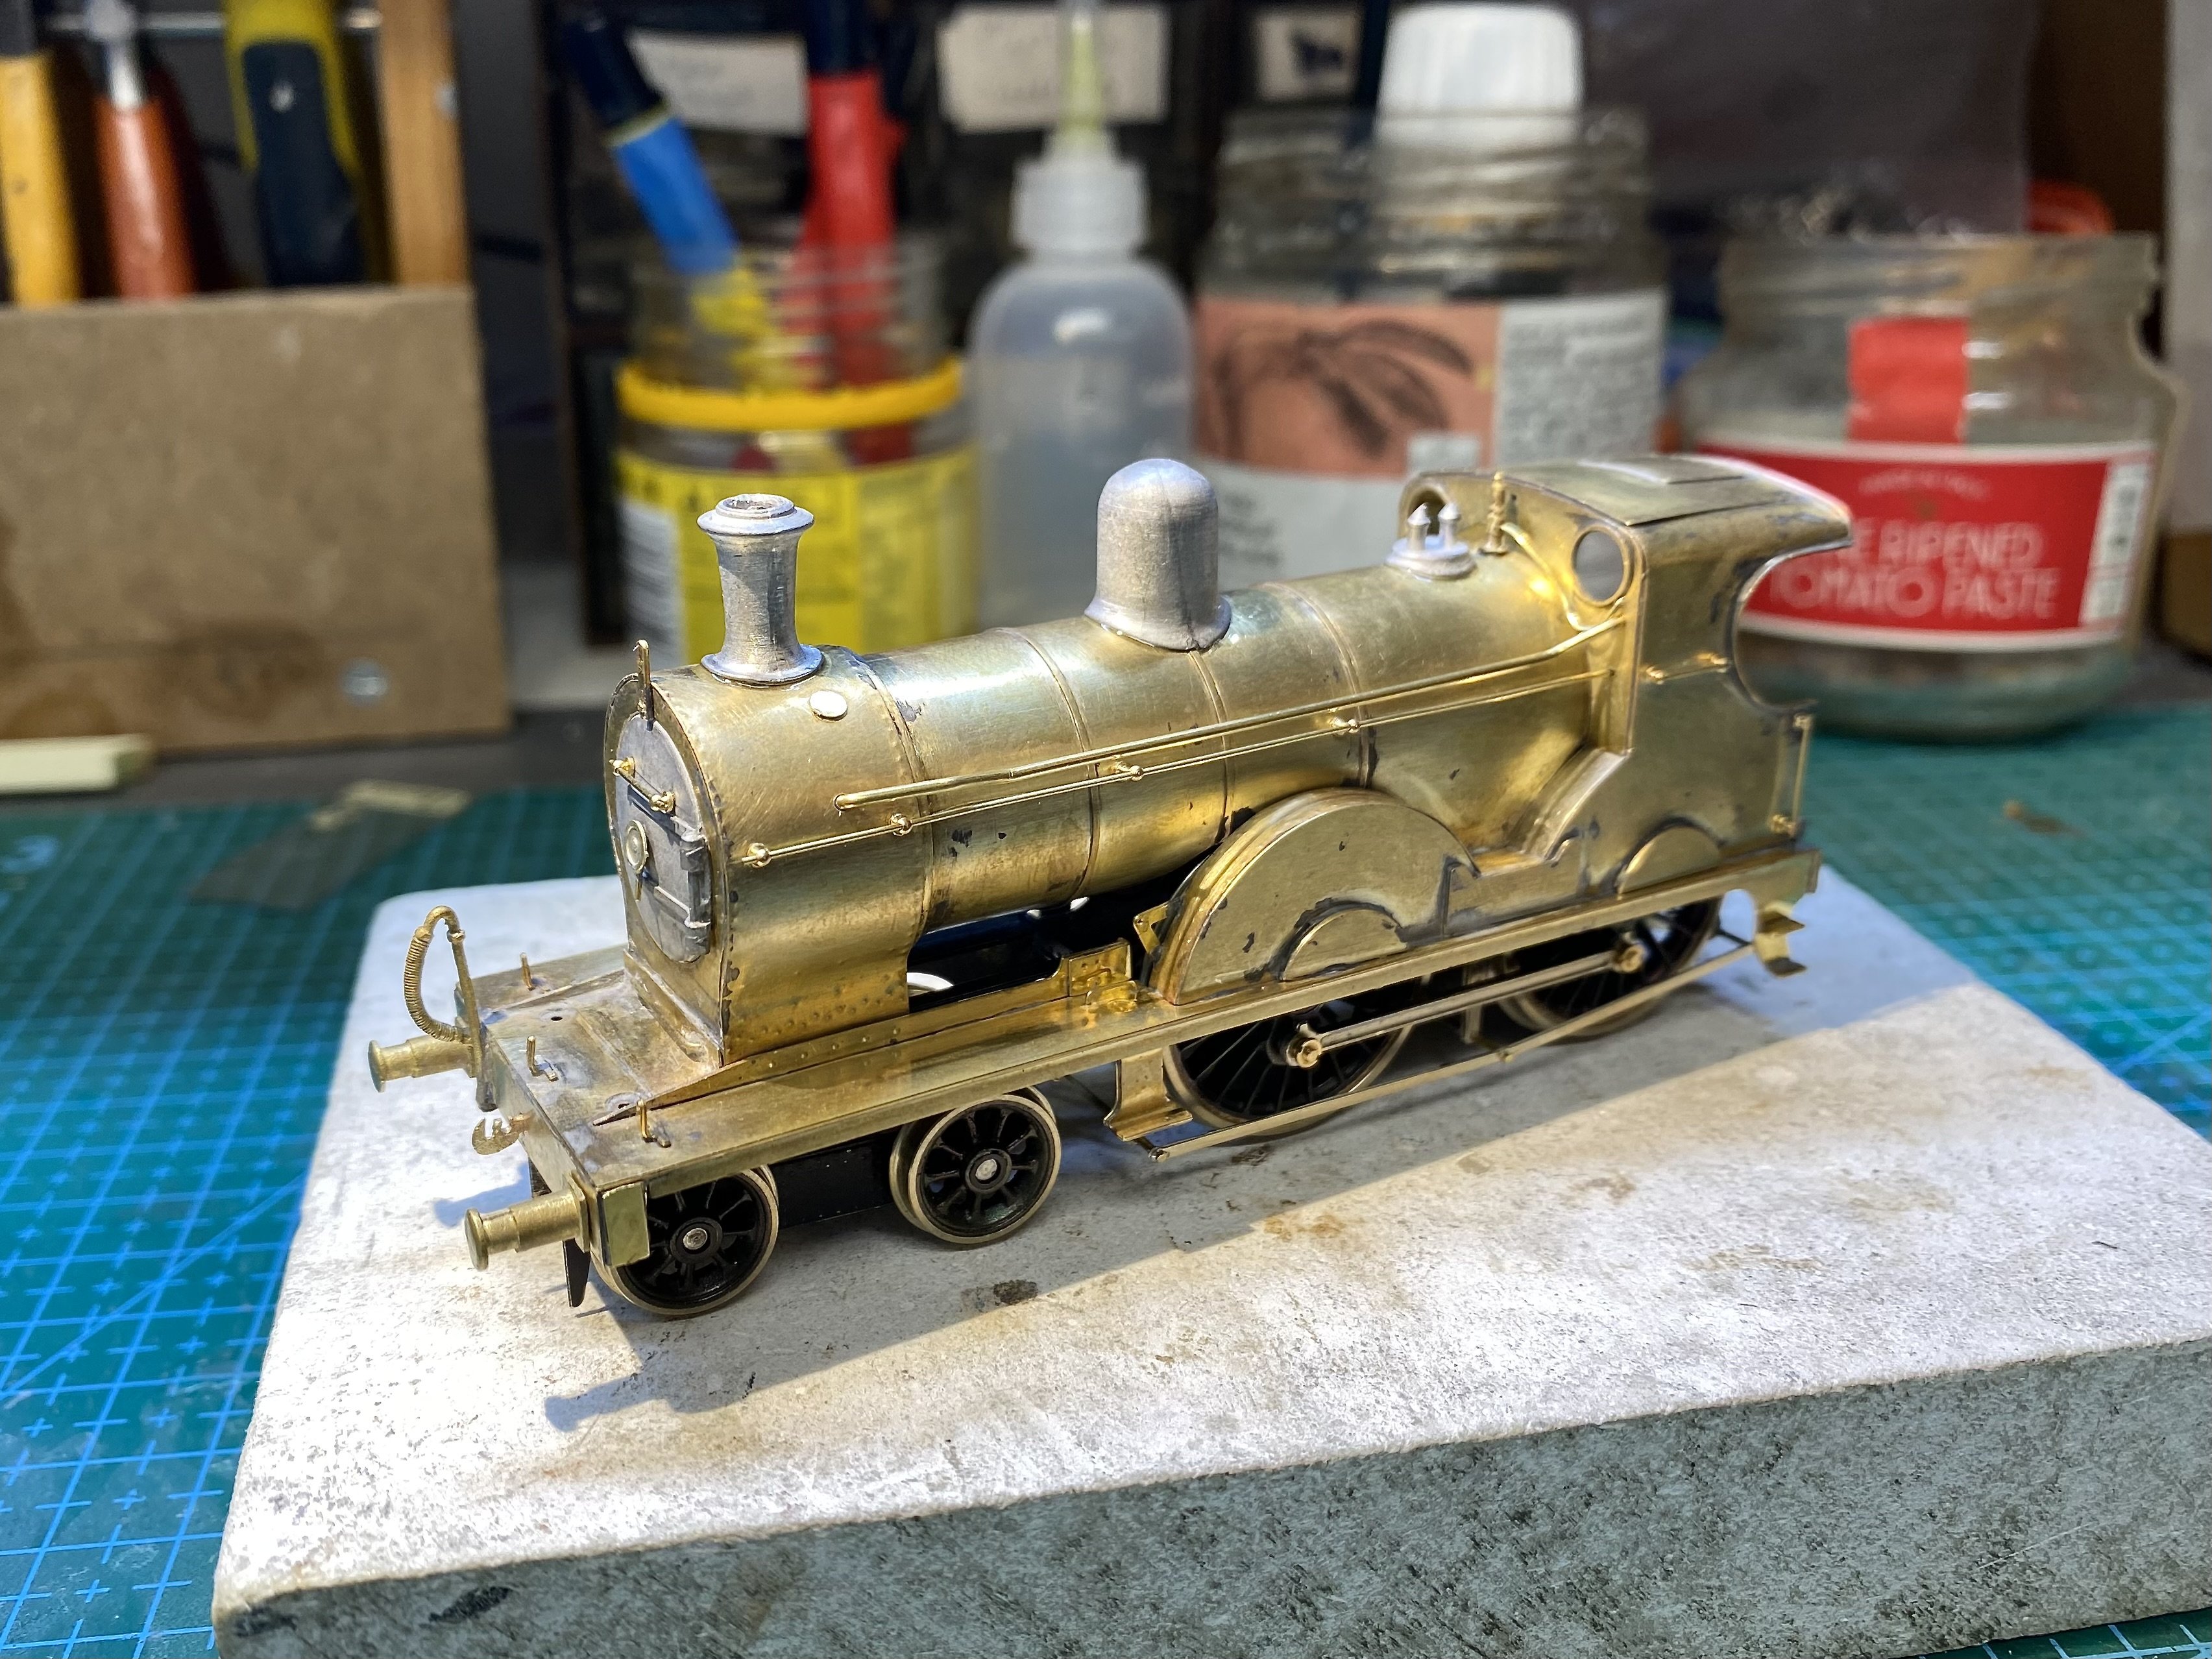
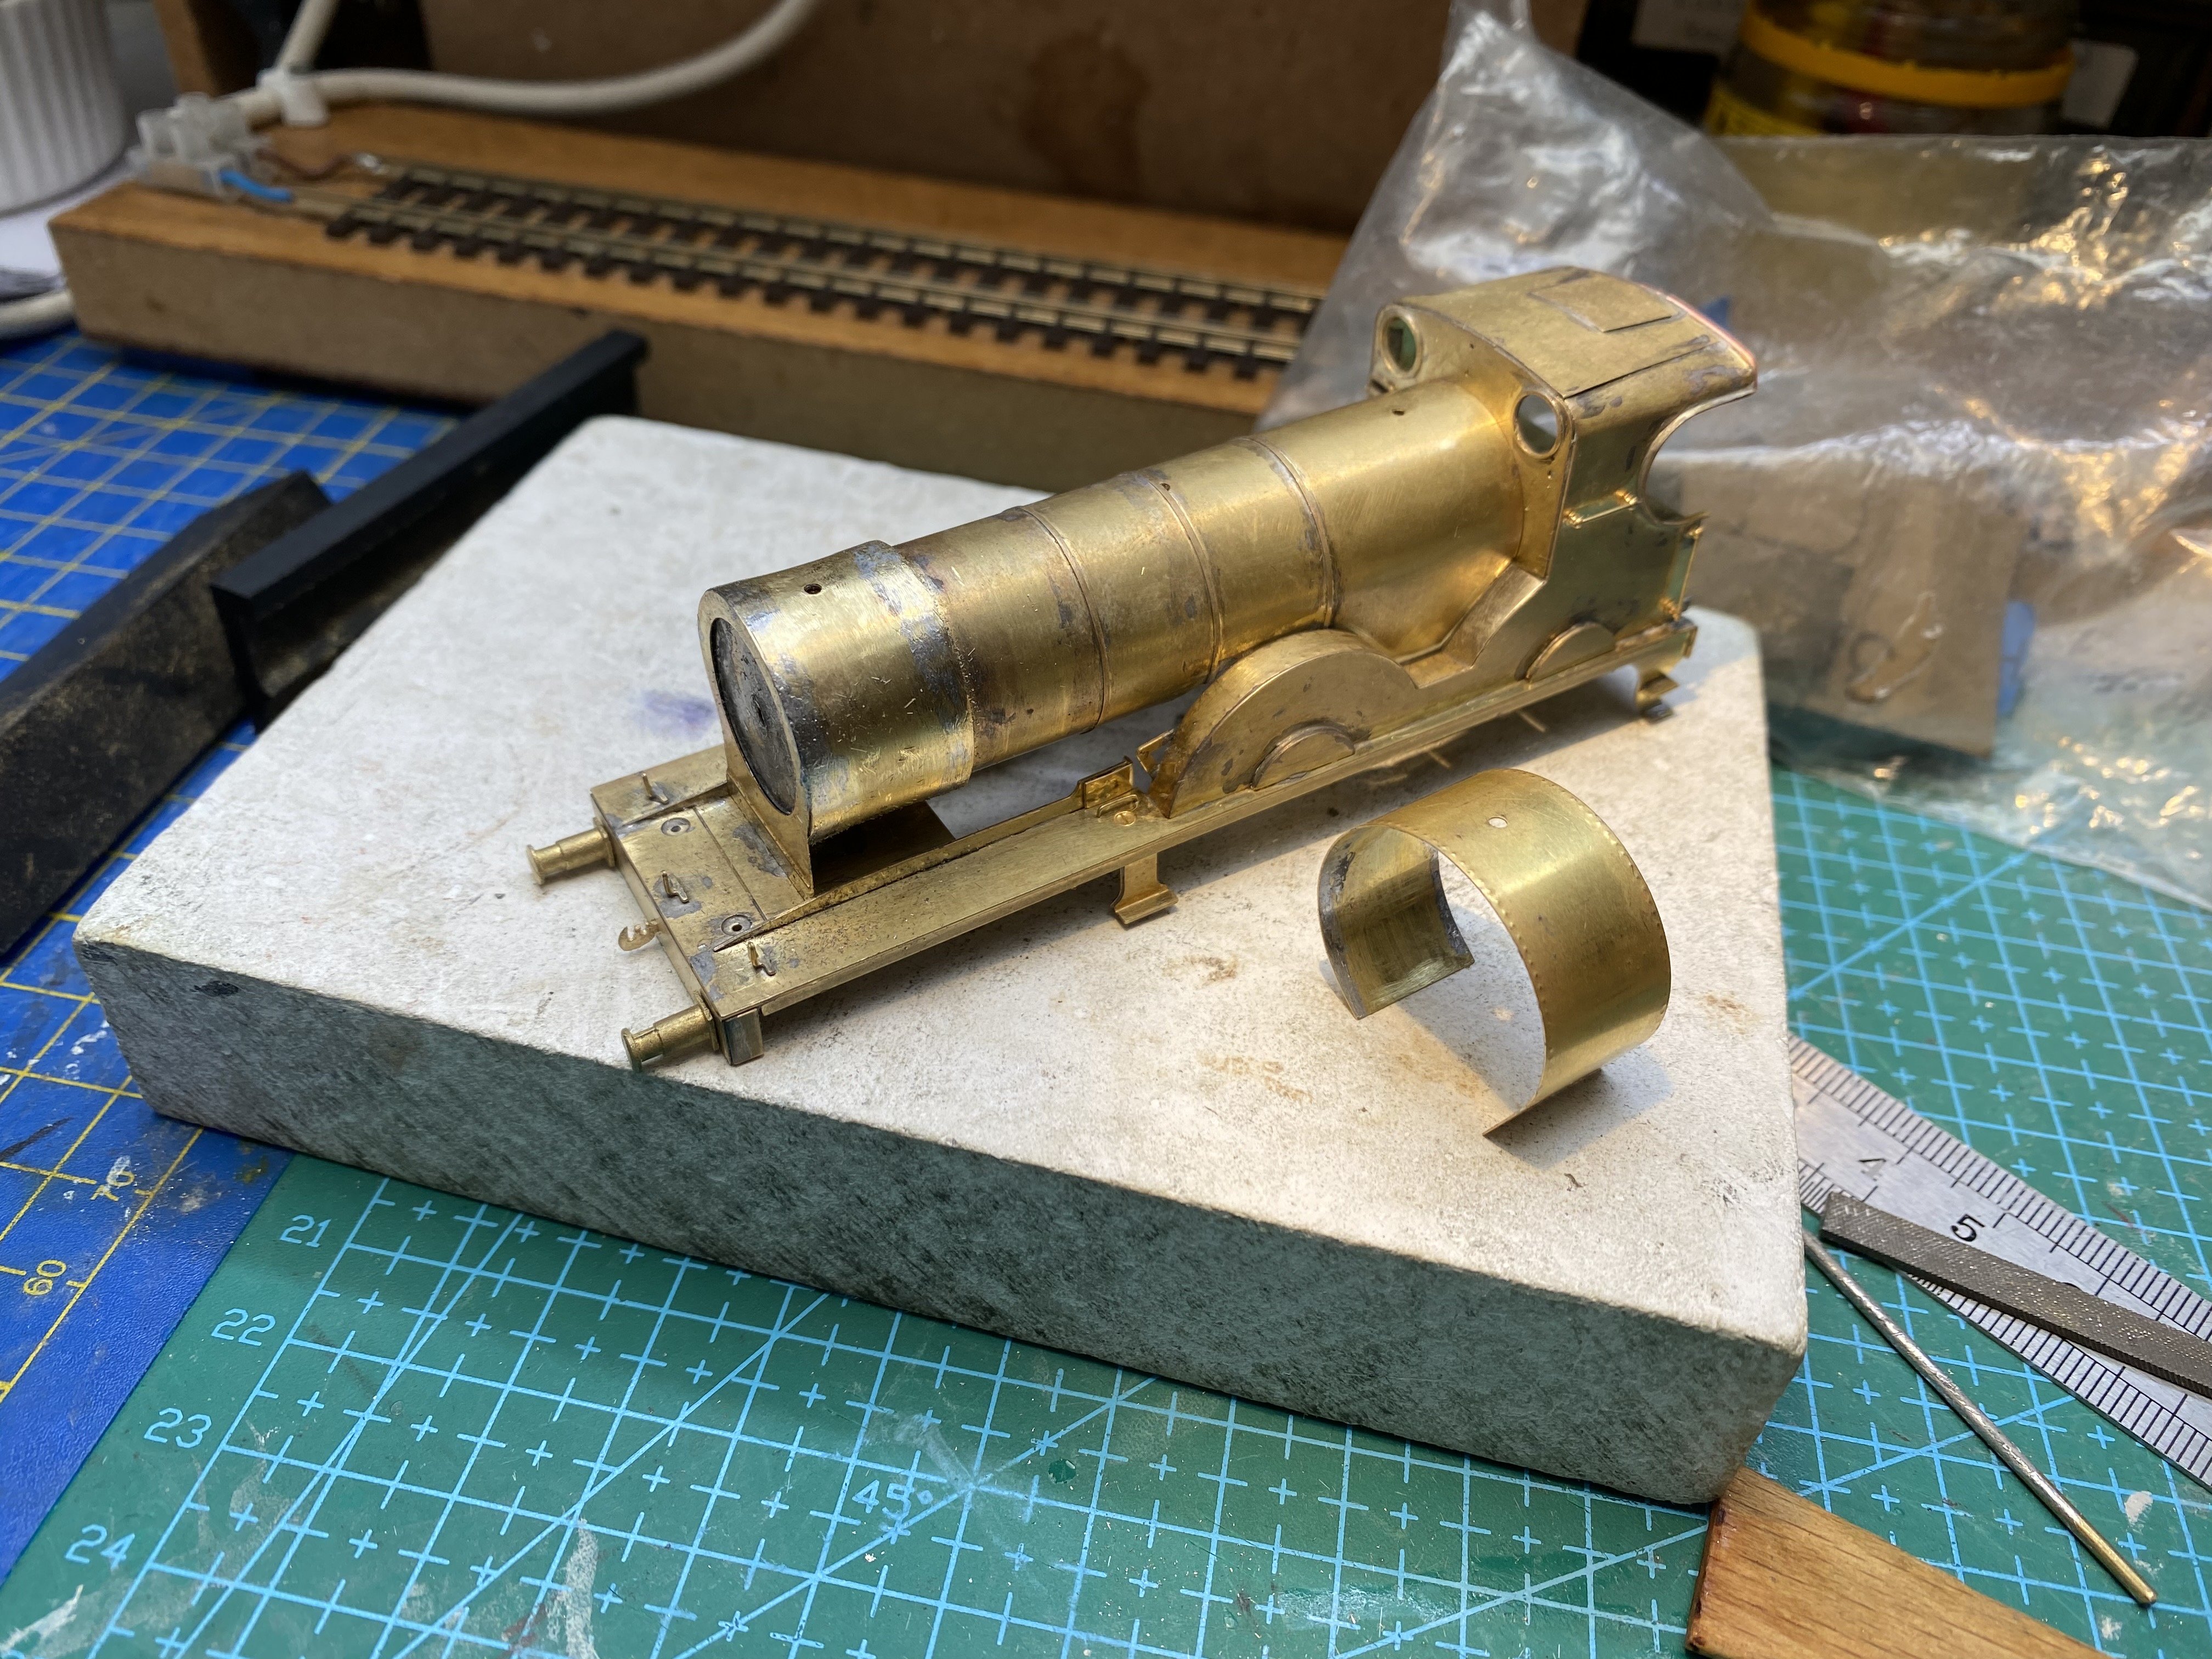
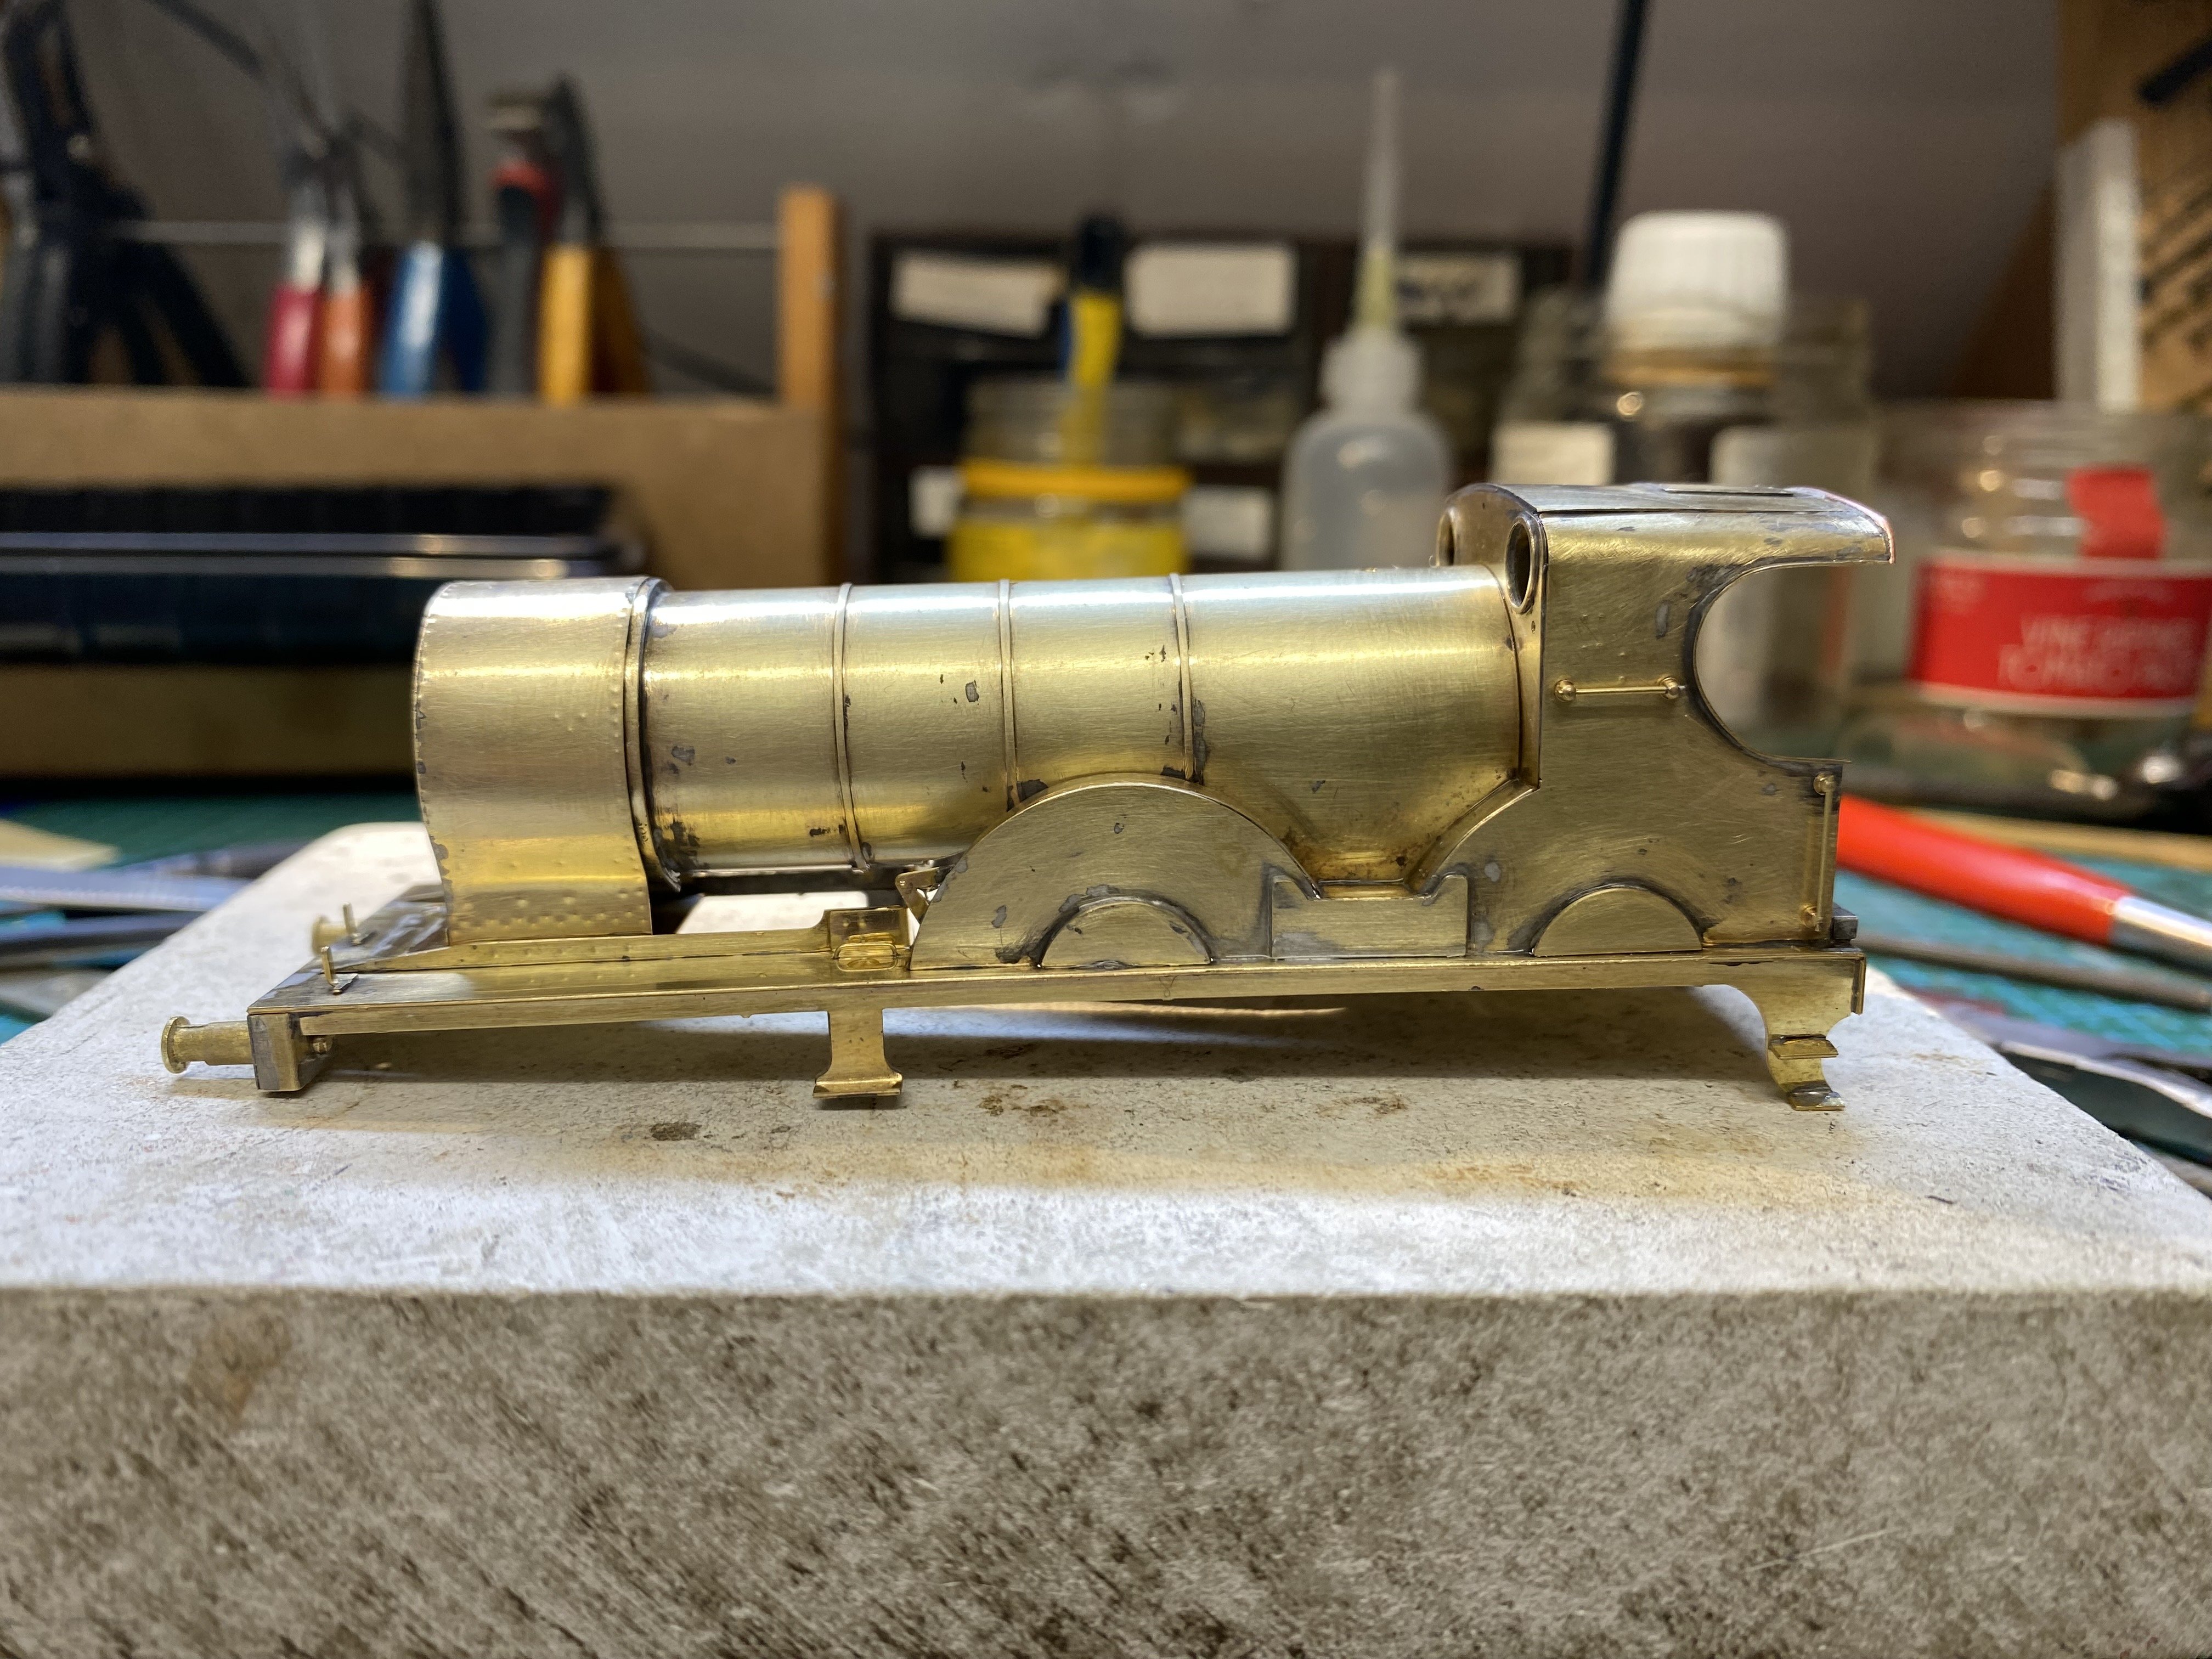
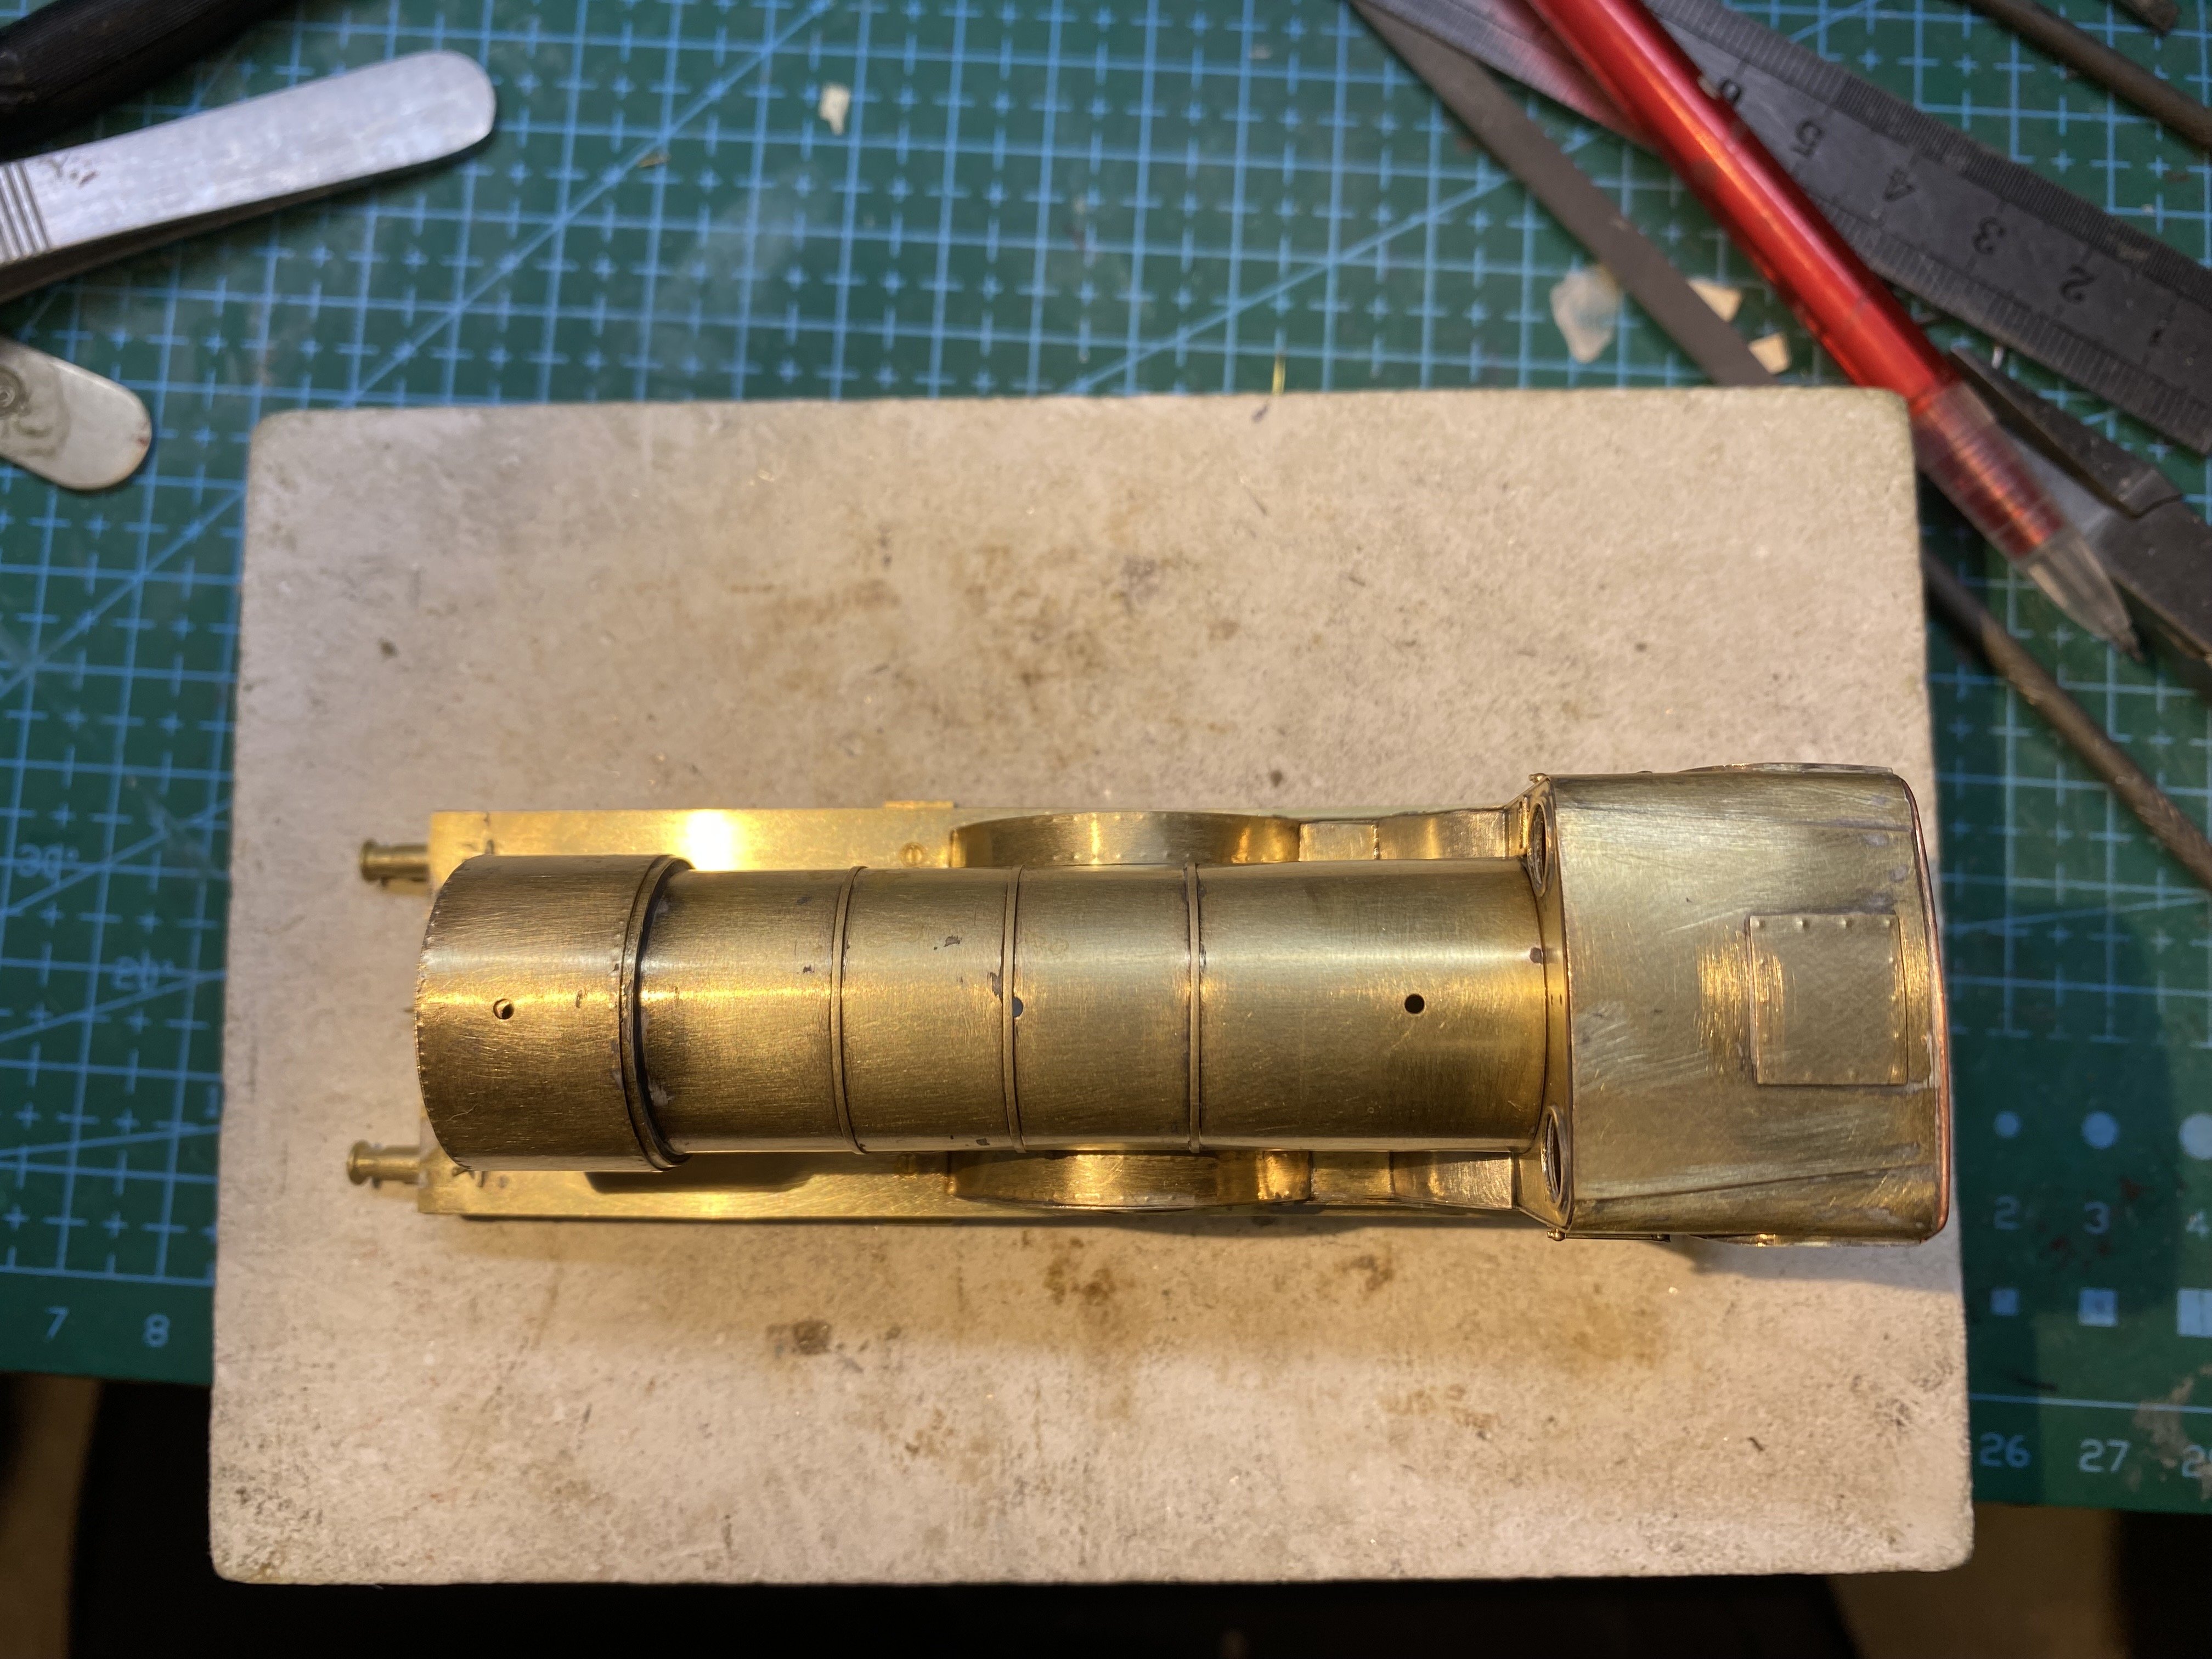
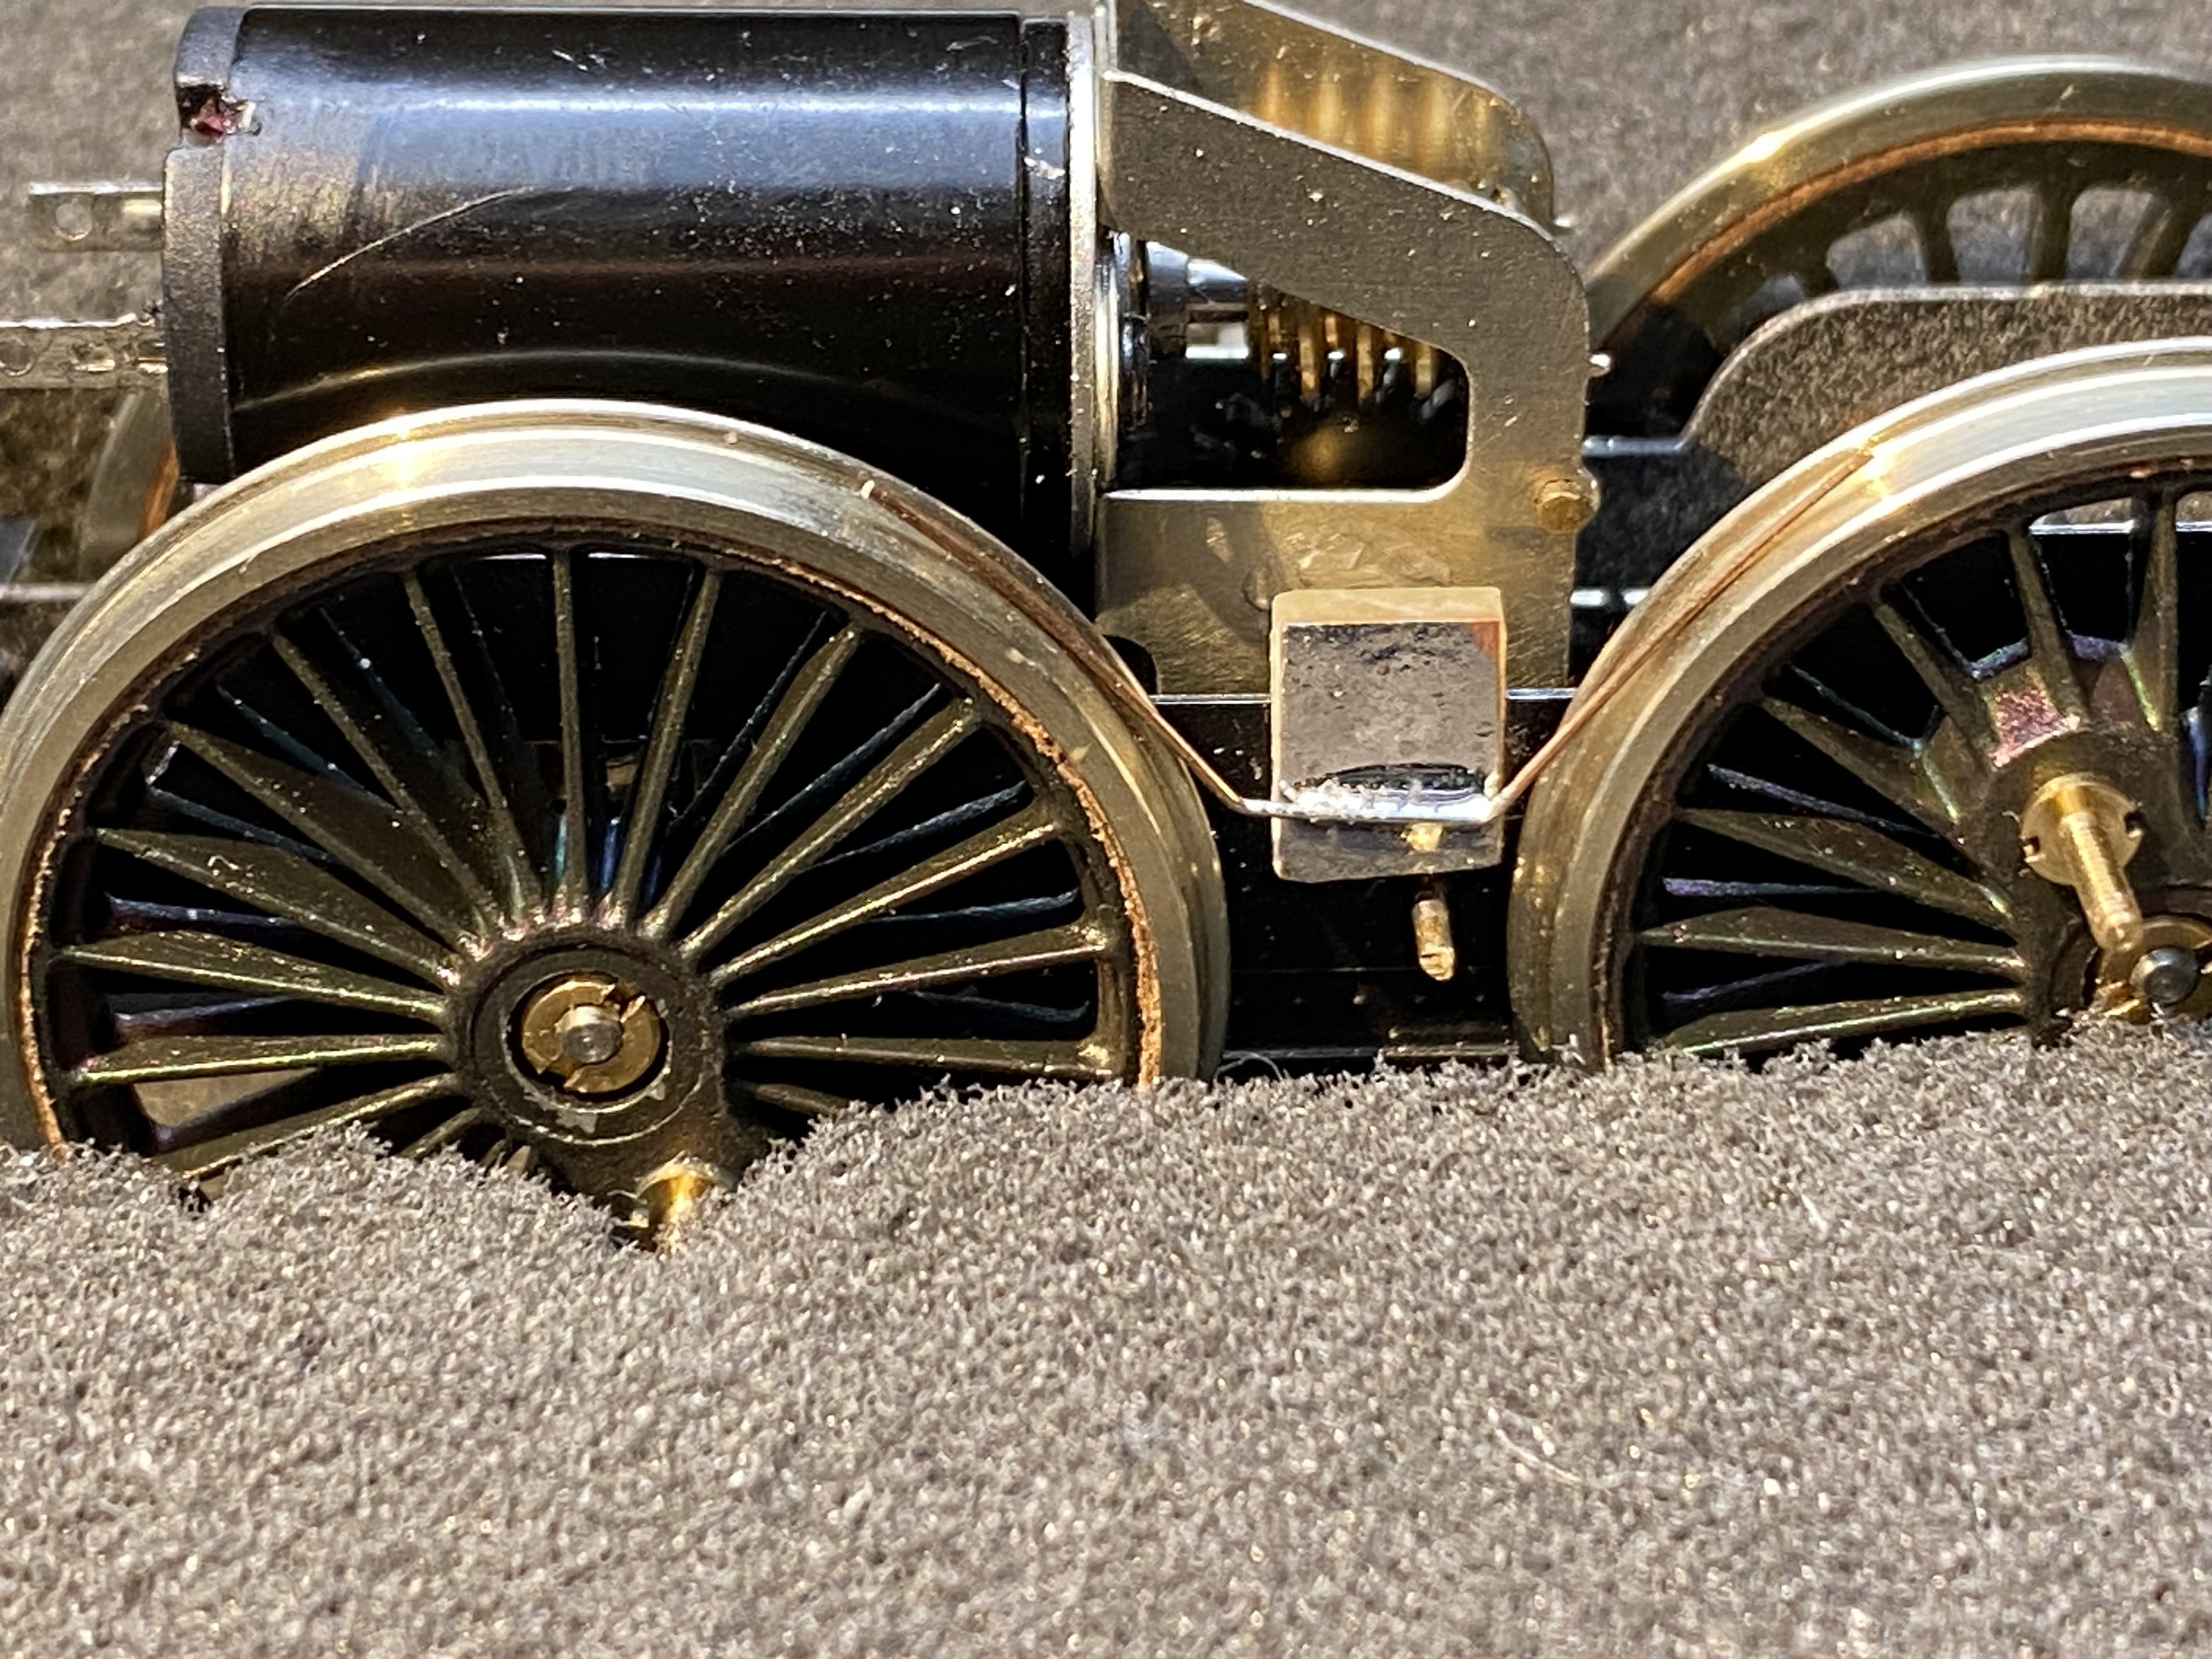
I've been avoiding fitting the brake gear to the PPs chassis up till now though some of the work was already done. Brake hangers using 0.7mm brass rod were soldered in at the time the chassis frames were assembled and the brakes themselves were made up and drilled to fit. Stringing it all together was tricky but slightly easier than I'd been dreading. This loco has brake pull rods on the outside of the wheels. I used these to help line up the brakes and solder them onto the hangers. Cross shafts were then fitted and soldered into holes in the bottom of the brakes. Finally the pull rods were soldered onto the cross shafts which were then trimmed and filed to length. I fitted the outside brake pull rods as far outboard as possible to allow for the wheels to be removed if ever necessary. The superstructure now has most of its details added and is just about finished. I scribed a horizontal line along each side of the boiler to guide drilling the holes for the handrail knobs which were superglued in. The white metal castings were epoxied on. If this was a tank engine we'd be done now but there are the makings of a tender still in the box. Alan
- 860 replies
-
- 21
-
-
-
Wonderful modelling. That's a very drunk passenger in the last carriage.
-
That’s a useful tool David!
-
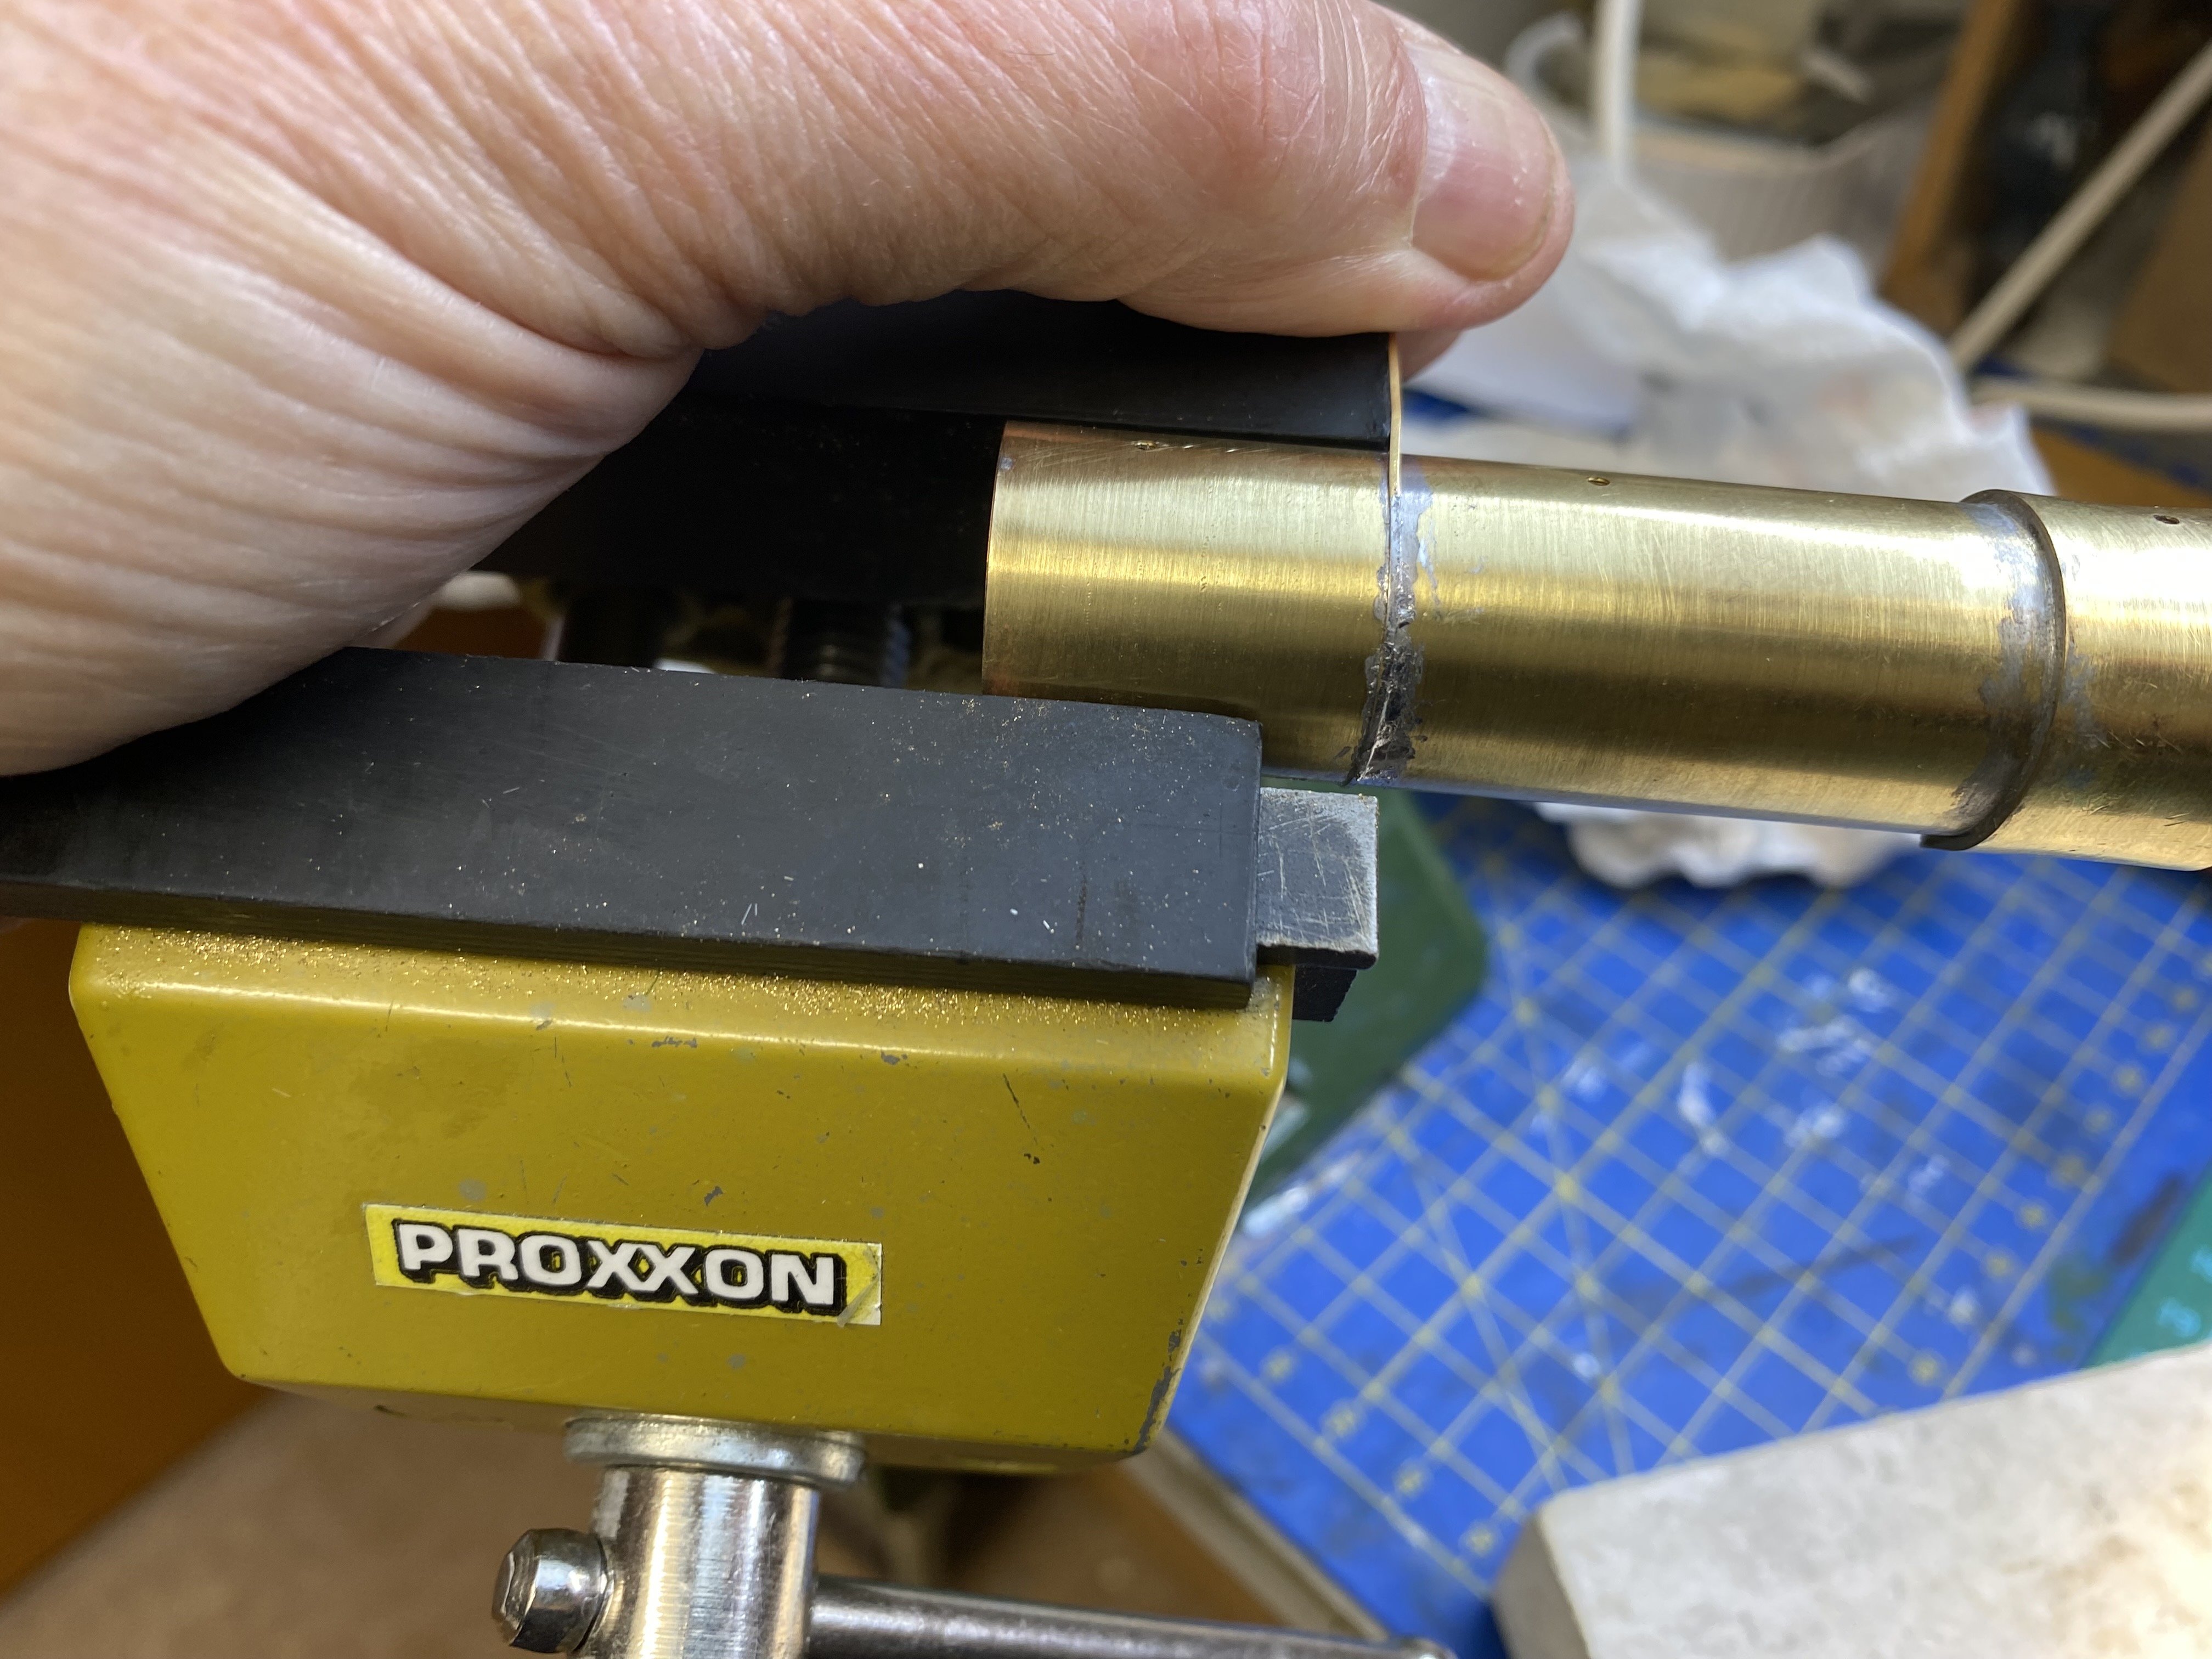
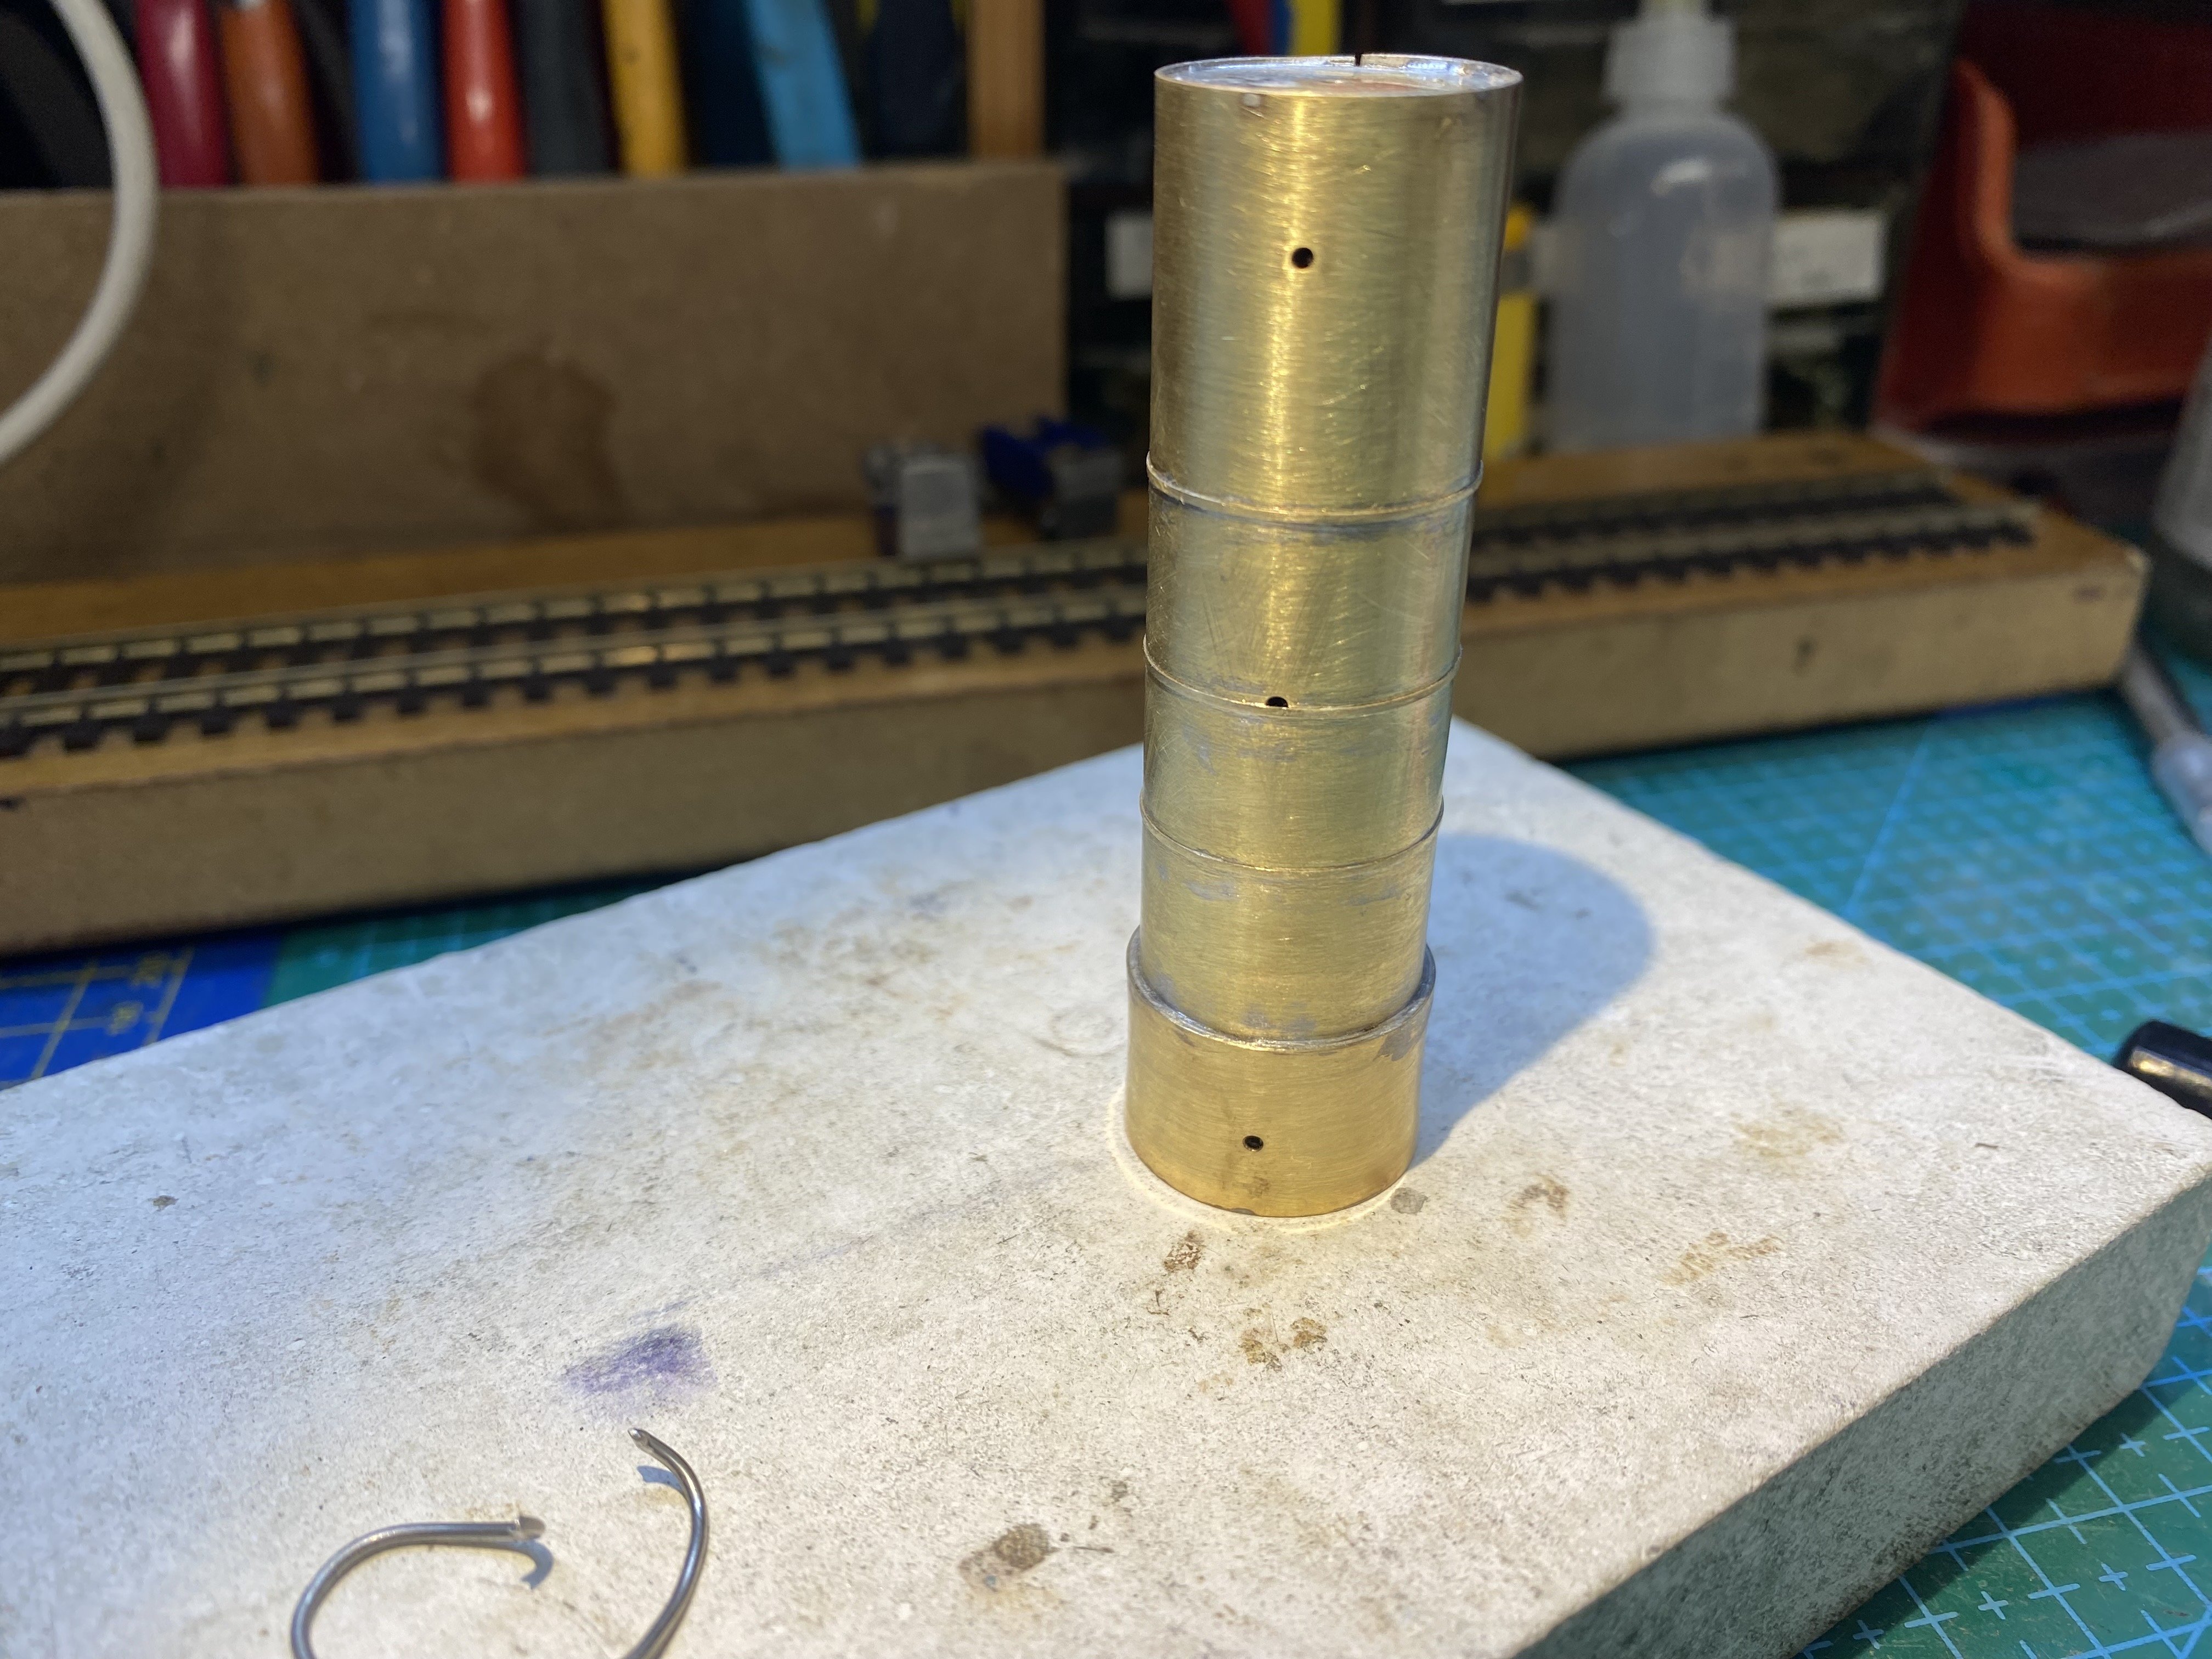
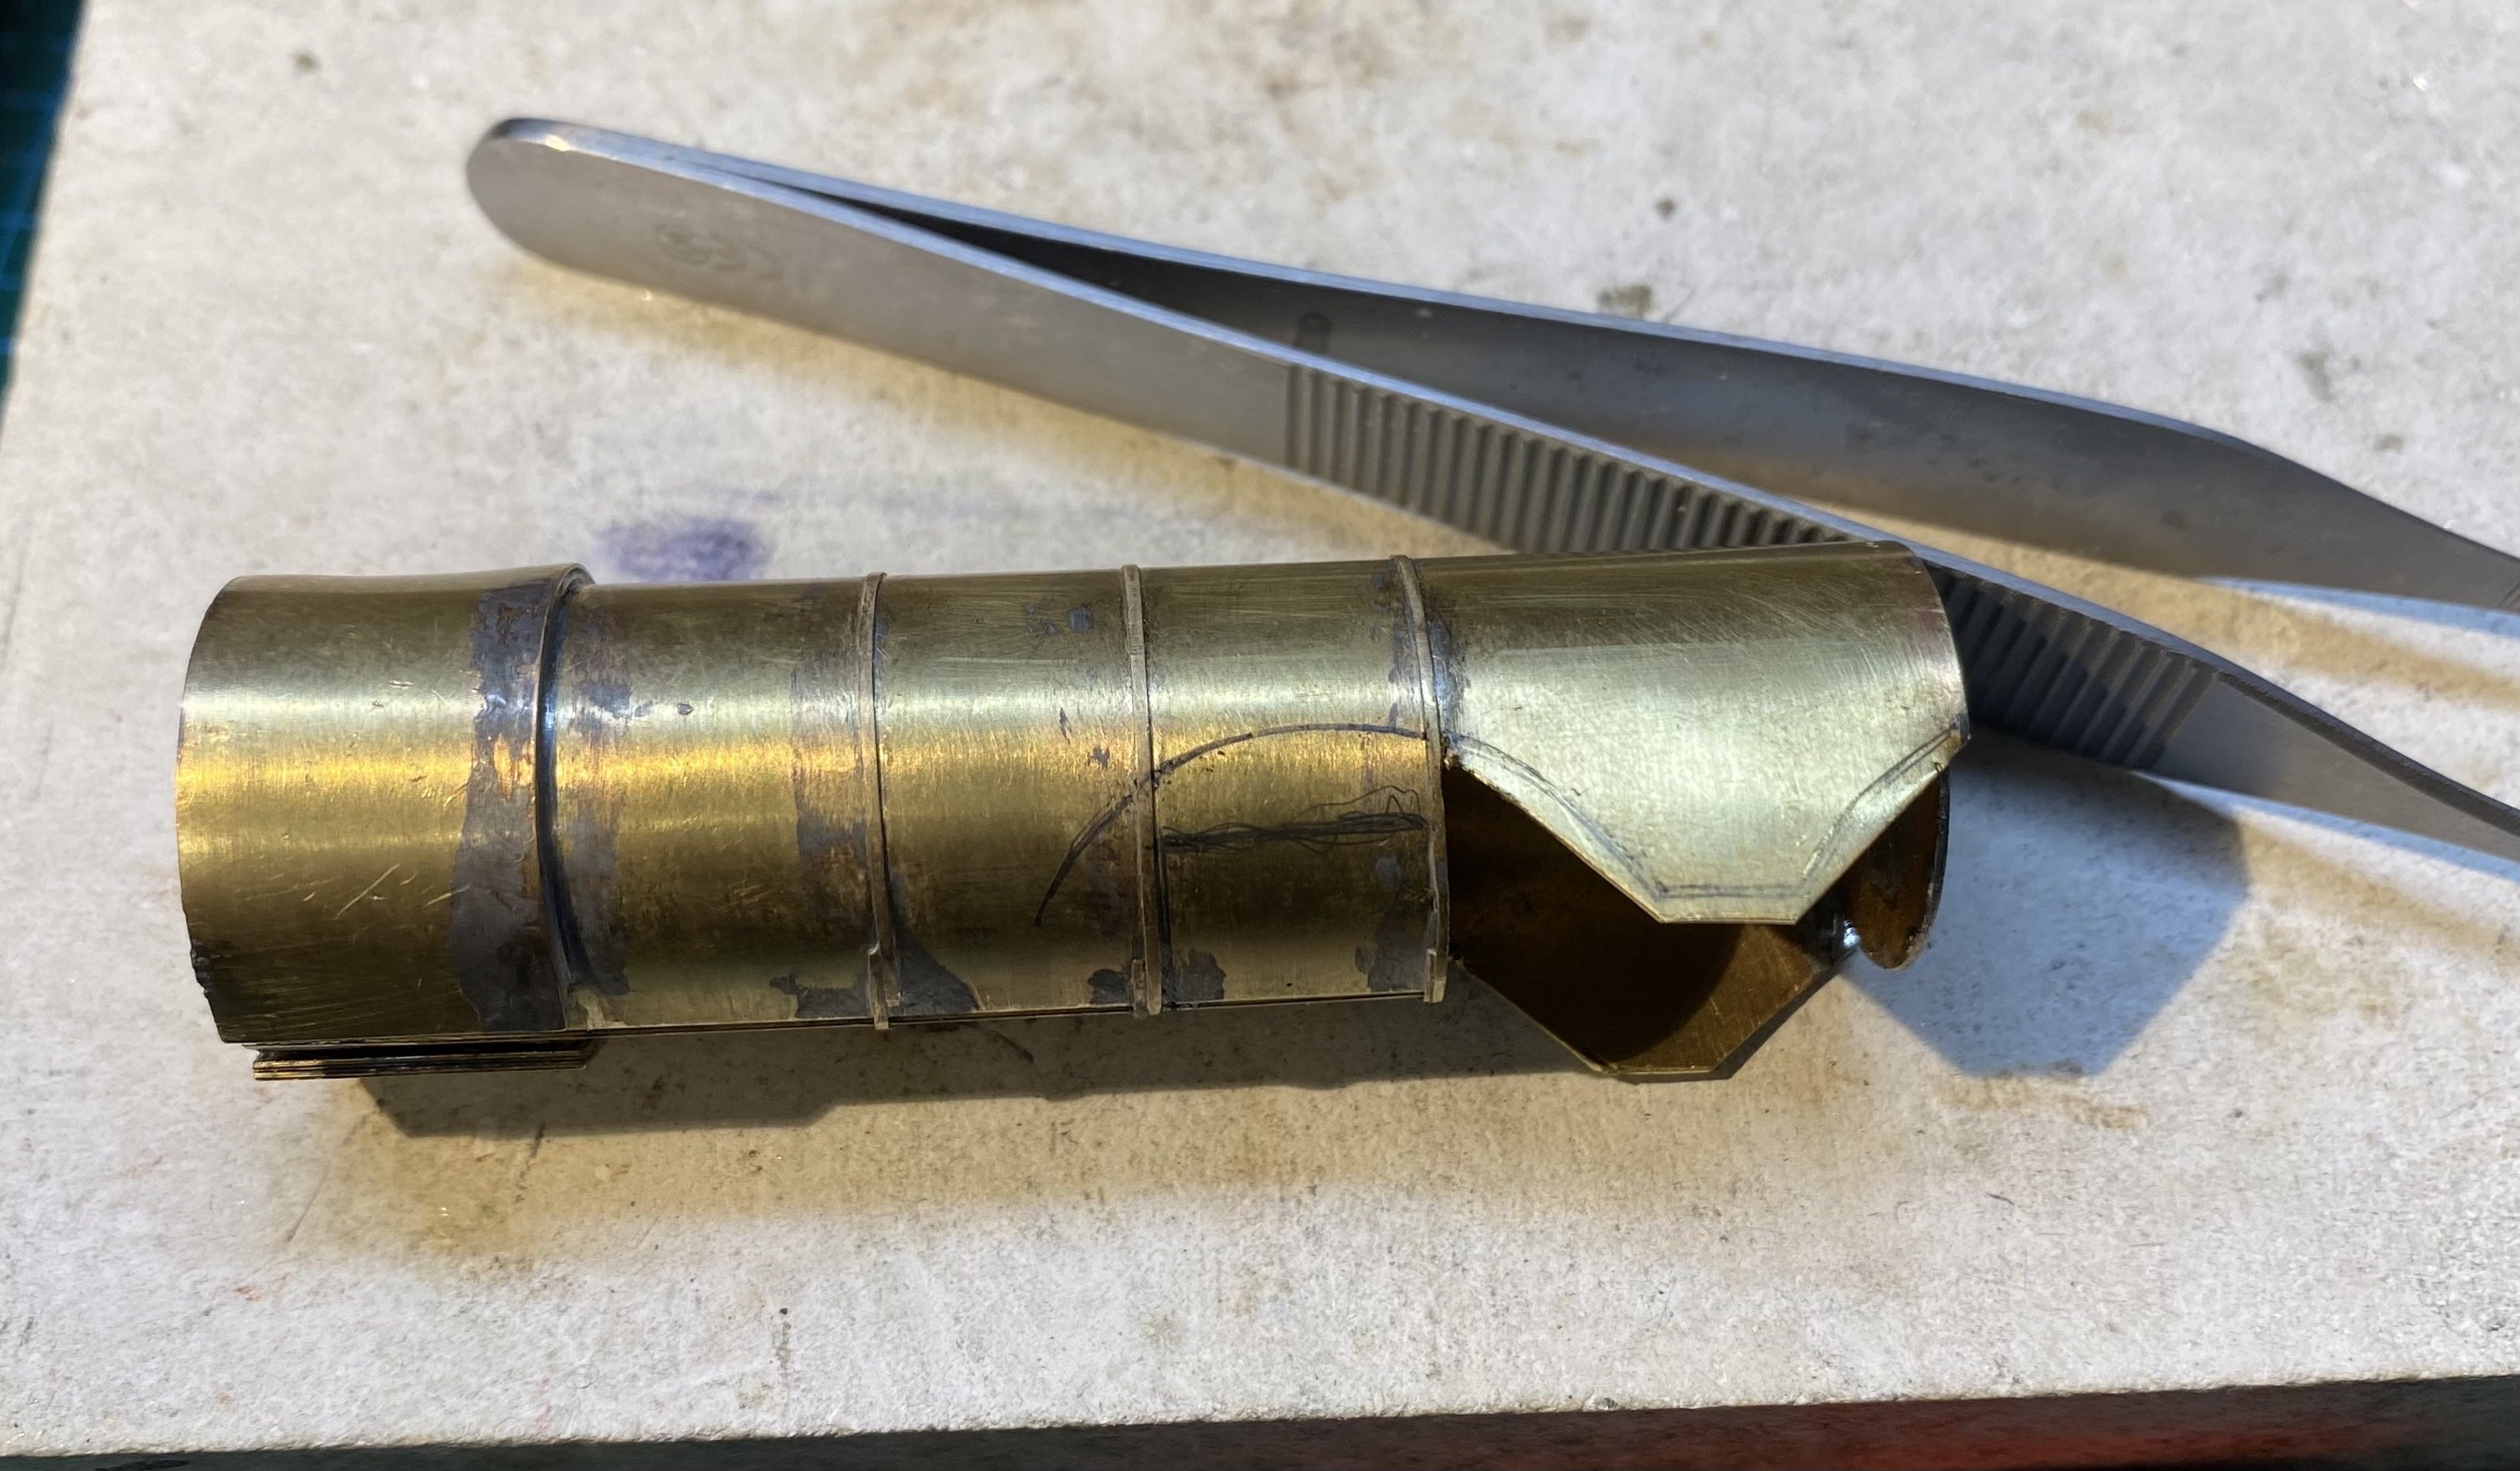
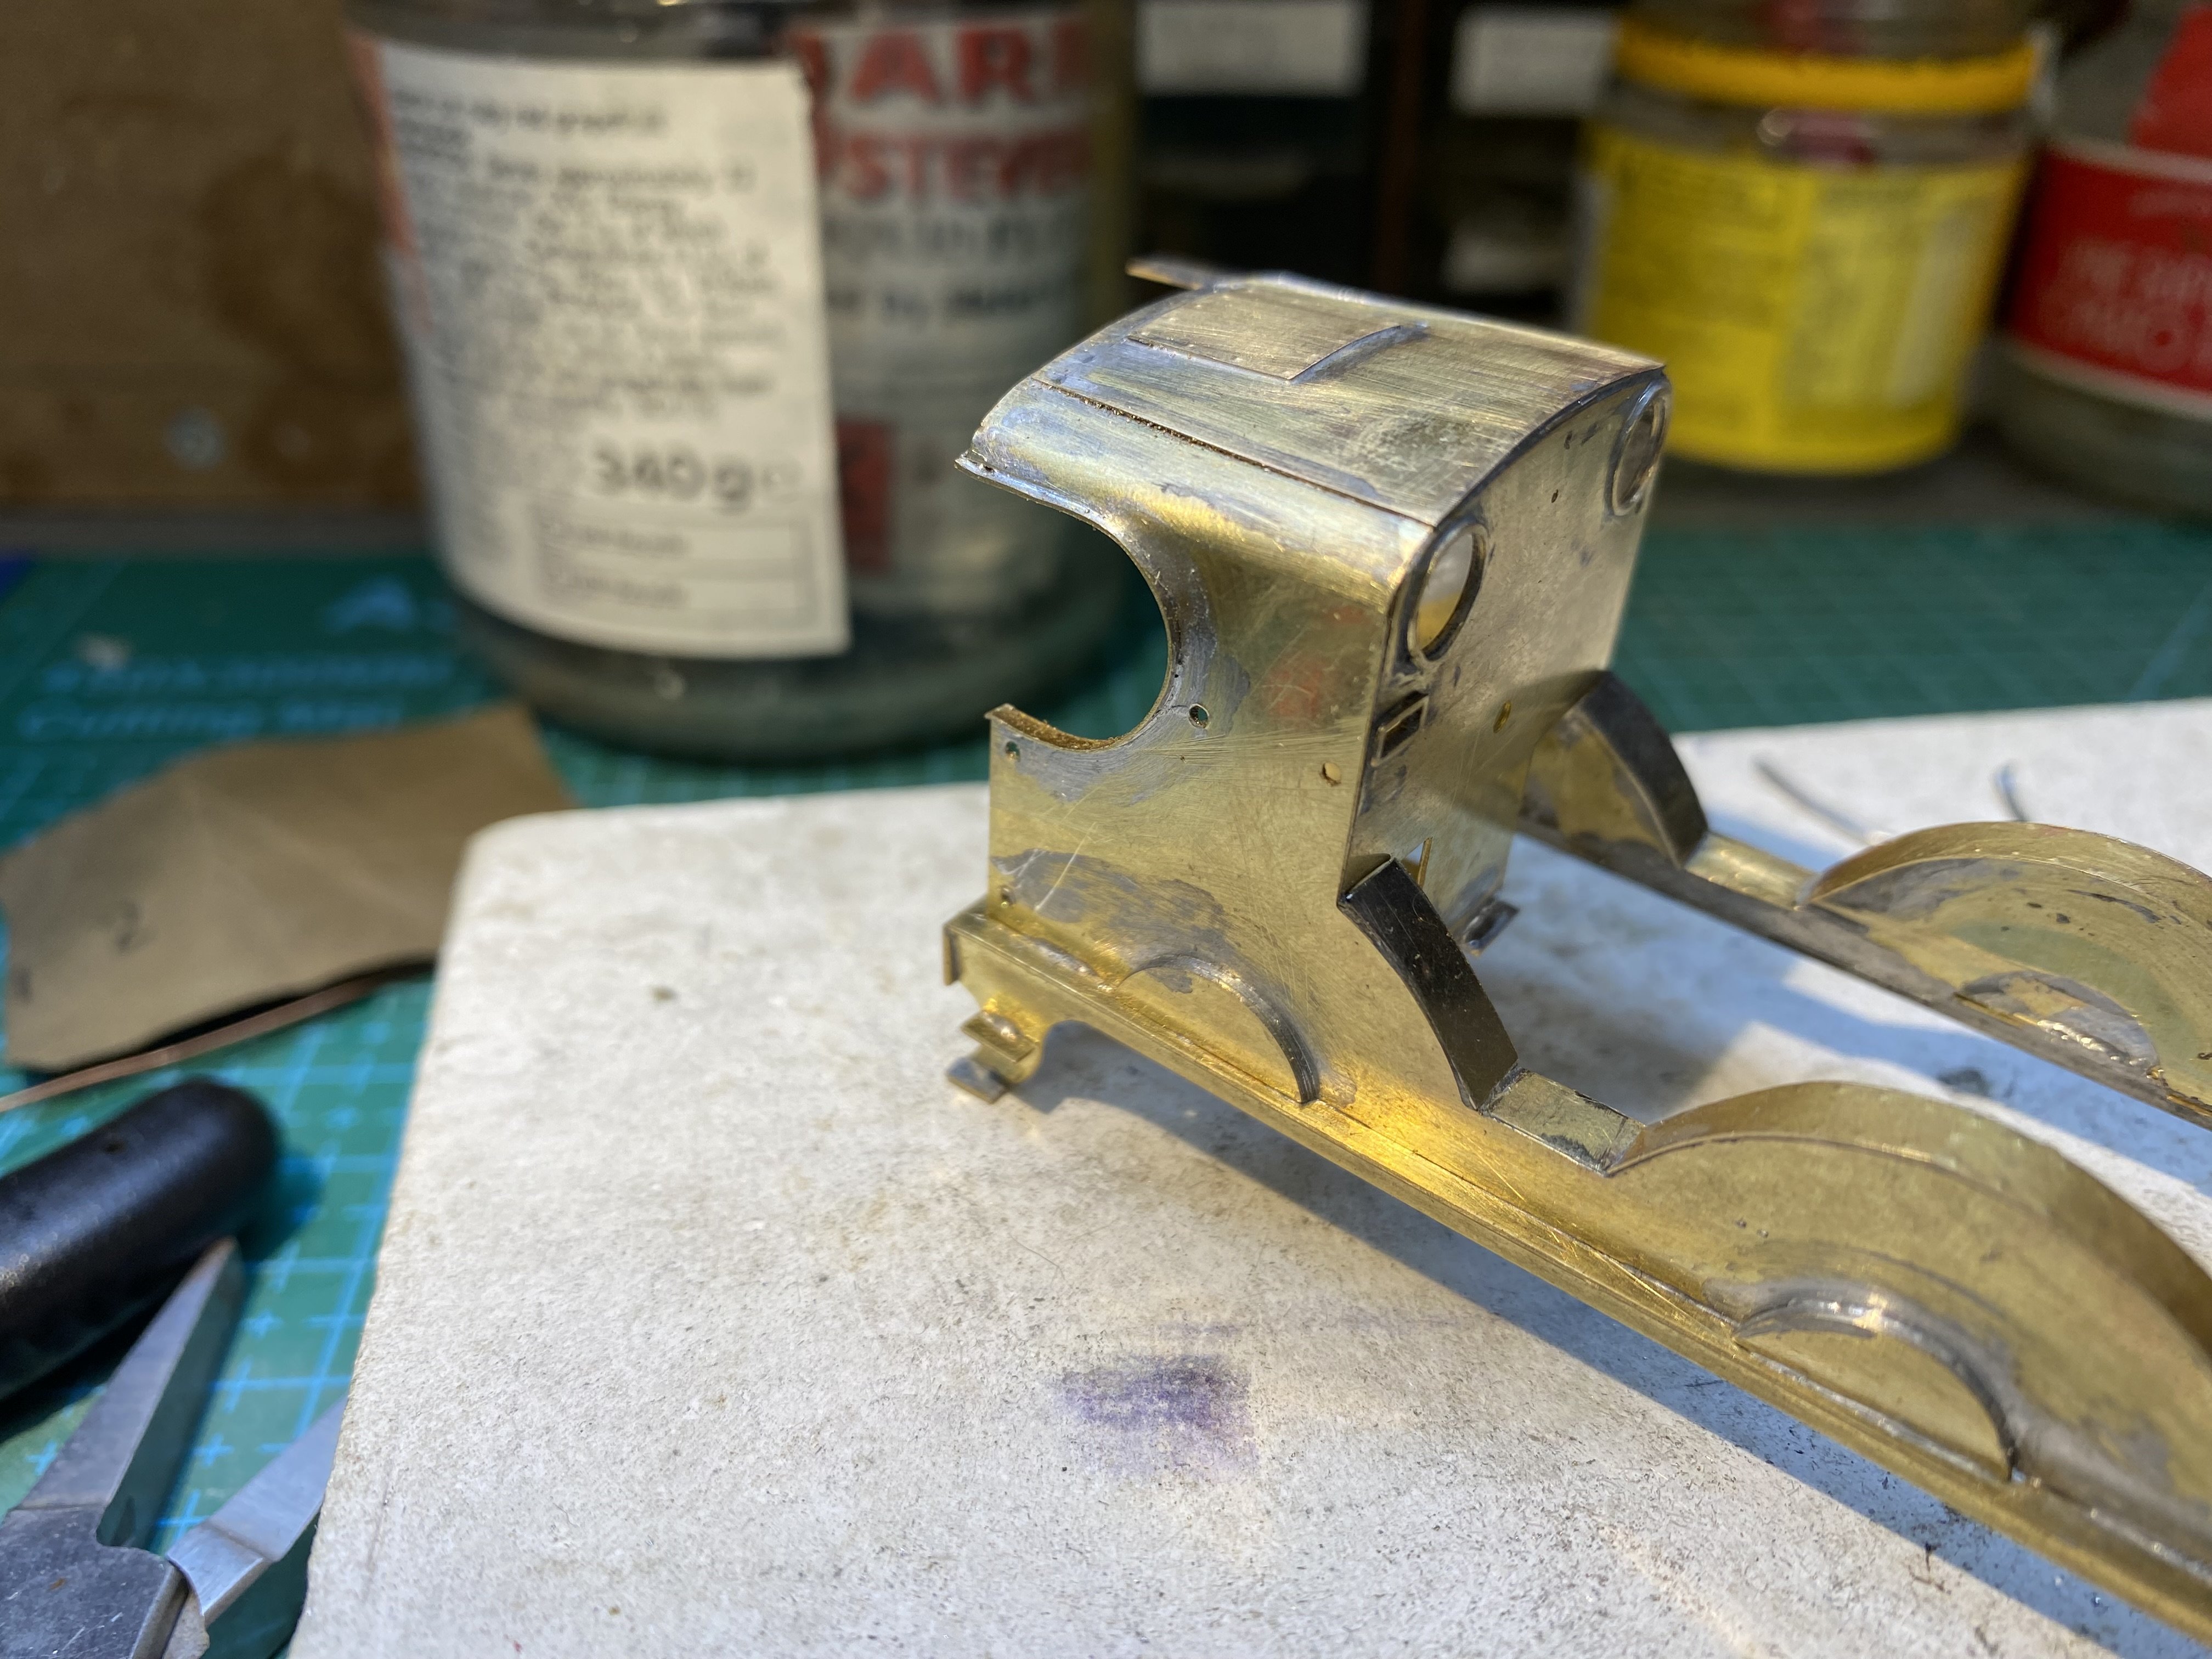
More PPs. The boiler came ready rolled which was a real help. It just needed tightening up a bit on the rolling bars. Boiler bands can be a bit of a struggle to fit. Three cheers for fibreglass pencils to clean up the mess afterwards. The boiler needed quite a bit cut out of it to clear the motor, gearbox and wheels. The danger is always cutting too much away and leaving an unsightly gap somewhere so it's a time consuming exercise - boiler in, mark it up, boiler out, cut a bit, boiler back in again, fit the chassis, check for clearance, repeat until done. The smokebox has three layers and needed a lot of heat to get everything soldered up. I had the temperature controlled iron turned up full and still it was struggling. A trial run at Loughan Quay PPs.mov Time for a tidy up, more fibreglass pencil and a scrub with scouring powder.
- 860 replies
-
- 15
-
-
-
That’s what underbellies are for. A place to hide all the solder Lovely work
-

"Voiding the Warranty" - Mol's experiments in 21mm gauge
Tullygrainey replied to Mol_PMB's topic in Irish Models
That’s shaping up beautifully. I like the tight arrangement of the industrial buildings. Lots of shapes, levels and angles. Even in mockup they look great. -
I wish I had the definitive answer to that one! The challenge, as David says, is that there's no 'concrete' colour as such since age, texture and weathering affect the colour and appearance of concrete in widely varying degrees, not to mention the ingredients used to make the stuff in the first place. My experiences in wrestling with this suggest to me that a single flat colour won't look convincing. A mixture of shades in the finished surface will look much better. I generally use cheap artists' acrylics from tubes in three colours - Mars Black, Titanium White and Raw Umber. Mixed in different proportions, these can produce an infinite variety of suitable tones. The process is distinctly trial and error. I just prod away until it looks right to my eye. Thin washes allow different colours to show through in random places on the final surface. I think we're agreed too that talc can add a bit of texture. Some dry brushing using the raw colours and sometimes some yellow/green to hint at moss or algae also contributes to the overall look. For largish areas of concrete, remember that it will likely have been laid in bays, with lines of tar between the sections. For modelling this, I scribe lines into the card surface and run black paint into these. Cracks can be modelled by drawing lines with a pencil. I'll leave the last word to the Grand Master, Gordon Gravett in his book Modelling Grassland and Landscape Detailing (Wild Swan, 2013). "For concrete slabs, I use Humbrol matt enamels: No.110 Natural Wood, No. 64 Light Grey, No. 34 White and just a touch of No. 81 Pale Yellow in varying proportions".
-
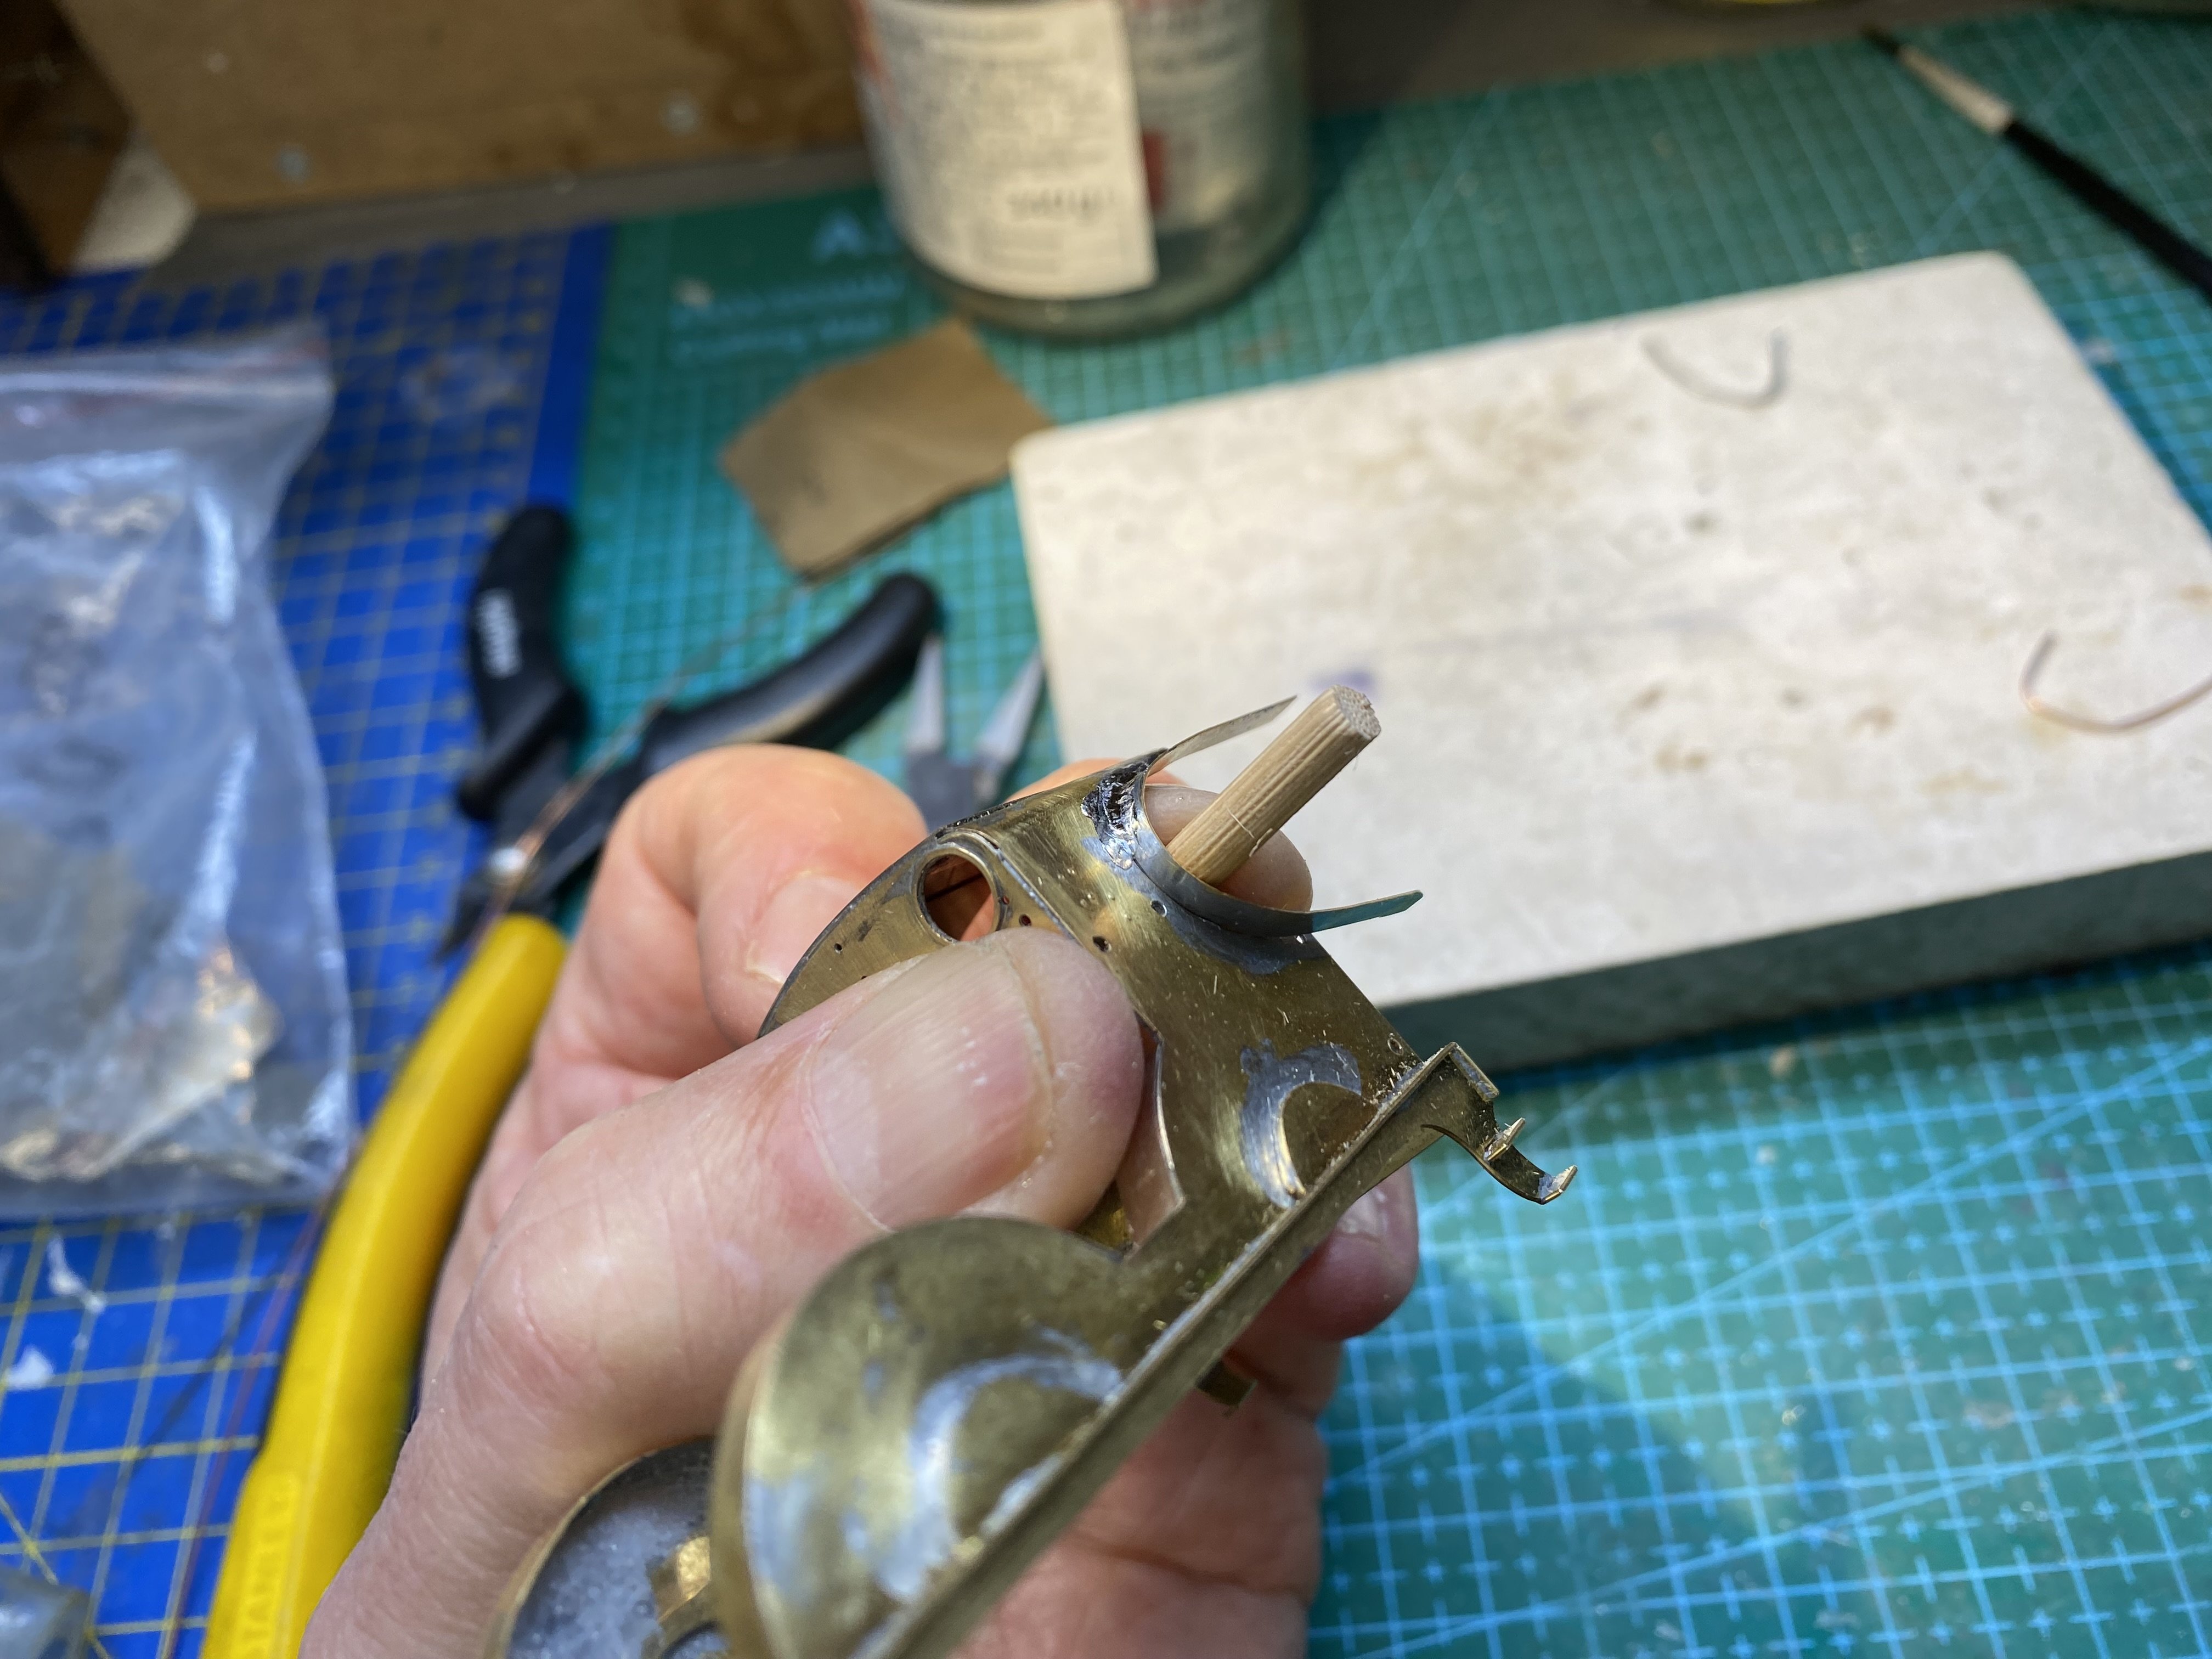
More work on Kieran's GNR(I) PPs. Pickups fitted and shouted at until they worked reliably... IMG_3925.MOV ... then a start made on the superstructure. Tricky stuff this, with a lot of soldering edge-to-edge in two planes. Difficult to keep it both straight and neat. This one will need a bit of filler here and there. The instructions recommend making cab beading from soft copper wire soldered round the edge of the curve, not on the face of the etch. I found this just about impossible to do neatly so resorted to my usual method of using scrap etch strip and filing it back. The little crankpin splashers were a job in themselves, each one laminated from two bits then soldered in place on the main splashers. I spent as much time puzzling over the instructions as I did making them. As is often the case with etched kits, head scratching and soldering require roughly the same amounts of time.
- 860 replies
-
- 10
-
-
By the time you’ve finished the Bredin, you won’t even notice the burns any more Great progress JB!
-
Ah,
-
Wow! I've found the High Level Coreless motor range to be high quality and a pretty good replacement for the late lamented Mashimas. There's one with a 30mm barrel and they all come in around £30.
-
No, it's a High Level iron core. It's painted matt black to help disguise its presence under the saddle tank.
-
Patrick's Countess of Antrim is back with me for a little remedial work. The attached video is the Countess's chassis. Can anyone explain the strange groaning noise it makes on startup? It's not dry bearings or gearbox noise or anything of that mechanical sort because it didn't make these noises before it was sound-chipped. The noise is still there when the sound is turned on but largely masked by the chuffing. Is it some sort of mismatch between motor and chip? Incidentally, my BCDR 2-4-0 No 6, with a similar sound installation and motor does exactly the same thing. IMG_3947.MOV
-
"Voiding the Warranty" - Mol's experiments in 21mm gauge
Tullygrainey replied to Mol_PMB's topic in Irish Models
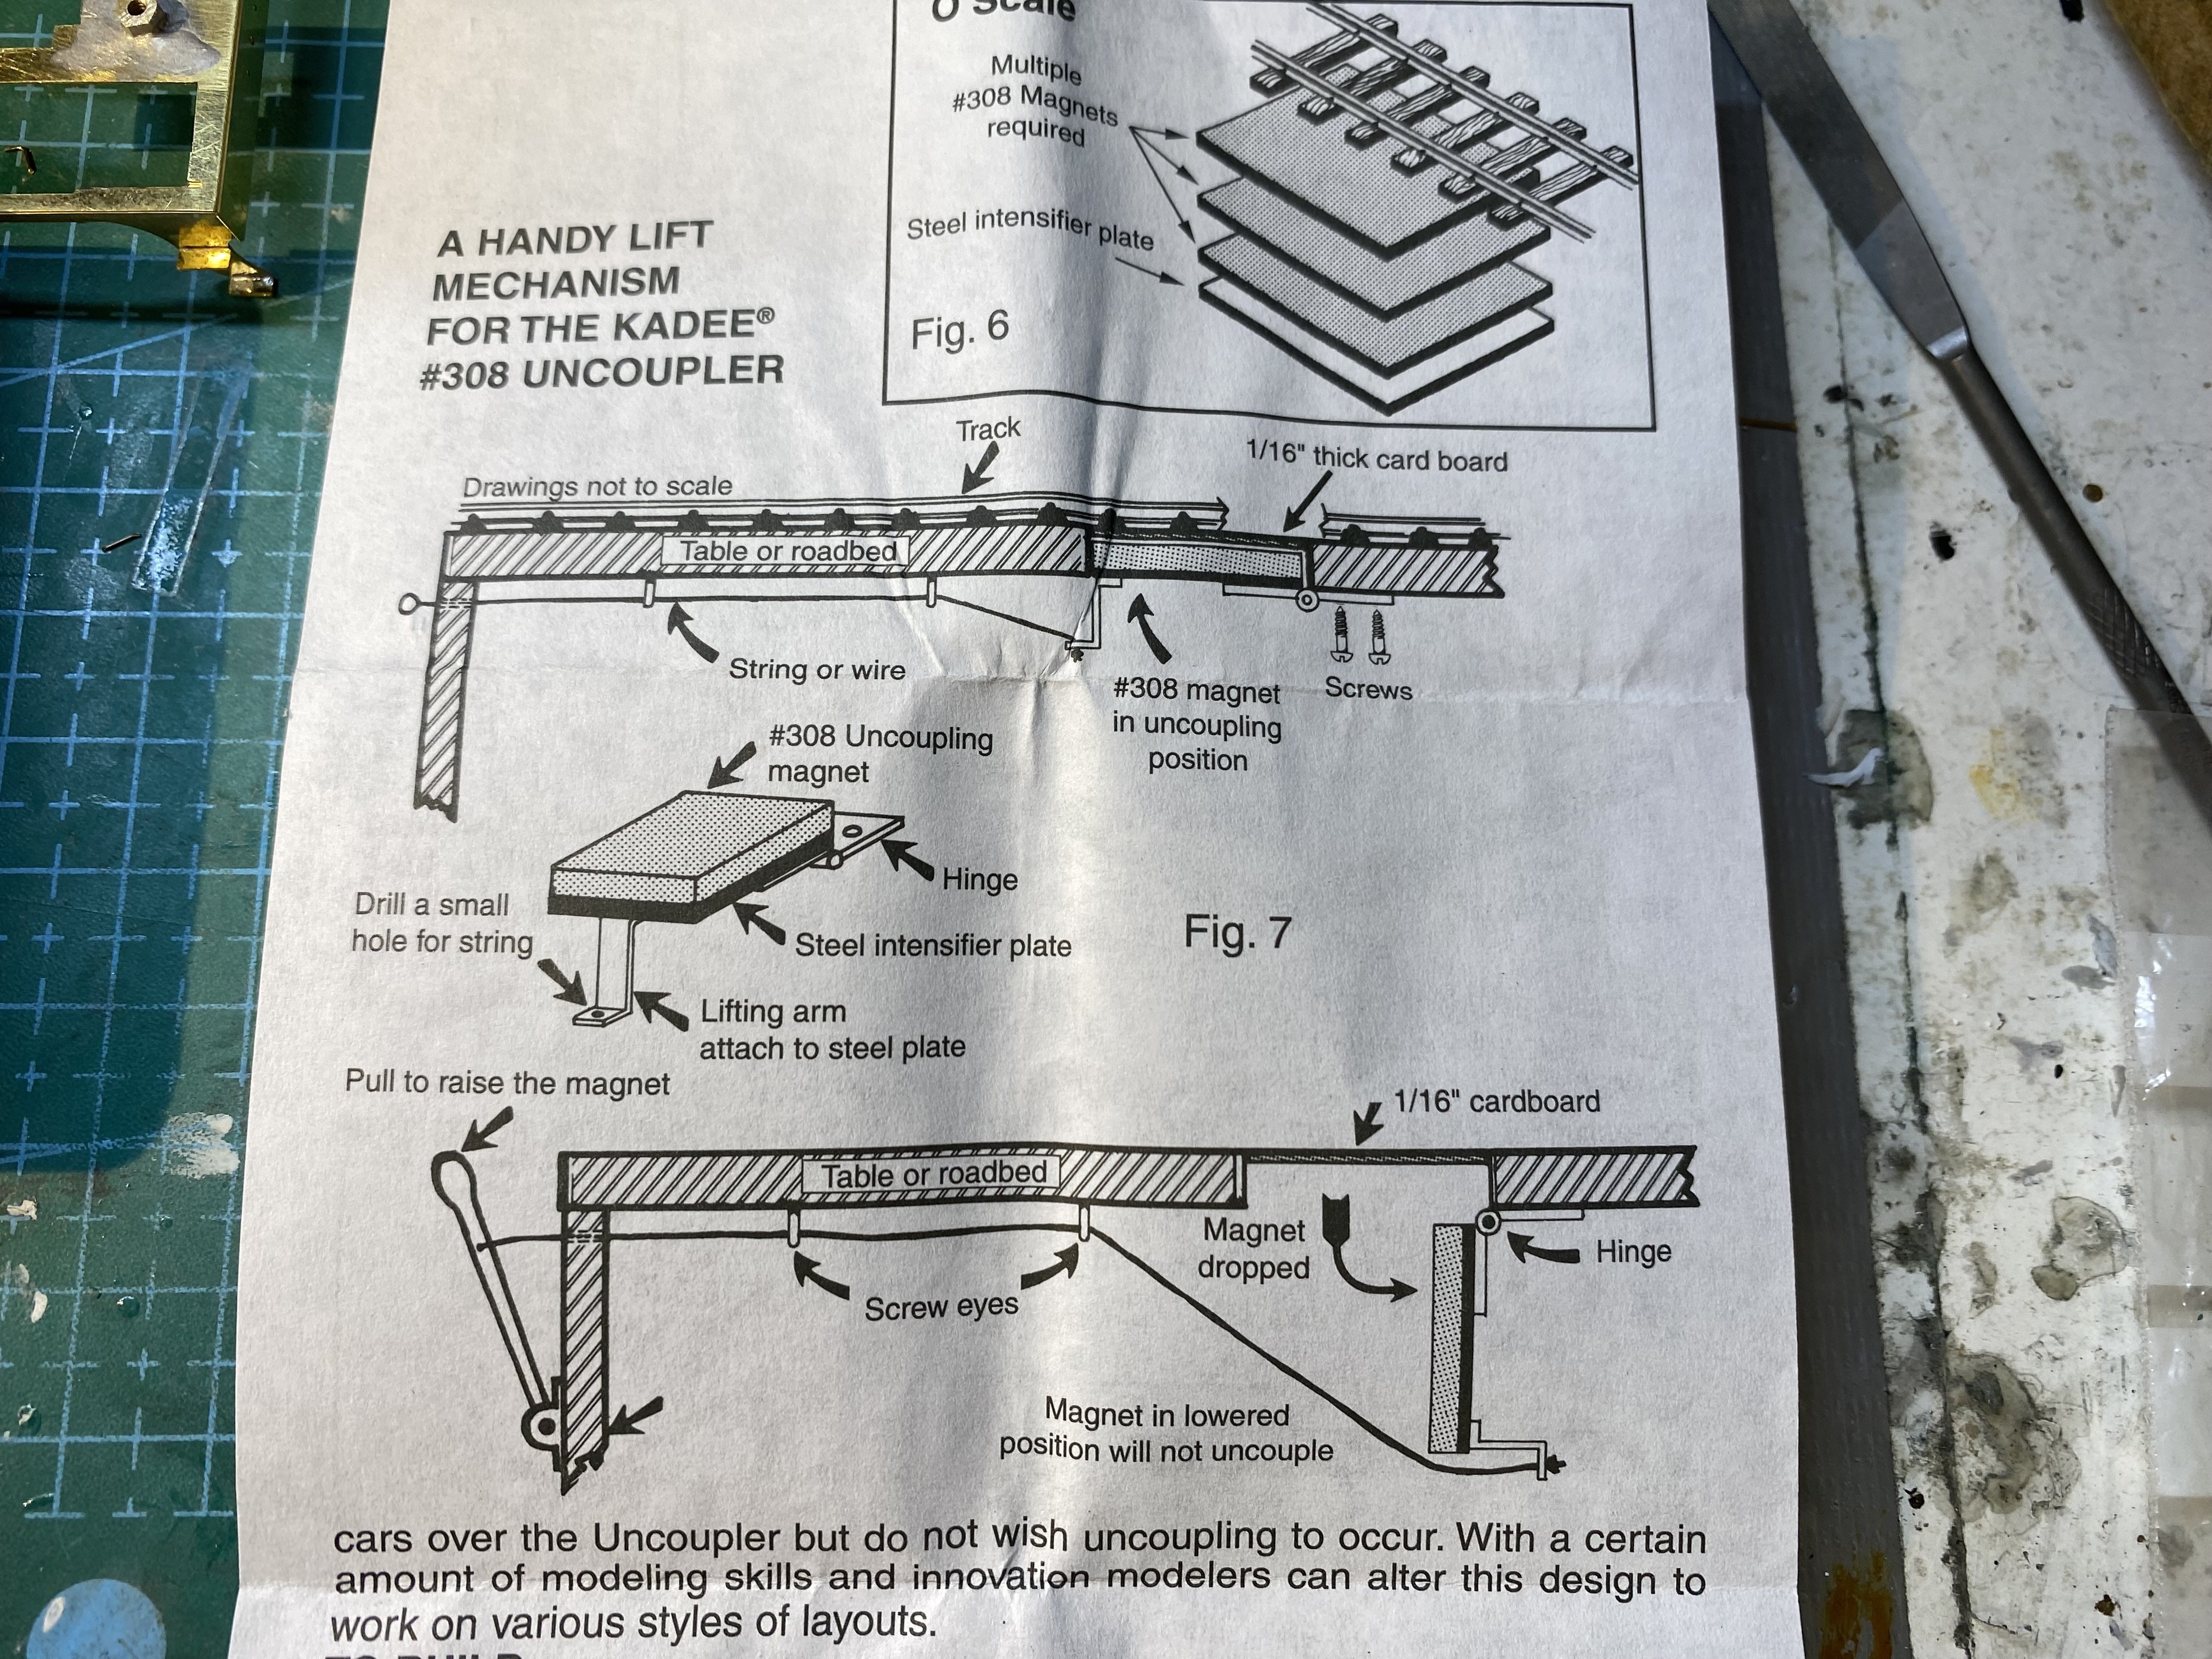
Kadee actually include this Heath Robinson contrivance in the instruction sheet for their under track magnets
-
"Voiding the Warranty" - Mol's experiments in 21mm gauge
Tullygrainey replied to Mol_PMB's topic in Irish Models
Frustrating is right! Hope the damage isn't too severe. -
"Voiding the Warranty" - Mol's experiments in 21mm gauge
Tullygrainey replied to Mol_PMB's topic in Irish Models
I used the Kadee top of the sleepers magnets on The Stone Yard, my O:16.5 layout and they work pretty reliably though I usually confine myself to particular combinations of wagons when exhibiting. The idea of creating resistance to help prevent random uncoupling is probably a key factor. The locos on The Stone Yard are pulling white metal wagons which have plenty of weight to keep things in tension. I gather the rule of thumb for wagon weight for UK modelling in 4mm is around 35gms. Kadee couplers are of US origin and I read somewhere that in the US, the NMRA recommends a guide weigh for wagons of 75gm. Maybe that's what we need to aim for. Mind you, I've tried that and some of my locos run out of steam pulling more than three 75gm wagons round the tight curves of Kilmore's non-scenic bits Postscript: The Kadee top of the sleepers magnets are designed for Code 100 rail. They're too tall for the Code 75 on Kilmore. -
I wonder did the designer intend it to be driven from the front coupled axle, which would avoid the problem. I think though that doing that would require building it as a rigid chassis, not necessarily a problem in 7mm perhaps but less desirable in 4mm with less weight to keep it in contact with the rails. I've not had a lot of success with rigid chassis but having a rigid front coupled axle, a compensated rear axle and a sprung front bogie risks creating a seesaw.