KMCE
-
Posts
540 -
Joined
-
Last visited
-
Days Won
29
Content Type
Profiles
Forums
Events
Gallery
Blogs
Everything posted by KMCE
-
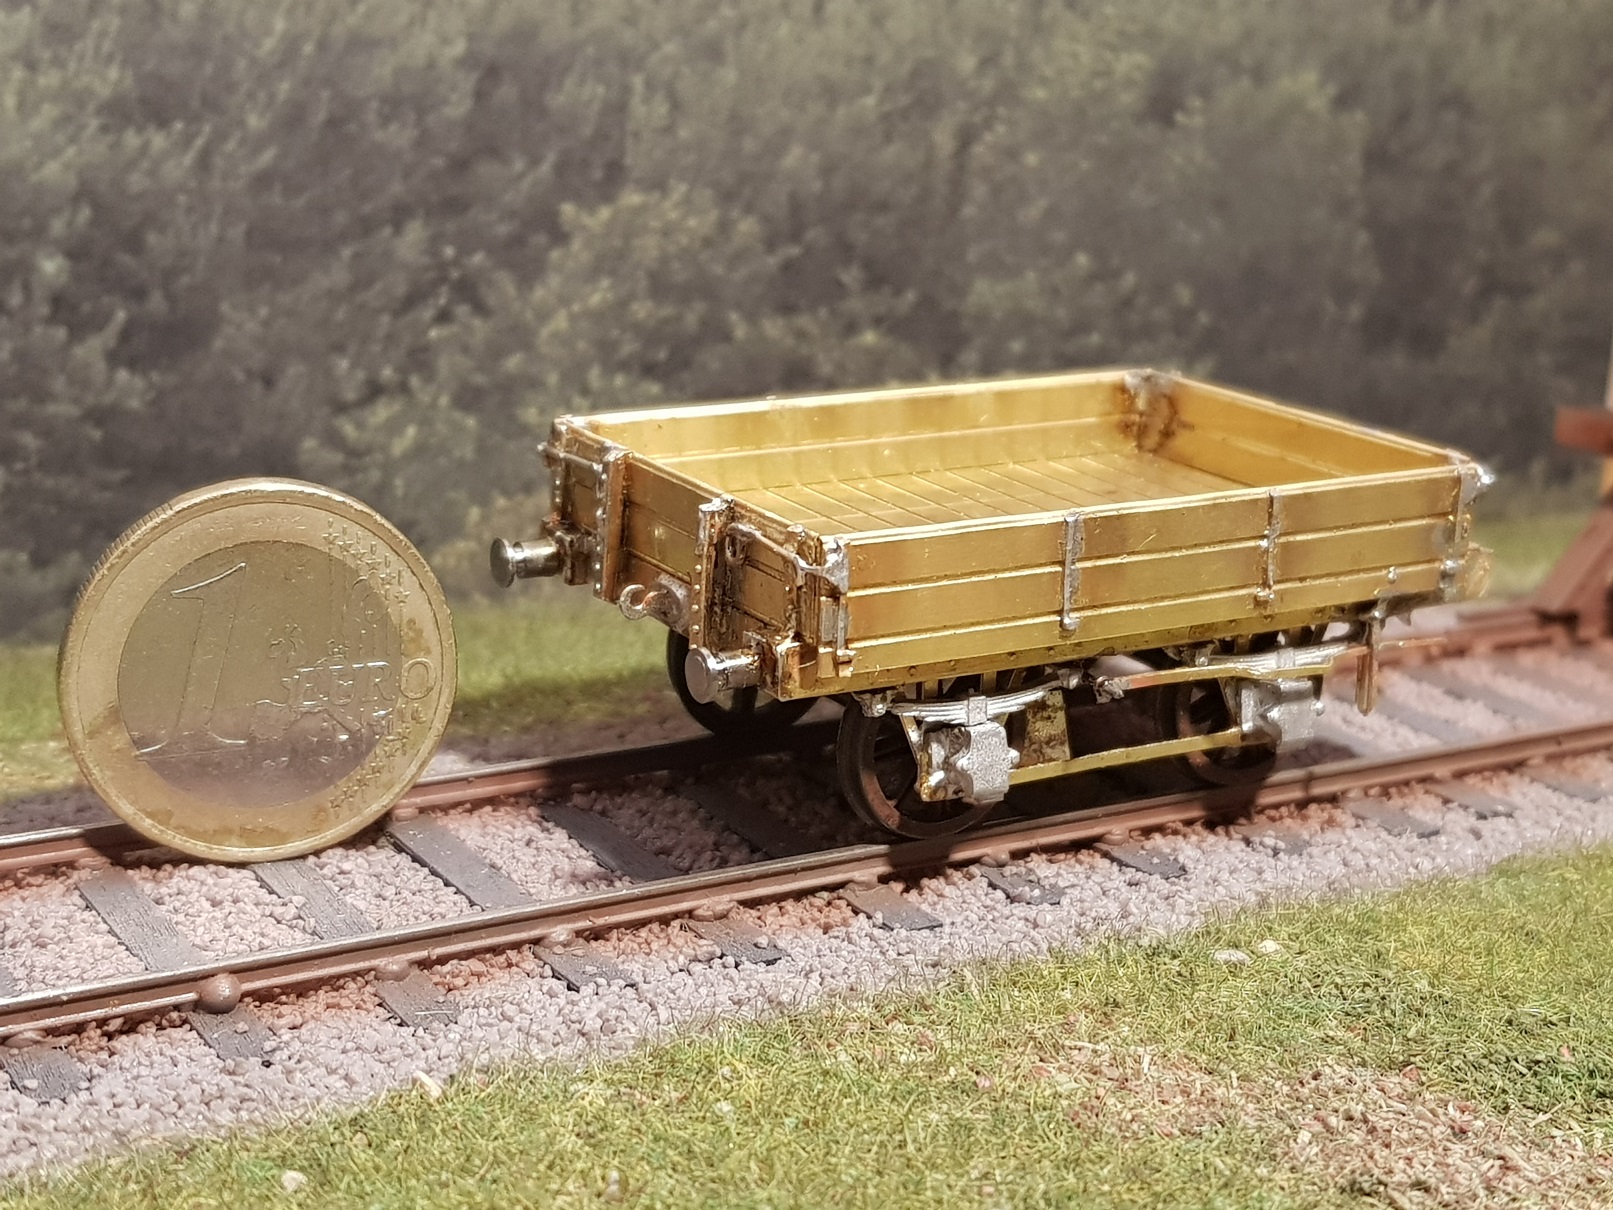
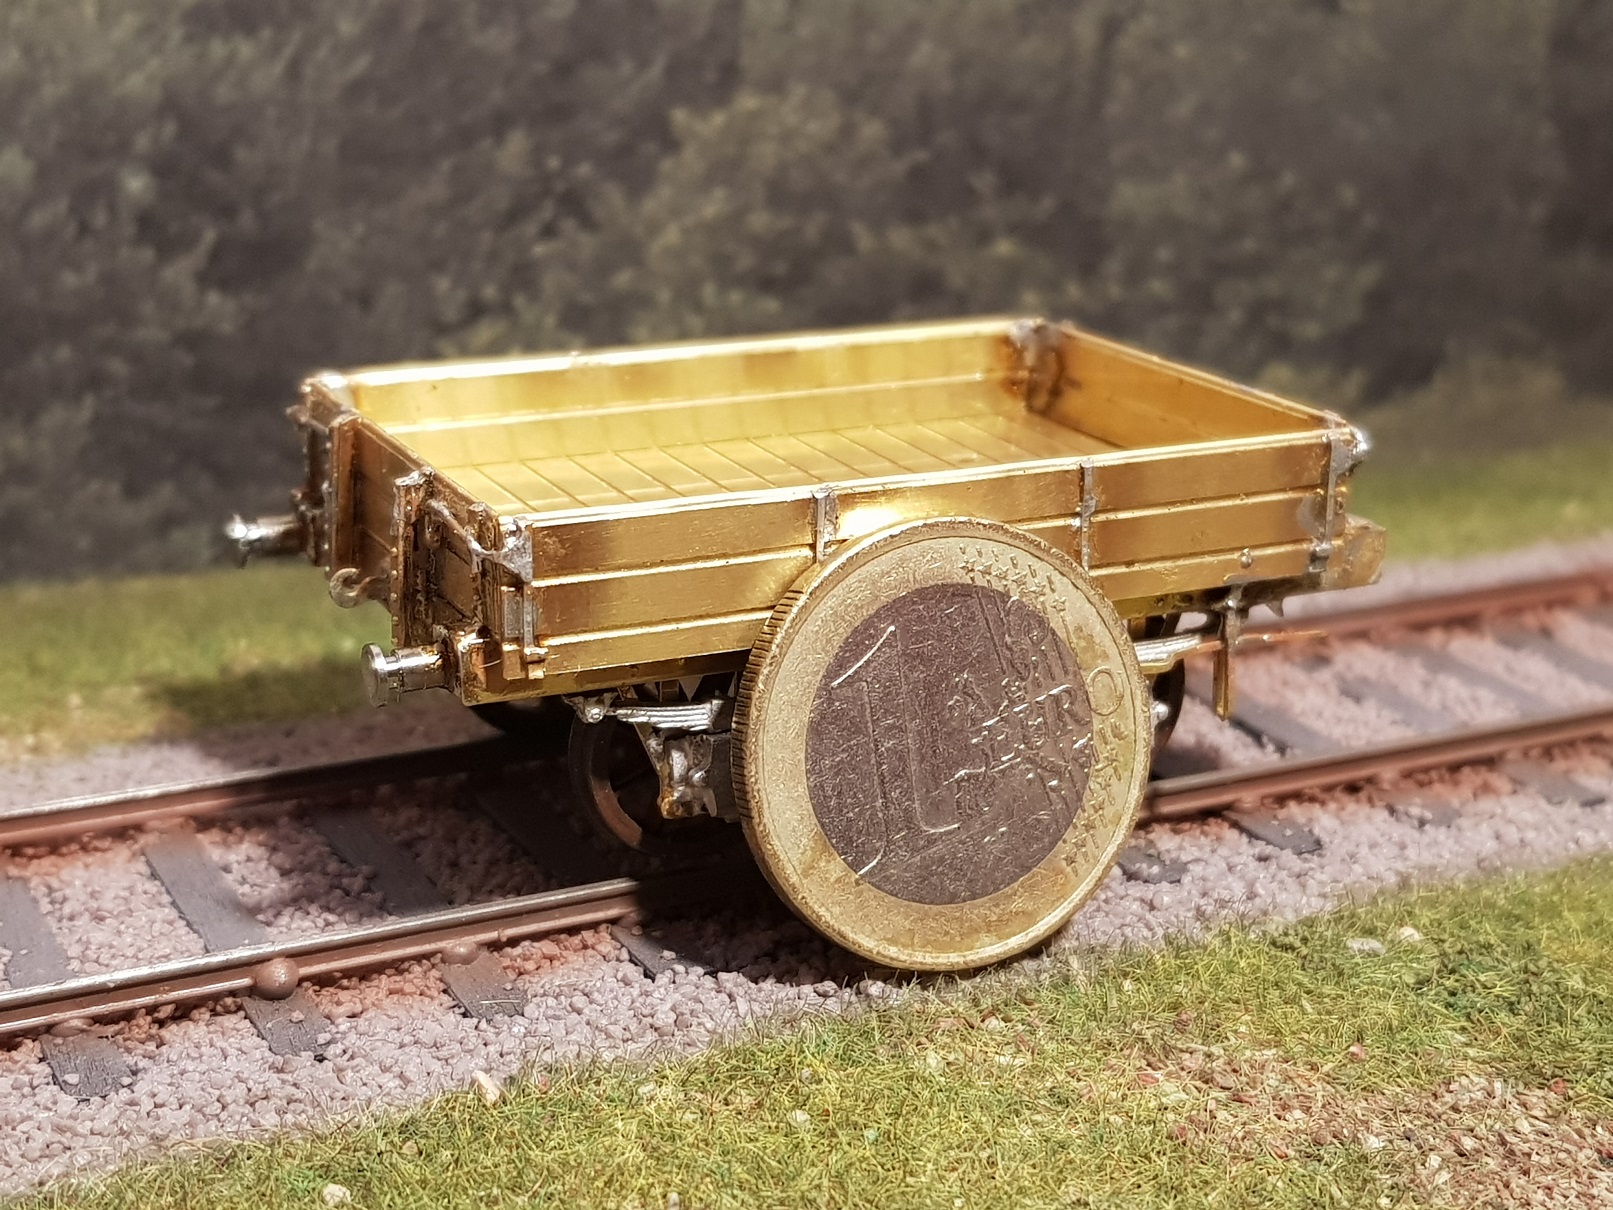
Very good idea. For context the €1 coin is the same diameter as a £1 Coin. Hopefully this puts it in perspective? Ken

-
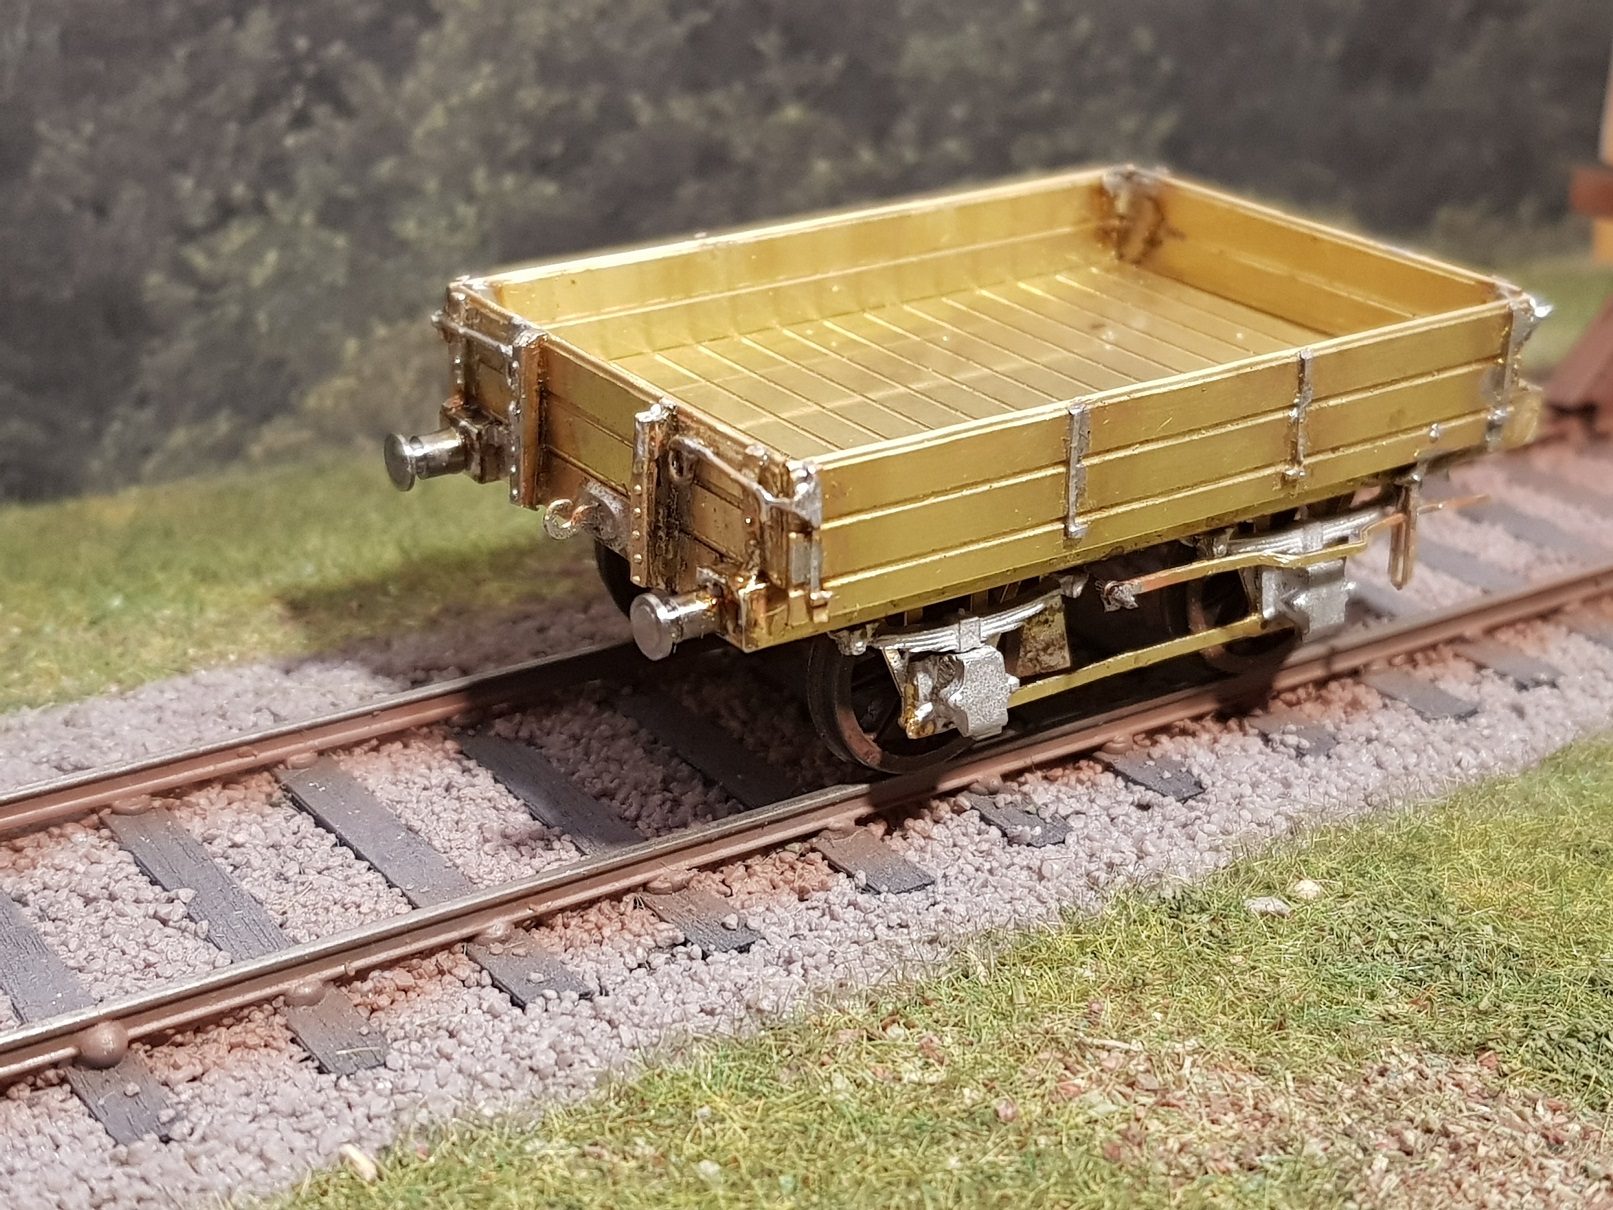
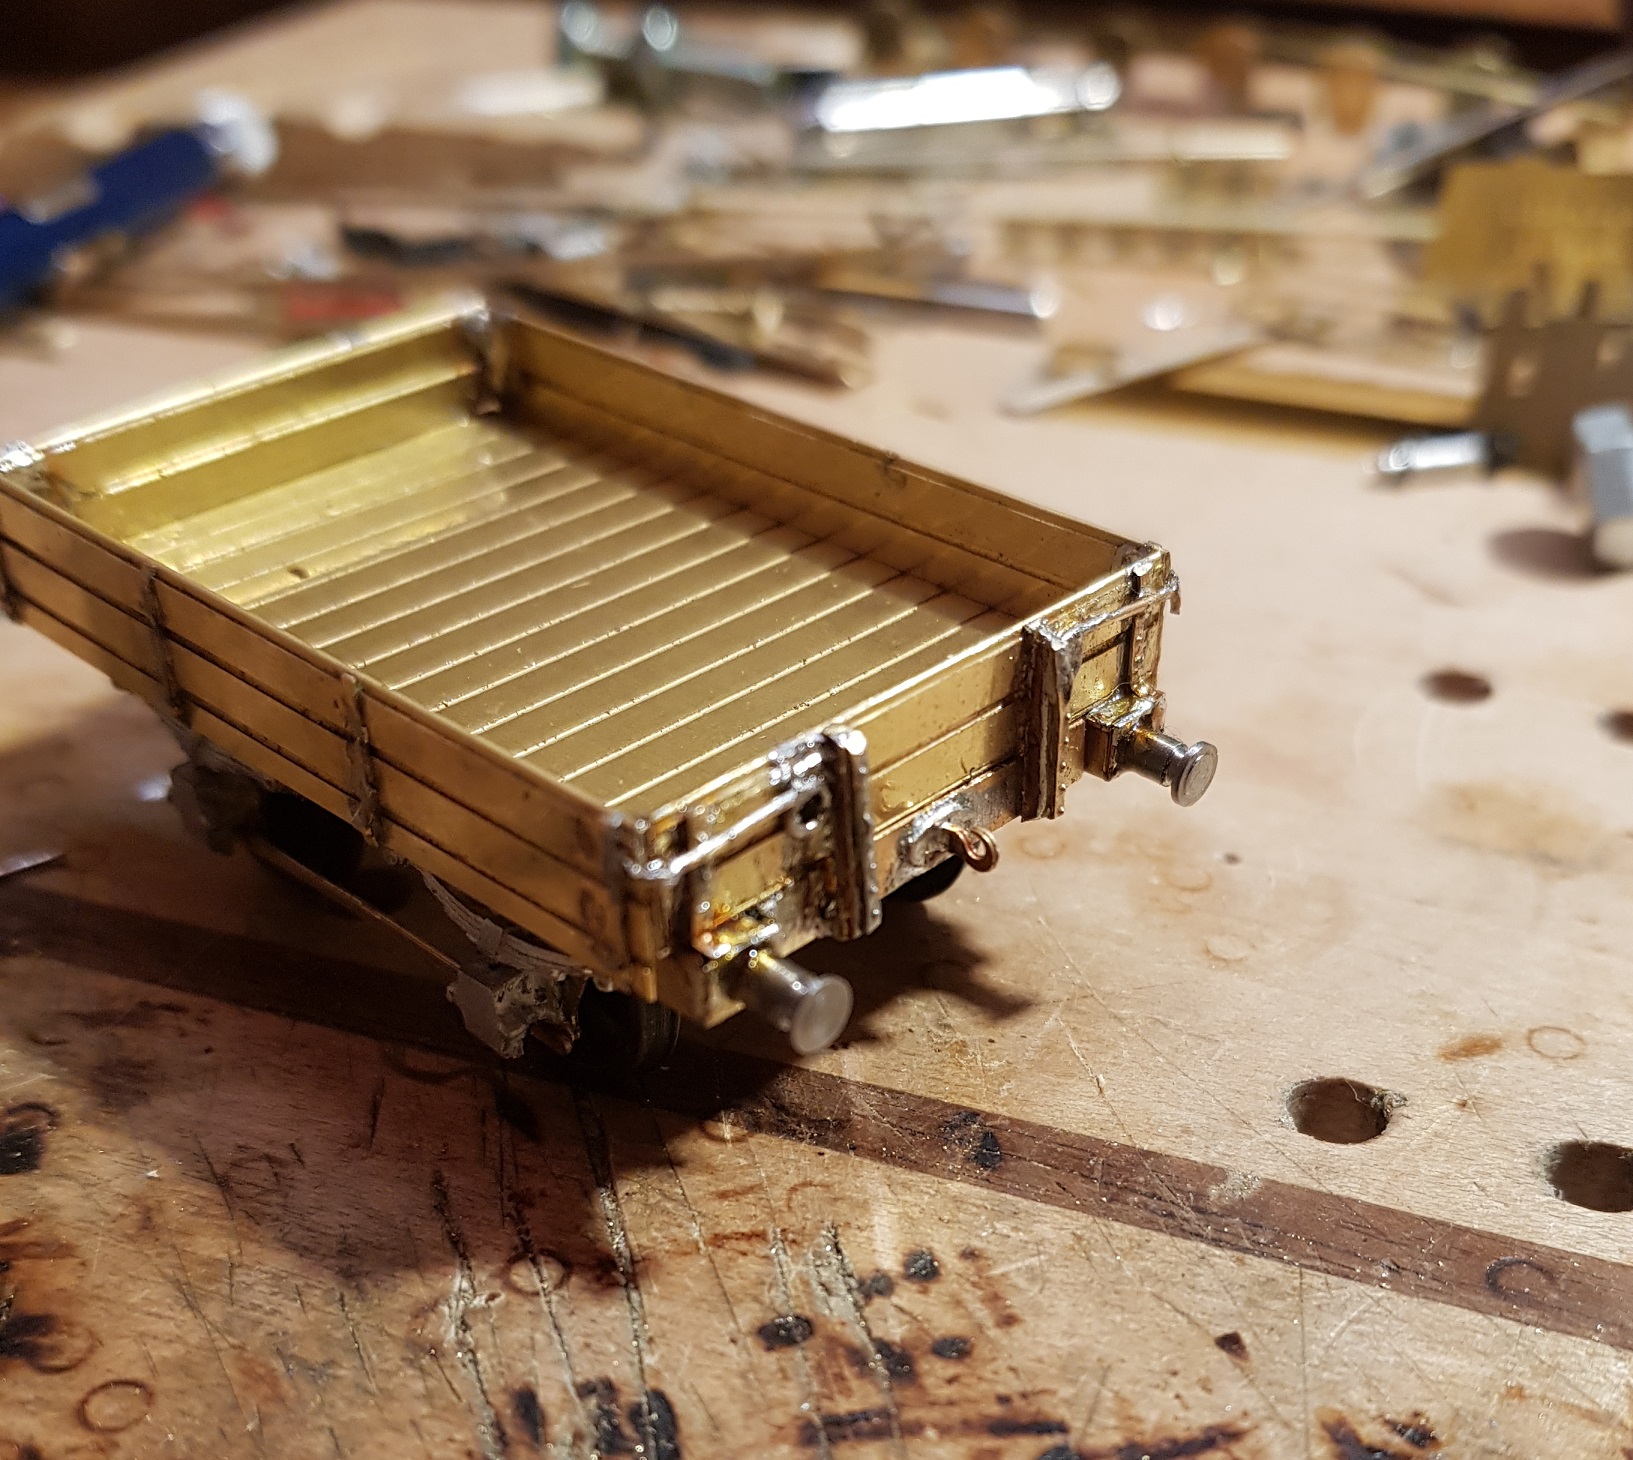
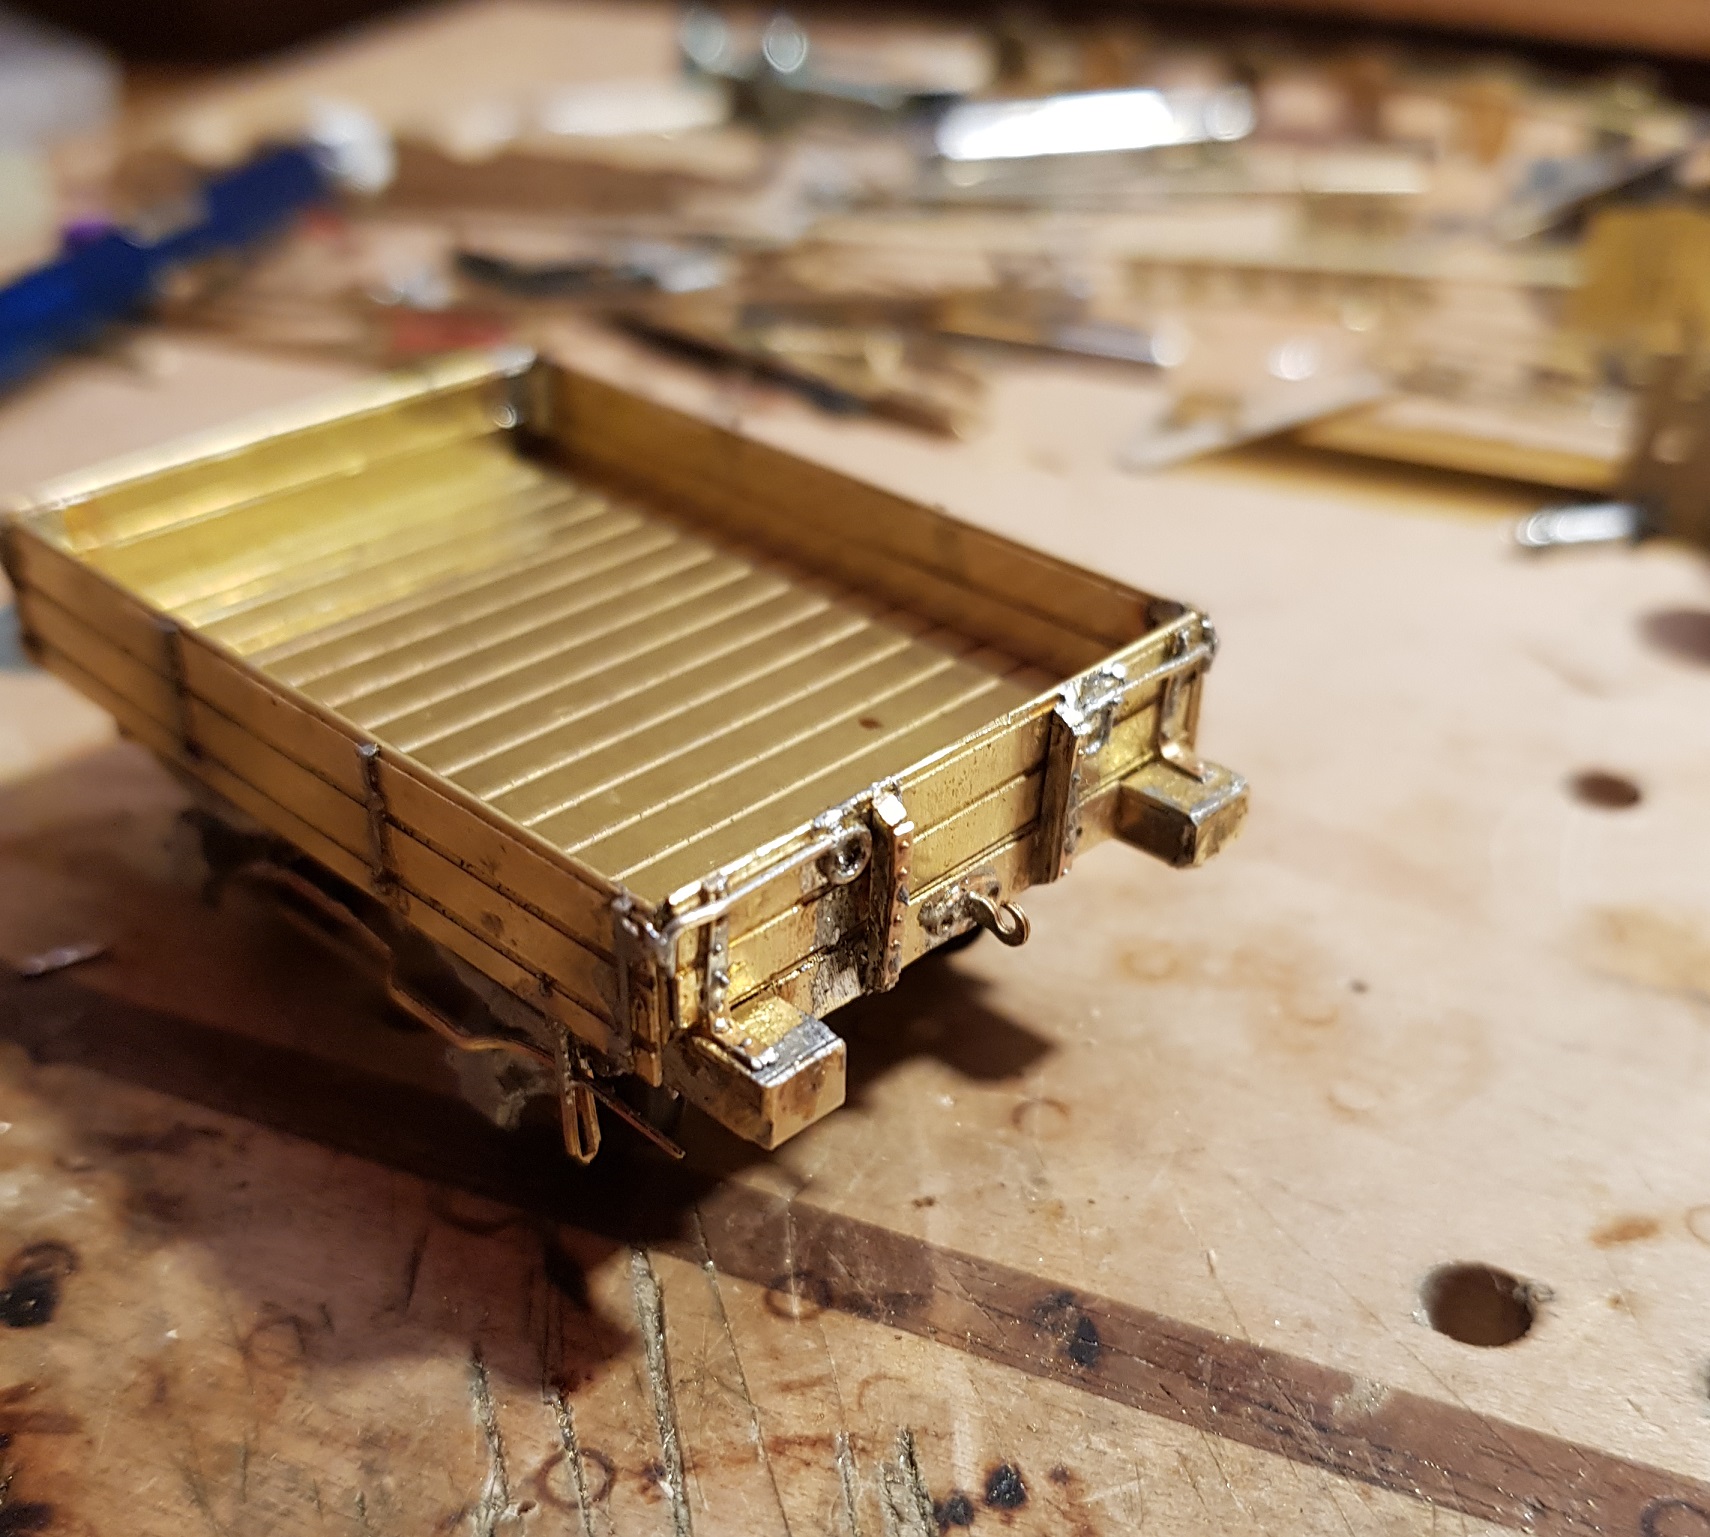
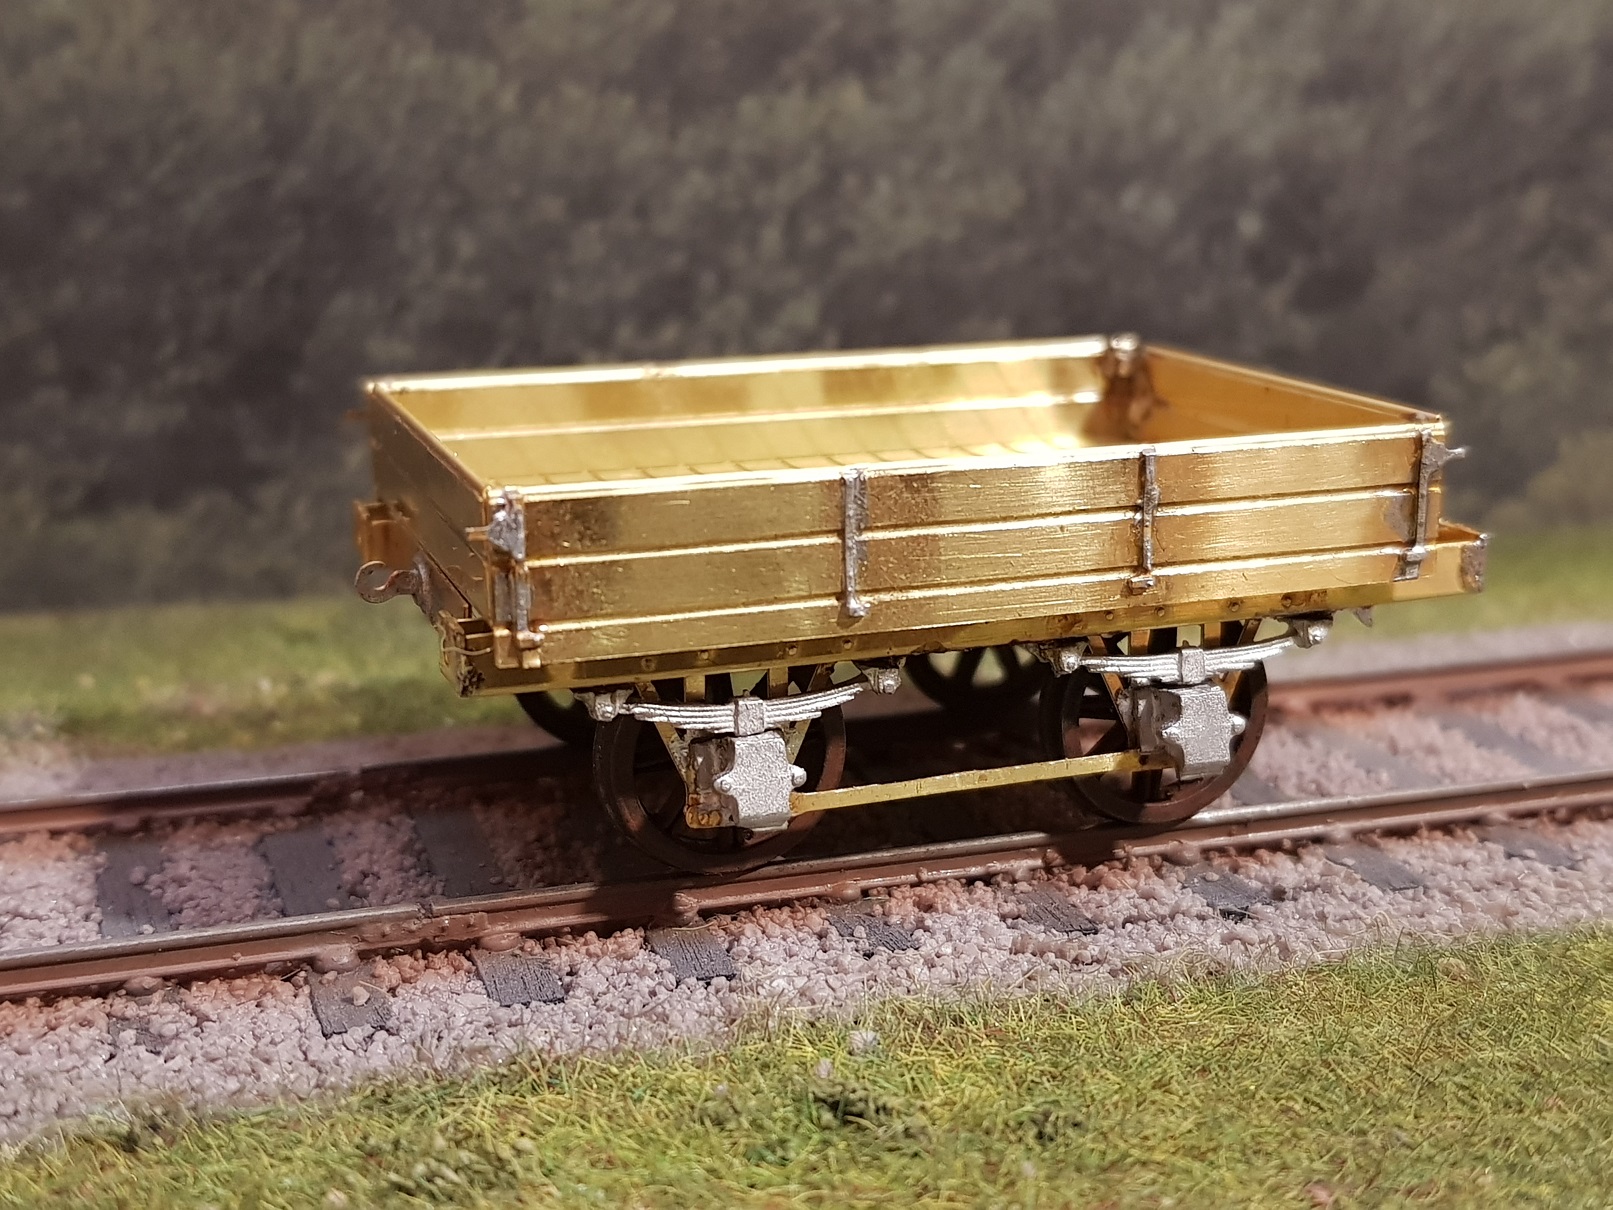
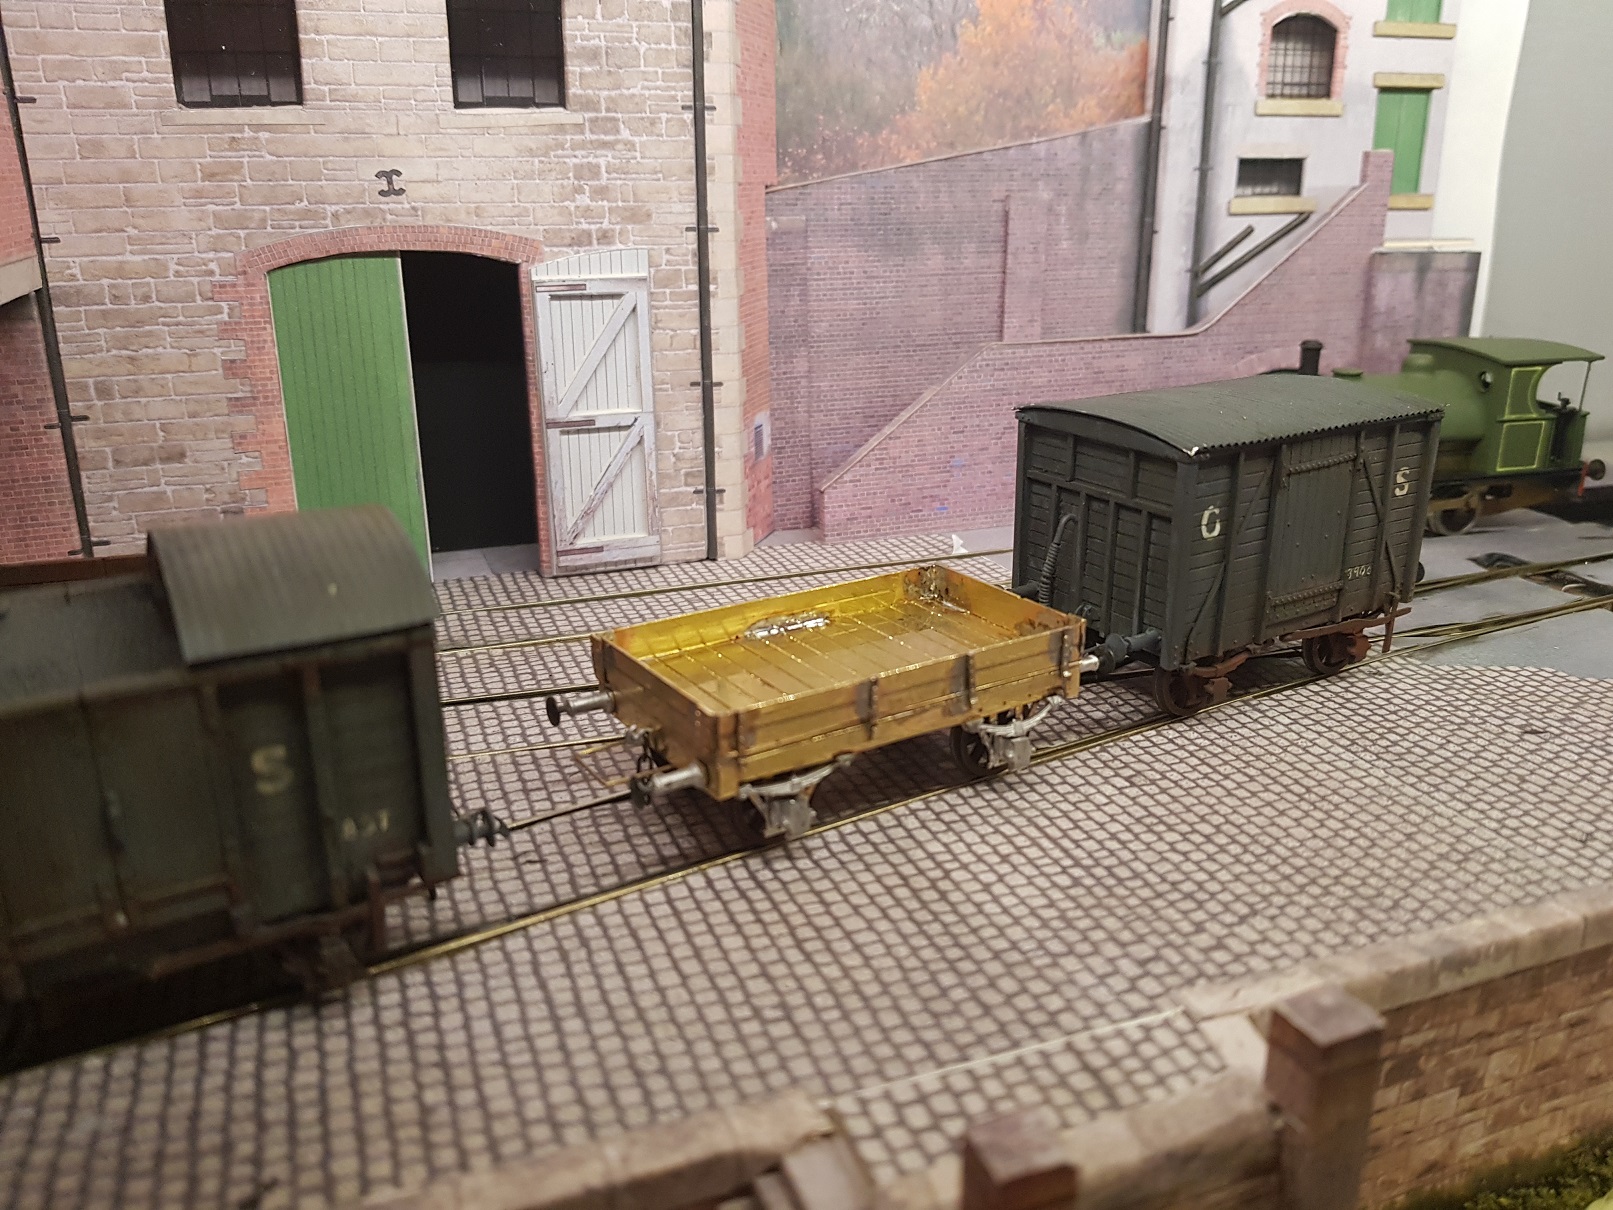
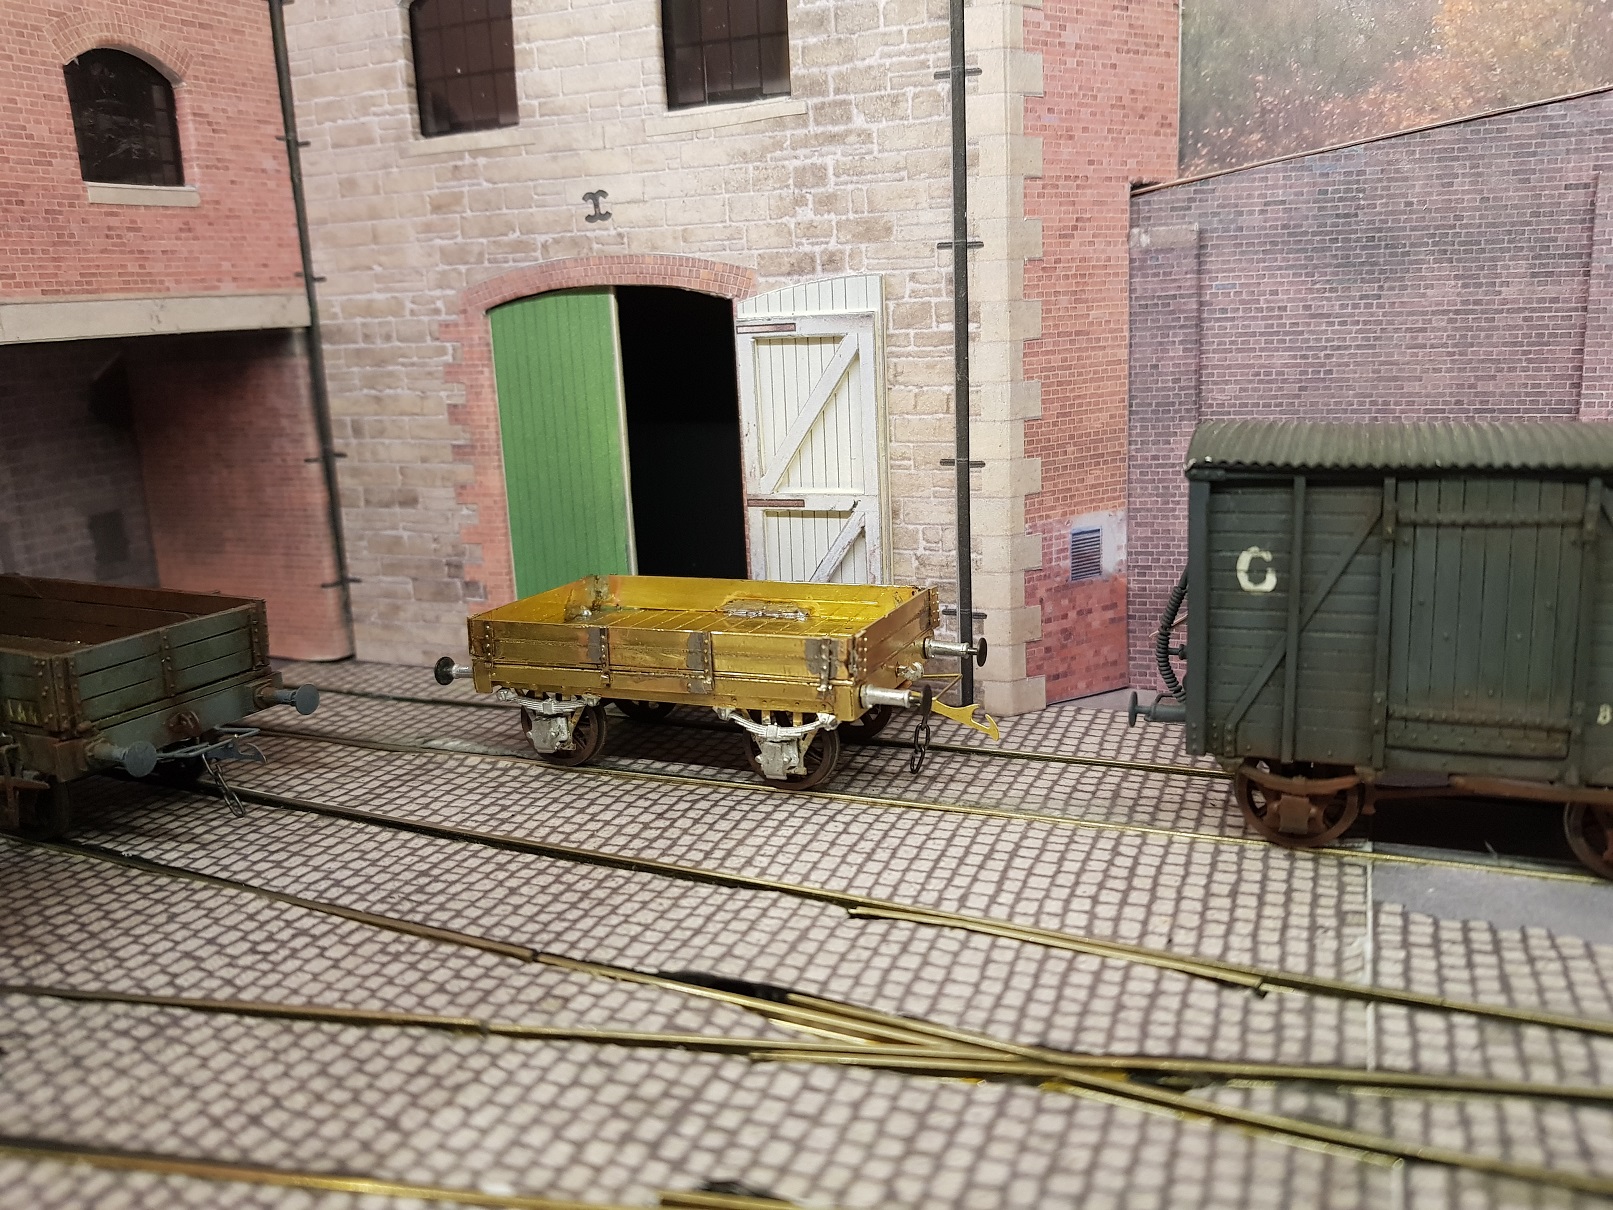
OK.. As alluded to above, the strap detail for the ends was too light to remove and tidy without distortion, so I fashioned straps from 1mm brass with rivets added. This allowed me to complete the ends and move on. The prototype has a nice metal retainer holding the sides on which was shaped up from 0.5mm wire, however the end loops are a little oversize, but should look OK from a distance. More of an effect than strict adherence to prototypical. Buffers were turned down from old loco axles which were too short for 21mm gauge which rendered the short buffers rather well. Brake detailing was sorted by separating the lever from the brake block and suporting the brake block on a length of 1mm strip with a hole drilled to line up with the suport bracket. This allowed the brake lever to be installed more in line with prototypical. So, wagon complete and more to do. If I am to re-run the etch, I will need to make some small changes to allow detailing strips to be used rather than my time punching rivets. Few other minor changes should sort future runs. Final image with 423 leading.... Some couplers & off to the paint shop and introduce to the other rolling stock!! All for now. Ken
-
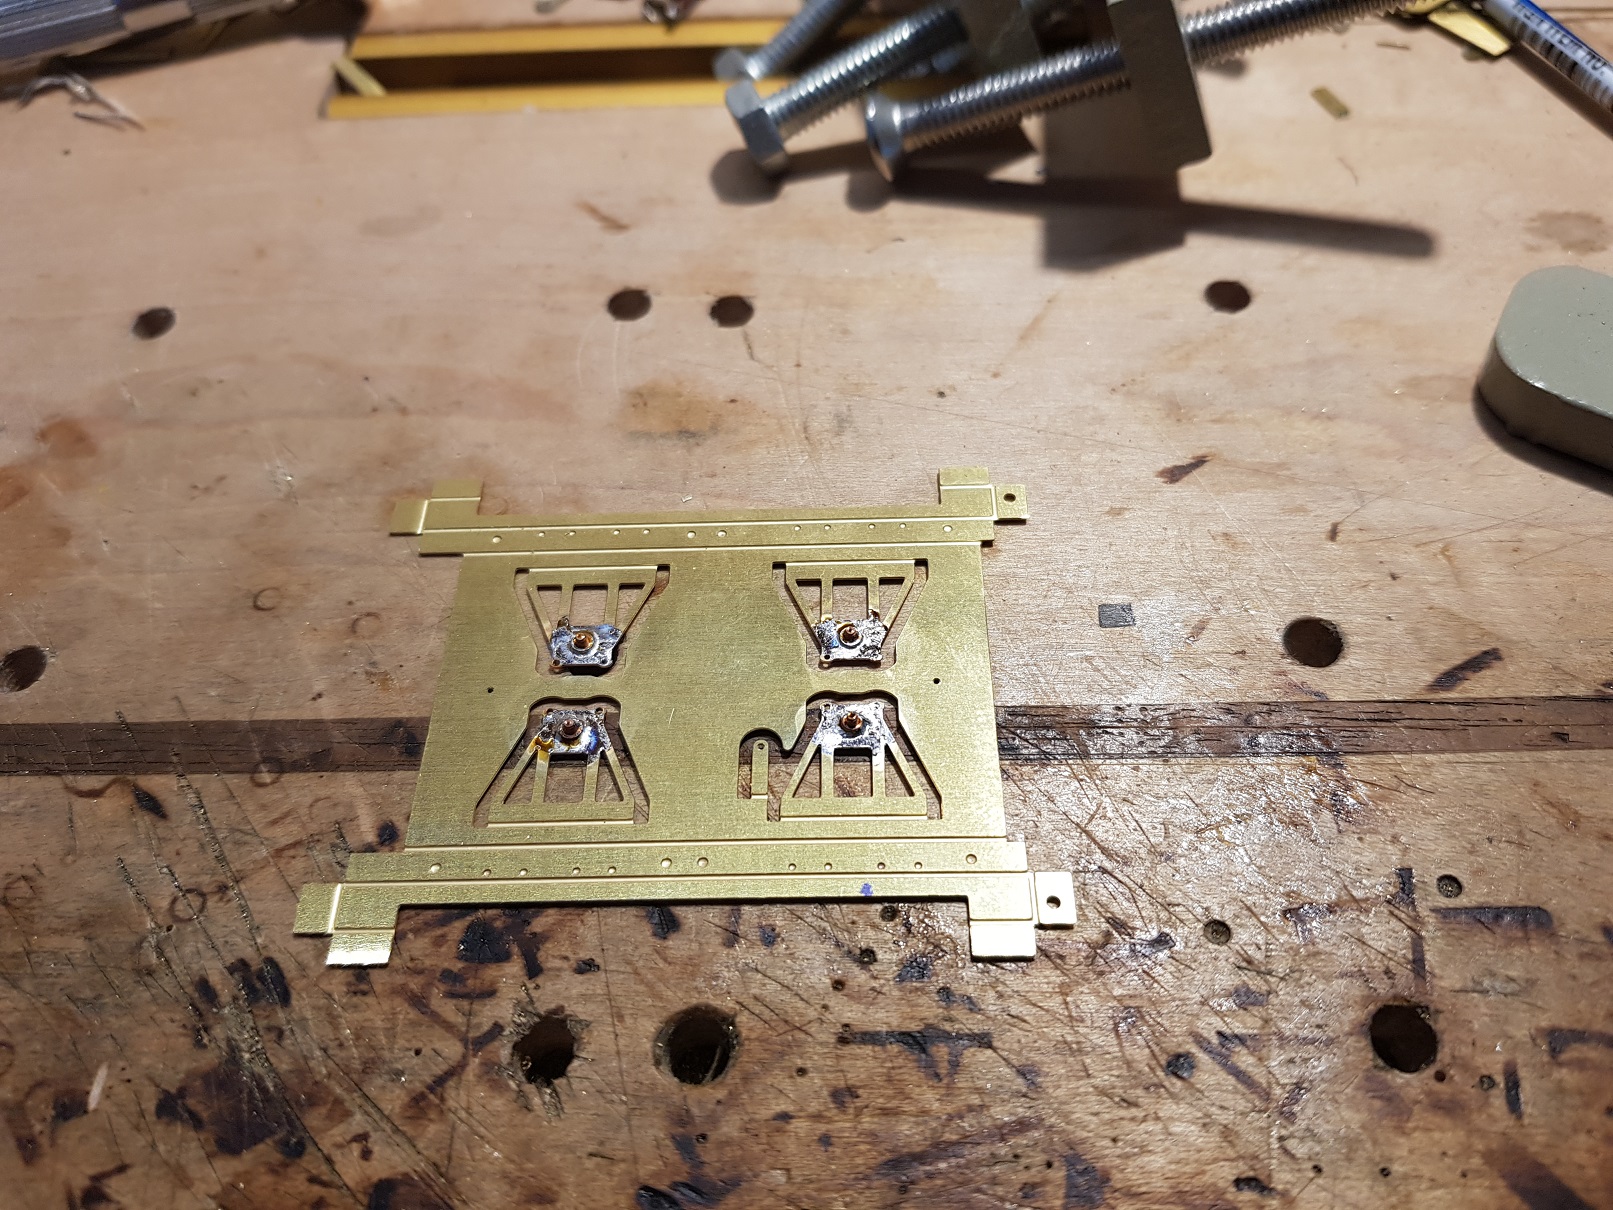
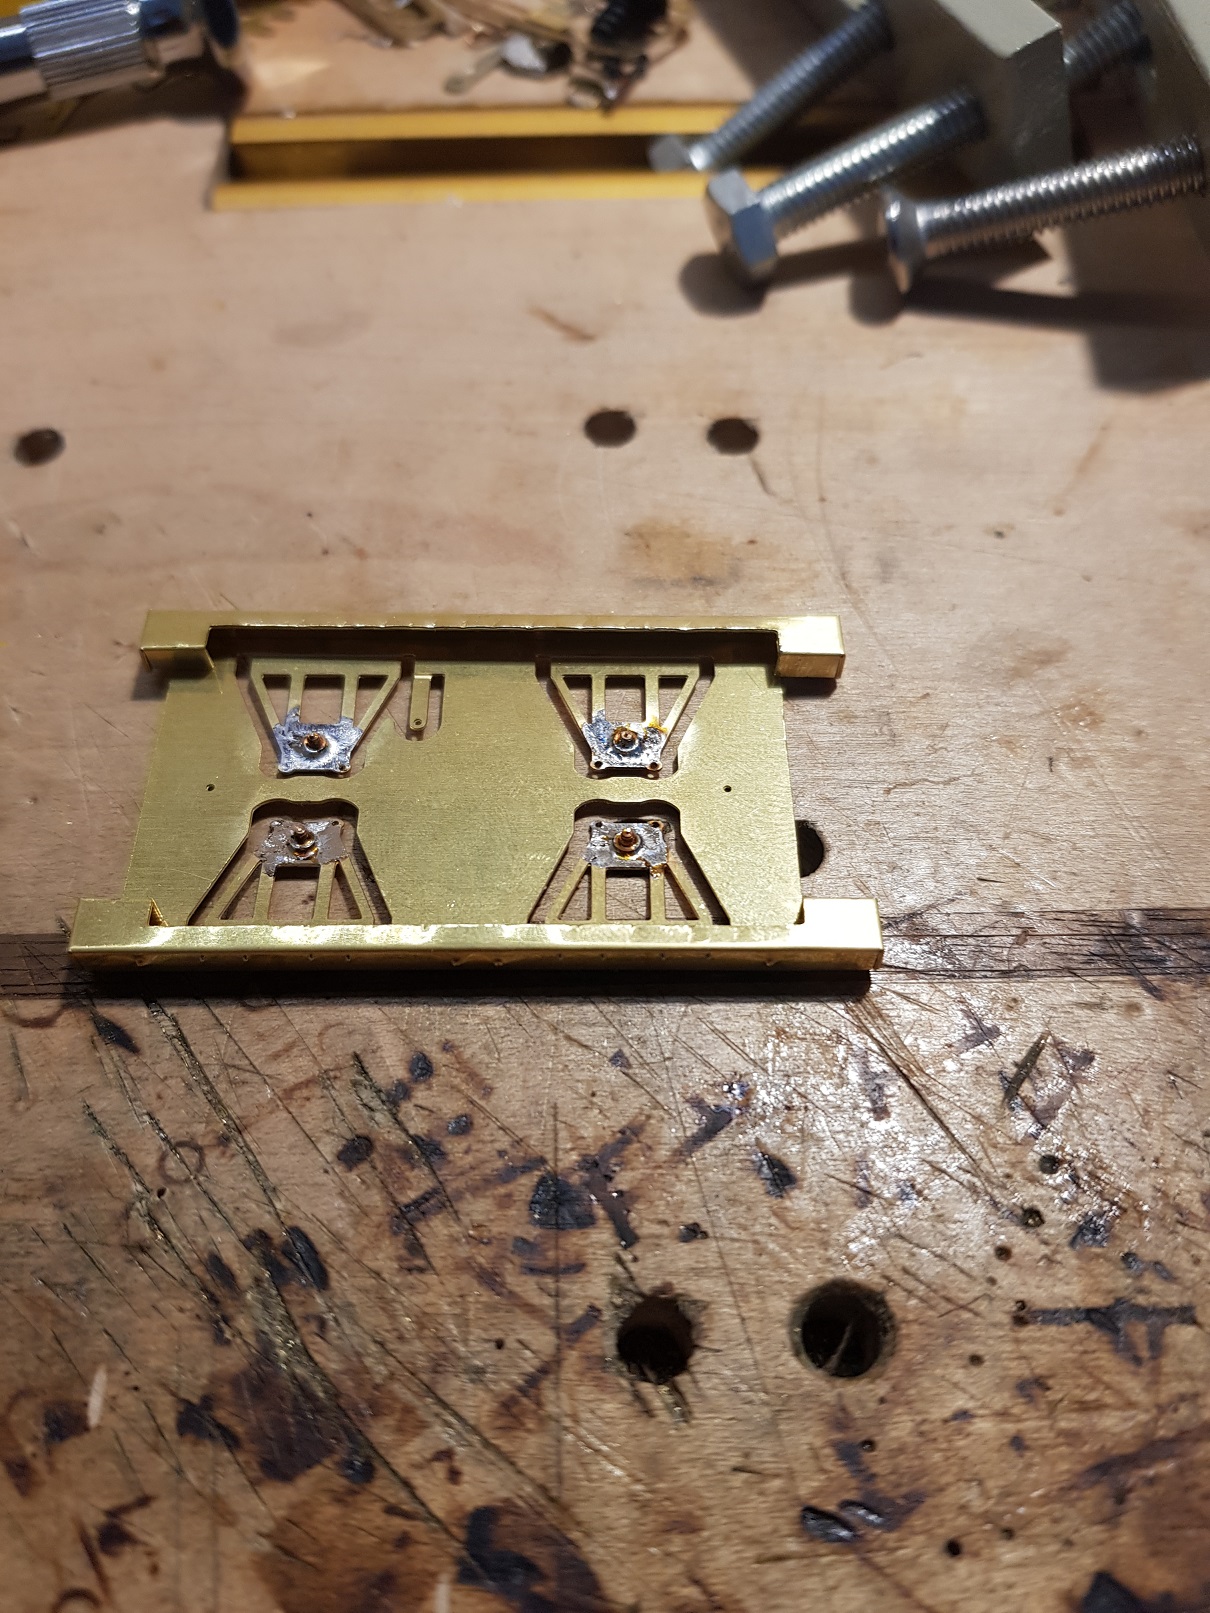
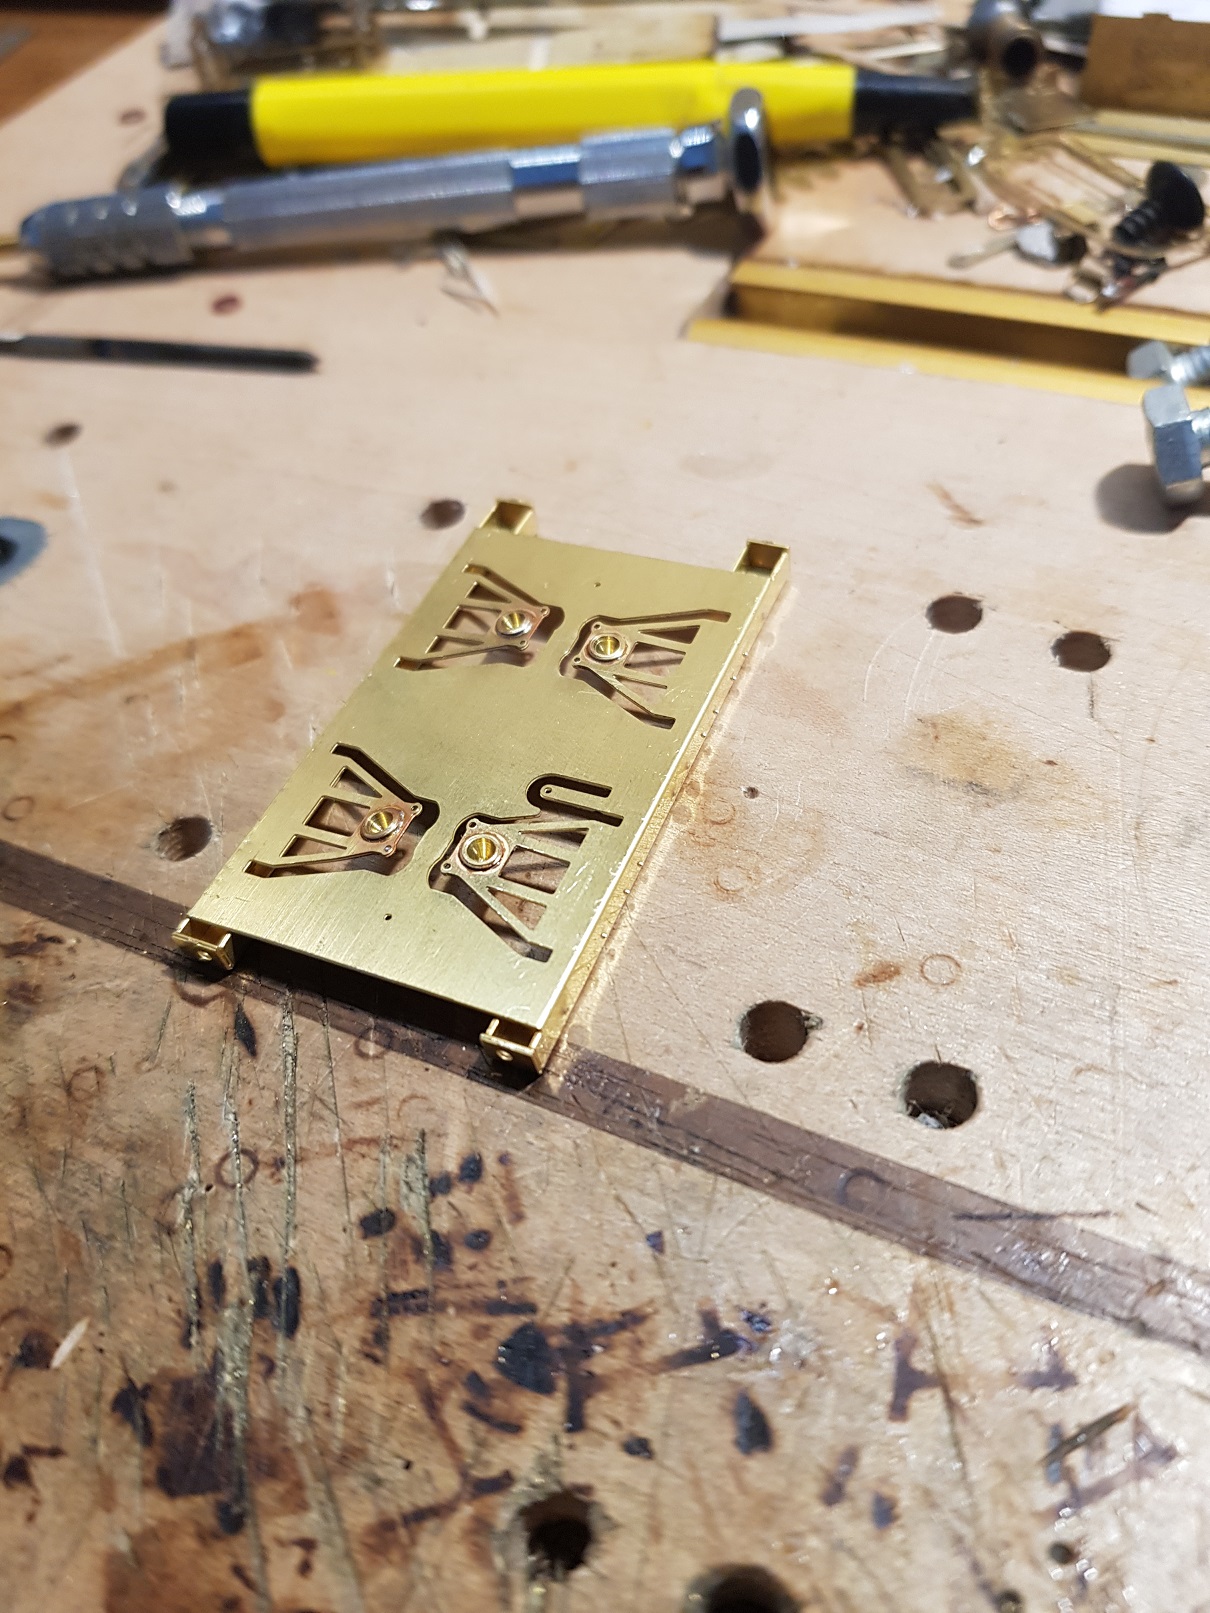
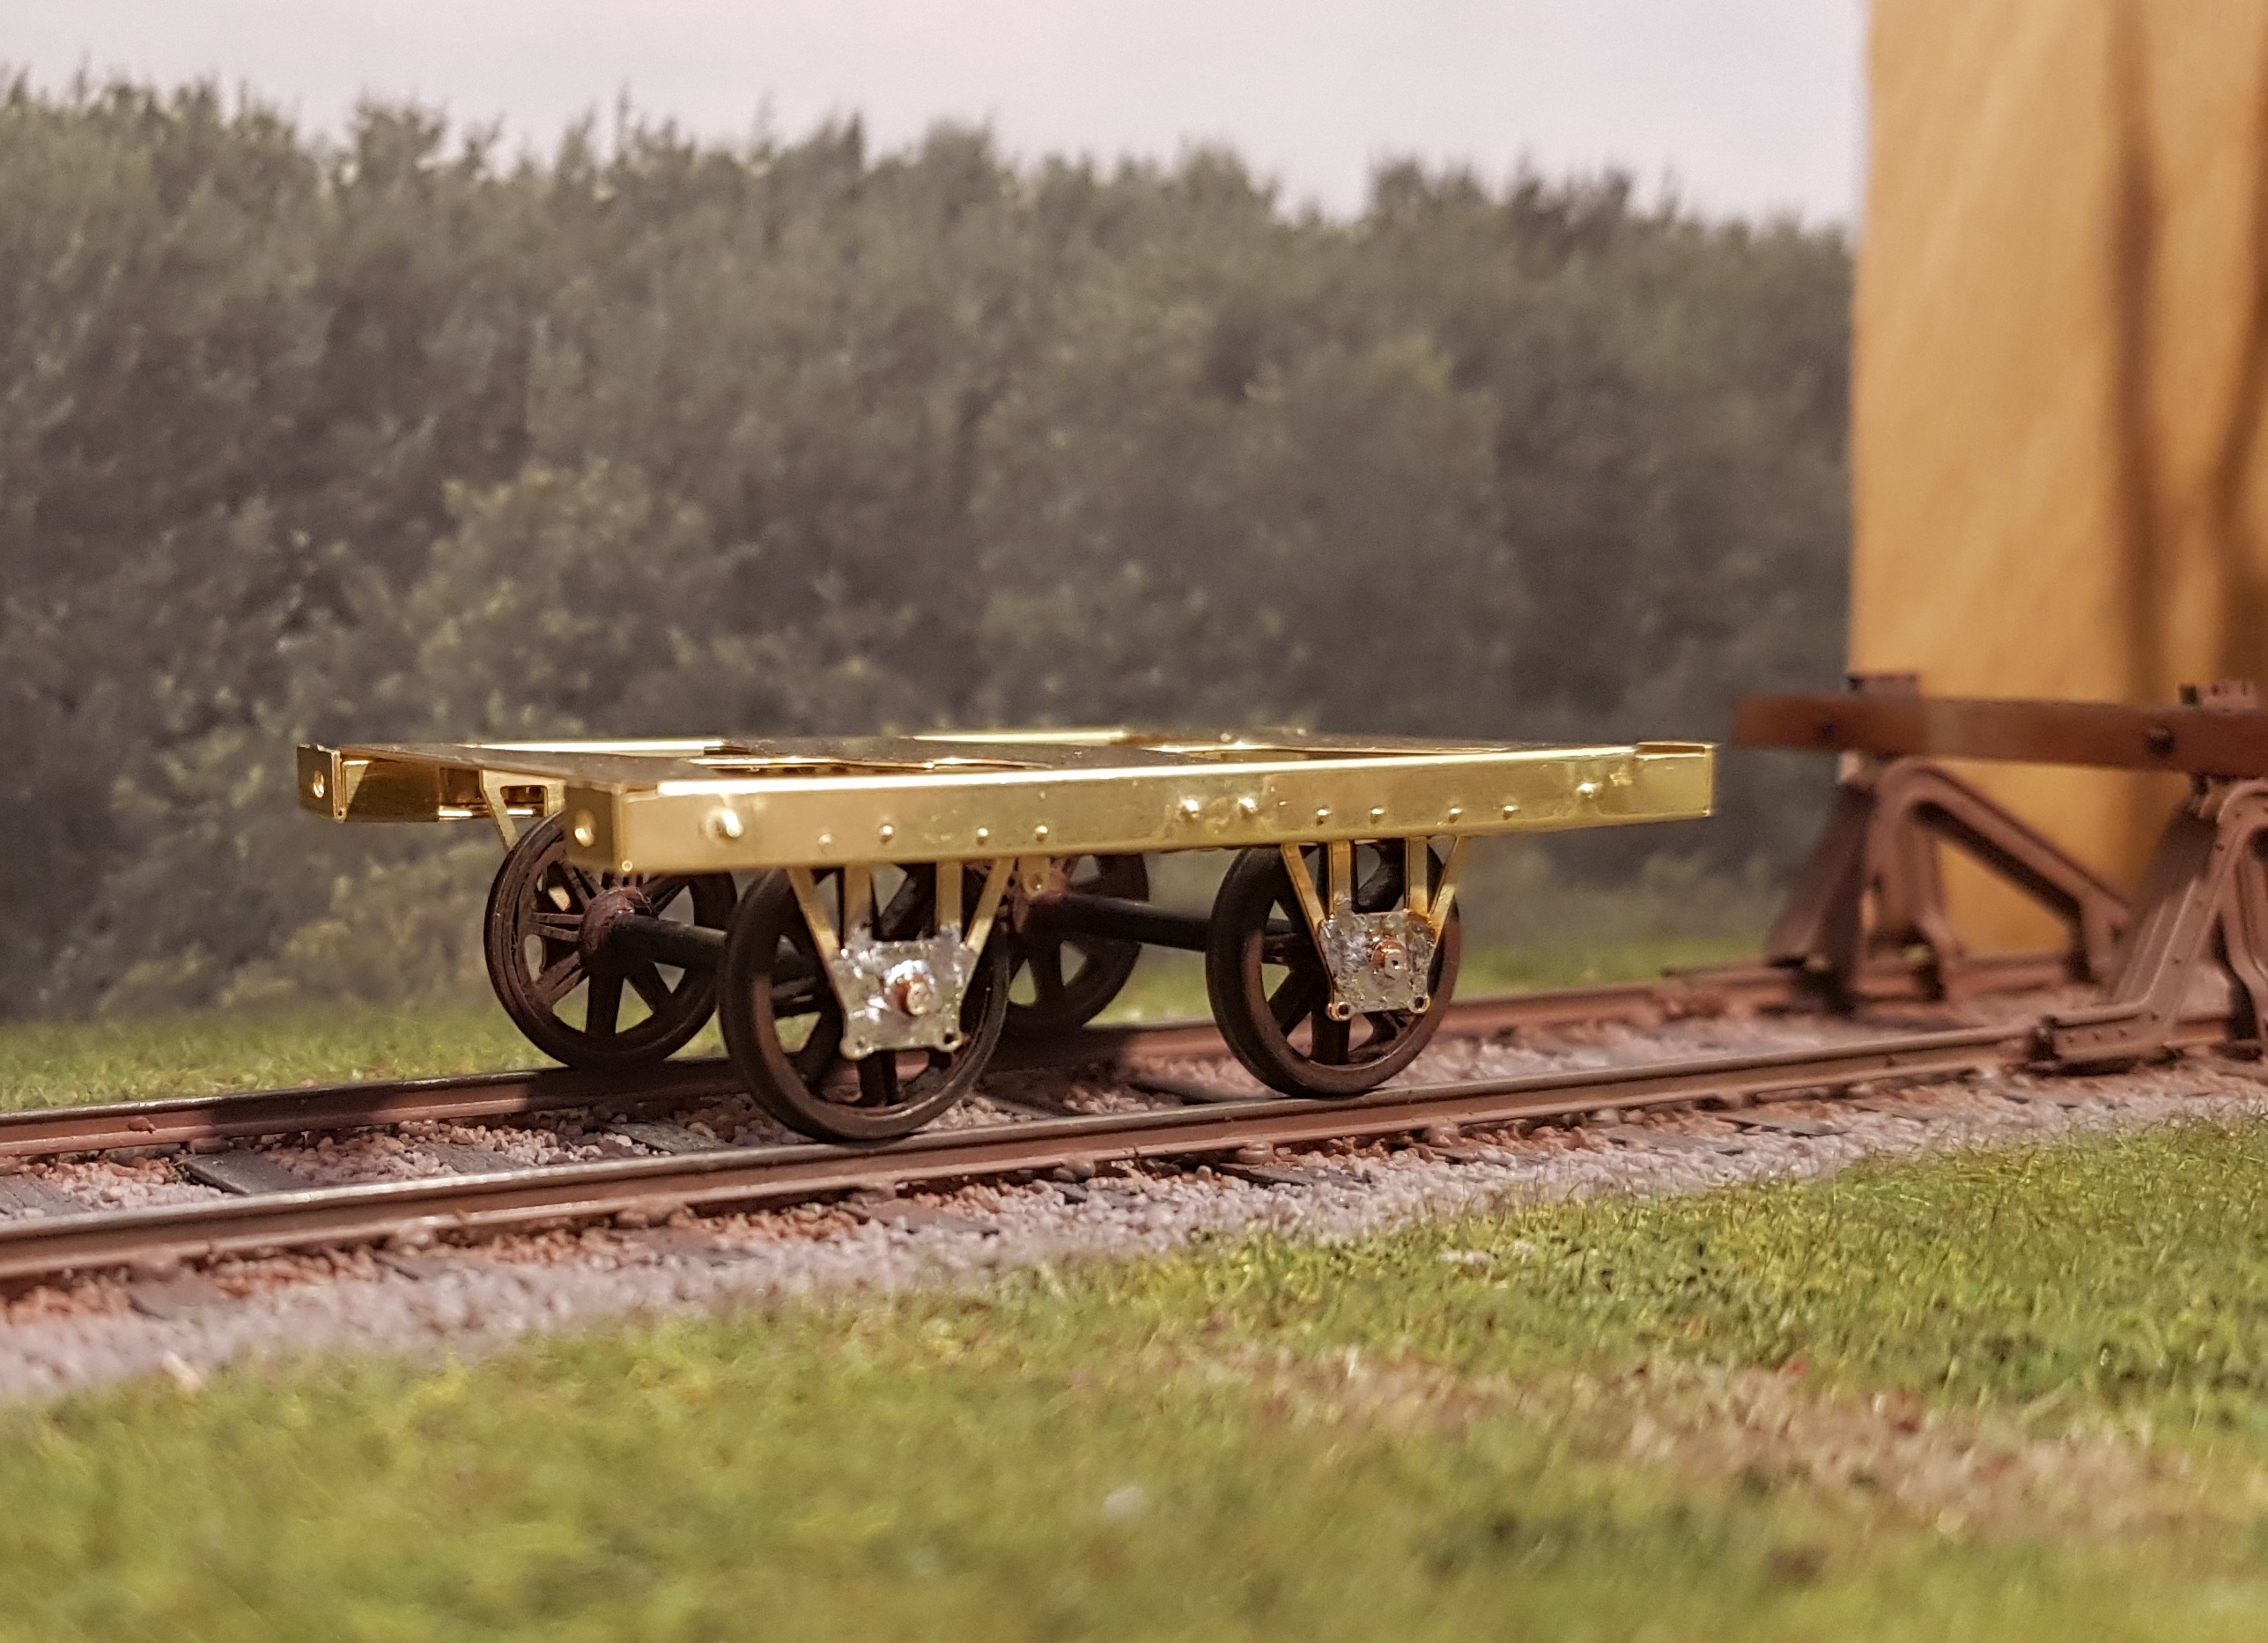
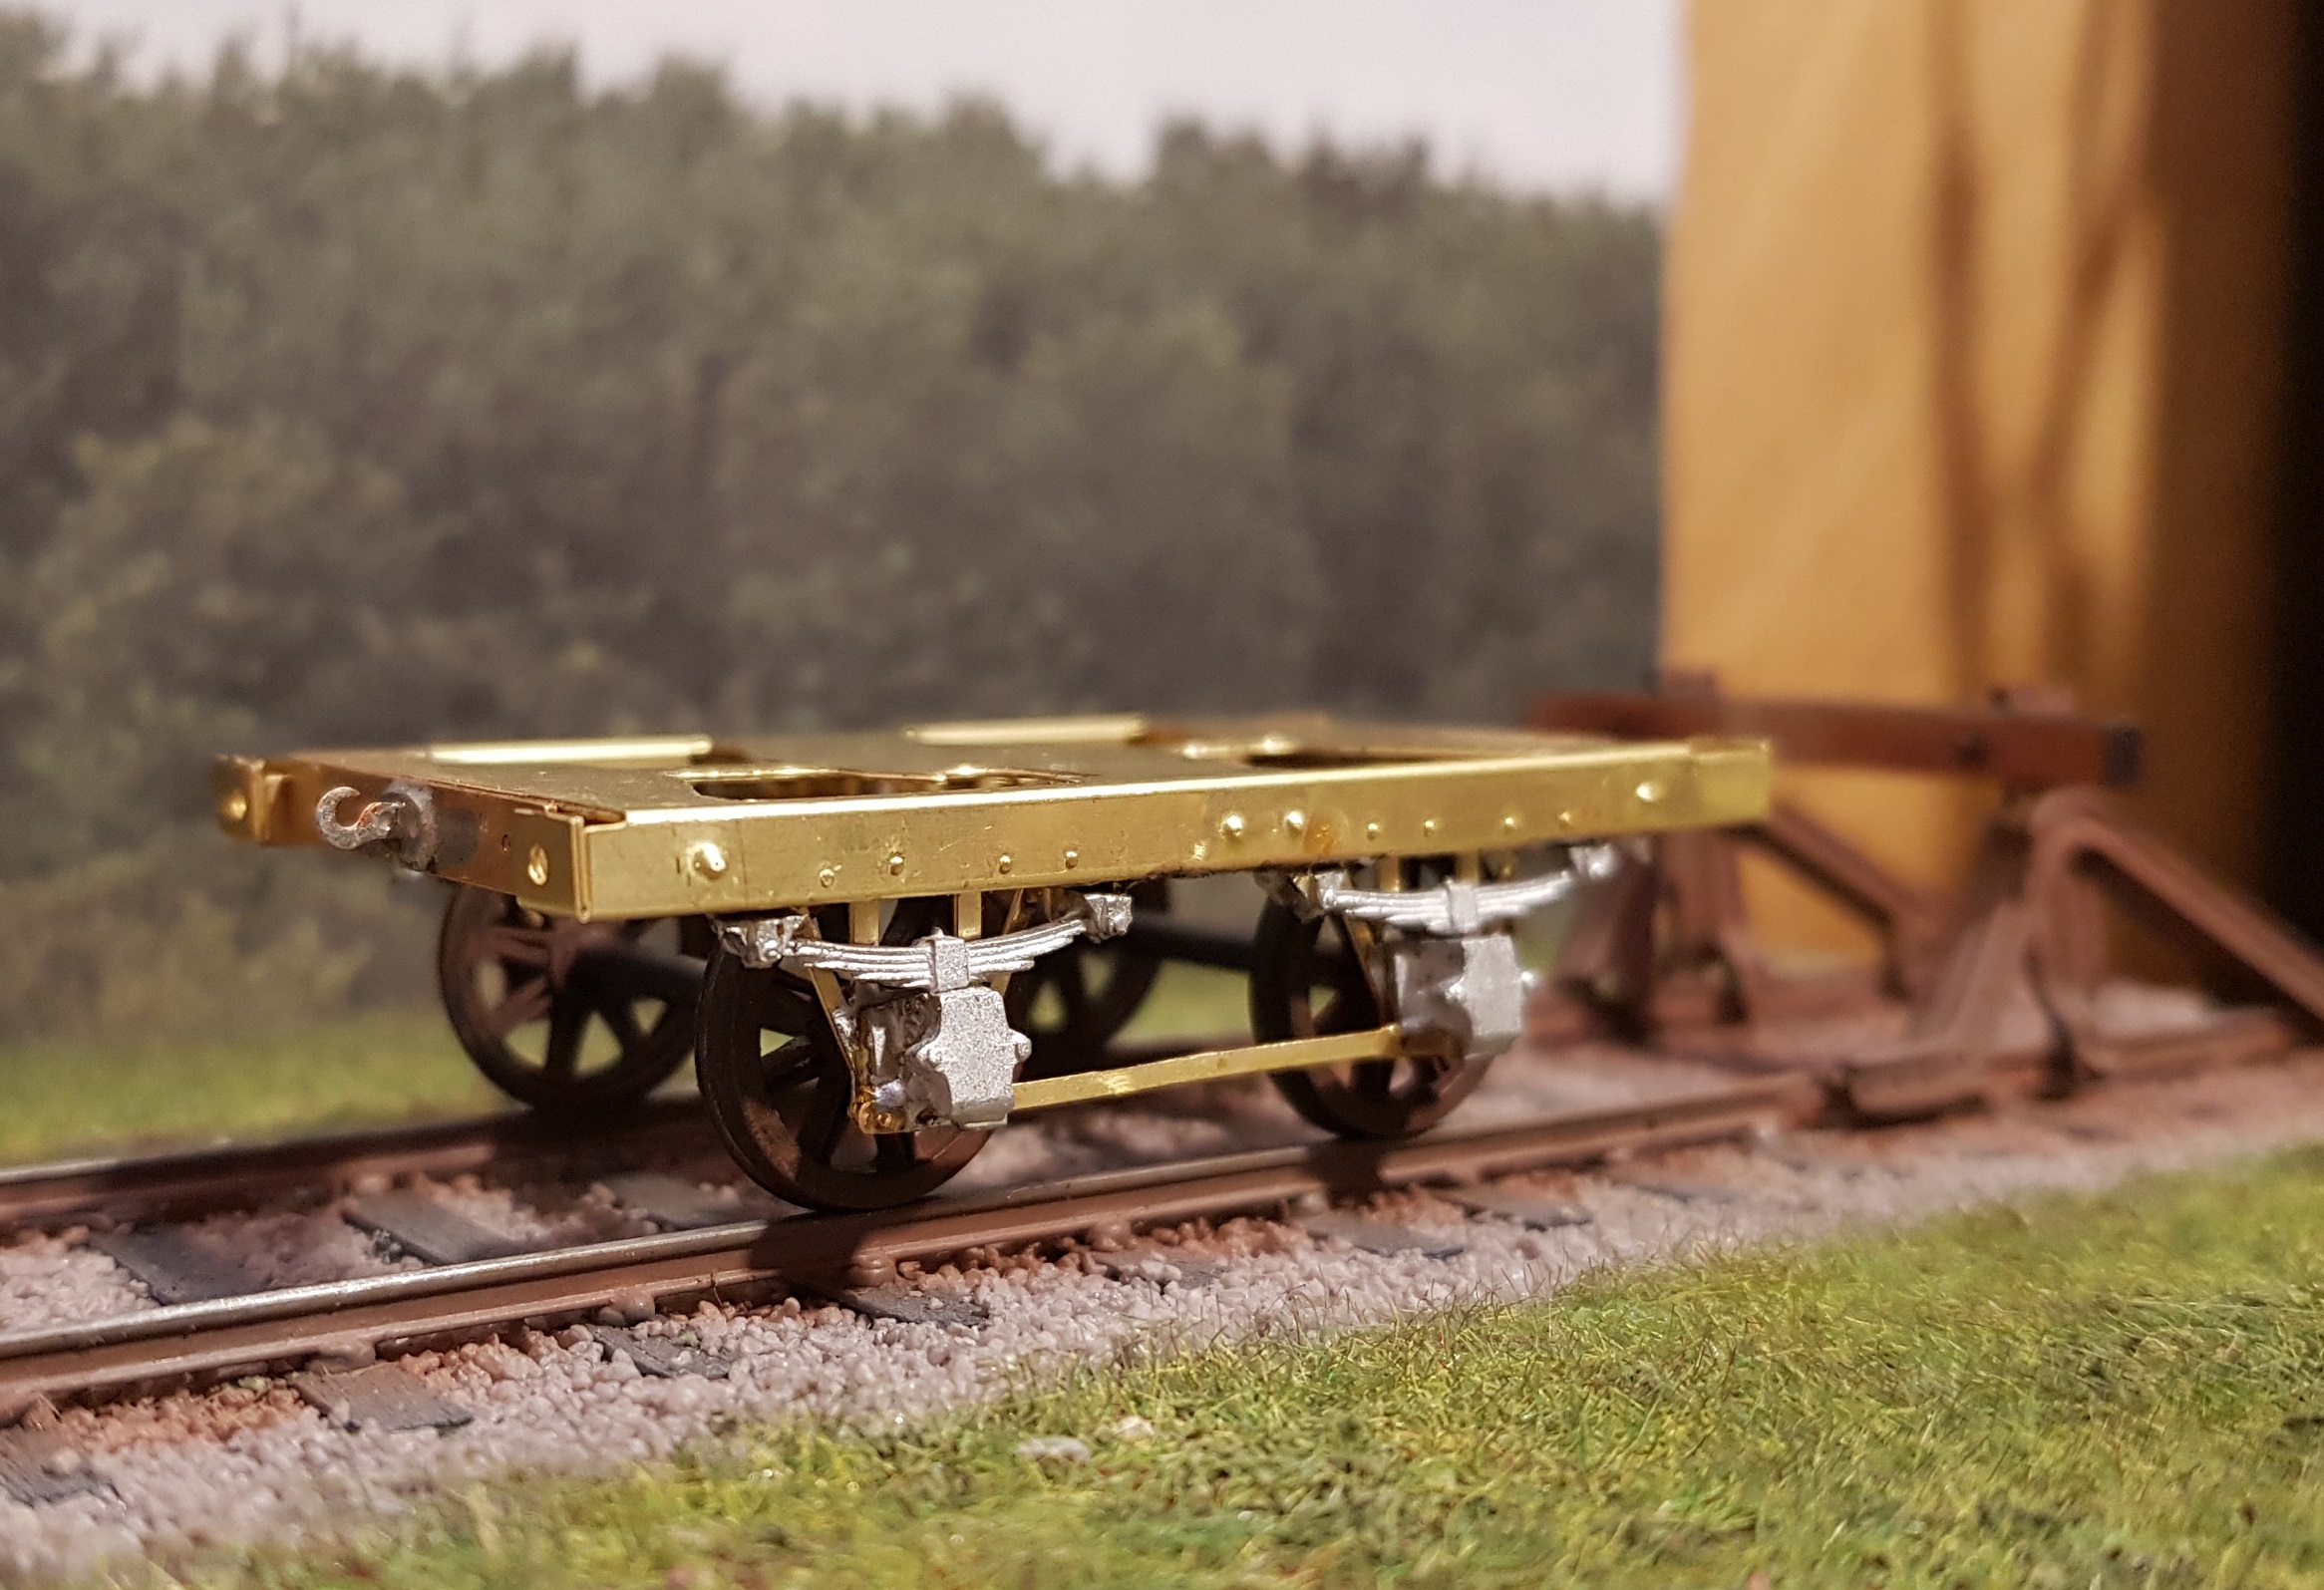
Well the Christmas project has commenced, and progressed rather nicely. There are some problems with small elements of the detail which became apparent as I built; nothing major, but if I order another etch, I will make some changes. First up, axle holes were reamed out to take waisted point bearings for the axles. Rivets were punched through using the holes as guides. Then began the fold up of the side of the chassis which is where the first gotcha showed up. I didn't allow for the final wrap aound on the chassis ends to close the box - not a big problem, spare fret material was used to fill the gaps. In a future etch I will add a tab to close this out. The w-irons were folded down till they reach the chassis which renders them at 90 deg to the chassis & thus in the correct position. This model is developed for 21mm spacing, however by moving wheels in on the axles an OO version could be made. We now have a basic rollling chassis. W-iron ties, axleboxes and springs were added to complete the rolling element of the chassis, however the brakes were not added as some additional spacing will be required to get the lever and brake block in the correct spaces. I had not allowed for this in the etch, so some remedial work will be requried. Chassis end sections with hook & plate detail added to finish the chassis element. The details for the side straps were included in a former to hold them in place for soldering on to the side. This work is much easier when the body etch was flat. Once the straps were in place, the tabs were trimmed & former removed. All that was needed now was for the double fold on the side to create inner & outer detail, and then folded up 90 deg to form the side. Rinse & repeat for the otherside and the main section of the body is complete. The body ends were formed in the same way and soldered into place. I allowed location holes in the floor and chassis to allign the body, which then allowed for the accurate positioning of the ends with relation to the chassis front & rear. The body can then be fixed to the chassis to arrive at a rolling unit. As noted above, the holes in the chassis box at each end were filled with spare sections of fret. The next gotcha was the strapping for ends - these were held by tabs either side, rather than top & bottom which resulted in them distoring out of shape when trying to remove them from the fret & clean up. I decided to revert to scratch built straps with rivets embossed, but that's for another post. For now, I'll leave it with a photo of the wagon with 423 to give an idea of size. More as progress warrants. Ken
- 379 replies
-
- 12
-

-

-

GSWR/GSR/CIE Six-Wheeled Coaches - ECMbuild in Gauge OO
KMCE replied to murrayec's topic in ECM Model Trains
Lovely work, as always, Eoin. Fine looking coach. -
Seriously impressive stuff.... That inside motion is taking it to another level & I love the backhead detail. Is that a faux makers plate on the frame upstand in front of the front driver sandbox?
-
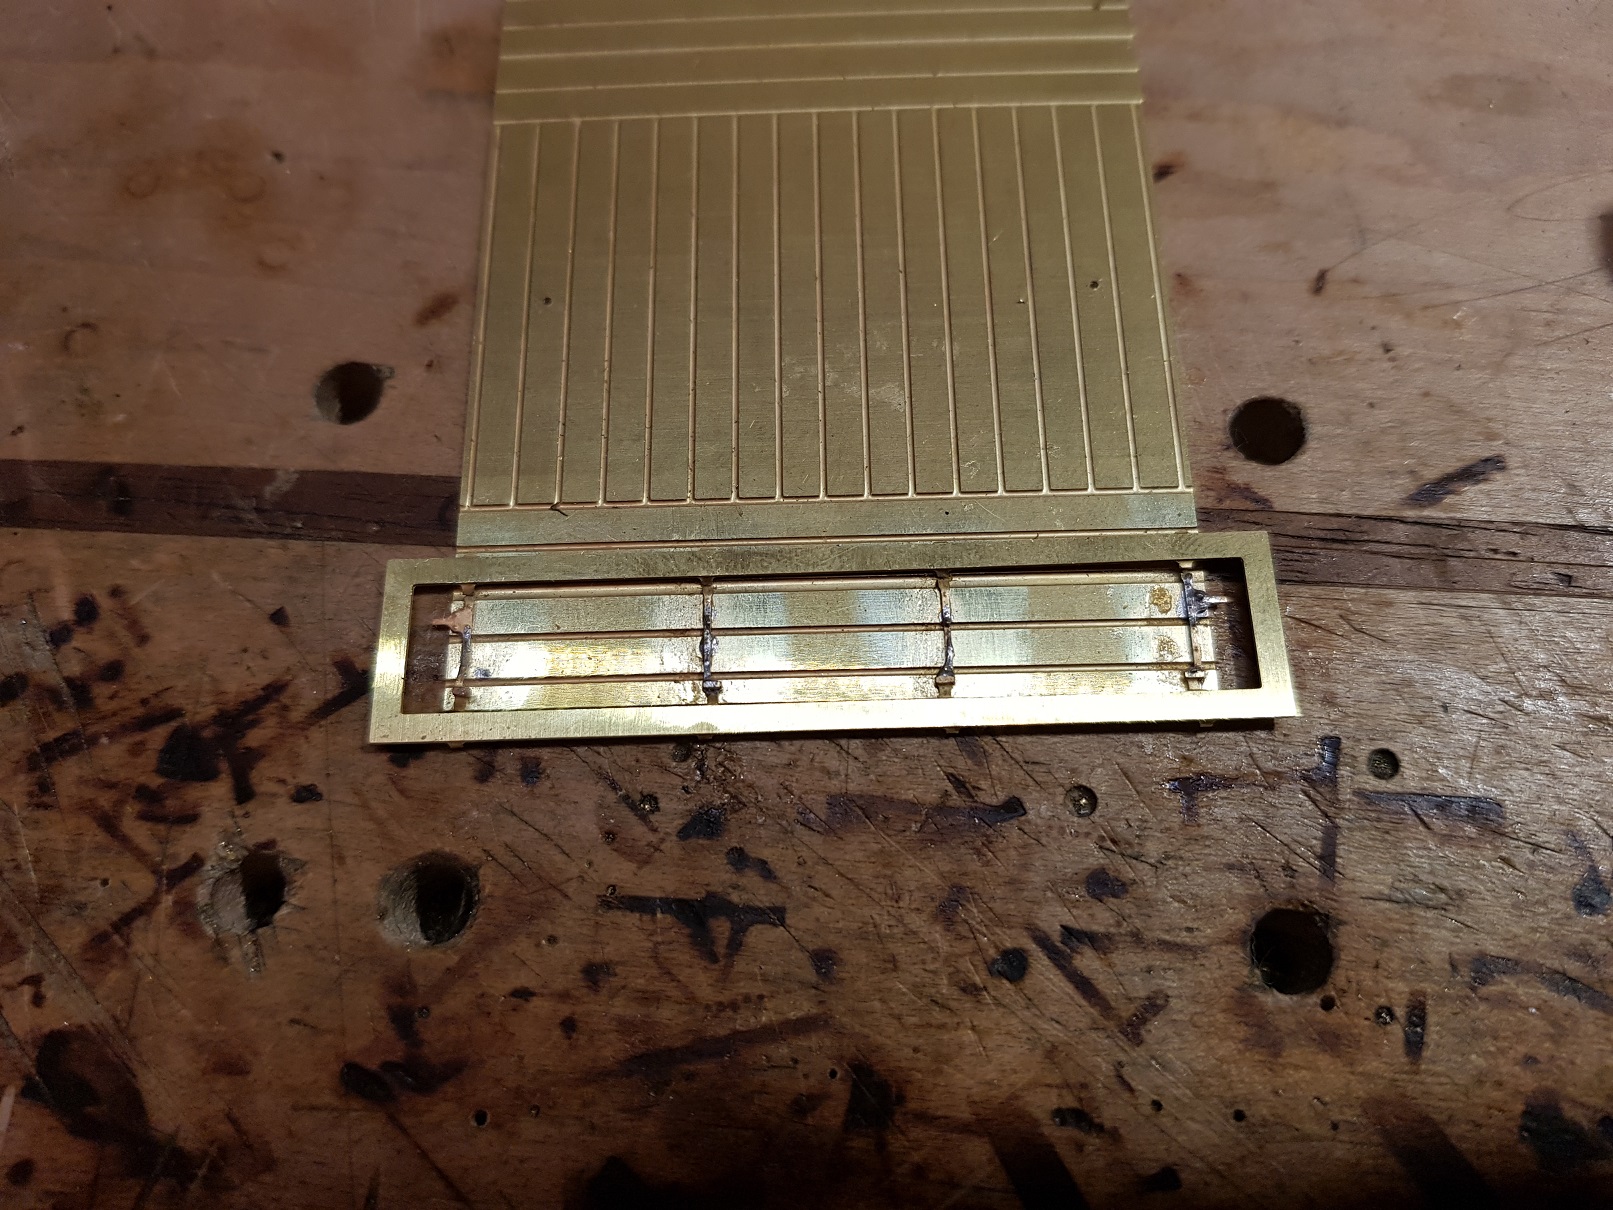
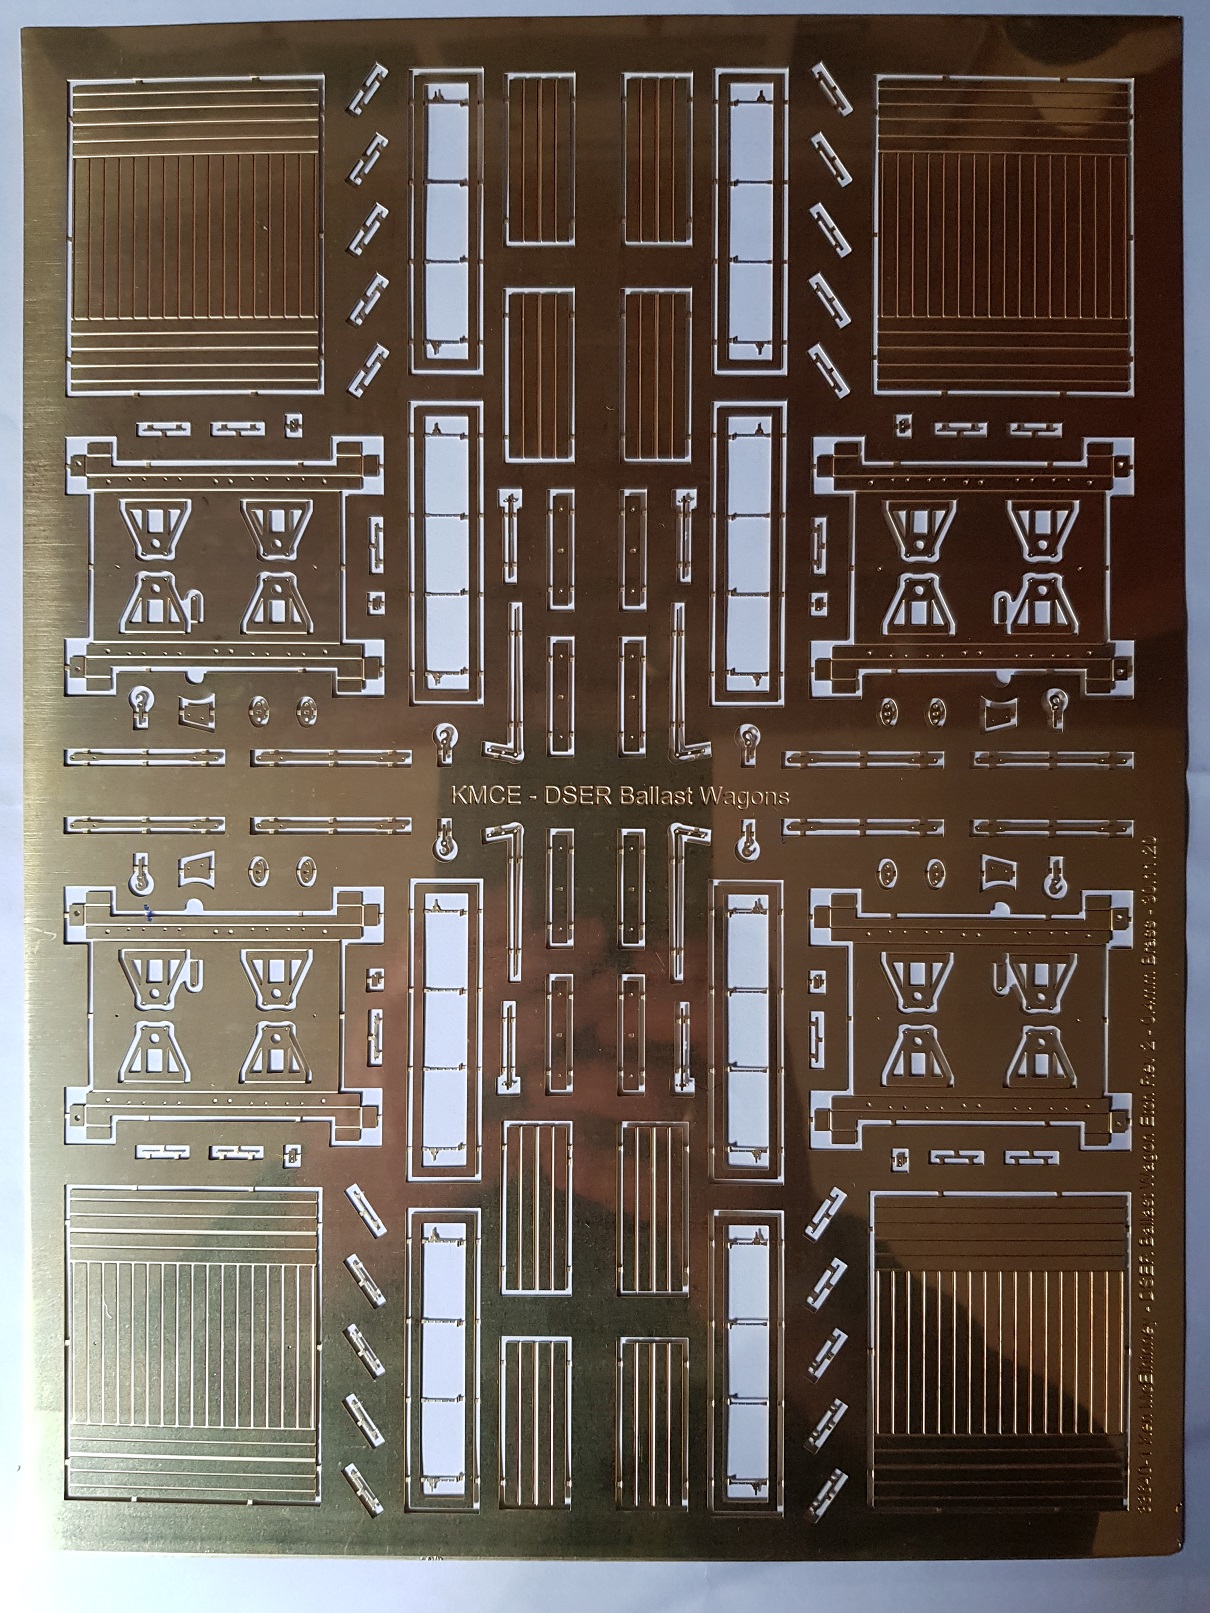
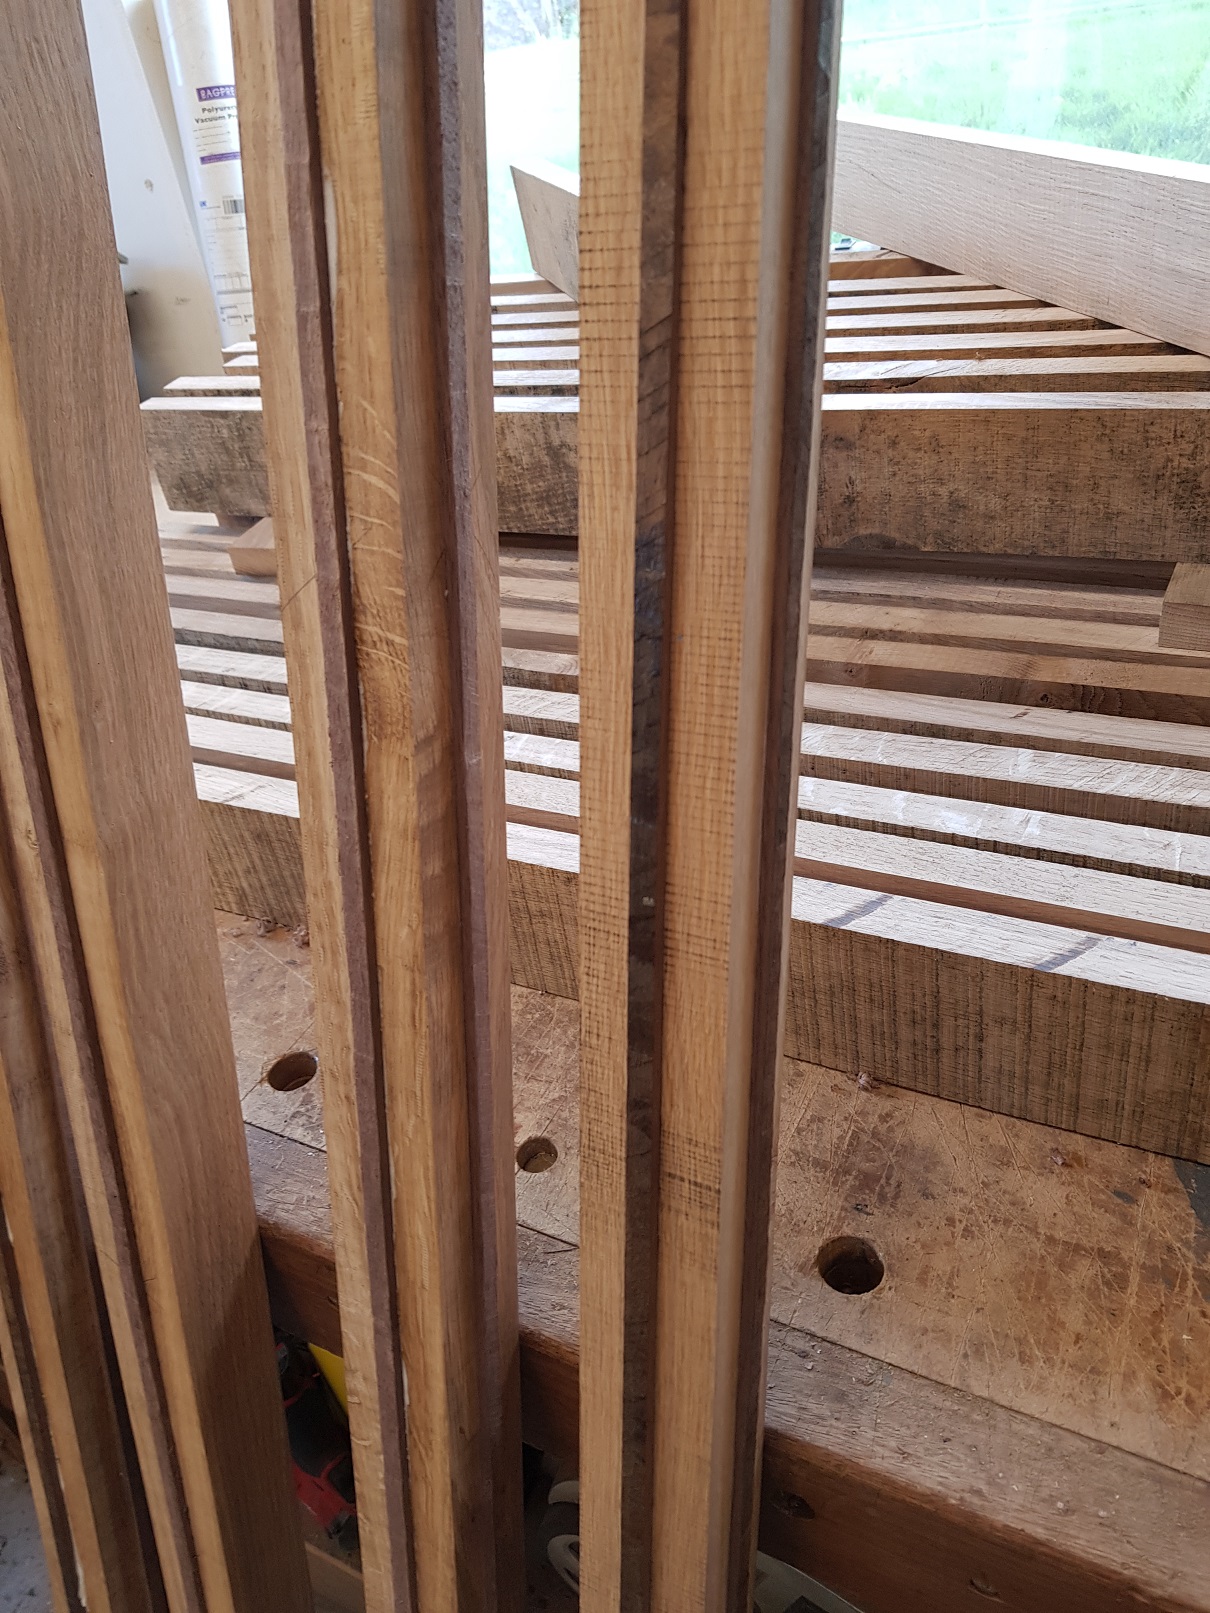
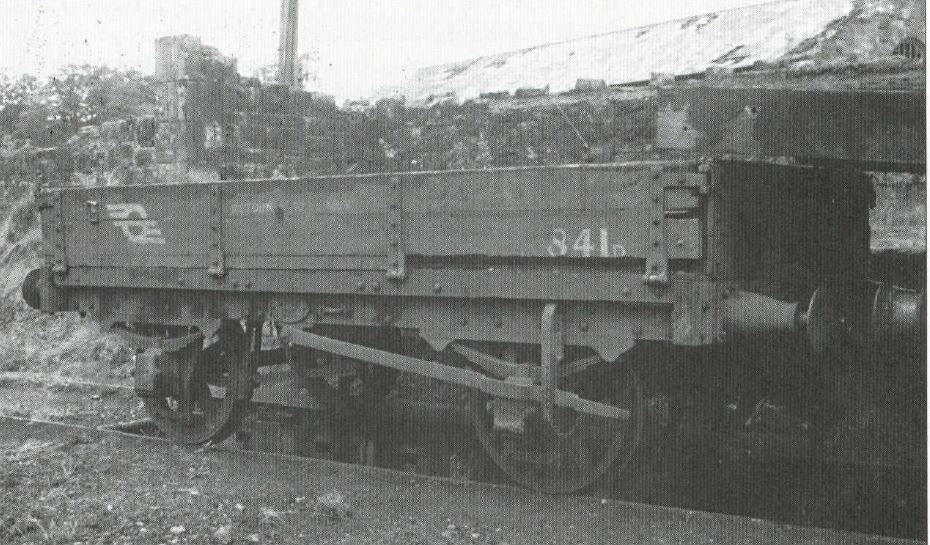
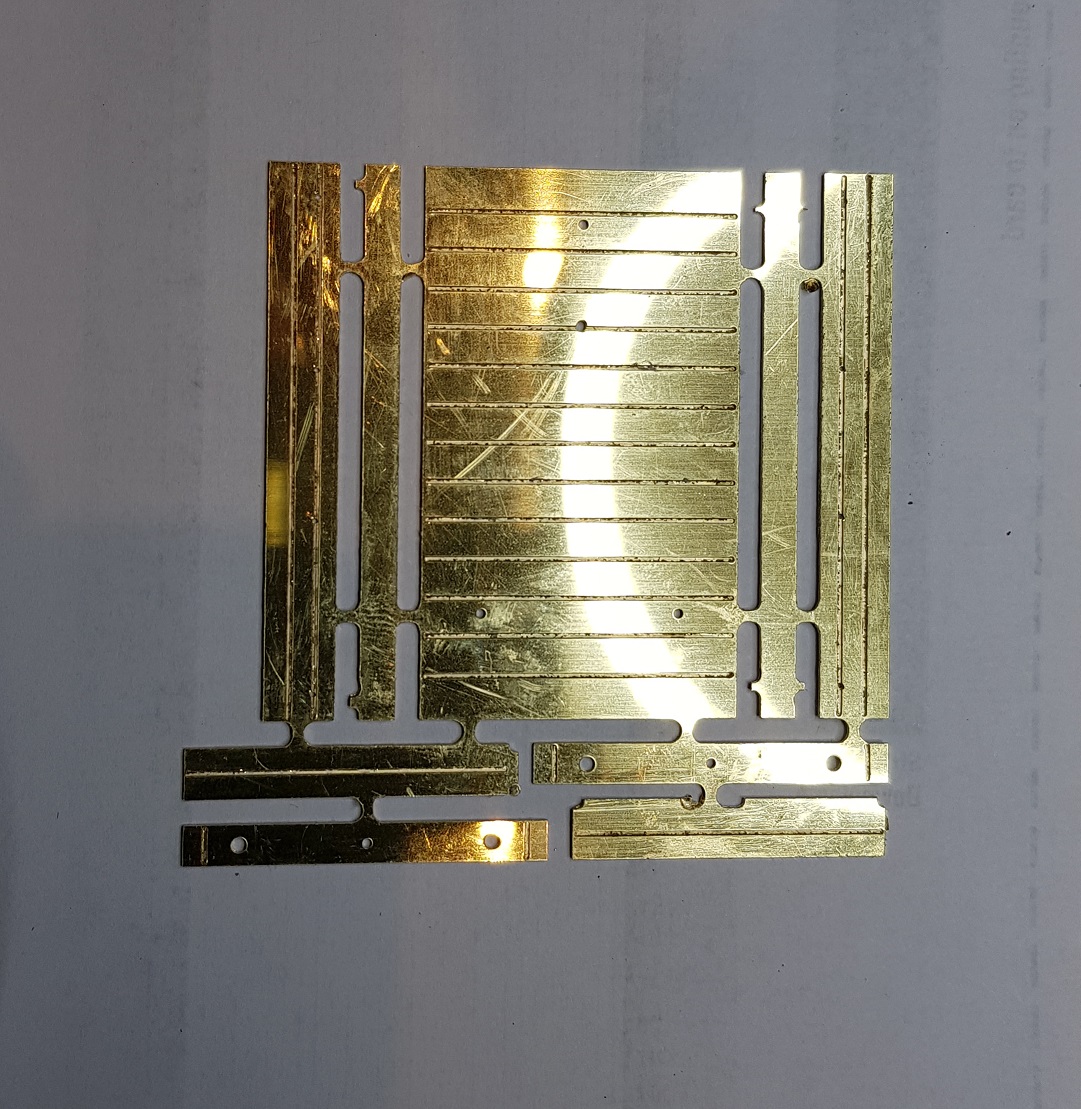
So....... What started off as research into DSER ( & DW&WR) wagons led to the HMRS who have a series of wagon drawings from the Metropolitan Railway Carriage & Wagon Co (MCW). I purchased a series of images in digital format from them for various wagons, one of which being a ballast wagon. From my own research, it appears these wagons were built in 1863 for the DW&WR, however the information provided in the excellent books by Messrs Shepherd (and Beesley) is a little unclear on this. Ballast wagons were ordered in 1856, however MCW only came into existance as company in 1863, so this earlier order must be discounted. From the Shepherd & Beesley account it appears ballast wagons were converted old mineral stock, or second hand wagons from other providers; thus more research will be required to tie down the provenance of both drawings and contemporary records. Anyhow, the HMRS drawings were imported into CAD and drawn up, however some inconsistancies between figured dimensions and drawn information needed to be resolved. Being an engineer, I went for the figured dimensions and amended the drawings accordingly - nothing major, but worth tidying up nonetheless. The drawings developed: Very nice looking wagons with a 6' wheelbase and a 12' x 8' loading area - this scales down to an overall length (over buffers) of 58mm. Buffers on one end only with dumb buffers on the other. Given the simplicity of the model, I decided to go the etch route to produce these, as one / two ballast wagons are not much good. Johh@Mayner in one of his posts advised that PPD Ltd were good to work with for etching, so I worked with their drawing rules and developed a master etch. Given these wagons are so small, it made sense to put 4 of them onto a single sheet to maximise the return on the effort & costs. PPD have been good to work with and whilst initially advising they could not return the etches before Christmas, I got a very nice early present to myself in the post - one complete etch for 4 wagons. These are very much based on brass Origami to create chassis & body, some additional elements were included for in the etch also to provide detail. Some minor errors have resulted both from my drawings & the limitations of etching, however it should be possible to build these and get a feel for how they go together. Cast elements will be requried for axleboxes & springs and I have some Dart Castings which should do, however it may be necessary to turn (and cast) some buffers given they are so small. So now, a nice little Christmas project shall commence. More as updates warrant...... BTW, Happy Christmas to one and all. Ken
-
Now that, I would like to see......
-
Looking good. Getting the tanks right is essential on tank locos as they dominate the loco. Worth the time and effort as it will show later. As you can probably guess, I'm a big fan of tank locos.....
-
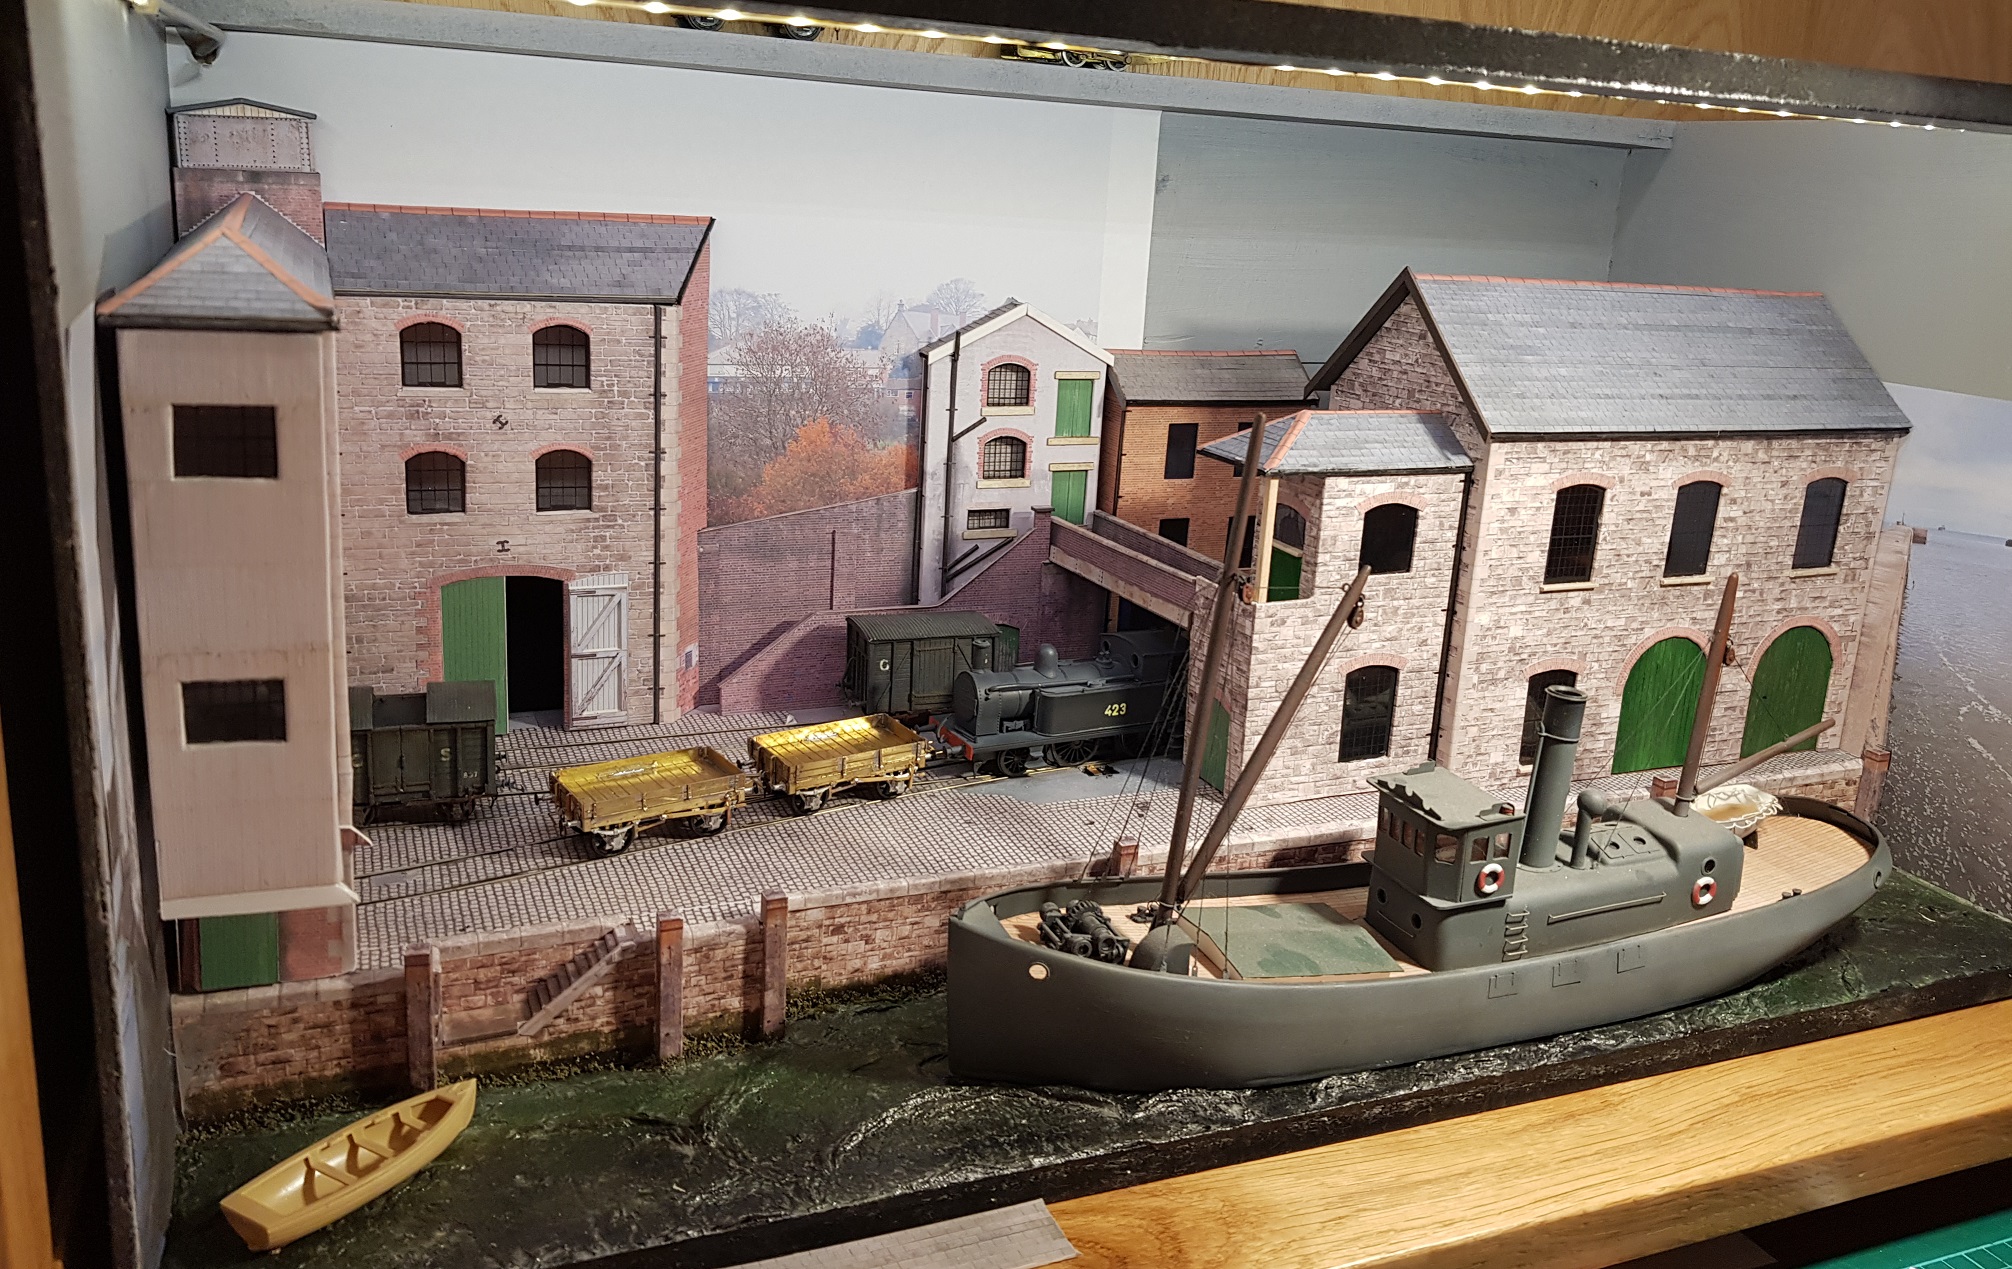
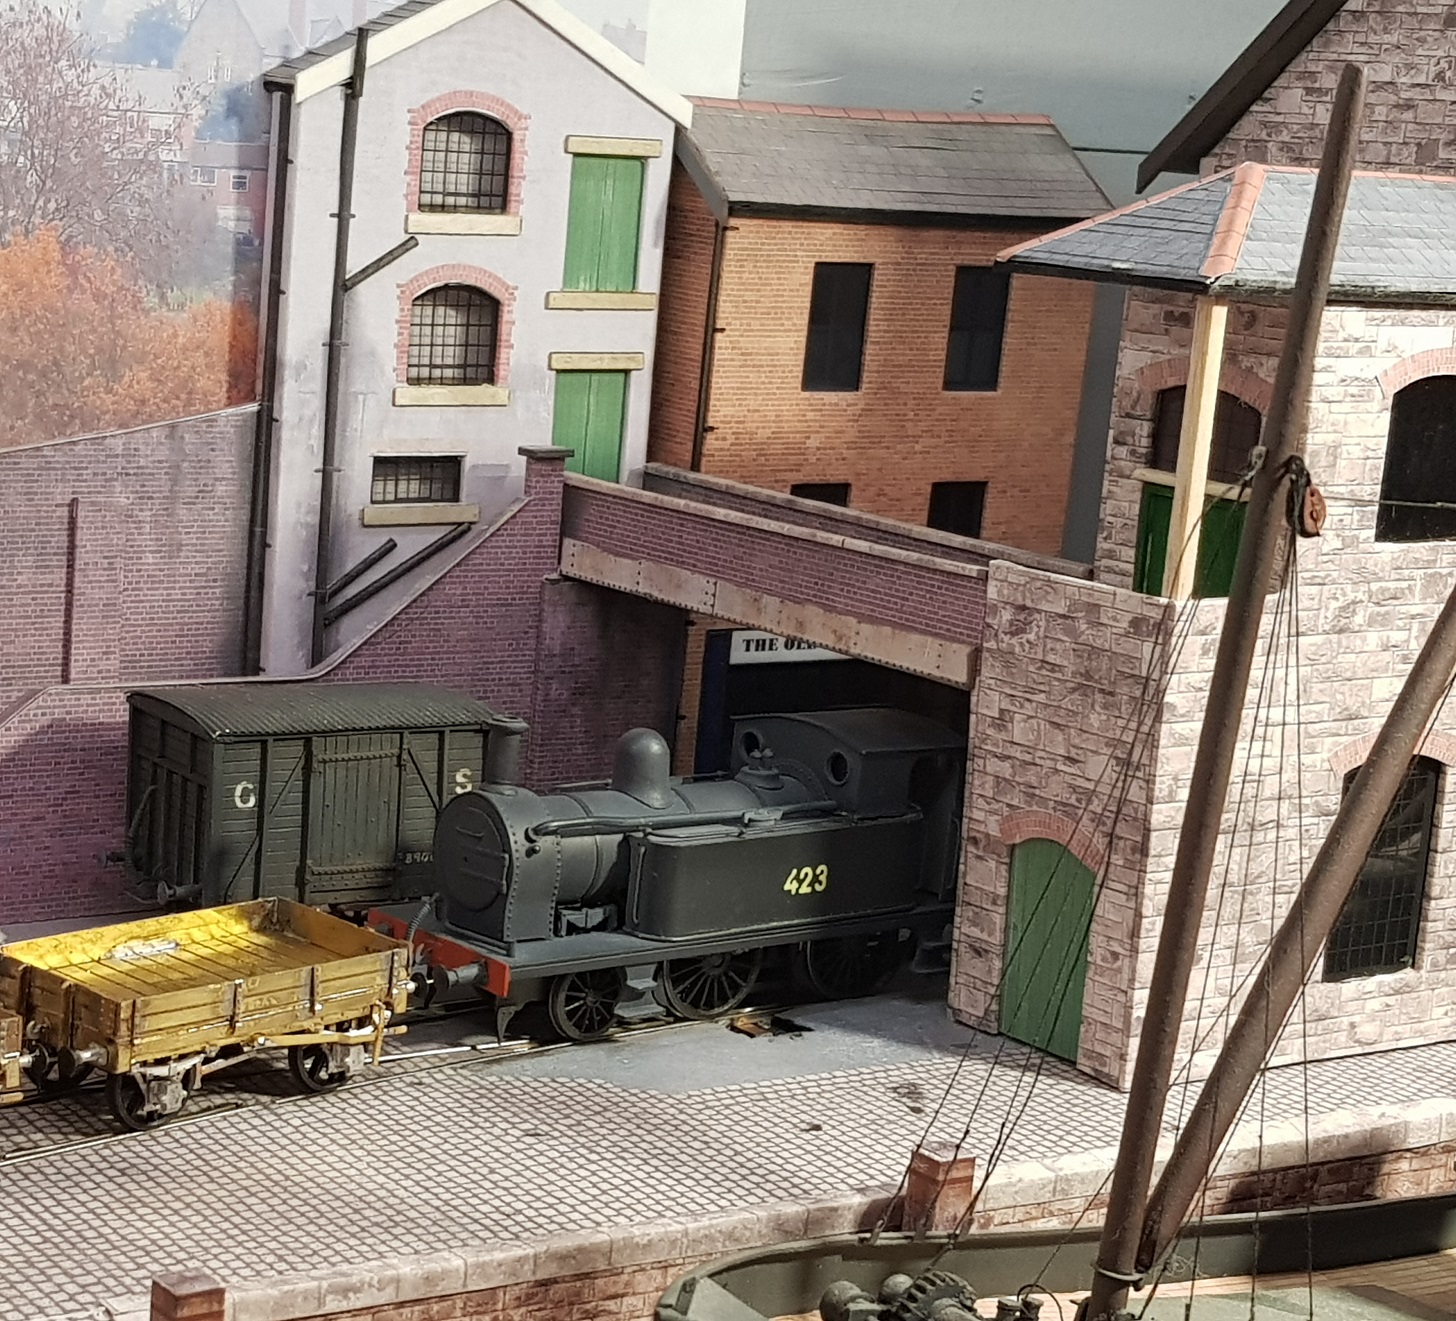
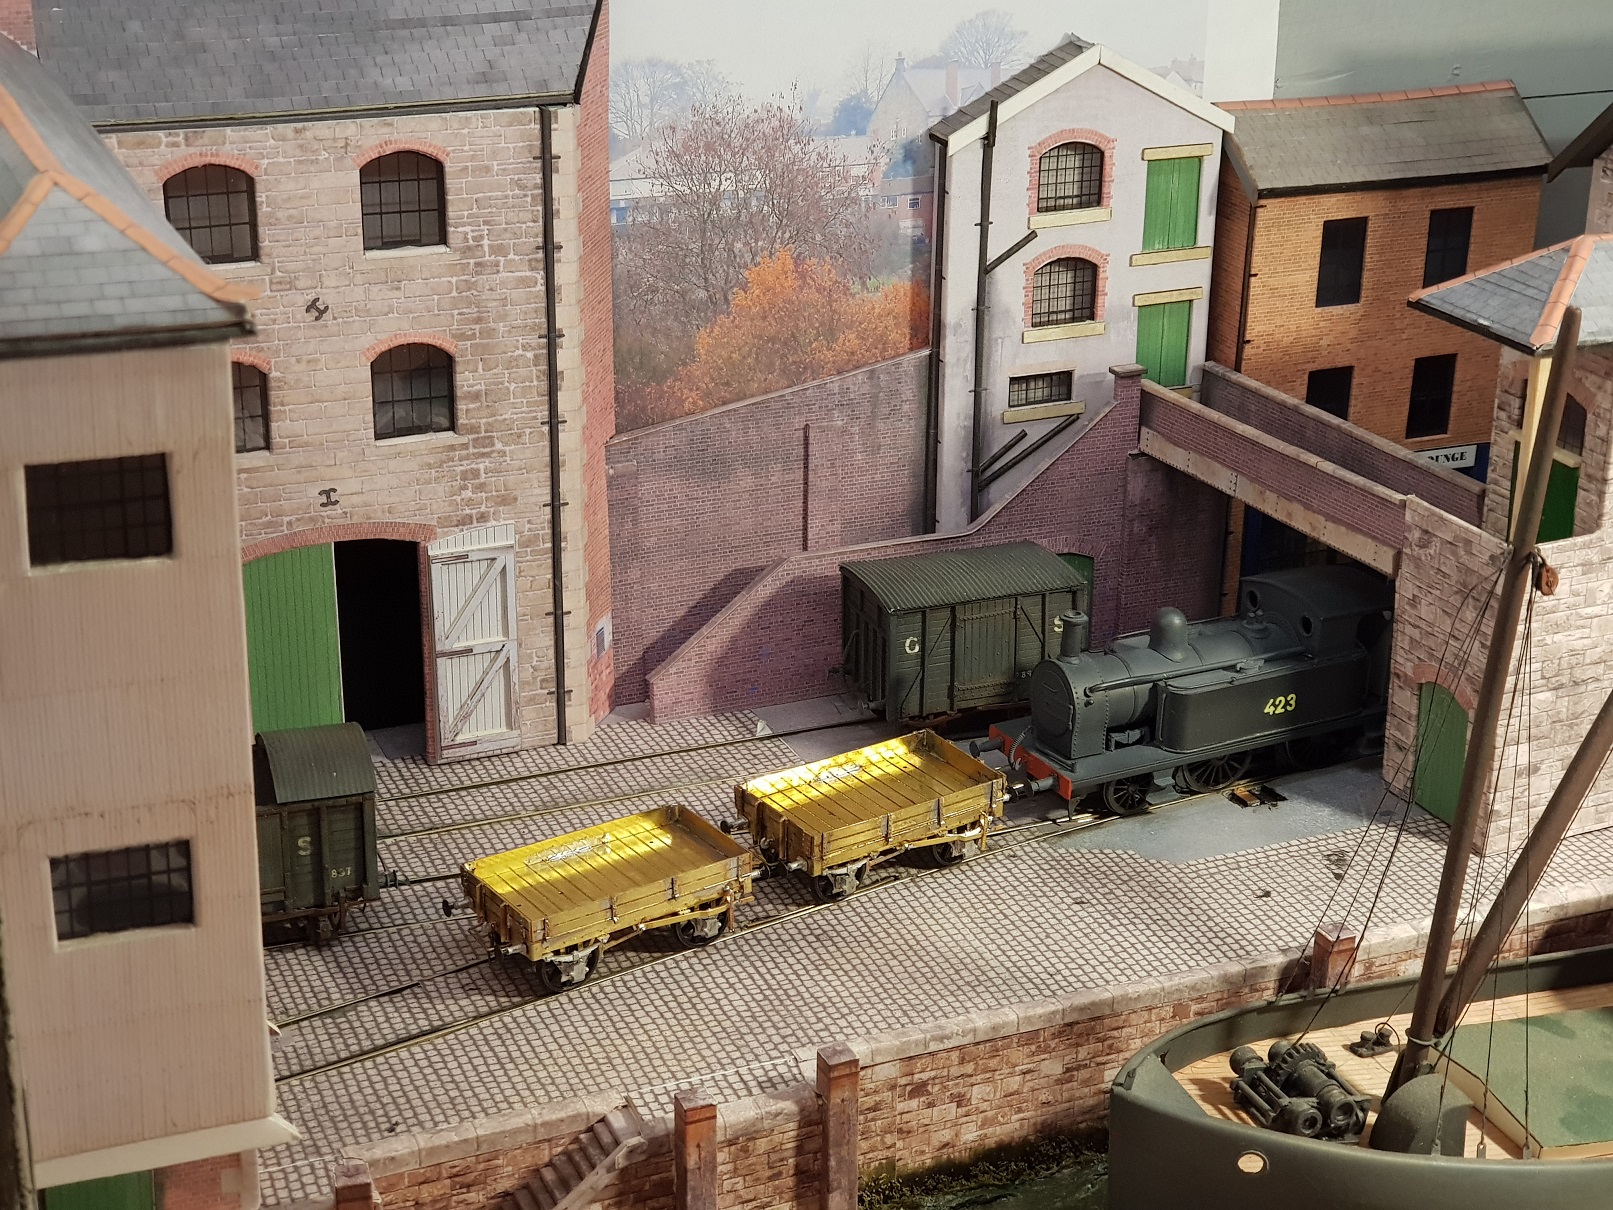
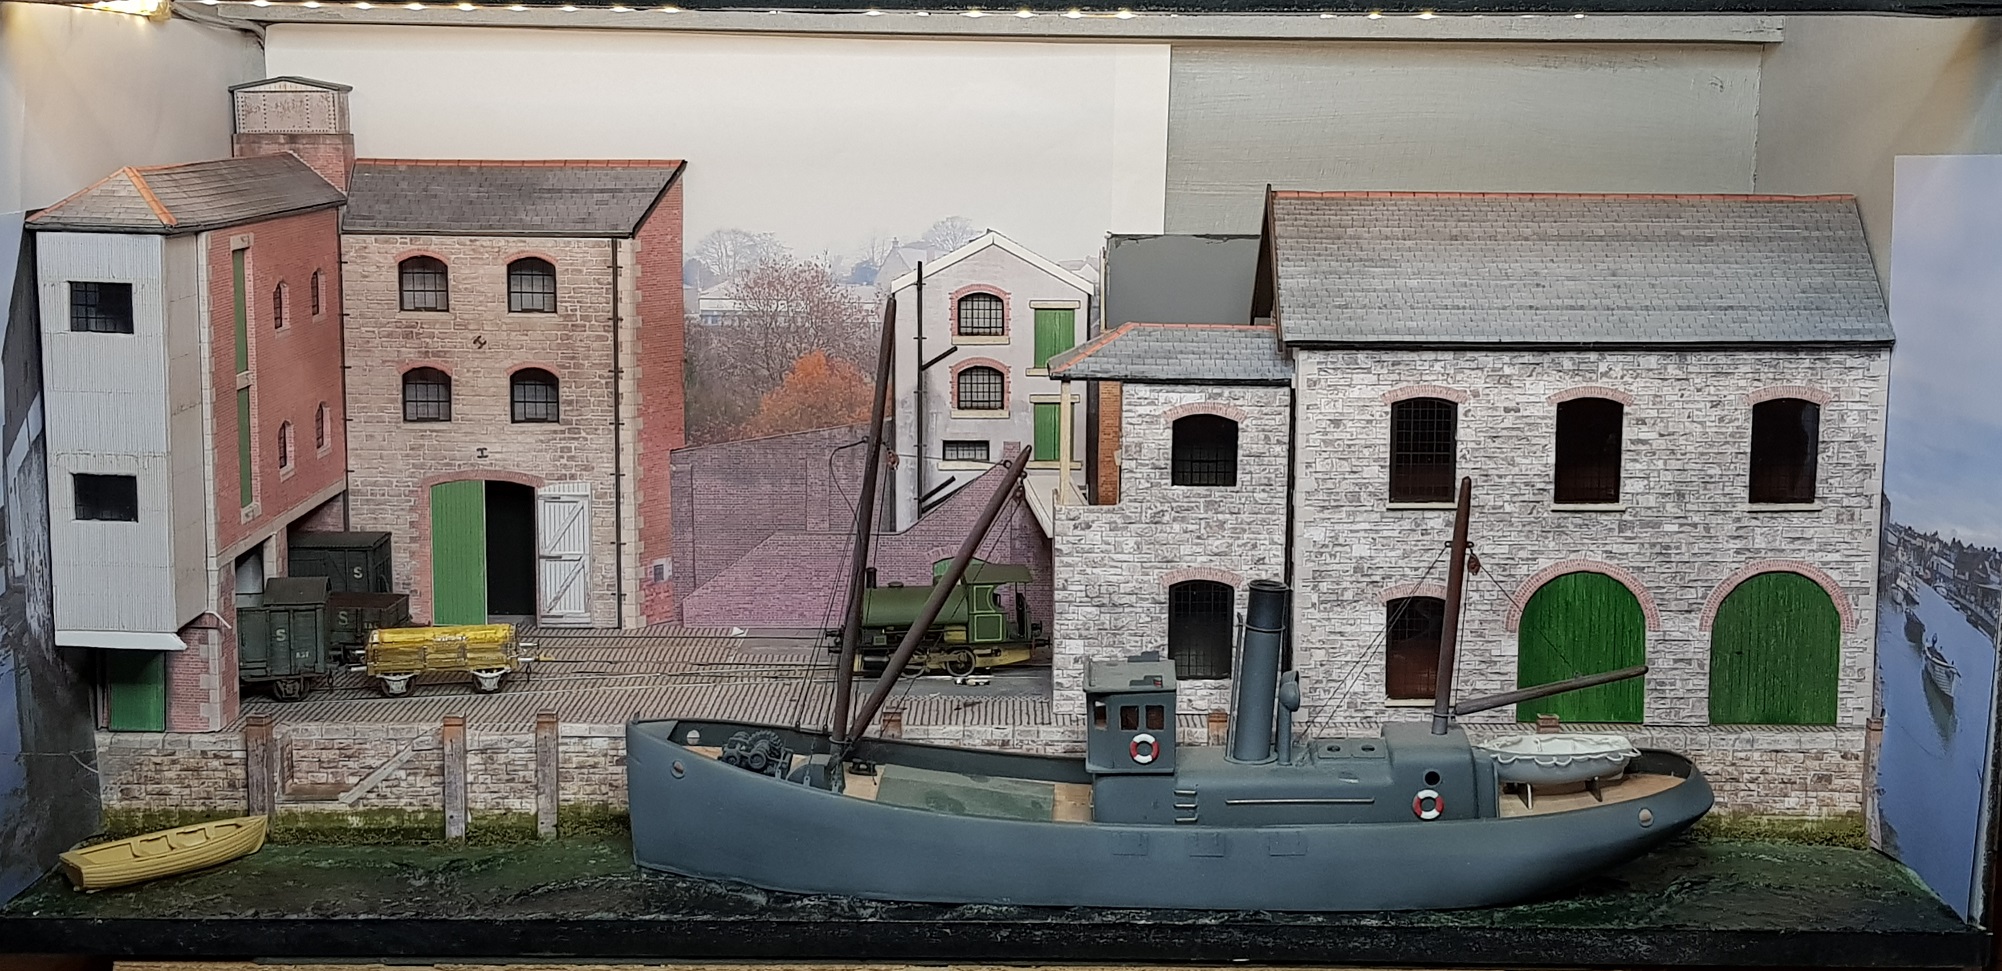
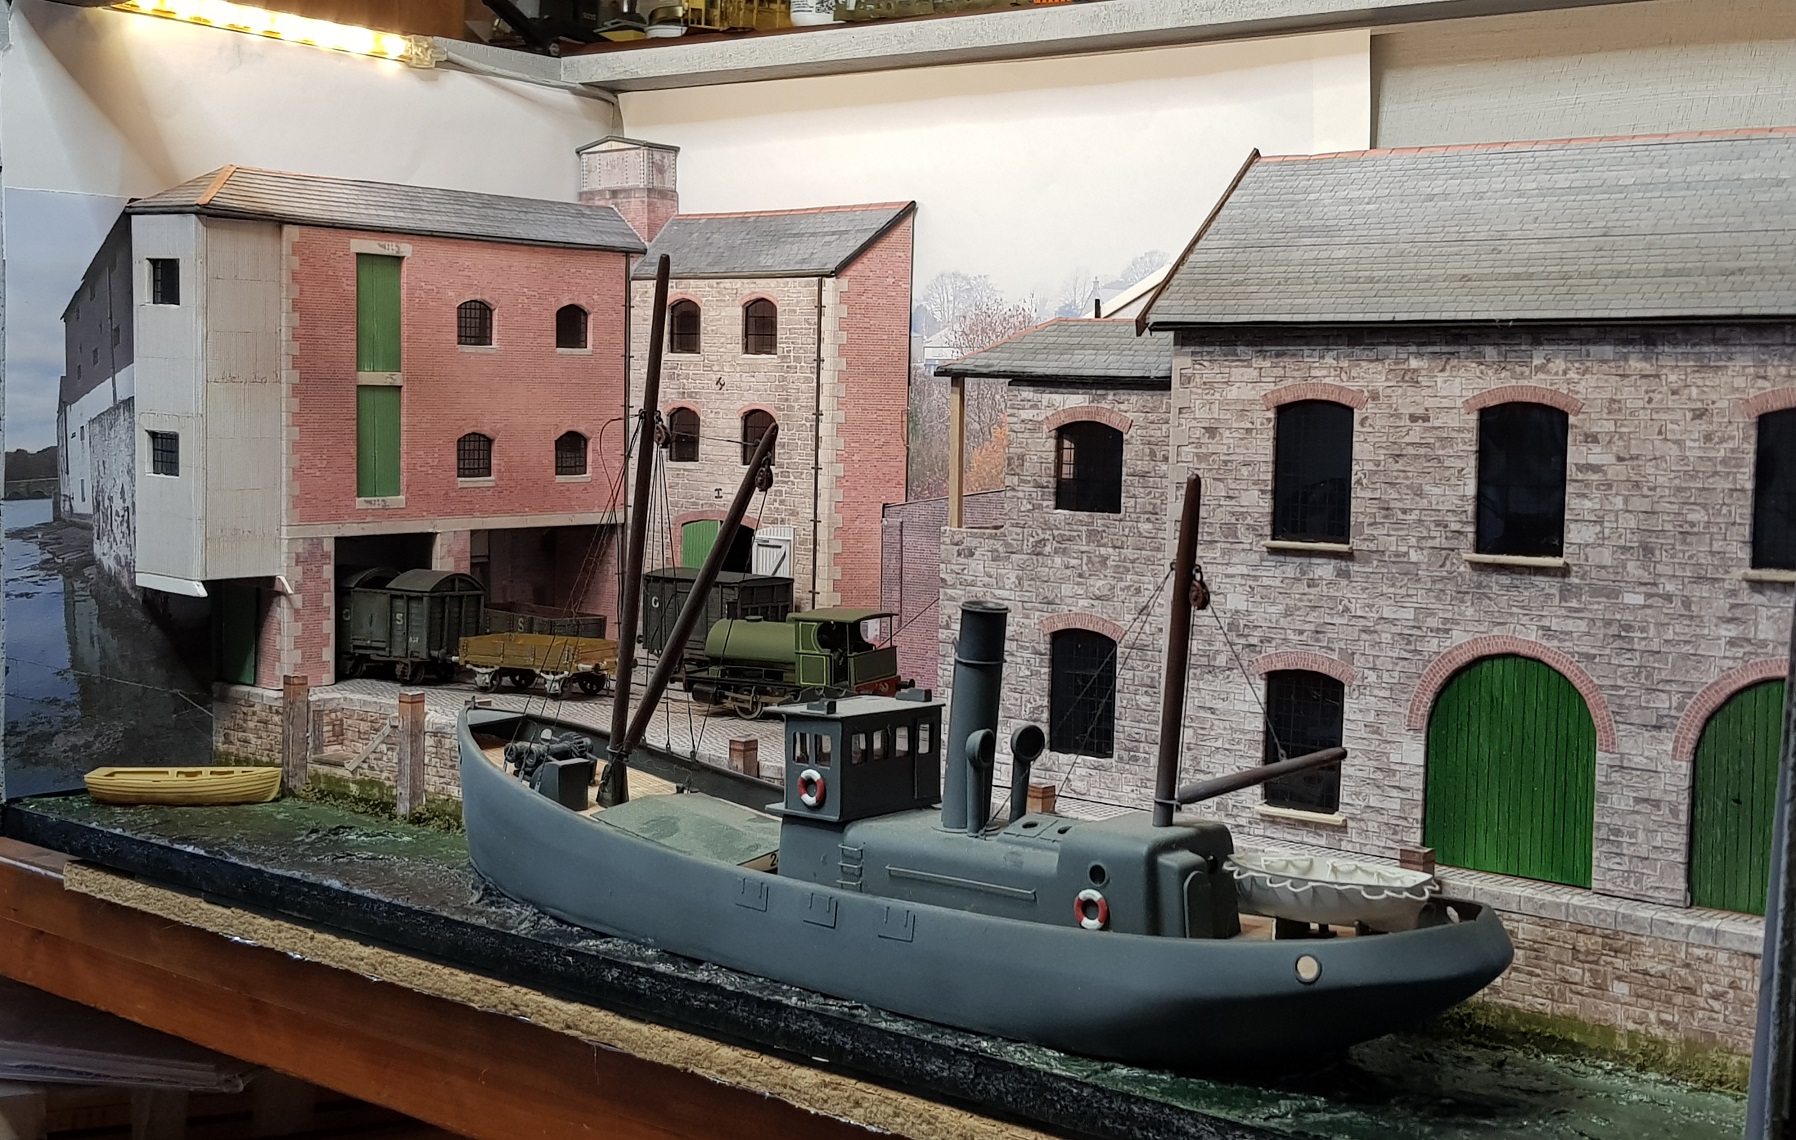
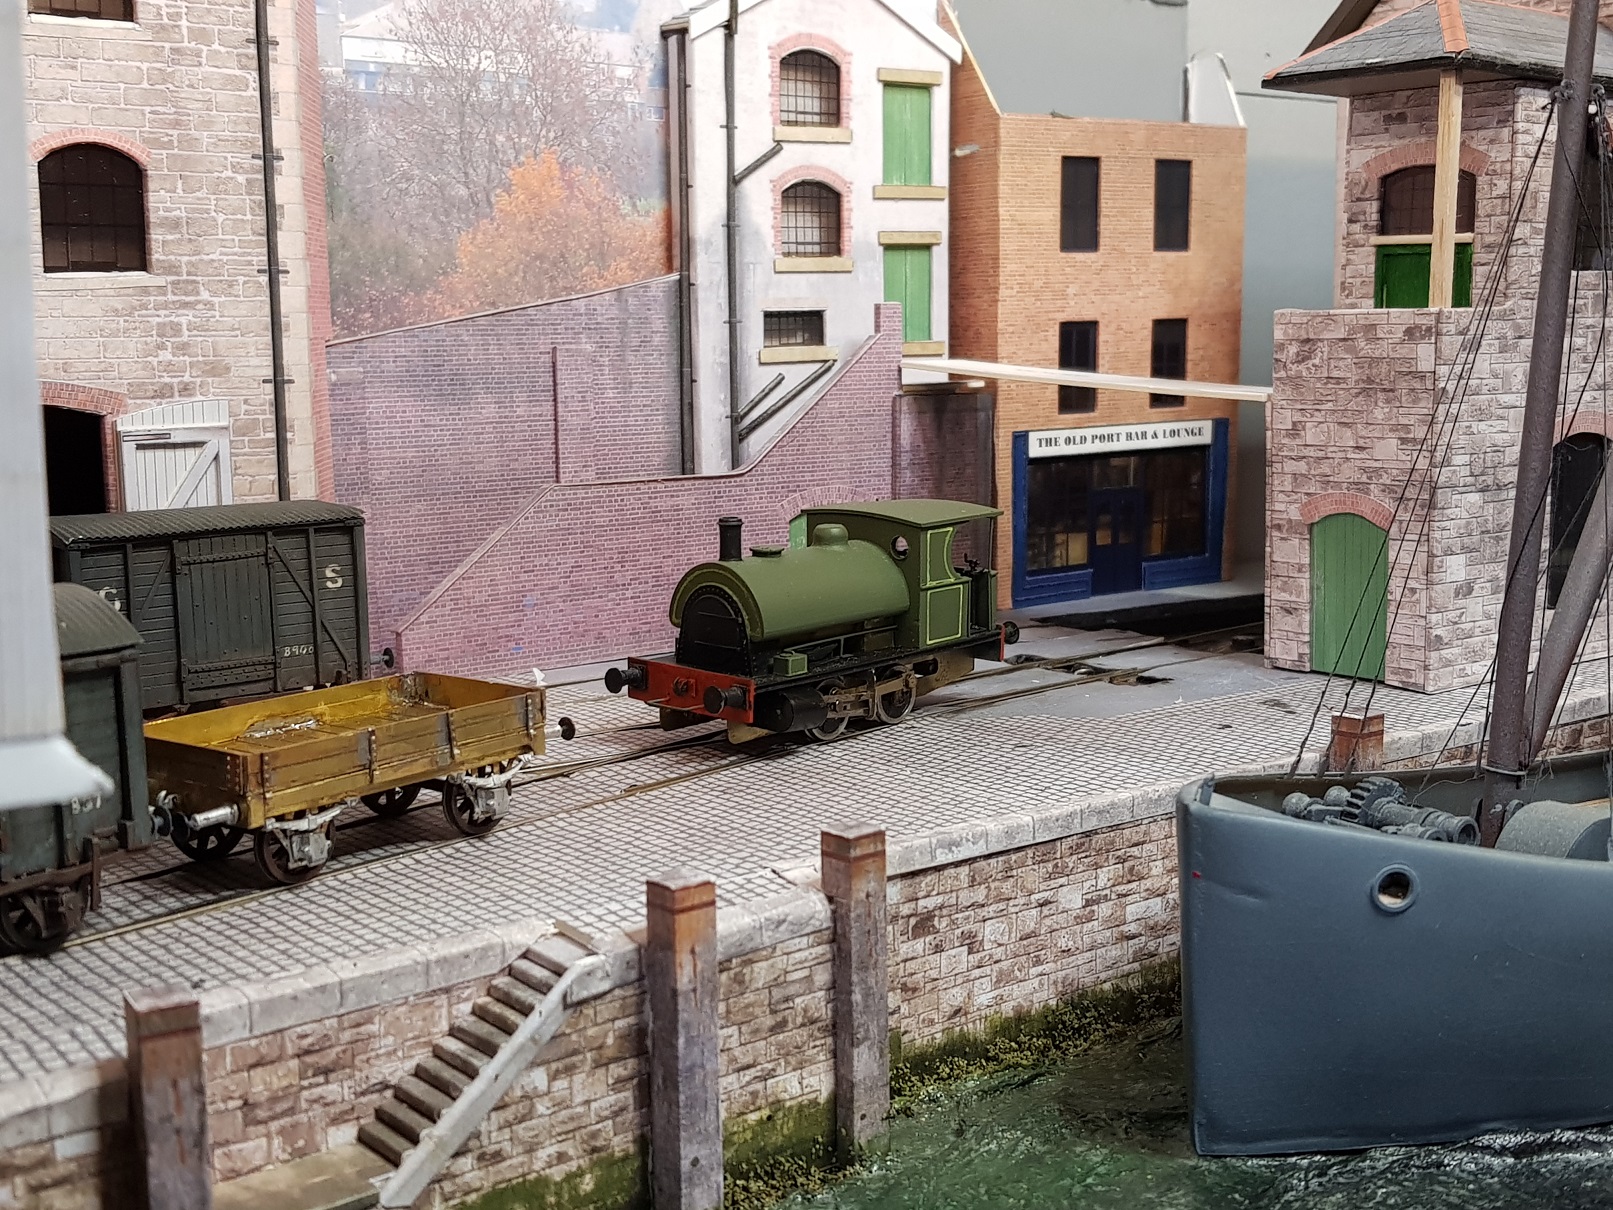
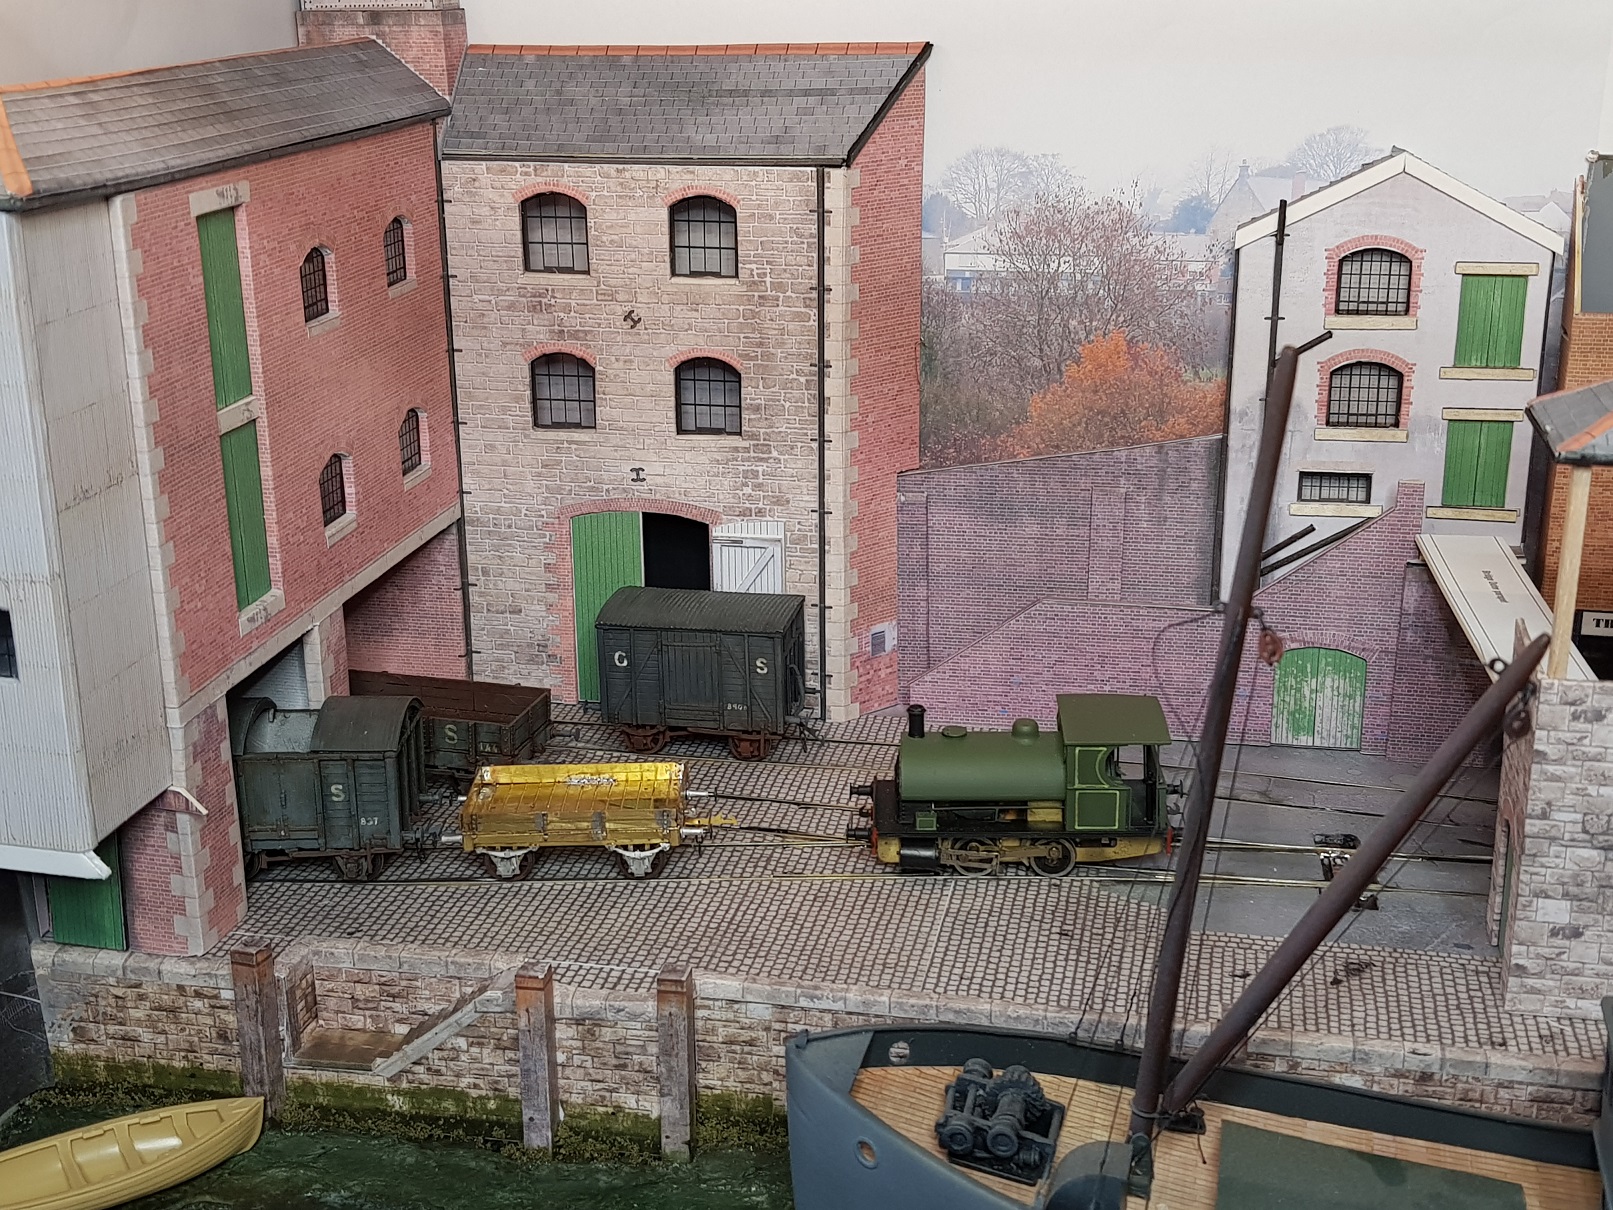
Finally got round to making the bridge work to tie the front and rear scenes together, along with some work to tidy up the bar builiding in the backscene. Sky scene needs to be completed to tie the various back and side scenes together, but I'm sure I will get to that in time. Some weathering will also help to blend the whole scene together. It will be on display (and operating) in Bray tomorrow at the fair, so if you're about why not drop by. Ken
- 71 replies
-
- 12
-
-
-

-
Now that I have a practically complete cabinet to work with, I decided to finish off the mineral wagons. The previous buffers were too long for the model, so I got some others from Dart Castings which are a little more prototypical. So buffers changed, brakes added I had one wagon complete. Rinse & repeat completed the second and now we have two DSER (ex Parnell Quarries) 7 ton mineral wagons ready for paint. Some painting and weathering needed to finish them off. Then perhaps a load in one, with the other empty? All for this post. Ken
- 379 replies
-
- 12
-
-
-
Now, now folks........form an orderly (and socially distacned) queue!
-
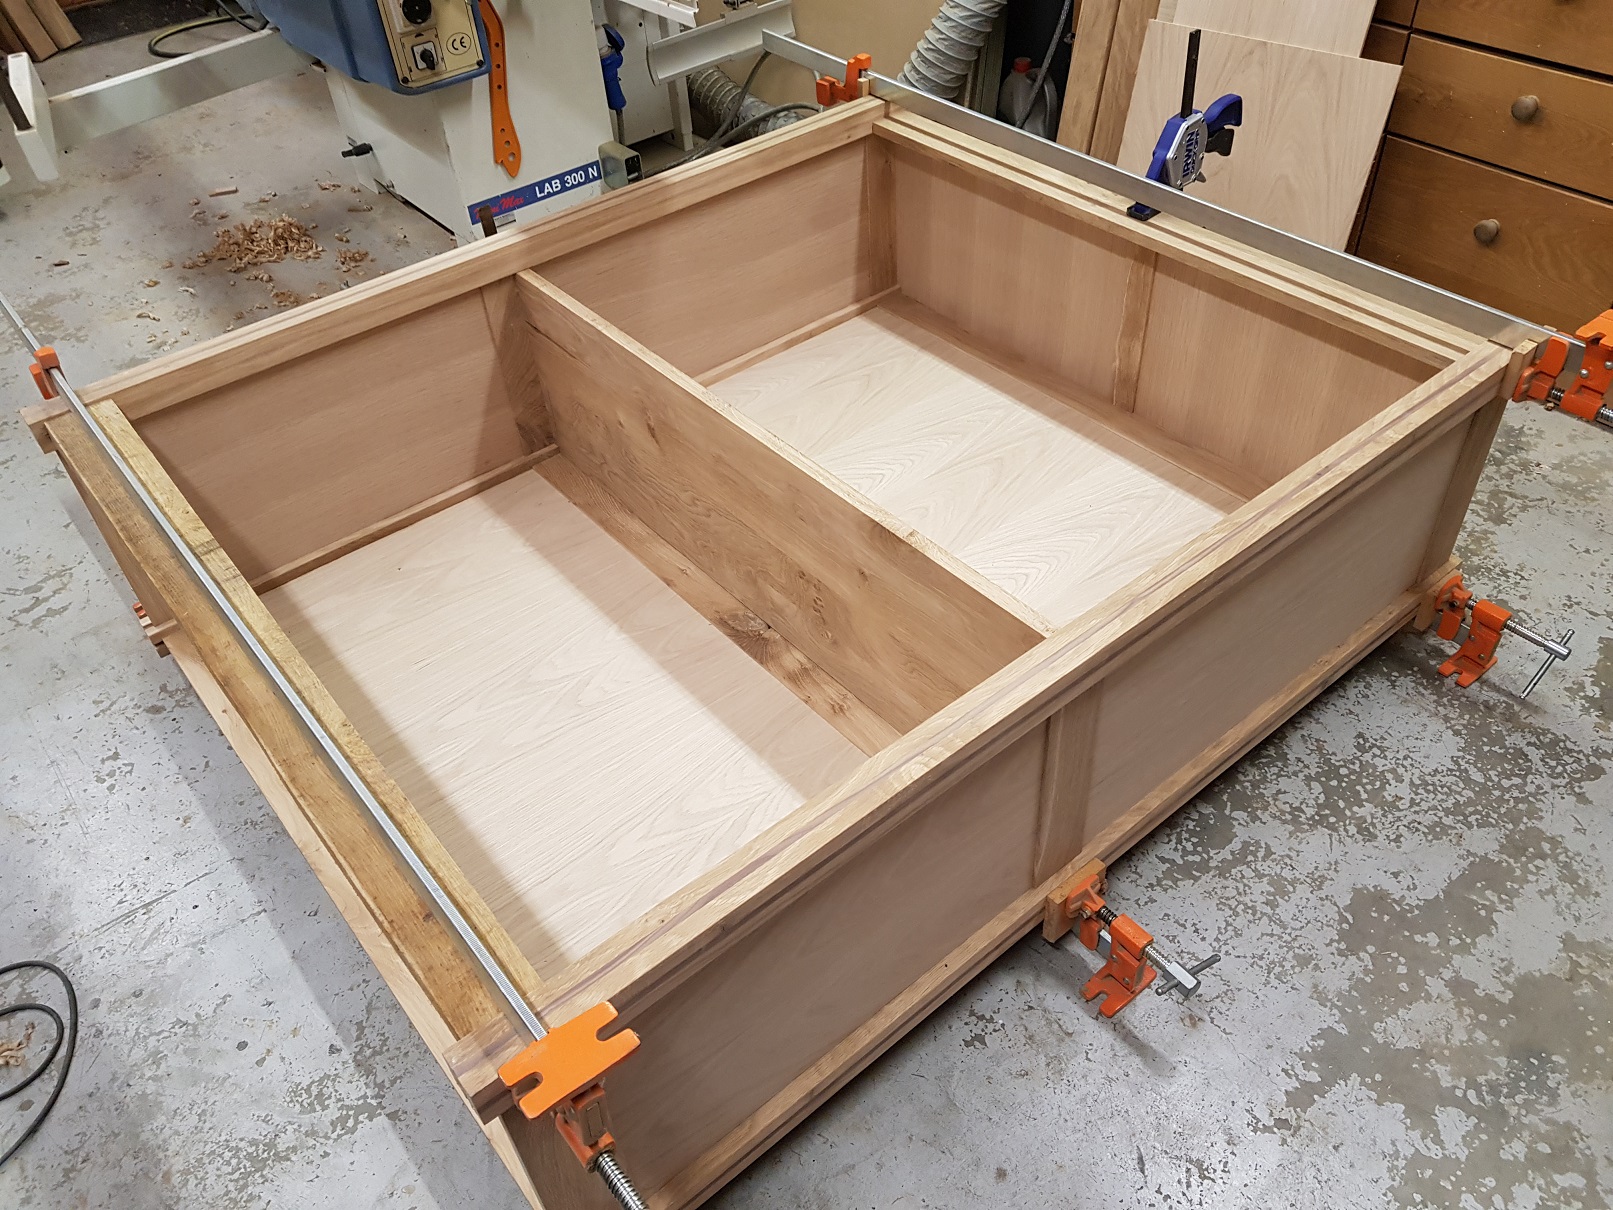
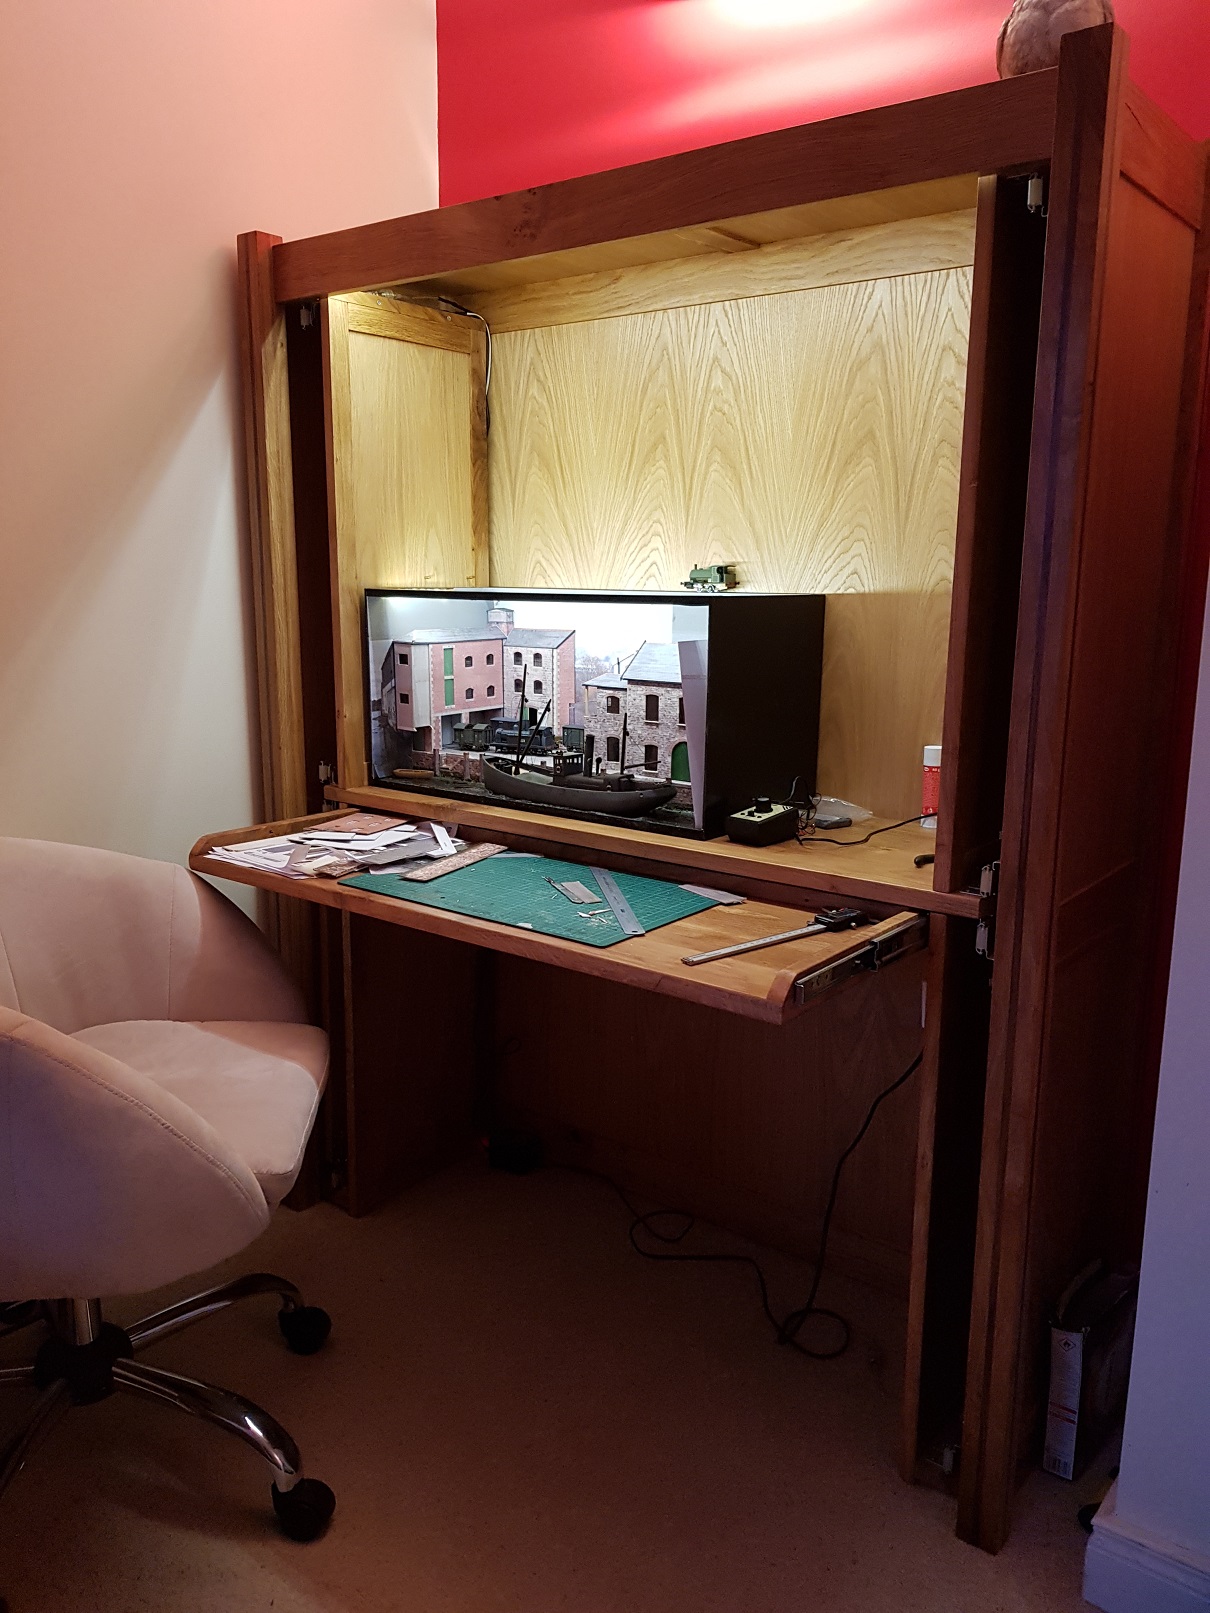
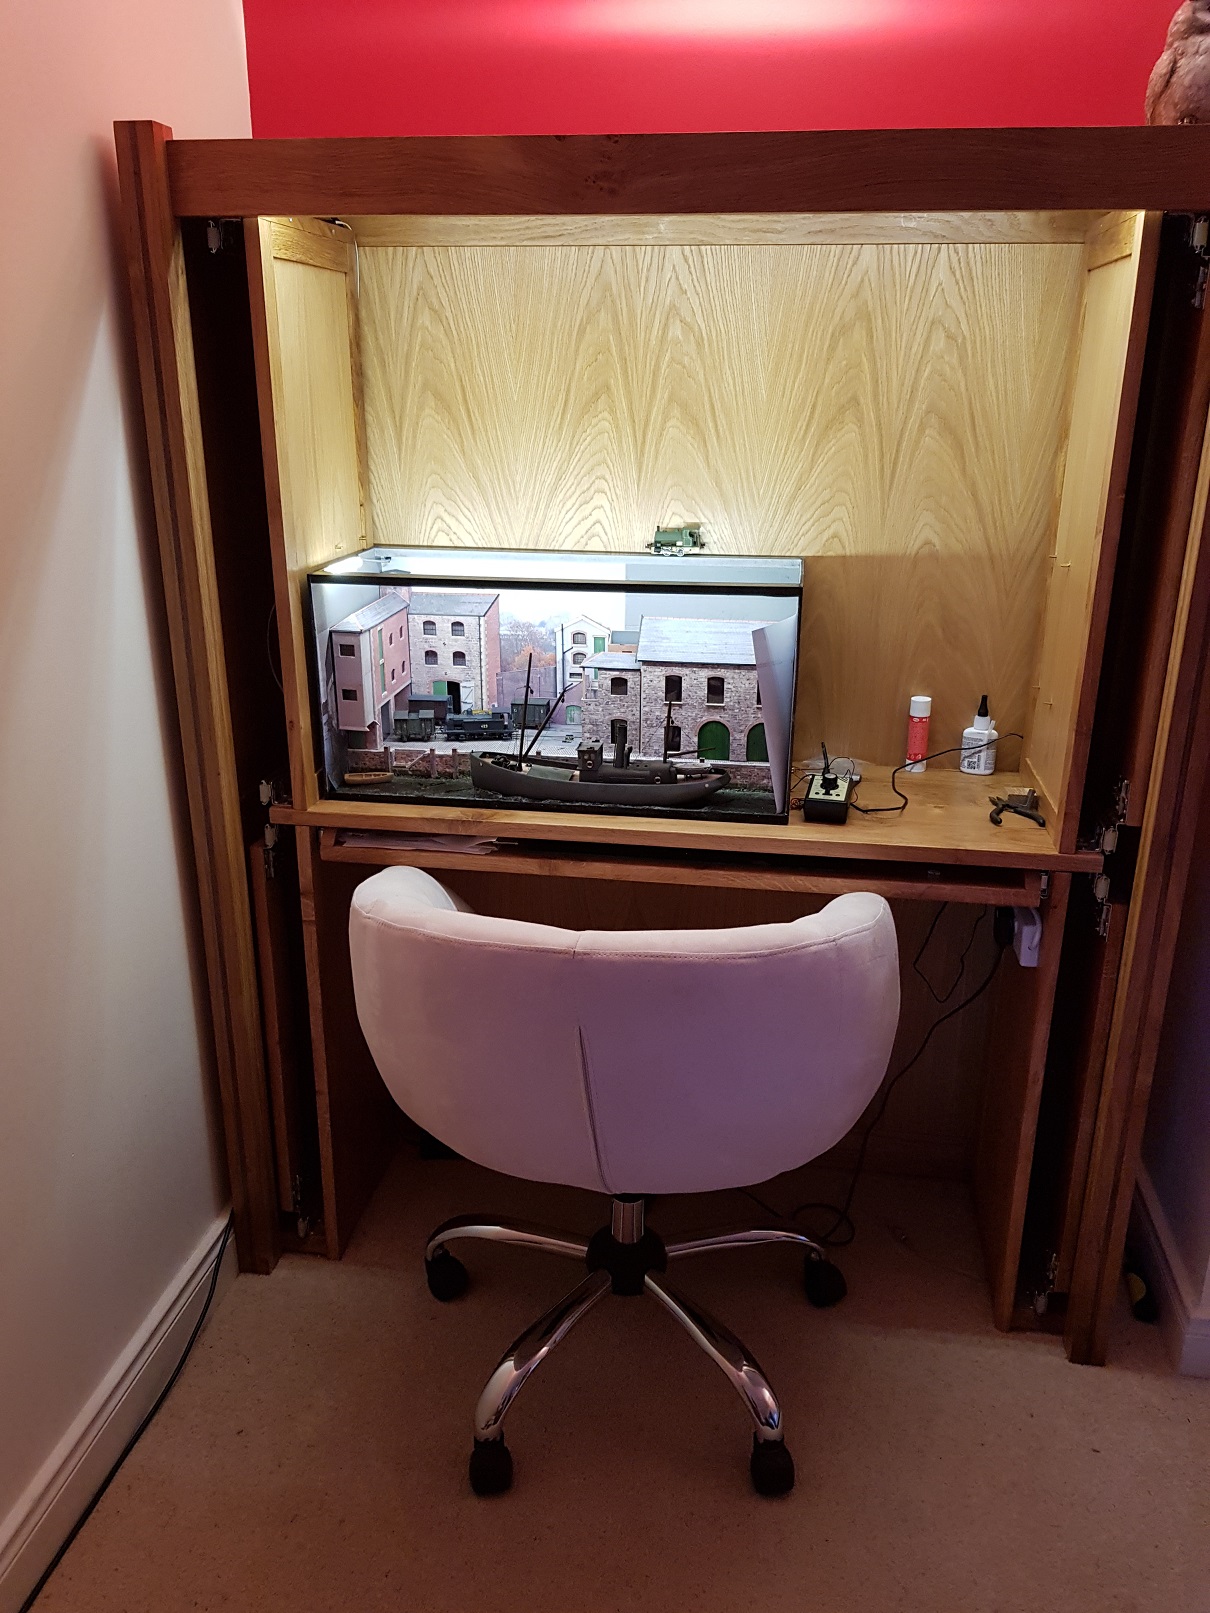
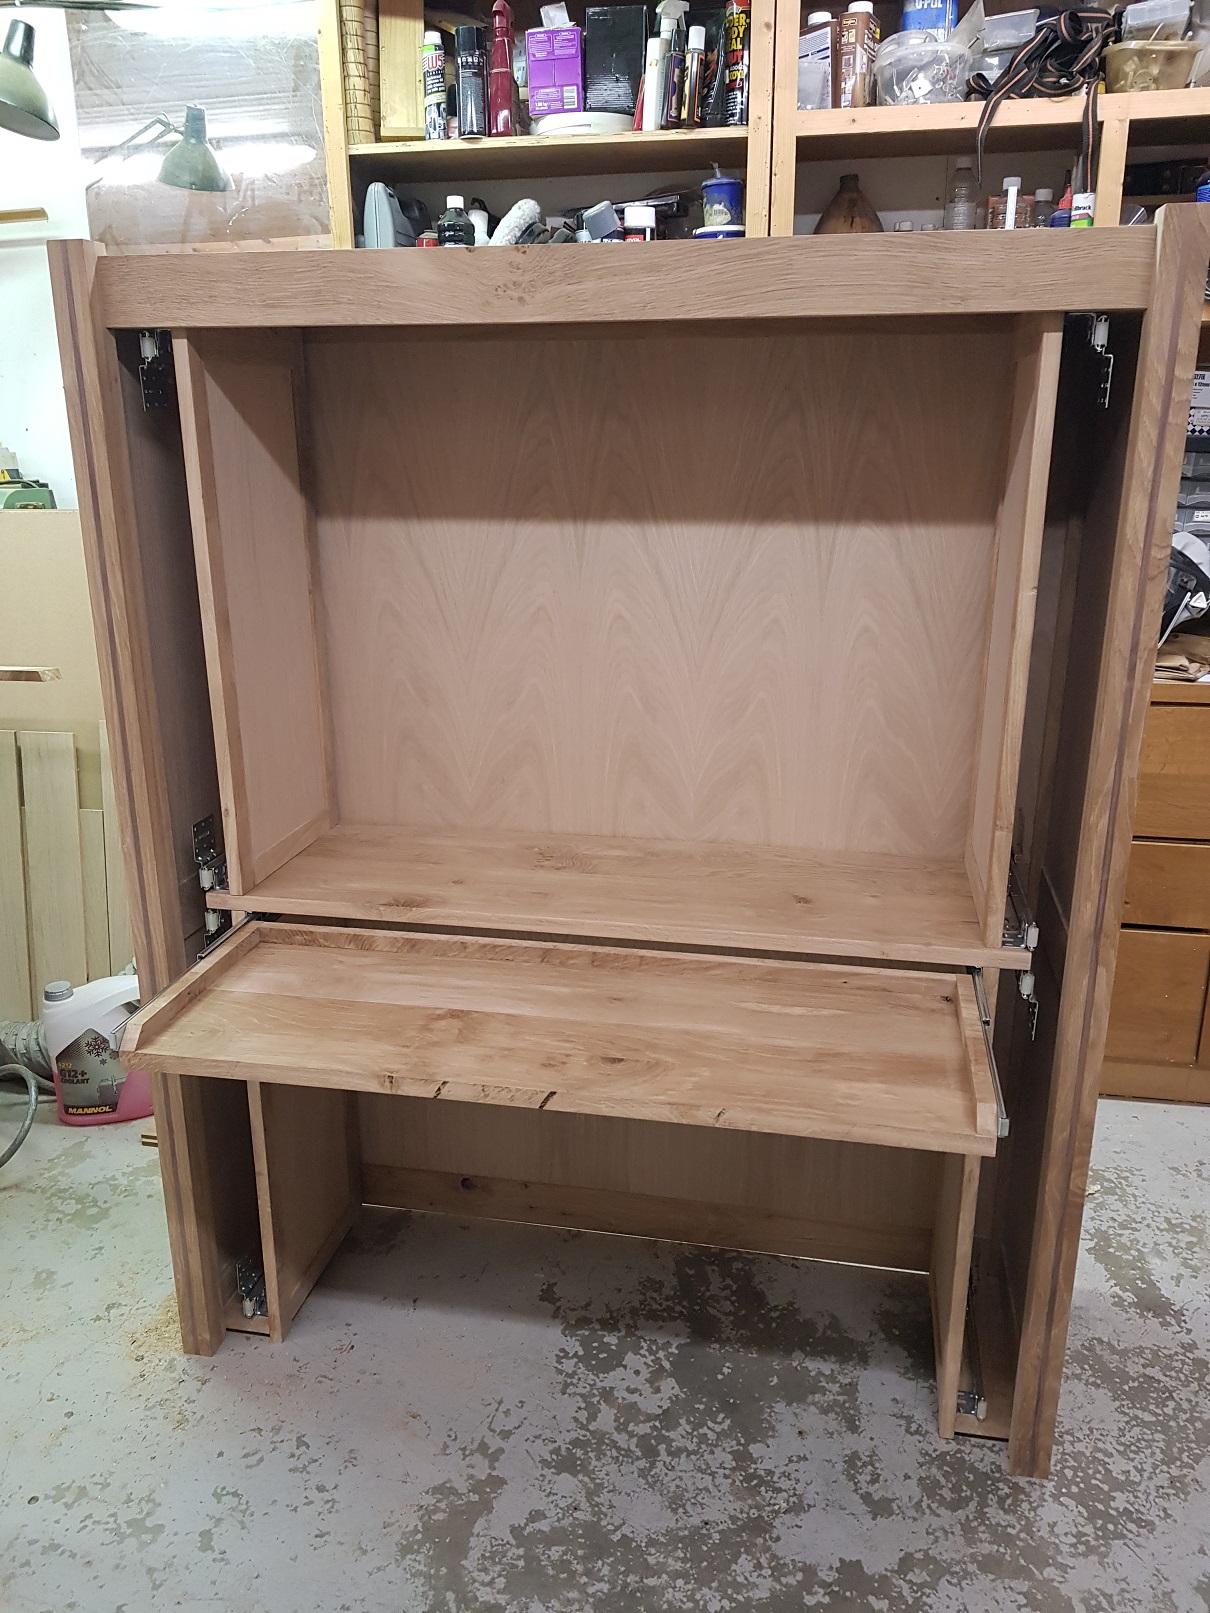
And now for something Completely Different Been busy with other projects! Another hobby of mine is cabinetry, and I decided to marry the two hobbies together. I find during the winter months I do not get much modelling work done as we light a fire in the living room every evening, and it is much more cosy there than going to to the other room, so i decided to fashion a modern version of the old writing bureau for the living room. The inention is to create a workspace that is shallow (fits into the alcove beside the fireplace) and can be closed away when not in use. At this stage I have got to a fuctional unit without doors as they will require considerable work to finsh. Unit is constructed of Oak (locally sourced) with Oak veneer inlaid panels (commercially sourced) with some Walnut stringing in the uprights for a little decoration. Uprights with Walnut stringing. Machined timber resting on the bench behind. Basic cabinet construction. The design of the cabinet is that it will have doors which open and slide back into the cabinet - the side pockets and hardware visible here. This is to help ensure the weight is not too far forward which may cause the cabinet to tip forward in use; the cabinet is only 400mm deep when closed. A drawer type table top pulls out and acts as the main worktop. Unit was finished in Danish oil and some strip LED lighting added for basic light. Functional unit without doors at this stage, as the doors will require considerable work. I have some very nice Oak Veneer which needs to be flattened & fixed to an MDF substrate before I can compelte the doors - I may get to that over the Christmas break. But for now, I can work in the living room with a cosy fire. So normal service will resume shortly!! Ken
- 379 replies
-
- 15
-
-
That's a fine looking model. Well done John. Are the dimples either side of the manway for for fitting handrails later? Ken
-
Thanks Broithe - should have looked there! Interesting, that size translates to c. 12mm in scale, however visually they look much bigger in comparison to the loco itself.
-
Quick one - does anyone know the wheelsize for the G601. Ordering some wheels & would like to include these (prior to the dreaded 1st January) Many thanks Ken
-
GSWR/GSR/CIE Six-Wheeled Coaches - ECMbuild in Gauge OO
KMCE replied to murrayec's topic in ECM Model Trains
Excellent stuff, as always Eoin. Glad you got to this as I have a few of these coaches to mke up & I was holding off until you posted more!!! -
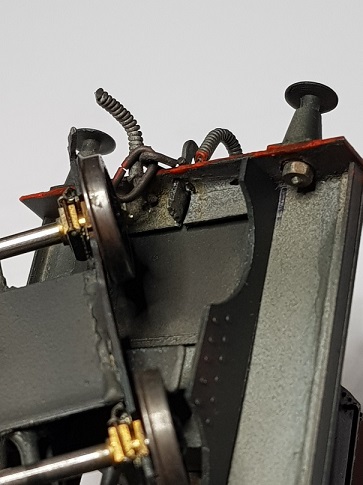
Looking excellent, David. I have been steering away from those raised footplate details for the reasons you allude to. The most tricky I will attempt at the moment are the steped footplate detail with the curve between the two. Think GSR 670 Class. Just a quick note on the tab type retainer for the front footplate. I like this arrangement, however on 458 I ran into a problem when adding the hook to the buffer beam - it was impeded by the tab holding the chassis which needed a slot cut to allow the hook through. Bit difficutl to explain, but hopefully the photos may explain better. Superb work, and a fine looking locomotive so far. Ken
-
Excellent work David. Very tidy soldering - looking good. Always nice to get a good rolling chassis - great milestone in loco building.
-
As Galteemore said, that's quite a bit of work. Vrey nice looking frames, and I'm very interested in the split frame idea. I have always made frames as a single unit to maintain strength, so I'll be watching this with interest. I note from your drawing, it appears the rasied frame under the smokebox is part of the front frame? I have tackled this in two ways in the past. For 458, frame extensions were added afterwards, which made for a large flat footplate to work with, whilst 670 was built with raised frames with infill pieces. Once things are complete it is very diffictult to tell the difference, howver I felt the work load on 670 was greater as it was necessary to install supports to carry the footplate at the correct height & level with each other. Doing it again, it would follow the flat footplate and faux frame extensions. Just my tw'pence worth. Looking good, and I'll be following this with interest. Ken
-
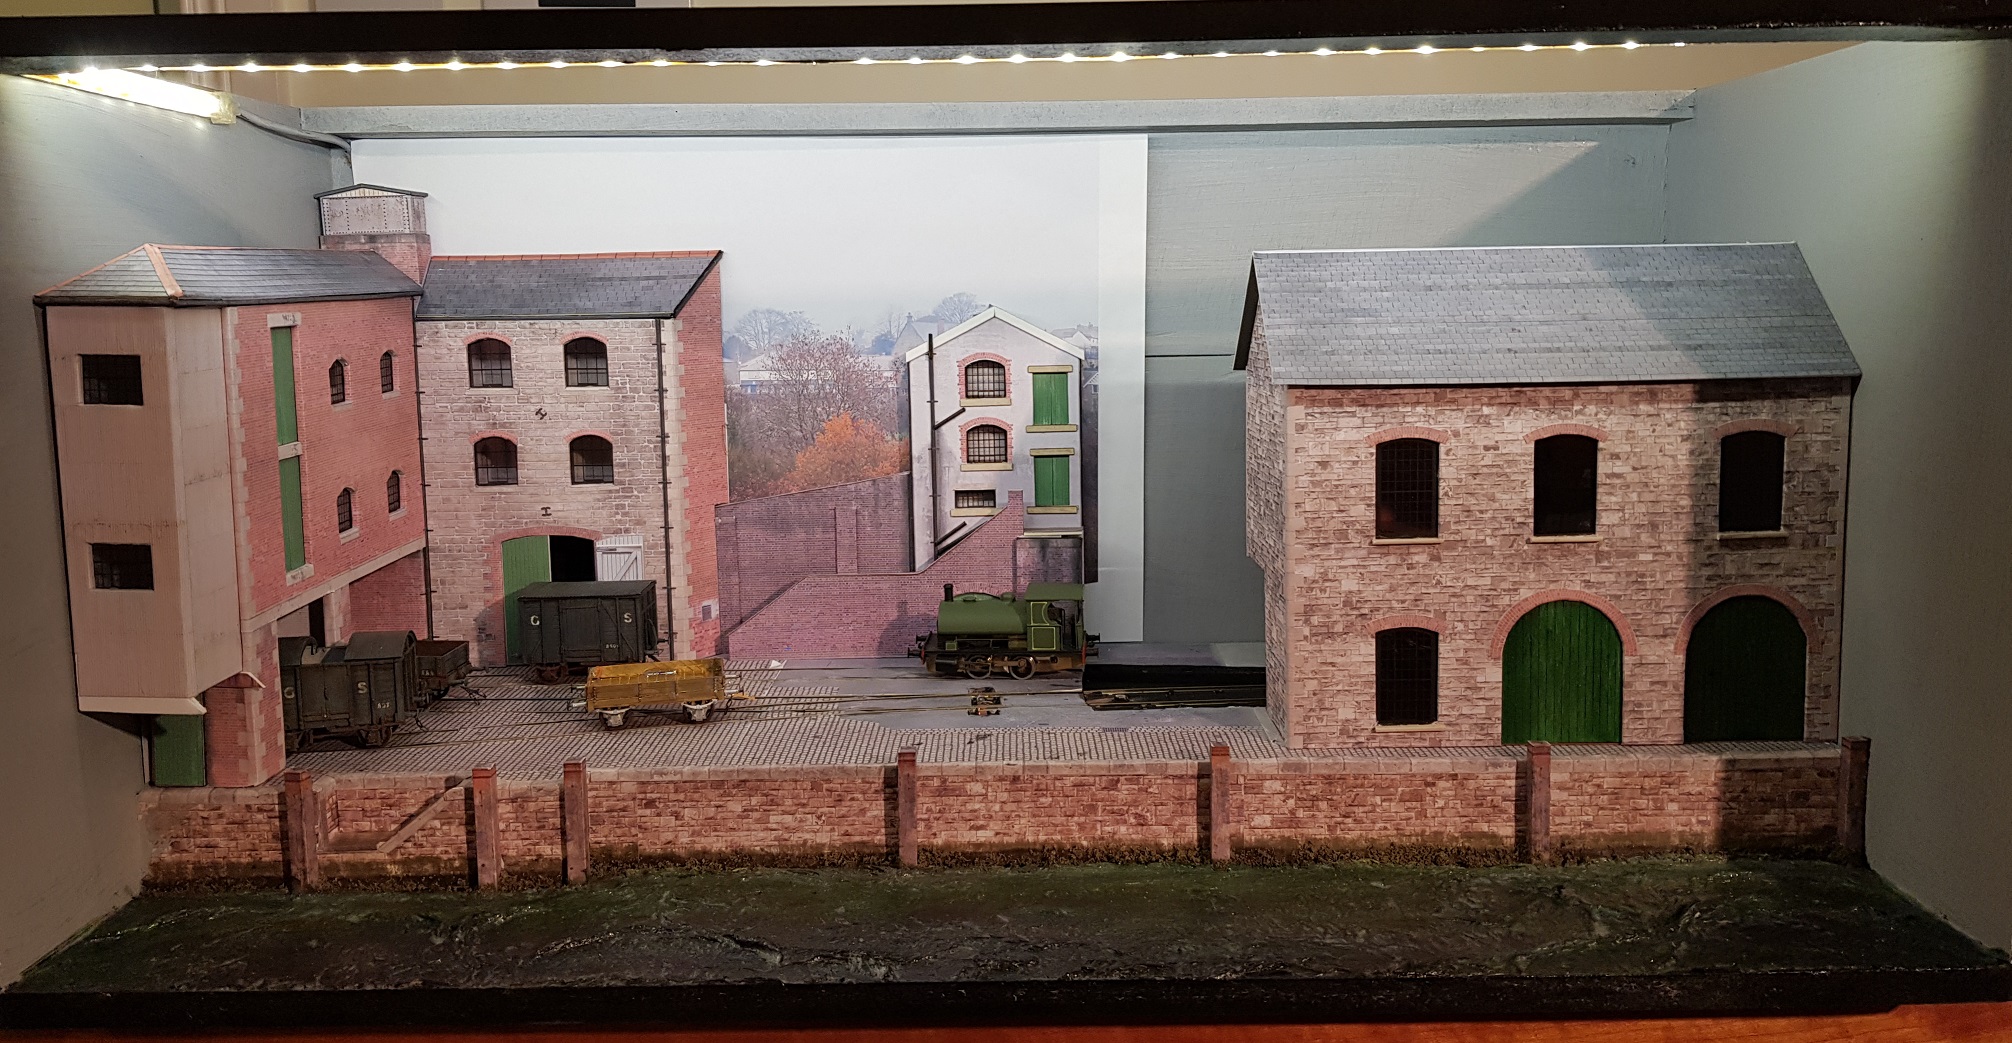
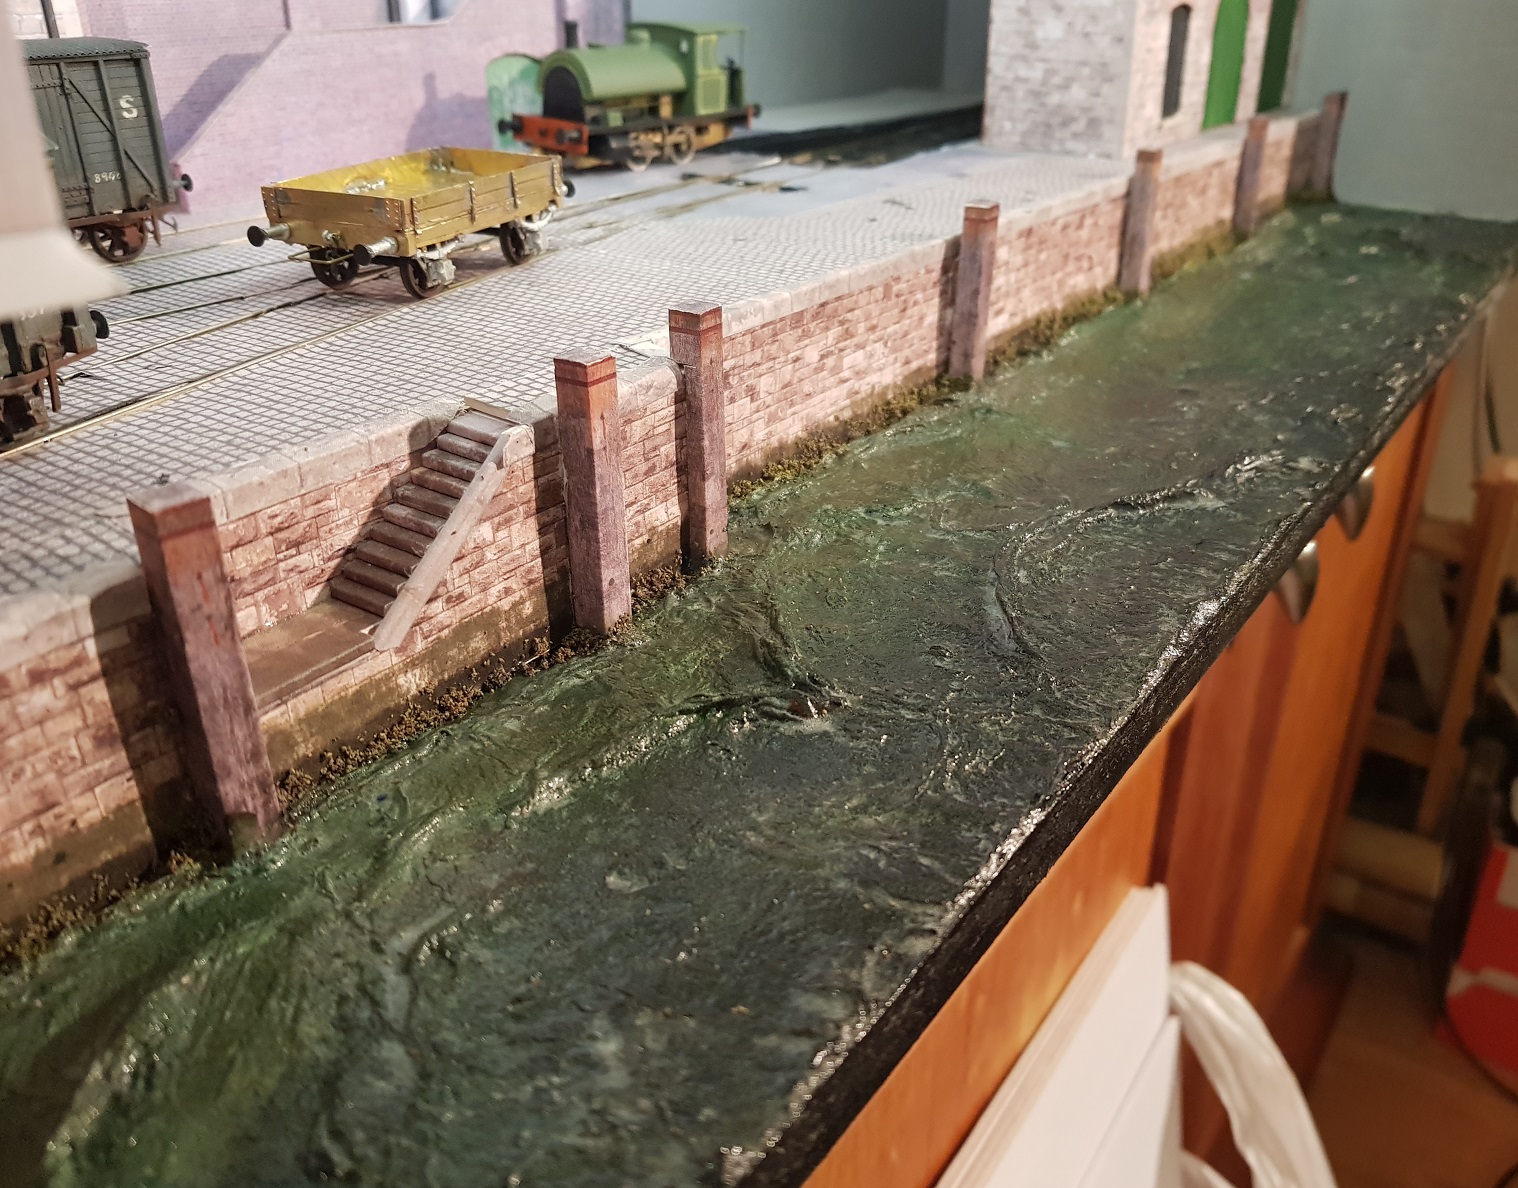
Little bit more progress. Some finishing touches to the front building & roof. Link building for bridge developed, however bridge is still to be completed. Started playing around with some backscenes to help set the layout in a larger secene. LHS is quite good, however RHS water is too smooth & the wrong colour, so may look at other photos to fill this in. Bridge will be much lighter that originally designed, so I thought I would re-purpose another building made before. I figured the guys would like to get a drink after work, so added the bar into the backscene, which hopefully closes out the backscene and helps to hide the sector plate. The sector plate & well will need repainting in light grey to blend in with the scene. Photo of the loco & rolling stock - kinda why we are here! A bit more work needed, but it's coming together rather nicely. Some weathering will help to plant everything in the scene and tone down the "newness" will help. Anon. Ken
- 71 replies
-
- 13
-
-
-
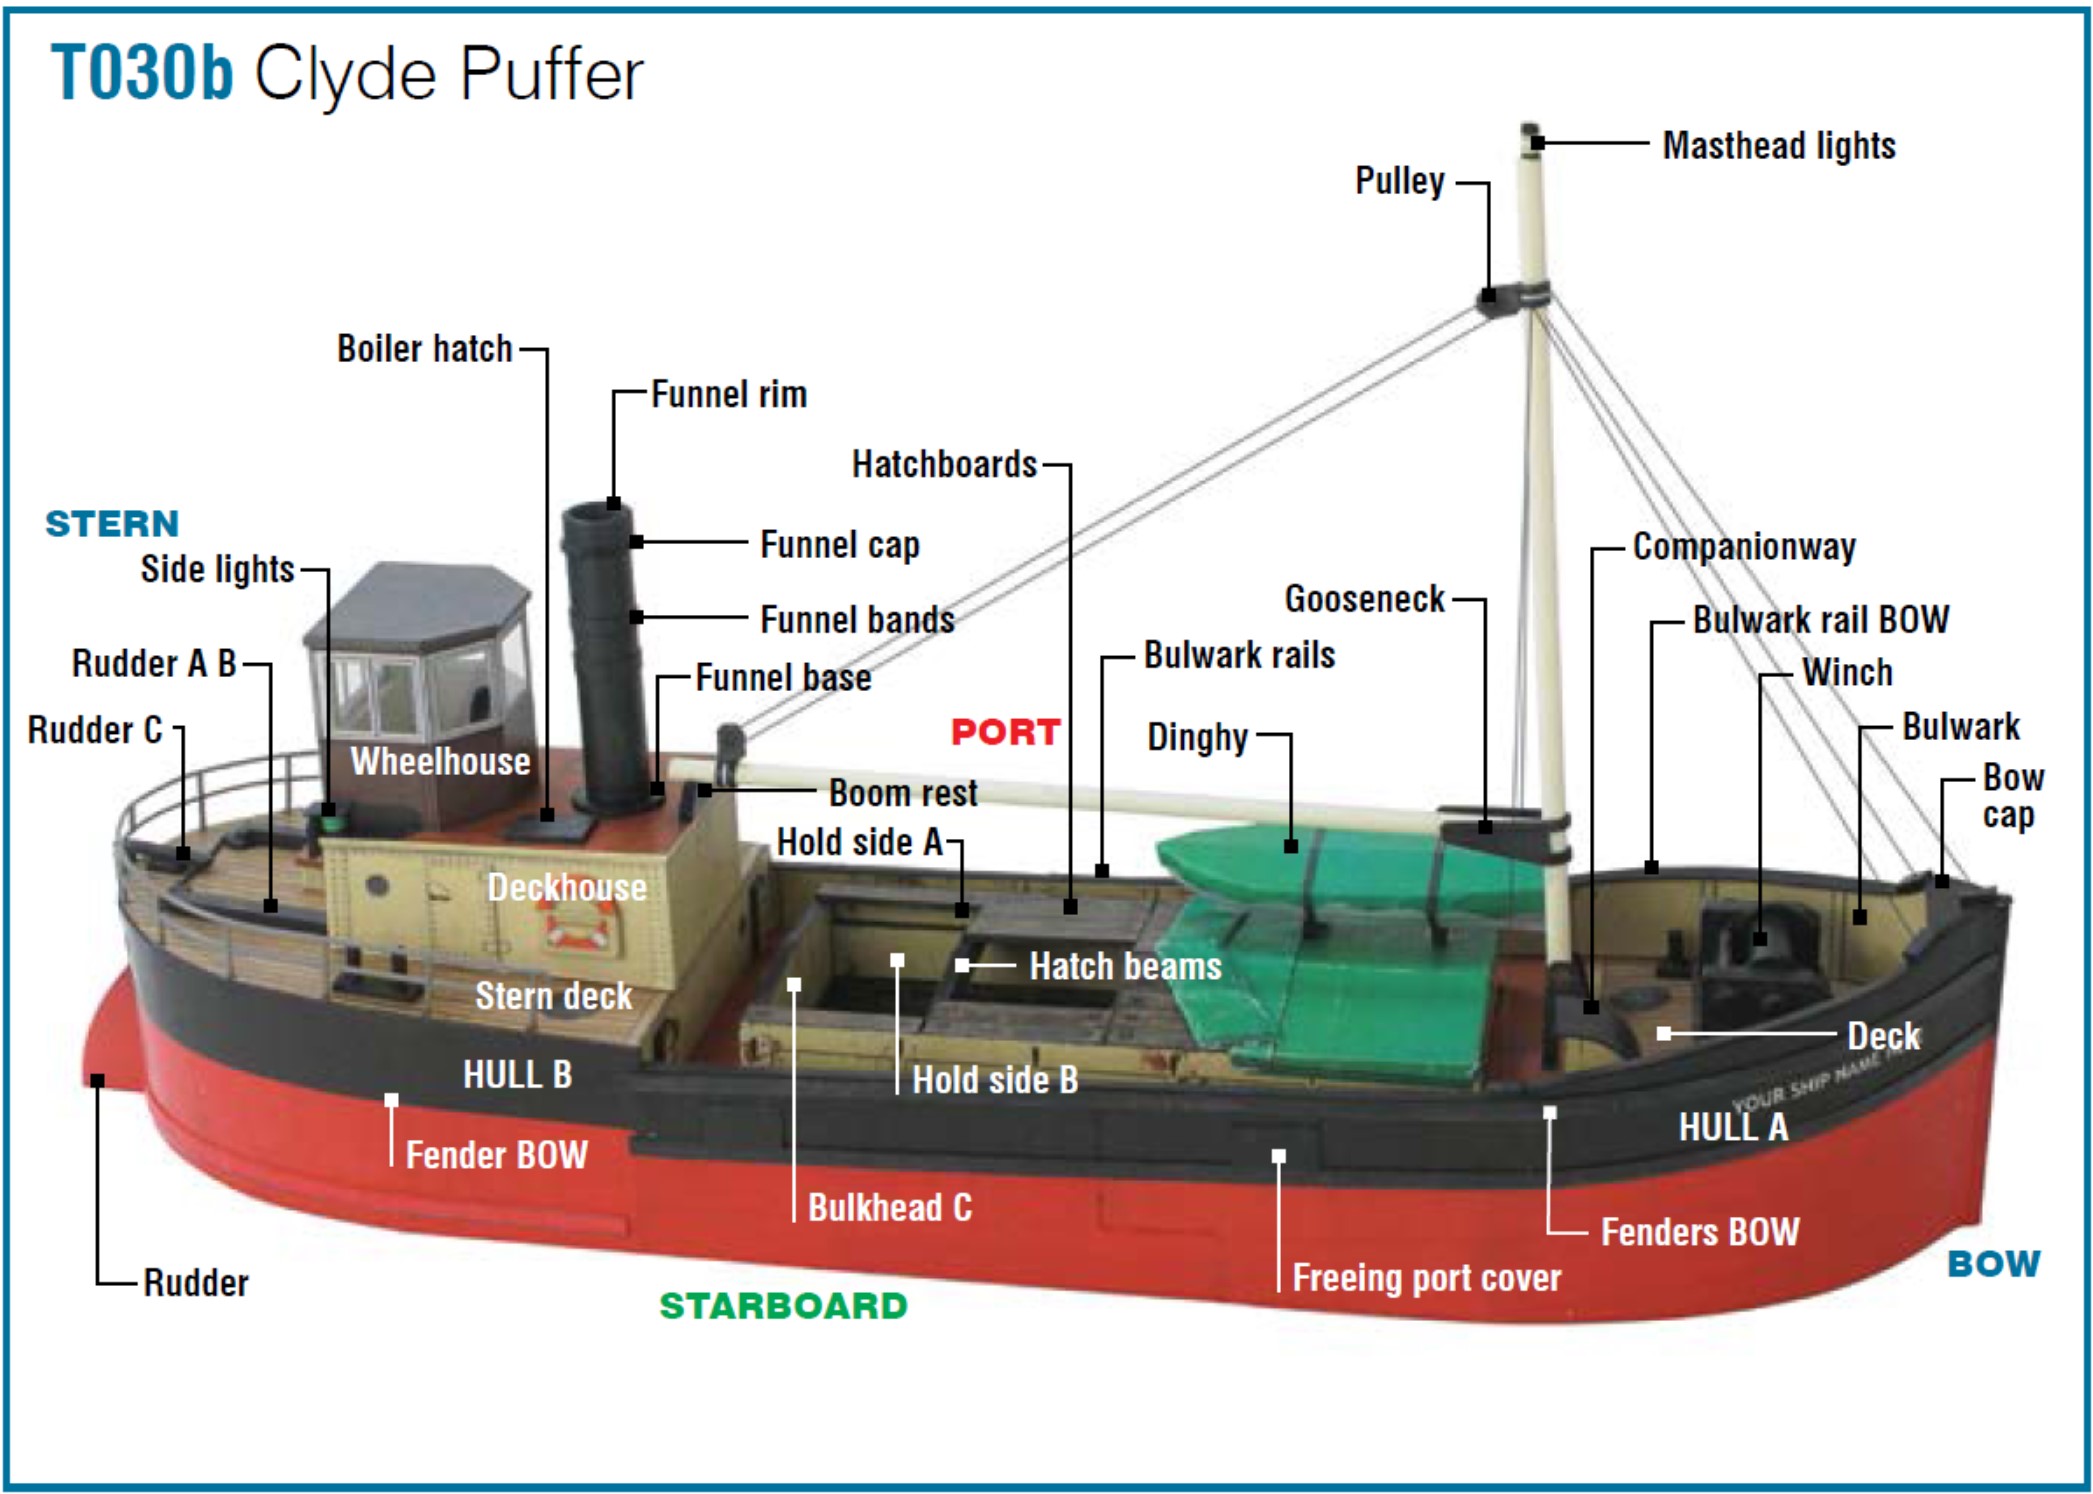
Puffers did make an occasional foray over to Ireland, and from recollection there is the remains of one over the Glaway direction. I had intended making a model of one, however I was gifted the drifter instead. It suits my purposes as a drifter was used as a supply ship for the Irish Navy in the 40's, (MV Shark) hence why it is making an appearance on Port Bréige. Scalescenes do a model of the Puffer which is quite detailed and would work for a static waterline model. It is in 4mm, however with judicious use of scaling on a printer, it may be possible in 7mm? If you want to go scratch build, I have a set of plans which may be of help. Ken
-
As mentioned in the Port Bréige post, I needed some additional rolling stock for the port, so a quick and easy wagon would be an open, and one I was planning on making was the DSER 7 Ton mineral wagon. These were ex-private wagons bought (or rather sold by Parnell Quariesy) when the work dried up. 12 in total made it through to DSER, GSR nad on to CIE, so quite long lived. Photo courtsey of Shepherd & Beesley book on DSER. Drawing drafted up in CAD and cut files prepared. Cut, grooved and drilled two sets of frets on the mill to allow me make two. A minor error emerged as the original intent was for the outer boards to sit directly on ths side of the flloor, however not allowing for metal thickness meant I had to break the side to install the boards above & below the floor. This is visible in the prototype photo, so maybe this worked out in the end. Some riveting and straps added to provide some detail and we get: Brakes to be added, rinse & repeat for the second and then off to the paint shop. These will be a nice addition to the fleet and given they are quite short will work nicely with the port. I may make a tarpaulin cover for one to differentiate them as part of the shunting puzzle. Futher updates as progress permits. Ken
- 379 replies
-
- 12
-
-
Some progress to report. LHS building is virtually complete, some snags to complete, but starting to look well. Re-purposed building got a face lift with new covering and red brick arches to blend in with the rest of the scene. The high roof will help to hide the back area over the sector plate. Another small building will be needed to tie the front scene to the rear using the bridge as a view block. Sea effect got some paint and a first coat of varnish - many more to go!! Bit more gloss over the paint should add some depth to the water and add a sparkle. Also - first outing for some new rolling stock. In this case a DSER 7 Ton mineral wagon. Not complete yet and I'll provide more info on the workbench. All for now. Ken
-
That's a level of sagacity that must be admired, and in your case, appreciated! Looking good there.
-
The photos were superb - this brings it to a whole new level. Fantastic!