Noel
-
Posts
7,478 -
Joined
-
Last visited
-
Days Won
149
Content Type
Profiles
Forums
Events
Gallery
Blogs
Store
Community Map
Everything posted by Noel
-
Wishing our model railway friends a very happy and special Easter. Noel "God didn't go to all the trouble of sending his Son merely to point an accusing finger, telling the world how bad it was. He came to help, to put the world right again." John 3:17 (Msg)
-

Photographic Website Updates
Noel replied to thewanderer's topic in Photos & Videos of the Prototype
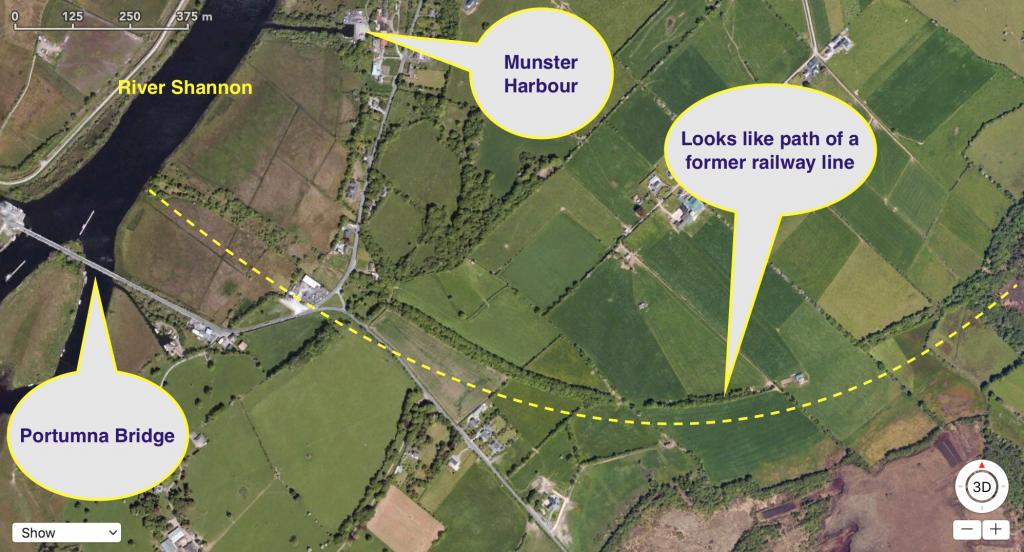
Excellent research and photos. Did the line cross the Shannon at Portumna or terminate on the east bank? Doesn't look like it from Sat images, but if yes, did it cross the Shannon using the current iconic road bridge which looks more like railway engineering than a road structure? There is an old disused commercial harbour on the east bank just 350m north of the current road bridge (i.e. Munster Harbour) which may have connected the railway with commercial Shannon traffic. Waterways Ireland now use it as a storage depot for hardware, buoys, pontoons, etc.
-
Nice job so far. Are you using solder or superglue? Is the Dapol chassis 9ft, 10ft or 11ft? I will probably run the imminent delivery of IRMs as 'dolomite' wagons instead of ballasts, so won't need plough vans. Yellow didn't seem to be around in the B&T 60s and early 70s era.
-
Superb. They look really impressive especially considering they are N gauge. Well done Eoin.
-
Steam trains at speed
-
Seems a bit like reinventing the wheel! It probably cost him more in time than buying one retail, but I suppose fun for folks into that sort of thing. China is the new economic super power, and as Fr Ted would say, "they are a great bunch of lads", sure they even make toy choo-choos
-
+1 Wishing Seamus well, comfort during medical care and a good outcome. Noel
-
Truly impressive. I take my hat off to folks who can make fabulous precision models out of brass like this.
-
I thought ballast wagons could be rough shunted.
-
Yes with 4 ballasts packs paid for and a 10% voucher in each pack, thats a generous 40% discount on a rake of tara's I think not, but appreciate the 10%.
-
Hi Guys Is IRM going to the Wexford exhibition (WMRC)? And if yes is there any slight possibility you may have some boxed production samples or even stock of the Ballasts there? Thanks, Noel
-
Photographic Website Updates
Noel replied to thewanderer's topic in Photos & Videos of the Prototype
Fabulous photos of the rail tour and especially the RPSI cravens. Great lighting. So much so you are really tempting me to try and re-paint one of my modern era tippex cravens into that lovely blue/cream livery. The freight grey 071's look fabulous in that livery. -
Wexford Model Railway Club Easter Exhibition 2017
Noel replied to Irishrailwayman's topic in What's On?
Really looking forward to this exhibition. I've heard many positive things about it and the quality of layouts it attracts. -
Only found this old post tonight as I was trawling old threads. An absolutely stunning example of scratch building using plastic card, detailing, and then finishing off with a precise painting and weathering finish. Sublime and inspiring as to what can be done. Clickey for page 1
-
Thanks Railer. I presume modern locos like 201 class have cab voice and track data recorders much CVR and FDR used in commercial aircraft (orange boxes btw not black), but did any such equipment get retro fitted to older loco classes here? Noel
-
Interesting. Is there an operational or safety reason for this (e.g. weight restrictions, driver training, equipment, etc)? Was that because drivers may not have been trained or familiar handling 6400 hp on acceleration?
-
Ok, thanks for explaining. I vaguely remember hearing some funny story about 201s doing multiple working on a trip some years ago.
-
Sounds an interesting curiosity. Please forgive the question, but why are two 071's required? I thought 071's did not double-head under power during their operating lives, only when one had broken down and was being towed, or the transfer of a loco. Are 071's setup for dual control? Presume one has enough HP to haul 8 coaches on that route.
-
Agree, it is excellent. Reeks of real atmosphere. Superb job on the rolling stock.
-
Thank God the entire modelling community has long been waiting for a top quality RTR model of the popular A class The gaping hole on the superb MM product line. The "Dalek" is a very nice looking model though.
-
Model engineering master class
-
Photographic Website Updates
Noel replied to thewanderer's topic in Photos & Videos of the Prototype
Nice photos as ever. My hint of OCD for colour matching, patterns and symmetry balks at the sight of mixed and incompatible liveries (i.e. 207 hauling intercity) -
Hi Tony. Your welcome. I've just added a few extra pics in the post above showing before and after. I used Peco code 100 track. However, I bought our track 23 years ago when much RTR stock still had pizza cutter wheel flanges so would not run over code 75 track, but if I was starting off again today I would have gone with code 75 because modern RTR stock for at least the past 15-20 years has wheel flanges that will run over code 75 track. The lower level inner branch line loop which has not yet been laid will be code 75. Noel
-
Hi Tony Two pics below of woodlands before and after the airbrush was used to weather and blend the ballast, rail and sleepers. As you can see, before looks hideous and toy like, but the after looks dulled and less contrast. Air brushed using railmatch sleeper grime thinned 50% with acrylic thinners. It might also save you having to hand paint the rail sides as a separate step. Before After Hope this helps. This is a pic (below) of the ballast still wet just after I had applied the water PVA glue mix to it using an eye dropper. I first gently sprayed tap water on the dry ballast after it had been positioned, to wet it so PVA mix would flow through it, and then used an eye dropper to apply PVA/water mix (50/50%) (few drops of fairy liquid in mix) and allowed it to dry for 24hr before painting. You can see from pic below its fairly wet but when PVA/water has dried it is clear with no visible PVA.
-
Hi Tony It should look a lot better when its weathered in. In the sample below I used Woodland scenics 'buff' coloured 'medium' ballast which looked hideous straight out of the container, but after it had been weathered with a single spray of 'sleeper' grime, which btw painted the rails sides, sleepers and ballast in one go, it looked a lot better (see below). The 'buff' like the 'grey' is very bright straight out of the container and contrasts too much with the plastic sleepers, but the overspray of sleeper grime on top of the lot blends it all together. I will try and dig out a photo where I used 'grey' medium ballast. Woodland scenics medium buff ballast after the ballast, sleepers and rails over sprayed once with RailMatch sleeper grime. The overspray does a lot to blend the whole lot together removing stark contrasts. The track in the pic above in on a 3mm track bed which would be suitable out in the country side to create a shoulder, but in the environs of railway stations not needed as it would all have been fairly flat (i.e. like photos of Omagh North). Perhaps make the ballast area just a little wider than the track in your photo. In my case I did not pre-paint the track work, nor rails, I just over sprayed the lot in one go once the ballast/pva/water mix had dried. Before the overspray the buff looked ridiculously bright compared to the unpainted sleepers. TIP - How I removed paint from rail surface: After over spraying the track, ballast and rails with sleeper grime (50% thinned), while it was still wet, I used my index finger tightly wrapped with a small piece of kitchen paper to run along the top of the rail and removed most of the paint just from the top of the rail, being careful not to come into contact with the top of the rail sides, sleepers nor ballast. Than about an hour or two later before the acrylic paint had cured, but was touch dry I used a cotton bud just dampened with methylated spirits to run along the top of the rail to remove any residual paint. It comes off much easier at this early stage before it has had time to fully cure.