David Holman
-
Posts
4,338 -
Joined
-
Last visited
-
Days Won
117
Content Type
Profiles
Forums
Events
Gallery
Blogs
Store
Community Map
Everything posted by David Holman
-
Nice one. Guessed this might be the usual practice in many places. However, given coal was a somewhat less available commodity than on mainland Britain, it must have been tempting for locals to pilfer a lumps from time to time. There is a lovely story about Maggie Coulter's goat on the Clogher Valley. It used to stand in the track and only moved when the crew pelted it with lumps of coal. As a result it was said 'she never lacked for a heart for her fire'. Been trying to find a goat for Fintonagh, but no luck so far...
-
£415!!!!! Who are they trying to kid?
-
The horsebox is rather nice too.
-
There speaks the voice of experience, methinks!
-
Good stuff, though hope your copy is less smelly than mine. Must have been kept somewhere damp and it smells decidedly mouldy, even though the paper is actually ok. Hopefully news of C class literature comes through, its one I'd happily do in 7mm scale - when I find the time, of course...
-
Excellent! Particularly like the overall concept - big pile of coal on the ground, presumably shoved straight out of the wagon door, then with the neat rows of baskets making it easier to load up the tender/bunker. Many thanks.
-
Would like to add a coaling facility to Belmullet's single road loco shed. What are the prototype options? Presumably, a wagon of loco coal on a parallel track is the simplest, though am thinking a small, sleeper built and maybe covered stage would make a nice scenic feature. Probably got a picture somewhere, but nothing springs to mind.
-
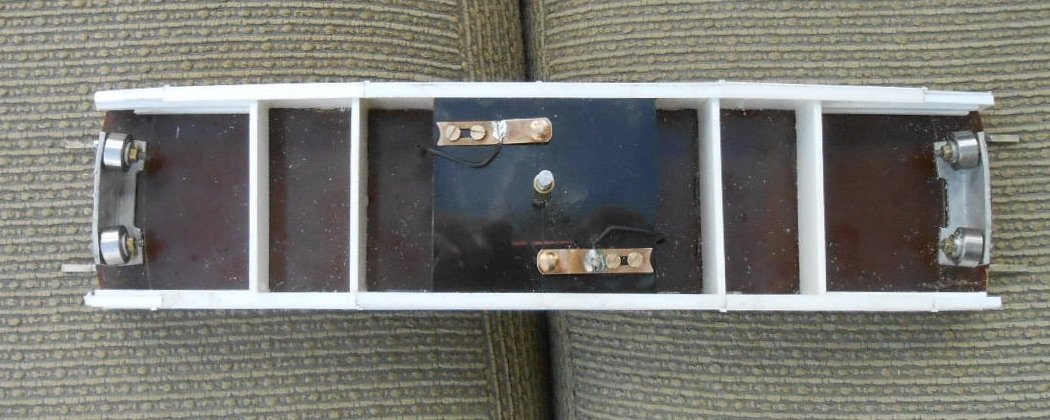
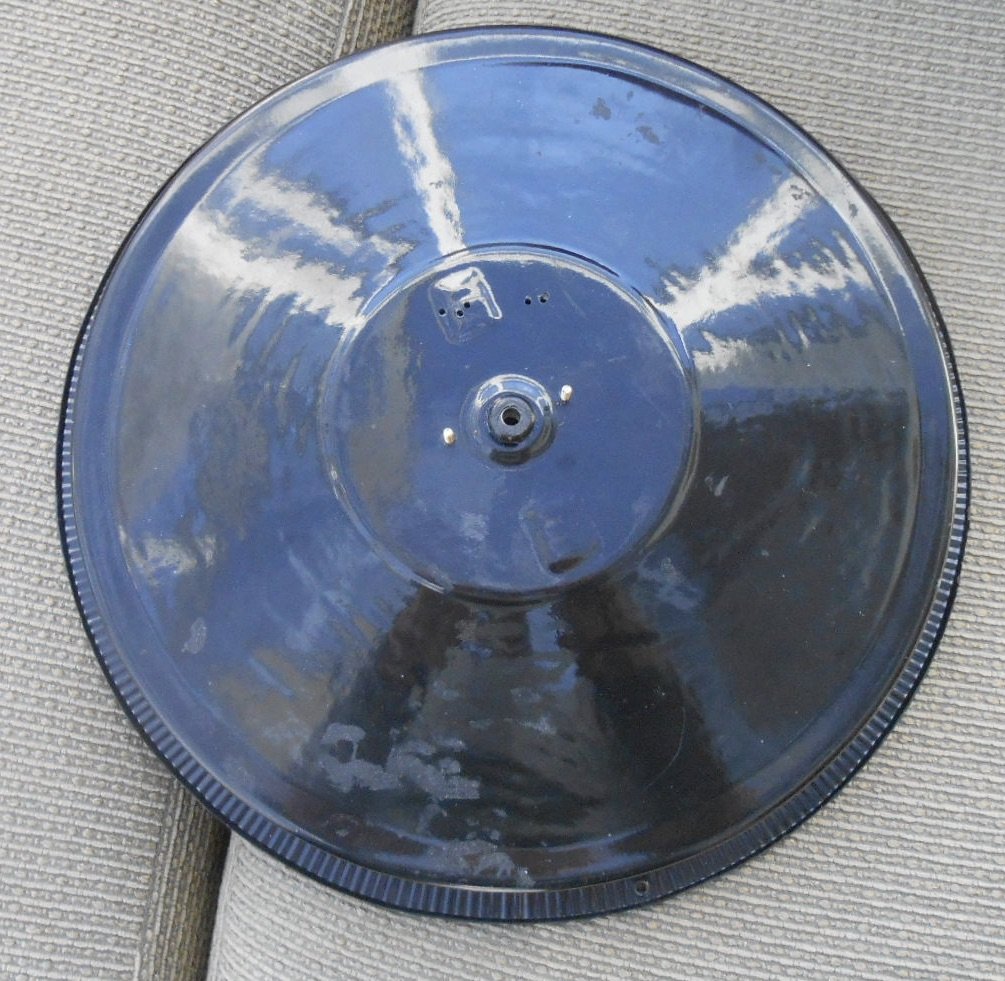
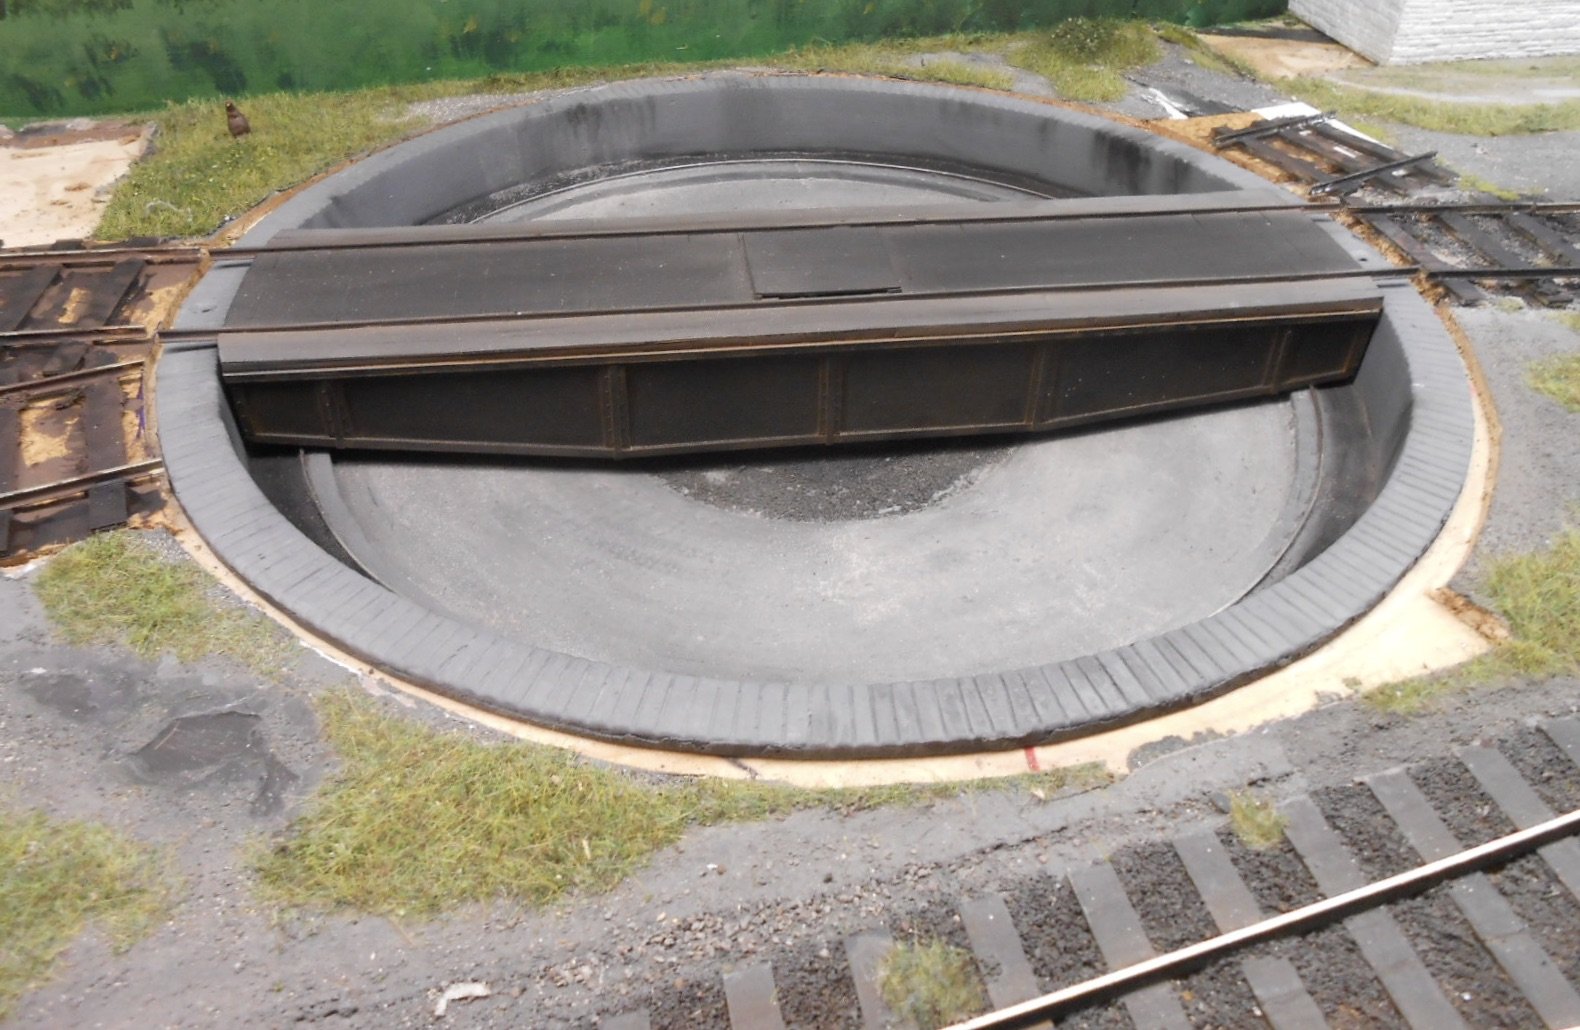
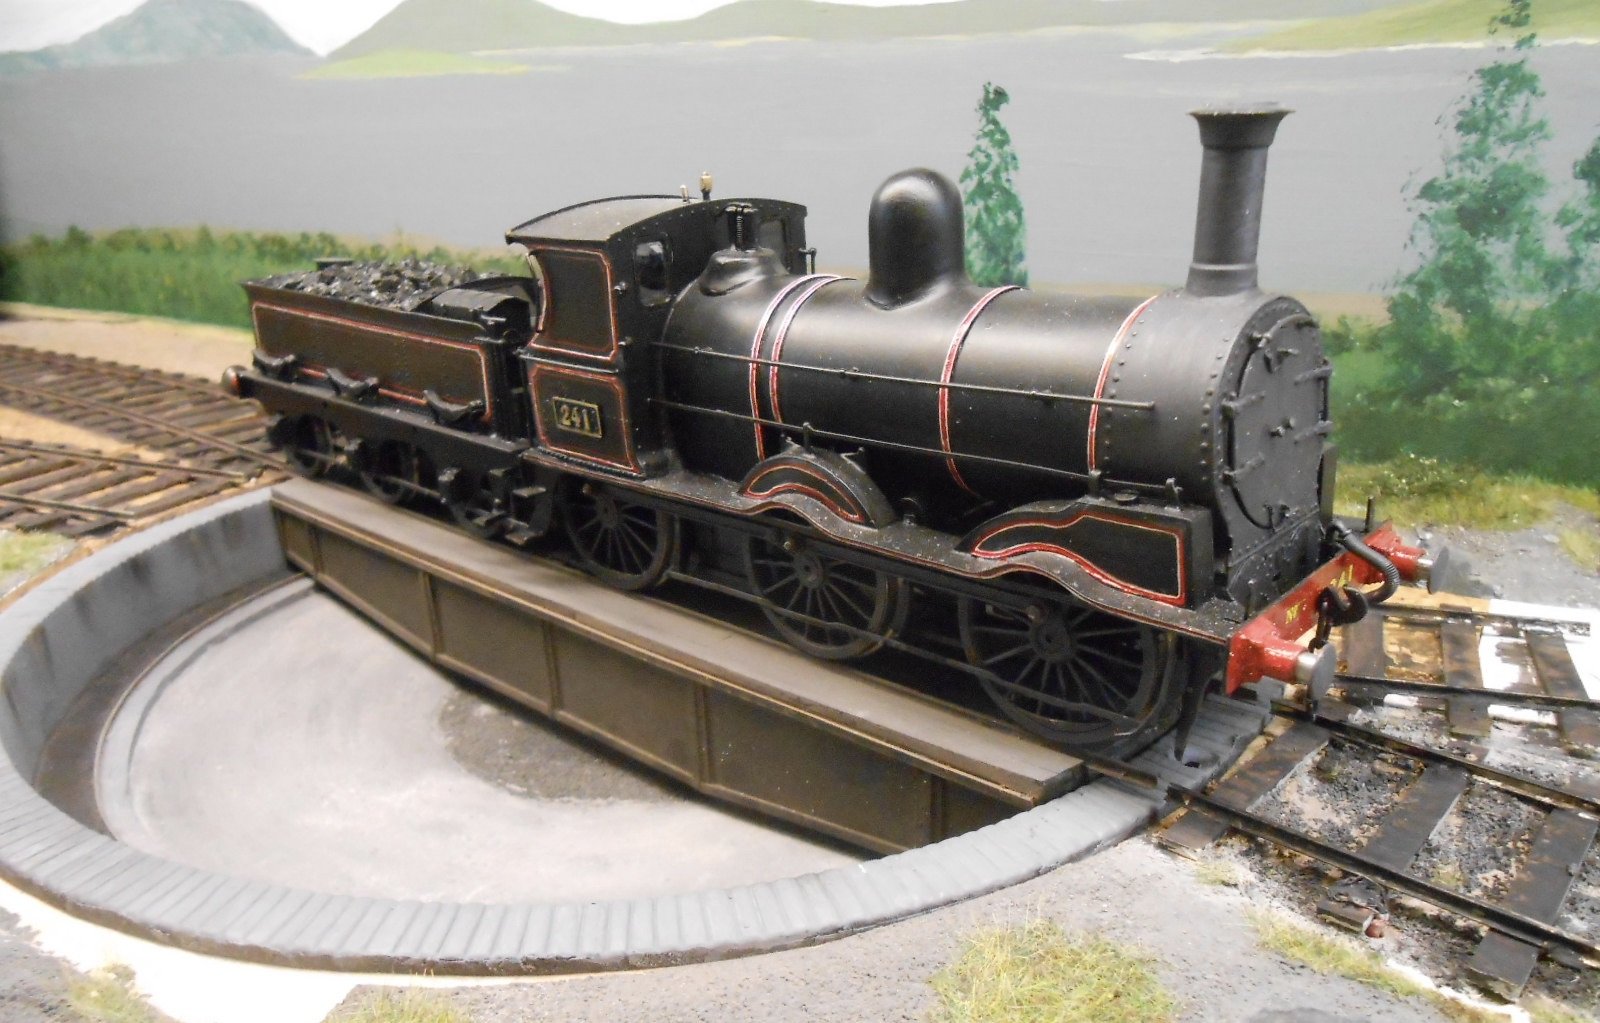
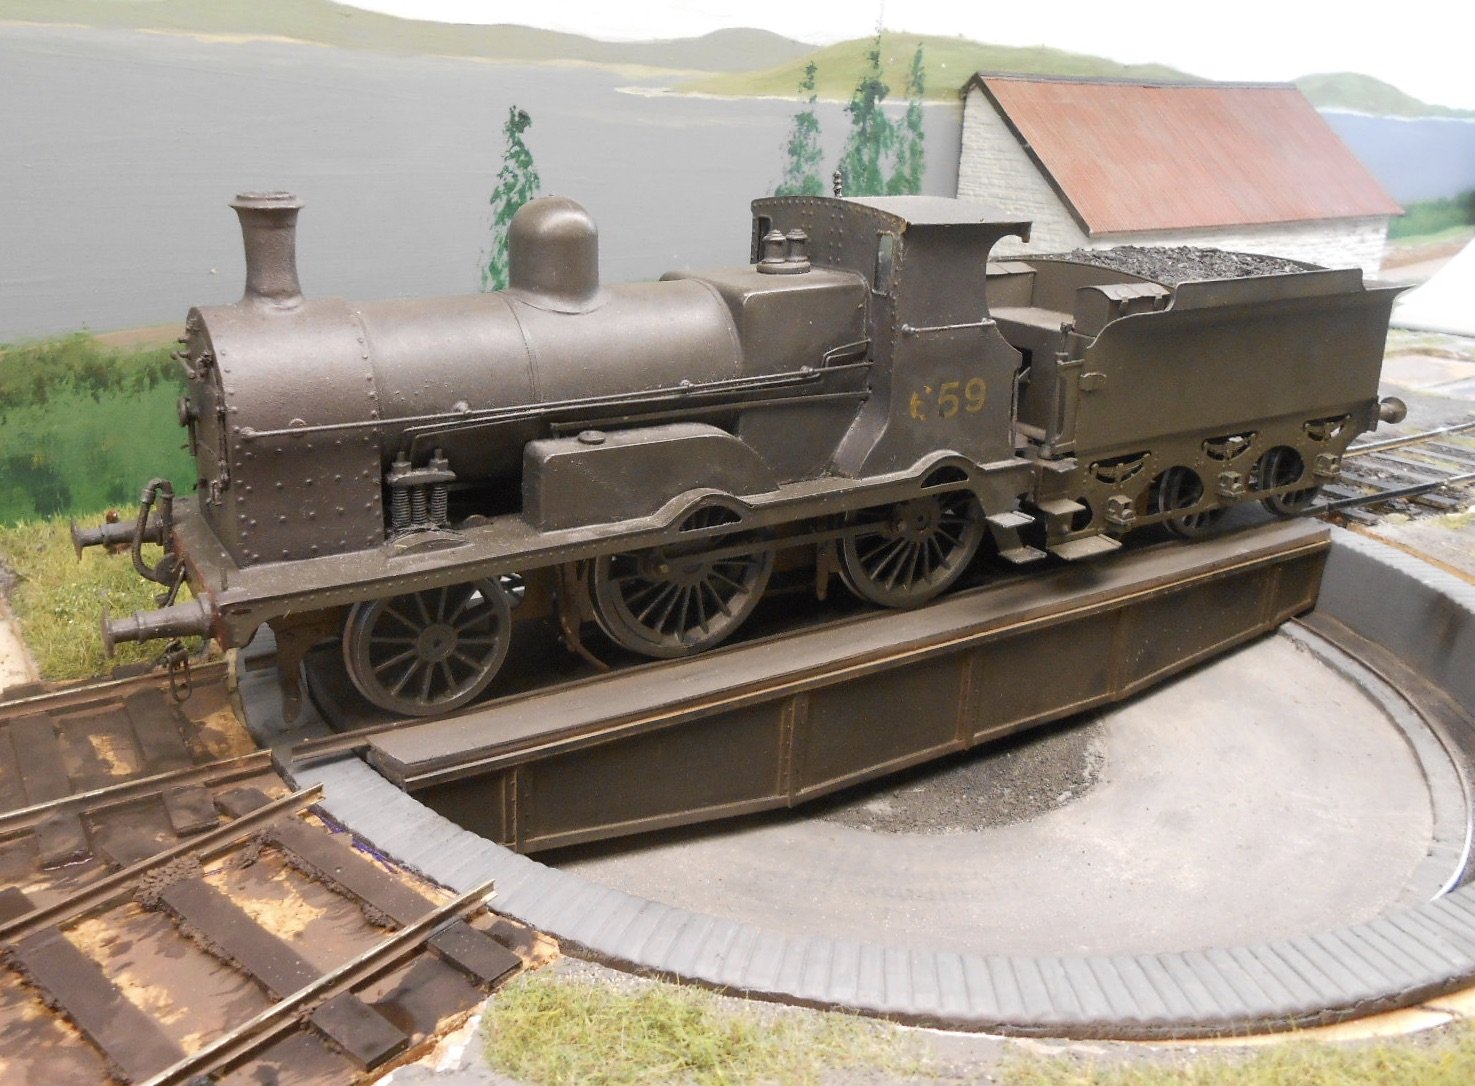
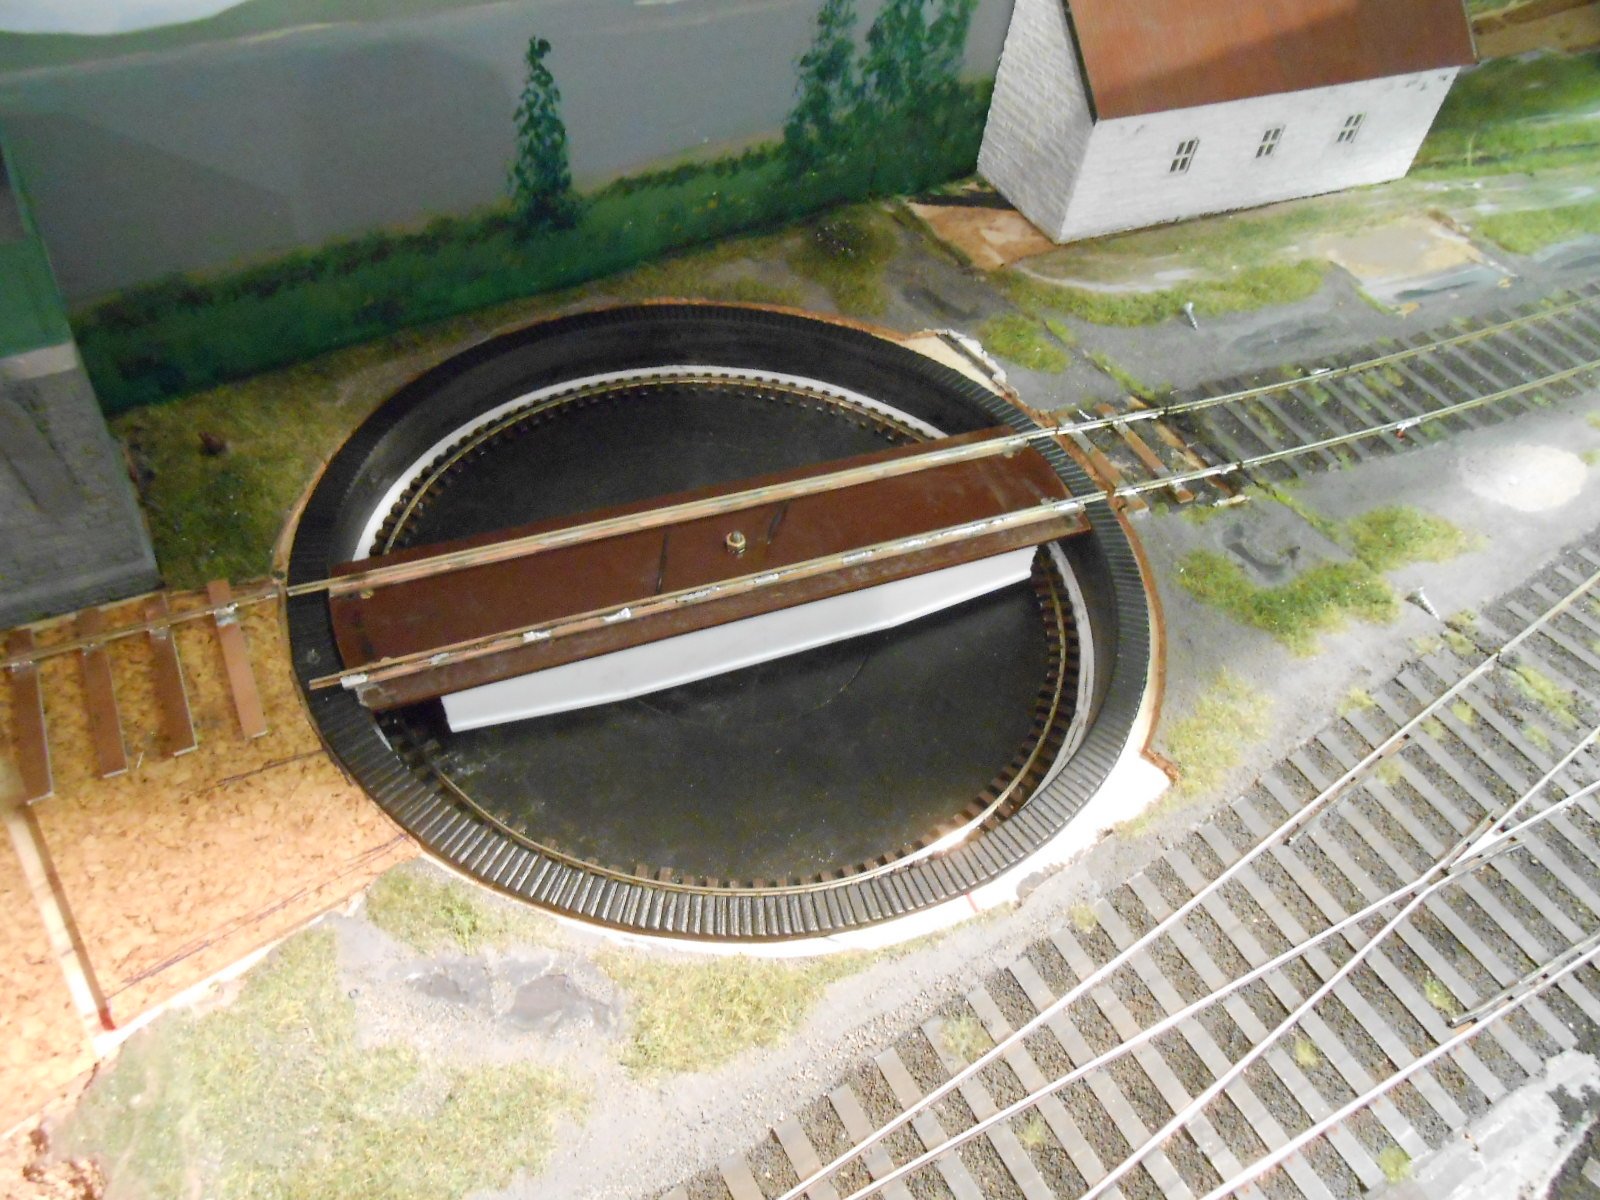
Slow progress on the turntable, though at least it is now at the cosmetic stage. However, the first couple of pictures show the pick up arrangements, with the phosphor bronze wipers on the underside of the deck and my adaptations in the base of the well to improve things. The kit uses a couple of countersunk screws that the wipers press on to get the current to the deck. This didn't seem to work very well, so I've increased the area of contact by adding two copperclad sleeper strips instead. A bonus from this is that power now goes to the siding as well as the loco shed road. The third picture is the underside of the well, showing how the screws pass through the base - this is where the power leads are bolted to. The deck sides have benefitted from some micro strip, with added rivet detail, while the top of the deck has had various bits of plasticard sheet to represent timbers. The result is a bit of a hybrid - narrow like the one at Kilfree, but rather deep. It would be quite a drop for anyone falling off the loco footplate to the bottom of the well! However, being quite short [a scale 36 ft], I've decided that adding a walkway would make it look too wide. The track diameter is 40ft, because the rails overhang the coping stone around the well, as per Kilfree. The well has had some modifications too. The track for the deck rollers didn't look right with its many short sleepers, so got busy with DAS clay to make it look like it was enclosed in concrete, as per many Irish prototypes. The very base of the well has been given a coat of gloss paint, on to which chinchilla dust has been scattered, for a gravel effect to contrast the concrete rendered effect elsewhere. And so to painting. Concrete is a funny colour, even before it gets weathered - a sort of yellowish grey, that also benefits from a bit of added texture: talc or weathering powders or both. Several coats of cheap artists acrylic have been used, on top of an initial layer of rattle can car primer from Halfords. The girders were fairly simple - black with rust added from weathering powders, while the planked decking is a well weathered brown/grey/black track colour. The surrounding area now needs building up with ground cover. This is also an area of compromise - Belmullet is intend to cover two periods: the early 1900s and the mid 1950s. In the former, the line would only have been around ten years old and therefore still fairly tidy one assumes, whereas by the '50s, it would possibly be looking a bit tired. My reasoning is that there has been a bit of maintenance in the early 50s, so the deck girders aren't too rusty though the weeds will probably be already encroaching. Finally, a couple of pictures from the two periods - my 101 in GSWR livery and then shades of Kilfree Junction with the G2.

-
Certainly coming on well. Especially like the way the track avoids being parallel to the baseboard edges - always gives a better, more spacious feel to things somehow. No doubt deep overhangs on the roof are designed to shade the (liquid) sunshine?!
-
Ah, but my bodgery is bigger than your bodgery! (✷‿✷)
-
Well out of my league! Much as I admire 2FS, in 7mm scale/36.75 (ish) gauge, I can get away with +/- half a mm on back to backs and things still seem to run ok. Shades of the actual SLNCR!
-
Severn Models do a range of exquisite, almost jewel like kits for everything from pylons to work bench tools. Well worth a look.
-
Every time I read about a 2FS project, I am tempted! The Society offers splendid support, not least at the moment, where £7.50 buys you a starter comprising a wagon kit and a length of track to make up. 2FS runs so well and the couplings are much neater than the commercial items where on a small loco like the Terrier, they add 50% to the length. Well done Angus for ploughing the furrow in 5'3! As for the speed records, I think it is doubtful any British loco apart from Mallard did more than 120mph, because the effort of going for the record seriously damaged it. The very brief period of 126 or thereabouts was largely because the attempted had to be abandoned at that point, or the motion would have been destroyed, with catastrophic consequences. This is also like as not the reason why it was never beaten, though post war austerity and dieselisation/electrification are others. The complex mechanical linkages in locomotive valve gear, plus the basic physics of power to weight ratio, thermal efficiency and so on probably put a basic limit of around 120mph for a conventional steam loco, with 110 a realistic day to day maximum. However, if diesels and electrics hadn't come along, who knows? Remember Back to the Future 3?!
-
Now there's an idea!
-
The cattle vans had been dropped off at Collooney, says Boocock.
-
When you think how much time and skill it would take to scratchbuild a road vehicle like this, it always strikes me a just how cheap they are to buy.
-
Now that's a nice view. The platform even looks like it's been raining!
-
Goes to show you don't always have to built a layout to make an attractive scene. Dioramas Rule!
-
This is my third turntable and though I have built around 60 locos, about the same number of coaches and what must be over 100 wagons, turntables are up there as the most challenging. They look simple and cosmetically, they are. However, making one work (and let's face it, there is no point having one otherwise) reliably involves getting all manner of variables to come together. The Dapol/ Airfix one is still about five quid and can be made to work quite well for another twenty, though (for me), getting the track pick ups right proved difficult. The Peco ones suffer because their pickups cause the deck to wobble. The same thing applies to the Finecast one, with overall, the price being the same as Peco, depending on size. No experience of Metalsmith, but as over £200, you'd hope it would be good. Would have liked to try Kitwood Models laser cut ply version, as the mechanism and pickups look well thought out, but have been unavailable for months. Ready to run versions are expensive too, but rightly so, given what is involved and that is before index linking the feeder tracks, which can double the price. There is also an element of iceberg theory in that there is a lot more going on below the baseboard surface than above. One motor, otherwise promising, needs 15cm of depth, not good for an exhibition layout. So obstacles everywhere, but fingers crossed, very satisfying when it works!
-
A round file works best for me, but no reason why a remember shouldn't do the same.
-
Two days hard work on the turntable - some of it tidying up some less than perfect work done before... Firstly, found that the well rail had not set in a proper circle, while it turned out that I'd also located it too close to the wall. Chance to practice some new combinations of rude words, after which the rail had to be removed and repositioned 1.5mm inboard. Did this by cementing two circles of 60thou plastic strip at the base of the wall, so the rail and sleepers could go against this. Now means the brackets holding the deck rollers in place do not scrape against the wall, so the deck turns quite nicely now [!]. Replaced the white metal rollers with some 11mm diameter ball bearings, which likewise improves the running. Ordered these from the web on Tuesday afternoon and they arrived in the post on Wednesday morning. I also had to cut away the ends of the deck girders, as I could not see what the rollers were doing; these can be replaced when I add the cosmetic detail. The most head scratching and brow furrowing went into mounting and mechanising the deck. My biggest concern is that the drive axle [4BA studding] is only fixed to the deck by a nut, while the base of the well is only 10mm thick, so there was room for a fair degree of slop as well as a very high chance of the deck coming loose. Hopefully cured the latter befitting a nut underneath, as well as on top of the deck, with some Loctitie 630 in the threads for added insurance. As long as the deck is turned clockwise the top nut tightens against the lower one. Meanwhile, underneath the well have added an aluminium strip, drilled 5mm to support the studding, in a piece of brass tube, which [fingers crossed] stops it wobbling around. Extra Meccanno plates do the same for the crank handle, as seen in the third picture. This afternoon, added rail to the deck, on longitudinal sleepers, then made up some half track to link the TT to the loco shed.
-
Hate brake blocks! The van is coming on nicely though.
-
Sometimes a brief pause while you are winning is a good idea. Still fancy that it will be the coupling rod holes that need opening a little. I've only ever used a pair of fine nosed pliers to tighten crankpin nuts, with a dab of nail varnish, not pink though, to hold them in place. More of a pain for mean are the Slater's wheel nuts. Find that the allen key doesn't always tighten them fully and before every show now I check for wobbly wheels.
-
The worst example I've come across, thankfully cured now, was the Tonbridge show. The sports hall lights could be described as sodium - yellow street lamps and the effect on an unlit layout's colours was interesting, to say the least! Spotlights certainly need handling with care, as Broithe says above. The main thing is to avoid unwanted shadows; LED strips are great for this, providing a very even light, but what ever is used, the main thing to remember is it should be the same light as you do any painting under - otherwise, the colours can end up looking very different to what was intended.
-
Not sure about being an expert, as I mainly copy the likes of Iain Rice and Gordon Gravett. Nevertheless, the Rice concept works really well, as I use it on Fintonagh. The pelmet is arranged to be about 2cm beyond the front edge of the layout and has a strip of LEDs (cool white) just inside. The second strip of LEDs is about two thirds of the way back. The latter provides overall, even lighting and avoids shadows on the backscene. The front strip ensures there are now shadows on any models closest to the he viewers. Meanwhile the two sides which support the pelmet (painted the same colour as the baseboard frames) act like a picture frame to separate the layout from the surrounding area. At a show, this can include the backs of other layouts, operators, coffee mugs etc, as well as enclosing the lighting too. It is REALLY noticeable at shows when layouts have little or no lighting, especially when the hall lighting is poor, or simply just different from that used at home.