David Holman
-
Posts
4,359 -
Joined
-
Last visited
-
Days Won
117
Content Type
Profiles
Forums
Events
Gallery
Blogs
Everything posted by David Holman
-
Oops! Thought I might have been provocative... For my late 50s period, 0-6-4Ts and railcars were all that was left. Had the ex GNRI 4-4-0 and 0-6-0s lasted longer, would have been very tempted!
-
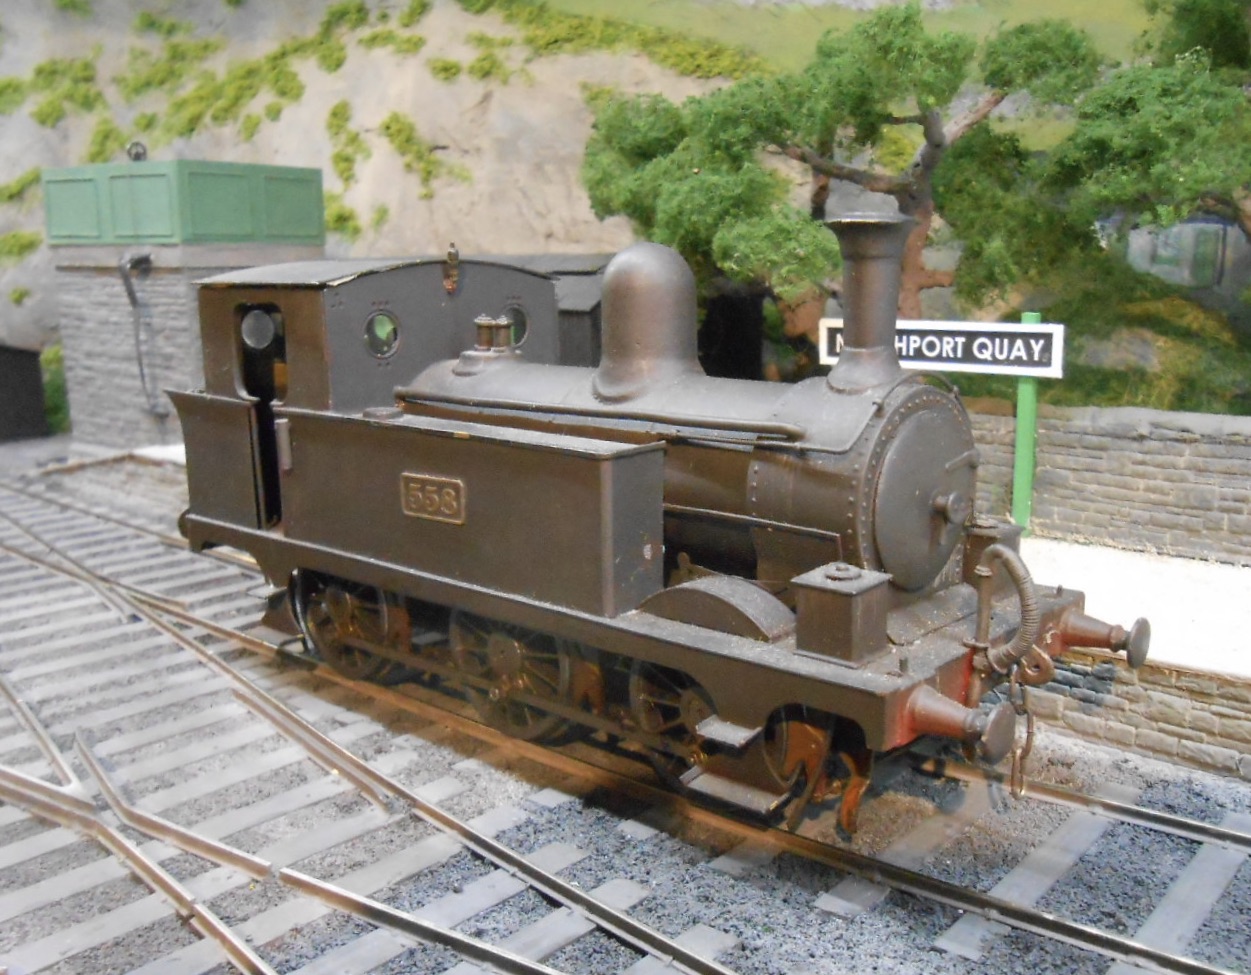
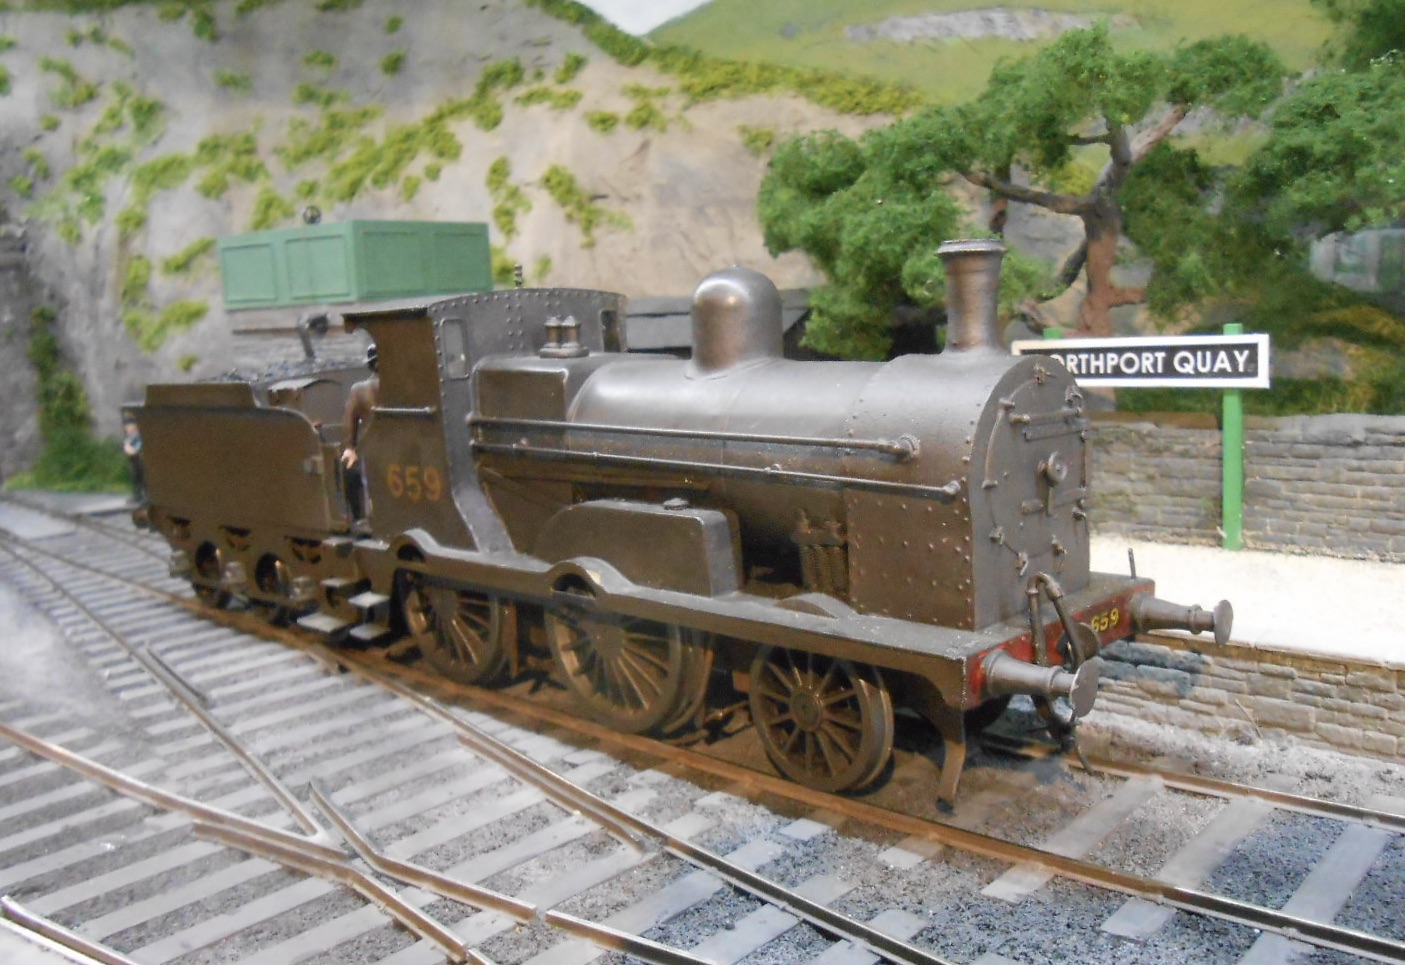
Midland Great Western Railway The Sligo Leitrim offered a slightly limited range of stuff for me to model, but there are many MGW temptations in the Alphagraphix/Tyrconnel catalogue. First up was the the E/J26. This is a super kit for anyone interested in getting into 7mm scale. The chassis is a single etch, which just folds up and you can easily have something running in a couple of hours. The kit is designed for 32mm gauge, but by reversing the top hat bearings, you easily get the correct back to back for broad gauge. All in all, this little loco took just over 40 hours to make, including painting & weathering and is a very good runner. Next came the G2 2-4-0, a more complex kit, but nevertheless following the usual AlphaG principles. I added extra detail to this one, especially around the smokebox, while it also required a bit of TLC following a serious crash when it fell off the baseboard and hit the floor about a metre below! Damage was fortunately only cosmetic. Another good runner, it benefits from tender pick ups, as well as on the loco. Haulage is a bit marginal though, with three six wheel coaches being about the limit - but then that is all the room I have, so its not a problem. My third MGW loco, also an AlphaG kit is the J18/9. Very similar to the G2 and probably an 0-6-0 version in some ways, there are a lot of common parts, so guess it was a worthwhile enterprise. Not [to my eyes] as pretty as the G2, I still harbour doubts about whether the boiler diameter should be larger, while the Green Bible tells us there were a fair few variations within this class. However, it runs well enough and usually gets rostered for my fish train. Will stick with my 1950s period for now, though I do have some early 1900s stuff too, but will cover this later.

- 56 replies
-
- 10
-

-

-
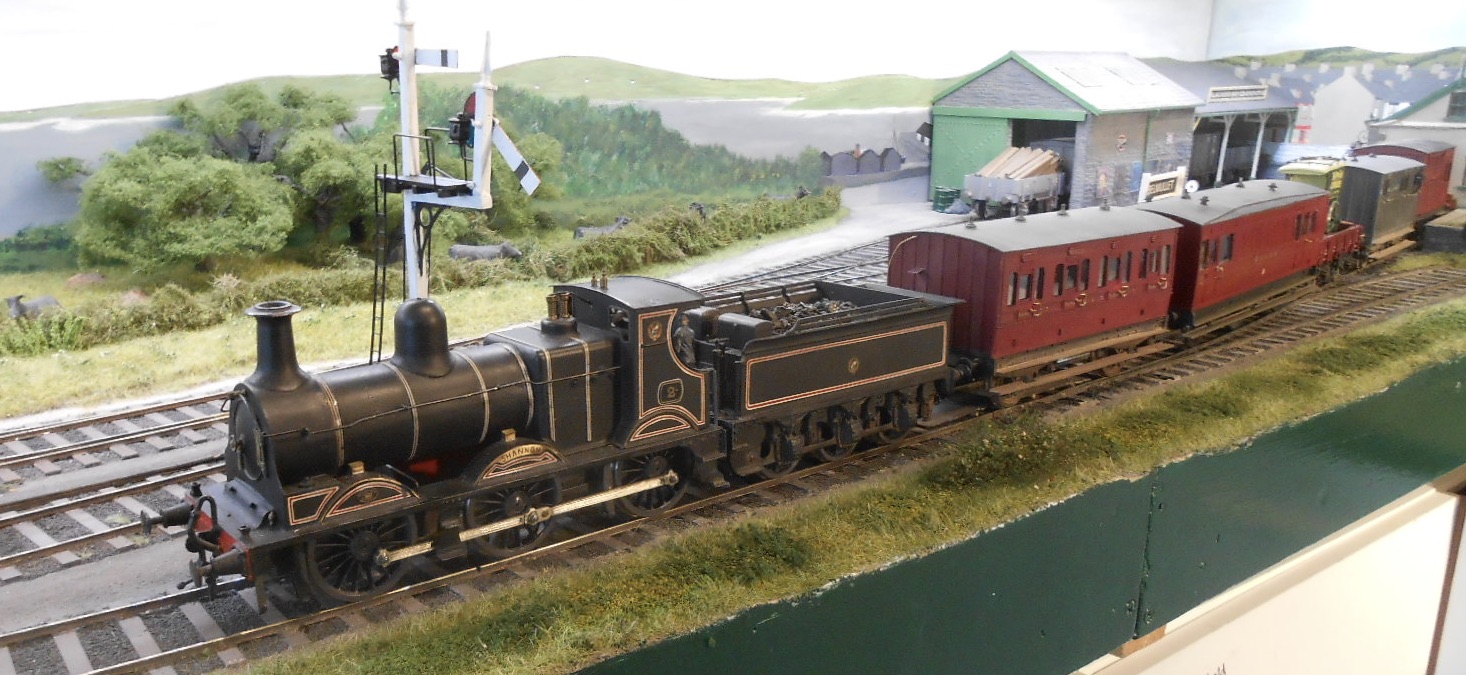
Not a Scooby, JB. Took me long enough to find out what prototype they were based on! Curious choice, especially with Richard tending to favour the WL&W, whereas [I believe], the D&M became part of the MGW. As for why he built two... Photos of Castle Rackrent show at least one of them as part of the 'Mail Goods', something I've tried to replicate on Belmullet. Hauled by Shannon, it made a nice train - more of which anon on my Collection thread
-
Fabulous! Thank you.
-
Dave Walker - another pioneer. I had dinner with him once, in the company of Gordon and Maggie Gravett, plus Andrew Burnham of Continental Modeller. It was at the old St Albans show. Dave was into Gauge One by then and it was another opportunity missed. I sometimes think I must go around with my eyes and eyes closed!
-
It pains me to say that as a long time member of the Chatham & District Model Railway Club, I have little or no memory of Adavoyle being at the Dockyard show. However, the year in question sticks in the mind for other reasons. We had lost the use of the Fitted Rigging House (a vast area of warehouses fronting the river) so for reasons best thought at the time, decided to hold the show in a large marquee, set up on the 'pea shingle'. This was a parade ground type area which proved far from level, or indeed stable. Needless to say, it chucked it down that weekend and the tent leaked, damaging at least one layout. I was doing a model buildings demonstration that year, so had little time to look round and hence missed Adavoyle, which must have delayed my entry into Irish models by several years. As for Richard, he was well known for turning up with things of interest to share and I believe even took a layout to shows by train, though not the epic Allenedac of course! When I met him at the Manchester Show, I got an invite to take Arigna Town to Glasgow, which I couldn't do and hence missed the chance to have other Castle Rackrent locos on my layout. At the time, I think I had the only other 7mm scale Irish broad gauge exhibition layout and then Richard died the next year - a huge loss to the hobby.
-
Gold dust! These folk are so important to our hobby and it is wonderful to hear more about them.
-
Brookhall Mill - A GNR(I) Micro Layout
David Holman replied to Patrick Davey's topic in Irish Model Layouts
A good painting deserves to be properly framed. Layouts likewise. Am sure Iain Rice would have approved. -
When Richard passed away, his executor did indeed circulate lists of all his stuff, inviting sealed bids for whole layouts and individual items. I believe his 3'6 gauge Norwegian layout went to Norway, while at least part of Castle Rackrent went to the 'barber's shop's museum in Manorhamilton, so may be on display there. Richard could build on a grand scale and I sometimes wonder what happened to his French layout with its vast two metre high viaduct? It would be great to hear more about his work and indeed the man himself. There were a couple of articles in MRJ and photos on the internet, but can't help thinking we ought to have more on this forum. Drew Donaldson and Tony Miles too, for that matter!
-
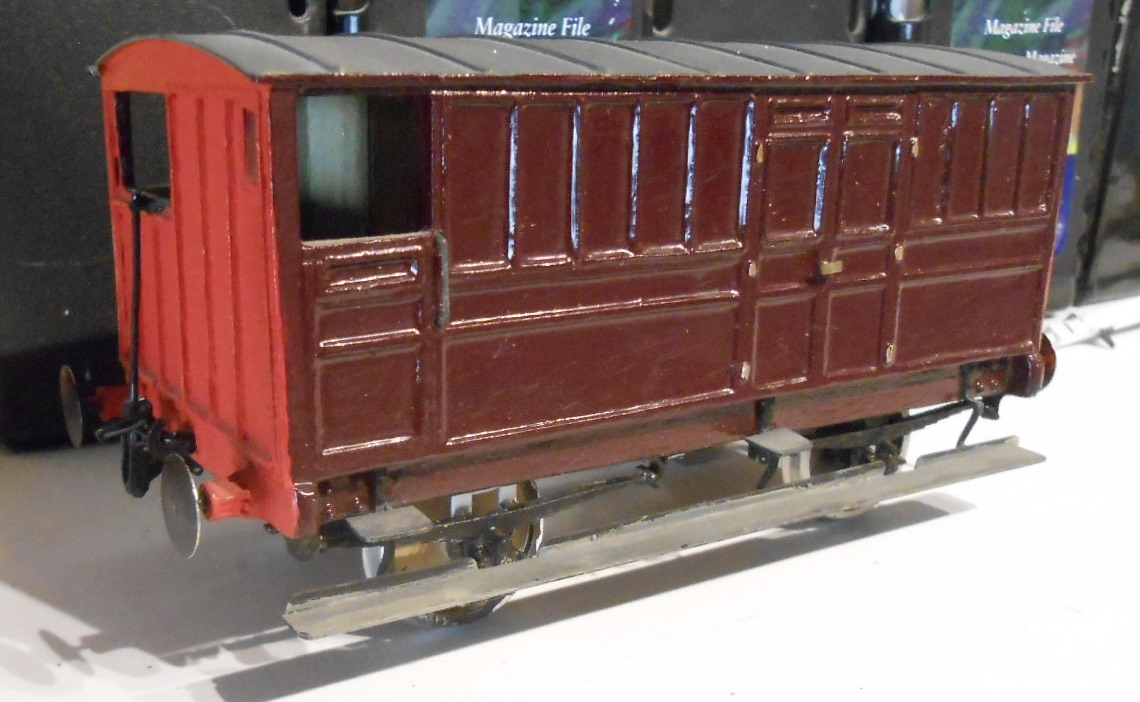
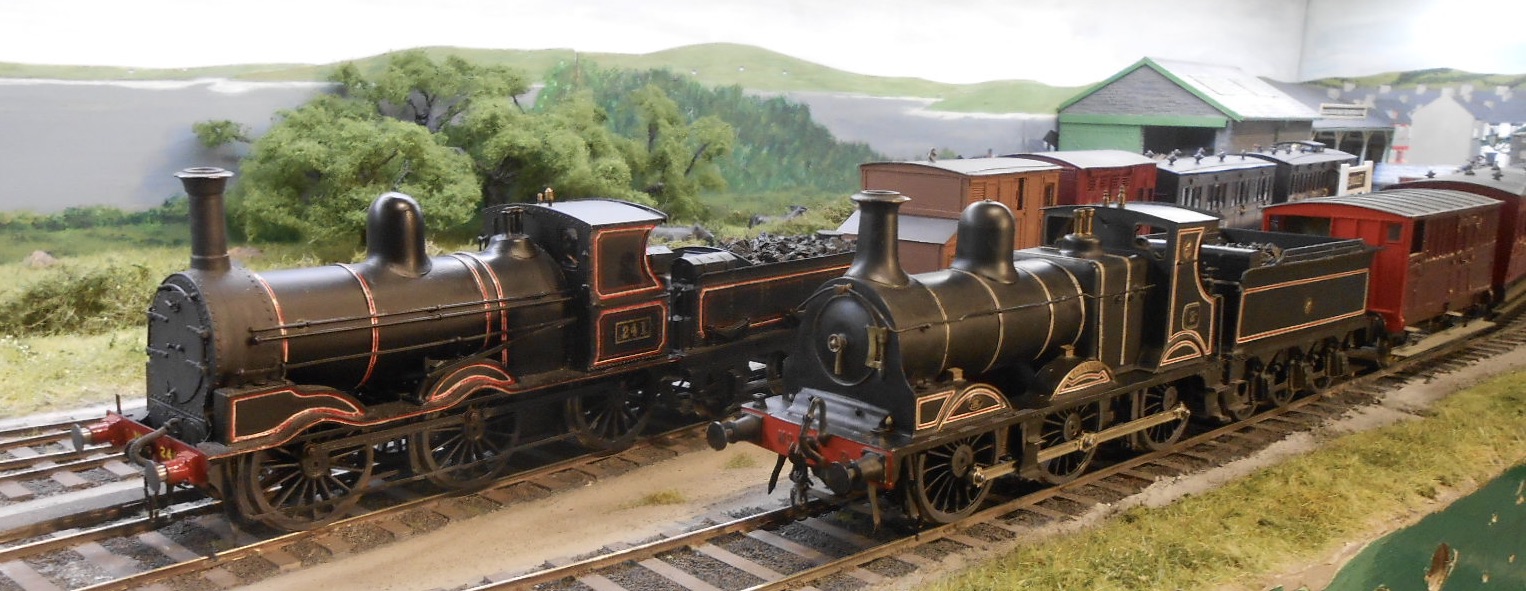
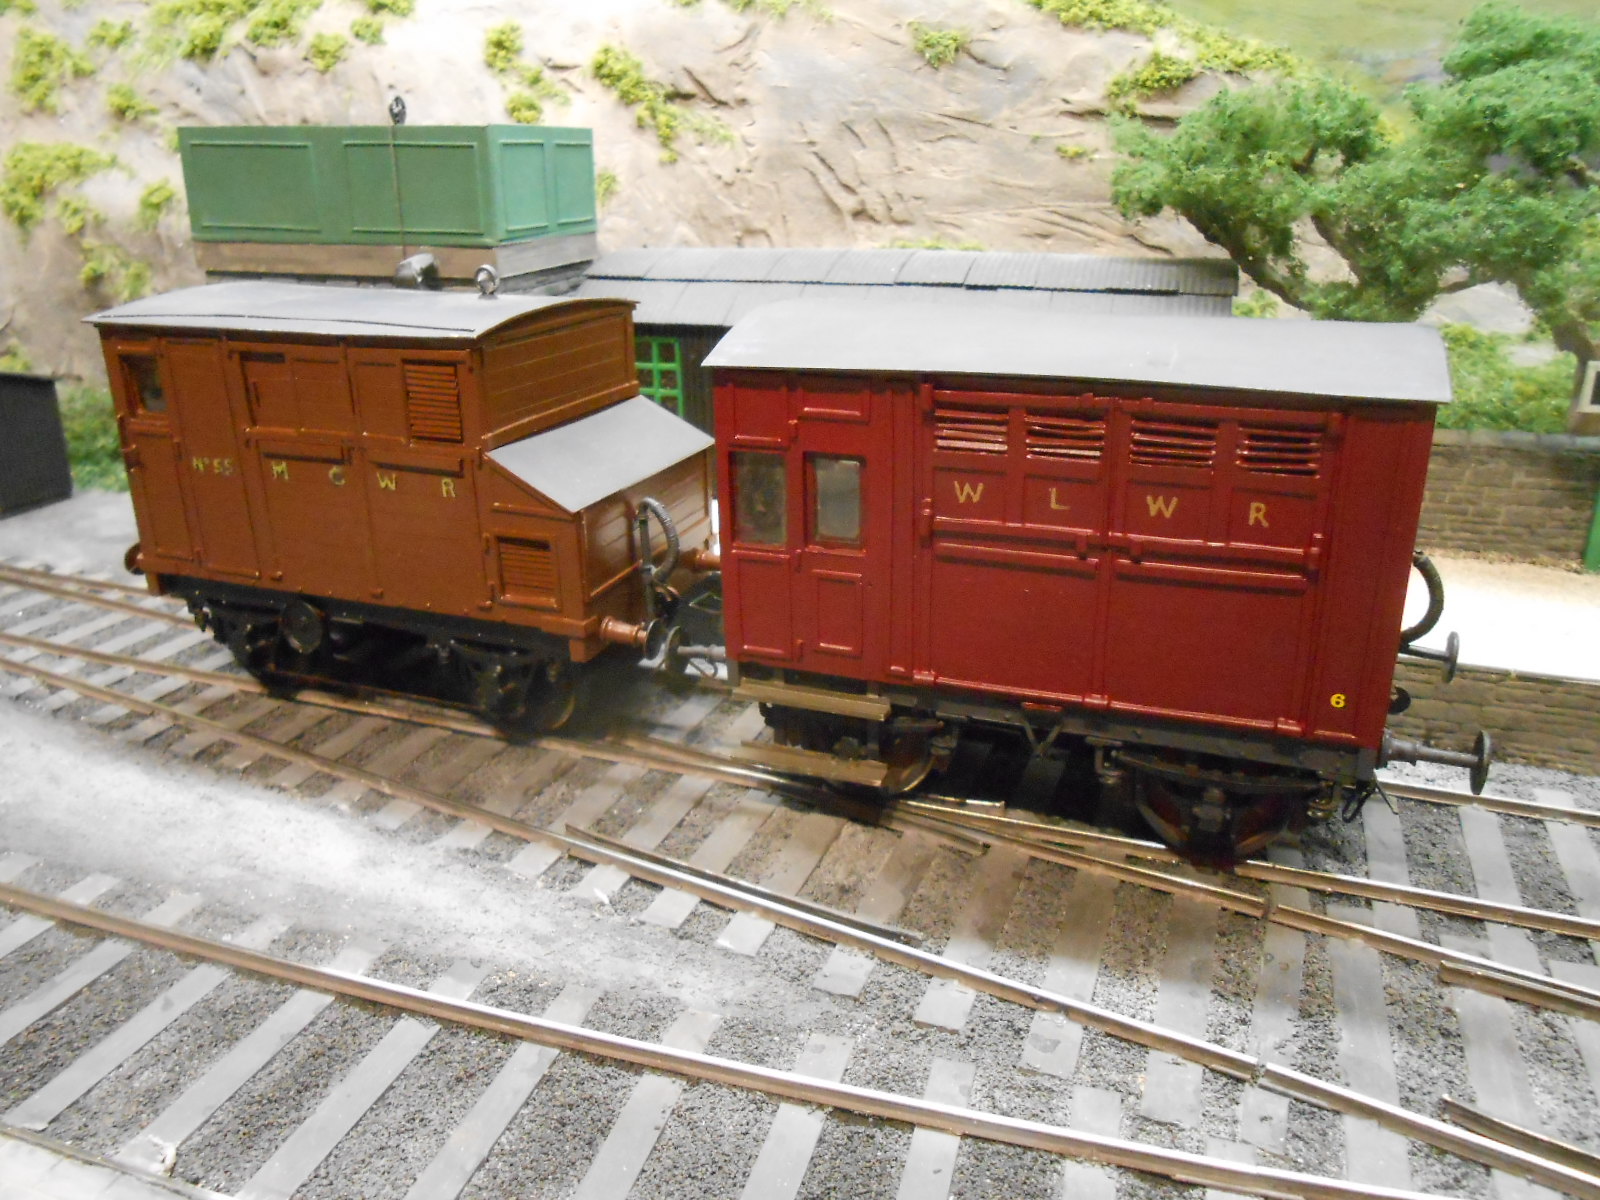
A couple of pictures of stuff I got from Richard's estate. This is Shannon, after I'd done a bit of restoration work. The model is close to 50 years old and was built by Richard for the original Castle Rackrent that he built in his bedsit! Appeared in the June 1975 RM. Not sure it was ever cleaned, but beautifully made & will relate more when I get to that part of my collection. Suffice to say it must have run many, many actual miles over the vast system he built up - as the state of the tender wheels below shows: Looks at that groove in the tread! Quite why he built the Dublin and Meath brake vans is anyone's guess, but they are certainly nice models, constructed from wood rather than plastic. And here's the 101, alongside Shannon. Quite why Richard never built it is a mystery, but it remained untouched for 20 years until his executor offered it to me at Guildex back in 2018.
- 60 replies
-
- 13
-
-
-
I did indeed - the wonderful WL&WR 0-6-0 Shannon, plus his two Dublin and Meath brake vans. Later, I got an unbuilt kit of a J15, plus a signal and some wheels. All have threads on this forum, either in my Work bench section, or the Tribute to Richard Chown thread. Met him once at the Manchester show, when we ran his Sligo Small Tank, Lissadel on my Arigna Town layout. He seemed a lovely guy and definitely one of my heroes. Didn't just do Irish stuff either. French 0 gauge, Norwegian narrow gauge and Brecon and Merthyr among his many interests!
-
Love how rock steady all the stock is on that video - possibly even better than the real thing!
-
N Scale Ballywillan, Co Longford.
David Holman replied to Kevin Sweeney's topic in Irish Model Layouts
Fascinating stuff and looking forward to seeing things progress. -
Not as hard as you'd think - especially the straight legged versions for the wagons. Went on to make a small herd of full legged models (it's written up somewhere on here), though my most recent one is Maggie Coulter's Goat which is either on my Clogher Valley or work bench threads.
-
A joy, as ever.
-
Do watch tv, but mostly it is background. Guess where I do make progress is by "little and often" - probably a couple of hours at least 5-6 days a week and sticking to one project at a time.
-
N Scale Ballywillan, Co Longford.
David Holman replied to Kevin Sweeney's topic in Irish Model Layouts
Witchcraft! Much as I (mostly) enjoy the traditional methods, if I was starting again, I'd certainly be investigating this stuff, because everything has its place. -
Horse transport and boxes on the Irish rail system
David Holman replied to Colin R's topic in Irish Models
The poor thing was vey scruffy in Sligo ownership, but then it was pretty old when they actually got their hands on it! -
Interesting, though the problem with them being handed seems to remain and they look a bit too obtrusive to me. I was going to need to replace quite a few of my Dinghams (bent/twisted over the years), requiring another two or three frets. Have just ordered some 28swg piano wire and spent the afternoon reading articles in MRJ 55 and 56, along with the section in the Guild Website and Gordon Gravett's first book on 7mm scale modelling, which has a useful section too. Indeed, Gordon and Maggie are staying with us for the Tonbridge show in a few weeks, so he is not allowed home until I've had a personal tutorial!
-
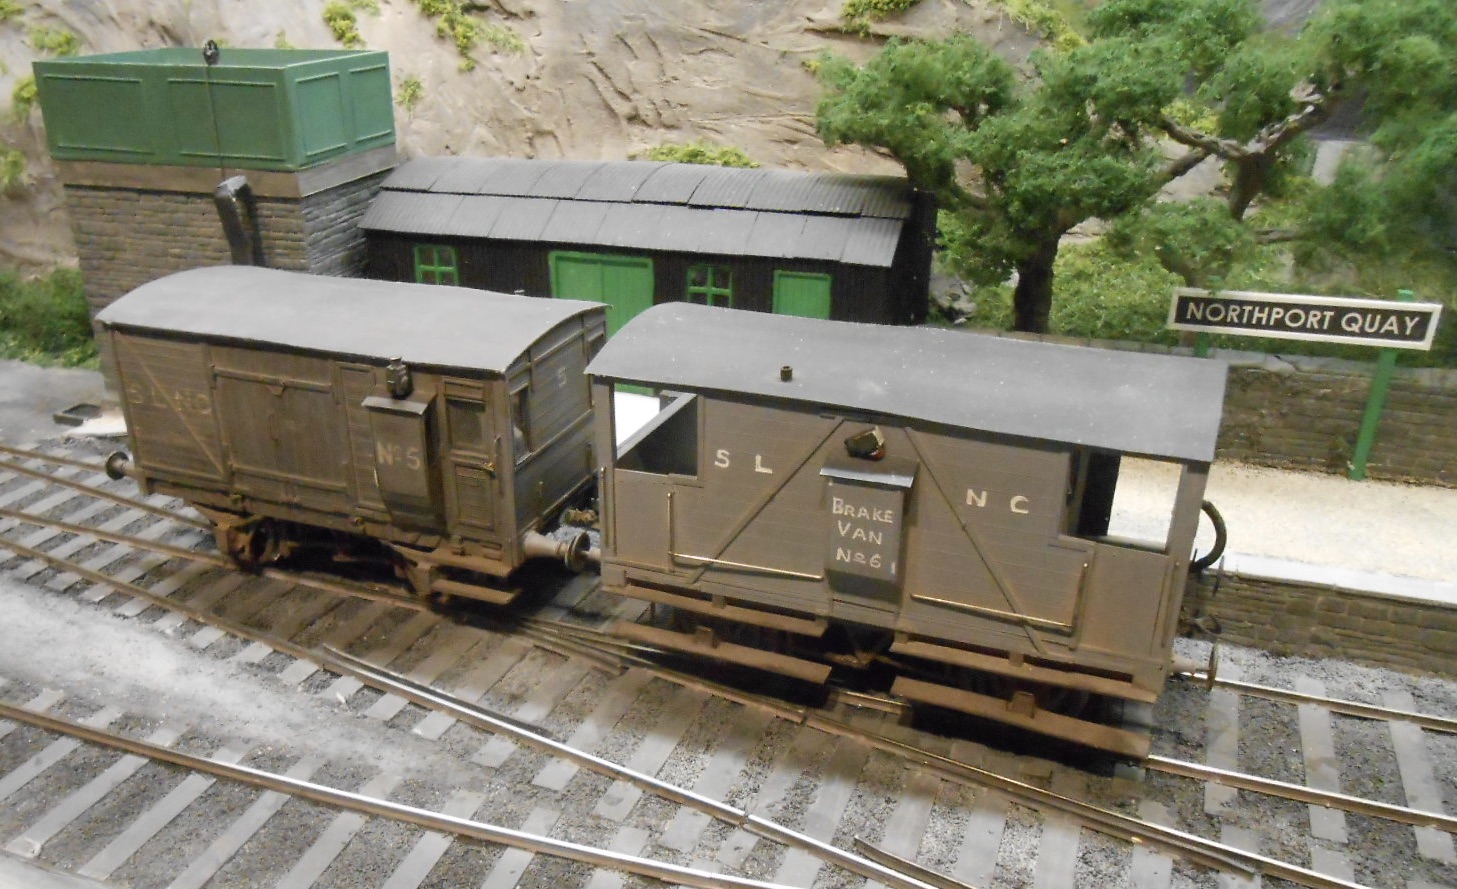
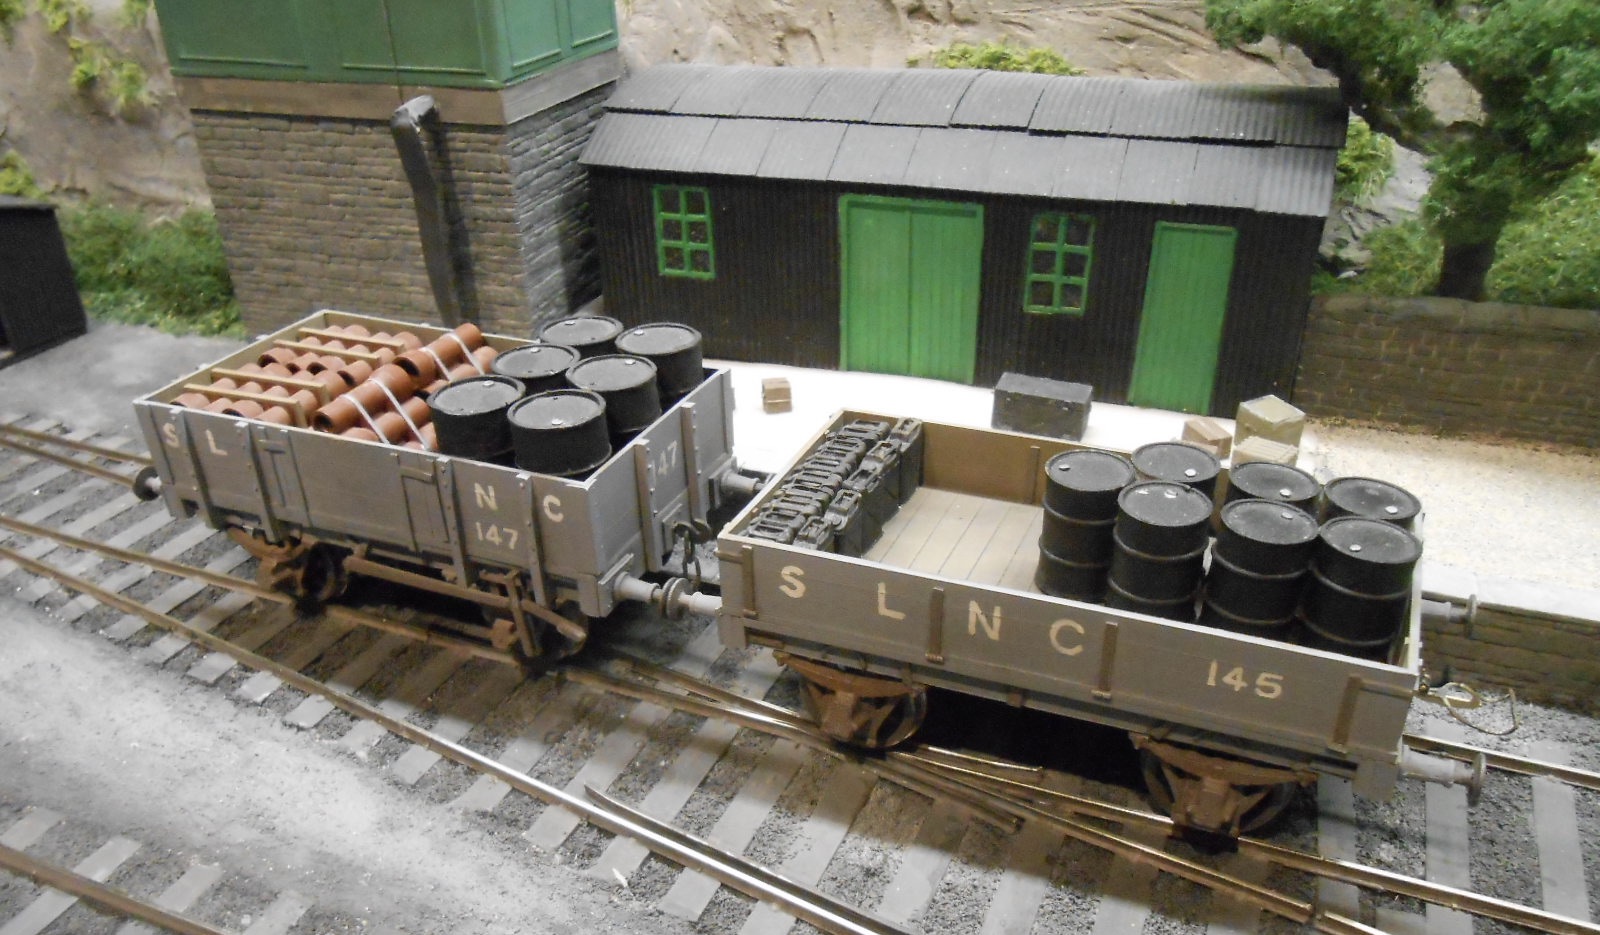
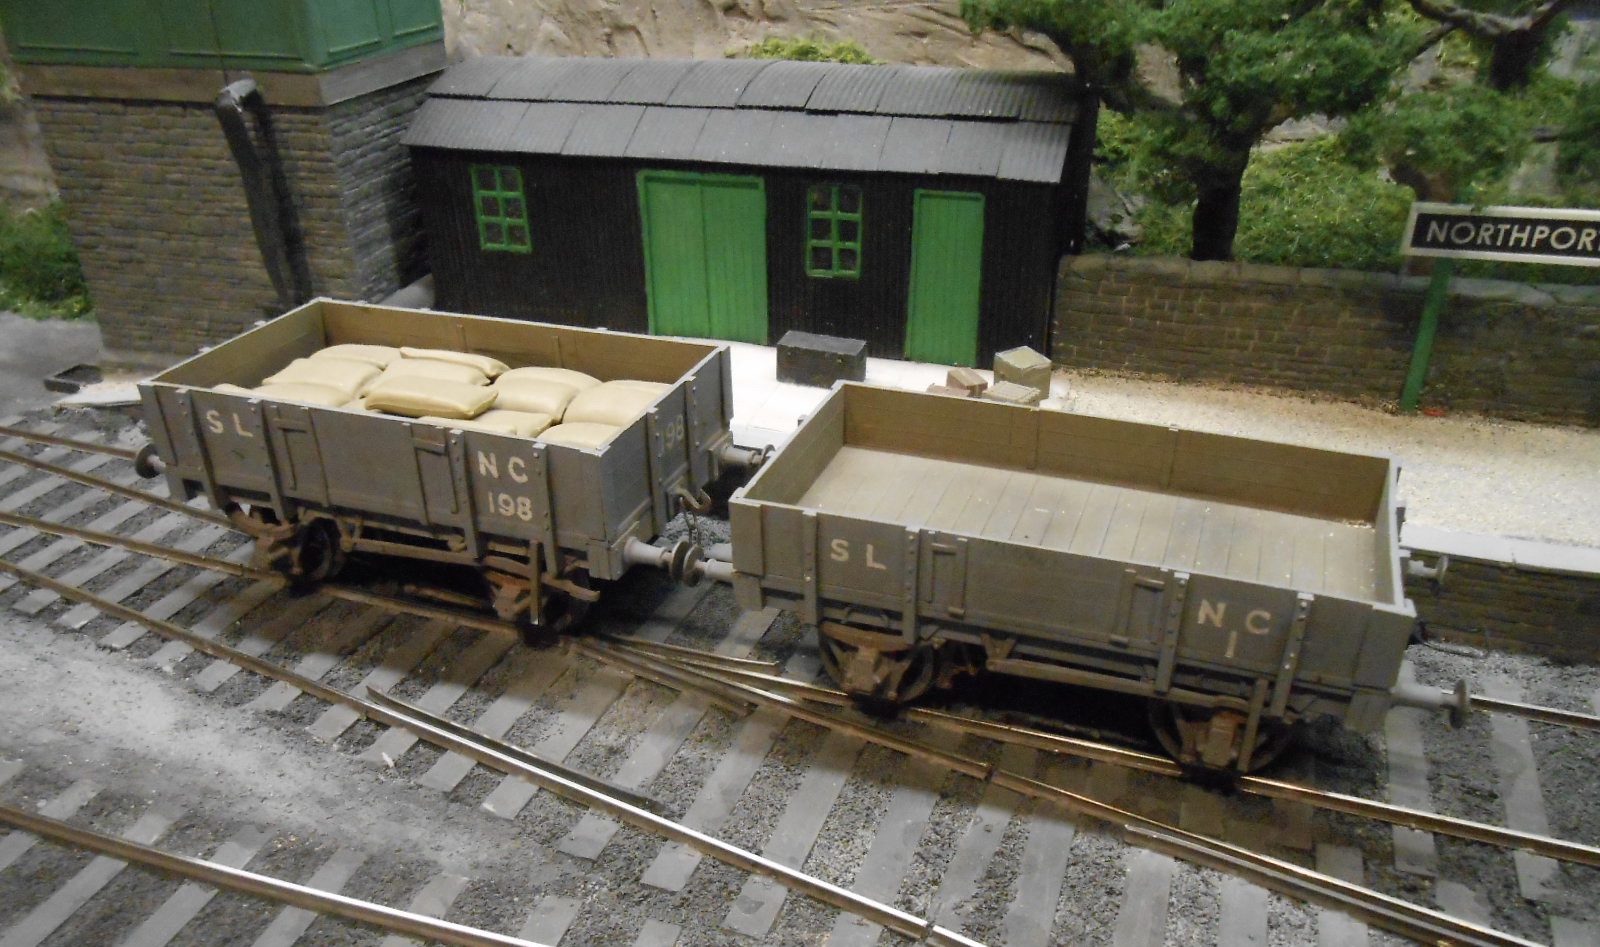
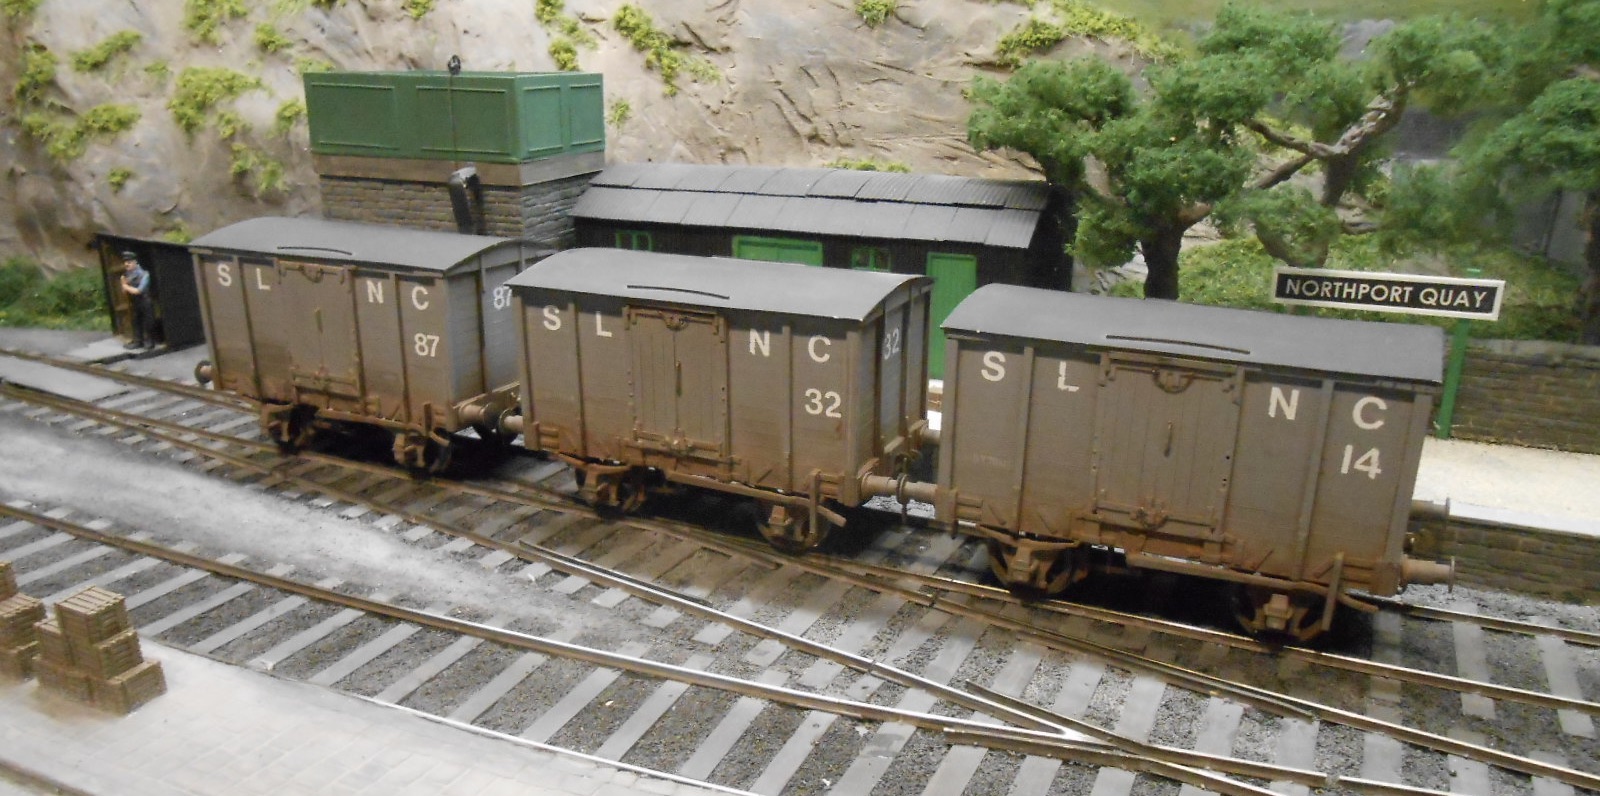
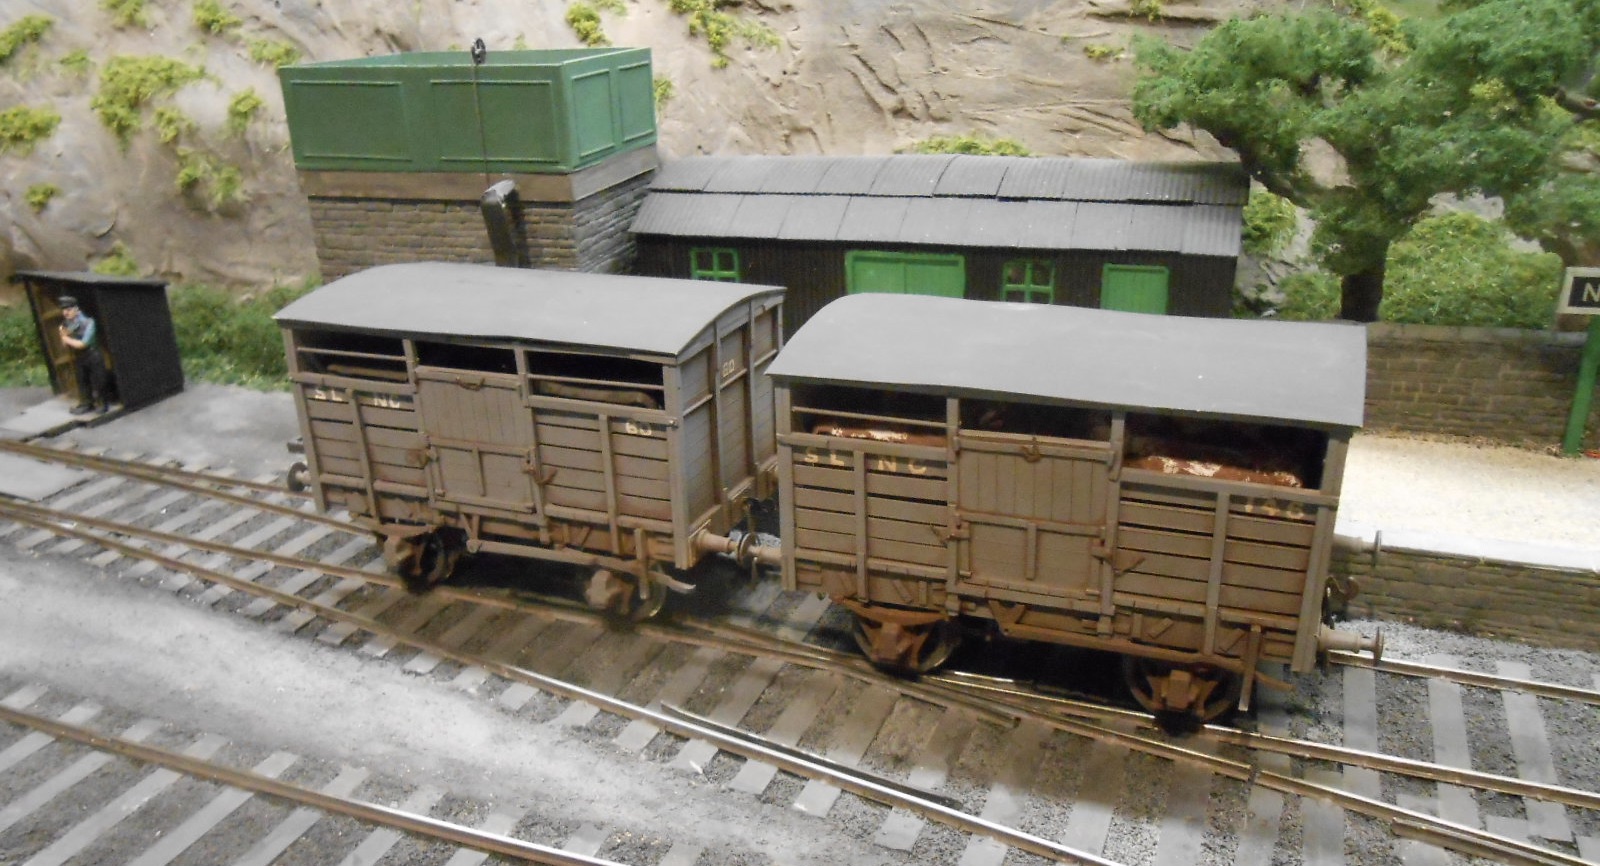
Sligo Leitrim Wagons Looking back through my journals [I record in ball point too...], my Irish adventure began at the end of 2011, with the purchase of an Alphagraphix/Tyrconnel J26 kit, more of which later. Baseboards for Arigna Town were built by the end of March 2012, with track laid and wired by the end of April. I built the J26 and Hazlewood that year, along with one coach and no less than 19 wagons. The railbus, 6 wagons and 10 buildings were made in 2013, with 3 locos [Railcar B, Fermanagh and St Mologa] and a further 15 wagons in 2014. There's early retirement for you! Anyway, to finish off the SLNCR collection [so far], let's start with the brake vans. There are four of these, beginning with the splendid 'road vans' - arguably the shortest mixed trains ever, given they had room for goods, the guard and a drover or two. The latter would hardly have been comfortable, but it points to these vehicles being used on the Sligo's cattle trains. As usual, AlphaG card kits formed the drawings, with plastic card and strip for the bodywork and white metal castings for the chassis. Lettering is the standard acrylic ink applied with a dipping pen. The other two follow the same process, though I've added vacuum brakes to the double veranda one, while No5 is the ugly ducking! Four open wagons come next, all pretty conventional, though in this case I was relying on the excellent photos and text in Neil Sprinks books on the Sligo. I batch built five cattle vans from the AlphaG card kit starter. Two are shown here, though I fear they are wrong as they look too small. Realised this too late, so run them anyway. The cattle inside are also hand built, using a plastic skeleton with very basic, straight legs, covered in DAS clay and filed to shape. A lot cheaper than buying white metal castings! Some are Irish Moyles [brown & white] while the back ones are Dexters. For the other vans, I made my own resin castings to simplify batch building. After making a master of a side and end of each type, I then made a mould and once this had set, found I could cast them in resin at the rate of one every half an hour or so. Simple, but effective, with the chassis built in the usual way. Two are 'semis' with a canvas centre section to the roof. It's amazing to look back on what I built over those three years. Indeed after starting the project in January 2012, the layout made its debut at the Chatham Show in June 2014 and went on to rack up a total of 39 exhibitions until retired in early 2019. Just goes to show that work is the curse of the modelling classes, though these days I often wonder where I found the time to go out and earn a living!
- 56 replies
-
- 19
-
-
-
Horse transport and boxes on the Irish rail system
David Holman replied to Colin R's topic in Irish Models
Here are a couple of 7mm scale models I built a while ago. One is the MGWR version already seen earlier, the other is a WL&WR version. Both are scratch built in plastic, using Alphagraphix card kits as the drawings. The WL&W horse box is back dated to original livery as it was originally built as the Sligo Leitrim one, which came from the WL&W...
-
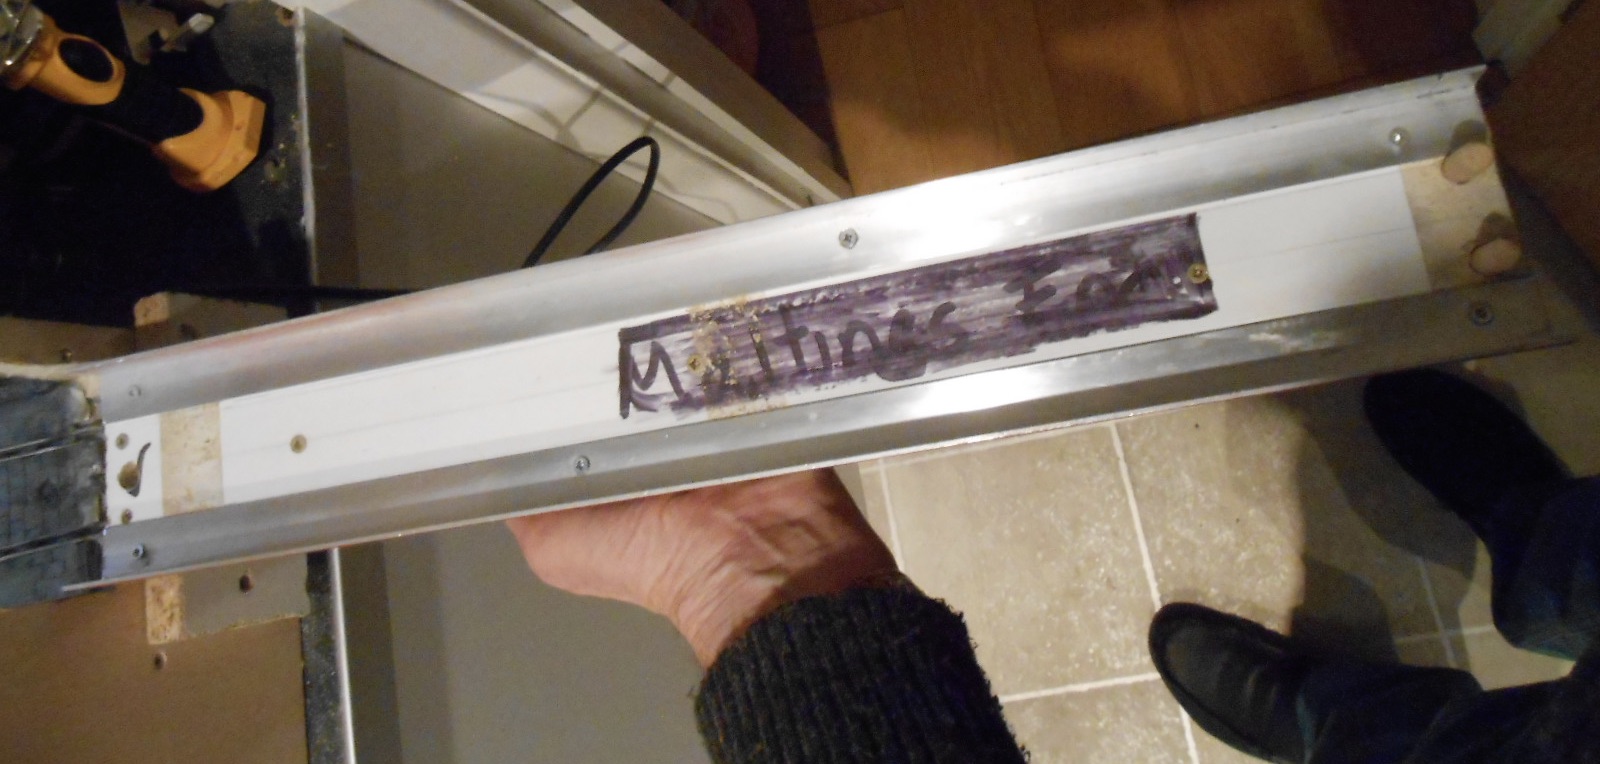
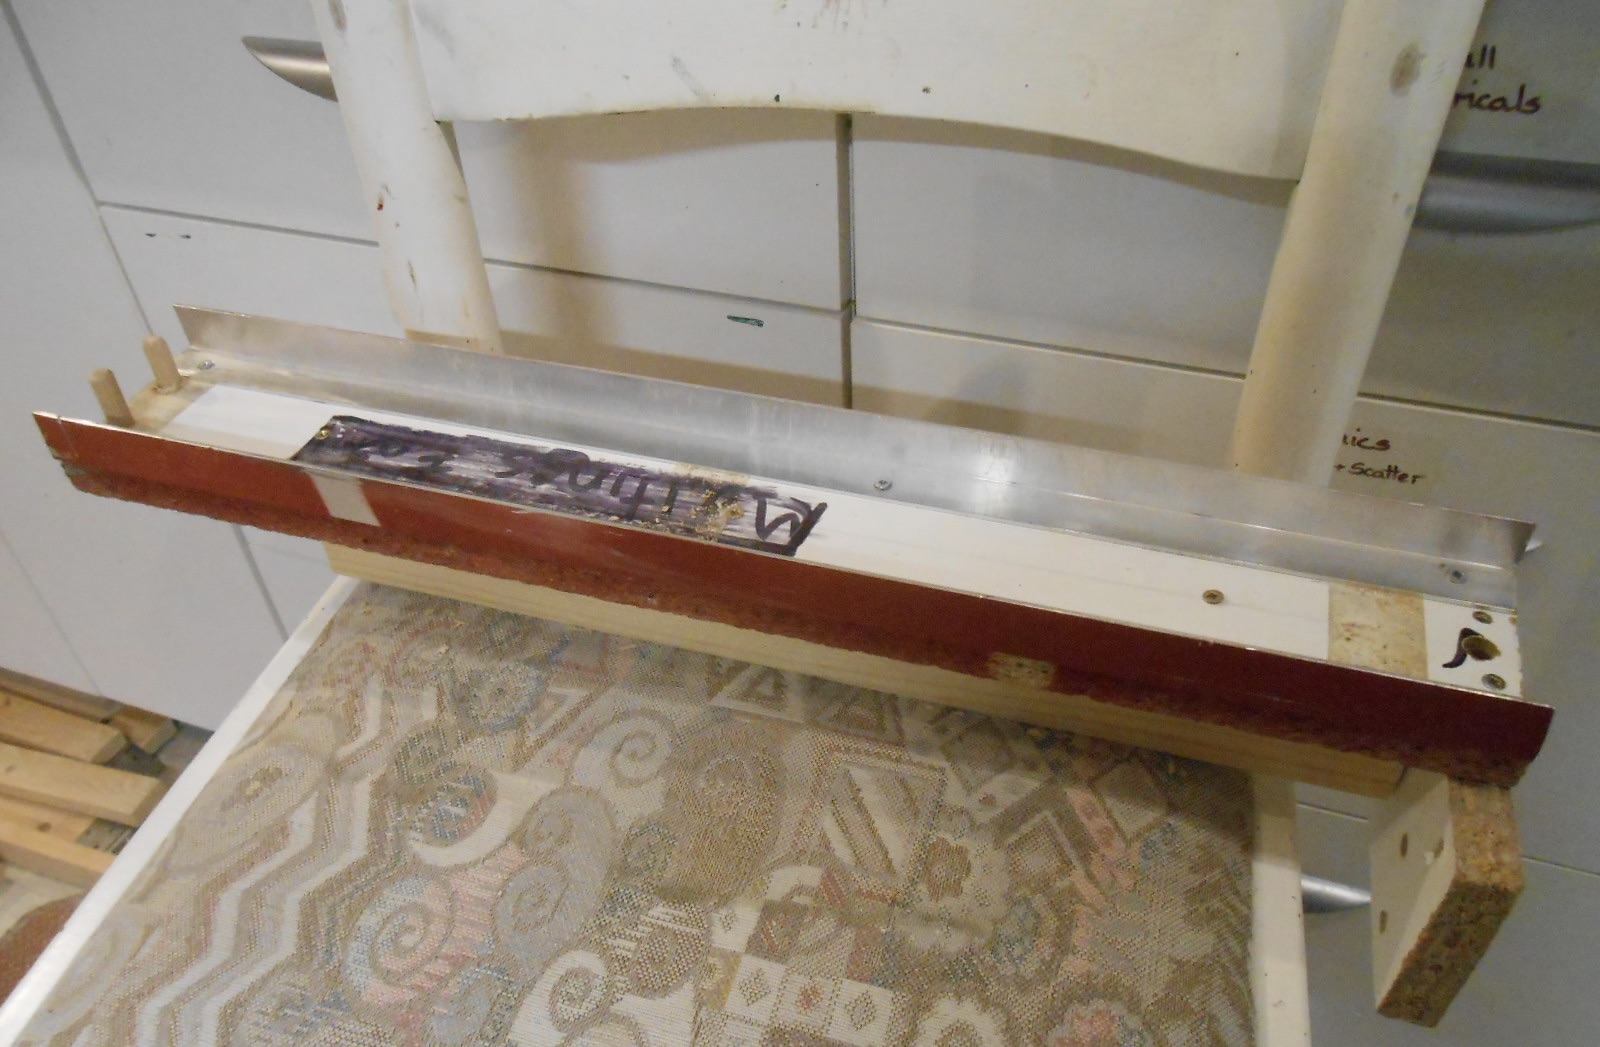
The layout is now set up on my workbench for [more than] a bit of operational fettling, post scenics. A fair bit of track cleaning, along with a loose wire that needed sorting, but everything [thus far] seems ok. The new thread detailing the models I've been building is useful in that everything now needs thorough testing & in particular to ensure that the couplings operate properly. Up until now, I've used a mixture of three links [& the hand of god] or Dinghams and electro-magnets. Unfortunately, the latter, while working ok, do not really suit the type of operation I want to do, which is more like on Fintonagh, so looks like I'm going to have to bite the bullet and convert to Alex Jacksons. Am hoping these will be simpler in 7mm scale to make and set up, because what they offer in particular is the ability to uncouple on the move, which I haven't been able to achieve with the Dinghams. The latter are 'handed' too, which really compromises my turntable fiddle yard. Wish me luck! The other bit of work has been to make a short fiddle yard for the right hand end of the layout - representing the siding on the pier. I'd got a 4' standard gauge cassette, left over from a previous project, so this was cut down to 18" and regauged to 36.75mm. The 'track' is nothing more than L section aluminium angle, which is screwed to a piece of chipboard. This has then been strengthened with a piece of 2x1 underneath and fixed to another piece of chipboard which is bolted to the layout. Aluminium angle works really well as track and no power is needed as the cassette is only for holding three wagons.
-
Really brings out the size and weight of the real thing. Not plastic models anymore.
-
N Scale Ballywillan, Co Longford.
David Holman replied to Kevin Sweeney's topic in Irish Model Layouts
Goodness knows how long scahalane's mega project has been going, Kevin, but this is a fine start. Things like this take time - which is why I stick to smaller projects - there always seems to be something new appear, that I then want to model. Ephemeral? Moi...? So much respect for guys who can stick with the dream and see it through. -
All scratchbuilt, JB. The paint job techniques come from The Art of Weathering, by Martyn Welch. Basically you put the bottom colour on first - in this case bare wood, a mixture of Humbrol grey (64) and natural wood (110). When dry, you paint on Humbrol Maskol where you want the patches to show through, then when this has dried, brush or spray on the top colour. Finally, when this has fully dried, you pull away the Maskol with tweezers. This leaves the bare wood underneath and flaking paint round the edges. Works a treat and have used the same process on steel mineral wagons, over a base cost of rust.