Mol_PMB
-
Posts
2,160 -
Joined
-
Last visited
-
Days Won
112
Content Type
Profiles
Forums
Events
Gallery
Blogs
Store
Community Map
Everything posted by Mol_PMB
-
Thank you for the quick and helpful response.
-
That's better - I can see this pic. Looks superb!
-
Thanks JHB! I don't suppose you have the GNR wagon diagrams too? I've been trying to buy a copy of those from the IRRS but there's only an email address for contact and my emails have gone unanswered.
-
Please could IRM could give us an update on delivery dates for the Park Royals? Also for the unfitted H vans, for which I was invoiced (and paid) last month? I am aware of the project status page but at present it isn't particularly helpful for either of these projects, with the Park Royals showing as In Production, due Q2 2025 (now in the past) and the Bulleid wagons all grouped together and showing as In Stock (which the unfitted H vans are not). https://www.accurascale.com/pages/projects I'm not in a rush for these models, just looking to plan expenditure over the coming months. Many thanks, Paul
-
Will the maroon production samples be running with matching IRM Mk2s as well? That would be a nice surprise from IRM...
-
For those of you who like 29000s https://ebay.us/m/xAfle9 Or if you prefer to travel al fresco: https://ebay.us/m/FWCzQN
-
Belmond - Haul only or push pull?
Mol_PMB replied to Noel's topic in What's happening on the network?
Agreed, that’s not the former Irish coaches. -
I like the shot at Thurles, reminding us how the last year or two of steam overlapped with the black and tan livery.
-
My first thought was more like IRM, Murphy, Dapol, JM, Past-Avenue, etc etc…
-
I think I have a couple of packs I bought secondhand and then plans changed. I’m away from home for a couple of days but will check when I’m back. I’m in GB - is that better or worse for you regarding taxes and duties?
-
This photo came up in one of my eBay searches - I haven't bought it but just linking it here in case it's of interest to someone. Us modellers spent most of our time looking at carriage rooves, so it's good to get the roof details correct. But good photographs from above can be hard to find, especially for rarer coach types. So, just in case anyone wants to model a CIE kitchen car, here you are: https://www.ebay.co.uk/itm/167625844392 There were only two of these, 2403 and 2407, and I think the number on this one reads 2407. The BR van in the foreground is in a shocking state compared to the rest of the train!

- 1 reply
-
- 3
-

-

-
Many thanks Jonathan, that's very useful info. Here's the only photo I've found of on 'outside planked' one in GSR livery, the photo is dated 1939 and only shows about one-third of van 16460: https://www.flickr.com/photos/irishrailwayarchive/53508914253 As some of the photos show, they had inside planks as well as outside planks, which is why I had referred to them as 'double skinned'. But it's useful to know that they weren't considered anything special.
-
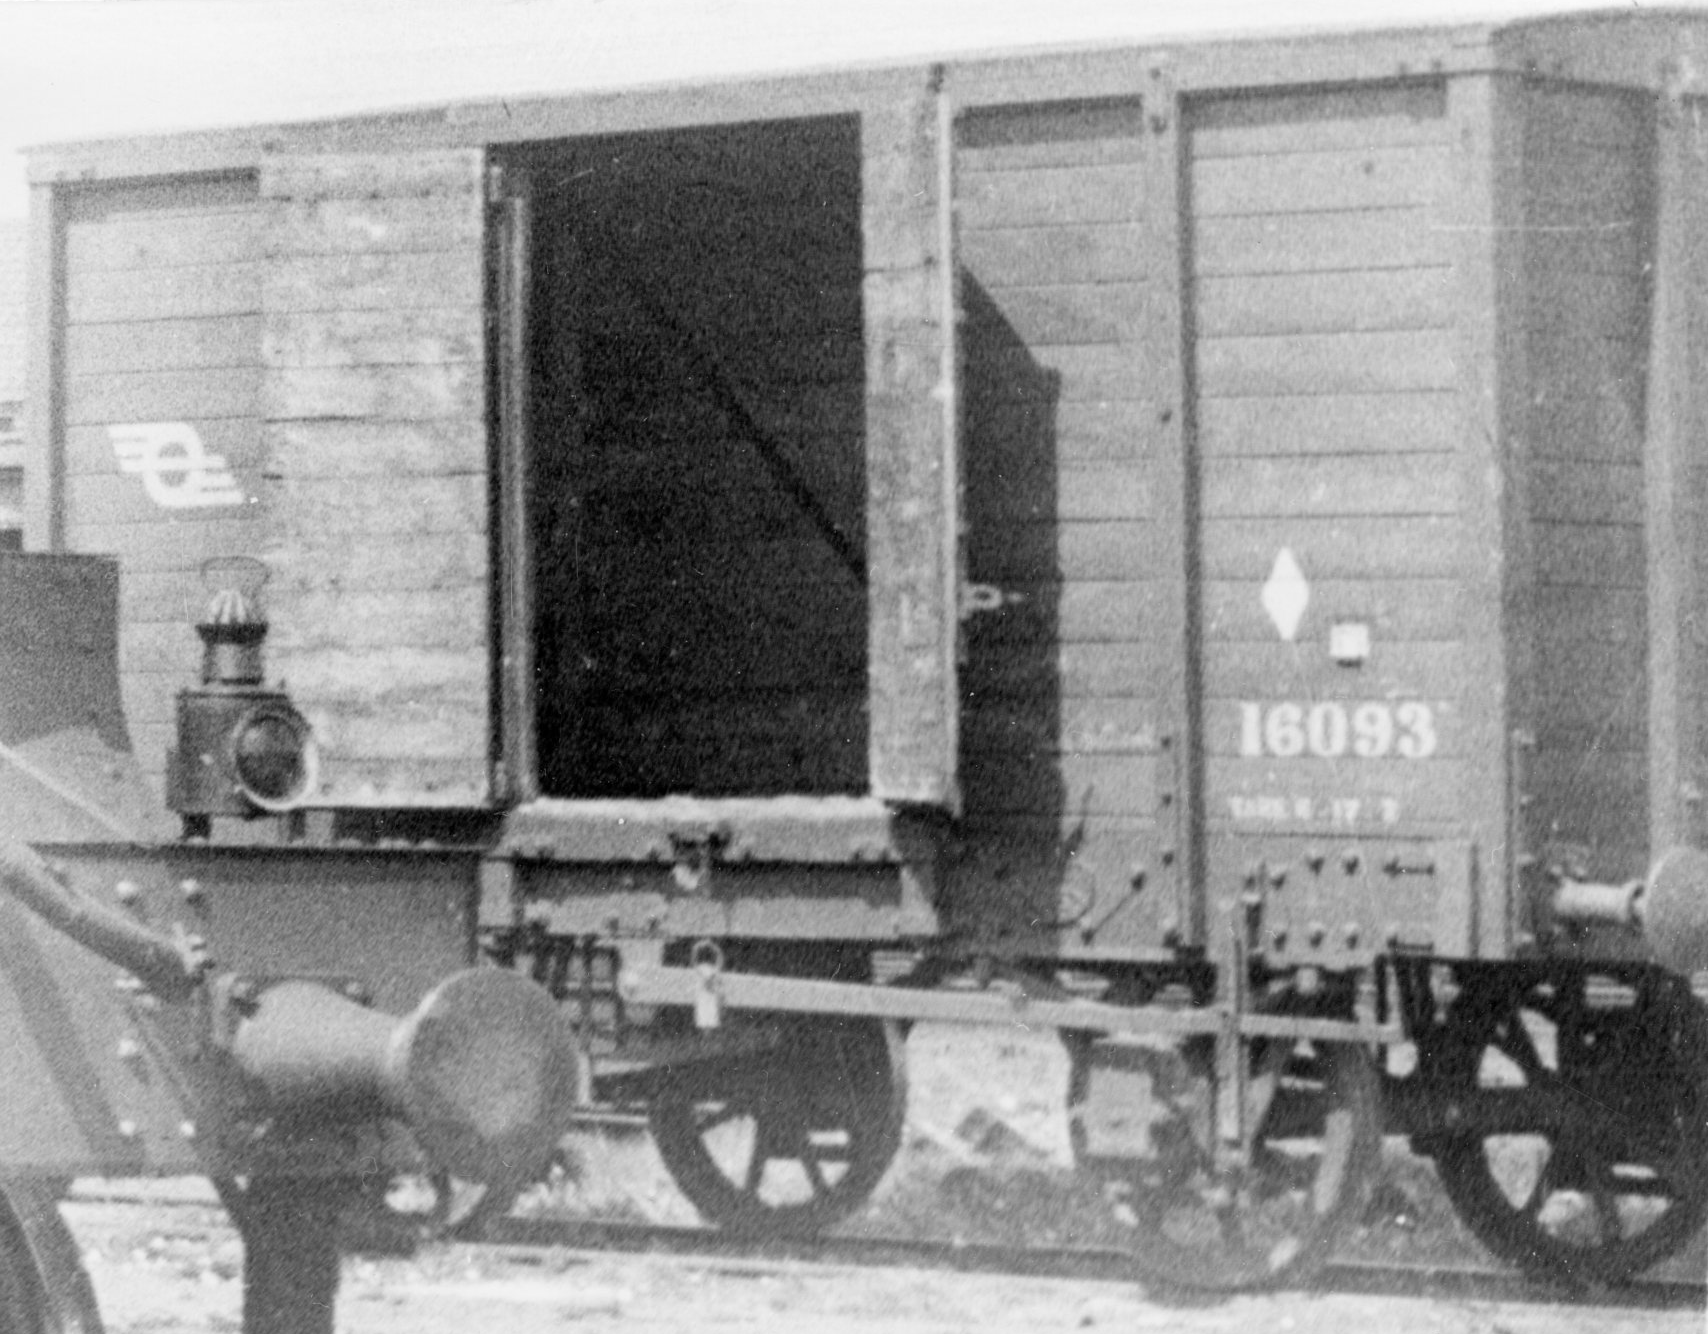
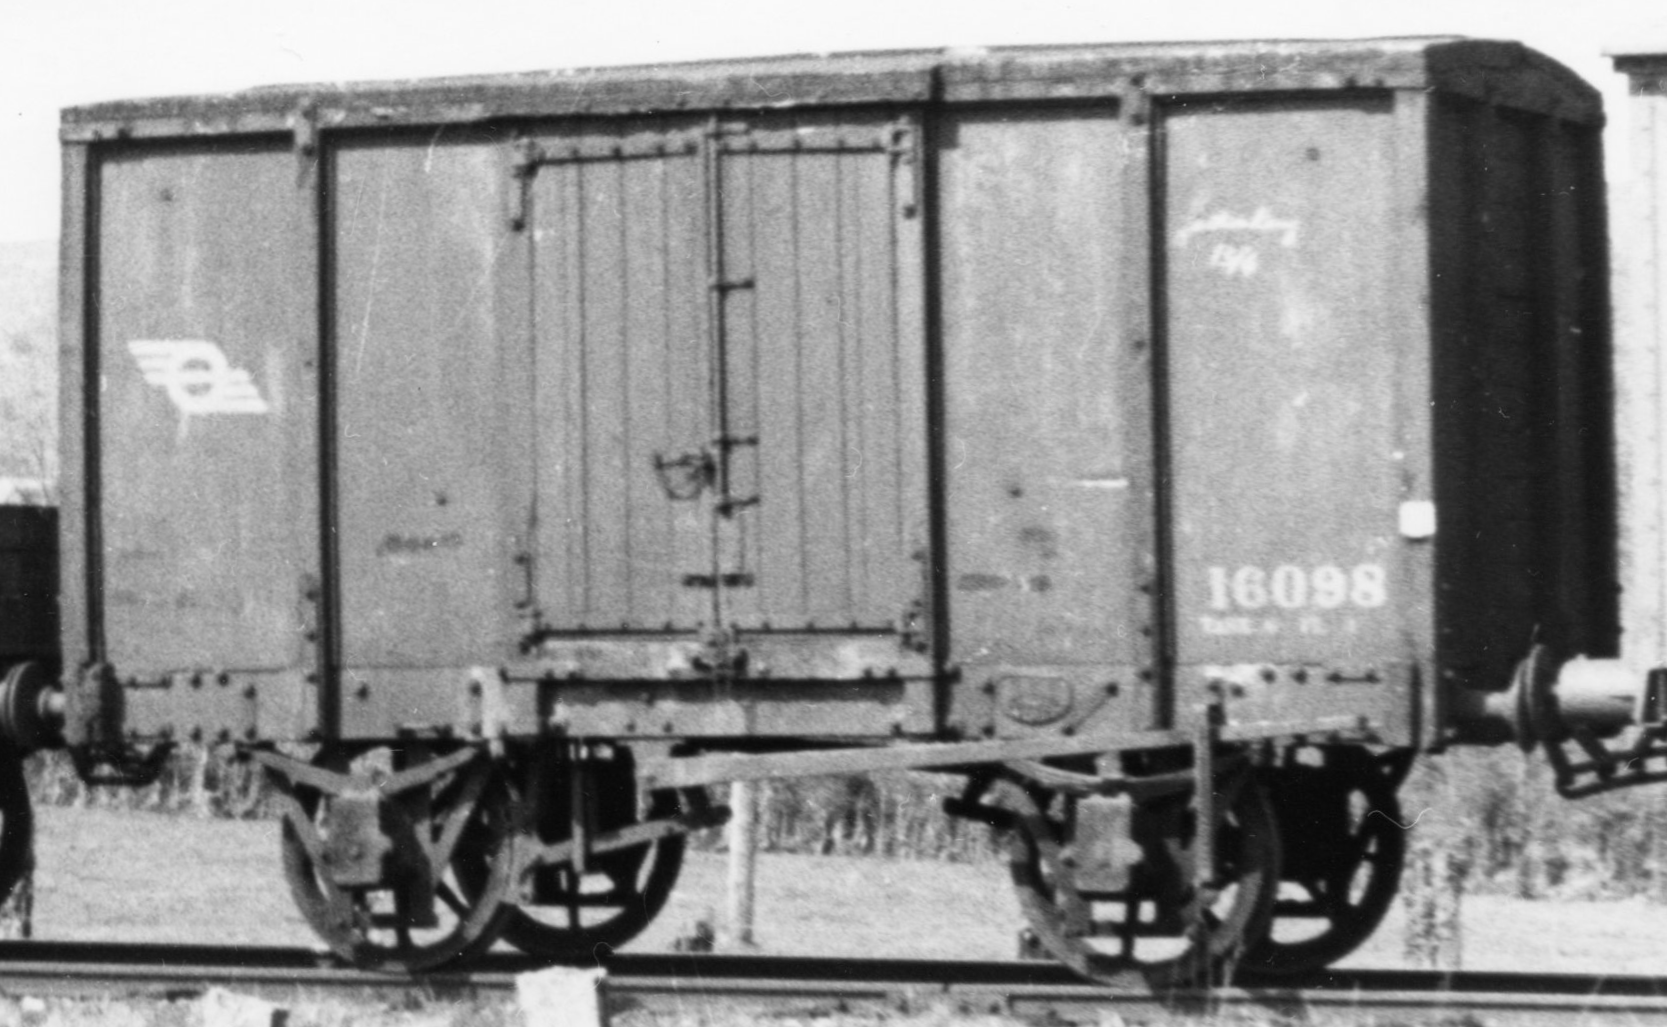
I have acquired a few prints and slides on Ebay recently which are relevant to this thread. Here's 16093, a GSR-built van seen in clean CIE livery. With the doors open we can see part of the interior including a diagonal brace on the inside. Does anyone know the significance of the white diamond above the running number? Here's 16098, just 5 numbers higher. This van has had its sides repanelled with sheet material - either on top of the original planks or replacing them. However, the doors and ends are still planked. The position of the internal diagonal reinforcing is highlighted by the bolt heads, which are more obvious on the sheet sides (but also present on the planked example above):
-
Looking good, John! Loosely on this topic, here's one of the TPOs as later converted into a luggage/parcels van. Letterboxes sealed, and renumbered in the 27xx series - possibly 2766. I'm not sure if there were any other changes - possibly the rooflights plated over.
-
A classic example of how to drive away custom. Ideally everything would run smoothly, although most people accept that things go wrong from time to time. But misleading or absent information during times of service disruption is extremely frustrating. Must do better!
-
It could be coming through from Whitehead - a blue 4-4-0 with a rake of green Mk2 coaches?
-
Here are photos from Ernie's archive of C203 and C218 (twice) with electric lighting jumpers: Edit: a search on Flickr found the following extra locos with the jumpers: C208: https://www.flickr.com/photos/irishrailwayarchive/54251291146/ C217: https://www.flickr.com/photos/irishswissernie/50995050488/ C226: https://www.flickr.com/photos/holycorner/6749912153/ In addition to D Renehan's six: 203, 213, 215, 218, 223 and 231 all of which can be confirmed from photos. There ought to be one more, for the total of 10. As yet I haven't been able to disprove C228, which was rather camera-shy in the period of interest.
-
IRRS Journal No.90 (feb 1983) includes the first of a 2-part article by D Renehan on CIE's Crossley Diesels. He notes: "An interesting development was the fitting of equipment to supply electric train-lighting for use on branch line services; 203, 213, 215, 218, 223 and 231 were among the ten so fitted. A jumper box was provided on the buffer beam, and a cable carried current from the generator to specially-equipped carriages. The experiment was, however, short-lived - the reason for it ceased to exist when the branch lines were closed." A study of photos might identify the other 4 locos fitted, and the dates when the equipment was fitted and removed. An interesting variant for IRM to consider on their (hopefully) forthcoming C class model. Edit: from looking at a few photos it seems they were installed around 1960, and retained until the locos were rebuilt with EMD engines. Their place on the bufferbeam was then taken up by multi-working jumpers.
-
"oul railcar. NIR thing"... Sometimes I wonder whether I was born about 100 years too late.
-
Second half perhaps not as interesting as the first, lots of fairly standard 40' boxes interspersed with some others that I think appeared earlier in the slideshow! Here are a few of the more notable examples: 36:04 and 41:09 to 41:24, 42:45, 51:15: Bell Express branding on over-length boxes (45'? 48'?) 36:45 and 39:06: 40' boxes with a blue roof 40:18: nice view of a pair of 20' boxes showing the door end lettering. Not the same on the two shown. 40:29: another layout of door end lettering on a 20' box 41:24 and 41:51, 42:05: over-length boxes without 'Express' branding 41:32: plain petunia 20' box, INTU coded. I did note that some boxes in full Bell livery also have INTU codes rather then BELU e.g. at 49:05. Leased? or did Bell have multiple codes? 44:32: a BELU coded container that appears to be blue all over - it certainly has a blue end. 46:37 and 51:10: unusual type of door on a 40' box, with most of the locking bar arrangement boxed in. 48:55 leased tank with Bell branding 49:51: 40' box with unequally spaced ribs on the sides - looks very odd! 52:25: over-length box with Bell Express branding, door end shown but it has an odd replacement door. 54:54: Bell Bulk 30' being tipped I'm all belled out now. I do have a couple of ideas for more models though. Hopefully Arran does too!
-
Watching this over lunch, a few more observations: 9:57: one of the early flush-sided boxes painted in the later blue and petunia livery (that's tempting to model!) 12:13: nice view of two different types of early alloy container, followed by a few more views of the sheet and post type. Note that initially they had non-ISO-compliant numbering. 13:33: a nice clean view of alloy containers with later ISO numbering. These are leased containers in BELL livery - note the ICS logo top right. 13:54: one of the ribbed boxes in simplified all-over-petunia livery. 15:08: the second container has a flush end but sheet-and-post sides. The lettering is on a separate panel fixed over the posts. 15:27: Bell Bulk 30' boxes, showing both ends. 19:27: the interior of the doors is painted petunia. Maybe on some containers the whole interior was? 20:37: very widely spaced ribs on the side of this 40-footer. (another at 22:40) 22:00: crane driver seems to have dropped the container on the cab of his own crane. Ouch! 24:30: a long series of photos of normal Bell containers being used for bulk traffic, being emptied by tipping. Includes some proper Bell Bulk containers too. Some of these images show good roof views. 26:40: sequence of insulated / refrigerated 40-footers of various types. Many of these are extra-wide. 27:29: combined Bell and Kerrygold branding 28:50: Bell tanktainers - a variety of BELU-registered examples. I'll look through the second half later - I'd better get back to work now!
-
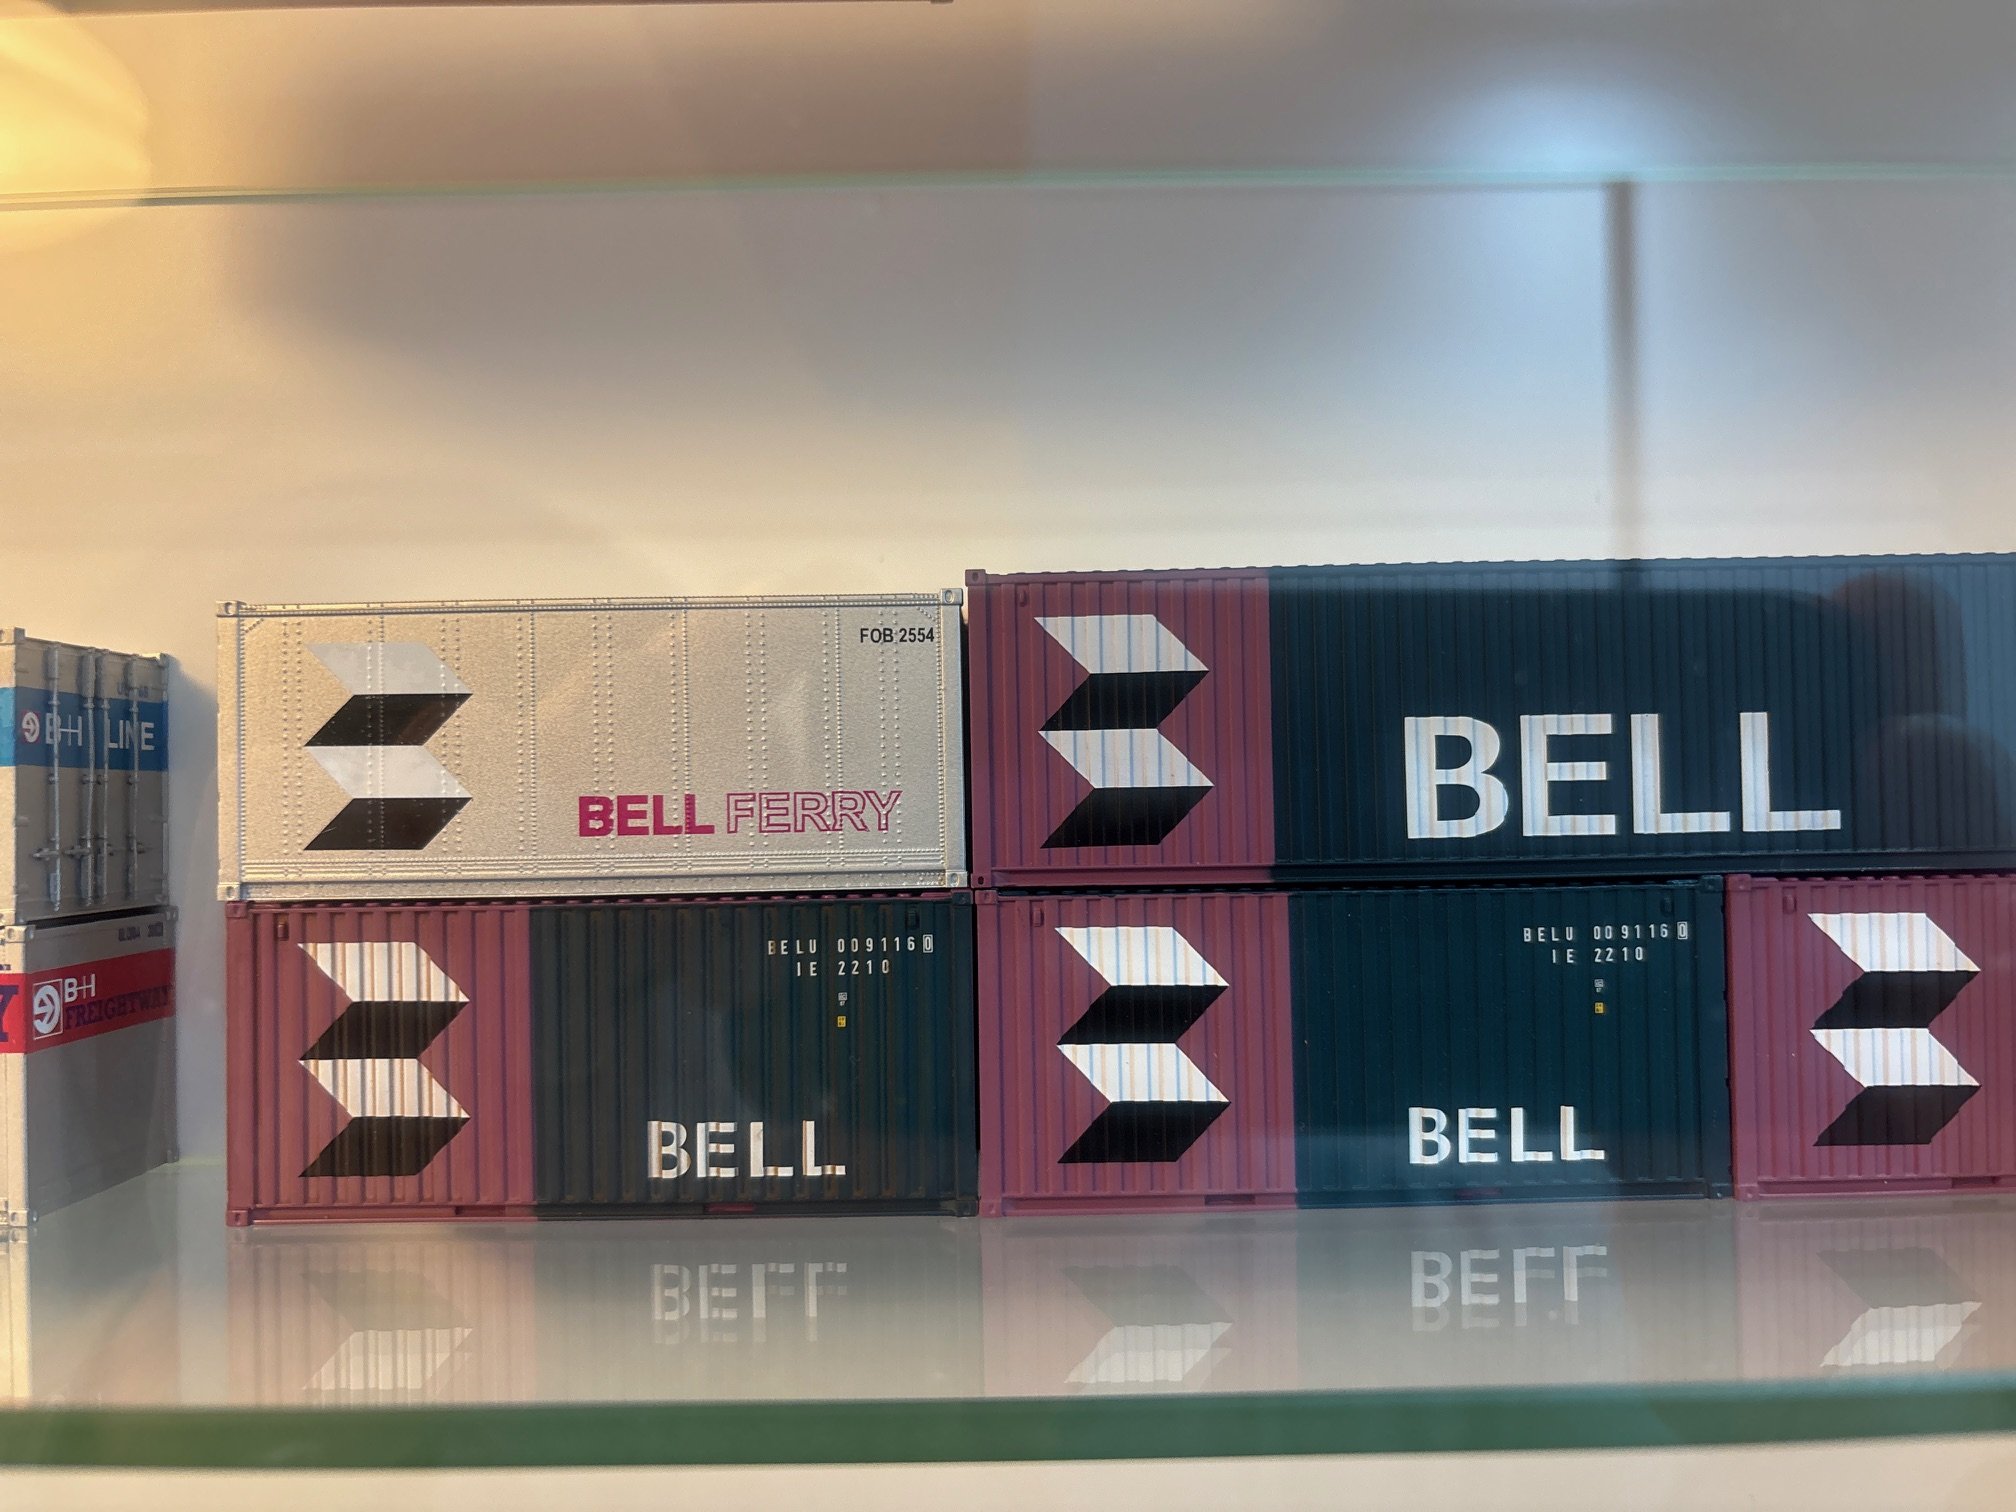
I've only watched the first few minutes and already seen some excellent container photos, particularly the early 'silver' (unpainted alloy) Bells. For example, from around 4:55 there are some good shots of the flush-sided type which I represented with a simple repaint of one of your boxes, top left here: In the early days of Bell, there were several subsidiaries including Bell Ferry and Bell Lines, and some of the early containers were lettered as such. I chose a Bell Ferry example that I found a photo of in Ireland; some of the photos in that youtube link show the Bell Lines equivalent. Nice to see some good photos of some of the sheet and post alloy types used by Bell in the early days too. Most of the images do seem to be in the Netherlands.
-
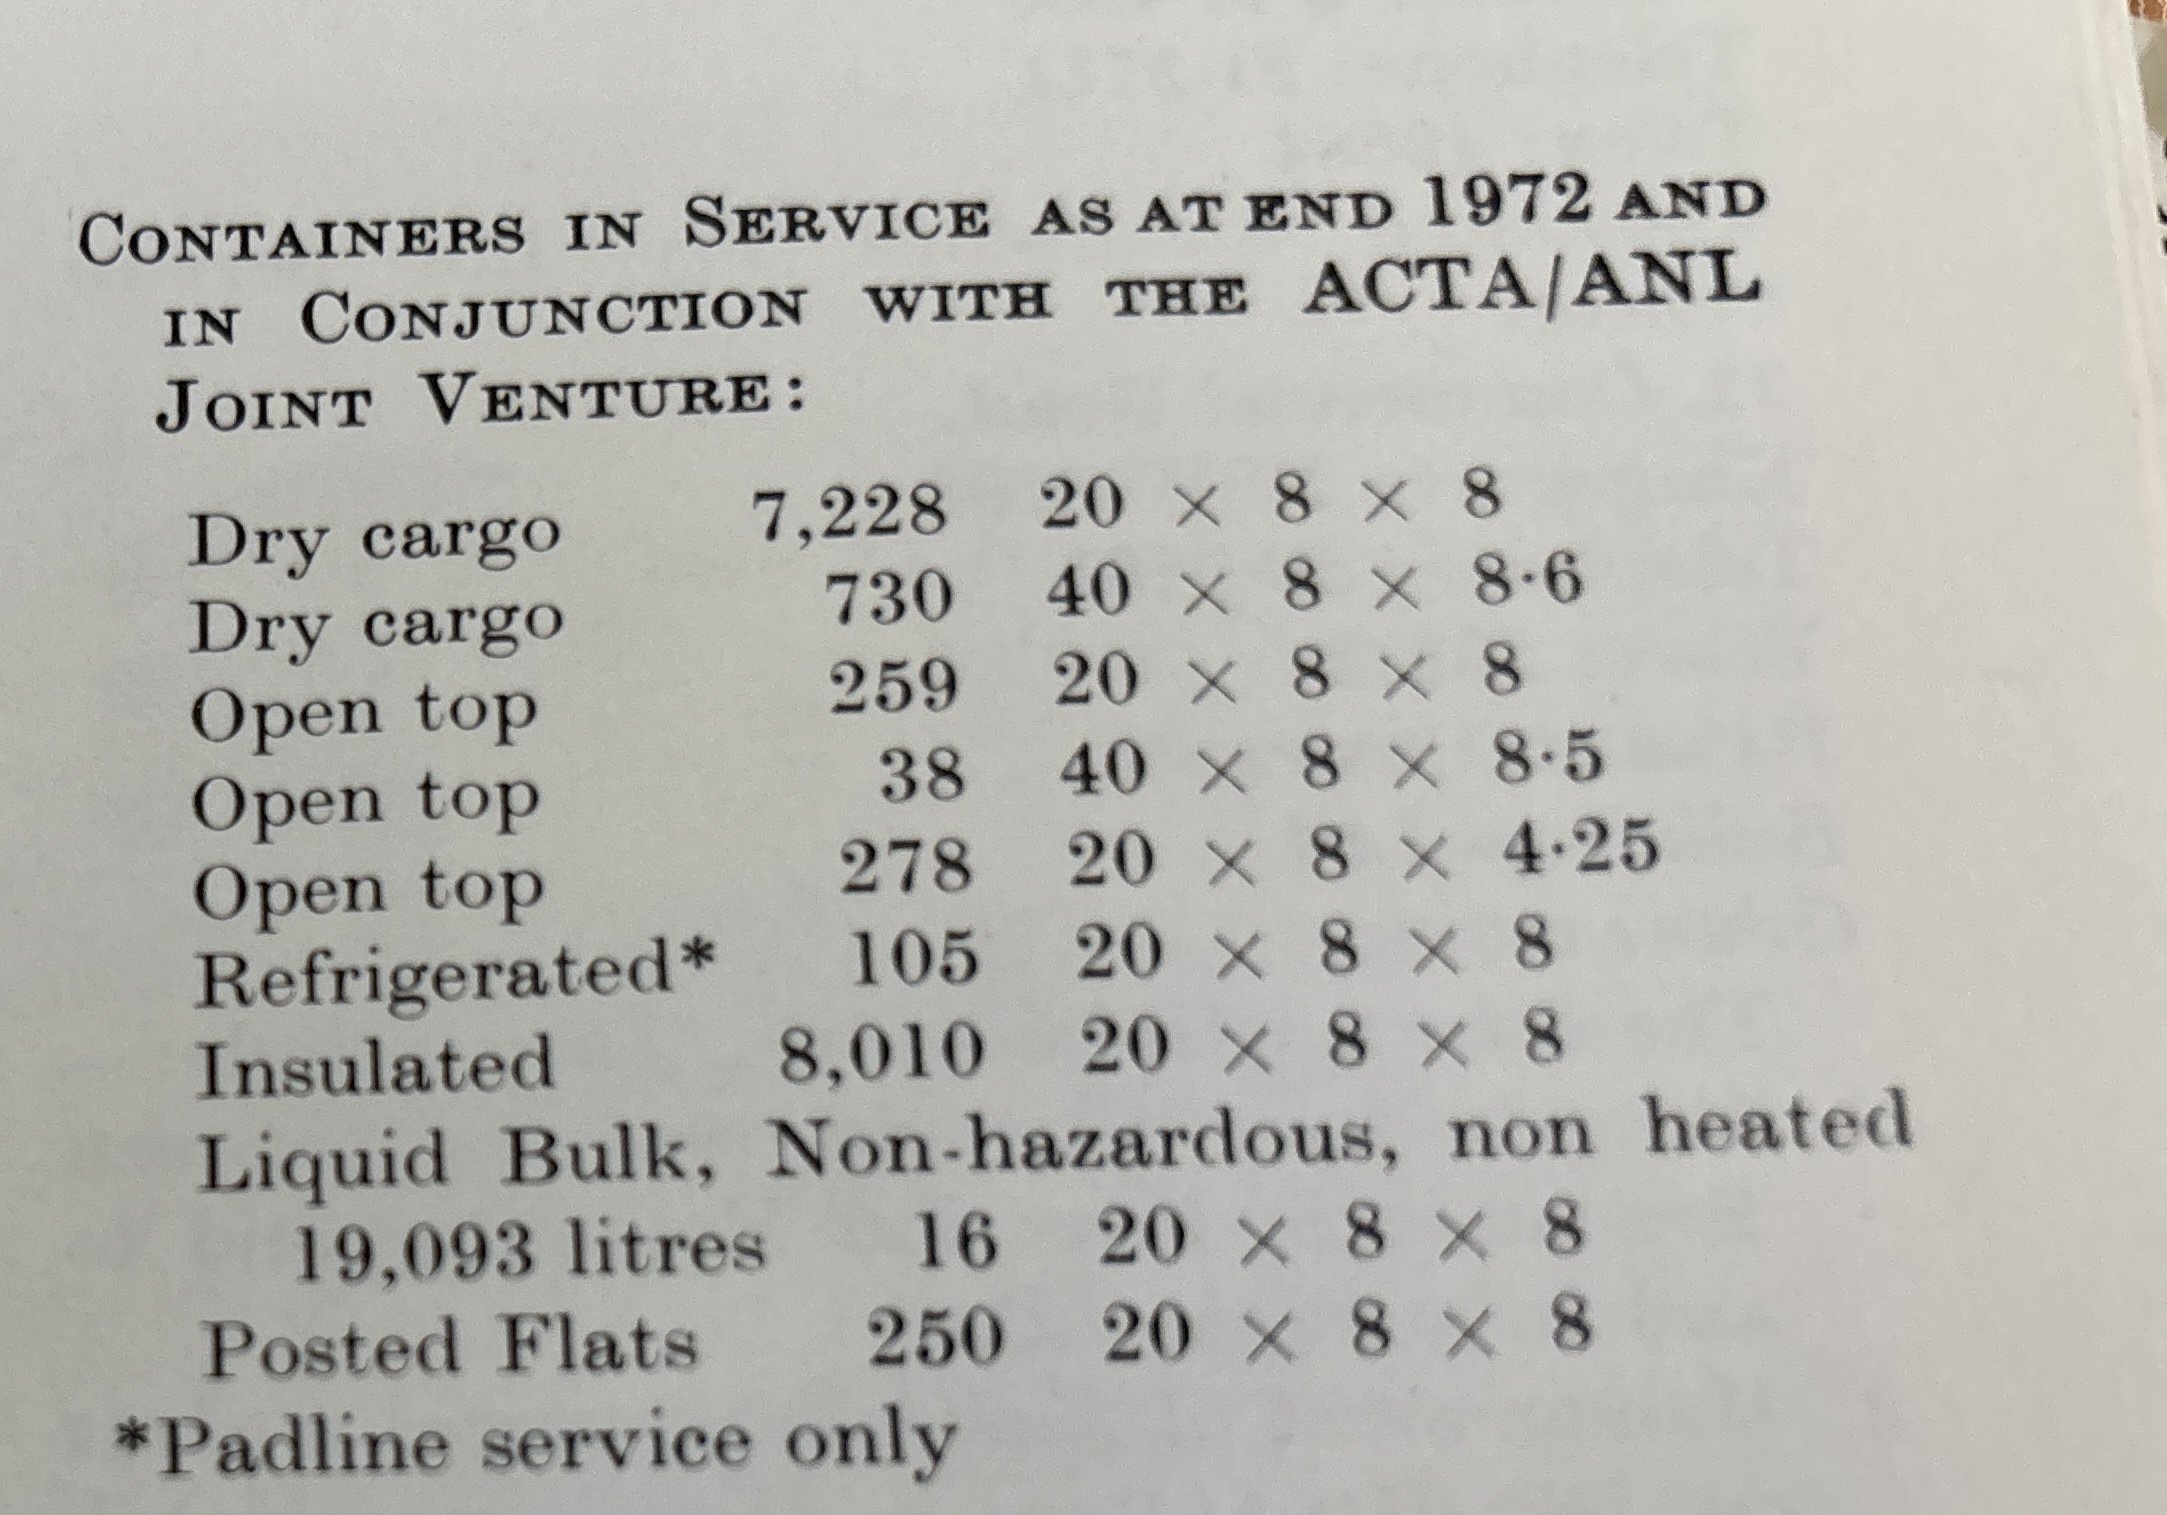
I’ve not yet stumbled across definite evidence of ACT boxes in Ireland but I expect it did happen. ACT was strongly into the refrigerated / insulated container trade of meat from Australasia to Europe, so these white 20’ insulated boxes were a big part of their 1970s fleet. In the mid-1970s they had offices across GB including Manchester and Liverpool, but none listed in Ireland. They probably relied on Irish Sea feeder services.
-
I think this might have been associated with the migration from IRM to AS website?
-
I’ll look up more info on ACT tonight or tomorrow when I have my copies of Jane’s to hand. I’ll see if they had an Irish office. These ACT boxes certainly appeared on early Freightliners and at the terminals in Manchester. In the late 60s and early 70s they were common. Seeing the circles printed on the end of the box representing the chilled air connections, you could do the same for a Manchester Liners chilled container (white, with red and black lettering). I have a copy of the original painting and lettering diagram for them.